
Whether you’ve mistakenly deleted the wrong QuickTime screen recording file, or it disappeared by itself and you’re unable to find it, don’t panic just yet. Luckily, there are effective solutions in case you need to restore a video file on your Mac.
In this article, we’ll cover the most effective data recovery methods that can be used to recover a QuickTime screen recording.
Table of Contents
Where Does QuickTime Save Screen Recordings?
Well, the answer is simple — wherever you tell it to save them. You have the option of choosing a location for your screen recording each time you are finished recording it and click Save.
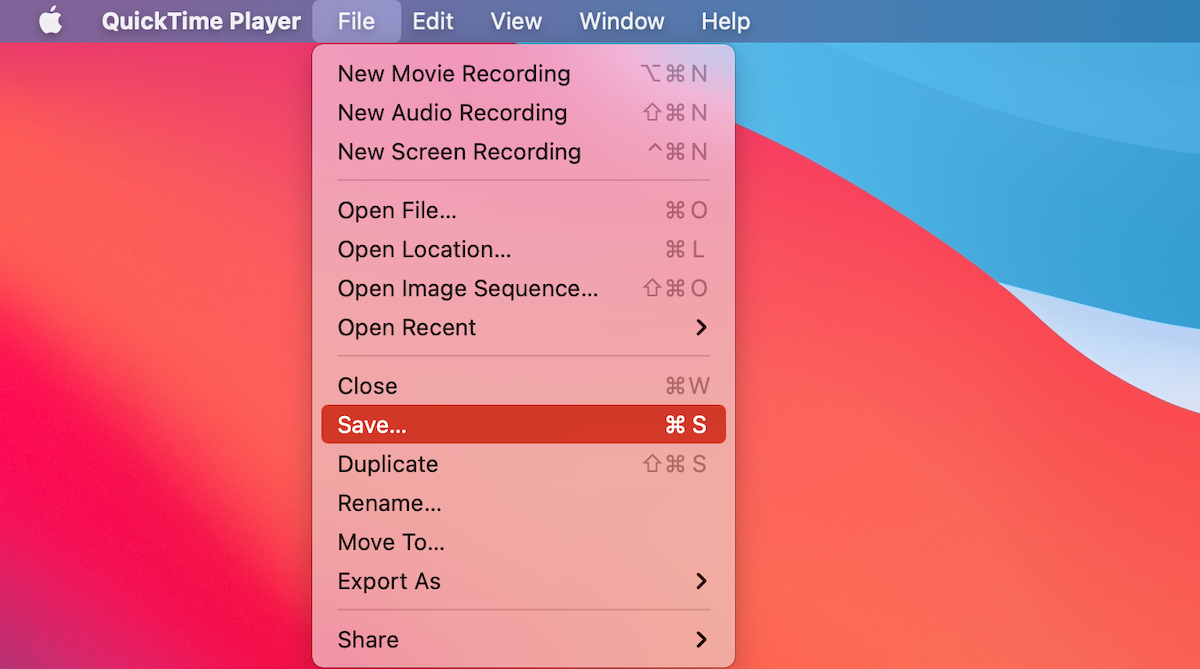
To save a QuickTime screen recording, all you need to do is click File from the menu at the top and choose Save. Then type in a preferred name for the video file and select a folder to make it the QuickTime recording location. Once you click Save to confirm your choice, go to the selected folder to find your QuickTime screen recording.
Possible Reasons Why QuickTime Player Didn’t Save Screen Recording
It’s possible that you can’t find your video file because your Mac didn’t save the QuickTime screen recording. To prevent it from happening, it is best to know the reasons that may lead to this:
| Reason | Description |
| 📦 Not enough space | If your Mac is overloaded with files, there might not be enough free space to save the QuickTime screen recording. |
| 📱 Other apps | Close any unnecessary apps that you have running before recording your screen. If the apps use up a lot of CPU power, it may cause QuickTime to behave strangely. |
| 💽 Hard drive corruption | This can happen for numerous reasons and may lead to data loss. |
| 🧍♂️ Human factor | If you choose to force quit the QuickTime application while recording your screen, it’s possible that the video file won’t get saved. |
The good news is that it’s possible to recover an unsaved screen recording on your Mac. For detailed instructions, check out the data recovery methods below.
How to Recover Unsaved or Deleted Screen Recording on Mac
Whether the QuickTime player didn’t save your screen recording or you deleted it by mistake, these data recovery methods should come in handy.
Method 1:Check the Temporary Files Folder
Wondering how to recover an unsaved QuickTime screen recording on your Mac? Then try to look for it in the Temporary Files folder. This folder is hidden on your Mac, so you can’t just open it through Finder just like any other folder.
Here’s how to access the Temporary Folder on your Mac and search for your unsaved QuickTime player document:
- Launch Terminal (go to Launchpad and type Terminal in the search field).

- Copy and paste this command:
echo $TMPDIR. Hit Return on your keyboard. - To open the folder, copy and paste this command :
open $TMPDIR. Hit Return to confirm.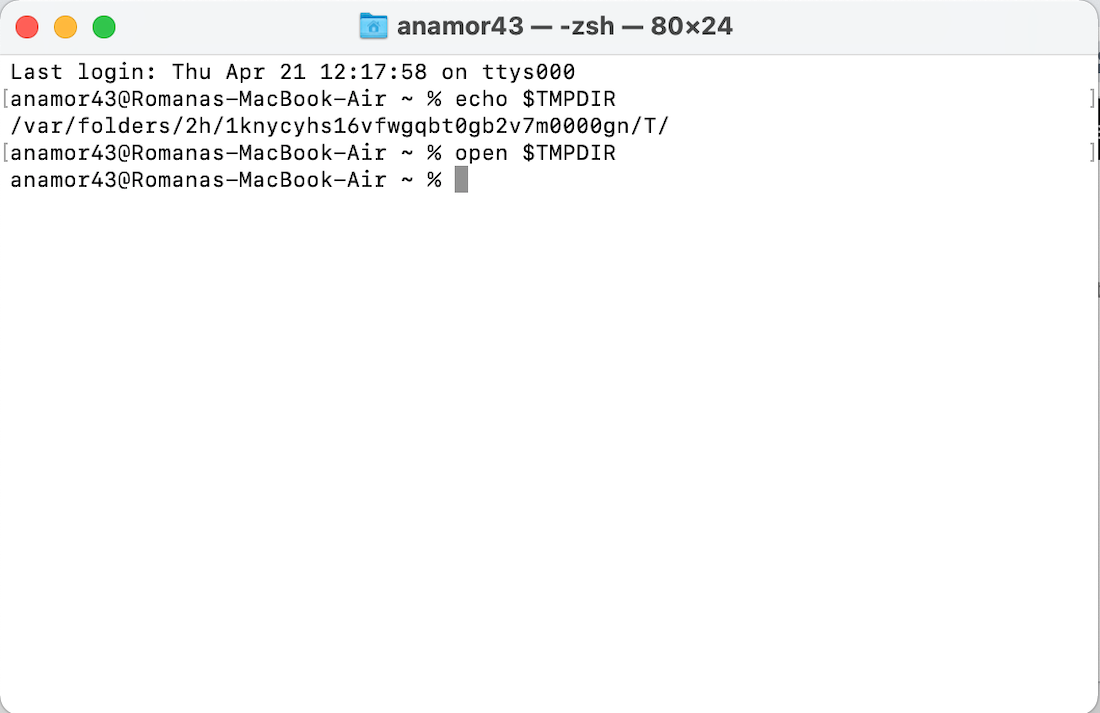
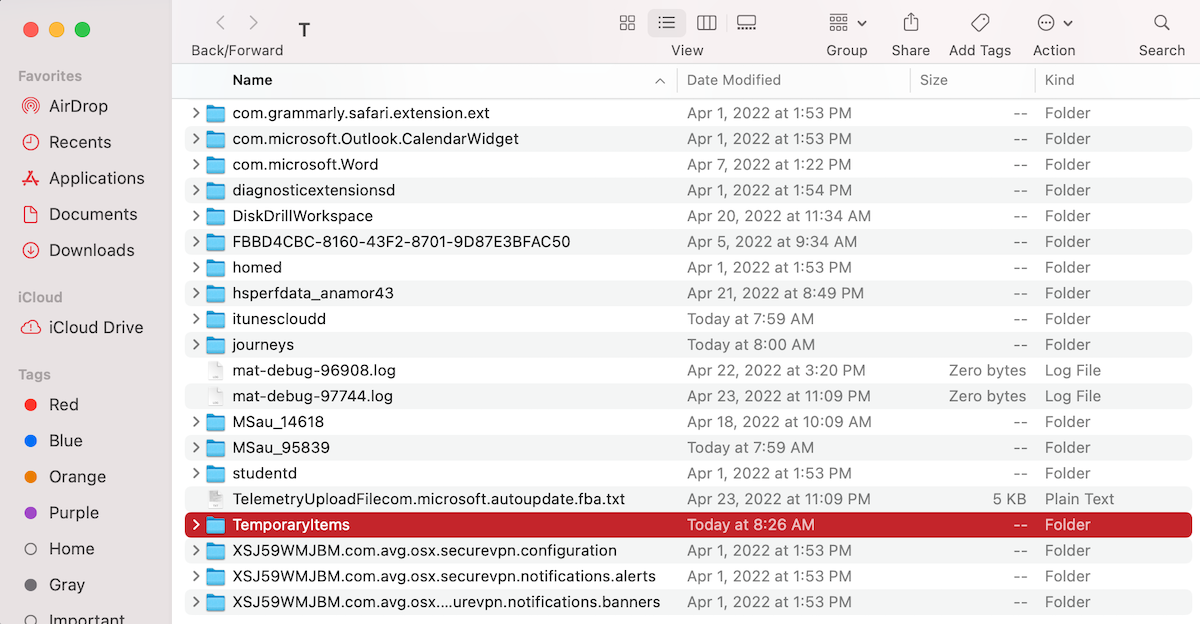
- Look for the folder containing QuickTime Player data and open it. If the needed screen recording is there, simply drag and drop it to a different location.
- If you didn’t find the screen recording there, be sure to check the TemporaryItems folder as well.
Method 2:Look in the Trash Bin
Checking Trash on your Mac is another option that you can try. If you remember deleting the screen recording, there is a chance that the file is still in the Trash folder. However, if you’ve set Trash to automatically remove files from it every 30 days and you’re sure that more time has passed since you deleted the screen recording, this method won’t work for you.
Here’s how to recover deleted recordings from Trash on your Mac:
- Click the Trash icon on the Dock to open it.

- Look through the files.
- Once you’ve found the needed screen recording, right-click it for a drop-down menu to appear.
- Click Put Back.
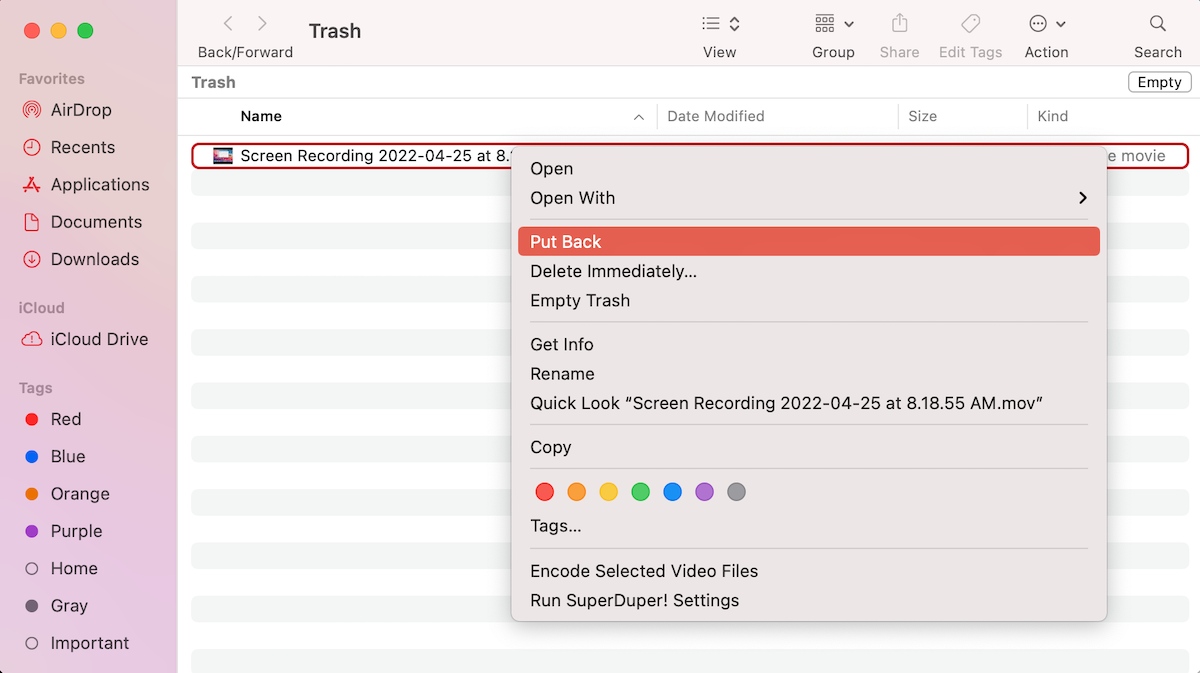
The recovered file will be returned to the folder where it was previously located.
Method 3:Use Data Recovery Software
If the previous methods didn’t give any results, you can try to recover the needed video file using a specialized data recovery tool. Disk Drill is a great example of such software since it is easy to use and takes only a few minutes to recover a deleted or lost QuickTime recording on a Mac.
Important: Stop using your Mac as soon as you’ve noticed that the needed QuickTime screen recording is deleted or missing. This will prevent your computer from overwriting data and therefore increase your chances of successfully recovering the deleted screen recording on your Mac.
Disk Drill is a versatile program since it supports almost any file format. It can effectively recover not just QuickTime screen recordings but also bring back other deleted video files, images, documents, emails, audio files, etc.
Here’s how to recover a deleted QuickTime recording on your Mac with Disk Drill:
- Download Disk Drill and follow the onscreen instructions to install the application on your computer.
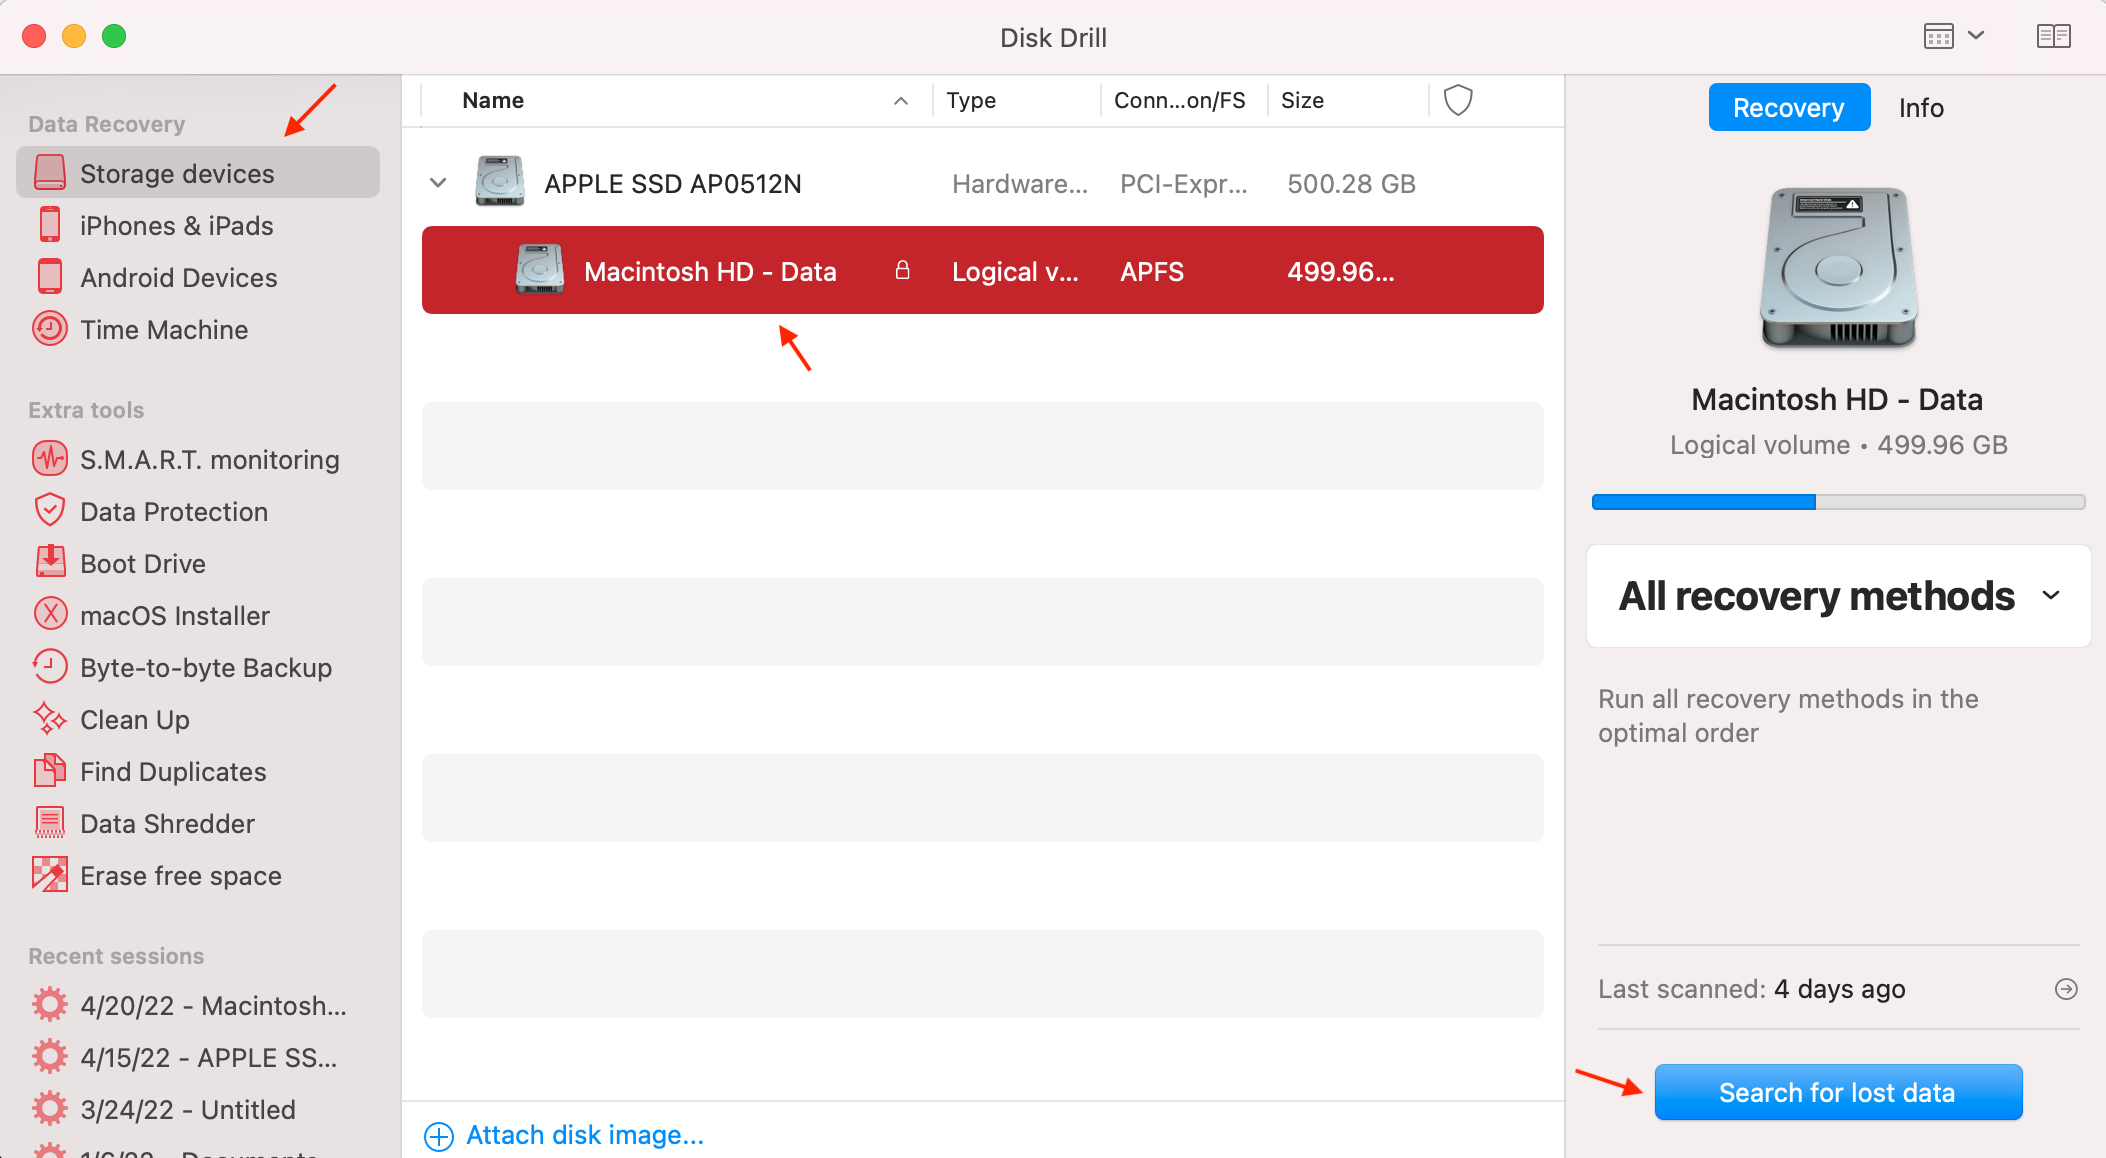
- Select Storage devices from the sidebar on the left, and then choose your drive from the list of available devices.
- Click the Search for lost data button.
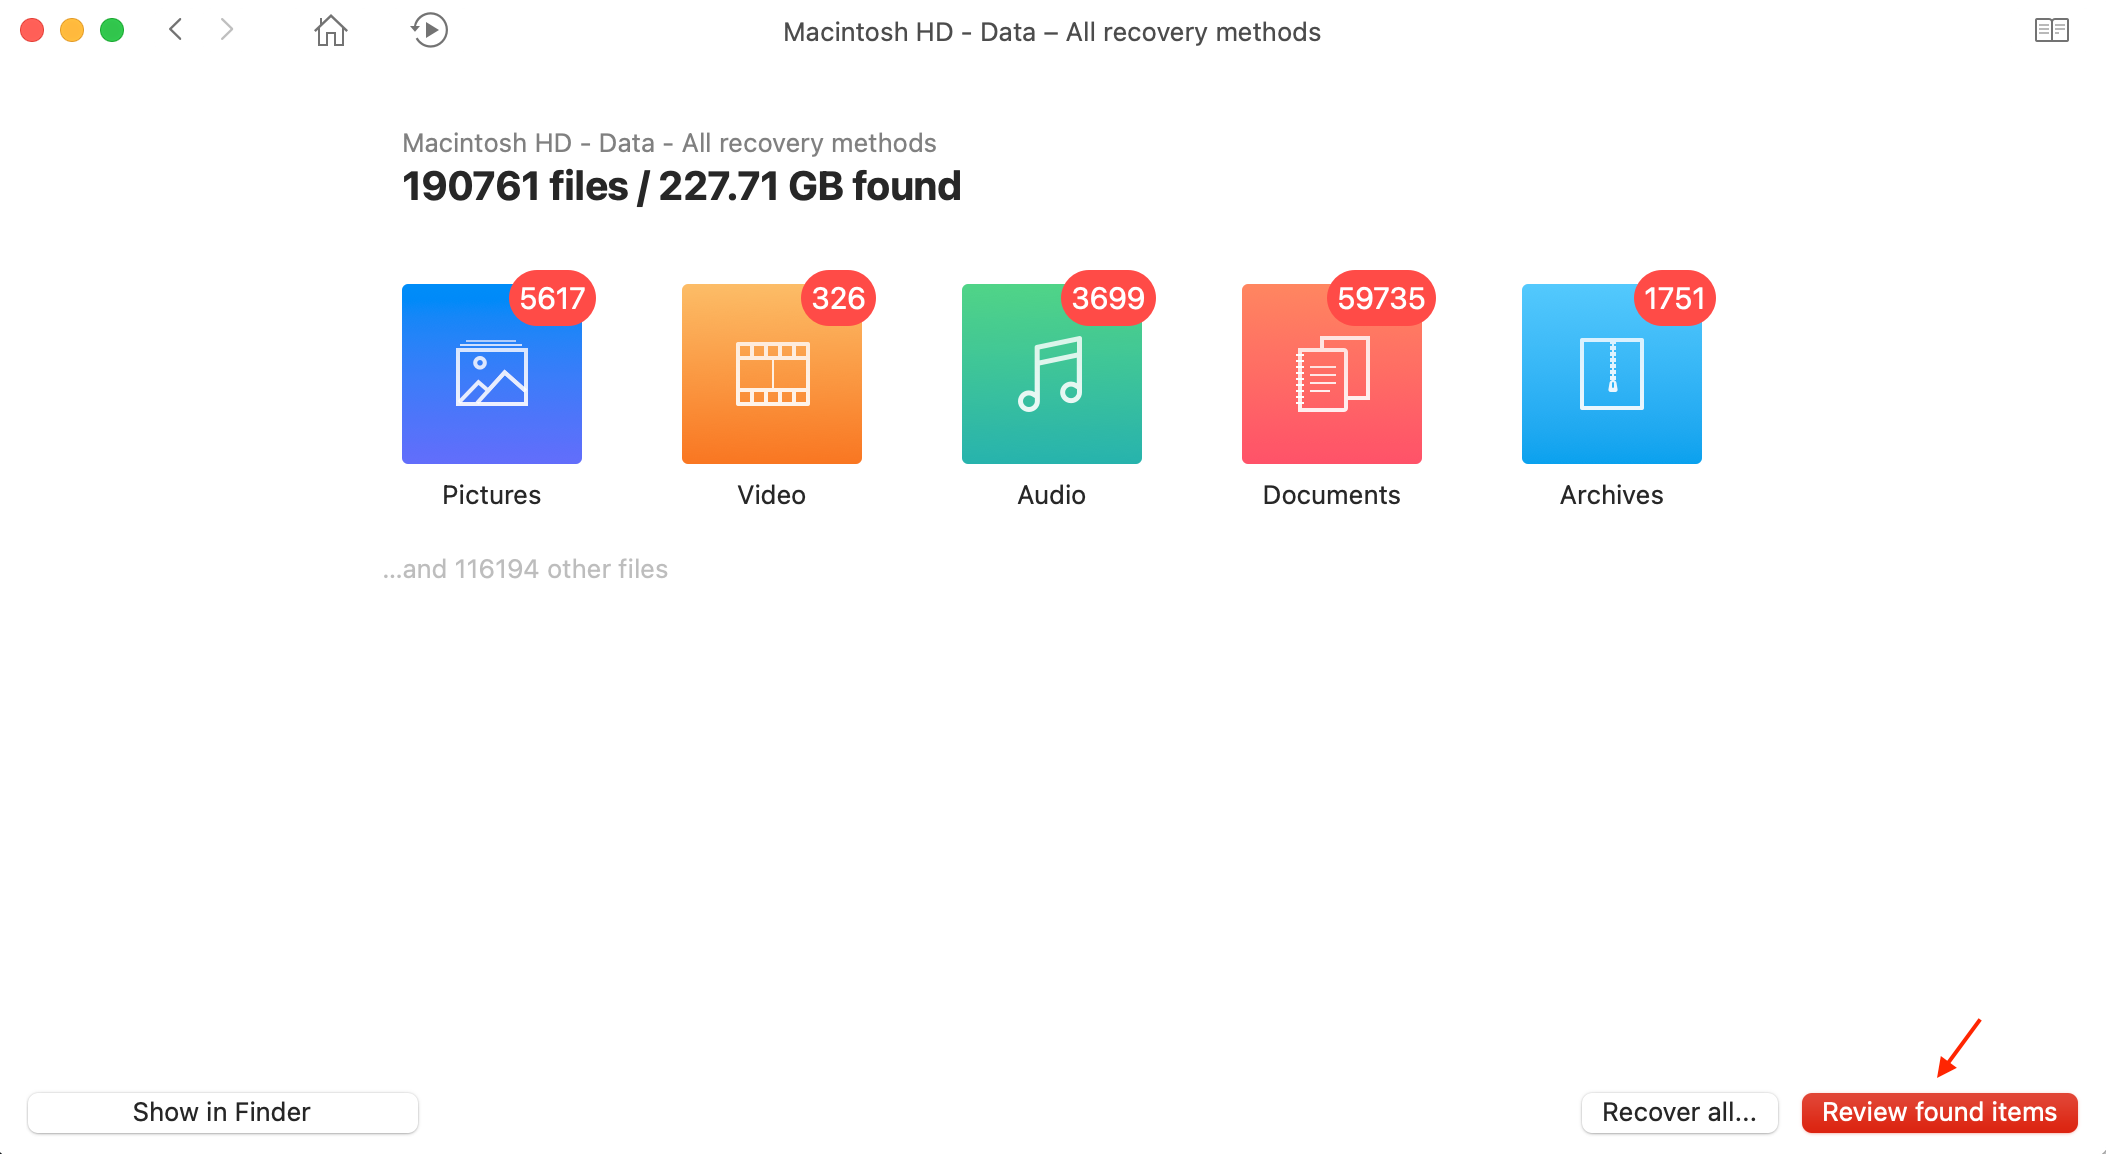
- Wait for the scan to finish or click Review found items to start looking for the missing file right away.
- To narrow down your search to only video files, click Video on the sidebar.
- Look through the available files. If you think that you’ve found the one that you need, click the eye icon near it to ensure it’s the right one.
- Choose the file that you wish to restore and click the Recover button on the bottom right.
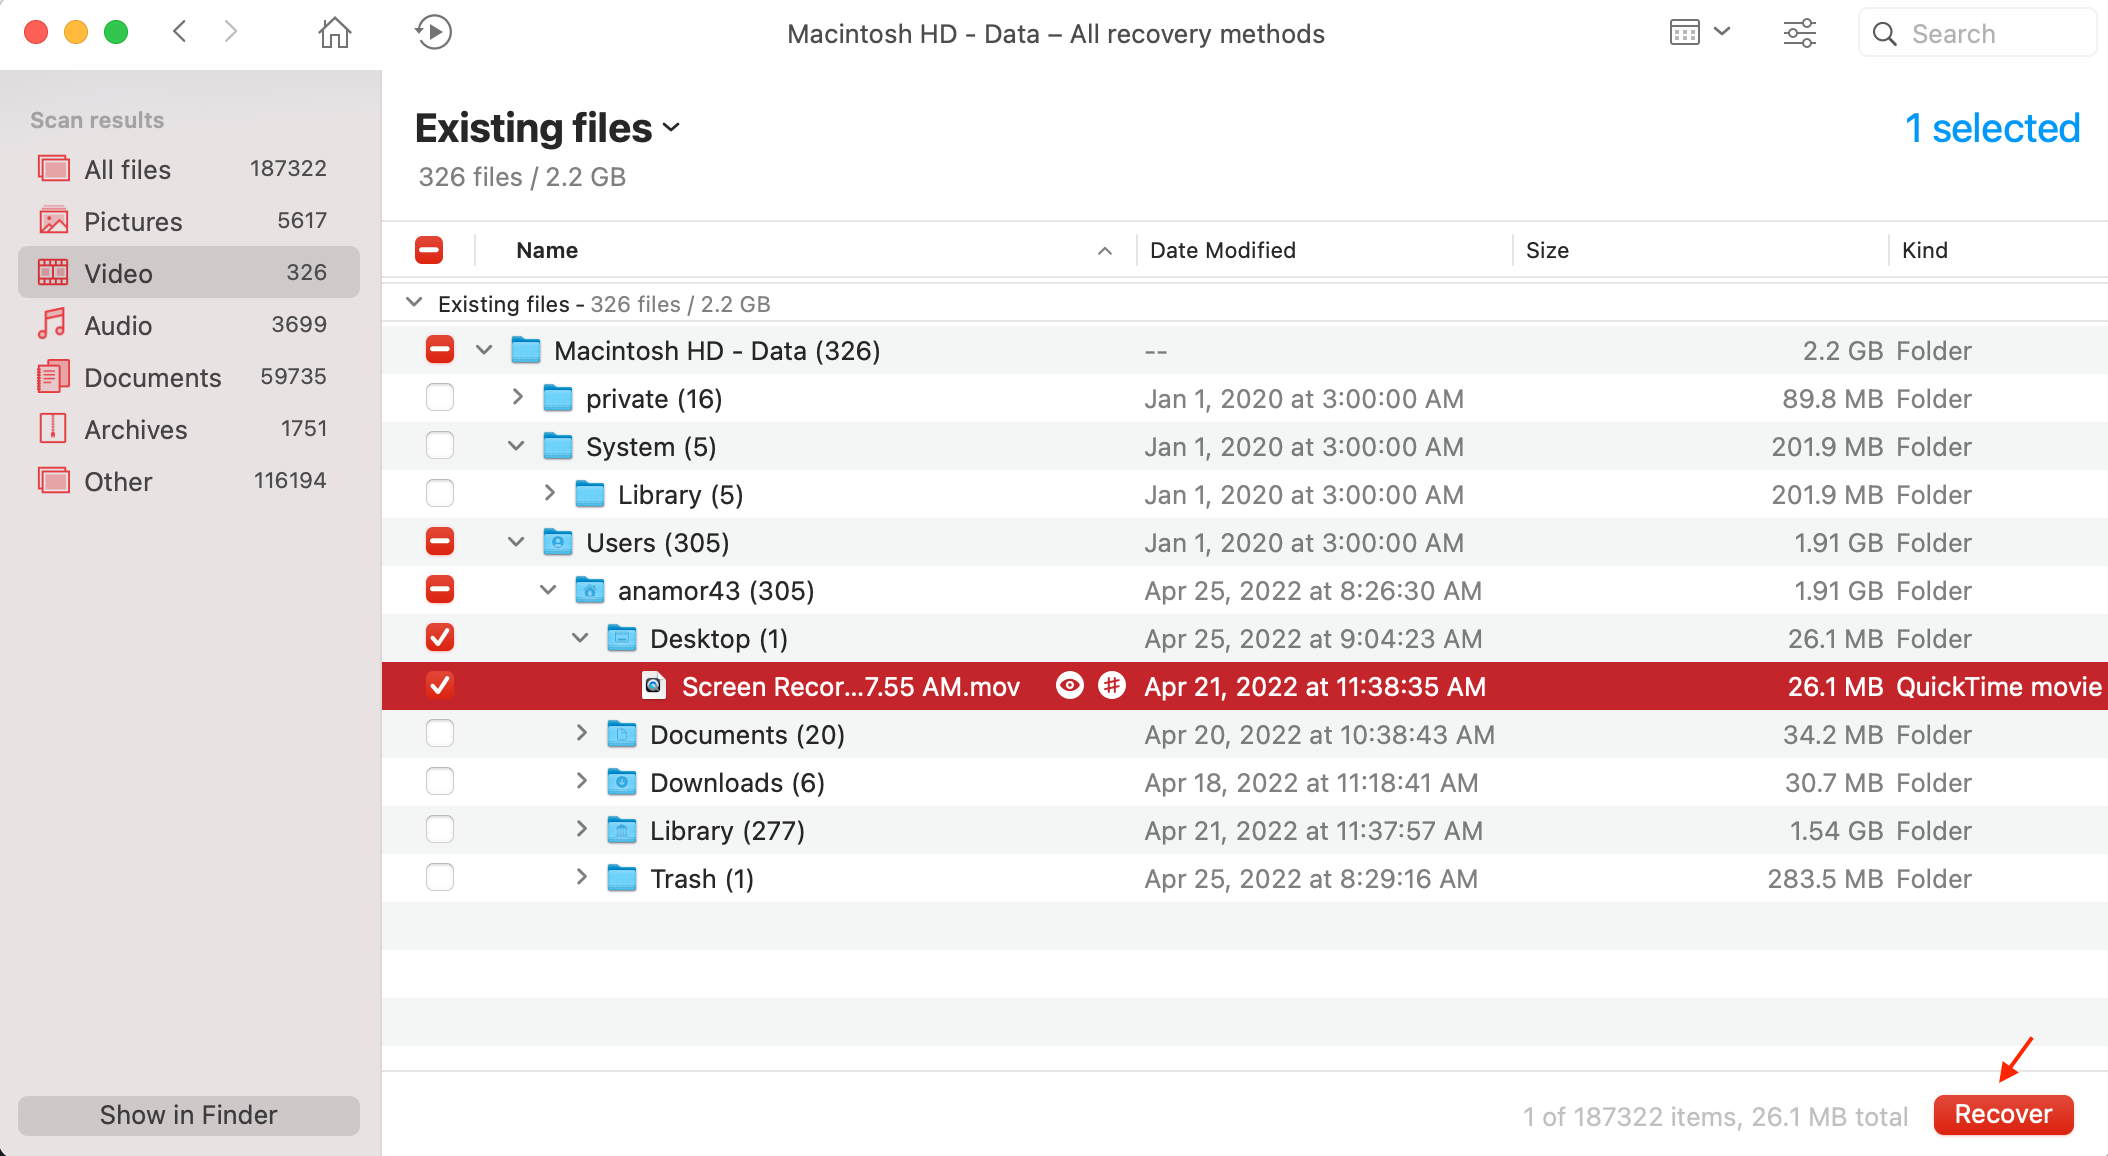
- Select a folder that you want to use as the destination for your file and click OK to confirm.
That’s it! Now go to the chosen destination folder, and the recovered QuickTime screen recording should be already there.
Method 4:Recover From a Time Machine Backup
Time Machine is a built-in backup tool on Macs designed for storing data. If enabled and set up, this application automatically backs up all of the data located on your computer at a chosen frequency (once a day, once a week, etc.).
Important: To be able to recover deleted QuickTime videos using Time Machine, there should be a backup containing that file. If the application didn’t make a backup of your Mac’s files when that screen recording was still present, this data recovery method won’t be effective.
Here’s how to restore a deleted QuickTime video recording using Time Machine:
- Connect the drive containing your Time Machine backups to your Mac.
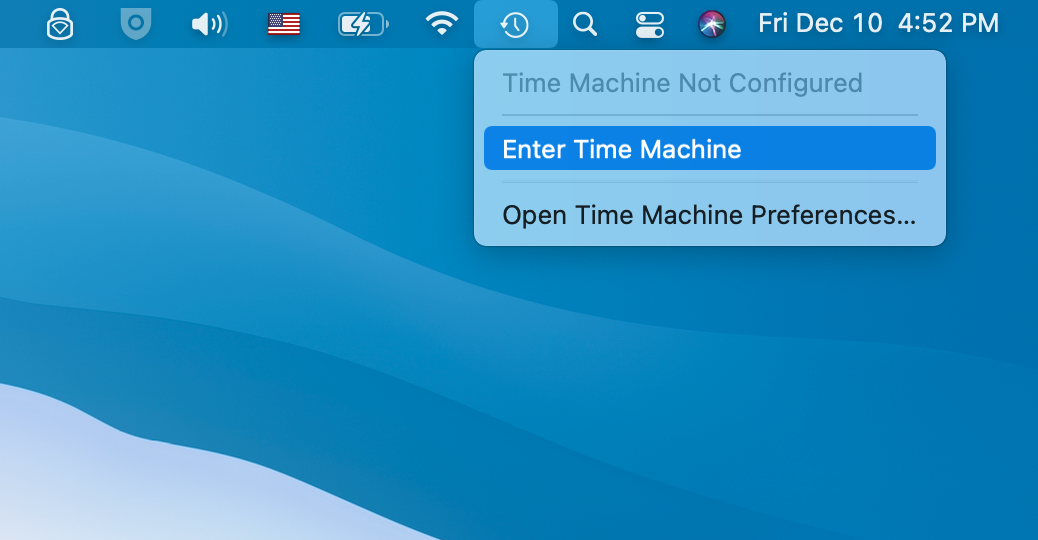
- Launch Time Machine (click the Time Machine icon on the menu at the top and choose Enter Time Machine).
- Choose the needed backup version using the timeline on the right side of the screen.
- Use the sidebar to select the folder where the deleted screen recording was located.
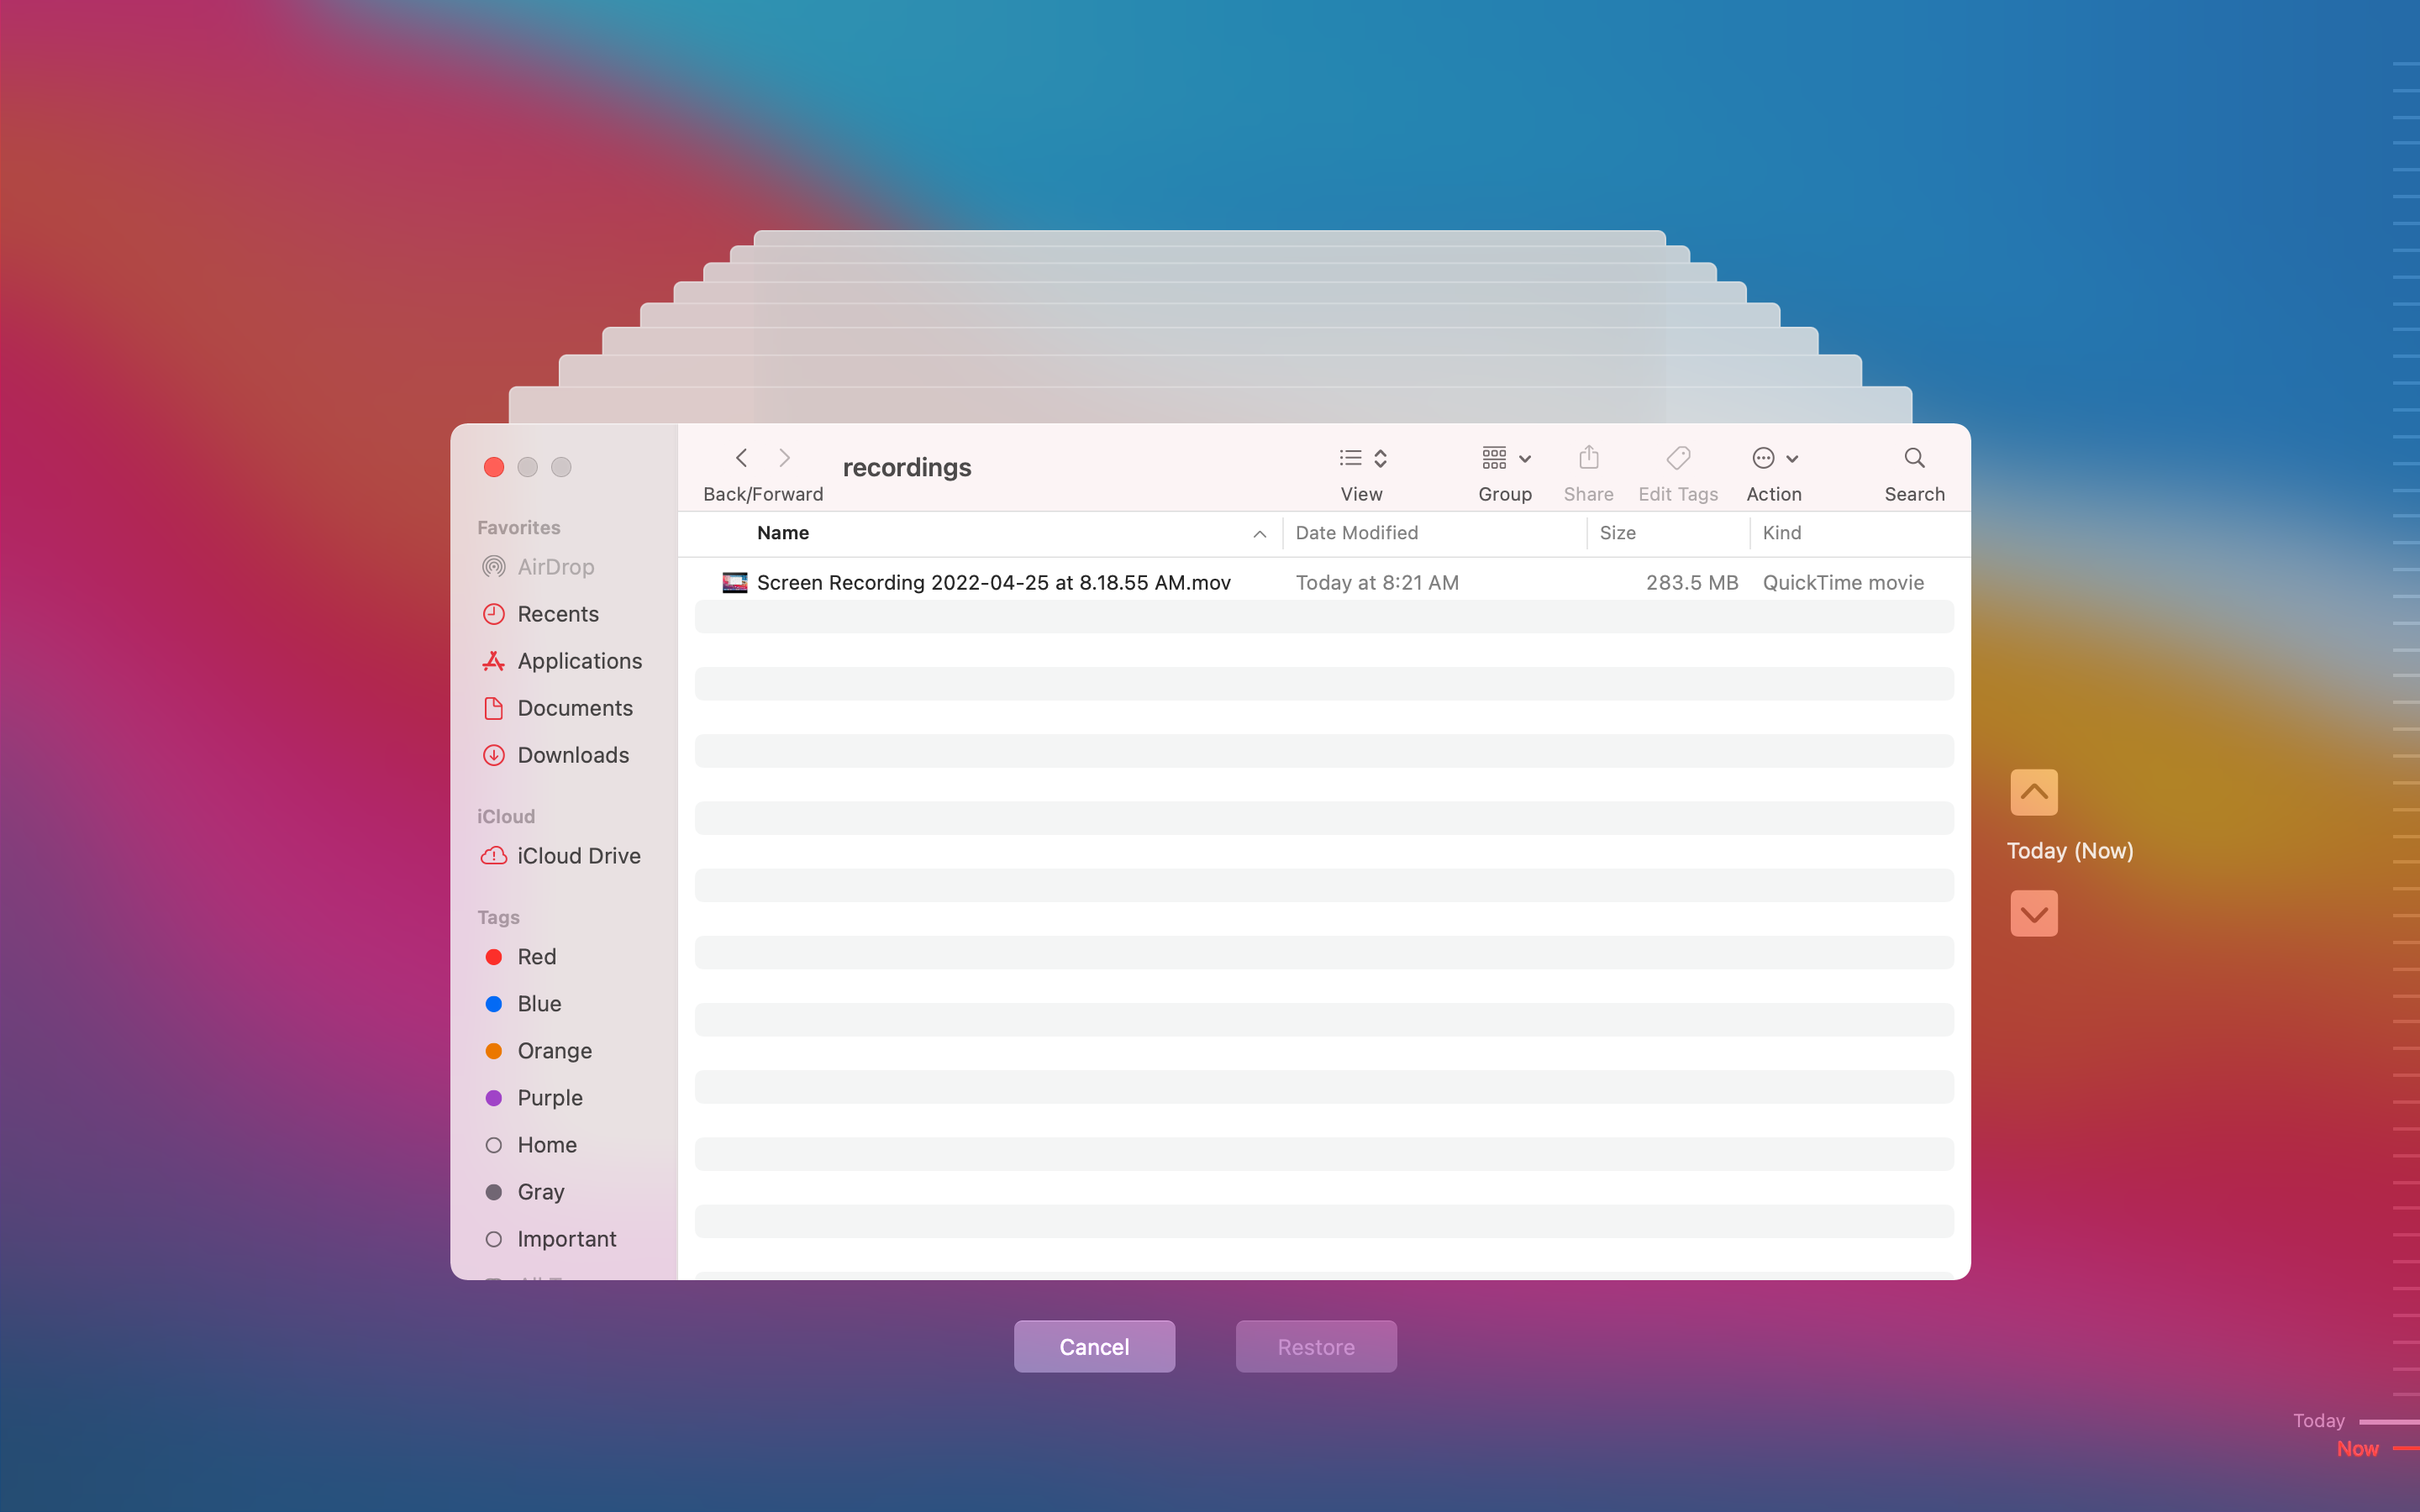
- Choose the video file that you wish to recover and click the Restore button at the bottom.
The recovered video file should be placed back to the folder where it used to be stored before the deletion.
FAQ:
- From the menu at the top of the screen, click File > Save.
- Type in a preferred name for your video file and choose a destination folder.
- Click Save to confirm.


