 Need help with fixing your corrupted external hard drive and preserving the files located there? Even though it might seem difficult to have to deal with such an issue, in most cases, you can repair such a drive by yourself without losing data.
In this article, we’ll cover the most effective ways to fix a corrupted hard drive and restore access to the files located there.
Table of Contents
Symptoms of Hard Drive Corruption on Mac
Not sure if your hard drive is really corrupted? Check out the table below with the most common signs of hard drive corruption, potential reasons for their occurrence, and solutions that might help fix those issues.
| Signs of corruption | Potential reasons | Solution |
| 👀 Mac can’t recognize the external hard drive | File system errors | Method 3: Mount Your Hard Drive in Disk Utility Method 4: Reset SMC Method 5:Reset NVRAM Method 6: Restart Mac in Safe Mode |
| ❌ Got an error message | Improper operation | Method 1: Repair a Storage Device Using First Aid Method 4: Reset SMC Method 5: Reset NVRAM |
| 💾 Drive got bad sectors | Long-term use | Method 1: Repair a Storage Device Using First Aid Method 7: Try to Format Your Hard Drive |
| ⏳ System is not responding | Outdated firmware | Method 1: Repair a Storage Device Using First Aid Method 7: Try to Format Your Hard Drive |
| 🪫 Apps unexpectedly quit | Software bugs | Method 6: Restart Mac in Safe Mode |
| 📁 You can’t transfer files to other folders | Malware | Method 1: Repair a Storage Device Using First Aid |
| 🩹 S.M.A.R.T. errors | Mechanical failure of hard drive components or bad sectors | Method 2: Repair Corrupted Hard Drives with FSCK Command |
| 💻 Unusual noises (clicks, beeping, etc.) | Physical damage | Method 3: Apply to Data Recovery Service |
How to Recover Data from a Corrupted Hard Drive on Mac
If you notice any of the issues mentioned in the previous section affecting your drive, it’s a good idea to recover the data from the drive first before attempting any repairs.
There are three external hard drive data recovery methods that you can try: using a specialized data recovery tool, restoring the files from a Time Machine backup, or resorting to a data recovery service. The first method is the overall easiest and most effective in most cases, the second one is best if you have a Time Machine backup available, and the last one is for situations when the previous methods didn’t work or if the damage to your hard drive is too severe.
Method 1: Recover Files with Data Recovery Software
Usually, using data recovery software to retrieve your files from a corrupted hard drive is the safest and most effective option. To be able to use a data recovery application, the following should apply to the situation you’re experiencing with your corrupted drive:
- You should be able to connect the external hard drive to your Mac
- The drive should be visible in Disk Utility
- The size for your external HDD is displayed correctly on your computer
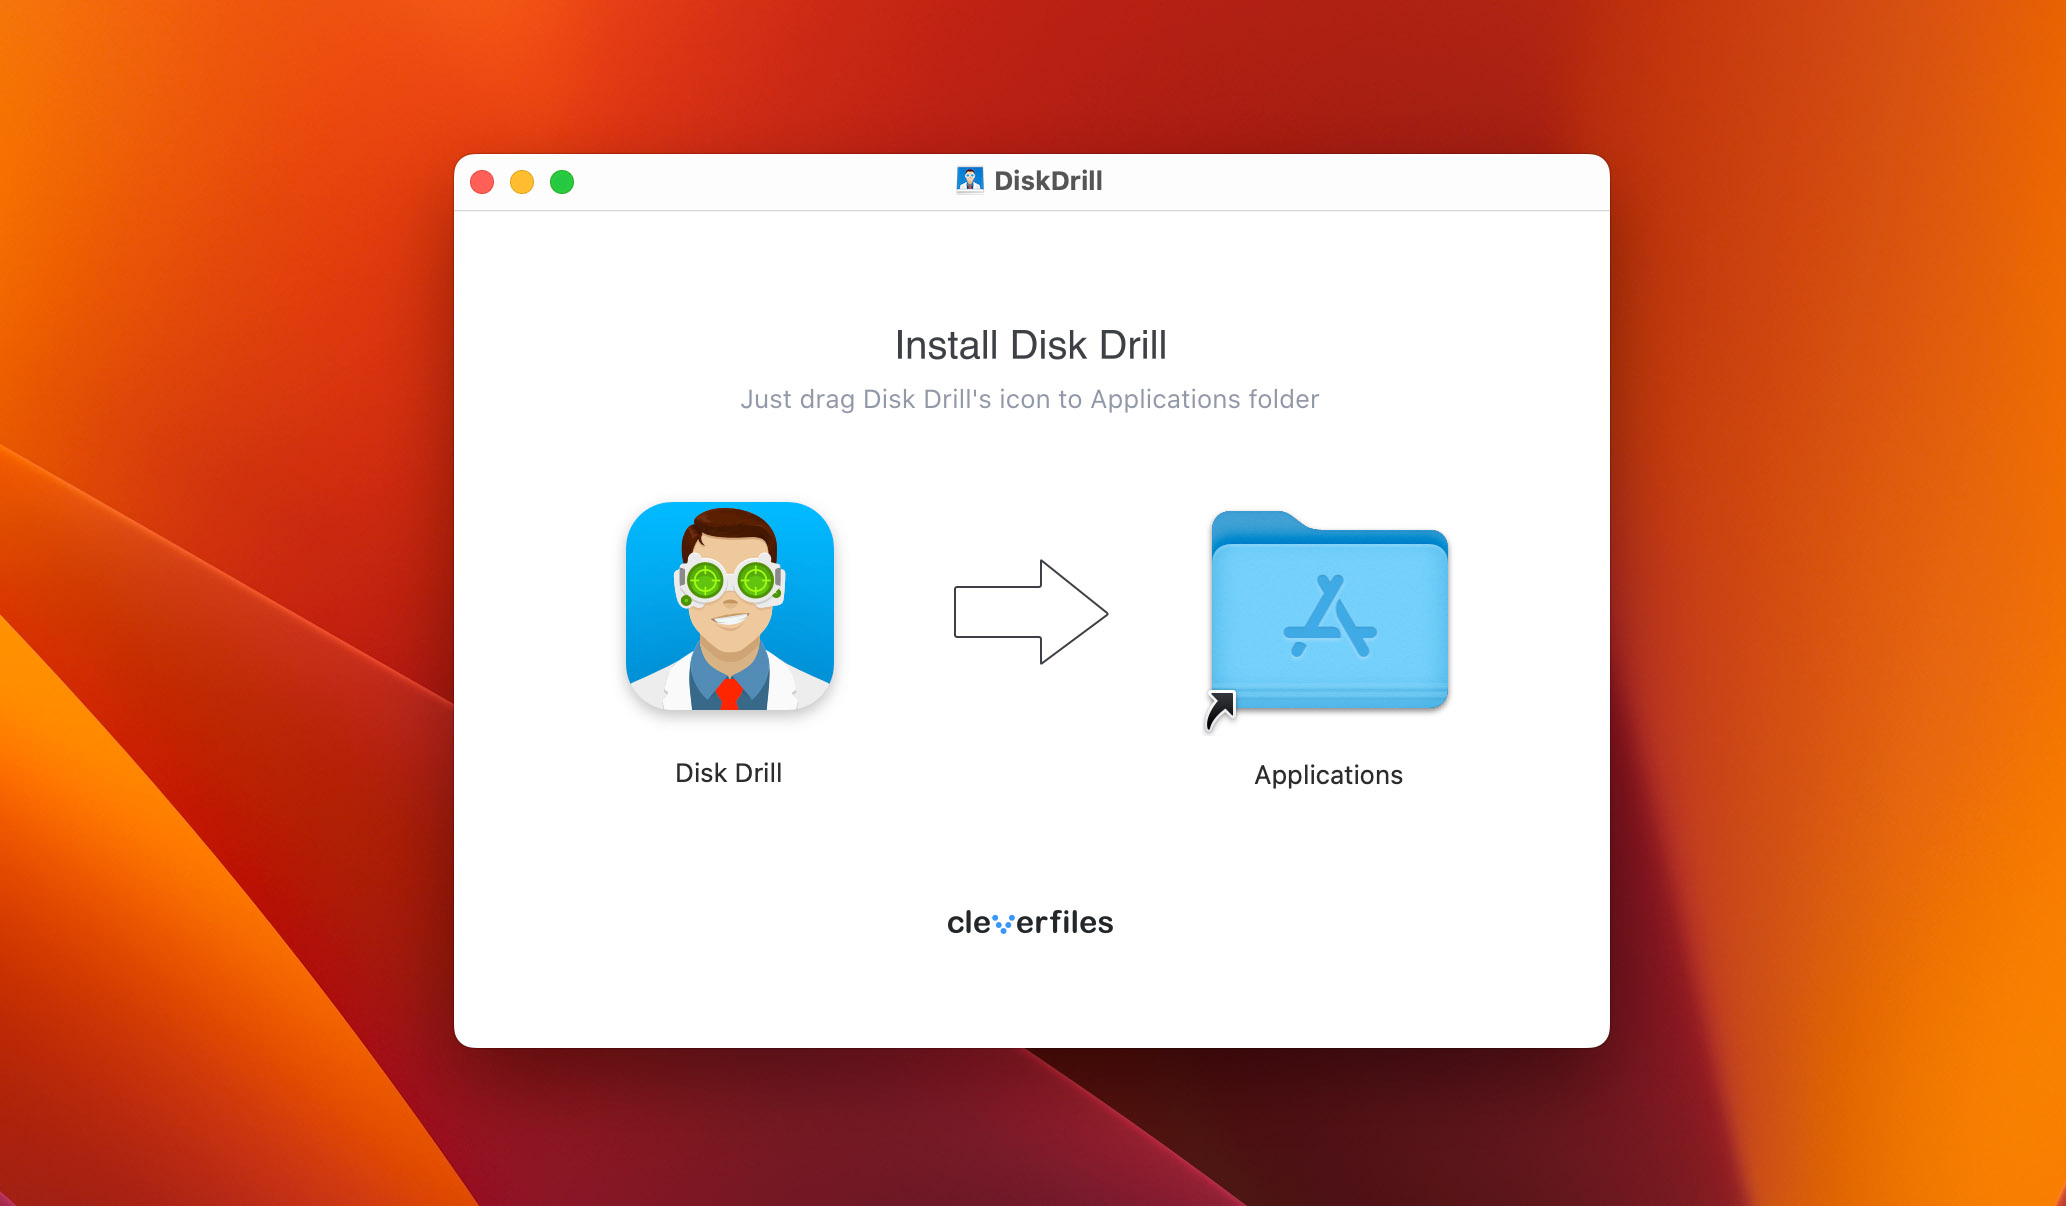
We recommend trying out a tool called Disk Drill since it has been considered as one of the best data recovery software for quite some time now and has a proven track record of successful recoveries of corrupted hard drives on Macs.
Some of the benefits of using Disk Drill for external hard drive recovery include the fact that this tool is compatible with all file systems (APFS, HFS+, exFAT, FAT32, etc.) and can restore almost any file type (videos, music files, presentations, photos, documents, archives, and others). Moreover, it can detect and retrieve whole partitions and restore RAW drives.
Follow these steps to recover files from a corrupted external hard drive using Disk Drill for Mac:
- Download Disk Drill and follow the onscreen instructions to install the application.
- Connect the corrupted hard drive to your Mac.
- Double-click the Disk Drill icon to launch the tool.
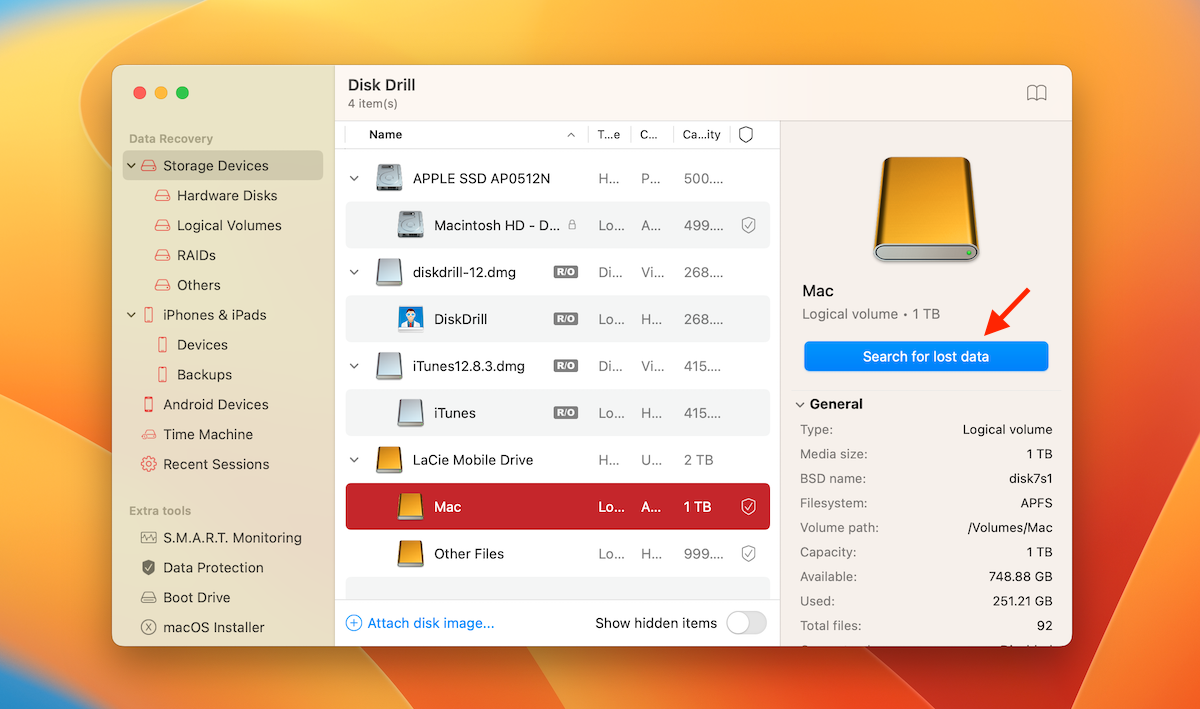
- Choose the Storage devices tab from the sidebar and then click the needed hard drive from the list.
- Click the Search for lost data button to initiate the scan.
- Click Review found items to start previewing the data as soon as it becomes available or wait for the scan to finish.
- Click the eye icon near a file to preview it (if a file has been discovered by the tool and you’re able to preview it, then you can be sure that the file will get recovered).
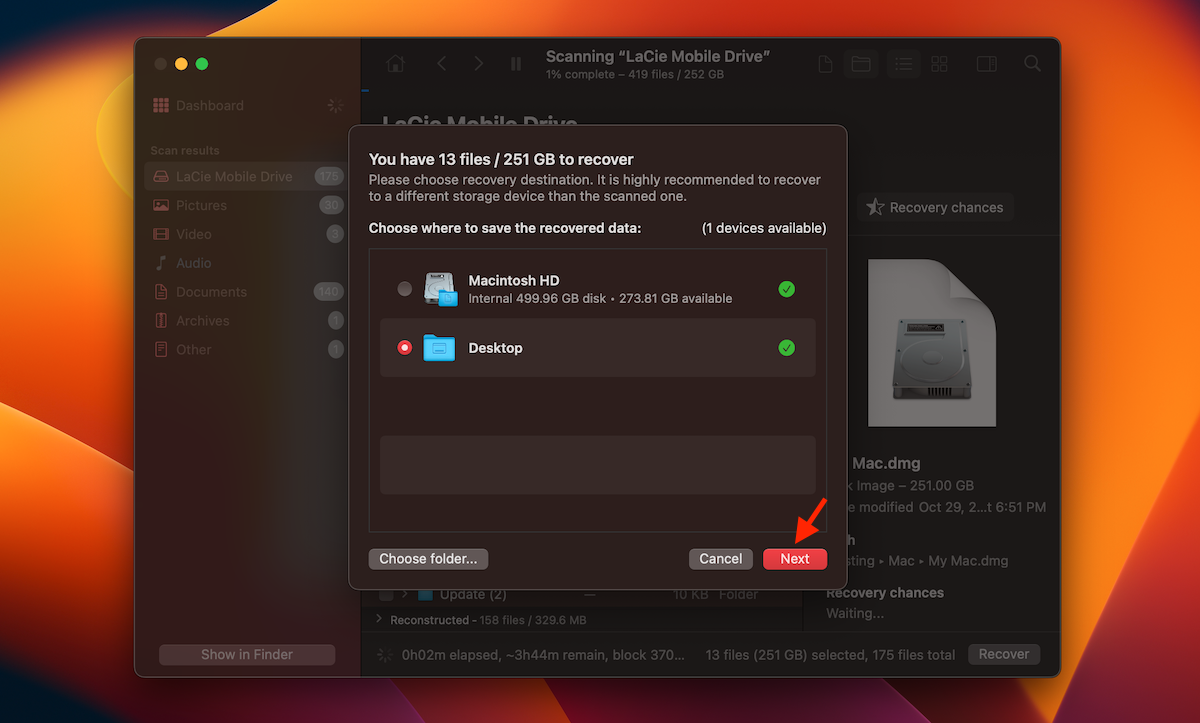
- Choose the data you wish to retrieve and click the Recover button.

- Select a preferred destination for the data and click Next to confirm.
Note: If you think that your hard drive might be physically damaged or you’ve noticed that it’s showing signs of failure, it’s a good idea to create a byte-to-byte backup from the drive and only then scan it (you can use the Byte-to-byte Backup feature in Disk Drill to do that). This way, you’ll be sure that no further damage will be done to the drive that might cause even more data loss.
Method 2: Recover Data From a Time Machine Backup
An even easier and quicker way to recover data from a corrupted hard drive on a Mac is by using a previously created Time Machine backup. All you need for this method is your MacBook, the Time Machine app (it comes pre-installed with every Mac), and the most recent backup of the faulty drive.
Note: If you hadn’t used Time Machine to back up the files from your hard drive before the issue with the drive occurred, you wouldn’t be able to use this data recovery method to bring back the data.
Follow these steps to recover data from a corrupted hard drive using a Time Machine backup on your Mac:
- Connect the drive containing the needed Time Machine backup to your Mac (or if the backup is stored internally on your computer, skip this step).
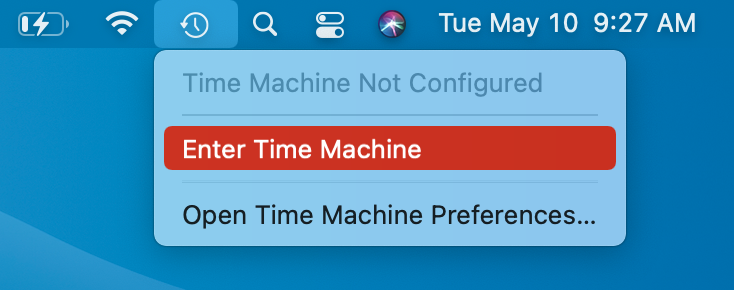
- Click the Time Machine icon on the menu bar at the top of your screen and choose Enter Time Machine from the drop-down menu.
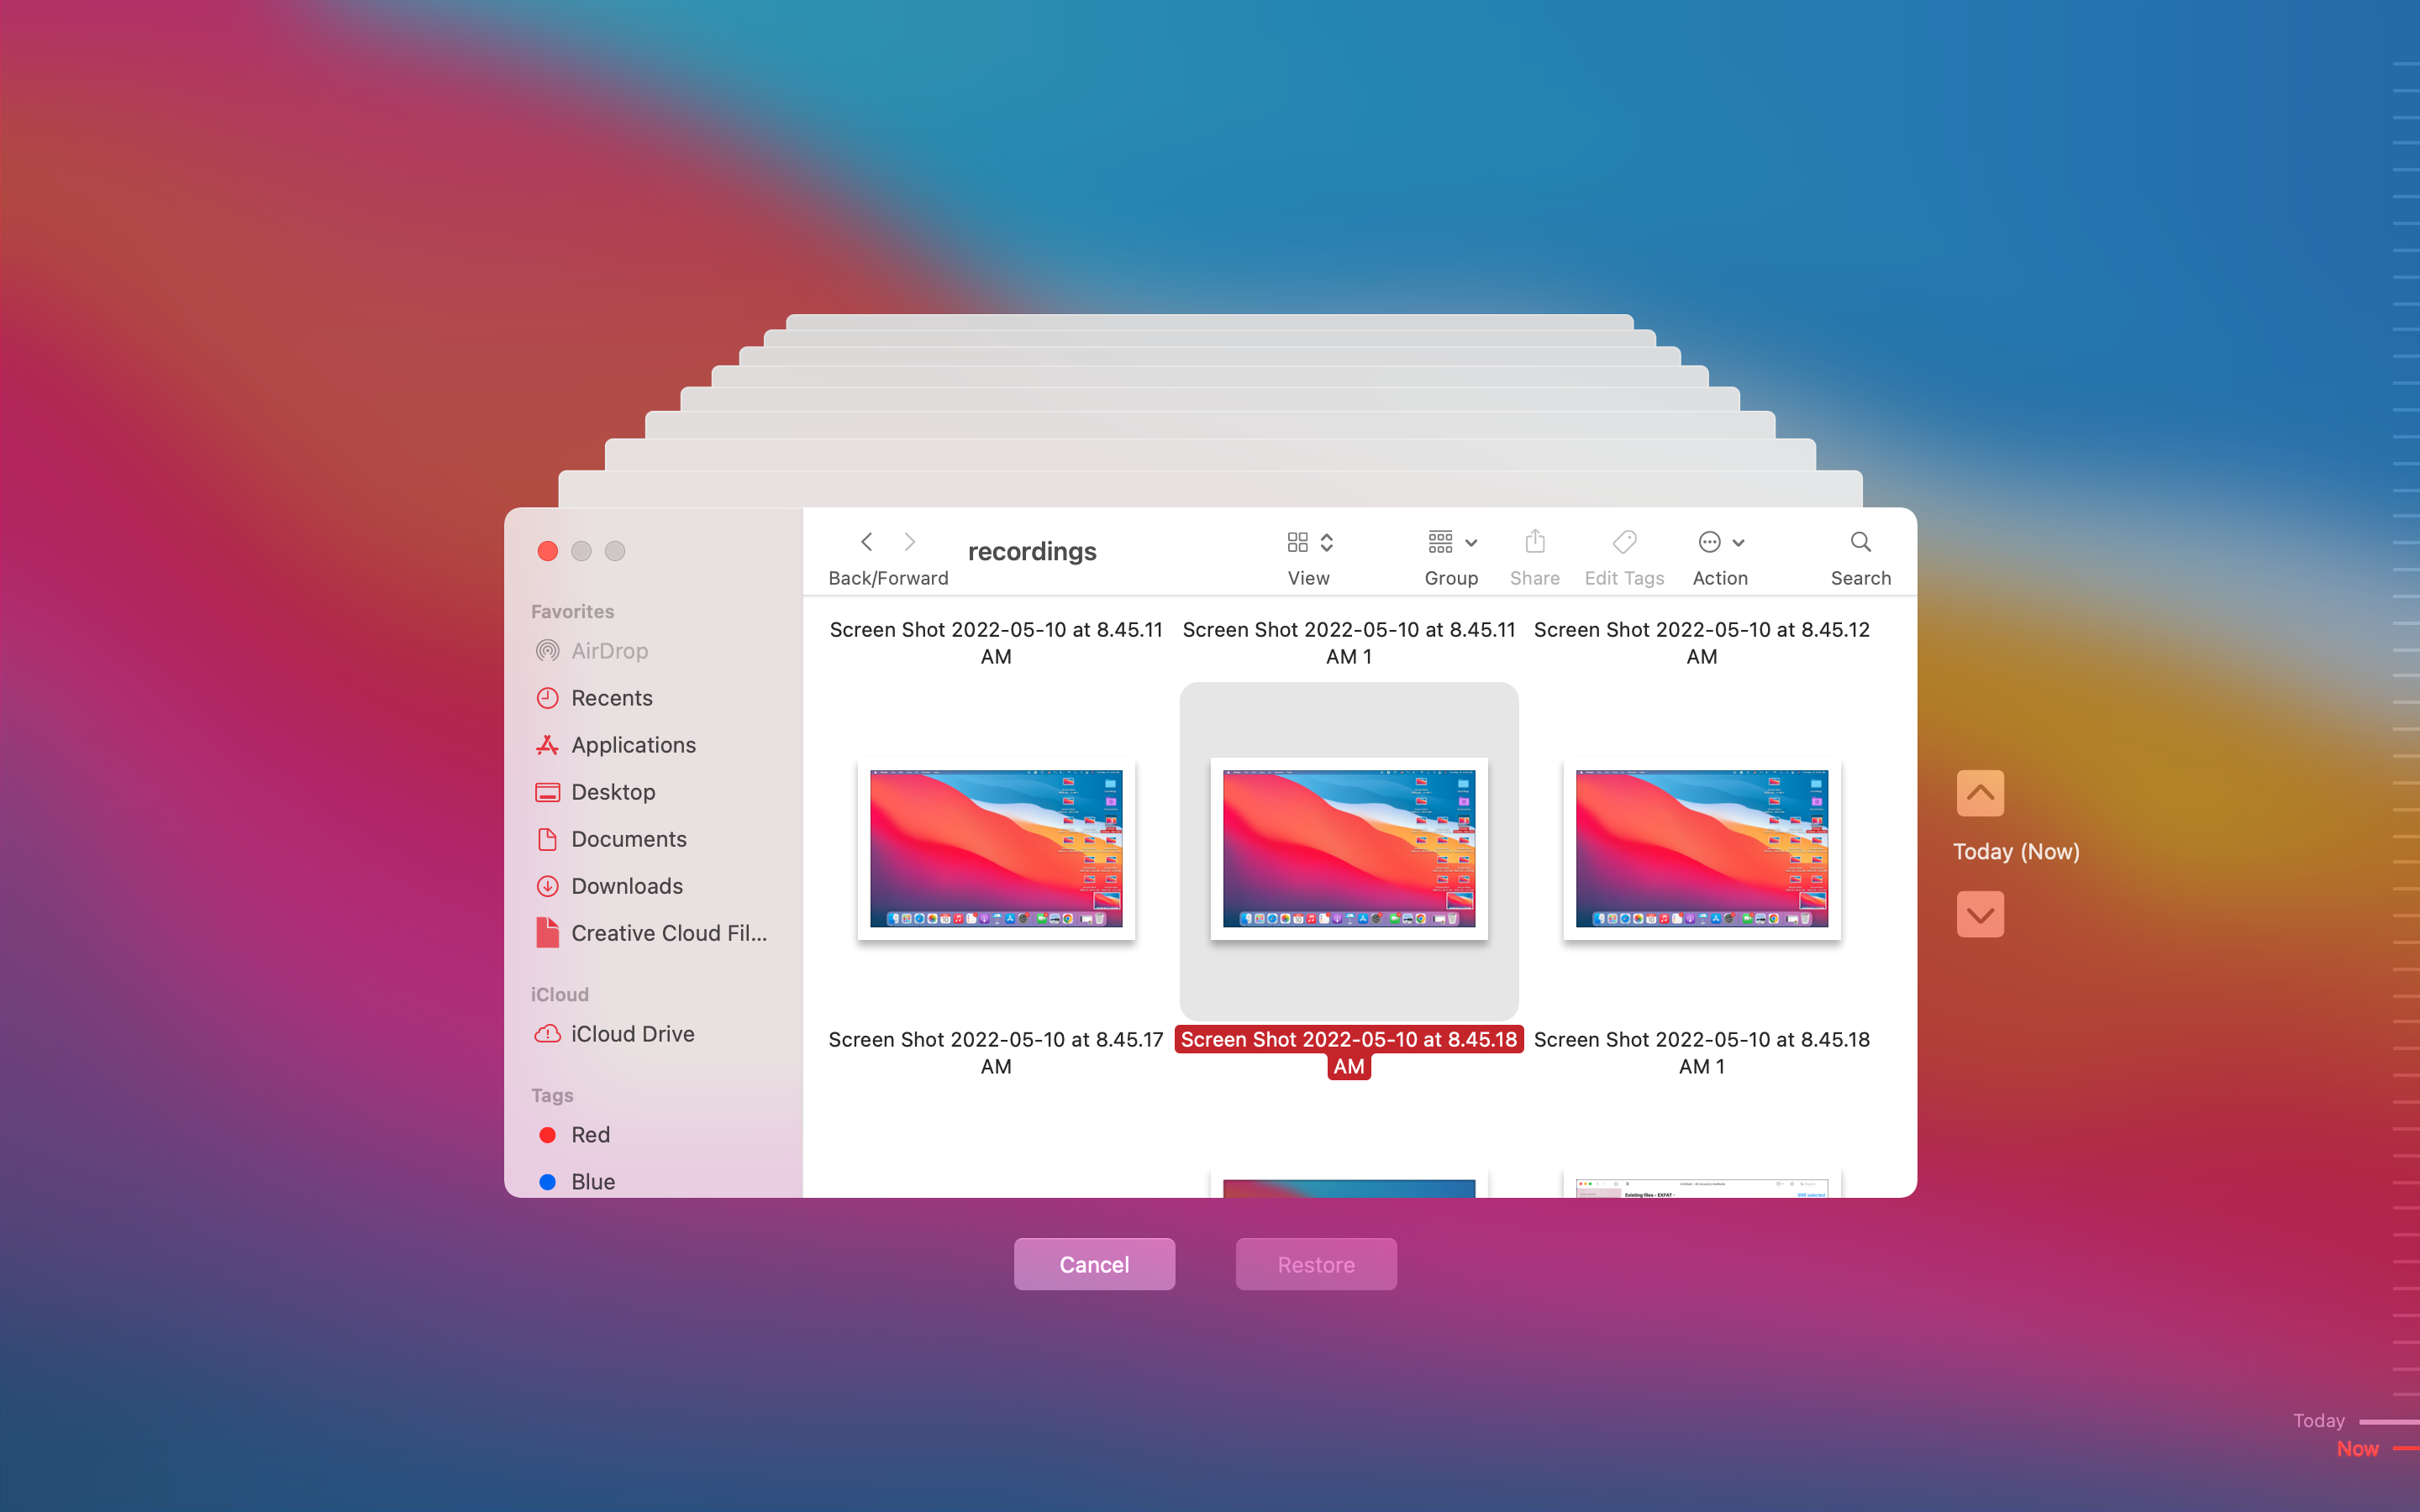
- Choose the files you wish to recover and click the Restore button.
Method 3: Apply to Data Recovery Service
If neither of the two above-mentioned data recovery methods hasn’t been of much help, then you should try to resort to a specialized data recovery service. This method is effective even in cases when dealing with severely corrupted hard drives.
You can either go to a local data recovery service or choose one online, but it’s essential to double-check the company you choose to make sure that they are professionals since there might be only one chance of recovering the data from your drive. If you’re not sure which service to choose, our recommendation is the CleverFiles Data Recovery Center.
Note: CleverFiles Data Recovery is not only a group of experienced data recovery experts. This center provides a free evaluation of your corrupted hard drive and has a no data – no charge policy, meaning you’ll have to pay for the service only if the data is actually recoverable. Moreover, if you need, they’ll also try to repair the corrupted hard disk.
Here’s what you should do if you choose to proceed with a data recovery service:
- Tell the chosen data recovery center about the issue you’re experiencing with the hard drive.
- Mail the faulty drive to the lab.
- Wait for an evaluation from the data recovery professionals and a price quote.
- If you accept the price quote, the experts will start with the recovery right away.
- Once the data has been recovered, you’ll get it shipped back to you on a new storage device.
Quickly Check Your External Hard Drive and Mac Settings
It’s a good idea to check your external hard drive to make sure that it is actually corrupted before moving forward with the fixes. Here’s what you should do:
- Connect the external drive to another computer: Whether it’s outdated system drivers on your Mac or a file system on the drive that’s not compatible with macOS, you should try to connect the external hard drive to a different computer to rule out these possibilities.
- Check the USB connections: There is a chance that the port of your Mac or the USB cable you’re using is damaged. Therefore, you should try another cable or port to connect the external hard drive.
- Make sure your external disks are visible in Finder: If your drive is not showing up in Finder, you should check its settings. To do that, go to Finder, click Finder from the top menu, and click Settings. Then choose the Sidebar tab and make sure there is a tick in the box near External disks (under the Locations section).
- Connect the drive directly without using a USB hub: If you were using a USB hub to connect your external hard drive to your Mac, try to connect it directly to the computer since there is a chance that the reason why you’re experiencing issues with the drive is a faulty USB hub.
- Check Mac console report: The Console app on your Mac collects different reports that can give answers to many issues that you might be experiencing with your computer. Moreover, it could inform you what happened to the external hard drive and whether there is a real problem with it.
Best Methods to Fix Corrupted Hard Drive on Mac
Make sure that you have copied your data from the hard drive before moving forward with any of these fixes since any manipulations with a corrupted hard drive may lead to irretrievable data loss. Whenever you’re ready, you can go through the methods described below as they appear one after the other. This way, you’ll get everything covered, and luckily you’ll repair your external hard drive.
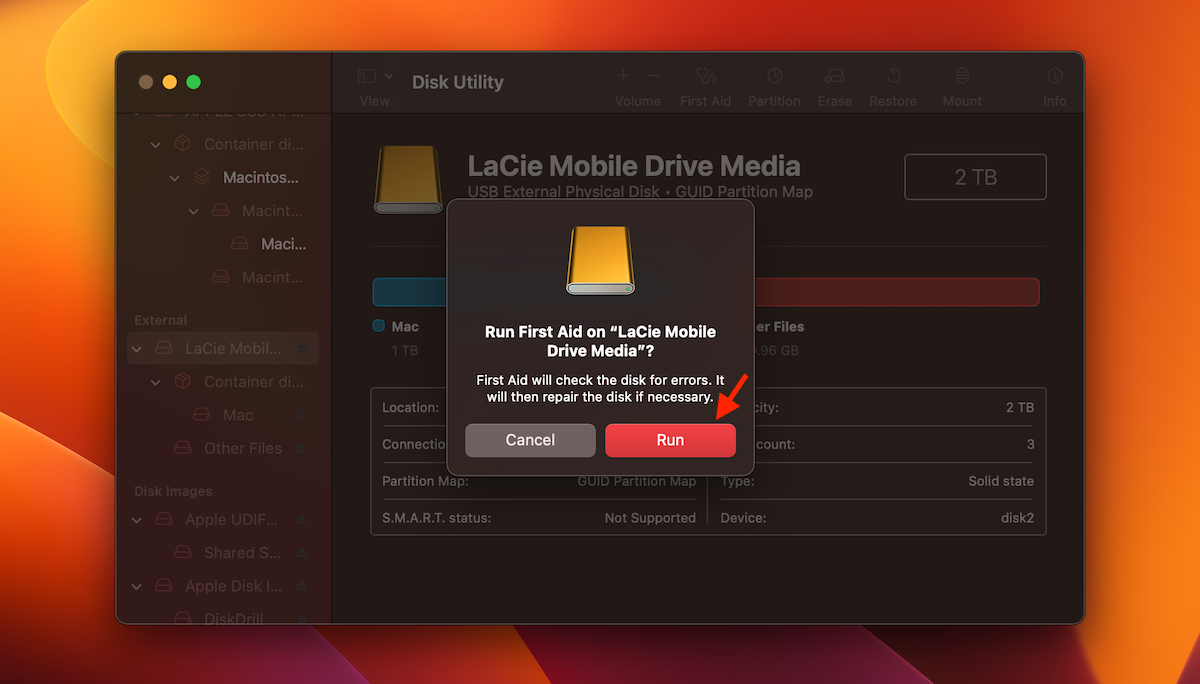
Method 1: Repair a Storage Device Using First Aid
The First Aid feature in Disk Utility can help you fix a corrupted external hard drive on your Mac. This tool will scan your drive and fix the disk errors and directory structure issues, if there are any. Moreover, Disk Drill comes pre-installed on all Macs, so you won’t have to download any third-party apps to try this repair method.
Note: This method is best if you want to fix a corrupted hard drive without formatting.
Follow these steps to run First Aid and fix your corrupted hard drive on your Mac:
- Connect the hard drive to your computer.
- Launch the Disk Utility app (to get to Disk Utility on your Mac, go to Launchpad and type in Disk Utility in the search field at the top).

- Choose the faulty drive from the list of available devices on the sidebar on the left.

- Click the First Aid button.
- Click Run to start the tool.
Note: Once the process is complete, unplug the external hard drive and then connect it again to see whether the problem has been solved and everything is working properly.
Method 2: Repair Corrupted Hard Drives with FSCK Command
If the previous method hasn’t worked, you can try to run the FSCK (file system consistency check) command to repair your corrupted hard drive. This command will check the drive for any file system problems and fix bad sectors on the external hard drive if any are found (similar to the First Aid feature in Disk Utility).
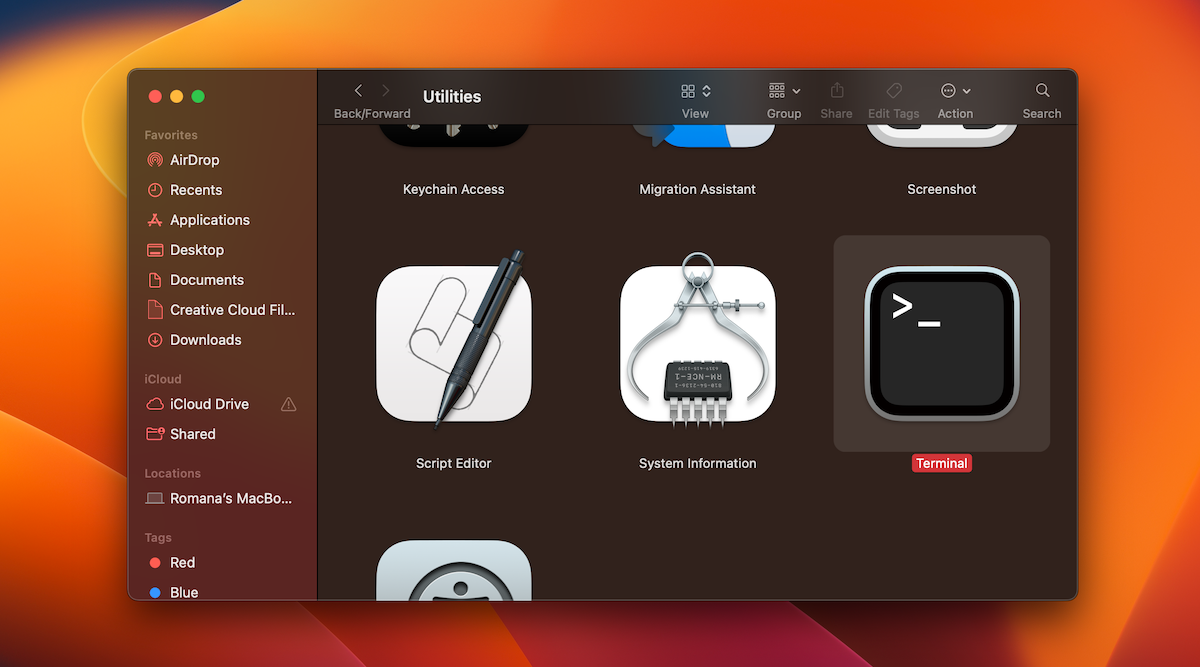
Note: For this method, you’ll have to use the Terminal app and the Single User Mode on your Mac, which are command-based tools (meaning there is no graphical interface). This might cause some users difficulties.
Follow these steps to fix a corrupted hard drive with the FSCK command on your Mac:
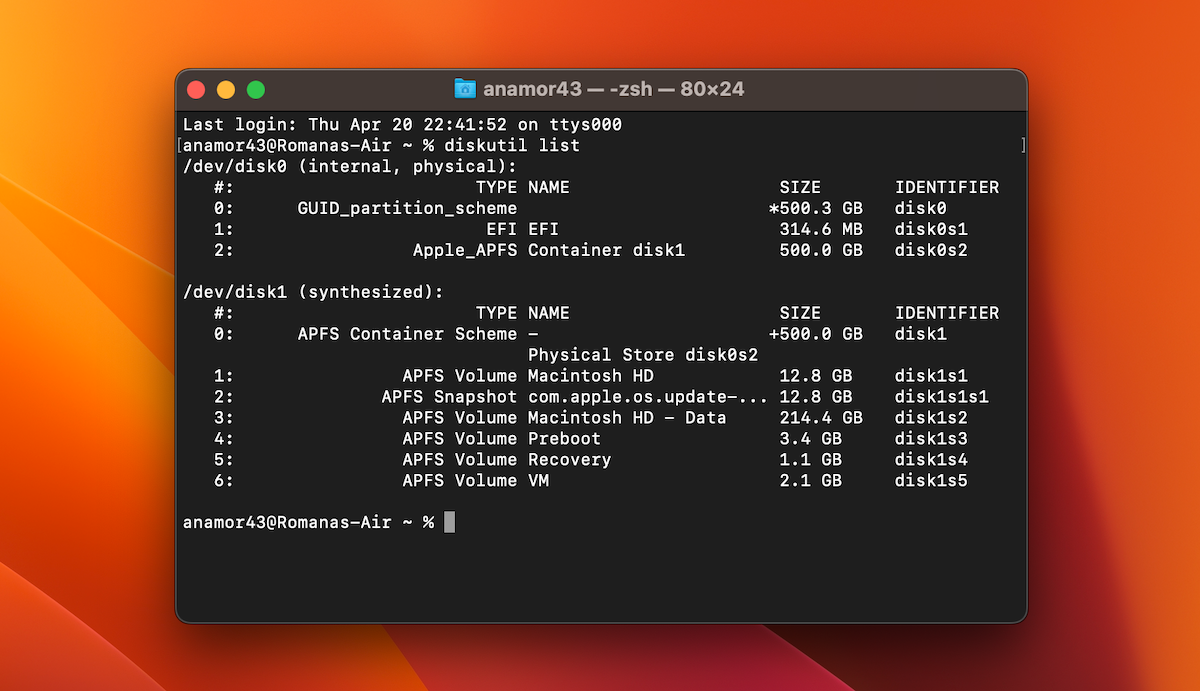
- Launch the Terminal app (open Finder > Applications and double-click the Terminal icon to open it).
- Copy-paste the following command and hit Return: diskutil list.
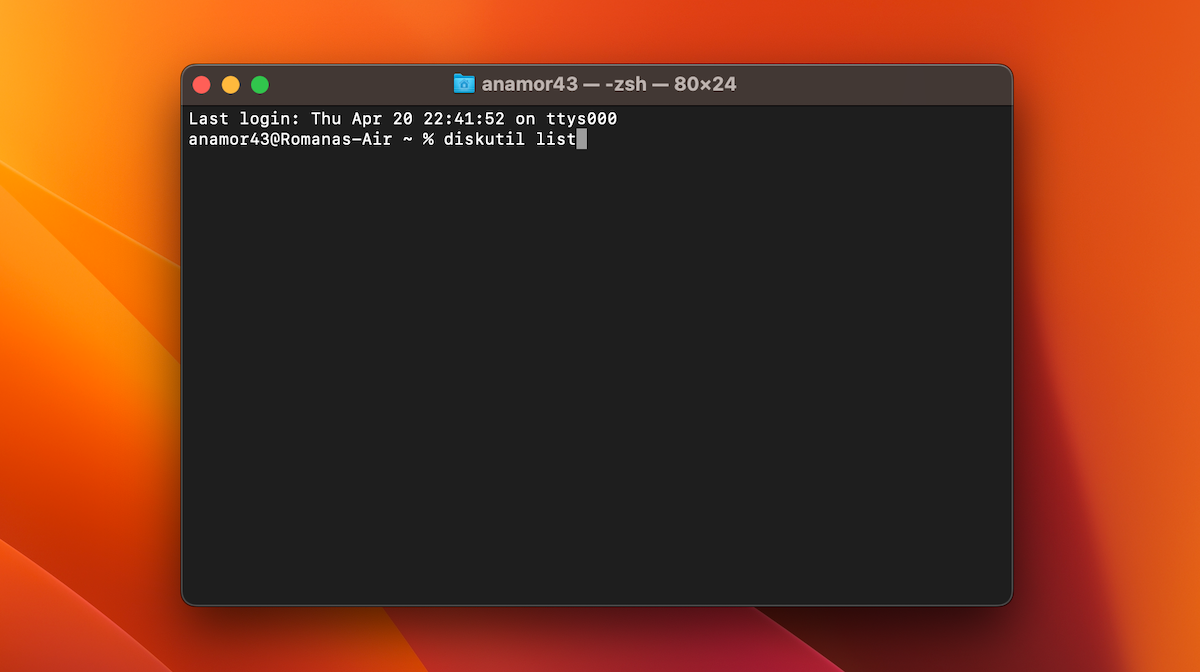
- Locate the corrupted hard drive on the list of devices and note its identifier path (for example, /dev/disk4).
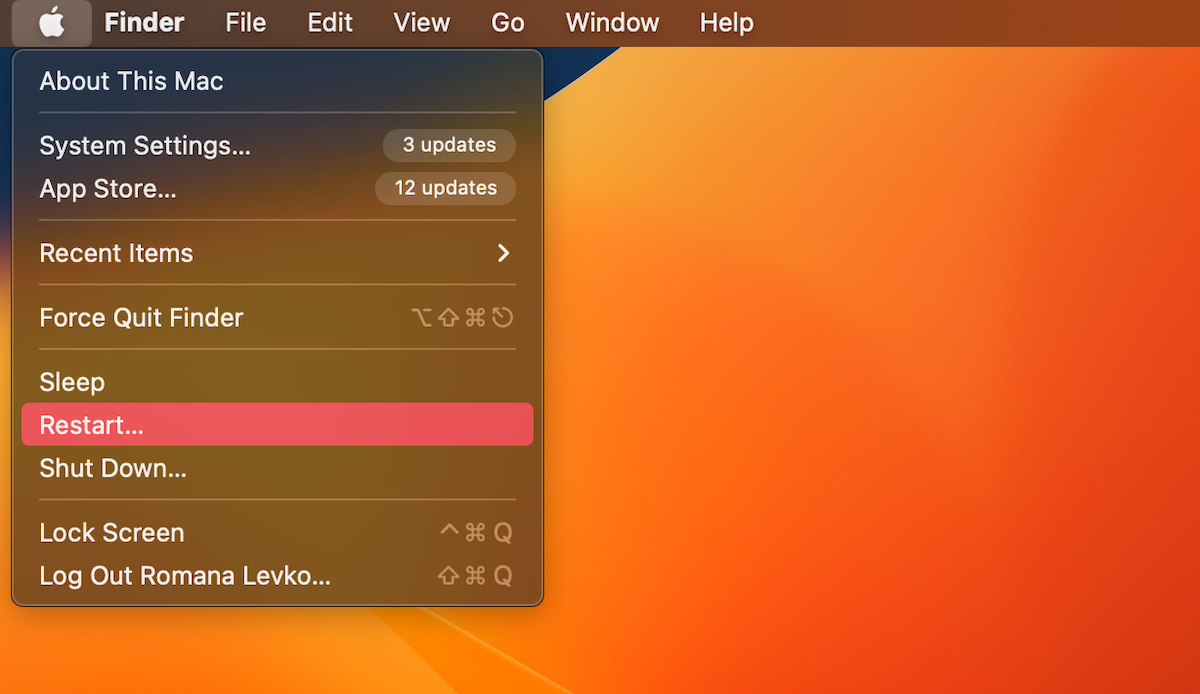
- Open the Apple menu at the top-left and click Restart.
- Immediately press and hold Command + S on your keyboard to start the Single User Mode on your Mac.
- Copy-paste the following command and hit Return: /sbin/fsck -fy
- Then copy-paste the following command and hit Return: /sbin/fsck -fy /dev/disk4 (replace /dev/disk4 with your hard drive identifier path)
- Once the process is complete, type in the following command and hit Return: reboot
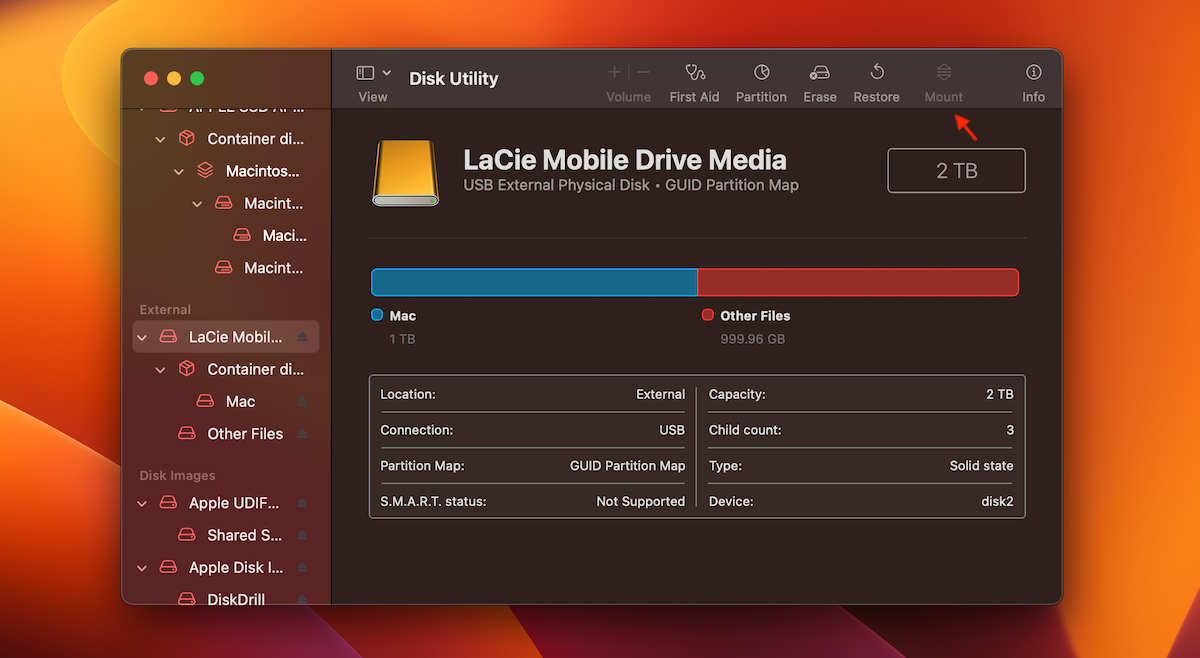
Method 3: Mount Your Hard Drive in Disk Utility
If you can see your hard drive listed in the Disk Utility app and its size is displayed correctly, but you can’t access the data stored there, you should try to force mount it.
Follow these steps to force mount your hard drive in Disk Utility on your Mac:
- Connect the hard drive to your computer.
- Launch the Disk Utility app (to get to Disk Utility on your Mac, go to Launchpad and type in Disk Utility in the search field at the top).
- Choose the faulty hard drive from the list of devices on the left.
- Click the Mount button at the top.
Method 4: Reset SMC
It’s possible that the reason why you’re experiencing issues with your hard drive is because of the SMC (System Management Controller) on your Mac. You should try resetting SMC on your computer to rule out this problem and fix your corrupted external hard drive.
If you’re using an Apple silicon Mac, then all you should do to reset SMC is to restart the computer. Otherwise, follow these steps to reset SMC on your Mac:
- Go to the Apple menu and click Shut Down from the drop-down menu.
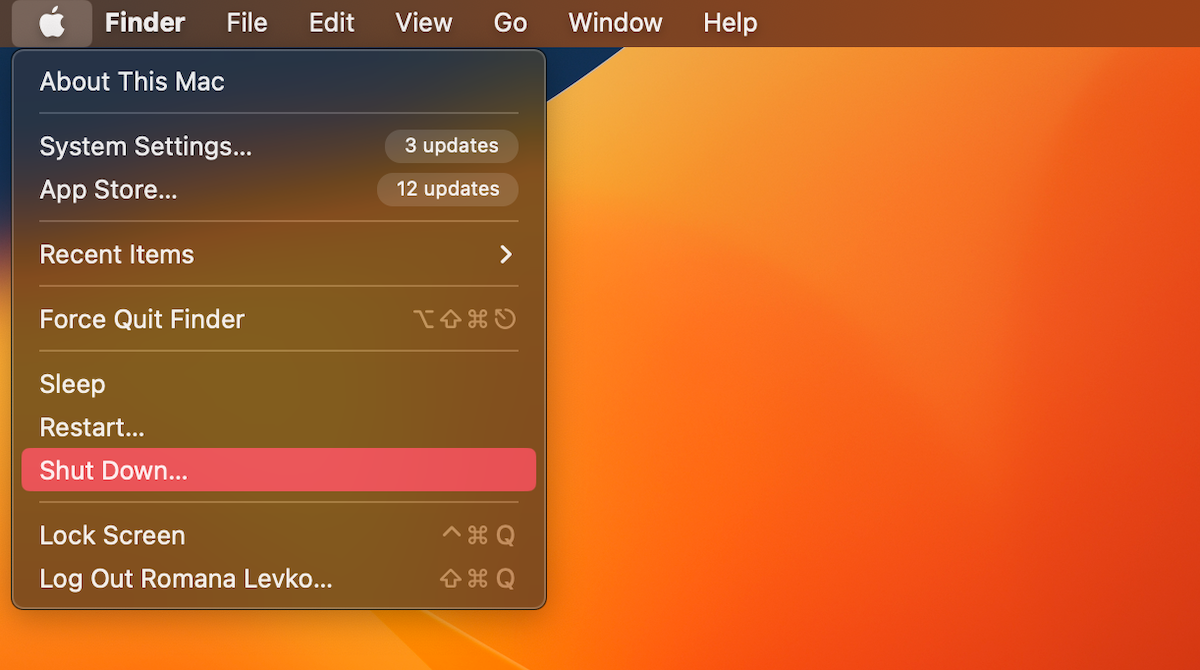
- Press and hold the following key combination: Control + Option + Shift
- Keep holding the keys for about 7-10 seconds, then without releasing them, also press and hold the power button.
- Keep holding all of those keys for 7-10 more seconds.
- Release the keys and press the power button to turn your computer back on.
Method 5: Reset NVRAM
NVRAM (Non-Volatile Random Access Memory) is a certain amount of memory used by your computer to access specific system settings directly on your Mac and on the devices connected to your Mac. If one of those settings is not working properly, it might be the reason why you’re having an issue with accessing the data on your hard drive.
Follow these steps to reset NVRAM on your Mac:
- Go to the Apple menu and click Shut Down from the drop-down menu.
- Turn the computer back on by pressing the power button.
- Then press and hold the following key combination right after releasing the power button: Command + Option + P + R
- Keep holding those keys until the Apple logo appears (for around 20 seconds).
Method 6: Restart Mac in Safe Mode
Third-party apps may block drive connection, so you should try to limit any extra apps or process activities on your Macintosh. To do that, you should reboot your Mac in Safe Mode. However, keep in mind that this process is different for Apple silicon Macs and Intel-based ones.
If you’re using an Apple silicon Mac, follow these steps to boot it in Safe Mode:
- Go to the Apple menu and click Shut Down from the drop-down menu.
- Press and hold the power button until you see the Startup screen.
- Choose a volume.
- Press and hold the Shift key.
- Click Continue in Safe Mode and wait for the computer to restart.
For Intel-based Macs, follow these steps:
- Go to the Apple menu and click Restart from the drop-down menu.
- Immediately after that, press and hold the Shift key (until the login window appears).
- Log in to your Mac.
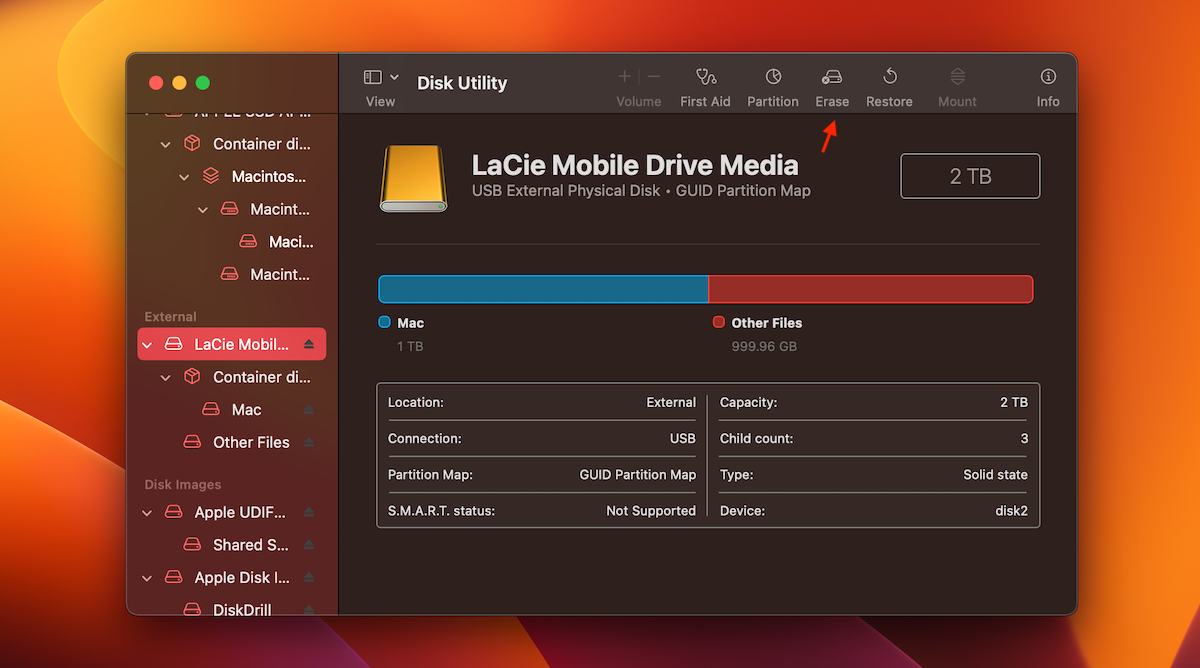
Method 7: Try to Format Your Hard Drive
If nothing from the above-mentioned methods helped with repairing your Mac disk, your last option that might help is to format it. You can do this directly through the Disk Utility app on your Mac.
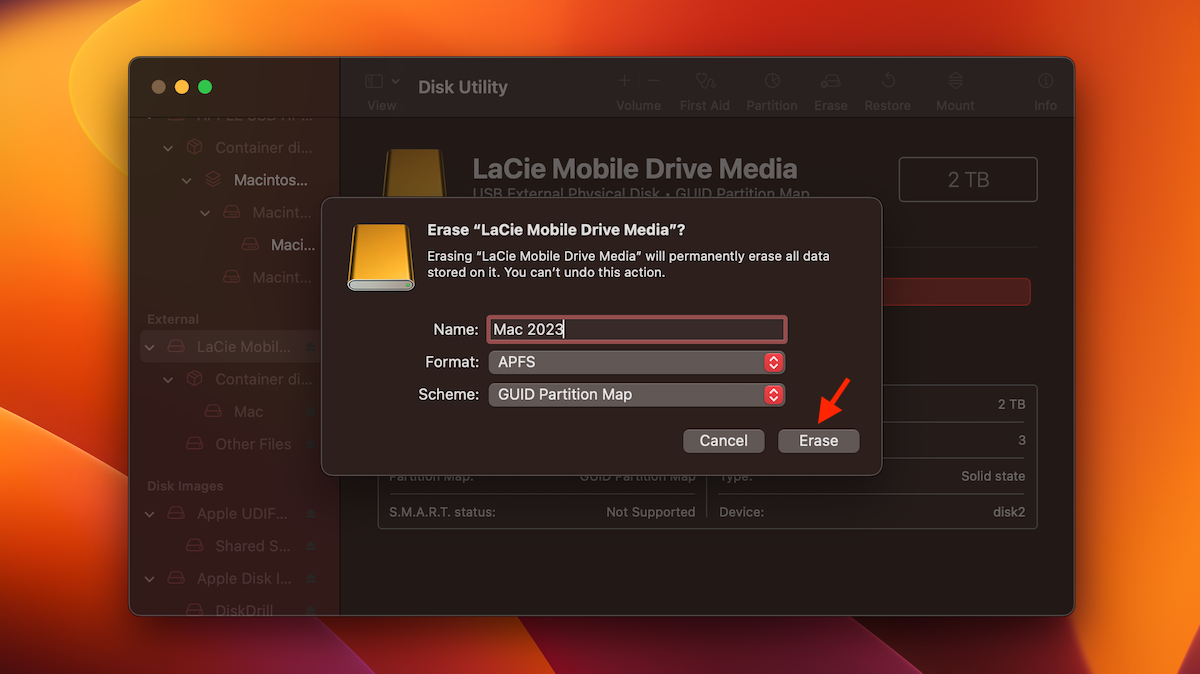
Note: After formatting the hard drive, all of the data from that drive will get permanently erased. Therefore, it’s a good idea to recover the files from it before moving forward with the formatting process.
Follow these steps to format the hard drive on your Mac:
- Connect the hard drive to your computer.
- Launch the Disk Utility app (to get to Disk Utility on your Mac, go to Launchpad and type in Disk Utility in the search field at the top).
- Choose the corrupted drive from the list of available devices on the sidebar on the left.
- Click the Erase button.
- Enter a name for your hard drive, choose the needed file format, and select the scheme.
- Click Erase to confirm and wait for the process to finish.
FAQ
- Connect the hard drive to your computer.
- Launch Disk Utility on your Mac.
- Select the connected drive from the list of devices on the left side.
- Click the First Aid button at the top.
- Click Run and wait for the process to finish.
- Physical damage
- Buggy firmware
- Power issues
- Malware strains
- Mechanical failure
- Open the Terminal app on your computer (go to Finder > Applications and double-click the Terminal icon to open it).
- Copy-paste the following command and hit Return: cd /Volumes
- Type in ls and also hit Return to view the list of all connected drives.
- Copy-paste the following command and hit Return: diskutil verifyVolume (type in your drive identifier)
- If you get the error message, copy-paste the following command and hit Return: diskutil repairVolume /Volumes/(your drive identifier)/


