 If you’ve spent hours searching for a certain screenshot on your Mac and still without any results, don’t give up just yet. It’s possible that you weren’t looking in the right places. Or maybe you can’t find the file because you’ve accidentally deleted it from your computer?
So whether you need to recover screenshots on a Mac or find a lost screenshot, this article has you covered.
Table of Contents
Where Are Screenshots Stored on Mac?
When you take a screenshot, your Mac saves it under a name similar to the following: Screenshot 2022-05-10 at 19.11.43. So every screenshot will be labeled with the exact date and time it was made.
By default, your Mac will save the screenshots to your desktop. But if you want your computer to save them elsewhere, you can easily change the setting. It’s possible to choose any folder on your Mac as the destination for your screenshots.
Here’s how to change the default location for screenshots on your Mac:
- Launch the Screenshot app (open Launchpad on your Mac and type Screenshot in the search field at the top of the screen or press Command + Shift +5).
- Click Options for a menu to appear.
- Under Save to choose any of the locations or click Other Location if the needed folder is not listed there (then open the folder that you wish to use as the destination for your screenshots and click Choose to confirm).
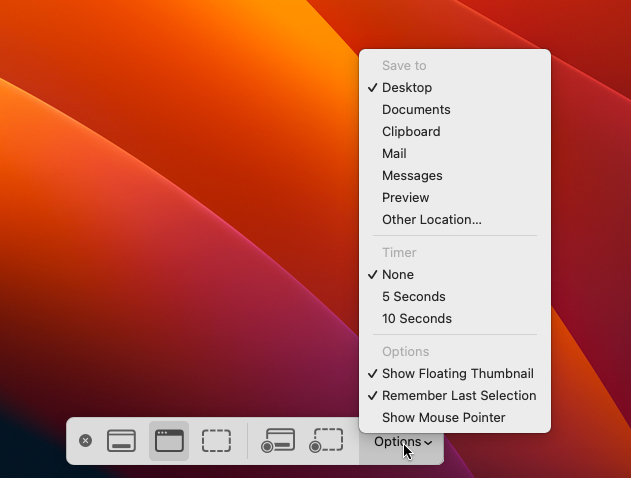
Now all of the screenshots that you take will automatically get saved to the new location.
How to Find Screenshots on a Mac
Can’t find the screenshots on your Mac? It’s okay, sometimes locating a screenshot on a Mac can be pretty frustrating. But luckily, there are a few ways to make this process much more manageable.
For best results, try all of the solutions described below since even if you think that the screenshots disappeared on your Mac, they might actually still be hidden somewhere.
Option 1:Recents Folder
If not much time has passed since you’ve taken a screenshot on your Mac, the easiest way to find it would be in the Recents folder.
Here’s how to open the folder and locate your screenshot:
- Launch Finder (click the first icon on your Launchpad).
- Choose Recent from the sidebar on the left.
- Look through the files located under Images.
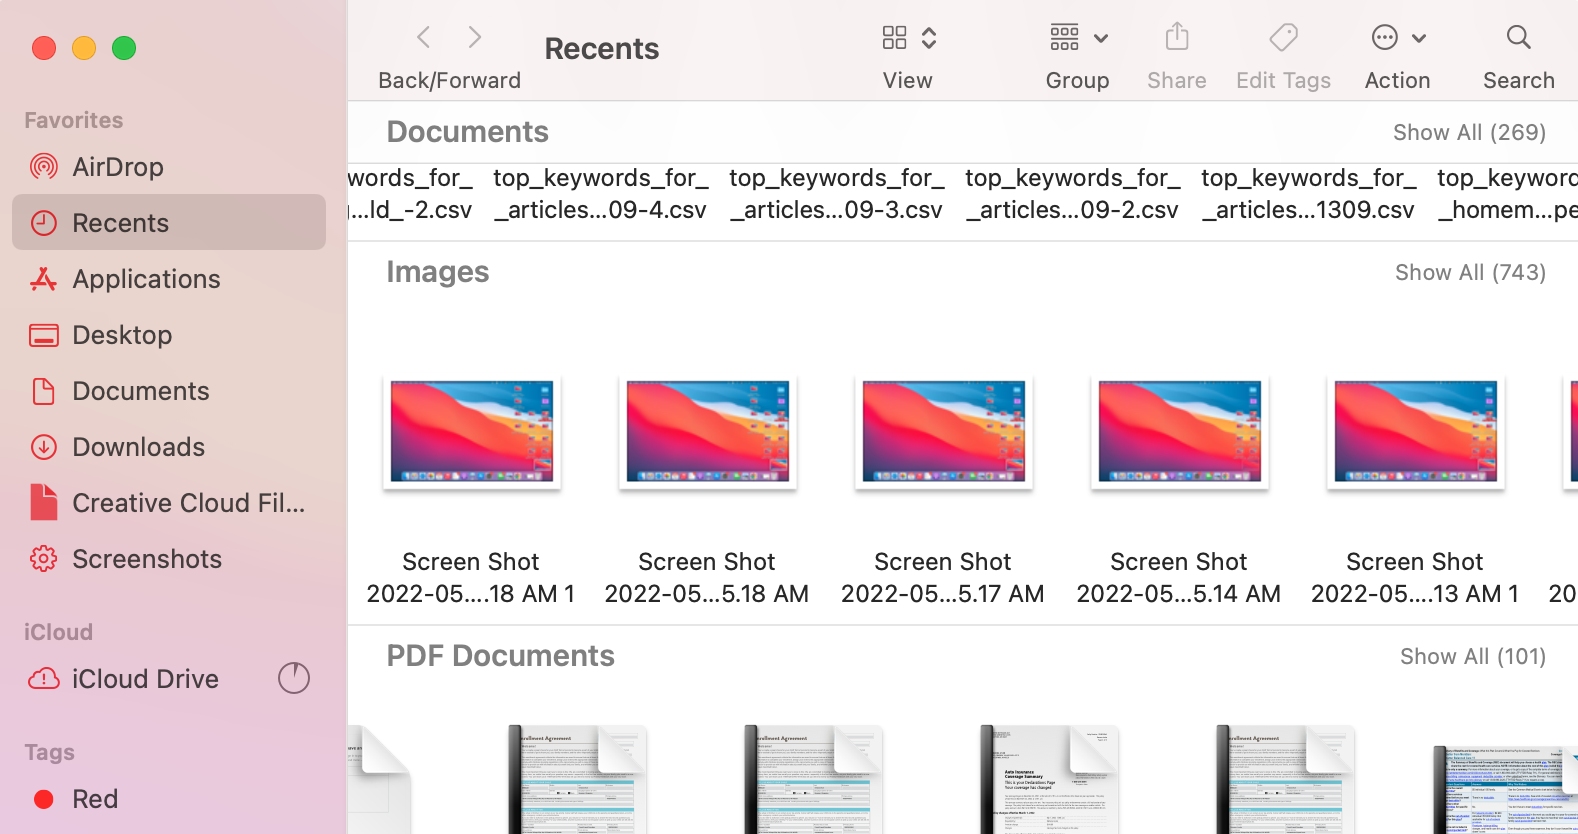
- If you’ve found the needed screenshot, simply drag and drop it into any other folder.
Option 2:Finder Search Bar
If you want to view all of the screenshots located on your Mac, then all you need to do is to open Finder and use a specific screenshot search tag.
Here’s how to find screenshots on a Mac with Finder:
- Launch Finder (click the first icon on your Launchpad).
- Click the magnifying glass icon on the top right for a search field to appear.
- Copy-paste this search tag into the field
kMDItemIsScreenCapture:1and hit Return (click Save under the search field to create a smart folder and add it to the Finder’s sidebar for easy access).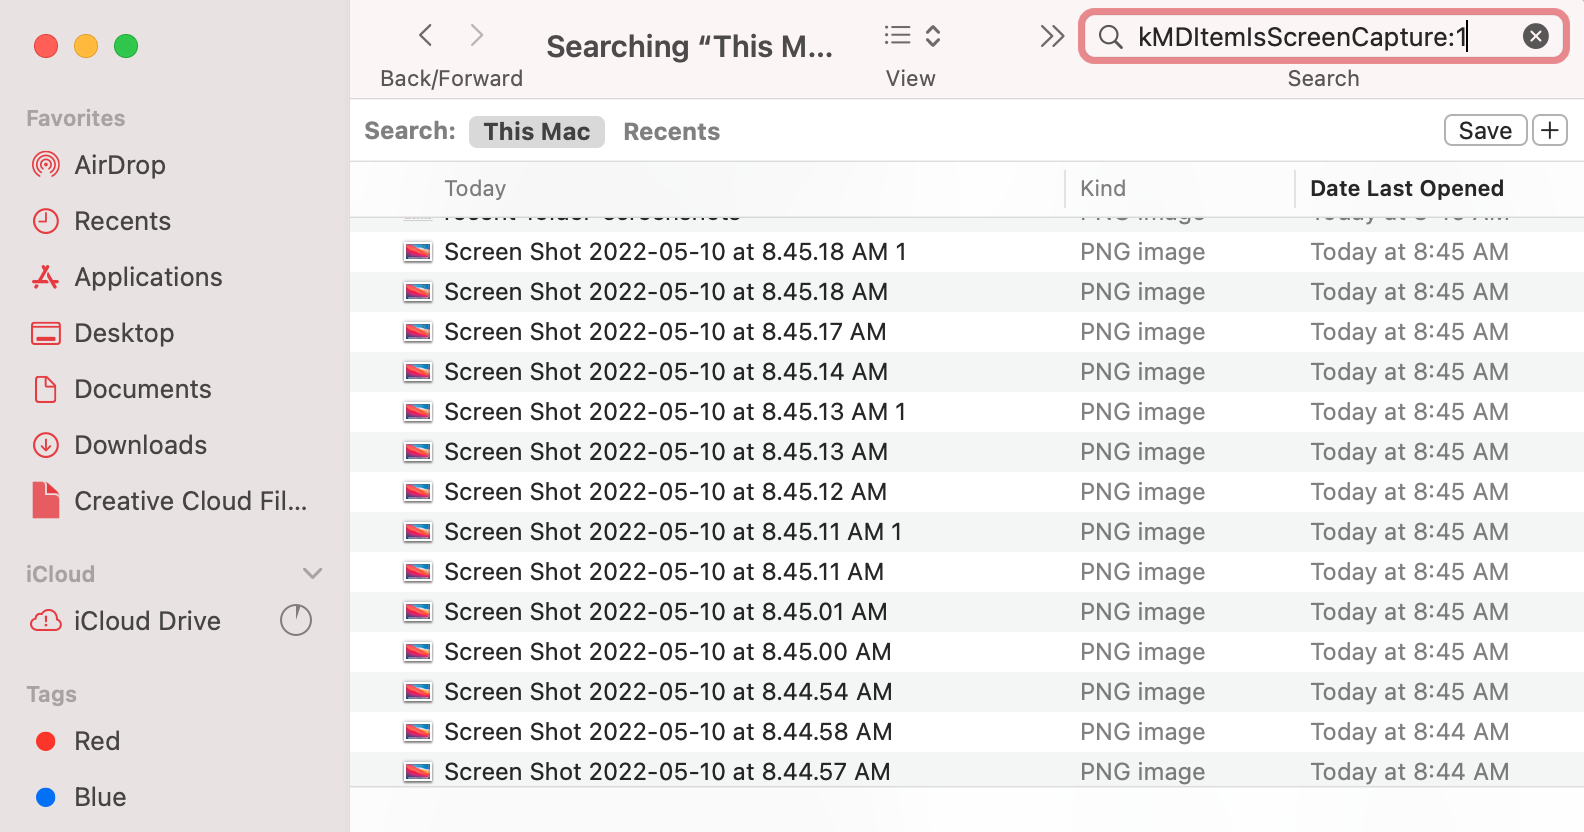
If you know the exact name of the screenshot you’ve been looking for, then simply type it into the search field in Finder.
Option 3:Terminal Commands
Using the Terminal app is another option that you can try to find your screenshots. But there is one huge downside to this method: you’ll be able to view only the paths to your screenshots. It’s impossible to actually see the screenshots on a Mac via Terminal since it’s a command-line application.
Here’s how to use Terminal to access your screenshots:
- Launch the Terminal app (open Launchpad and click Terminal to open it).
- Copy-paste the following command
mdfind kMDItemIsScreenCapture:1and hit Return.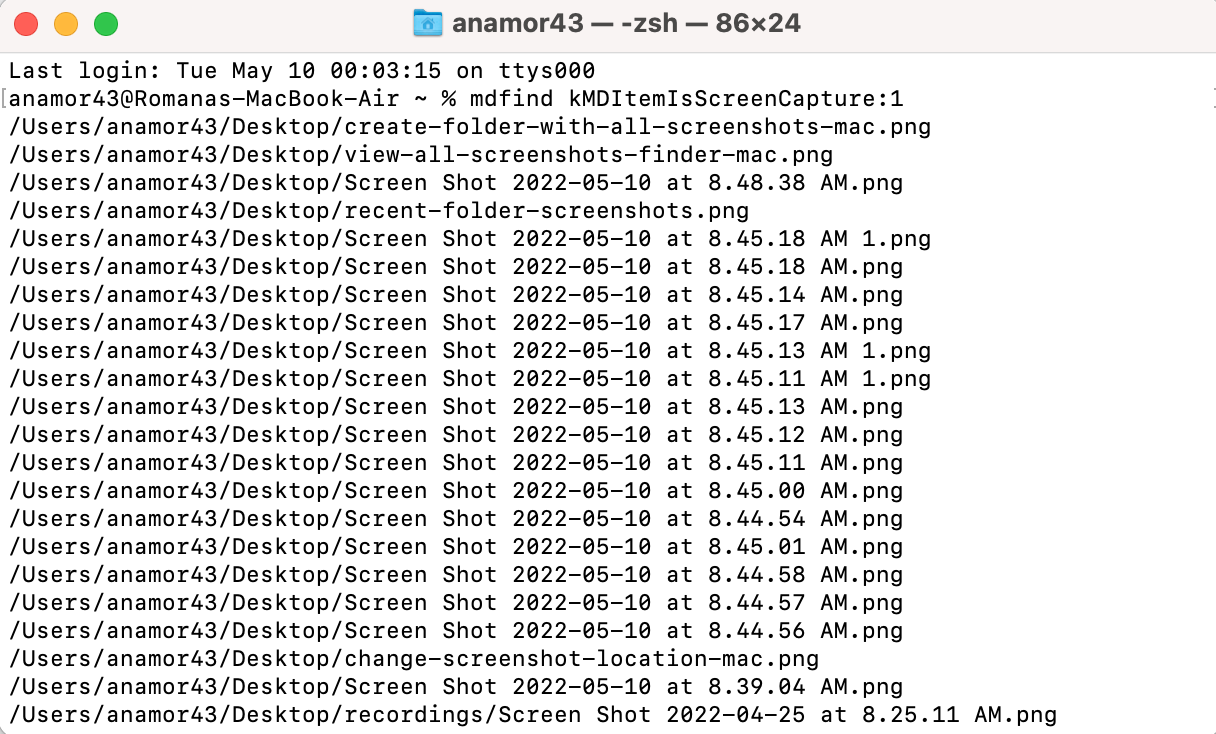
- You’ll see a list with paths to all of the screenshots located on your Mac. To view screenshots on a Mac, copy its path. Then go to Finder > Go > Go to Folder, paste the path in the search field, and click Go.
Option 4:Spotlight Search
Another way to search for screenshots on a Mac is with the help of Spotlight. So if you’re one of those people who are more comfortable using this tool compared to Finder, follow these steps to access the screenshots on a Mac:
- Launch Spotlight (either click the magnifying glass icon in the menu bar or press Command + Spacebar).
- Copy-paste this
kMDItemIsScreenCapture:1into the search field and hit Return.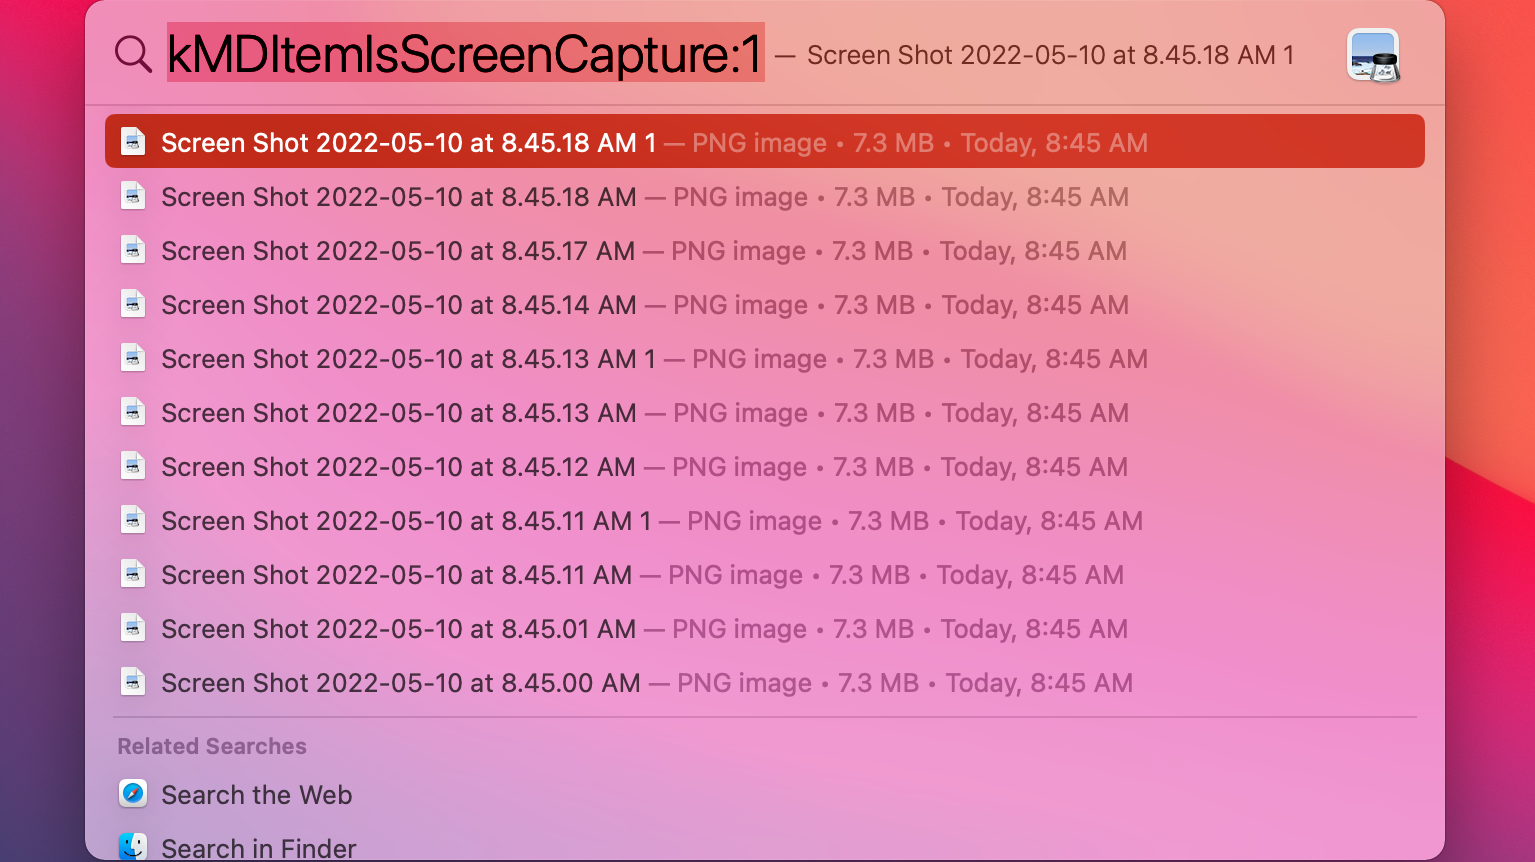
- Click a file to preview it or double-click it to open.
- If you want to see where exactly a specific screenshot is located, then click it and press Command + Return.
How to Recover Deleted Screenshots on Mac
These are the best data recovery methods for restoring a deleted screenshot on a Mac. All you need to do is choose a suitable one depending on your situation and follow the step-by-step instructions.
Method 1:Restore From Trash
Let’s start with the easiest data recovery method — checking the Trash folder. When you delete a file, it gets instantly moved to Trash on your Mac, so as soon as you notice that you’ve mistakenly deleted the wrong screenshot, the first place where you should look is there.
If you haven’t emptied Trash after deleting the screenshot, then you can simply undelete it either by dragging it out of Trash into any other folder or by using the Put Back feature.
Important: If you’ve set Trash to automatically empty files after 30 days, and that’s approximately how much time has passed since you deleted the screenshot, then try the next data recovery method.
Here’s how to restore deleted screenshots via Trash on Mac:
- Open Trash on your Mac (click the Trash icon on the Dock).
- Look through the deleted files to find the needed one.
- Once you’ve found the screenshot, either drag and drop it into a different folder or right-click it and choose Put Back from the drop-down menu.
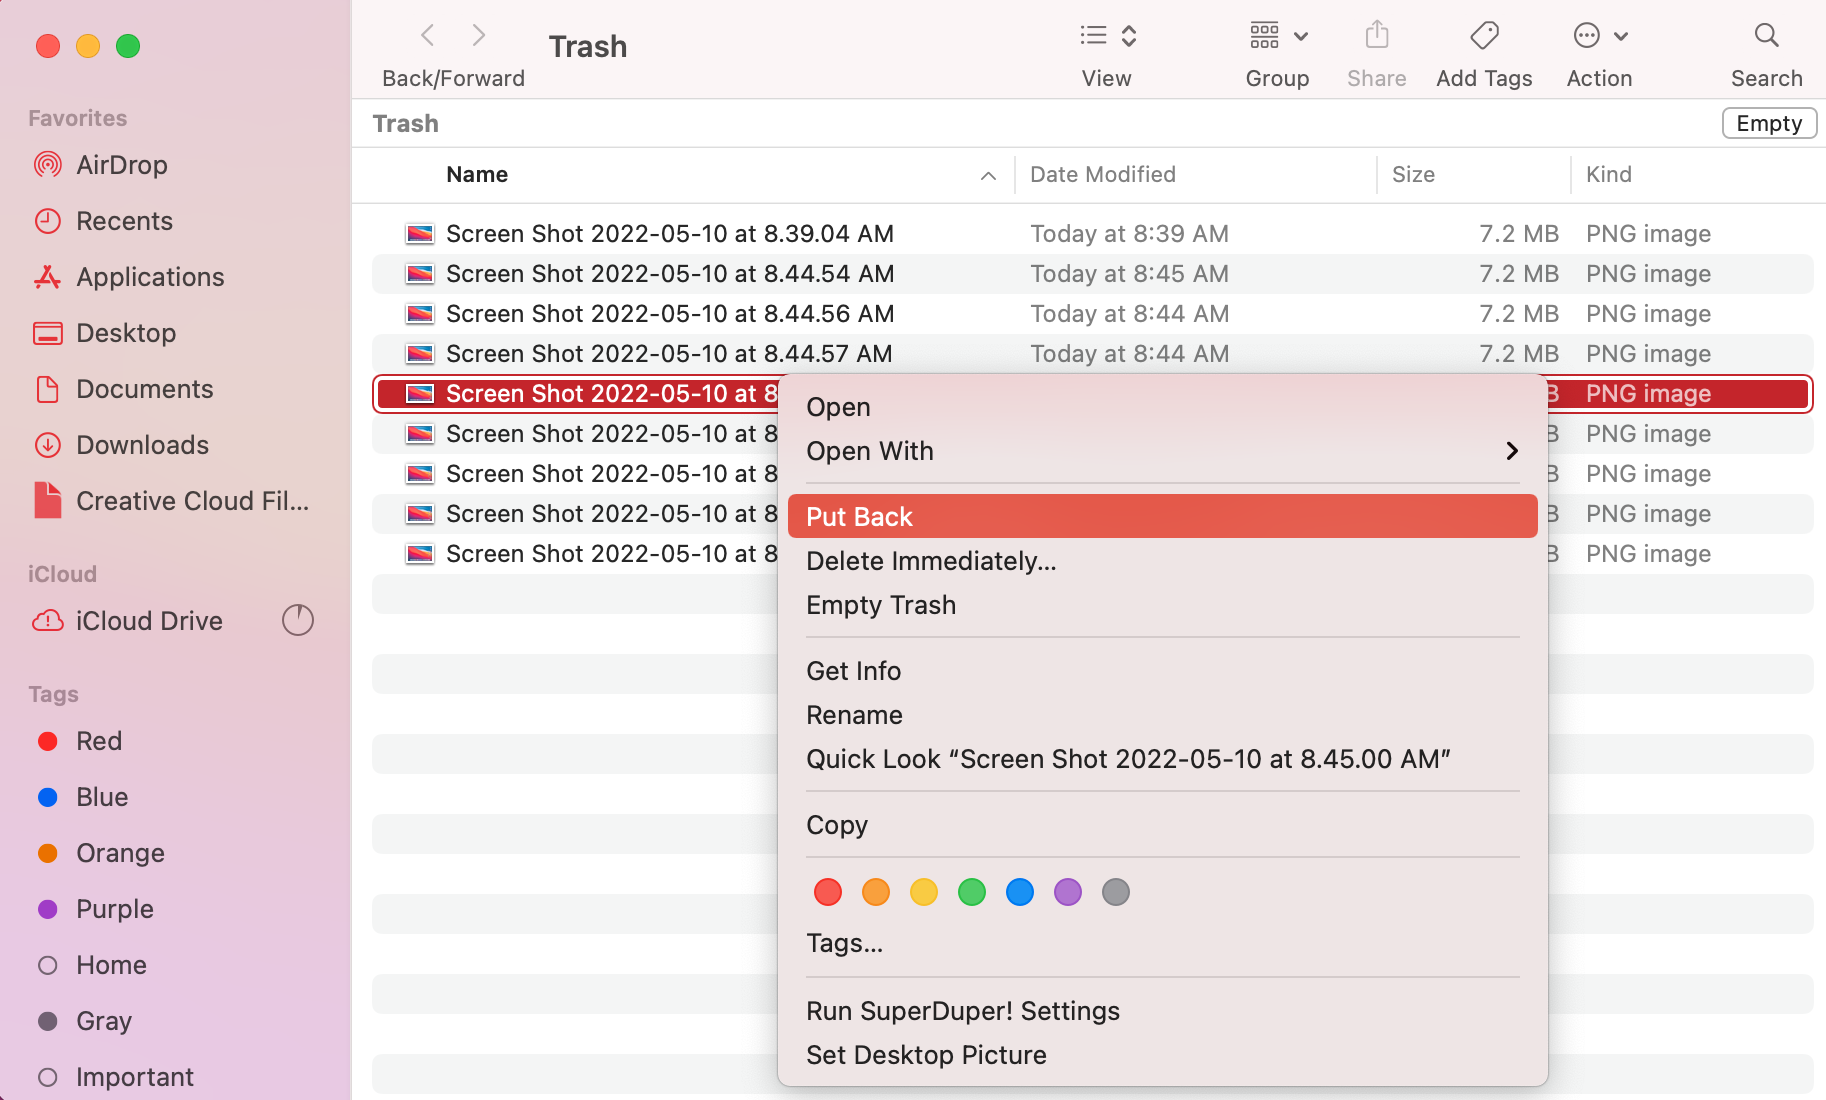
If you choose to recover the screenshot with the Put Back feature, the file will be returned to the location where it used to be stored before deletion.
Method 2:Use Data Recovery Software
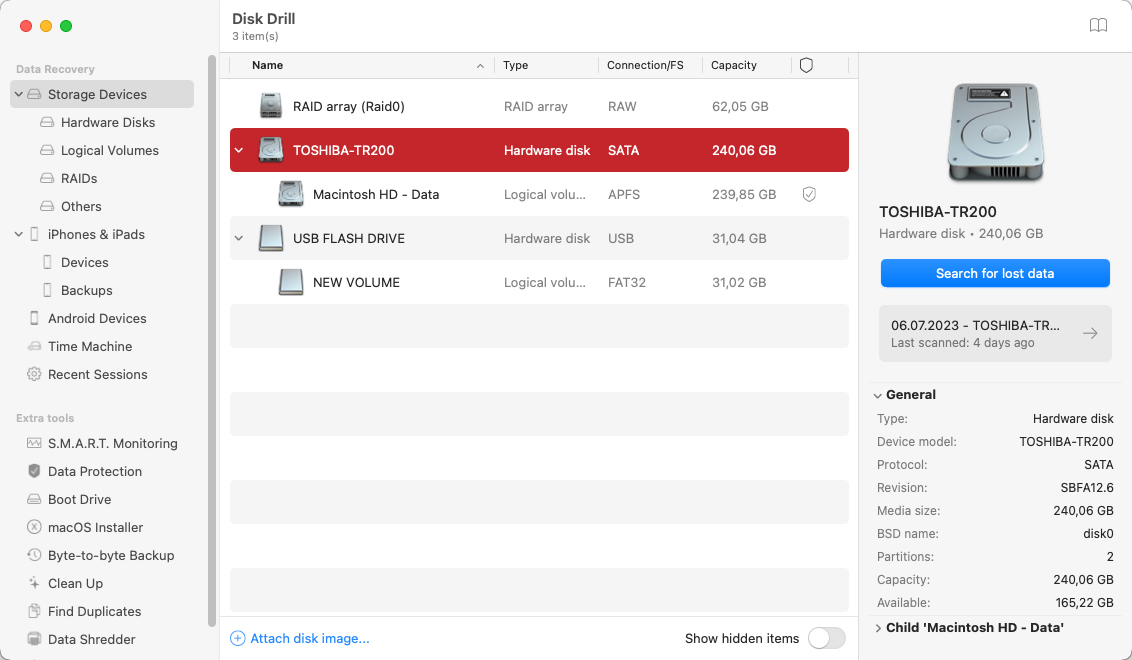
Another effective method that can help you to restore a deleted screenshot on a Mac is to use a data recovery tool like Disk Drill. This application has a user-friendly interface and is very easy to navigate, which makes it a perfect option for those who don’t have much tech experience.
Important: To increase your chances in successful data recovery, it’s essential to stop using your Mac as soon as you notice that you’ve deleted the wrong screenshot. This should keep your computer from overwriting data.
There are numerous benefits of using Disk Drill: it’s fast, can recover various file types, and is compatible with both macOS and Windows-based computers. Also, it has both a free and a paid version, which is great since you’ll have the chance to try it first before purchasing.
Here’s how to recover deleted screenshots on Mac using Disk Drill:
- Download the Disk Drill app and follow the onscreen instructions to install it.
- Choose the Storage devices tab on the sidebar and then click the drive which used to contain the deleted screenshot.
- Initiate a scan by clicking the Search for lost data button.
- Click Review found items to view all of the scanned files.
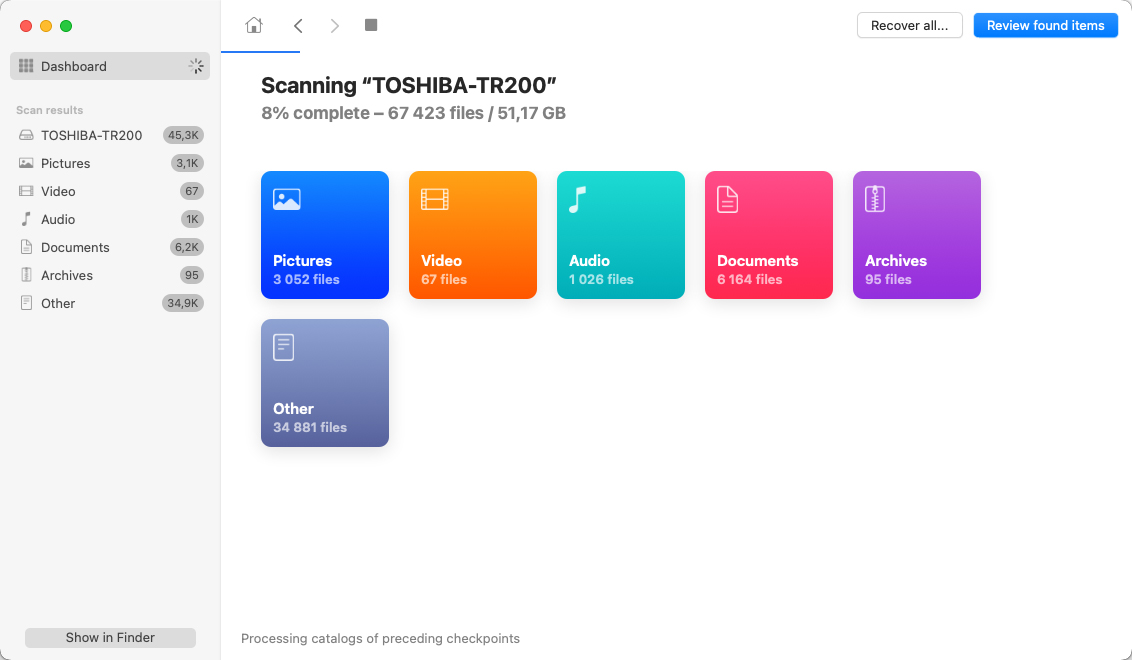
- Choose Pictures from the sidebar to narrow down your search, or use the search field on the top right of the screen to type in the name of your screenshot.
- Click the eye icon near any file to preview it.
- Once you’ve found the needed screenshot, choose it and click the Recover button.
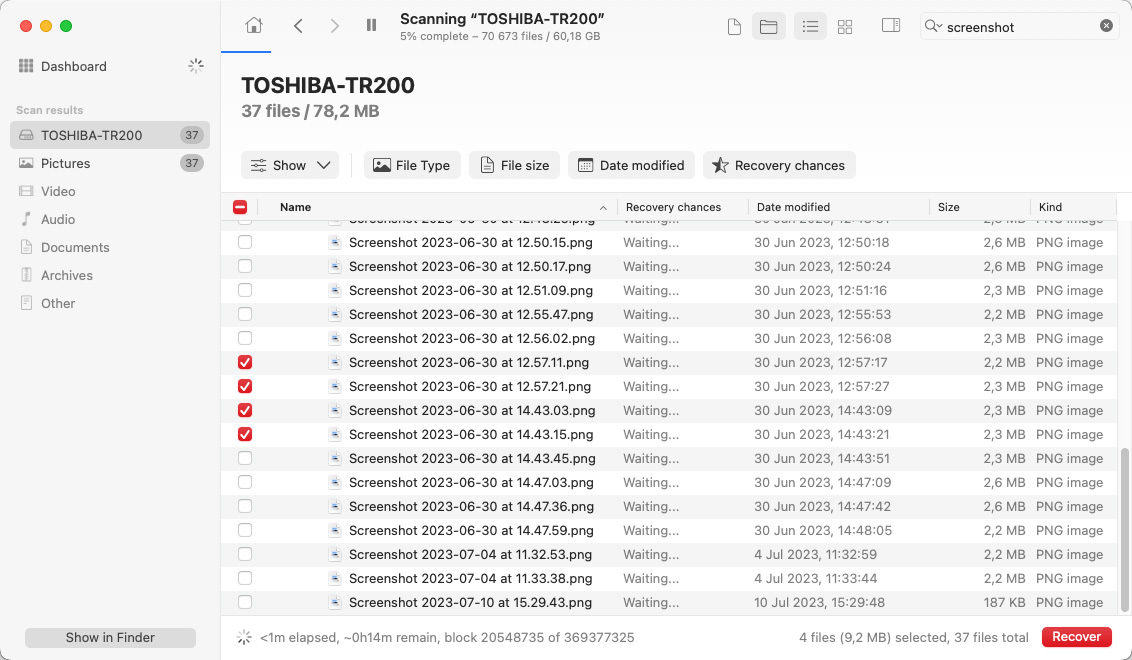
- Select the destination folder for your file and click Next to confirm.
Now all you need to do to access the file is open the chosen folder.
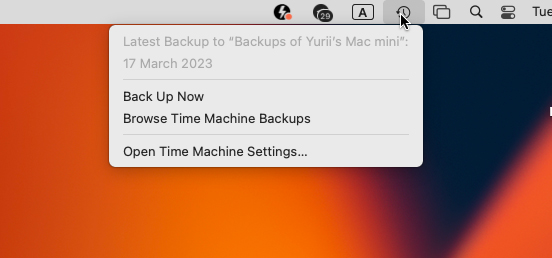
Method 3:Recover From a Time Machine Backup
You can use Time Machine to restore deleted photos, videos, Pages documents, Excel spreadsheets, etc. So it’s only natural that you can also use your Time Machine backups to recover a missing screenshot.
Note: If you’ve been regularly backing up your Mac with Time Machine, you should be able to restore the deleted screenshot from one of those backup versions. But if the application didn’t back up your computer before you permanently deleted the needed file, this method won’t bring any results.
Time Machine is especially helpful in cases when you need to recover old deleted screenshots on a Mac. Here’s what you should do to restore a screenshot using Time Machine:
- Connect the external drive containing your Time Machine backups to your Mac. If you used an internal drive for the backups, then skip this step.
- Click the Time Machine icon on the menu at the top of the screen and choose Enter Time Machine from the drop-down menu.
- Choose a backup version using the timeline on the right.
- Go to the folder where the deleted screenshot used to be located.
- Click the needed file to choose it and click Restore.
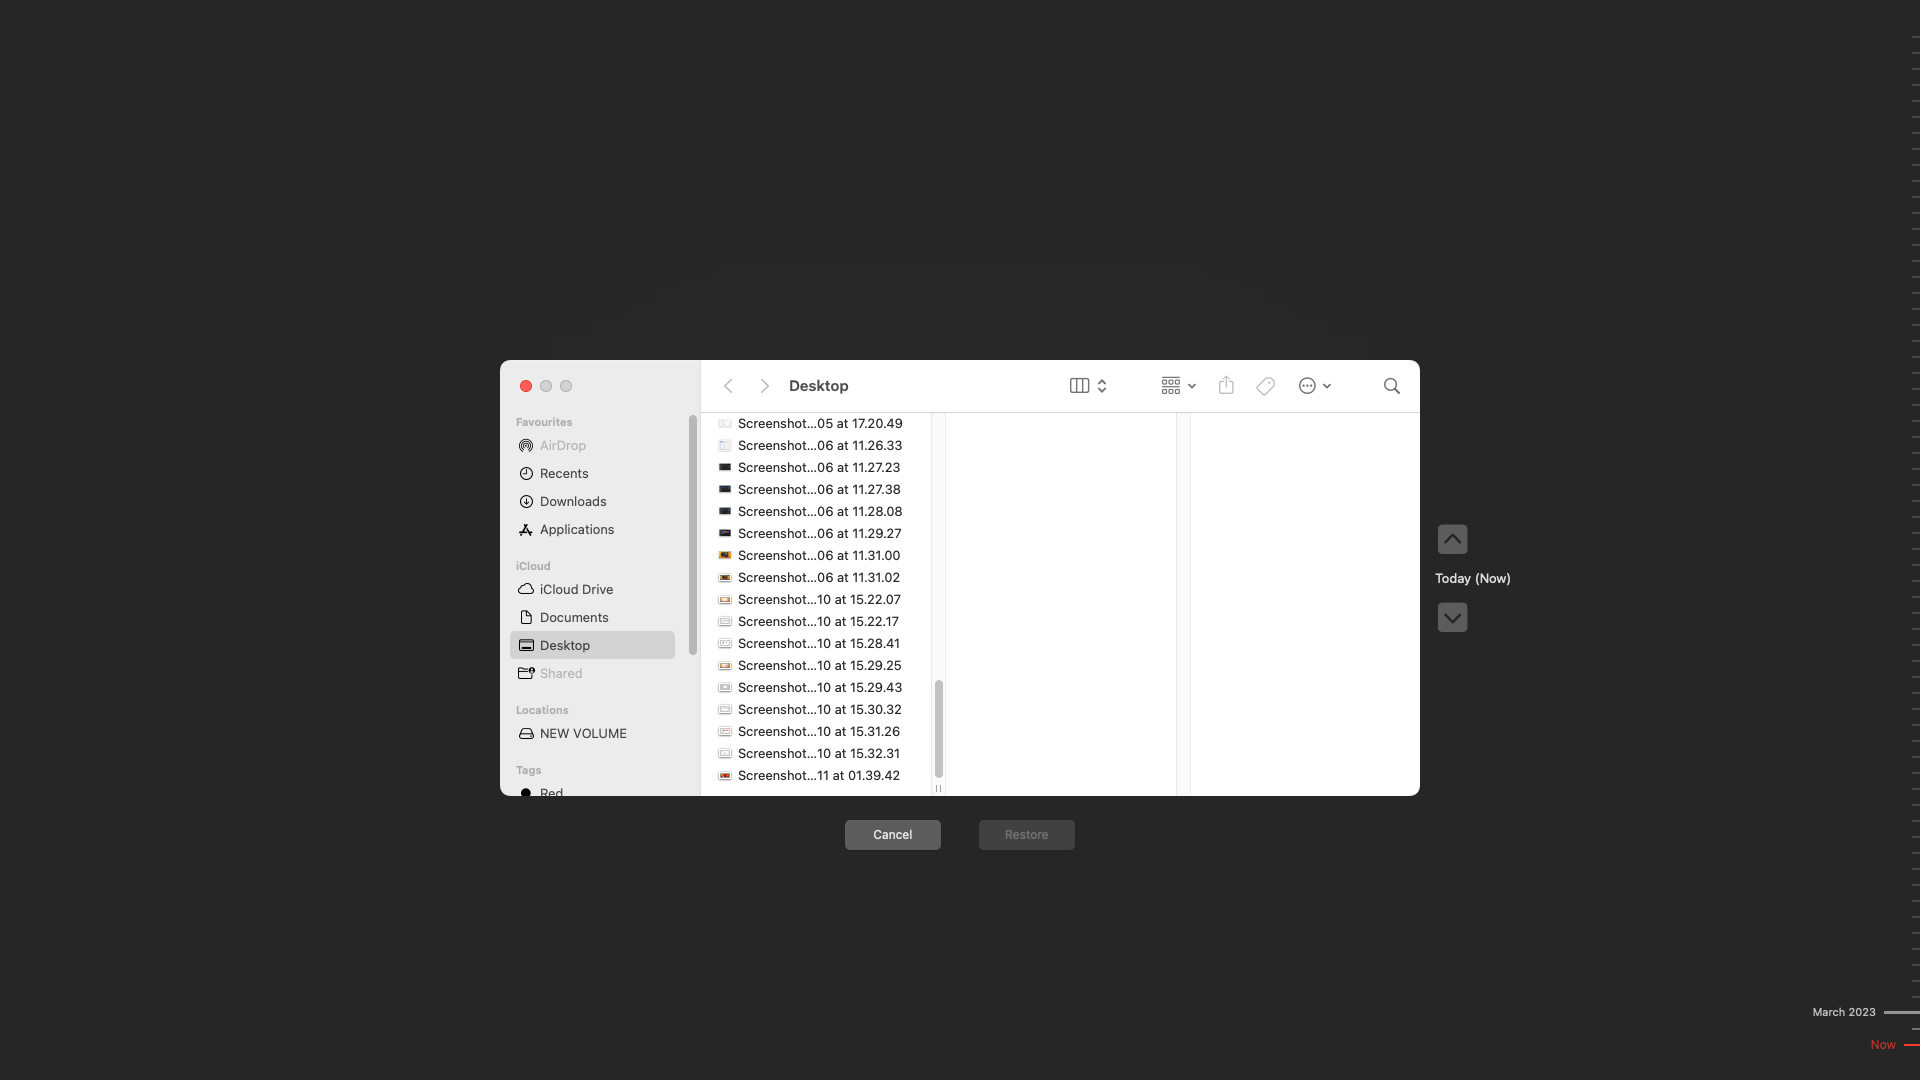
That’s it! The recovered screenshot should be placed back in its previous location.
Method 4:Recover Deleted Screenshots from iCloud
Depending on how your Mac’s sync settings were configured, you can recover deleted screenshots using your iCloud drive. This method will only work if you’ve enabled iCloud sync on your Desktop folder.
Here’s how to get back deleted screenshots using iCloud:
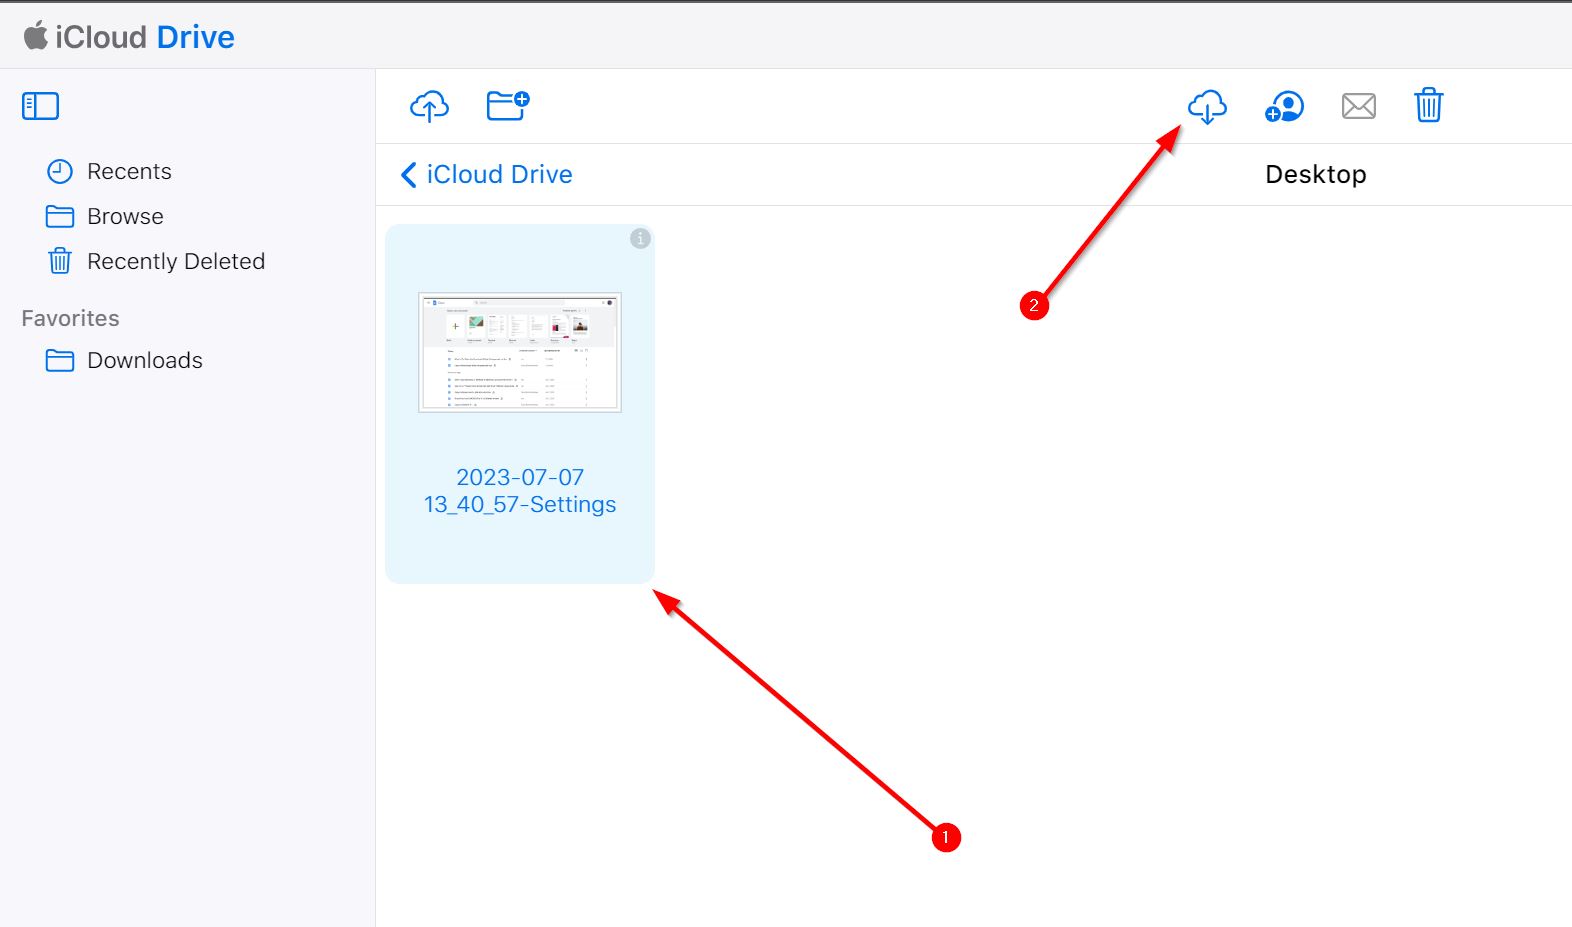
- Open a web browser and visit iCloud.com. Log in.
- Click on Drive to open iCloud Drive.
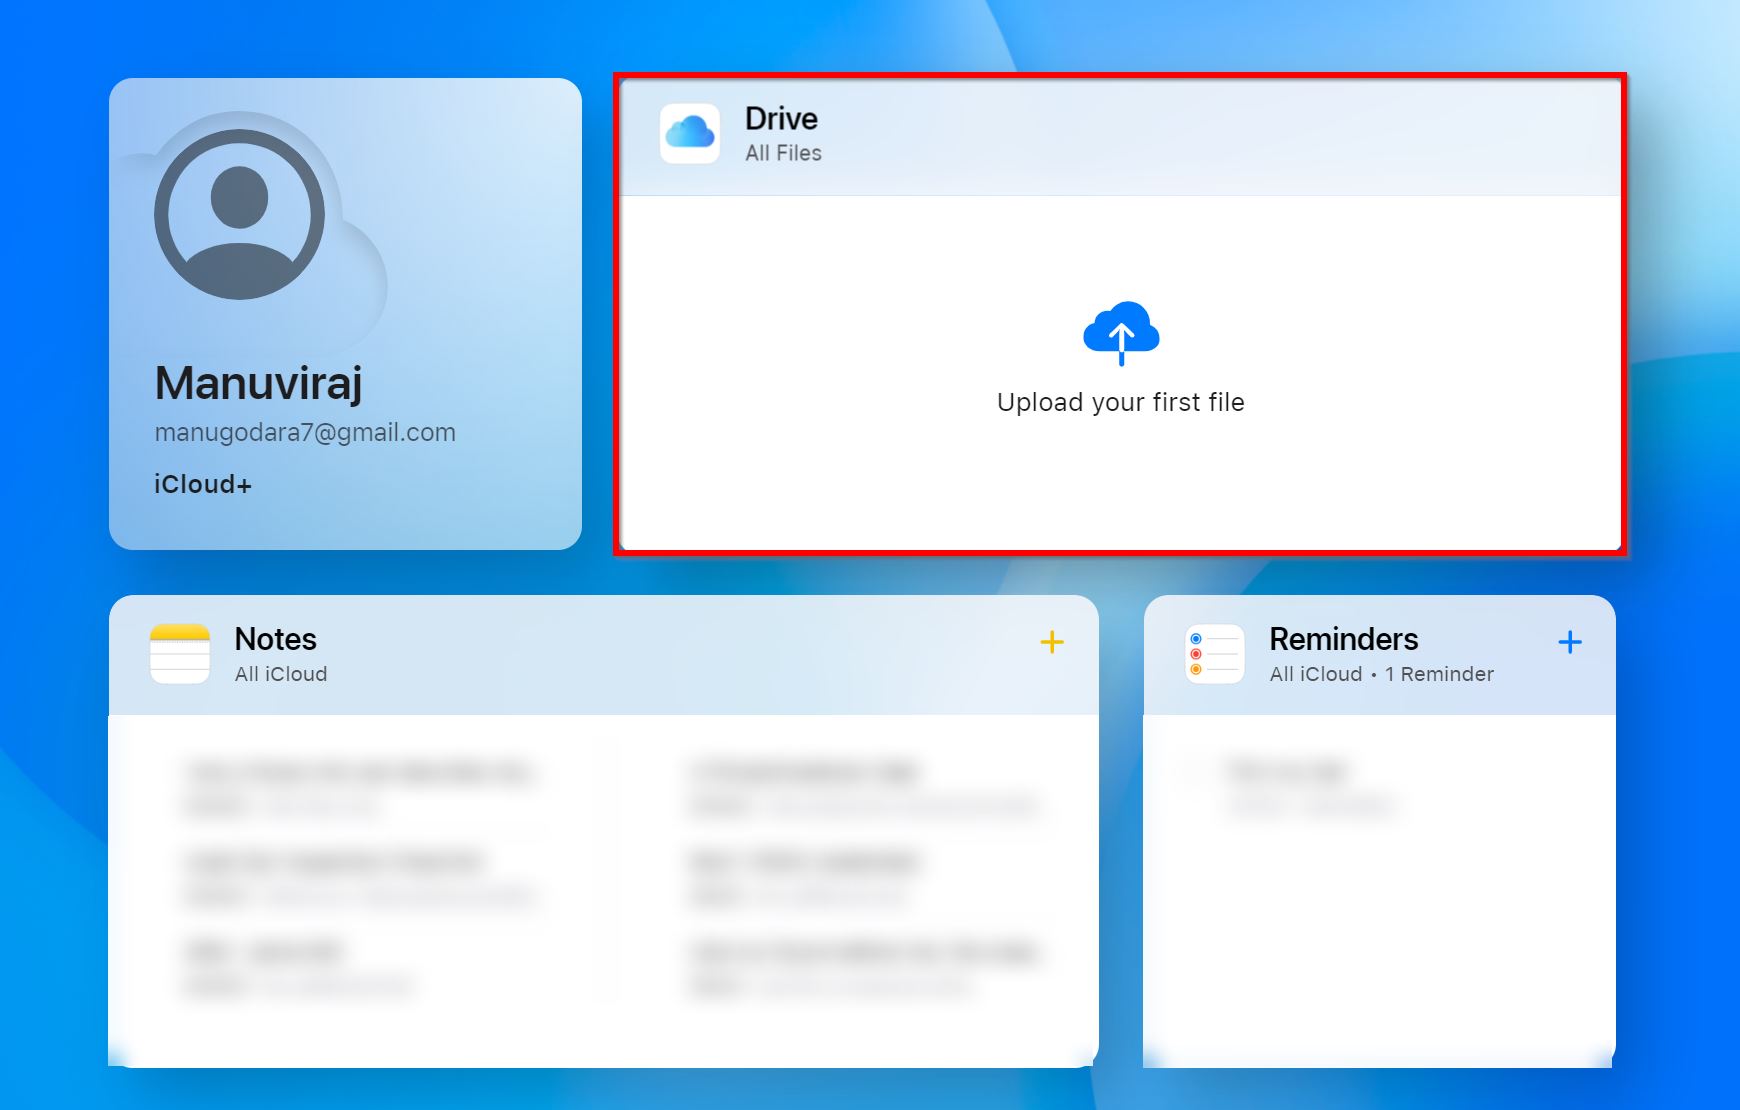
- Click on Browse and open the Desktop folder, which is the default save location for screenshots.
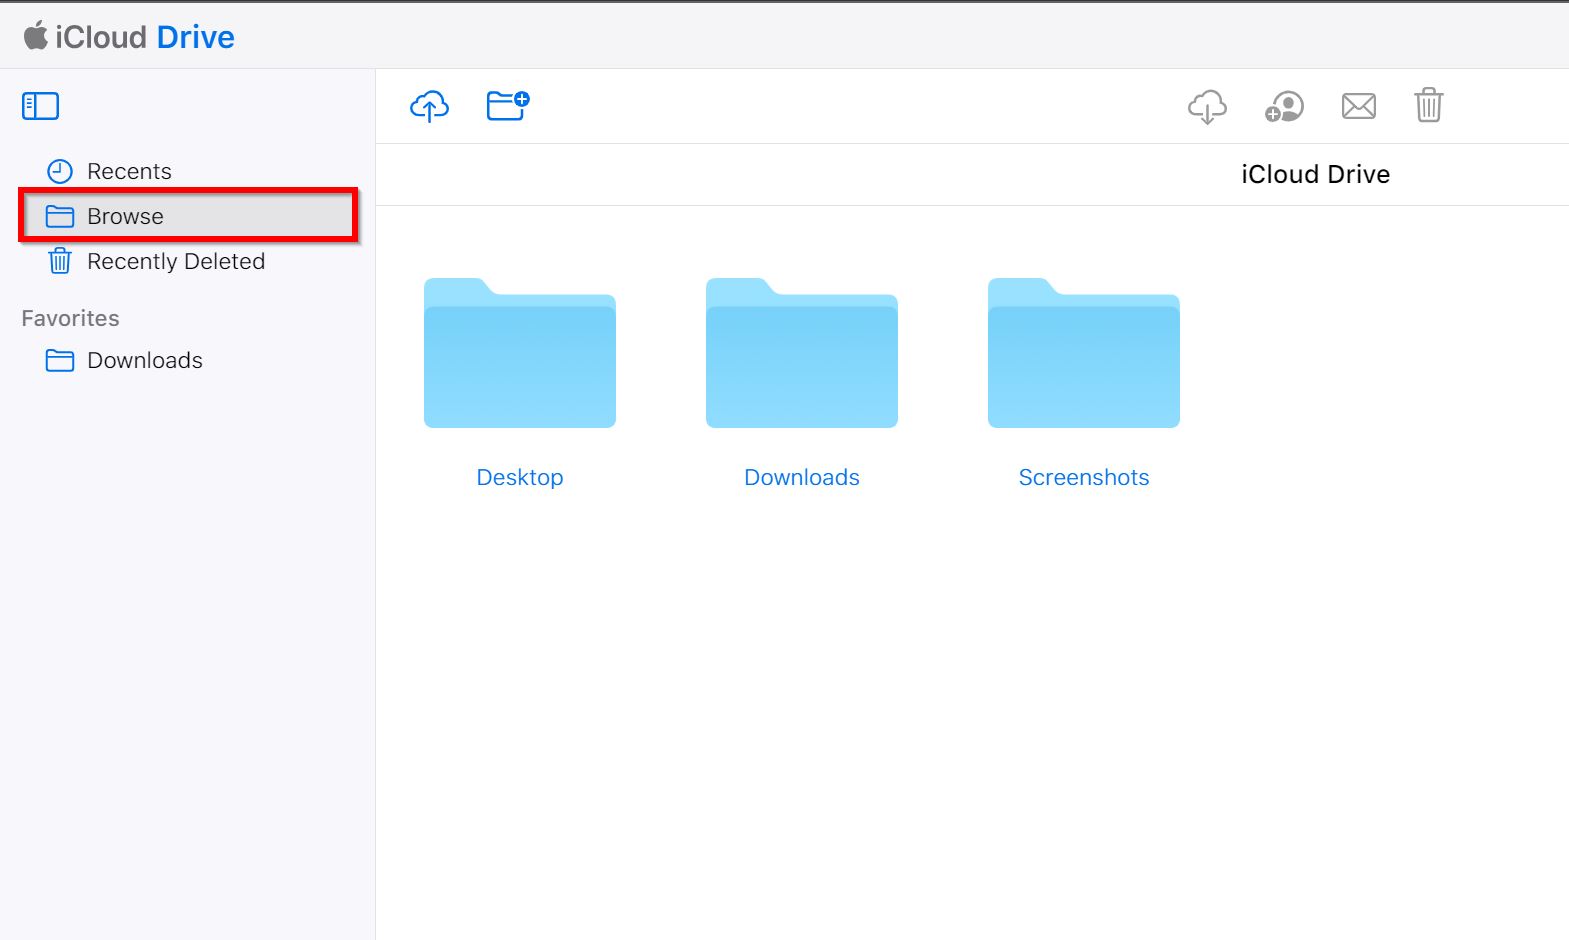
- Select the screenshots you wish to recover and click on the Download button.
If you’re unable to locate your screenshots in the Browse tab, it’s recommended you check the Recently Deleted tab.
Why Screenshots May Disappear From Your Mac
There are several things that could lead to missing screenshots on your Mac. The most common reasons include:
| Reason | Description | Solution |
| Accidental deletion | In an attempt to clean out your Mac and organize your files, you may accidentally delete the screenshots you require. | If you deleted the screenshots less than 30 days ago, you can restore them from the Trash, provided you didn’t empty it. |
| Logical errors on your disk | If your Mac’s storage disk is not working as it should and is throwing up random errors, there could be logical issues on the drive. Data loss is also a symptom of a logically damaged drive. | Use the First Aid feature on your Mac’s Disk Utility to fix any errors on the drive. You can then attempt to restore the screenshots using a data recovery program. |
| Formatting the wrong disk | In an attempt to get a fresh start on your macOS, you may format the wrong disk, or forget to back up your screenshots beforehand. | As long as you didn’t pick the “Secure Erase” option while formatting, and you didn’t write a lot of new data to the disk, a capable data recovery program should be able to recover your screenshots. |
| Physical damage of the drive | Factors such as physical shock, water, power surges, and heat can all cause damage to the storage drive. This impacts hard drives more since they have numerous moving parts. | Physically damaged drives are best dealt with by experts. We recommend you contact a professional data recovery service to recover data in this scenario. |
Regardless of what caused them to disappear, it’s always advisable to check your iCloud Drive’s Browse and Recently Deleted sections for your Mac’s missing screenshots.
FAQ
- Download Disk Drill and install it.
- Open Disk Drill, select your Mac’s drive, and click Search for lost data.
- Click on Review found items.
- Select the screenshots and click Recover.
- Choose a recovery destination and click Next.
- Press Command + Space to open Spotlight.
- Type kMDItemIsScreenCapture:1 in the search bar.
- All your screenshots will show up in Spotlight.


