 With the rise of solid-state drives and their performance advantages over traditional hard disk drives, there is little reason for the average consumer to be worried about making the switch. But, solid-state drives are not without their faults, and you may unfortunately encounter a problem where the drive stops appearing altogether.
This issue can strike any solid-state drive, whether it’s brand new or on its last legs. Thankfully, there are ways to fix it. Read on to learn what you should do if your SSD is not showing up.
Table of Contents
Why Isn’t My SSD Showing up on Windows?
There are many reasons why your SSD drive may not be showing up, and determining what is causing your problem can help find a solution. Here are the most common reasons why an SSD stops showing up.
| Issue | Description |
| 💥 Physical corruption | If your SSD stopped showing up after a physical incident, it could be physical corruption that’s preventing it from appearing. Typically, if the drive is no longer being read, the only way to recover from this is by using a professional data recovery service. |
| 🔻 Uninitialized drive | If the disk is not initialized, it will result in Windows not detecting the SSD. Initializing it prepares it with a partition table so you can create partitions and format them with file systems to store data. |
| 🔠 No drive letter | Windows assigns a drive letter to every connected storage device. Therefore, there’s a chance it won’t display the SSD if a drive letter isn’t assigned. |
| 🔧 Outdated or corrupted drivers | Drivers enable communication between your hardware and operating system. If your SSD is not appearing, it could be due to outdated or corrupted drivers that are no longer functional. |
| 🖥️ Incorrect BIOS settings | For recently connected drives, Windows may not find the new SSD on your PC because your BIOS doesn’t have the correct settings. For example, the SATA port you’re connecting to may not be enabled. |
| 🗄️ Incompatible file system | The file system you use is important. While your SSD may support Windows, macOS, and Linux file systems, your operating system doesn’t. For instance, a Sandisk SSD Plus formatted with APFS will not be readable by a Windows machine. |
Is It Possible to Recover Data From an SSD That Is Not Showing Up?
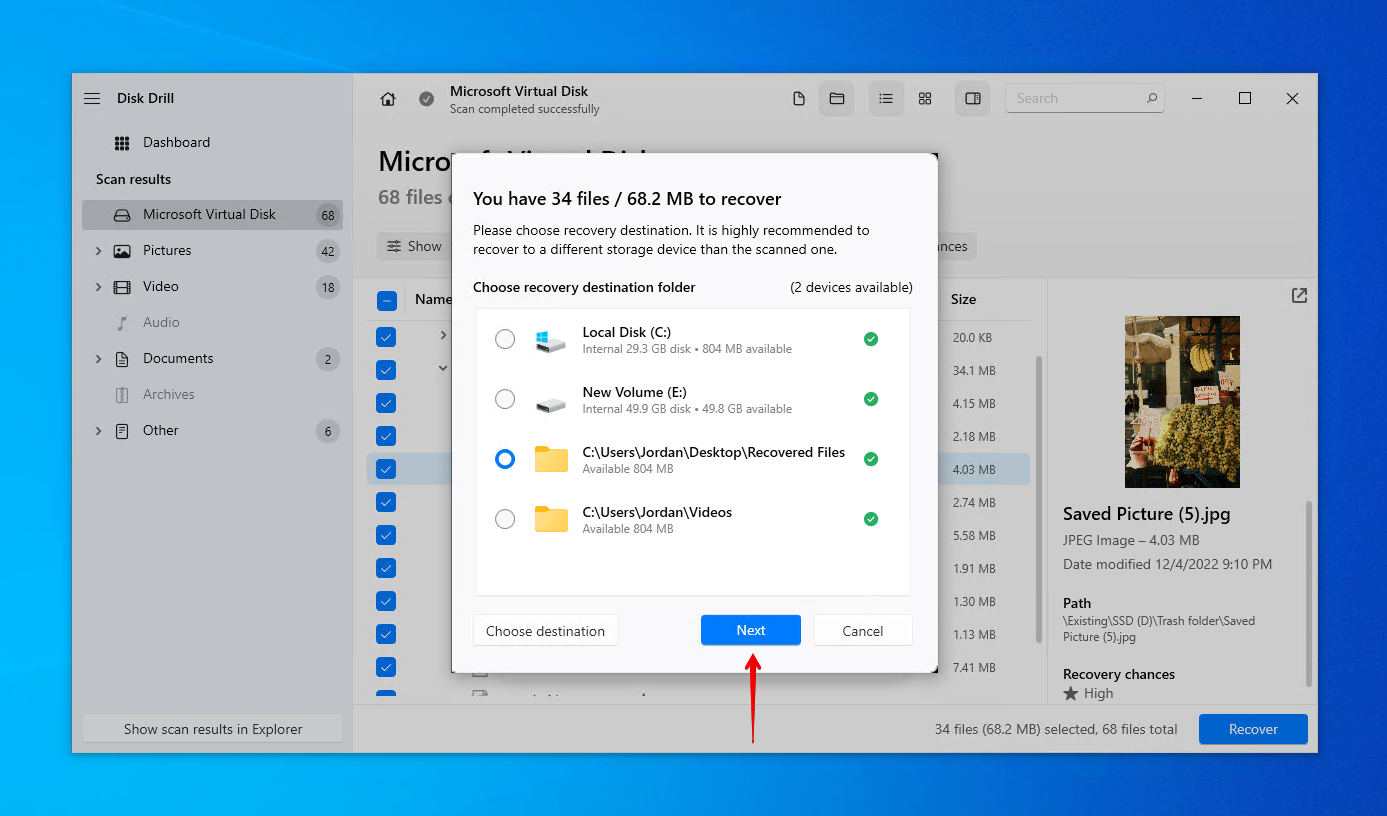
In some cases, it is possible to recover data if your PC is not recognizing the SSD. In order to do so, your SSD must be visible in Disk Management and showing the correct size. If these conditions are met, you can recover the data yourself with the help of Disk Drill Data Recovery, a tool that can quickly and easily restore your SSD data.
If your SSD has TRIM enabled, you must act quickly before TRIM has a chance to erase your data.
- Download and install Disk Drill to a healthy drive.
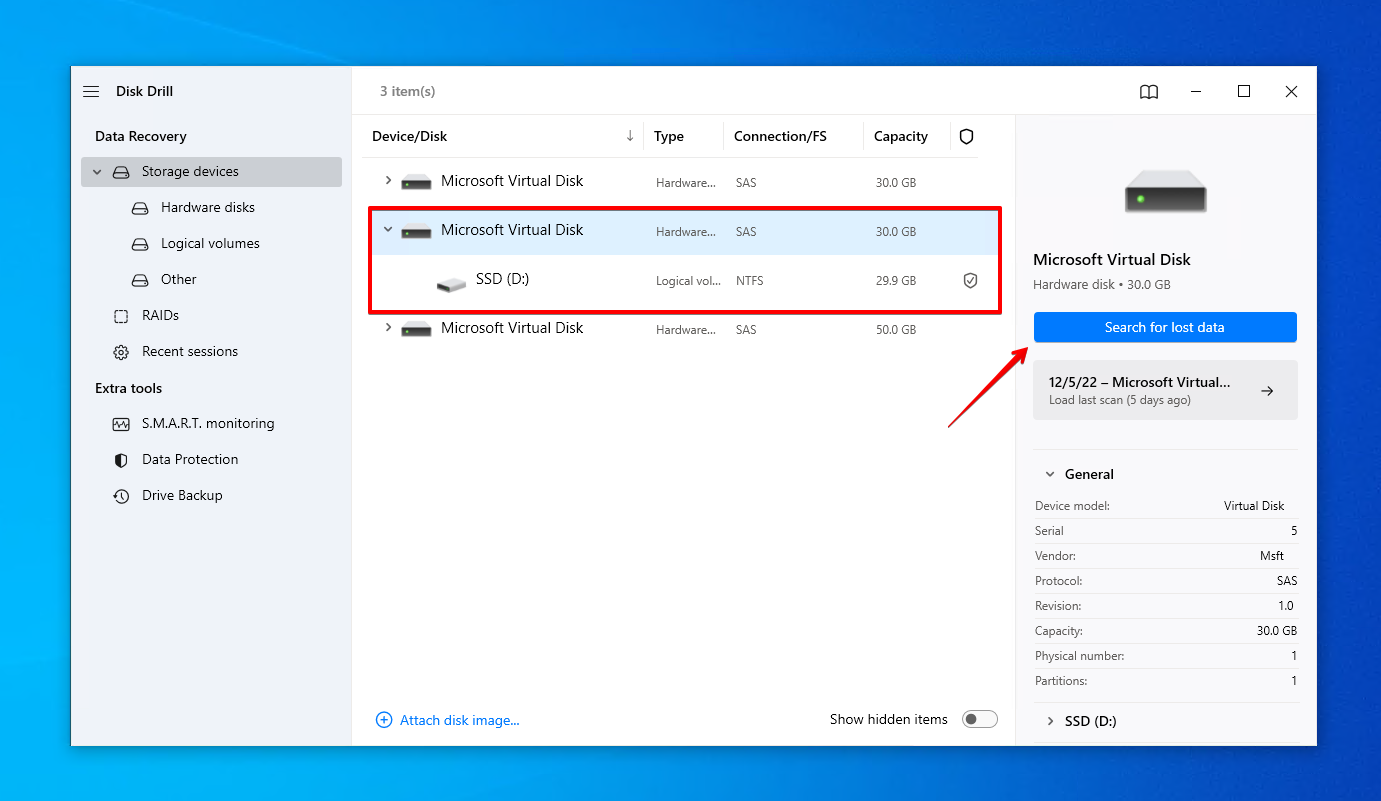
- Select your SSD and click Search for lost data.
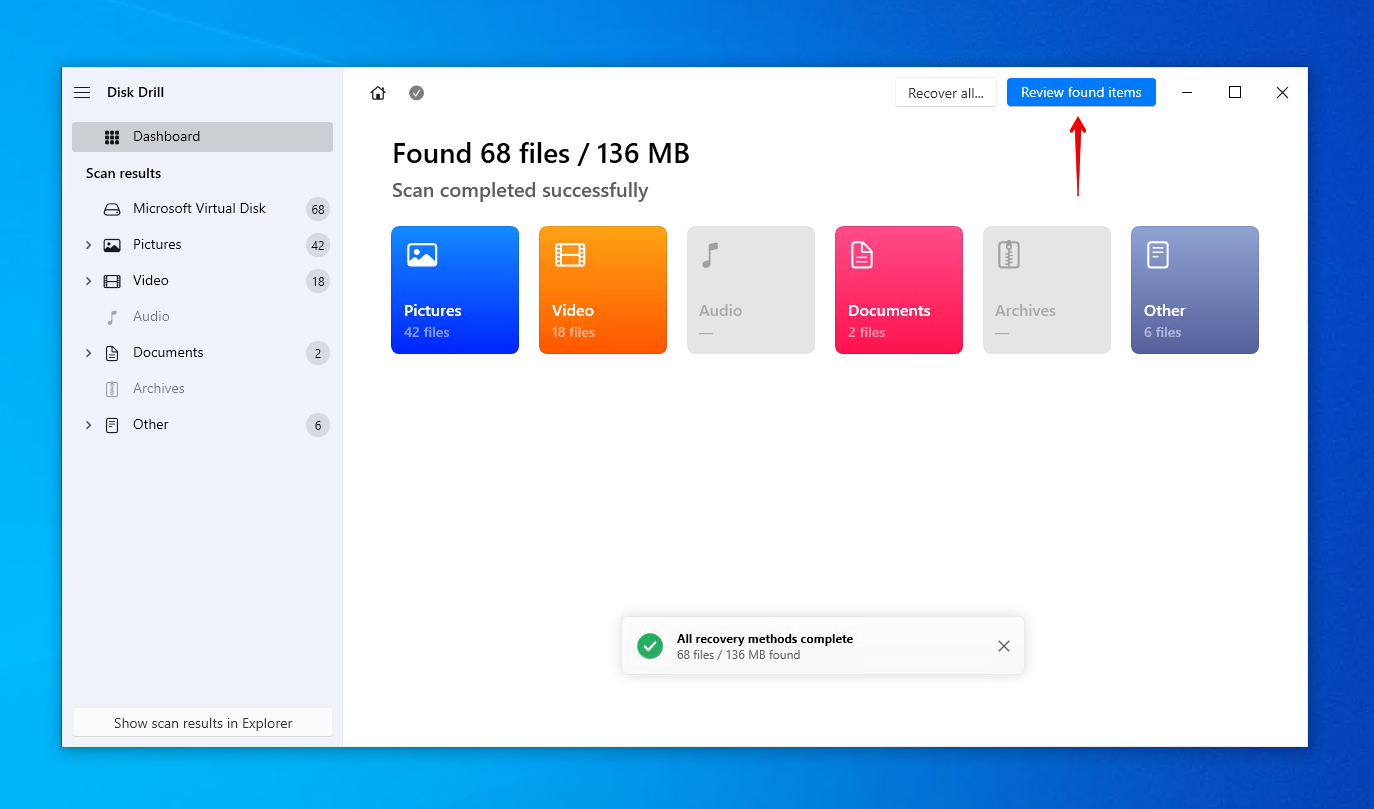
- Click Review found items. Or, click Recover all to restore everything Disk Drill found immediately.
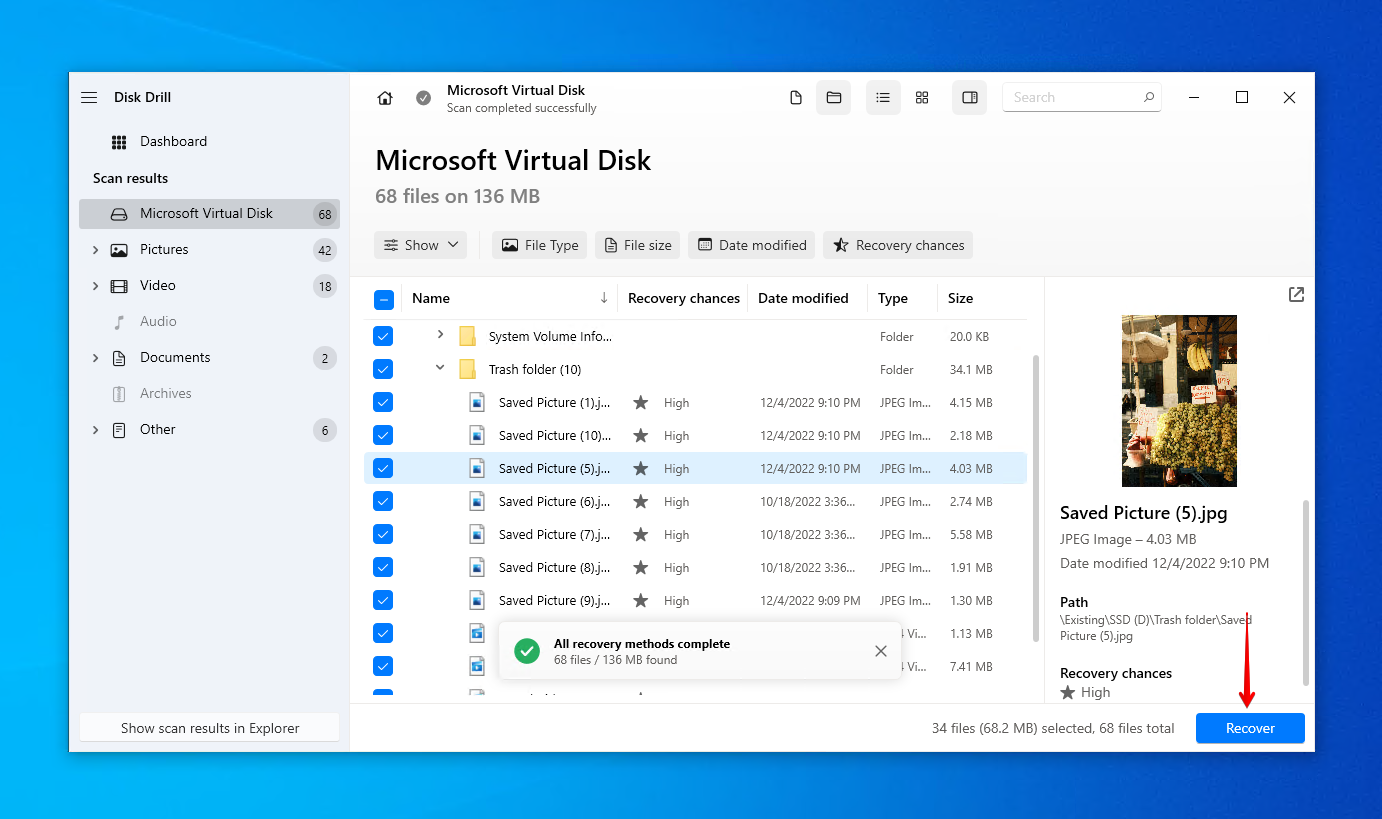
- Mark the files you want to recover from the SSD. Use the filter options to organize the results, and use the preview panel to see what you’re recovering. Click Recover when you’re ready to restore the files.
- Choose an appropriate recovery location and click Next to complete recovery with Disk Drill.
Disk Drill works with basically any brand, supporting SanDisk, Crucial, Western Digital, and Samsung SSD recovery, to name a few. Now that your data is recovered, let’s look at how to fix the SSD.
How to Fix an SSD Not Showing up in File Explorer
We’ve covered various methods you can use to restore functionality to your SSD. Be sure to go through each methodically to ensure nothing is missed.
Method 1:Initialize
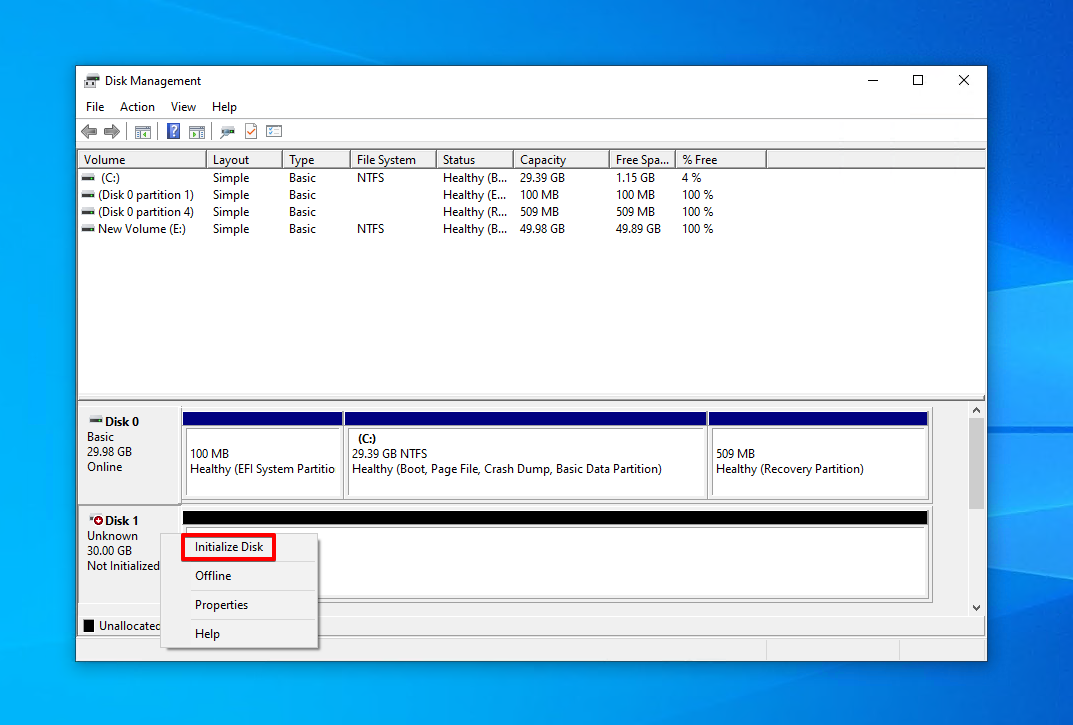
A common reason why your SSD is not showing up in Windows is that it hasn’t been initialized. This is often the case when trying to get Windows to recognize a new SSD. Before a disk can be partitioned and set up with a file system, it needs to be initialized so a partition table can be created. This is how you initialize an SSD.
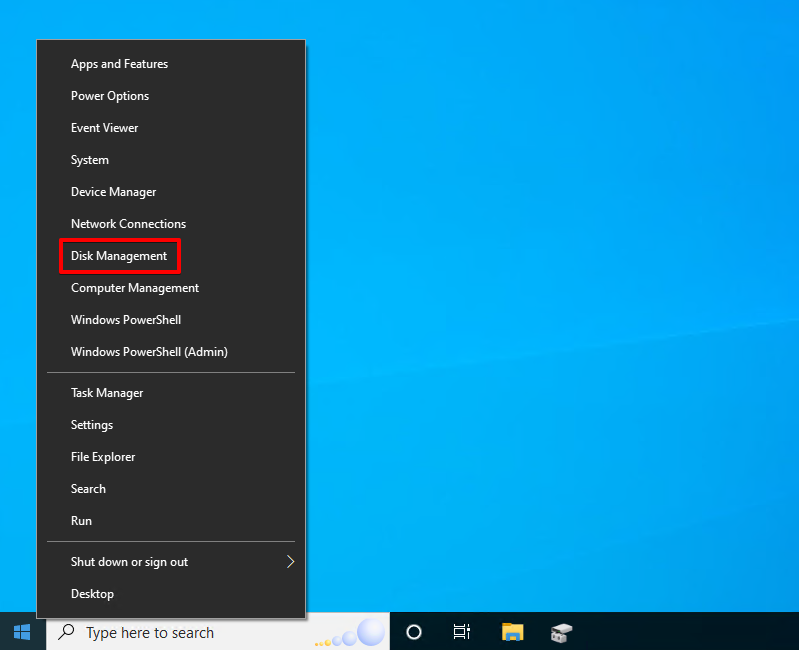
- Right-click Start and click Disk Management.
- Right-click the uninitialized disk and click Initialize Disk.
Method 2:Assign Drive Letter
Drive letters were a means of navigating volumes in the early days of MS-DOS. While they aren’t necessary now, Windows keeps them around for the sake of backward compatibility. That being said, it’s always good to make sure a drive letter is assigned to your connected solid-state drives. In some cases, an SSD not showing up in File Explorer can be because it’s missing a drive letter.
How’s how you assign a drive letter to an SSD:
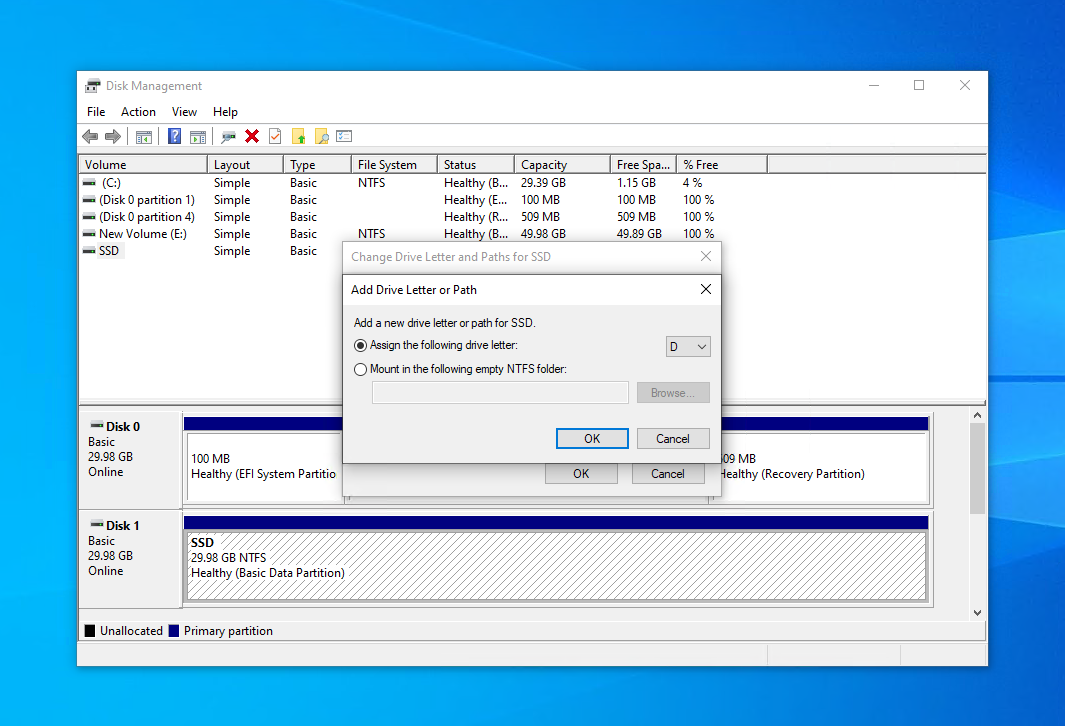
- Right-click Start and click Disk Management.
- Right-click the volume on your SSD and click Change Drive Letter and Paths.
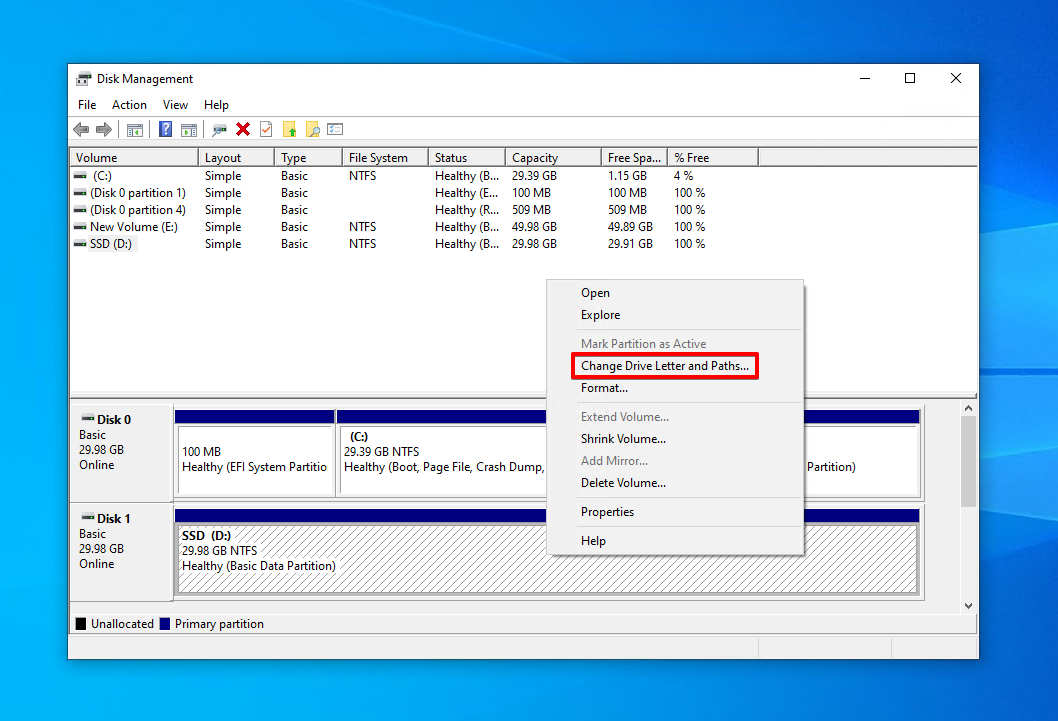
- Click Add. If you want to change your existing drive letter, click Change.
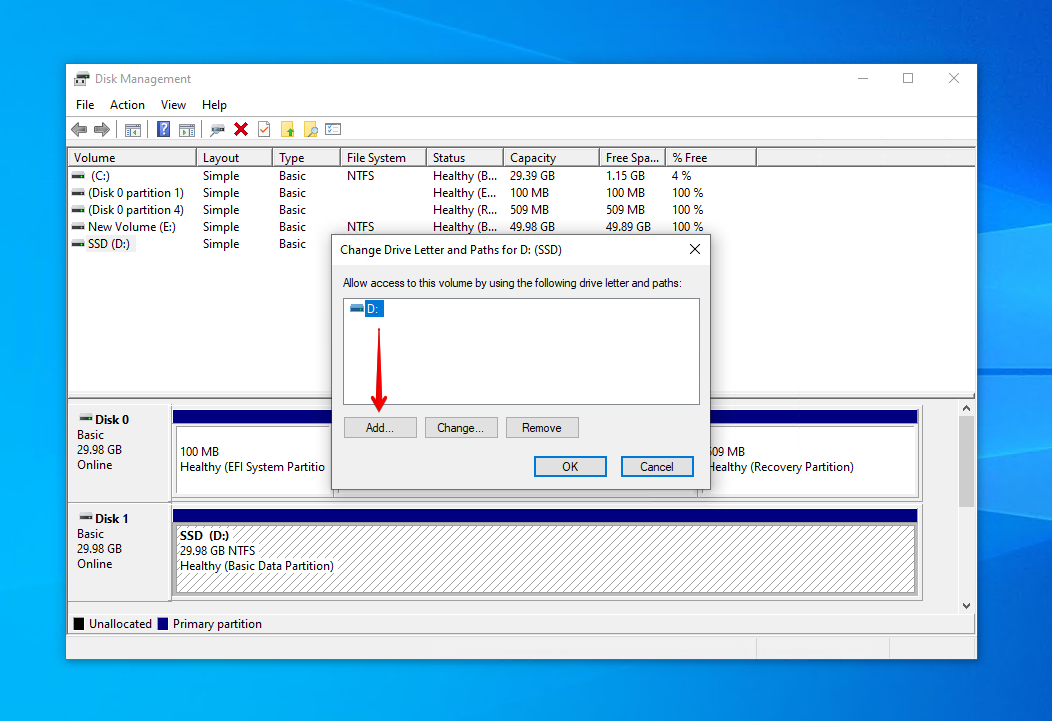
- Choose a drive letter and click OK. Click OK again if needed.
Method 3:Update or Reinstall the Drivers
Drivers play a key role in the communication between your SSD and the rest of your computer. When a solid-state drive is not recognized, it could be due to outdated or corrupted drivers. Keeping your drivers updated is important so your SSD has the most recent patch fixes for known issues.
Here’s how you update or reinstall your drives if an internal or external SSD is not showing up:
- Right-click Start and click Device Manager.

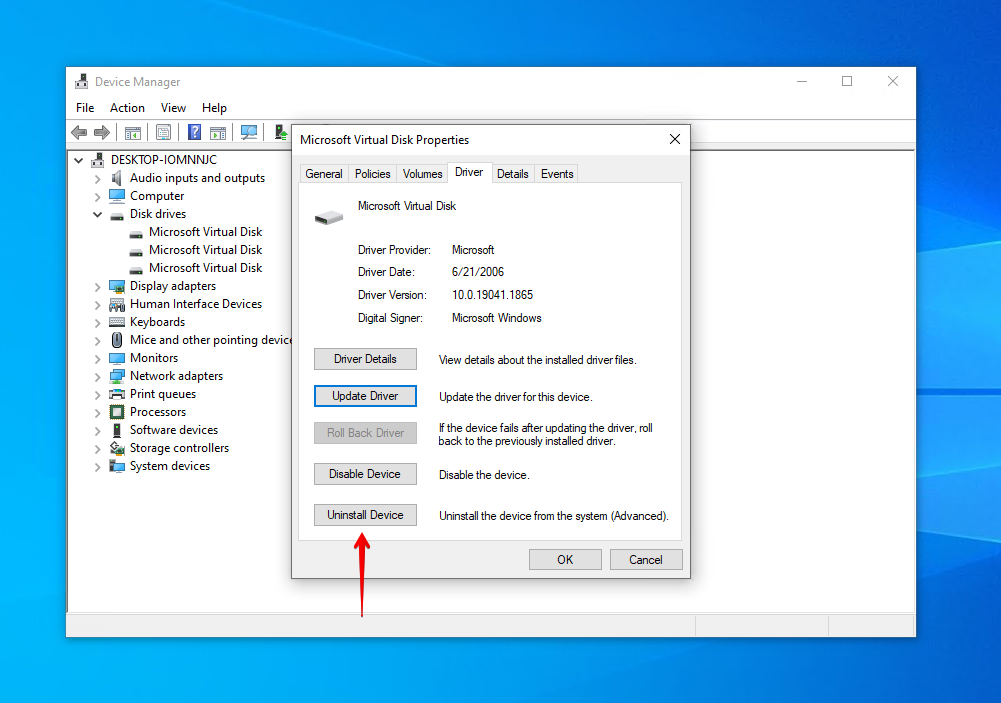
- Expand Disk drives and access the Properties of your SSD.
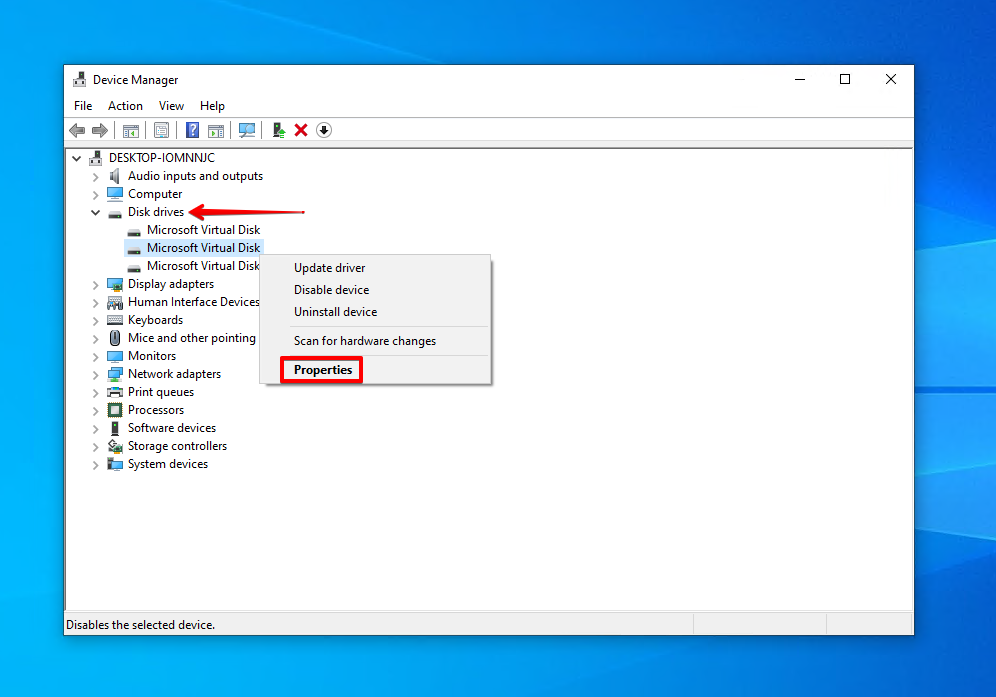
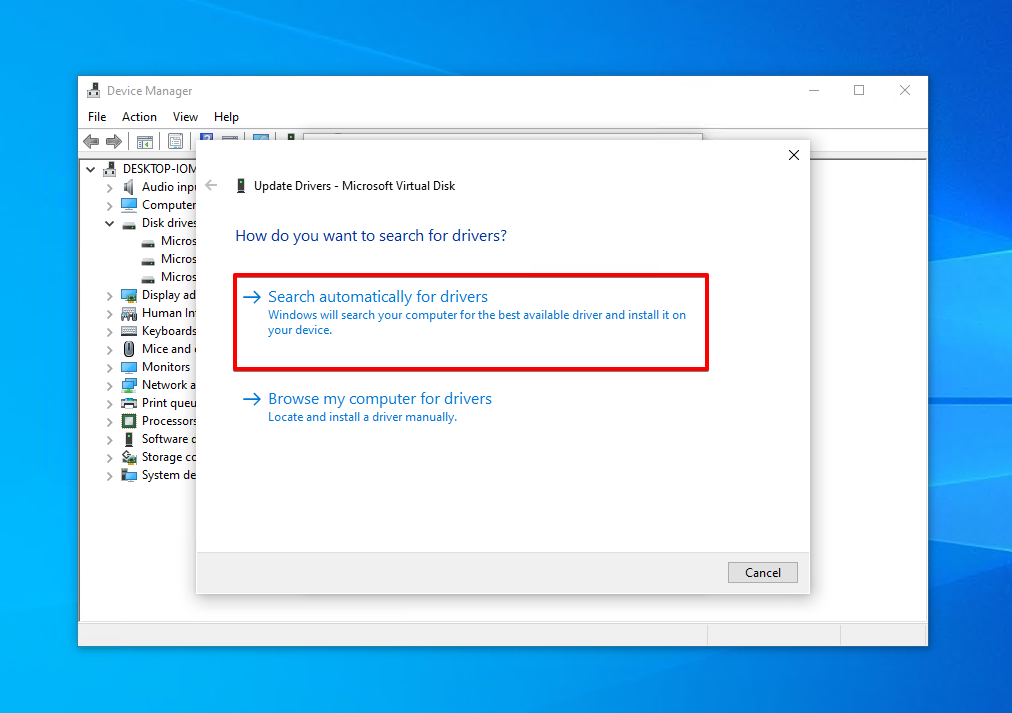
- Go to the Driver tab and click Update Driver.
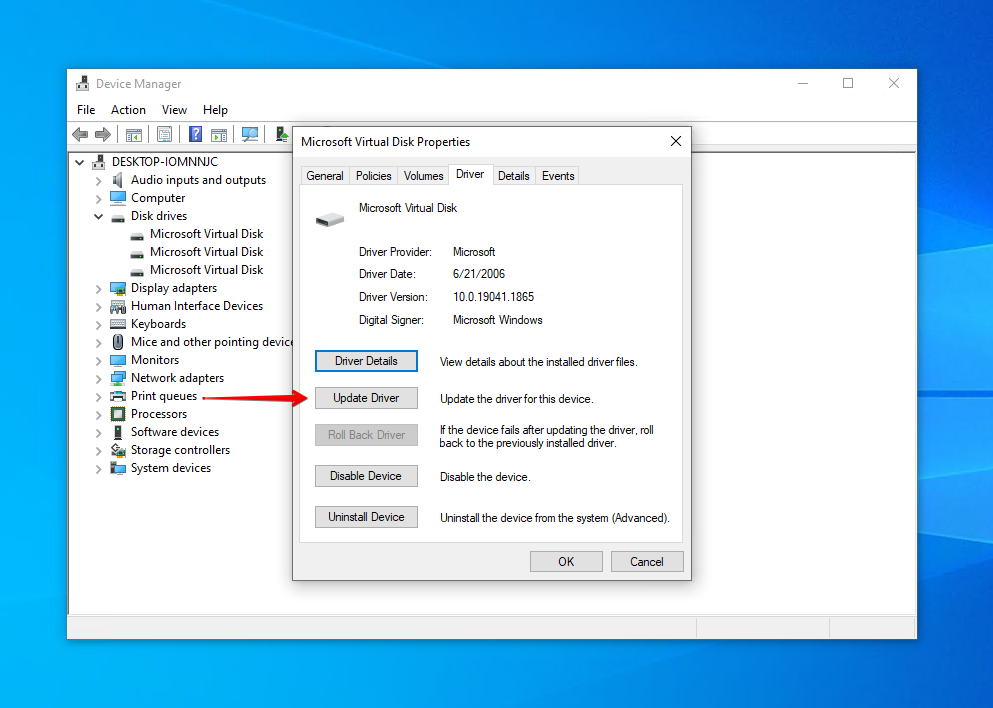
- Click Search automatically for drivers. If you have drivers to manually install, click Browse my computer for drivers instead. Should no updated drivers be found, move on to the next step.
- Click Uninstall Device.
- Disconnect and reconnect your SSD to force the drivers to reinstall. If it’s an internal SSD, simply restart your computer.
Method 4:CheckDisk
If your plugged-in SSD isn’t appearing, you can run CheckDisk to repair any drive-related issues it’s facing. The default scan of CheckDisk simply scans your SSD for errors and reports them back to you. However, you can include parameters so that it also attempts to fix any issues it finds, including bad sectors.
How’s how to run CheckDisk to fix issues with your SSD:
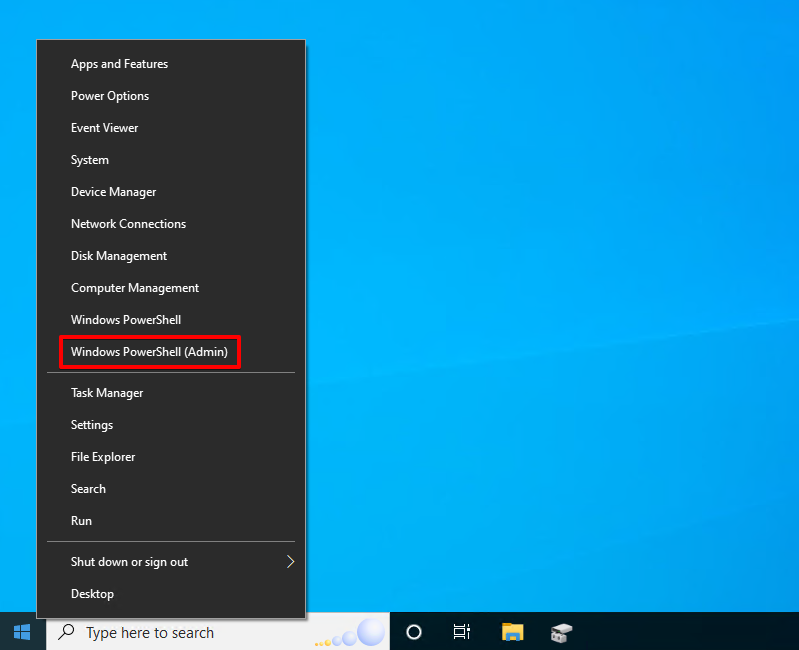
- Right-click Start and click Windows PowerShell (Admin). On Windows 11, this will be Terminal (Admin).
- Type
chkdsk *: /r. Replace * with the drive letter assigned to your SSD. Press Enter and CheckDisk will begin scanning and fixing any errors it finds.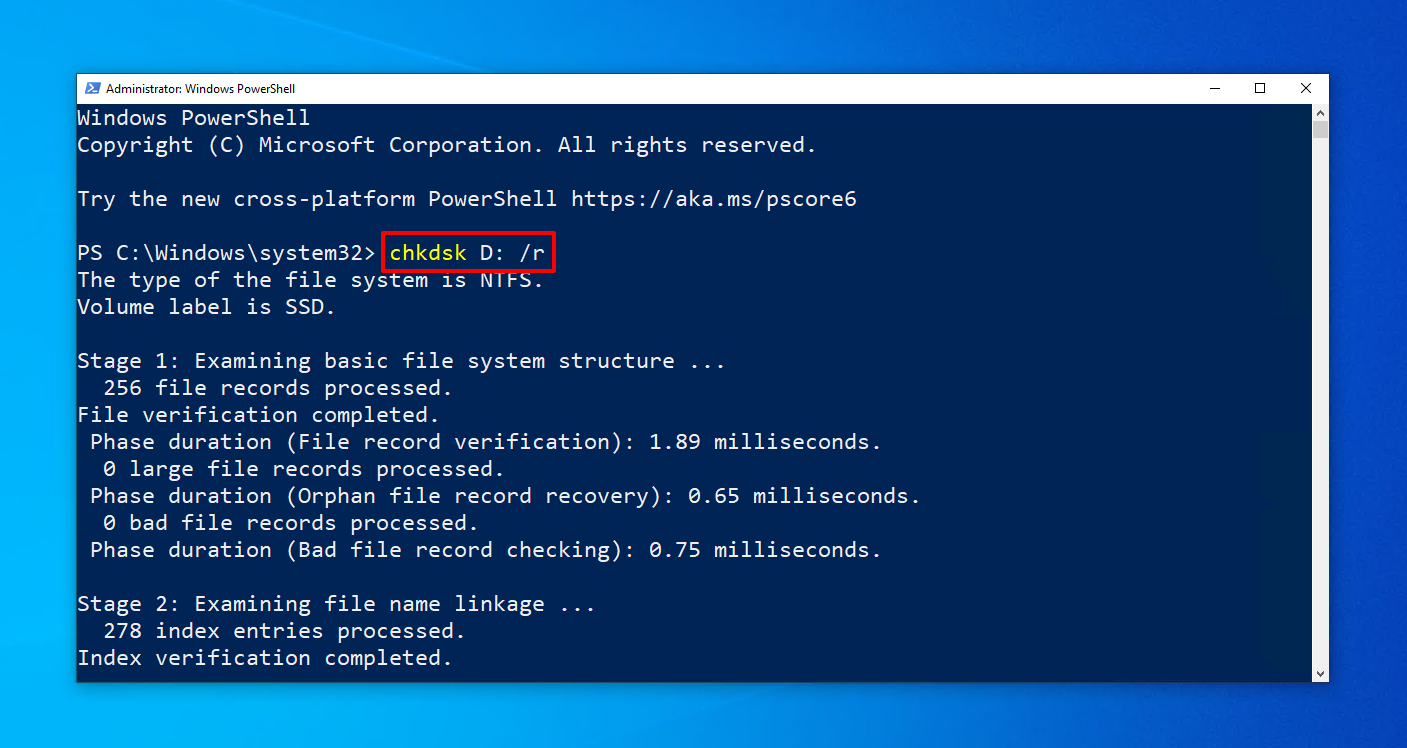
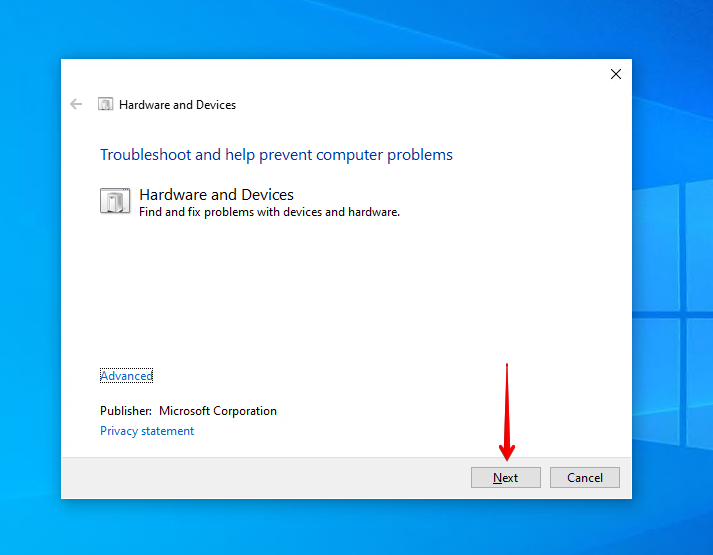
Method 5:Windows Troubleshooter
There is an entire suite of troubleshooters included with Windows. While they’re often overlooked in favor of more tailored solutions, it’s wise to at least try using a troubleshooter if your SSD is not detected, as they are a good way to quickly fix a wide range of problems without much effort. Today, we’re going to be using the Hardware and Devices troubleshooter.
- Right-click Start and click Windows PowerShell (Admin). On Windows 11, this will be Terminal (Admin).
- Type
msdt.exe -id DeviceDiagnosticand press Enter.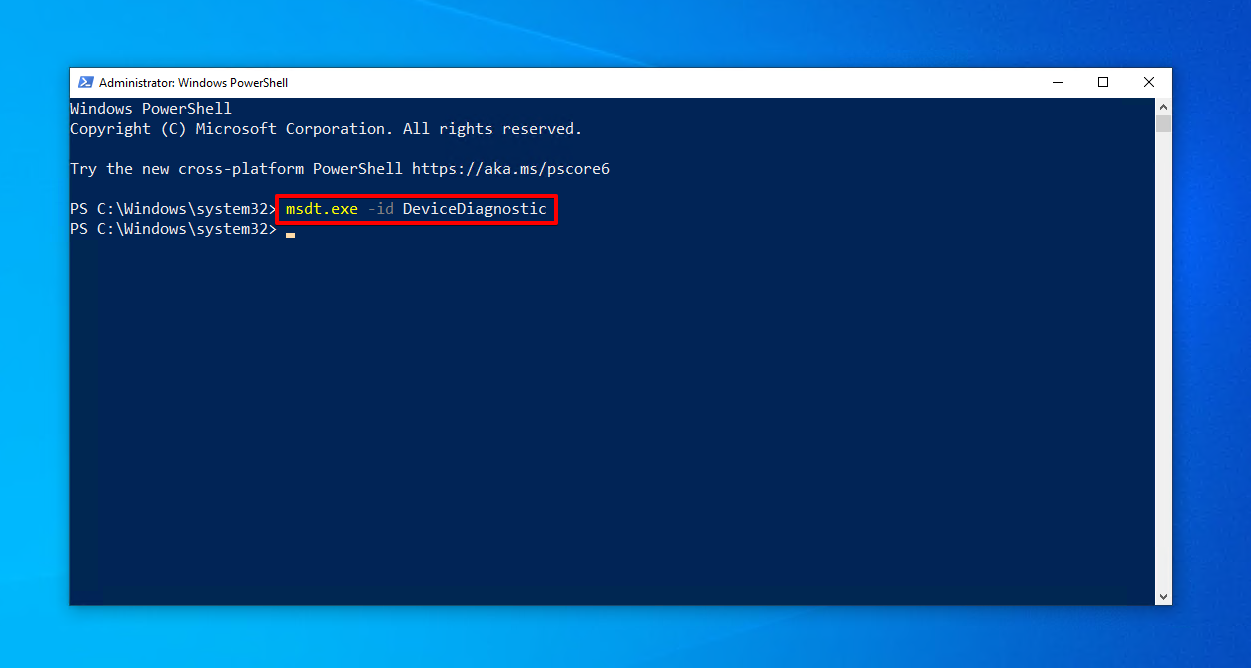
- Click Next to start the scan and follow the onscreen instructions to apply any fixes it finds.
Method 6:Format SSD
Formatting your SSD is an old but reliable fix for various issues that prevent it from appearing on your computer. When you format an SSD (more precisely, its volumes) it is deleting all of the data on it currently and giving it a new file system, ready to store data once again.
Even if you haven’t performed data recovery yet, you can still recover data from drives following a quick format.
- Right-click Start and click Disk Management.
- Right-click the volume of your faulty SSD and click Format.
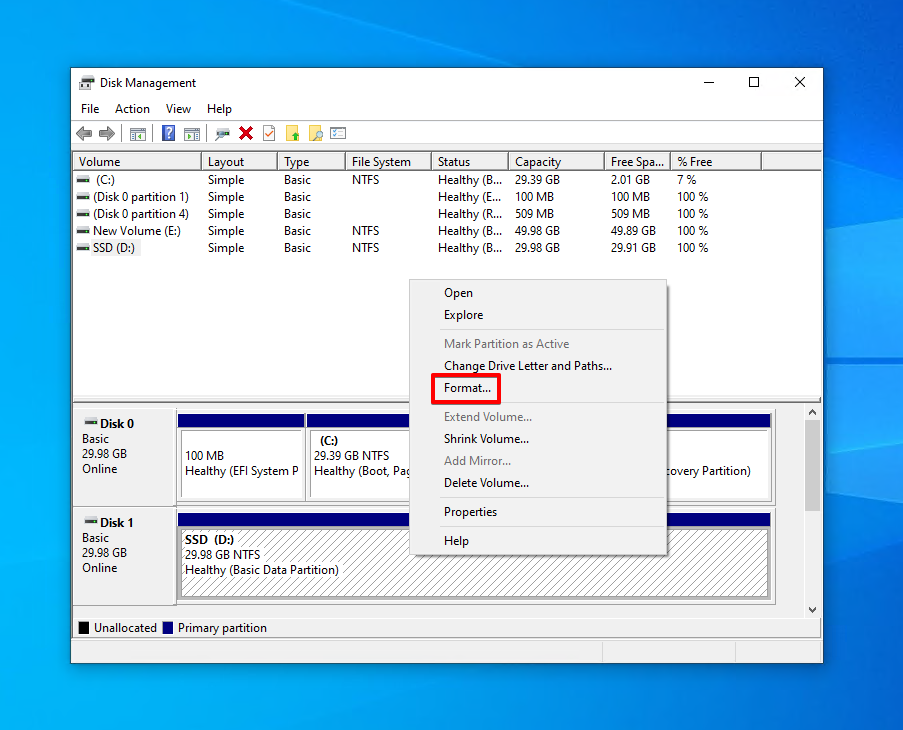
- Ensure Perform a quick format is ticked and click OK.
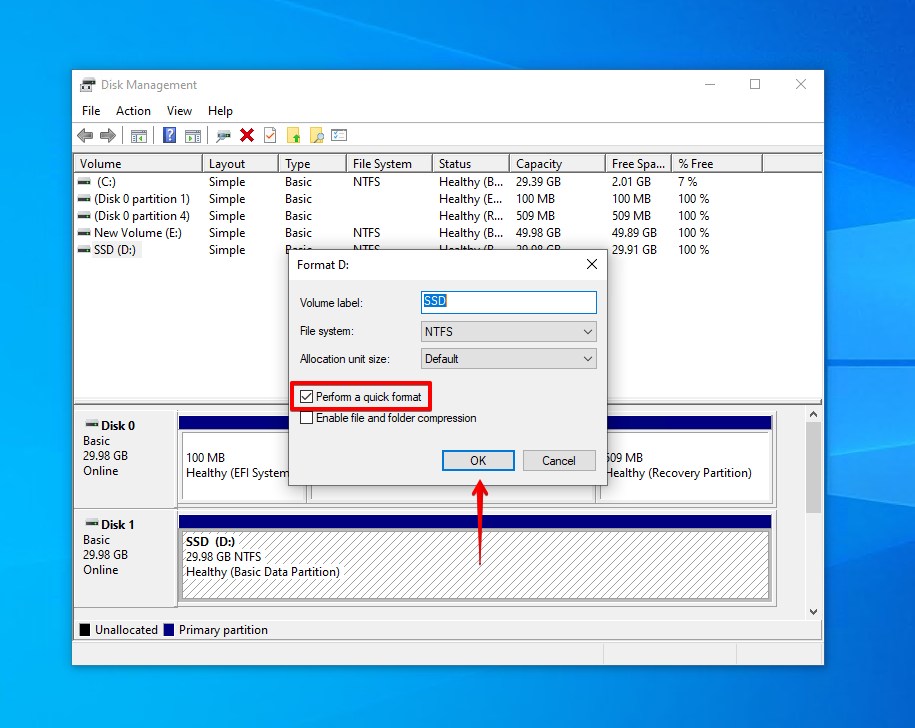
- Click OK again.
How to Fix an SSD Not Showing up in Disk Management
When an SSD is not showing up in Disk Management, it will take a bit more work to troubleshoot why. In this case, here are some additional methods you can try.
Before we begin, if your SSD shows up in Device Manager but not Disk Management, check to see if your SSD is part of a Storage Space in Windows. If it is, this is likely preventing it from appearing in Disk Management.
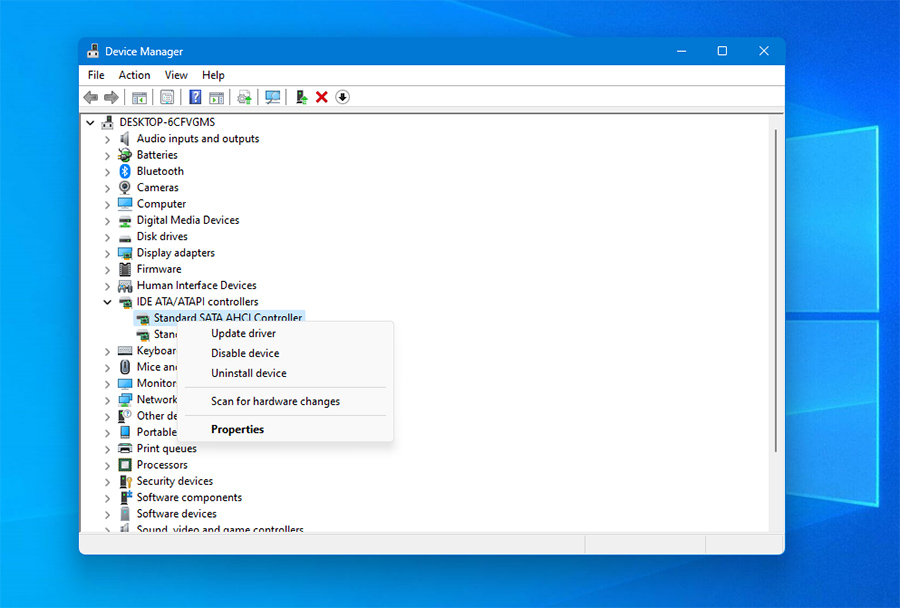
Method 1:Update Controller Drivers
Like device drivers, the drivers for your IDE ATA/ATAPI and storage controllers need to stay updated in order for them to work properly. Without them, there will be a breakdown in communication between your SSD and the rest of your computer. This is a key consideration if your installed SSD is not showing up and can be fixed relatively easily.
- Right-click Start and click Device Manager.
- Expand Storage controllers and update the drivers of your storage controller.
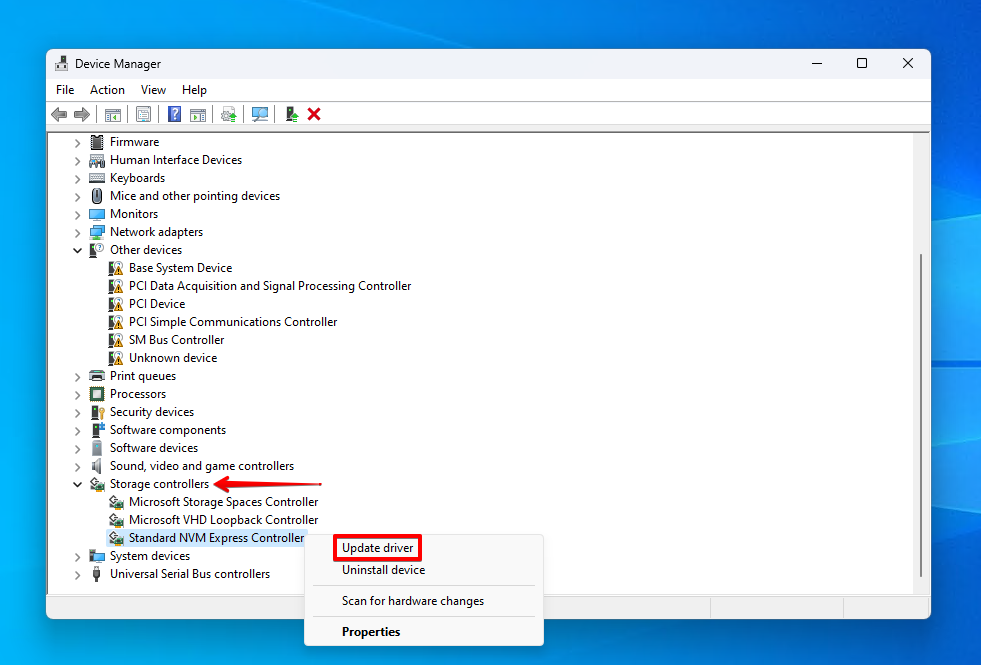
- For desktops, you will also need to update your IDE ATA/ATAPI controller drivers.
Method 2:Change SATA Controller Settings
This problem is fairly common with solid-state drives connected to ports that have never been used. If you have a chance to look at your motherboard, you will most likely find the SATA ports are numbered. Your computer will not detect a new SSD if the SATA port it’s connected to is disabled in the BIOS, which is often the case if a new SSD is not showing up in Disk Management. Therefore, if your second SSD is not showing up, make sure the SATA port is enabled so the drive can be read..
These steps are generalized, as each manufacturer has its own BIOS. For more precise steps, refer to the documentation of your motherboard to find exactly where you need to go.
- Enter your BIOS.
- Go to the Drives section.
- Ensure the appropriate SATA port is enabled and click Apply.
- Save changes and exit.
Method 3:Format With Bootable Drive
The Universal Disk Format (UDF) is the file system used for optical media. Your Windows installation disk may be formatted with it. However, it may be running a version of UDF that is not supported by your operating system.
Therefore, to circumvent this, you can format using a bootable drive instead. Create a bootable USB flash drive and use it to boot into Windows, format the SSD, and reinstall a fresh version of the operating system.
How to Fix an SSD Not Showing up in BIOS
There are times when your SSD isn’t even showing up in your BIOS. While your options are limited, there are still some fixes you can try. Check them out below.
Method 1:Change SATA Controller Mode to IDE
Most new motherboards will come preconfigured to run in AHCI mode, as it offers the best performance and features for SATA SSD devices. However, your SSD may not appear when this mode is active. To test this, you can switch the SATA Controller Mode to IDE. It is older than AHCI but it offers better compatibility.>
- Enter your BIOS.
- Select Serial ATA and press Enter.
- Set SATA Controller Mode to IDE.
Method 2:Inspect SSD
An SSD that’s not appearing in the BIOS, even in IDE mode, will likely be suffering from some form of physical corruption. Physical corruption refers to physical damage, including mechanical or electrical failure. Check the cable and port for any signs of damage. You can also try replacing the cable to see if that works, or connecting the drive to a different USB/SATA port of the device.
Should nothing work, your best option is to consult a data recovery service to restore your data. They specialize in these types of cases and are equipped with the knowledge and tools to safely diagnose the problem and recover your data.
Conclusion
Finding out that your SSD isn’t being read by your computer is troubling. Thankfully, there are ways to fix it, whether you’re trying to make Windows recognize your new SSD or troubleshooting an SSD that has been working fine up until now. First, you should perform SSD data recovery if there is data you want to keep. You can do so as long as the SSD is present in Disk Management and reading the correct size.
Once your data is safe, make sure that the SSD is initialized. If it is, try assigning a drive letter to it and checking for updated drivers. Next, try repairing it with CheckDisk or the built-in Hardware and Devices troubleshooter. If all of these fail, format the SSD.
In cases where the SSD is not showing in Disk Management, make sure your storage controller drivers are up-to-date and working. Next, make sure the SATA port you’re connecting to is enabled in the BIOS. If the drive isn’t appearing in the BIOS, try changing the SATA Controller Mode to IDE. If that still doesn’t work, consider reaching out to a data recovery service.


