 It can be extremely stressful when you’re trying to access the data located on your external drive, but your Mac simply doesn’t let you view them. If that’s what you’re experiencing and your external hard drive is not mounting to your computer, this article can help you resolve the issue.
Read on to learn about what you should do to make your external hard drive mountable again and successfully connect it to your Mac to get hold of your files.
Table of Contents
Why Is Hard Drive Not Mounting on Mac?
Cannot mount an external drive on Mac? Then it might be helpful for your situation to know the potential reasons why your external drive won’t mount in the first place.
Here’s what can be causing this problem:
| Reason | Description |
| 🔌 Loose or faulty USB cable | In general, this is the most common reason why an external HDD won’t connect to a MacBook. It’s possible that the USB cable that you’re using to mount the drive is either loose in the port and you need to adjust it slightly, or it is damaged. To know if the latter is true in your case, simply try to use a different cable. |
| ❌ Damaged USB port | If you think that the USB port in your Mac might be damaged, try to connect a different external device (HDD, flash drive, etc.) to your computer to see if it mounts correctly. |
| 🦠 Drive corruption | If your external hard drive is corrupted either because of a virus attack or the interruption of the read-and-write process, it’s quite possible that it might be causing the mounting problem. |
| 💻 Older macOS version | Not all macOS versions support certain file systems used by external hard drives. For example, if your Mac is running macOS High Sierra, then it won’t be able to open external HDDs using the APFS file system. With all newer macOS versions (Catalina, Monterey, and Big Sur), you can read and write external HDD with practically any file system. |
| ⚙️ Wrong settings | It’s quite possible that you can’t see your external HDD in Finder or Desktop because you’ve disabled this setting. To find out more about how to check these settings and enable them, see Option #5. |
How to Get Data from a Drive That Is Not Mounted
You can use a specialized data recovery tool to recover your files from an external hard drive on your Mac, even if it doesn’t mount. But this method will work only if you see your external drive on the sidebar in Disk Utility when it’s connected and if it has the correct size listed.
If you’re not sure which data recovery application to use, our recommendation is Disk Drill since it has an intuitive and user-friendly interface that allows any user to easily navigate the app to perform the needed task. Moreover, it works for basically any external hard drive (such as Seagate external HDDs, WD, SanDisk, LaCie, Toshiba, etc.).
Follow these steps to retrieve the data from your external hard drive on your Mac using Disk Drill:
- Download Disk Drill for Mac and follow the onscreen instructions to install the application.
- Connect the external hard drive in question to your MacBook.
- Launch Disk Drill and choose Storage devices from the sidebar on the left.
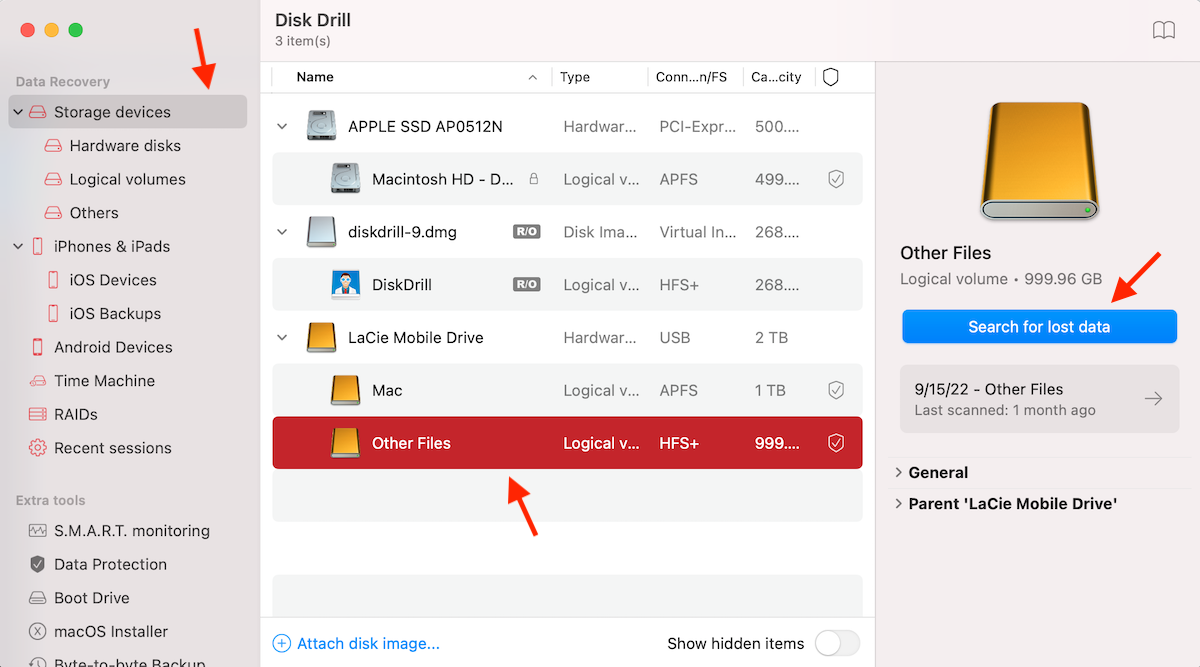
- Look through the list of available devices and click on your external hard drive to select it.
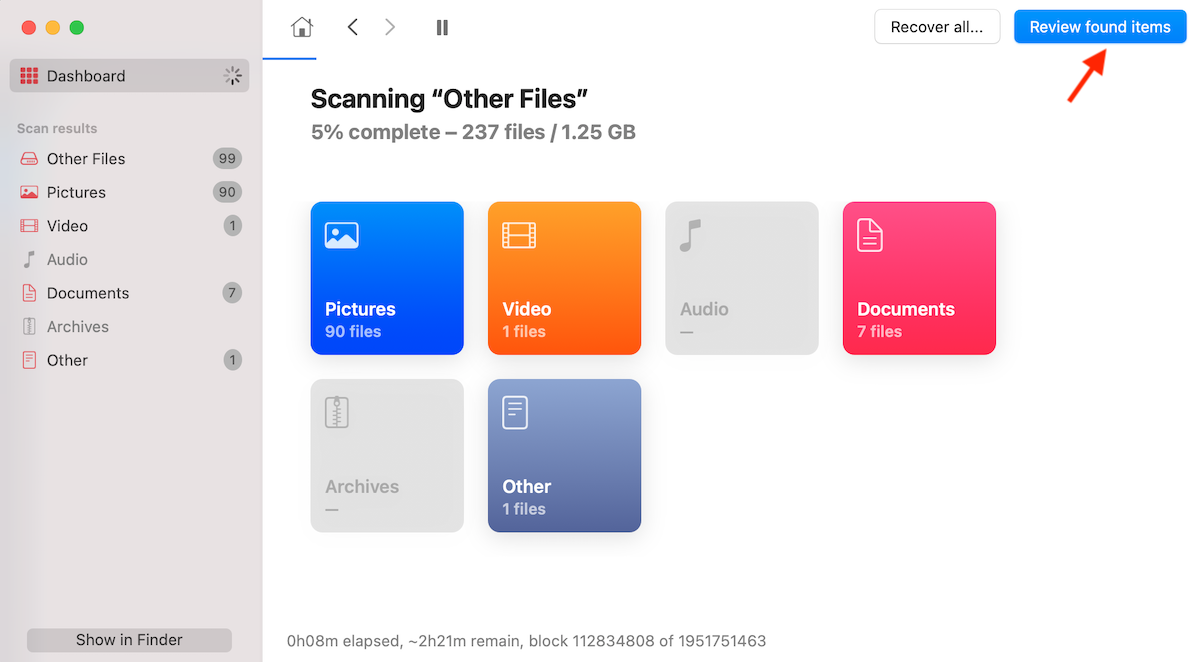
- Click the Search for lost data button and wait for the scan to finish.
- Click Review found items to preview the potentially recoverable data.
- Use the search field on the top right of the screen if you’re looking for a specific folder or file. You can type in the file’s name, type, or extension. Or, if you want to narrow down your search, choose the needed folder on the sidebar on the left.
- Click the eye icon near a file to preview it and make sure that it’s the needed one. Then click the empty box near a file to place a tick and select it.
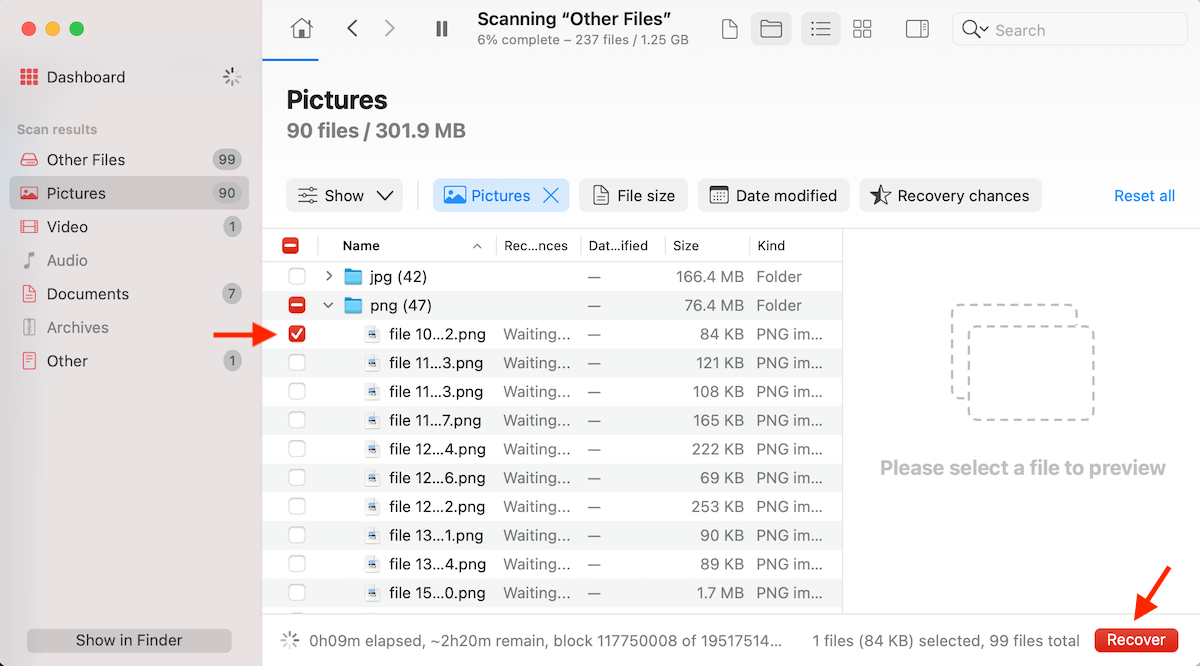
- Click the Recover button at the bottom right whenever ready.
- Choose a folder where you wish to store the recovered files and click OK to confirm.
Note: If the unmountable external hard drive is either physically damaged or isn’t operating properly at all, it’s a good idea to create an image from the drive in question and then scan the image to find and recover the data. You can also do that with the help of Disk Drill’s feature called Byte-to-byte Backup.
How to Fix External Drive that Is Not Mounting on Mac
Below are the methods that you can try to successfully mount your external hard drive to your MacBook.
Option 1:Change USB Ports
It might sound pretty obvious, but a lot of times, the reason why you can’t mount an external hard drive to your Mac lies behind a broken or faulty USB port (especially if you’re having trouble with mounting all of the external devices to your Mac).
In such a case, you can either try a different USB port, or if it also doesn’t work, you might need to resort to a professional to fix the issue on your Mac.
Option 2:Check the Cable
Another reason why you can’t connect the external drive to your Mac might be a faulty USB cable. So it’s a good idea to try mounting the external hard drive with a different USB connector to see if it might be causing all the trouble.
Option 3:Reset NVRAM or PRAM
It’s quite possible that the issue isn’t with your external hard drive but with your Mac. Sometimes a corrupt NVRAM or PRAM might be causing various problems on your computer and even prevent external drives from successfully mounting to it. And even though NVRAM corruption doesn’t happen very often, it’s best to reset it to rule out this problem.
Note: If you’re using an M1 Mac, then all you need to do to reset NVRAM or PRAM on it is to restart your computer.
Here’s what you should do to reset NVRAM or PRAM on your Intel-based Mac to eliminate the issue:
- Turn off your computer.
- Press the power button to turn your Mac back on, and then immediately press and hold the following key combination: Command + Option + P + R.
- Hold the key combination until you see the Apple logo appear on your screen for the second time (it takes around 20 seconds).
Option 4:SMC Reset
SMC (System Management Controller) is a sub-system on Macs that helps with power management, fan control, etc. Moreover, it can sometimes even be the cause of external drive connectivity issues.
Note: On M1 Macs, all you need to do to reset SMC is to shut down the computer for around 30 seconds and then power it back on.
Here’s how to reset SMC on an Intel-based Mac:
- Turn off your Mac.
- Press and hold the power button for 15 seconds
- Restart your computer.
Option 5:Change macOS Display Settings
If your external drive works fine and you can see that it is mounted to your Mac in Disk Utility, it’s a good idea to check your computer’s settings. It’s quite possible that you can’t view the external drive neither on the desktop nor in Finder because of these settings.
Here’s what you should do to make your external drive viewable again on your Mac:
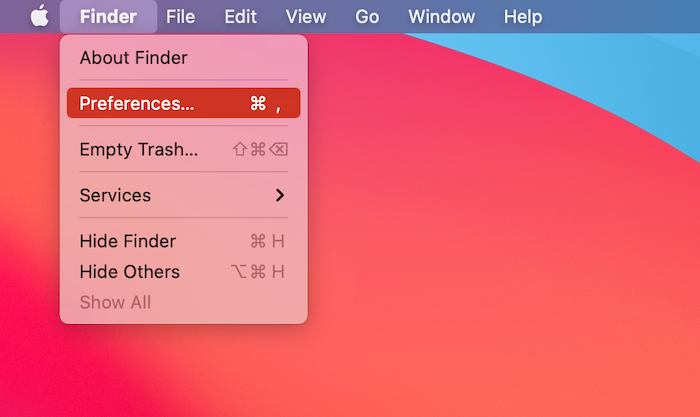
- Click your Mac’s desktop and then choose Finder from the menu at the top.
- Choose Preferences from the drop-down menu.
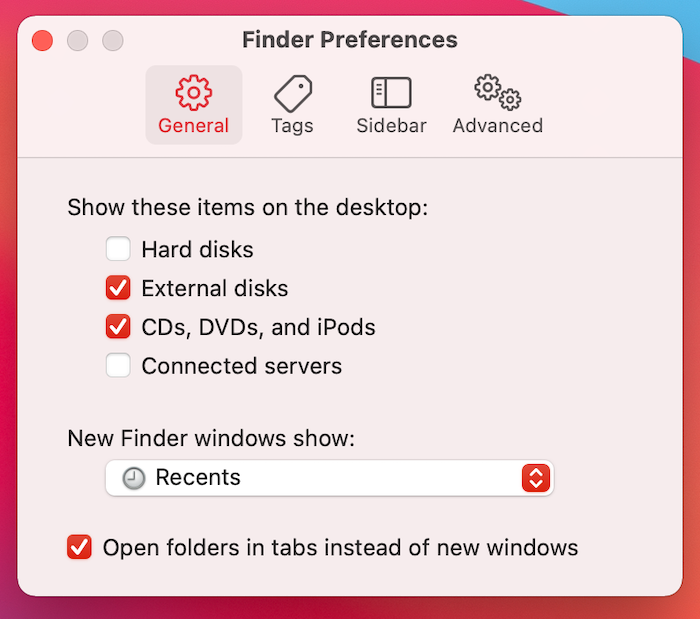
- Click the General tab and click the box near External disks to place a tick (if it’s already selected, move to the next step).
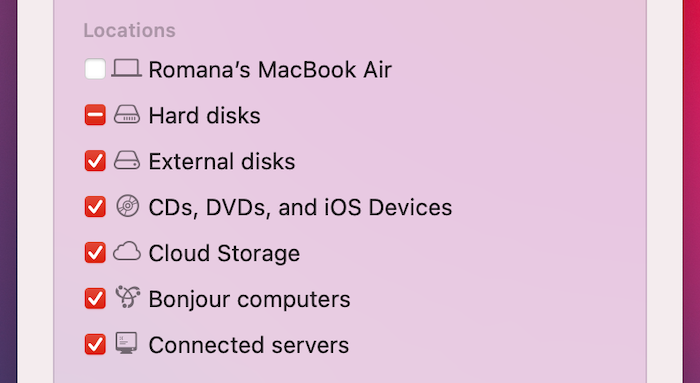
- Go to the Sidebar tab and look for External disks under the Locations section. Click the box near it to place a tick and start seeing the connected external disks in the Finder’s sidebar.
Option 6:Use a Third-Party External Drive Mounter
If your external hard drive is using the NTFS file system, it might be the reason why you can’t open such a drive on your Mac. So in case you are trying to mount an external drive that’s using a Mac-unsupported file system (such as NTFS), you can try to use a specialized third-party external drive mounter app to assist in connecting such a drive and accessing the data located there.
Option 7:Run First Aid in Disk Utility
Every Mac comes equipped with a tool called Disk Utility which you can use to perform various drive-related tasks. If you think that your external hard drive might have file system errors and, because of that, doesn’t mount to your Mac, you can use this app to try to find and repair those errors.
Here’s what you should do:
- Launch Disk Utility on your Mac (go to Finder > Applications > Utilities and click Disk Utility to open it).
- Select your external drive from the sidebar on the left.
- Click the First Aid button at the top.
- Click Run to confirm.

Option 8:Force Mount the Drive in Disk Utility
If the external hard drive is viewable in Disk Utility, but you can’t access the data located there, it’s possible to force mount the disk in this application. Once you succeed, you should be able to access the files stored on that drive on your Mac.
Here’s what you should do to manually force mount a hard drive on a Mac:
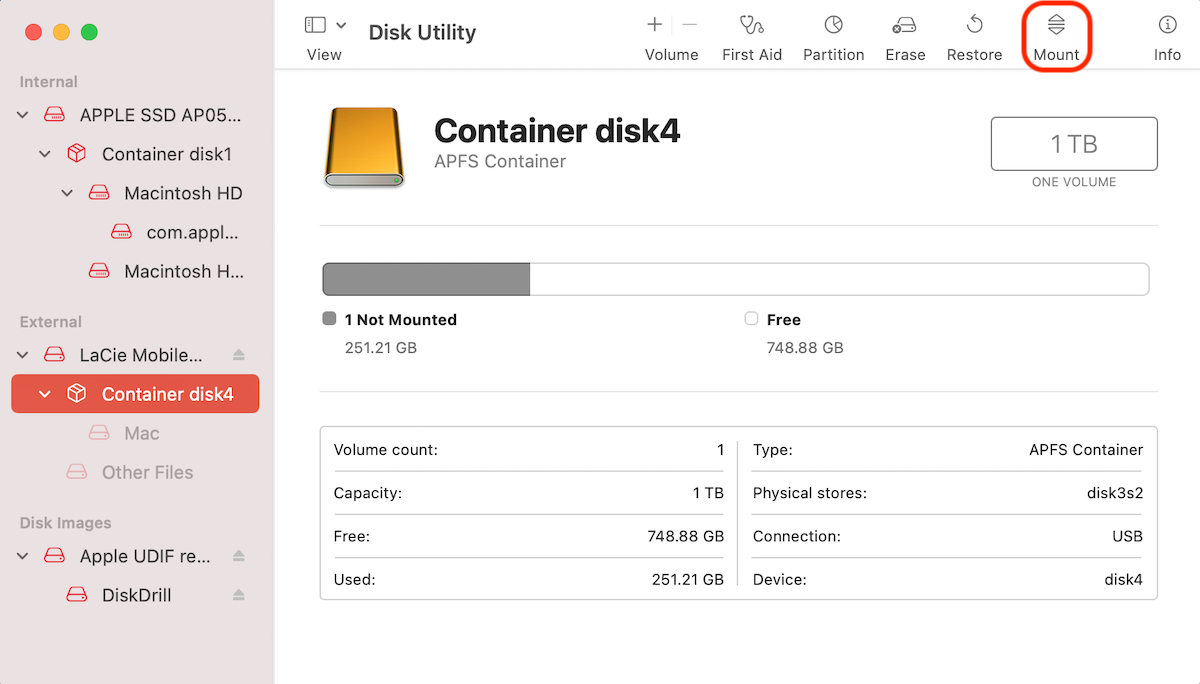
- Launch Disk Utility on your Mac (go to Finder > Applications > Utilities and click Disk Utility to open it).
- Choose the needed external drive from the sidebar on the left.
- Click the Mount button at the top.
Option 9:Format the Drive
If you’ve tried the above-mentioned methods and still were unable to mount the external hard drive to your Mac, there is one more option for you to try, which is formatting it. It’s a great option since it can fix your external drive and make it mountable again if the reason for the trouble is a corrupted filesystem.
Note: Keep in mind that this will erase all of the files from your drive. Although, you might still be able to recover the data from the formatted drive with a data recovery tool.
You can format an external hard drive either via Terminal or Disk Utility. We’ll explain the latter option since it’s easier and more suitable for all users.
Here’s how to format an external hard drive on your Mac:
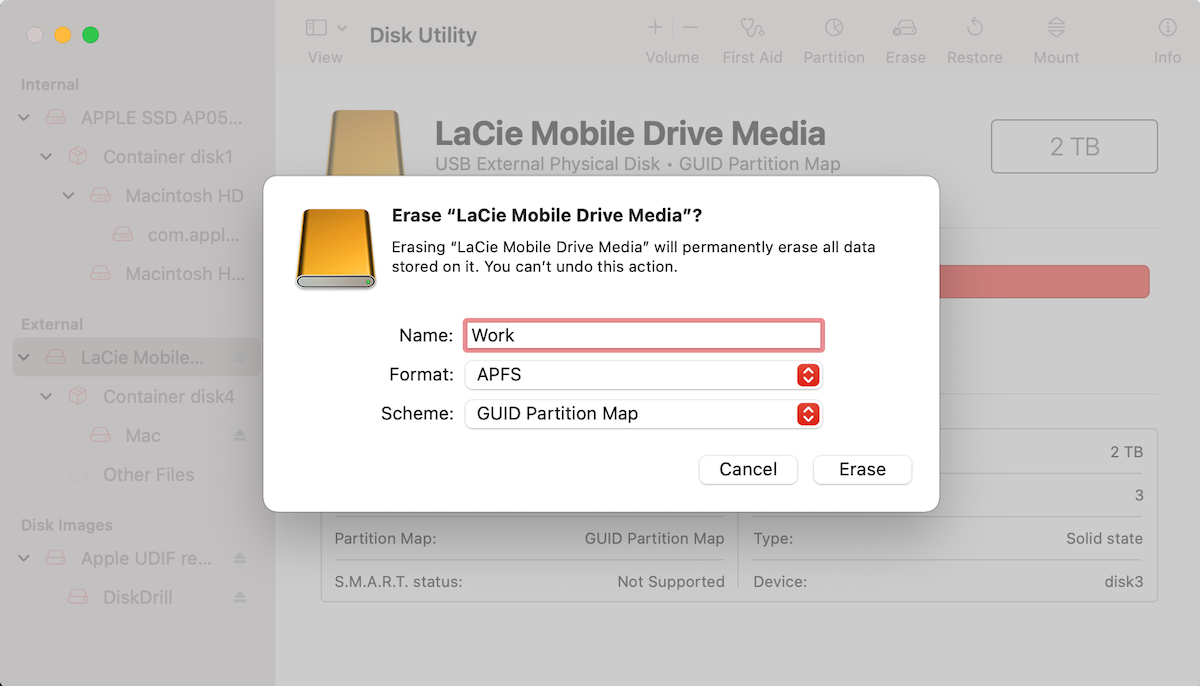
- Launch Disk Utility on your Mac (go to Finder > Applications > Utilities and click Disk Utility to open it).
- Choose the needed external drive from the sidebar on the left.
- Click the Erase button at the top.
- Type in a preferred name for your hard drive, choose a format, and scheme.
Conclusion
It can be quite stressful not being able to successfully mount your external hard drive on your Mac to access the data stored there. But luckily, whether that happened because of drive corruption, wrong Mac settings, an incompatible file system, or any other reason, now you have a few solutions that should help you to solve the issue.
FAQ:
- Connect the drive to your Mac.
- Open Disk Utility on your computer (go to Finder > Applications > Utilities and click Disk Utility to open it).
- Select your external HDD on the sidebar on the left.
- Click the Mount button at the top.
- Click Finder on the Dock on your MacBook.
- Click Finder at the menu on the top of the screen and choose Preferences from the drop-down menu.
- Select the Sidebar tab.
- Place a tick in the box near External disks by clicking it.


