 Unable to access the data on your SSD, or noticed that some of it is missing? It’s likely you have a corrupted SSD on your hands. But, fret not, because we’ve compiled an in-depth guide that explains how to fix a corrupted SSD, why SSD corruption occurs, and how you can recover your data back.
Table of Contents
Reasons Leading to SSD Corruption
There are several possible factors that could lead to SSD corruption. It’s essential to know what they are and the kinds of symptoms they present because it can help you pick the appropriate solution.
Here’s an overview of the possible reasons behind a corrupted SSD and their symptoms:
| Reason | Description | Symptoms |
| 🔨 Physical damage | SSDs don’t have any moving parts, reducing the chances of physical damage. However, it’s not impossible. Physical shocks, heat, and water can damage the semiconductor cells and the NAND chip. | It’s best to err on the side of caution, as SSDs typically don’t display outright signs of physical damage (buzzing, grinding, beeping sounds), as HDDs often do. Slow performance, inability to power on, and excessive heating can all be signs of physical damage. |
| 💻 Logical corruption | Logical corruption refers to software-level damage on the SSD. It can be caused by malware, bad sectors, and driver issues. | A logically corrupted SSD displays symptoms like sluggish performance, deleted partitions, data loss, inability to access data, and randomly appearing or disappearing files and folders. |
| 🖱 Faulty or outdated firmware | An SSD’s firmware is crucial to its functioning. Outdated, corrupted, or malfunctioning firmware can cause logical damage to the drive and even outright data loss. Firmware damage can occur because of power failures, malware, and faulty updates. | A strong indication of firmware issues is when you have problems reading, writing, and accessing data on your drive. Additionally, the drive may freeze or crash at random intervals. |
| ♨️ Overheating | Like other computer hardware, SSDs are sensitive to heat. Overheating SSDs degrade faster and it will result in data loss unless the issue is addressed. | Slow read and write performance is the primary indicator of an overheating SSD, as speeds are throttled to deal with the extra heat. You can use programs like HWMonitor to check the temperature of your SSD. |
| ⏱ SSD wear and tear | SSDs have a limited lifespan, and they fail rapidly once they reach the end of it. The lifespan of an SSD is typically determined by the amount of data you write to it. | If you notice the SSD crashes during startup, takes a long time to read files, frequently restarts, and overheats, it may be at the end of its lifespan. |
With the exception of physical damage, most issues leading to SSD corruption can be addressed and don’t require too much technical know-how. It’s best to recover your data before you proceed to fix the corrupted SSD. In case of physical damage, stop using the SSD and contact an expert. Don’t attempt DIY recovery as it can result in complete data loss.
How to Recover Data from a Corrupted SSD
Before proceeding to fix a corrupted SSD, it’s essential to recover your data first because many of the fixes entail data loss, and in the worst-case scenario–you may need to perform a full format on the SSD.
It’s equally important to perform SSD data recovery as soon as possible because of the TRIM feature on SSDs. The TRIM command is executed at regular intervals, and it automatically cleans up data blocks that are available for use. These data blocks may contain the deleted files you wish to recover, but once the TRIM command has been executed (unlikely in corrupted SSDs, but still possible), data recovery becomes impossible.
We recommend you use Disk Drill to perform corrupt SSD data recovery. This is because of two main reasons–the program, despite being feature-packed, is easy to use, and it will recover most, if not all of your data, provided the SSD is visible in Windows Disk Management along with its correct size. It also supports over 400 file formats across all Windows file systems.
Here’s what the data recovery process from a corrupt SSD looks like in Disk Drill:
- Download and install Disk Drill on a storage drive, apart from the corrupt SSD.
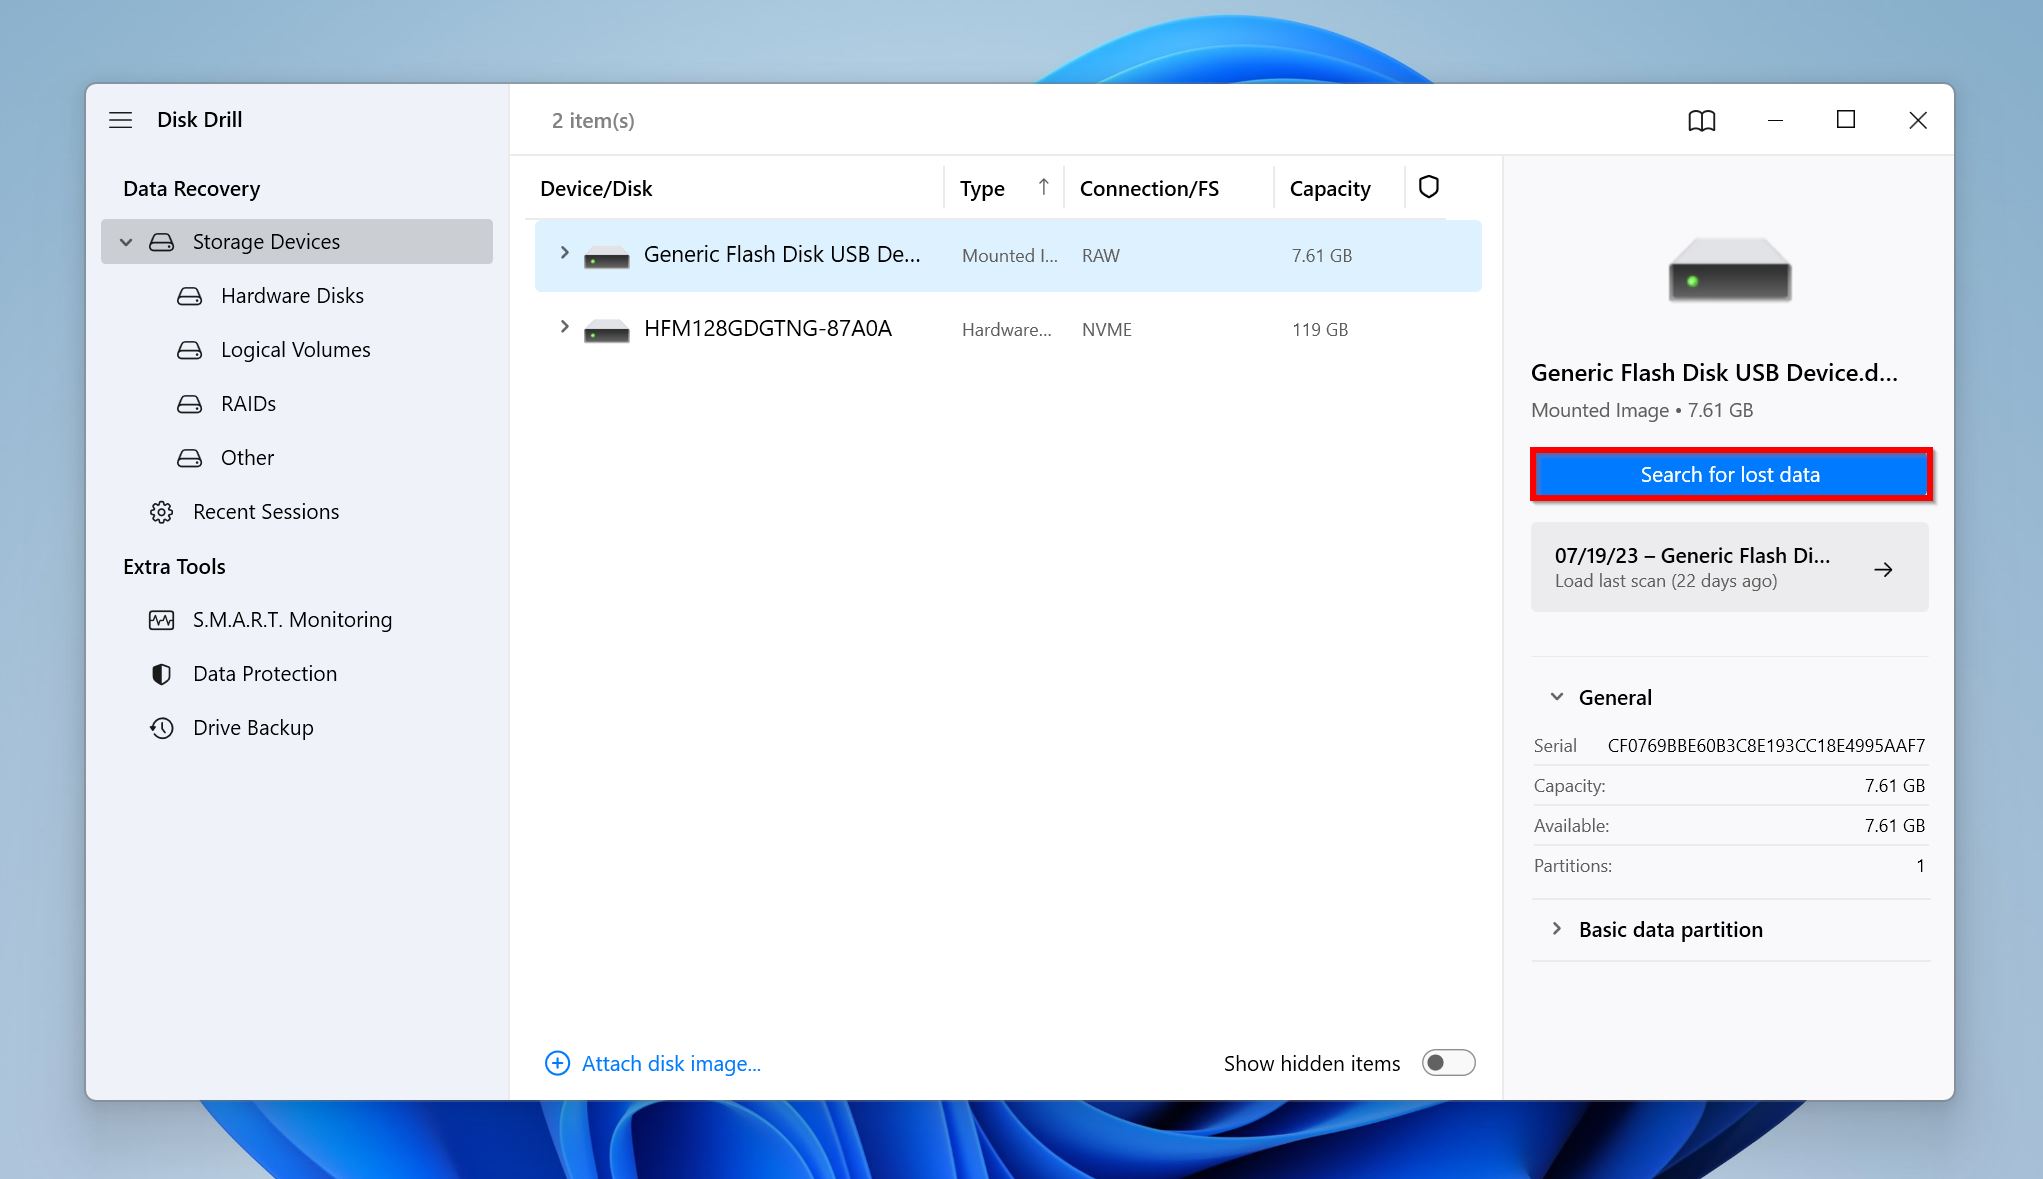
- Open Disk Drill, select your SSD, and click on Search for lost data.
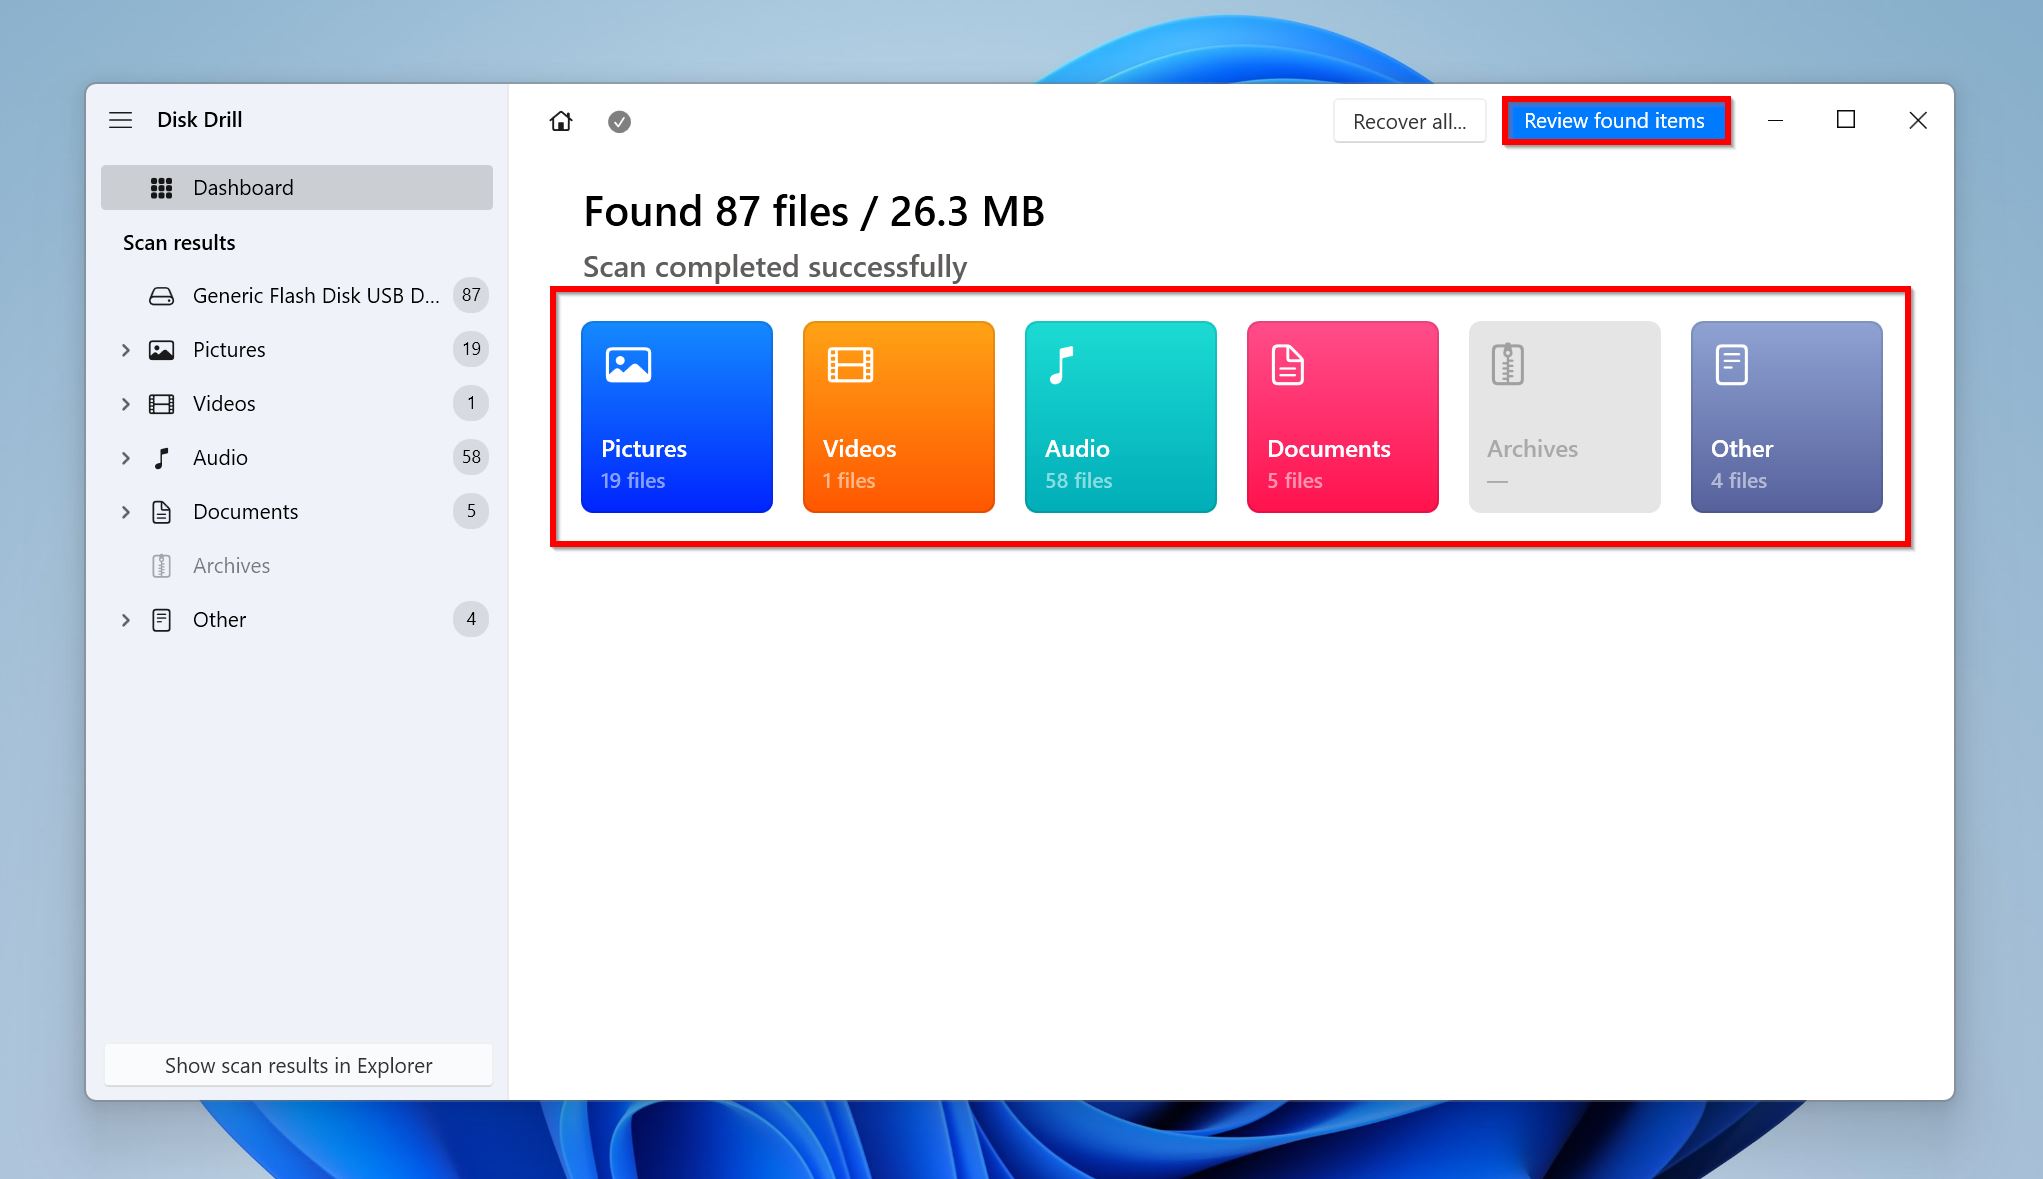
- Click on Review found items to view the files Disk Drill discovered. If you wish to filter out the results, you can click on the relevant tile (Pictures, Video, Audio, Documents, Archives, and Other), instead.
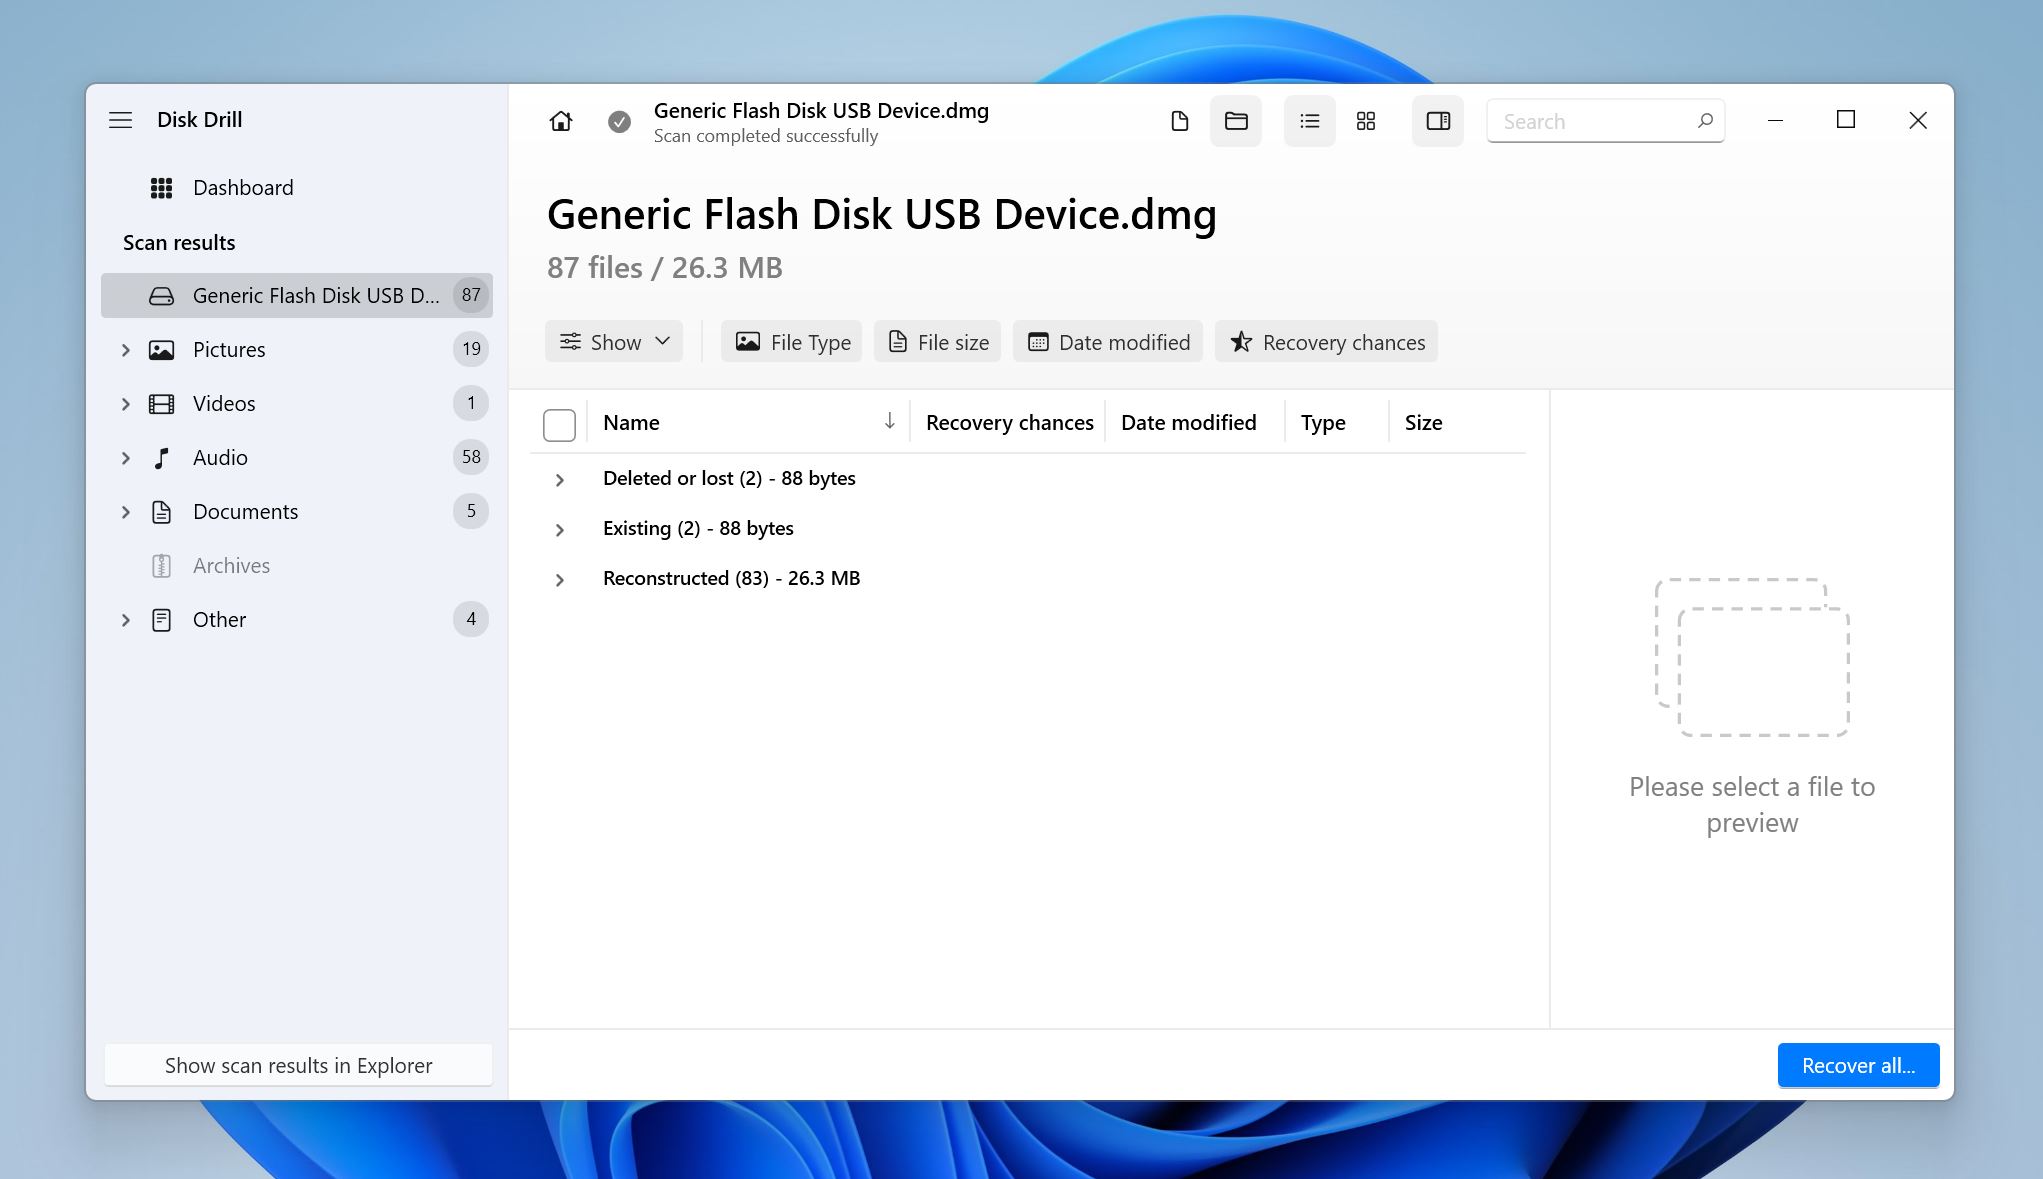
- Expand the Deleted or lost and Reconstructed sections to view deleted, recoverable files. If you’ve lost access to the existing files on the drive, you can expand the Existing section to view and recover them.
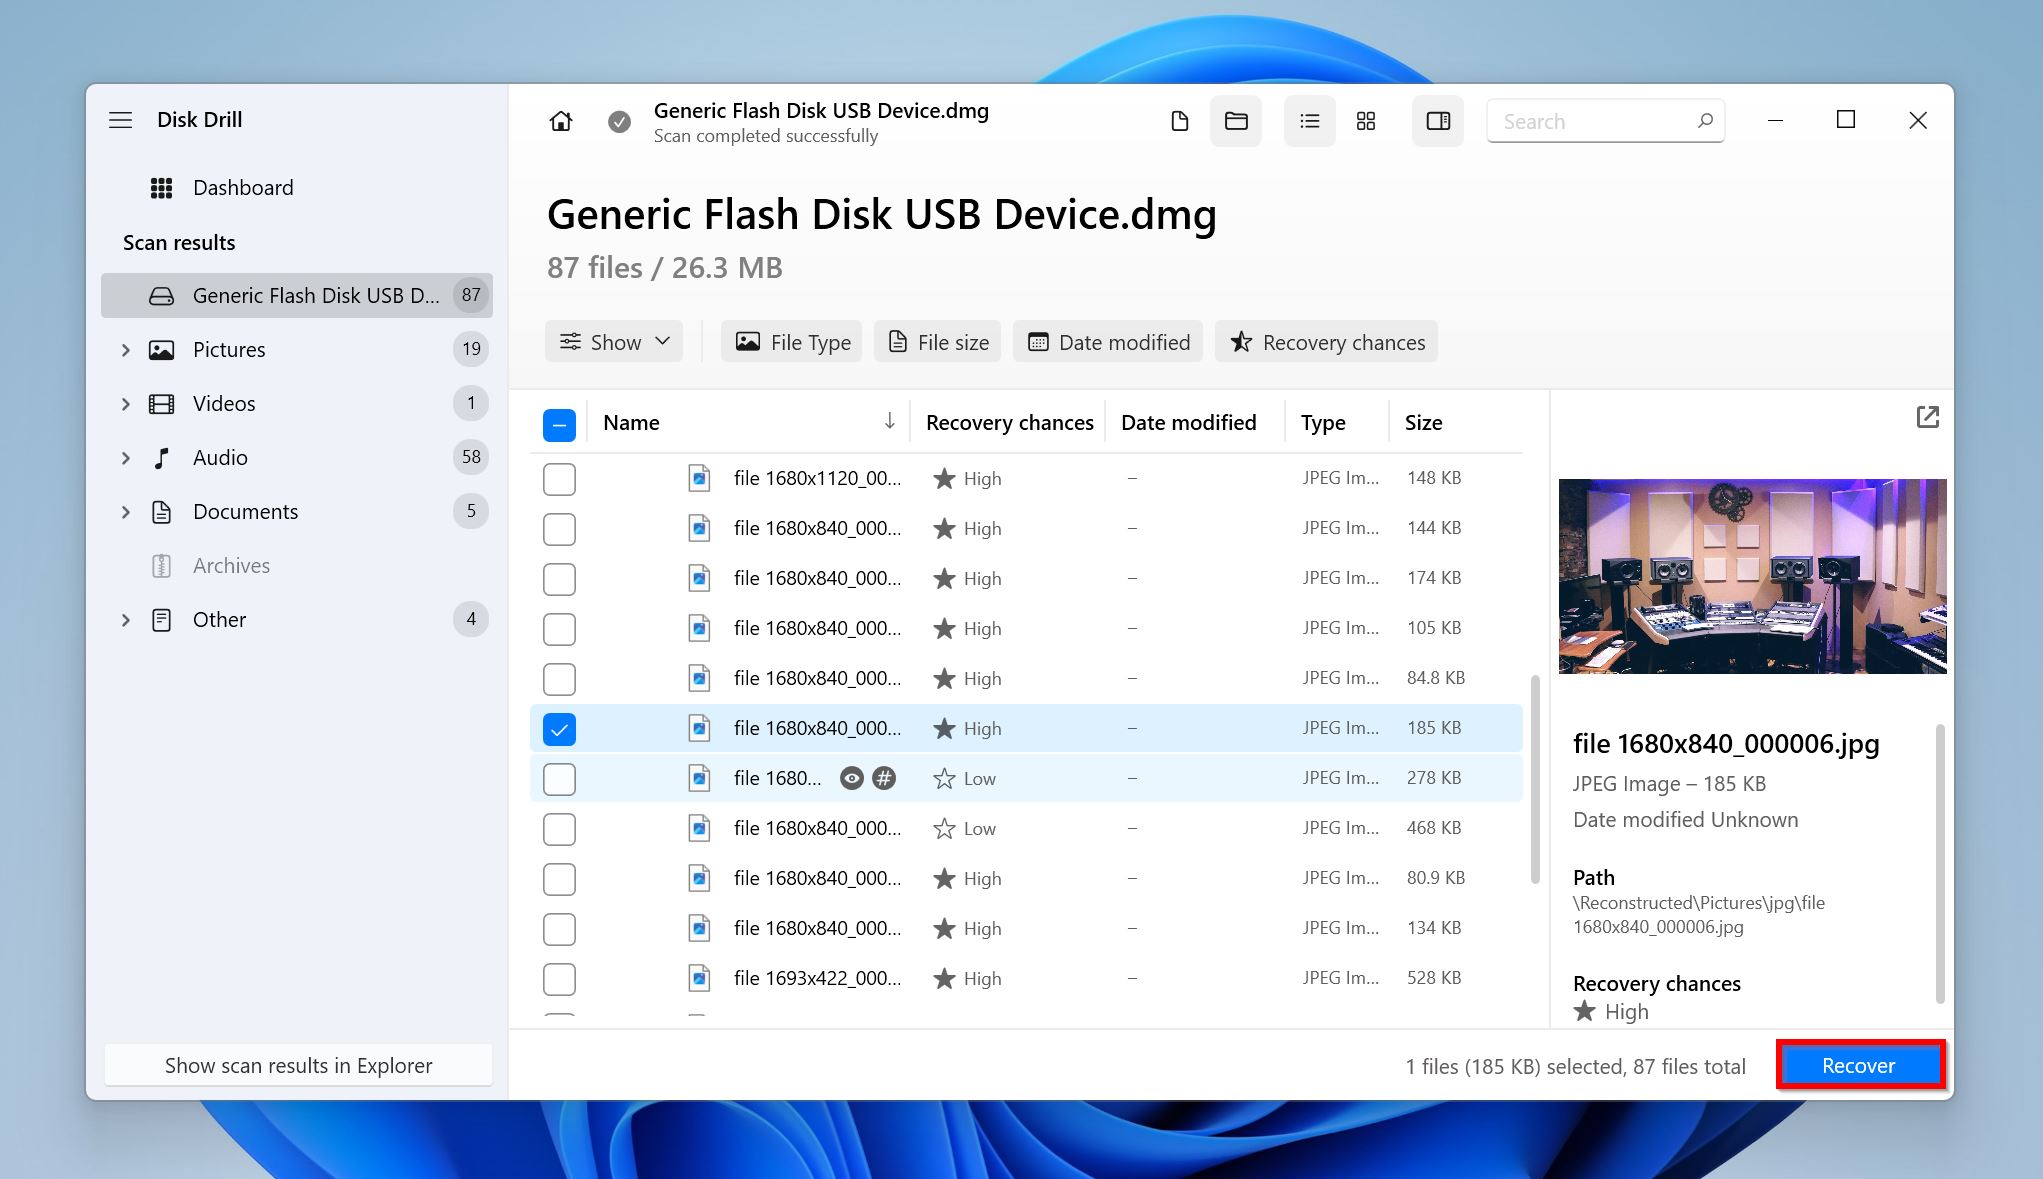
- Select the files you wish to recover and click Recover. Disk Drill displays a preview of the currently selected file, but you can preview any file by clicking the eye icon next to its filename.
- Choose a recovery destination for the files and click Next. It’s best to recover these files to a storage drive other than the corrupted SSD.
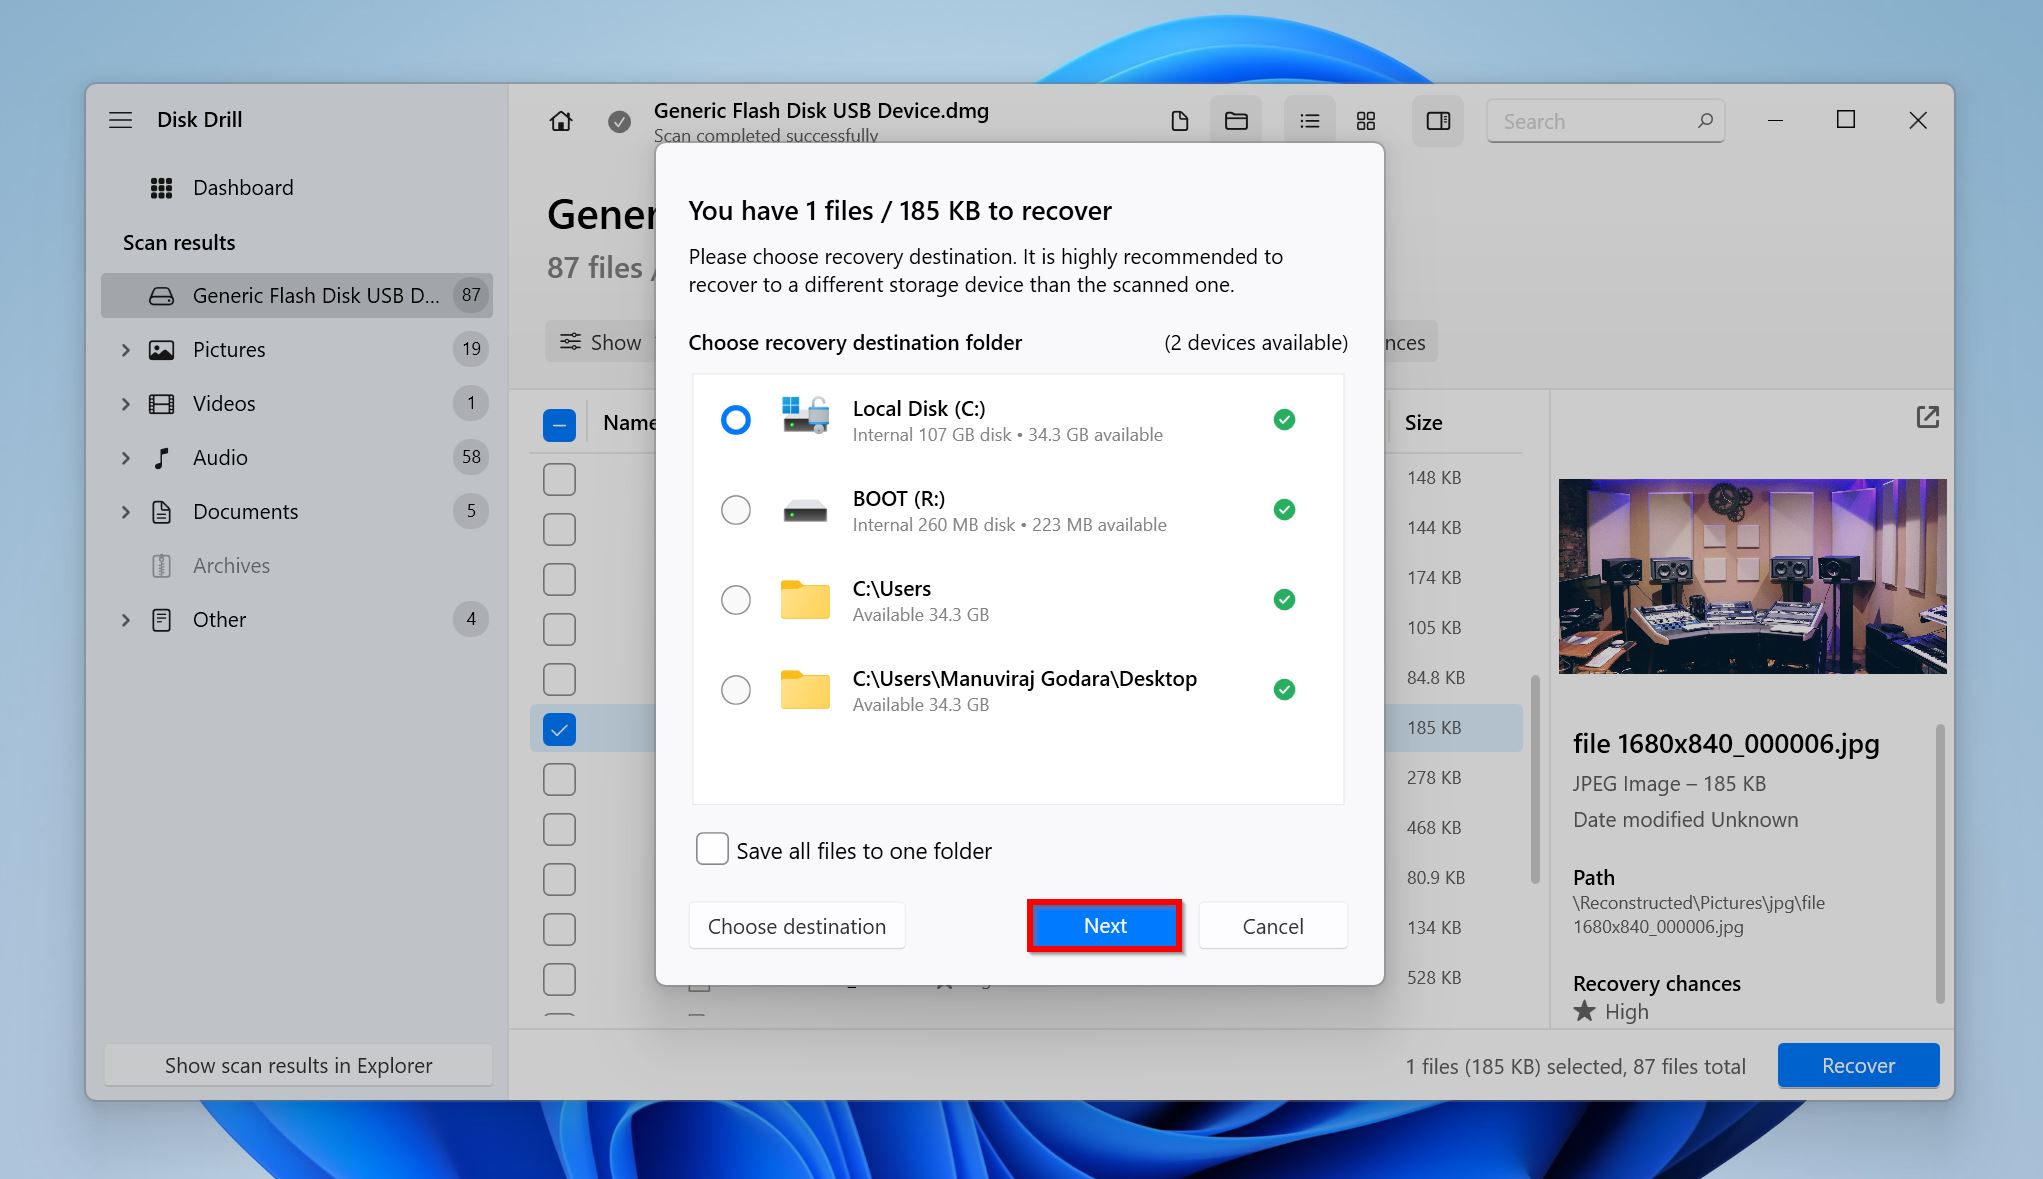
- Disk Drill will recover your files. You can recover up to 500 MB of data for free; beyond that, you’ll need to purchase a license.
5 Methods to Fix a Corrupted SSD
One of the methods below is likely to fix the corruption on your SSD and restore it to its previous state. These methods cover a wide range of bases, such as physical connection issues to full-fledged partition recovery. Before proceeding, recover your data if you haven’t already.
Method 1: Check the SSD’s Physical Connection
It’s quite possible that the SSD is not corrupted, but is having issues communicating with your PC because of connection problems. The common offenders include damaged cables and connectors, as well as loose connections. Your SSD will most likely not be detected at all, or randomly disconnect if this is the case.
It’s advisable to connect the SSD to another PC using a fresh pair of SATA cables and see if the issue persists. In the case of an M.2 SSD, carefully examine the M.2 slot and the connector on your SSD for oxidization and other types of physical damage. You can also get the drive evaluated by an expert.
Method 2: Update SSD Firmware and Drivers
The SSD’s firmware, and software drivers are crucial to the smooth functioning of your SSD because they facilitate the software-level communication between the PC and the drive. Outdated drivers and firmware can cause several issues on the drive and may even lead to corruption. Additionally, firmware and driver updates contain bug fixes and security patches.
To update your SSD’s firmware, you need to know who manufactured it. Each SSD vendor will have their own SSD management tool that you can use to check the SSD’s health, as well as check the firmware version and update it. SSD management tools for some common manufacturers include:
If your particular SSD vendor doesn’t have a dedicated SSD management tool, you’ll need to use their website to manually find and download firmware updates for your SSD.
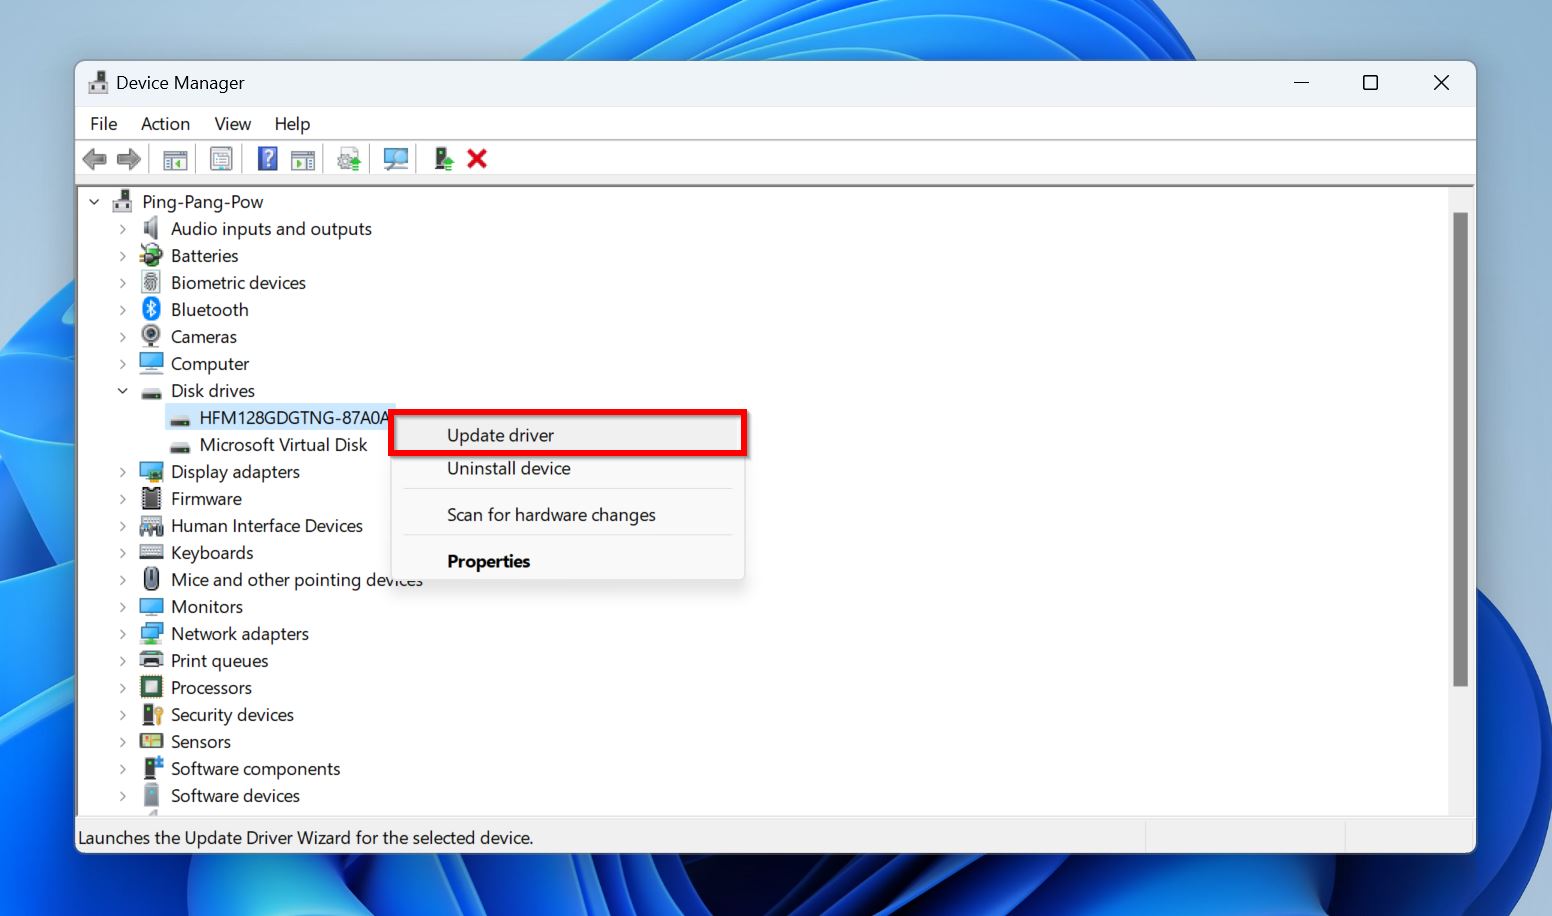
When it comes to updating drivers, you don’t need any third-party programs. You can do it using the Windows Device Manager, and potentially fix the corrupted SSD. Here’s how:
- Press Windows Key + R to launch the Run tool. Type devmgmt.msc in the text box and press Enter to launch the Device Manager.
- Expand the Disk drives section.
- Right-click on your SSD and choose Update driver.
- Click on Search automatically for drivers. Choose Browse my computer for drivers if you have already downloaded the latest drivers from another source.
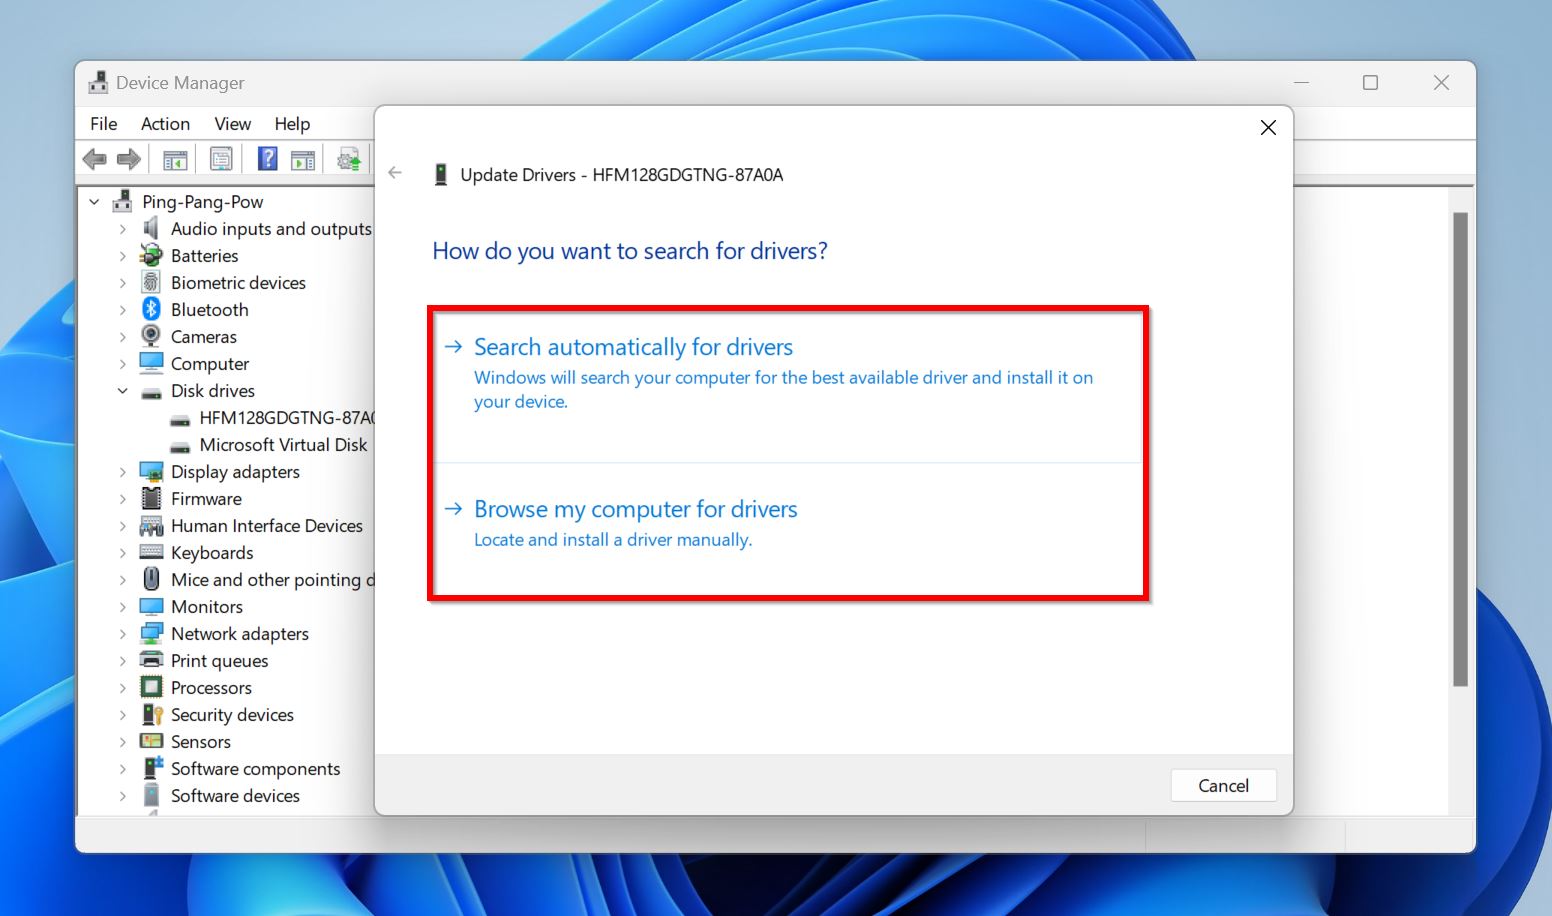
- Windows will automatically install the latest drivers. In case you choose the first option in Step 4, you’ll need an active internet connection.
Method 3: Run CHKDSK to Fix Bad Sectors
Any storage drive will develop bad sectors over time and an accumulation of bad sectors can result in data corruption. Fortunately, Windows has an in-built tool–CHKDSK–that can find and fix bad sectors on your SSD.
Here’s how to run CHKDSK and fix the corrupted SSD;
- Search for “cmd” in Windows Search (Windows Key + S). Right-click on Command Prompt > Run as administrator.
- Type
chkdsk X: /r /xand press Enter. Replace X with the drive letter of the partition you wish to scan. If you have multiple partitions, do this for each partition.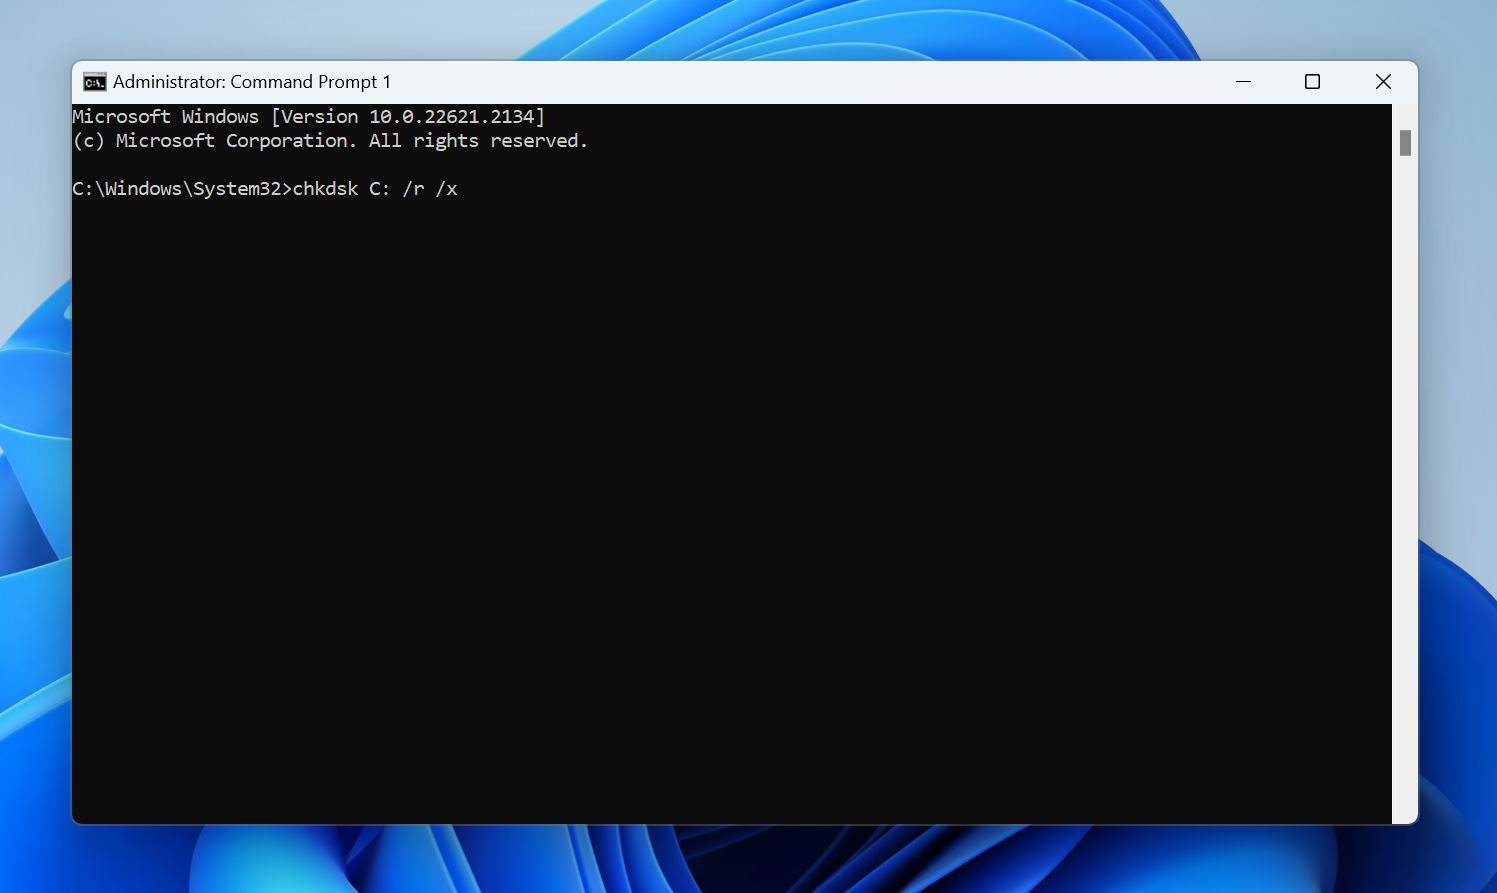
- Wait for the CHKDSK command to run. It’s recommended you don’t interrupt the command, even if it appears to be stuck.
Method 4: Repair the Corrupt Partition Using TestDisk
TestDisk is a third-party tool that can repair the corrupt partition on your SSD. It’s quite useful if you notice the partition has disappeared from Windows Explorer and the space it occupied now shows up as “Unallocated” in Disk Management.
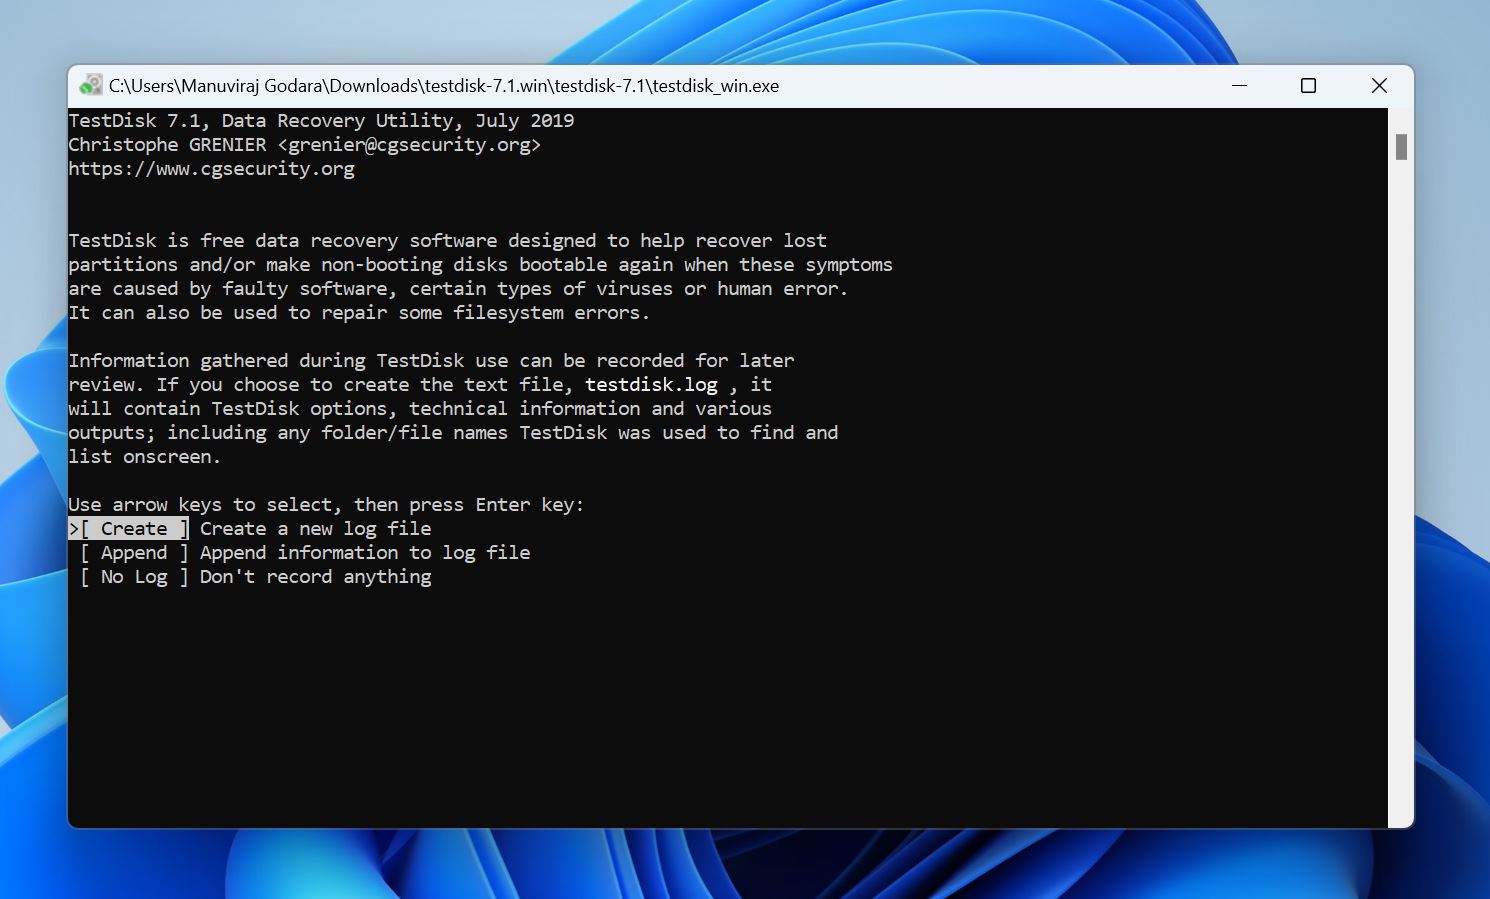
Due to the lack of a GUI, you’ll need to use the arrow keys to navigate the program and the Enter key to select the desired option.
Here’s how to repair a corrupted SSD partition using TestDisk:
- Download TestDisk and extract the contents of the archive. Do this on a separate drive, i.e., a drive other than the corrupted SSD.
- Use the arrow keys to select whether you wish to create a log file or not. Press Enter to confirm.
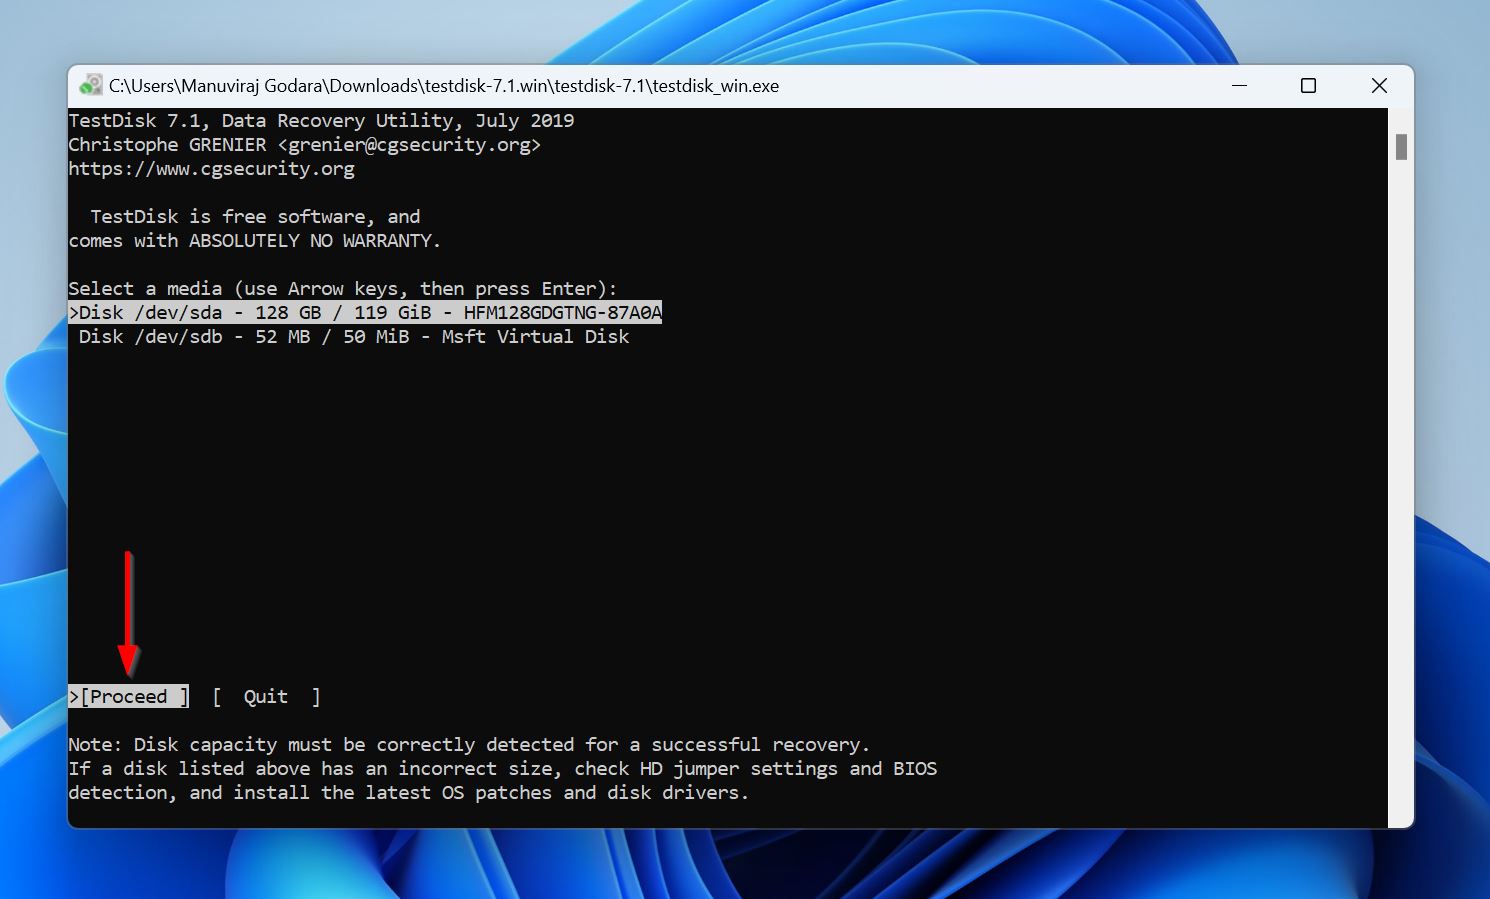
- Choose your SSD from the list of storage drives.
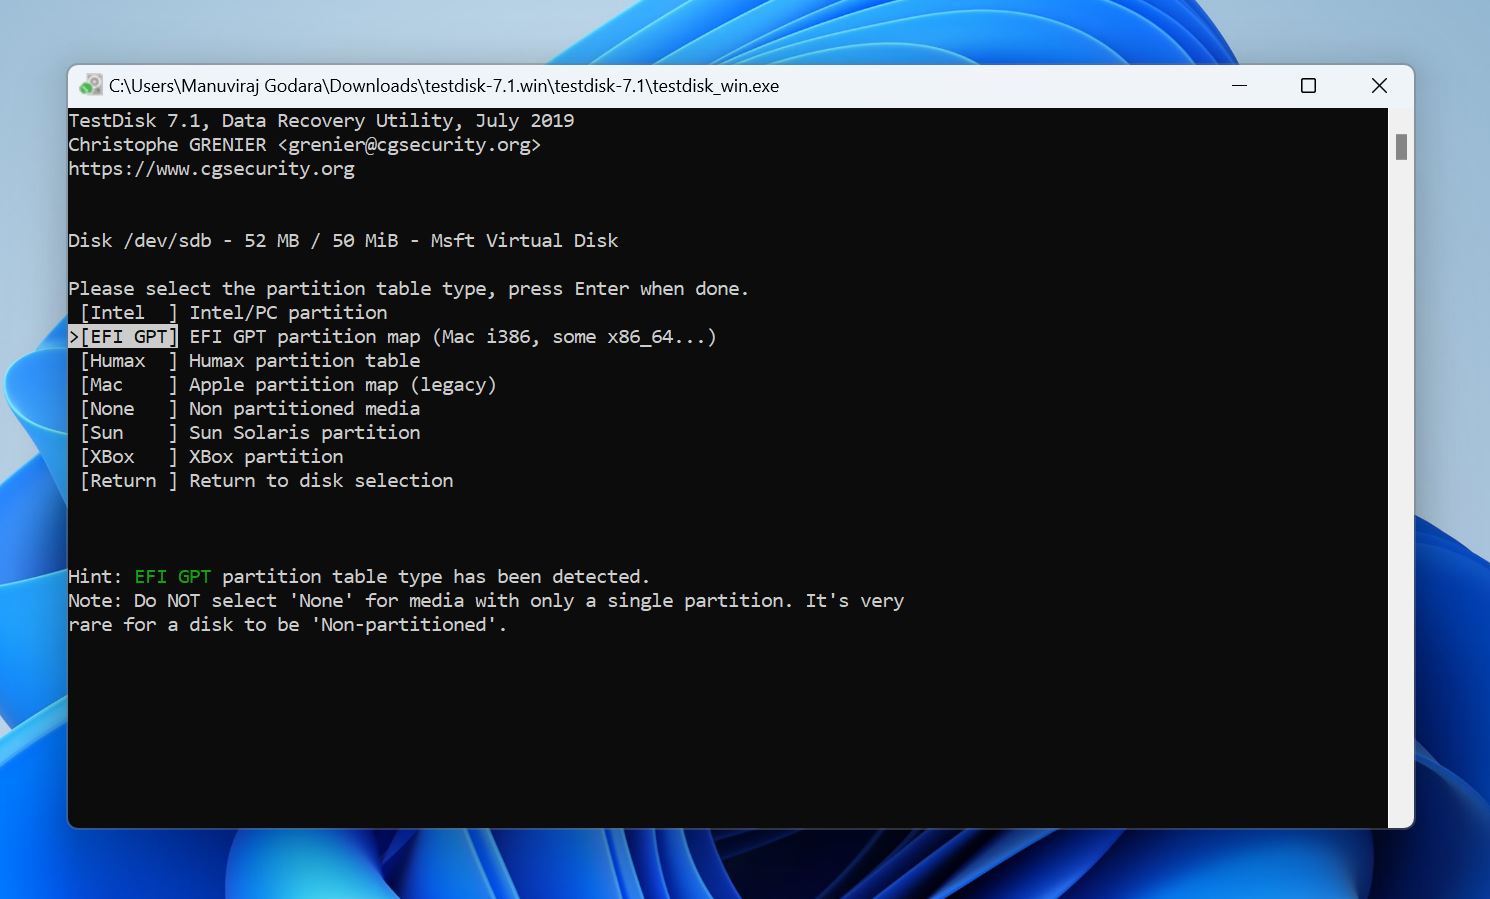
- Select the partition table type. It’s best to simply press Enter on this screen, since TestDisk automatically highlights the correct partition table.
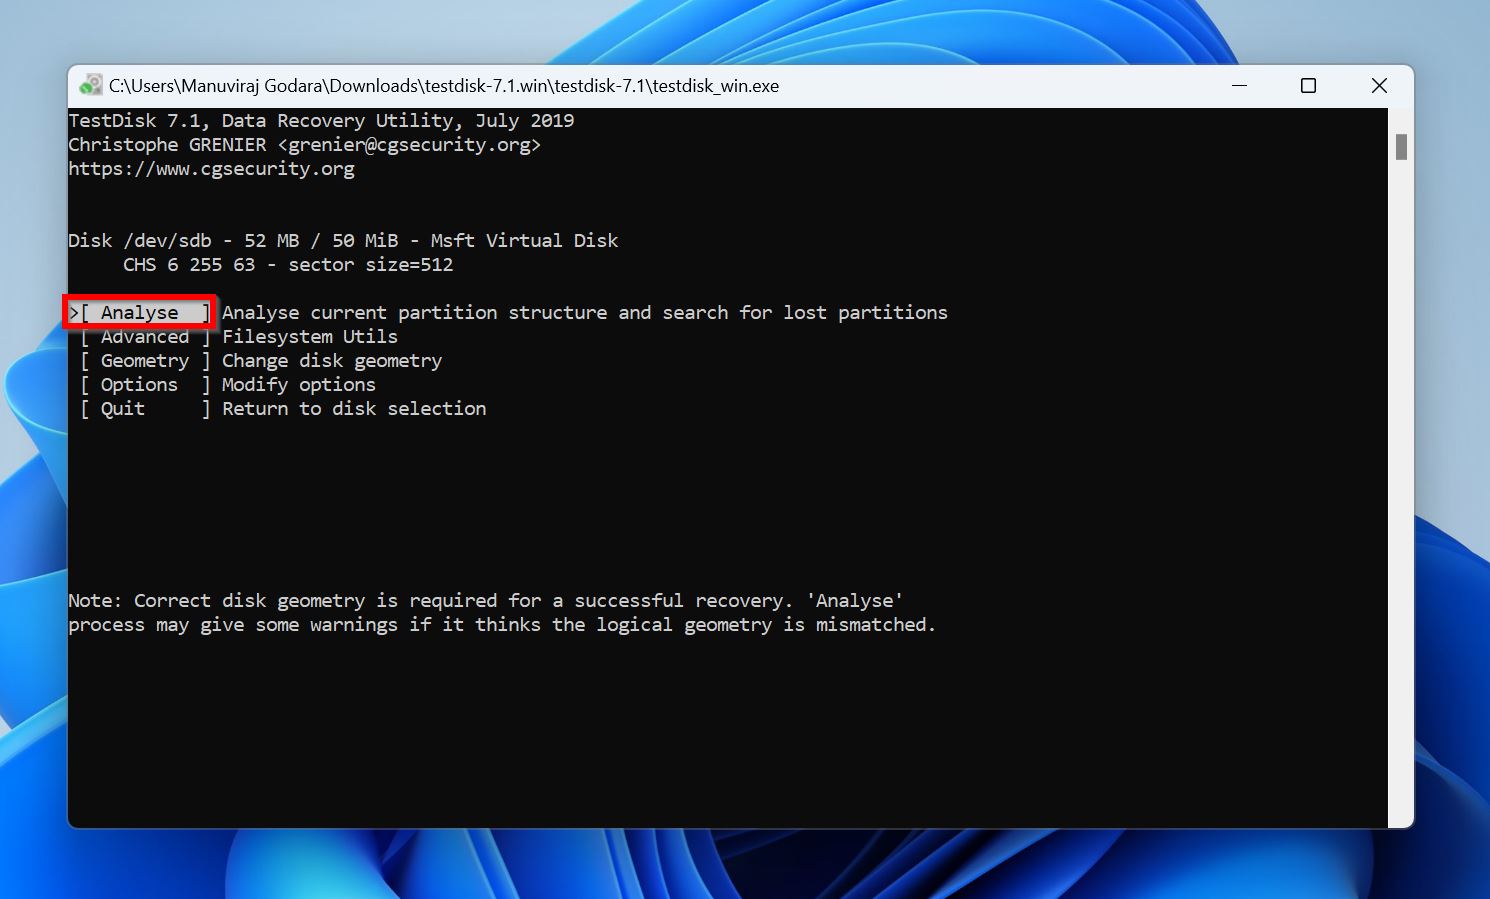
- Select Analyse and press Enter.
- Select Quick Search and press Enter. TestDisk will list the recoverable partitions along with their status.

- Highlight the partition you wish to recover and press P on your keyboard to list its files. Check if all the files are there. Press Q to go back.
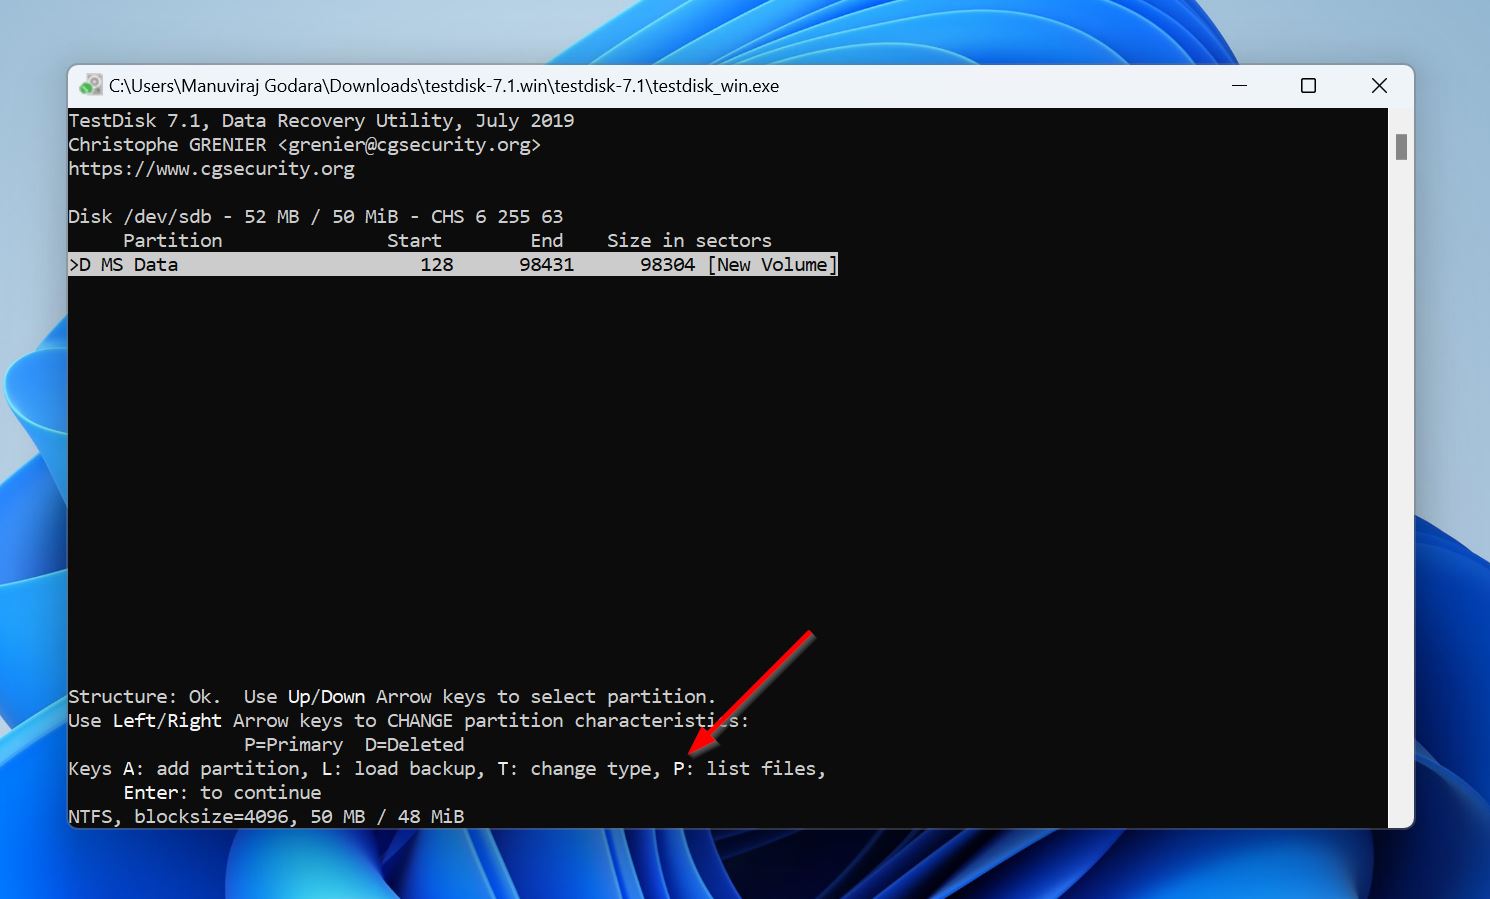
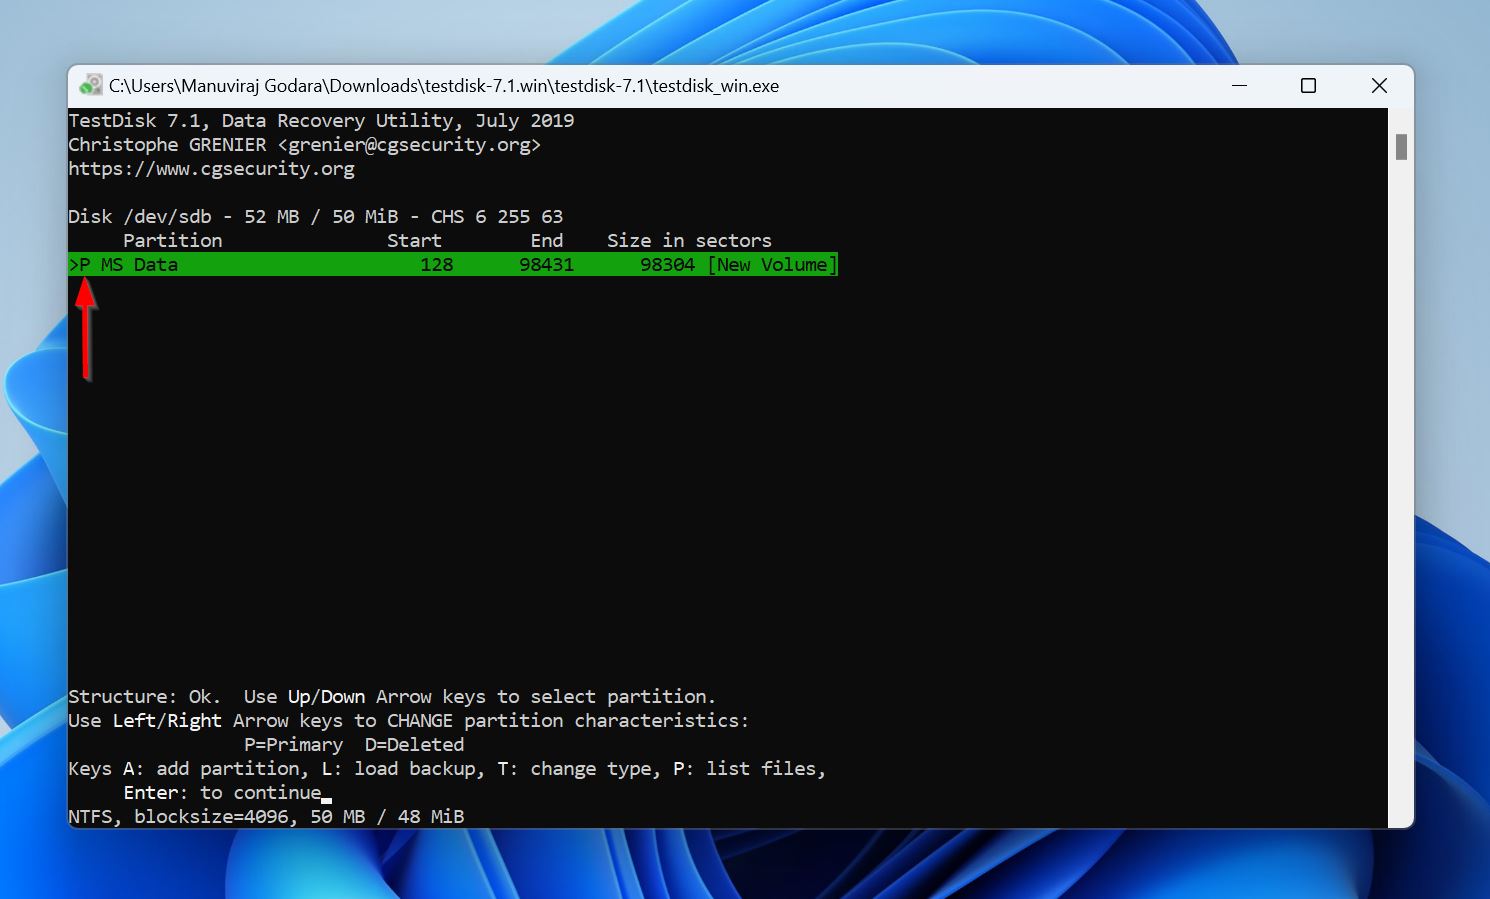
- The partitions will have a P, D, L, or * character before them, denoting Primary, Deleted, Logical, and Bootable respectively. The partition you wish to recover will likely have a D prefix, and you need to mark it as P. To achieve this, select the partition using the Up or Down arrow keys, and press the Left and Right arrow keys to cycle between the P, D, L, and * characters.
- Press Enter after marking the partition as P.
- Use the Deeper Search option to find more partitions or if all your files aren’t there. If you don’t wish to do so, proceed to the next step.
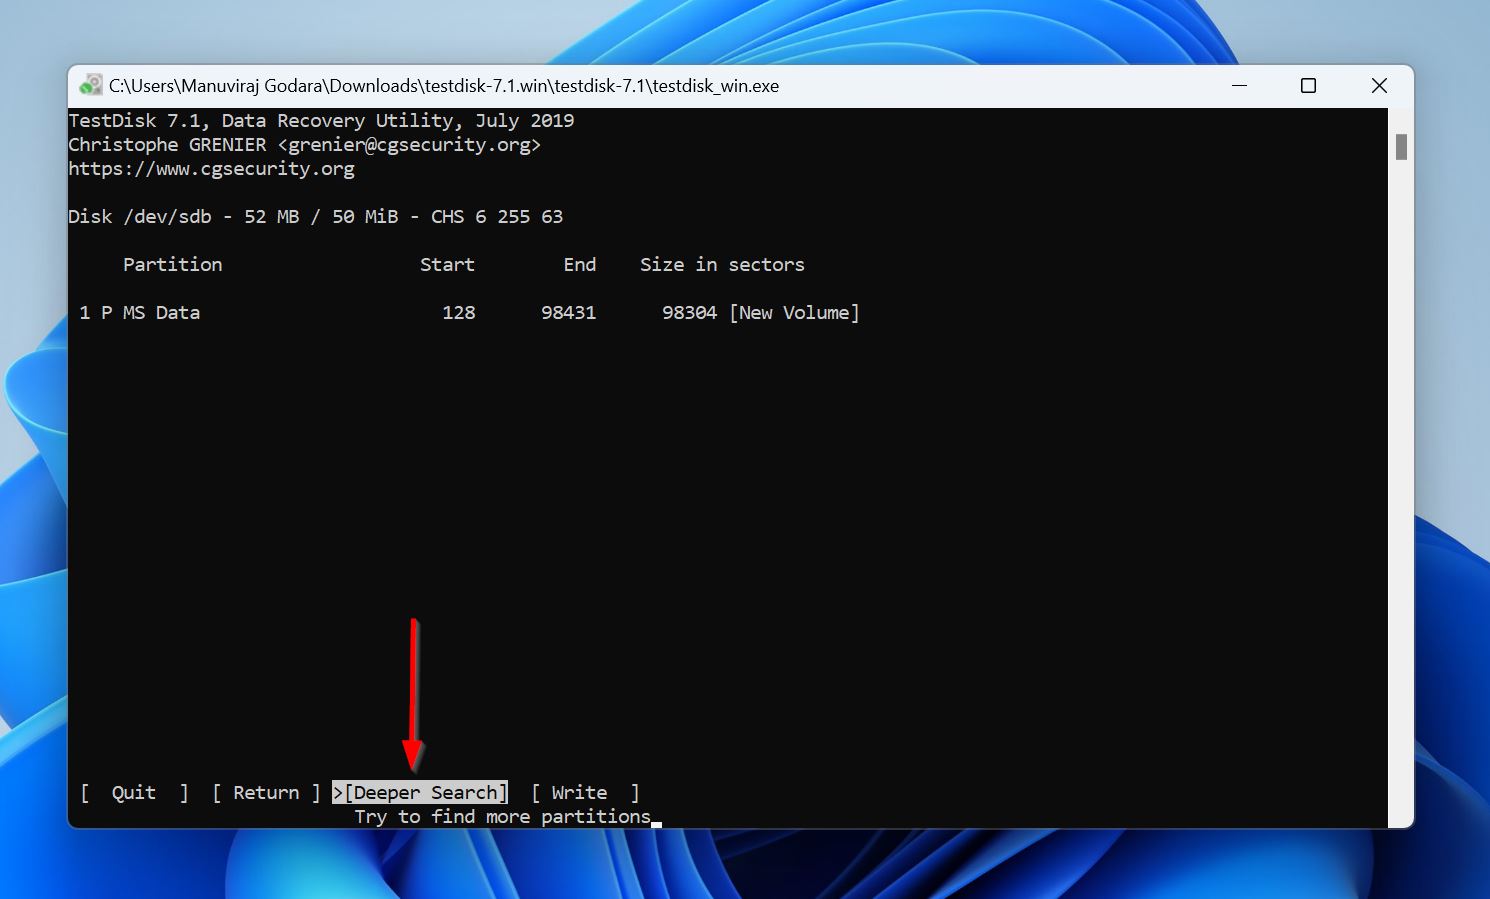
- Choose the Write option (no pun intended) and press Enter.
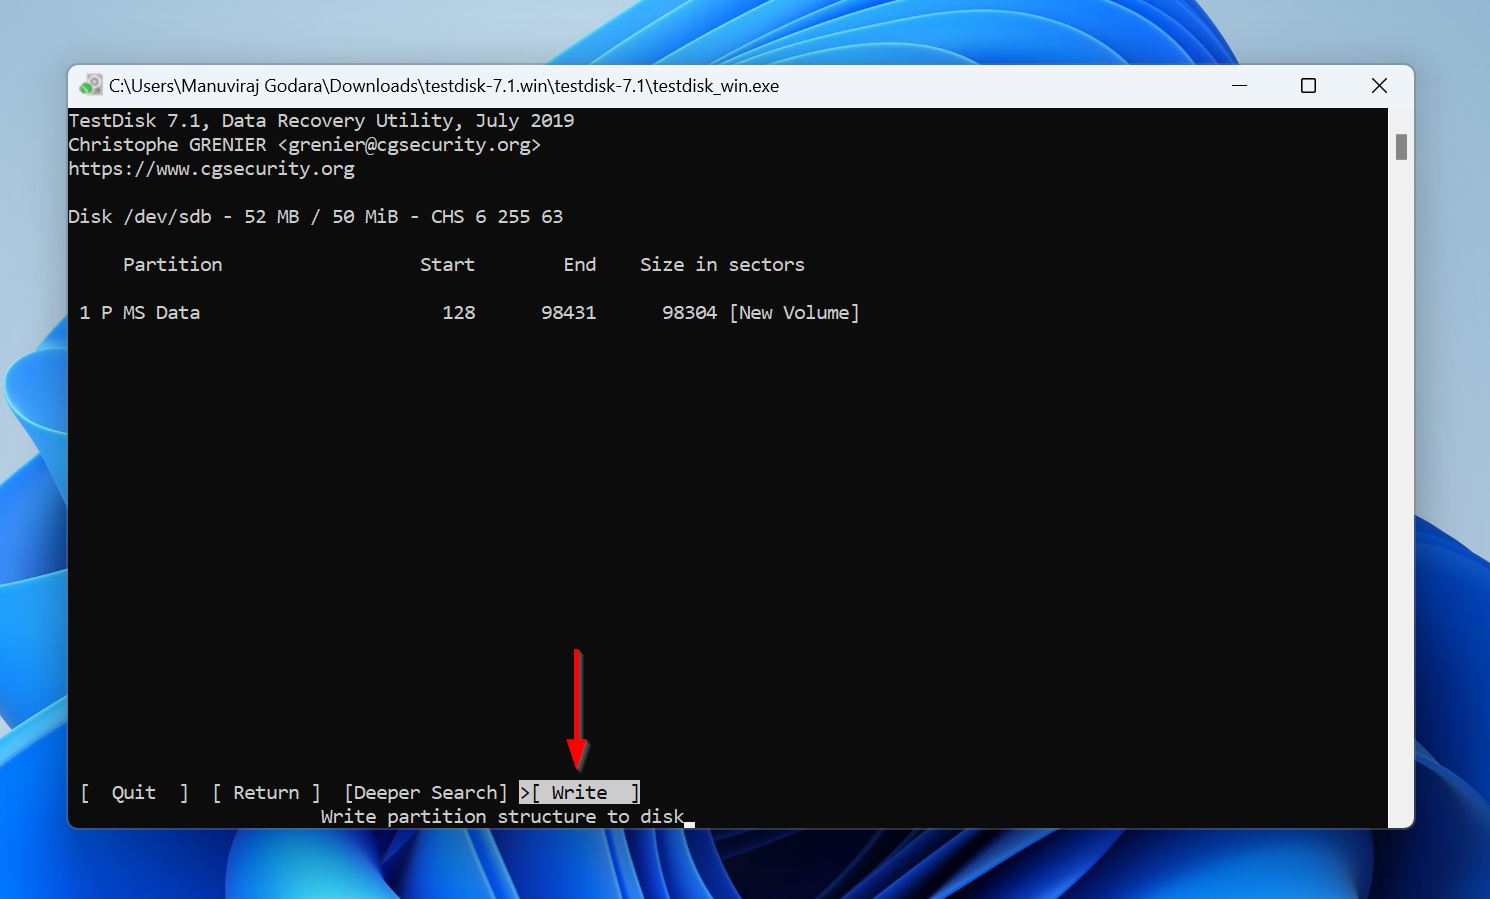
- Press Y in the confirmation prompt.
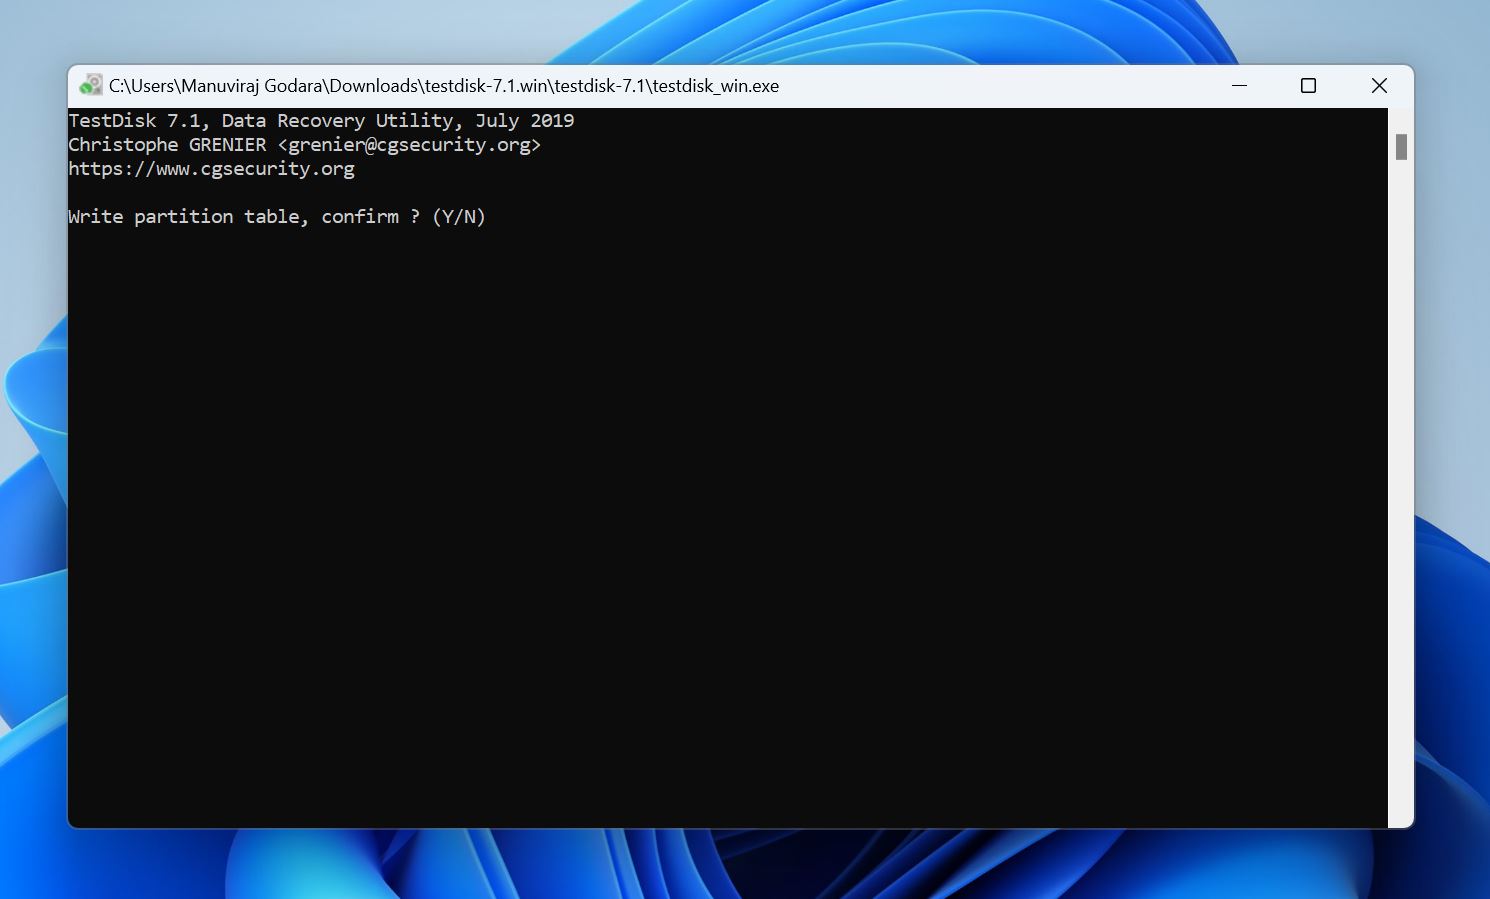
- TestDisk will recover the corrupt partition and prompt you to reboot the PC.
Method 5: Perform a Full Format of the Corrupt SSD
A full format of the corrupted SSD will repair most logical issues with it, as it overwrites each data block with zeroes, essentially giving you a clean slate to work on. However, any data on the drive will be unrecoverable after this, so ensure you recover it beforehand.
Here’s how to full format a corrupted SSD:
- Type “disk management” in Windows Search (Windows Key + S). Click on Create and format hard disk partitions from the search results.
- Right-click on the partition you’d like to format and choose Format.
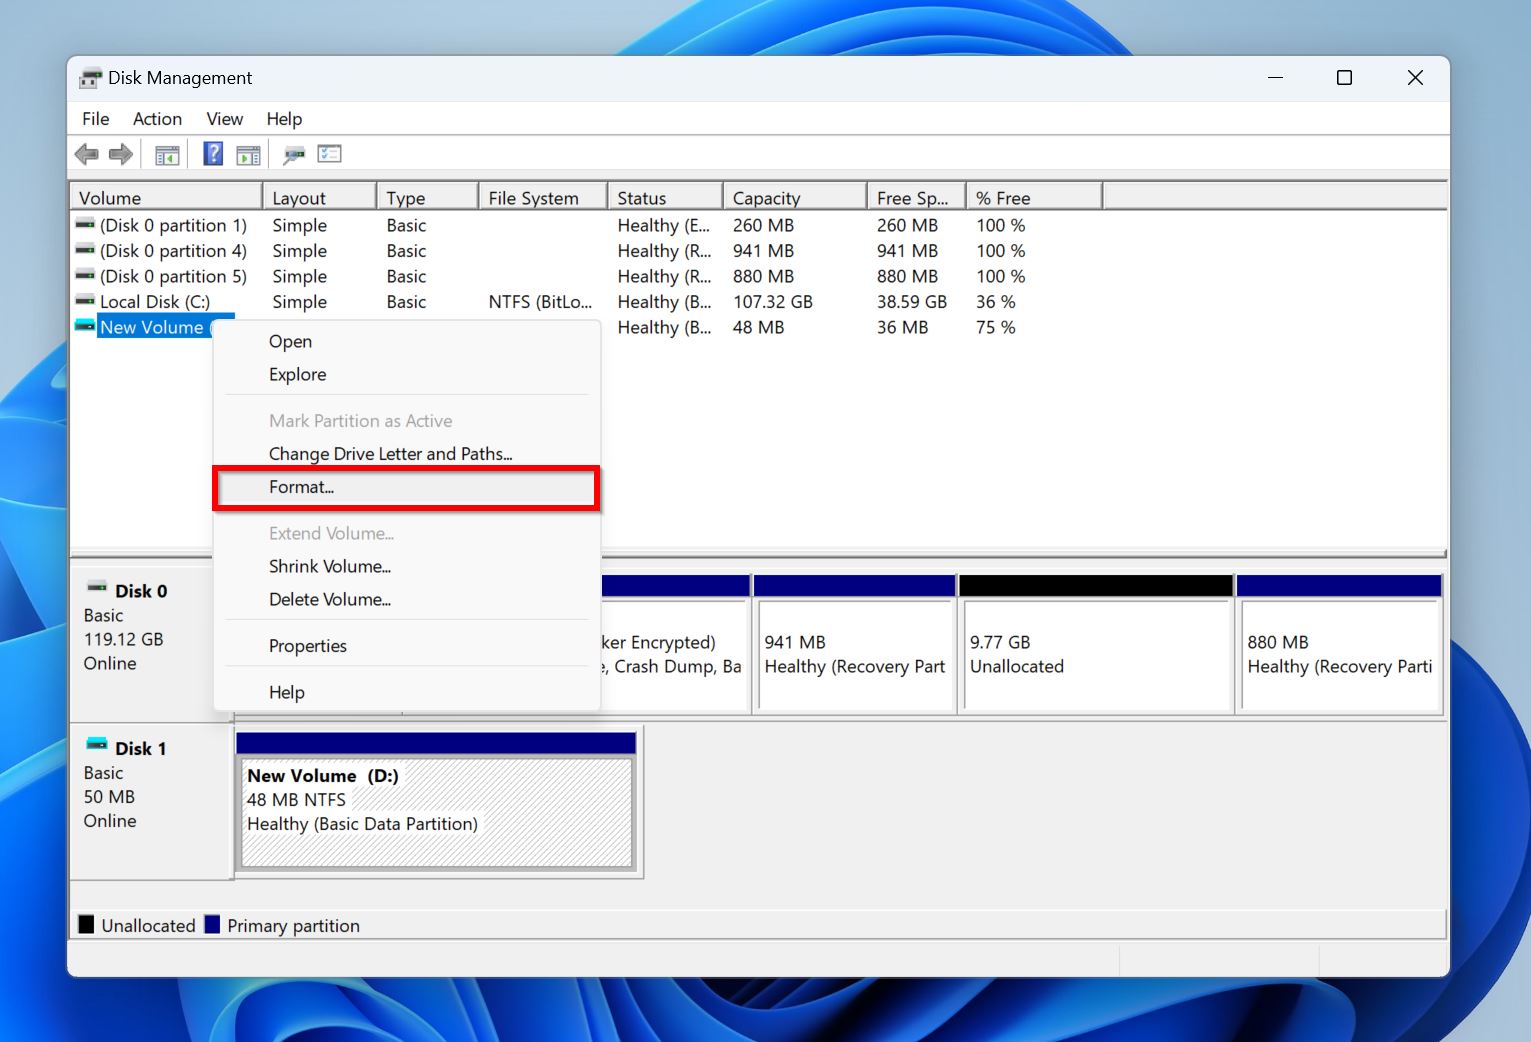
- Uncheck the Perform a quick format option in the format parameters window and click OK. You can choose the remaining parameters according to your wish or leave them as they are.
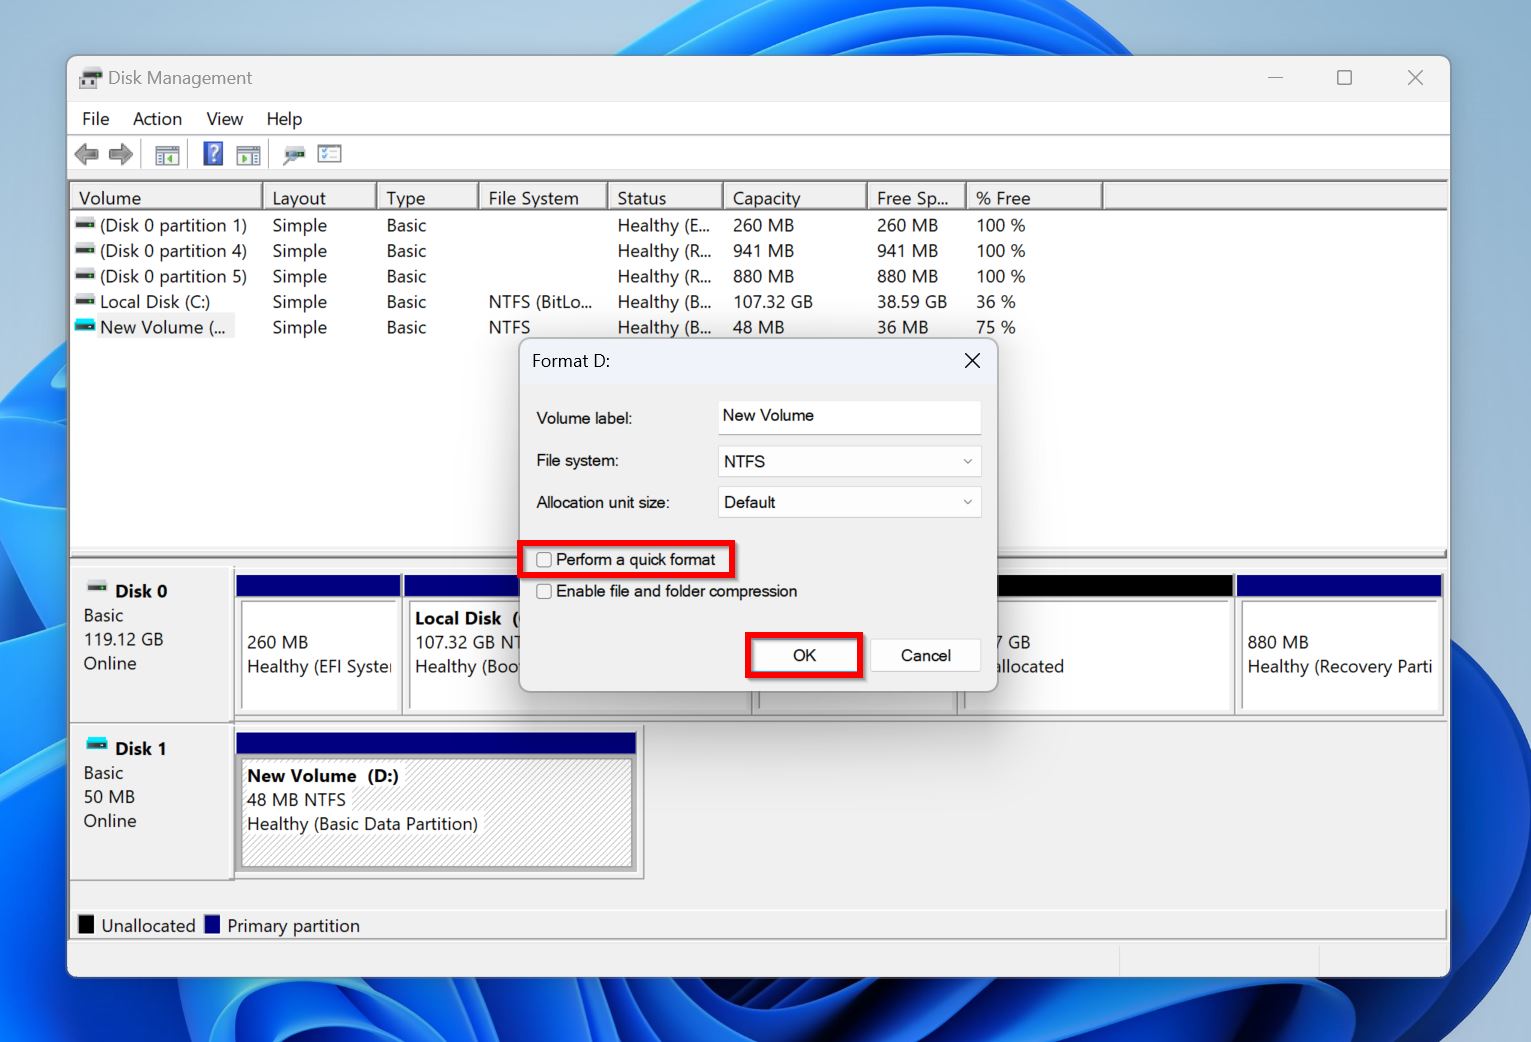
- Windows will perform a full format of the drive.
Note: Windows lets you format the C: partition if you’re using the same drive to boot your PC. In this case, it’s best to use a bootable USB drive, or another PC to format the drive.
How to Avoid Losing Data Due to SSD Corruption in the Future
SSDs are notorious for failing shortly after they start displaying symptoms of corruption. It’s best to stick to a regular data backup schedule for the best protection against data loss in the future.
If you notice any of the following symptoms on your SSD, back up your data as soon as possible:
- Slow read and write speeds.
- Randomly appearing and disappearing files.
- Frequent crashes and freezing.
- Error messages like error code 0xc000014cm, and the “Drive is not accessible” pop-up.
Keeping an eye out for the aforementioned symptoms will ensure you can take timely action.
Conclusion
A corrupted SSD could be on the fast lane to failure, and that’s why we place extra emphasis on data recovery before you address the corruption. Once your data is safe, you can check the SSD’s connection, update its firmware, run CHKDSK, and use an SSD repair tool to get back the corrupt partition. If all else fails, it’s best to perform a full format on the SSD.


