
Without a doubt, USB drives are incredibly convenient devices for data storage or transferring files between computers. But just like any other storage device, they’re not flawless. There’s always a tiny chance that something may go wrong, and you’ll lose a valuable file.
So what should you do if a file that you’ve uploaded to the USB drive mysteriously disappeared? How to recover data from a flash drive on Mac? Read on to find the answers.
Table of Contents
Is it Possible to Recover Lost Files from USB Drive on Mac?
In most cases, yes. Thanks to modern data recovery solutions, you’ll be able to recover most, if not all, deleted files from your USB drive in a few simple settings. This applies to data loss scenarios like minor corruption, an interrupted move operation, or an accidentally formatted pen drive.
But, it’s imperative to act quickly and avoid writing new files to the drive before recovering your data.
If the USB drive is physically damaged or severely corrupted, DIY data recovery is usually not possible. In these cases, stop using the drive immediately, and contact a professional data recovery service to get back your data.
How to Recover Files From USB on Mac
The first thing that you should do is stop using the USB drive. Just keep it disconnected from your computer until you are ready to start the flash drive data recovery on Mac.
It’s impossible to stress enough the importance of doing this since it’ll prevent the possibility of data overwriting and, therefore, will help with recovering your files.
Method 1:Use Data Recovery Software
Now let’s start the USB data recovery on Mac. The most reliable and effective method of restoring USB on Mac is by using a data recovery tool.
Disk Drill is a great example of such an application since it’s simple to navigate and is pretty versatile. Moreover, it supports all types of USB devices and can recover almost any file (images, videos, documents, archives, and more).
Here’s how to recover a USB drive on Mac using Disk Drill:
- Download and install Disk Drill if you haven’t already. Click the file and follow the onscreen instructions to finish the installation.
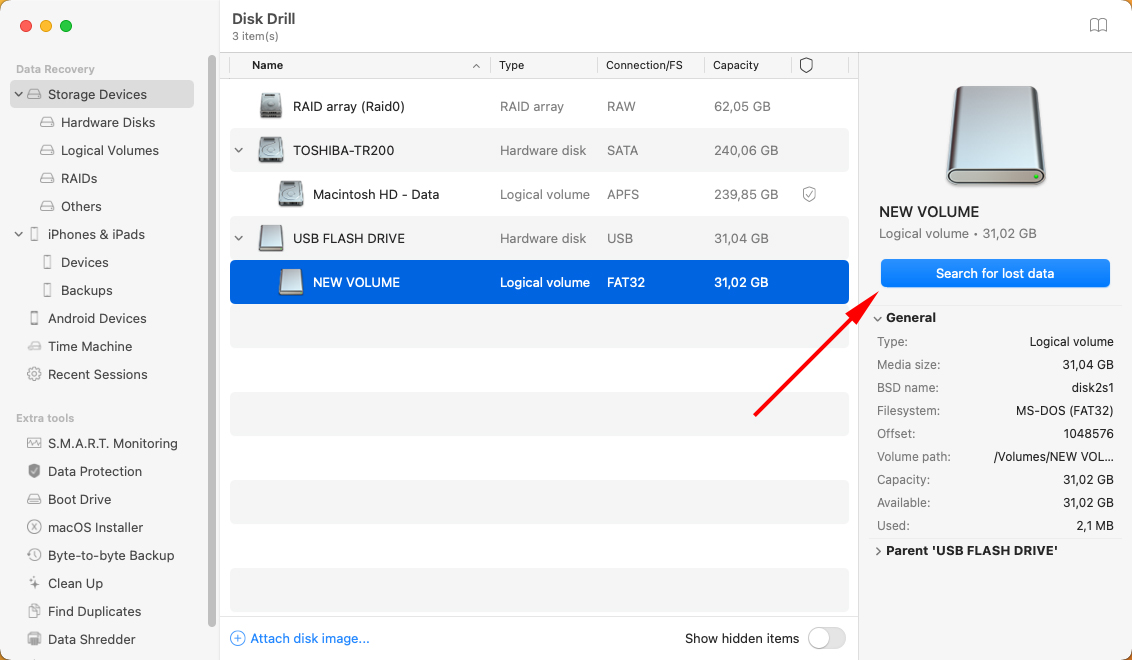
- Connect your USB drive to your Mac and launch Disk Drill. From the list of storage devices, choose the connected flash drive.
- Click the Search for lost data button located on the bottom-right of the screen to start scanning your device.
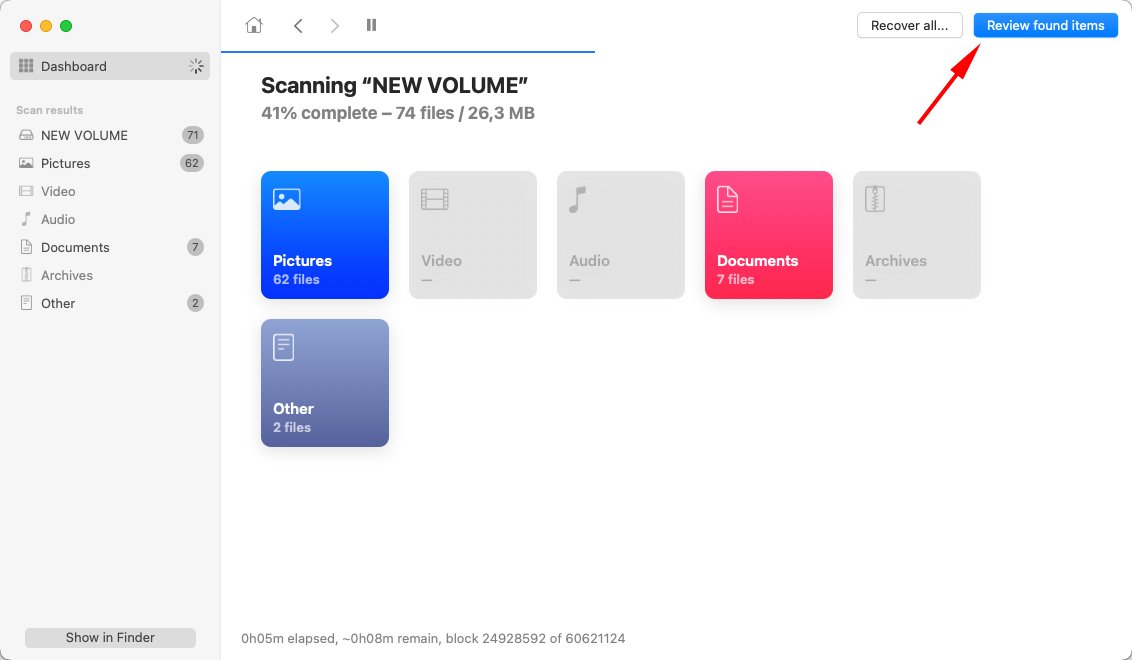
- Click Review found items to preview the files while the application is scanning your drive or wait for it to finish the scan.
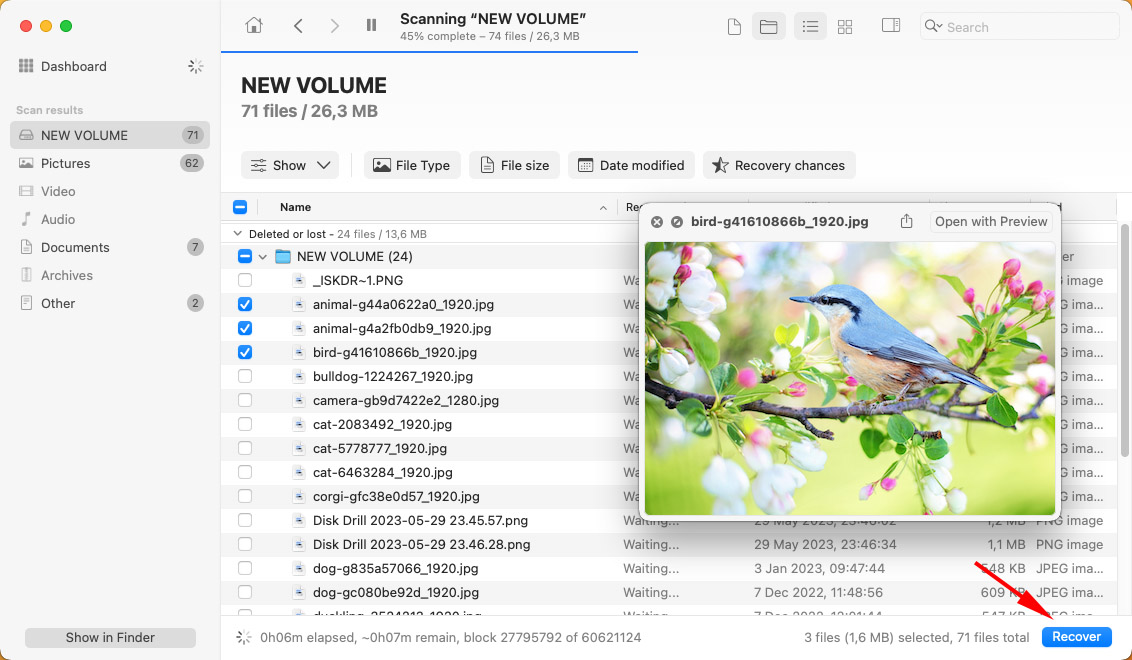
- Once you’ve found the needed files, click the box near that file to choose it. If you want to recover all of the files, click the box at the top of the files list. When ready, click Recover.
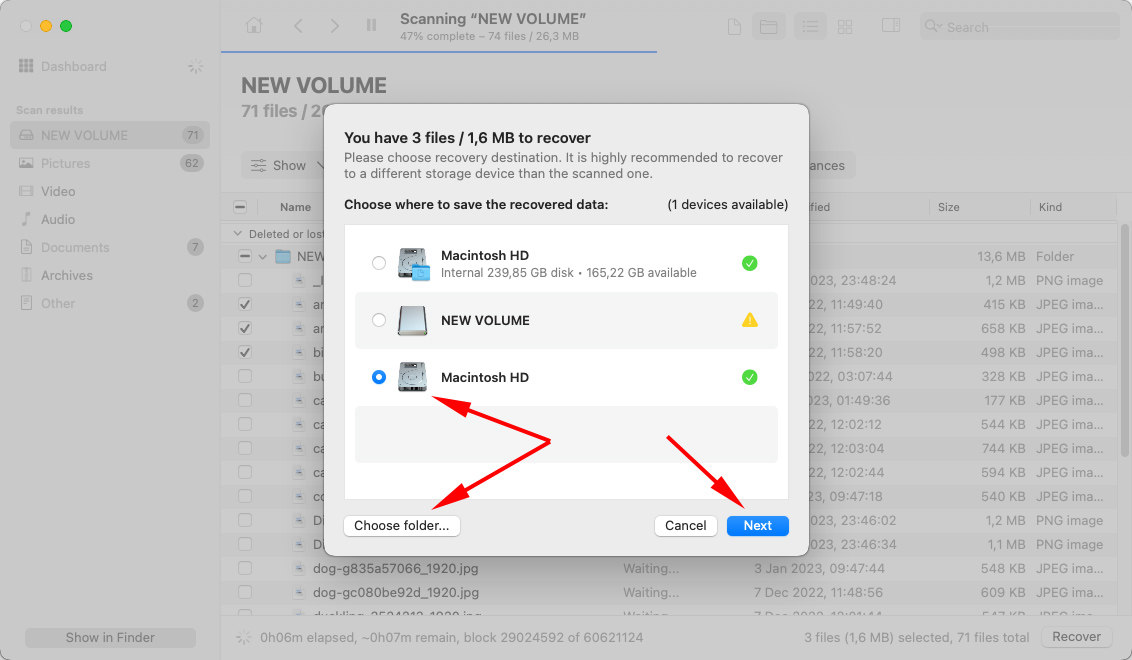
- A pop-up window will appear asking you to choose a folder where you want to keep the recovered file. Click the needed location and click Next.
Method 2:Recover Recently Deleted Files from Trash
When you delete a file from your USB drive, it doesn’t disappear for good right away — it gets moved into the Trash folder first. So if not much time has passed since you’ve manually deleted a file from your flash drive, the chances are it can still be found in Trash on your Mac and easily recovered.
Important: If you’ve already emptied Trash after deleting the file from your flash drive, then this method won’t work in your situation. The only solution will be to use a Mac USB recovery tool to restore the file.
Here’s how to recover files from a USB on Mac via Trash (if you’ve just recently deleted them):
- Launch Trash on your Mac. It is usually located on the right side of the Dock.

- Look through the files located there.
- Once you find the lost file from your flash drive, drag and drop it into a different folder or back into the USB drive.
Method 3:Unhide Files on the USB Drive
In order to avert unintended changes and deletions, macOS can hide certain folders on the USB drive. Typically, these folders contain app settings, deleted files, and other data. It’s possible that the files you’re looking to recover have simply been hidden by macOS.
Here’s how to unhide these files:
- Connect the USB drive to your Mac.
- Navigate to the USB drive in Finder.
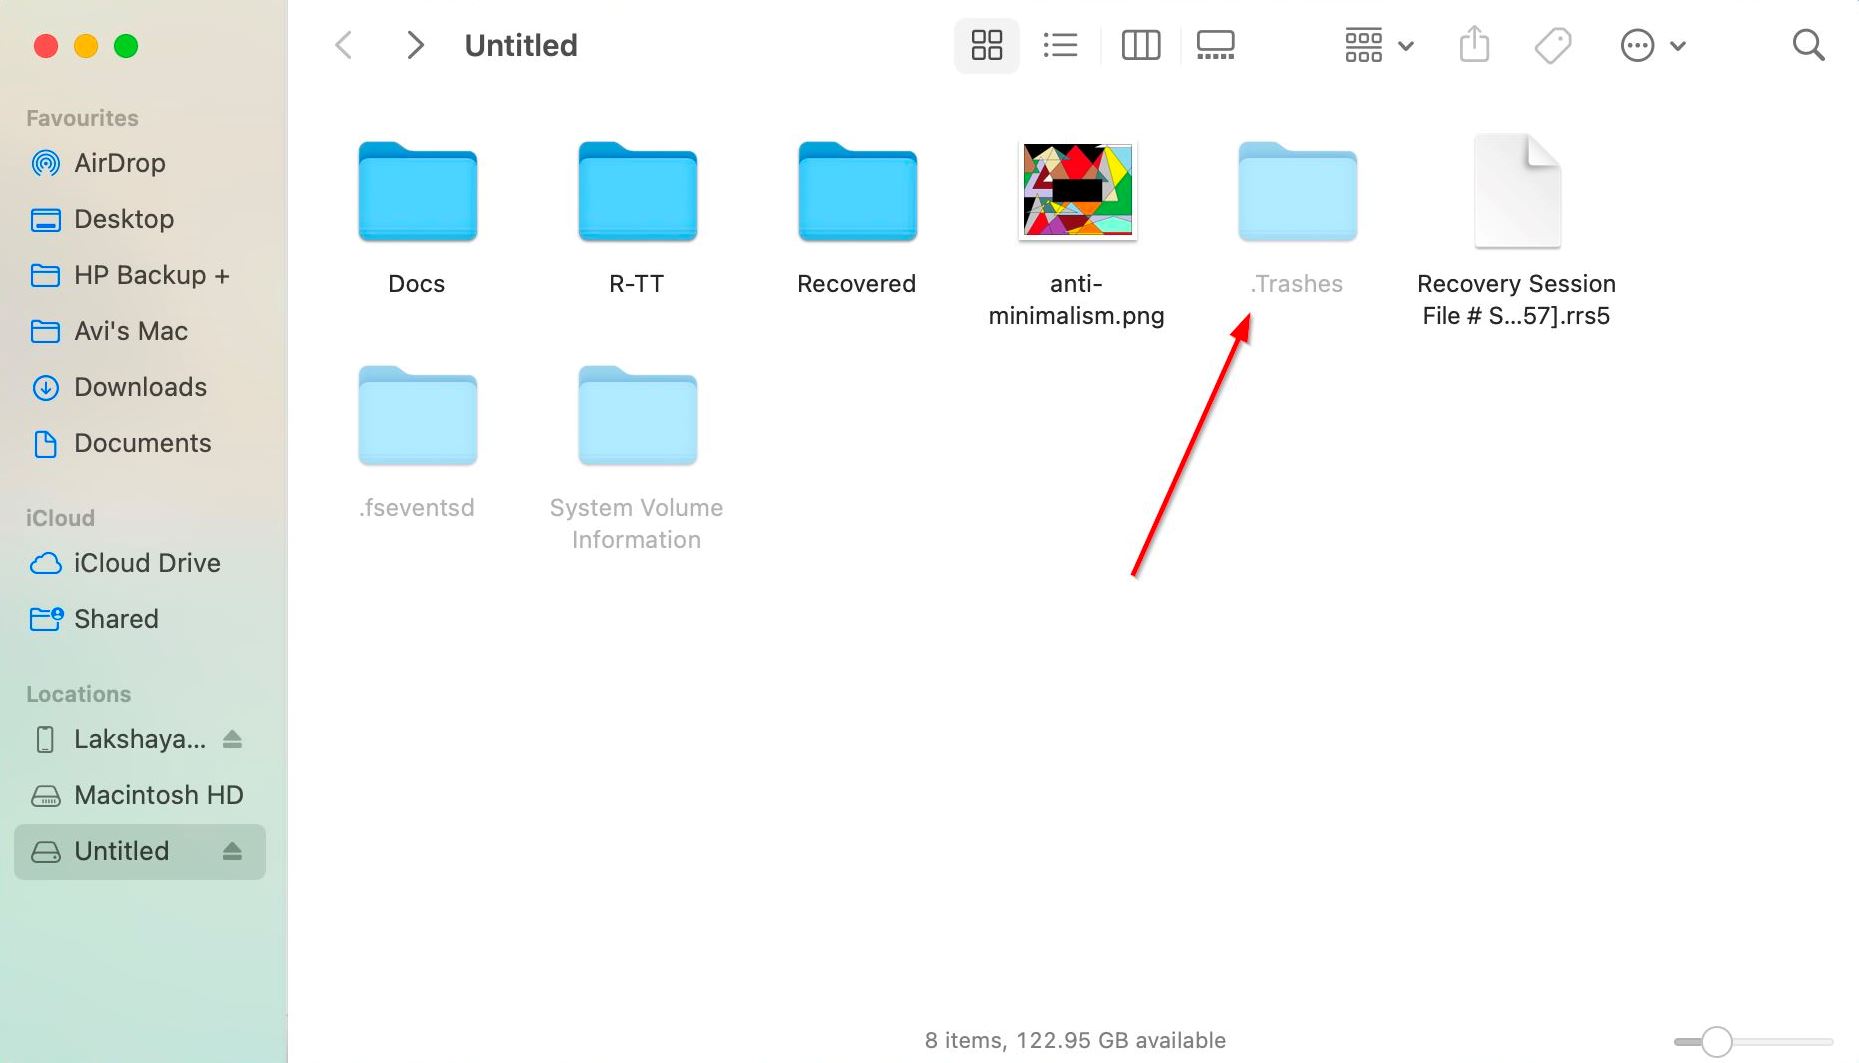
- Press Command + Shift + . (dot) to unhide hidden files. You can use the same shortcut to hide the files again.
- You can look in the .Trashes folder to view any files that were deleted from the USB drive.
How to Fix a Corrupted USB Drive
If data disappeared from your flash drive without your interference, it’s possible that the USB drive is corrupted. In such a case, before you start using it again, it is best to fix the issue.
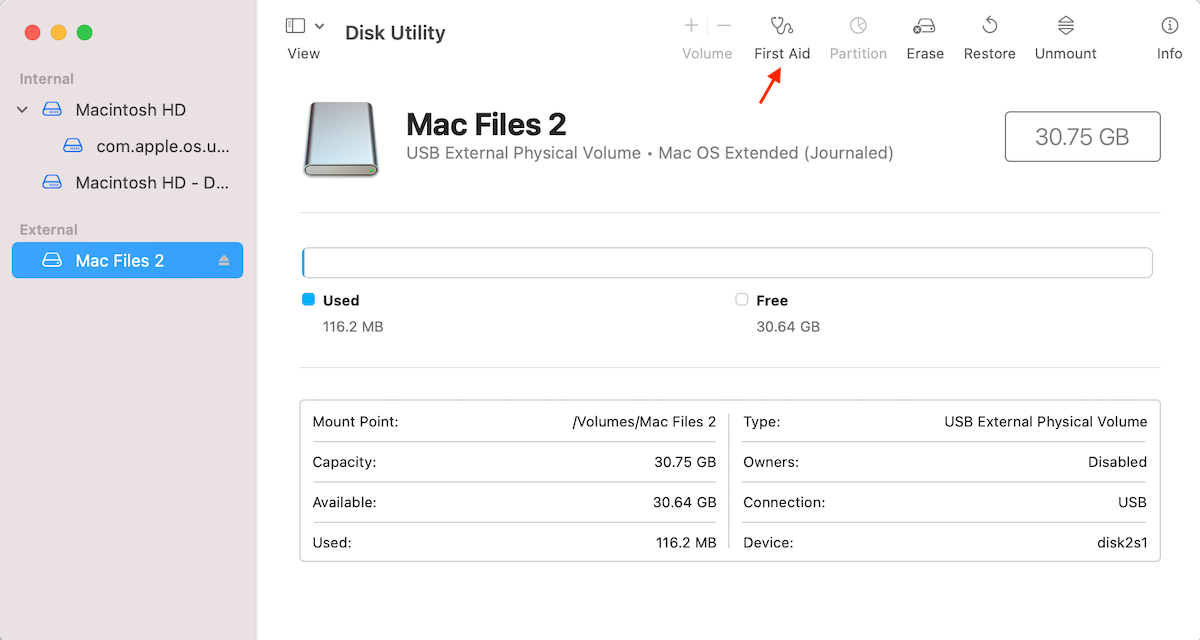
Solution 1: Run First Aid
Disk Utility has a feature called First Aid that can fix errors of any storage device on Mac. So if your USB drive isn’t working properly, you should try to fix it with First Aid. If this doesn’t help, then the last option that you have left is to format the device.
Here’s how to fix a corrupted flash drive on your Mac via Disk Utility:
- Head to Launchpad and click Disk Utility to open it.
- Look through the list of devices on the sidebar. Click your USB drive to select it.
- Click First Aid at the top.
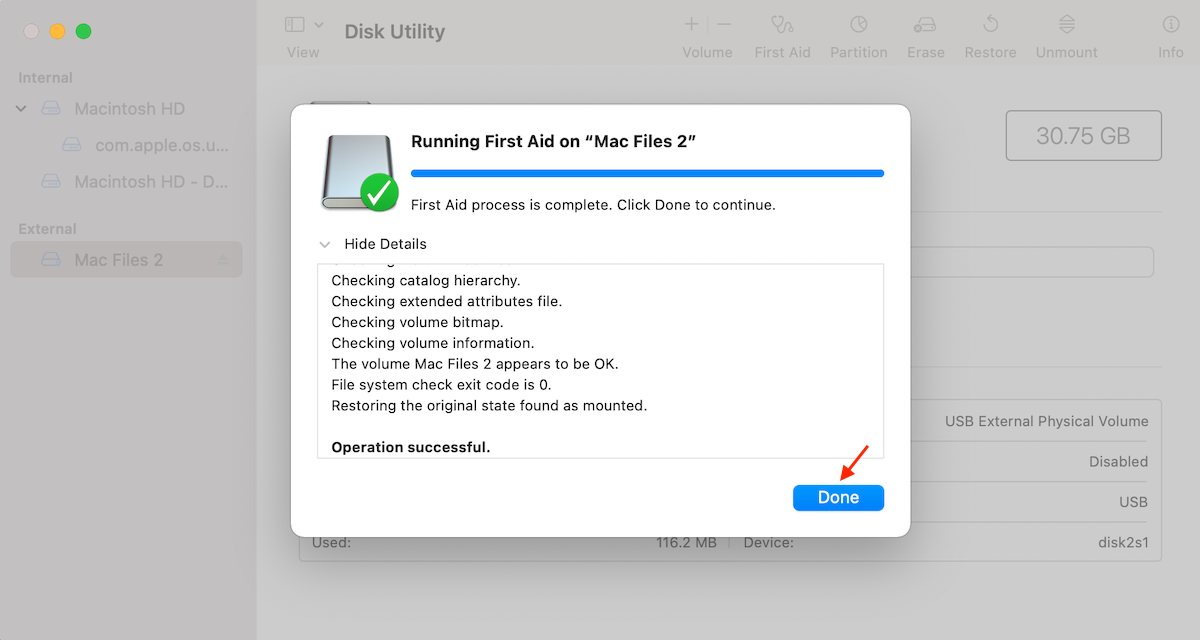
- Click Run to confirm.
- Wait for the First Aid process to finish. Click Done.
You can also run First Aid using macOS’ Terminal. Here’s how:
- Search for Terminal in Spotlight Search (Command + Space), and open the Terminal app.
- Type
diskutil listand press Enter. This command lists all the drives connected to your Mac. Look for your USB drive in the list.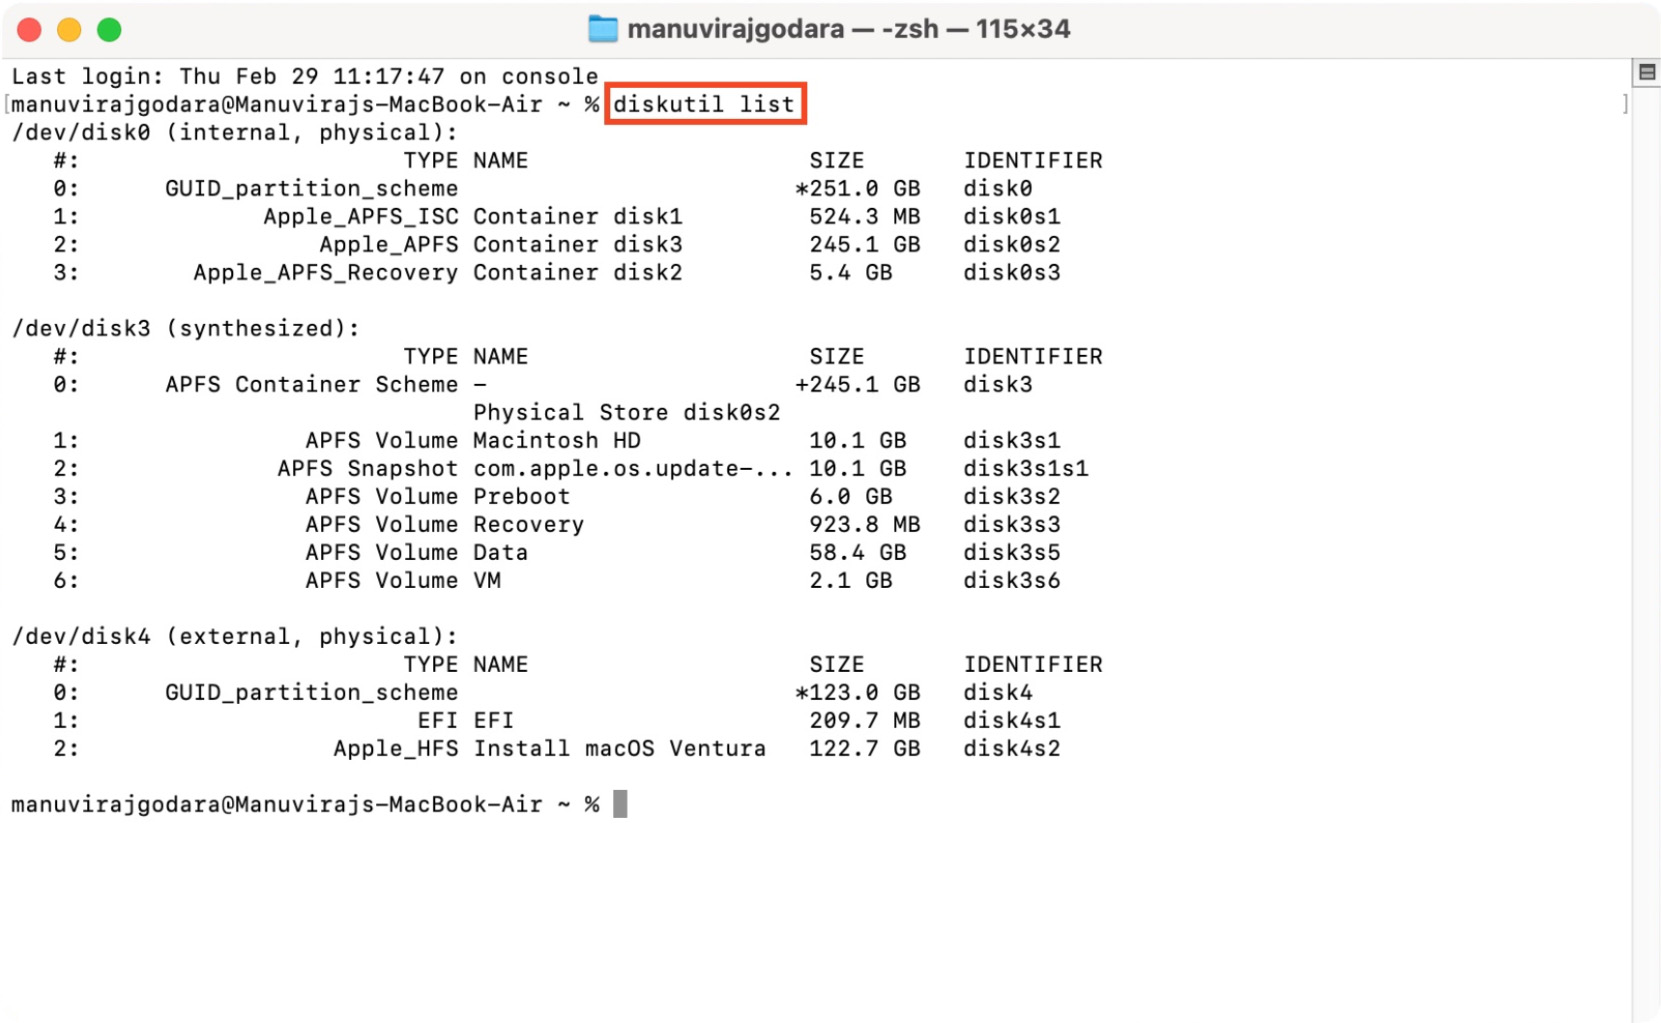
- Type
diskutil repairDisk /YOUR USB DRIVEand press Enter. Replace “YOUR USB DRIVE,” with the disk number of your USB drive. In my case, the command wasdiskutil repairDisk /dev/disk4.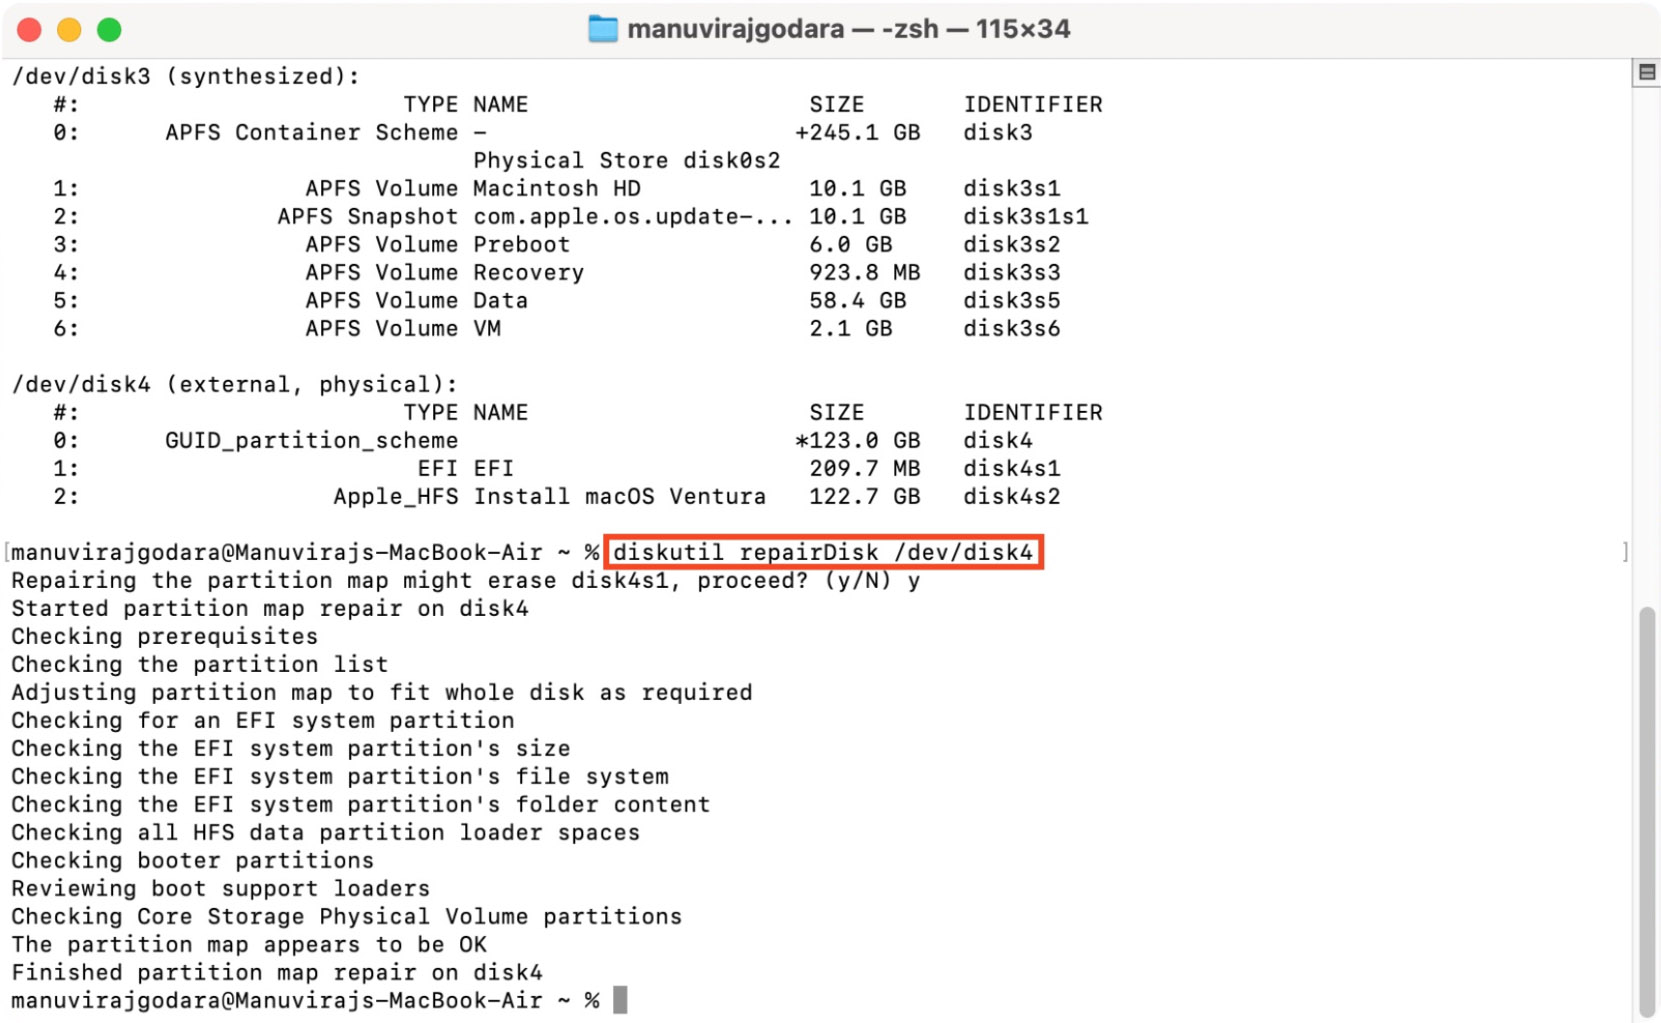
- First Aid will scan and repair any errors on the USB drive.
Note: The free Disk Drill for Mac version doesn’t allow you to recover the files from a USB drive but only to preview them. So if the scan has revealed the needed file and you want to proceed with the recovery, you should get the pro version.
Solution 2: Format the USB Drive
You should also use Disk Utility to format your flash drive on Mac. Make sure that there are no files located on the device before formatting it since after the process is finished, all of the data will get erased from the USB drive.
Here’s how to format a USB flash drive on your Mac via Disk Utility:
- Head to Launchpad and click Disk Utility to open it.
- Click your USB drive from the list of devices on the left side of your screen.
Click the Erase button at the top.
- Type in a name for your flash drive in the Name field. If you plan to continue using the drive with your Mac, choose the Mac OS Extended (Journaled) format or any other suitable format.
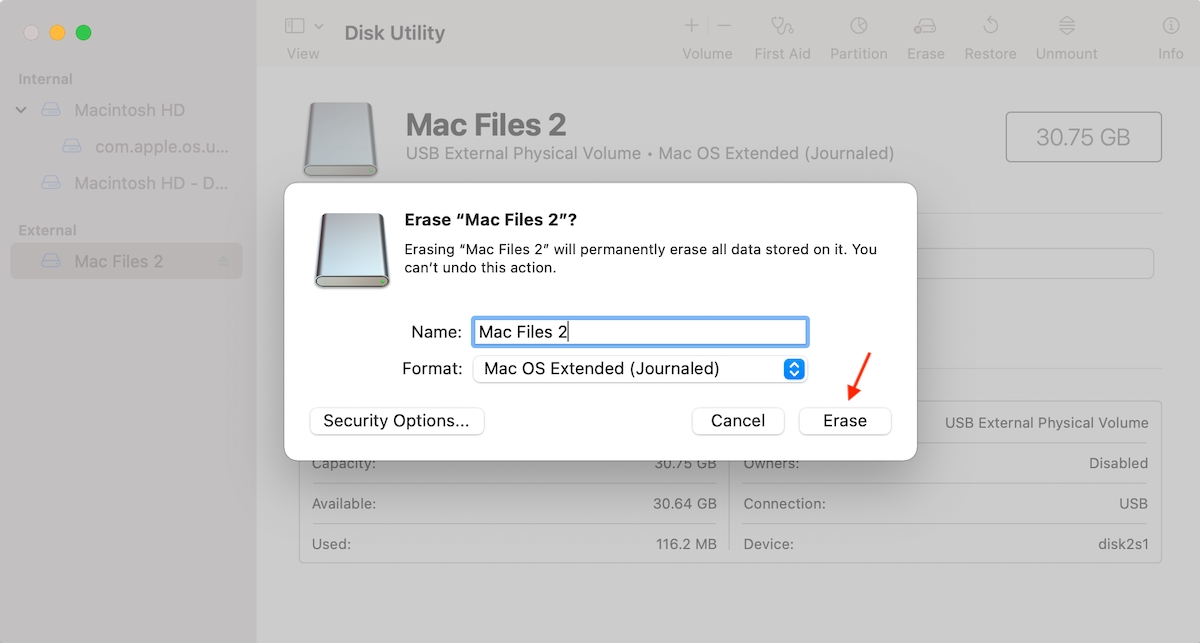
- Click Erase.
- Once the USB Drive is formatted, click Done and eject your device.
Now you’ll get a fresh start with your flash drive. You can start uploading files to it and using the USB drive as desired.
Solution 3: Fix Corrupted USB Drive Using TestDisk
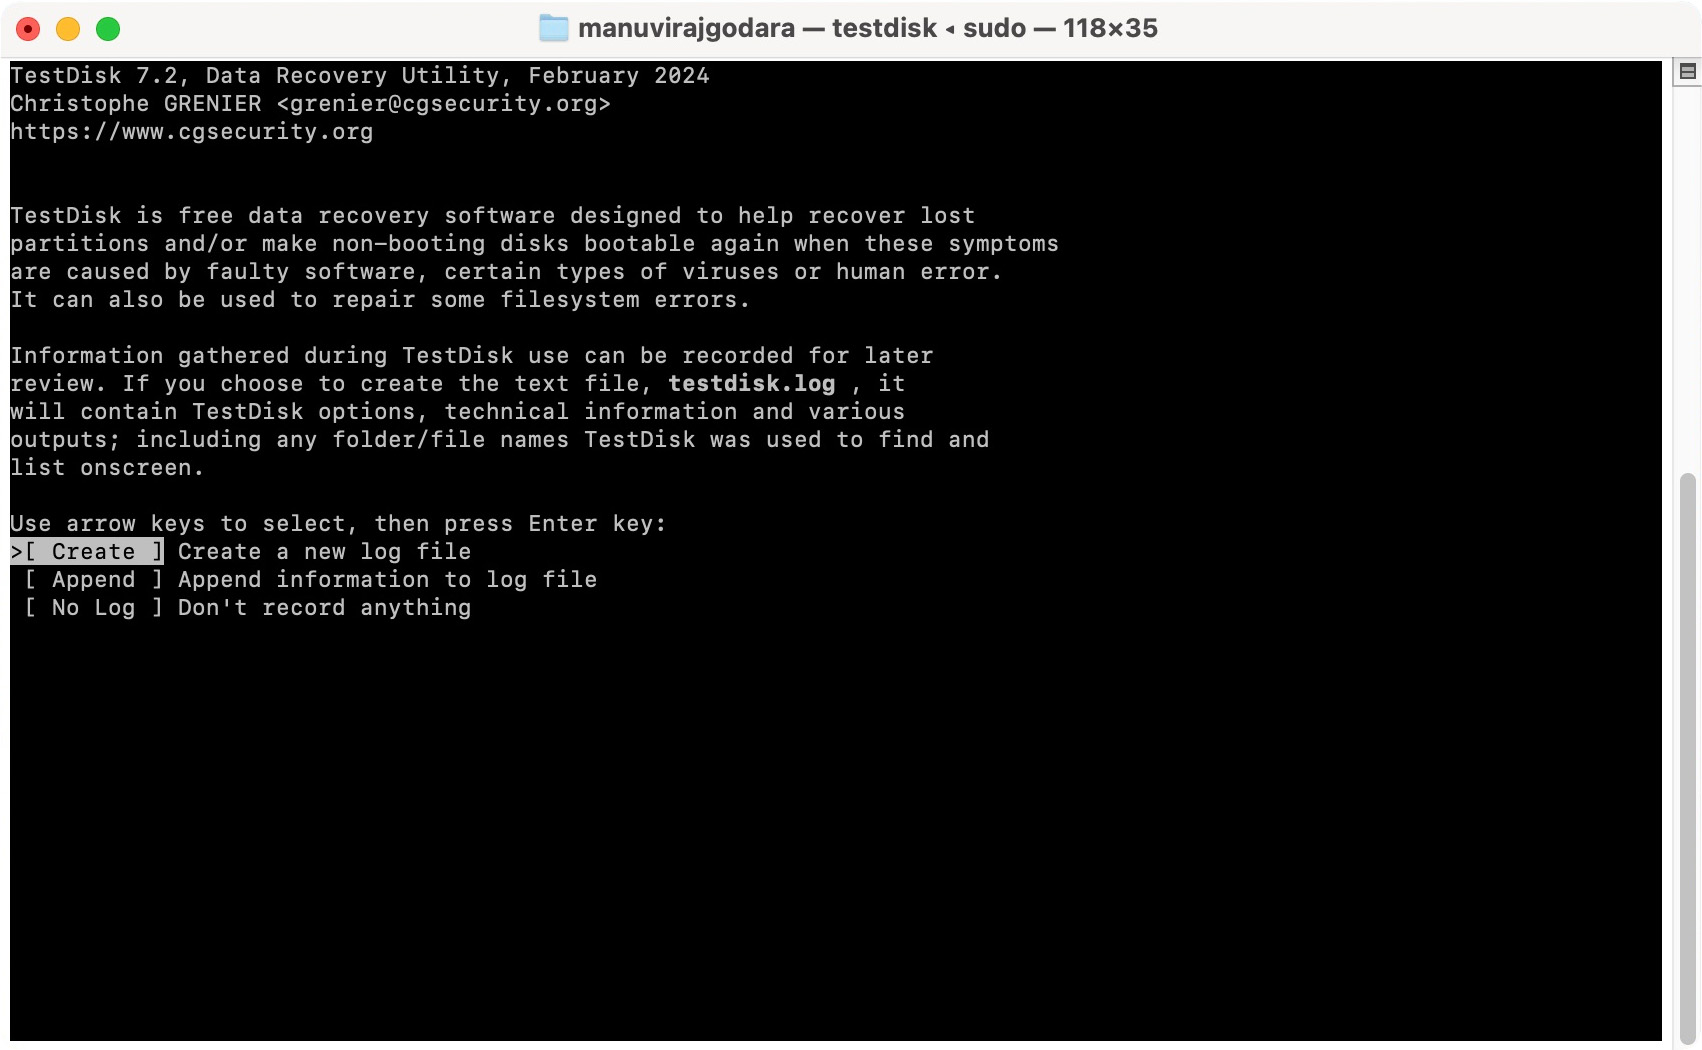
TestDisk is an excellent partition repair tool that can recover corrupt and lost partitions from your USB drive. In most cases, TestDisk recovers partitions with the existing data intact.
The program’s lack of a GUI makes using it cumbersome for novice users. You can only navigate the program using a keyboard—use the Arrow keys to highlight an option, and press Enter to select it.
Here’s a step-by-step guide on how to fix a corrupt USB drive using TestDisk for Mac:
- Download TestDisk and extract the archive.
- Launch TestDisk from the extracted folder.
- Choose whether you wish to create a log file or not. A log file will store the events of the partition recovery process. It does not impact the actual repair/recovery process whatsoever.
- Select your USB drive from the list and press Enter.
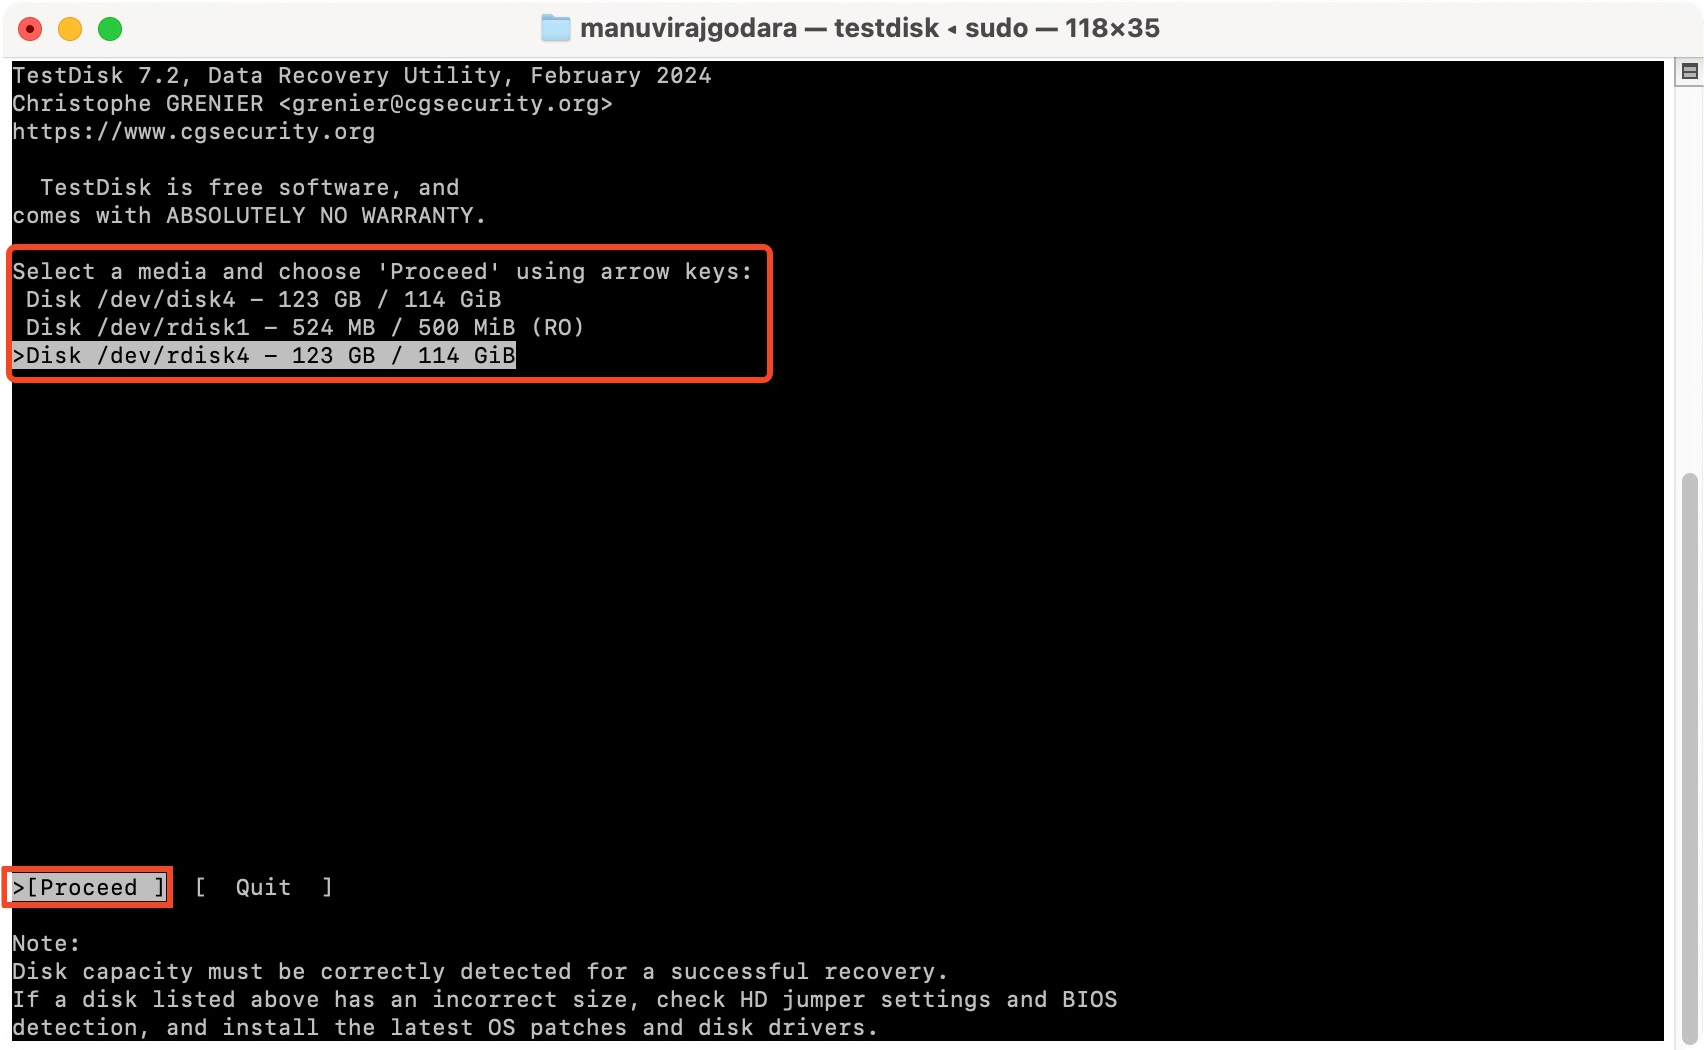
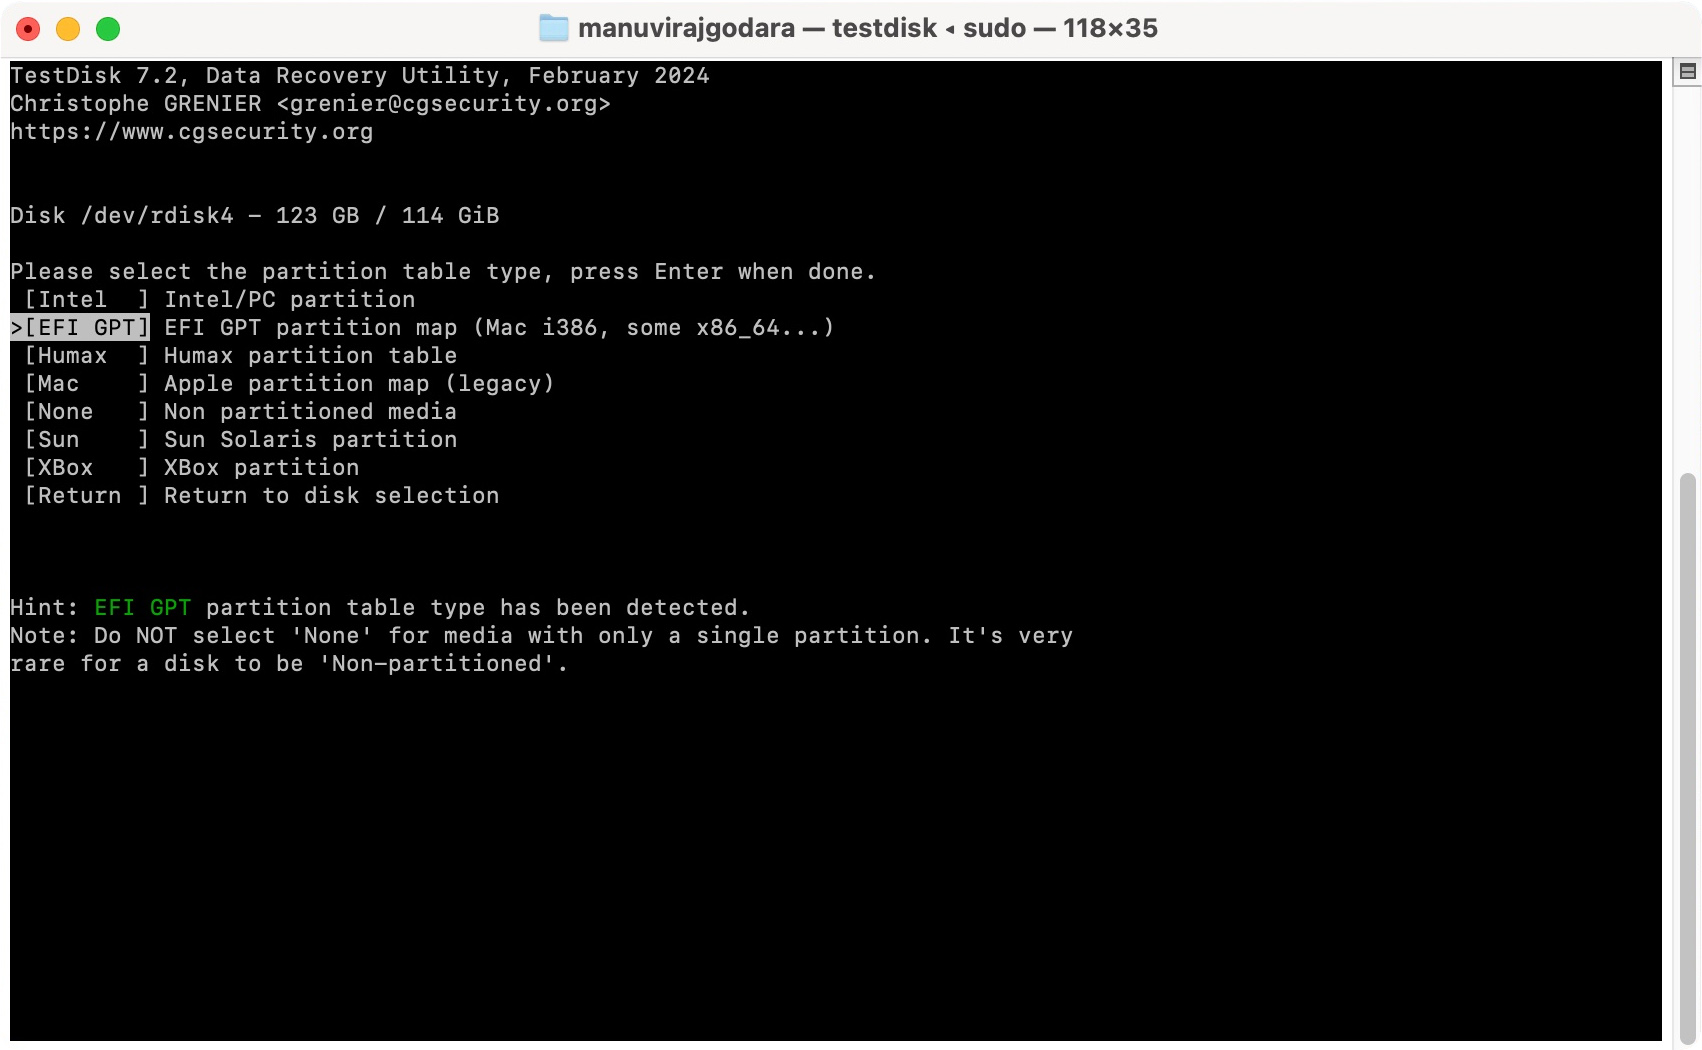
- Select the partition table type. TestDisk auto-detects this, so simply press Enter on this screen, unless you’re sure your USB drive has a different partition table.
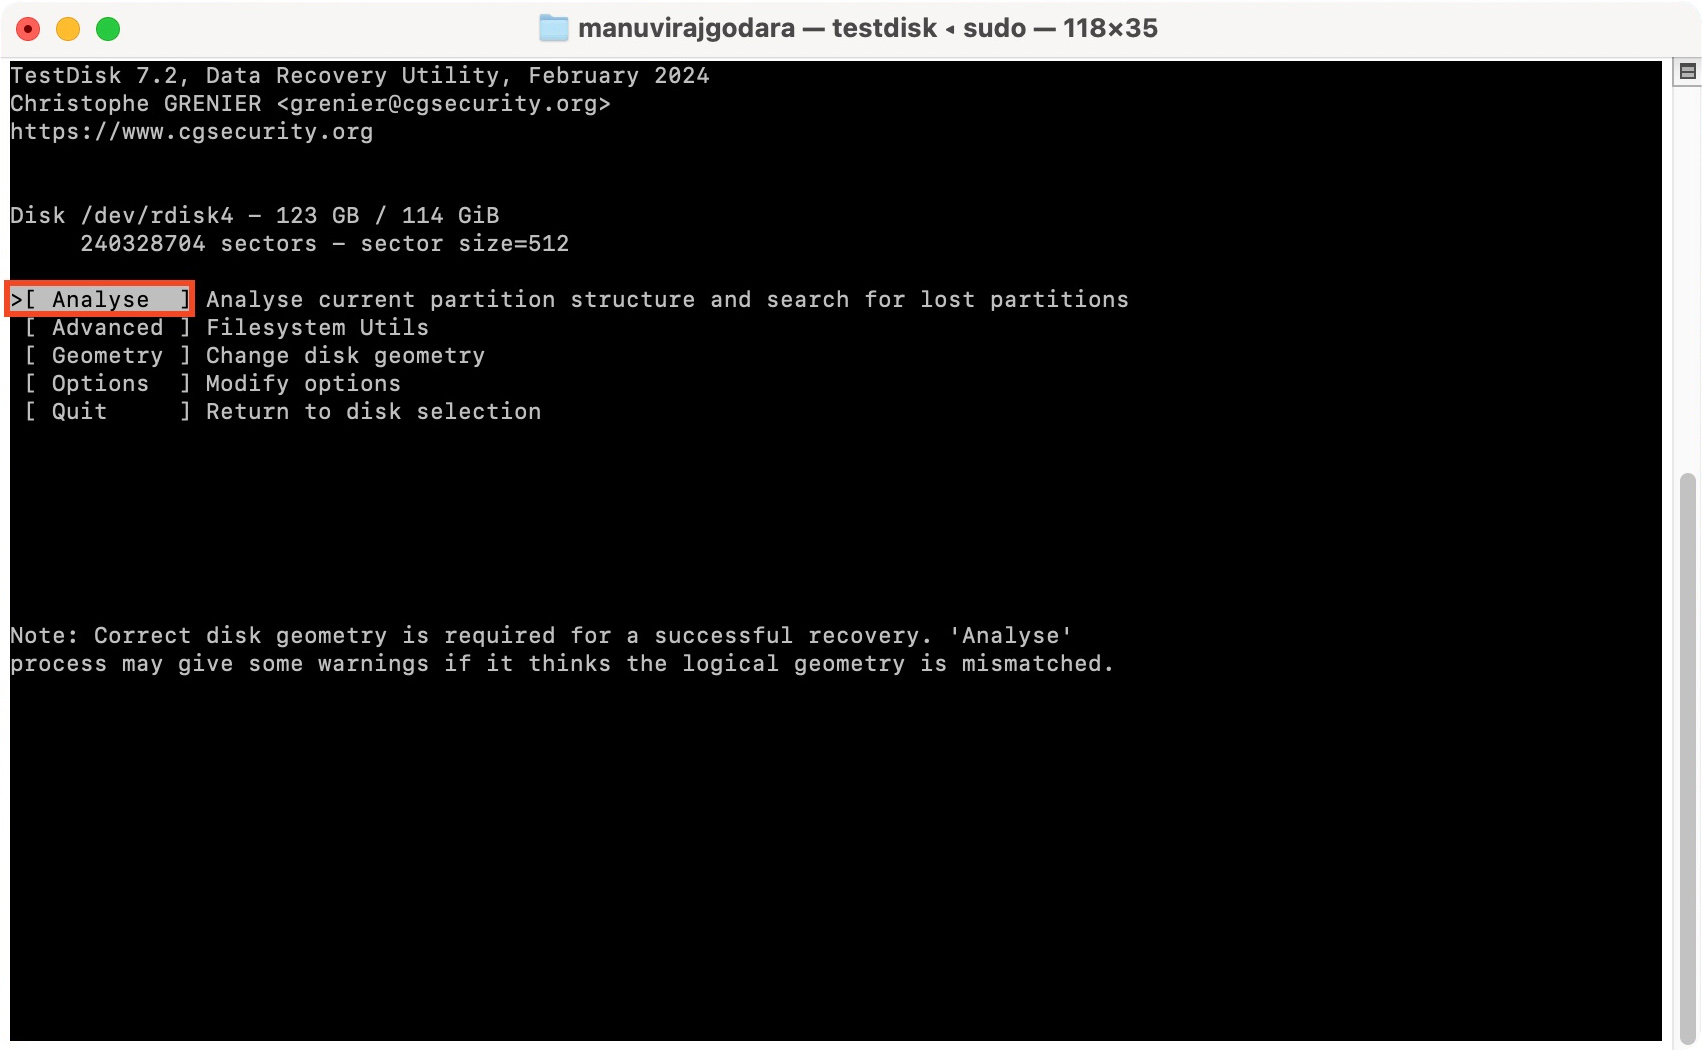
- Select Analyse and press Enter. Press Enter on the confirmation screen as well.
- Select Quick Search and press Enter. TestDisk will list all the partitions it discovers.
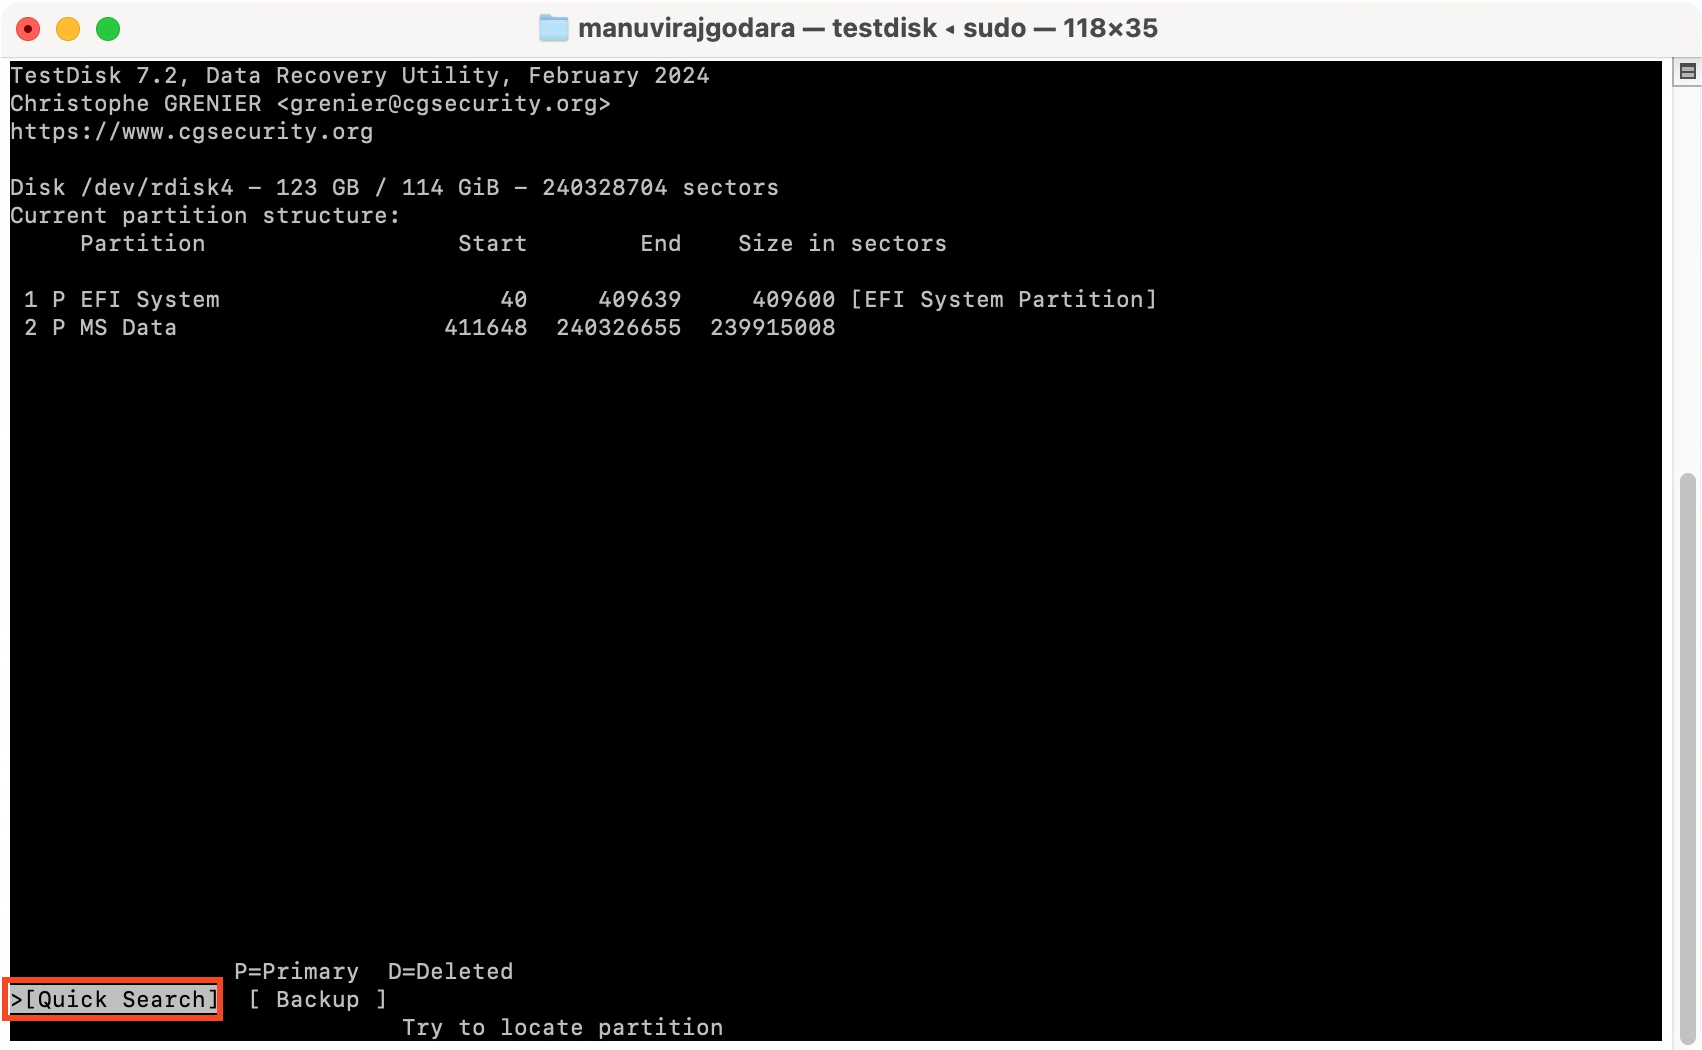
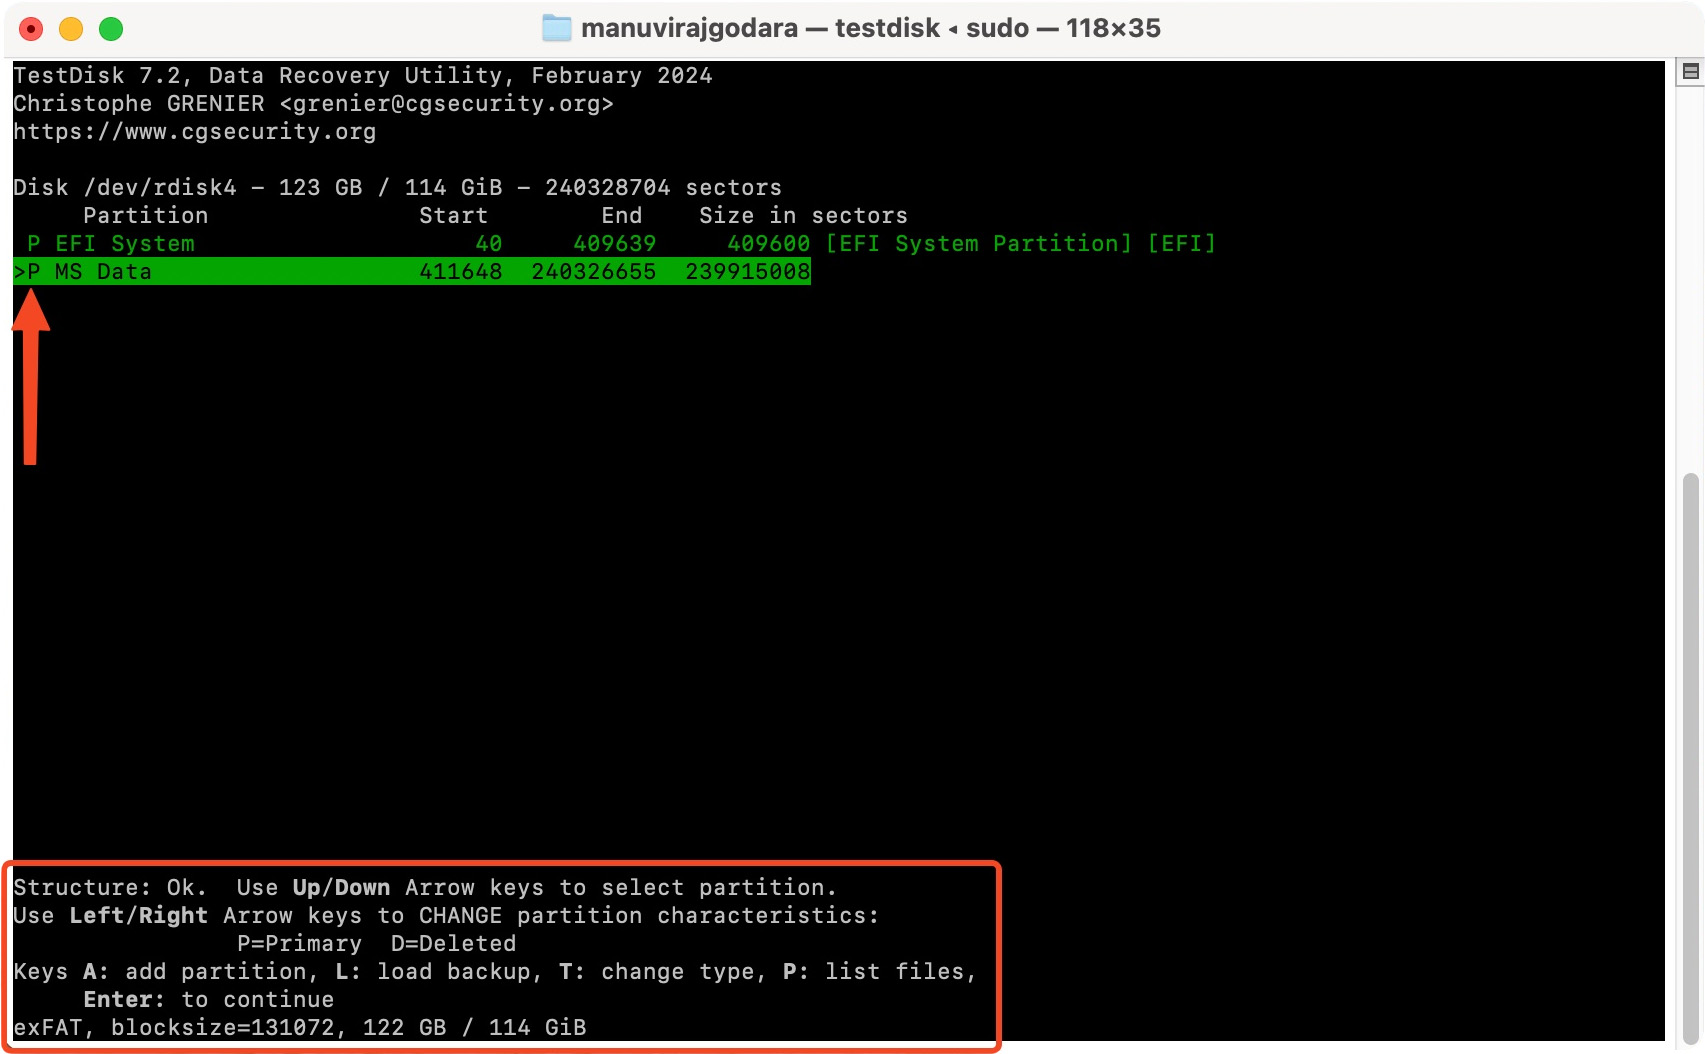
- Each partition will have a prefix next to it—D(eleted), *(Bootable), P(rimary), L(ogical). A partition listed as Deleted will remain deleted if you don’t change the prefix. To change the prefix, highlight the selected partition, and use the arrow keys to cycle through the prefixes. To recover a partition, ensure it has the P prefix before it. Once you’ve changed the prefix, press Enter.
- Highlight a partition and press P to list its files. Press Q to go back to the previous screen. If the required partition isn’t listed, select the Deeper Search option—this will take a long time.
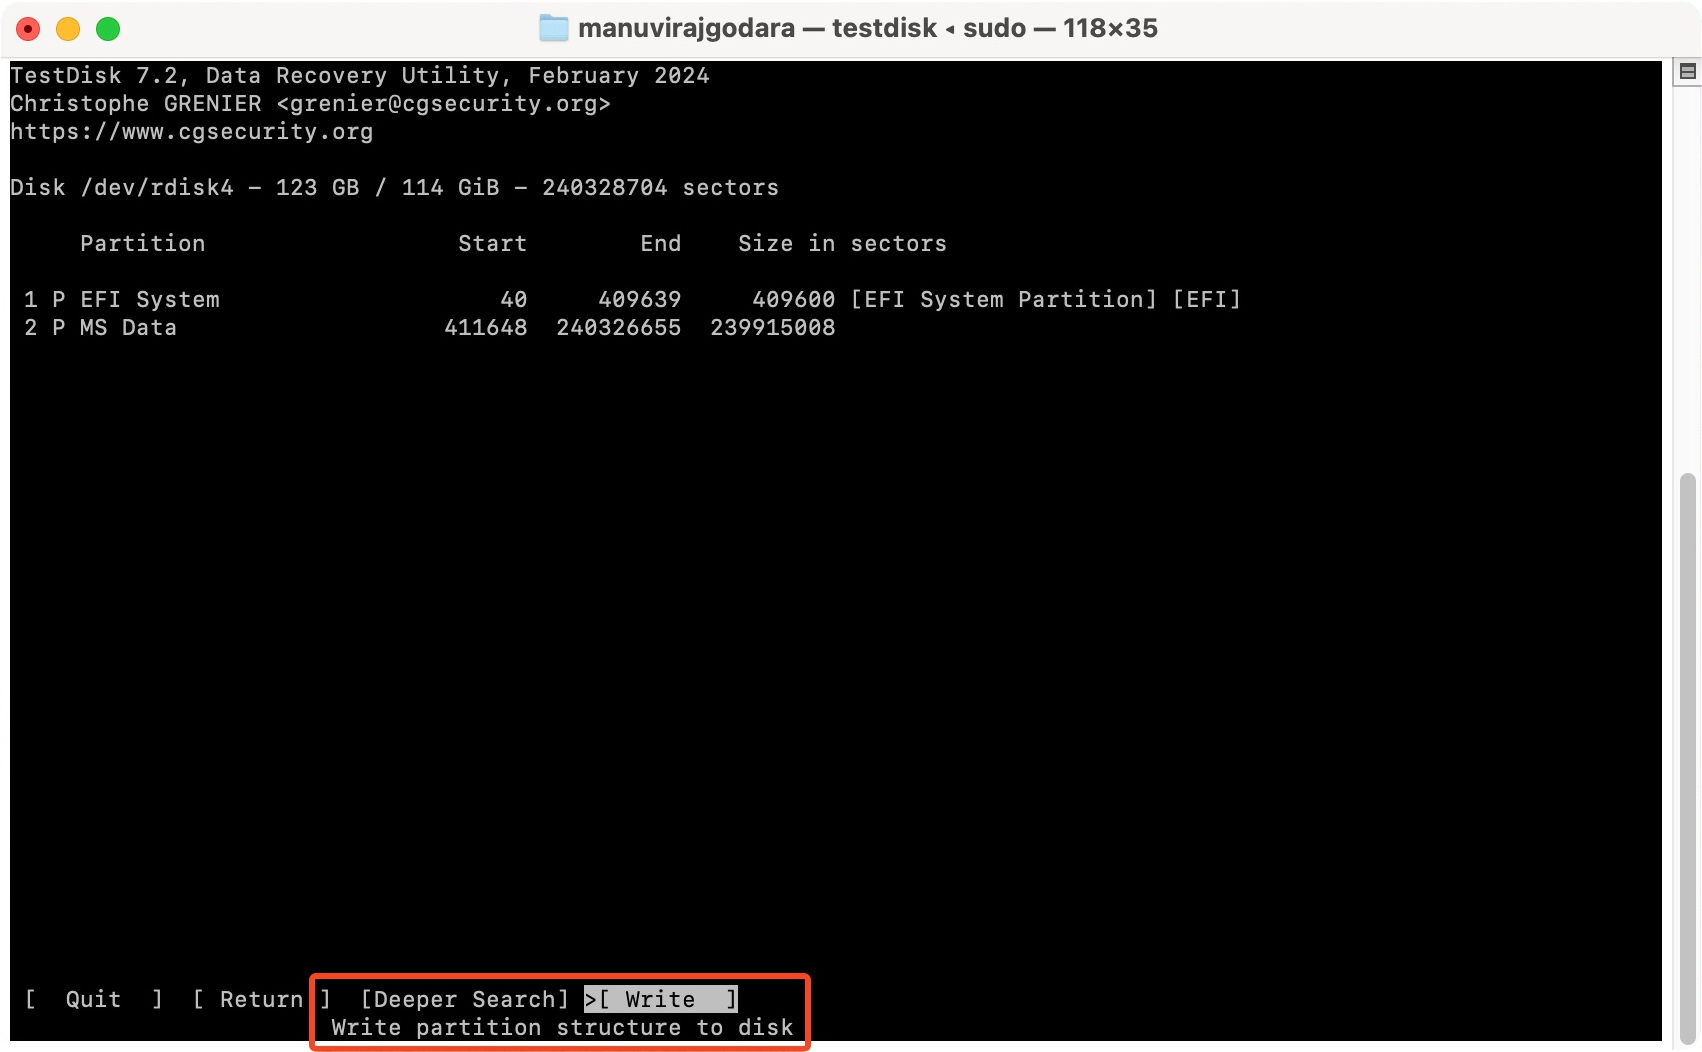
- Once you’ve confirmed the required partitions and files are there, select Write, and press Enter.
- Press Y on the confirmation prompt.
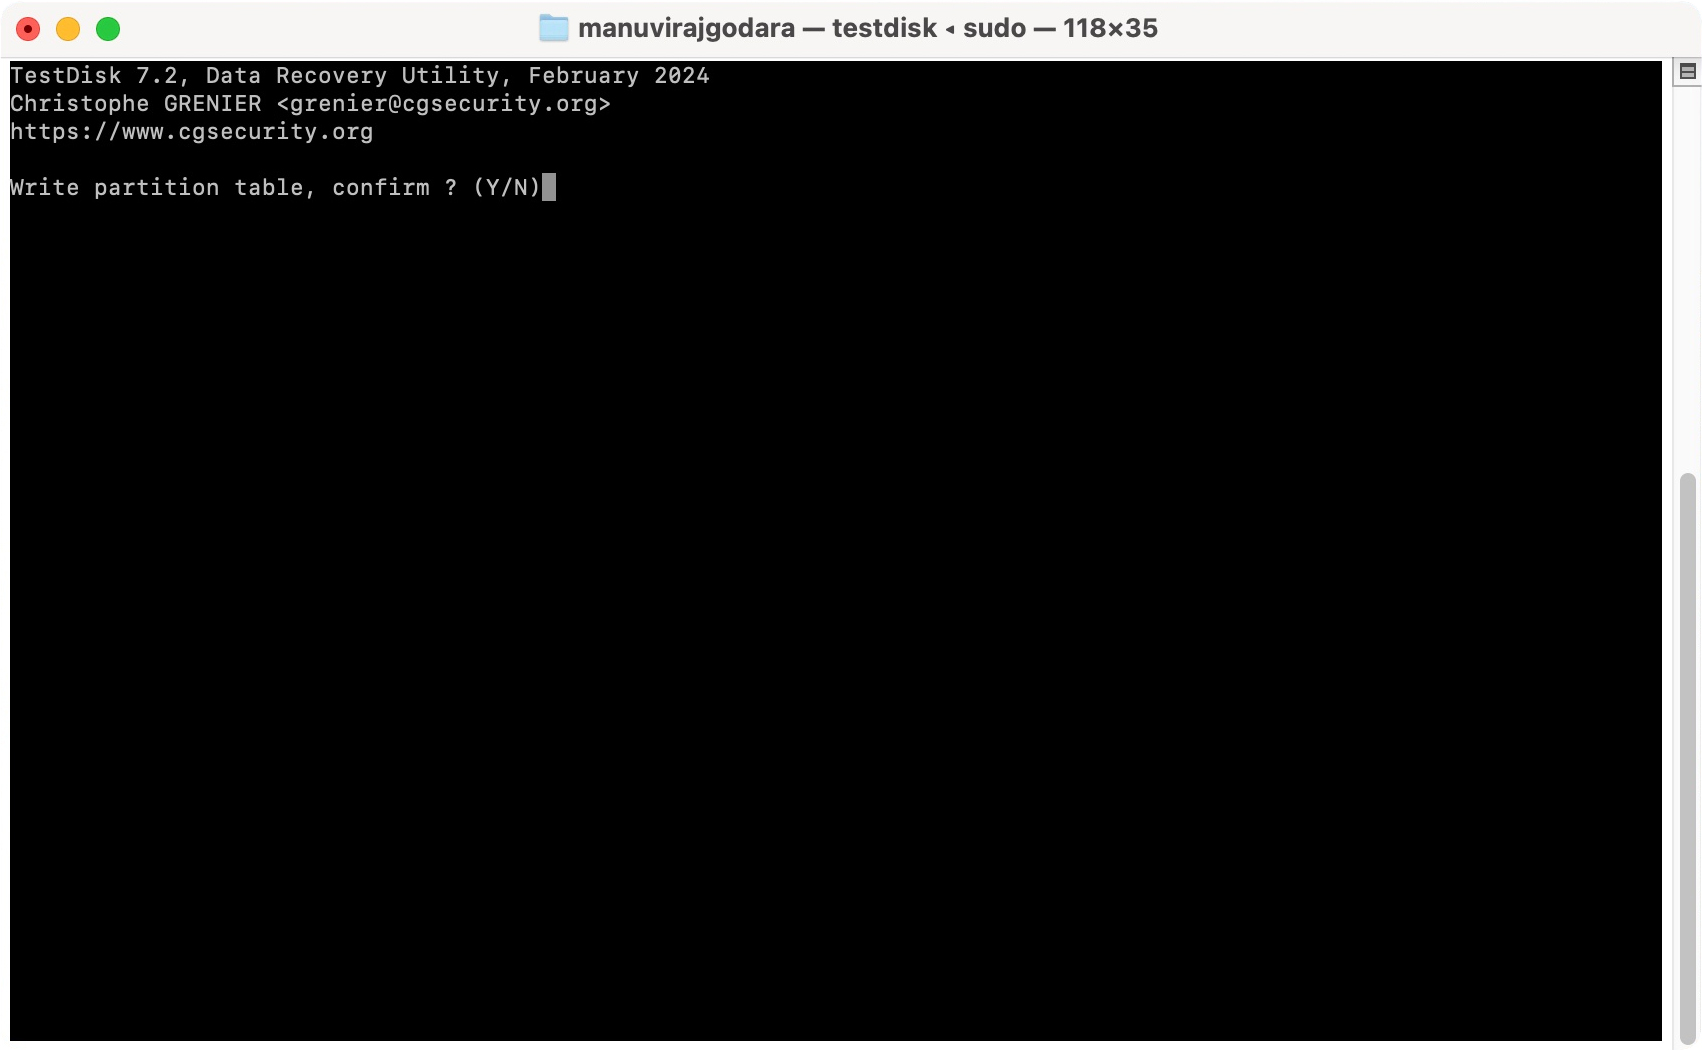 TestDisk will repair the USB drive.
Solution 4: Check for Software Updates
Running the latest version of macOS ensures you have the most recent USB drive drivers installed on your Mac. If you’re having trouble accessing your USB drive, it’s worth checking for the latest software update on your Mac and installing it. This may not technically “fix” the USB drive, but it will rule out the possibility of the problem being caused by outdated software.
Here’s how to check for software updates on macOS:
- Click on the Apple logo in the top-left corner of your screen.
- Choose System Settings, or System Preferences, depending on your macOS version.
- Click on General > Software Update.
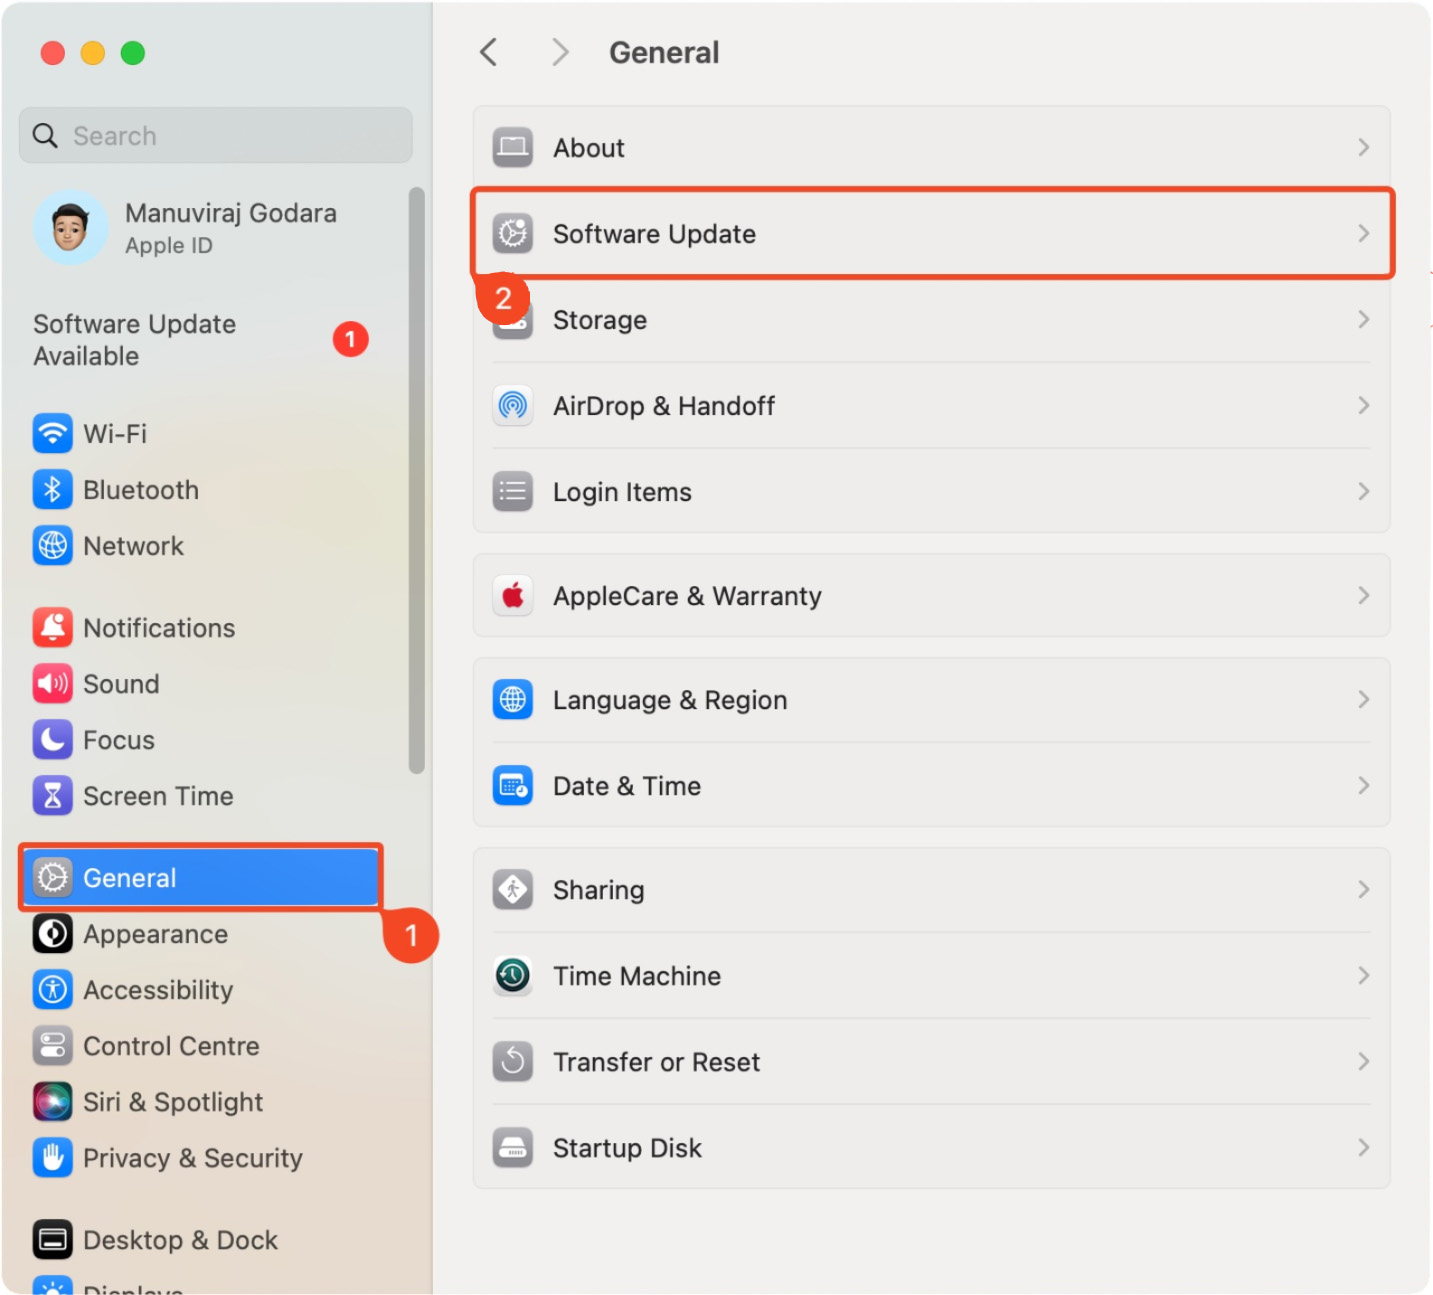
- MacOS will automatically check for updates on this screen.

Why Files Disappear From USB Drives
Let’s go through the main reasons why data can get lost on a USB drive:
- The flash drive is damaged: If the USB fails to mount, your Mac doesn’t recognize it, or it produces weird sounds, there is a chance that the drive is damaged, and therefore, anything can happen to it, including the disappearance of files.
- The USB got formatted by mistake: This action will erase all of the data from your drive. But if you stop using the drive right away, there will still be a chance for specialized software to recover data from a flash drive on Mac.
- You ejected the drive while the files were still being copied to it: If you interrupted the process of copying files from your Mac to the USB drive, then, of course, you won’t be able to find them there.
- The USB device is corrupted: There are a few actions that can lead to this, especially if you use the USB drive between computers with different operating systems (Windows and macOS, for instance).
- You accidentally deleted the files: Just one wrong click of the mouse, and you can delete an important file. Fortunately, if you realize what you’ve don’t right away, you’ll be able to restore that file from Trash. Otherwise, the only way to do it is to use a data recovery application.
- The USB drive has been infected with malware: Computer viruses can lock, and often wipe out all existing data from the USB drive. It’s possible that malware caused unexplained data loss on your USB drive. Scan your USB drive using a capable antivirus program to fix this.
Conclusion
Recovering data from a USB drive is possible using third-party data recovery tools. However, make sure that the pen drive is not physically damaged and is visible in macOS’ Disk Utility. If not, you’re better off contacting a professional data recovery service.
If the data loss was unexplained, it could be because the USB drive is corrupted. Doing one of the following things should fix it—run First Aid on the drive, use TestDisk to recover corrupt partitions, ensure your Mac is updated, and format the flash drive.
FAQ:
- Download Disk Drill and install it.
- Open Disk Drill, select the USB drive, and click Search for lost data.
- Click on Review found items.
- Select the files you wish to restore, and click on Recover.
- Pick a recovery destination for the files and click Next.
- Open Trash from the Dock.
- Look for the deleted files, right-click on them, and choose Put Back.
- Alternatively, you can open the USB drive in Finder, unhide the .Trashes folder and see if the files are there.


")

