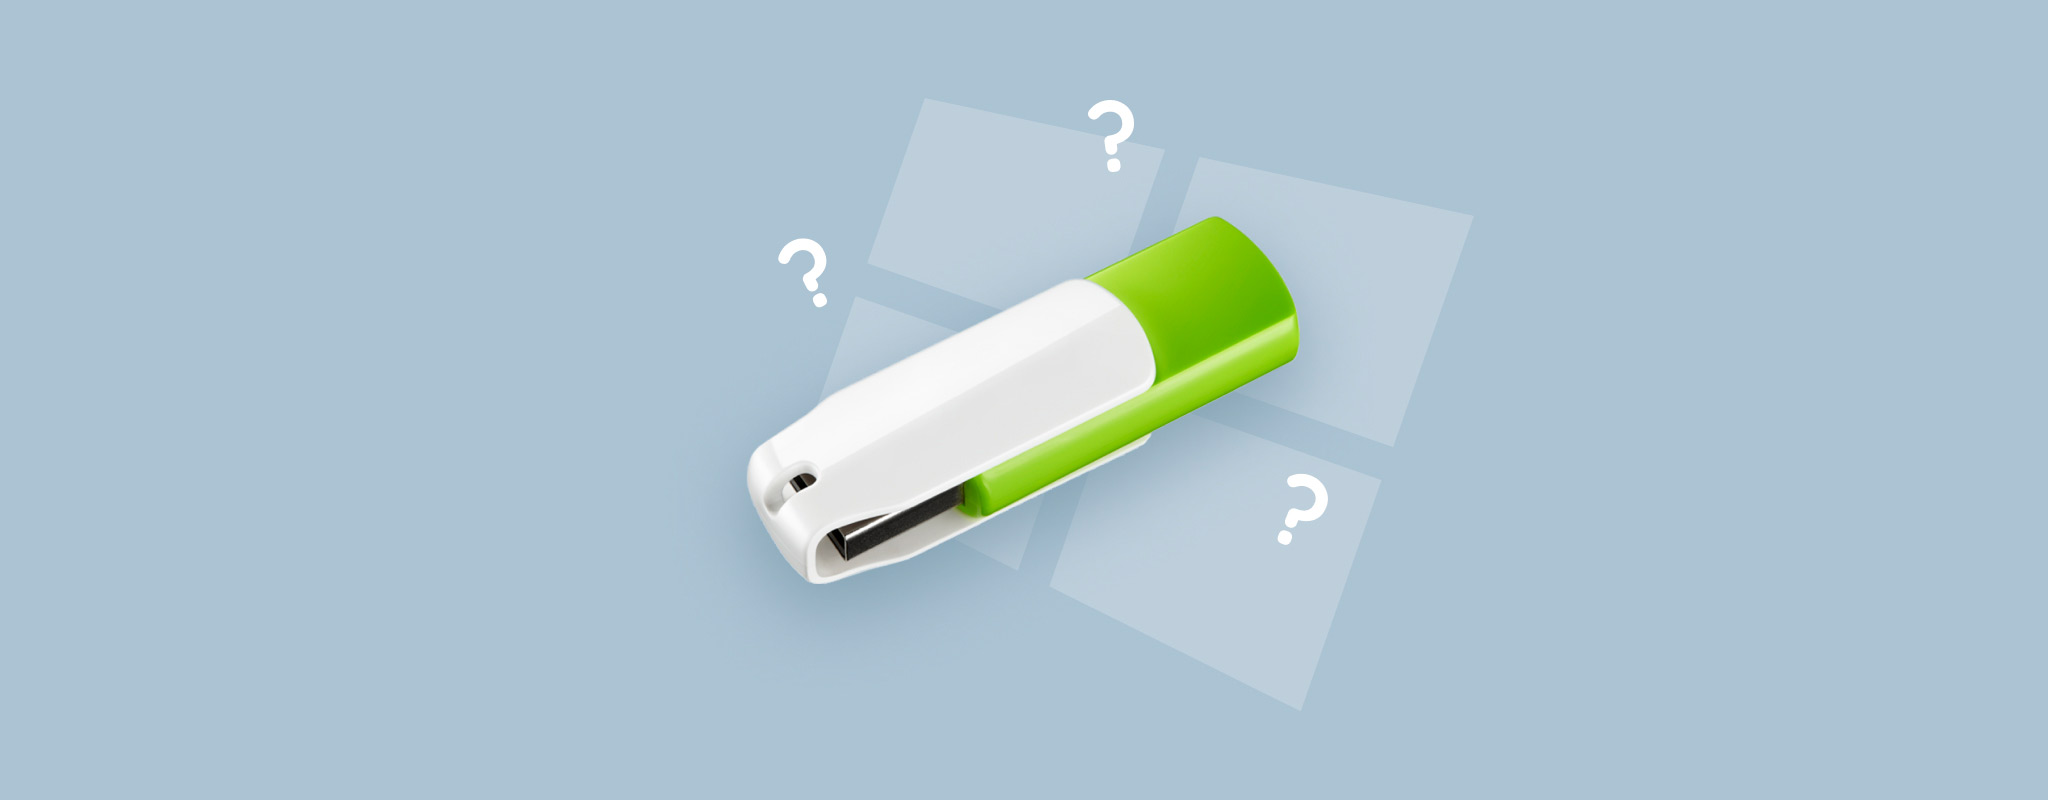
USB drives, as convenient as they are, can still cause a lot of headaches. If suffering from logical damage like corruption, it may appear that your USB drive has Unallocated Space. This is a false reading, as your data is still there, it’s just inaccessible. Therefore, you need to act swiftly in order to recover the contents of your USB.
In this article, we’ll go over what you can do to recover data from a flash drive that’s not detected on any computer and how you can fix it.
Table of Contents
How to Recover Data From USB Not Recognized
Even if your USB drive doesn’t show up in Windows Explorer, your computer may still be registering it. In fact, as long as it’s visible in Disk Management and showing the correct size, you will be able to recover data from a flash drive that’s not recognized. If it’s not visible in Disk Management, try to make it readable first.
To recover the data, we’ll be using the data recovery tool Disk Drill. It is designed to recover data from almost any device, including a thumb drive that’s not showing up. With free version you can recover up to 500MB of data. The key to successful recovery is acting quickly and refraining from using the USB until the data is recovered.
Follow the instructions below to recover data from a thumb drive that is not recognized.
- Download and install Disk Drill to your computer. Open it.
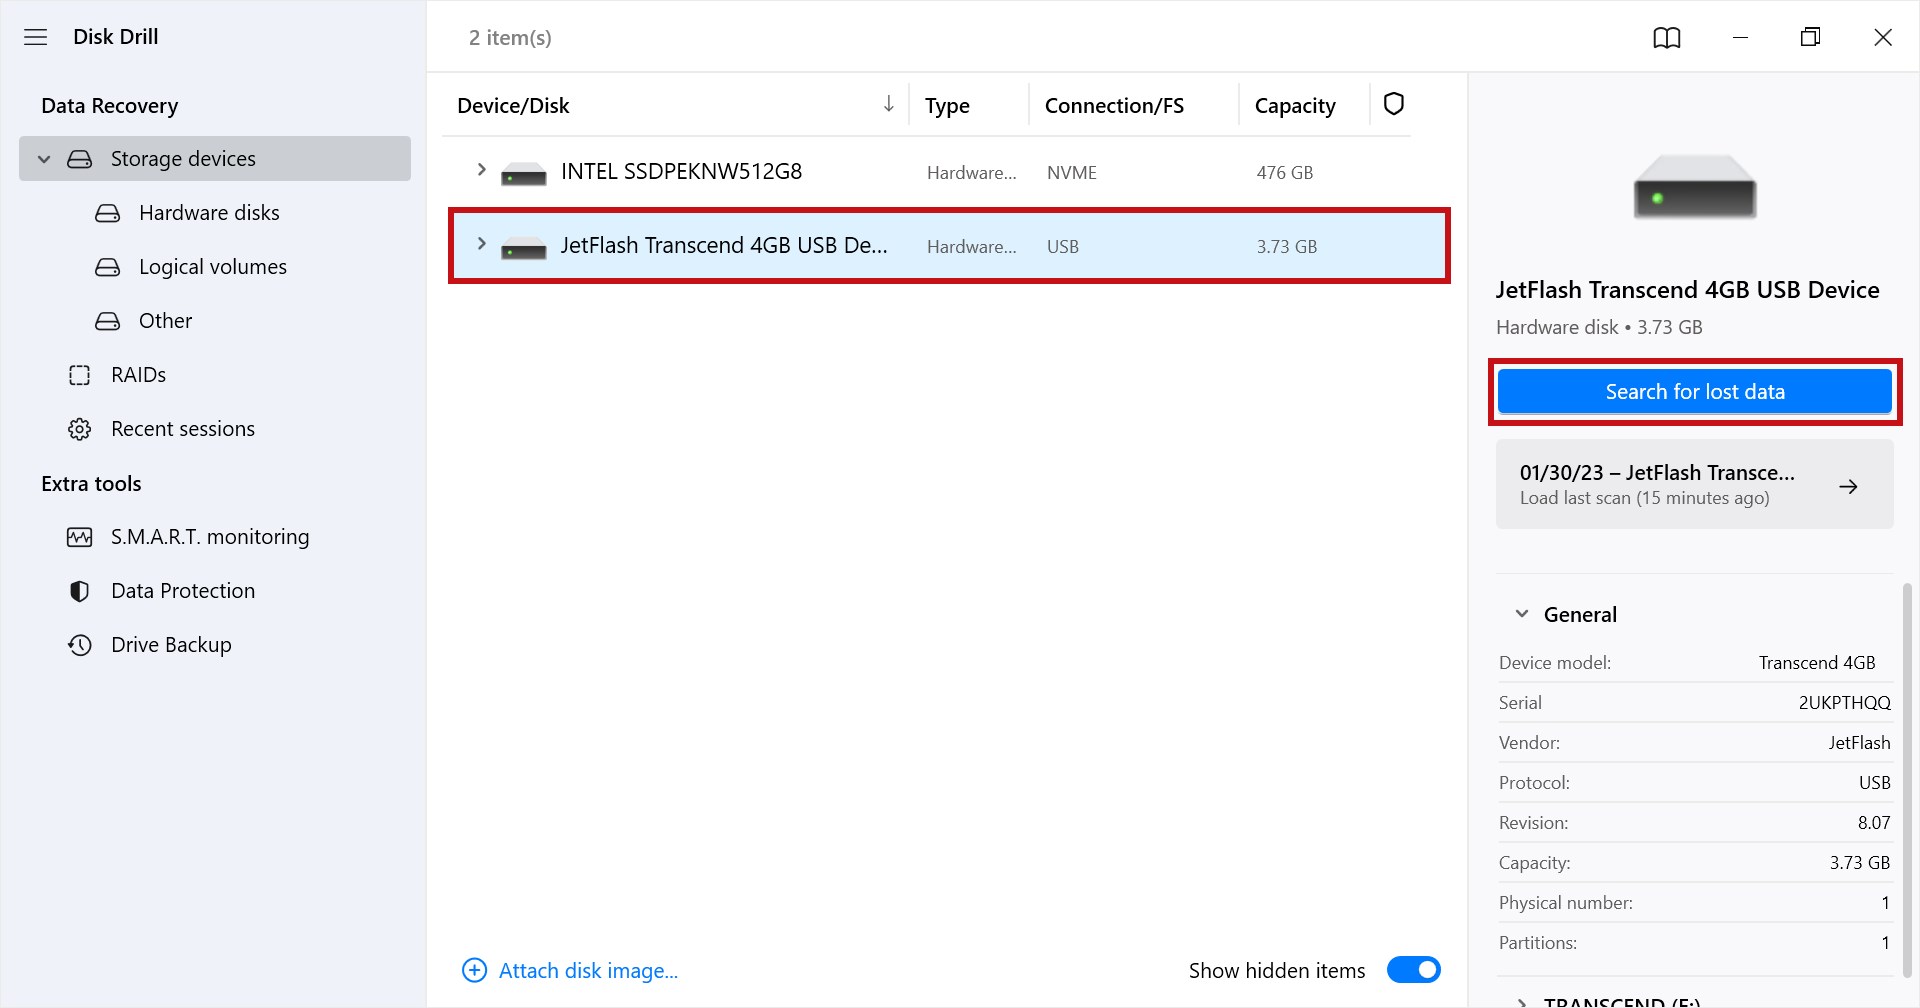
- Select your USB, then click Search for lost data.
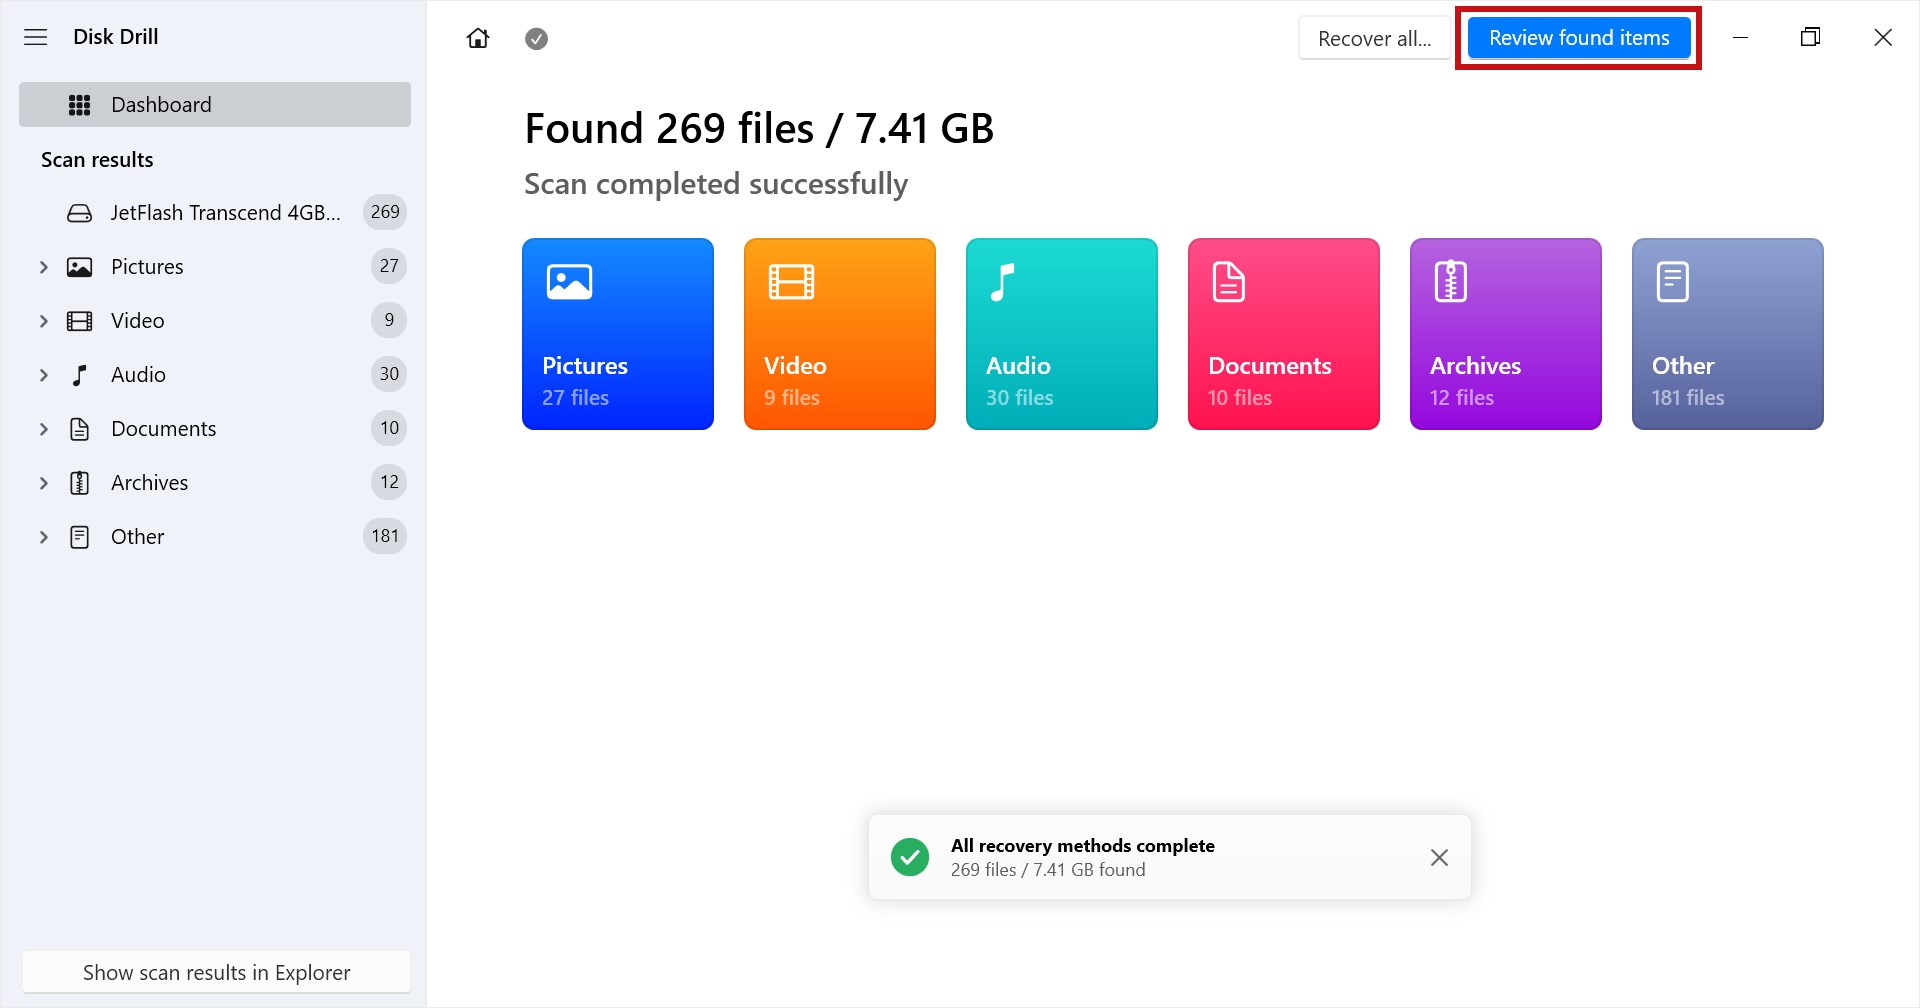
- Click Review found items once the scan is complete.
- Mark what files you want to recover. The Recovery chances column displays your chances of successfully recovering each file. And, you can preview a file by double-clicking it. When you’re ready, click Recover.
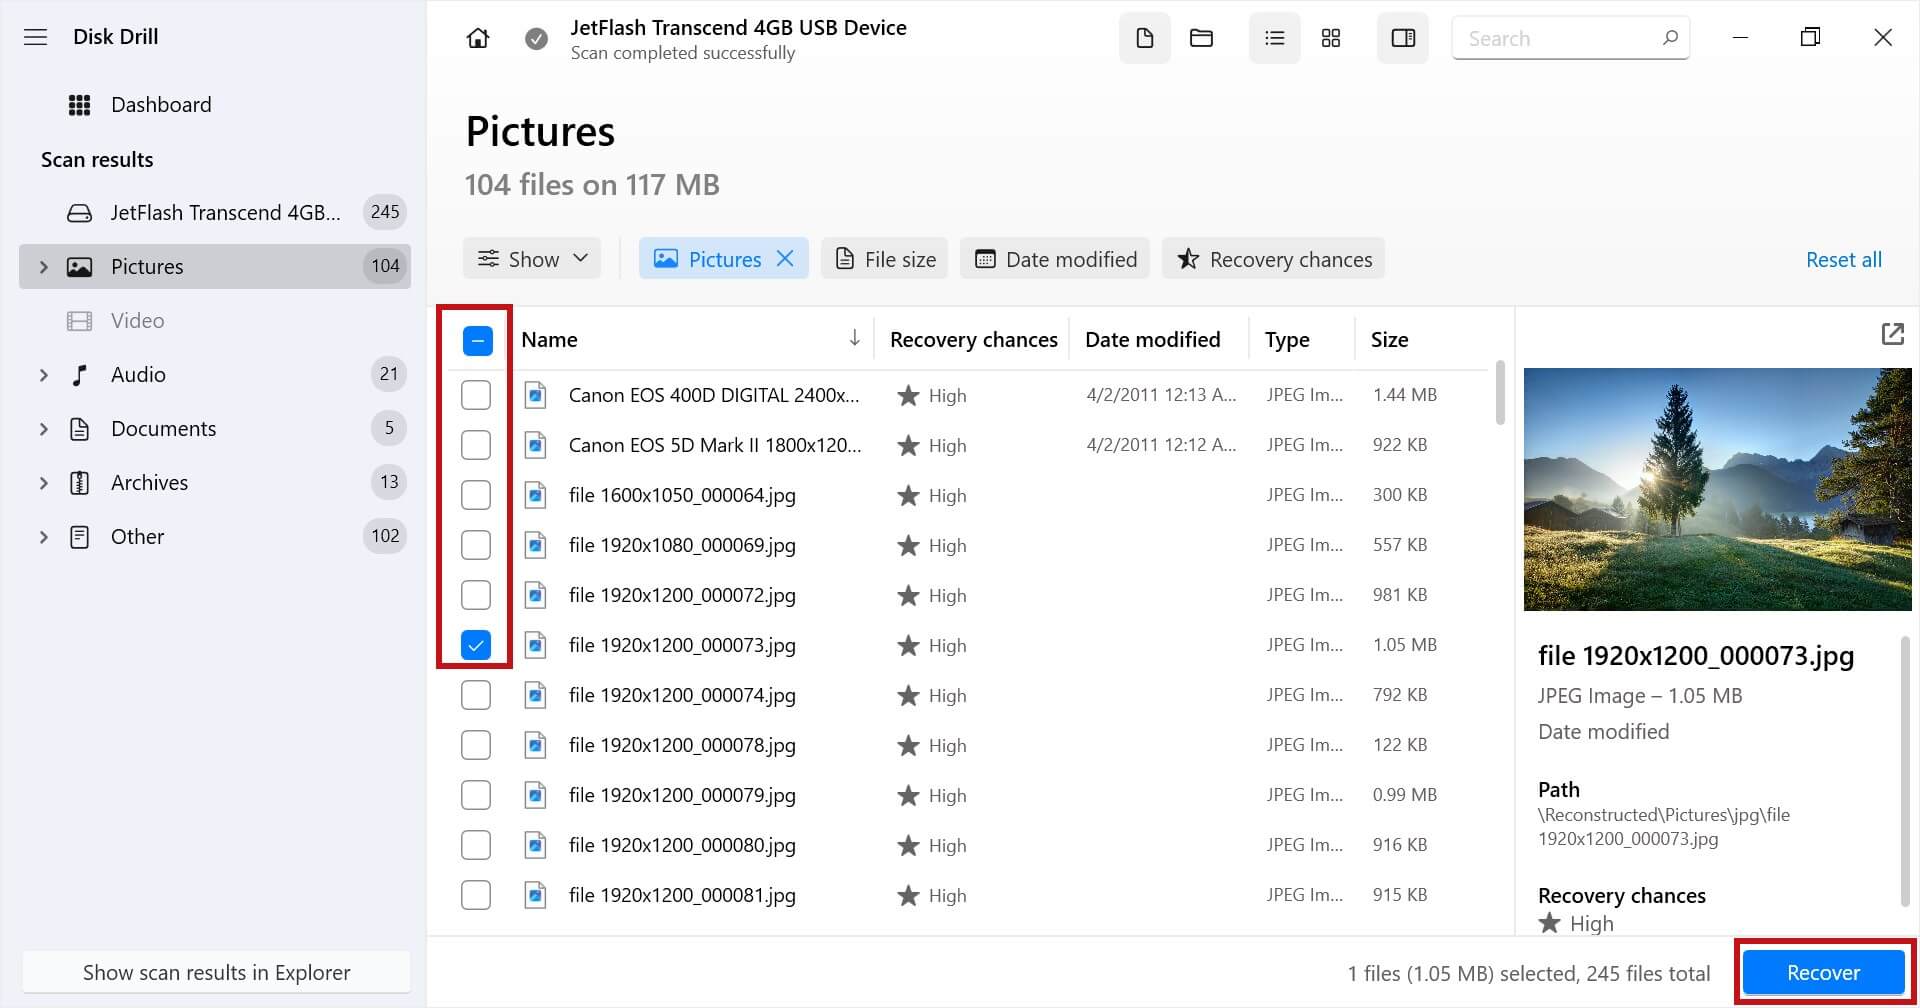
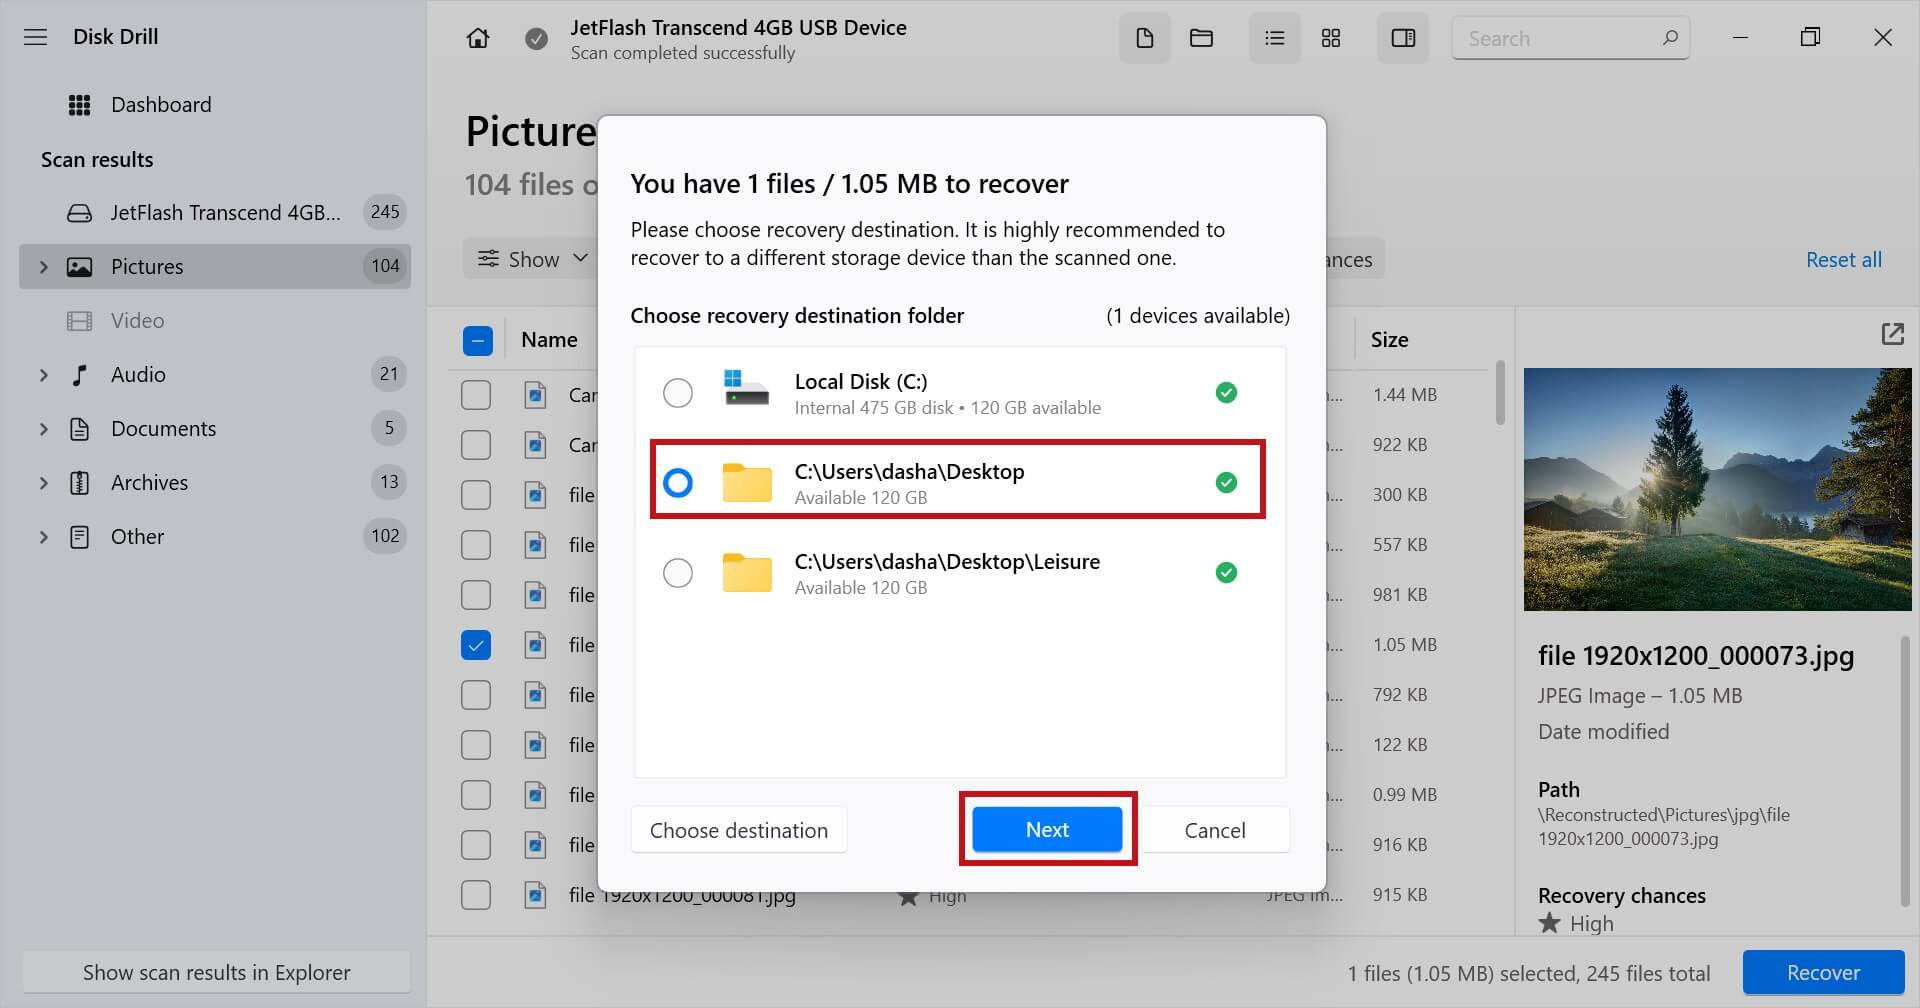
- Choose the output location. Make sure you don’t recover the data to the same USB, as it could corrupt it.
Once complete, you will be met with an overview screen that details the recovery process. You can then go to the folder you chose for recovery and view your files.
Before Troubleshooting: Isolate the Problem
Before troubleshooting, you must first identify what is causing the problem. Determining the source of the issue can save you a lot of time that would otherwise be spent troubleshooting areas that aren’t relevant.
To do this, you must test the USB in a different port to see if the port you’re using is faulty. If another port doesn’t work, then you should try connecting the USB to another device to make sure it’s not a problem with the device you’re connecting to.
If the USB works fine when connected to another USB port or device, then the problem isn’t with your USB. If the USB still isn’t being read, proceed to next section.
How to Fix USB Flash Drive That Is Not Recognized
If your USB isn’t visible with the correct size in Disk Management, recovery won’t be possible. But, there are a few solutions you can try to make it readable. The below methods will help you understand how to fix a USB flash drive that is not recognized.
Method 1: Connect Directly to the Motherboard
The USB ports on your computer’s case, typically located at the front or top, connect to your motherboard using internal wires. These wires could have been damaged at some point, resulting in any device connected to the USB ports on your computer case becoming unreadable.
To avoid this, try connecting directly to one of your motherboard’s USB ports on the back plate of your computer if your USB thumb drive is not recognized. This way, you can ensure you’re getting a direct connection and avoiding any complications with the internal wiring of your computer case.
Method 2: Clean the USB Contact Points
Physical substances like dust and dirt can build up over time. This can lead to a physical barrier that blocks the connection between your USB and USB port. Regularly cleaning your USB and USB ports can prevent this.
If you want to remove dust, use an air duster or can of compressed air to blow the dust out. For other, more persistent obstructions, lightly wet a cotton swab with isopropyl alcohol and gently clean out the USB or port. Once complete, let it dry completely before use. Be mindful of how delicate the USB connections are and only clean USB ports when the device is powered down.
Method 3: Hardware Troubleshooter
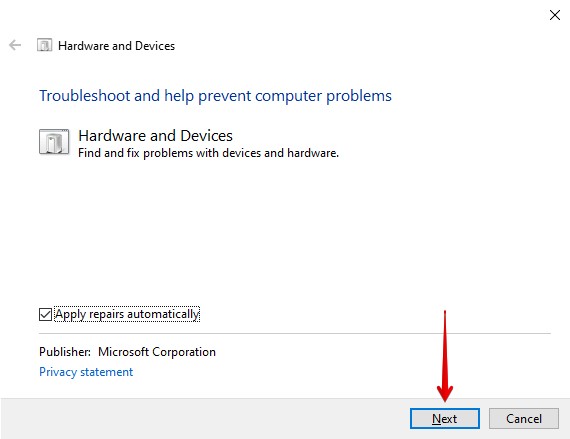
Windows comes with lots of powerful troubleshooters that are designed to target specific problems. The Hardware and Devices troubleshooter can scan your computer for issues pertaining to your USB and fix them so you can access a USB drive that is not recognized.
Use these steps to launch and run the Hardware and Devices troubleshooter.
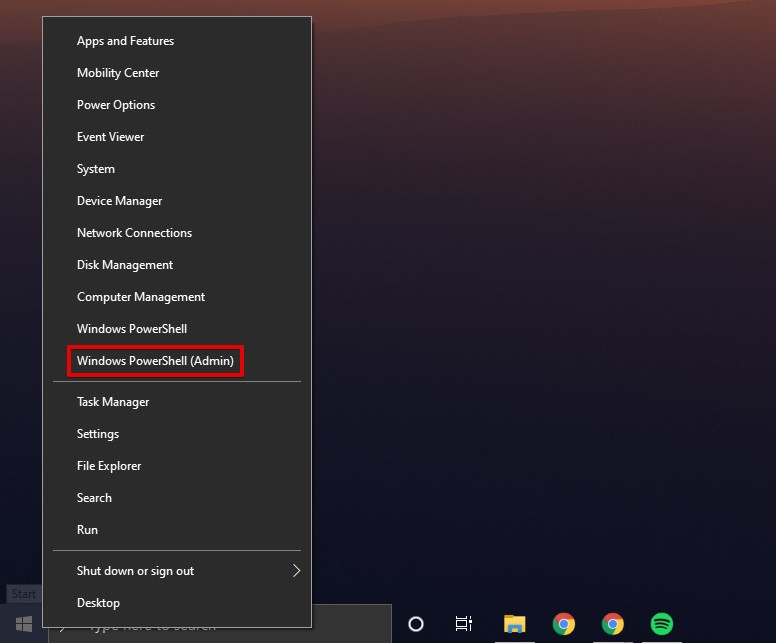
- Right-click Start and select Windows PowerShell (Admin). Click Yes if prompted by UAC.
- Type
msdt.exe -id DeviceDiagnosticand press Enter.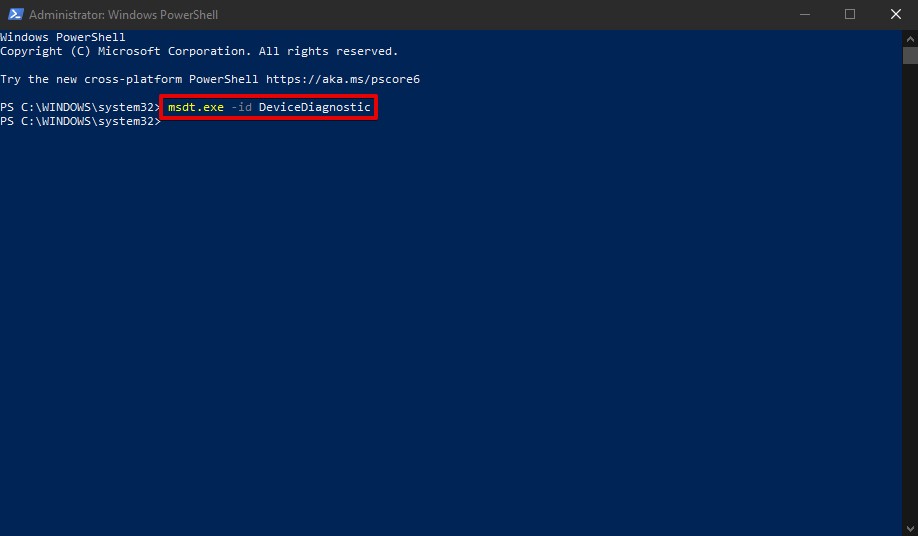
- Click Next. Follow the on-screen instructions based on the problems that Windows discovers.
Method 4: Format an Unrecognized USB
Formatting a USB involves refreshing the existing file system or adding a new one. This process will delete any data that resides on the USB. Formatting has always been a quick and effective method to fix USB flash drives if not detected, as it’s basically restoring it to factory settings.
Once you’ve recovered your files from the USB to a safe location, perhaps you would like to format it to fix any issues that are preventing it from being read like normal. Follow these steps to format an unrecognized USB.
- Right-click Start and select Disk Management.
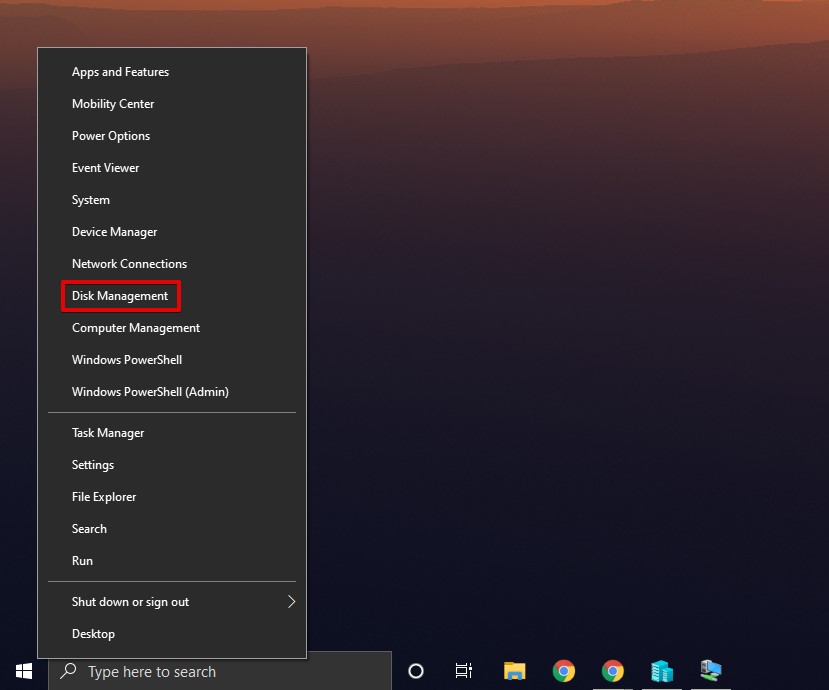
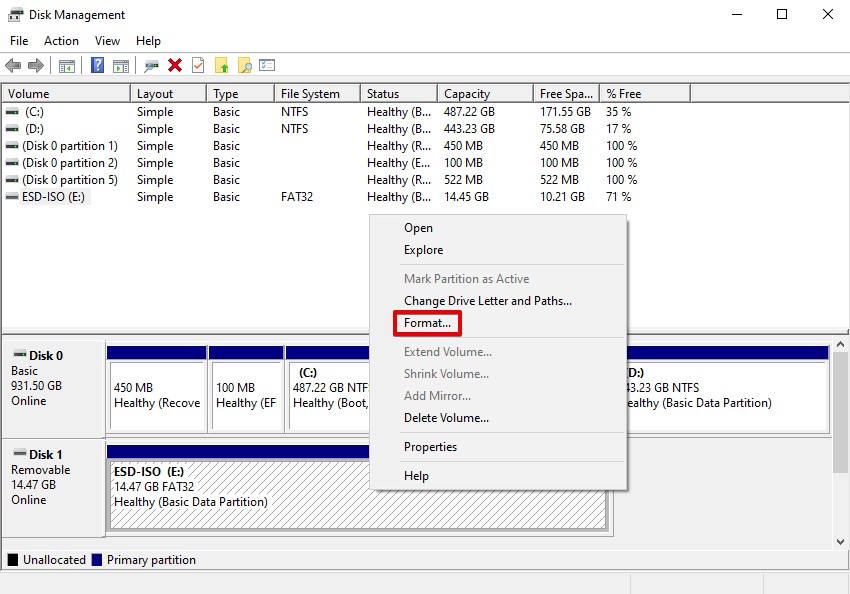
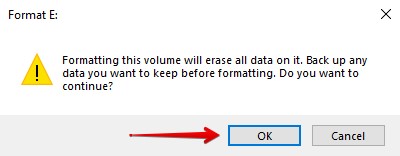
- Right-click your USB volume and click Format.
- Ensure Perform a quick format is selected. Change the Volume label, File system, and Allocation unit size if necessary. Press OK.
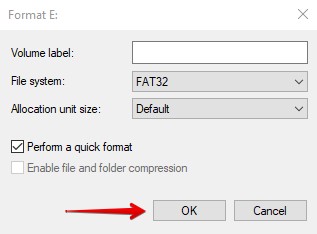
- Click OK when prompted to confirm the action.
Method 5: Update or Reinstall the USB Drivers
Any hardware you connect to your computer requires a driver. Drivers establish and maintain communication between your devices so you can actually use them. If your USB’s drivers are corrupted or out-of-date, it may result in your USB performing erratically, or your flash drive not showing up in Windows 10 at all.
Follow these easy steps to update or reinstall your drivers to fix your USB flash drive that’s not recognized.
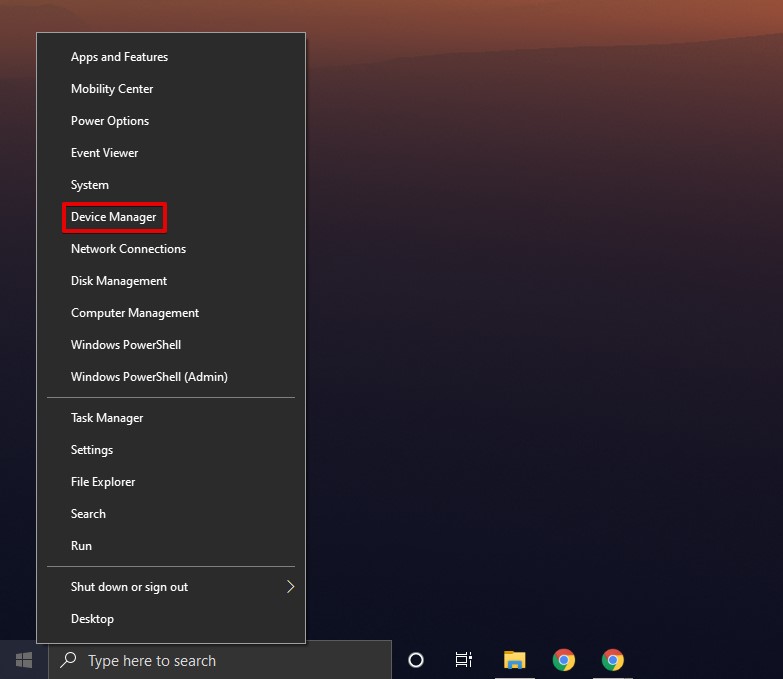
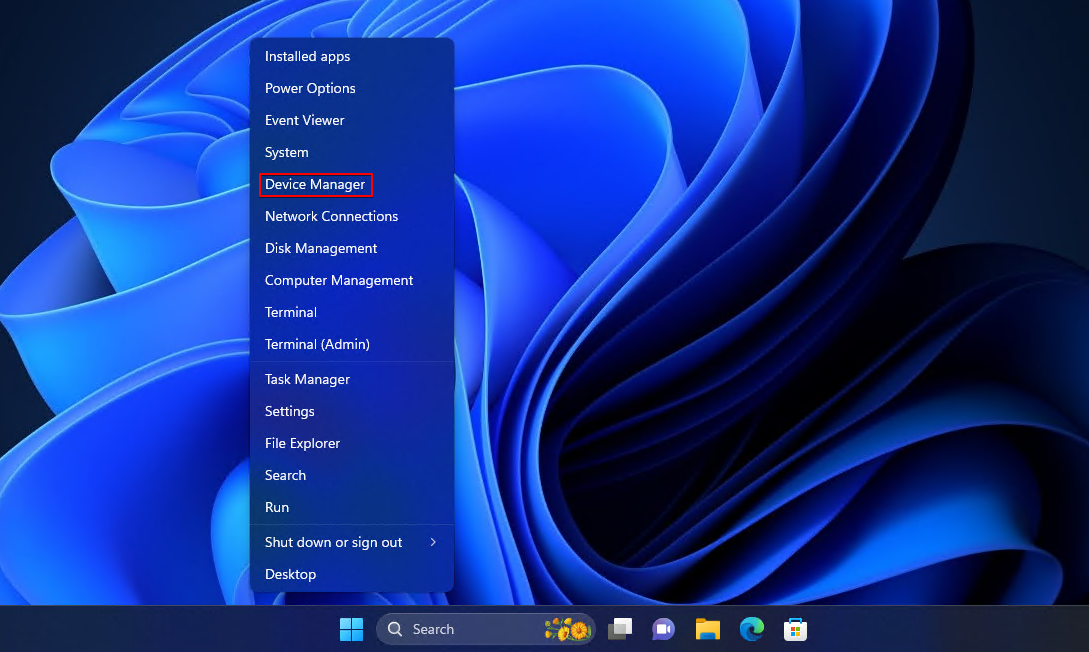
- Right-click Start and select Device Manager.
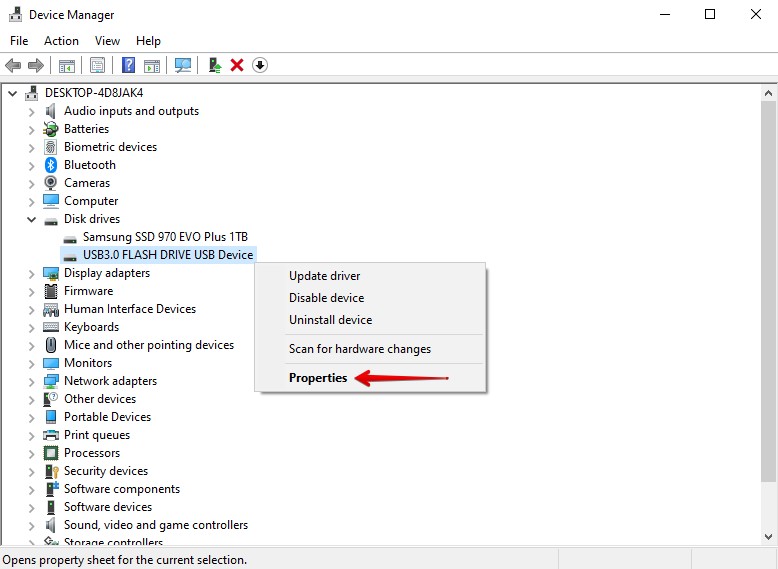
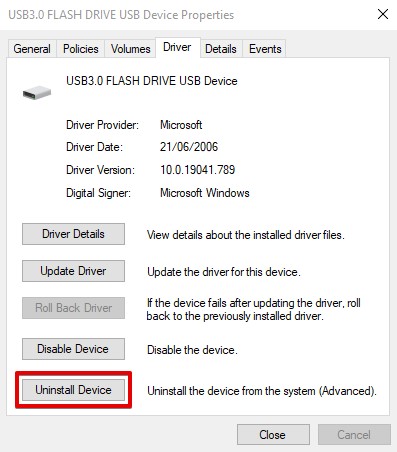
- Expand the Disk drives dropdown. Right-click your USB and click Properties.
- Click the Driver tab, then click Update Driver.
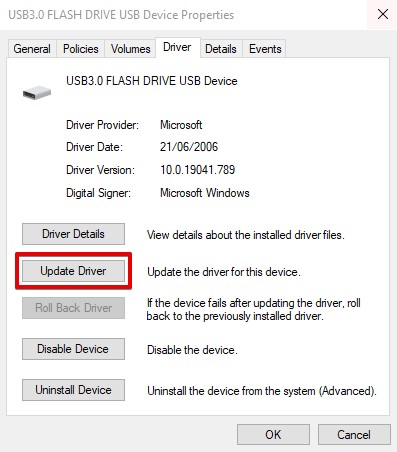
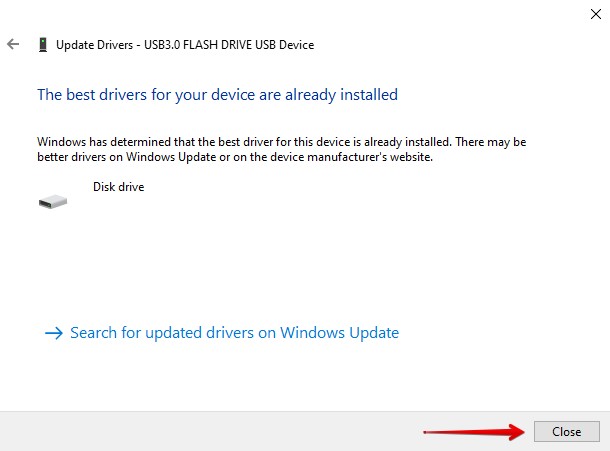
- Click Search automatically for drivers. Windows will search the internet for up-to-date drivers and download/install them. If none are found, proceed to the next step.
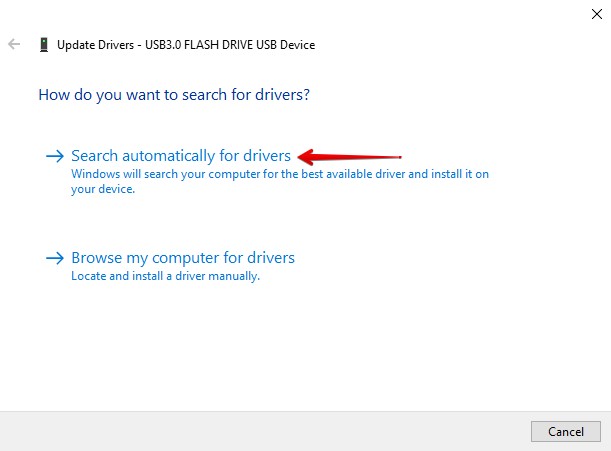
- Click Close.
- Click Uninstall Device.
- Click Uninstall.
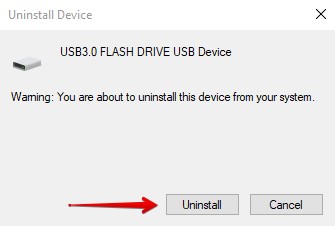
Once the driver is uninstalled, simply remove your USB and connect it again to force the drivers to reinstall.
Method 6: Reinstall USB Controllers
A USB controller is responsible for managing all your USB-connected devices, like your keyboard, mouse, and USB flash drive. It works with your device’s driver and helps your system understand how to use the device. Without it, none of your USB devices would work, even with their own drivers.
Reinstalling your USB controller can also help re-establish communication between your system and USB. Follow these instructions to reinstall your USB controller.
- Right-click Start and click Device Manager.
- Expand Universal Serial Bus controllers. Right-click your USB controller and click Uninstall device. When prompted, click Uninstall again.
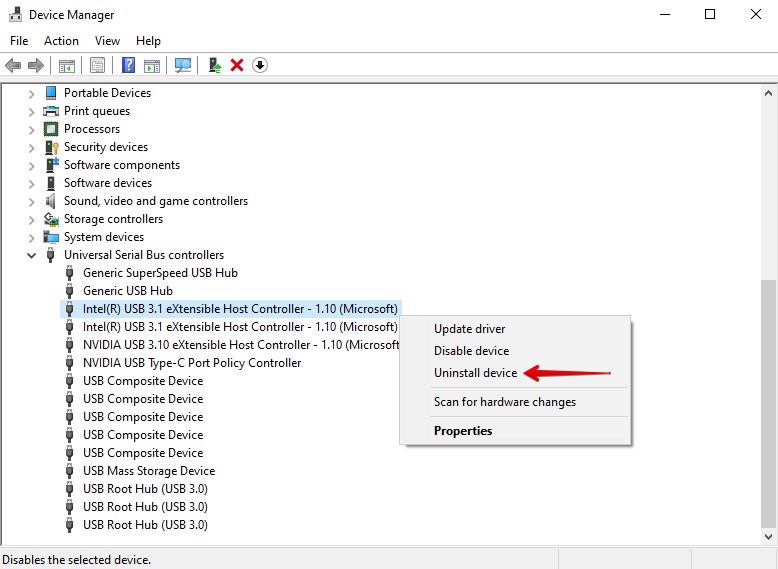
- Repeat step 2 for all USB controllers you see under Universal Serial Bus controllers. When finished, restart your computer to force the drivers to install again.
Method 7: Disable the USB Selective Suspend Setting
Windows does what it can to conserve power, especially on battery-powered devices like laptops. USB Select Suspend is a setting that allows Windows to disable unused USB ports in an attempt to reduce power consumption. However, this setting can often cause problems, as Windows may sometimes disable ports that you actually want to use.
To fix this, you will need to disable the USB Selective Suspect setting in our power plan to ensure the port you’re connecting to is usable.
Follow these steps to disable USB Selective Suspend through Power Options:
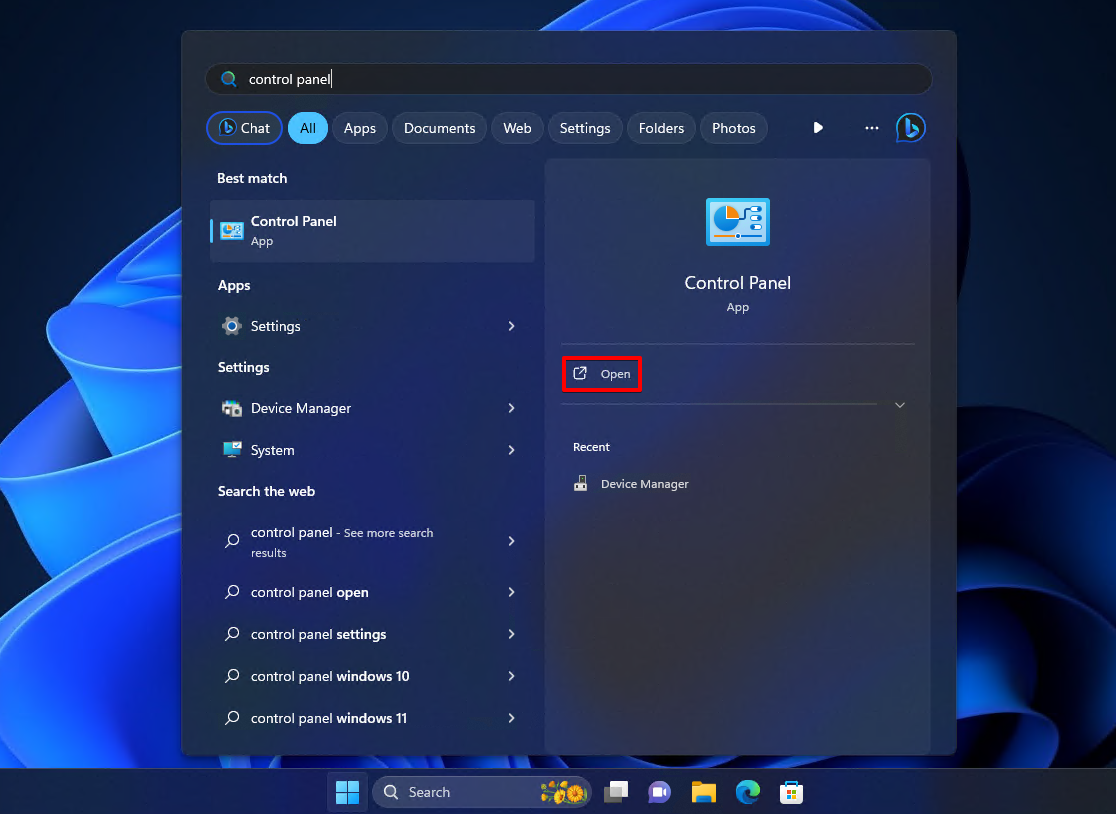
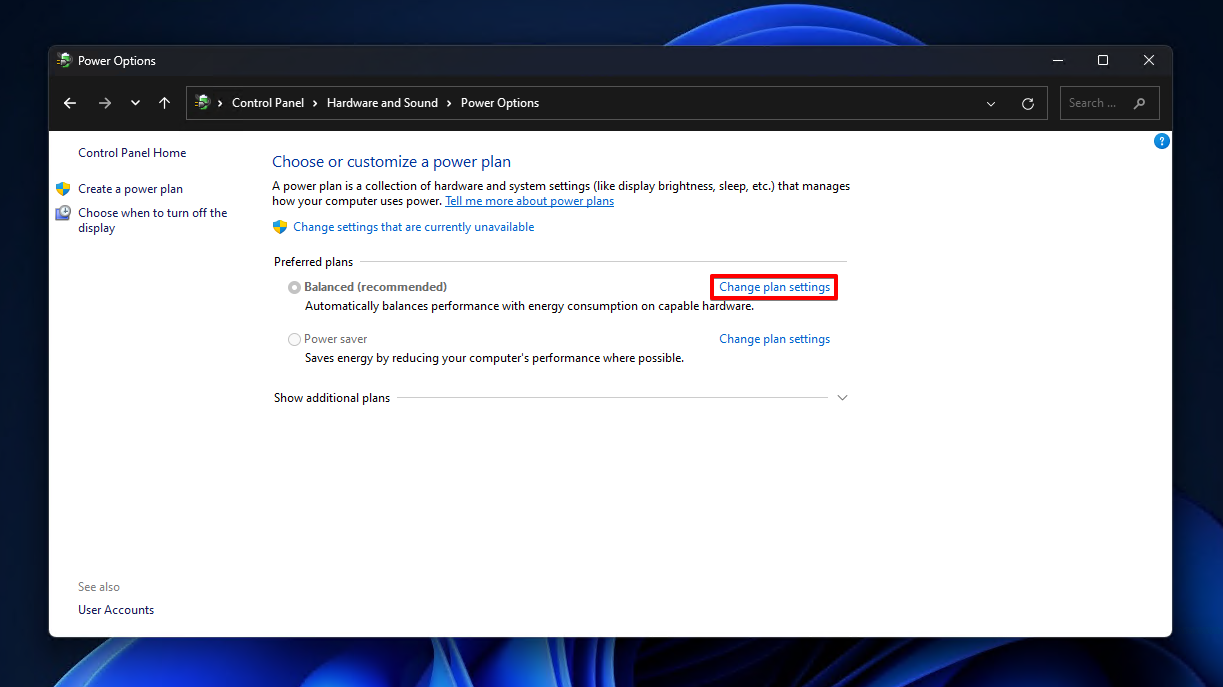
- Click Start. Search “Control Panel” and open it.
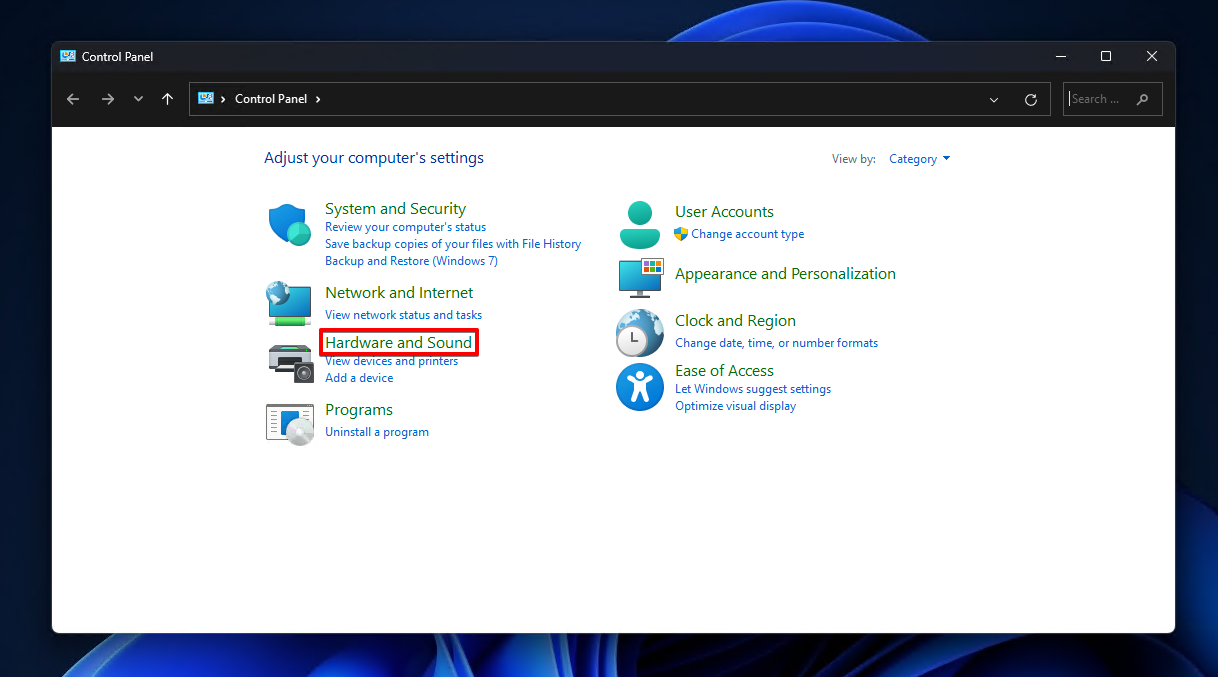
- Click Hardware and Sound.
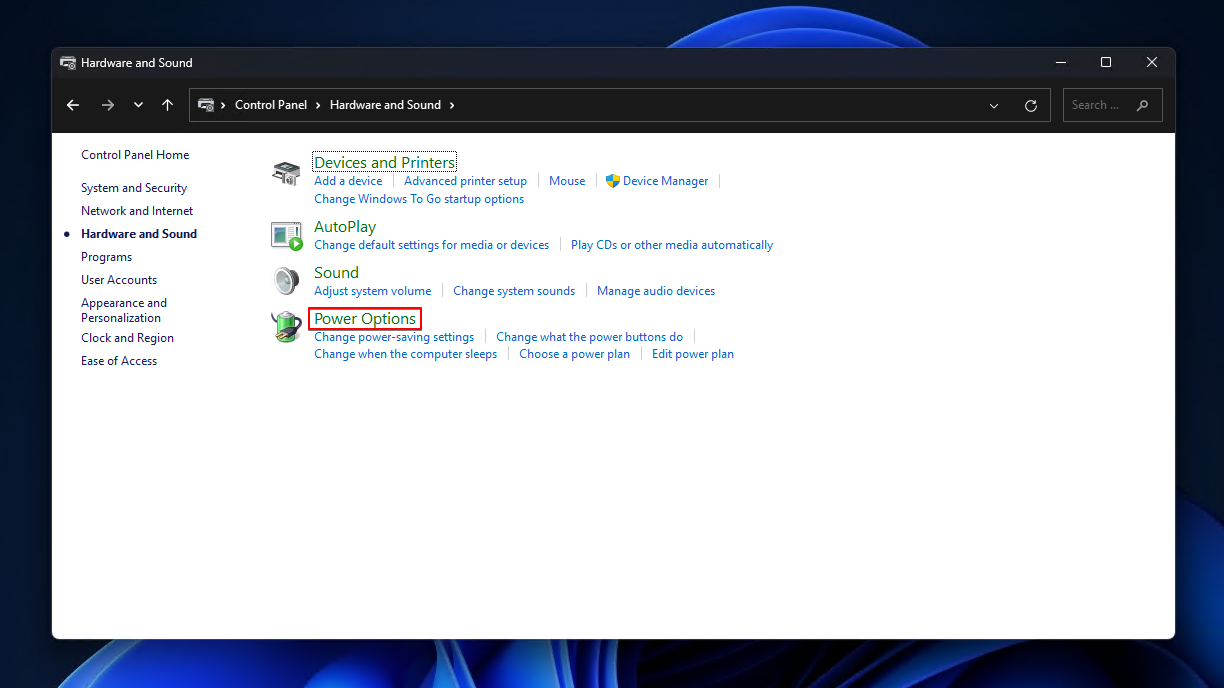
- Click Power Options.
- Click Change plan settings.
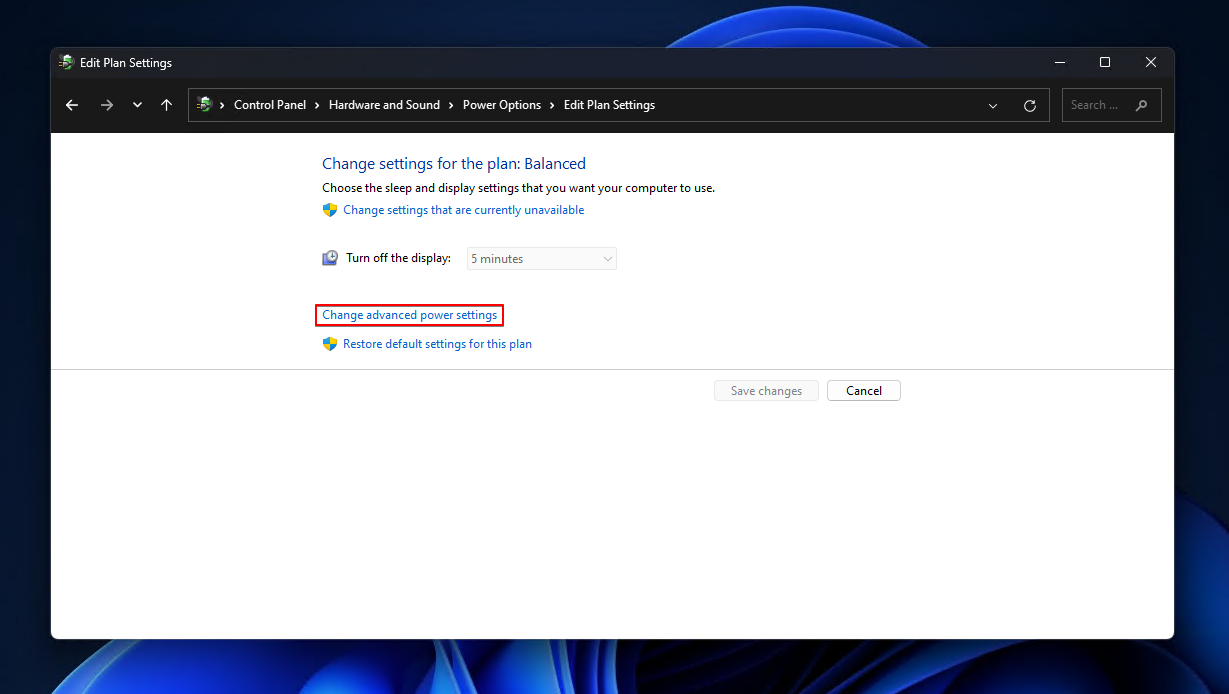
- Click Change advanced power settings.
- Click the dropdowns USB settings then USB selective suspend setting. Change the values to Disabled.
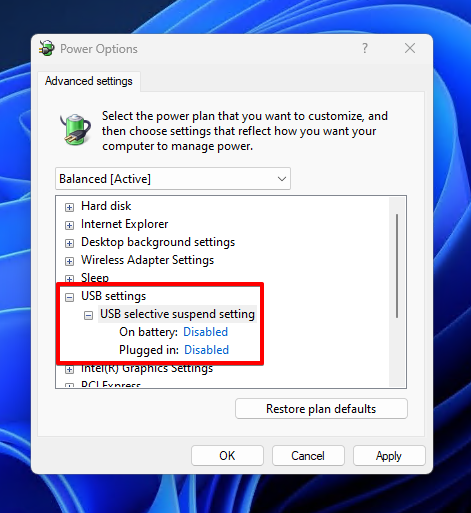
- Click Apply, then OK.
If you switch to another power plan, this setting will need to be updated on that plan too.
Method 8: Disable the Power-Saving Option for the USB Root Hub
Your USB Root Hubs also have their own settings that dictate when they should and shouldn’t be enabled to save power. When the power saving option is enabled, Windows will have the ability to turn the USB port off to conserve power.
Again, Windows can sometimes disable the USB ports even when they’re being used. As a result, your USB drive won’t be recognized when it’s connected to a disabled USB port. You can prevent Windows from doing this by manually disabling the power saving option for each USB Root Hub, as we’ll show you next.
- Right-click Start and click Device Manager.
- Expand Universal Serial Bus controllers and right-click USB Root Hub. Click Properties.
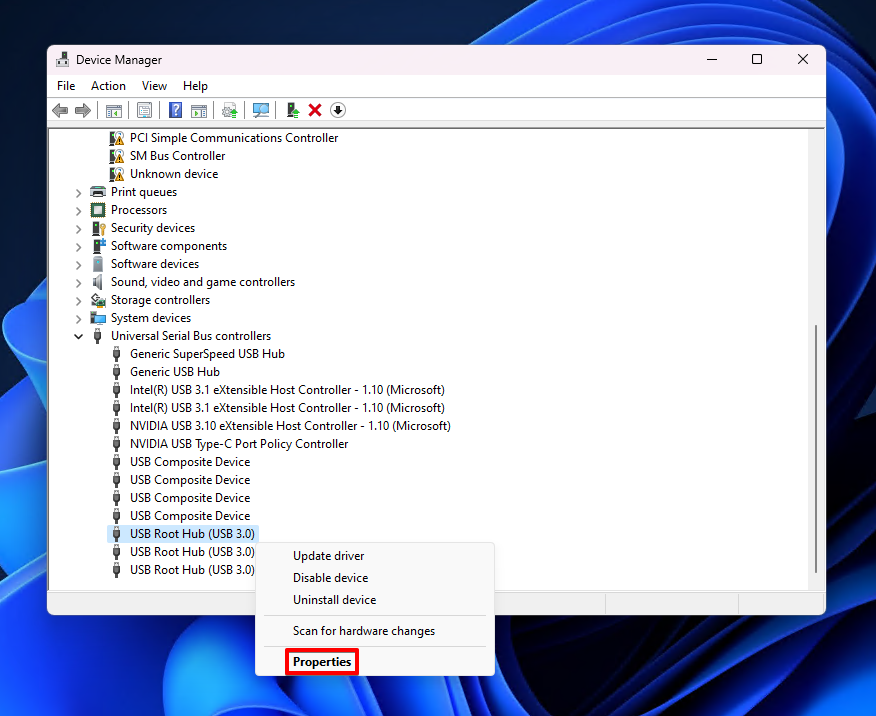
- Click Power Management, then untick Allow the computer to turn off this device to save power. Click OK.

Method 9: Roll Back to a Previous Restore Point
If none of the previous methods have worked, you can make one last-ditch effort to fix the problem by rolling your system back to a previous point in time.
Restore points are snapshots that contain your system settings, drivers, and software at the time of creation. If this problem is being caused by incorrect settings, you can restore your system to a time when the USB was working fine.
Note: Restoring your system with a restore point will delete any software or hardware drivers you’ve installed since the time it was created. Therefore, make a backup of anything you wish to keep.
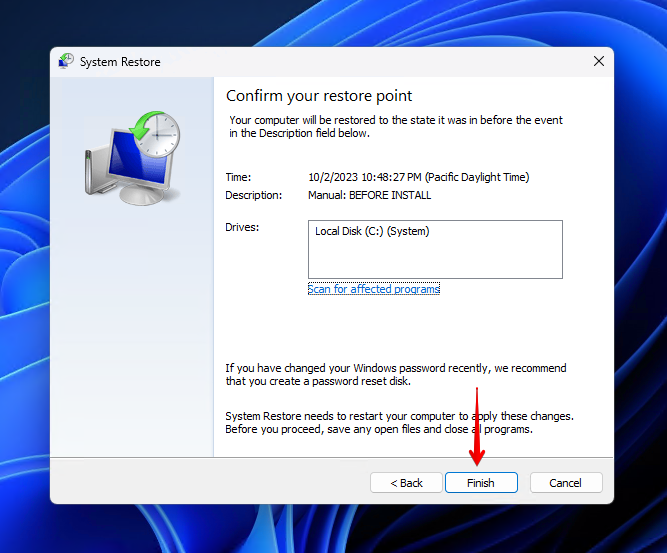
Follow these steps to restore your system using System Restore:
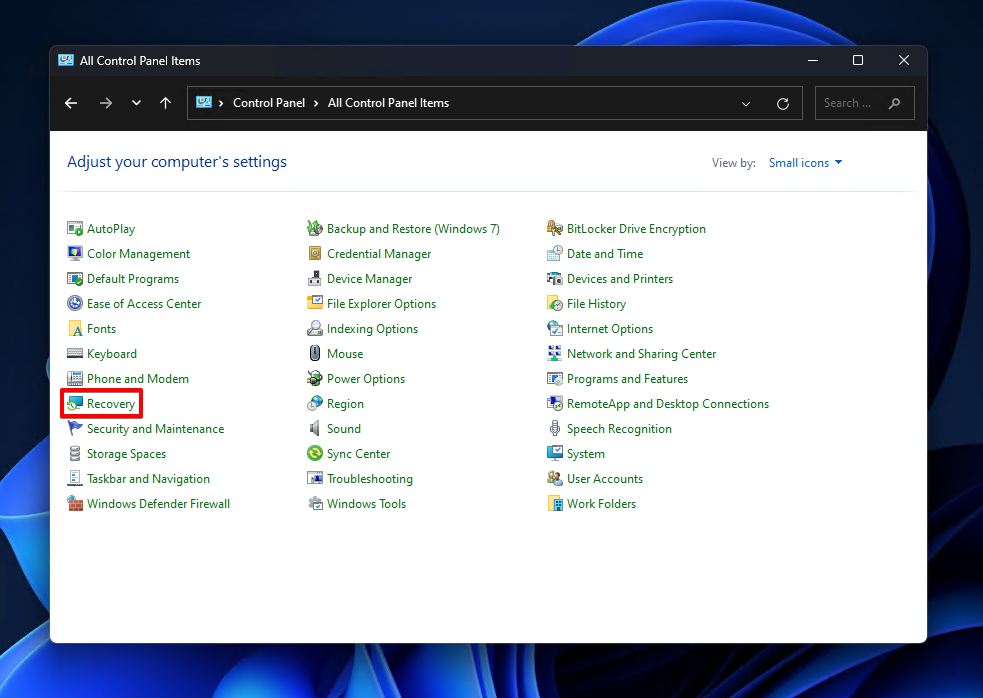
- Click Start. Search “Control Panel” and open it.
- Change the view mode to Small icons or Large icons, then click Recovery.
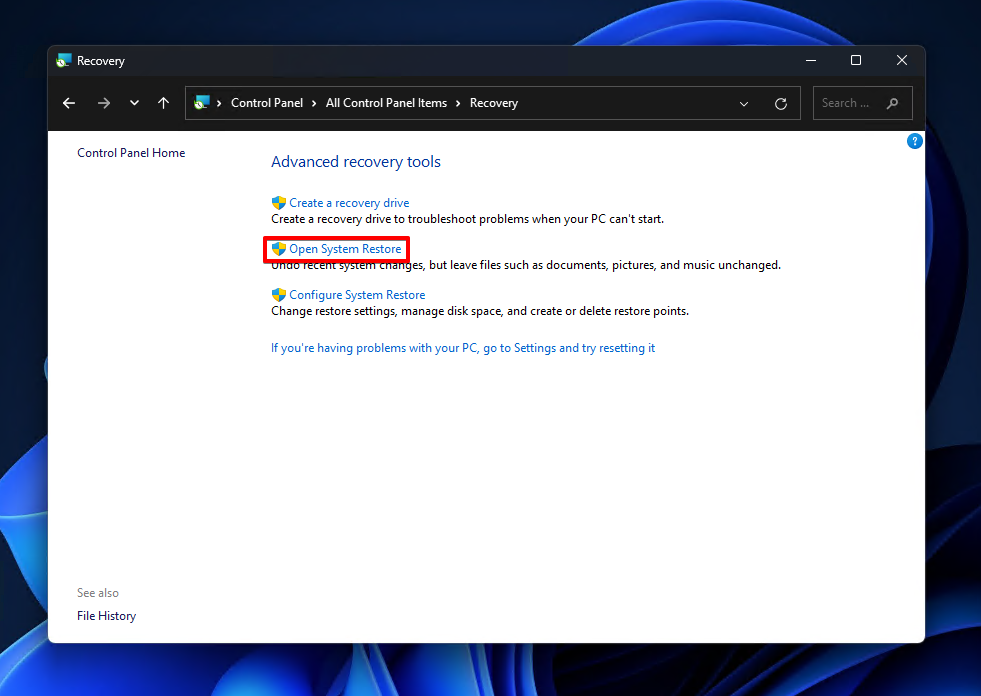
- Click Open System Restore.
- Click Next.

- Select a restore point and click Next.
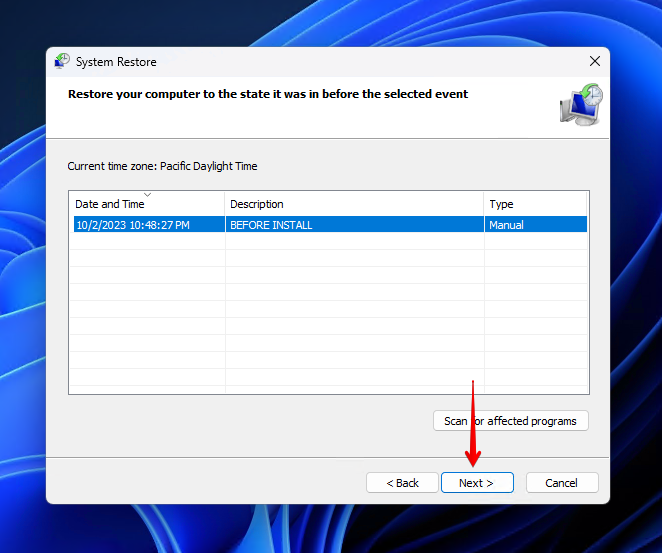
- Click Finish.
Conclusion
When your USB drive runs into a problem that causes it to become unrecognized, it can be hard to pinpoint what has gone wrong. Regardless of the cause, there are a number of ways you can address the issue.
First, start small. Try isolating the problem and connecting the USB drive directly to a port on your motherboard. If that doesn’t fix it, try running the hardware troubleshooter in Windows and updating or reinstalling the USB drive’s drivers. Next, try disabling the power-saving settings associated with the USB ports you’re using.
Should none of the above work, you can always try rolling your system back using a restore point. However, be aware that this will also roll back any applications you’ve installed and settings you’ve changed.
FAQ:
- Right-click Start and select Windows PowerShell (Admin).
- Type msdt.exe -id DeviceDiagnostic and press Enter.
- Click Next and follow the prompts to scan your computer and fix related issues.
- Right-click Start and select Device Manager.
- In the Disk drives dropdown, right-click your USB and click Properties.
- Click the Driver tab, then click Update Driver.
- Click Search automatically for drivers. If none are found, proceed to the next step.
- Click Close.
- Click Uninstall Device.
- Click Uninstall. Disconnect your USB and connect it again.
- Improper removal
- Physical damage
- File system corruption
- Malware infection
- Corrupted or outdated drivers


Solid guide. I managed to fix my USB issue by updating the drivers. Didn’t even know that was a thing! Appreciate the help.