
When you turn on your computer, the last thing you want to see is a RAW partition. When one of your partitions has become RAW, it either means there’s something wrong with the file system or your operating system doesn’t recognize it. In most cases, your data will still remain intact, although it will be inaccessible.
While formatting the partition with a new file system like NTFS will fix it, you will lose all of your data in the process. Instead, we’re going to show you ways you can convert RAW to NTFS without losing data.
Make these steps before formatting partition ⤵
Table of Contents
Why Do You Need to Convert RAW to NTFS?
A partition in a RAW state cannot be used to read or write data as it’s unrecognizable to the operating system. Before we discuss methods on how you can fix RAW partition without losing data, it’s good to know how it has happened. There are four common reasons why the partition is being read as RAW:
- Unsupported file system – If your drive is formatted with a file system that’s not supported by Windows (for instance, Apple’s HFS+), Windows will automatically suggest formatting the drive when it’s connected, even if there’s data on it.
- Corrupted file system – In the event of your system experiencing unexpected power failure during a write operation, this interruption could result in the file system becoming corrupted. If so, the partition will be read as RAW by the operating system. The same effect can be caused by an abrupt disconnect of the drive or by a malware attack.
- Missing a file system – When your file system is deleted or altered incorrectly, Windows will automatically label it as RAW until it’s formatted with a supported file system.
- Bad sectors – Physical damage on the drive surface can create bad sectors, which are unreadable areas. If a significant portion of the drive’s sectors are bad, the file system might become compromised, leading to a RAW state. In this case, it’s not advisable to perform DIY recovery and you should contact professionals.
If you had data on that partition before it was converted to RAW, that data will still remain there until it’s deleted or overwritten. This is why everyone should strive to convert RAW to NTFS without formatting, as there’s a good chance you can still restore all your files.
Steps to Make Before Converting a RAW Drive to NTFS
Making any changes to a partition in a RAW can be dangerous to the data that’s on it. Before doing anything to your partition structure, it’s important that you either create a backup of the RAW partition or recover data from your hard drive using data recovery software. This is important if you want to fix the RAW hard drive to NTFS without losing the data.
Most solutions in this list will require you to format the partition with the NTFS file system, and even those that don’t may still delete what contents are on the said partition. In order to convert RAW to NTFS without data loss, it’s essential that you either back up the existing data on the RAW partition or attempt to recover it using recovery software before trying to restore the partition.
For both steps, we’re going to be using a data recovery app – a tool that can restore deleted or lost data. While there are many similar apps out there we prefer Disk Drill, because it’s capable of creating your drive’s backups to ensure your data is safe before attempting any fixes and is compatible with a variety of file systems including those not native to Windows.
Step 1: Create a Byte-to-Byte Image
While Disk Drill’s main feature is data recovery, it also comes with a feature that allows you to create a byte-to-byte image of the disk. This is helpful in ensuring your data is backed up for when we convert the partition from RAW to NTFS.
- Download, install, and open Disk Drill.
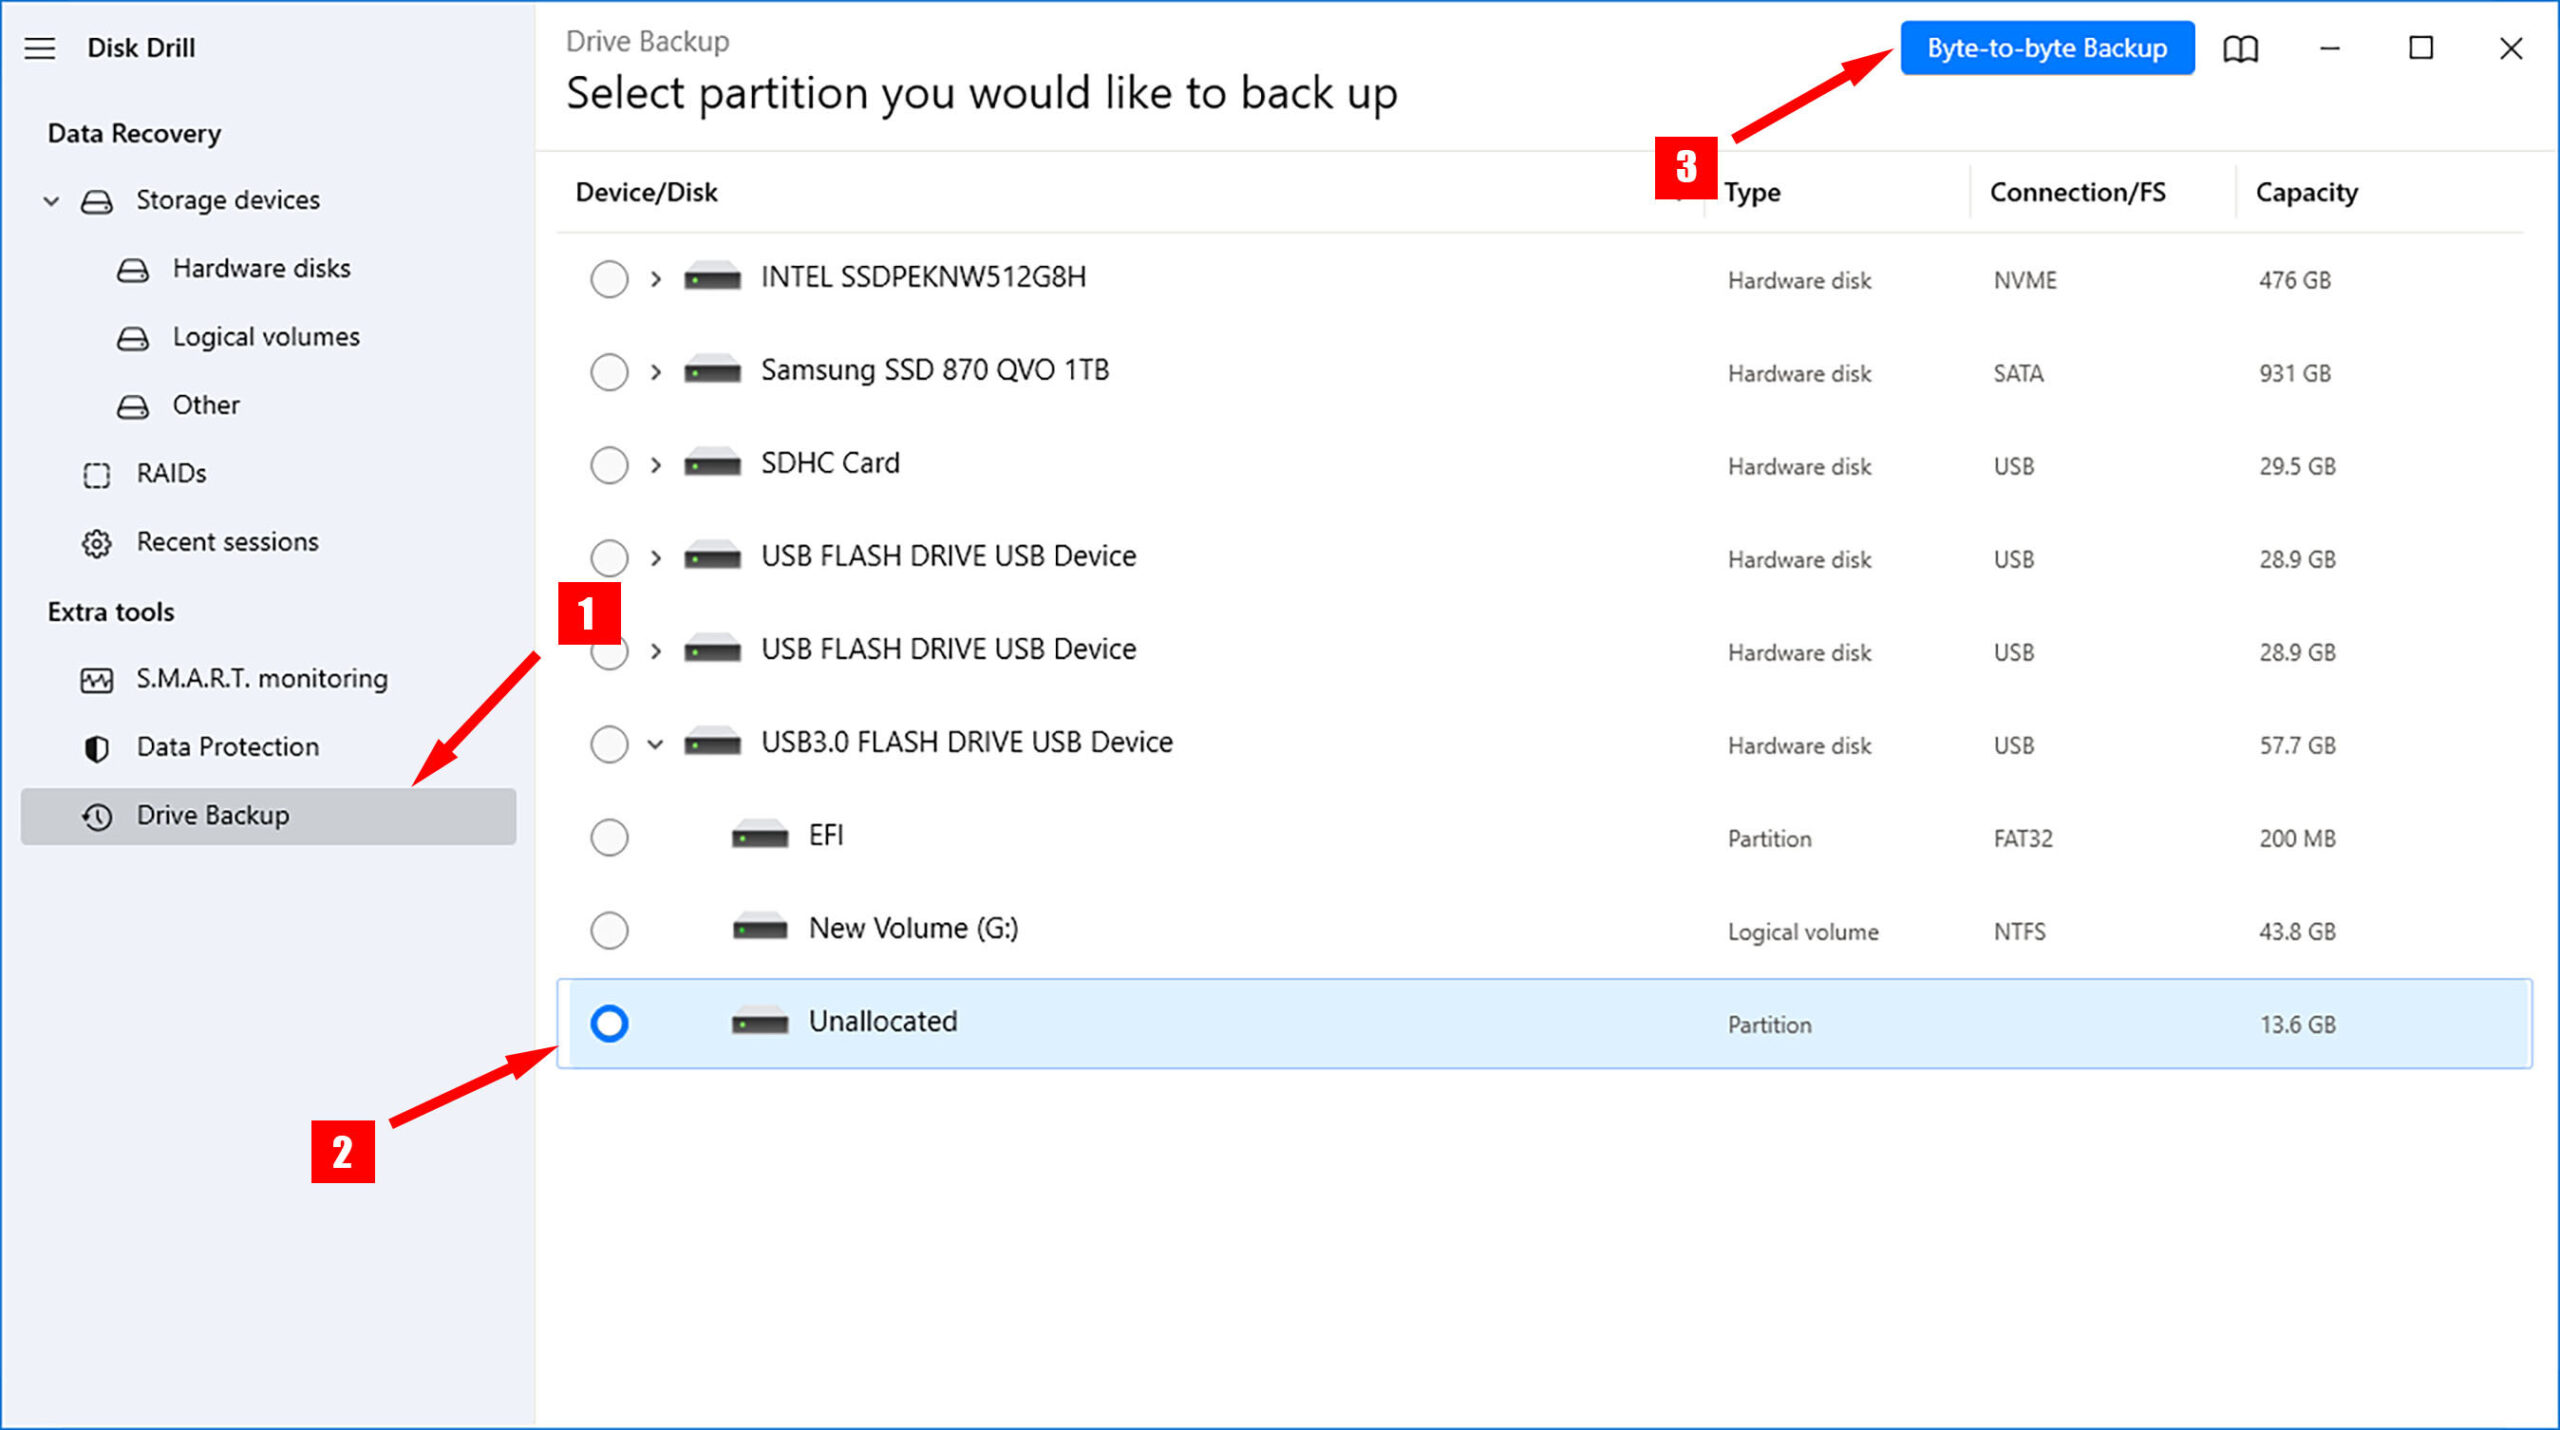
- Click Drive Backup, then click the dropdown on the disk that contains the RAW partition, then select on the RAW partition. Click Byte-to-byte Backup.
- Choose a location where you want the backup saved.
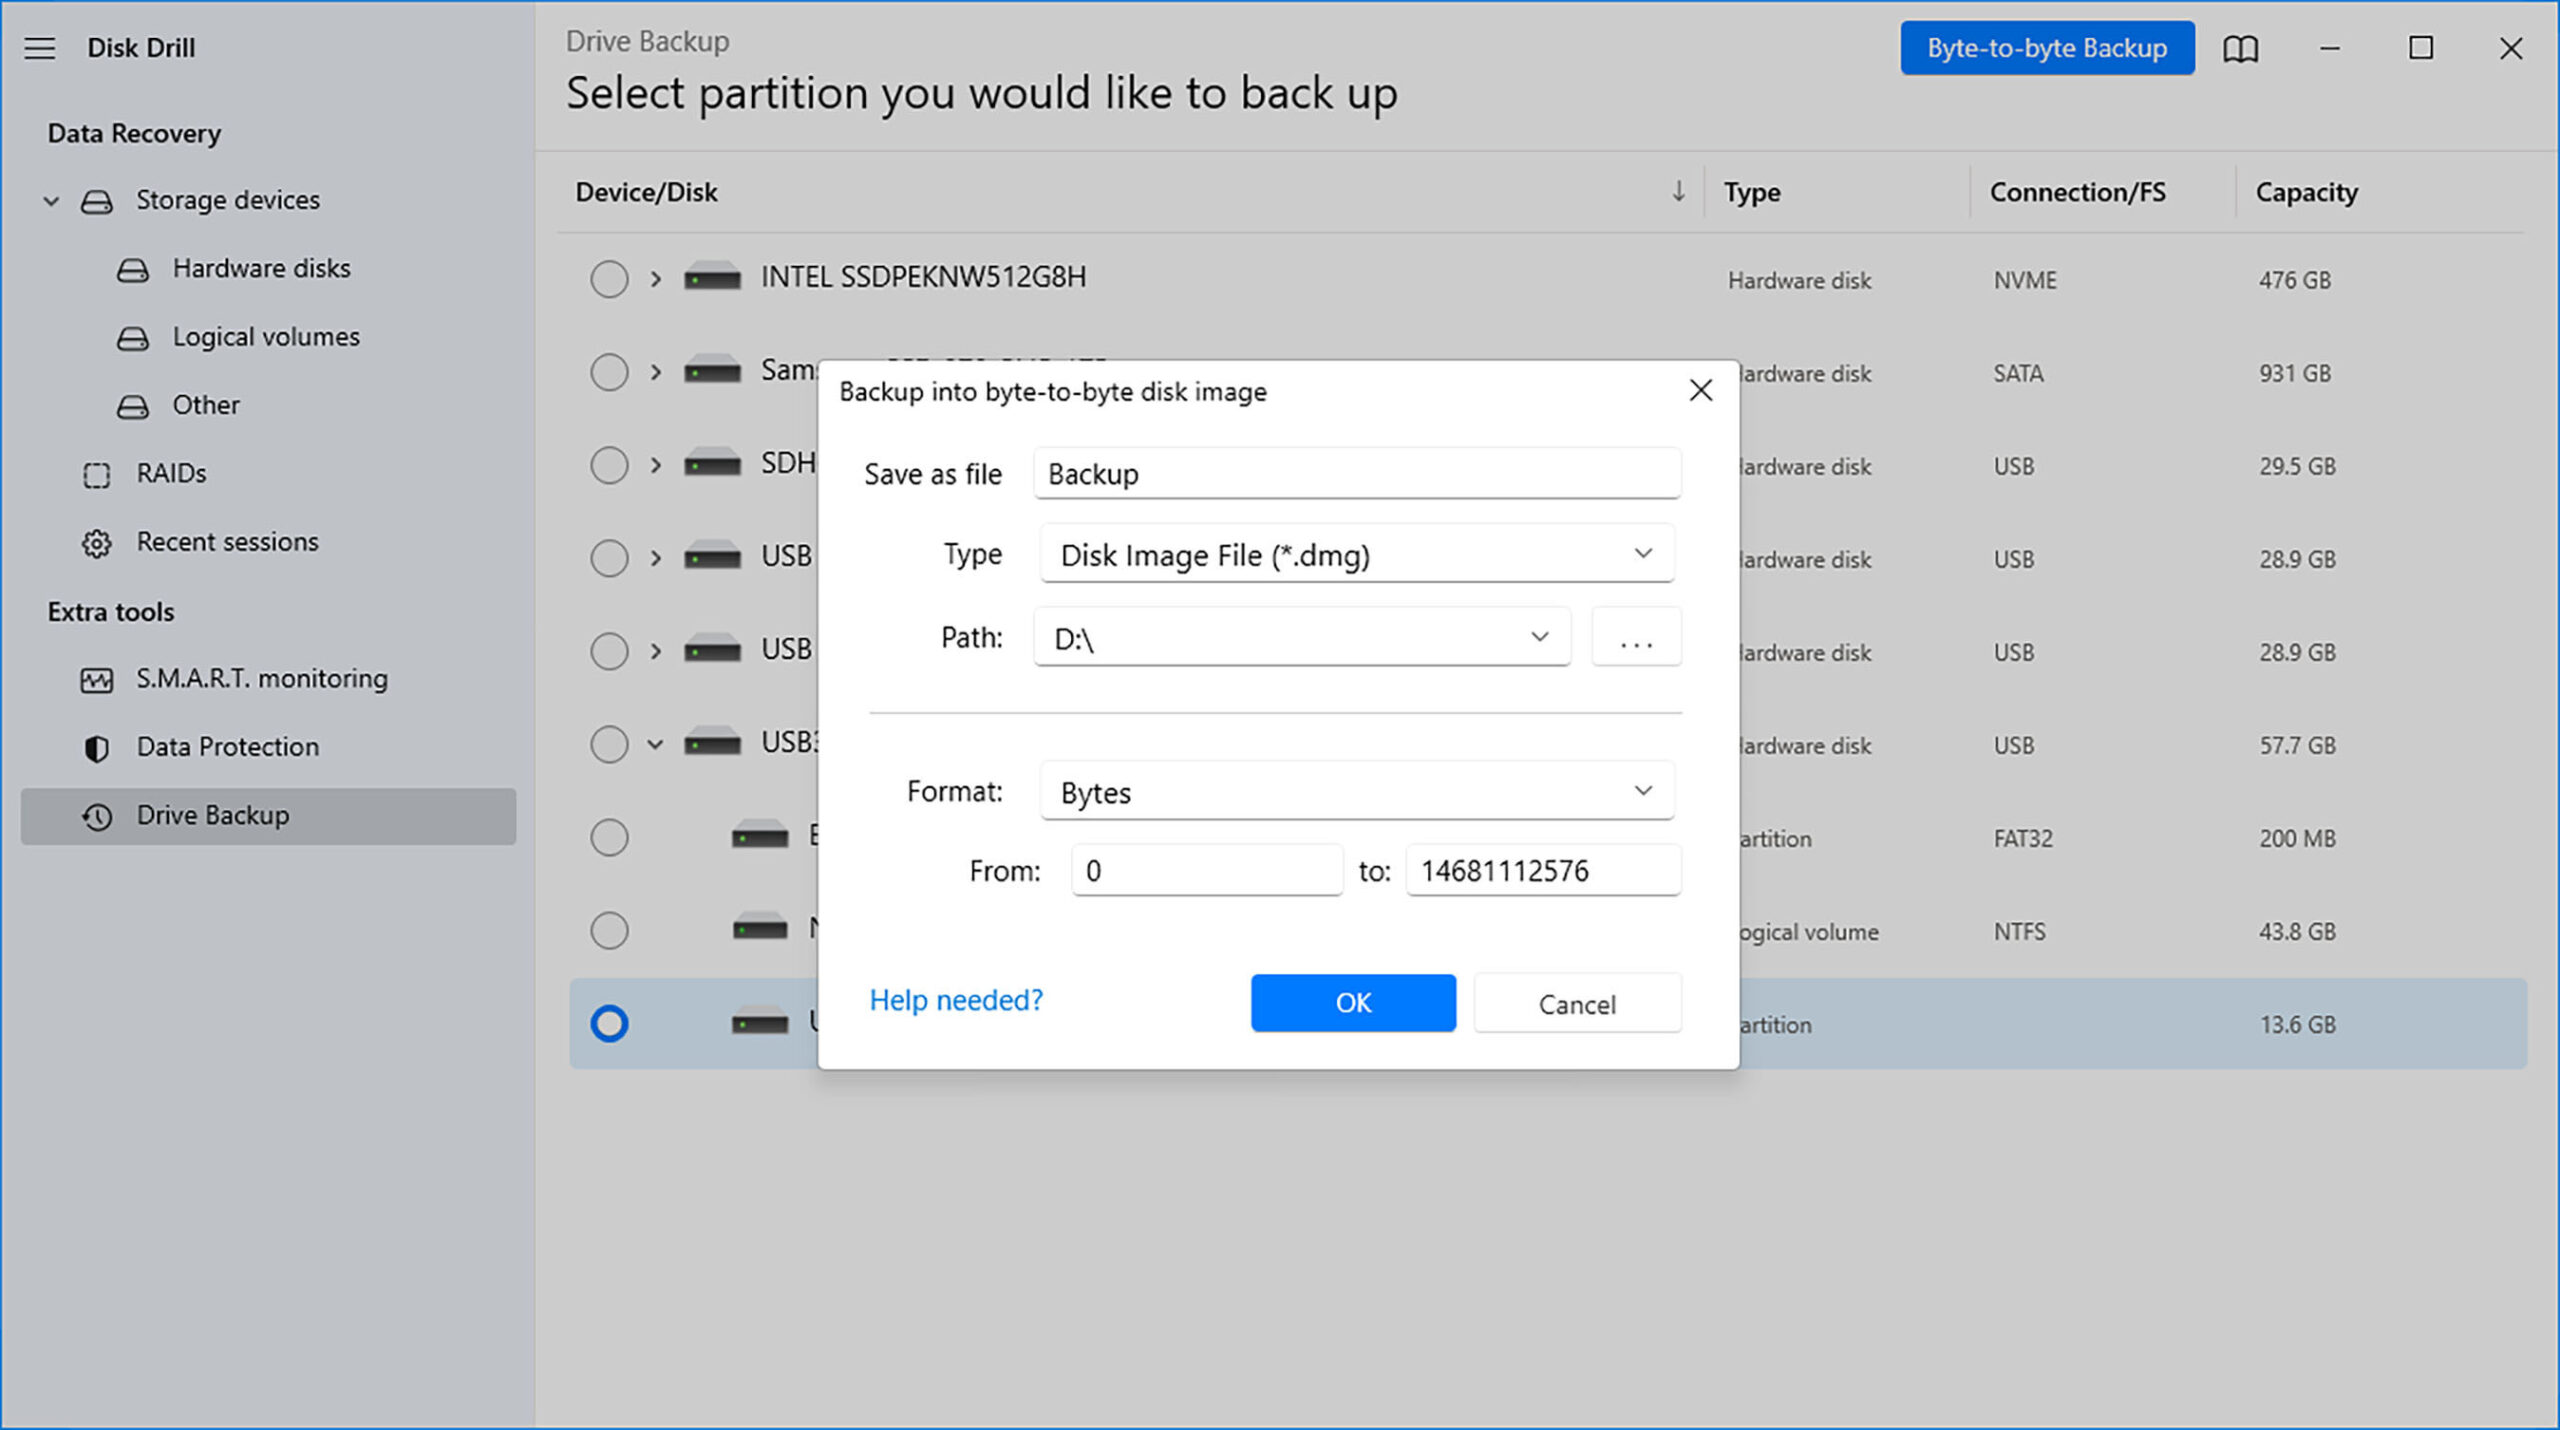
This image will include all of the data contained in the RAW partition. Having a complete copy enables you to fix RAW drive without losing data.
Step 2: Recover Data Using Disk Drill
Even though you can’t access your data using Windows Explorer, it can still be recovered using Disk Drill. This is perfect for RAW data recovery, as recovering your files through Windows Explorer is impossible when it can’t be accessed.
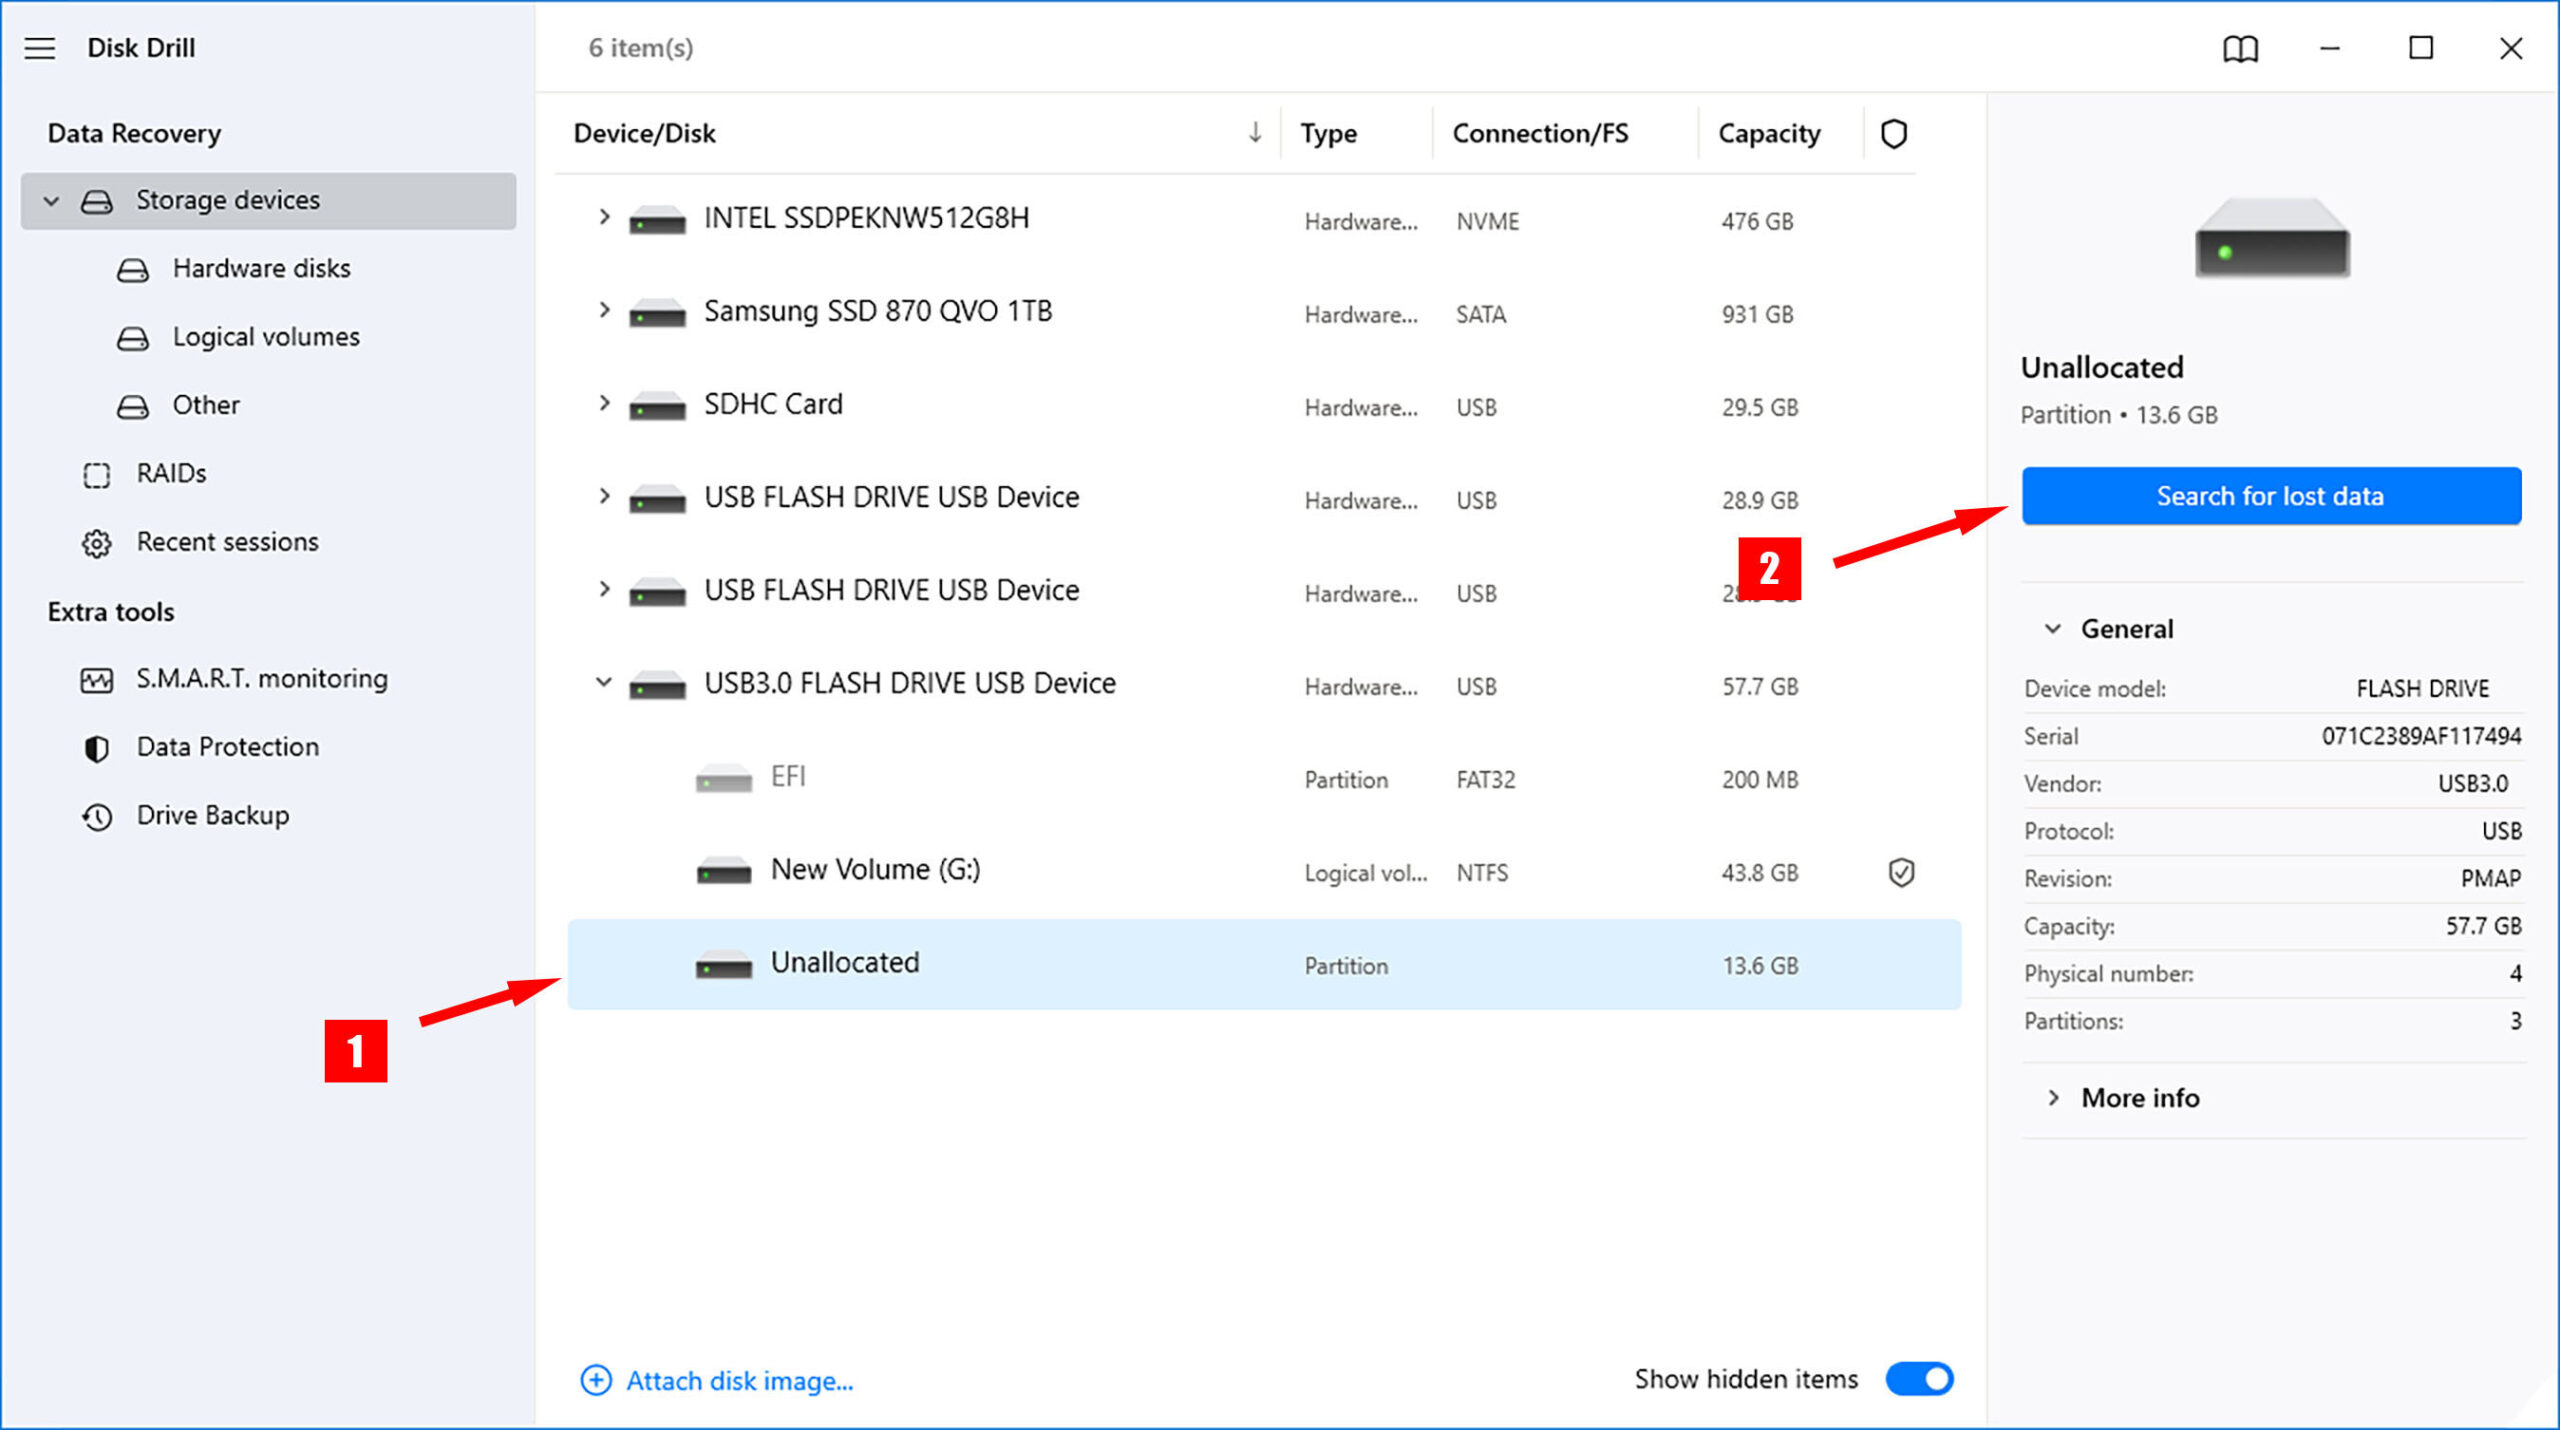
- Expand the dropdown of the disk that contains the RAW partition, then select the partition. Click Search for lost data. The scan will start.
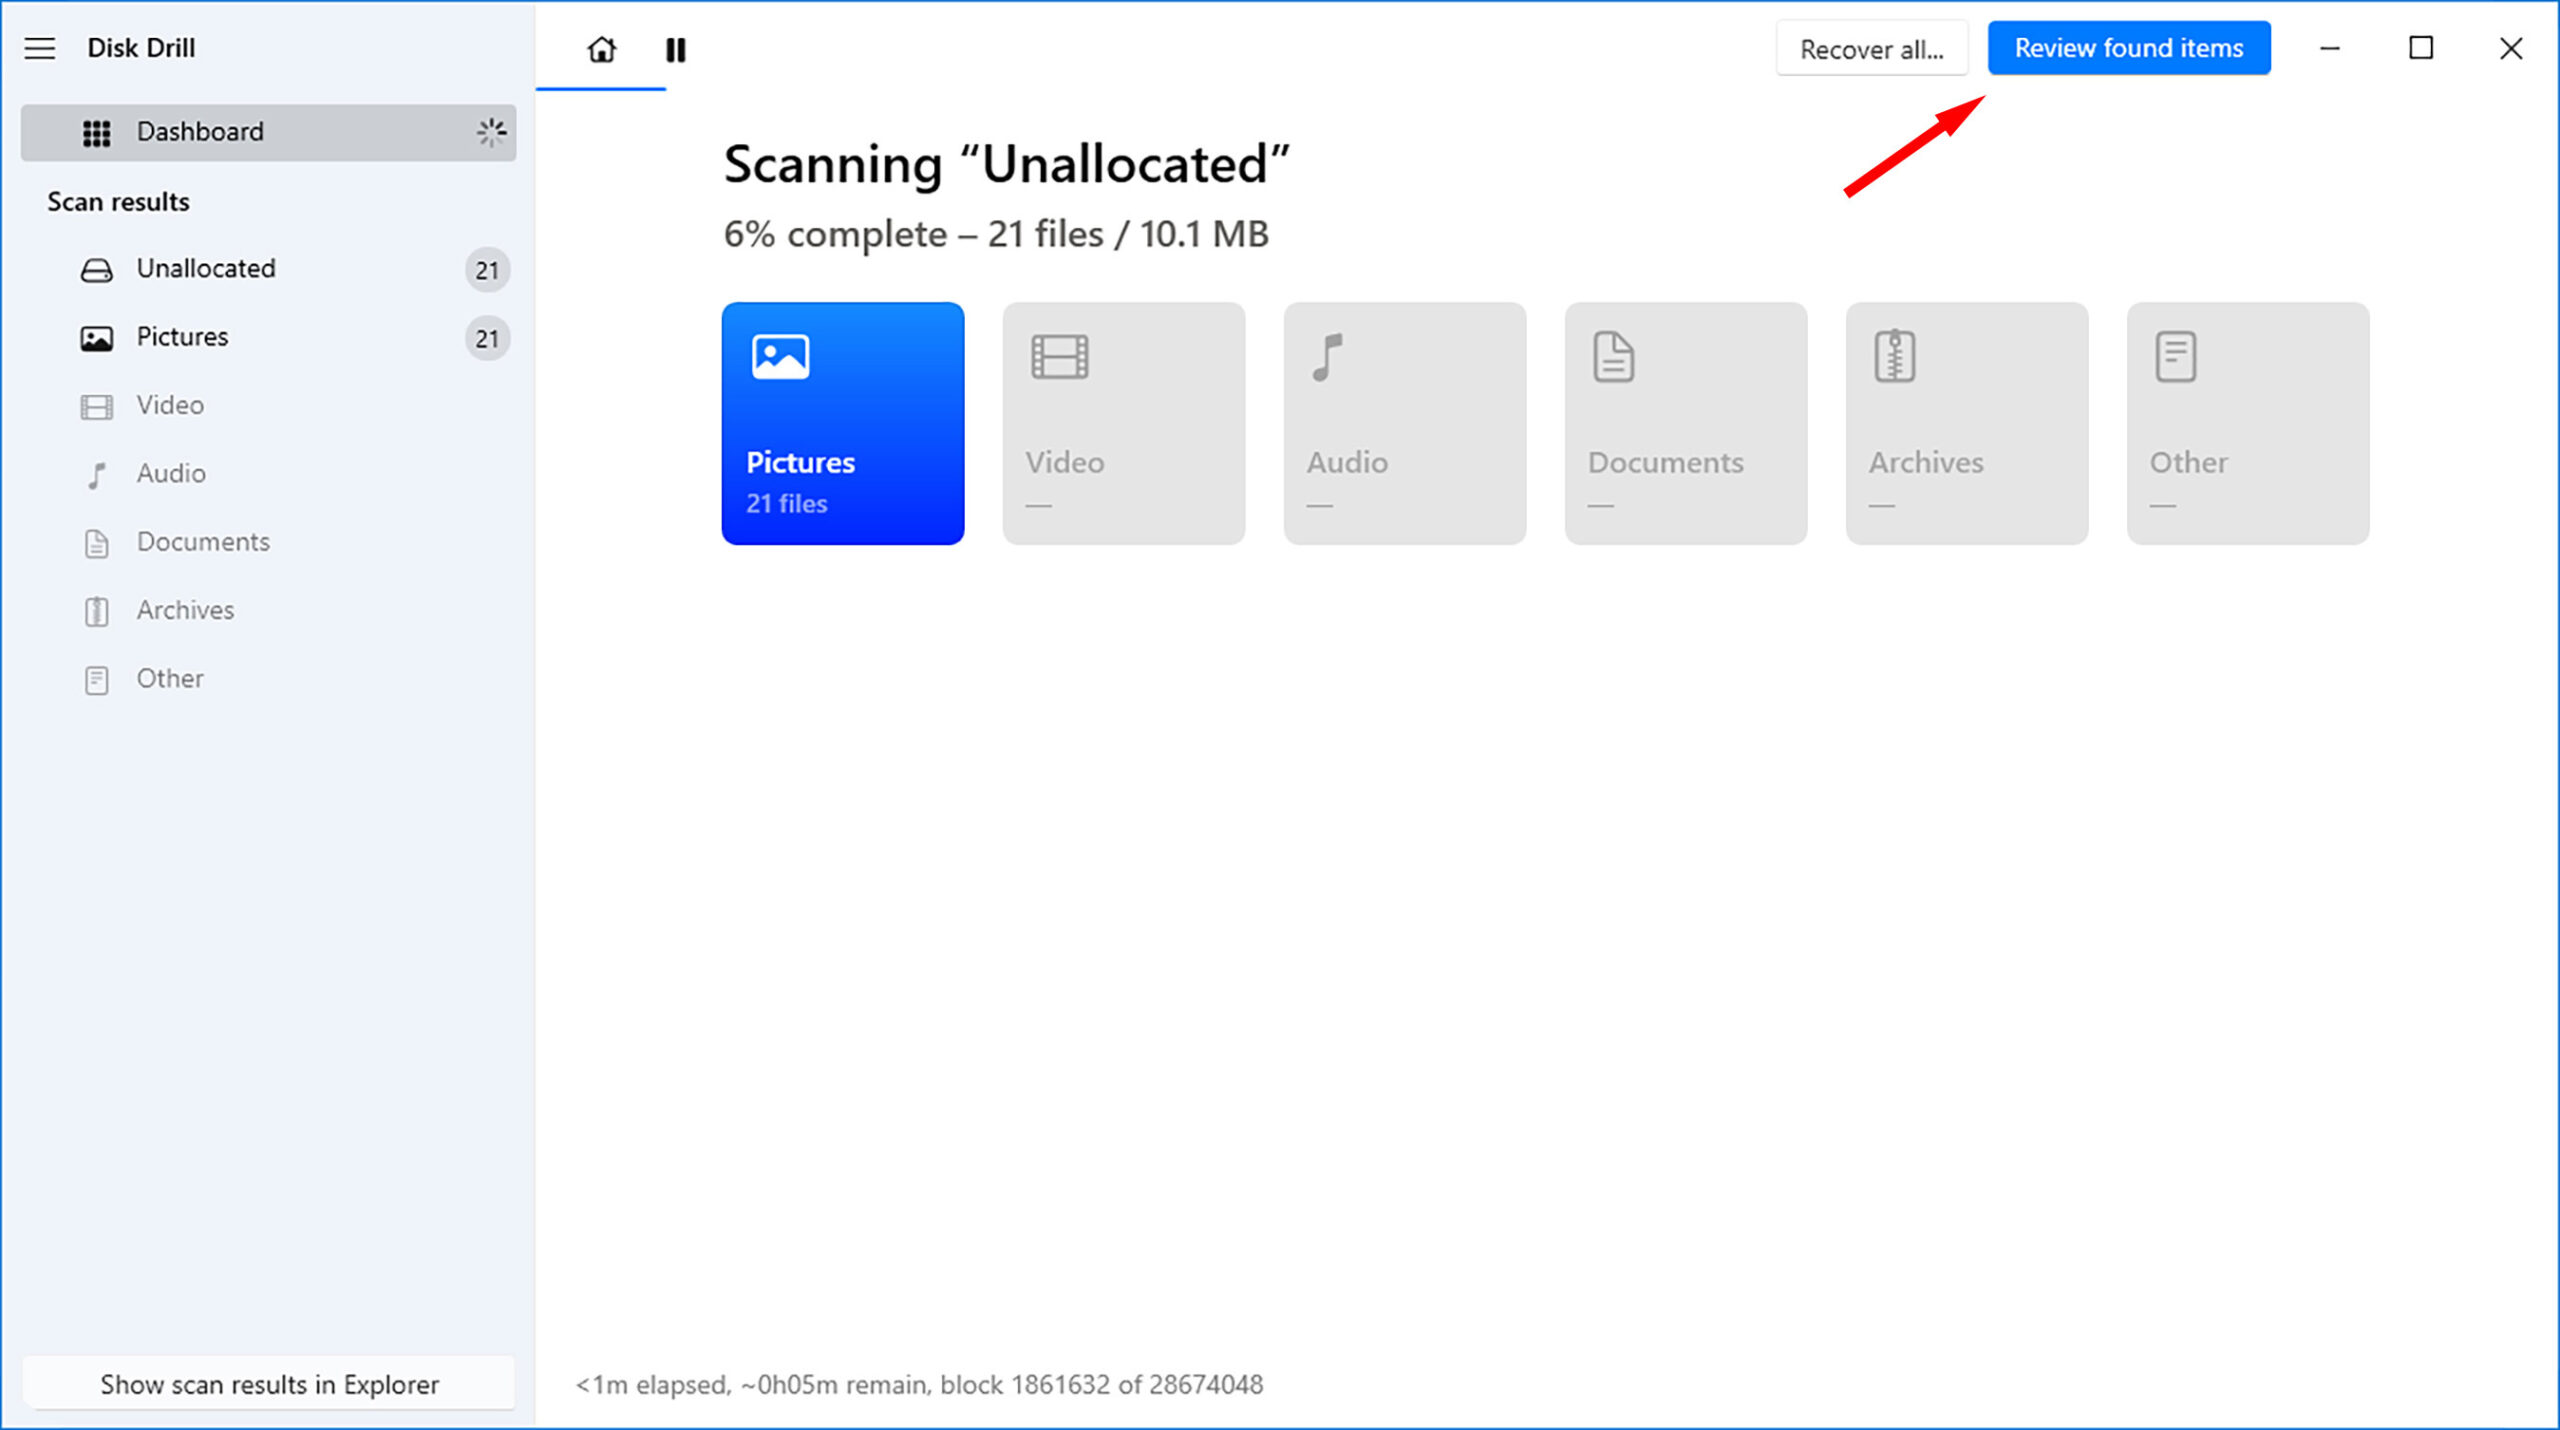
- When the scan has finished, click on Review found items.
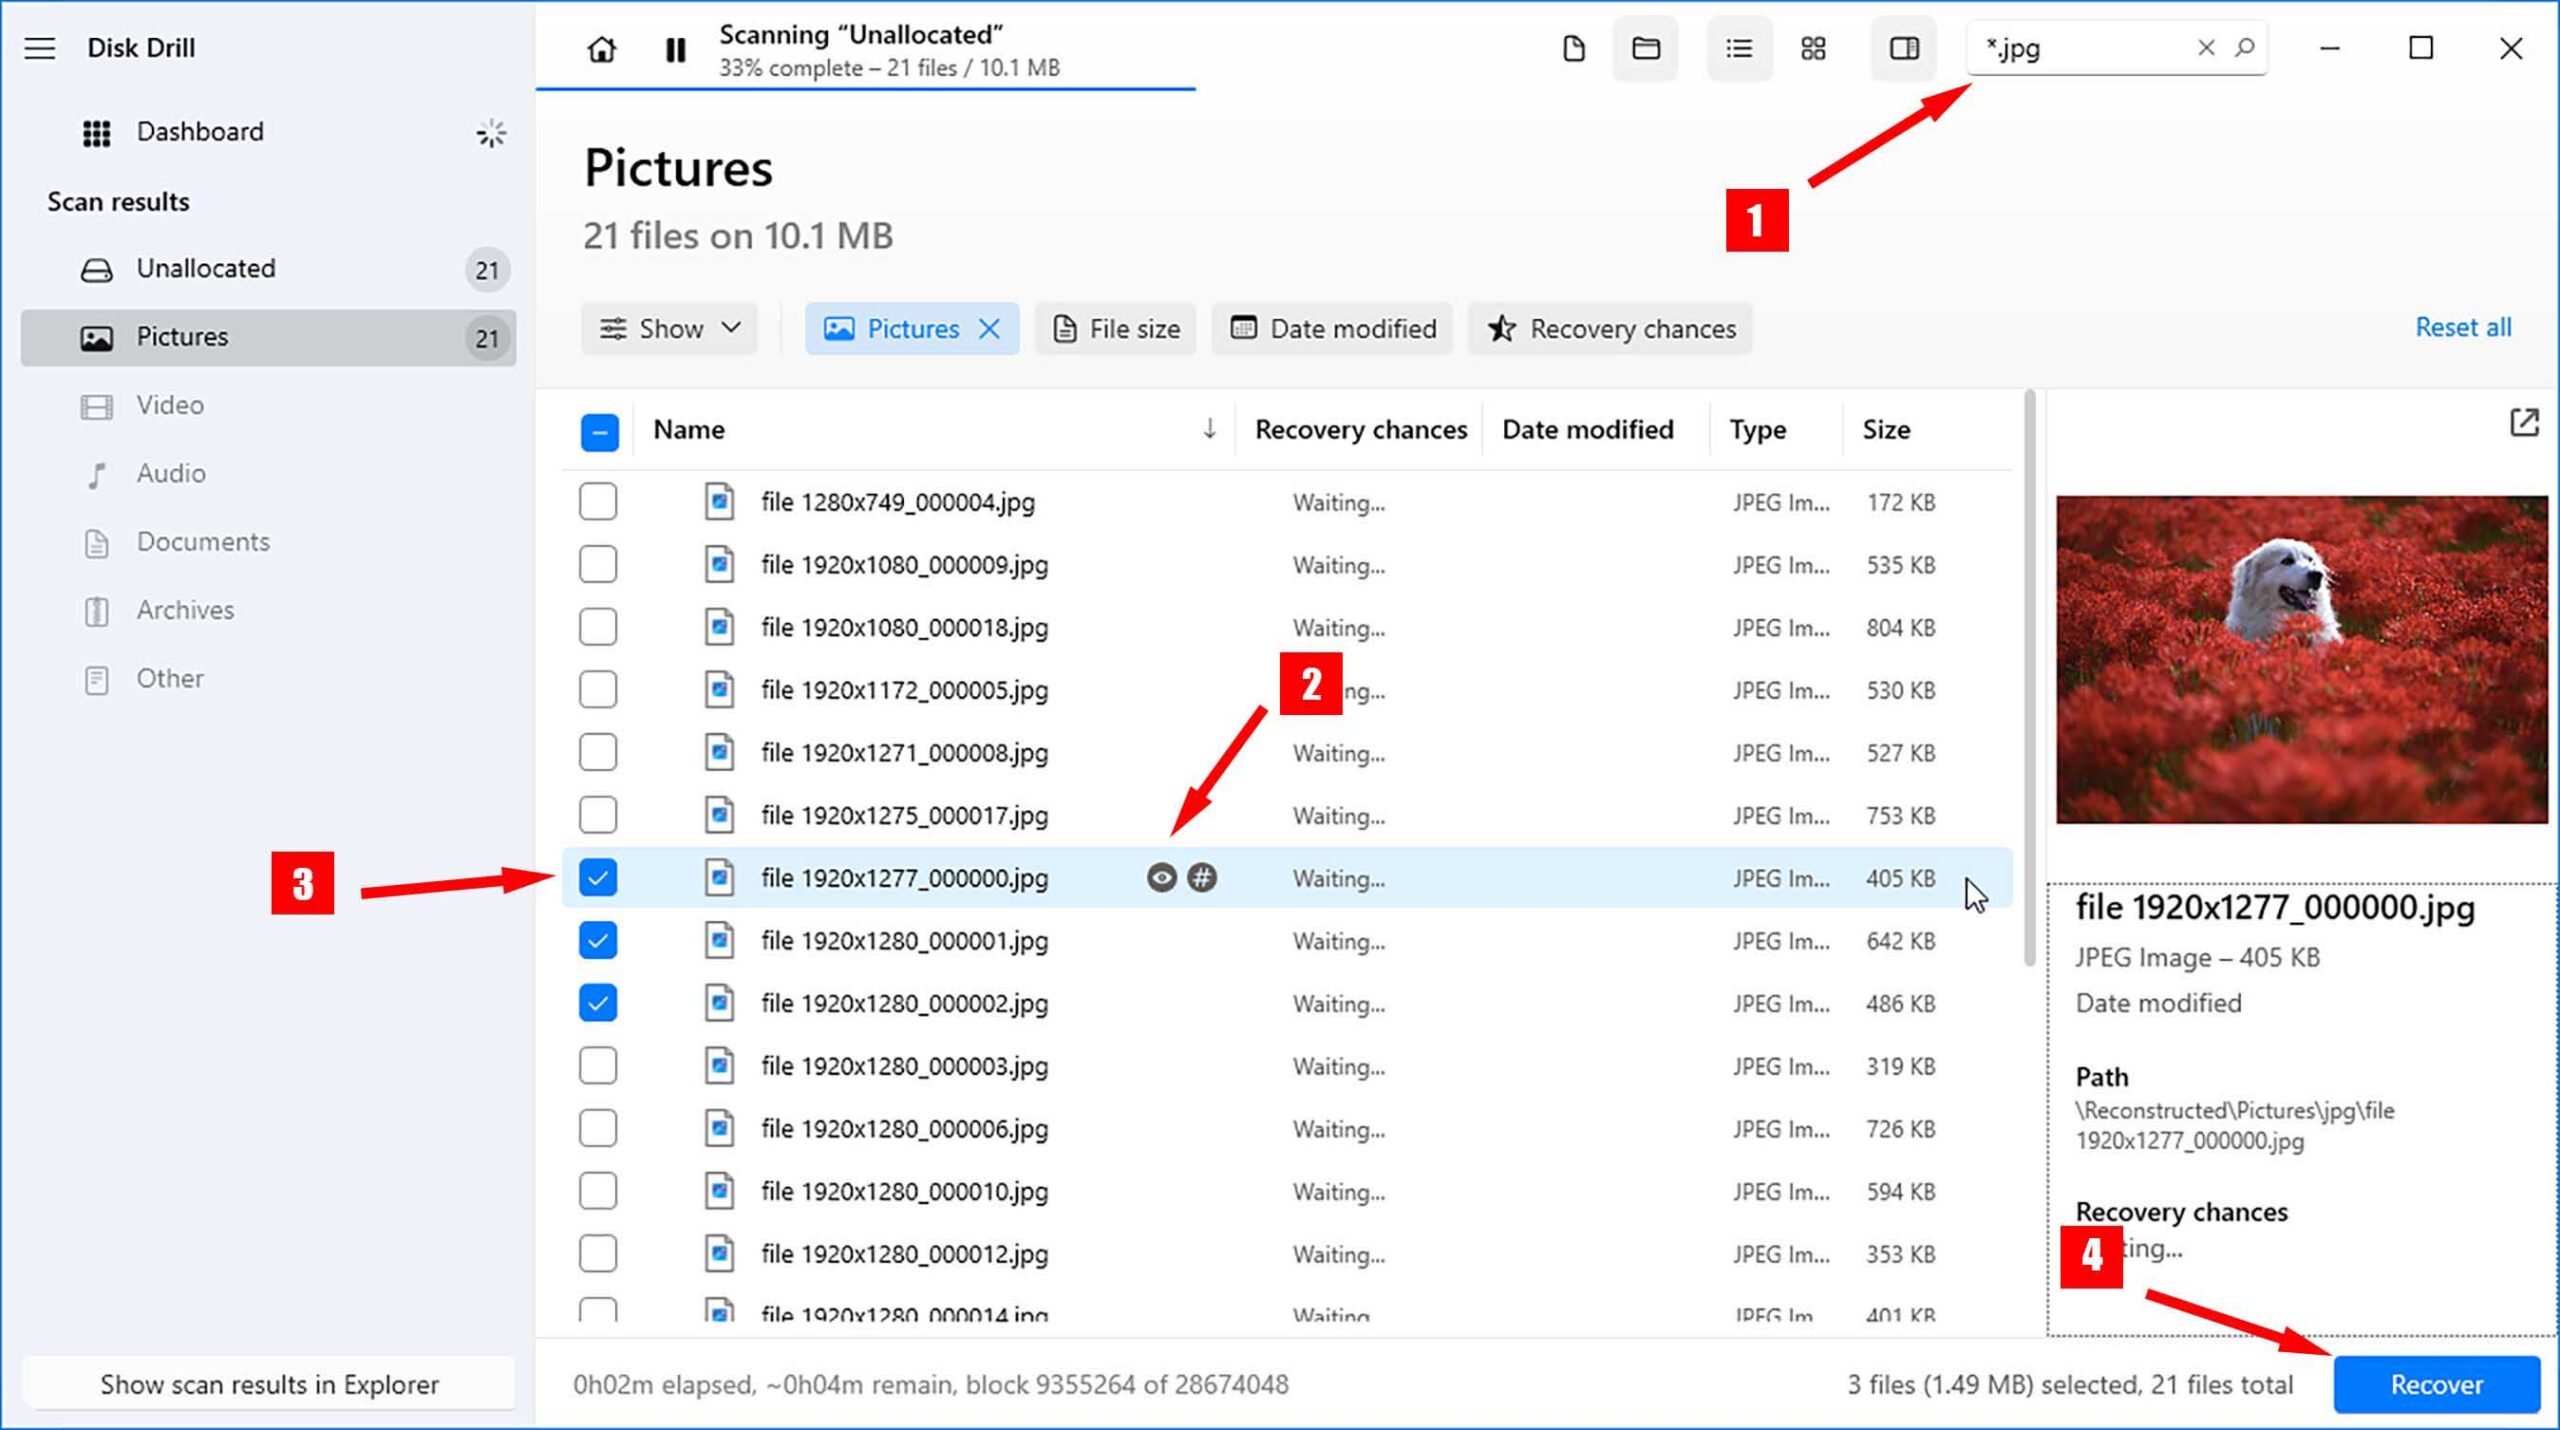
- Go through the list of discovered files and mark what files you want to recover by ticking the box next to the file name. You can use the search feature to find specific files to be recovered. When ready, click Recover.
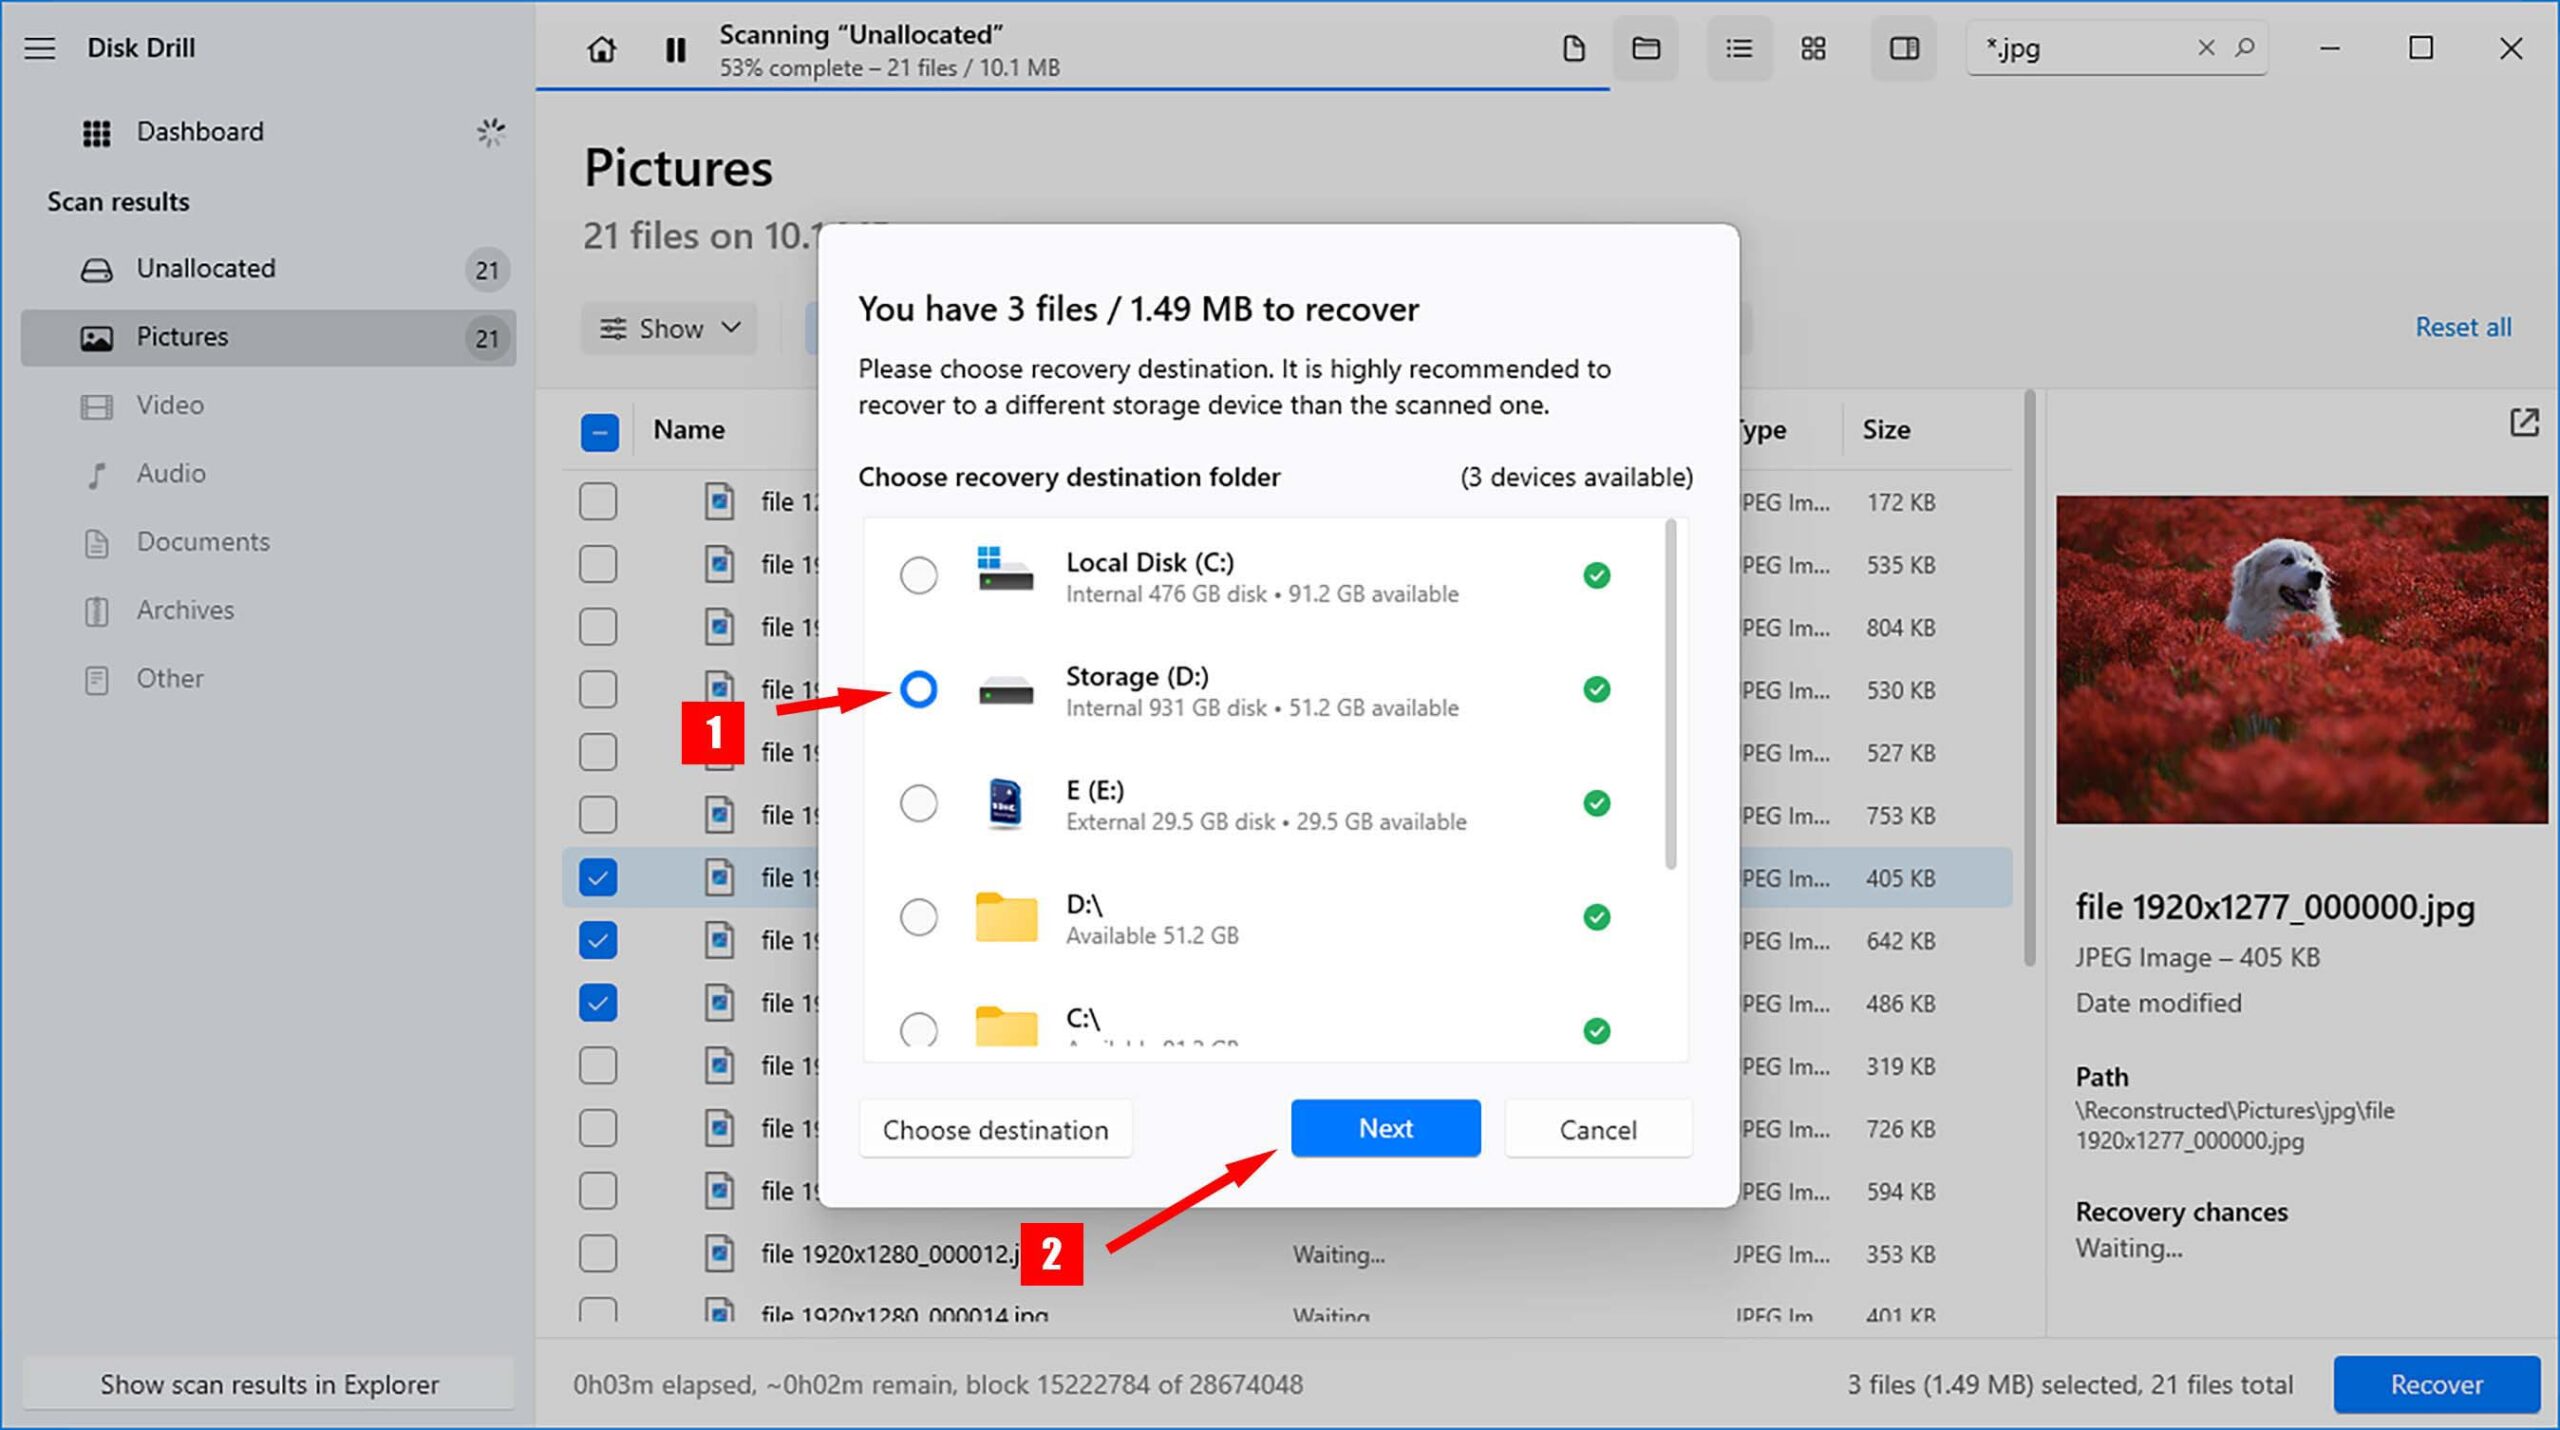
- Specify where you want the files recovered to. When ready, click Next.
Once your data is recovered, you’ll have the ability to recover the RAW partition to NTFS without worrying about losing your data in the process.
How to Convert RAW Drive to NTFS Using Command Prompt
If you’re more familiar with a command-line interface, you can achieve the same results using Command Prompt, the built-in command-line terminal that comes with Windows. While it can fix the drive in most cases, there’s a chance of data loss during the conversion process.
- Press Windows Key + S and search Command Prompt. Right-click the top result and select Run as administrator. If prompted to allow access, click Yes.

- Type
diskpartand press Enter.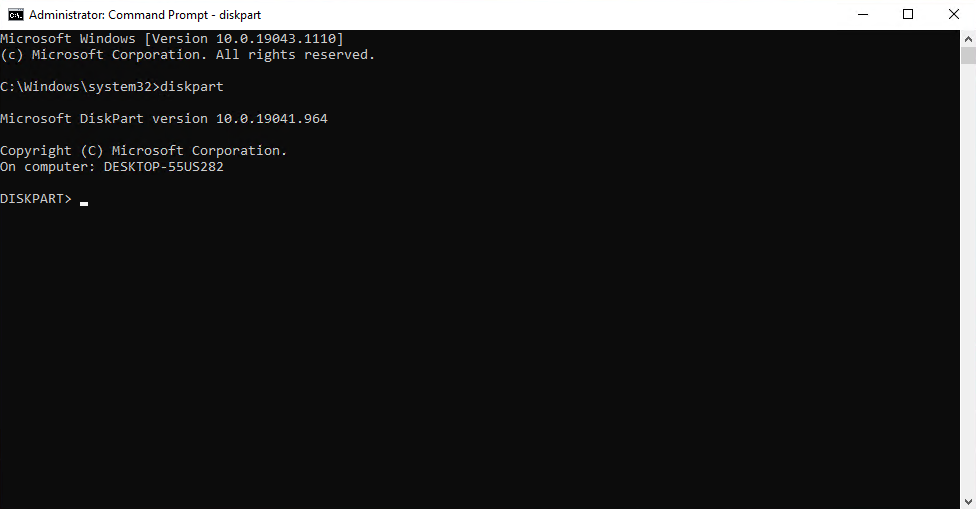
- Type
list diskand press Enter.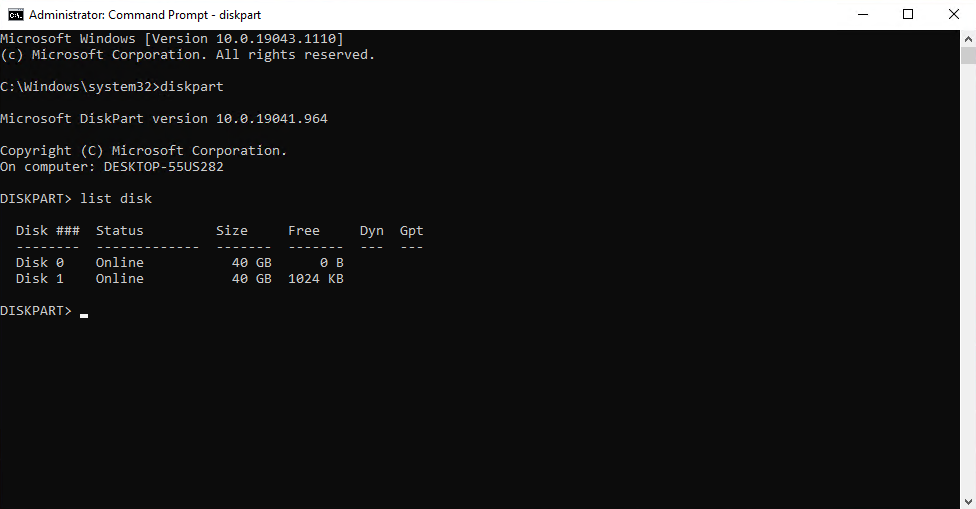
- Type
select disk 1and press Enter. Replace the number with whichever number appears for the applicable disk.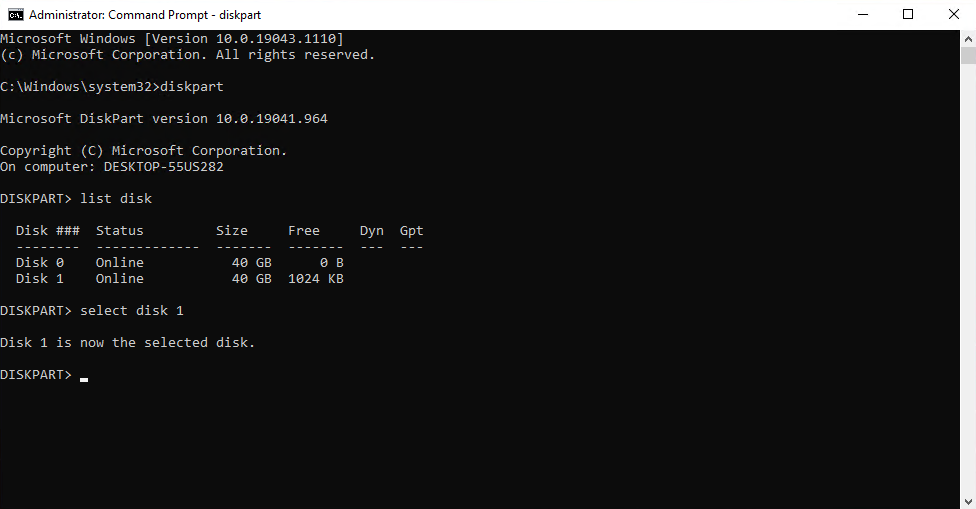
- Type
cleanand press Enter. This will wipe the disk so it’s ready to accept a new file system.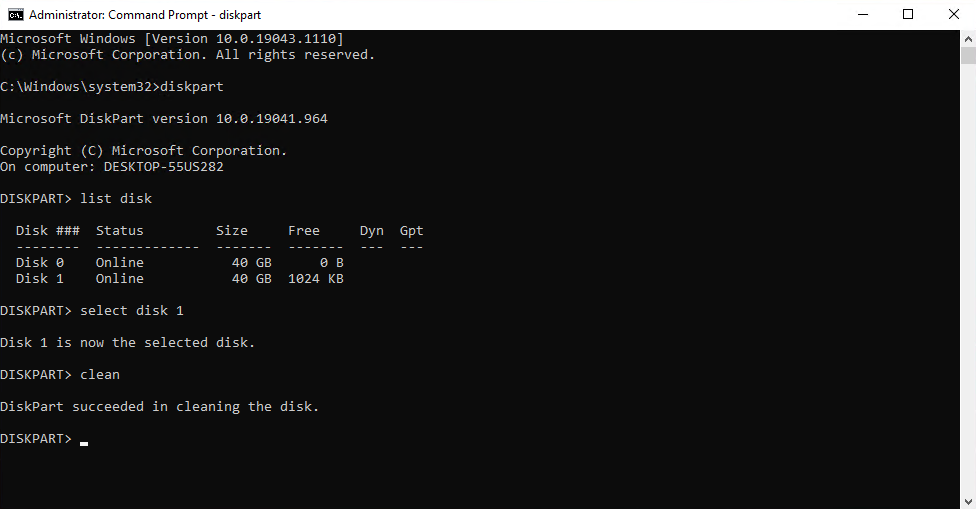
- Type
create partition primaryand press Enter.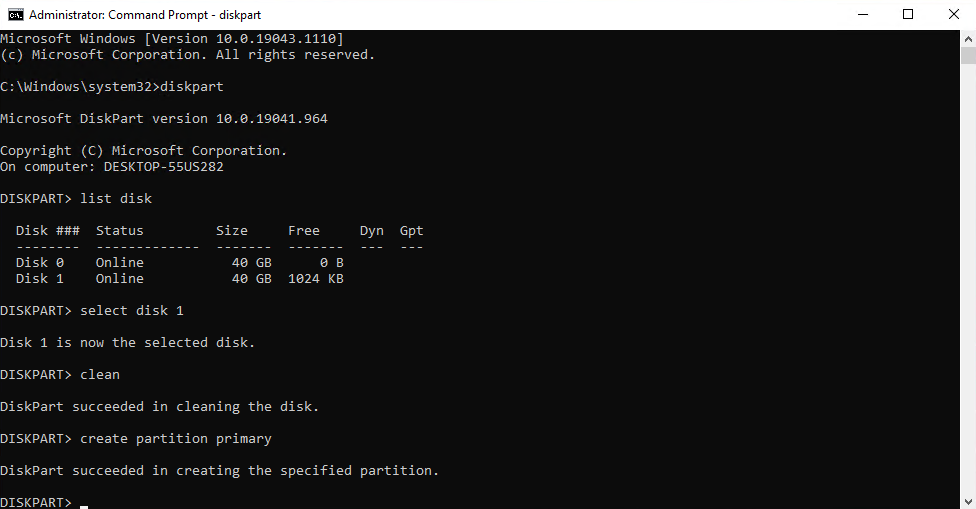
- Type
format fs=ntfsand press Enter. This will format the drive with the NTFS file system.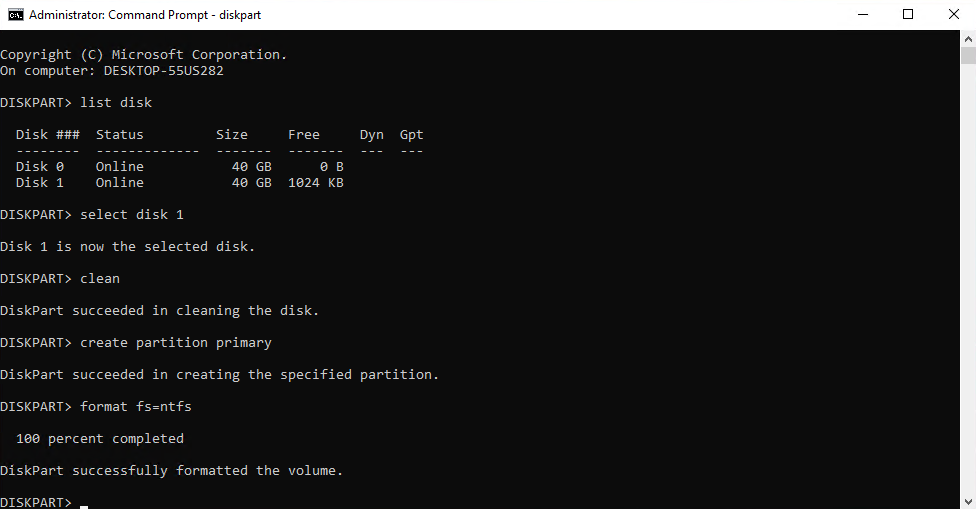
- Finally, type
assignand press Enter. This will apply a drive letter so that the partition becomes accessible.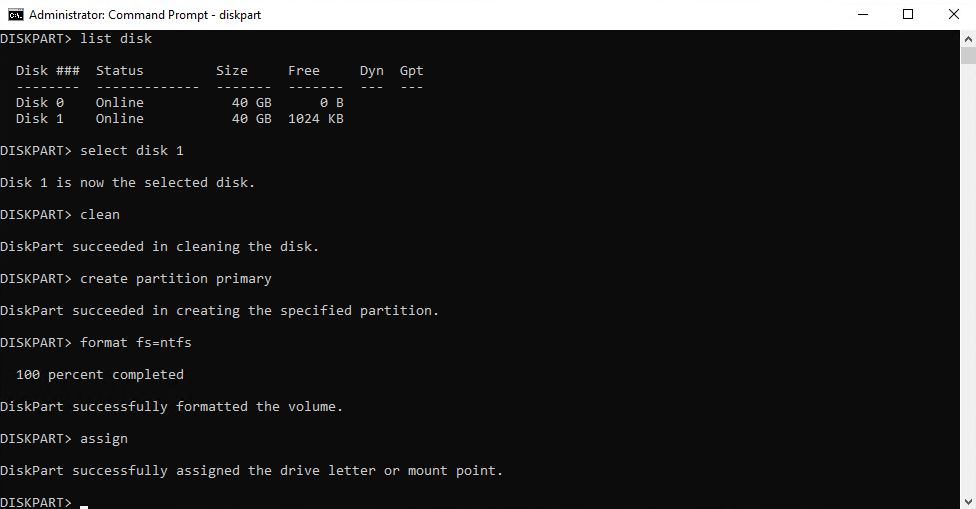
How to Convert RAW to NTFS Using File Explorer
The File Explorer in Windows provides the simplest way of formatting your drive with the NTFS file system to repair RAW partitions. Though it may not work in all cases, it’s still the simplest and fastest way to format the partition to the other file system.
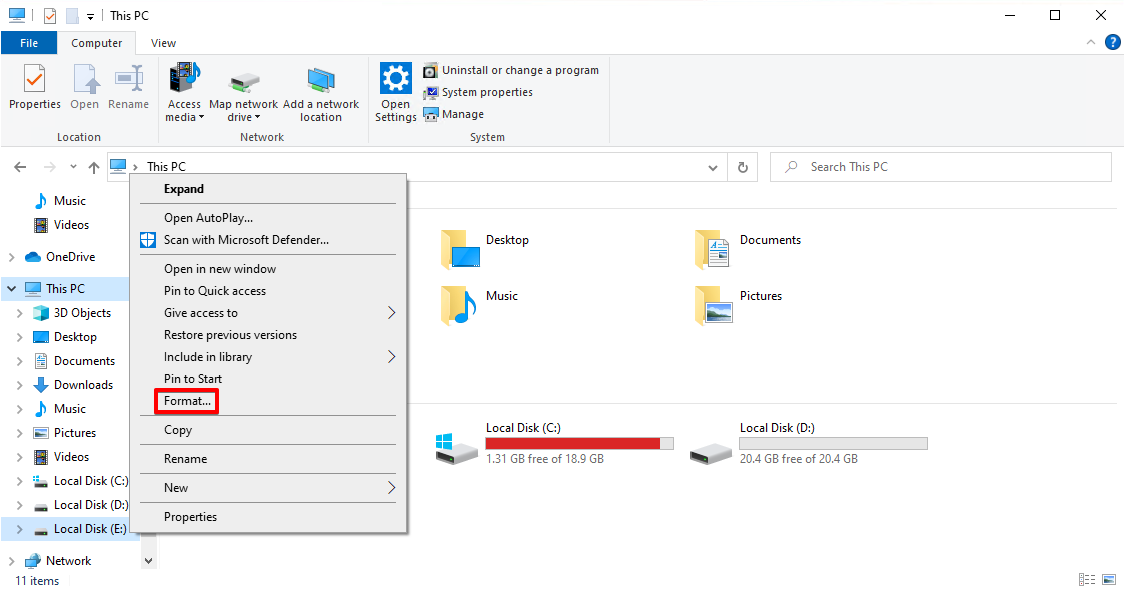
- Open File Explorer.
- Right-click the drive that contains the RAW partition, then click Format.
- Specify a volume label (or leave it blank), and select NTFS as the file system. Ensure that Quick Format is enabled, and click Start when ready.
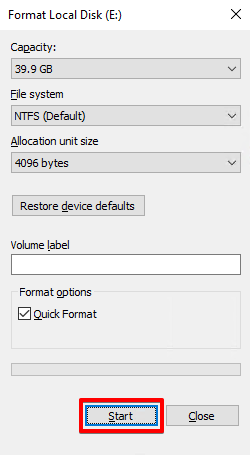
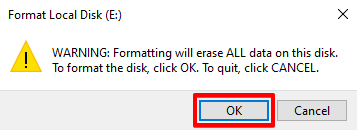
- When the warning dialogue appears, click OK to finalize the format.
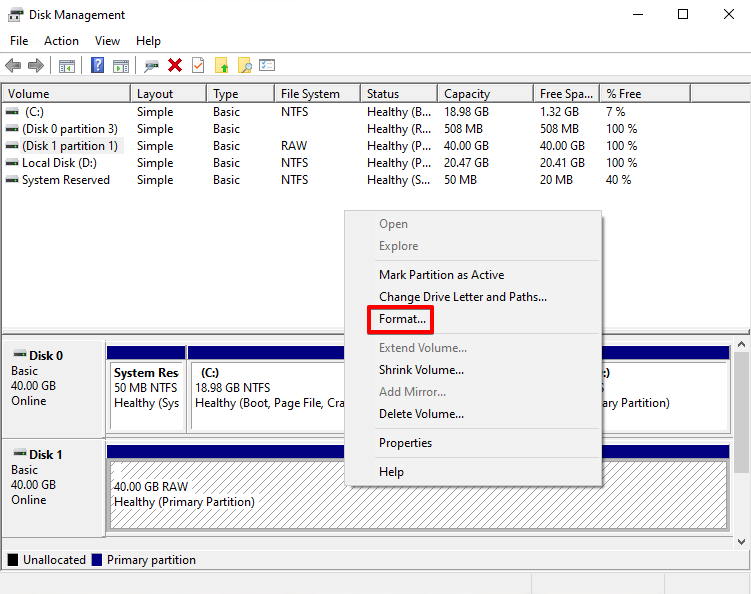
How to Format RAW Drive Using Disk Management
Once you’ve created a backup or recovered the data using data recovery software, your next step is to fix the partition by formatting it with a new file system. To do this, we’re going to use the Disk Management tool that’s included with Windows.
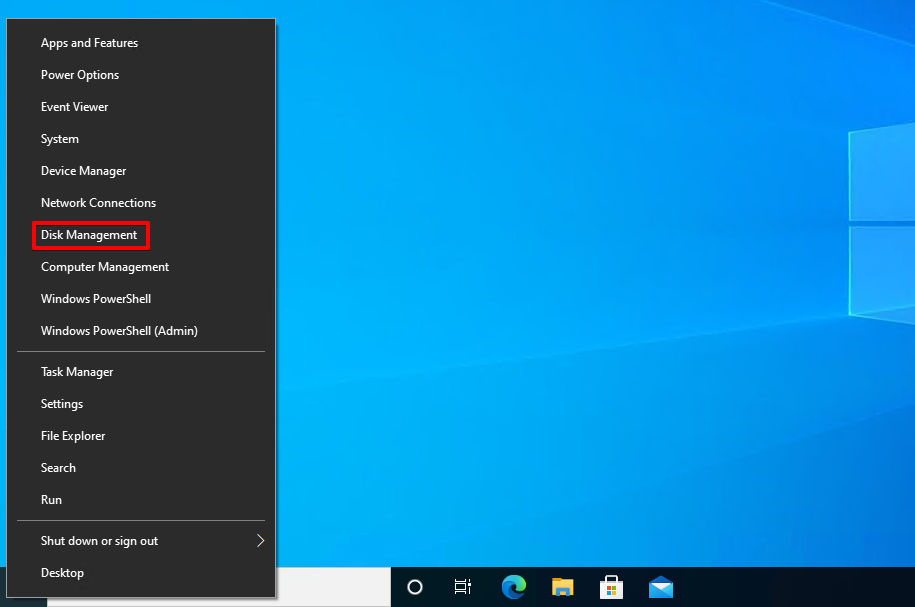
- Right-click Start and click Disk Management.
- Right-click the RAW partition, then click Format.
- Provide a name for the partition. For the file system, choose NTFS from the dropdown. Press OK when ready.

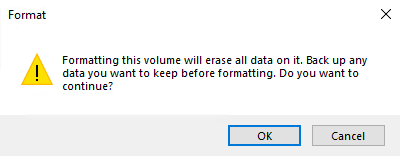
- When the warning dialogue appears, click OK to confirm your selection.
As a last resort, you can delete the entire RAW partition and create a new one from the free space.
How To Fix a RAW Drive Without Format
While the quickest way to fix a RAW drive would be to simply format it and change its file system, not everyone has the time or resources to back up their drive, wipe it, and copy over all the backed-up data. In this case, there are a few techniques you could try to repair the RAW drive without having to format it.
Method 1: Update the Driver
RAW drive sometimes can be caused by the inability of your system to read the drive properly due to outdated or corrupted drivers. And that’s actually good news for you as it means a simple driver update can solve this issue. Here’s how you can accomplish this:
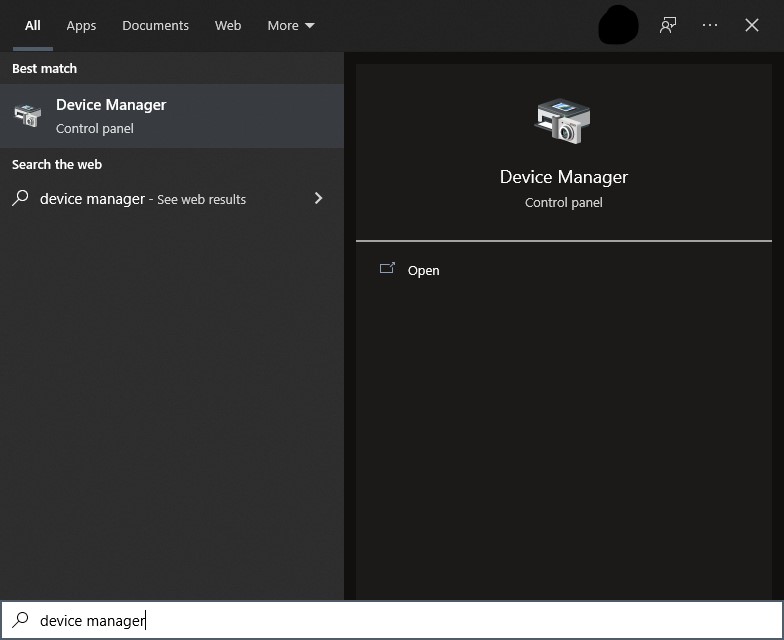
- Type “device manager” into the search tool on your taskbar and select the top result.
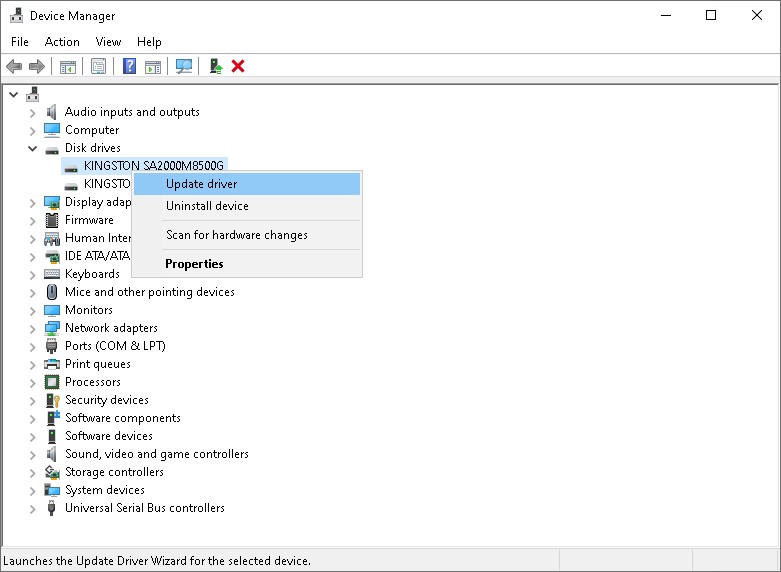
- Locate your hard drive from the list of devices, then right-click it and select Update driver.
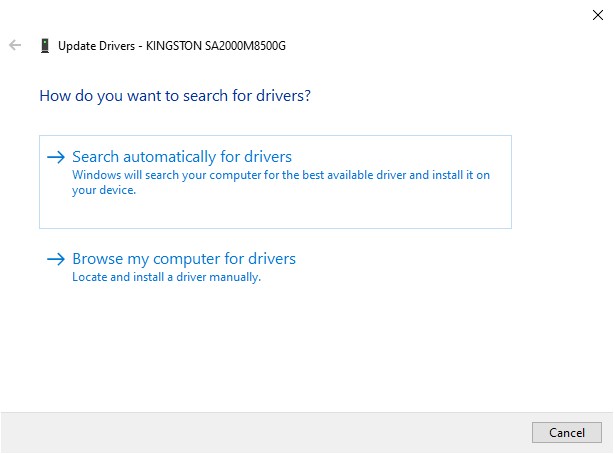
- Select the Search automatically for drivers option and Windows will scour the internet for the latest driver and install it for you.
Method 2: Repair RAW File System
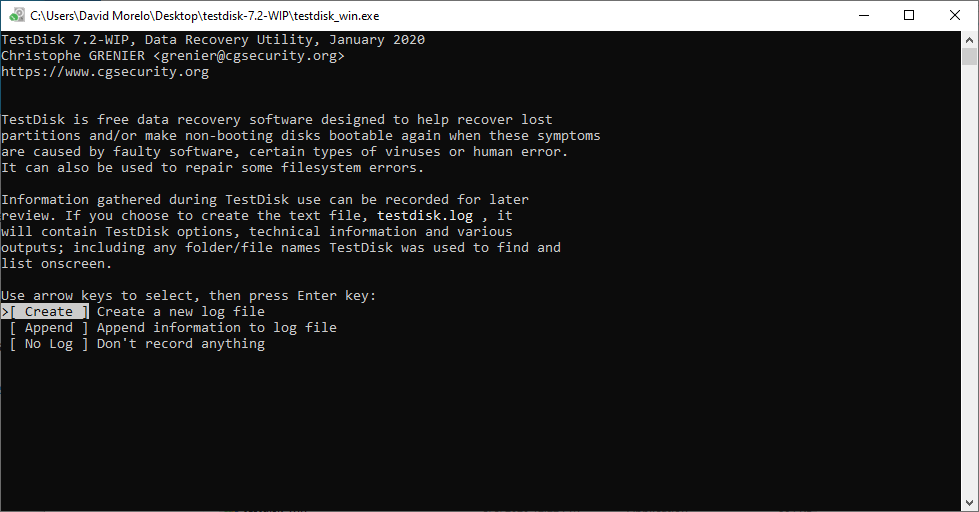
Several programs claim the capability to fix RAW file systems. However, in our opinion, TestDisk, despite being command-line-based, is the best tool for dealing with these RAW partitions. It is a free and open-source solution for recovering lost partitions.
Compatible with Windows, macOS, and Linux, TestDisk can be downloaded directly from its official website.
To perform a RAW disk recovery by rewriting the partition table using TestDisk:
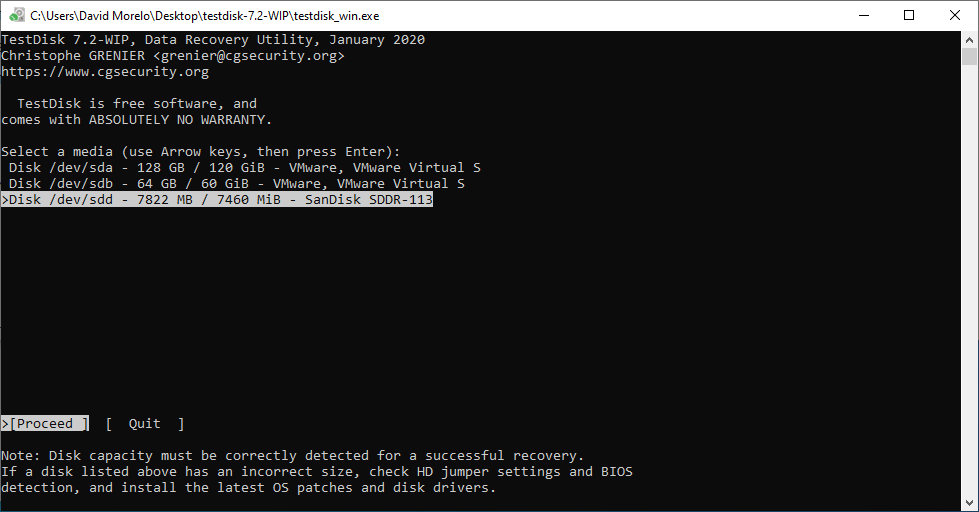
- Launch TestDisk.
- Select Create to create a new log file.
- Select the storage device with the deleted partition.
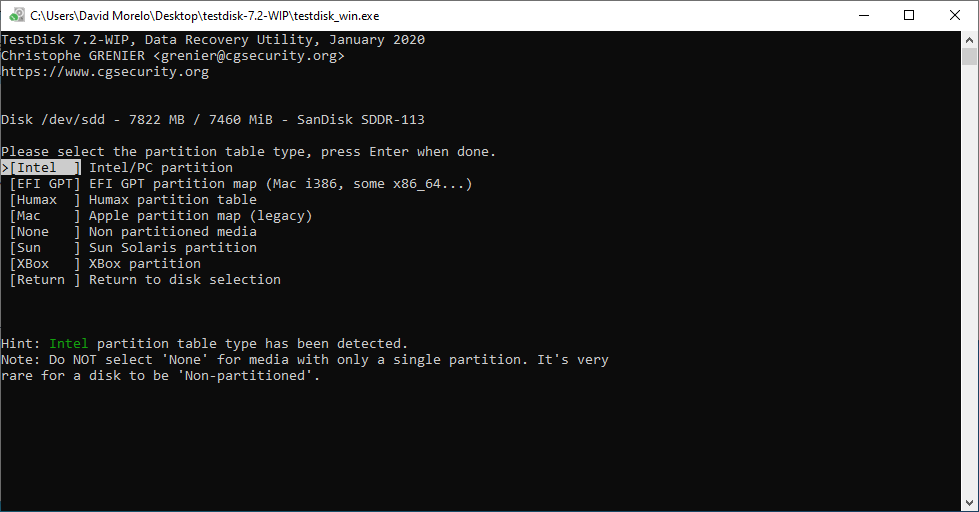
- Select the partition table type.
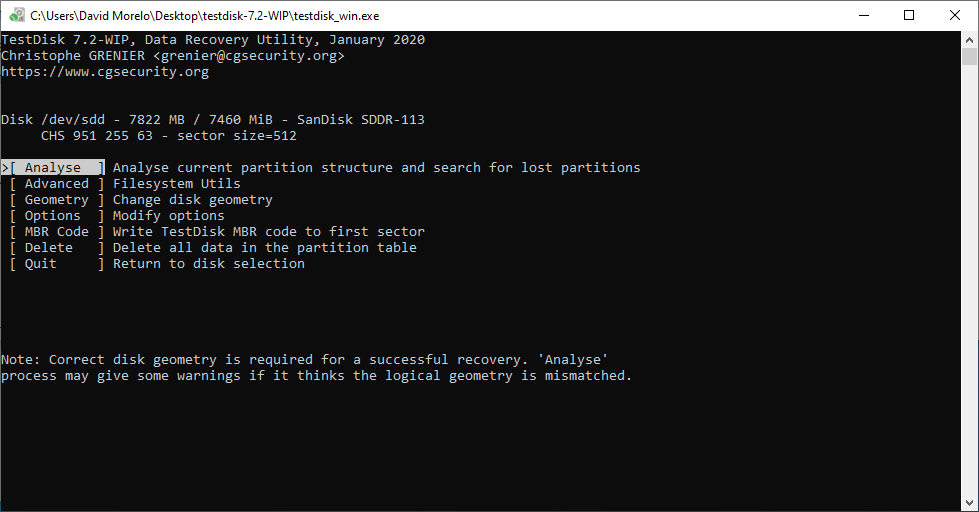
- Press Enter to analyze the current partition structure and search for lost partitions.
- Perform a Quick Search for the deleted partition.
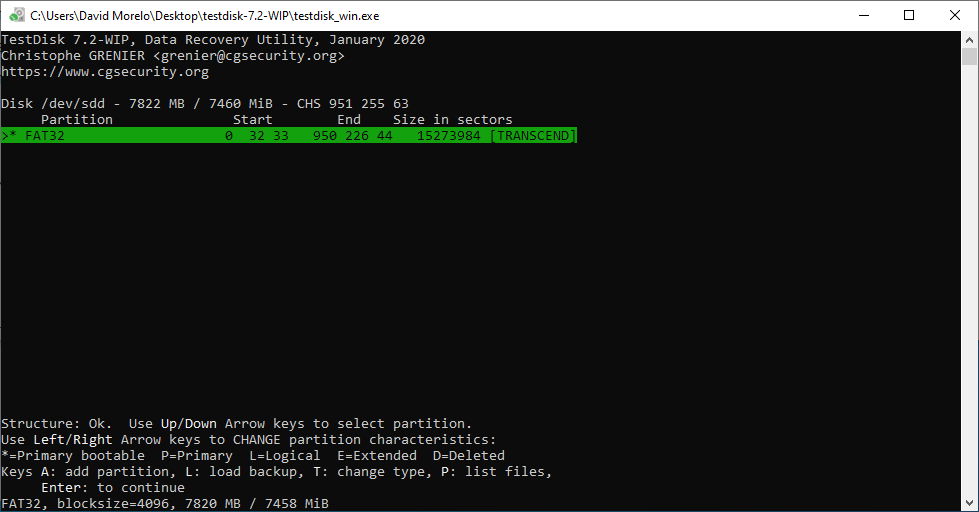
- (Optional) Perform a Deeper Search to find deleted partitions that Quick Search wasn’t able to recover.
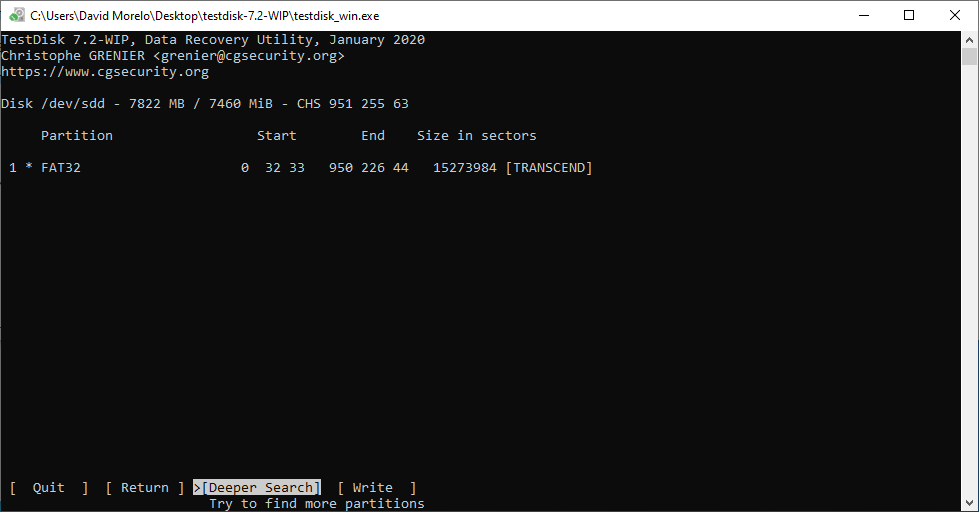
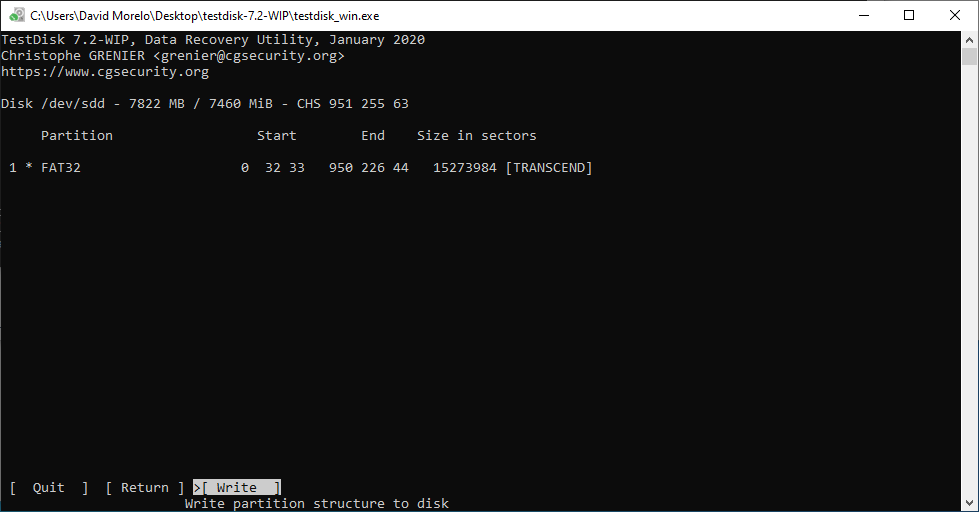
- Write the new partition structure.
Conclusion
Seeing a RAW partition upon boot can instantly make you think that all of your important data is gone. Thankfully, through the methods outlined in this article, you can restore your RAW partition to NTFS without losing your files. To avoid this going forward, it’s important to make regular backups of your data. Keeping backups allows you to restore a copy of your files in the event of catastrophic data loss.


This article was incredibly helpful! I was panicking when my external hard drive suddenly became RAW, but the detailed steps using CMD made it easy to convert it back to NTFS without losing any of my precious data. The screenshots were a nice touch, too. Thanks a ton!