 If used regularly, it’s normal for a computer’s hard drive to eventually become full, especially if unused files aren’t deleted regularly. However, there are times when you’ll get a Windows low disk space warning even though you should have a lot to spare.
In this guide, we’ll discuss the common reasons why a hard drive says it’s full, but it’s not. We’ll also go through the best methods to get your hard drive back in working order.
Table of Contents
Why Hard Drive Says it’s Full When It Is Not
There are various causes for your operating system to show not enough disk space, but there is plenty available. Here are some of the more common ones:
| Reason | Description |
| 🦠 Malware attack | A malware attack can cause a multitude of problems for your computer, ranging from data loss to performance drops. Another common issue is an error where your drive is empty but shows full. In these cases, your primary concern should be getting rid of the malware. |
| 💿 Bad Sectors / Logical errors | Another reason for this problem is bad sectors or logical errors on your hard drive resulting from device corruption or damage. Tools like CHKDSK may be able to remedy the issue, though you may end up having to reformat your hard drive. |
| 📂 Hidden Files | Your hard drive may be filling up because of hidden files generated by certain programs for backup purposes or temporary usage. |
Recover Data with Disk Drill
Some of the underlying causes and fixes relating to this issue may lead to data loss on your hard drive. With that said, it’s highly recommended that you use a premium data recovery program to retrieve any important data from the drive before you proceed. But before you do that, it’s important that you create a backup of the device and perform the recovery from there instead. This is to prevent any additional data loss resulting from the restoration process.
Disk Drill is an excellent option to go with on account of its remarkable recovery capabilities, quick scans, and approachable user interface. Plus, it already has a built-in byte-to-byte backup feature, so you can create a backup and perform the recovery using the same program. You can try Disk Drill out through its free trial version, which includes all of the app’s features, along with a recovery cap of 500MB (on Windows).
Here’s a quick, step-by-step guide on how to create a backup and recover data using Disk Drill.
Create a Byte-To-Byte Backup
- Navigate to the Cleverfiles website, then download and install the latest version of Disk Drill, which is compatible with both Windows 10 and Windows 11.
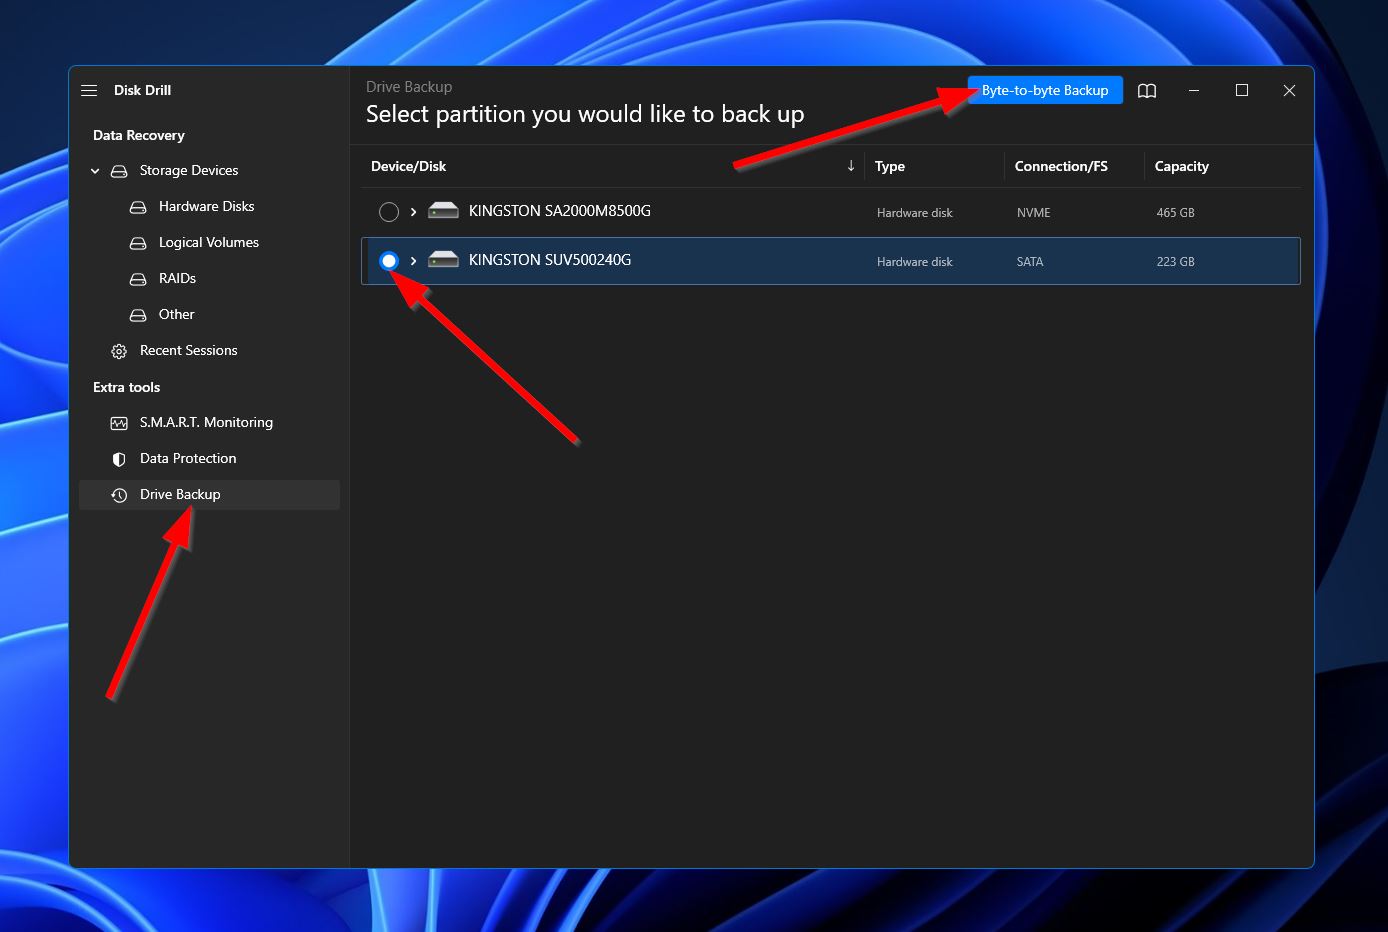
- Make sure that your hard drive is properly connected to your computer, then launch Disk Drill. Next, click “Drive Backup” in the left-side panel and select your hard drive from the list of storage devices. From there, click “Byte-to-byte Backup” in the top-right corner of the window.
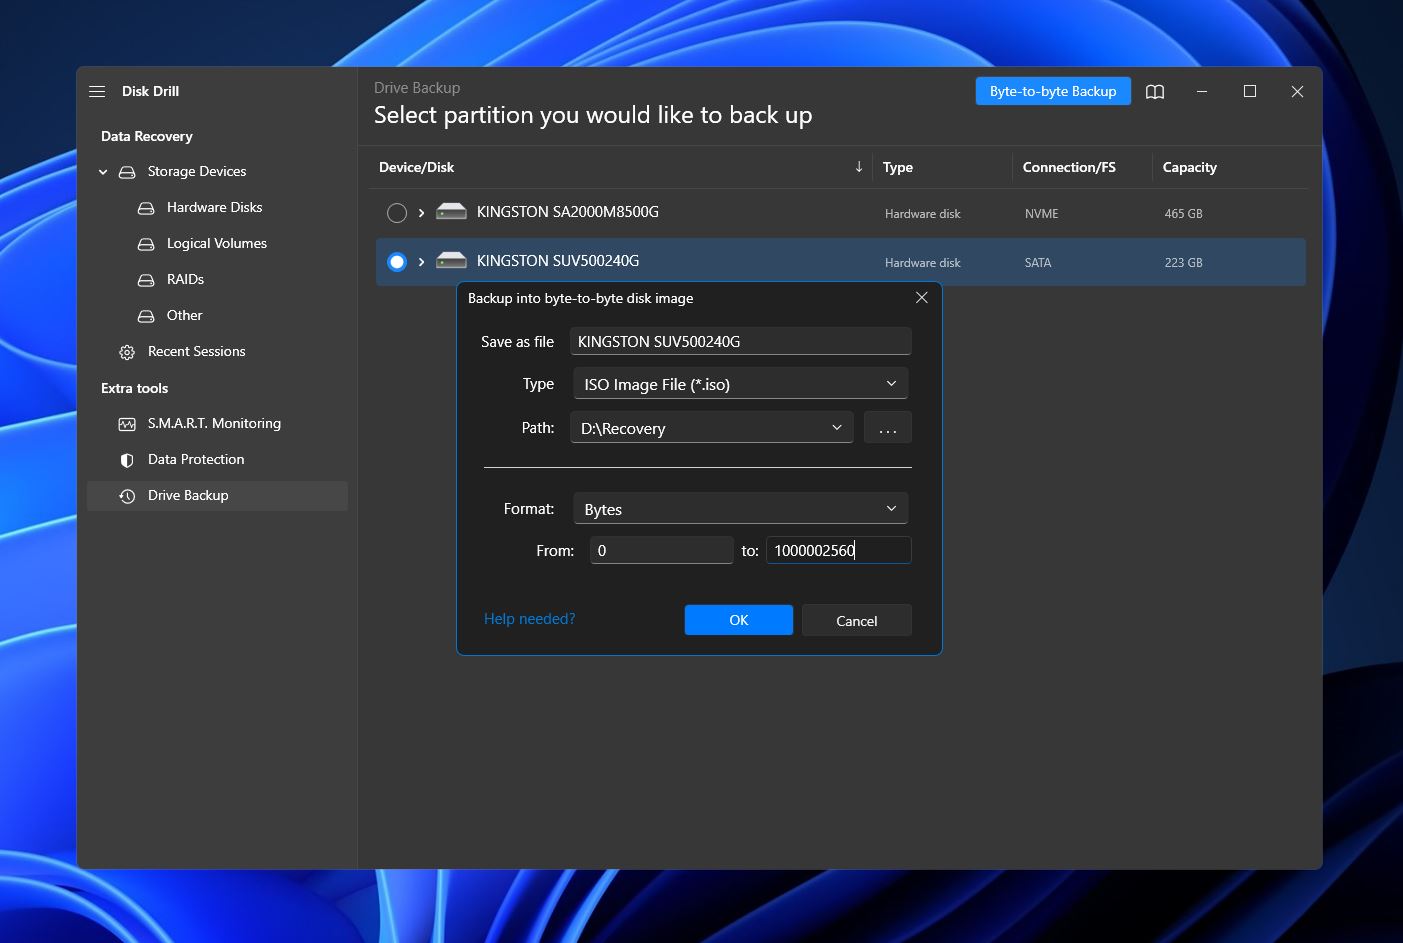
- A small window will appear where you can set up the backup details, such as file name, format, path, etc. Hit “OK” when you’re all set.
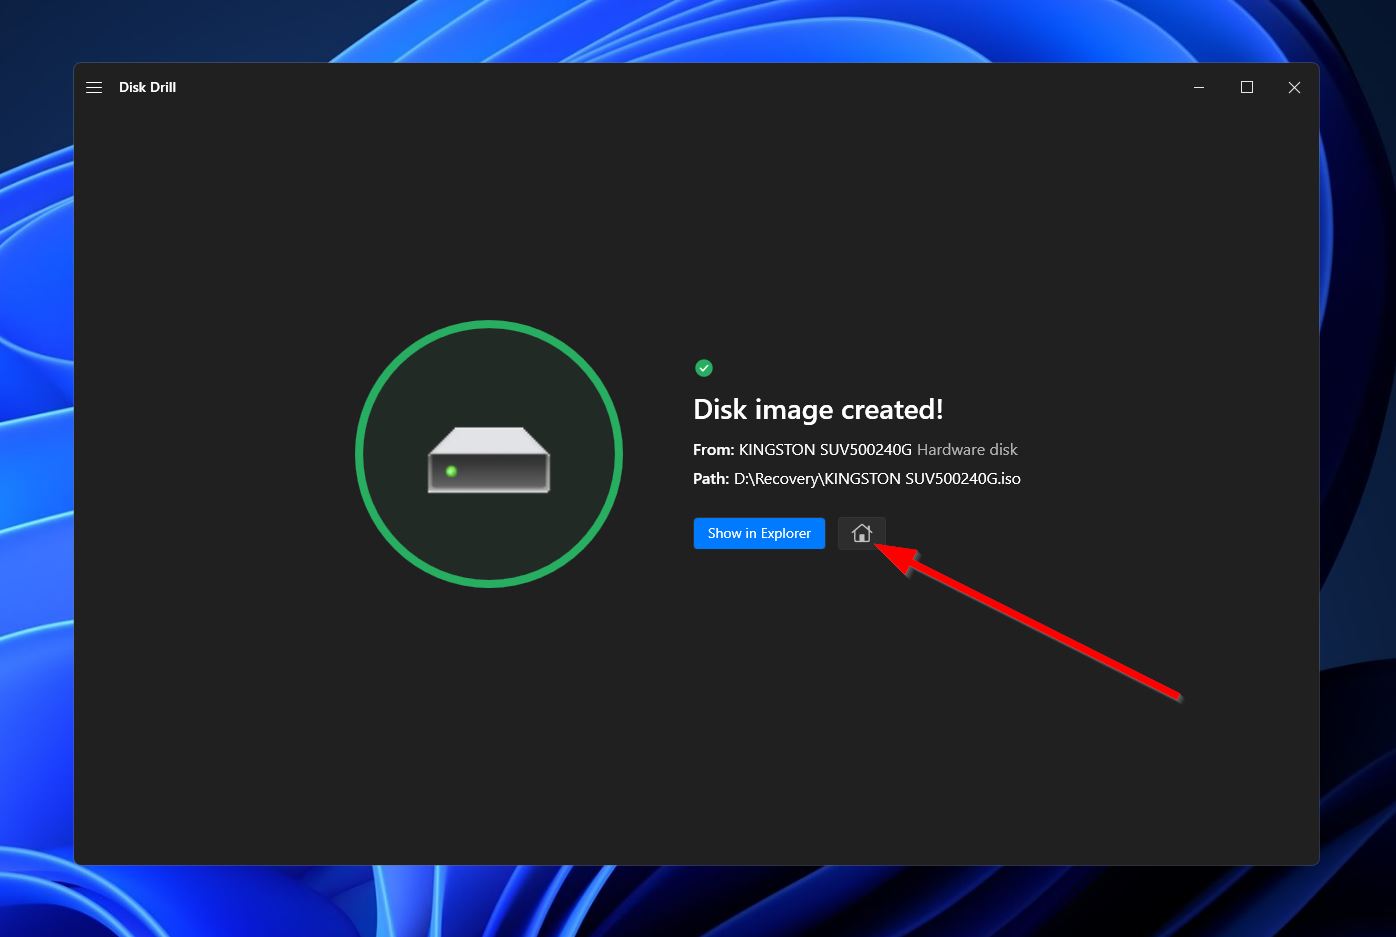
- Disk Drill will create your backup. Once complete, you’ll see a completion screen. Click the home icon near the top of the window to go back to the home screen.
Recover Data From The Backup
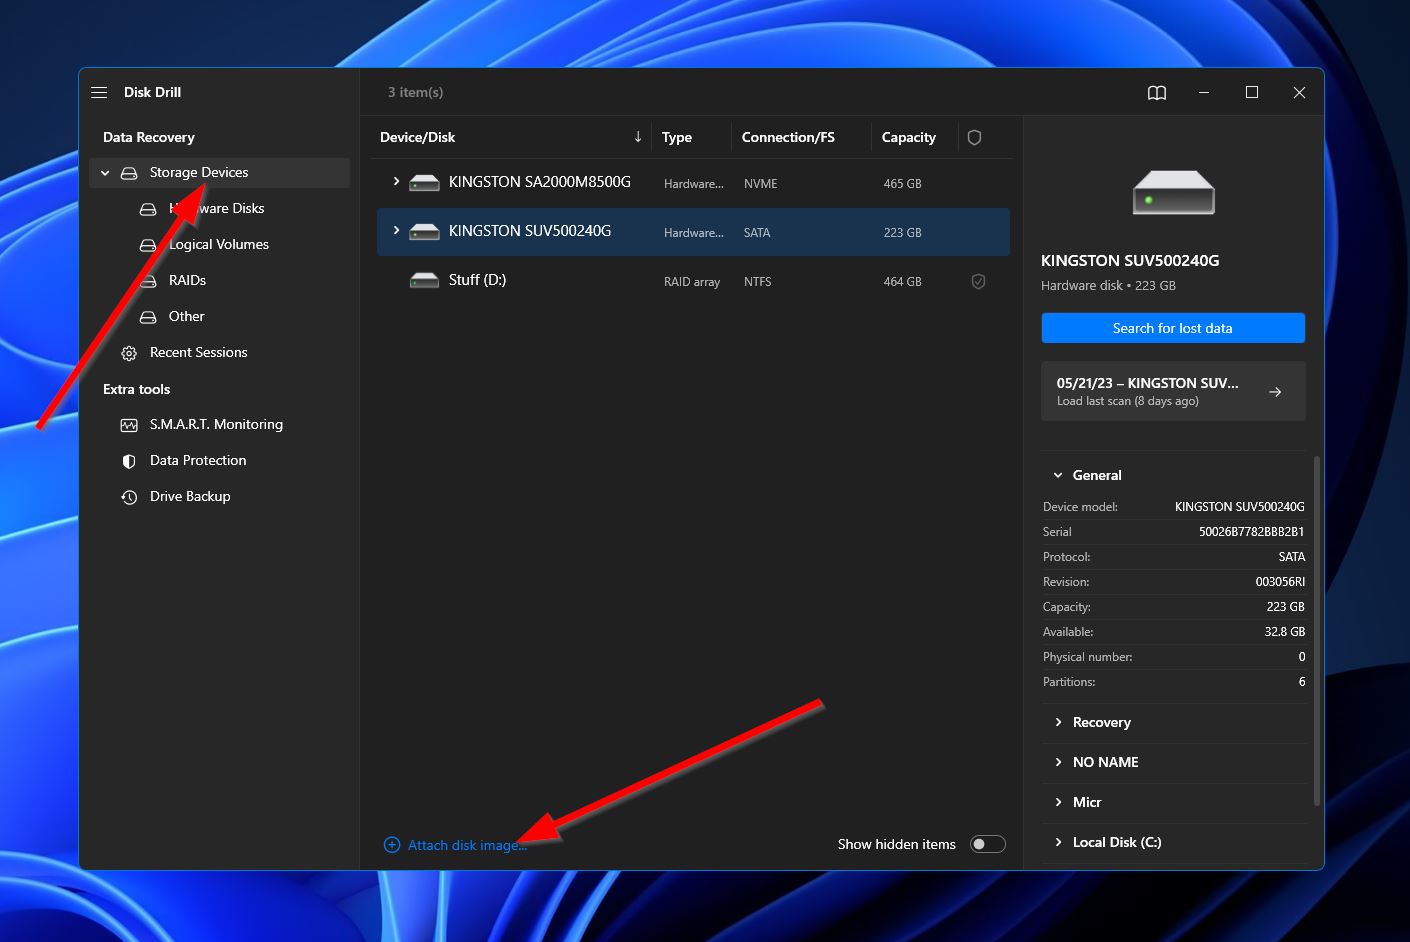
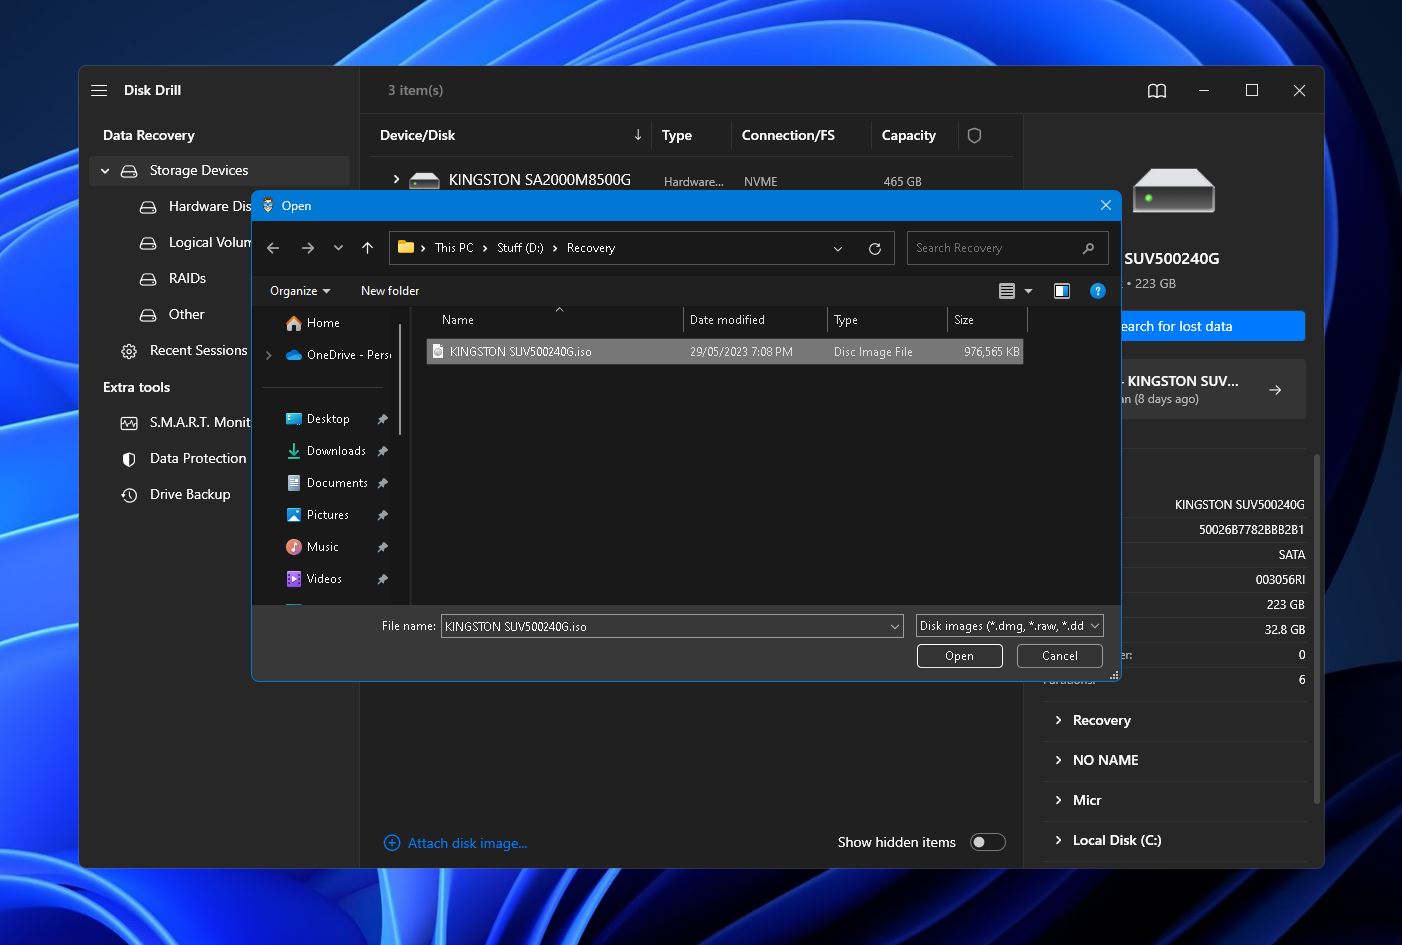
- Make sure you’re in the “Storage Devices” section of Disk Drill, then click the “attach disk image” option near the bottom of the window.
- In the pop-up that appears, navigate to the folder where you saved the backup from the previous section, then open it.
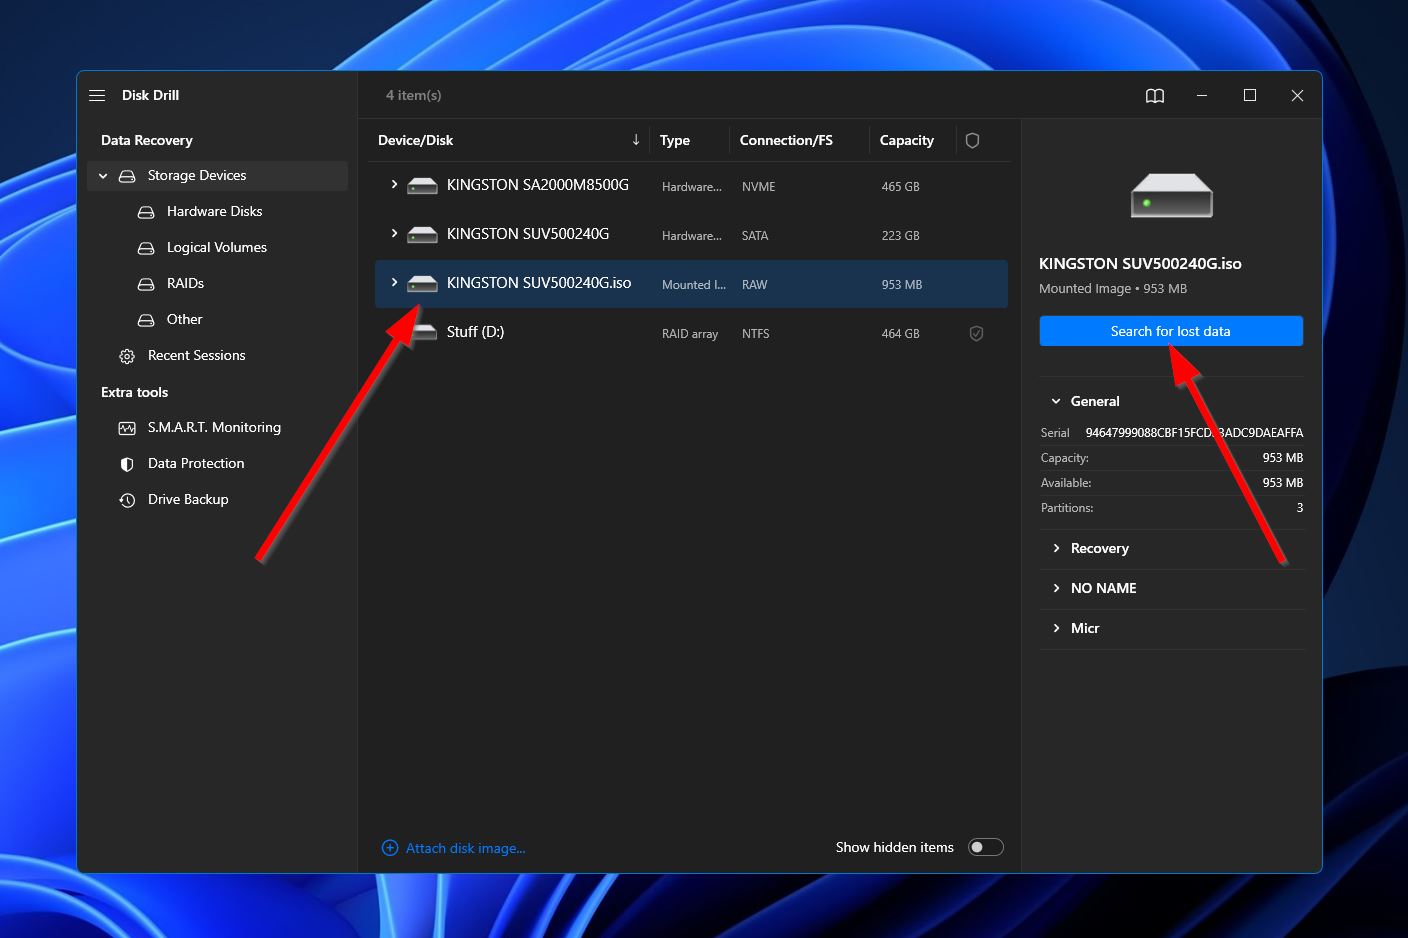
- The backup should now appear in the list of available storage devices. Select it and click the “Search for lost data” button on the right side.
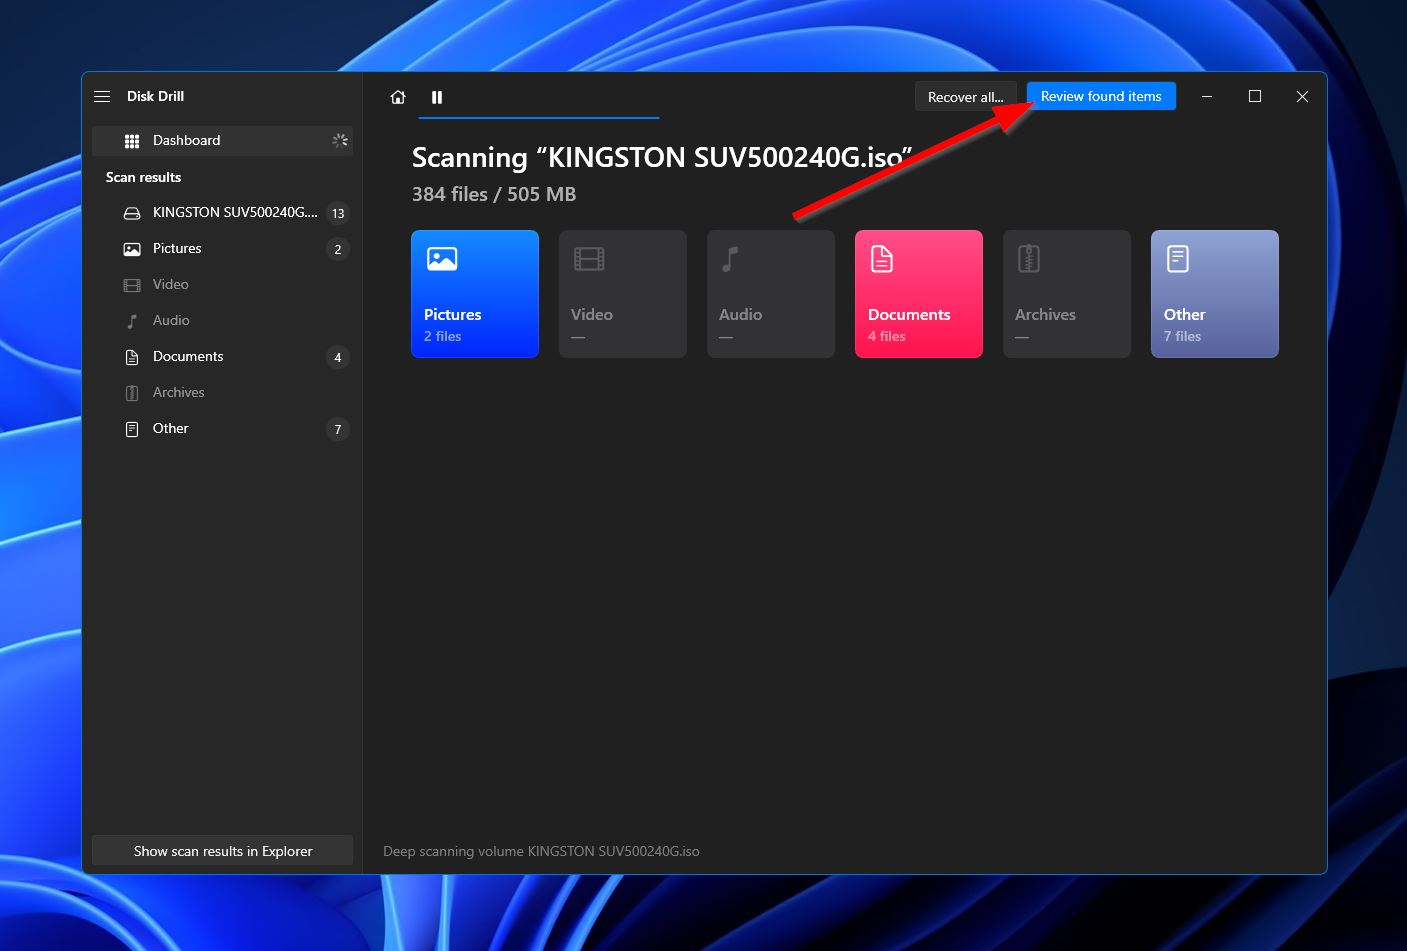
- Disk Drill will now scan the hard drive backup for any retrievable files. Whether you wait for the process to complete first or want to head to the results page as the scan continues, you can click the “Review files found items” button at the top-right corner to start browsing through found files.
- On the results page, you’ll notice an “Existing” category that you can expand to find all the folders, subfolders, and files currently existing on your hard drive. Select any of them by ticking the checkbox beside their file names, then click the “Recover” button at the bottom-right corner to proceed.
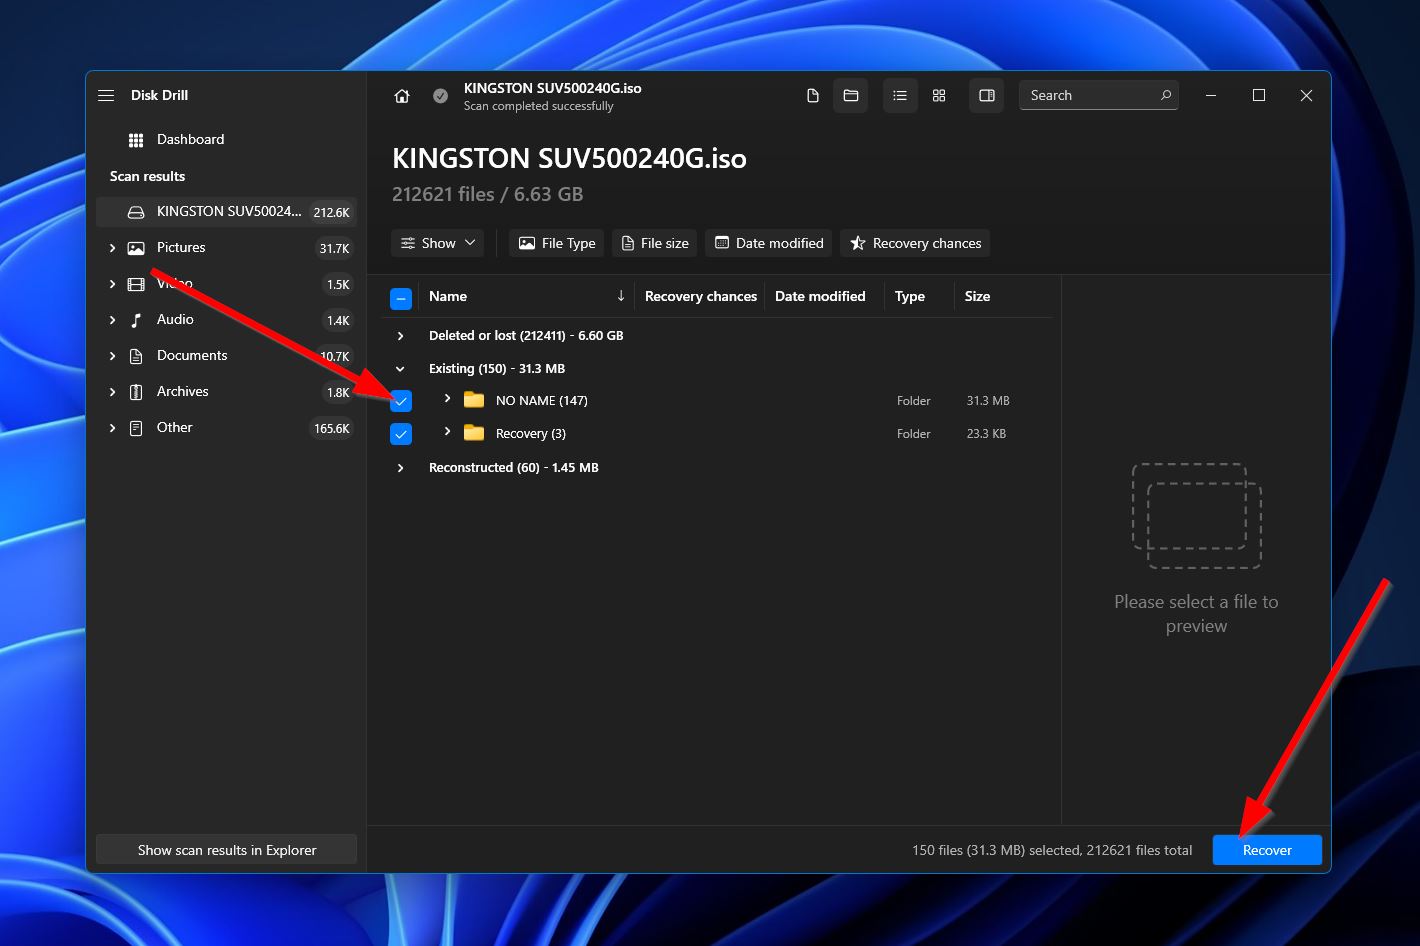
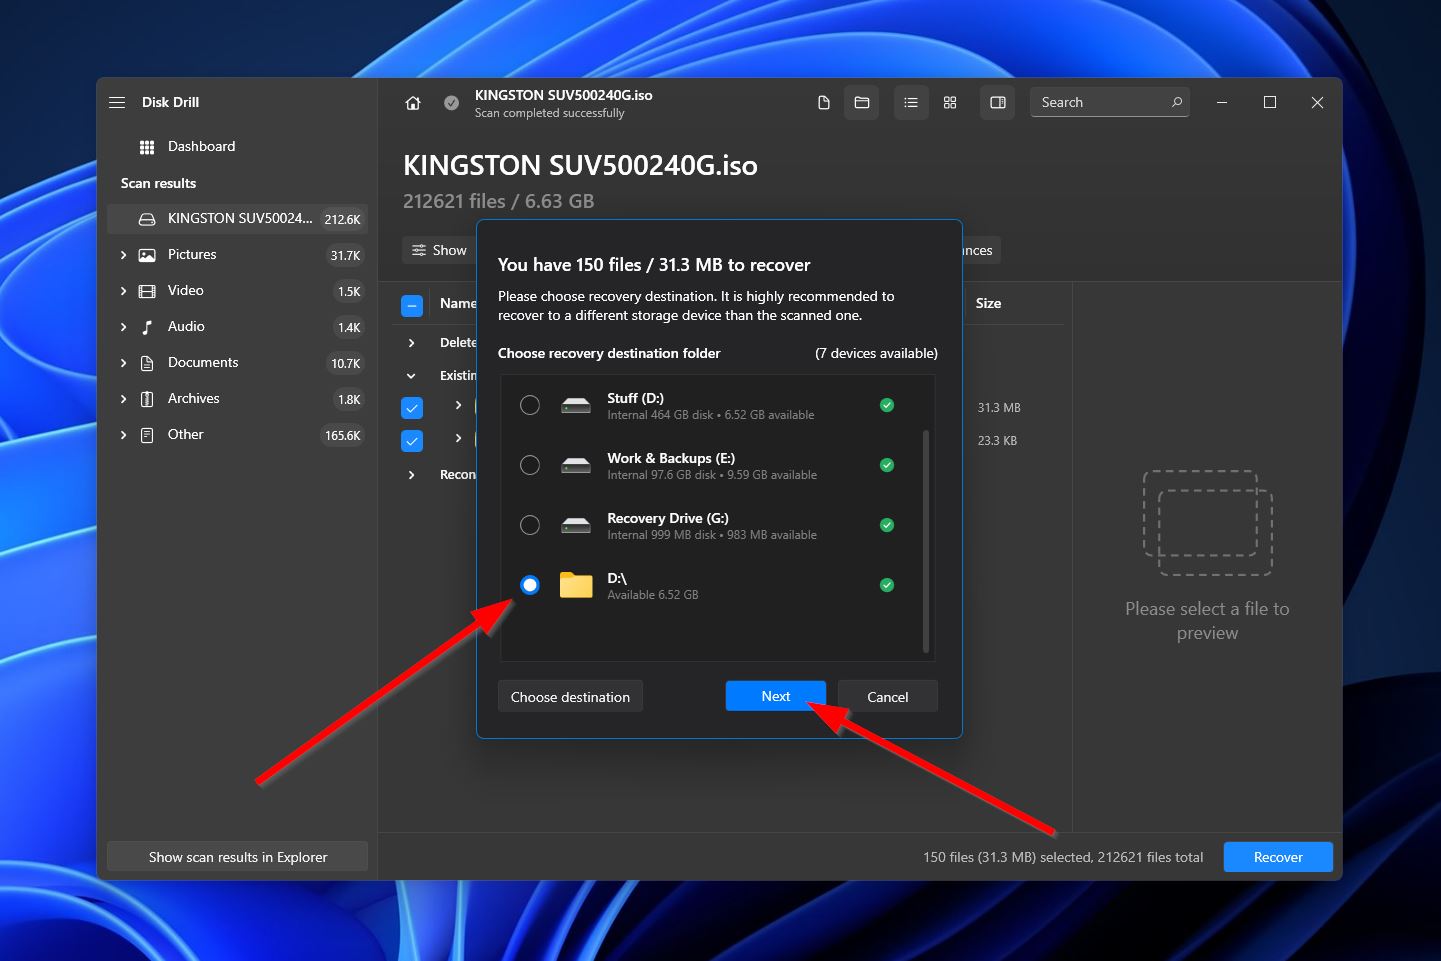
- In the pop-up, you’ll need to select a folder in which to save your recovered files. Make sure to do so on a different drive than the one you’re retrieving files from. Click “Next” when you’re ready.
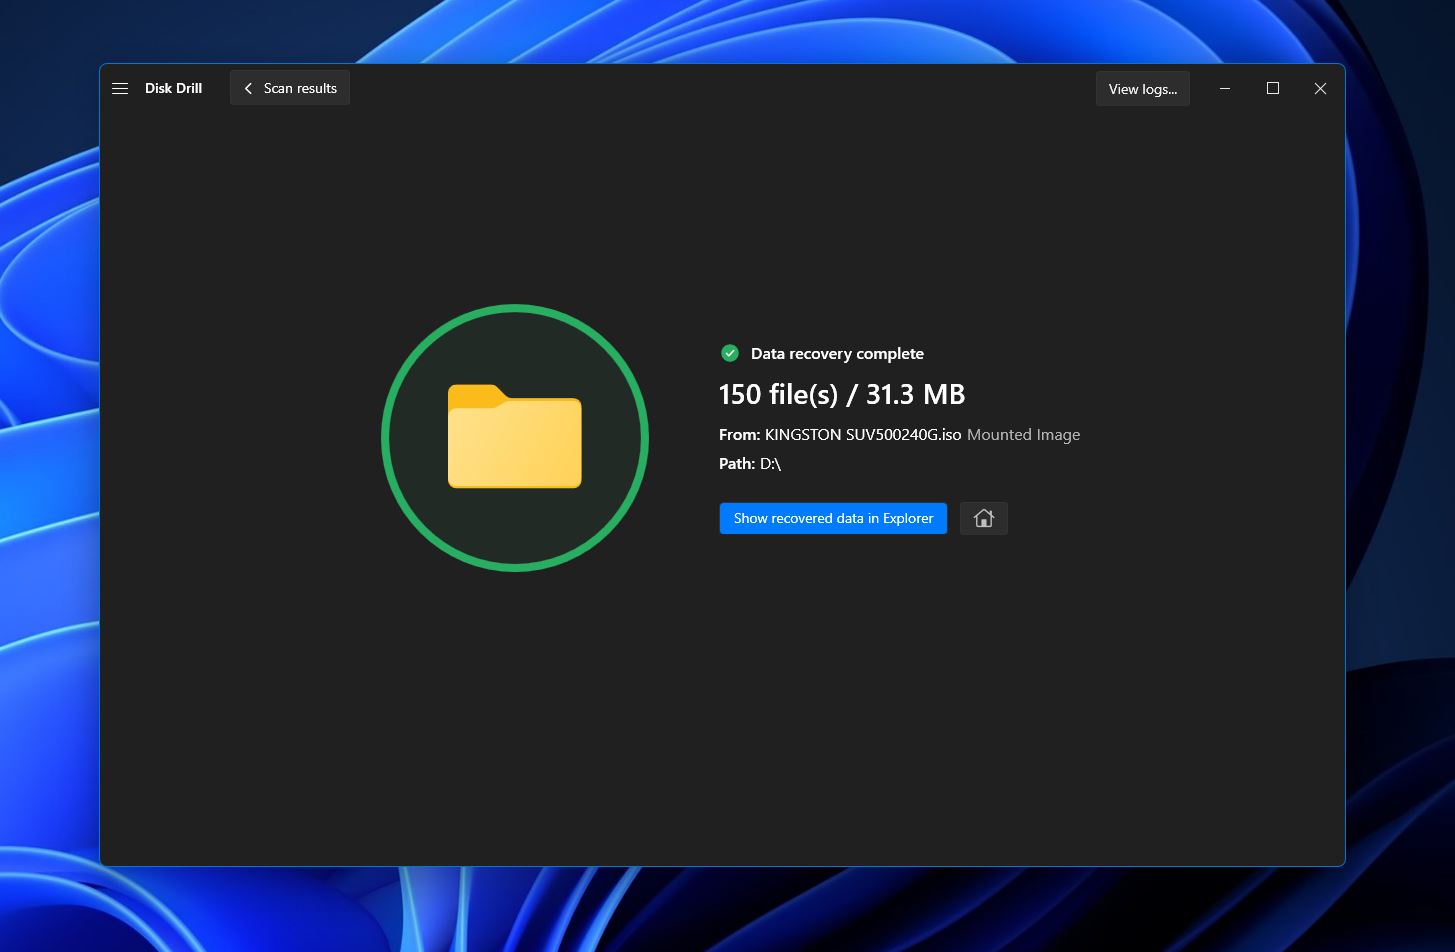
- Disk Drill will attempt to recover your chosen files. Once finished, you’ll see a completion message and a button that takes you right to your recovered files.
How to Fix Hard Drive that Shows it’s Full When It’s Not
Depending on what’s causing the “hard disk full but no files” issue on your hard drive, there are a number of different fixes you can try. This ranges from utilizing first/third-party tools to hard drive reformatting in more extreme cases.
Method 1: Check for Malware
Malware attacks on your computer are one of the most common reasons for your hard drive being full when it actually isn’t. So the first thing you should do when you encounter this problem is to scan your PC for any infections. While there are quite a few competent anti-malware programs available on the market, Windows has a capable built-in one called Windows Defender. Here’s how to use Windows Defender to scan and remove malware from your PC:
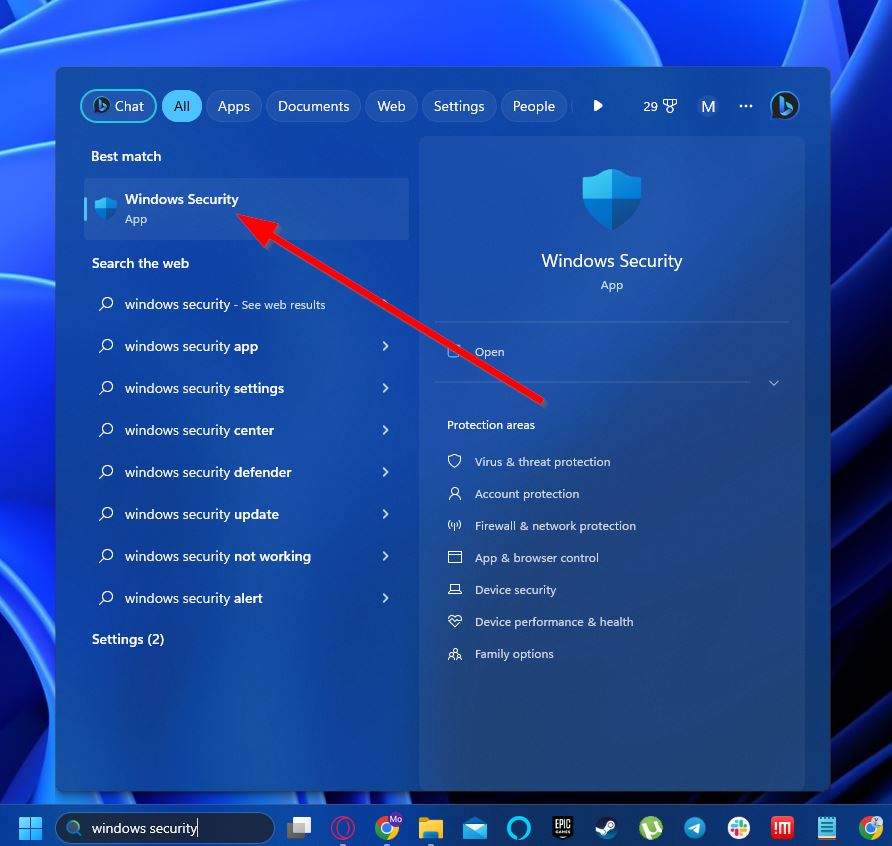
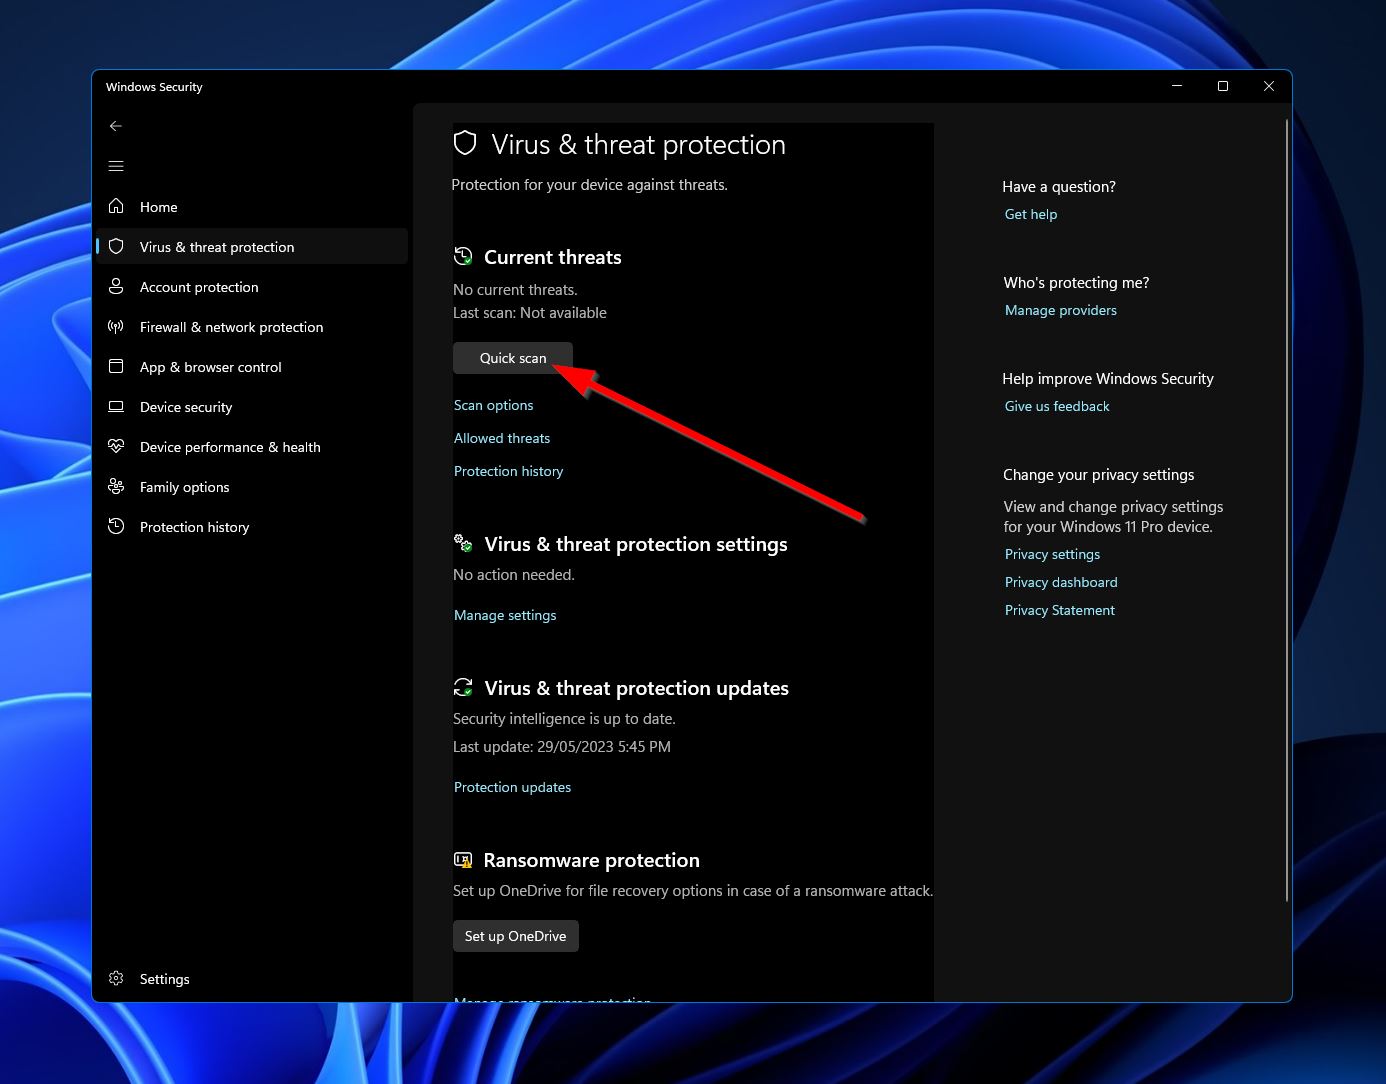
- Type “Windows security” into your taskbar search feature and select the result with the same name.
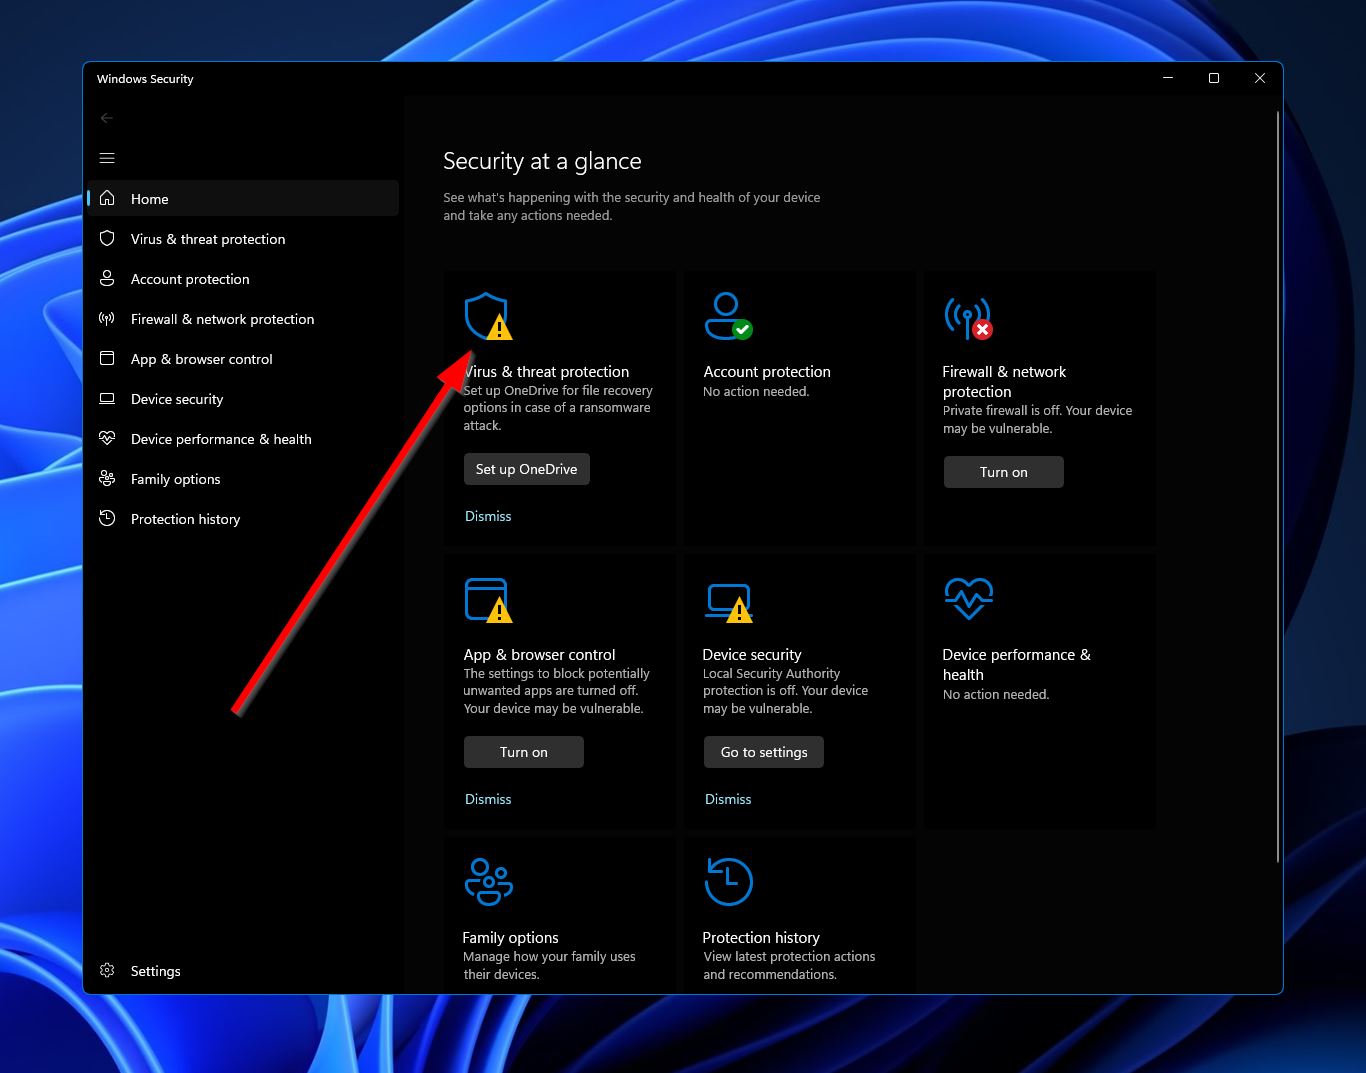
- Click “Virus & threat protection.”
- Under “Current threats,” click the “Quick scan” button. Windows will now scan your computer for any malware threats and potentially remove them.
Method 2: Run Disk Cleanup
There could be plenty of unseen files cluttering your hard drive and eating up a significant chunk of space. That’s why it’s a good idea to run the Windows Disk Cleanup tool so you can get rid of unwanted files. Follow the steps below to accomplish this:
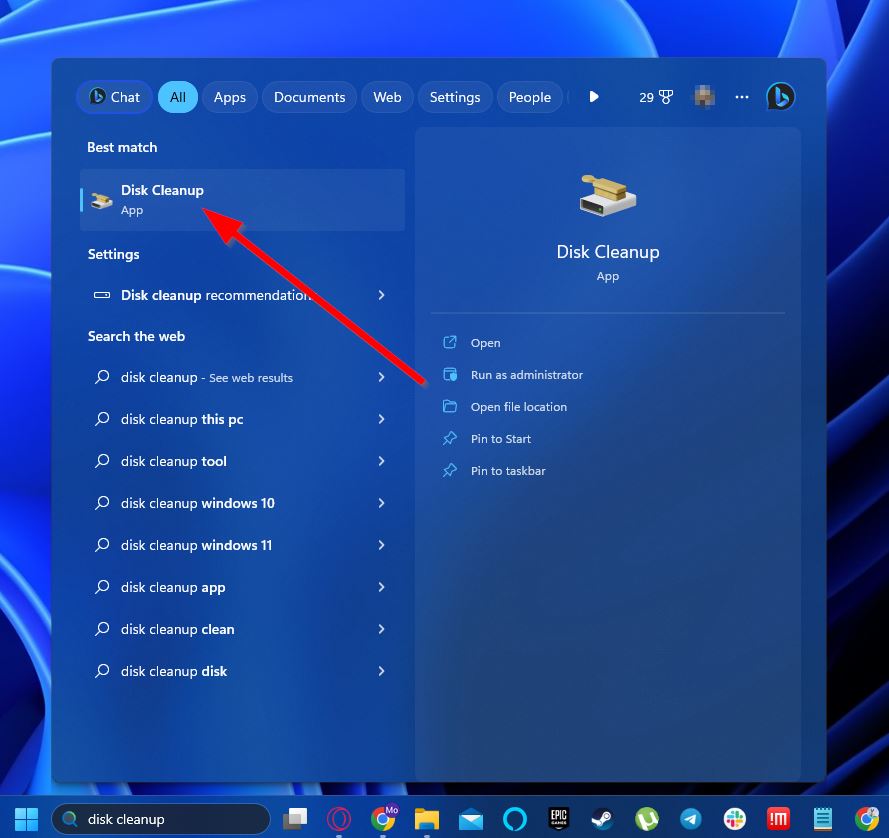
- Type “disk cleanup” into your taskbar search feature and select the result with the same name.
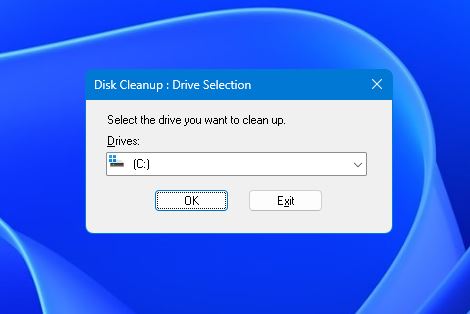
- Select your drive letter from the dropdown and hit “OK.”
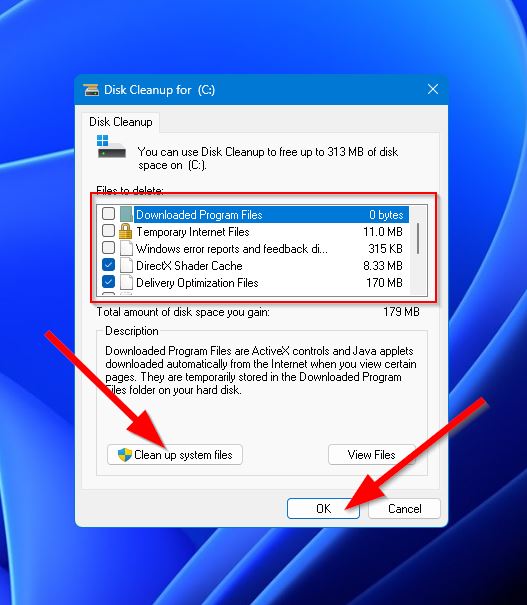
- In the “Files to delete” section, tick the options you want to delete. This includes temporary files, thumbnails, delivery optimization files, and more. You can also click the “Clean up system files” button near the bottom of the window to get rid of system files that are safe to remove. When you’re ready, click “OK.”
Method 3: Clean Recycle Bin
The Windows Recycle Bin tool stores deleted files for up to 30 days, after which it purges them permanently. But during that 30-day period, the files are still taking up space on your hard drive, which may be what’s causing the problem where your hard drive says it’s full, but it’s not. These are the steps for emptying your Recycle Bin:
- First, open the Recycle Bin tool from your desktop.
- Then, click the “Empty Recycle Bin” option near the top of the window.

Method 4: Check for Temp Files
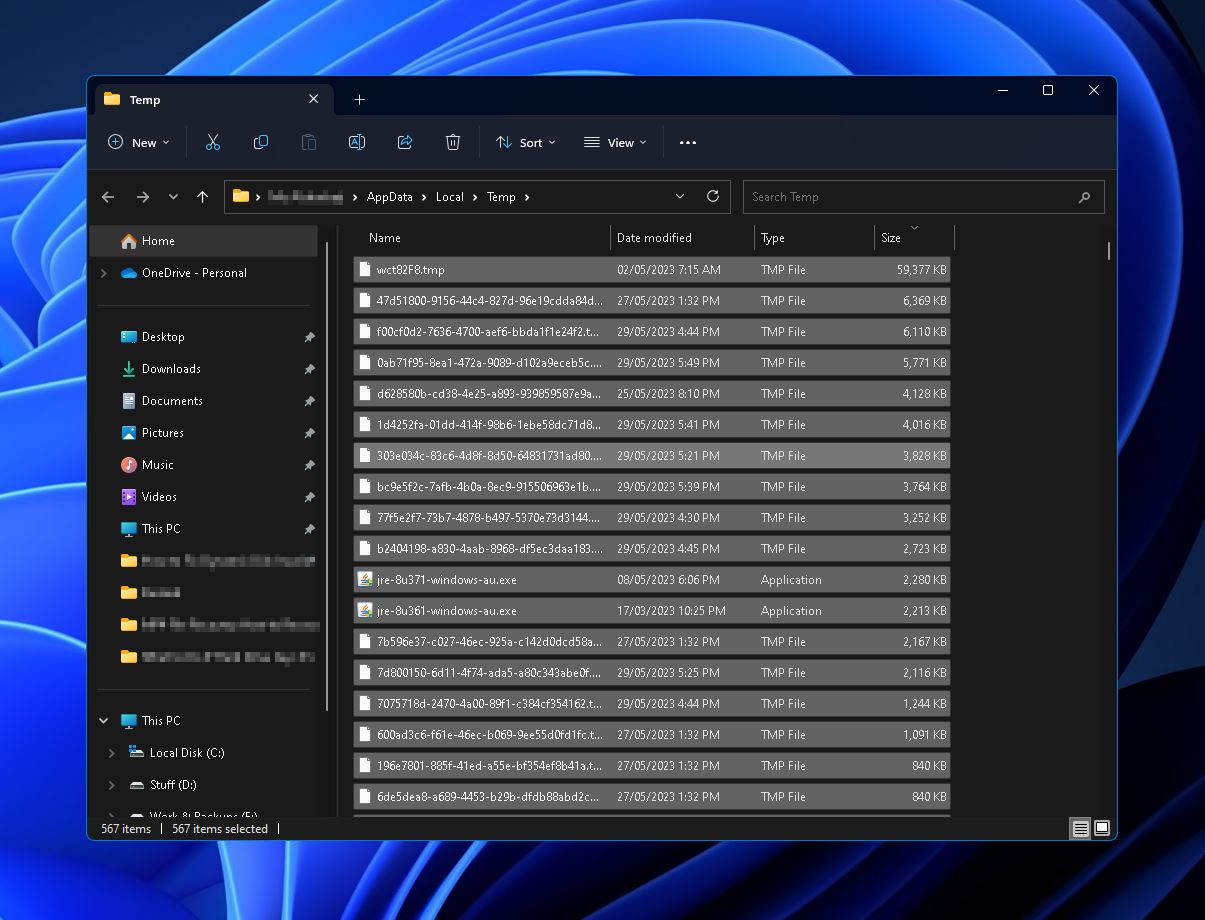
Temporary program files are stored in the “Temp” folder created by Windows, and these files are normally erased in time. However, there are instances when these temporary files accumulate, taking up a whole lot of space. This may be the cause of why your C drive is full, but no files are present since the “Temp” folder is always located in the same drive Windows is installed. So here’s how you can access the “Temp” folder to delete its contents:
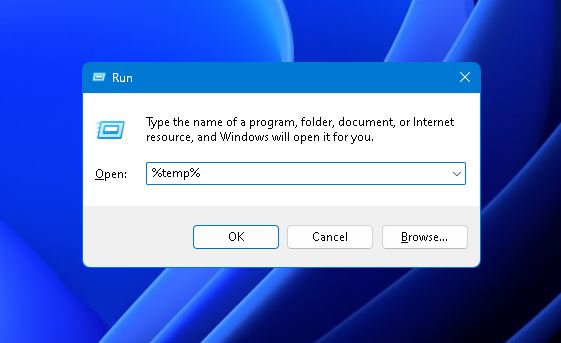
- Press the Windows + R keys to bring up the “Run” command, then type in “%temp%” and hit Enter.
- This should open the “Temp” folder. Simply highlight all of its contents and press the Shift + Delete keys to get rid of them permanently.
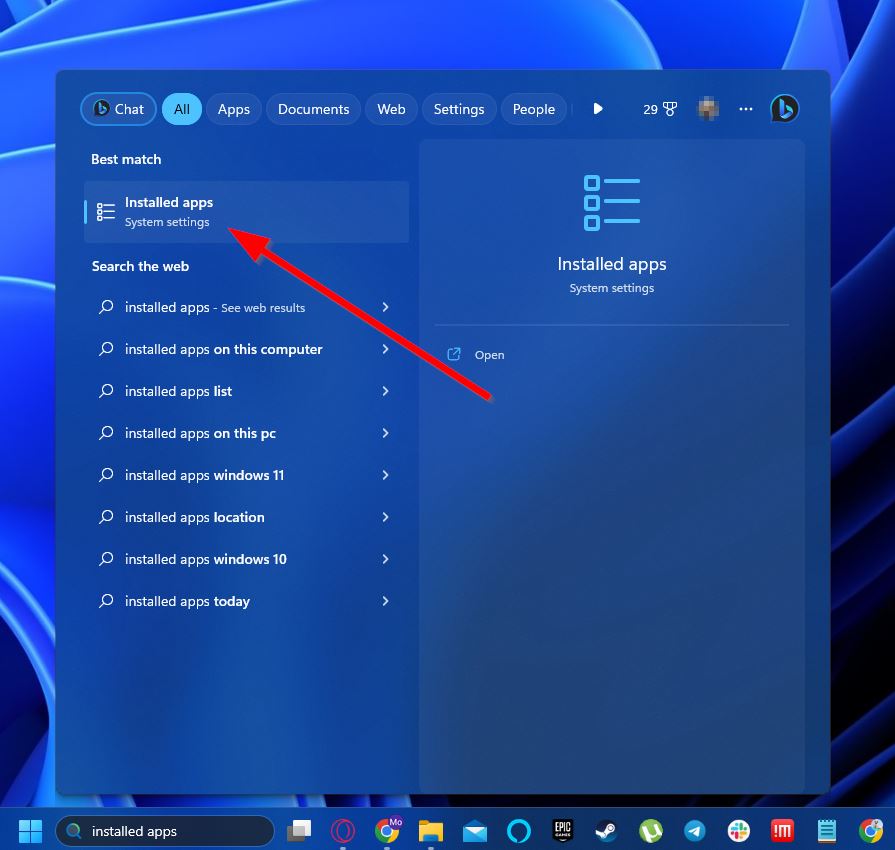
The Microsoft Store or other apps may prevent you from deleting certain temporary files. To get past this, you’ll need to stop these apps from running in the background.
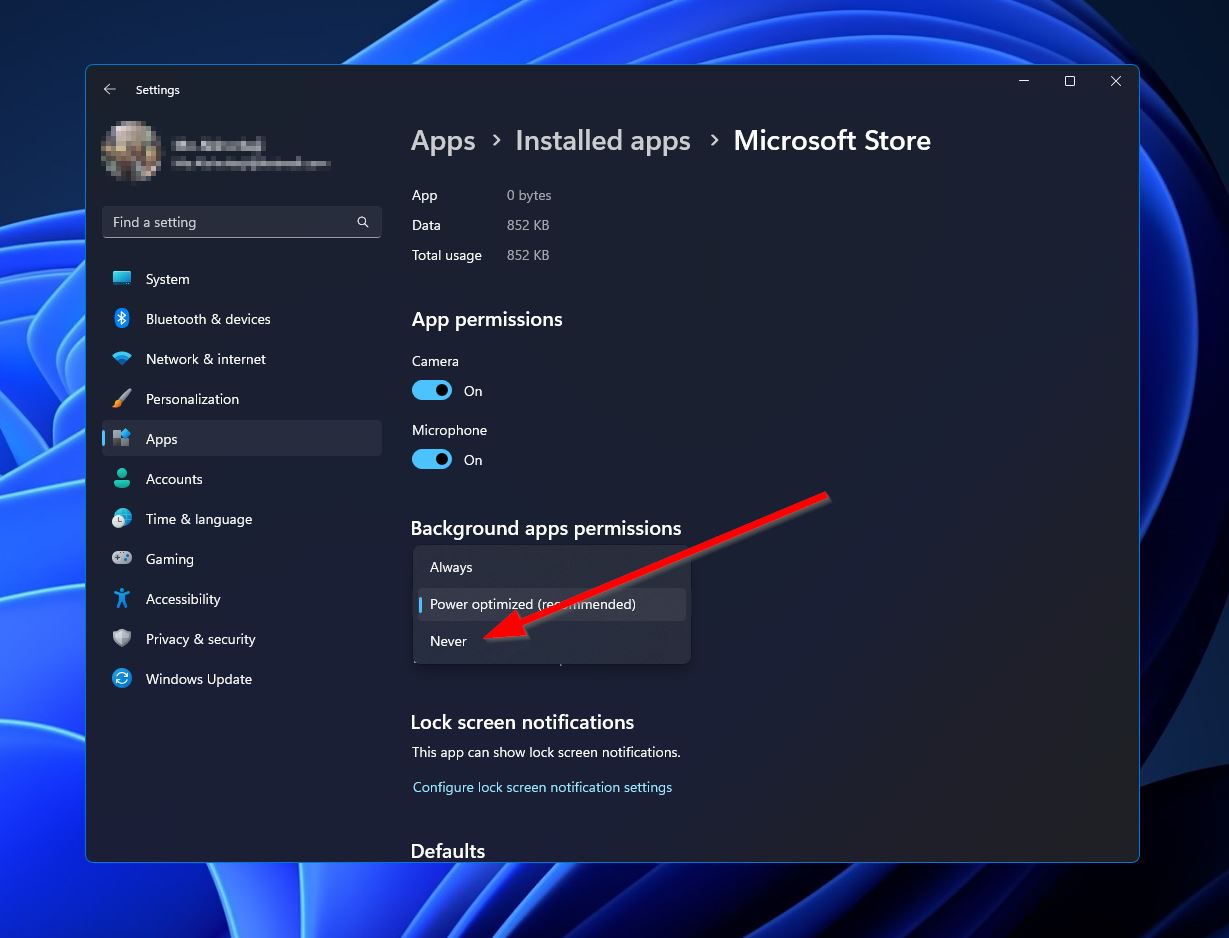
- Type “installed apps” into your taskbar search feature and select the result with the same name.
- Use the search bar near the top of the window to search for the program in question. From there, click the three dots button on the right of the program and select “Advanced options.”
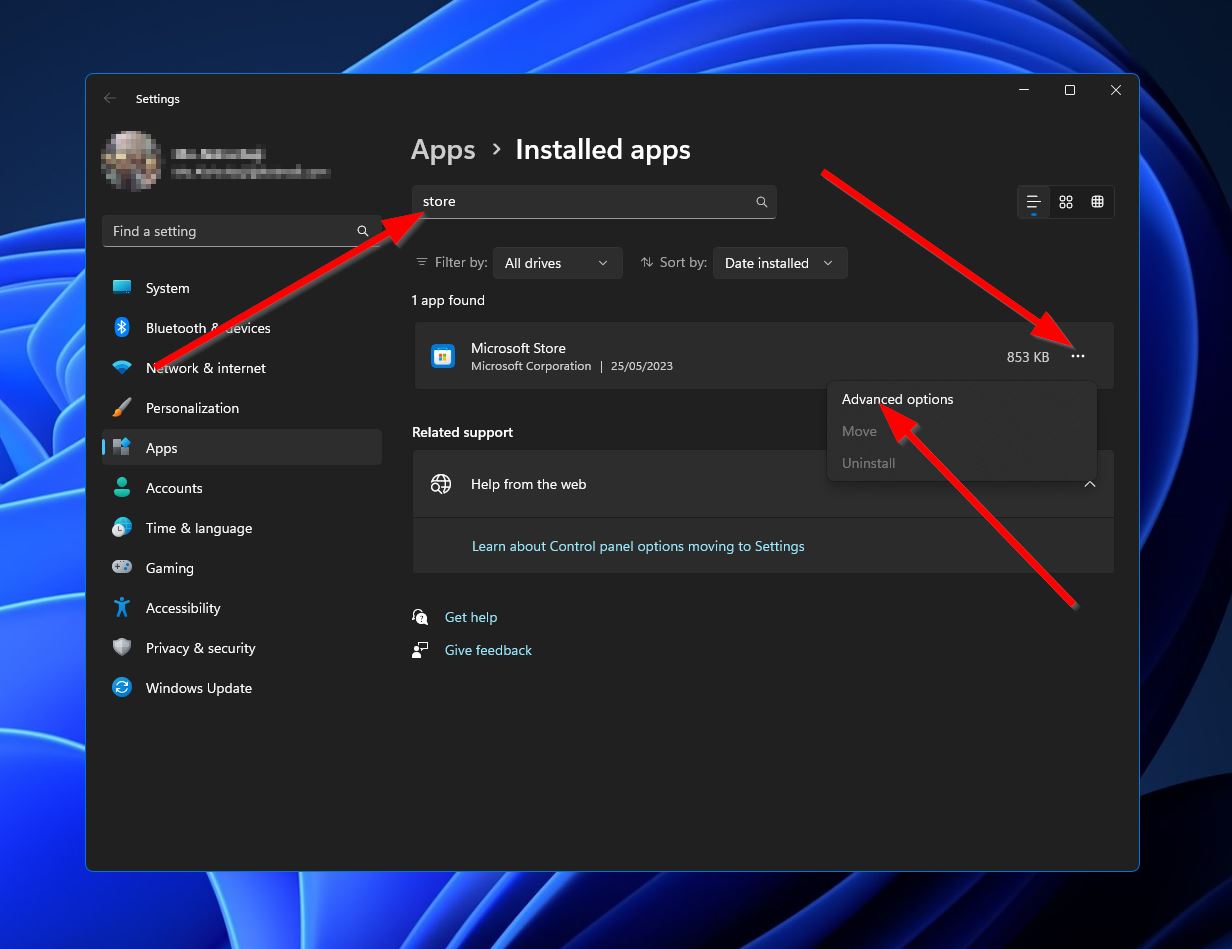
- Click the dropdown under “Let this app run in the background” and select “Never.”
Now you can go back to the “Temp” folder and try deleting the files once more.
Method 5: Check for Hidden Files
Due to a potential system issue or malware attack, there are times when a lot of hidden files may take up residence on your hard drive, causing it to appear full. To be safe, you’ll want to enable the option to see hidden files in Windows Explorer. The method to accomplish this varies depending on which version of Windows you’re running.
Method 6: Run CHKDSK to Find and Fix Error That Can Cause This
CHKDSK is a built-in Windows feature that performs an integrity scan of a storage device and attempts to fix any errors it finds. These errors could be causing your hard drive space problem.
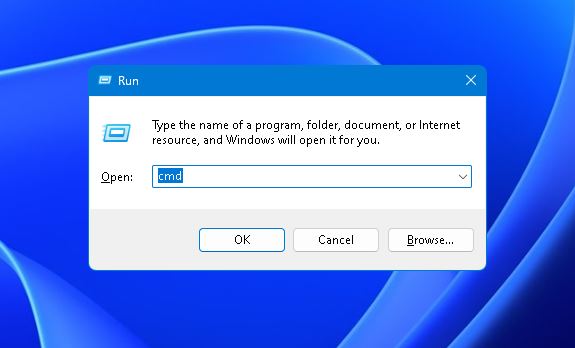
- Press the Windows + R keys to launch the Run command, then type in “cmd” and press Ctrl + Shift + Enter to run as admin.
- Type in “chkdsk” and the drive letter of your hard drive, along with the colon symbol. Following the colon symbol, add a space and then “/f” to instruct CHKDSK to fix any errors encountered during the scanning. Your end command should be similar to this:
chkdsk c: /f
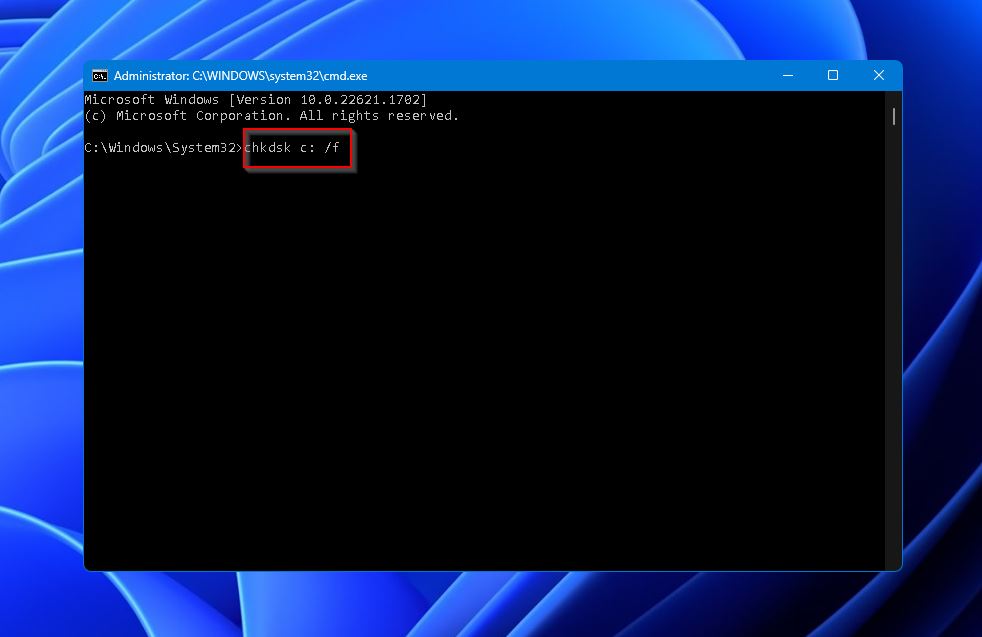
- CHKDSK will now scan your hard drive and fix any errors it finds.
Method 7: Reformat Hard Drive
If none of the methods so far have managed to fix your issue, then the only remaining course of action is to format your drive. However, keep in mind that doing so will guarantee the loss of all the files on the drive, so make sure to create a backup if necessary.
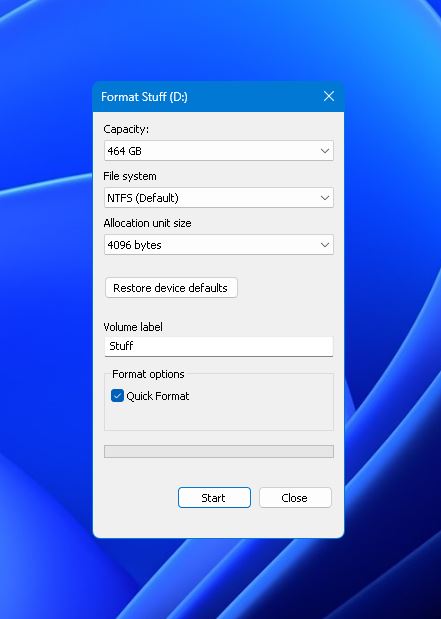
- Double-click the “This PC” icon on your desktop, then right-click the affected hard drive under “Devices and drives” and select the “Format” option.
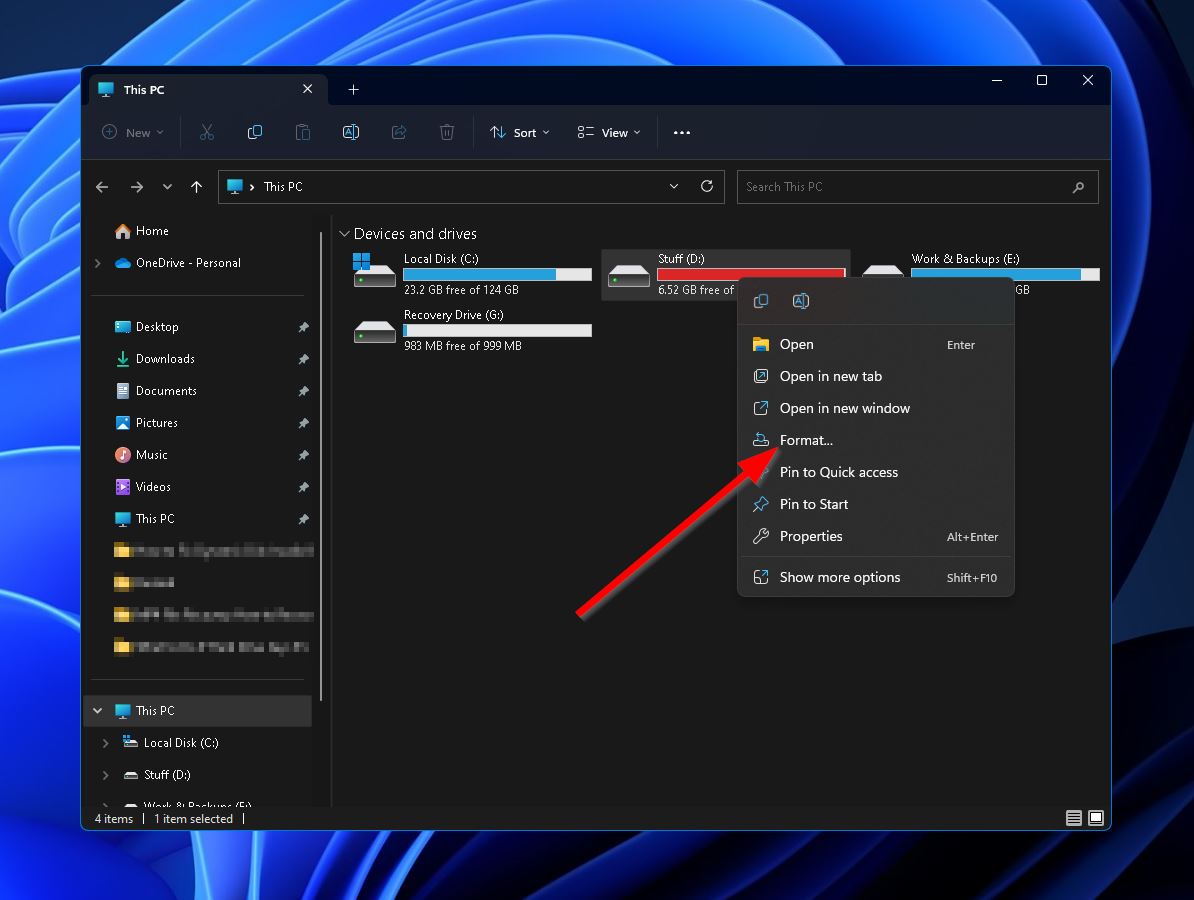
- Select the appropriate File system, Allocation unit size, and Volume label for the drive, then click “Start.” Windows will then format your drive.
Note: If the affected drive is your system drive, it can only be formatted using operating system installation media. This is the flash drive or DVD used to install the OS.
Conclusion
There are many factors that can cause your hard drive to show a lot of disk space used, but no files are seemingly present. Your drive may be suffering from a malware attack, corruption, or an excess of hidden/temporary files that aren’t normally shown. Whatever the reason, following the steps outlined in this guide will hopefully get your hard drive back to tip-top shape.


")