 A slow hard drive can put a damper on your PC usage–whether you use it for gaming, or work. Luckily, there’s a lot you can do to fix a hard drive that is slow. In this guide, we’ll take a look at the various reasons behind a slowing hard drive, what you can do about it, and how to keep your data secure through it all.
Table of Contents
Why the Hard Drive is Slow
A slow hard drive can indicate a plethora of issues–some serious, some benign. Often, the problem is software-related, unless you dropped the hard drive, or there’s a clicking, beeping, or grinding sound coming from the drive. If you’re facing the issue with a relatively new drive (<5 years), the drive could be defective and on the verge of failure.
Here’s an overview of the possible reasons why your hard drive is slow:
| Reason | Description | Solution |
| 🕷️ Malware | Computer viruses and other types of malware can bog down your drive by creating loads of new files in a short span of time. They can also hog your computer’s resources. | Run a complete antivirus scan. |
| 💿 An accumulation of bad sectors | Over time, hard drives develop bad sectors that are essentially unreadable areas on the disk. Many bad sectors can slow down your hard drive. | Run the Error Checking Tool on Windows. You can recover your data, then format the hard drive for a clean slate. |
| 🧩 Fragmentation | On a hard drive, files are stored in fragments, i.e., a file is split and stored in different physical areas of the disk. When you need to access the file, your drive pulls together all the pieces, which is time-consuming. As you write more files to the drive, it becomes increasingly “fragmented”, which slows it down. | Run Windows Defragmentation. We also recommend you disable indexing. |
| 💻 Too many programs are set to launch during startup | If your internal hard drive is taking too long to respond during startup, it could be because you have numerous programs that are automatically launched during startup, like gaming clients. | Disable unnecessary startup programs using the Task Manager. |
| 📚 Background apps taking up the hard drive’s resources | There are various first and third-party background processes that take up the hard drive’s resources. Some of them aren’t even necessary. These background processes can slow down the hard drive as it’s unable to allocate resources to run the programs you want to use. | Use the Task Manager to check which processes are taking up your hard drive’s resources. End these processes if they’re not necessary. |
| 🔗 Connection issues | A loose connection or a damaged connector can result in slow hard drive performance. Inadequate power supply can also result in a slow drive/ | Double-check your drive’s connections, power supply, and ensure the cables/ports are not damaged. |
| 🔨 Physical damage | Hard drives have numerous moving parts that can be damaged with a simple drop/physical shock. Physically damaged drives usually let out a beeping, clicking, or grinding noise. | Physical damage should be dealt with immediately. Disconnect the drive and contact a professional data recovery service. |
How to Fix Hard Drive Speed Issues
Depending on what caused your drive to slow down, there are various fixes you can attempt to resolve the problem. Before proceeding with the fixes listed here, ensure that the drive is free from dust and that its heat is being dissipated properly.
Method 1: Check the Physical Connections
If you notice that your external hard drive has become very slow suddenly, it could be because of a stretched cable, or a damaged USB connector. Or it could simply be a case of a loose connection. Regardless, ensure that the cables, ports, and connectors aren’t damaged. It’s best to switch the USB cable and connect it to a different port on your PC, just to be sure.
On internal drives, the SATA connection may have become loose, in which case you’ll need to re-slot it.
Besides connections used for data transfer, the power cable can be damaged or loose as well. Double-check the connection between your computer’s PSU (Power Supply Unit) and the hard drive. If you notice random power offs, the PSU itself could be faulty.
If you’re not comfortable working with your PC’s internal components, it’s best to contact an expert who can do all of this for you.
Method 2: Check for Physical Damage
Hearing clicking, beeping, or grinding noises from the slow hard drive? It’s because the drive is physically damaged. Even though it may be working, using a physically damaged hard drive will rapidly damage it even further, resulting in data loss that cannot be undone.
If you notice any signs of physical damage, stop using the drive immediately, and contact a professional data recovery service. It’s best to avoid DIY methods if you value your data.
Method 3: Defrag the Hard Drive
Periodically defragmenting your hard drive ensures it works optimally and can access your files easily. Defragging can take a while, especially on drives with large storage capacities and massive quantities of data stored on them.
To defrag a hard drive that is slow, follow these steps (Windows 10 and Windows 11):
- Type “defrag” in Windows Search (Windows Key + S). Click on the Defragment and Optimize Drives app.
- Select your hard drive and click on Analyze. Wait for the process to complete.
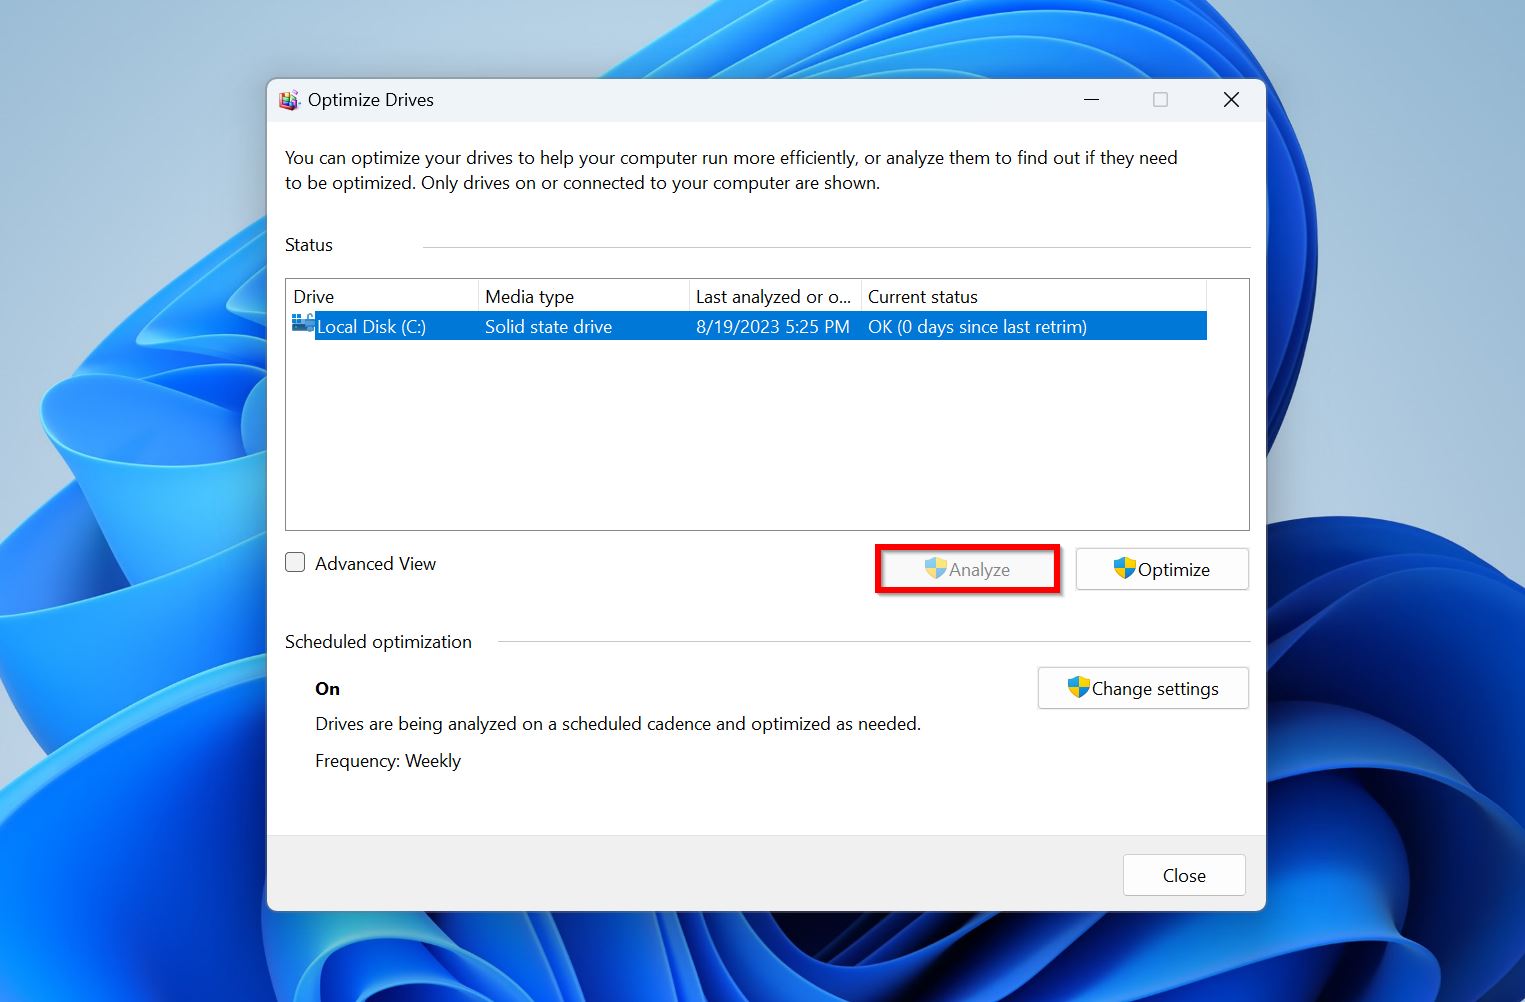
- Now, click on the Optimize option.
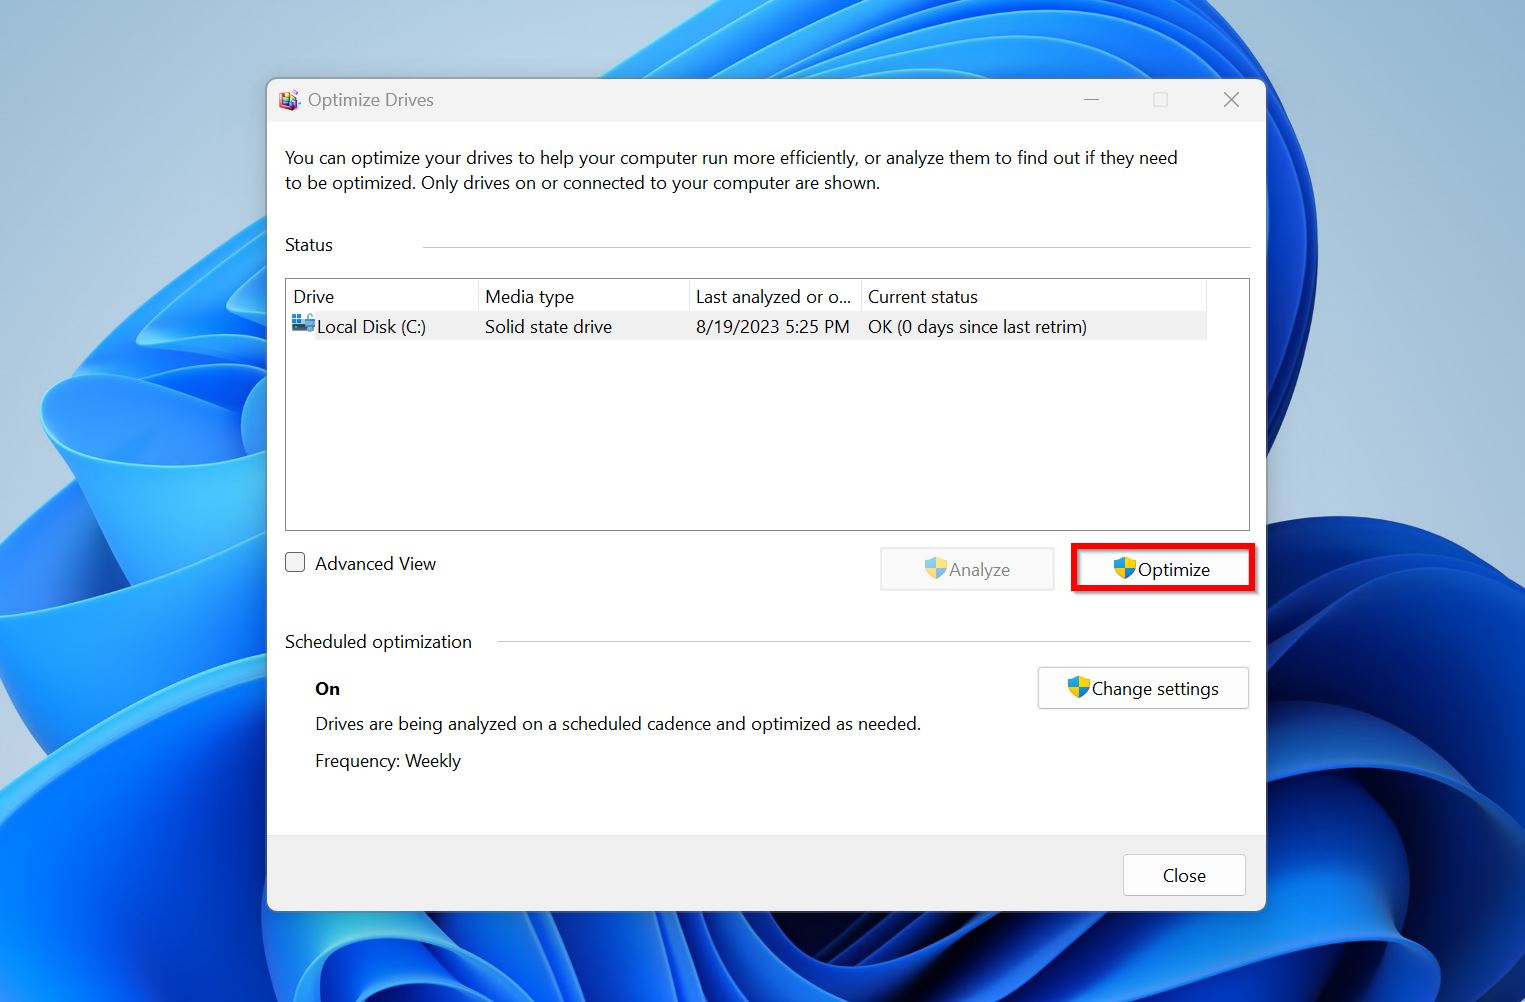
- The defragmentation process will begin. Make sure the process isn’t interrupted.
Bonus: You can schedule periodic automatic defragmentation scans, using the Change Settings option, under Scheduled Optimization in the Defragment and Optimize Drives window.
Method 4: Check for Errors
Windows has an in-built disk-checking utility called CHKDSK. While CHKDSK is a command-line tool, it has a GUI counterpart called the Error Checking Tool. CHKDSK and the Error Checking Tool can fix a slow hard drive by checking for bad sectors and marking them unfit for use.
Here’s how to use the Error Checking Tool and fix a hard drive that is slow:
- Press Windows Key + E to launch Windows Explorer.
- Go to This PC.
- Right-click on the partition you wish to scan and click Properties.

- Go to the Tools tab and click on Check under Error checking.
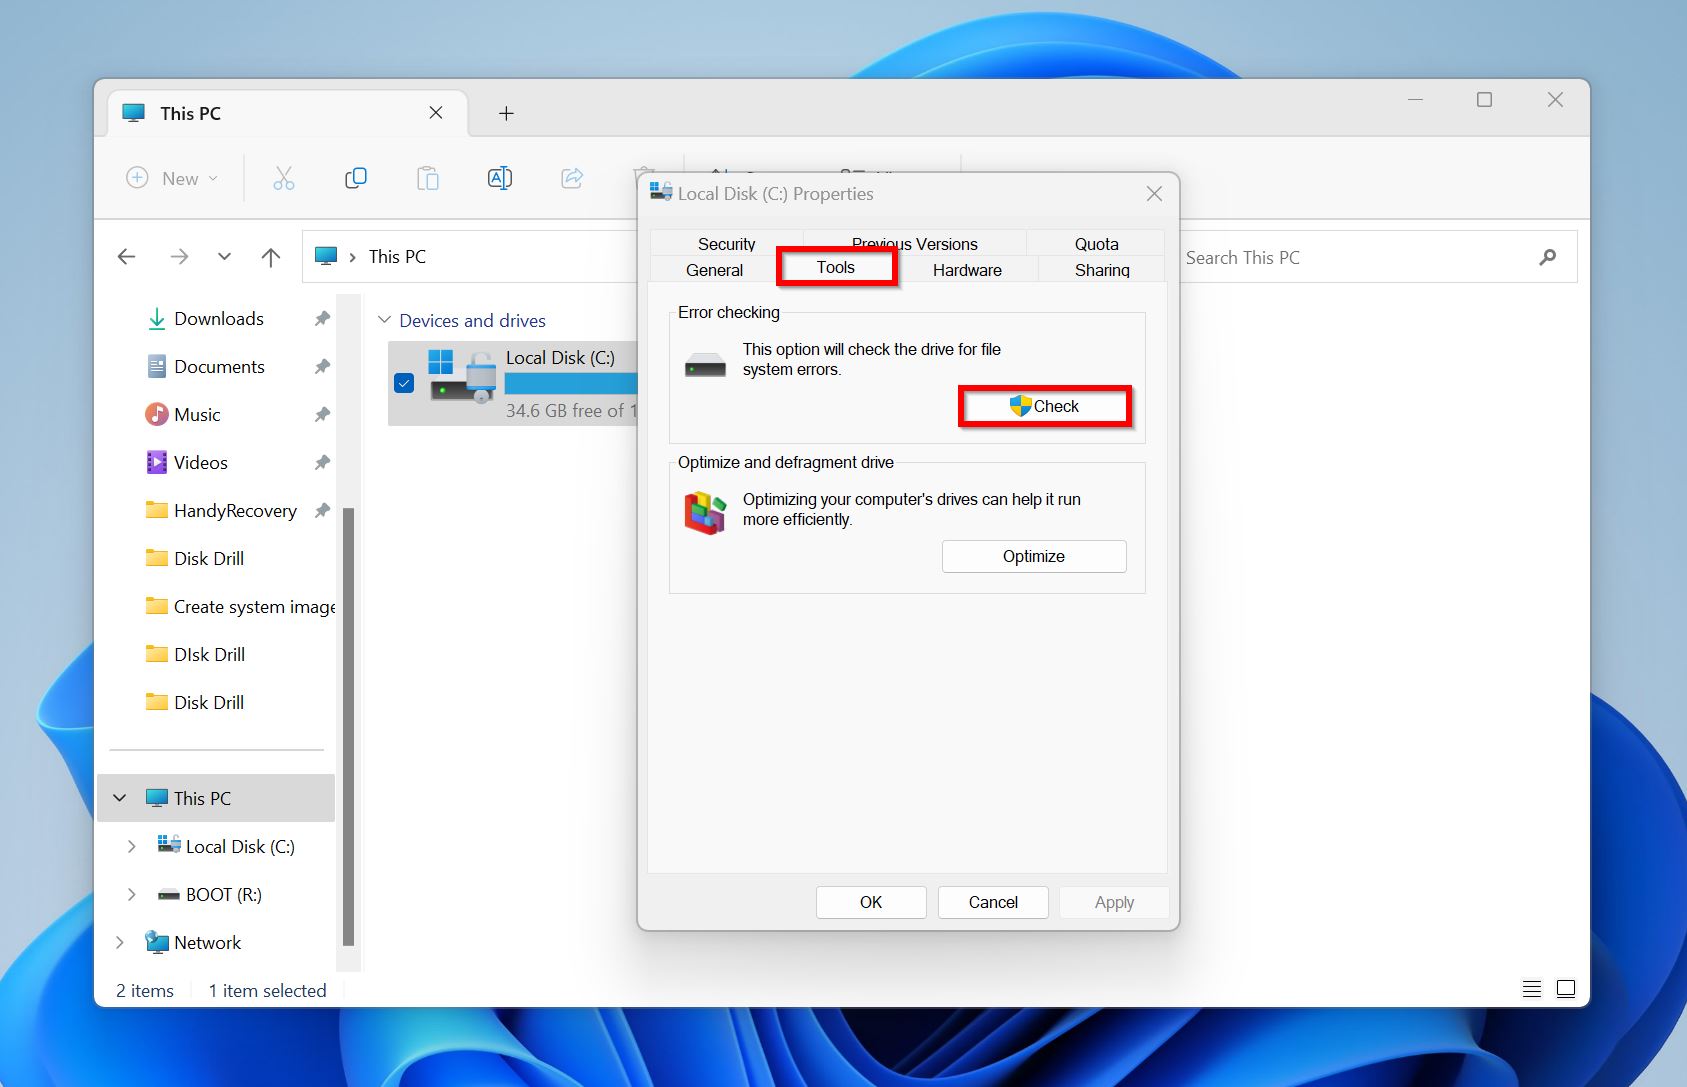
- If prompted, click on Scan drive.
- Windows will scan the drive. Do this for each partition you have on your hard drive.
Method 5: Check Background Processes and Apps
Badly designed apps, and malware can occupy a considerable percentage of your hard drive’s read/write capacity, resulting in slowdowns and random freezes. To check if this is happening, use the Task Manager.
Here’s how to do this:
- Press CTRL + Shift + ESC to launch the Task Manager, or search for it in Windows Search (Windows Key + S).
- Ensure you’re in the Processes tab. In Windows 11, the Processes tab can be found by clicking the checkerboard-like icon in the left navigation bar. In Windows 10, there will be a tab labeled, “Processes,” towards the top.
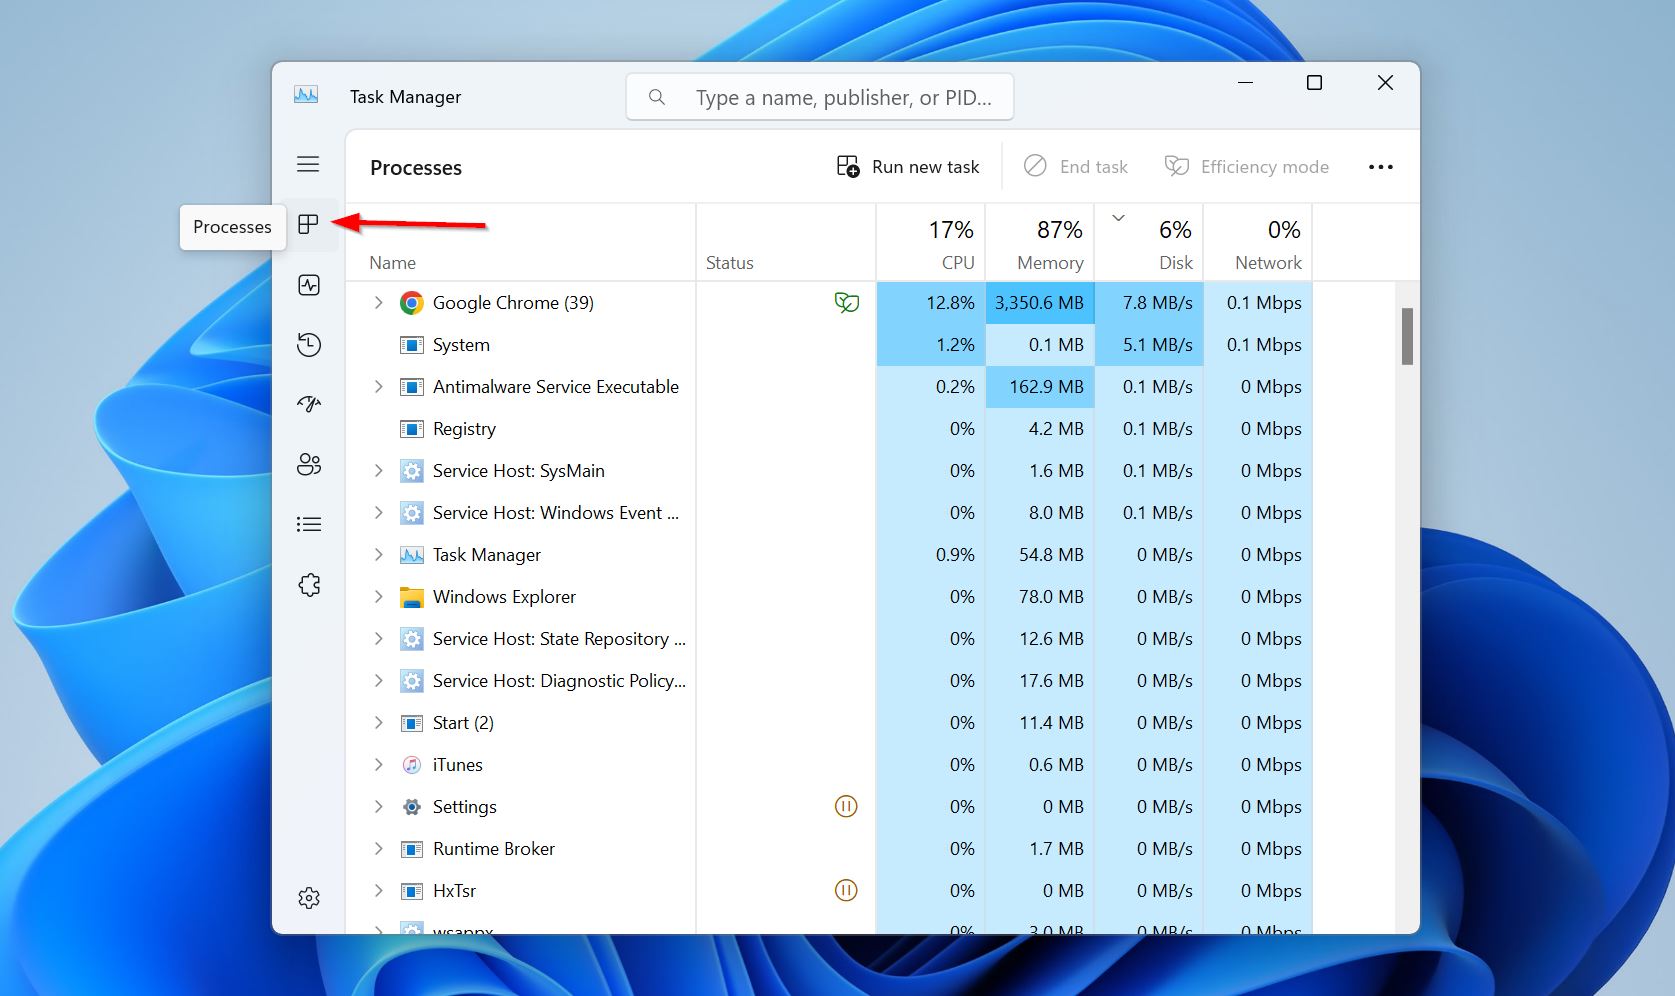
- Check the Disk column to see the processes that are taking up your hard drive’s processing power. You can click on the column to sort the processes by most to least usage, or vice versa.
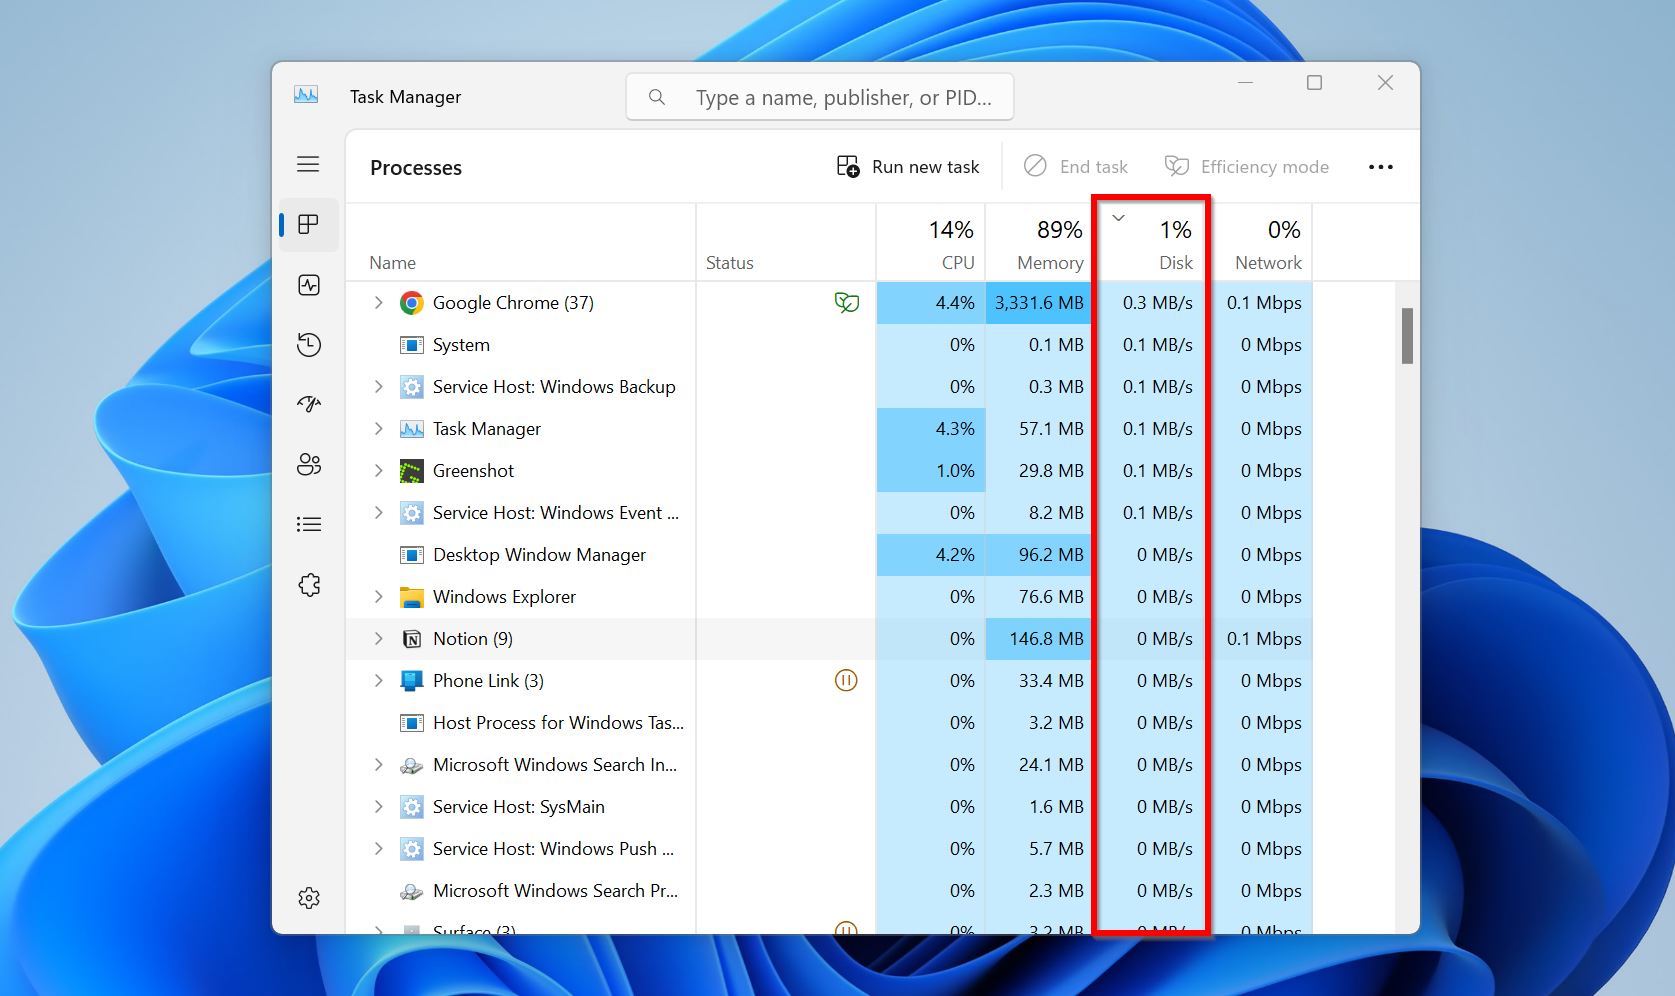
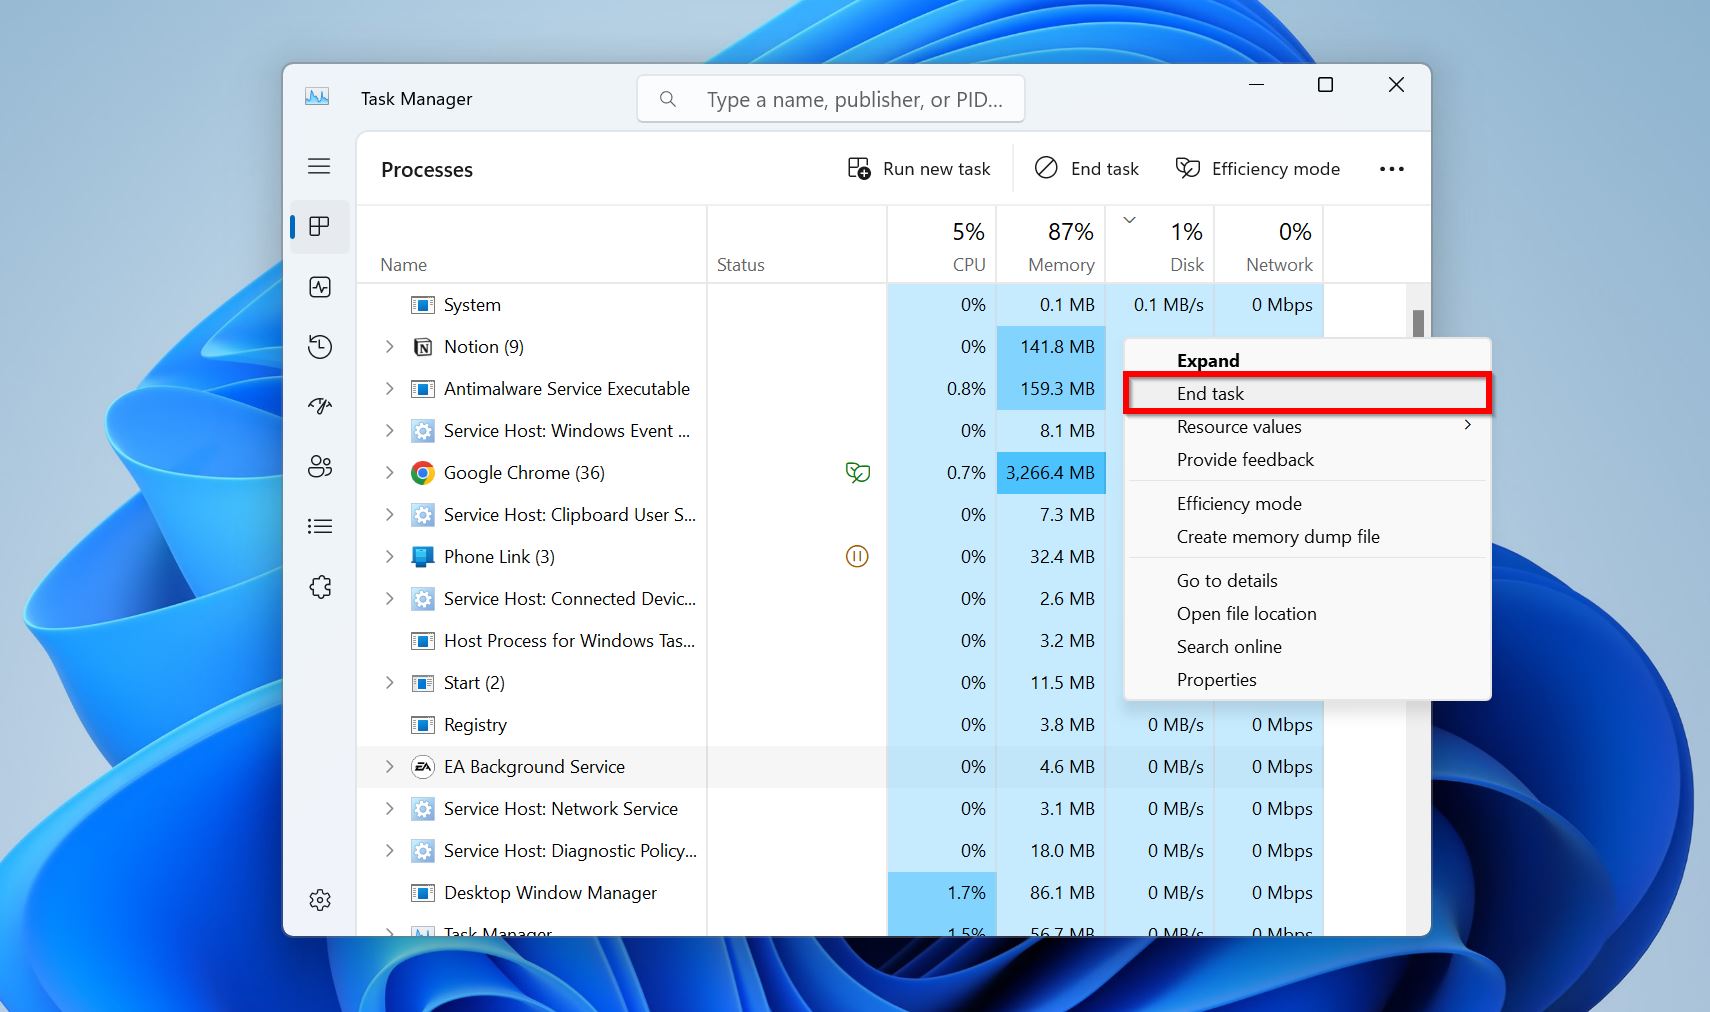
- To end, a process that’s taking up your hard disk’s processing power–right-click on the process and choose End Task/Process. Be sure to Google the process’ name to find out whether it’s a system process, a third-party app, or malware.
Bonus: You can use the Task Manager to prevent apps from launching at startup. To do this, open Task Manager and go to the Startup tab. Right-click on the app you wish to prevent from launching at startup and click Disable.
Method 6: Run an Antivirus Scan
Malware is one of the most common reasons for a slow hard drive. If you notice a suspicious process that’s taking up your PC’s resources, it’s best to perform an antivirus scan as soon as possible.
You can use a third-party antivirus tool, or use the in-built Windows Security dashboard to perform an antivirus scan.
If you proceed to use Windows Security/Defender, here’s how you can perform an antivirus scan:
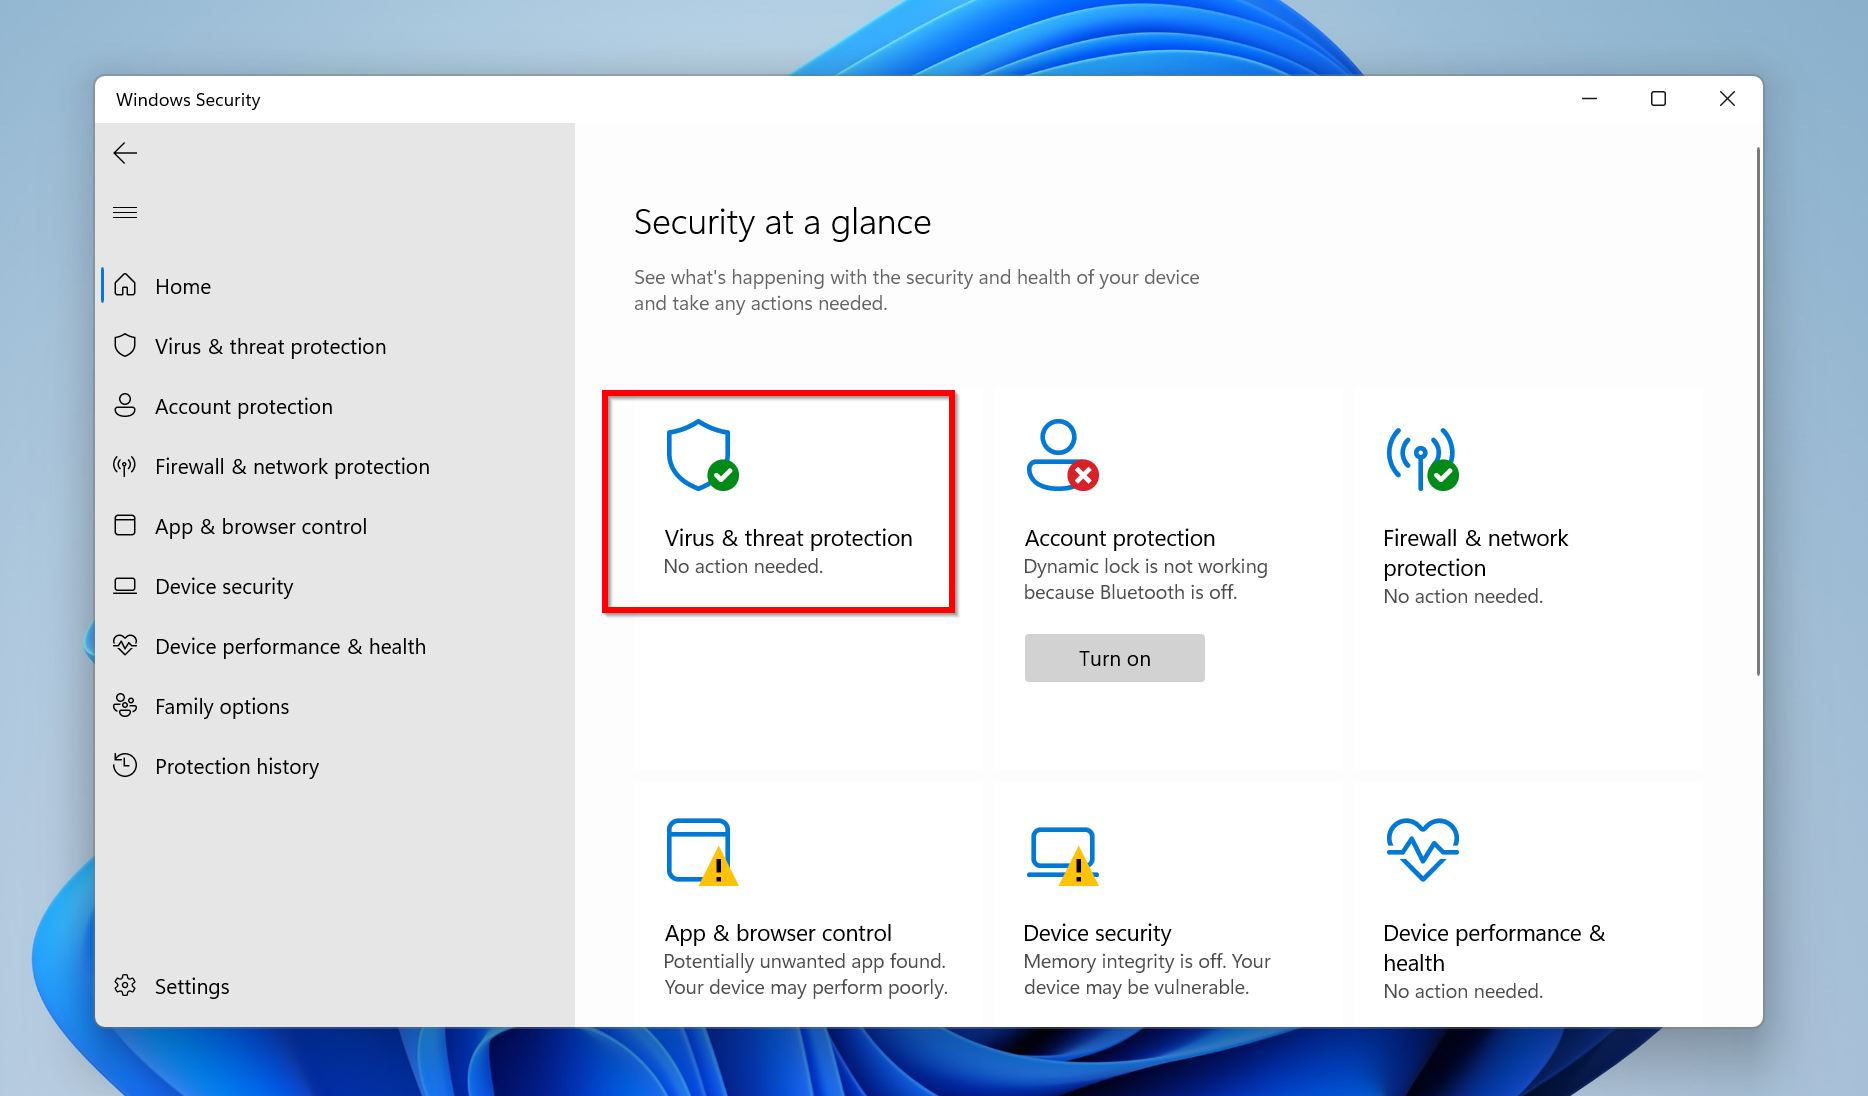
- Search for “windows security” in Windows Search (Windows Key + S). Launch the Windows Security app.
- Click on Virus & threat protection in the Windows Security dashboard.
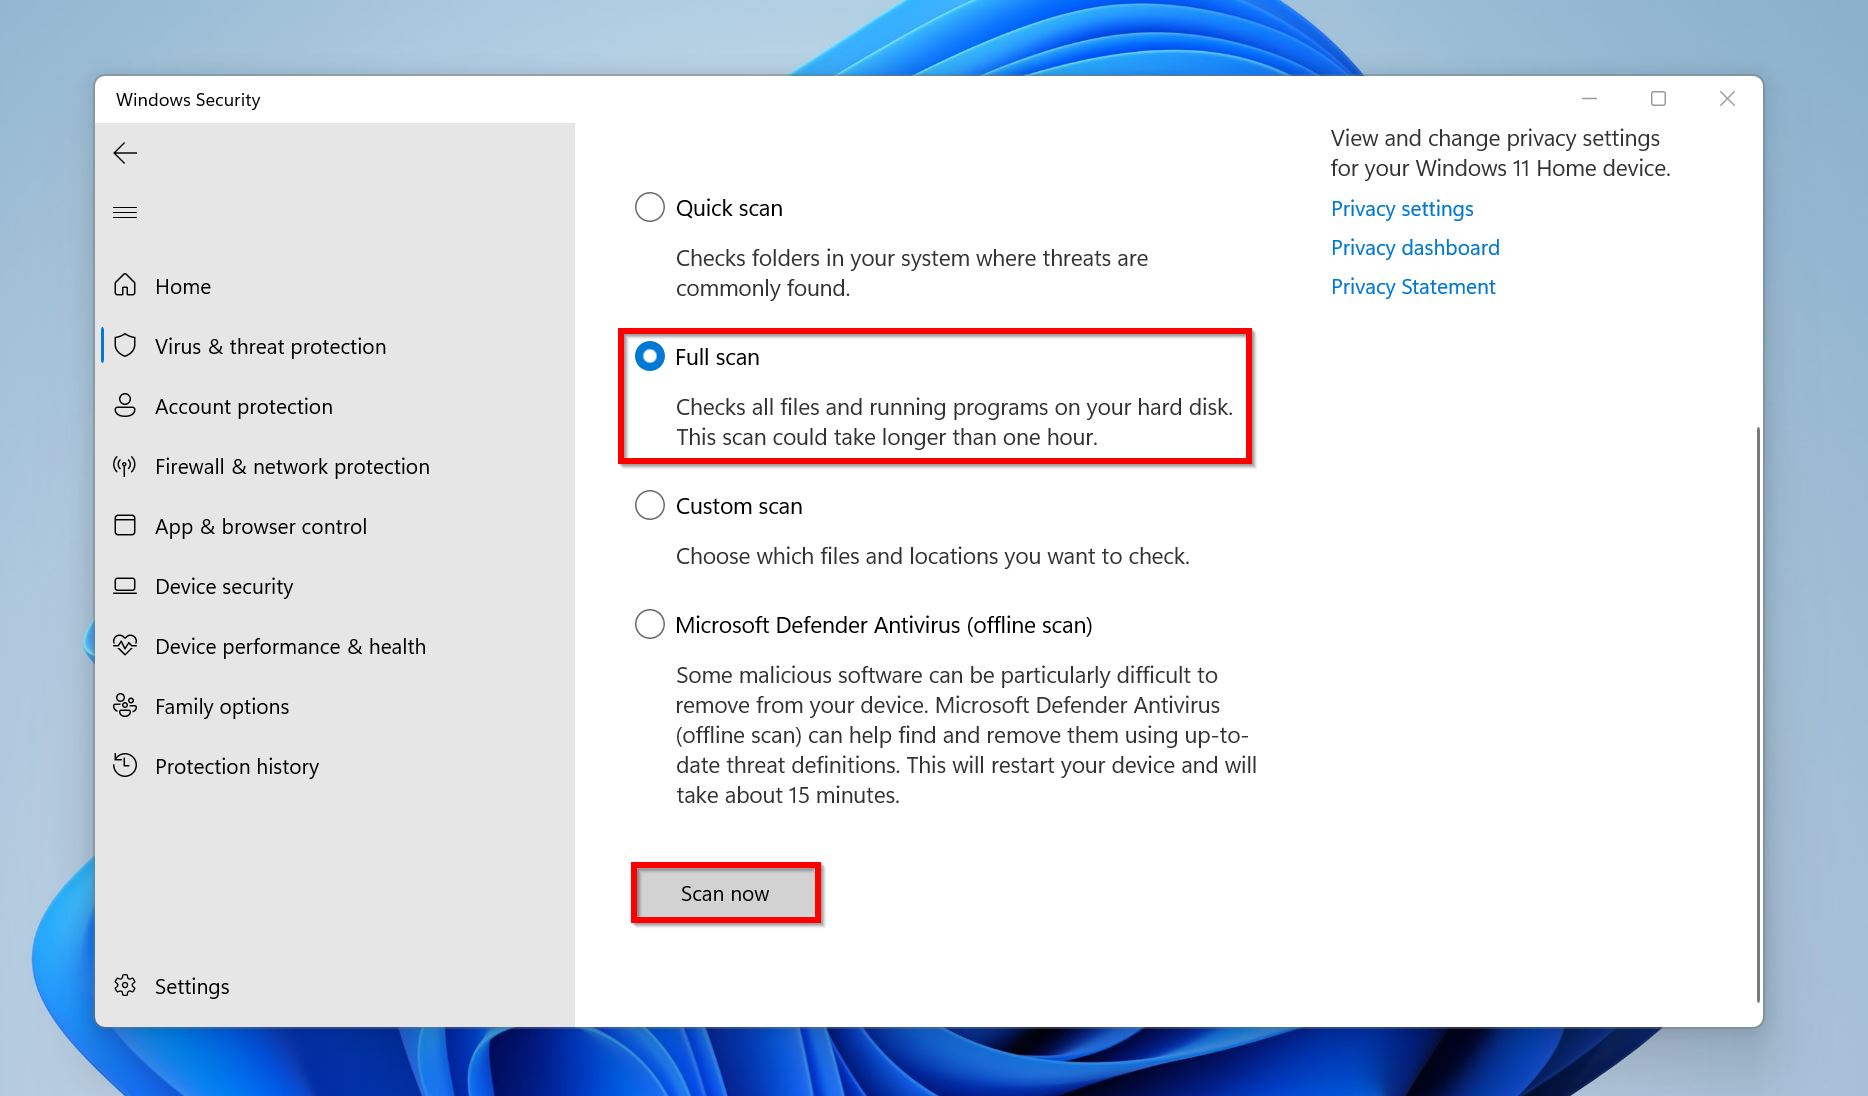
- Under Current Threats, click on Scan options.
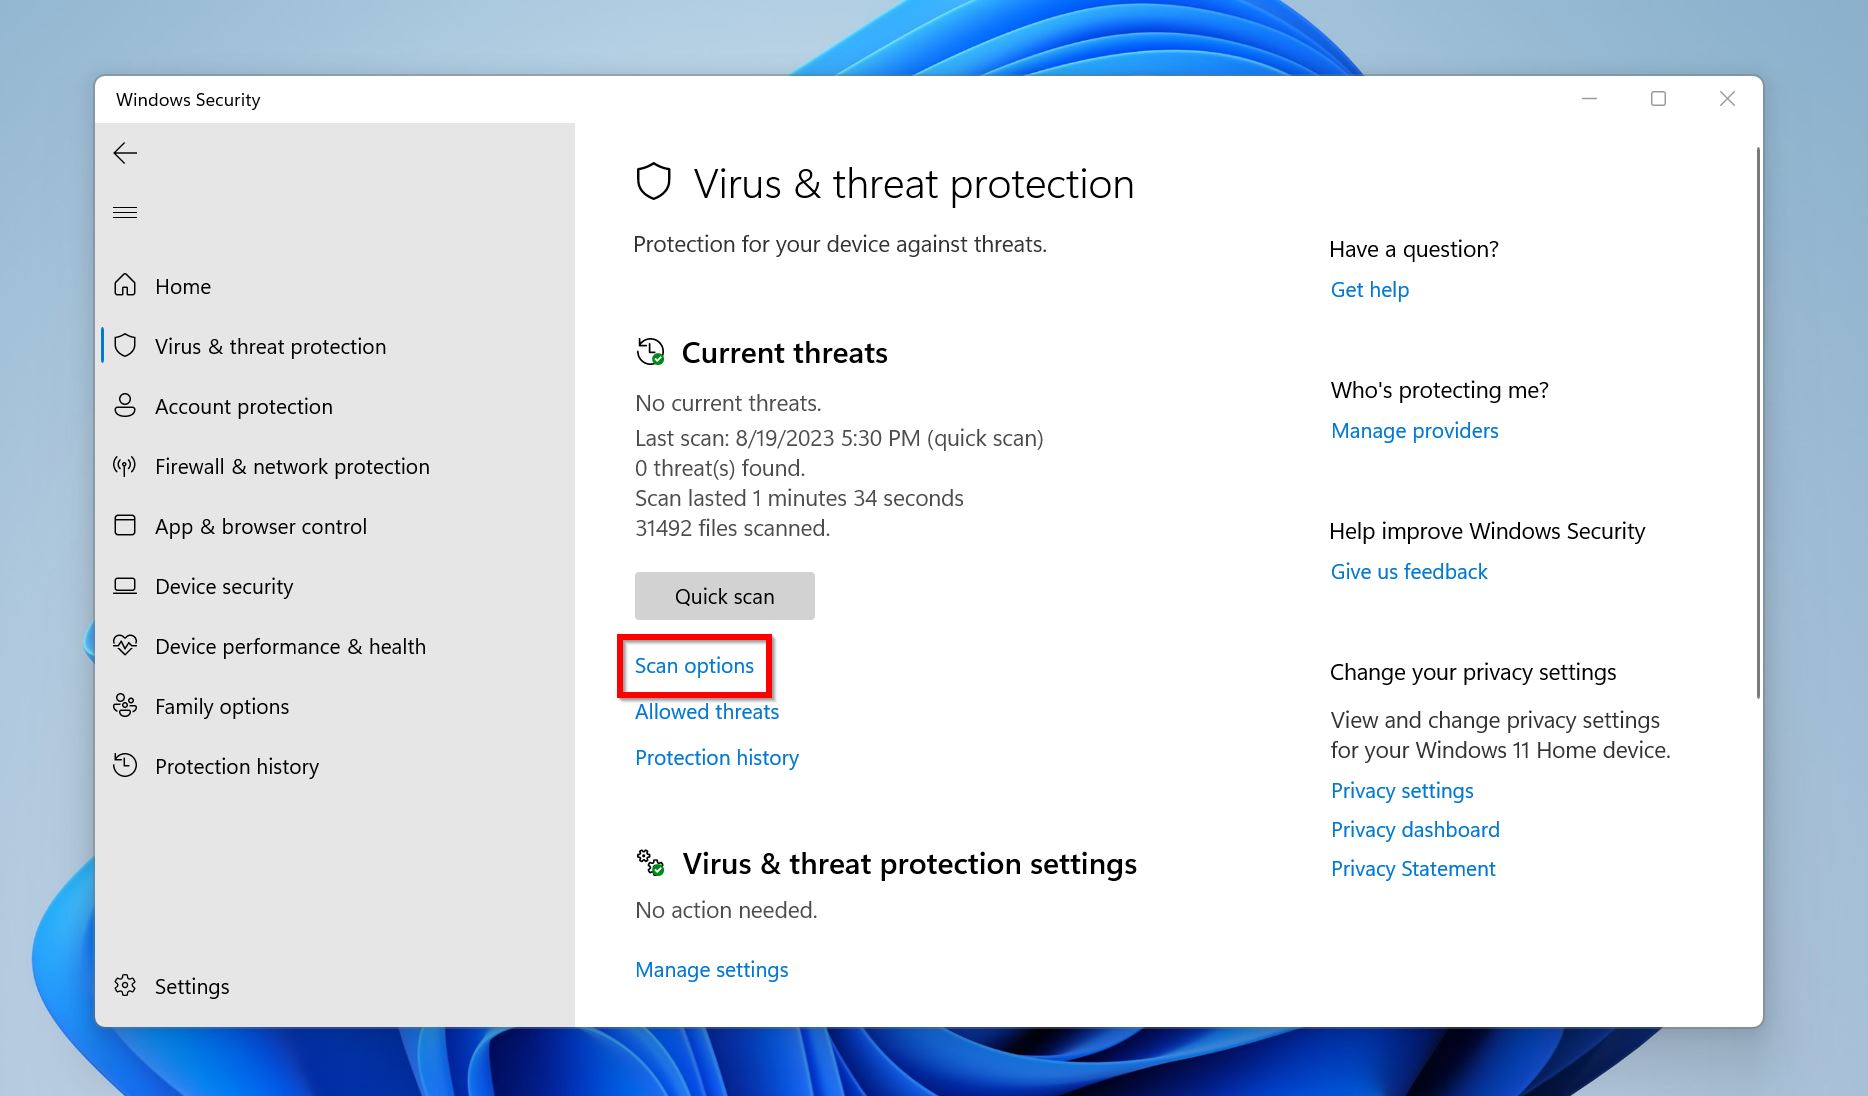
- Select Full Scan if you wish to scan the internal hard drive and click on Scan now.
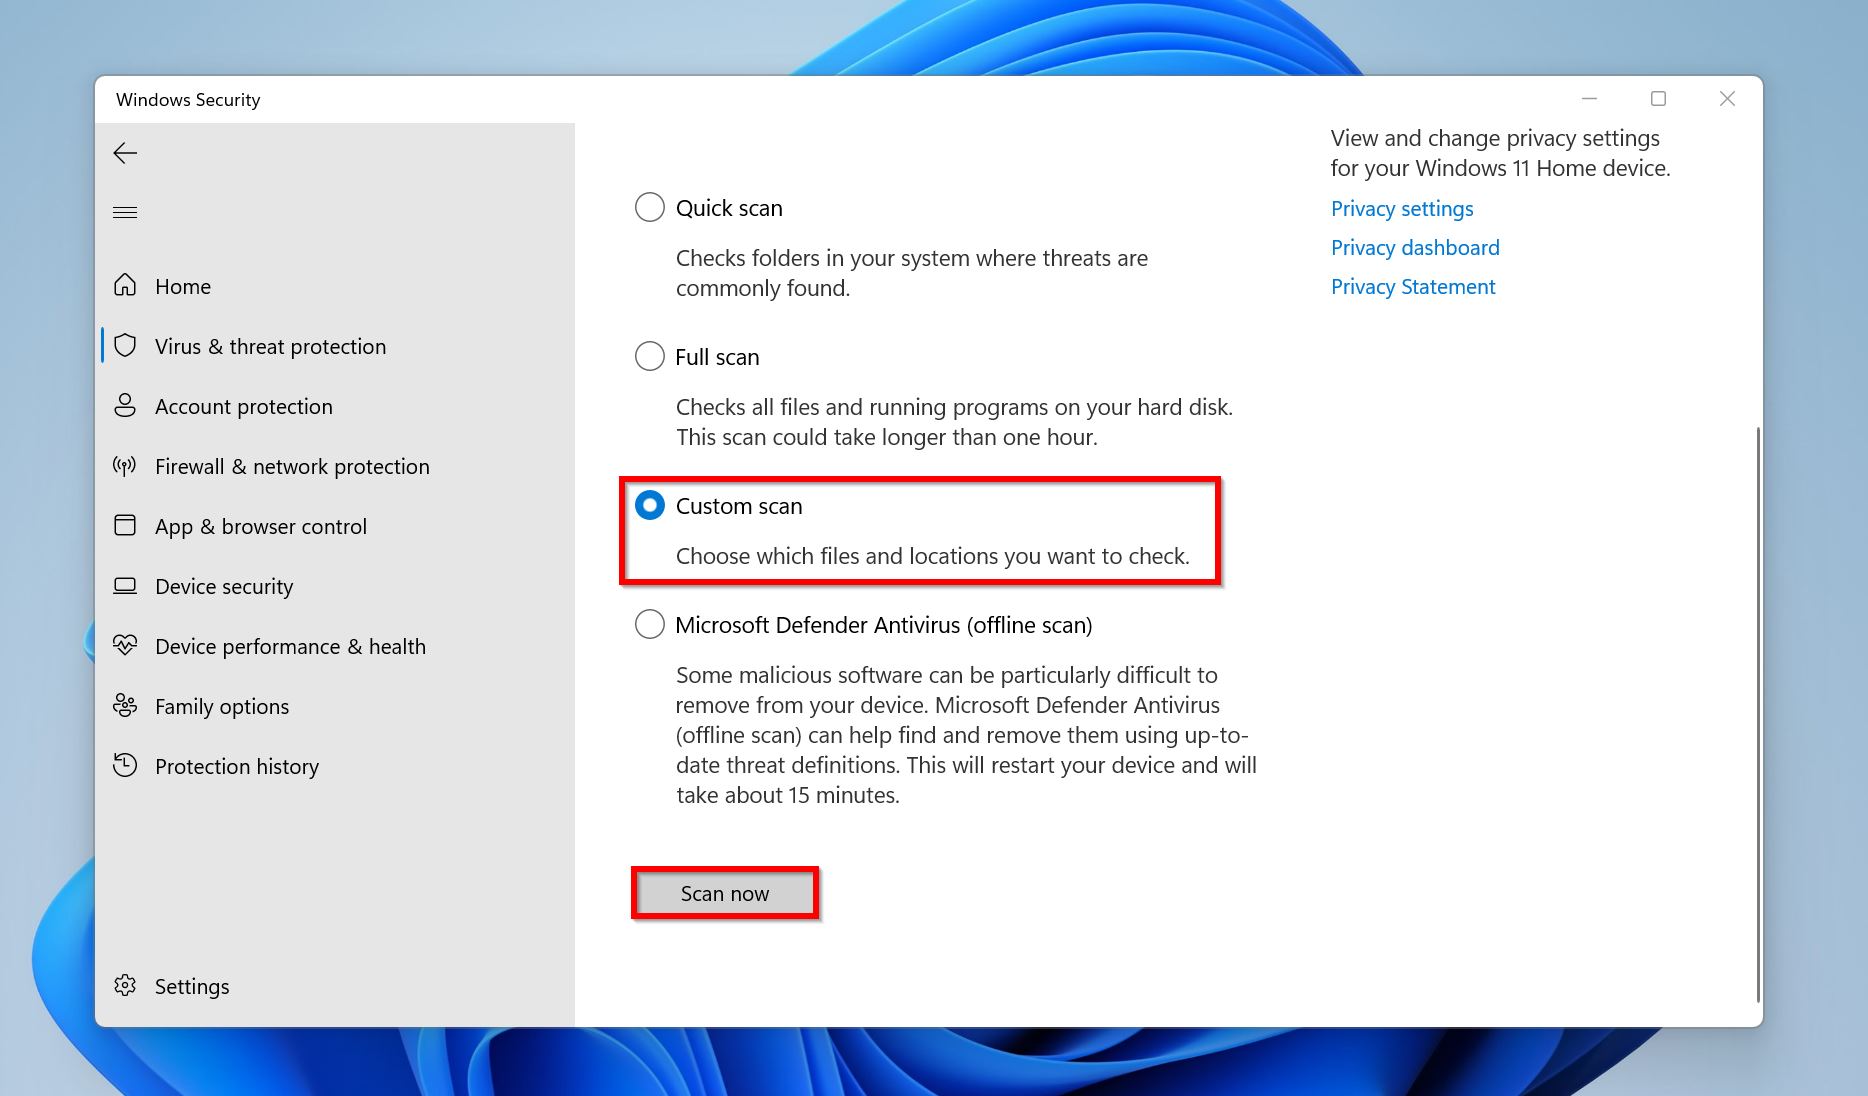
- If you wish to scan an external hard drive, choose Custom scan instead of Full Scan. Then click on Scan now and select your external hard drive. You can one folder at a time, so it’s best to temporarily put all your files in one folder, if possible.
Method 7: Disable Indexing
The Windows Search Indexing service improves the file/folder search performance on your PC, i.e., you can find files faster when using the Search feature. However, indexing can result in high disk usage, resulting in a slow hard drive.
If you frequently create, copy, or transfer new files to and from your hard drive, you can disable Search Indexing for better hard drive performance. A slower search time is better than a slower hard drive.
Here’s how to disable Search Indexing in Windows:
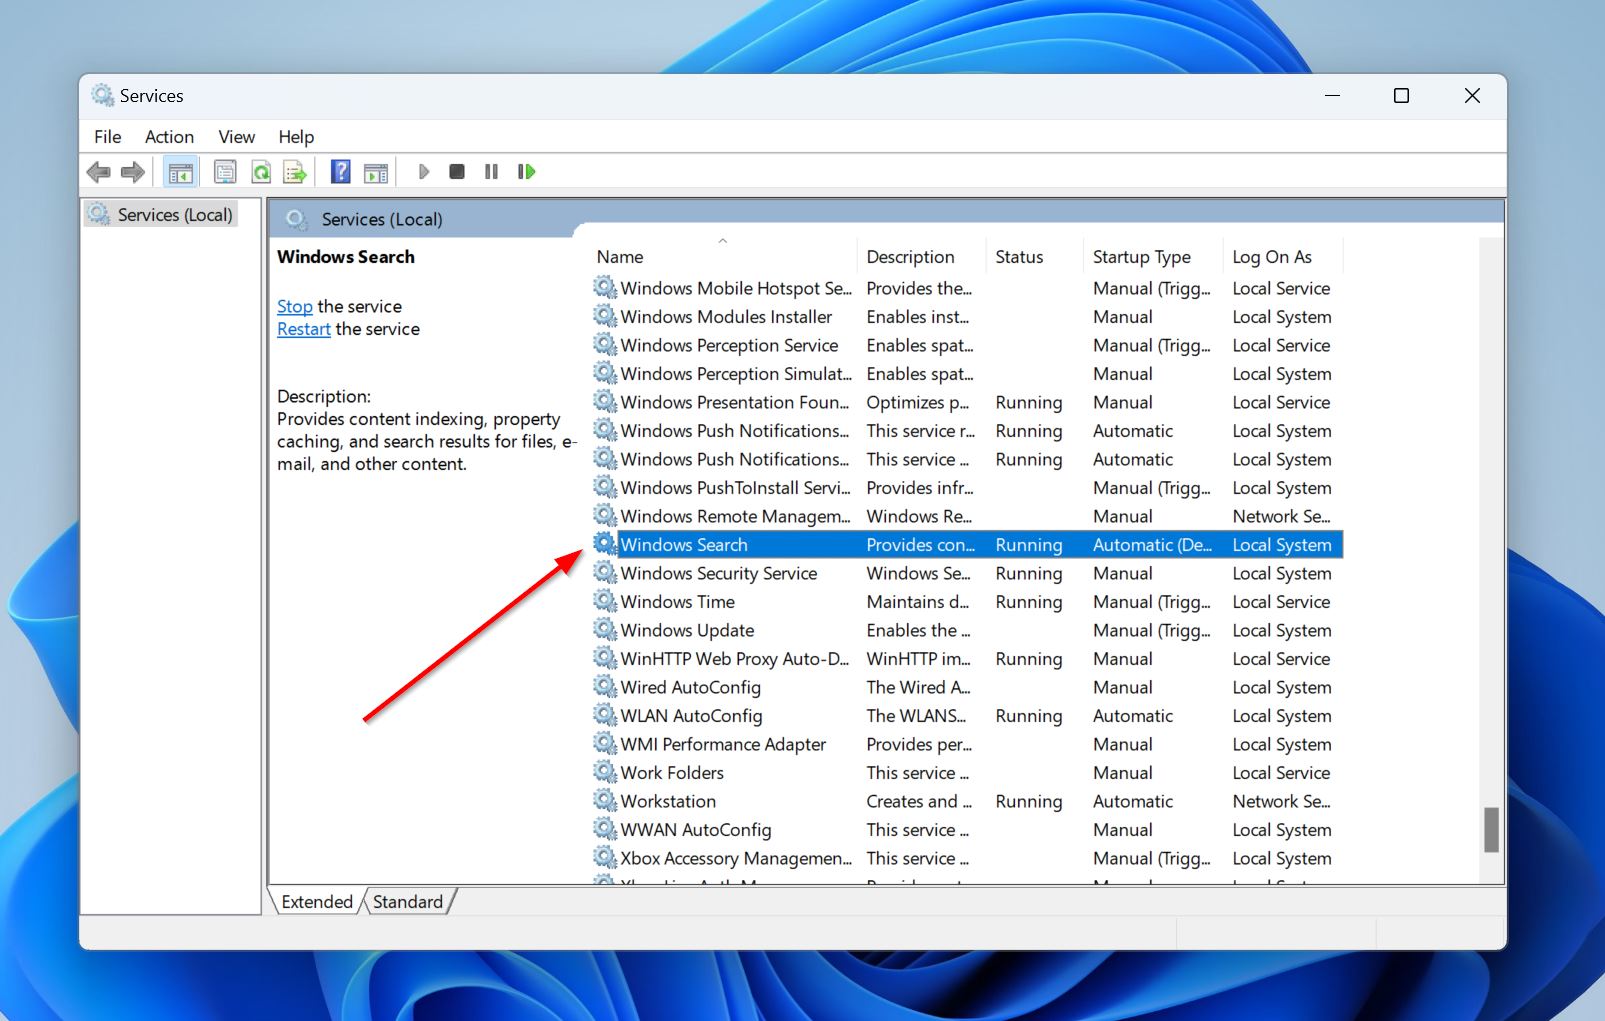
- Launch Windows Search (Windows Key + S) and type “services.” Launch the Services app from the search results.
- Locate Windows Search in the list and double-click on it.
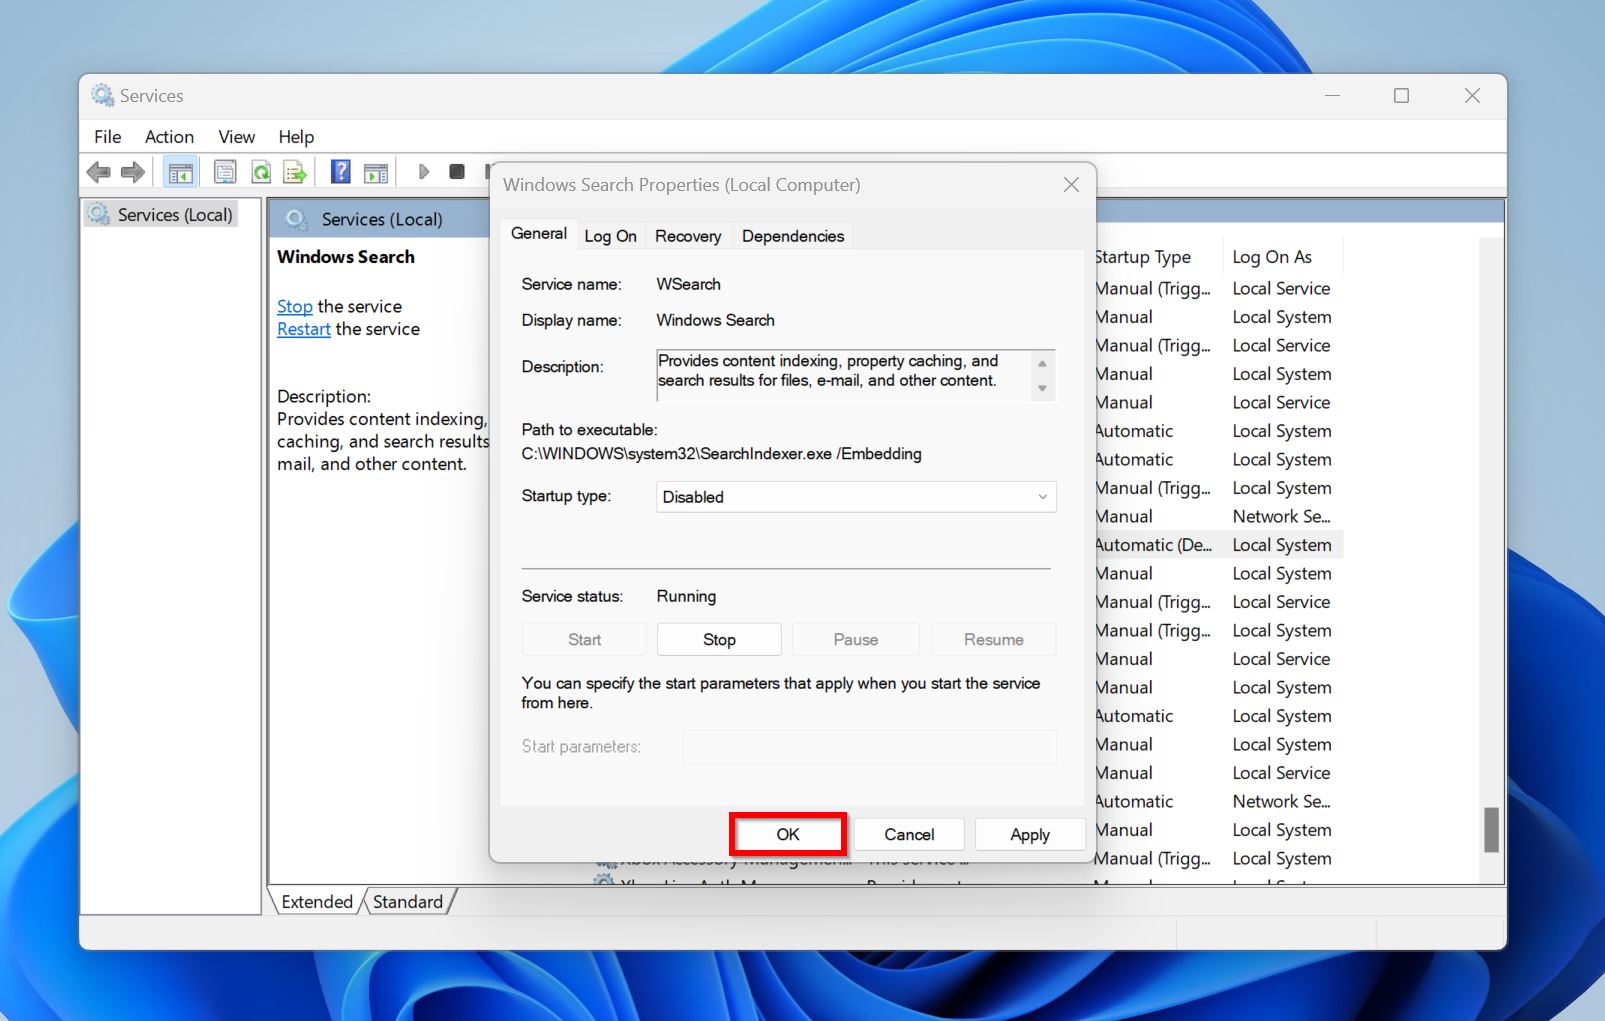
- Choose Disabled from the Startup type: drop-down menu. This disables Search Indexing from starting up automatically.

- Click on Stop under Service status: to stop Search Indexing.

- Click on OK and reboot your PC.
- Search Indexing will be disabled.
Method 8: Format the Hard Drive
If nothing else works, your only option is to format the hard drive. Formatting will fix most logical errors on your hard drive, and a fresh Windows install can also do wonders for your PC’s overall performance.
A format will wipe out all your data and while a good data recovery program can get it back (only in case of a Quick Format), it’s best to back it up beforehand.
Once you’ve backed up your files, here’s how you can format the hard drive:
- Search for “disk management” in Windows Search (Windows Key + S). Click on Create and format hard disk partitions from the search results.
- Right-click on the partition you wish to format and click on Format.

- Choose the required format parameters, or you can leave them as they are. Keep the Perform a quick format option ticked and click OK.
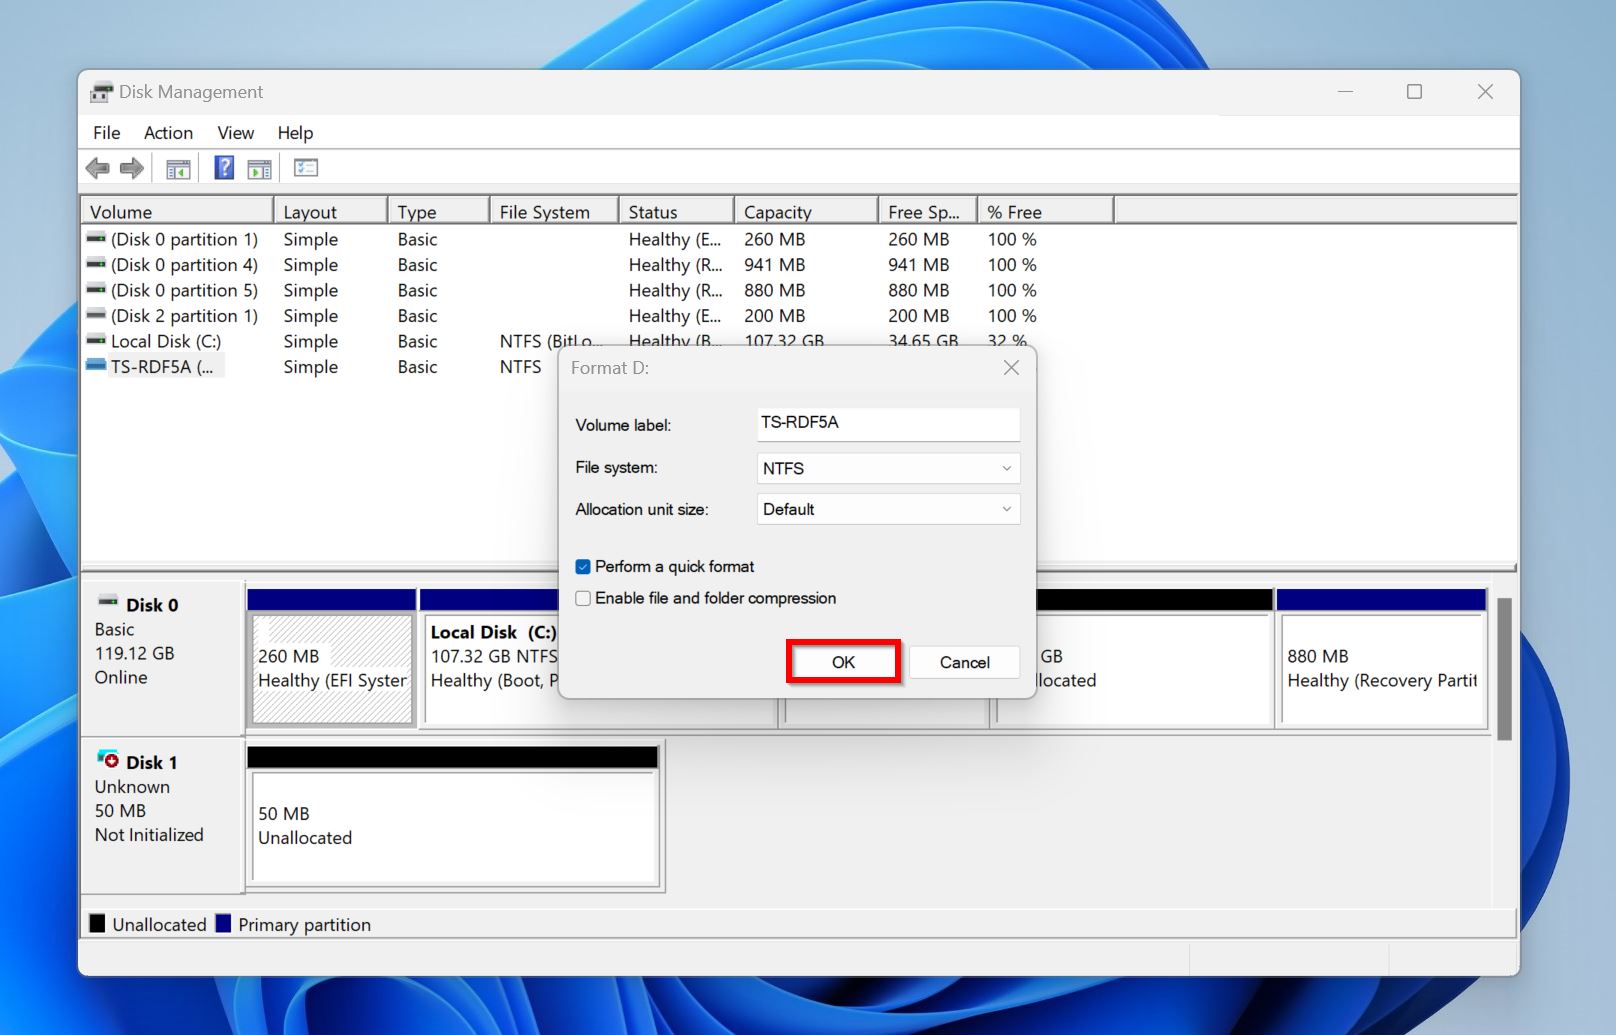
- Windows will format the partition. Do this for each partition.
How to Recover Data from a Dying Hard Drive
Slow performance from a hard drive can be indicative of the drive’s imminent failure, especially if you fixed it earlier and it has slowed down again. If, for some reason, you’re unable to access your files using Windows Explorer, you’ve lost some of your data, or you formatted the drive–you can use data recovery software to get back your files.
But, if the drive is physically damaged or not detected at all by your PC, i.e., it’s not visible in Disk Management with the correct storage size, you’re better off contacting a professional data recovery company.
Method 1: Use a Data Recovery Program
There are plenty of data recovery programs on the web that claim to recover data from a dead hard drive. However, for this tutorial, we chose to go with Disk Drill. Not only does it have a proven track record of recovering data from a variety of data loss scenarios, but it’s also extremely easy to use. It’s compatible with all major file systems and will detect your hard drive even if it’s RAW, i.e., the drive doesn’t have a file system at all, or the file system was damaged. You can take advantage of Disk Drill’s free trial that lets you recover up to 500 MB of data for free (Windows only).
Here’s how to recover data from your hard drive, using Disk Drill:
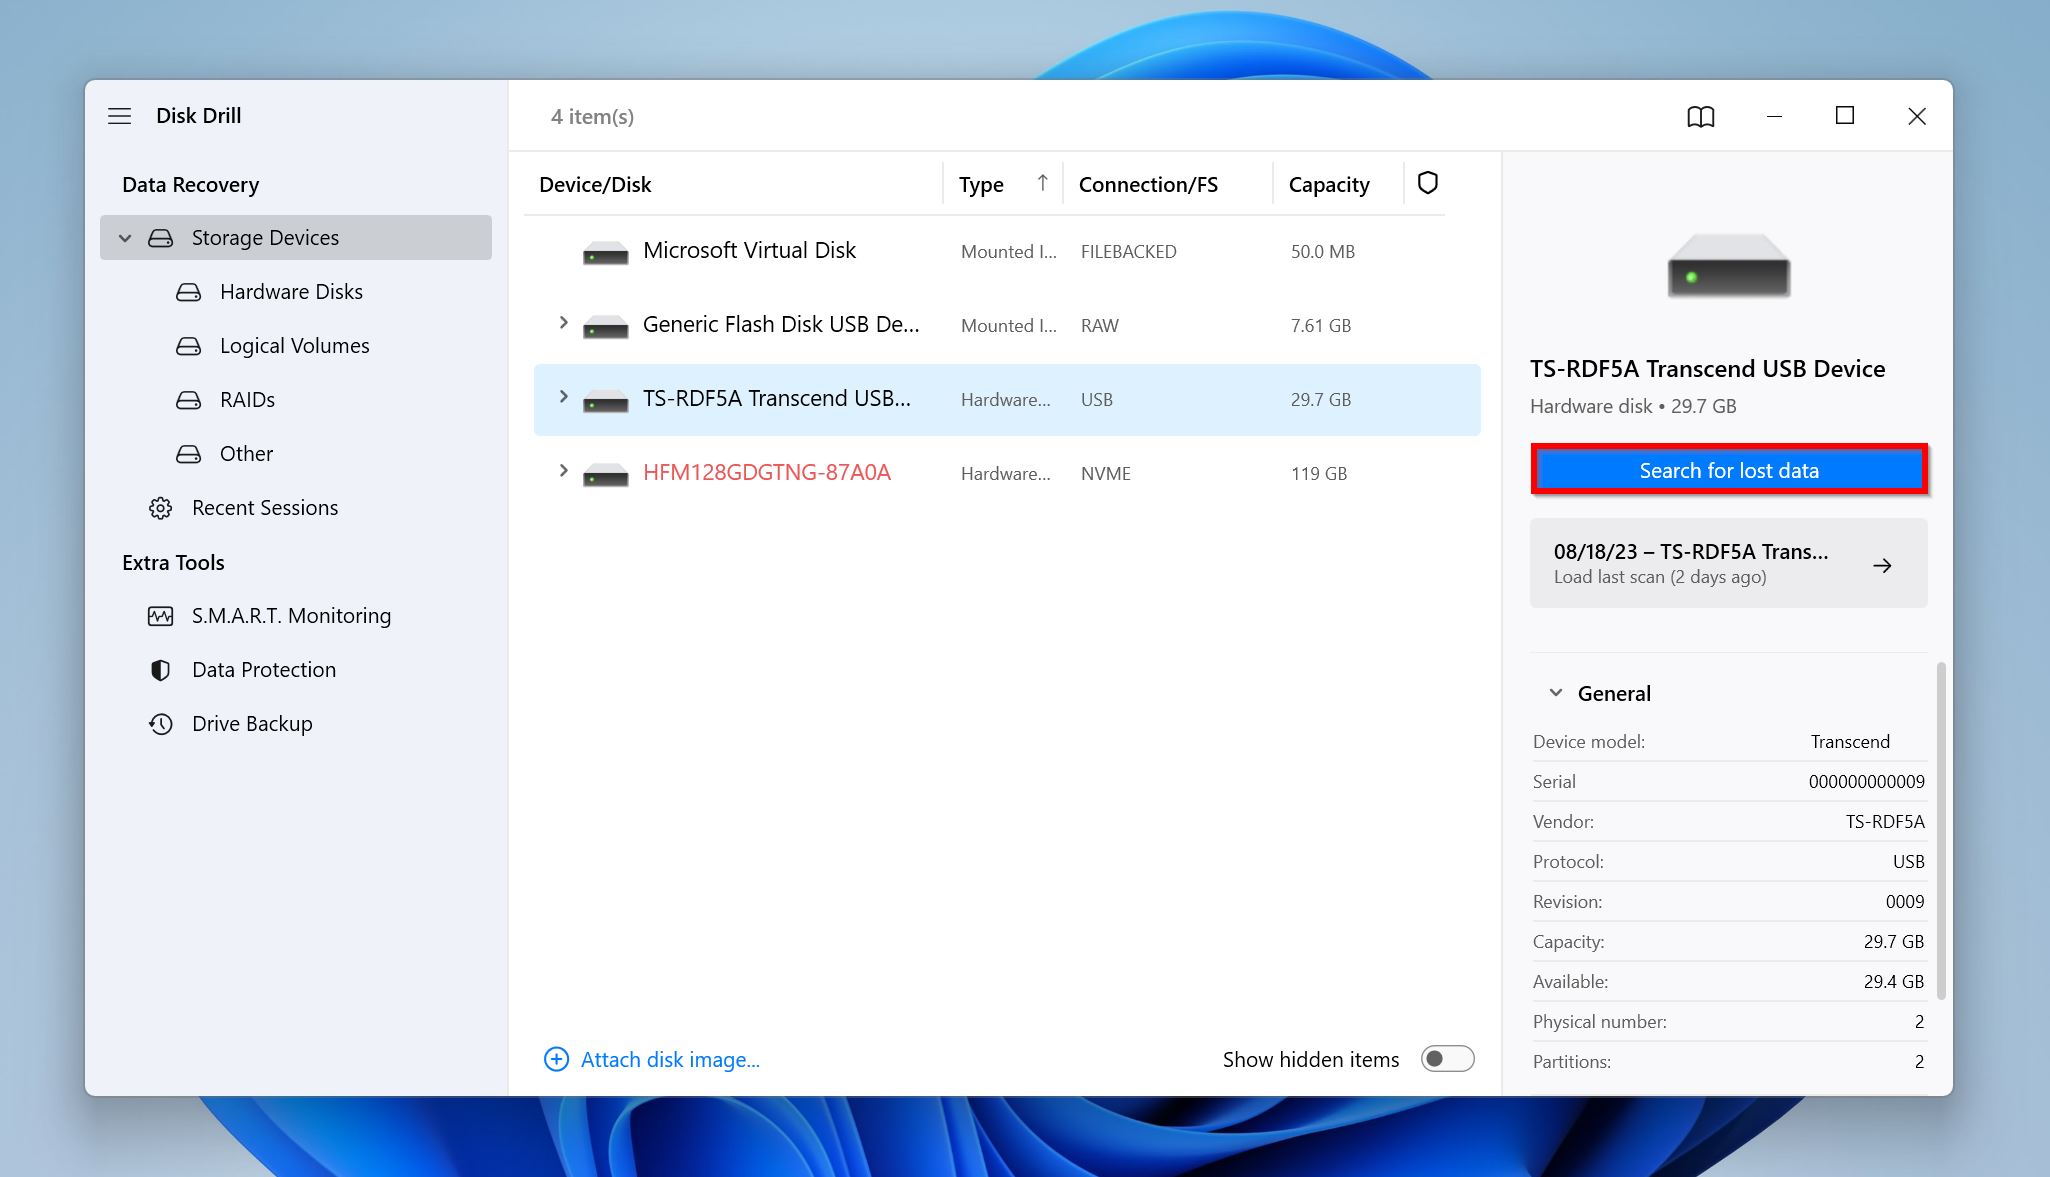
- Download Disk Drill and install it. Don’t do this on the drive you wish to scan.
- Open Disk Drill, select the hard drive, and click on Search for lost data.
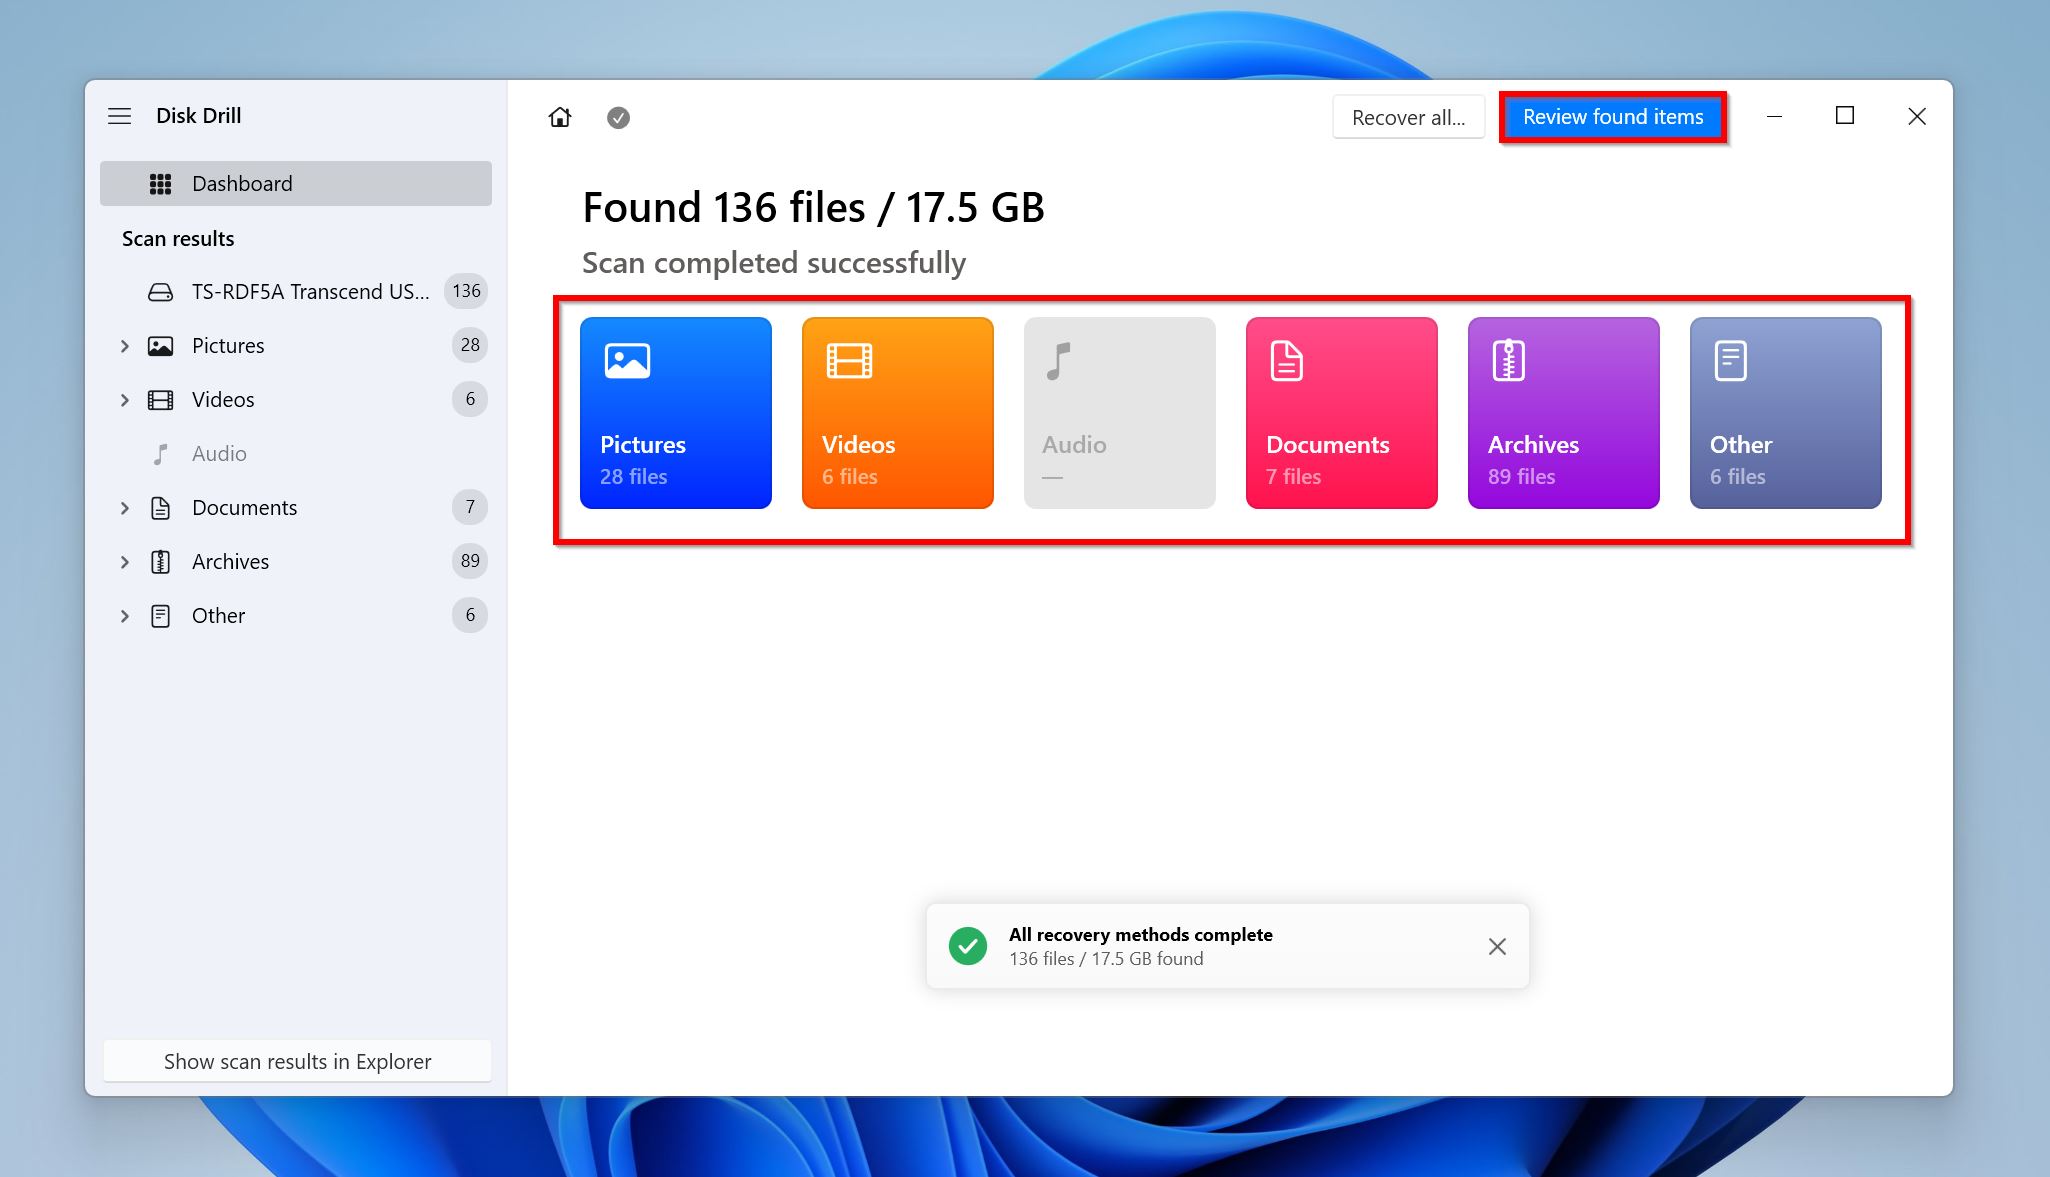
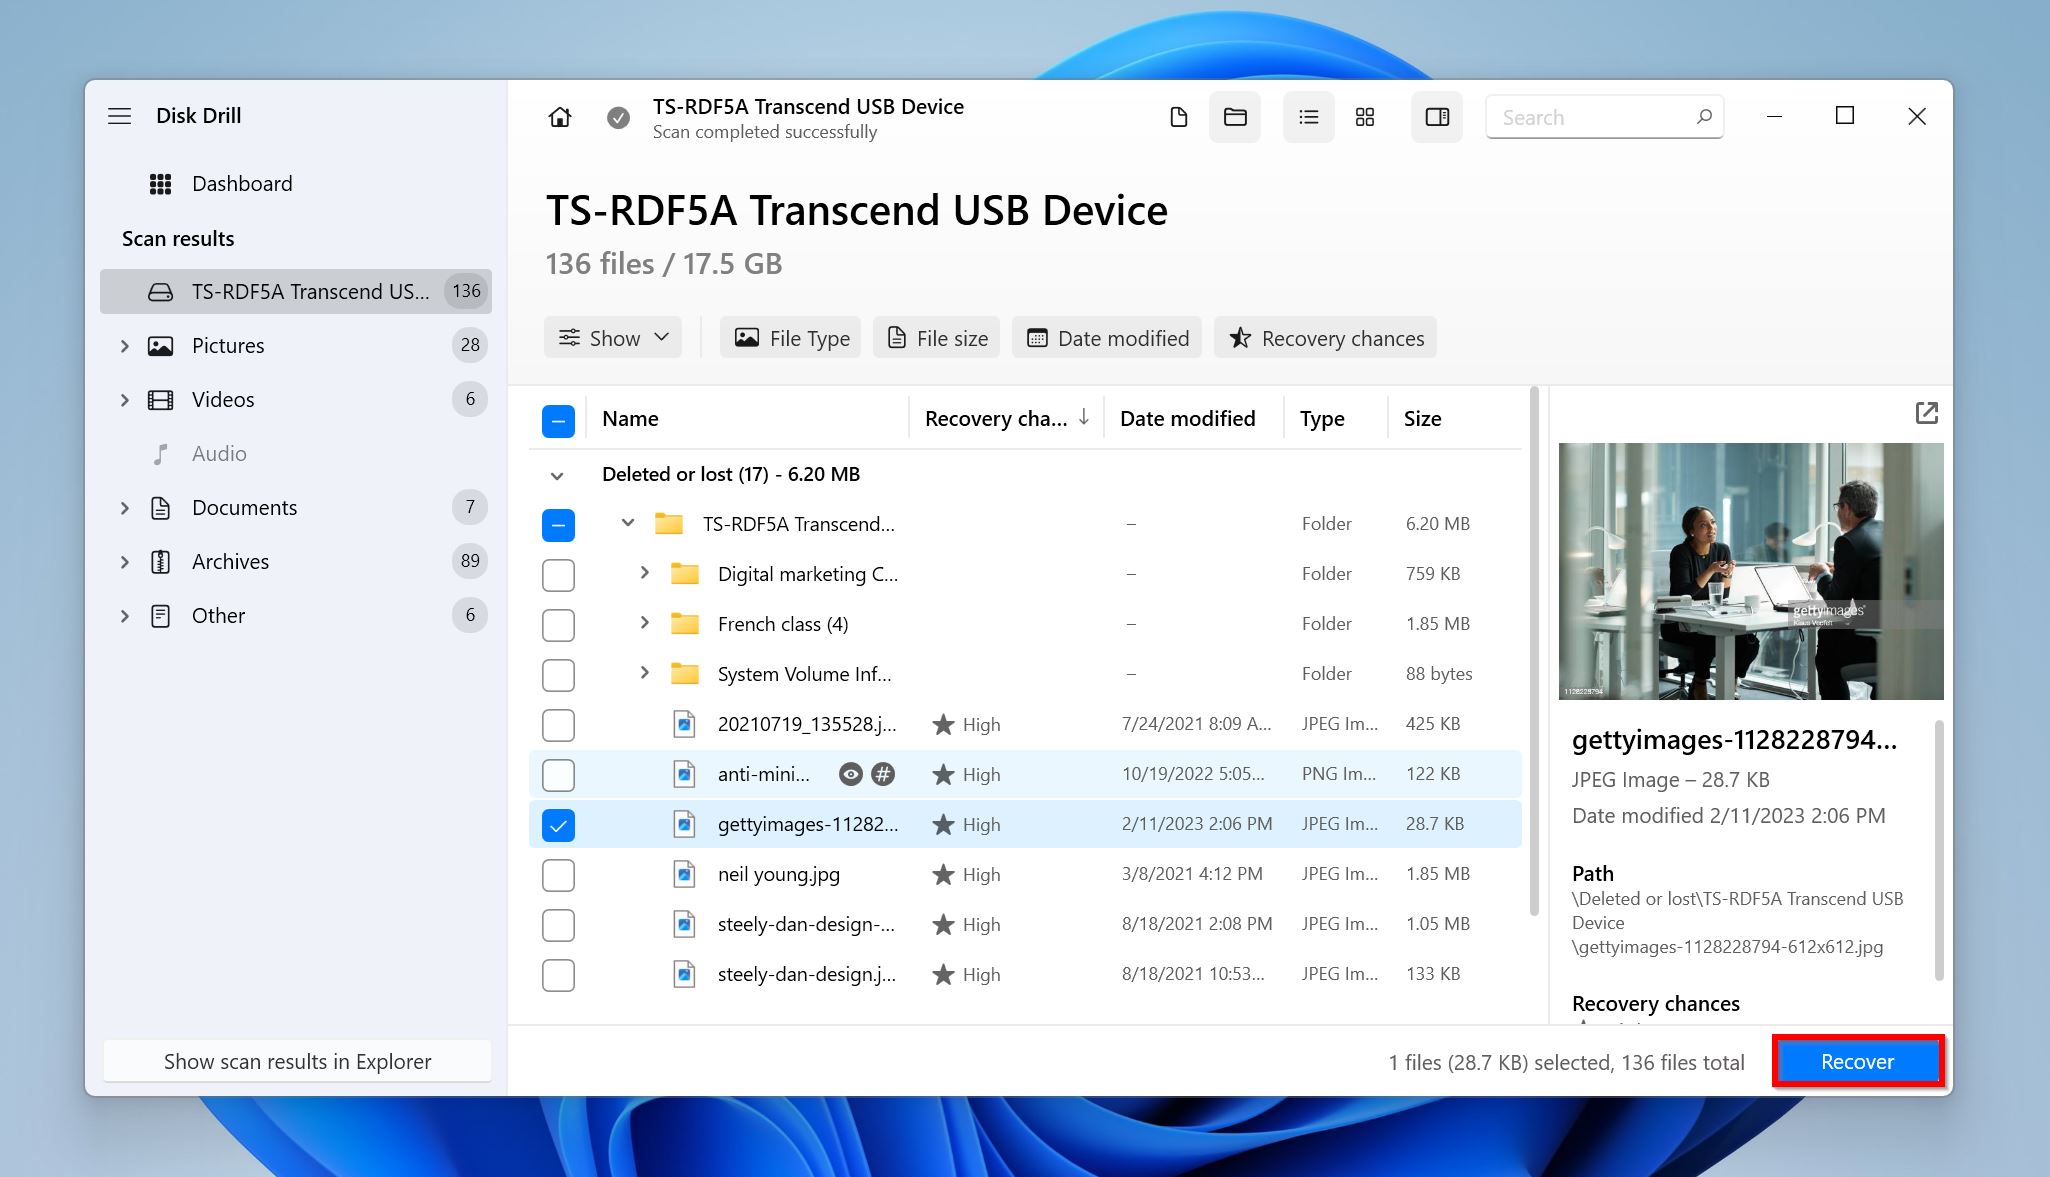
- Click Review found items to view all the recoverable files Disk Drill discovered. If you want to filter out the results beforehand, directly click on the required filetype (Pictures, Video, Audio, Documents, Archives, and Other).
- Expand the Deleted or lost and Reconstructed sections to view deleted files that can be recovered. The Existing section will contain files that are currently stored on the hard drive.
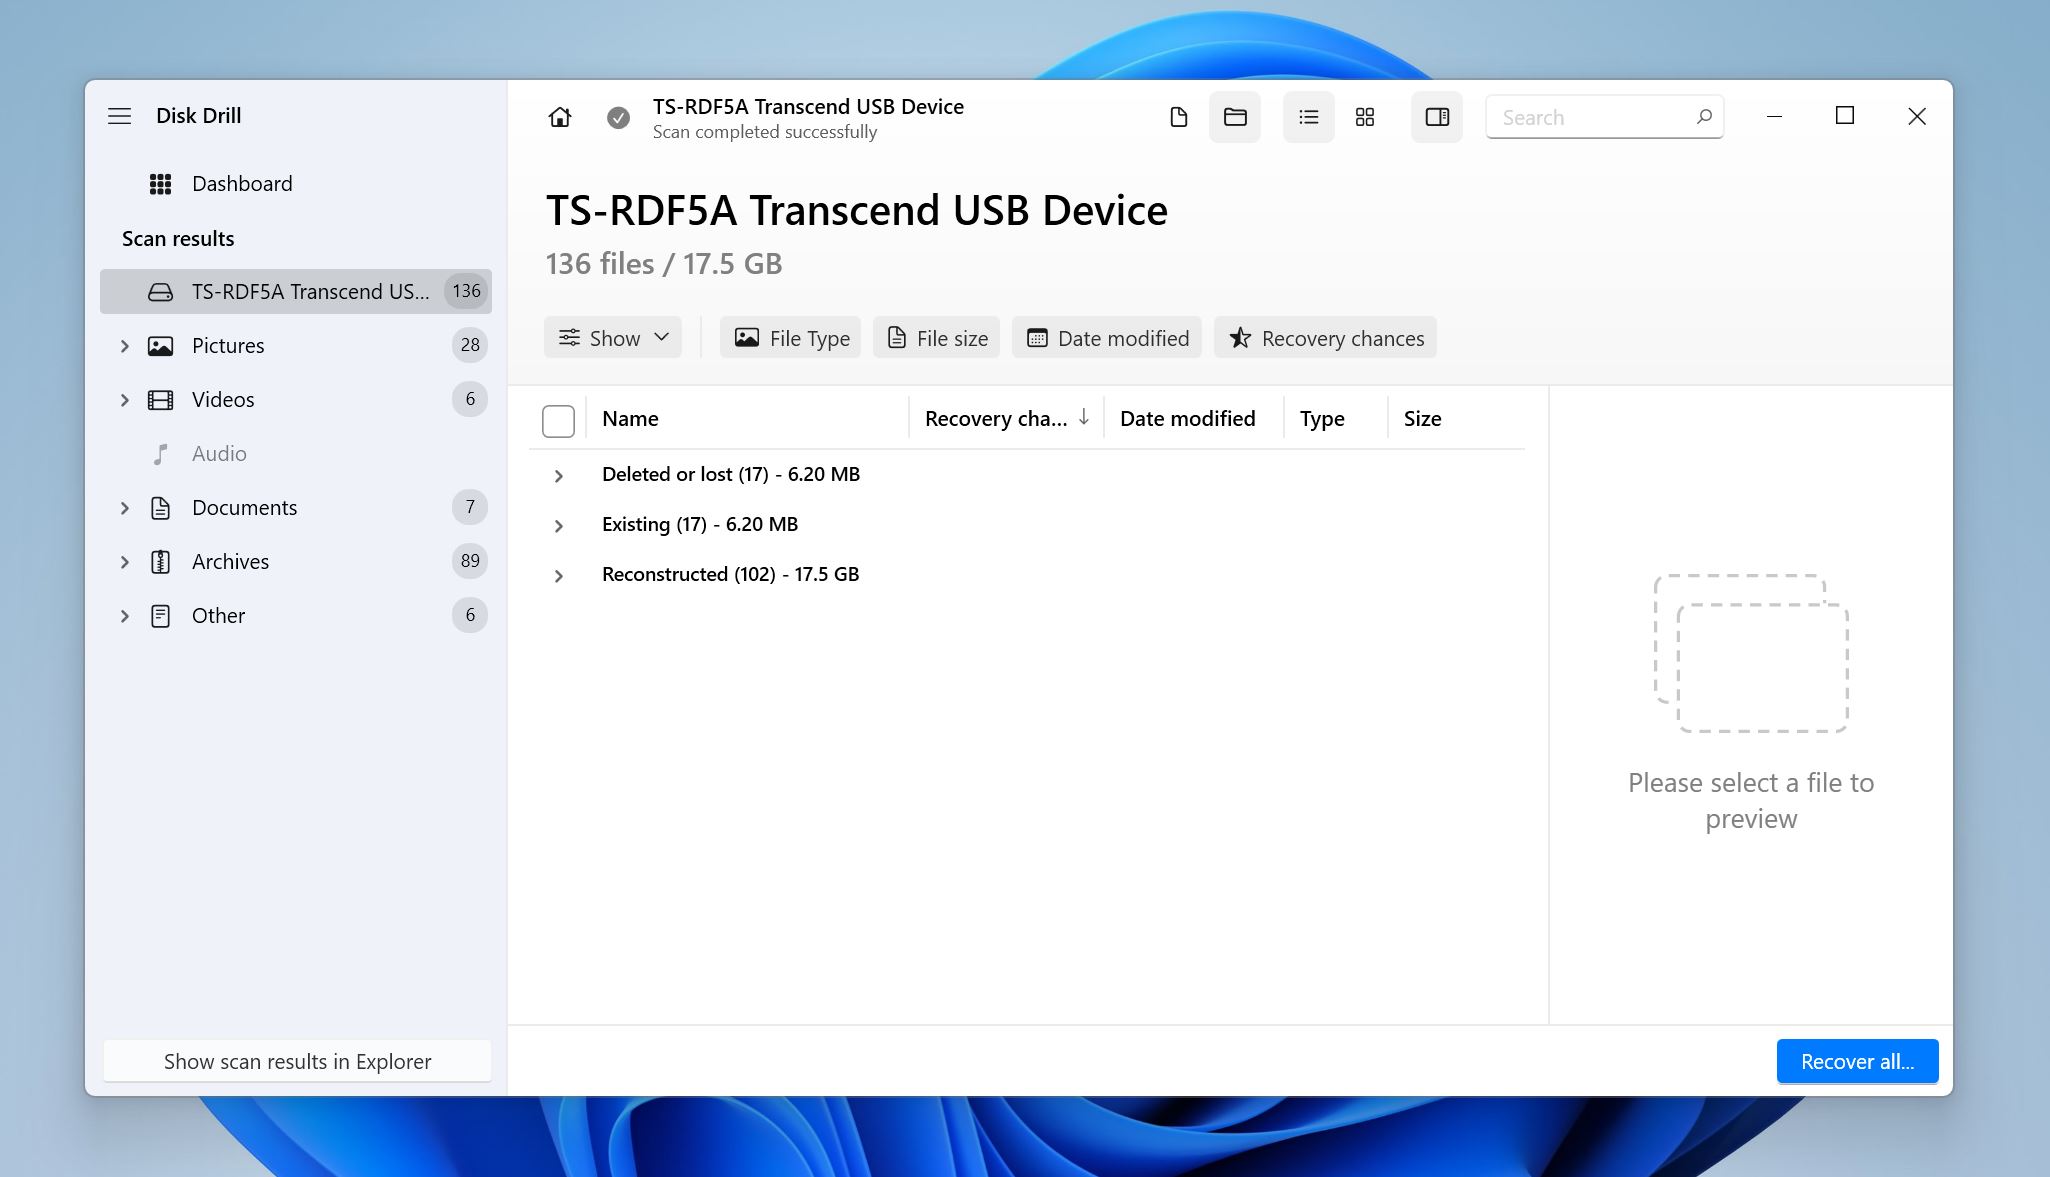
- Select the files you wish to recover. Disk Drill displays a preview of the currently selected file, but you can use the eye icon that appears when you hover your cursor next to any file’s filename to manually preview a file. Click on Recover once you’ve finished selecting your files.
- Choose a recovery destination for the files and click Next. Don’t recover the files to the damaged drive.
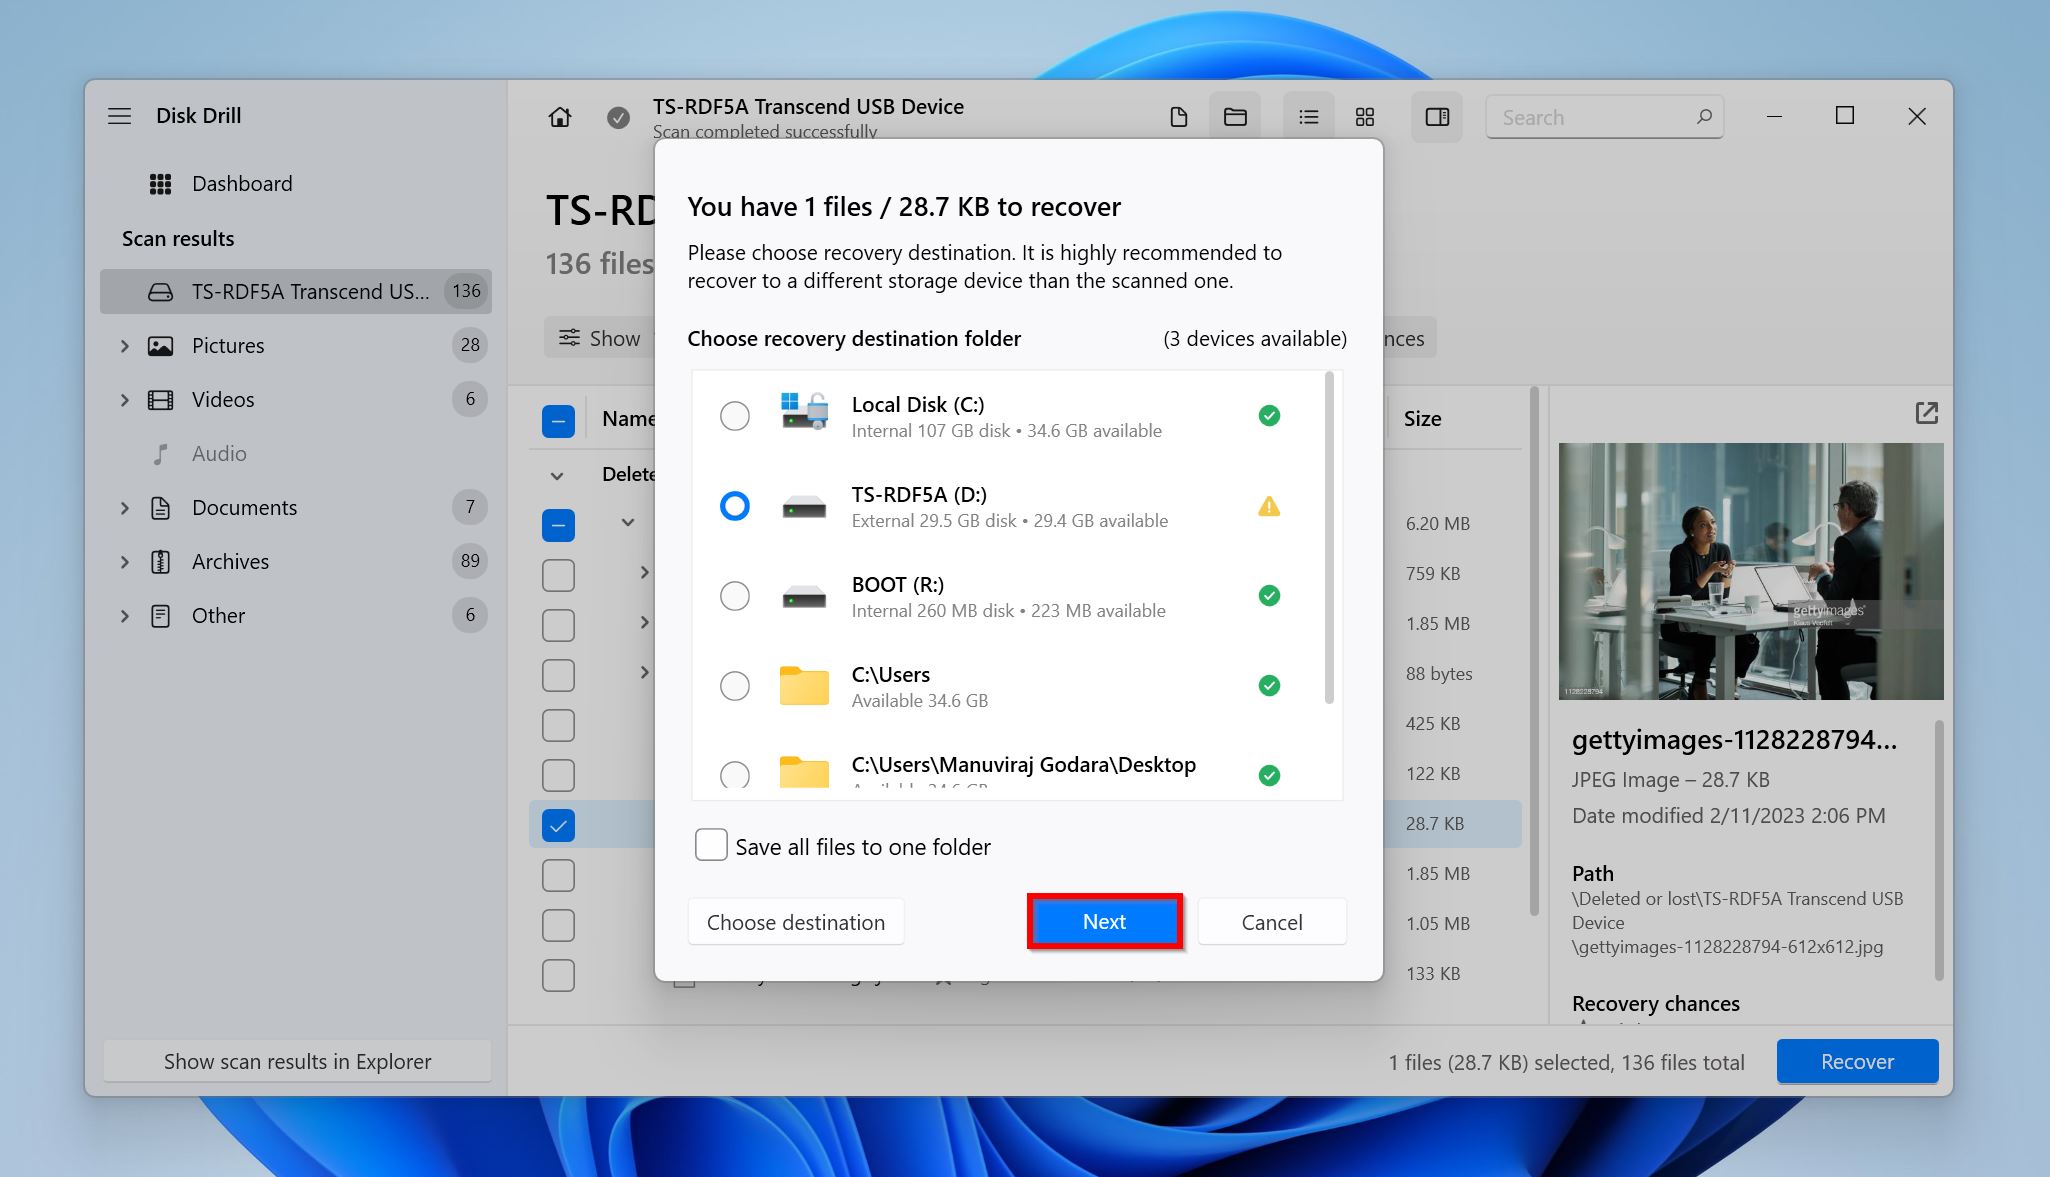
- Disk Drill will recover your files.
Method 2: Use a Professional Data Recovery Service
Using a professional data recovery service is pricier than simply downloading a data recovery program. However, the data recovery chances are also higher since your drive will be handled by an expert. No matter how dire the situation, a good data recovery company should be able to recover some, if not all, of your data.
Here’s what to expect when using the services of a professional data recovery service:
- Contact the professional data recovery service via their hotline or e-mail. Explain, in detail, your data recovery scenario and the state of the drive.
- You’ll then need to ship the drive or drop it off at a drop-off location for a physical evaluation.
- The data recovery service will get back to you with the amount of data that can be recovered and the cost. The evaluation itself is typically free.
- You can then decide whether to proceed with data recovery or not.
Conclusion
A slow hard drive can be a part of normal aging or file fragmentation, but occasionally, it can also indicate severe issues with the drive, especially if the drive was physically damaged. Fixing a slow hard drive usually involves defragmenting it, checking for malware and bad sectors, and checking the physical connection.
It’s best to prioritize your data’s safety, regardless of what caused the slowdown. You can back it up earlier, or use data recovery programs or a professional data recovery service to get back your data after it was lost.
FAQ
- Use a USB 3.0 cable and port to connect the drive.
- Defragment the drive at regular intervals.
- Ensure the performance mode of your drive is set properly.


