Partitioning a hard drive comes with many benefits. This includes being able to run more than one operating system on a single computer, the ability to have one partition for more confidential data while the other could be more casual, or you may have multiple people using the same computer and want your data to be kept separate.
Whatever the case may be, deleting a partition will delete with it any data that is on it. You may have deleted a partition and then realized that you shouldn’t have as there were important files on it. Can you recover a deleted partition? The short answer is yes!
Table of Contents
Why the Partition May Be Deleted
Most of the time when a partition is missing or deleted, it is not done by the user but is the cause of some other sort of event. The most common and main reasons that your partition could either have been lost or is not showing up anymore are:
| Reason | Description |
| 👤 Accidental deletion | If you’re not sure what you’re doing, or you’re making quick adjustments in Disk Management or DiskPart and make a mistake, you can end up accidentally deleting the partition entirely. |
| 🗃️ Partitioning error | While you’re shrinking a partition, you may enter the incorrect value and shrink it more than you intended to. Or, your computer may crash while you’re trying to extend or shrink the volume, causing it to become corrupted or damaged. |
| 💥 Power failure | Sudden power failure can interrupt important processes, like formatting, that will leave your partition in a corrupted or RAW state. If you were in the process of writing data to the drive, it can also cause some of your files to become corrupted and unusable. |
| 💻 OS update | If your computer shuts down before it finishes updating the operating system, a number of issues could occur, like your system partition becoming corrupted. |
| 📊 Partition table corruption | When a partition table becomes corrupted, the operating system will not know how to locate the partitions on the drive. Therefore, you will lose access to all of the data on those partitions until the partition table is repaired or restored. |
| 💿 Hardware failure | Sudden hardware failures, like a failing power supply, hard drive motor, or any other moving parts, can suddenly stop critical processes on your computer and result in the corruption of your hard drive. |
| 🕷️ Malware | Malware, like viruses, can be designed to intentionally damage the partition table of your drive (in addition to other areas of your computer). In such cases, you may find some of your partitions (and the data on them) become lost or encrypted. |
| 🗄️ Firmware Issues | Drivers are an essential firmware component of your storage device. Outdated or corrupted storage device drivers will break down communication between your drive and Windows. Until it’s fixed, you won’t be able to access the data on the drive. |
Unless the hard drive has experienced physical damage, the partition should be recoverable. The quicker that you act, the higher of a chance that you have of successfully recovering the missing partition and the data that is on it.
If you notice a partition or files are missing from your computer, act quickly to ensure successful data recovery!
How to Recover Specific Files from a Deleted Windows Partition
Before you jump straight into troubleshooting, it’s important that you recover what data you can, as you risk it being overwritten and becoming unrecoverable. However, the data recovery tool that you use must be able to get the job done effectively. While there’s never a 100% guarantee that you’ll get your data back, the odds can be increased if the software is well-made. If you only intend to recover specific files from the lost partition, we suggest Disk Drill.
Disk Drill is a very competent recovery solution that equips you with all the essential tools to get your data back, even if it seems like it’s lost forever. Here are some of the main reasons why we recommend Disk Drill for recovering data from a deleted Windows partition:
- Easy to use – Disk Drill has a streamlined and accessible user interface that’s easy to use for a user of any level. Recovering your data can be done in just a few clicks.
- Great support – Disk Drill has the ability to recover data from almost any type of partition, including RAW and unrecognized drives, and supports all commonly used Windows file systems, such as FAT16, FAT32, exFAT, and NTFS.
- Multiple scan modes – The program combines multiple scan types (quick, smart, and signature) into a single click, allowing you to discover as much data as possible without performing multiple scans manually.
- Byte-to-byte backups – You can create byte-to-byte image backups for free within the program to protect your data from becoming permanently lost if the drive is unstable and fails during the recovery process.
- Free 500 MB data recovery – You can recover up to 500 MB of data for free before you need to upgrade to a paid license. Additionally, other features like Drive Backup and S.M.A.R.T. Monitoring are completely free.
We’ve included some step-by-step instructions below to help you recover the data from a deleted Windows partition using Disk Drill.
Step 1. Download and install Disk Drill for Windows.
Keep in mind that when installing Disk Drill you will have the best chance of success by installing it onto an external device such as an external hard drive or thumb drive. We want to maintain wear and tear on the storage device that we’re trying to recover data from so that the data on it is not overwritten.
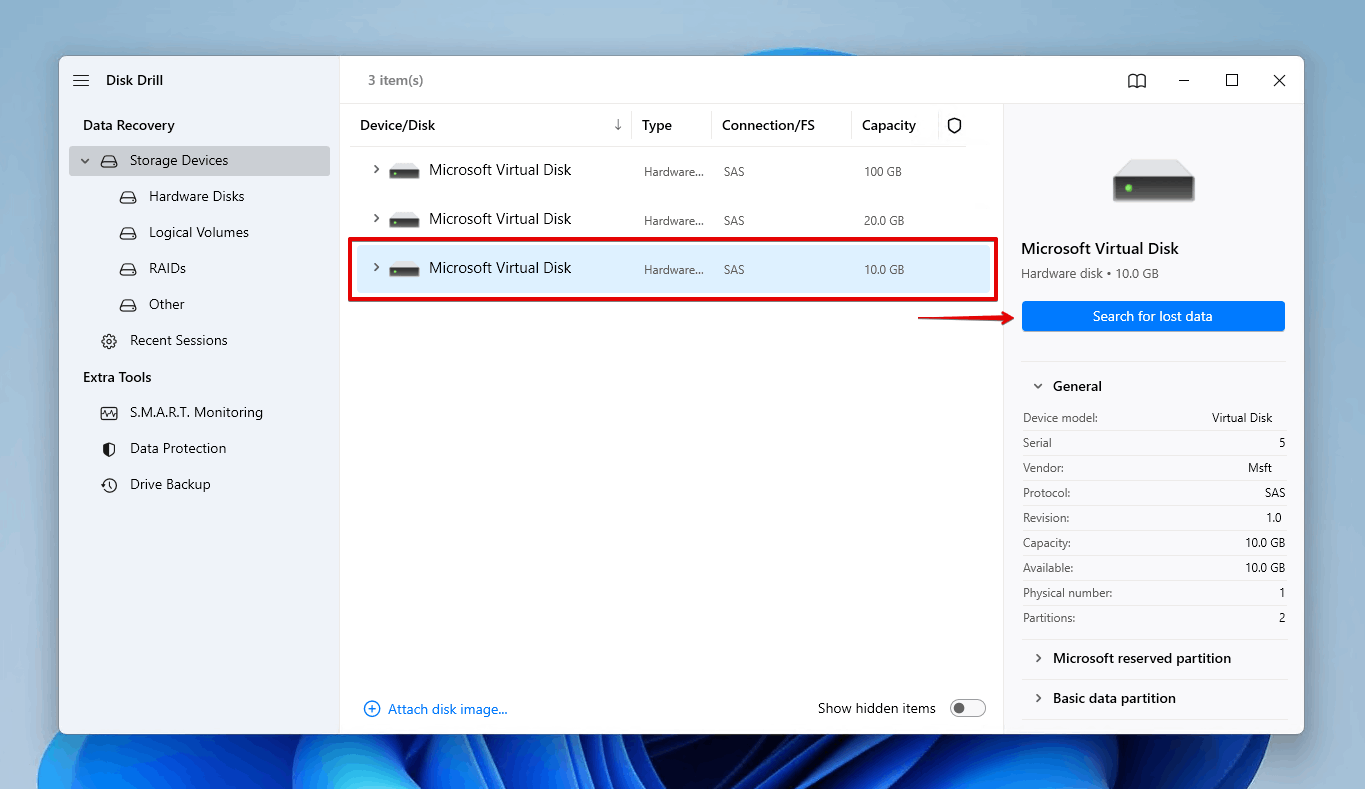
Step 2. Scan your Windows computer.
After launching Disk Drill, making the Data Recovery tab active will show us all of the devices/disks that are connected to our Windows machine. To start a scan, click on the “Search for last data” option in the lower left-hand corner of the screen.
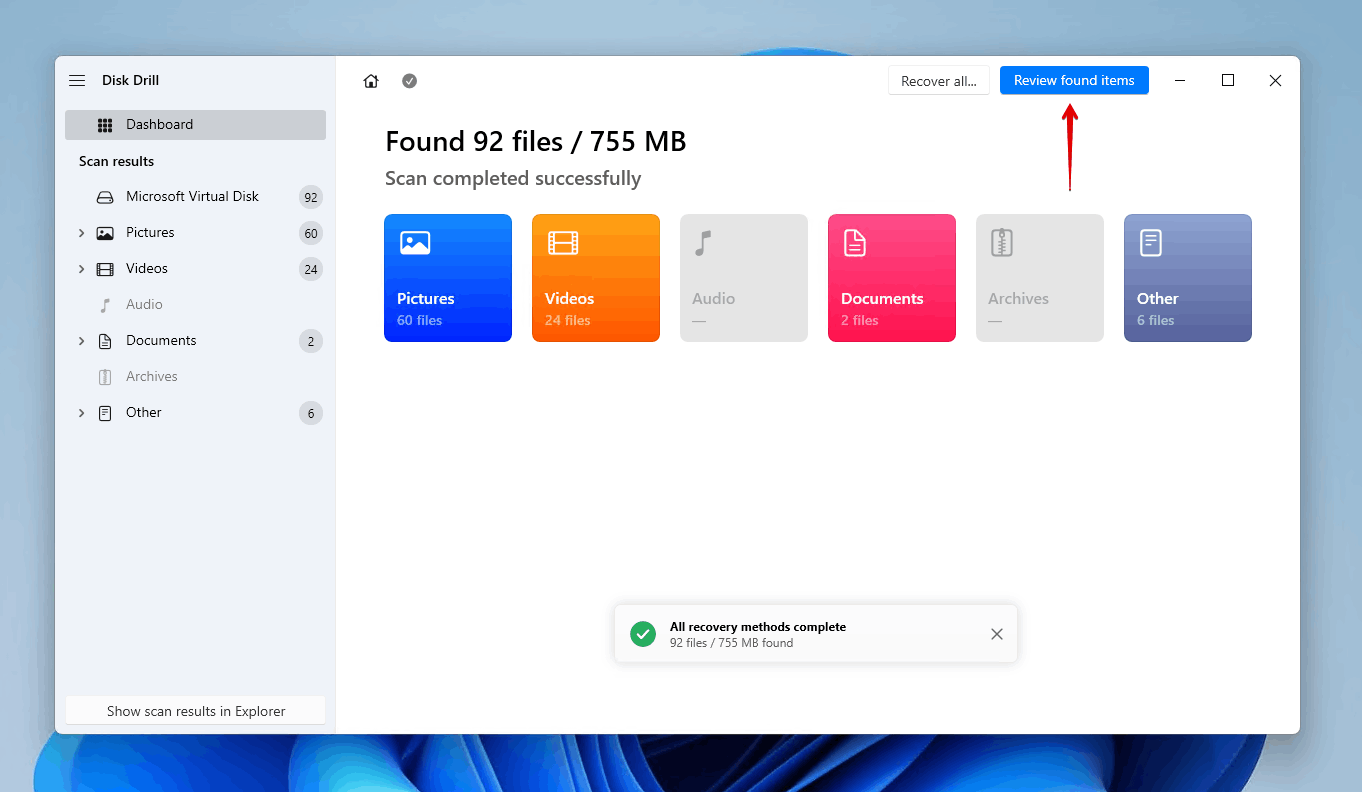
Step 3. View the recovered data.
As our computer is being scanned, we can see that Disk Drill will start displaying the lost information that it has found with our partition being one of those items! You can wait for the scan to finish or click “Review found items” in the upper right-hand corner and any files if you need them right away.
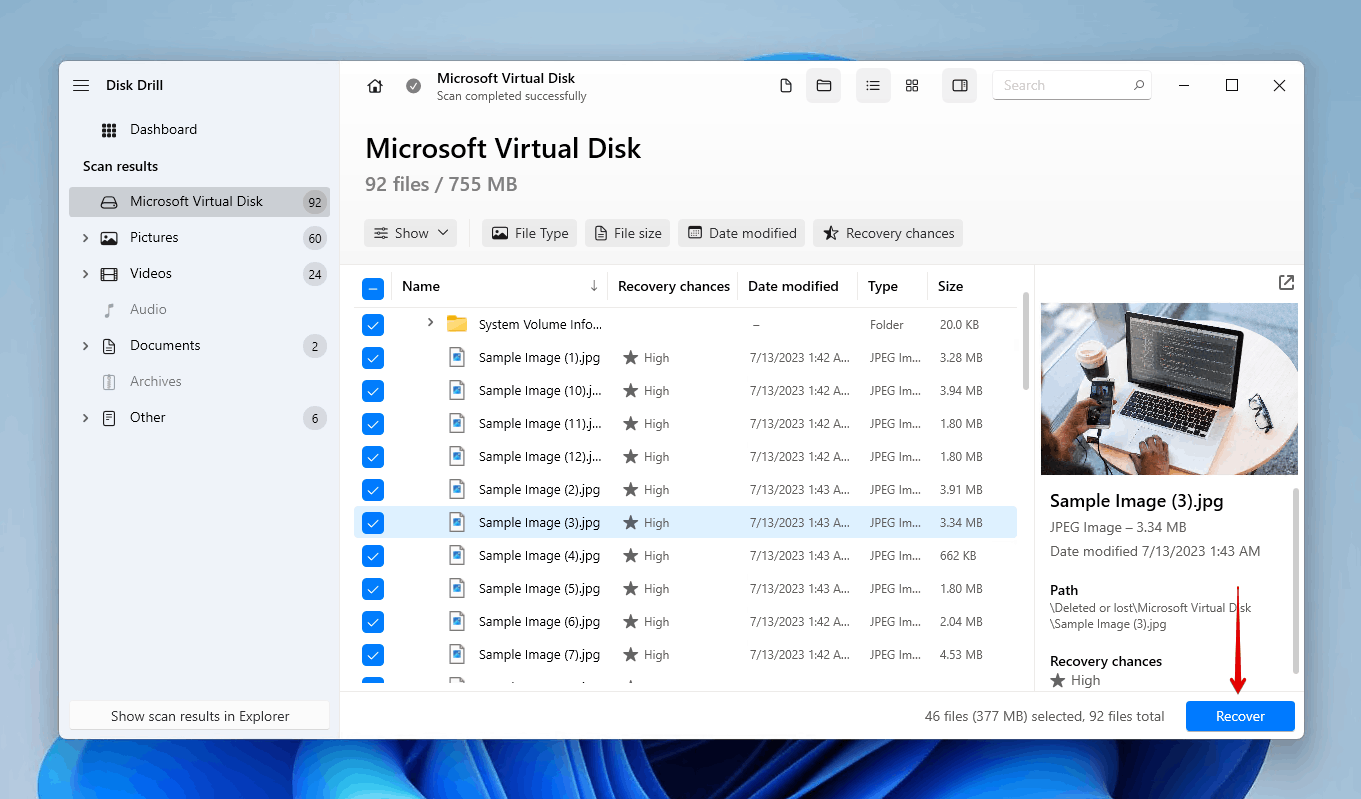
Step 4. Choose what to recover.
Clicking on the lost partition, I can view the files that are located on it that Disk Drill has been able to recover for me. I am only looking to recover certain files off of it as there were some photos that I want to recover and put back onto my computer.
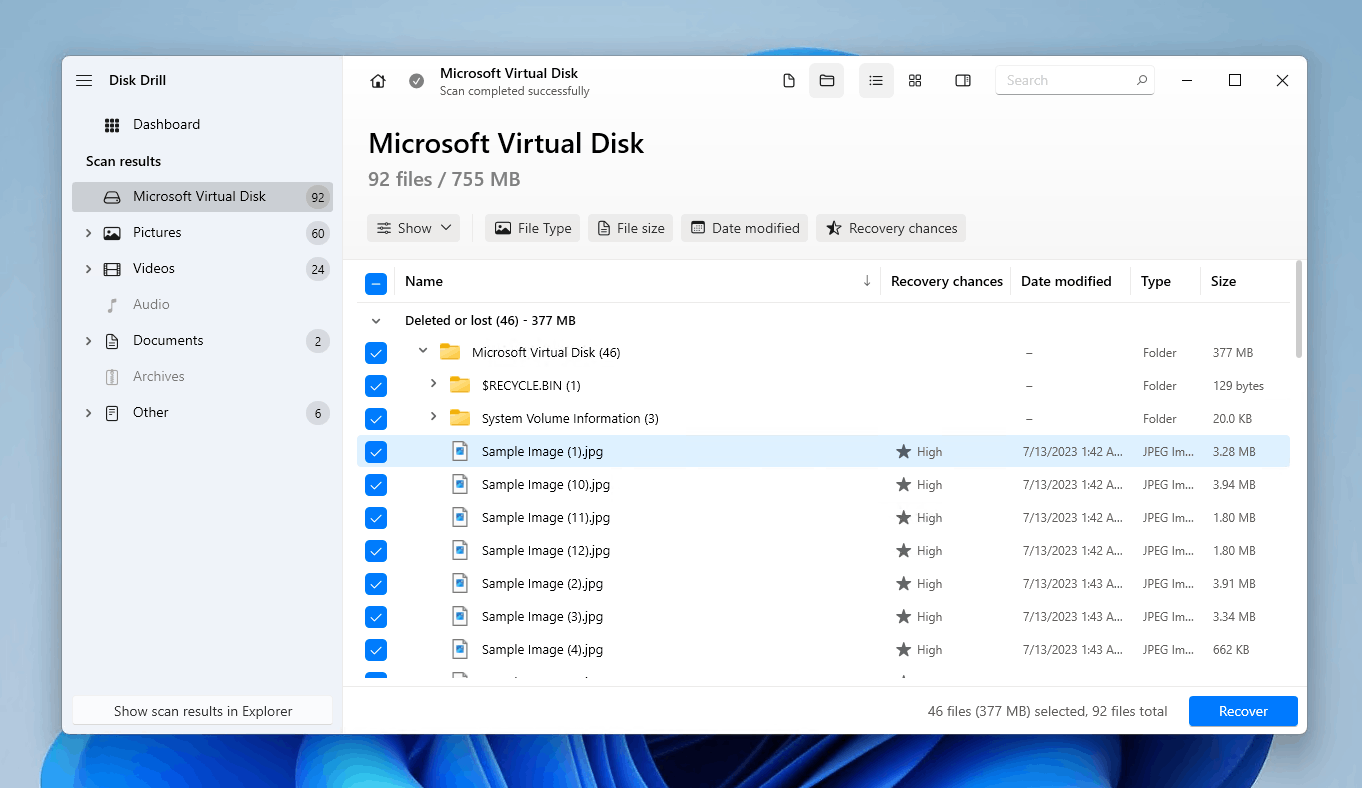
Step 5. Preview selected files before recovering.
I can double-click on a file to enter the “preview” mode and look at the image before recovering it. Once I have found and decided what files I want to recover, I can check the boxes in the lower right-hand corner as seen in the screenshot below. This helps with those files that don’t have a specific name tailored to them.
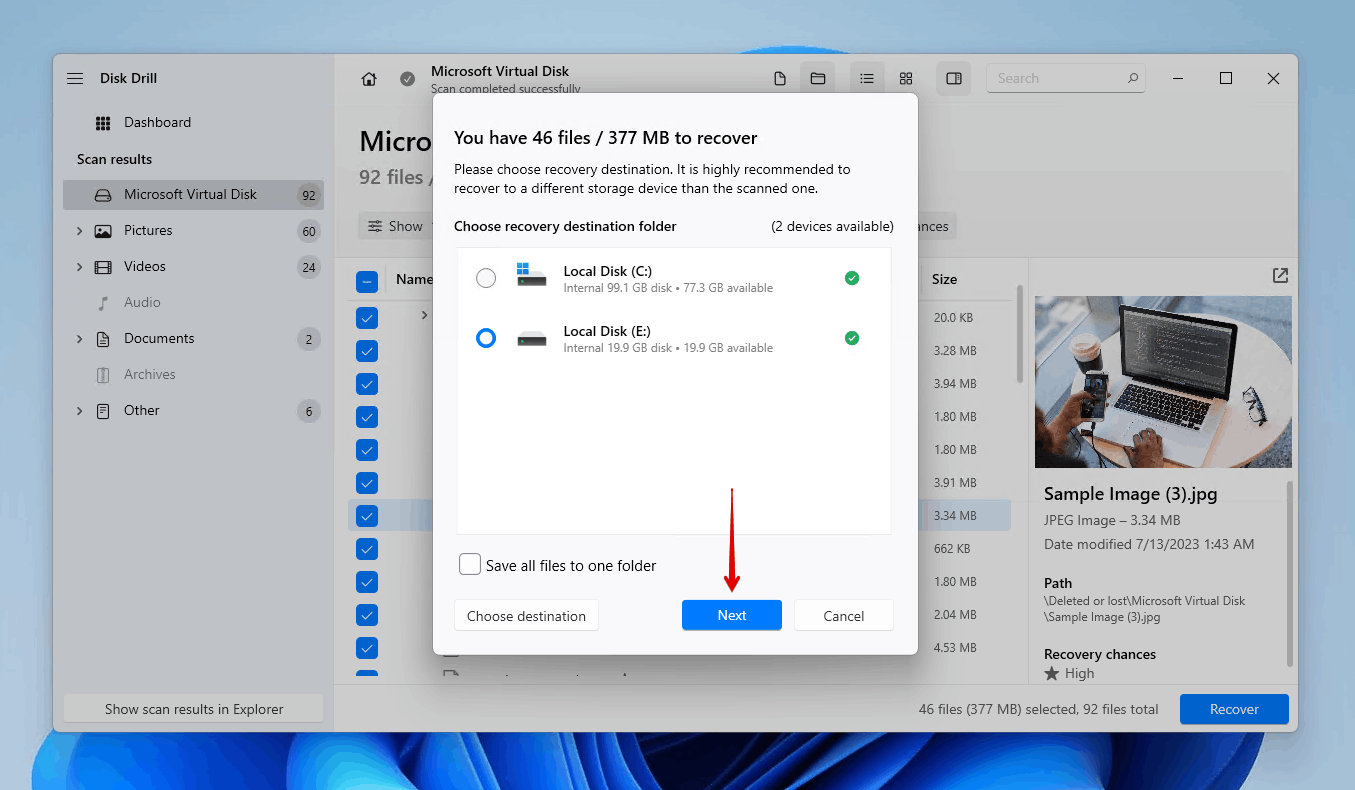
Step 6. Recover your missing data.
I can then click “Recover” and Disk Drill will take just a few moments for the deleted files to be back on my computer after I specify the location of the folder I want the files restored to.
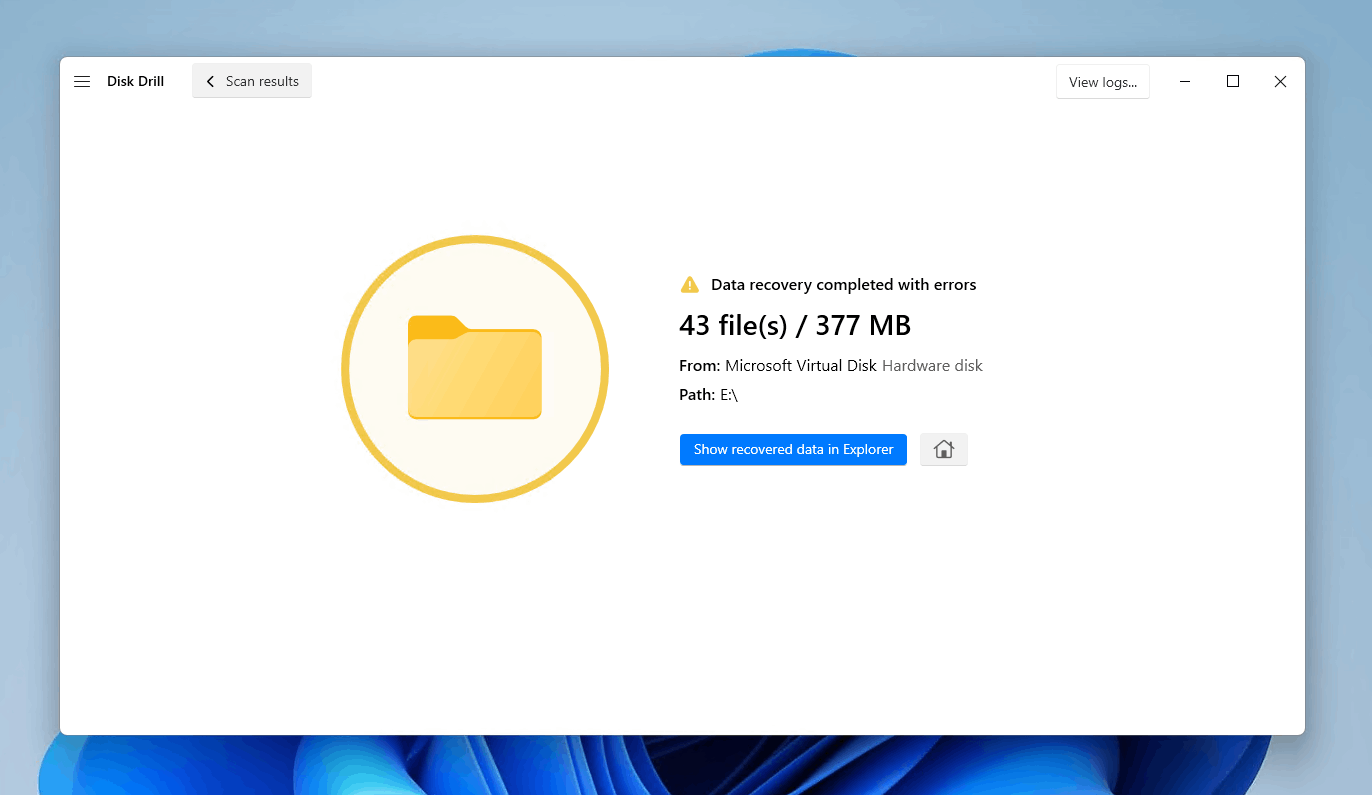
Step 7. Verify the recovery was successful.
After the recovery has finished, Disk Drill will give me a confirmation notification along with the option to open the folder I chose for recovery.
How to Recover the Entire Partition
When you’ve safely recovered your data, you can get to work on either fixing or recreating the partition so you can once again store data on it.
There are multiple ways you can go about recovering the partition. Some of the methods listed below will guide you through creating a brand new partition, whereas others will guide you through recovering the partition by fixing the underlying problem and restoring the data along with it.
It’s important that you have recovered your data at this point, as some of the methods below may cause your data to become permanently unrecoverable.
Method 1:Confirm the Disk Is Initialized
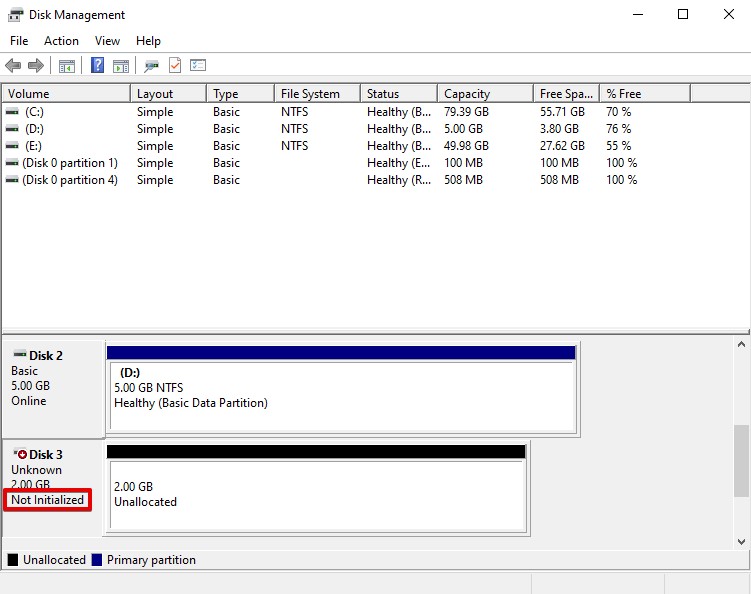
Before a drive can be partitioned, it first needs to be initialized. If the drive is marked as Not Initialized, it means either the drive is missing a valid disk signature (because it has never been initialized and formatted) or the formatting has broken due to corruption. Checking this allows you to plan what your next steps will be.
If you find that the disk in the Not Initialized state, initializing the disk will delete all of the files on it. Instead, recover the partition using TestDisk as it will recover the partition as well as the data on it.
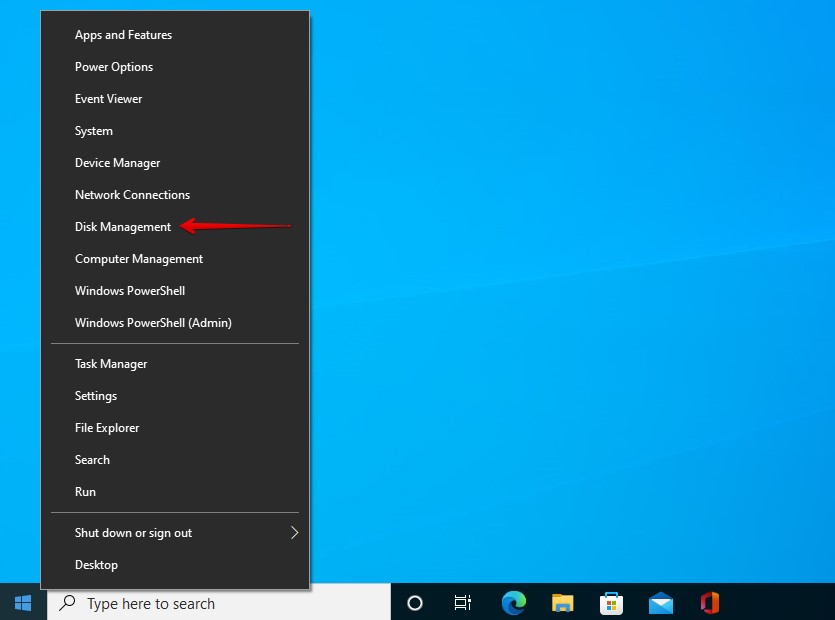
- Right-click Start and click Disk Management.
- If your disk says Not Initialized, it means your partition will no longer be accessible and you should proceed with recovery.
Method 2:Assign or Change Drive Letter
Windows automatically assigns drive letters to storage devices you connect to your computer. If the drive letter has dropped, or if Windows failed to assign one, assigning a drive letter may be enough to restore access to the partition. Moreover, changing the existing drive letter if one is assigned may also rectify the issue.
This method is only viable if the partition is still visible in Disk Management. If it’s not, you will need to create a brand new partition using the next method instead.
- Right-click Start and click Disk Management.
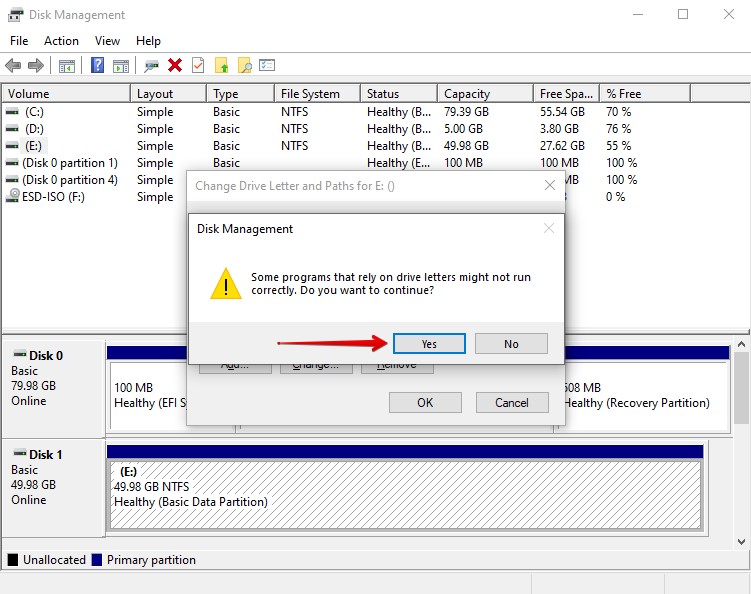
- Right-click the volume if the partition is visible. Select Change Drive Letter and Paths.
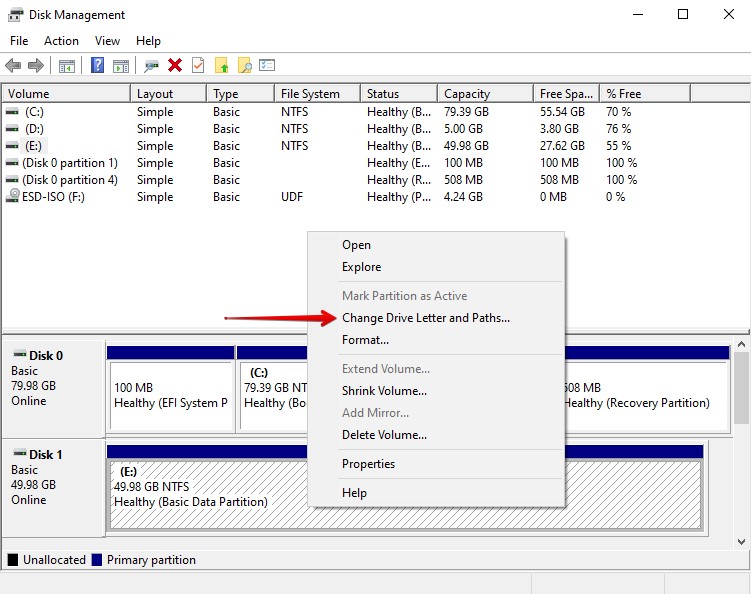
- Click Change if a drive letter is already assigned. If there is no drive letter, click Add instead.
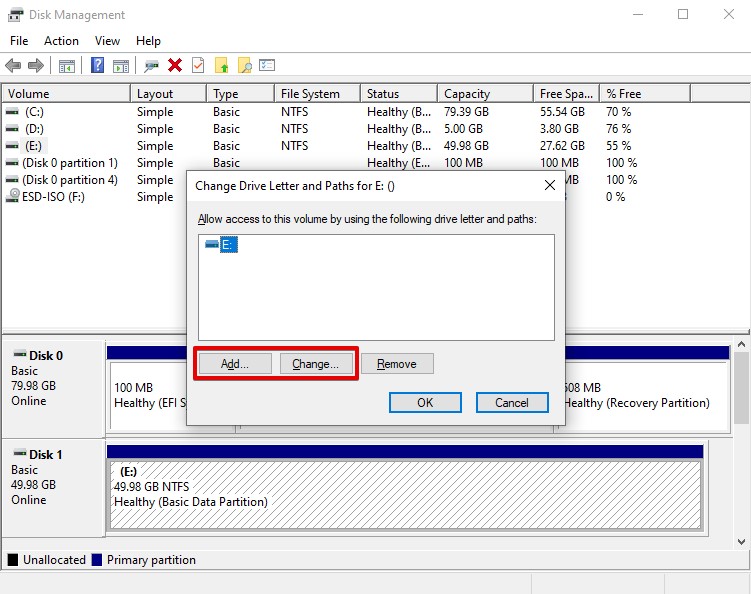
- Select a new drive letter from the dropdown menu and click OK.
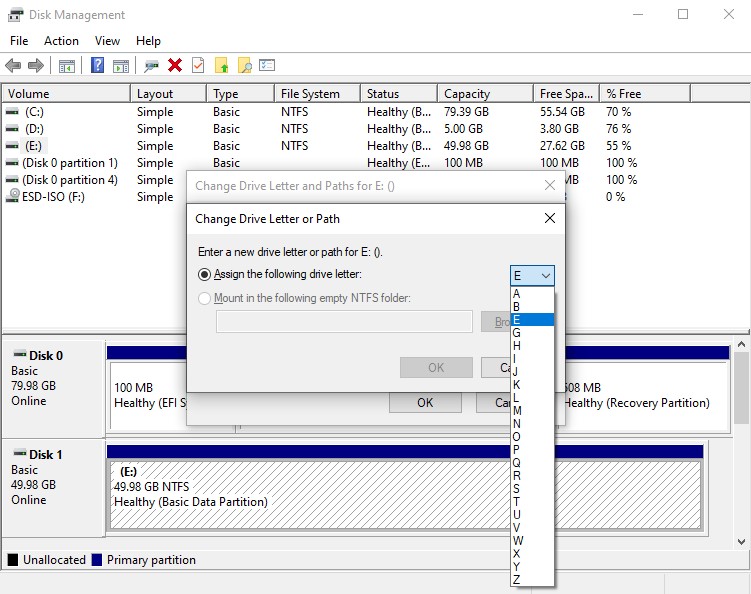
- Click Yes if prompted to confirm the drive letter change.
Method 3:Recreate Partition from DiskPart
DiskPart is a command-line disk management tool that can be used to create partitions from unallocated space. Using a number of commands, you can set up a partition exactly how you want it.
Much of what we’ll be doing with DiskPart can also be achieved with Disk Management. So, if you prefer setting up a partition using a user interface, try the next method instead.
Follow these steps to create a partition using DiskPart:
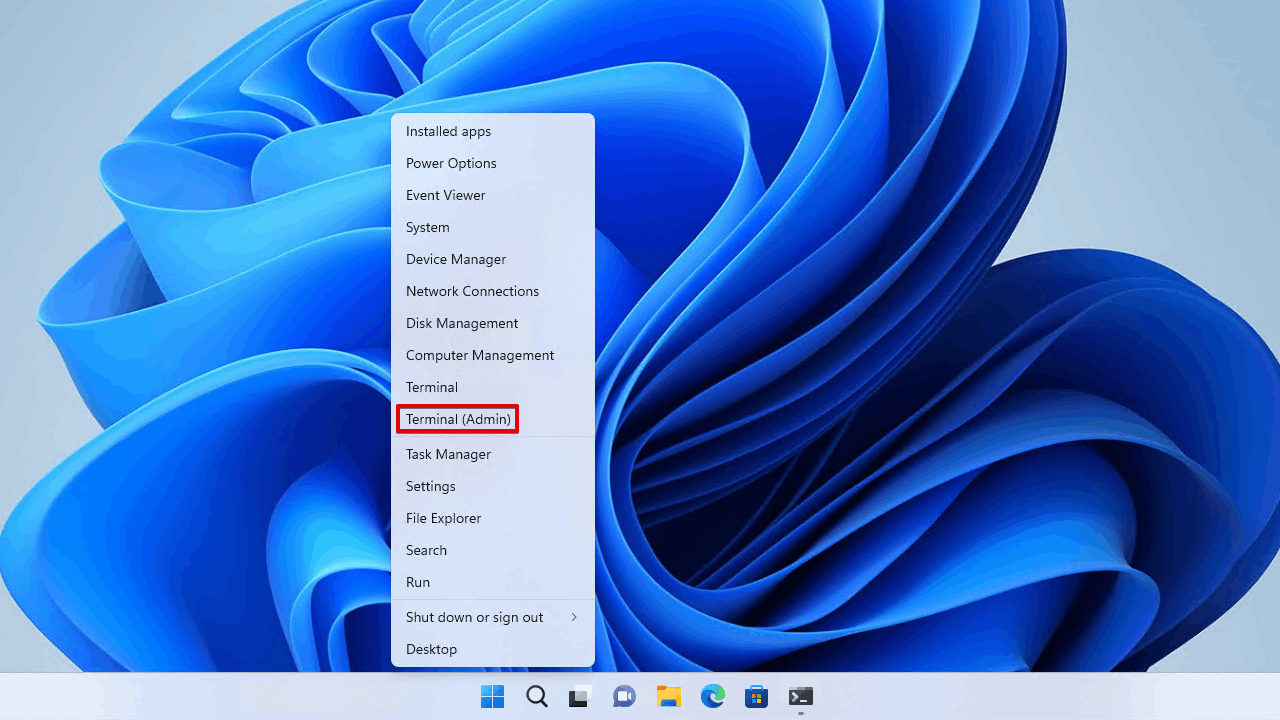
- Right-click Start and click Terminal (Admin).
- Type
diskpartand press Enter.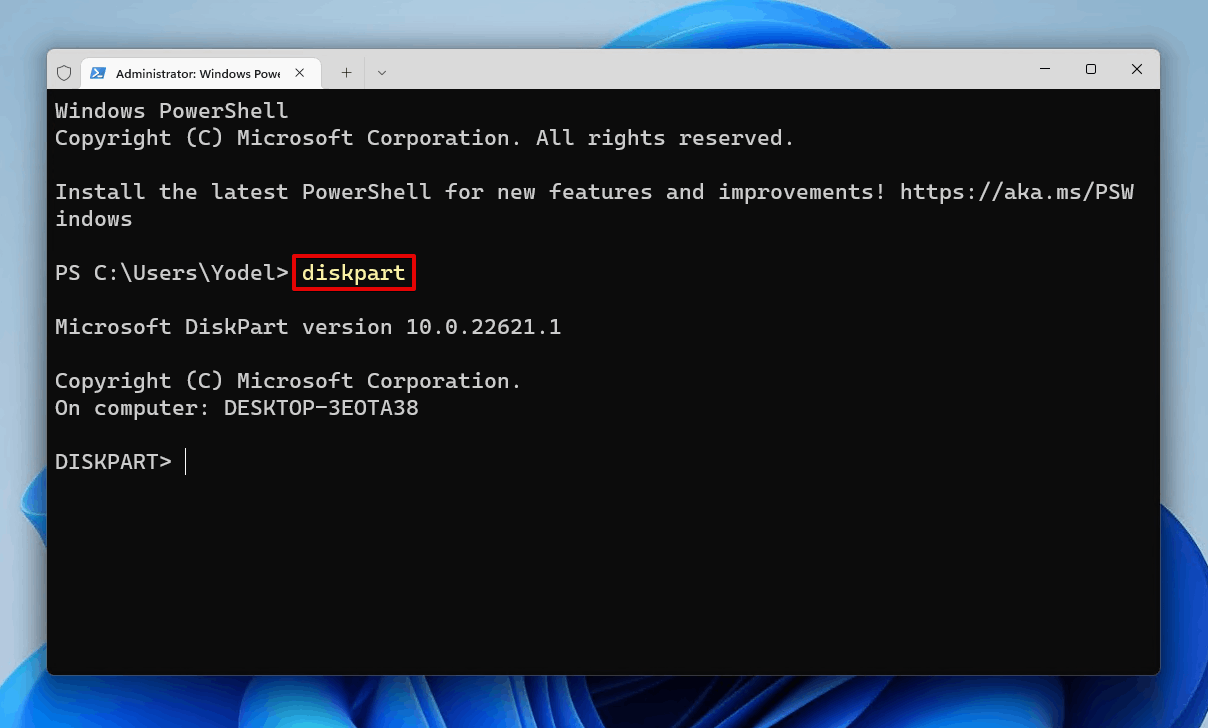
- Type
list diskand press Enter. Make note of your disk number.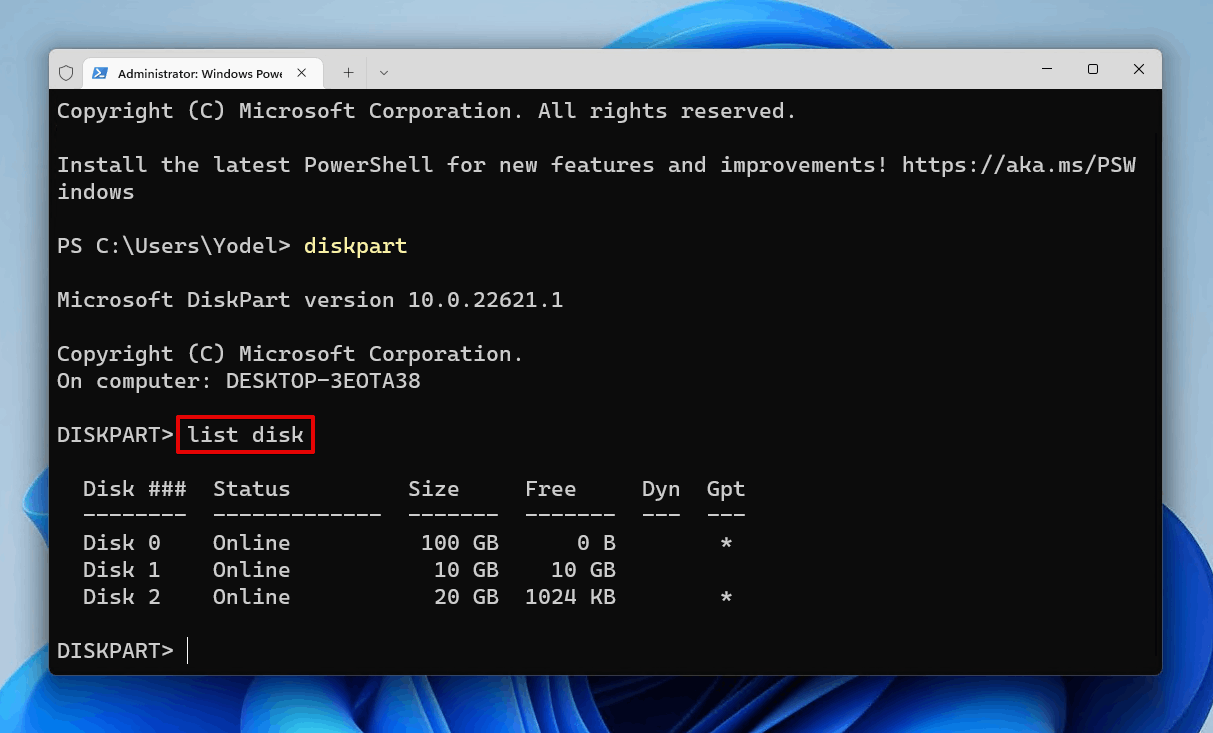
- Type
select disk *. Replace * with your disk number. Press Enter.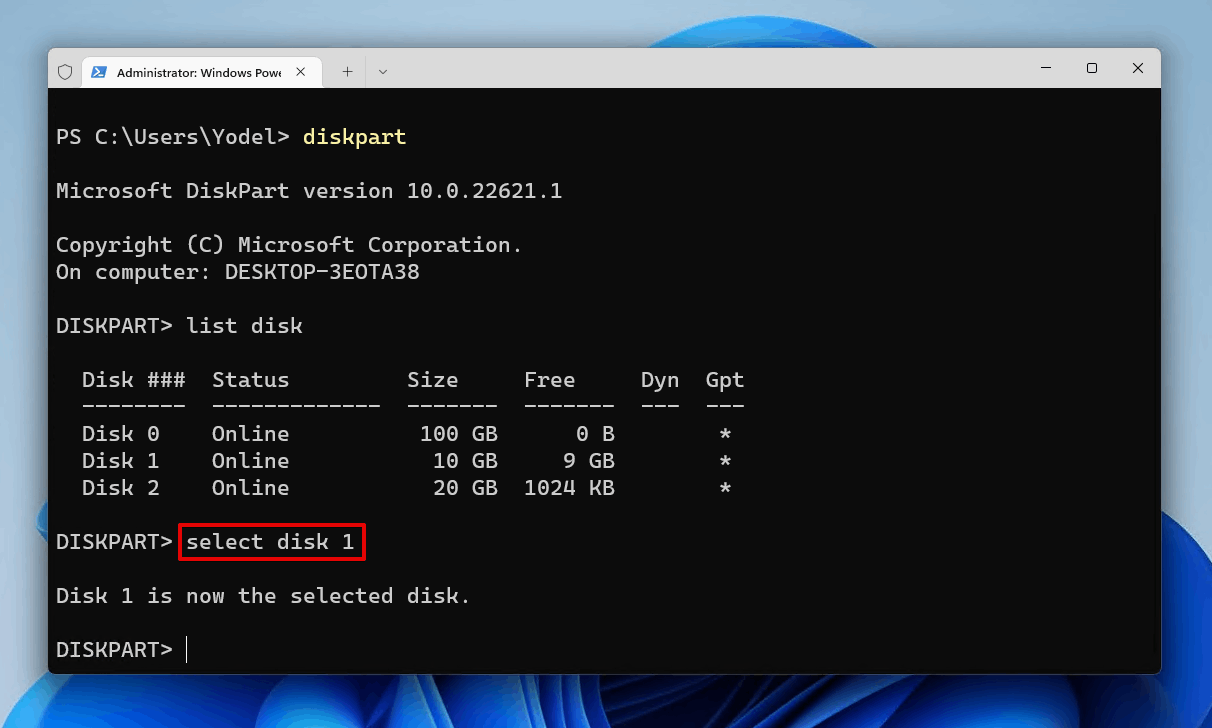
- Type
create partition primaryand press Enter. This will create a blank new partition for us to work with. Alternatively, if you want the partition to be a specific size, you can do so by adding thesizeparameter (measured in megabytes). For example:create partition primary size=10000will create a 10 GB partition.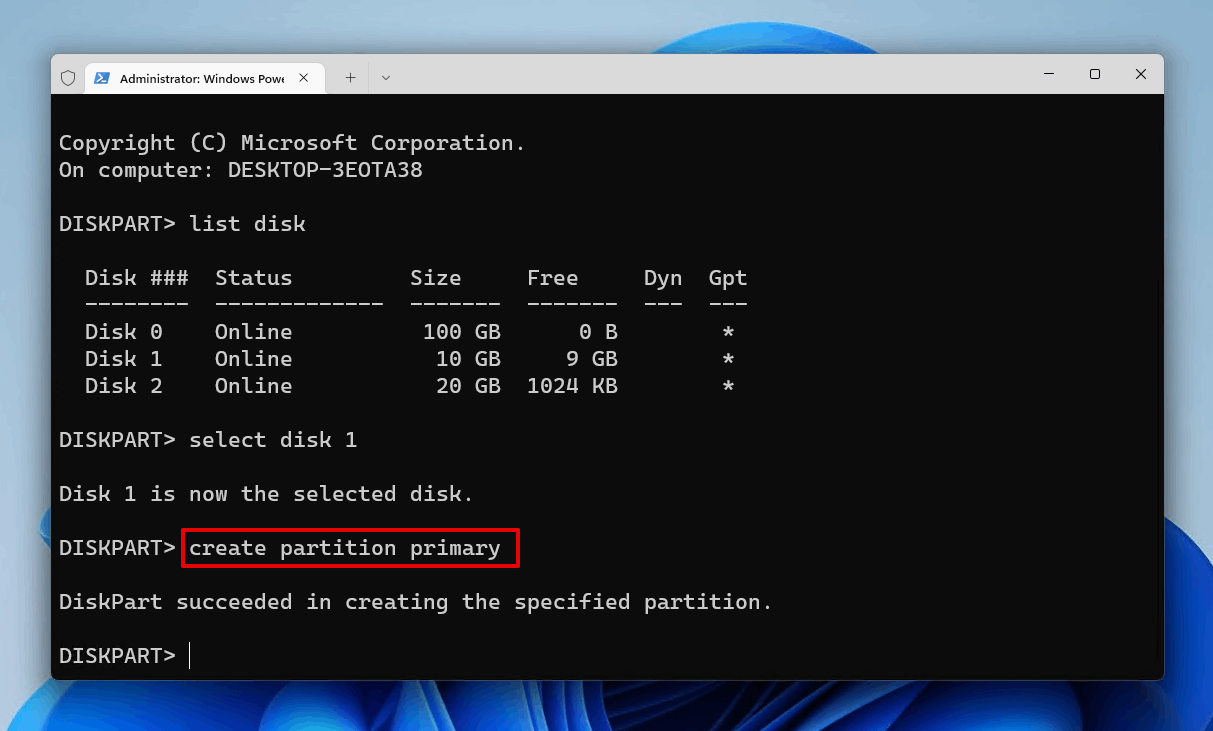
- Type
assignand press Enter. This will assign a drive letter to the volume.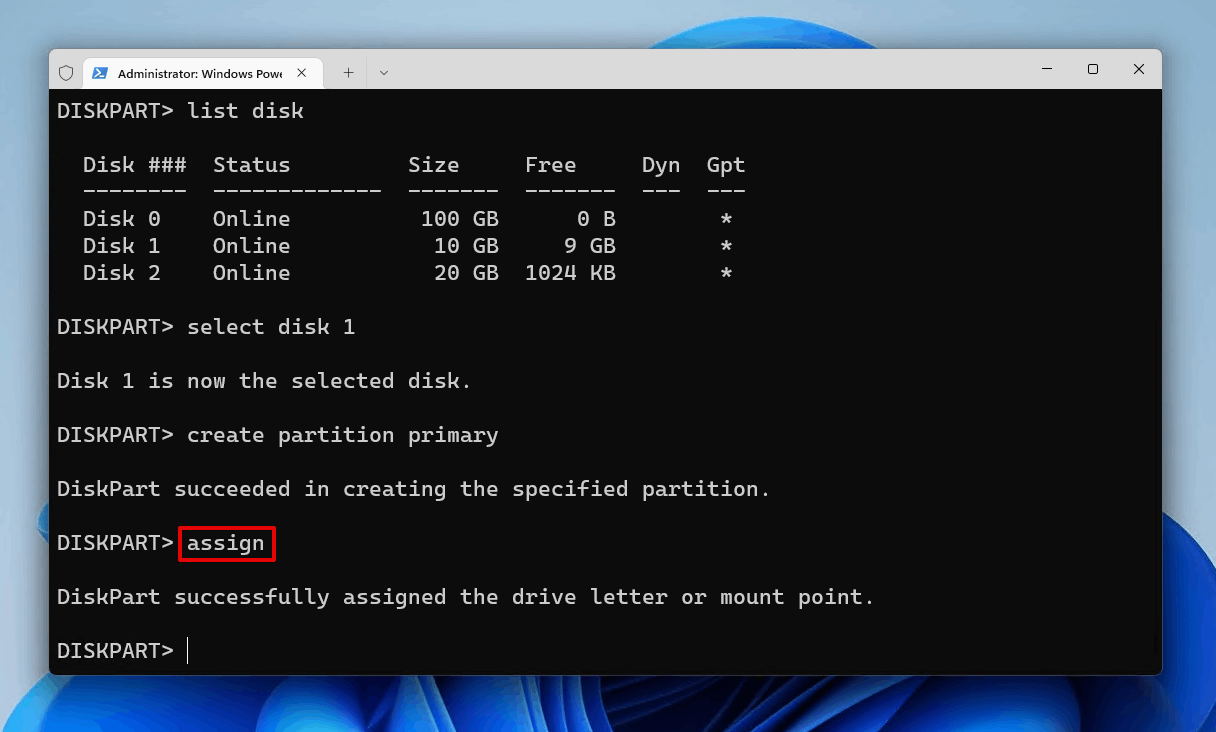
- Type
format fs=ntfs quickand press Enter. You can use another compatible file system if you don’t want to use NTFS.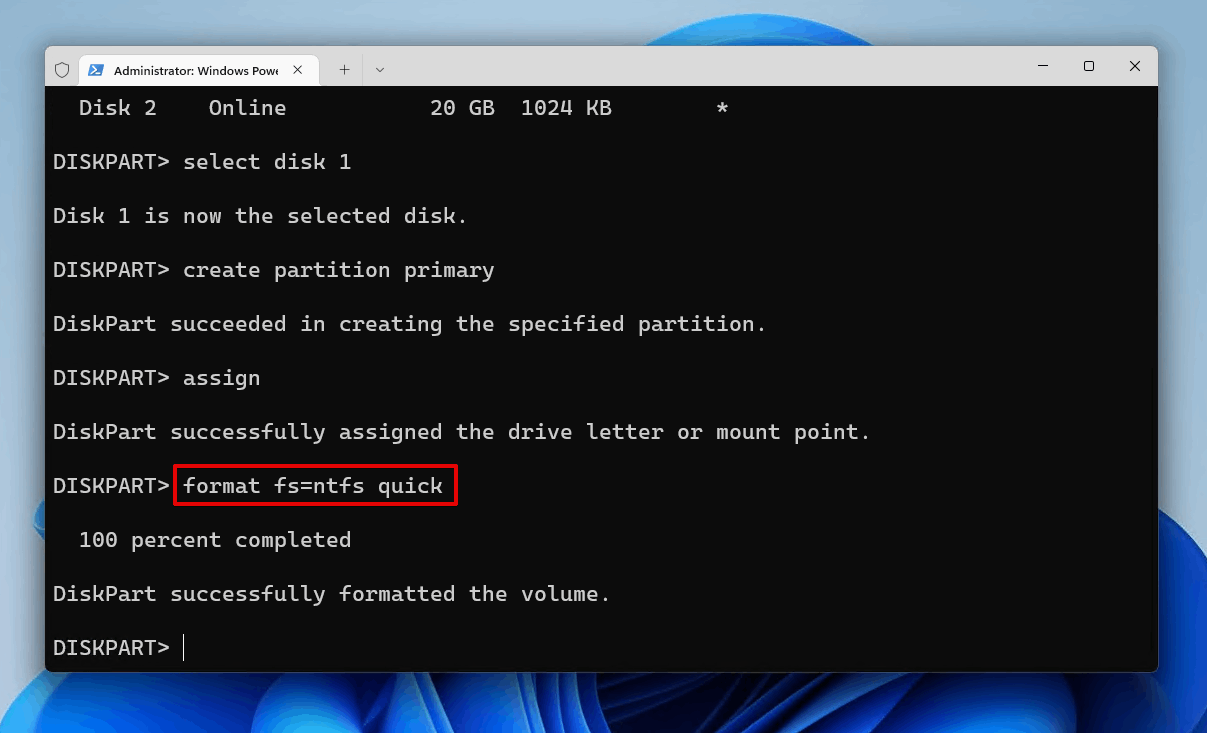
- Type
exitand press Enter.
Once you run the last command, you can exit Terminal and verify that the new partition has been set up.
Method 4:Recreate Partition Using Disk Management
In some cases where your partition has disappeared, it may have been replaced with what’s known as unallocated space. Unallocated space is space that hasn’t been formatted with a file system, rendering it unusable. If your partition has been damaged, it could have reverted back to unallocated space. Therefore, before you can use it again, you must format it with a file system.
Unallocated space doesn’t necessarily mean that your data is gone, just that it’s not reachable as Windows cannot read the partitioning info for that section of the drive. You can recover this data using the recovery method we mentioned earlier, then create a new partition and move the data back across afterward.
Follow these instructions to format the unallocated space with a file system so you can use it again.
- Right-click Start and click Disk Management.
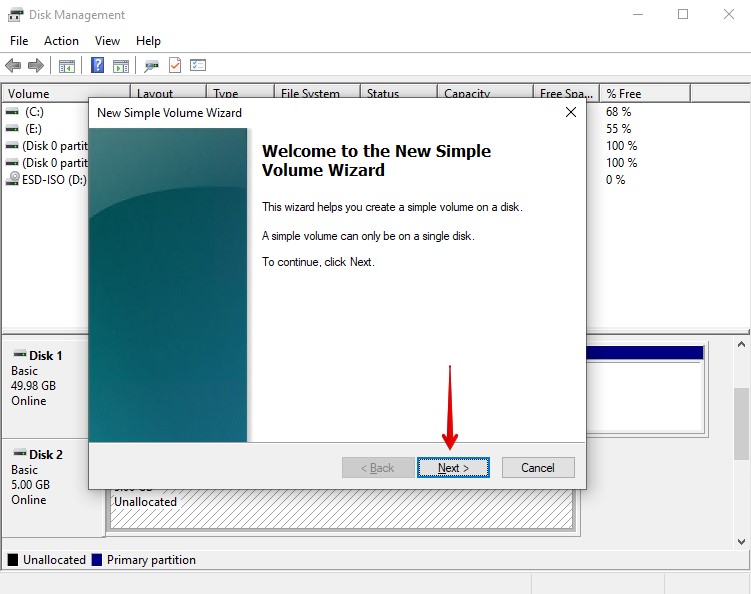
- Right-click the unallocated space and click New Simple Volume.

- Click Next.
- Specify how large you want the volume to be. Click Next.

- Choose a drive letter and click Next.

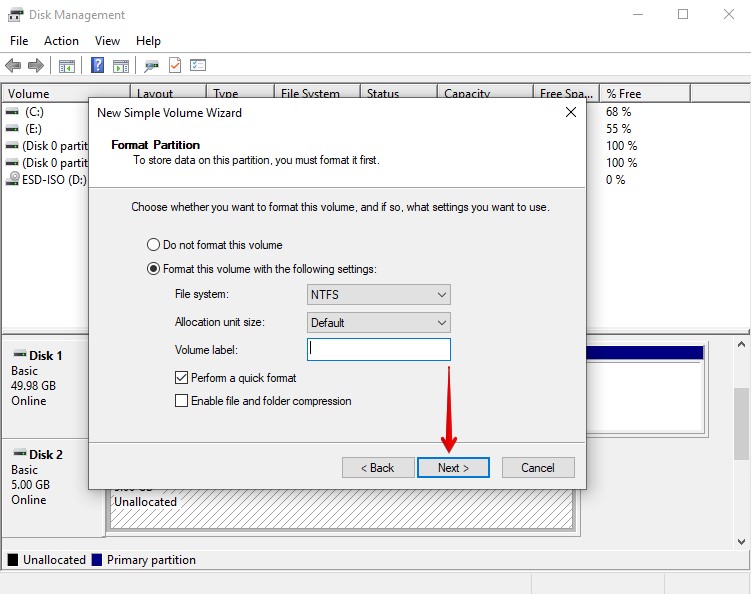
- Choose a label for your volume and make sure it’s being formatted with the NTFS file system. Ensure Perform a quick format is ticked. Click Next.
- Click Finish.
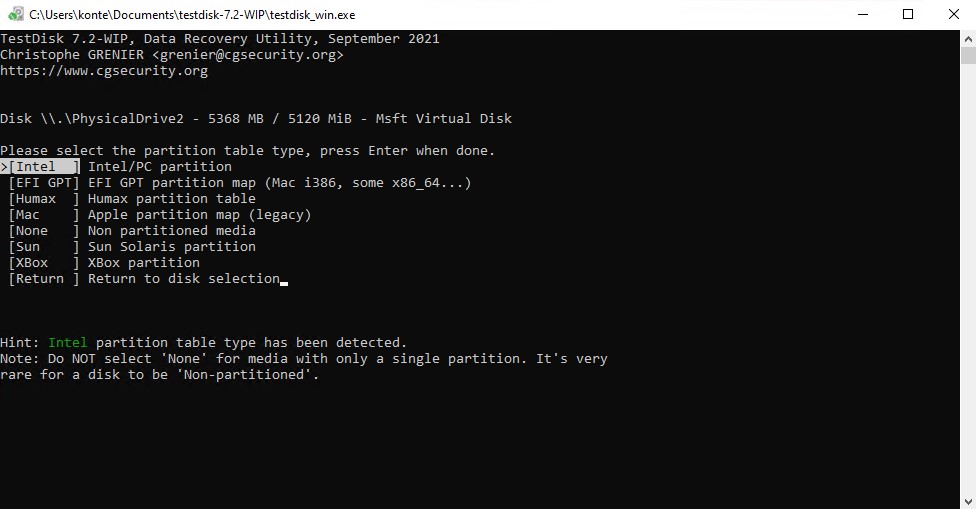
Method 5:Use TestDisk
If you’re recovering a partition that’s simply used for data storage, you can use TestDisk to recover the entire partition, as well as the data on it. TestDisk is an open-source partition recovery tool. It’s trusted in the recovery community for its efficiency and favored by many because it’s free.
It can scan your drive for any lost partitions and recover them to their original state, either by repairing the corrupted partition table or rewriting the partition from an existing backup.
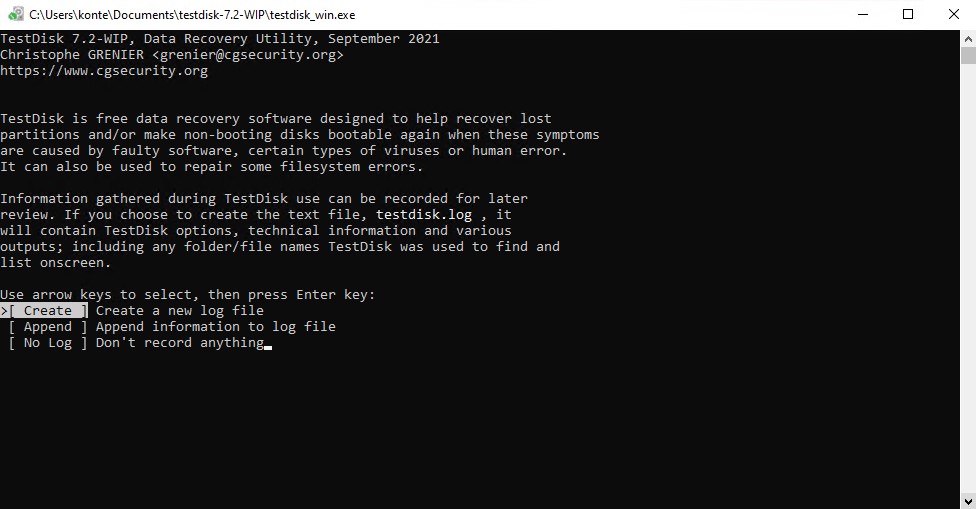
- Download TestDisk and extract the contents. Open testdisk_win.
- Press Enter on the Create option to create a log of the actions you’re performing.
- Highlight the disk that contains the lost partition and press Enter.
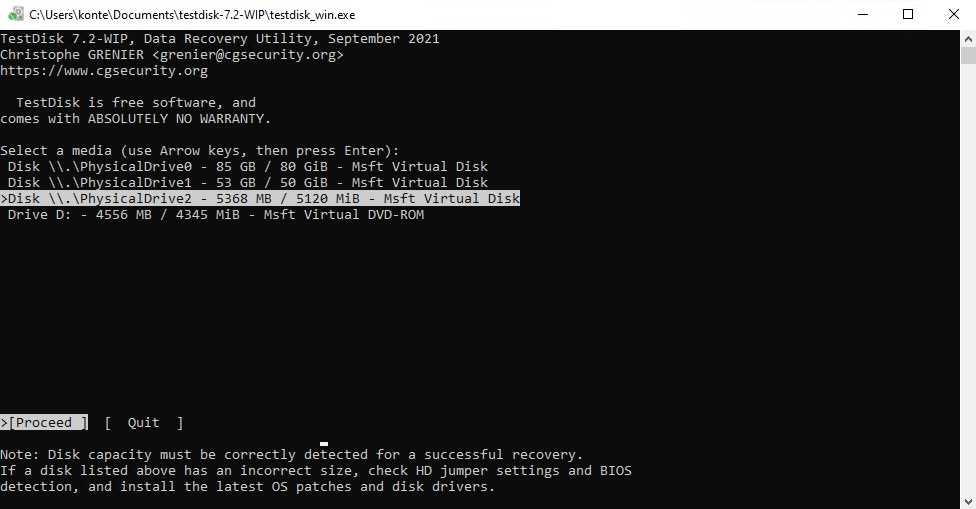
- Highlight your partition table type. TestDisk automatically selects the one it detects. Press Enter.
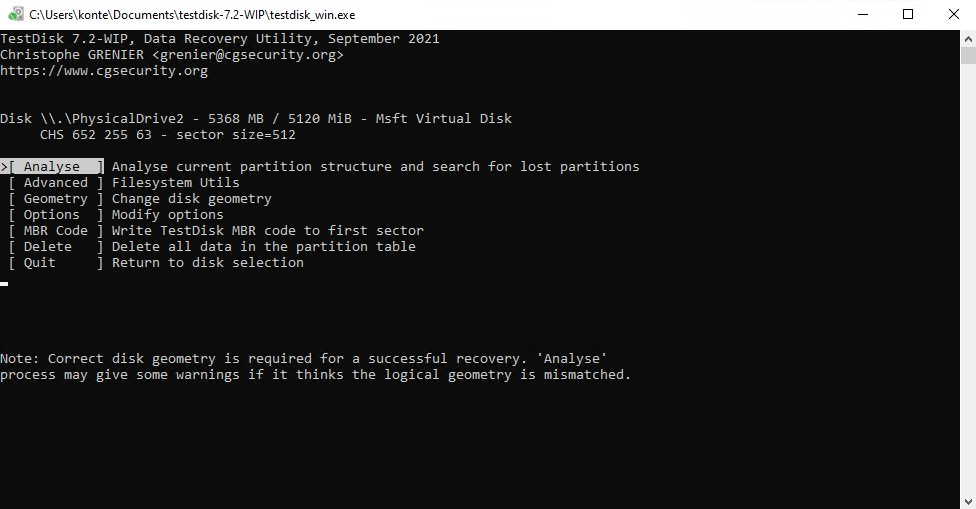
- Press Enter on the Analyse option.
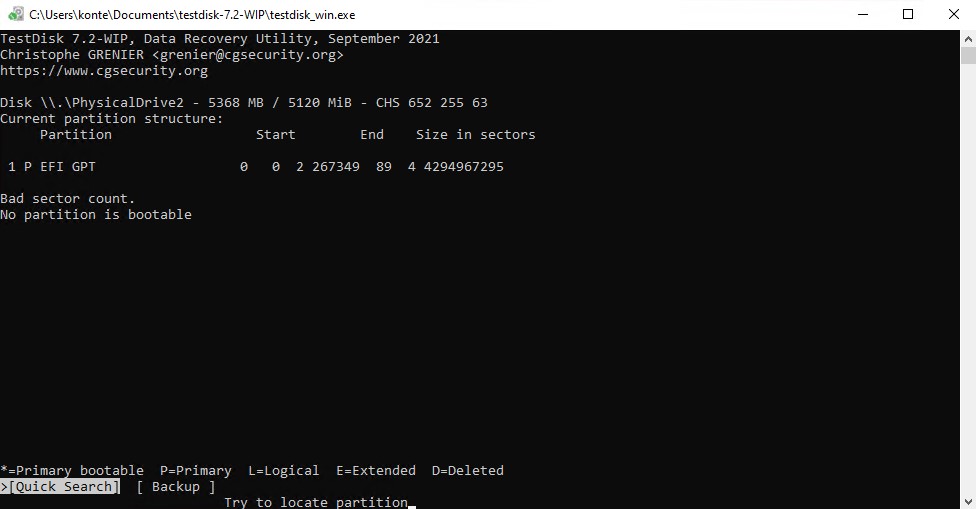
- Press Enter again to start the Quick Search.
- Select the lost partition and press Enter.

- Move to the Write action and press Enter to restore the partition.
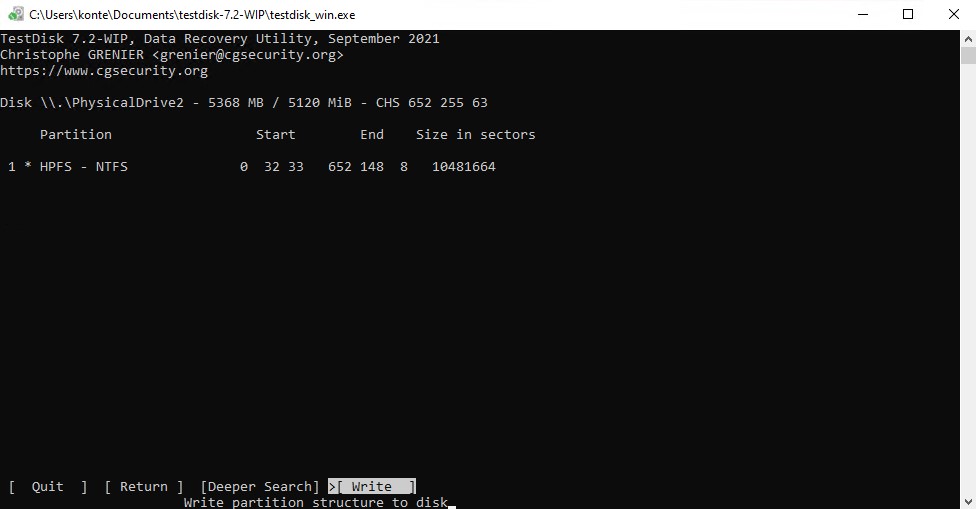
- Press Y to confirm.
How to Restore Accidentally Deleted Recovery Partition
The recovery partition is rarely used unless it’s necessary, but it’s an essential part of your operating system that helps you recover your computer to a working order if your system drive encounters any issues. It isn’t assigned a drive letter and usually sits at the end of all your partitions on your system drive.
This partition can be deleted quite easily through using the delete partition override command, but recovering it is a bit more of a challenge. However, it’s not impossible, as you can restore it using your Windows installation media.
If you no longer have your original Windows installation media, you can create a bootable USB and use that.
If you’ve accidentally deleted the recovery partition on your system drive, we’ll show you how to create a new one.
- Connect your Windows installation media.
- Right-click Start and click Terminal (Admin).
- Type
mkdir c:\tempand press Enter.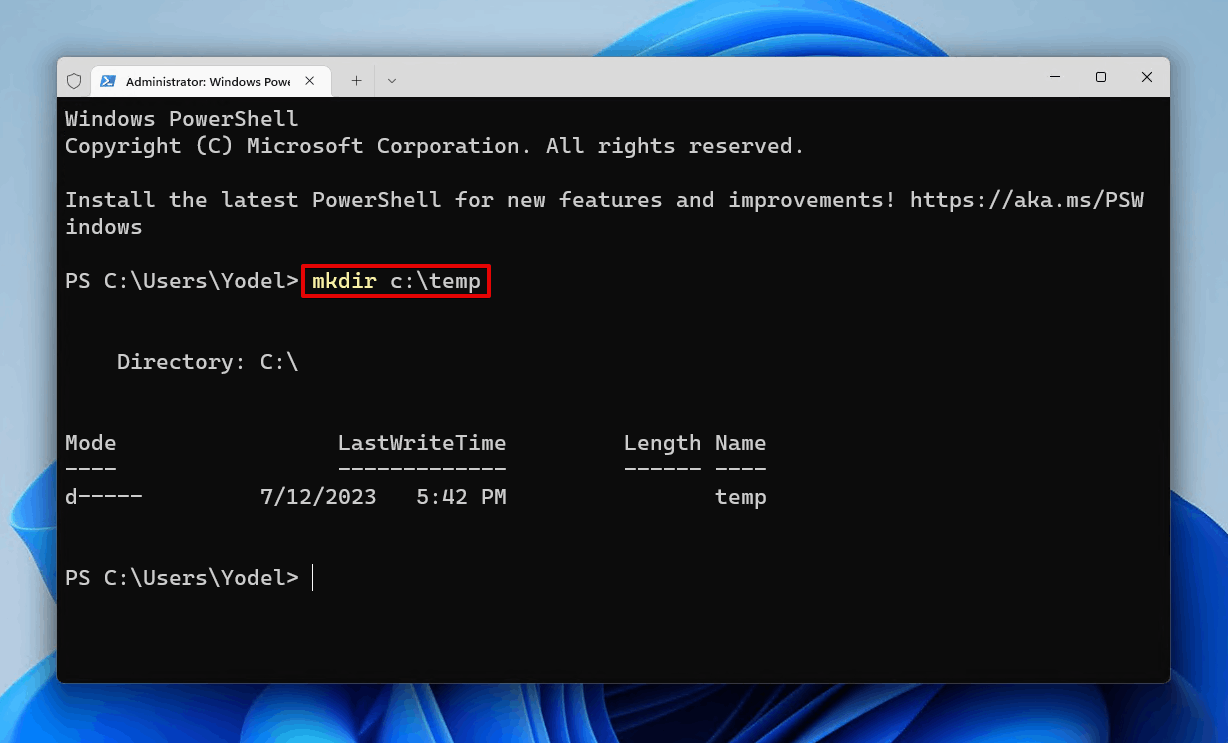
- Type
dism /mount-wim /wimfile:"d:\sources\install.wim" /index:1 /mountdir:"c:\temp" /readonly. You may need to update the drive letter with the one assigned to your Windows installation media. Press Enter.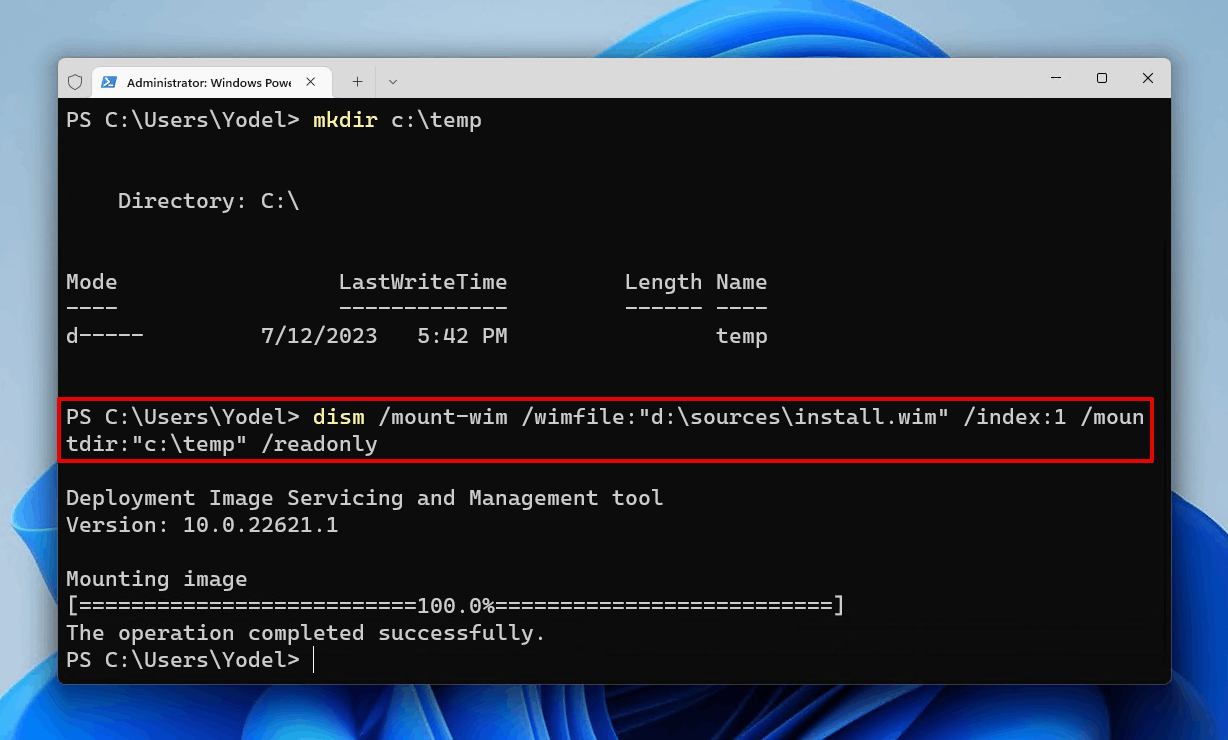
- Copy (or move) Winre.wim from C:\temp\Windows\System32\Recovery to C:\Windows\System32\Recovery\.

- Type
DISM /unmount-Wim /MountDir:"c:\temp" /discardand press Enter.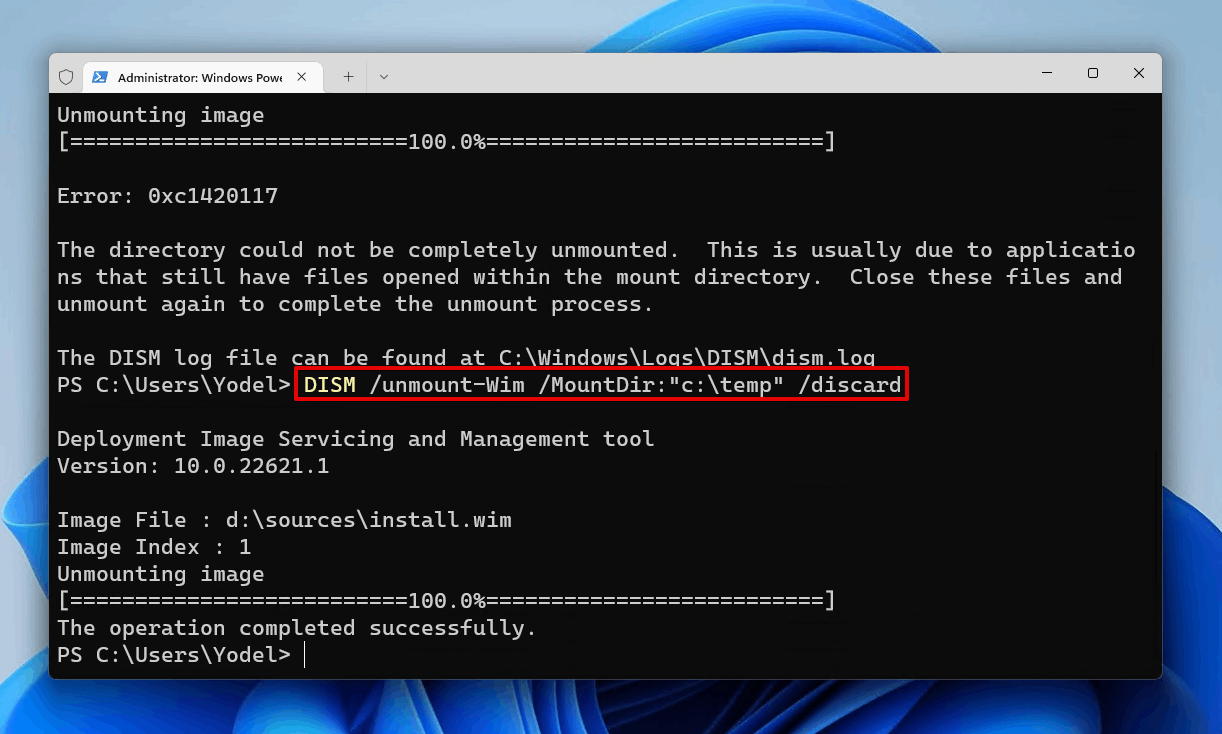
- Type
diskpartand press Enter.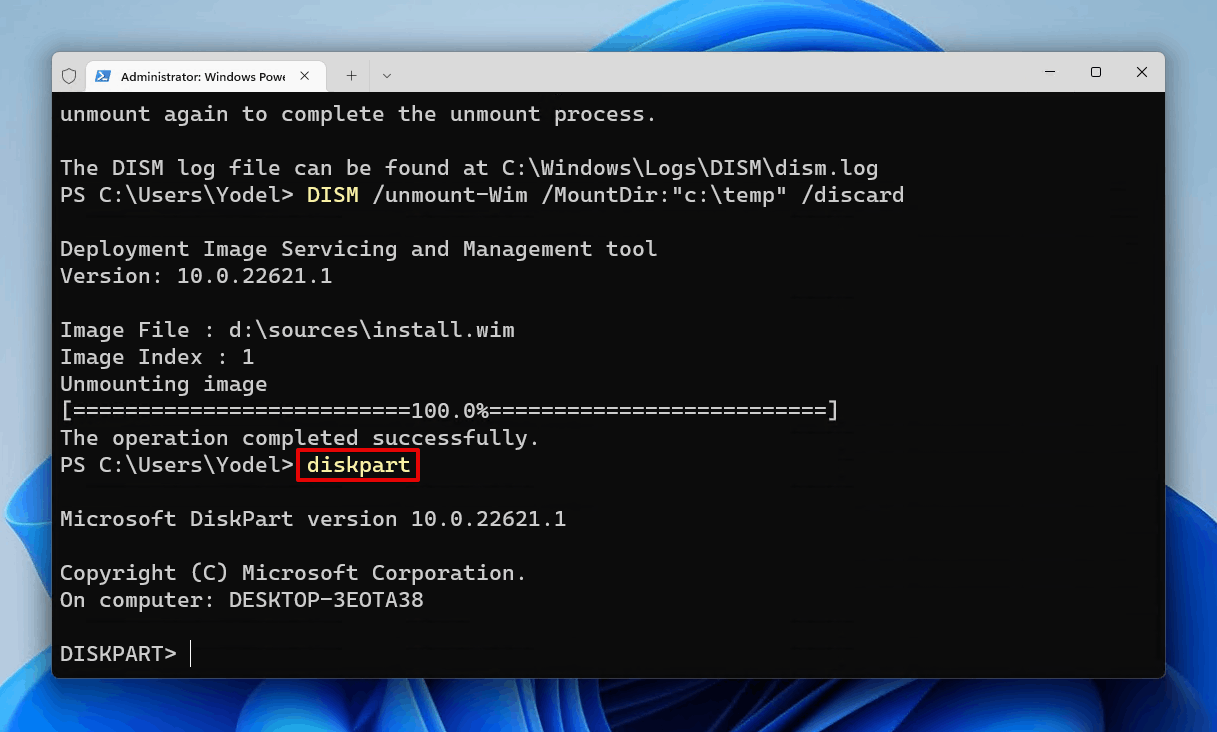
- Type
list diskand press Enter. Make note of your system disk’s number (usually Disk 0).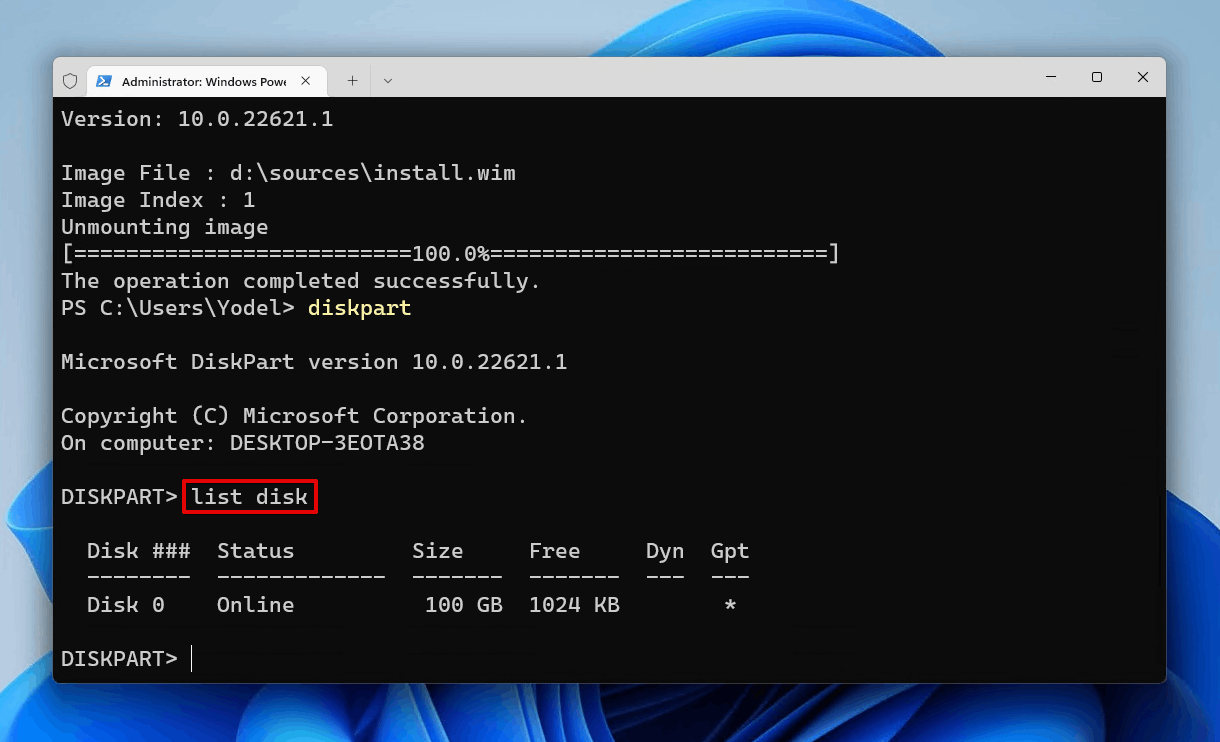
- Type
select disk *. Replace * with your disk number. Press Enter.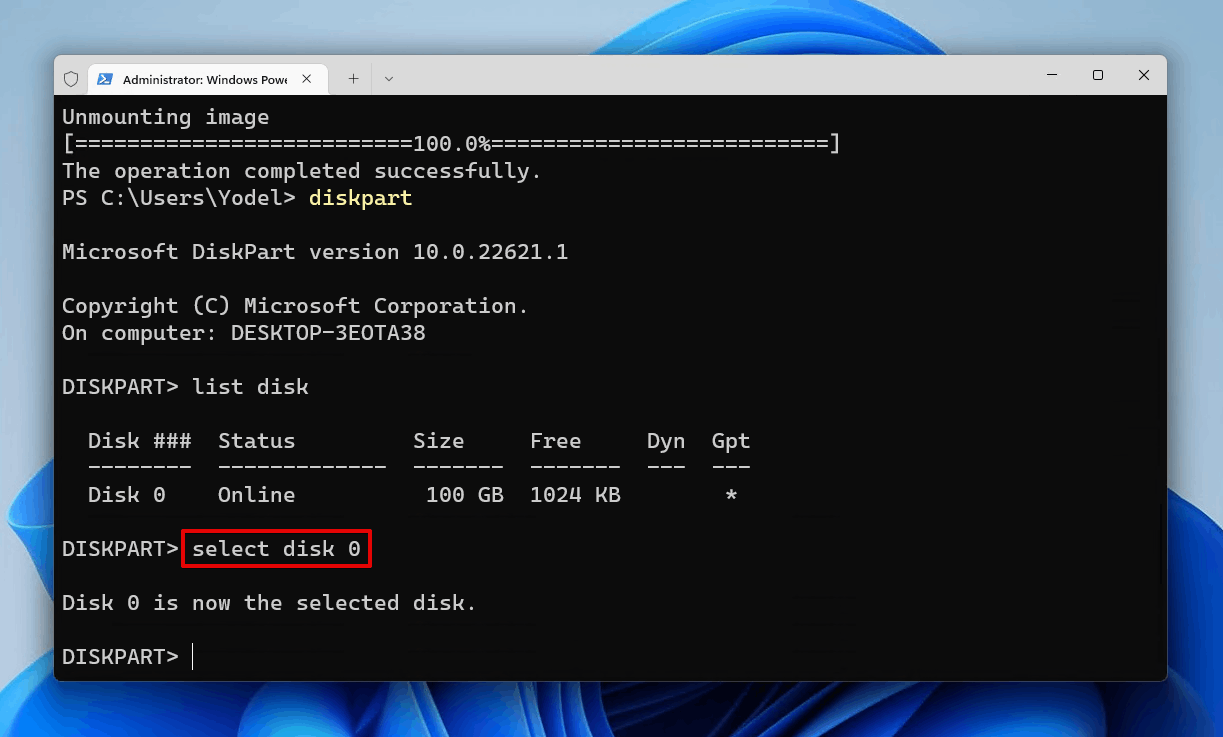
- Type
list partitionand press Enter. Make note of the primary partition you will be shrinking to make space for the recovery partition.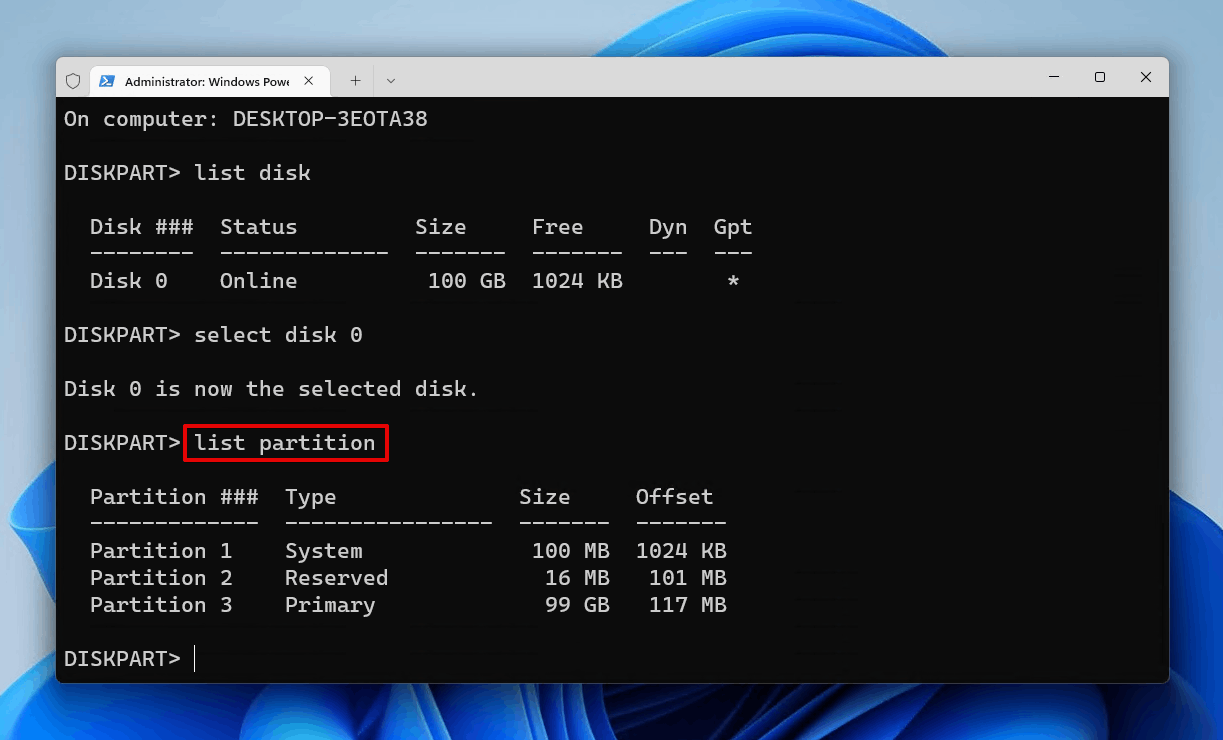
- Type
select partition *. Replace * with your partition number. Press Enter.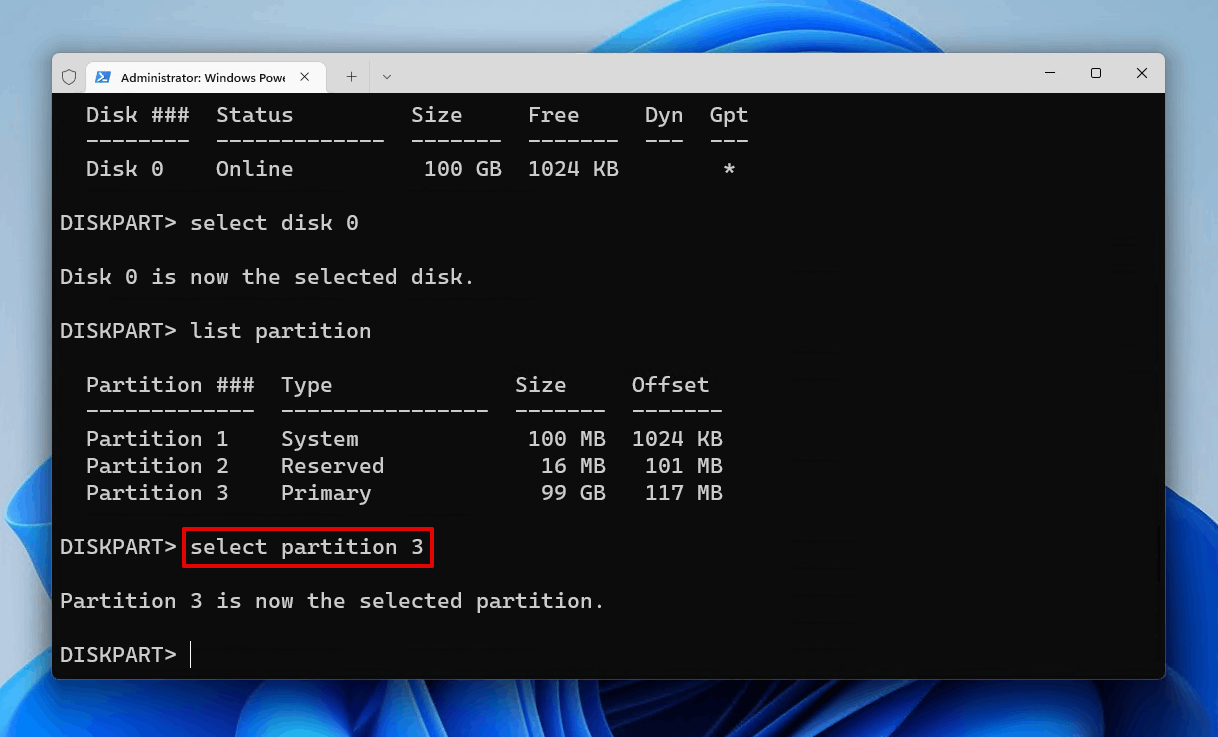
- Type
shrink desired=700and press Enter.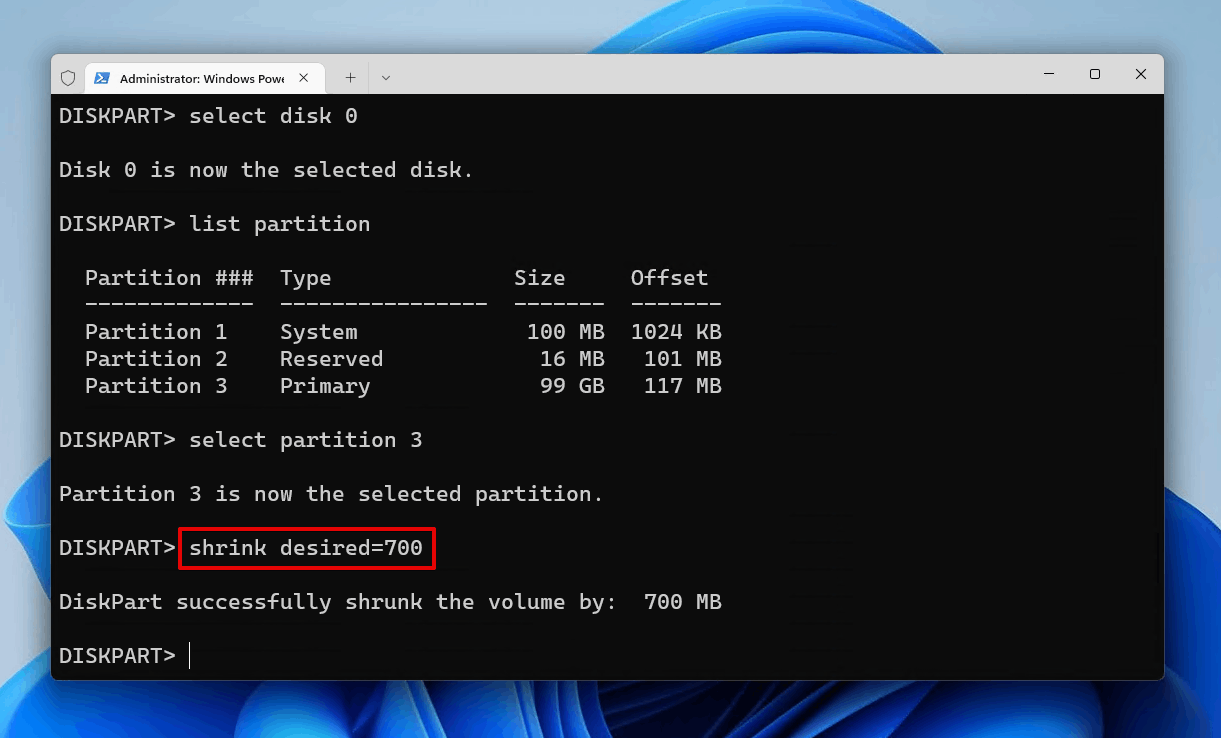
- Type
create partition primaryand press Enter.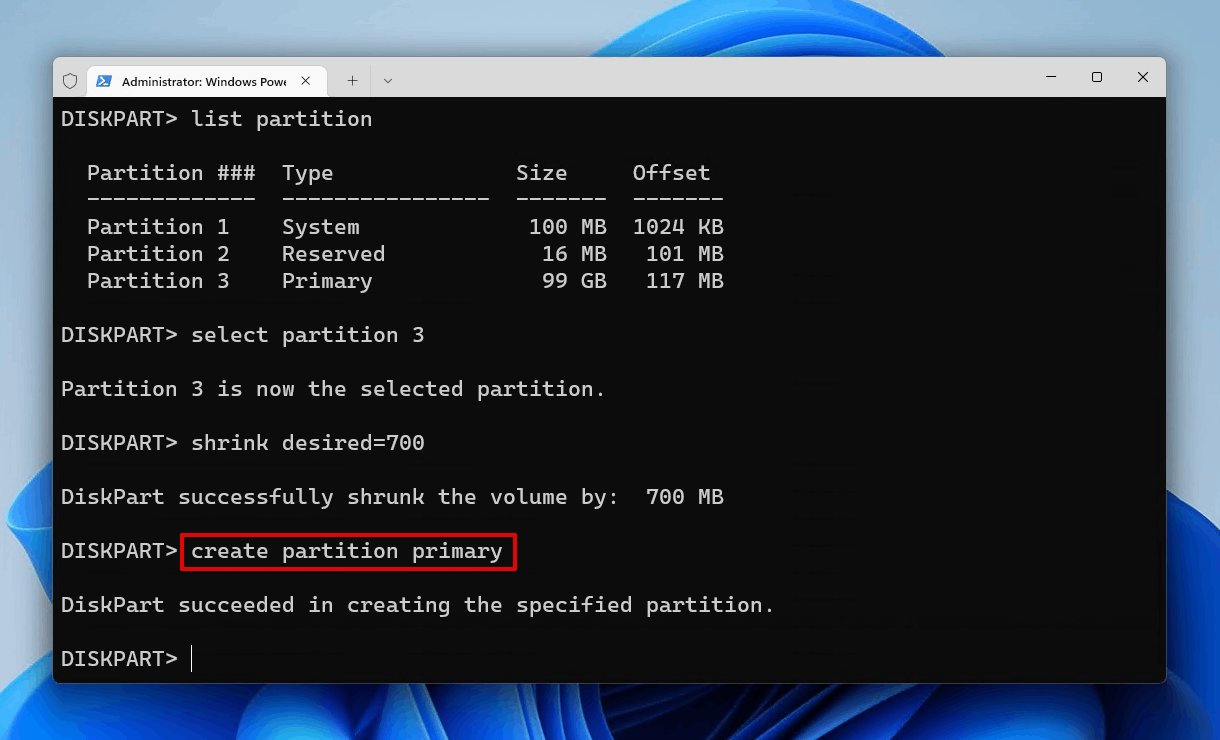
- Type
format quick fs=ntfs label="winRE"and press Enter.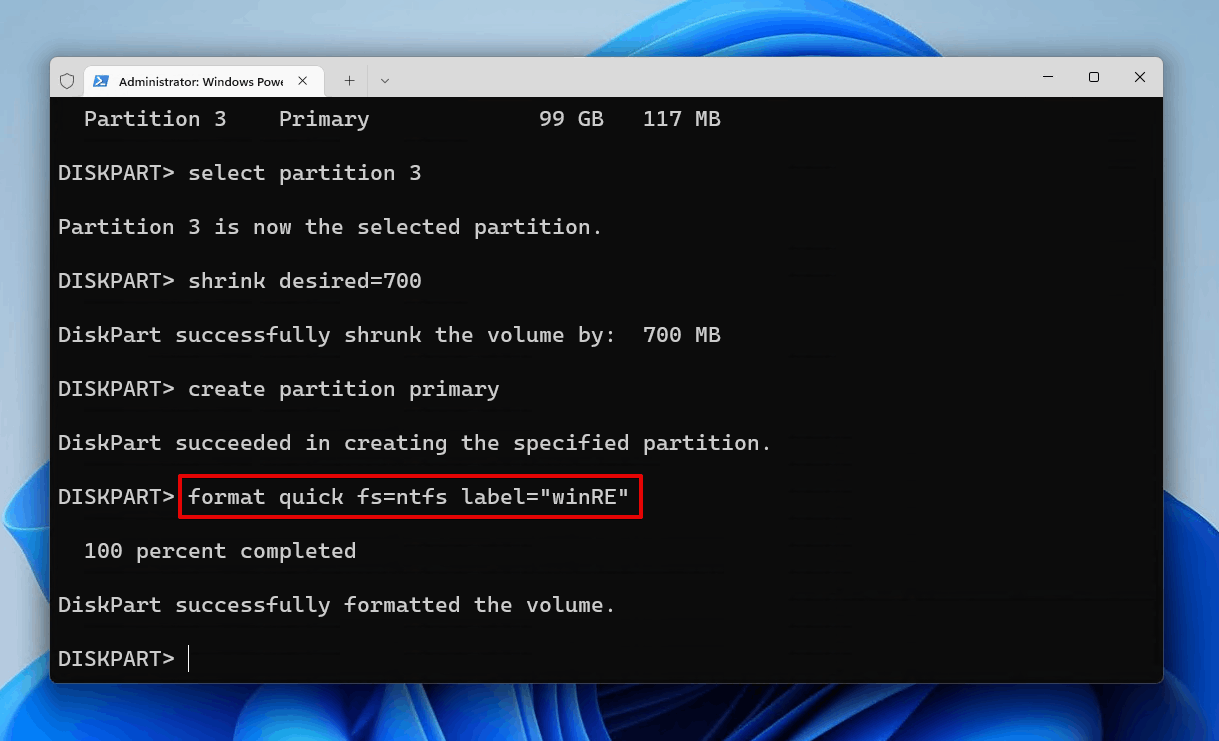
- Type
set id=de94bba4-06d1-4d40-a16a-bfd50179d6acand press Enter.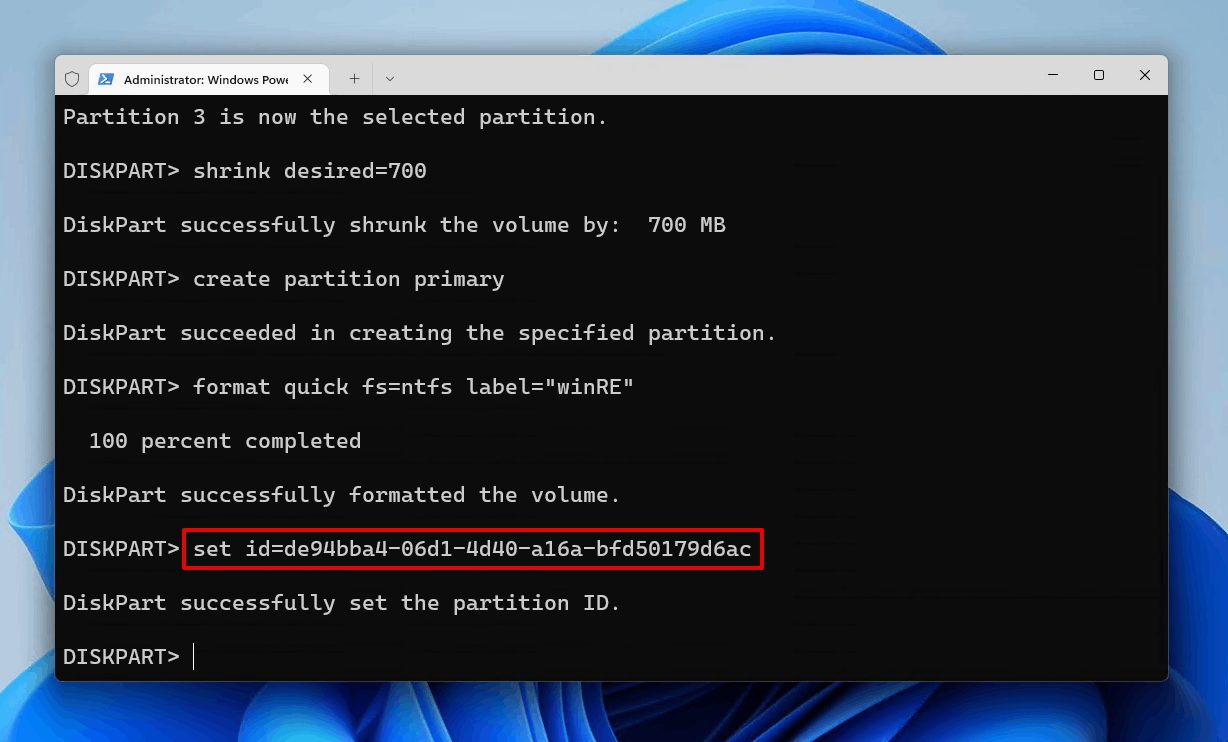
- Type
exitand press Enter.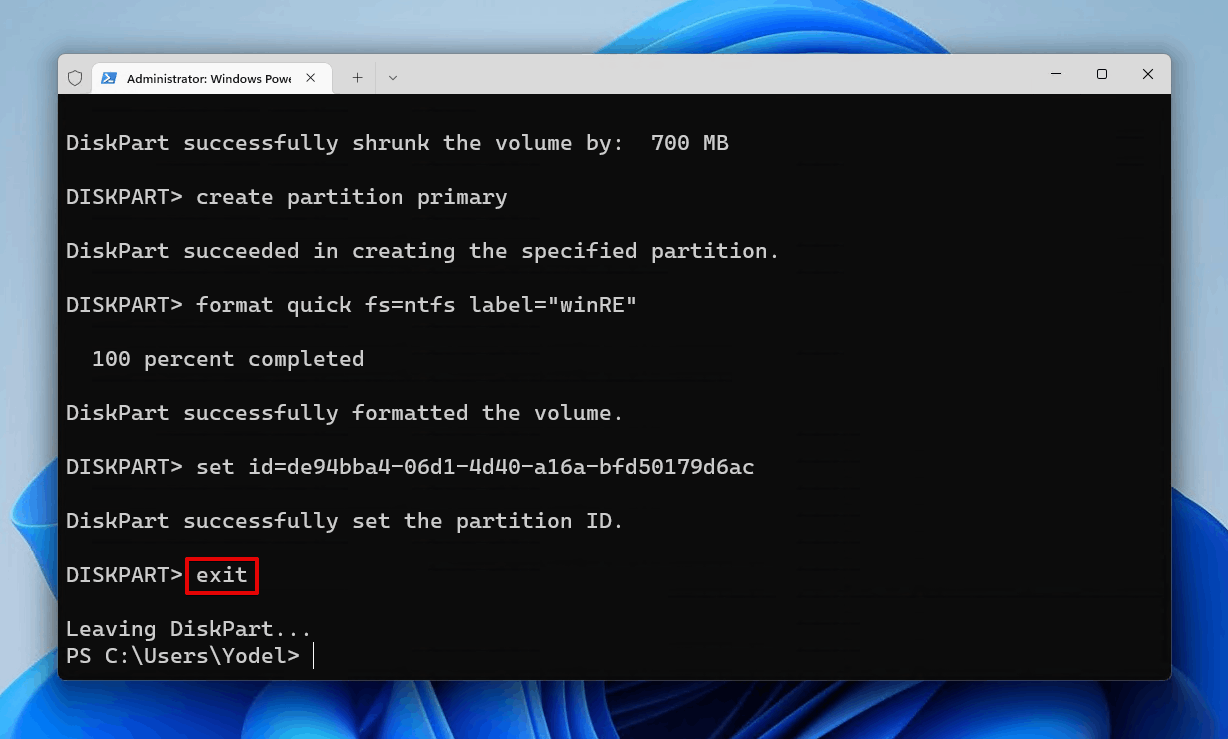
- Type
reagentc /enableand press Enter.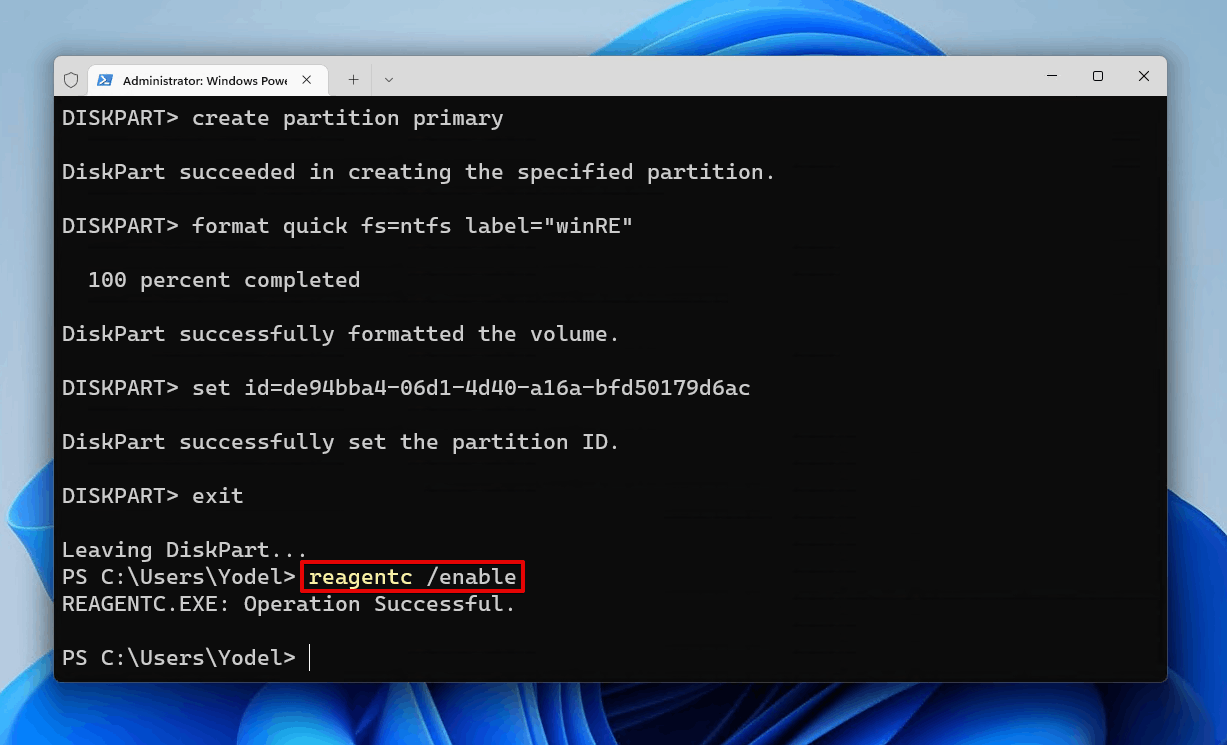
After running the final command, you can close Terminal. If you open Disk Management, you should now see the recovery partition at the end of the disk.
How Can I Protect My Partition From Going Missing?
It may not be possible to guarantee with 100% certainty that your partition will never go missing again, but there are some steps you can take to reduce the chances of it happening again and make sure your data stays safe. Here are some useful tips you can use to help protect your partitions.
- 💾 Back up your data. Make a backup of your computer’s internal/external hard drives. You can plug in an external hard drive and use the Windows backup feature to prevent this from happening from here on out. Windows backup comes installed with your windows machine and is free to use. You can get reliable SSD backups that can be thrown into a bag as they don’t have moving parts for fairly reasonable prices these days. Making sure that your computer uses SSDs, in general, are more reliable than spinning hard drives.
- ⚡ Invest in a surge protector. If a power surge was the cause of the partition issue, invest in a surge protector. They offer protection against power surges and most distance lightning strikes. While they can’t protect against direct lightning strikes, they do a good job of offering protection against everything else.
- 🔋 Use an official charger. If you’re using a laptop, make sure that you’re using the charger that came from the manufacturer! Yes, getting one from a 3rd party vendor may save you some money in the long run, but it is not worth the frustration of losing precious files and photos.
- 🚫 Avoid writing new data. If you do notice that your partition or other data is missing, don’t load new files onto your computer as this can overwrite them and make them unrecoverable. Also, make sure you do the data recovery as soon as you notice that the partition is no longer there to ensure that you have the highest chance of recovering your data.
Knowing how to recover a lost partition or the data off of it, is a valuable skill to know as computers do fail and mistakes do happen. With the right tools and knowledge though, you have a better chance of recovering your data should that happen.


