 DiskInternals Uneraser is not as well-known as some of the apps we’ve tested before, but it has been gaining popularity as of late. It’s also one of the more affordable recovery apps currently on the market.
However, that doesn’t mean much if you don’t know the whole story of its capabilities and limitations. Unfortunately, Uneraser isn’t as widely covered as its competitors – so we wanted to provide the most comprehensive (and beginner-friendly) breakdown of this app.
In this article, we cover Uneraser’s features, pros, cons, and real-life recovery performance, which you’ll see unfold in the demo section below. Read on!
Table of Contents
Brief Overview of DiskInternals Uneraser
This section consists of DiskInternals Uneraser’s most important facts. Our goal here is to figure out early whether or not Uneraser is even worth considering for your specific data loss scenario and needs.
Along with basic information like system requirements and a list of pros and cons, we also included a subsection where we discuss which type of user and what data loss scenarios would most benefit from Uneraser’s features.
System Requirements:
- Windows 2000, XP 2003, 2008, Vista, 7, 8, and 10 (also works with Windows 11)
- 1 GB RAM (more is better)
Pros
- Highly affordable
- While outdated, its interface is uncluttered and straightforward enough for beginners to pick up easily (and has a step-by-step wizard to help)
- It provides good features that make recovery easier, such file type selection, a search tool, and thumbnail view
- Comprehensive yet beginner-friendly scan configurability
- Provides disk image creation and recovery feature
- Very outdated interface
- Its user experience is manageable but we expect a lot better from a paid app based on our experiences with other apps
- Windows only
- Struggles with more complex data loss scenarios, such as severe logical damage (RAW disks, etc.)
- Preview tool takes up a lot of space in a very unintuitive manner
Most Suitable For
DiskInternals Uneraser is undoubtedly competent, but it lacks many of the features and UI design choices that other apps offer. This makes it a solid option for many use cases, but unsuitable for others.
This is the case for most recovery apps – choosing the “right” one boils down to your needs.
However, it takes a bit more knowledge than a beginner would start with to accurately and hastily determine which apps best address their needs and expectations.
To accompany the raw information in this article and help you as best we can with this puzzle, here’s our analysis of the users and use cases for which Uneraser is best suited:
- Simple data recovery tasks, such as restoring data that was accidentally deleted or formatted
- Users who are on a tight budget but require more features than free apps provide (e.g. virtual disk recovery)
- Beginners on a budget who need a very uncluttered and simple interface (and are willing to forgo more advanced features for it)
- Restoring specific types of data FAST – since you can select what file types Uneraser scans for, you can cut down the scan time by de-selecting large file types you don’t want to restore (e.g. high-res videos)
DiskInternals Uneraser Features
App features matter in a BIG way. They affect user experience, recovery performance, and the app’s ability to address certain data loss scenarios.
For example, the image backup and recovery feature helps with restoring severely corrupted drives.
We made a detailed but easy-to-understand list of DiskInternals Uneraser’s key features, which roughly translates to what you can expect to accomplish with this tool.
- Recovery wizard – You can opt to use the app’s recovery wizard, which allows you to undertake the recovery process via useful dialogue boxes. It takes you from source selection to file saving.
- Basic file browser – Files can be sorted by name, type, size, last modification date, and tags, all of which work with the app’s search tool. You can also preview individual files from the scan results.
- Disk image backup and recovery – We were pleasantly surprised to learn that the app can create and restore data from disk images, which is a feature not all recovery apps provide (even the more expensive ones).
- Comprehensive source selection – Aside from selecting the disk you want to restore data from, Uneraser also lets you which file types you want it to look for. Going a step further, you can even search files by name, which is a rare and welcome feature.
- Extensive file system support – Works with both Windows-based file systems, including NTFS, exFAT, and FAT32, as well as macOS-based ones like HFS and HFS+.
Real-Life Data Recovery Test Results
To objectively evaluate DiskInternals Uneraser’s performance, we ran a recovery test on a USB drive after deleting its files and formatting it with Disk Management (to make recovery more challenging).
This section is a walkthrough of that test. We’ll show you the entire process of recovering our USB drive with Uneraser – from installation to recovery.
Our goal here is not only to show you how the app works but also to provide a detailed guide that you can follow when attempting to restore your own drive.
Installation
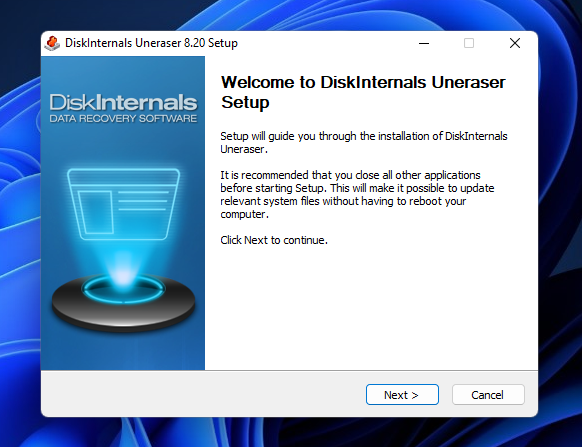
Installing DiskInternals Uneraser is as easy as any average Windows software. We downloaded the app’s installer from its official website, which kickstarted the process with a familiar installation wizard that was super easy to follow.
As with all apps we review on this site, we made sure to analyze the installer using malware detection tools. DiskInternals Uneraser is safe to download and install.
Scanning & Recovery
In this section, we’ll show you how we used DiskInternals Uneraser to: (1) scan, (2) browse, and (3) restore and save the missing files from our USB drive. Each task will have its own mini-section so it’s easier to follow along.
You’ll also be able to review the actual tabulated results of this test at the end of the process.
File Type & Source Selection
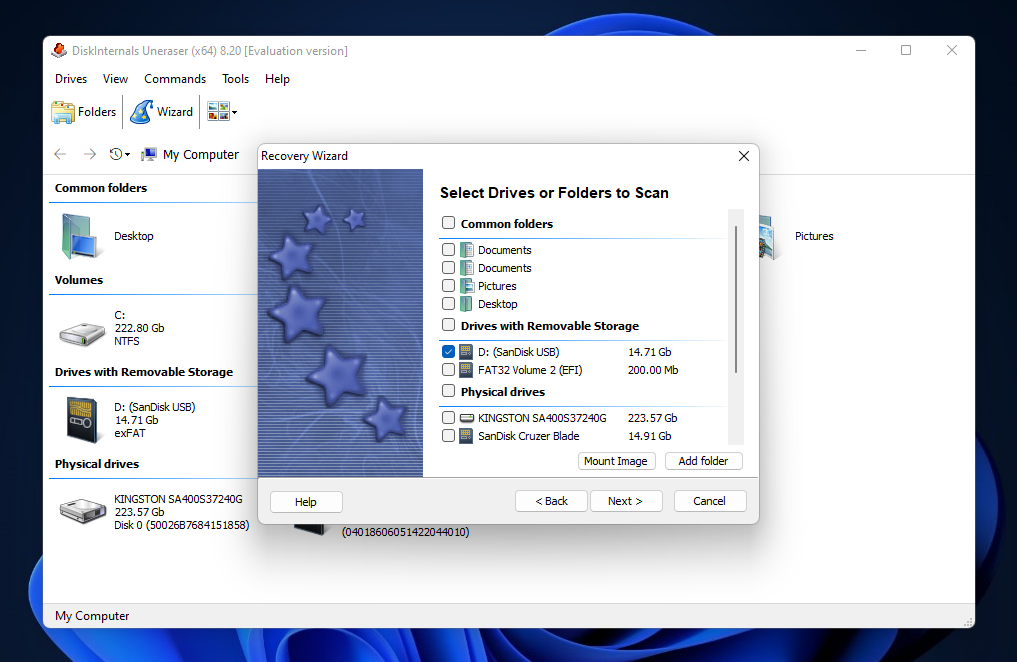
Source selection is the process of choosing which disk you want to recover data from – it’s usually step 1 of the recovery process (after installation).
DiskInternals Uneraser provides a convenient and beginner-friendly approach: the recovery wizard. Instead of navigating the source selection menu and setting up parameters yourself, Uneraser’s recovery wizard simply asks you how you want to set up the scan one step at a time.
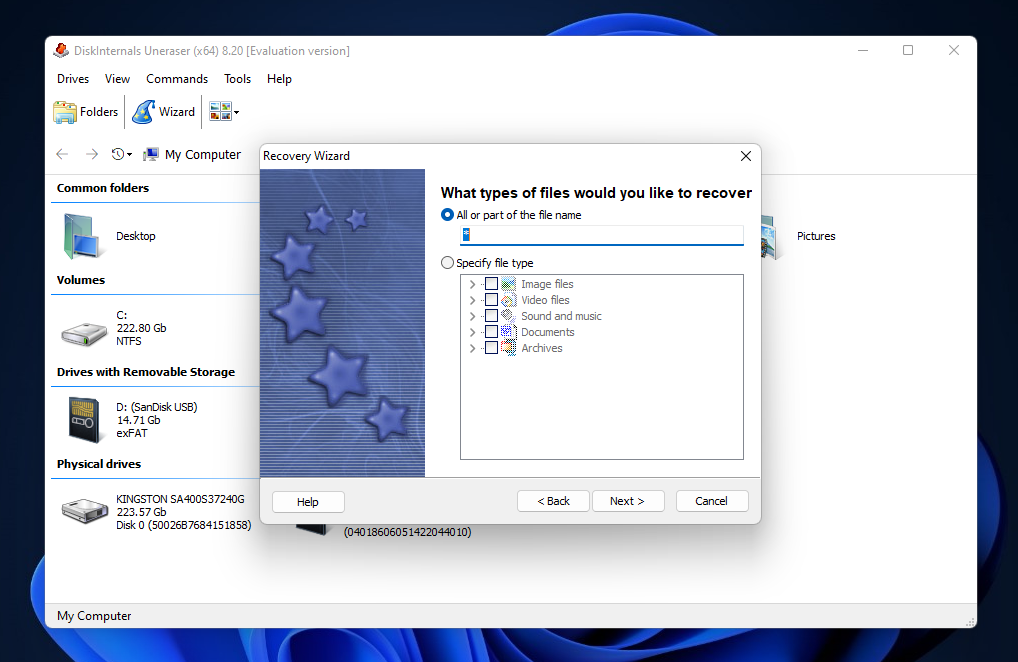
We really liked the ability to limit the scan to specific file signatures, but for the purposes of this demonstration, we opted to let Uneraser find all the file types it could.
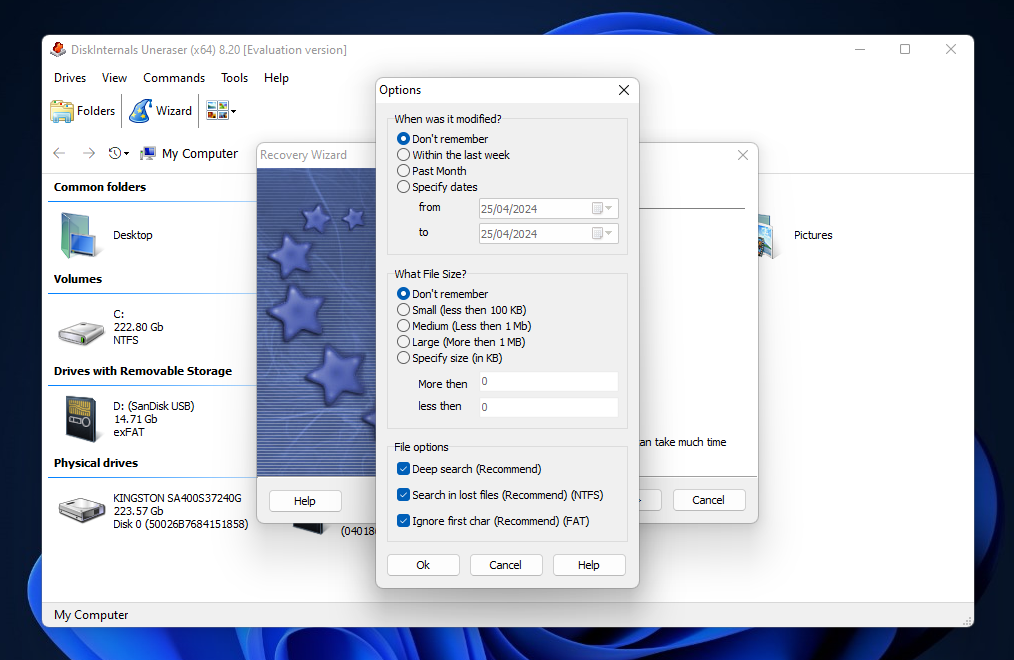
The Options menu (which appears at the end) also provided other useful configuration options, like file size specifications and last modified date (both in ranges). Though, we didn’t like that Deep search was hidden in this menu and not selected by default, which is important for beginners to have the best chance of recovery possible.
Browsing of Recovered Files

Browsing the files Uneraser recovered was a bit clunky – but we’ll describe our general user experience before getting into that.
The file browser is made up of 3 sections:
- The tree menu in the left sidebar, where you can navigate through drives and folders
- At the bottom of the window, an overview of whatever is selected in the sidebar; it includes information about the type, count, and size of its contents (upon selecting a file, it instead displays a preview)
- Above the overview section, the actual contents of the selected items are displayed
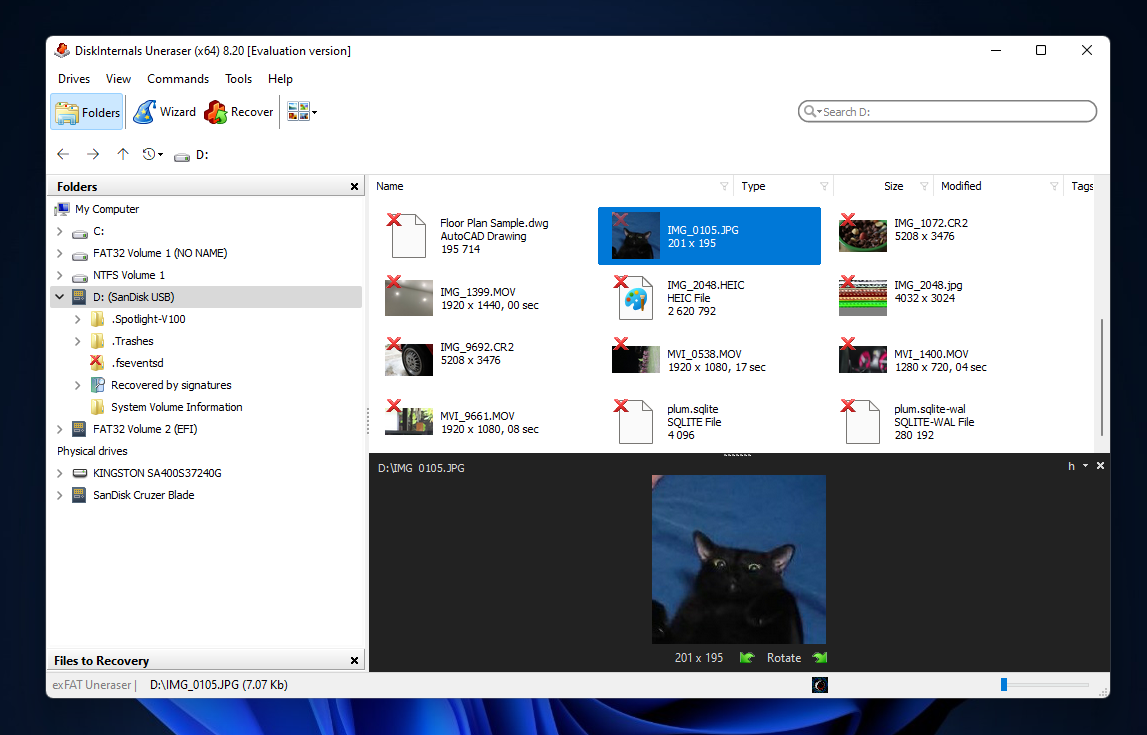
On one hand, we could see this multi-view interface being useful for those who are familiar with data recovery software. However, we found it rather cluttered for beginners, especially when there are data recovery tools out there that typically streamline this view to not overwhelm the user.
Our major complaint was that interacting with this interface was not always smooth. For example, attempting to select subfolders in the sidebar minimizes the host drive’s dropdown menu. To reliably navigate folders, you’re better off double-clicking them in the contents view.
Along with the information dump, this made DiskInternals Uneraser’s user experience a bit confusing (but usable).
Saving of Recovered Files
At this point, our next task was to select the files we wanted to restore and save them to a safe location. Unfortunately, DiskInternals Uneraser also made this process slightly more difficult than it needs to be.
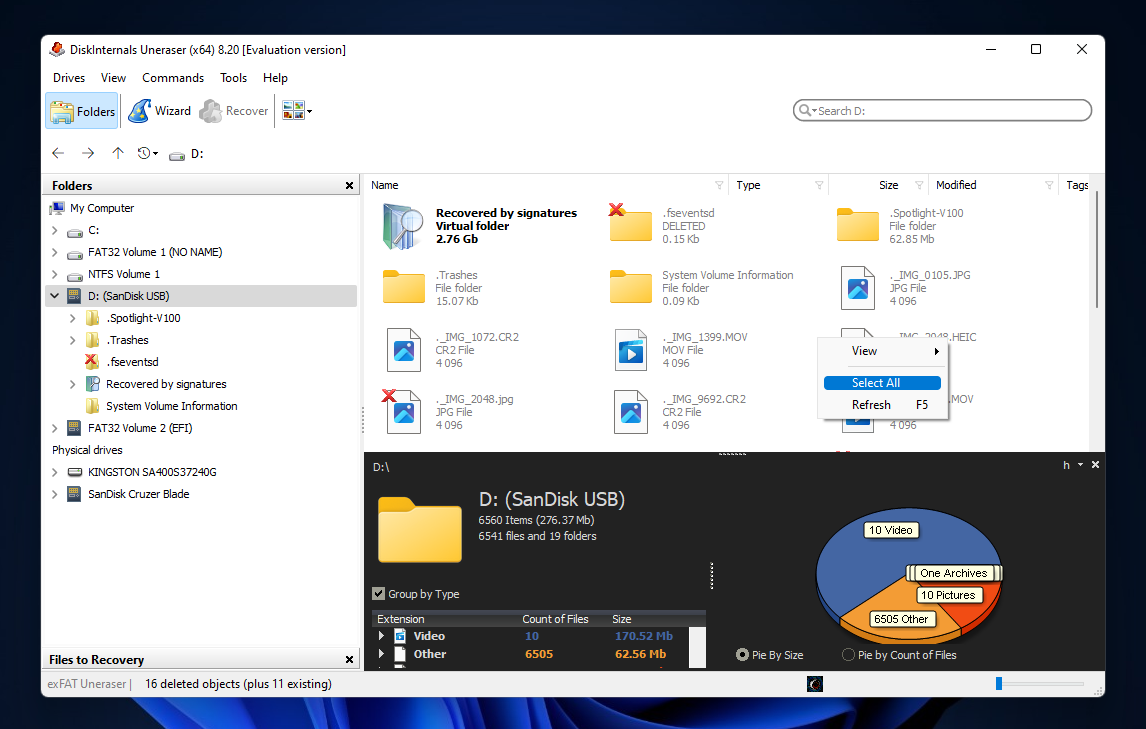
To select all the files Uneraser found, we had to navigate to our drive’s root folder, right-click on an empty space, and click Select all.
There may be an easier way to do this, but we simply went for the intuitive option, like a beginner would.
It’s not a major red flag but we couldn’t help but compare it to the more refined system of multi-select checkboxes that other apps provide.
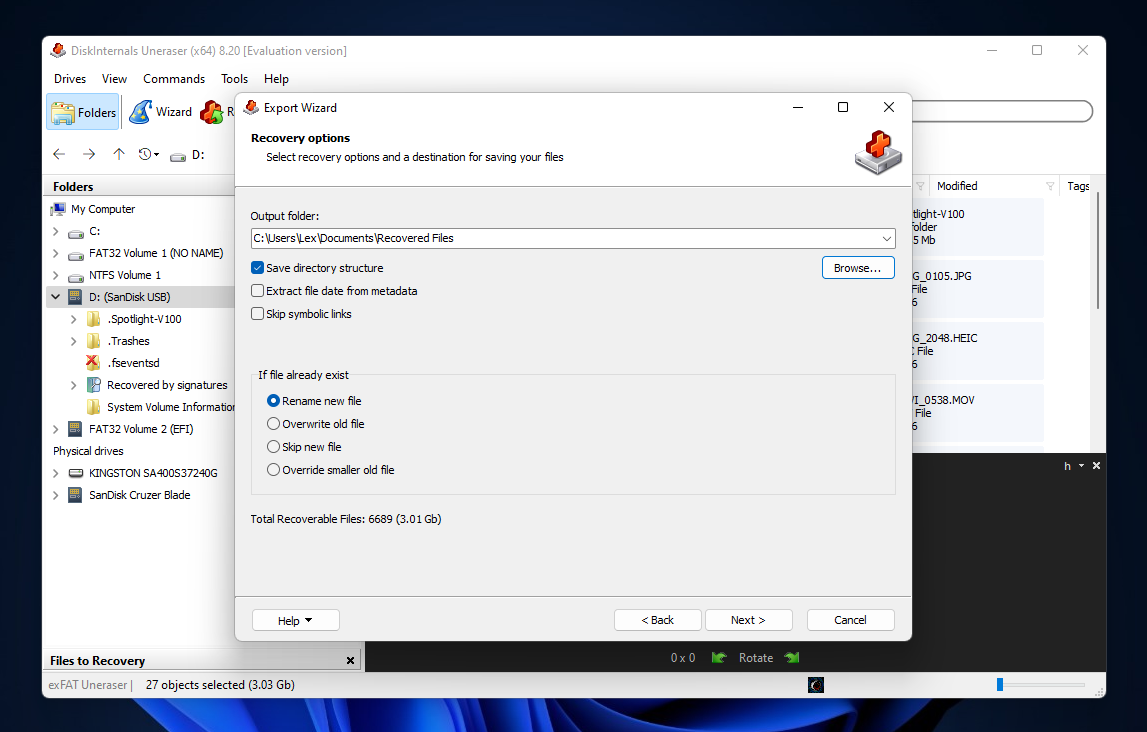
Upon clicking the Restore button in the menu bar (after selecting all files), we were then greeted by the save dialogue. Again, there were more parameters than we’re used to seeing on modern recovery apps, with the exception of technician tools like R-Studio.
Most users can leave the default settings (as we have) and only set the Output folder, which will be the location where Uneraser saves the restored files.
Overall, DiskInternals Uneraser clearly needs a UX overhaul at every stage of the recovery process. Our review of its actual performance comes next.
Recovery Results
The USB drive we scanned had various types of data, including photos, videos, and documents. Within those categories, we made sure to include files with different signatures, such as JPG, CR2, MOV, MP4, DOCX, PDF, and even DWG. Then, we deleted the data and formatted the drive.
DiskInternals Unerase easily found all recently deleted and formatted files and even restored the original folder structure. Even more than that, Uneraser restored many old forgotten files from the USB drive.
This is an expected ability for most recovery software; in fact, Uneraser performed a bit slightly below average to other apps in that aspect, as many of the old files it restored were unusable.
| Parameter | Result |
| Number of files found | 6,708 files (24 folders) |
| Total size of found data | 3.1 GB |
| Scan time | 9 minutes and 38 seconds |
| Size of storage device | 16 GB |
Pricing
DiskInternals Uneraser is certainly on the affordable side of the data recovery software market – especially because it’s not subscription-based (you only need to pay once). That said, we can’t say it’s a crazy good deal because both its interface and capabilities are lacking.
On the other hand, most of its competitors are $20 ~ $40 more expensive; Uneraser also has a superior user experience and/or performance compared to free recovery apps. So, we do see its value for users who need a reliable budget-friendly tool to restore recently deleted or formatted data.
| License Type | Notable Features | Price |
| Free Trial | Unlimited scanning of drives and previewing of data | Free |
| Personal | Recover deleted files from storage devices and virtual hard disks, one year of free updates | $39.95 |
| Business | Everything in Personal, ability to map severely damaged disks and partitions to a virtual disk, valid for commercial and governmental purposes | $79.95 |
| Pro | Everything in Business, license to provide recovery services to third-parties | Everything in Business, license to provide recovery services to third-parties |
DiskInternals Uneraser vs. Competitors
It’s easy to say that DiskInternals Uneraser is a good app based on our test. However, there’s a lot more to it than that.
As we previously mentioned, choosing the “right” data recovery software comes down to knowing your priorities and determining an app’s value based on those priorities. Then, you want to compare that value against its competitors (which serve as suitable alternatives).
That would take a lot of time and research… If you didn’t have us! Based on our years of experience analyzing recovery software, we compiled Uneraser’s closest competitors along with their features and pricing info. Compare them side by side in the table below.
| Data Recovery Software | Price | Subscription Types | Free Trial | Best Features |
| DiskInternals Uneraser | $39.95 ~ $79.95 (Pro license requires contacting them) | Lifetime | Unlimited scan and preview, no free data recovery | Good at restoring recently deleted files, info-rich interface may be useful to certain users |
| R-Studio | $79.99 | Lifetime | Unlimited data recovery for files sized 256 KB and smaller | Affordable price for many uncommon powerful features and reliable performance |
| iCare Data Recovery | Free ~ $69 (annual), $399.99 (lifetime + unlimited PCs) | Annual, lifetime | Free unlimited data recovery for recently deleted files only and free 1 GB data recovery with complete features | Generous offering of free data recovery paired with acceptable performance |
| Disk Drill | Free ~ $69 (annual), $399.99 (lifetime + unlimited PCs) | Lifetime | Free 500 MB data recovery (valid for Windows versions only) | Good mix of powerful features and user-friendliness, great 2-for-1 license deal |
Verdict
In summary, DiskInternals Uneraser is a competent and usable data recovery software, especially for recently deleted files. We find its price point acceptable for its performance, but we hope to see major improvements to its user experience down the line – otherwise, it may soon be left in the dust.
We can recommend Uneraser to users on a strict budget who need a reliable tool for simple data loss scenarios, such as accidental deletion and formatting. However, you can have access to superior performance and usability if you’re willing to spend a bit more.


