 There are lots of reasons you might want to get data from old hard drives. Perhaps you were rummaging through your storage and came across an ancient drive that might have some nostalgic photos. Or perhaps your previous PC finally died on you before you could extract the info from the hard disks.
Either way, in this guide, we’ll show you how to get data off an old hard drive depending on what shape the storage device is in.
Table of Contents
Can Data Be Recovered from an Old Hard Drive?
Getting files off old hard drives mostly depends on the overall state of the device. After all, with age, hard drives become more likely to become afflicted with various issues, such as corruption or malfunction.
Let’s take a look at some of the most common cases you may encounter when dealing with an old computer hard drive and the best way to recover data from them.
Case 1: The Old PC is Dead, but the Drive is Operating
It’s not uncommon for an older computer to meet an untimely demise while keeping its hard drives intact. For cases like these, you can use an old hard drive on a new computer and access the files from there.
To accomplish this, here’s what you’ll need to do:
- To start things off, you’ll need to remove the drive from your dead PC.
- From there, you have to connect it to a working computer. You can do so externally using an old hard drive adapter or enclosure. Alternatively, you can connect it directly to the computer using the necessary cables.
- Once you connect the old hard drive to a new computer successfully, it should be able to access the files on the old hard drive, allowing you to copy anything you need.
Case 2: The Old Drive is Working but Corrupted
Another fairly common scenario is when the drive is still functional, but you’re unable to access files on old hard drives because the drive became corrupted.
Just like in the previous case, you’ll need to connect the device to your computer either directly or through an adapter or enclosure. After that, it’s best that you create a byte-to-byte backup of the drive and use an exceptional data recovery program to scan and recover files from the backup. That way, you’ll prevent any further data loss.
Disk Drill comes highly recommended, given its first-rate recovery capabilities, lightning-quick scans, and well-crafted UI. Plus, it already includes a byte-to-byte backup feature, so you can create a backup and perform the recovery with the same program.
It’s adept at rescuing files that disappeared from external drives on Mac and Windows machines. But of course, you won’t have to invest in the software right away either since the trial version lets you restore up to 500MB worth of files on Windows.
To create a backup and retrieve data from an old SATA drive, simply follow the steps outlined below:
Creating a Byte-To-Byte Backup Using Disk Drill
- To get started, head to the Cleverfiles website and download the latest version of Disk Drill.
- Launch the downloaded setup file and follow the instructions on the screen until successfully installed.
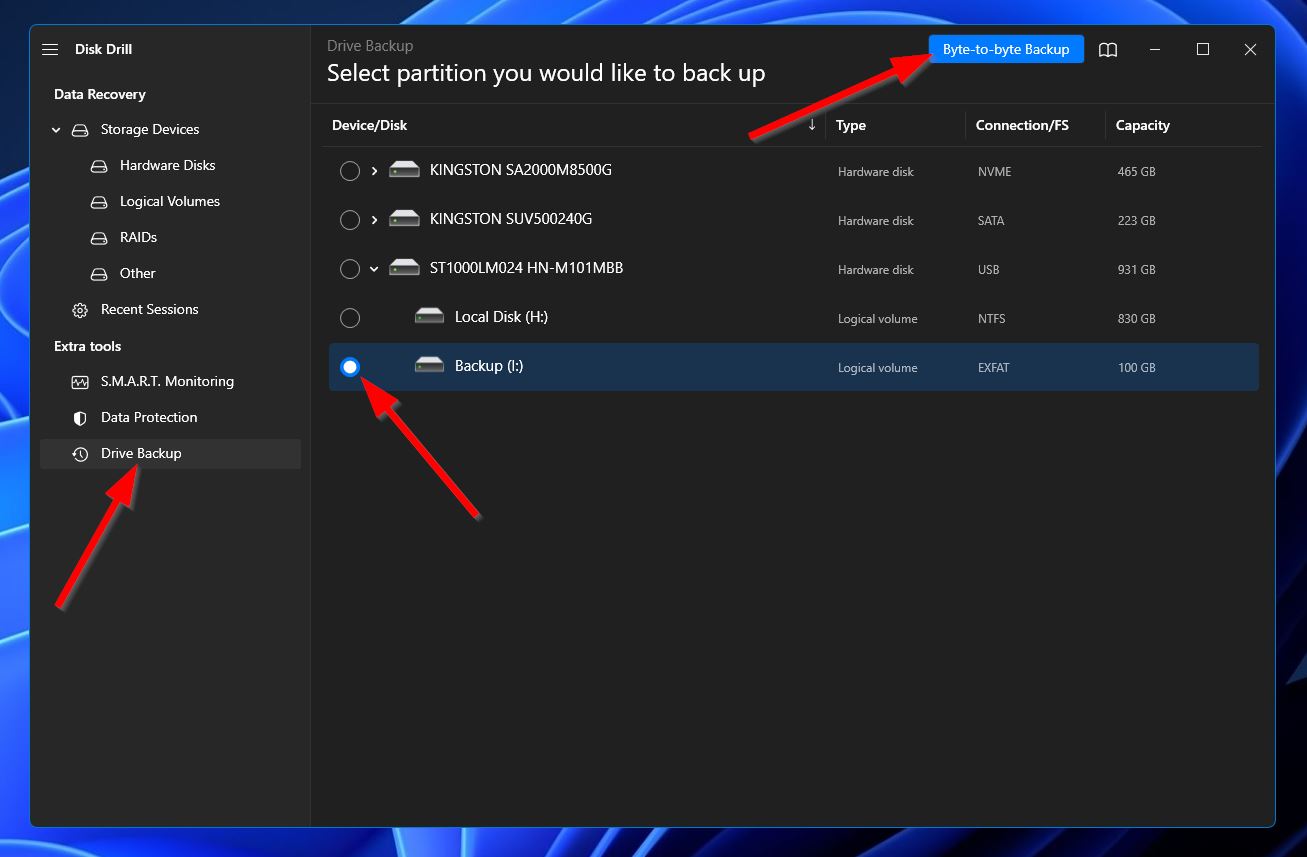
- Next, make sure that your old hard drive is properly connected to your PC, then run Disk Drill. From there, click “Drive Backup” in the bottom-left corner of the window and select your hard drive from the list of available storage devices. Once you’re ready to move to the next step, click the “Byte-to-byte Backup” button in the top-right corner.
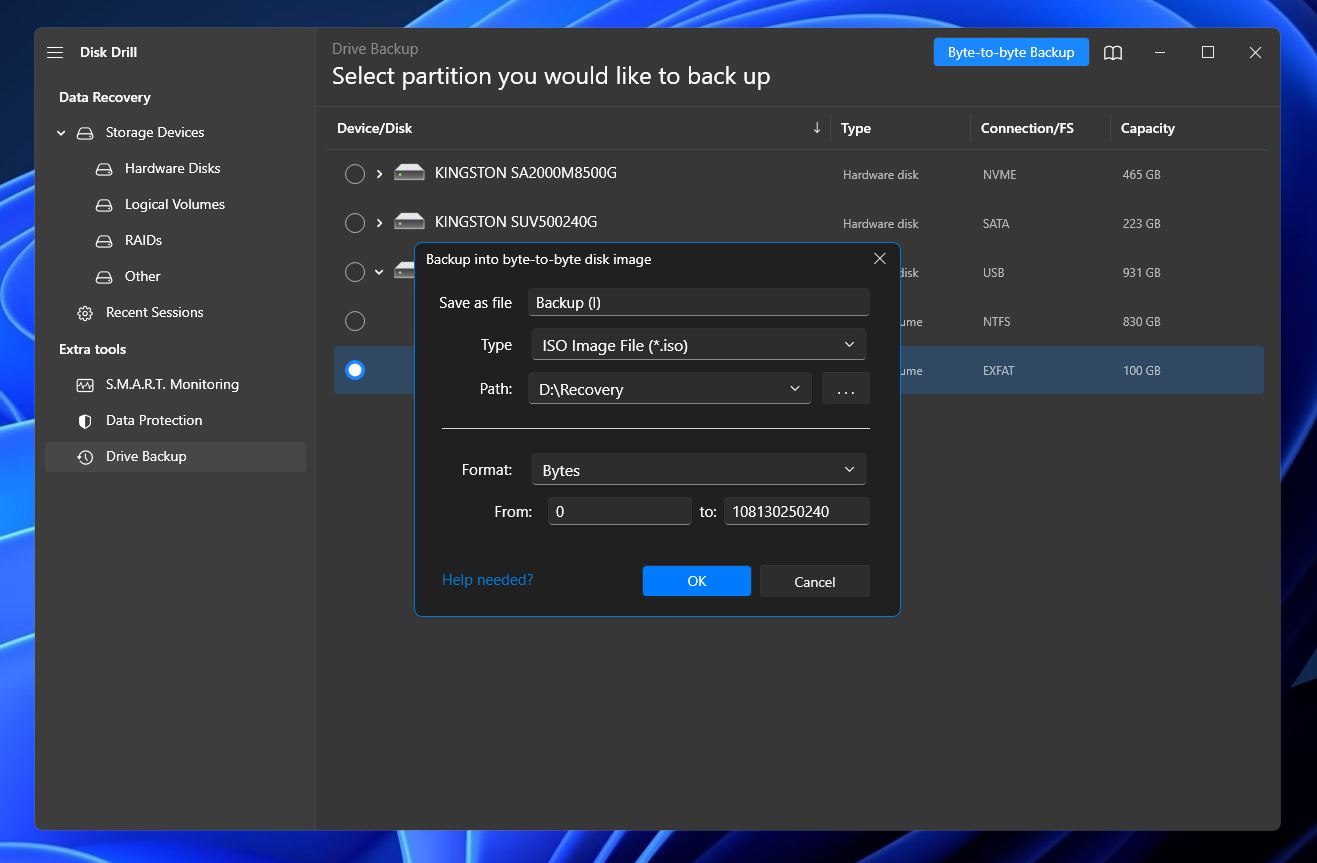
- Upon clicking, a pop-up will appear where you can configure the backup details. This includes the file name, format, path, and more. Click “OK” to proceed.
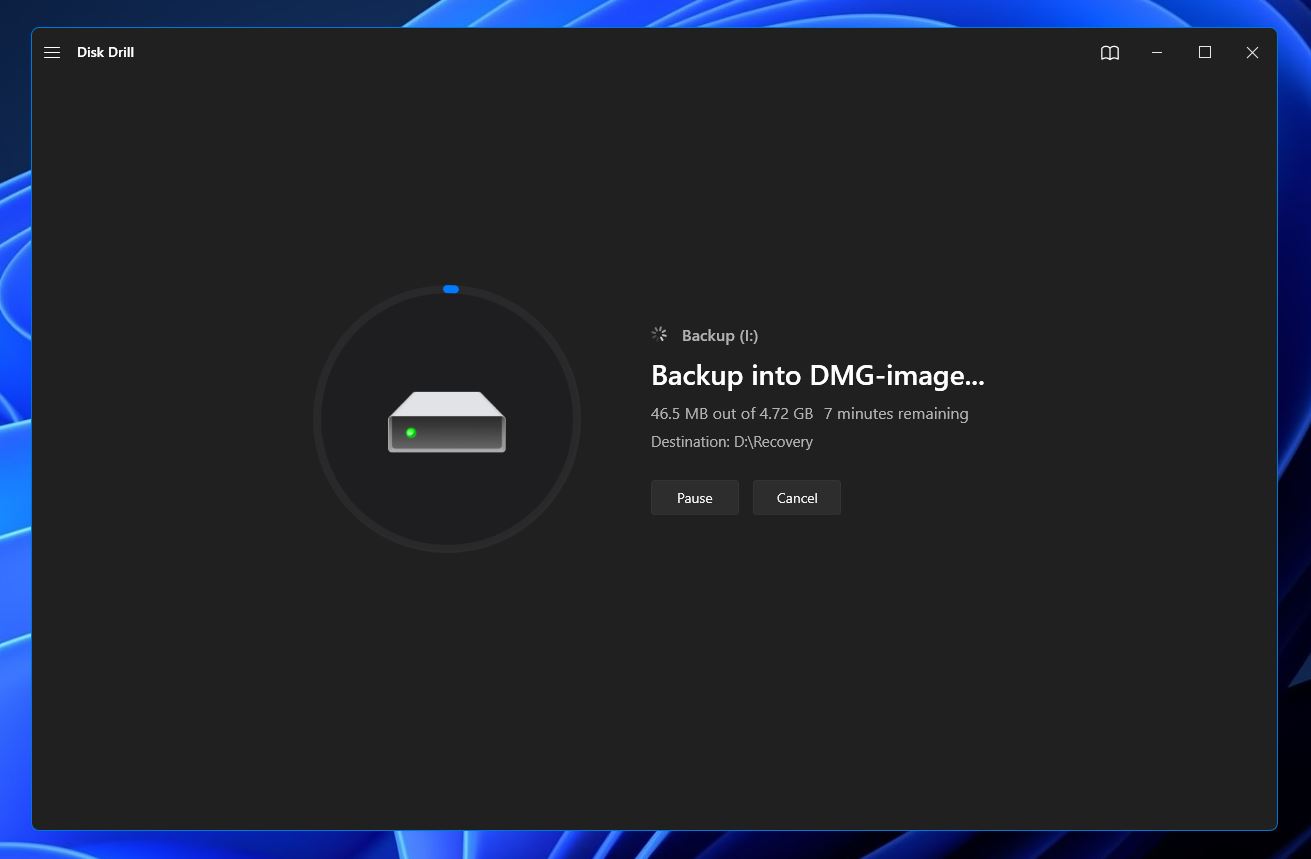
- After that, Disk Drill will now begin creating the backup. The overall duration of this process depends mostly on the capacity of your hard drive. When it’s done, you’ll be greeted by a completion screen. Then, you can click the home icon to return to the program’s home screen.
Recovering Data From a Backup Using Disk Drill
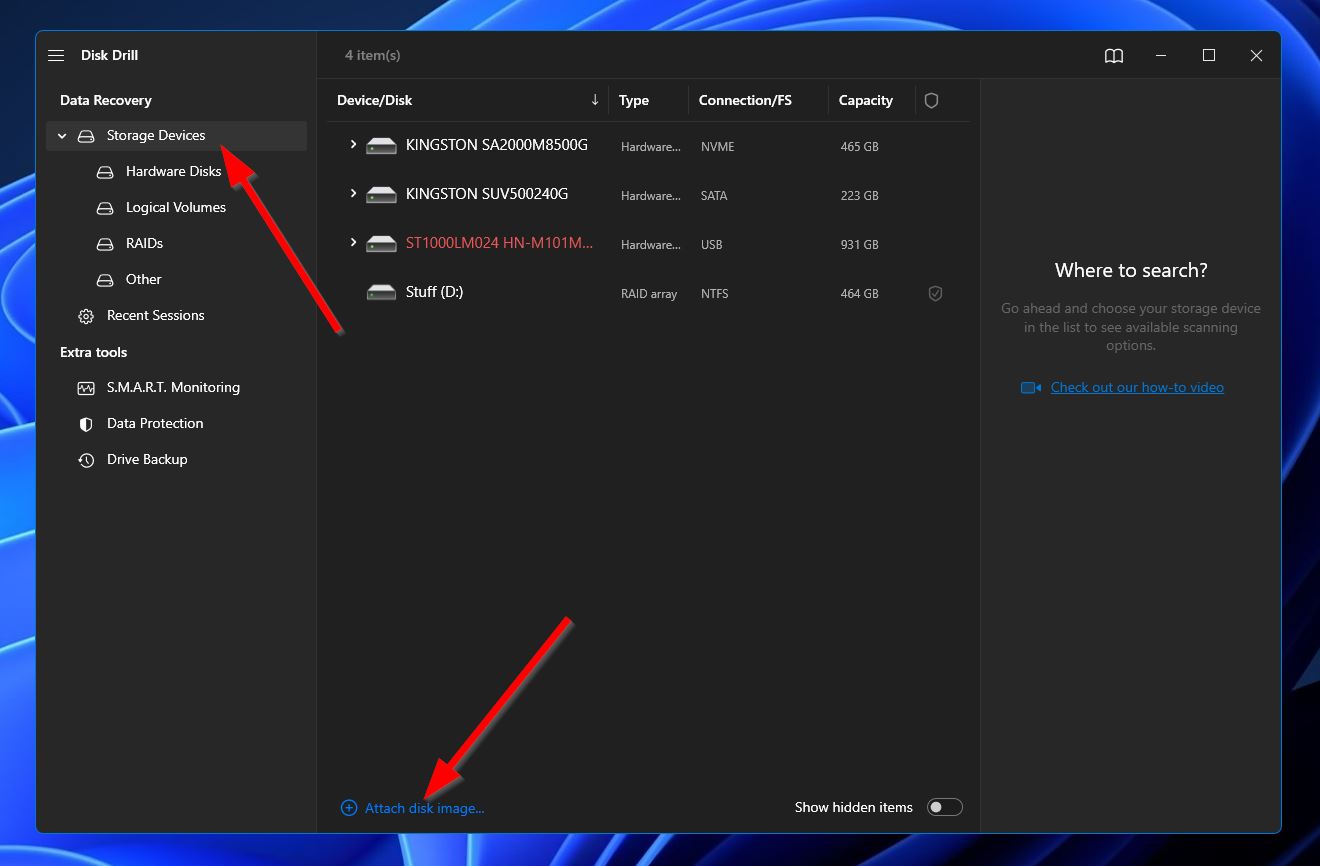
- From the Disk Drill homepage, make sure you’re on the “Storage Devices” section in the left-side panel and then click “Attach disk image” near the bottom of the window.
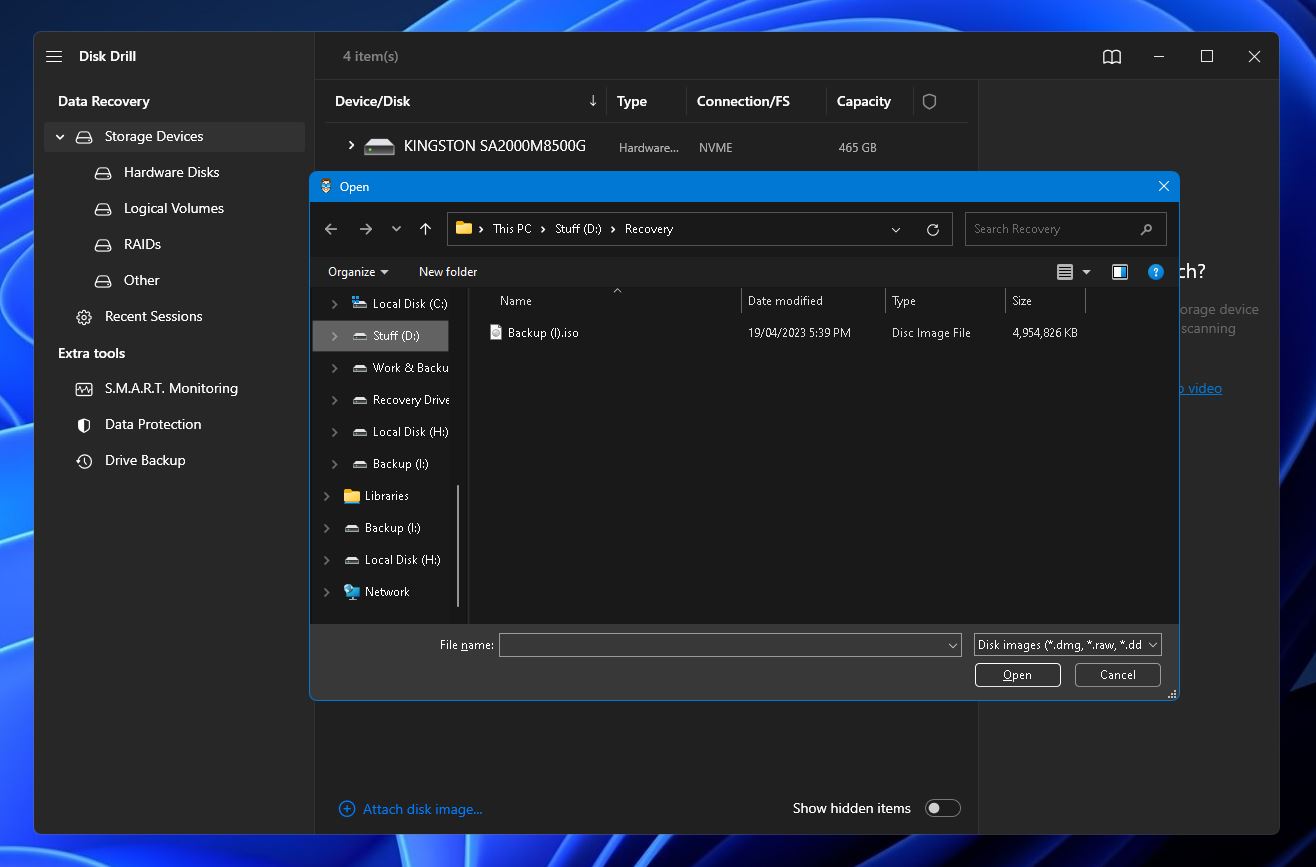
- Next, a pop-up file explorer will appear where you’ll need to open the byte-to-byte backup you created in the previous section. Once done, the backup will appear in the list of available storage devices.
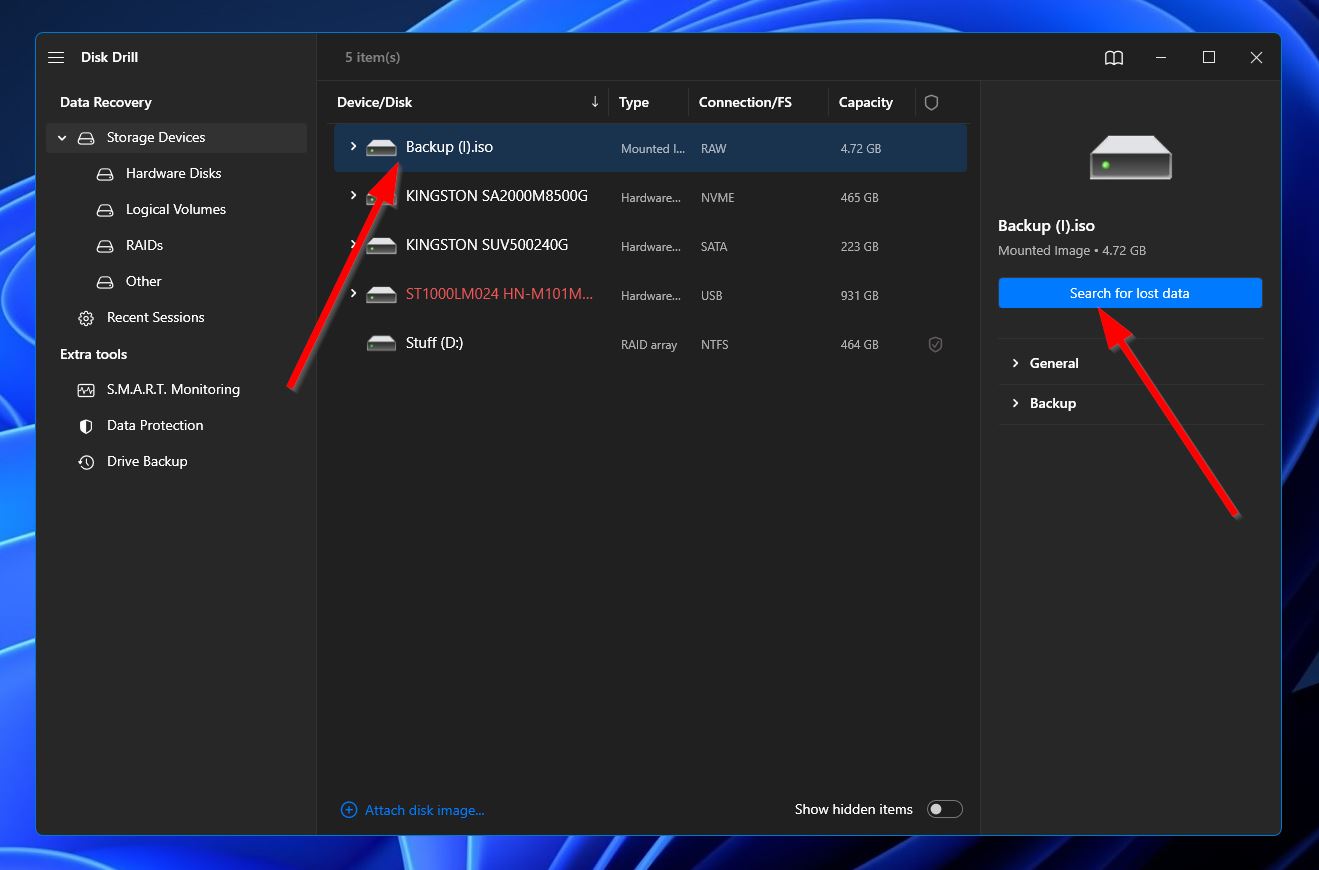
- Select the backup from the list and click “Search for lost data.”
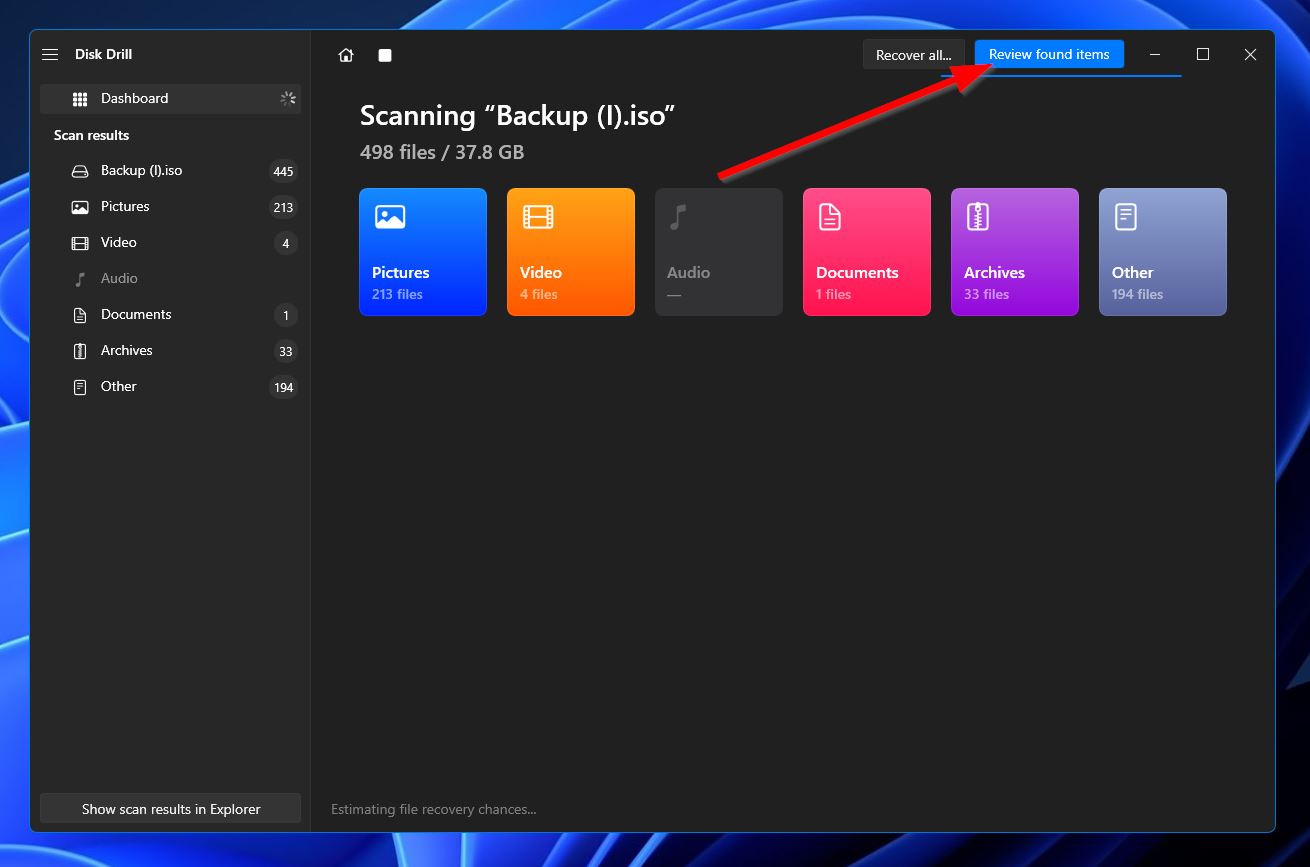
- Upon clicking, Disk Drill will start scanning the hard drive backup for any files it can recover. While waiting for the scan to finalize, you can click the “Review found items” button at the top-right corner to switch over to the results screen. That way, you can sift through the found files while the scan progresses. You can also opt just to wait for the scan to end first before clicking the same button to continue.
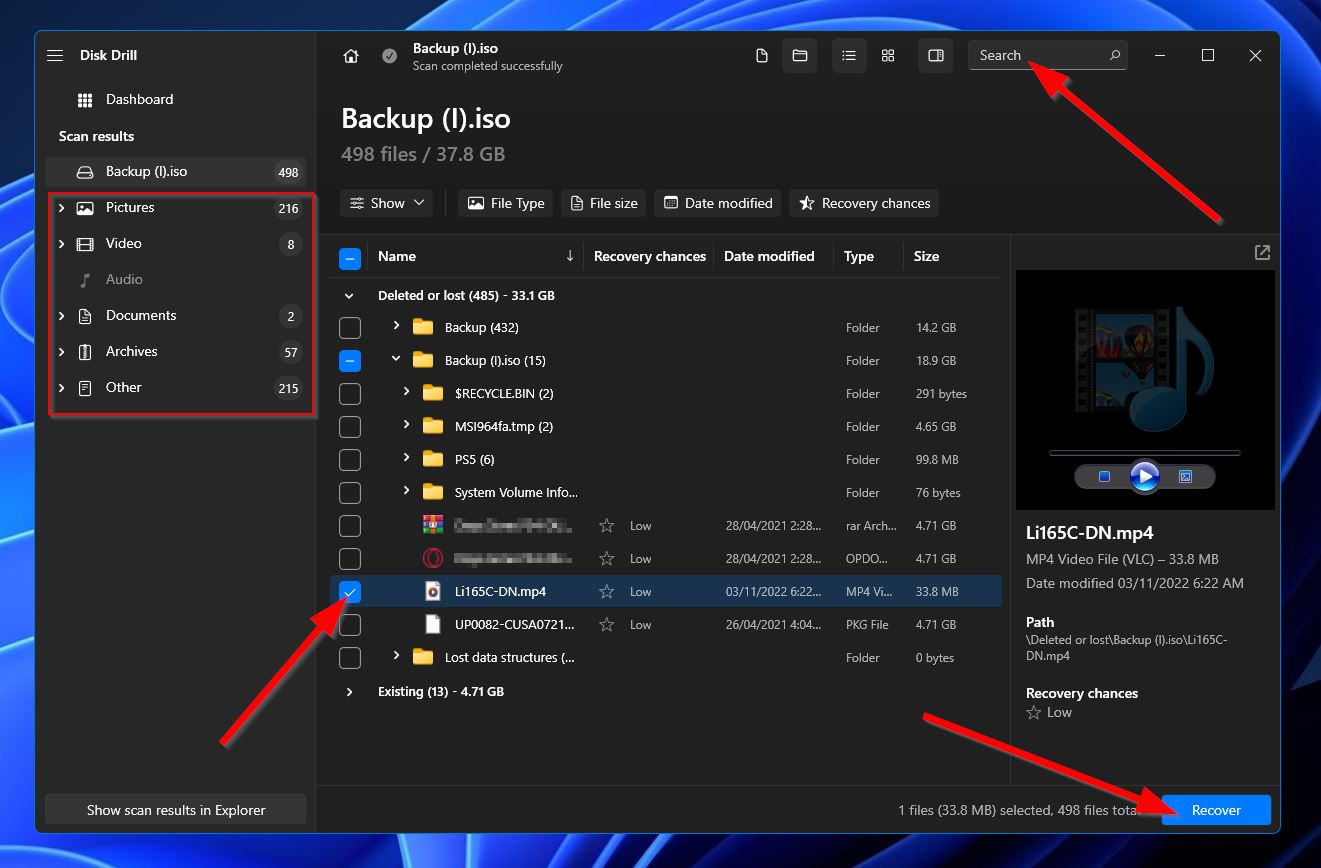
- Once done, you can now browse through the files shown in the results section until you find the ones you want to recover. You can make the search easier by using the category filters on the left or the search bar in the top-right corner. Keep in mind that the search bar accepts both file names and file extensions. Once you locate the files, select them by ticking the checkboxes on the side of the filenames. When you’re ready, click the “Recover” button.
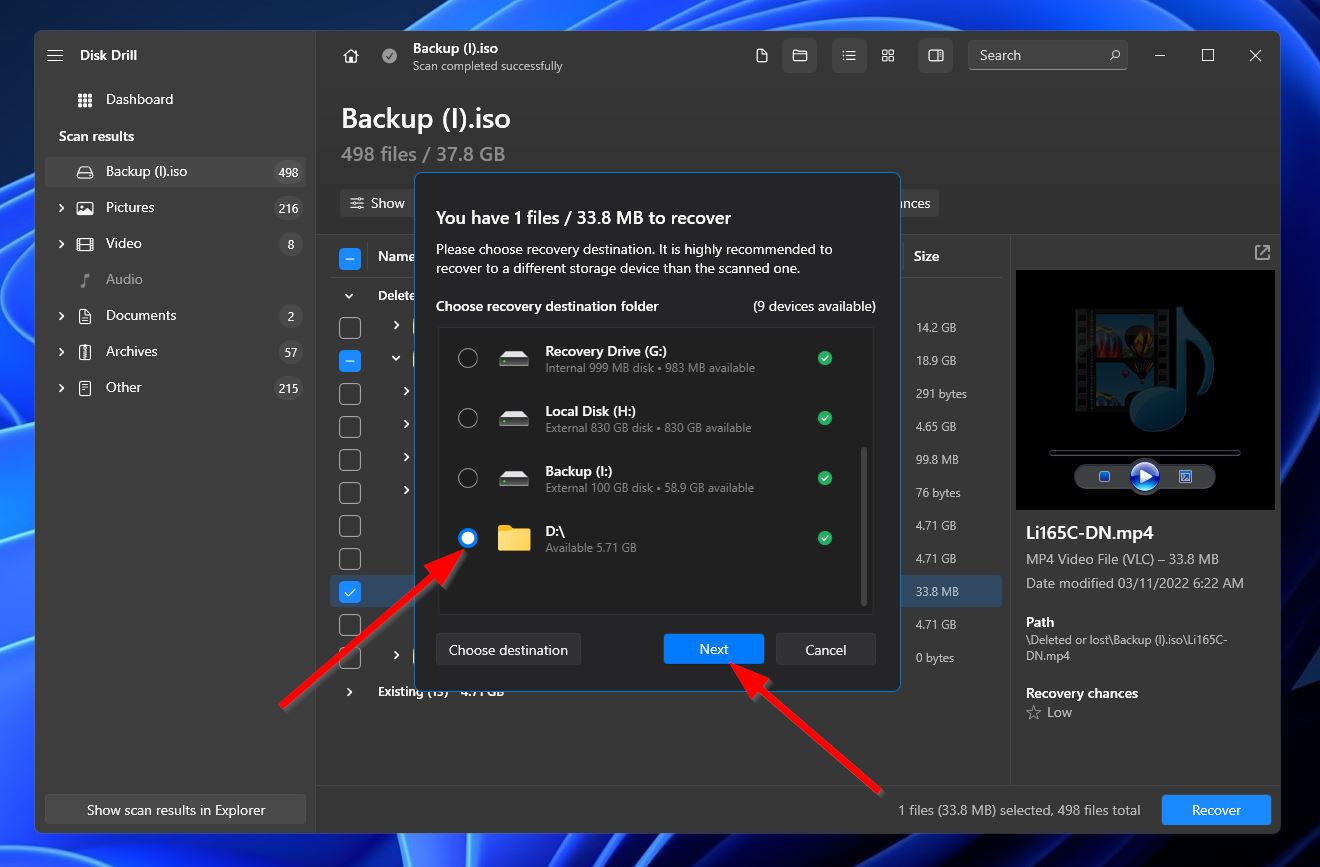
- Next, a small window will appear where you’ll need to set the destination of your retrieved files. After you’ve decided, click the “Next” button to start the recovery process.
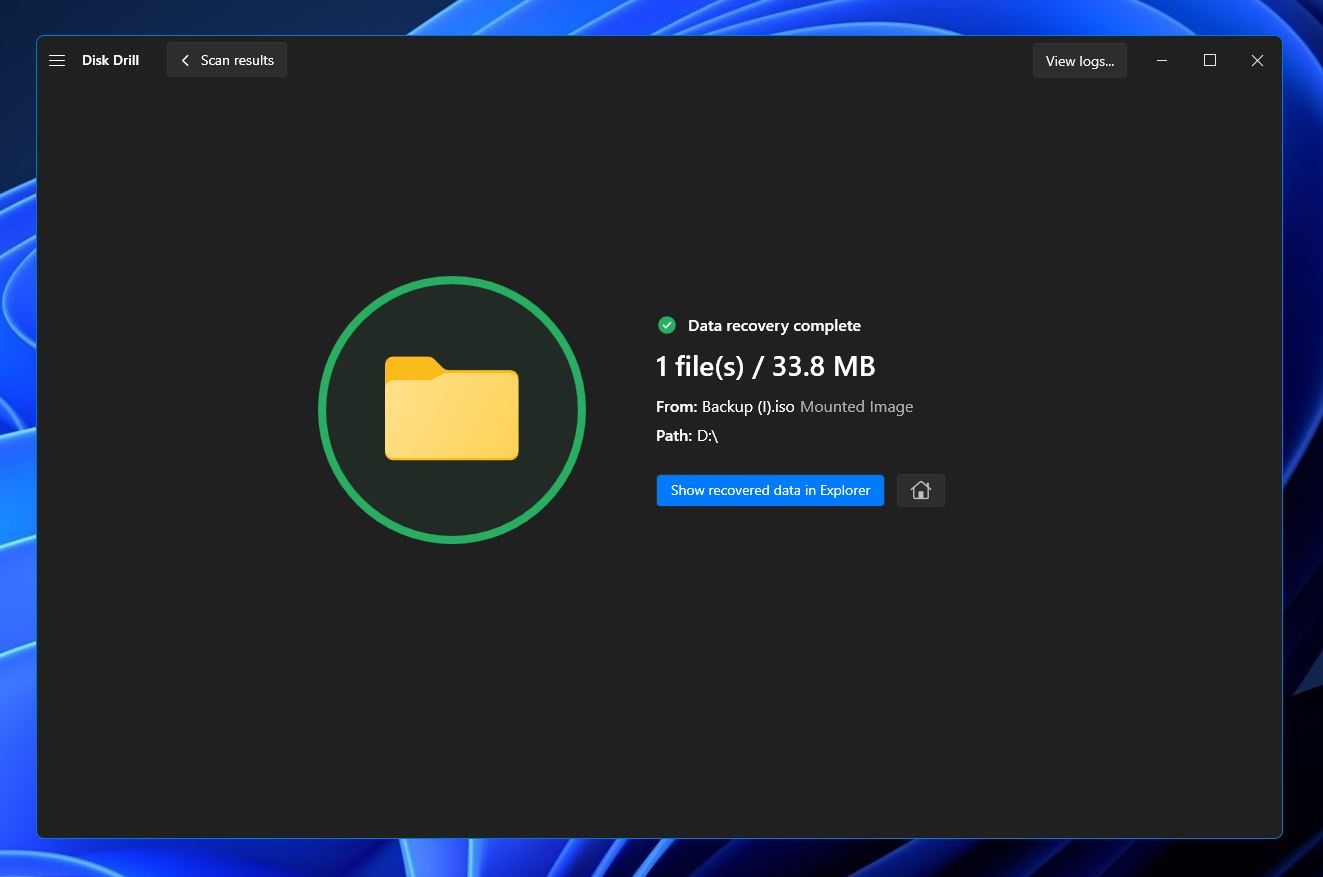
- Upon the success of the data recovery process, you’ll be greeted with a completion screen. You’ll also see a button labeled “Show recovered data in Explorer” that you can click to immediately open the folder where your rescued files are located.
After you’ve created a byte-to-byte backup and recovered the necessary data, you can attempt to fix your old hard drive through different methods. CHKDSK is a built-in Windows tool that thoroughly scans the overall integrity of the drive and attempts to repair any system errors it comes across.
And, since you already have a backup, you can try formatting the hard drive to see if that helps it function properly again.
Case 3: The Old Hard Drive Is Dead
In the unfortunate scenario where the old hard drive itself is the one that’s no longer functional, data recovery programs won’t be of any help.
The best way to recover data from old hard drives in these cases is to research top-rated data recovery services that cater to your area. These services employ professionals who specialize in restoring data from storage devices in dire straits.
Another relatively controversial trick you can try is to stick your old hard drive in the freezer overnight. Yup, you heard that right. Doing so could actually help resuscitate your drive in certain cases, giving you some time to recover data from the drive. However, note that this is just a temporary solution.
- 📏 Board Expansion: Hard drives generate heat which, in extreme cases, could cause certain materials in the device’s board to expand. This, in turn, may cause the hard drive to stop working. Freezing the device has a chance of shrinking these materials back to an acceptable size, allowing it to function properly once more. Until they heat up and expand again, that is.
- 🛢️ Lubrication Failure: Older hard drives tend to run into lubrication trouble, as the lubrication would eventually wear out, and the moving parts of the device’s motor would stick. Freezing the hard drive can widen the distance between these parts, allowing for more leeway for the platters to spin properly again.
- 💿 Stiction (Short for “Static Friction”): Stiction may occur when the hard drive is turned off, and its heads land (and get stuck) on the part of the device called the landing zone. This happens more often when the drive is heated excessively and then shuts down right after. The dramatic drop in temperature may cause the heads to stick and prevent the hard drive from functioning properly once turned on again. Freezing the device could revive it long enough to copy data before getting stuck again.
Conclusion
There are quite a few ways to recover data from old hard drives, even if they’ve become corrupted or are no longer functional. If the device is still working, you can try performing hard drive data recovery yourself. Just keep in mind that you’ll need a working computer, along with an old hard drive adapter or enclosure to connect it with.
You could also connect the drive directly to the PC if you like. On the other hand, if the drive is dead, then you’ll need to reach out to a data recovery service for help. In some cases, placing the dead hard drive in a freezer may help if you’re willing to take the risk.
FAQ:
- Device corruption
- Significant physical damage
- File system unsupported by your new computer
- Uninitialized disk
- Connector/port trouble
- Driver issues
- Check the connectors to ensure they’re functioning properly. Whether you’re connecting the hard drive internally or externally, a good connection is vital.
- Check if the drive appears in your PC’s BIOS but not in Disk Management or Device Manager. If that’s the case, then there’s a good chance that the cable is no good.
- Uninstall all ATA drivers and force Windows to automatically install and configure them again. This method has proven to be quite successful with a lot of users.
- Find an ATA driver from your motherboard manufacturer’s official website.
- Use the “Import Foreign Disks” option in Disk Management. A hard drive may be marked as “foreign” when a dynamic disk is moved from one computer to another.


