
Accidentally deleted some important files from your laptop? Or did malware and other uncontrollable factors make your files disappear? It’s easy to assume that the files are gone for good and there’s no way to get them back. But that couldn’t be further from the truth. By following proper data recovery etiquette and using good data recovery tools, you can easily get these files back.
The sections below take a deep dive on the laptop data recovery process and how you can maximize your data recovery chances.
Table of Contents
Reasons for Laptop Hard Drive Data Loss
Before proceeding to recover data from your laptop hard drive, it’s advisable to determine what caused the data loss. Different data loss scenarios require different approaches. For example, using a professional data recovery service when you simply deleted the files using the Delete key is a bit overkill. On the other hand, physical damage should only be dealt with by experts and DIY data recovery attempts will further ruin the drive.
Note: Regardless of the reason for data loss, it’s best to avoid using your laptop until you need to perform the data recovery procedure. Continued usage increases the chances of previously deleted files being overwritten by user or system created files.
To make your job easier, here are some possible reasons behind data loss on a laptop:
| Data Loss Reason | Description |
| 🚑 Accidental Deletion | Human error leads to accidental file deletion or, in some cases, accidental permanent file deletion (Shift + Delete). |
| 🗃️ Formatting | Mindlessly hitting the format button is another common cause of data loss. |
| 🦠 Virus or Malware | Installing malicious applications invites trojans and other dangerous viruses that can delete and corrupt files from your laptop’s hard drive. |
| 💿 Bad Sectors | Logical or physical bad sectors result in hard disk corruption and data loss from laptops. |
| ⚡ Power Outages | Abrupt power failures or surges can affect your laptop’s hard drive. |
| 🔨 Physical Damage | Blunt physical force and laptop hard drive disk head damage can lead to mechanical failure – and eventual data loss. |
| 💻 Software Corruption | File writing interruptions and partition table corruption are frequent culprits of data loss. |
Once you’ve determined the reason for data loss, you can proceed with data recovery. However, the recovery methods will differ depending on whether the laptop is working or not. Read on to know what to do in each case.
How to Recover Deleted Files from the Working Laptop
The method to recover deleted files from a working laptop will depend on whether you have a backup or not. In case you have a backup, you can simply restore it using File History, or Backup & Restore (Windows 7). Don’t have a backup? No worries, you can use a third-party data recovery tool to get back your deleted files in a few simple steps.
Let’s take a look at both these data recovery methods below:
Method 1: Use Laptop Data Recovery Software
When a file is deleted from a laptop’s hard drive, it’s not technically “wiped” from the drive (unless you use specialized data shredding tools). The file is simply marked as invisible, and the data blocks it occupied can now be used by new files. Consequently, new files overwrite these deleted files. As long as you don’t write new files to the drive, these old, deleted files can be retrieved by third-party data recovery tools.
Note: Modern laptops often come with M.2 SSDs, which can complicate the data recovery process. This complication arises due to the TRIM command, which clears unused data blocks for better efficiency and SSD longevity. The TRIM command is periodically executed. Data recovery becomes difficult, if not impossible, after TRIM.
When it comes to third-party data recovery programs, you’re spoiled for choice. There are hundreds of programs, all claiming to be the best. However, you need to pick one that has a proven track record, is easy-to-use, and has an excellent recovery rate. Keeping these factors in mind, we opted to use Disk Drill in our tutorial.
Disk Drill comes with a cutting-edge data recovery algorithm that supports data recovery from all types of storage drives and file systems, including laptop hard drives/SSDs. The program also lets you create and scan disk images, as well as preview files before recovery. Windows users can also take advantage of Disk Drill’s free trial which offers up to 500 MB of data recovery at no cost.
Here’s how you recover data from a working laptop using Disk Drill:
- Download, install and launch Disk Drill. You shouldn’t use the laptop for downloading or installation activities. As a result, install Disk Drill onto a USB or pen drive and then run the data recovery tool.
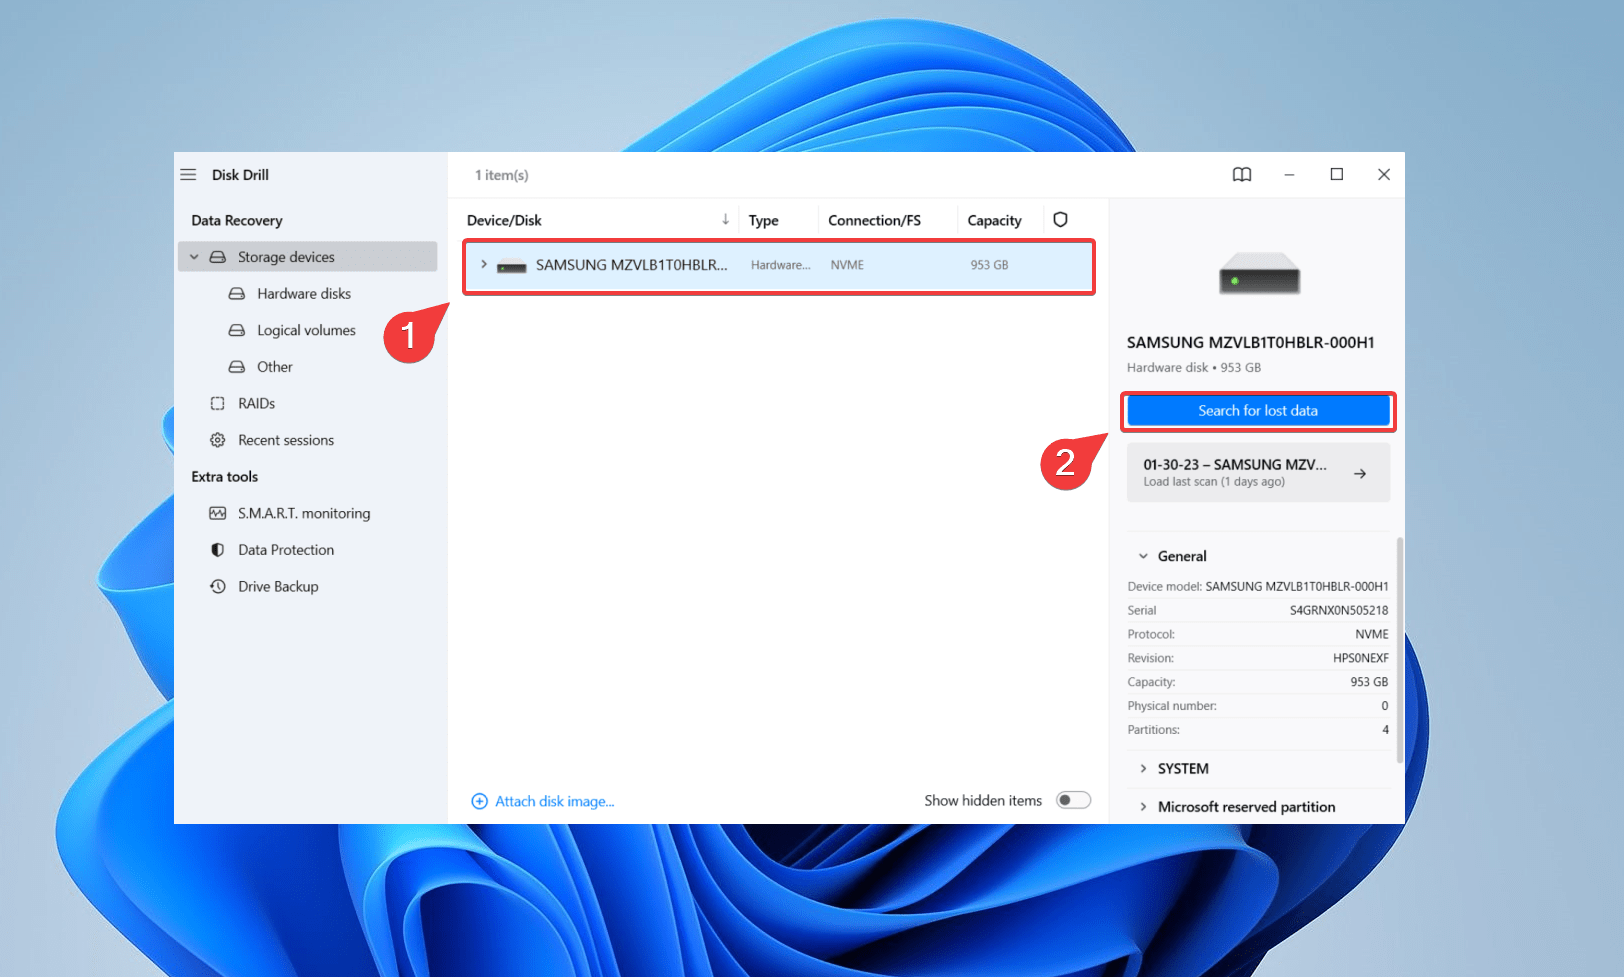
- Select your laptop’s internal hard disk from the list of available drives, and click Search for lost data.
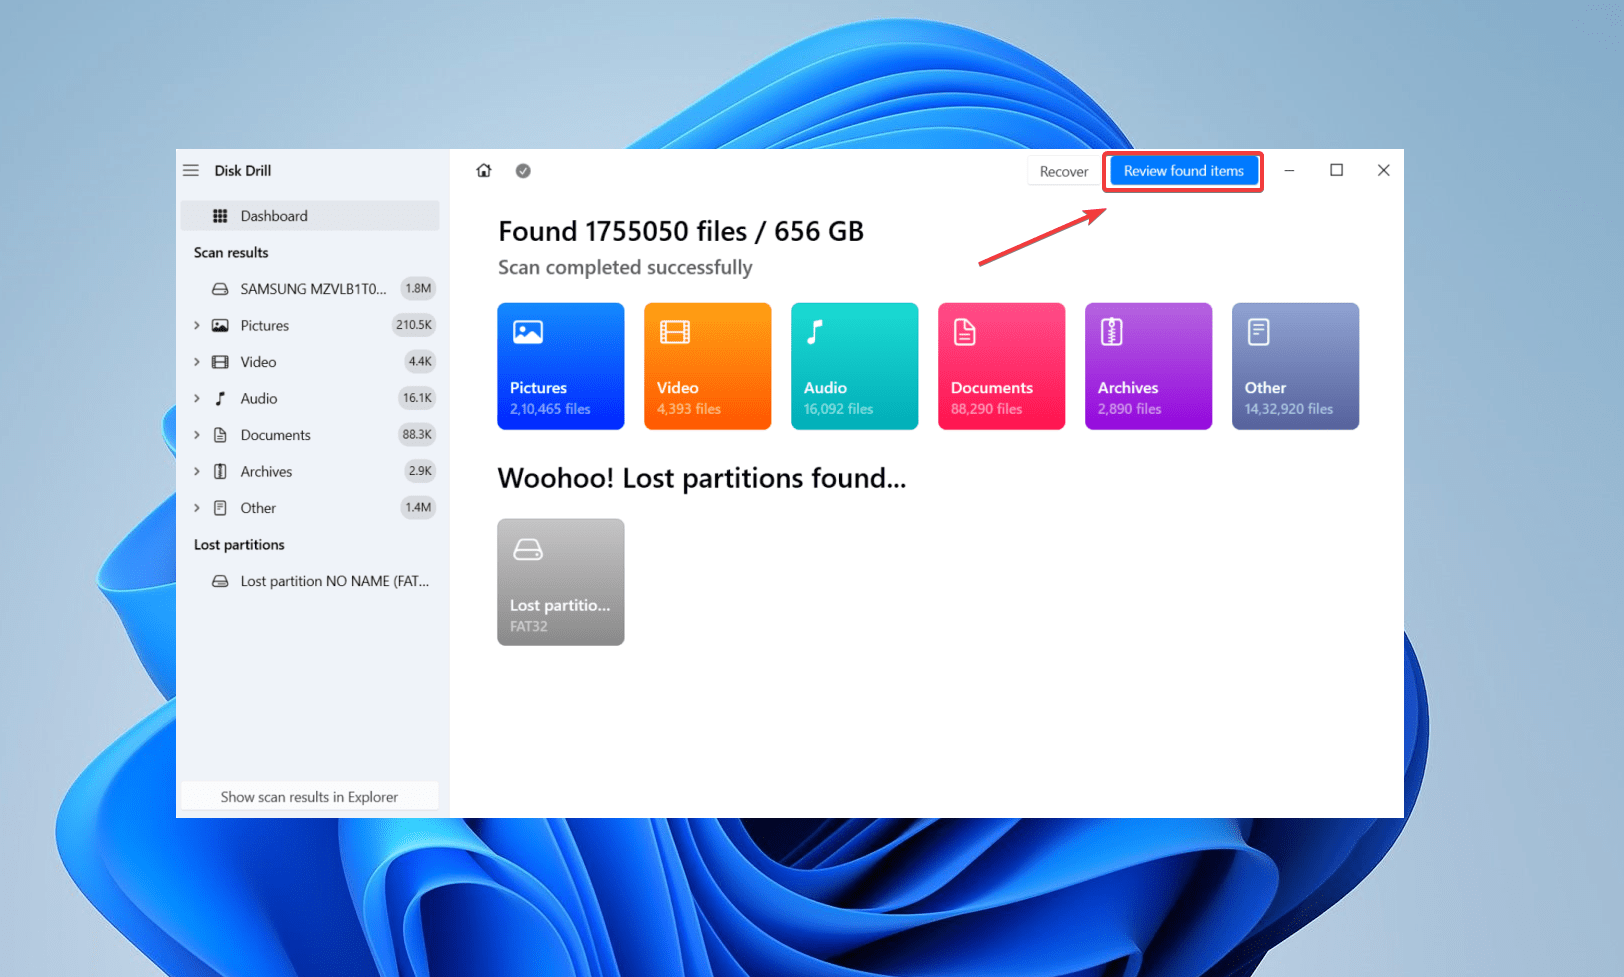
- Once the scan terminates, click on Review found items to scroll through the recoverable files on your laptop’s hard drive.
- Apply filters to refine the list. For instance, you can type jpg into the top right-hand corner and hit Enter to shortlist only jpg files for recovery. Leverage the preview feature by clicking the eye icon to reveal file attributes like the file location and last modified date.
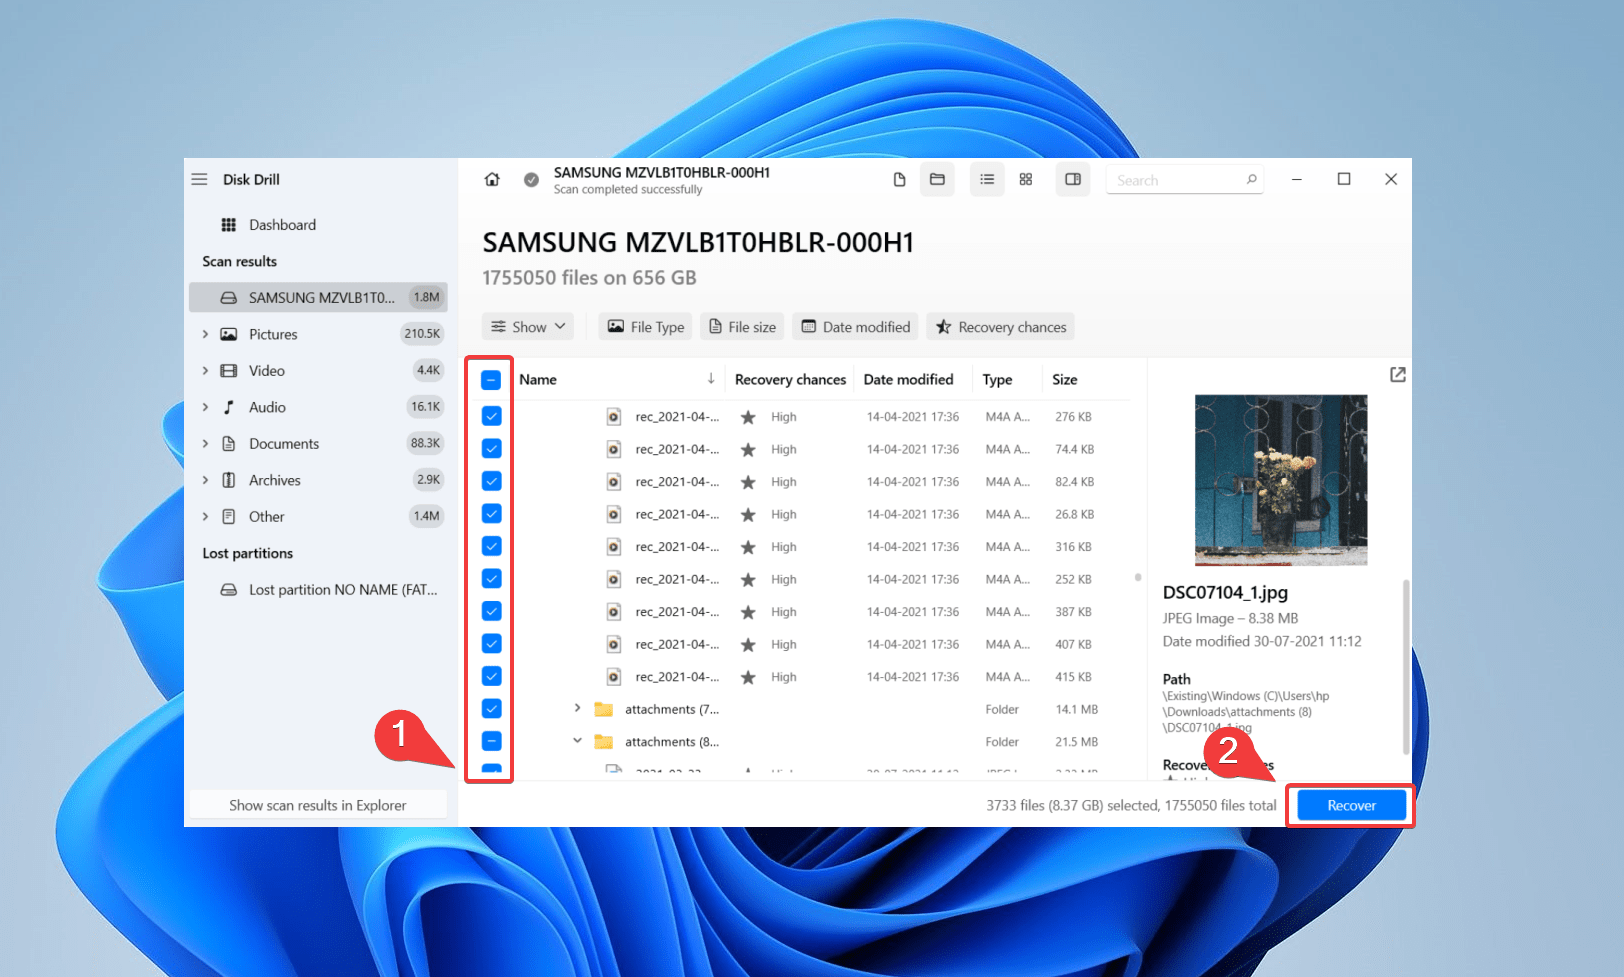
- Select the files you want to retrieve from the laptop’s hard drive, then click Recover.
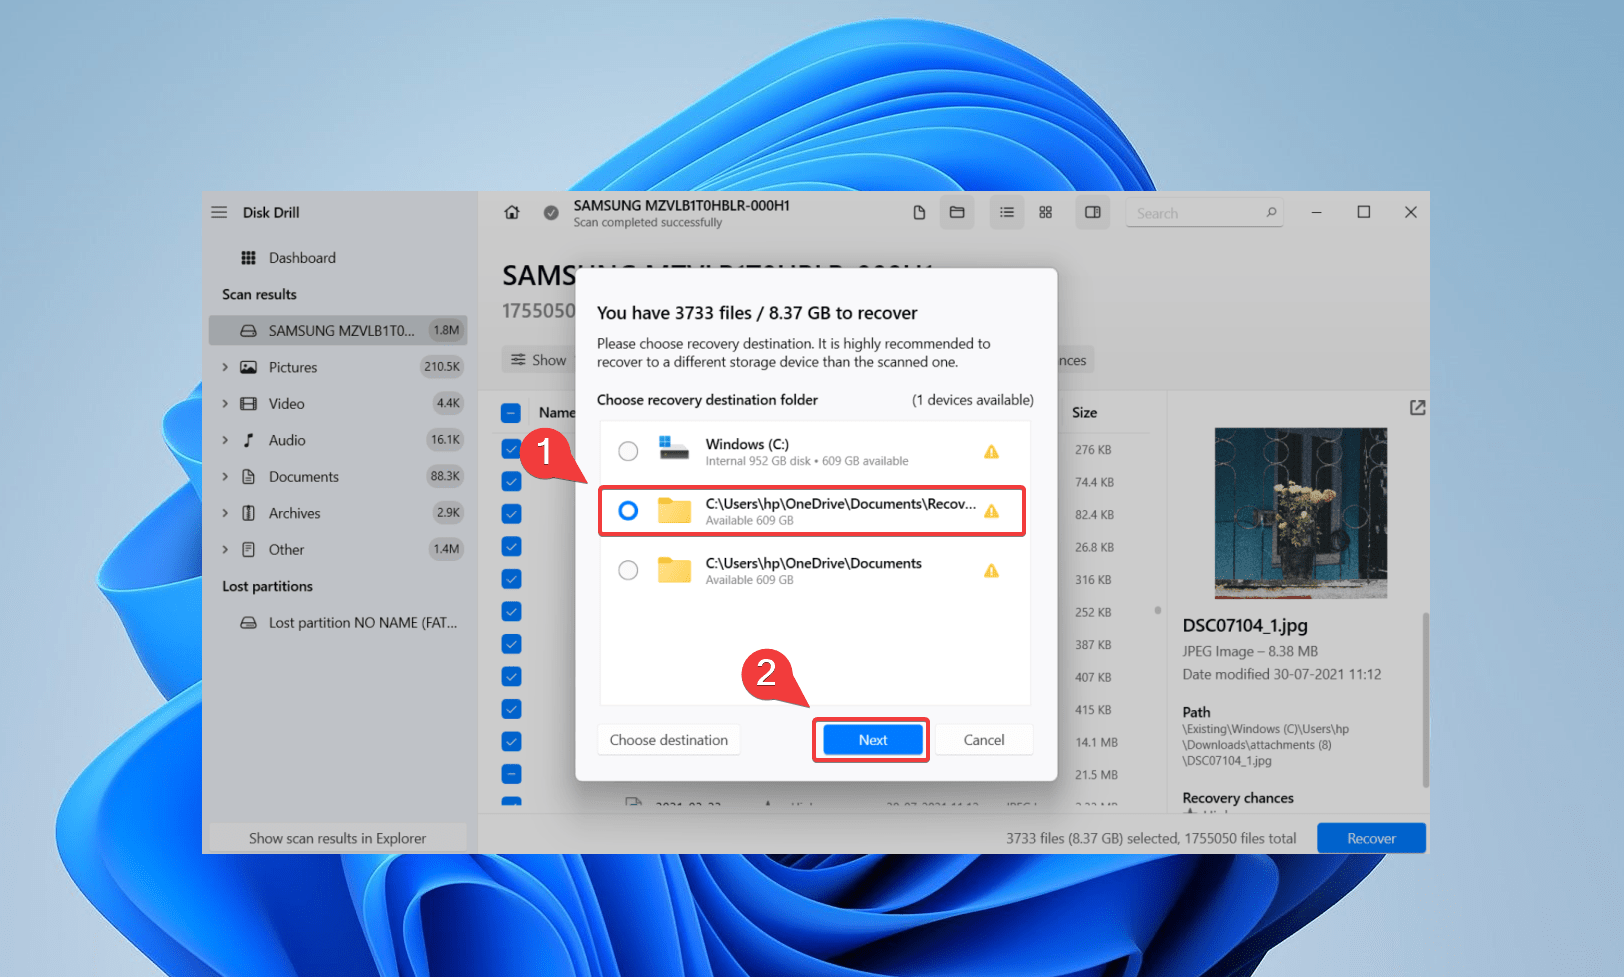
- The last step in recovering data from your laptop hard drive is to specify a destination for saving your recovered data. Again, save the files on an external device, not the affected laptop hard drive.
- Finally, click on Show data on explorer to view your recovered files.
Method 2: Recover Data from File History
For this method to work, you should have configured File History sometime in the past. If not, skip ahead to the next section.
File History periodically backs up pre-defined files and folders to an external storage or network location. File History performs continuous and proactive backups of your target files. Consequently, File History allows you to restore previous file versions.
💻 This tutorial features a Windows 11 Lenovo PC. On Windows 10, you can find the File History option in Settings > Update & Security > Backup.
Here’s how you can recover data from your laptop hard drive using File History:
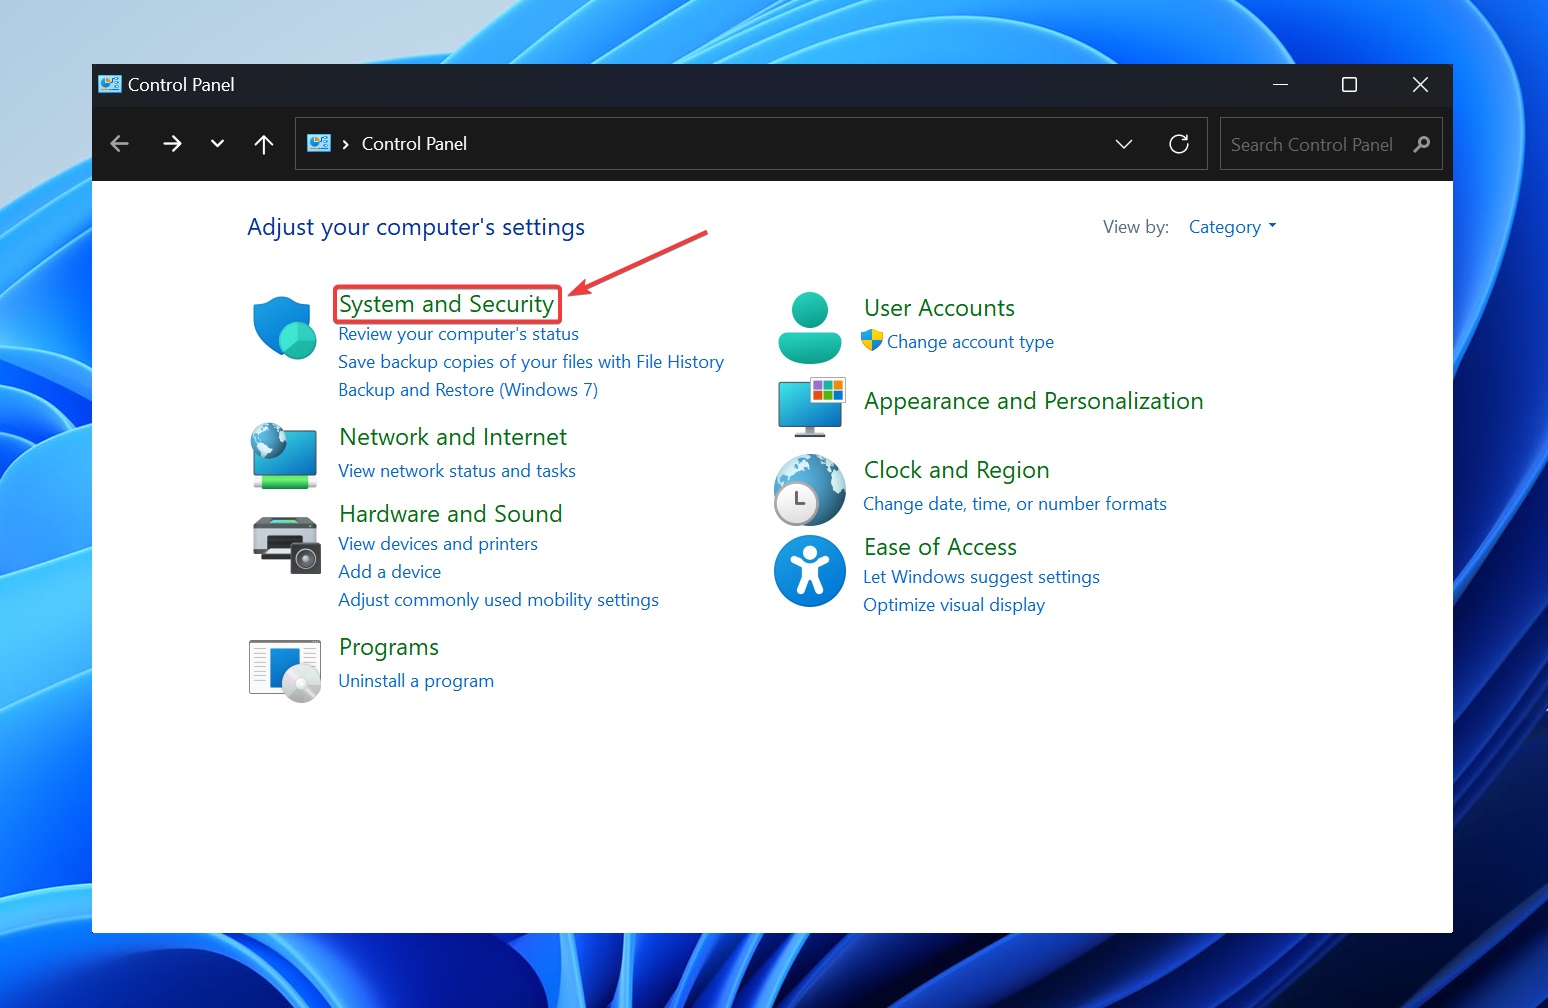
- Click Start > Control Panel > System and Security.
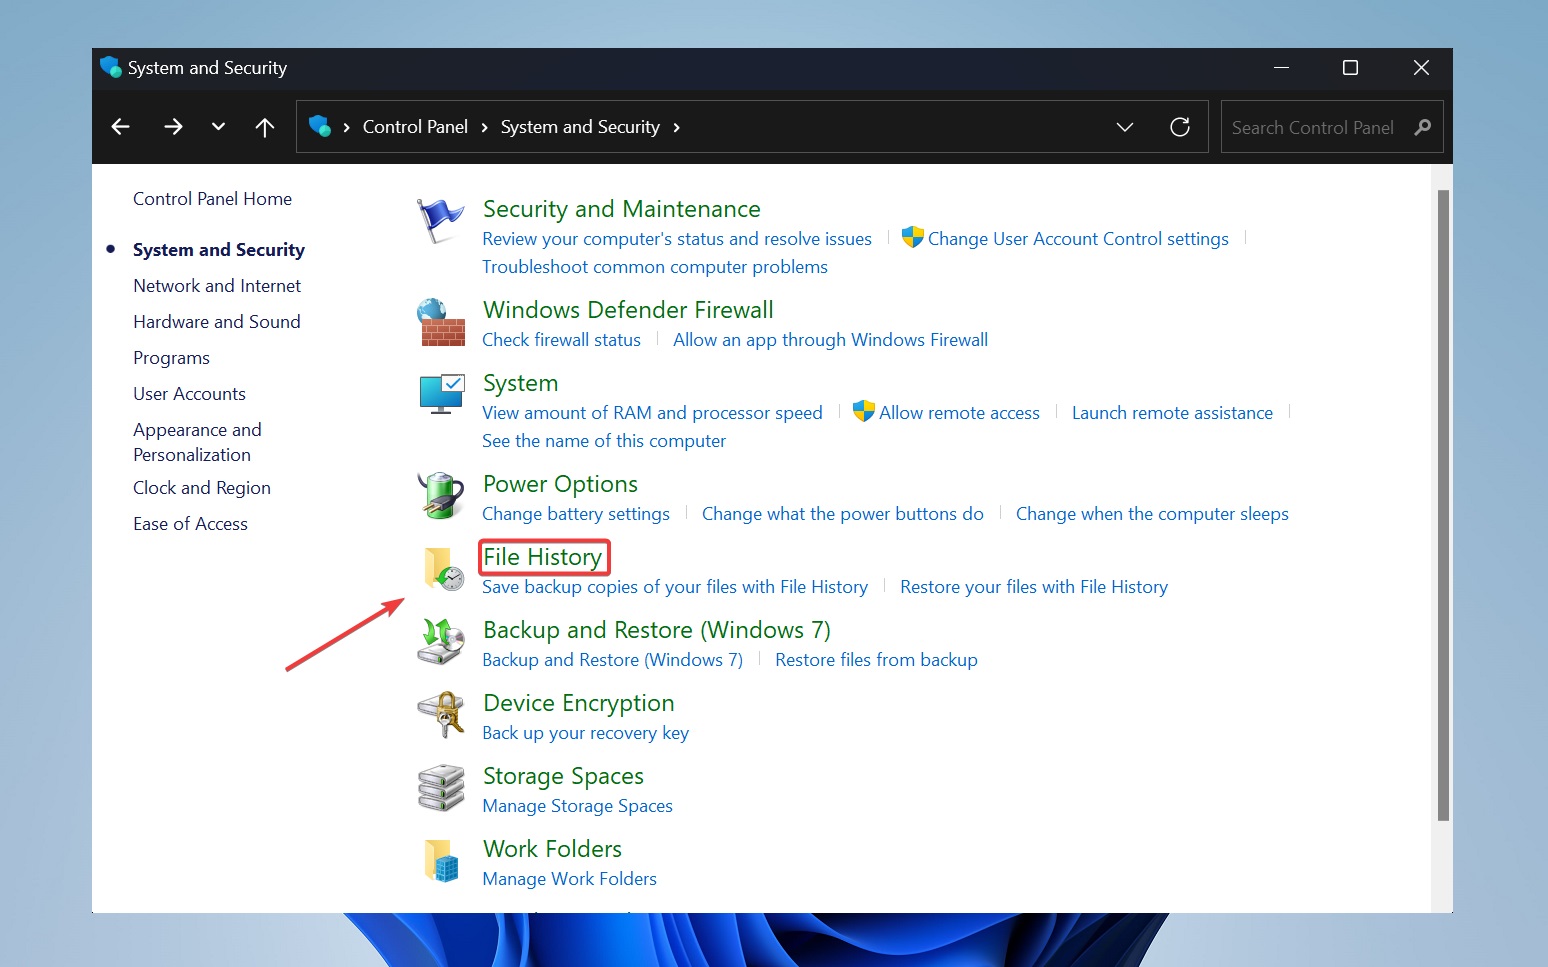
- Open File History.
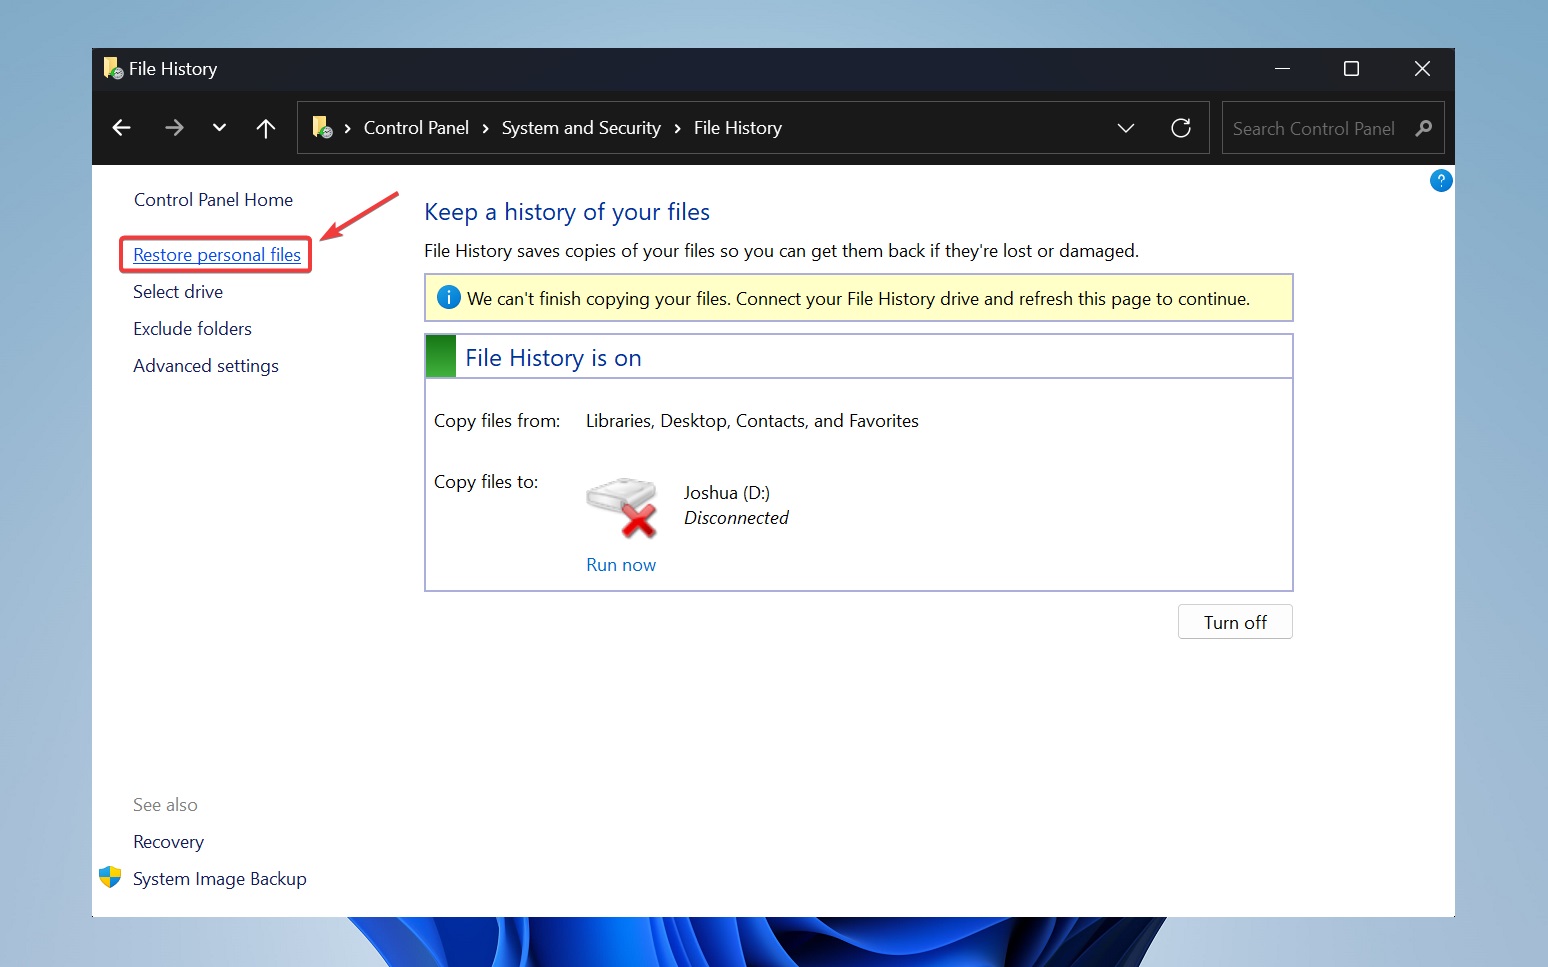
- Click on the Restore personal files button.
- Select the appropriate time frame and the files you would like to restore, and then click on the green button to retrieve your missing files.
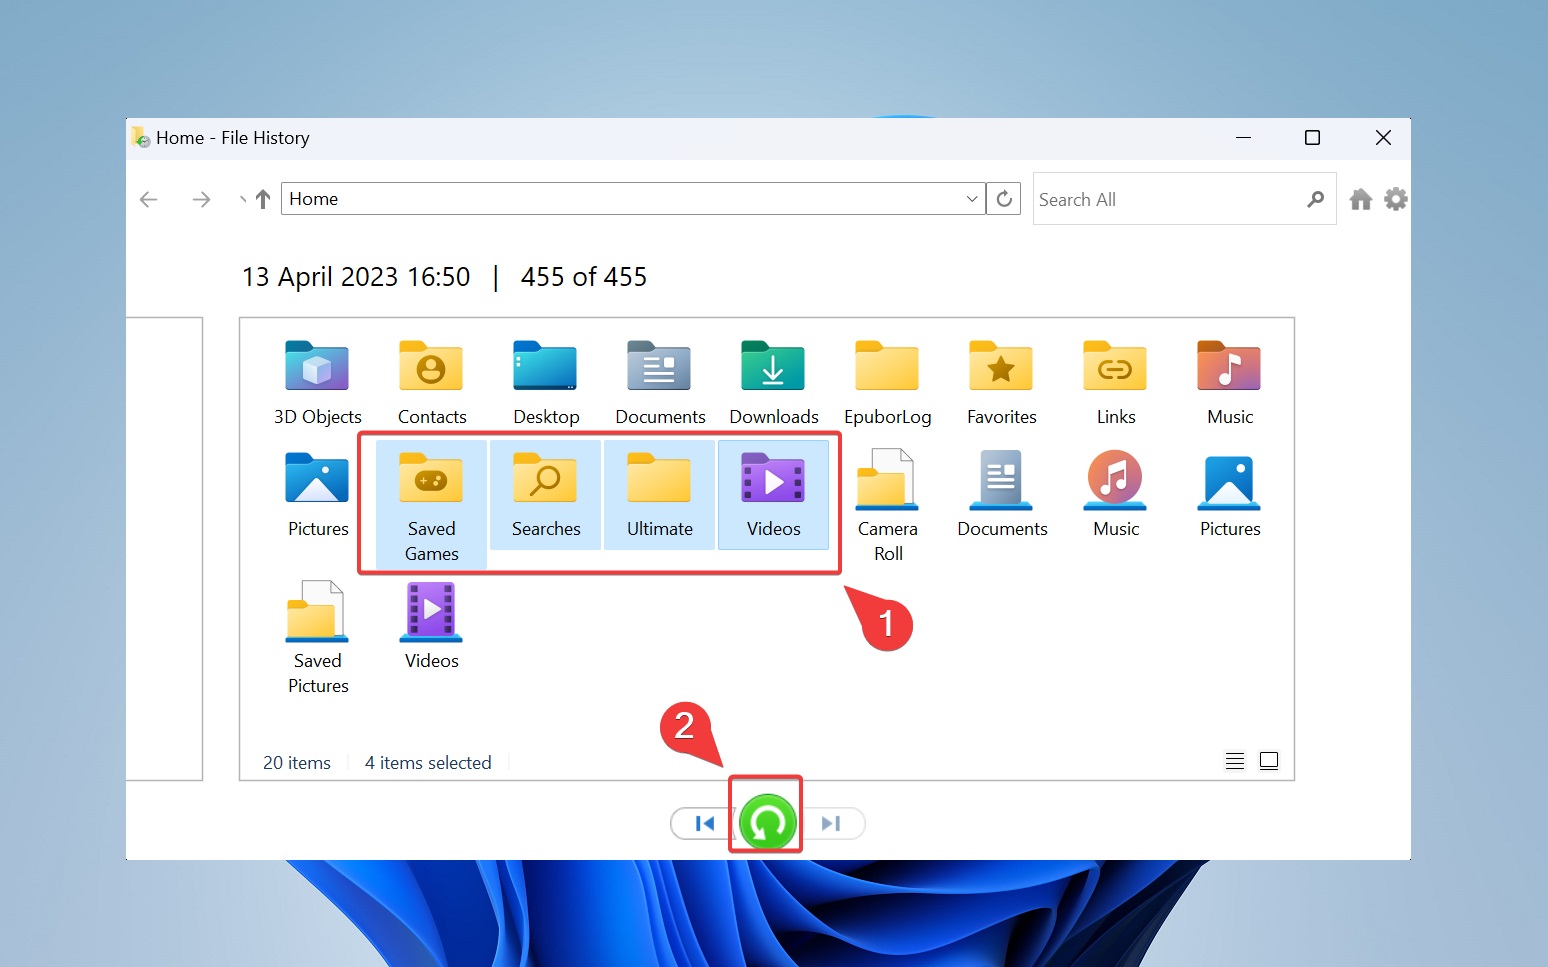
Note: Alternatively, click the gear button to save the restored files in a different location.
Method 3: Restore Data from Backup
Windows has a nifty native utility tool called Backup and Restore that facilitates the backup and restoration of files.
Again for this method to work, you should have configured a backup some time in the past. Here’s how you can restore your data from a backup:
- Navigate to Backup Settings > Backup and Restore (Windows 7).
- Now, click on Restore my files.

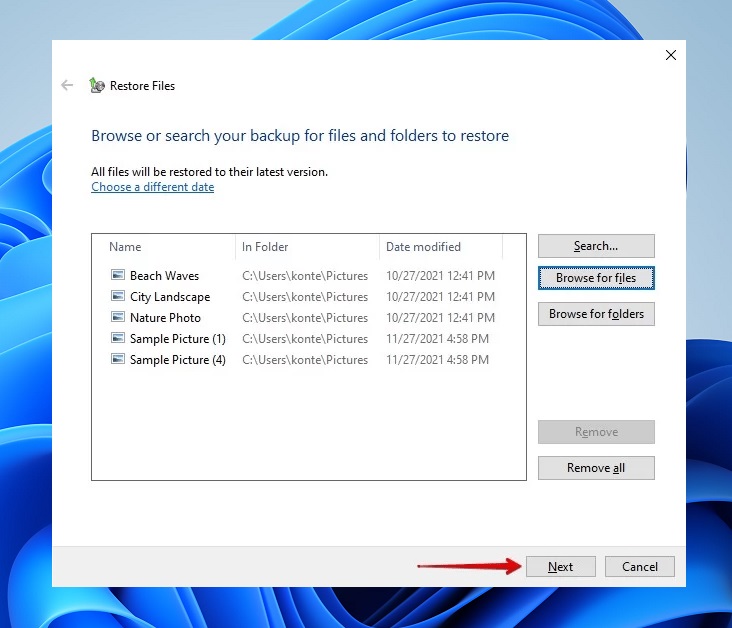
- Use the search button to select specific files and folders, and click Next.
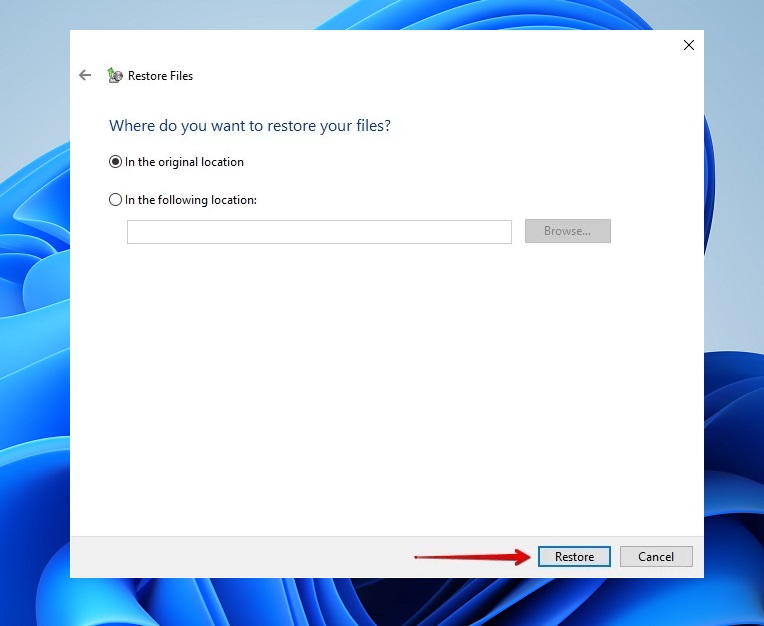
- Click Restore to complete the file restoration process.
How to Retrieve Files from a Broken or Dead Laptop
If you cannot boot the laptop for reasons like a broken laptop screen or a corrupted hard drive, don’t panic. This section entails some techniques on how you can transfer files from a broken laptop to another laptop or PC.
Method 1: Insert Laptop Hard Drive into Another Laptop or PC
Here’s how you can restore data from your broken laptop’s hard drive:
- Disconnect the battery on your laptop and carefully unscrew the main access panel (on the base) to reveal the HDD. Now, remove the screws surrounding the HDD (drive mount).
- Gently tug away from the connectors to disconnect the hard drive. Next, extract the hard drive out of its bracket.
- For connecting the hard drive to a Laptop: Disconnect the hard drive on another laptop, and connect your broken laptop’s hard drive.
For connecting the hard drive to a PC: Nowadays, most PCs ship a SATA power cable which you can use to connect the broken laptop’s HDD directly. - Access the broken laptop’s HDD and perform a full back. You could open up File Explorer and take a local data backup. Otherwise, you could back up files to a cloud storage provider like OneDrive or DropBox.
🔰 Alternatively, you can check out Disk Drill’s Byte-to-Byte feature, which generates a complete byte-level disk image of your broken laptop’s HDD. Then, you can scan this disk image to view existing files and retrieve any deleted files.
Method 2: Connect Hard Drive to Another Laptop Using a Disk Enclosure
This method is slightly easier than the former; however, you need to purchase a special external disk enclosure to mount the hard disk. Ensure you are buying an enclosure with the right size since HDDs come in 2.5 and 3.5 inches sizes.
The disk enclosure takes your laptop’s HDD SATA input and converts it to a USB output for your laptop to read the data.
Here’s how you can use the disk enclosure to access your broken laptop’s hard drive:
- First, you need to unscrew the enclosure and remove the cover.
- Insert your broken laptop’s hard drive into the enclosure.
- Carefully connect the 7-pin SATA and 15-pin SATA power cables to the enclosure.
- Screw the driver into the enclosure. Then, replace the case with the screws.
- Use the connecting cables to connect the USB output into your laptop.
- Now, access the hard drive and perform a backup.
Method 3: Contact Professional Data Recovery Service
If you are dealing with irreparable physical damage, it’s best to consult a professional data recovery service center. Data recovery professionals at such centers employ stringent practices to recover data from your laptop’s hard drive.
Here are common signs of hard disk mechanical failure:
- Unusual clicking sounds
- Abrupt drop in operating speeds
- Screen of death error
- Overheating
Data recovery service centers use sophisticated tools to fix the physical damage on your hard drive by opening these sensitive disks in a clean room.
While shortlisting data recovery service centers, do ample research and evaluate against these criteria:
- 💯 Online reputation: Read through verified customer reviews to vet the reputation of a data recovery center near you.
- ✅ Industry certifications: Check the company website for industry certifications like ISO standards.
- 📜 Service policies: Read through the company’s terms and conditions to understand liabilities and other policies.
- 💰 Price: Lastly, compare the pricing options of various service centers to make an informed decision based on the cost vs value.
Conclusion
First thing to do when dealing with data loss on your laptop? Stop using it. Then, determine what caused the data loss, and choose the appropriate data recovery method. The most common reasons for data loss are accidental deletion, malware attacks, and physical damage.
In case of accidental deletion and malware attacks you can either use a data recovery program like Disk Drill, or if you have a backup—restore the files using File History and Backup & Restore (Windows 7).
Avoid DIY methods if the laptop’s storage drive is physically damaged. If the drive is unscathed, but the laptop doesn’t power on due to other factors, try connecting the drive to another laptop, then performing data recovery.
FAQs
- Download, install and launch Disk Drill.
- Select your laptop’s hard drive and click on Search for lost data.
- Click on Review found items to see through recoverable data.
- Select files for recovery.
- Finalize the data recovery process by specifying the destination.


