 Windows 10 will usually recognize a secondary hard drive as soon as you install it. However, issues such as logical damage, broken cables, and improper formatting can all cause the drive to not appear on your PC. To fix a secondary hard drive that’s not detected by Windows, you’ll have to use one of the fixes below.
Table of Contents
Reasons Why Windows Doesn’t Recognize Your Secondary Hard Drive
To determine the appropriate fix for a secondary hard drive that Windows doesn’t recognize, you need to know what’s causing the issue in the first place. The reasons can be broadly classified into physical damage, or logical faults.
Use the following table as a guide:
|
Reason |
Description |
| 🔌 Cable or connector issues | Damaged SATA or USB cables/connectors can result in Windows not detecting your secondary hard drive. The hard drive won’t show up in Windows Disk Management. |
| 💿 Bad sectors on the drive | Both software and physical faults can cause unreadable and unwritable areas to develop on your drive. These are called bad sectors. Even new hard drives can have them. Unless the damage is severe, the drive will show up in Disk Management. |
| 🔠 No drive letter | A drive that’s not assigned a drive letter (such as C:, D:, etc.) will not show up in Windows Explorer. You can easily fix this by assigning a drive letter to the drive using Disk Management. |
| 🛠️ Driver issues | Drivers help Windows communicate with your secondary hard drive. If they’re outdated, corrupt, or missing, Windows won’t detect the drive. It’s common for this issue to present itself after a major Windows update/upgrade. |
| 🖥️ BIOS issues | If the SATA or USB controller (in the case of an external hard drive) ports are disabled in the BIOS, Windows 10 won’t recognize your second hard drive. You’ll need to manually enable them in the BIOS or UEFI settings. |
| ⚡ Power supply issues | A secondary hard drive that is receiving inadequate or no power at all, won’t be detected by Windows. This issue can be caused by a faulty power supply unit (PSU), or damaged cables. |
| ⚙️ File System error | If your secondary drive is formatted with an unsupported file system, it won’t be recognized by Windows. The storage space may show up as unallocated or RAW in Disk Management. This commonly happens if you previously used the drive with another OS such as macOS or Linux and then switched to Windows. |
How to Recover Data from Secondary Hard Drive that Stopped Showing Up
Before proceeding to fix your undetected secondary hard drive, it’s advisable to first get off all your data from it. Why? Because you may have to format the secondary hard drive to fix it, which removes all previous data.
The best way to recover data from a hard drive is to use third-party data recovery software. In addition to being highly effective, these tools are much more cost-efficient than contacting a professional data recovery service. However, you should only use them if your hard drive is visible in Windows Disk Management and has not suffered physical damage.
There are plenty of options to choose from when it comes to data recovery tools. In this tutorial, I decided to go with Disk Drill. Features such as a user-friendly GUI, support for all common file systems and file formats, and the ability to both create and scan disk images–make it the perfect choice to recover data from a secondary hard drive that is not detected.
The data recovery process is split into two parts–creating a disk image of the secondary drive, and then scanning it for recoverable data. Let’s see how:
Step 1: Create a Disk Image Using Disk Drill
A disk image is a soft copy of your entire drive. Creating one is crucial because directly scanning the disk stresses it and can worsen corruption or data loss.
- Download Disk Drill and install it.
- Connect the secondary hard drive to your PC.
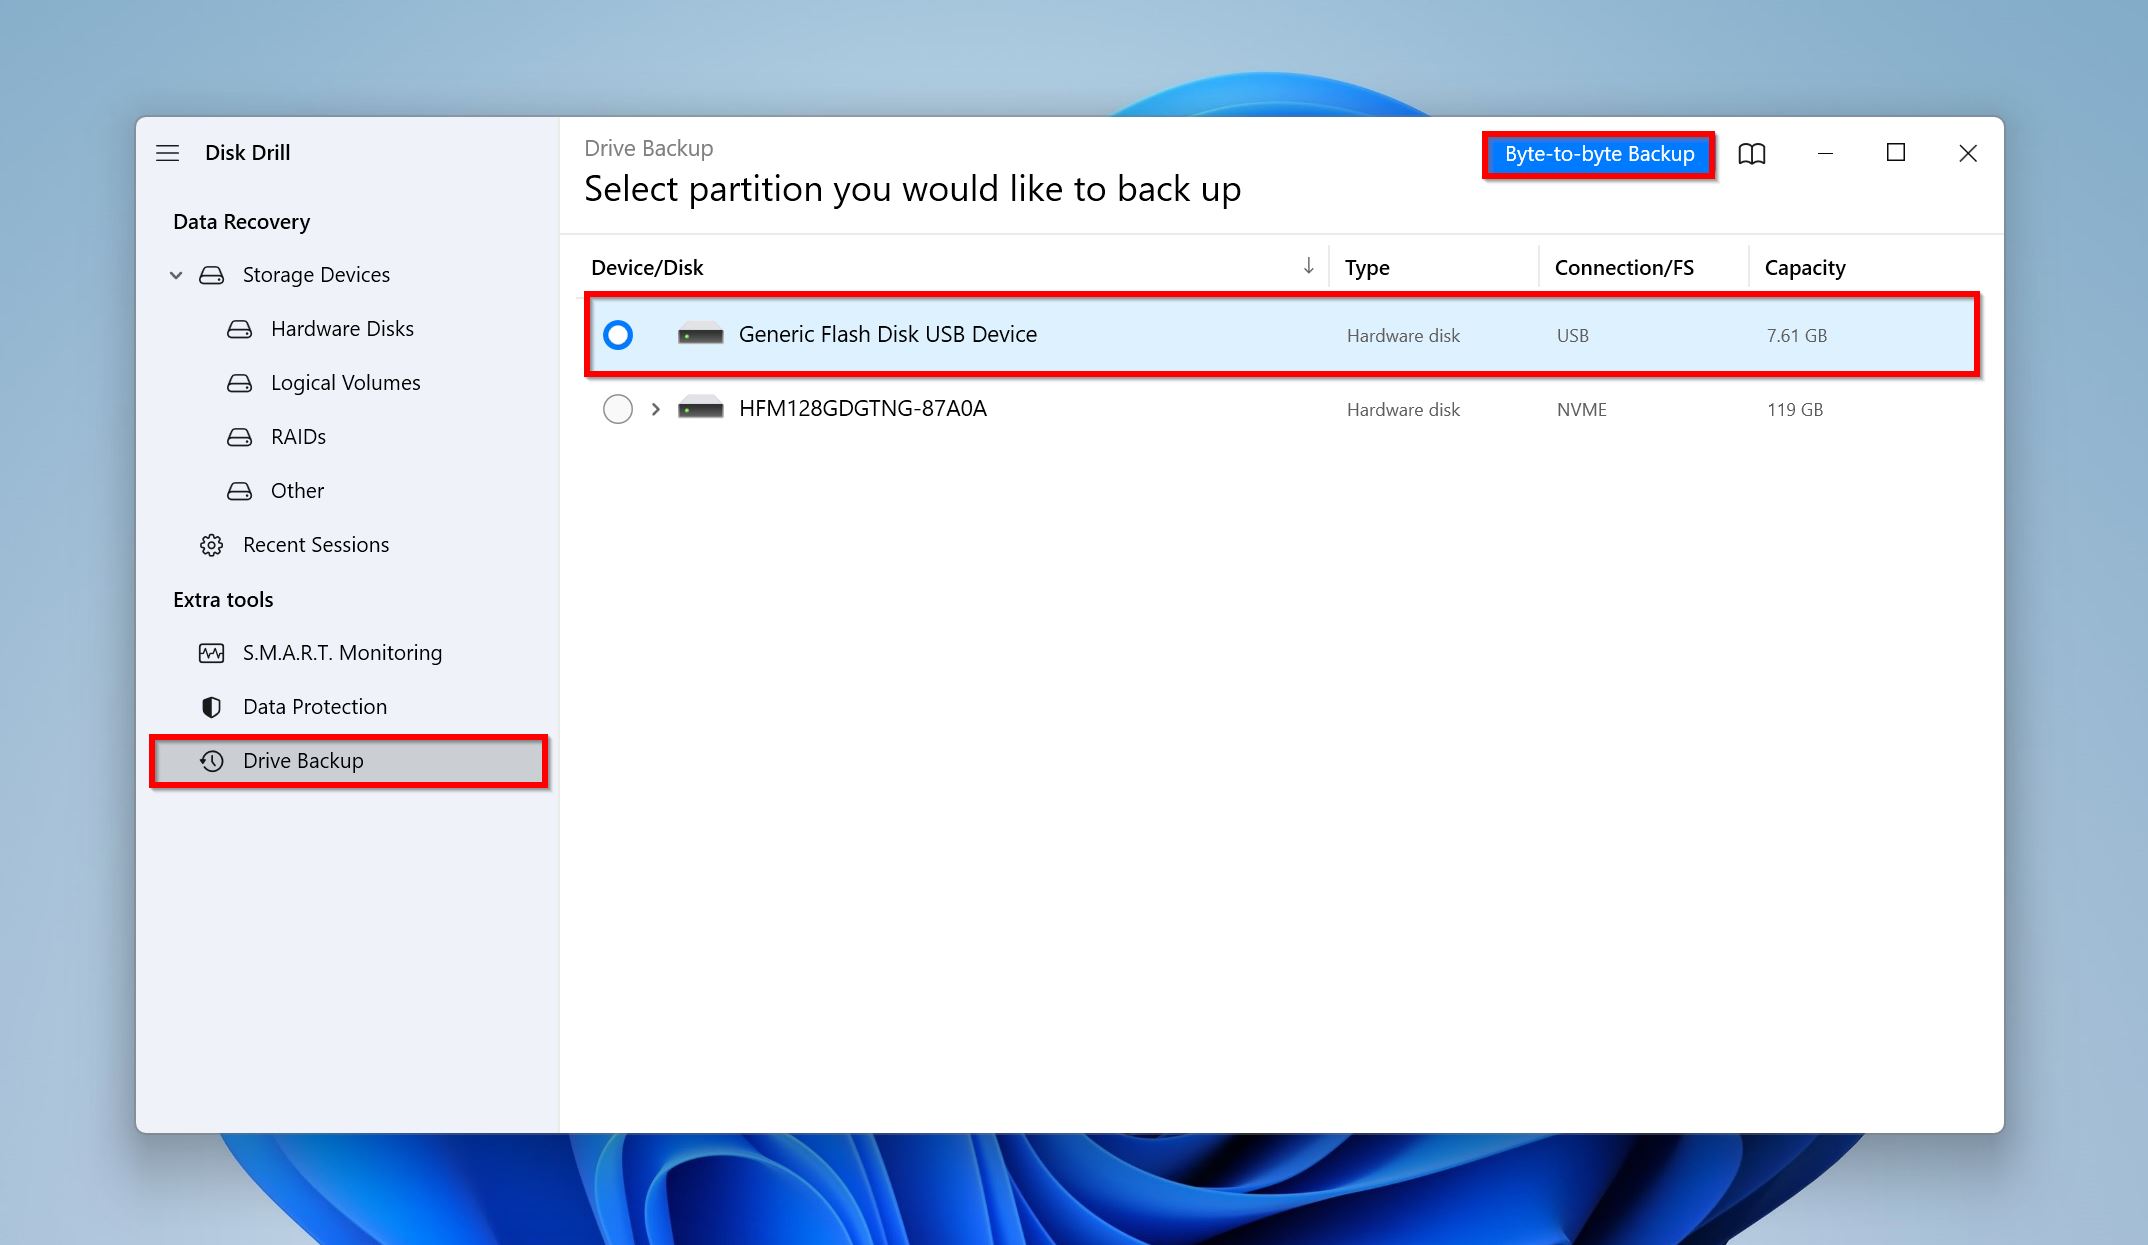
- Open Disk Drill and click on Drive Backup under Extra tools.
- Select the secondary hard drive that’s not detected in Windows 10, and click Byte-to-byte Backup.
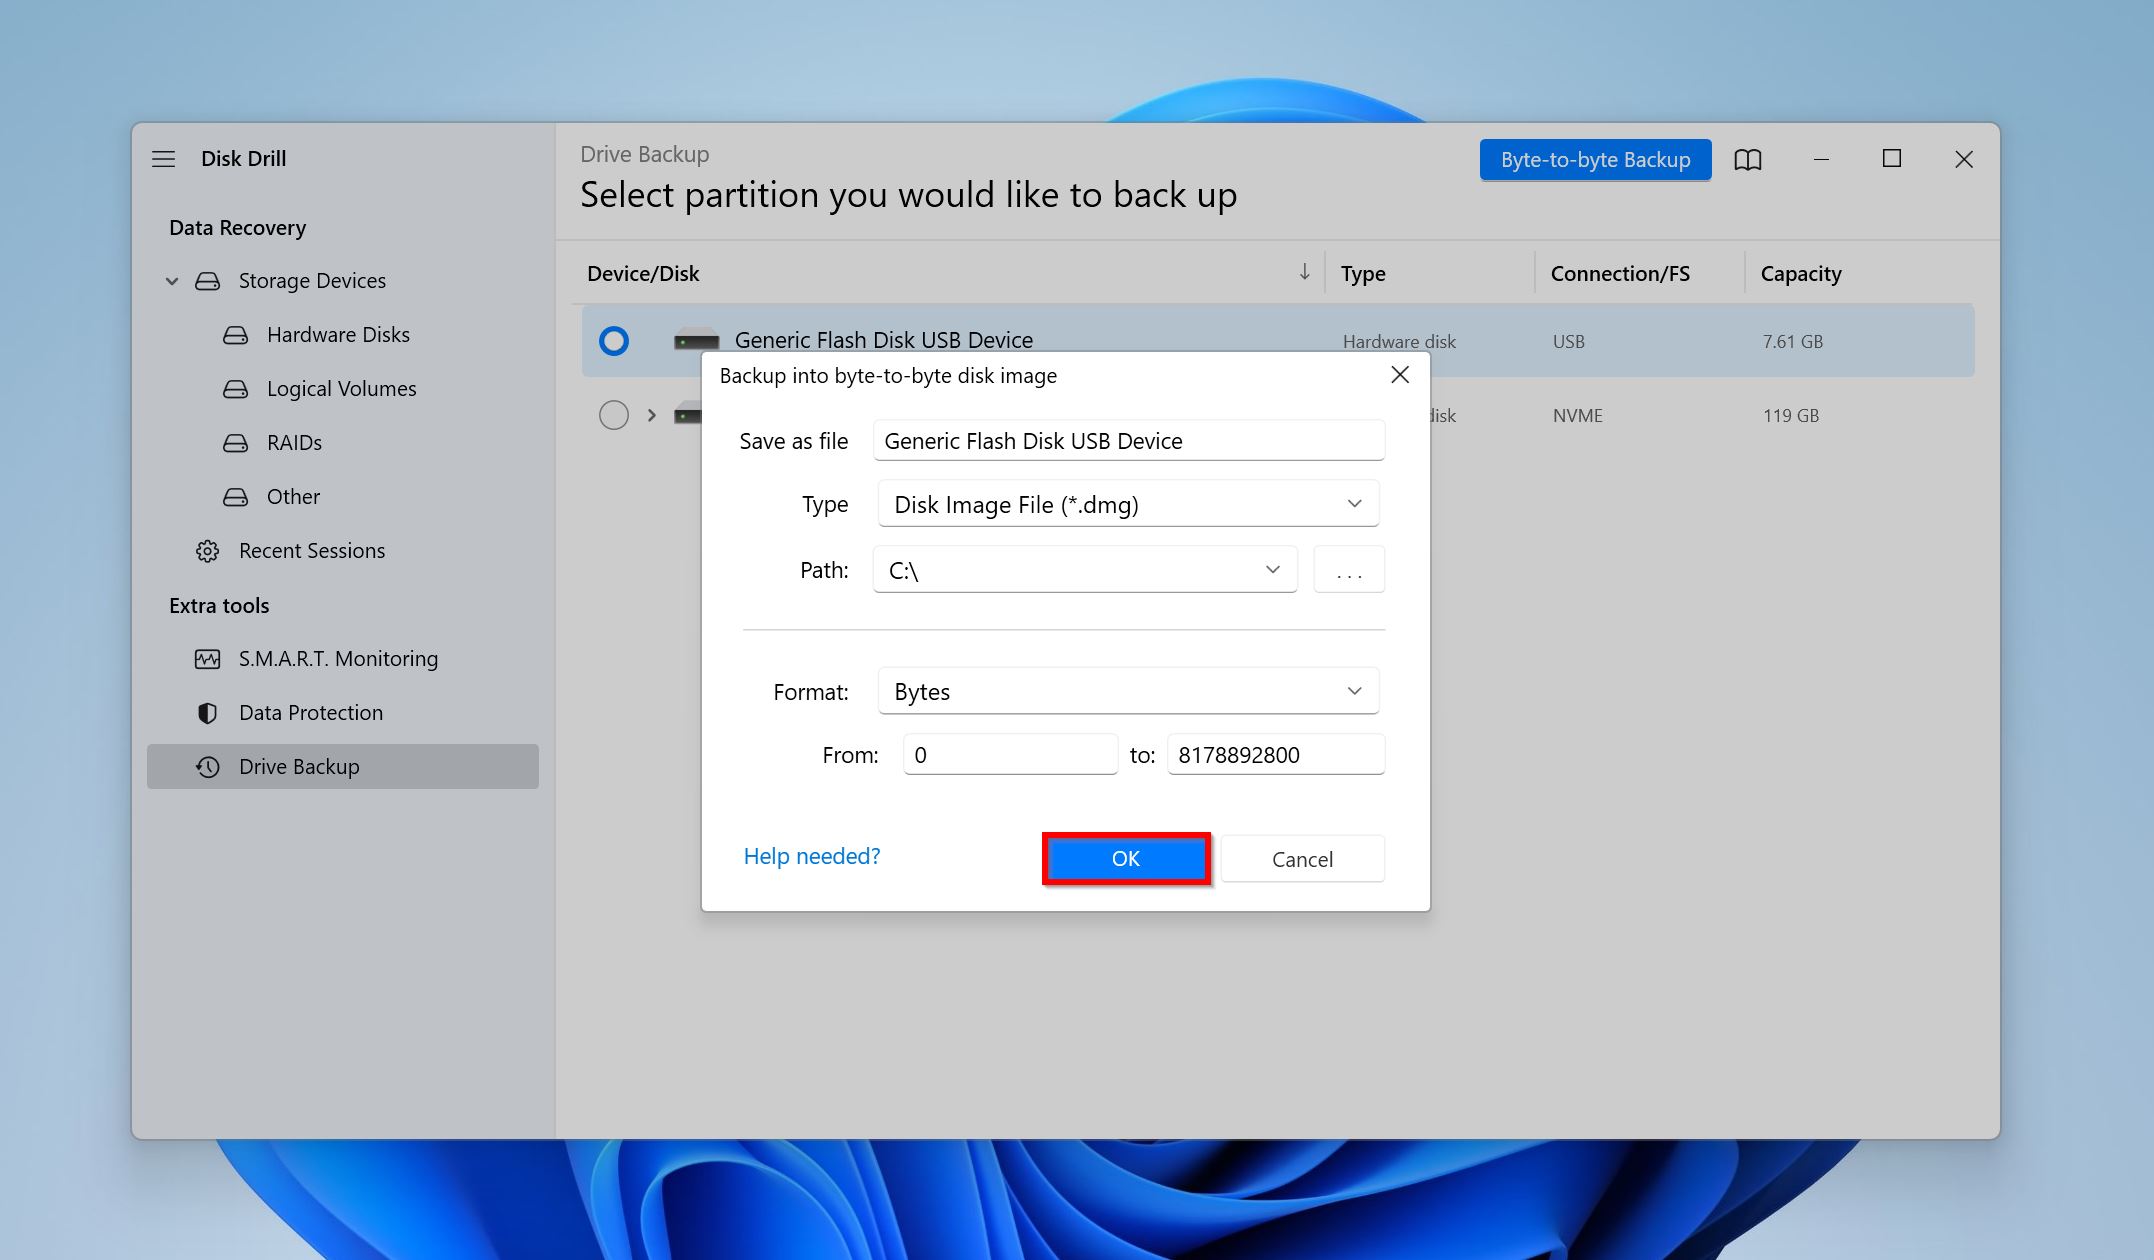
- Choose where you want to save the disk image. The destination should have free storage space that is equal to or more than the size of your secondary hard disk. Click OK.
- Disk Drill will create the disk image. You can now disconnect the hard drive.
Step 2: Scan the Disk Image for Recoverable Data
- Open Disk Drill, and make sure you’re on the Storage Devices screen below Data Recovery.
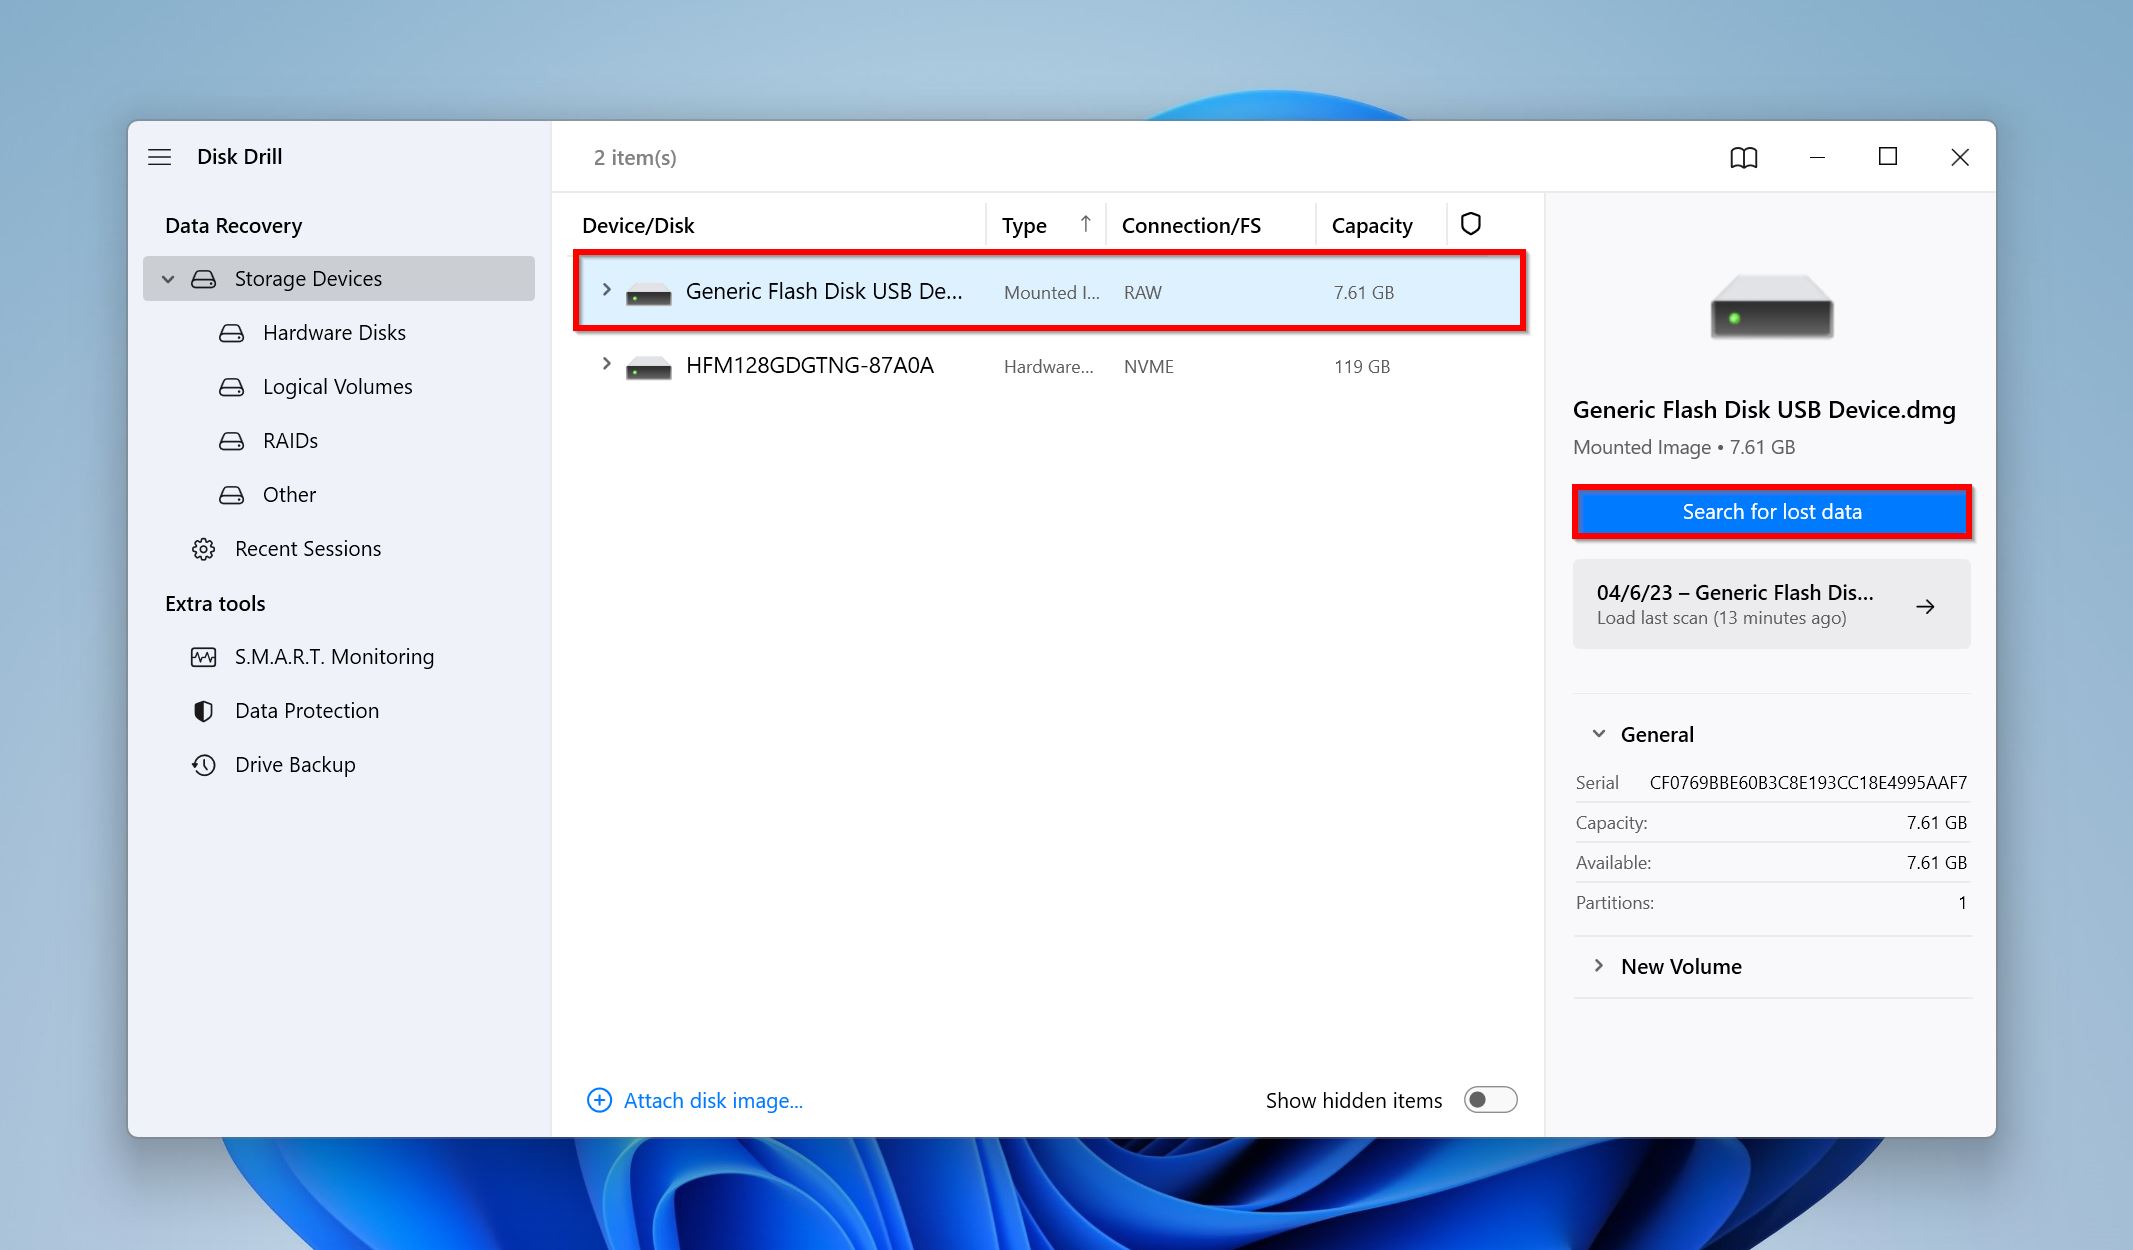
- Click on Attach disk image, browse for the disk image of your secondary hard drive and double-click on it. It’ll be added to Disk Drill as a mounted drive.

- Click on the mounted image and click Search for lost data.
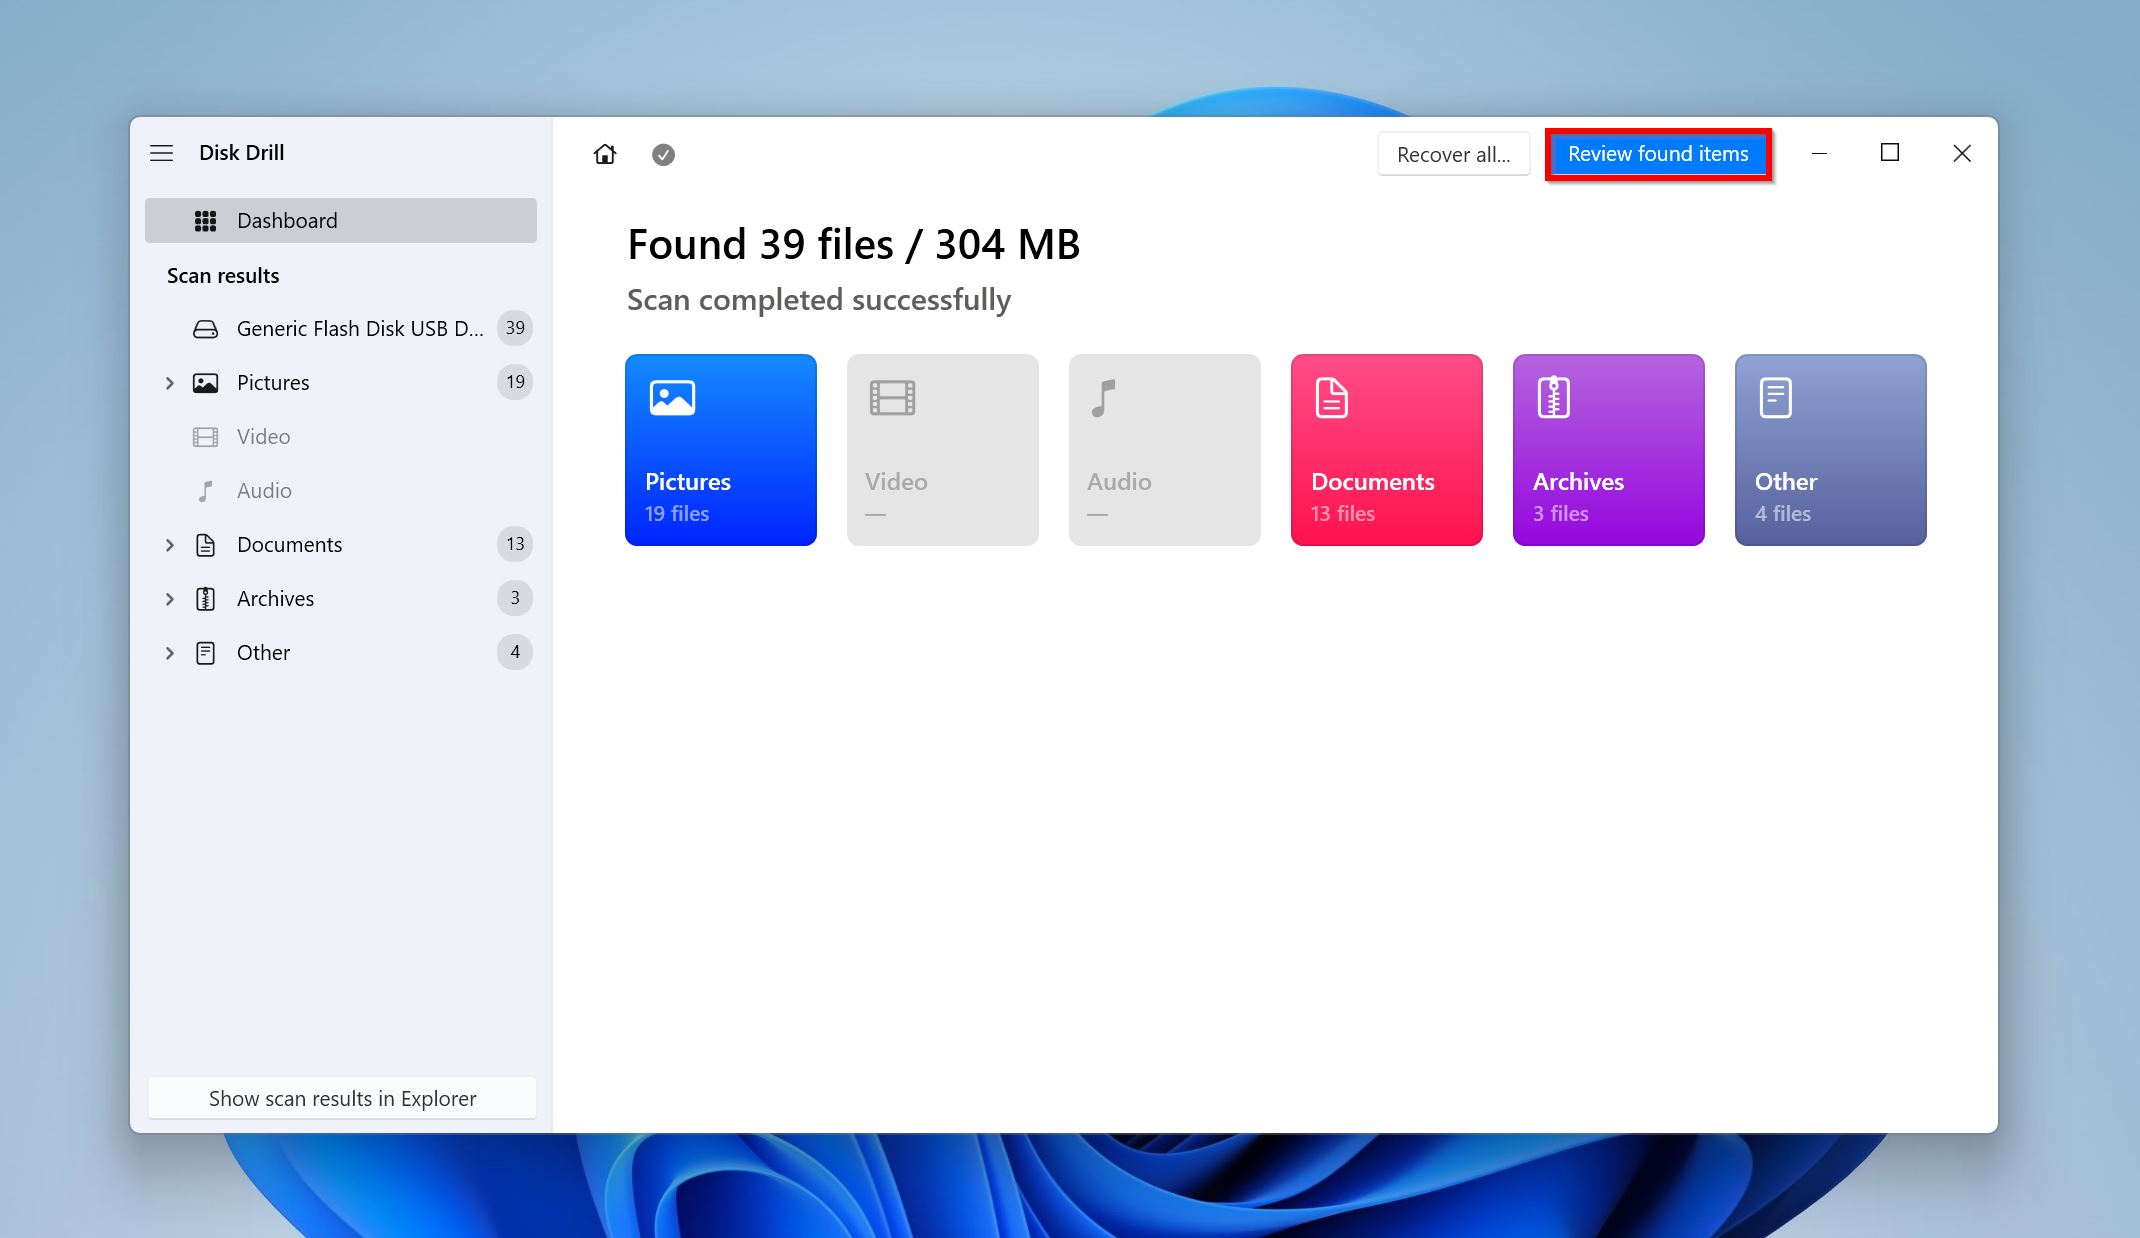
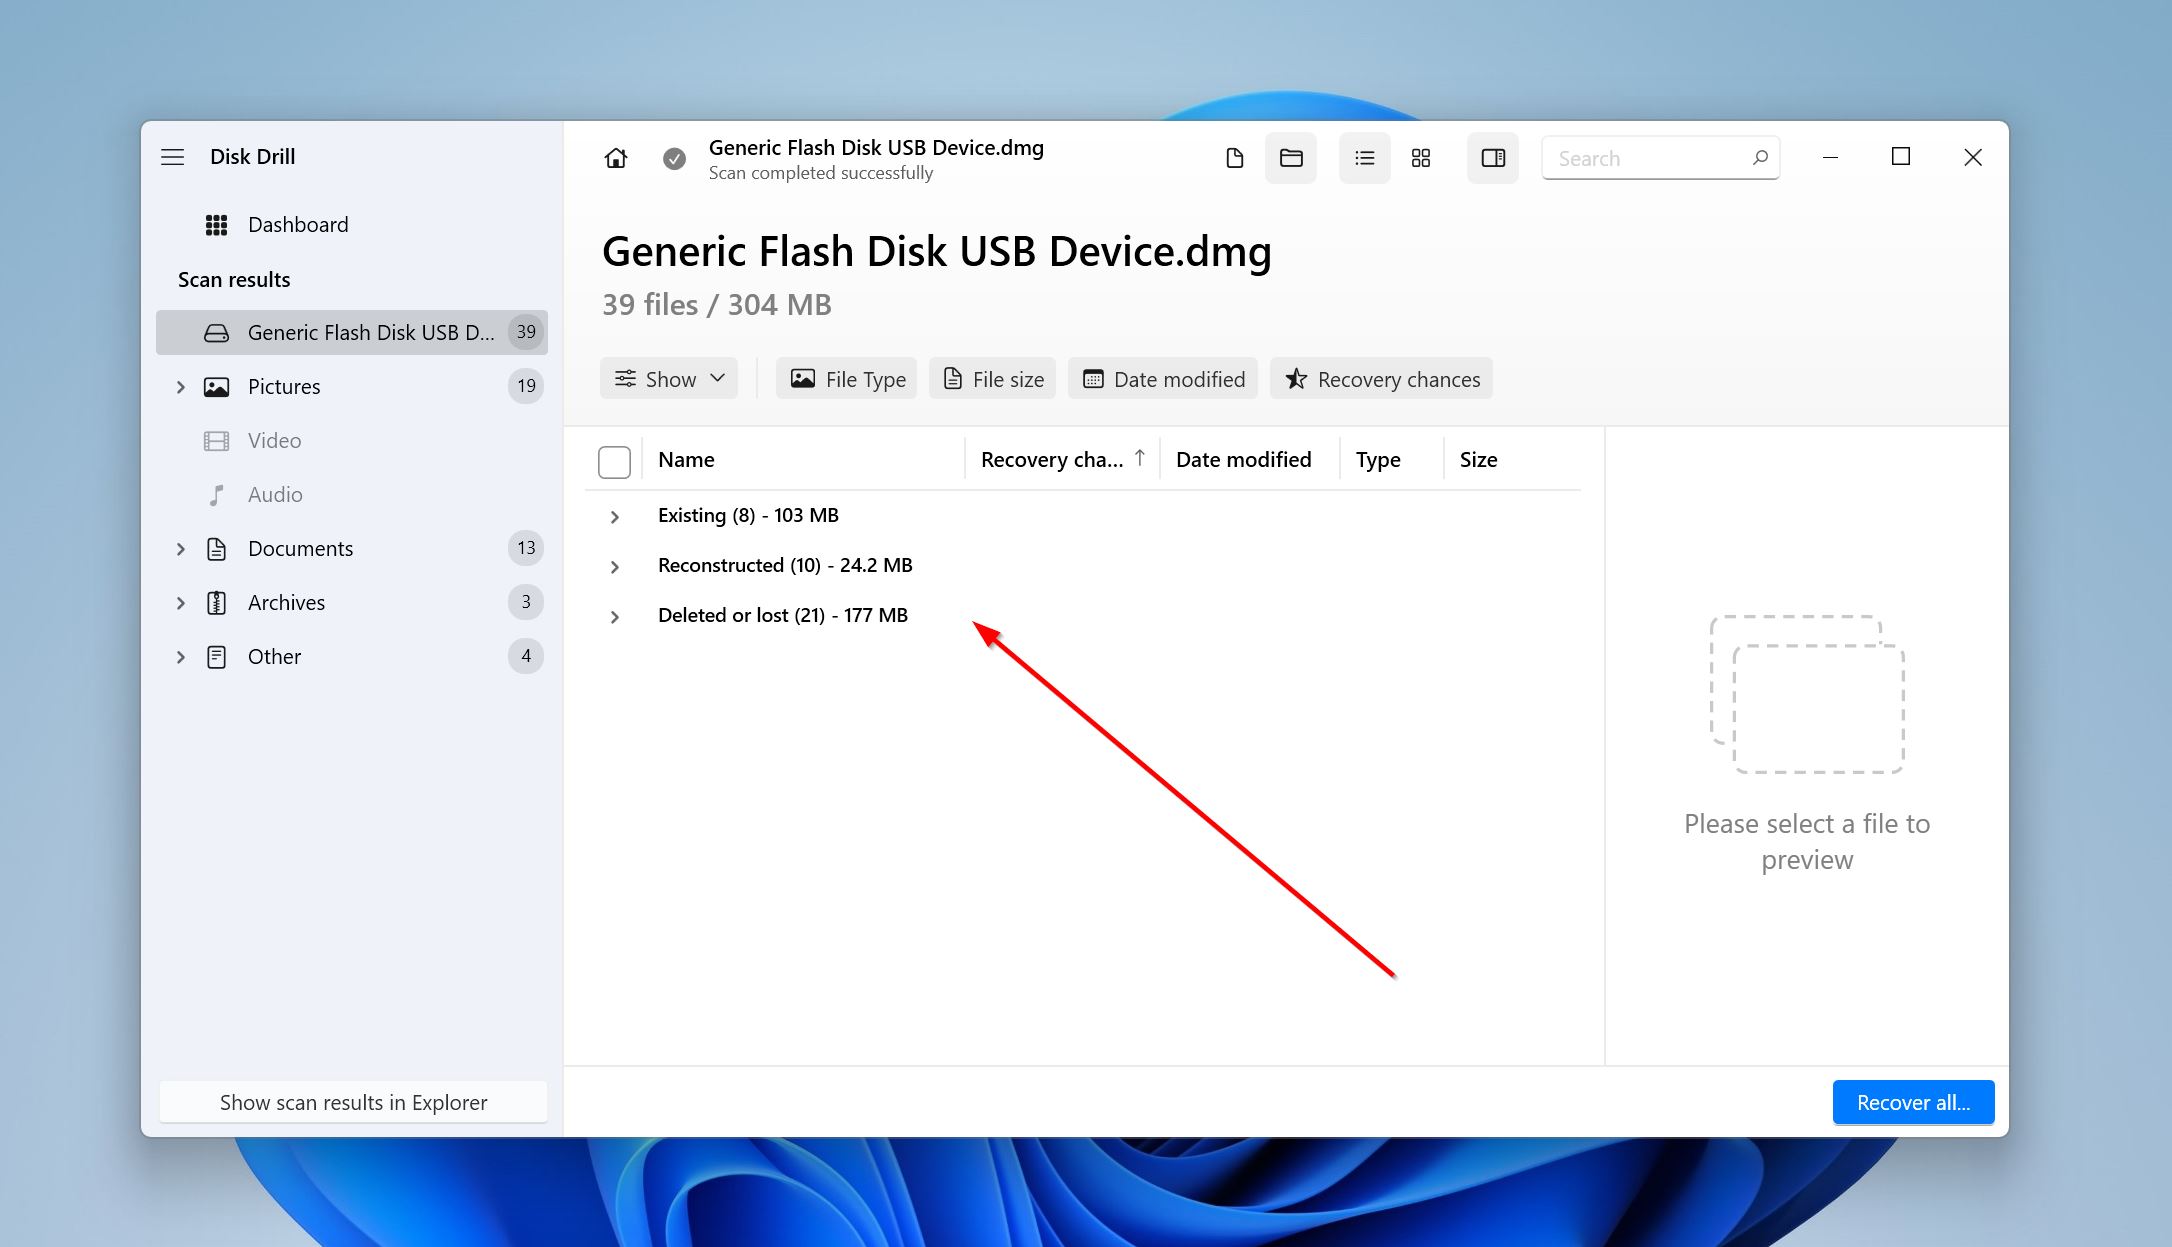
- Click Review found items to view the recoverable files Disk Drill discovered. To filter out the results, directly click on the file type you’re looking to recover (Pictures, Video, Audio, Documents, Archives, and Other).
- Expand the Existing section to view the presently stored files on your secondary hard drive. You can expand the Deleted or lost, and Reconstructed sections to view files that were previously deleted or lost due to corruption.
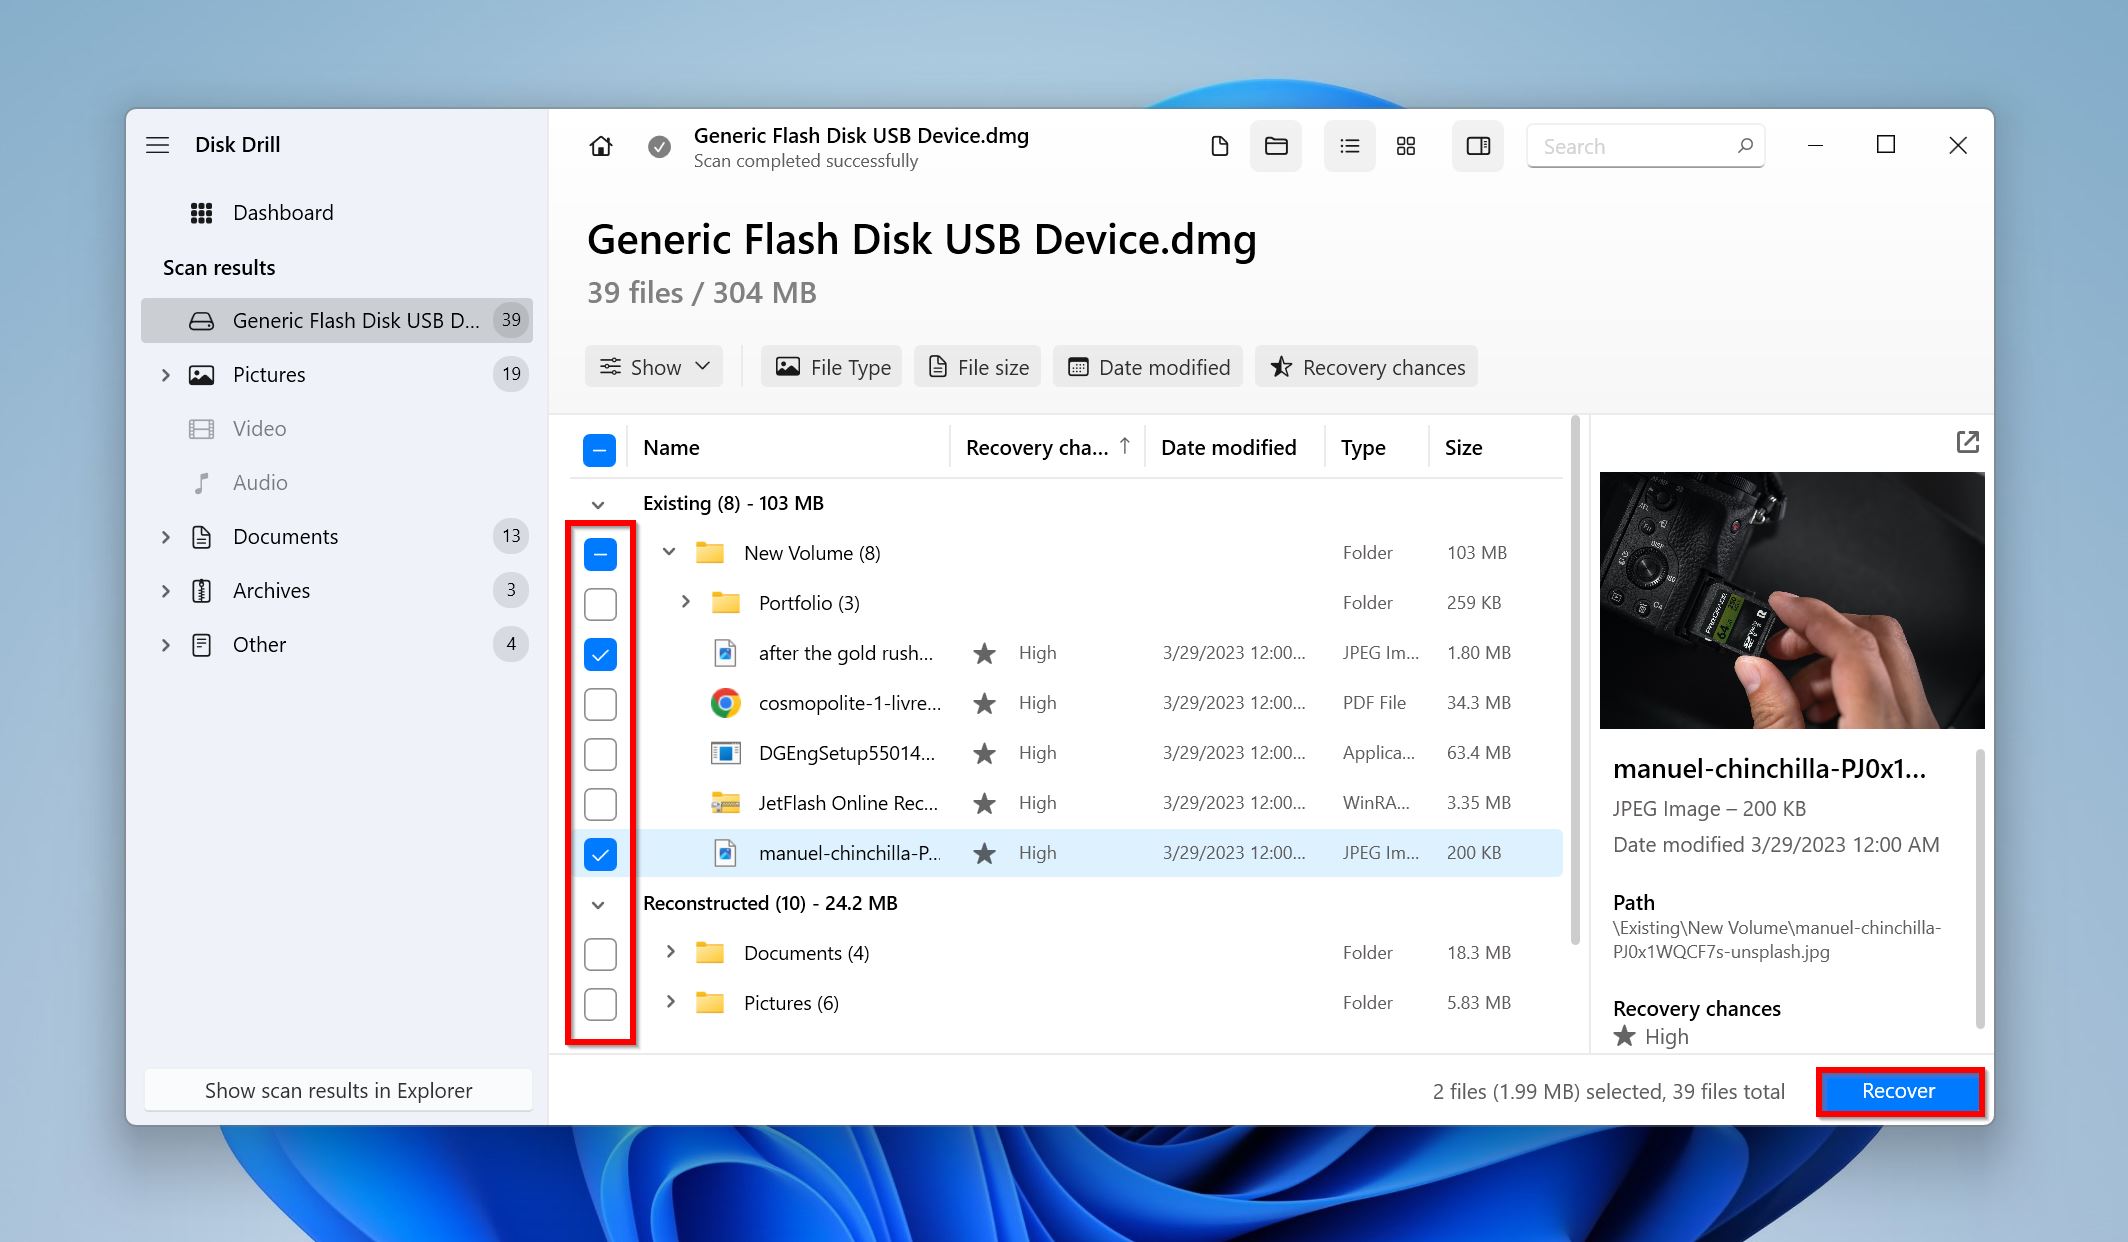
- Use the checkboxes to select the files you want to recover. Disk Drill will display a preview of the selected file. Click on Recover.
- Choose a recovery destination for the files and click Next.
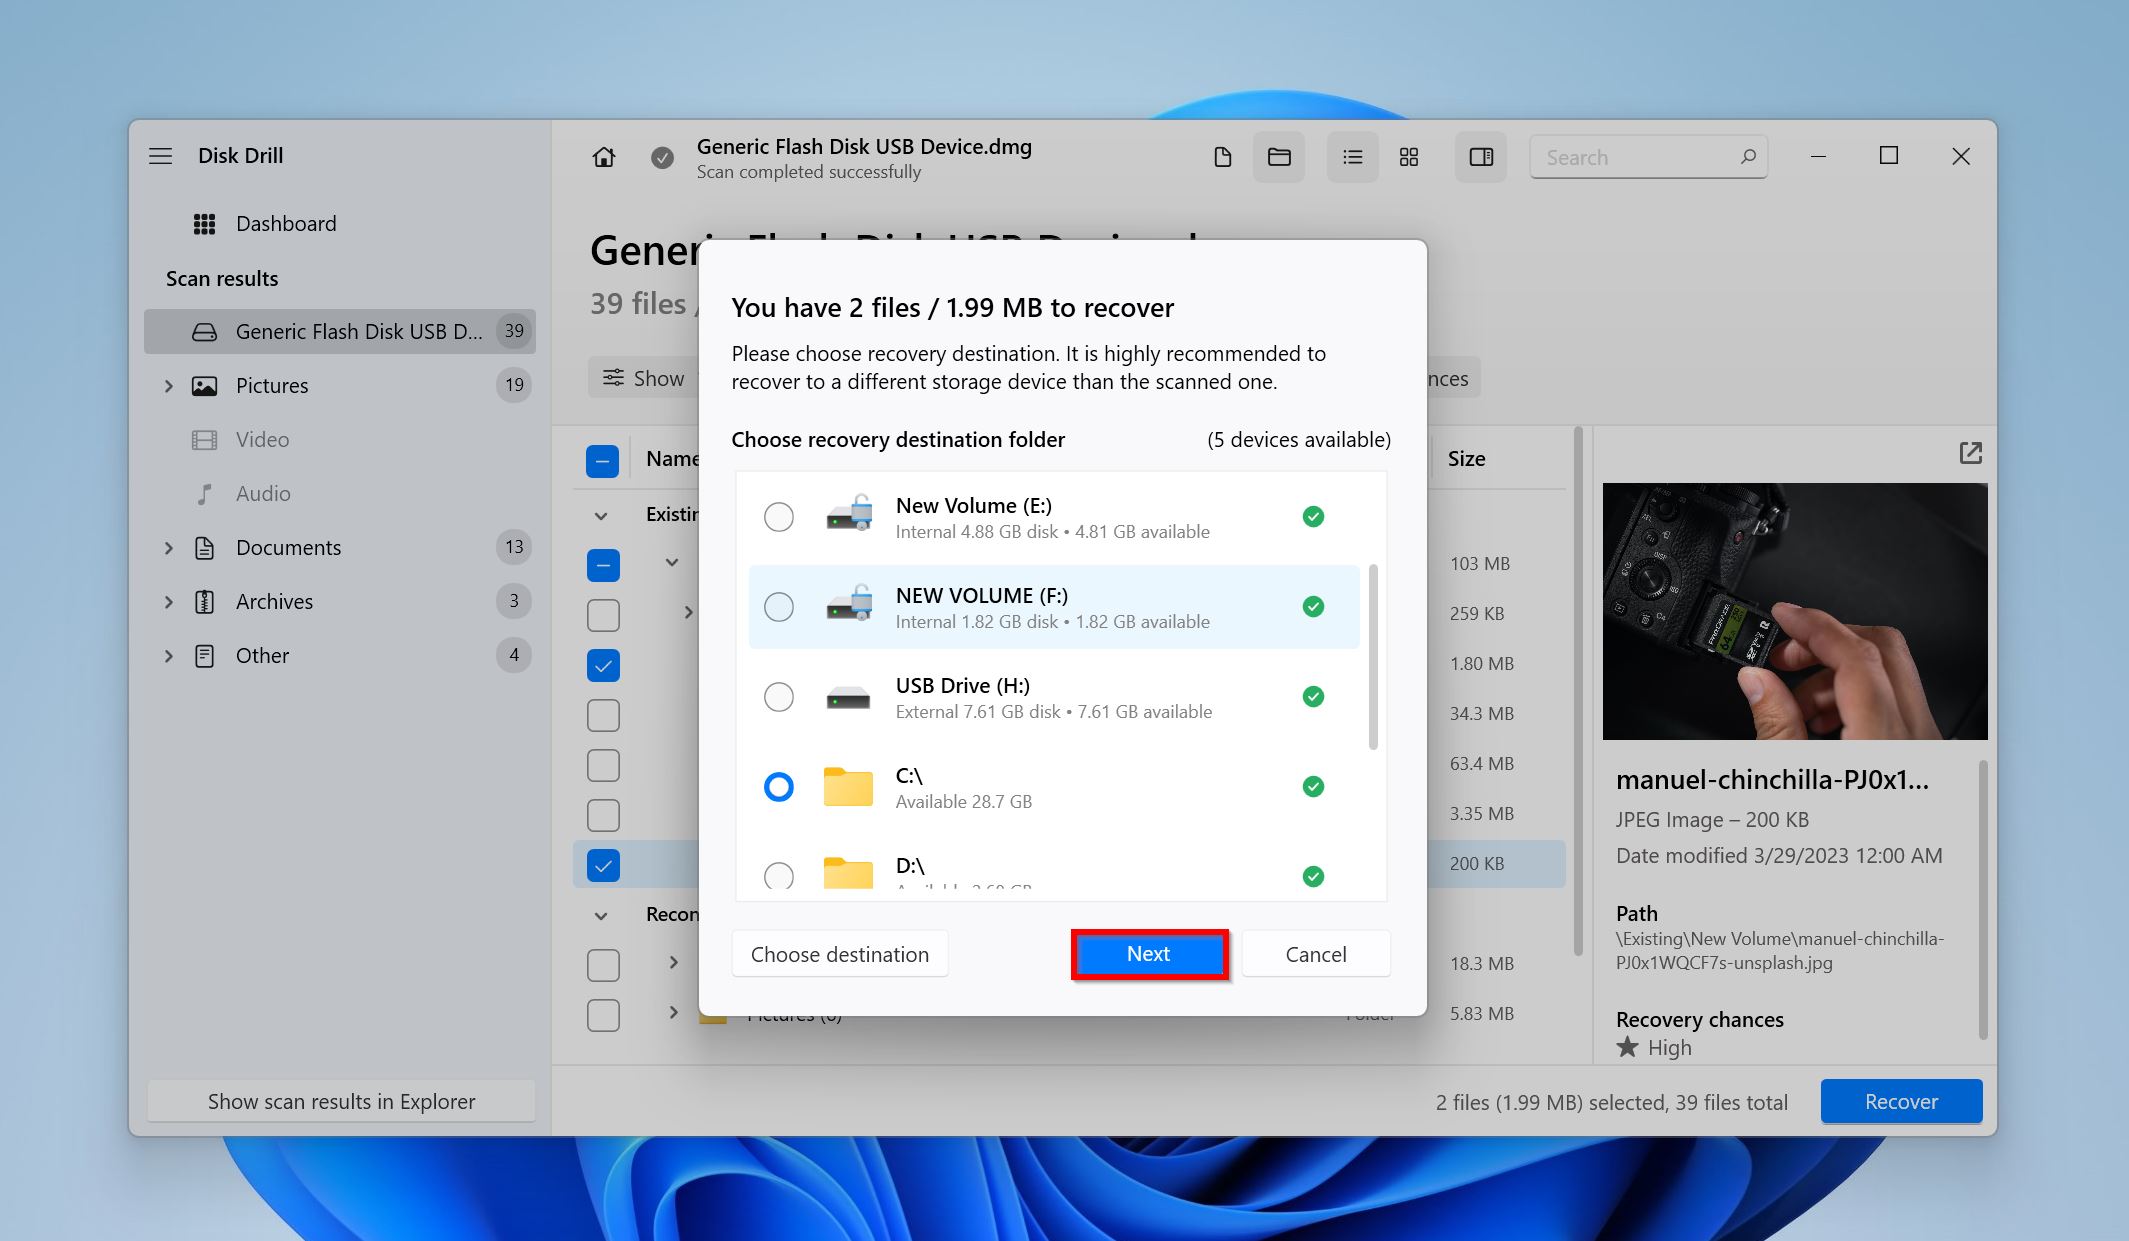
- Disk Drill will restore the selected files.

How to Fix a Secondary Hard Drive that is Not Detected on Windows 10
Fixing a hard drive that’s not detected could be a simple case of reinstalling drivers or using a different connector. The methods below describe fixes that the average user can perform at home. In case they don’t work, a professional data recovery service should still be able to help you out.
Let’s take a look at some things you can do if Windows 10 doesn’t see the second hard drive:
Method 1: Connect the Drive to Another PC
The first thing you should do if Windows is not detecting your other drive, is connect it to another PC. This is to check if the problem lies with the hard drive or your PC. See if the drive shows up in the BIOS. If it doesn’t, inspect the drive for physical damage, and also double-check whether it’s compatible with your computer’s hardware.
If you hear clicking, whirring, or beeping sounds from your secondary hard drive, contact a professional data recovery service. This also applies if the drive doesn’t power up at all.
Method 2: Enable the Secondary Hard Drive in the BIOS
Some secondary hard drives need to be enabled in the BIOS before they can be detected and used normally by your PC. To enable the second hard drive in the BIOS, you’ll need to access your BIOS, see the System Settings or Device List, then switch the hard drive to ON.
The process differs across manufacturers, but typically, you’ll have to press one of the Function keys (F1, F2, F3, etc.) when the manufacturer’s logo appears on the screen. Navigate to the devices list, look for your secondary hard drive, and ensure it’s enabled.
Method 3: Enable the Hard Drive in Disk Management
If your second hard drive is not showing up in File Explorer, but is visible in Disk Management, it could simply be disabled, or not have a volume.
You can fix this in Windows Disk Management by initializing the drive:
- Type “disk management” in Windows Search and click Create and format hard disk partitions from the search results.
- Towards the bottom of the Disk Management screen, right-click on your secondary hard drive and select Initialize Disk.
- In the Select disks section, choose your secondary hard drive and then select the GPT (GUID Partition Table) option.
- Click OK.
Method 4: Assign a Drive Letter to the Drive
Without a drive letter, your secondary hard drive won’t show up in Windows Disk Management. Usually, Windows automatically assigns a drive letter to all connected storage drives. But, if the drive has no volume and is brand new, you may have to assign a drive letter manually.
Here’s how you can do this:
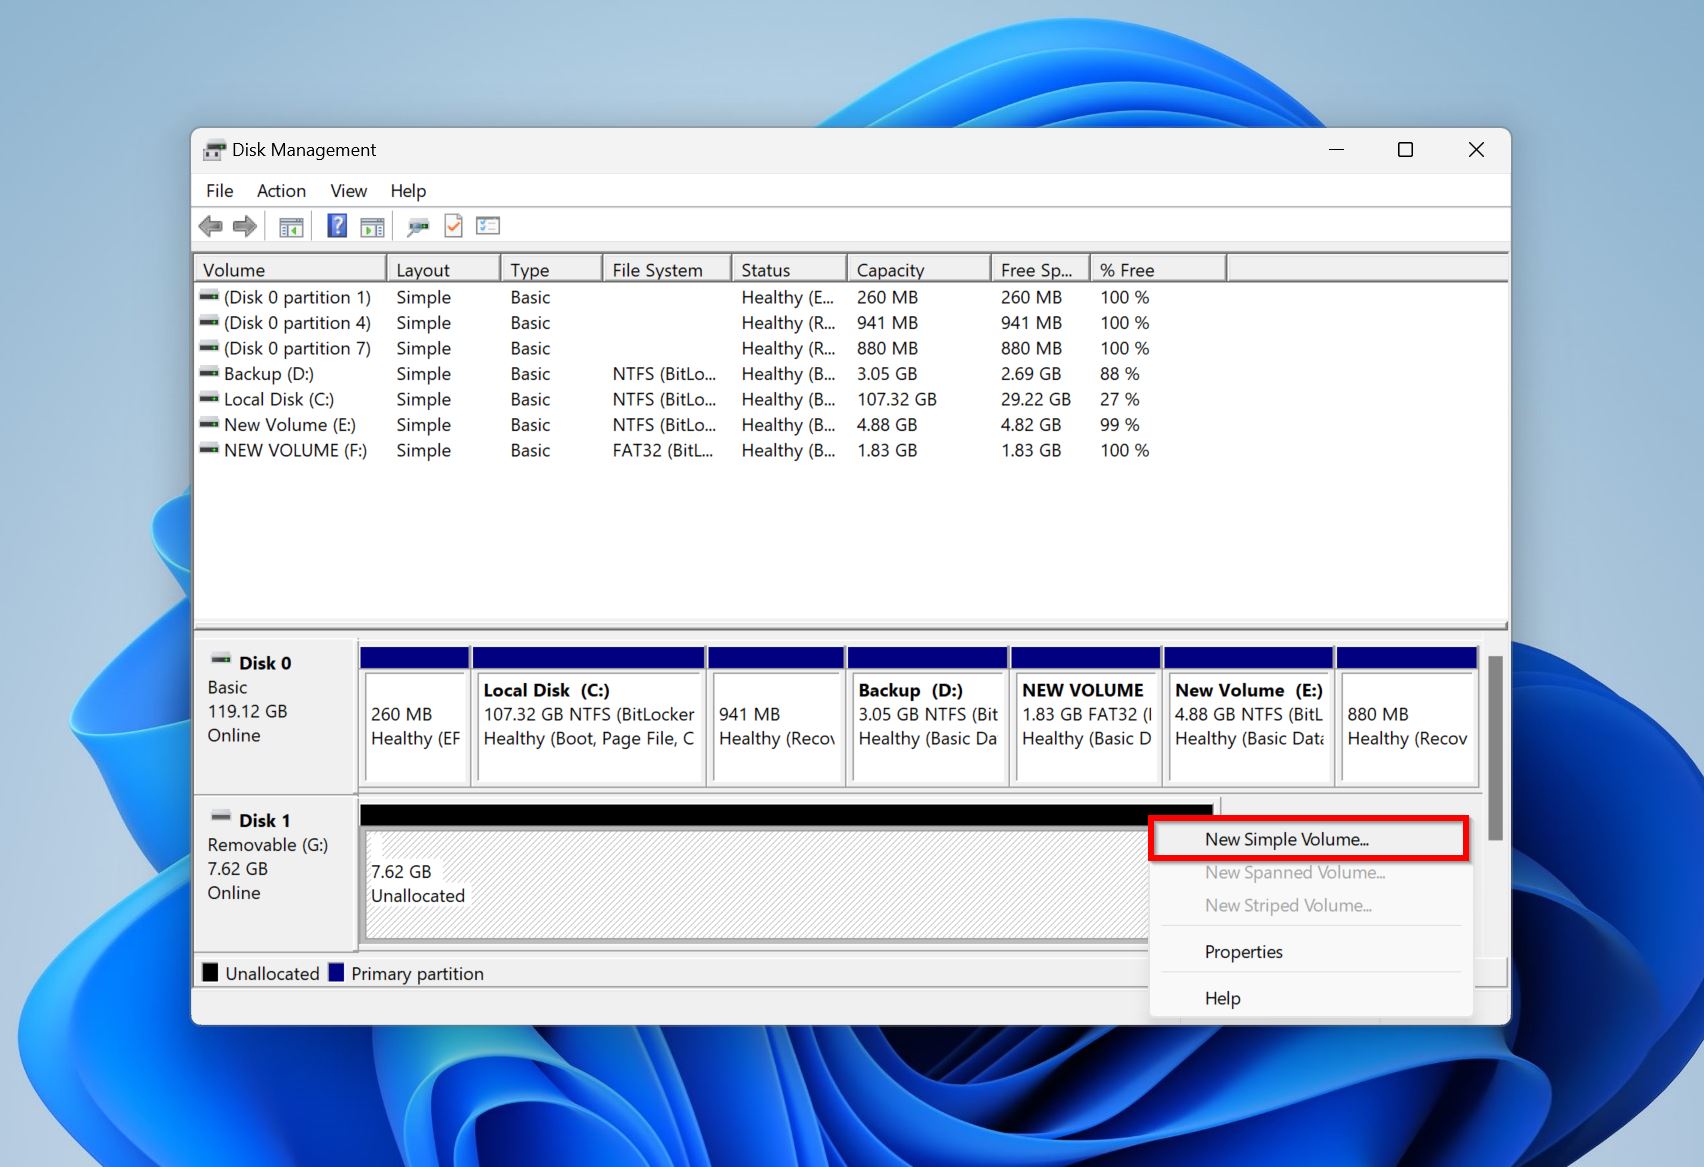
- Search for “disk management” in Windows Search. Click on Create and format hard disk partitions from the search results.
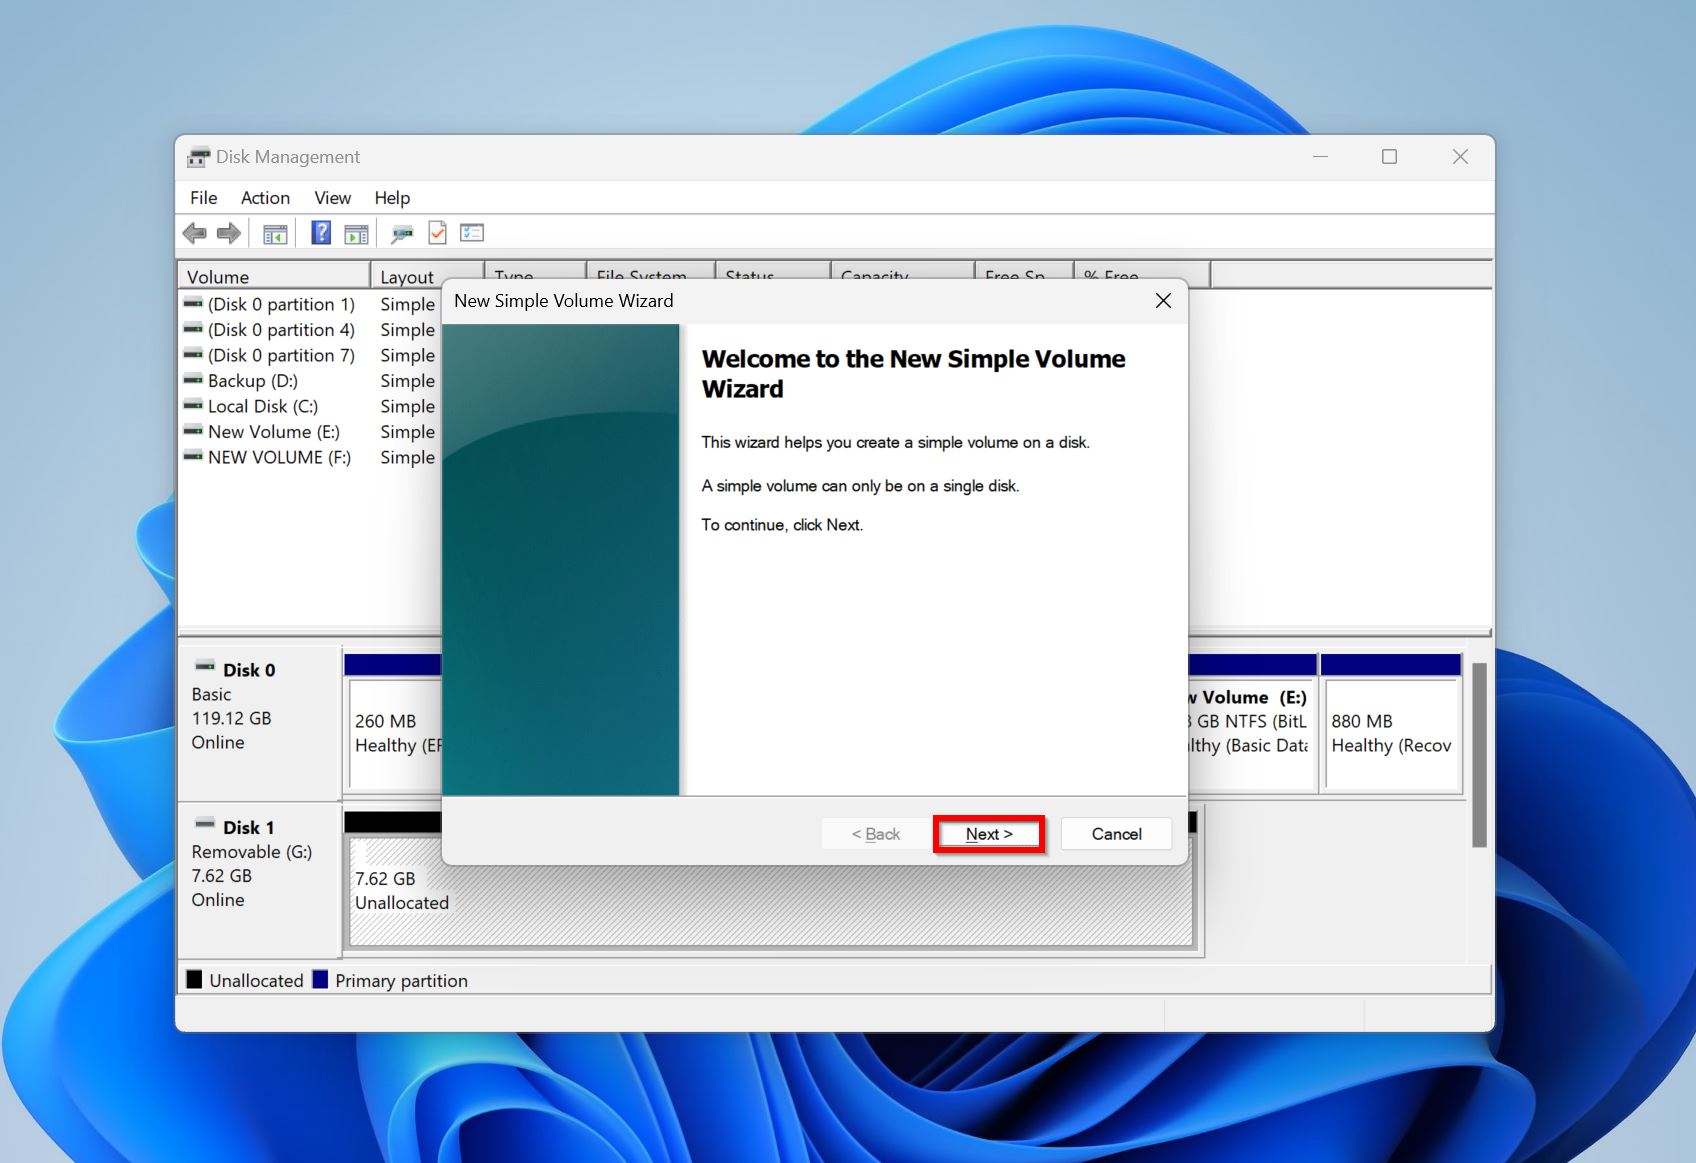
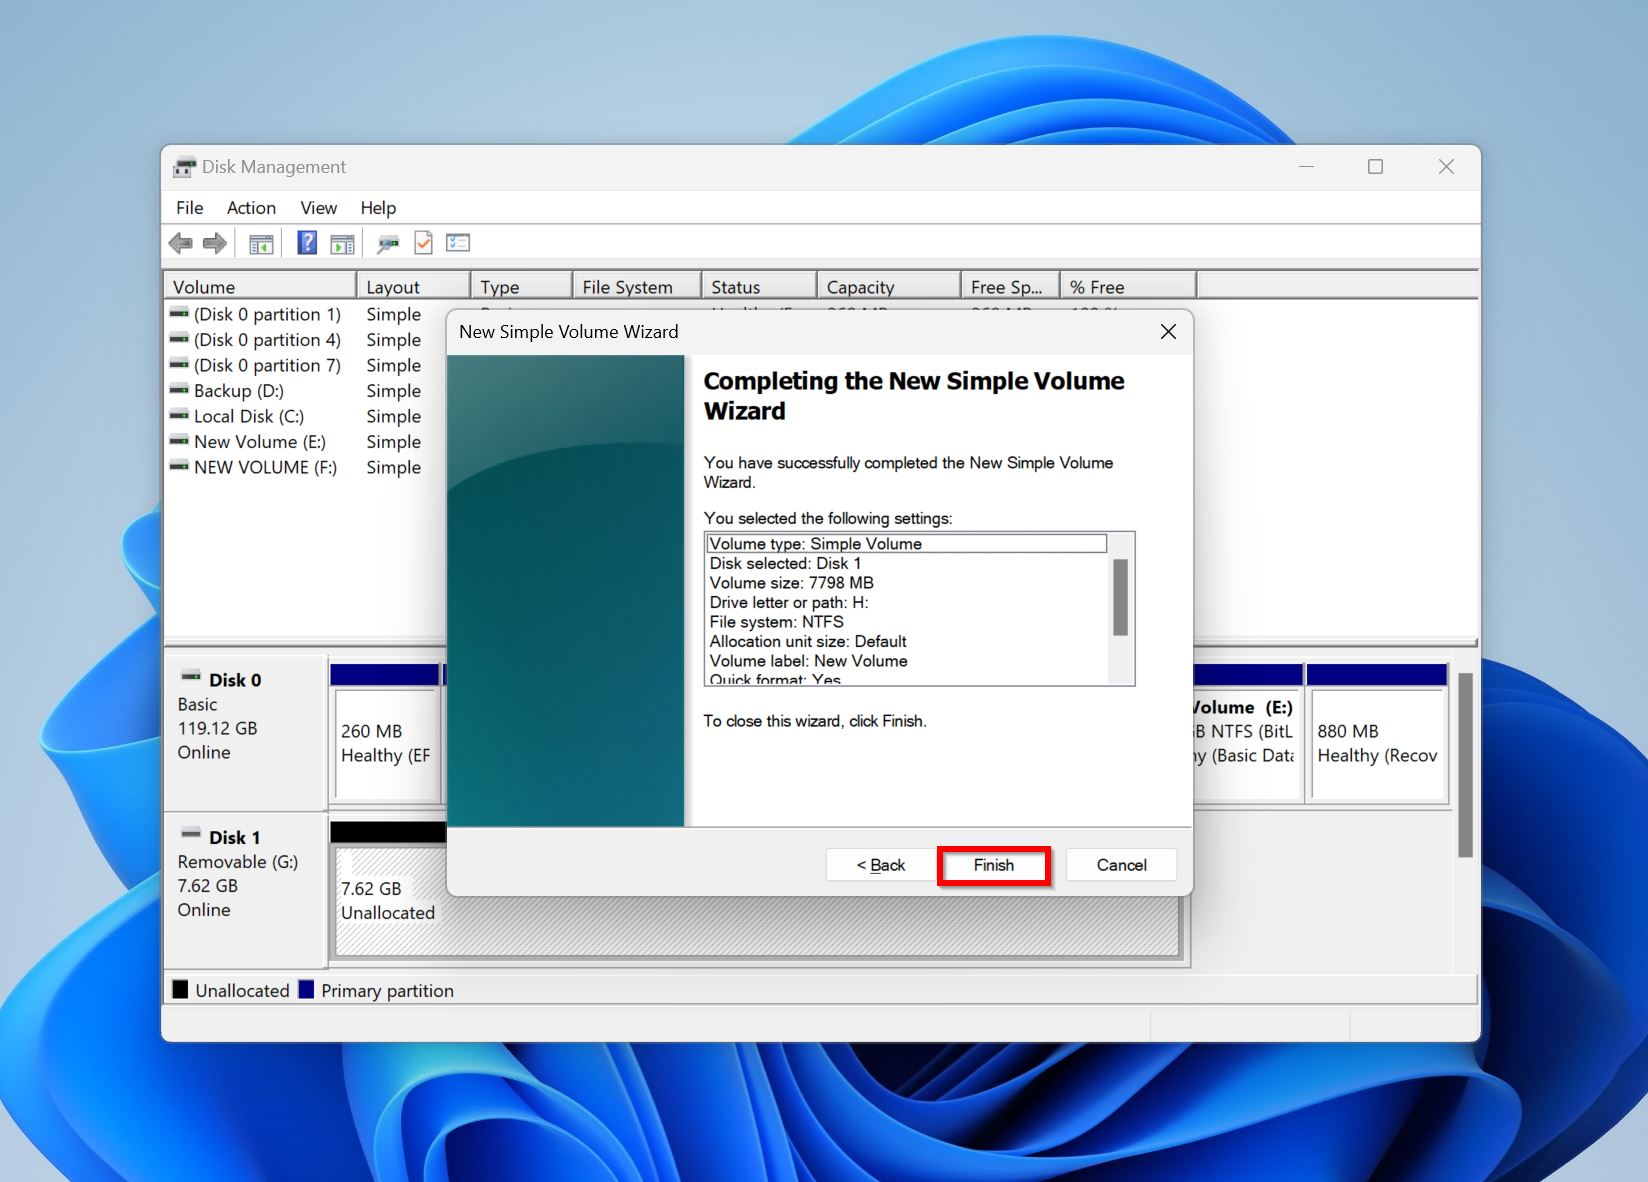
- In Disk Management, right-click on the secondary hard drive and click on New simple volume.
- Click Next on the Simple volume wizard welcome screen.
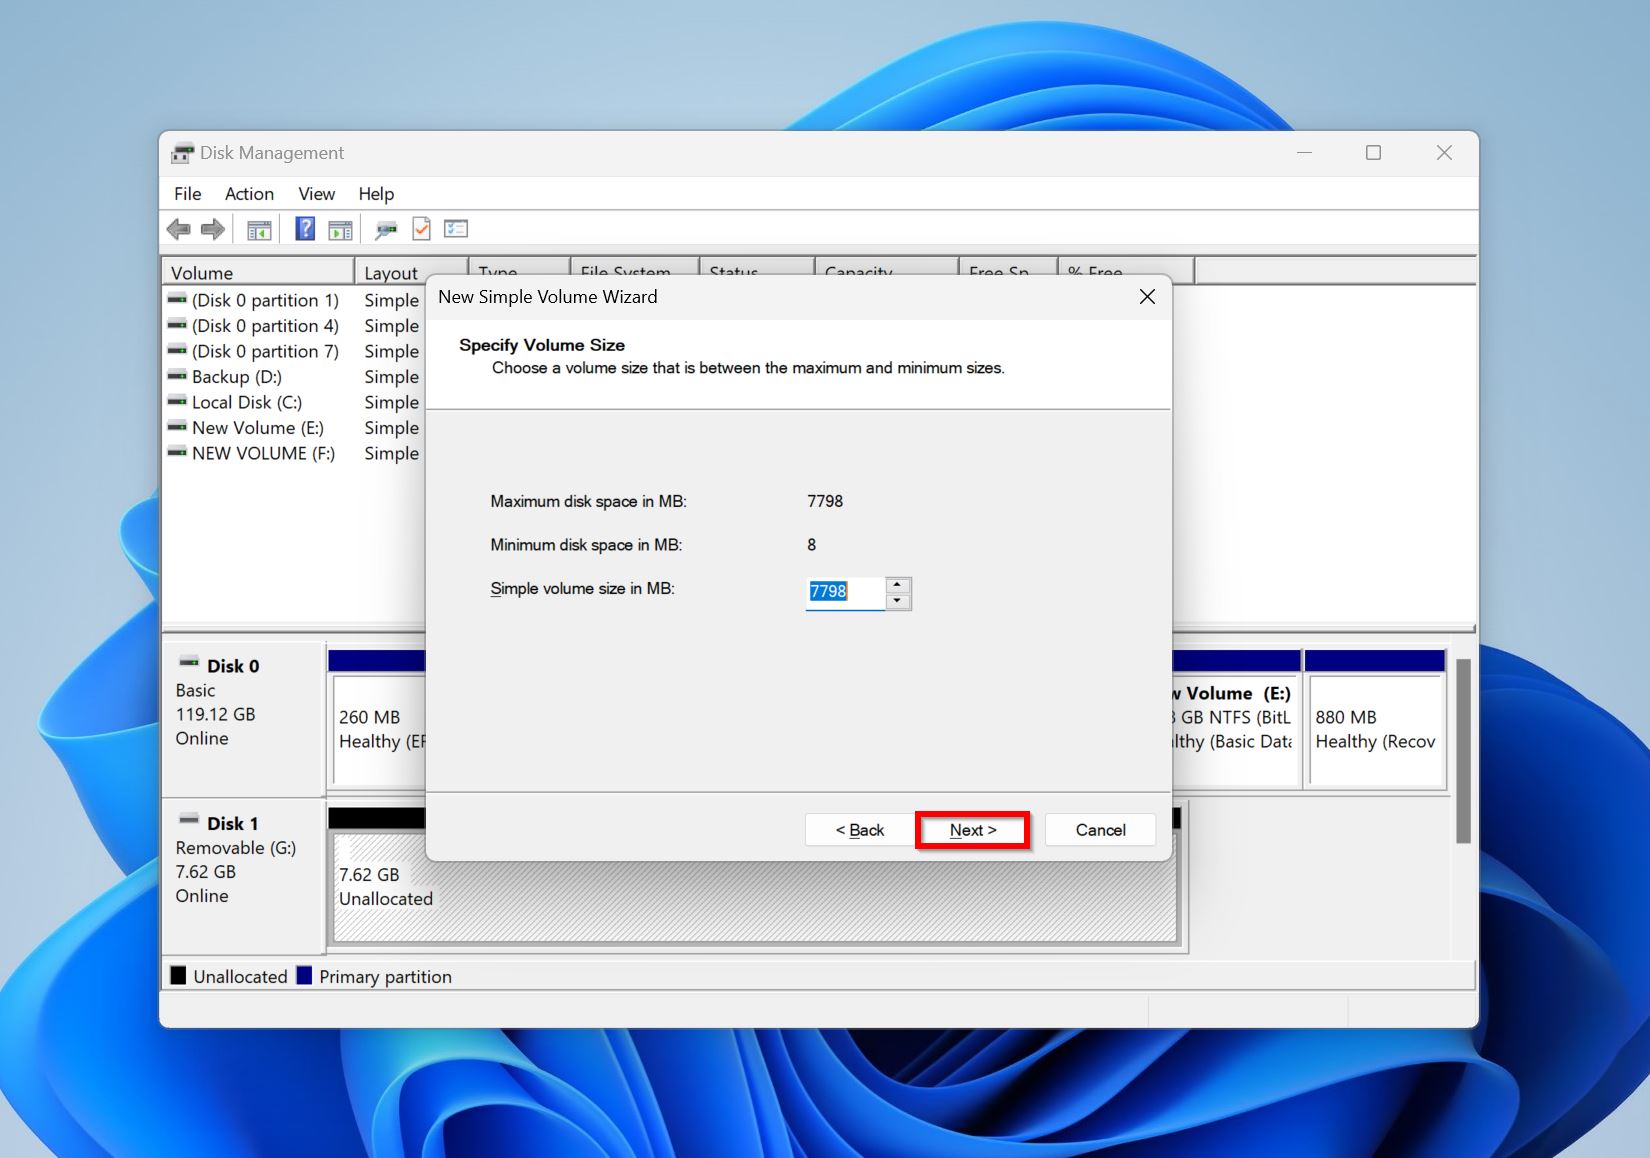
- Specify a volume size and click Next.
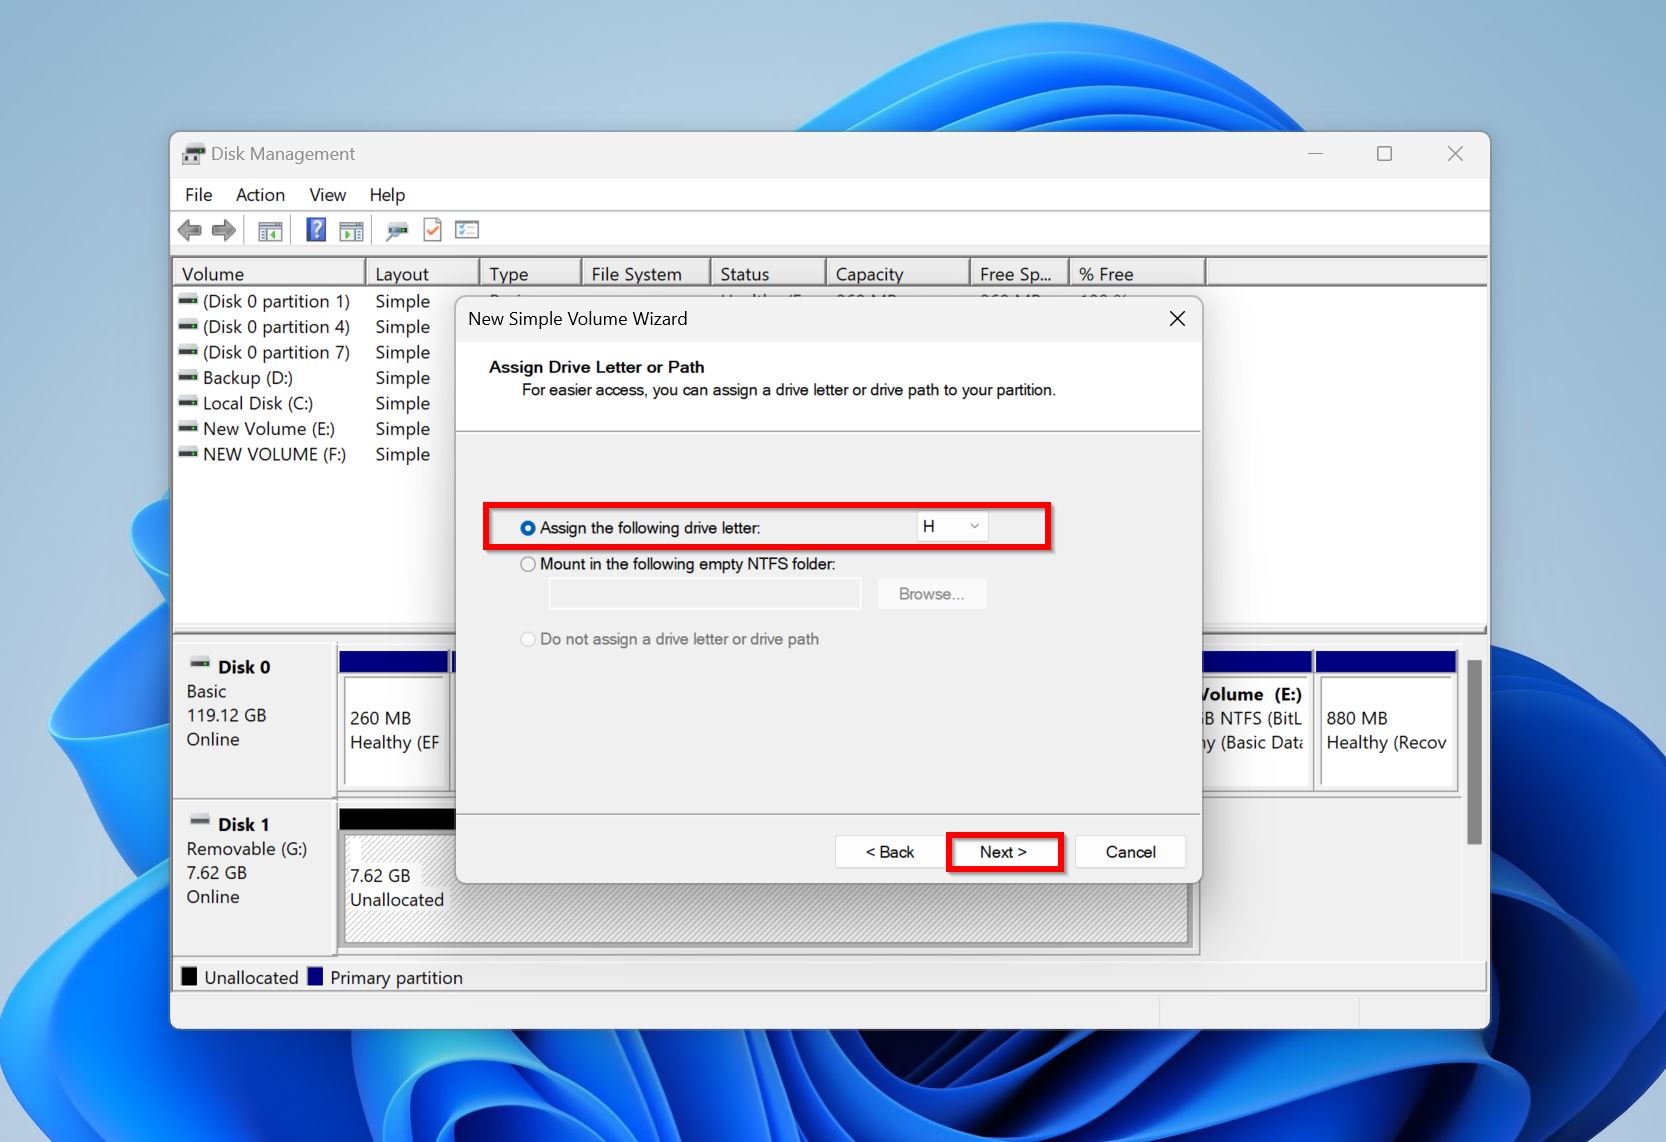
- Use the drop-down menu to assign a drive letter and click Next.
- Select the Format this volume with the following settings option and choose the file system you wish to format it in. Click Next. You must do this so that you can drive can store files and be recognized in Windows Explorer.
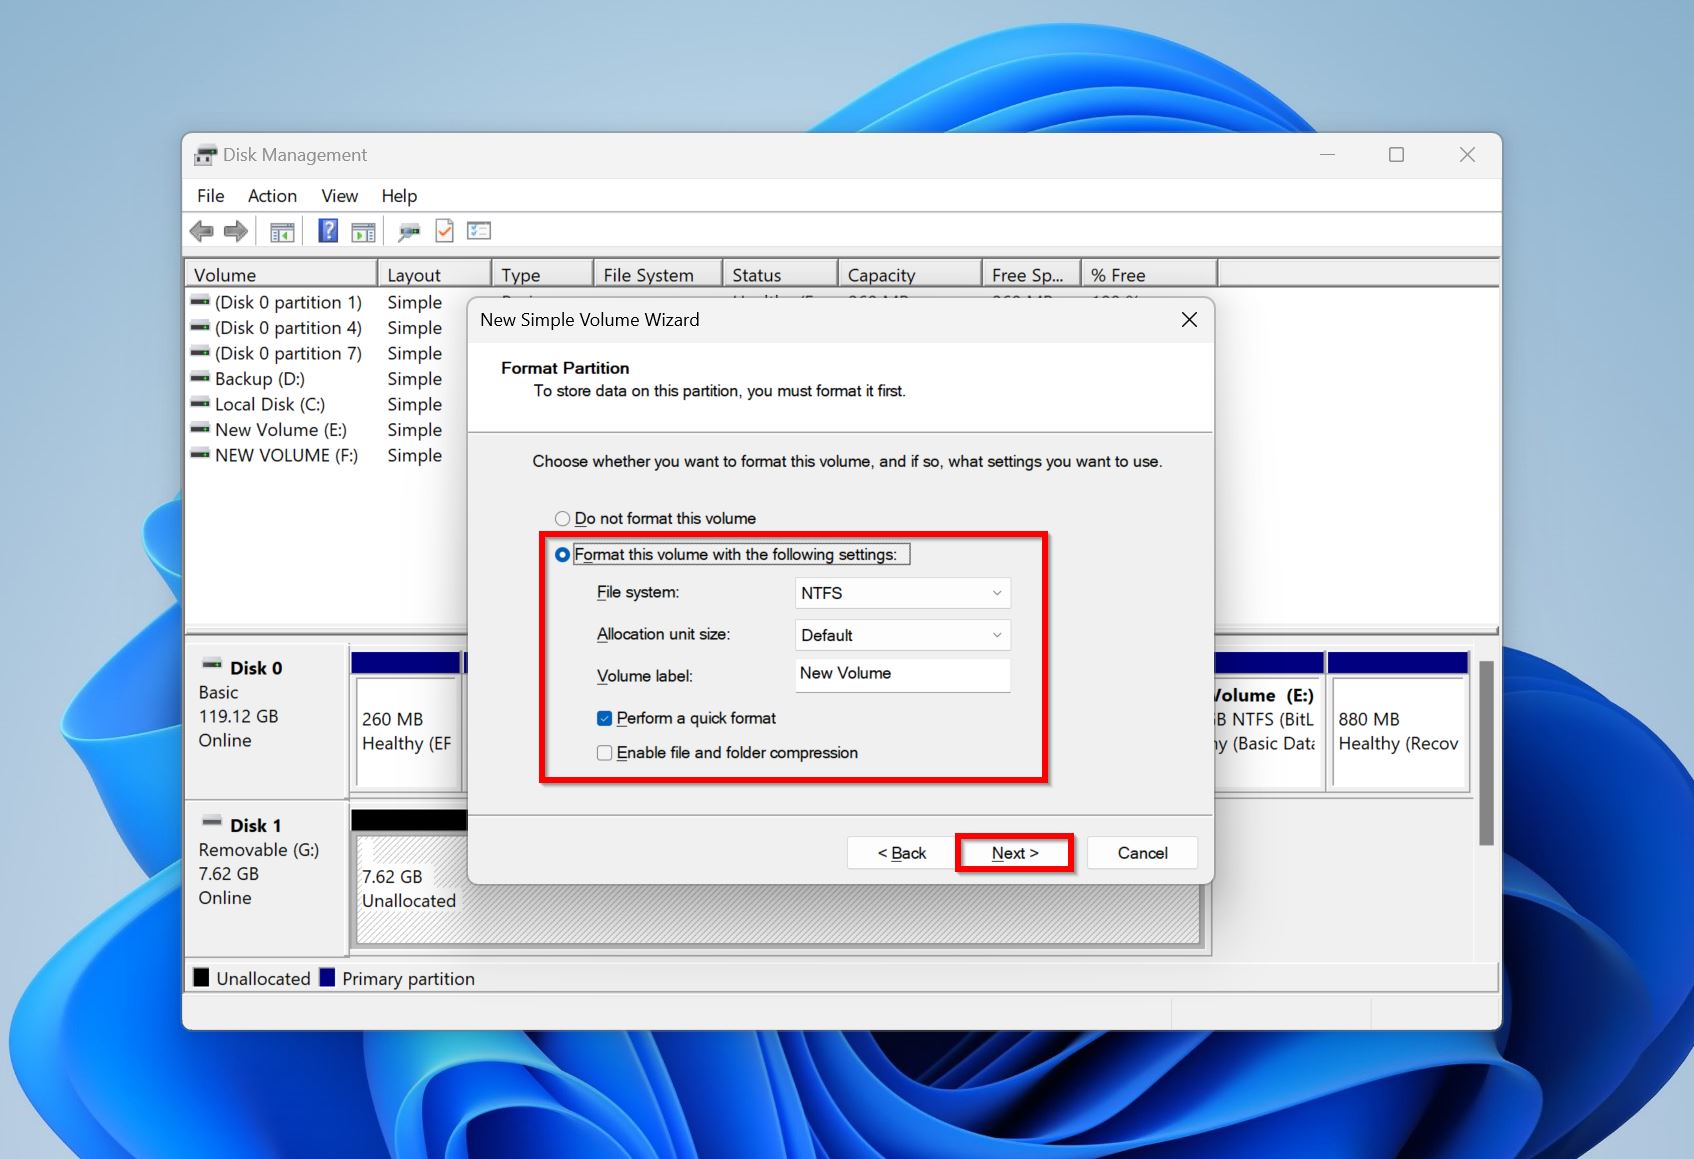
- Click Finish.
You change drive letters anytime by opening Disk Management, right-clicking the drive, and selecting Change Drive Letter and Paths.
Method 5: Update the Hard Disk Driver
Drivers help the hardware and operating system communicate with each other. Outdated drivers are a common reason behind Windows not detecting and communicating with your secondary hard drive.
Here’s how you can manually update your hard drive’s drivers:
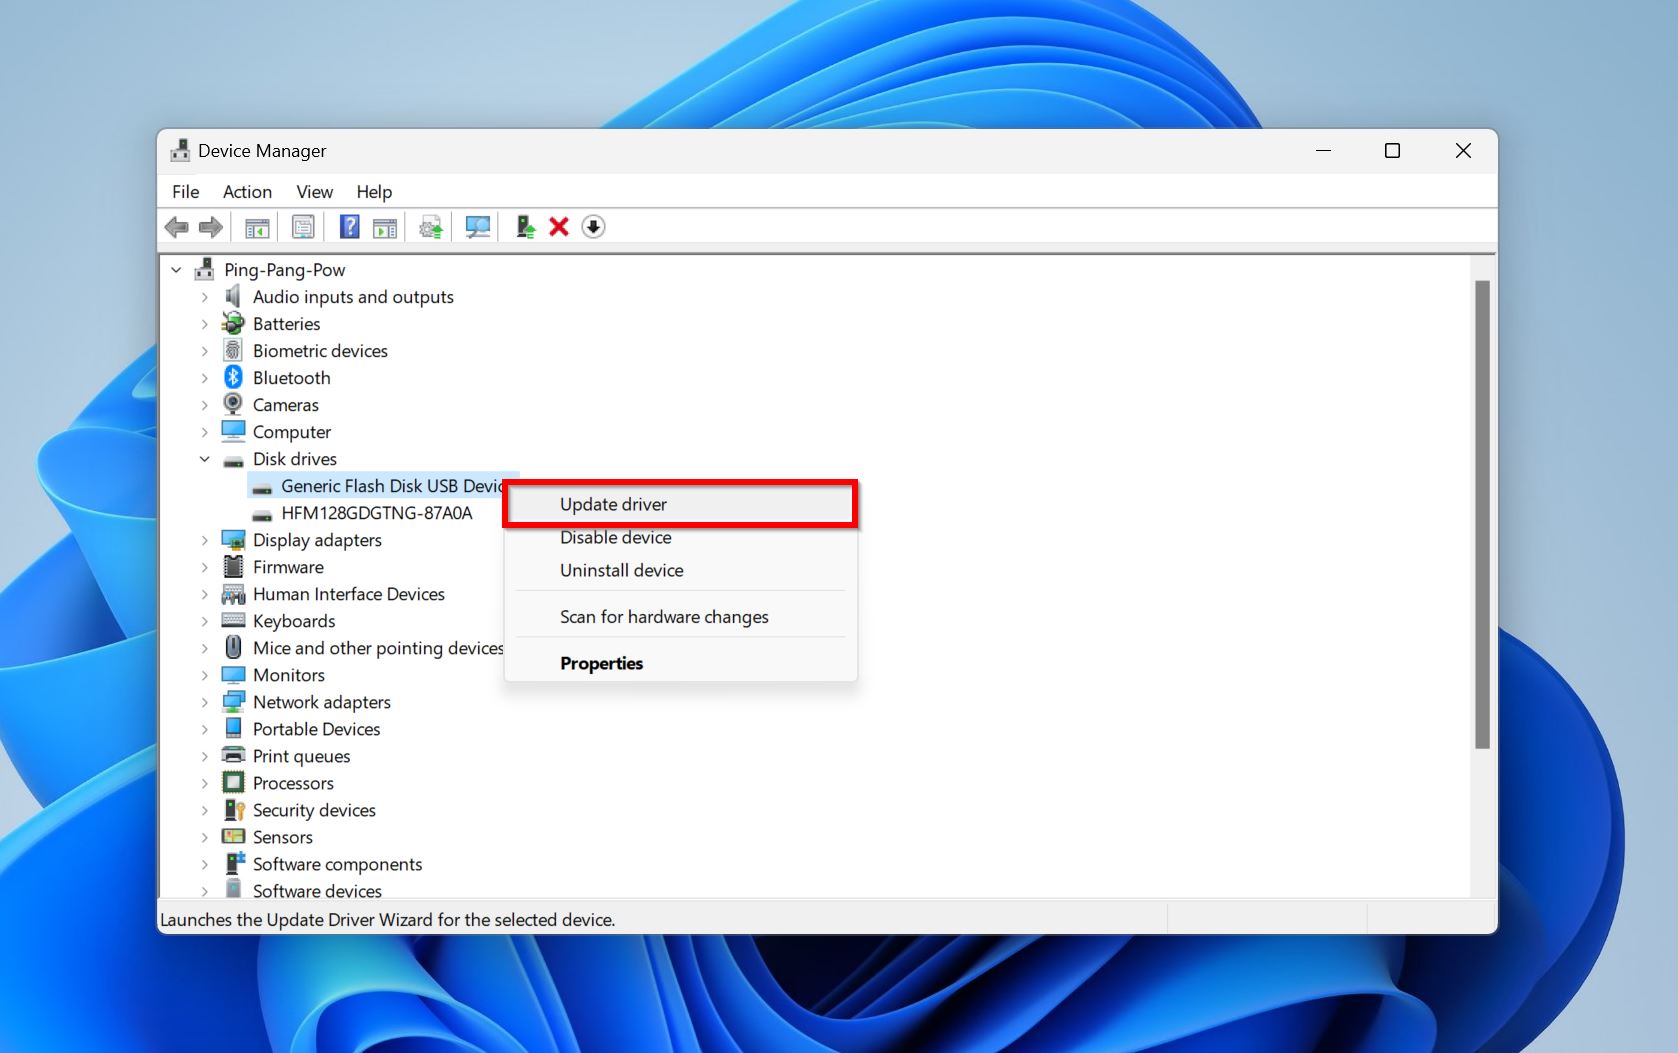
- Press Windows Key + R, type devmgmt.msc in the Run text box and press Enter.
- Expand the Disk drives section, right-click on the secondary hard drive and click Update driver.
- Click Search automatically for drivers. You can also opt to download the drivers from the hard drive manufacturer’s website and then browse for them using the Browse for drivers option.
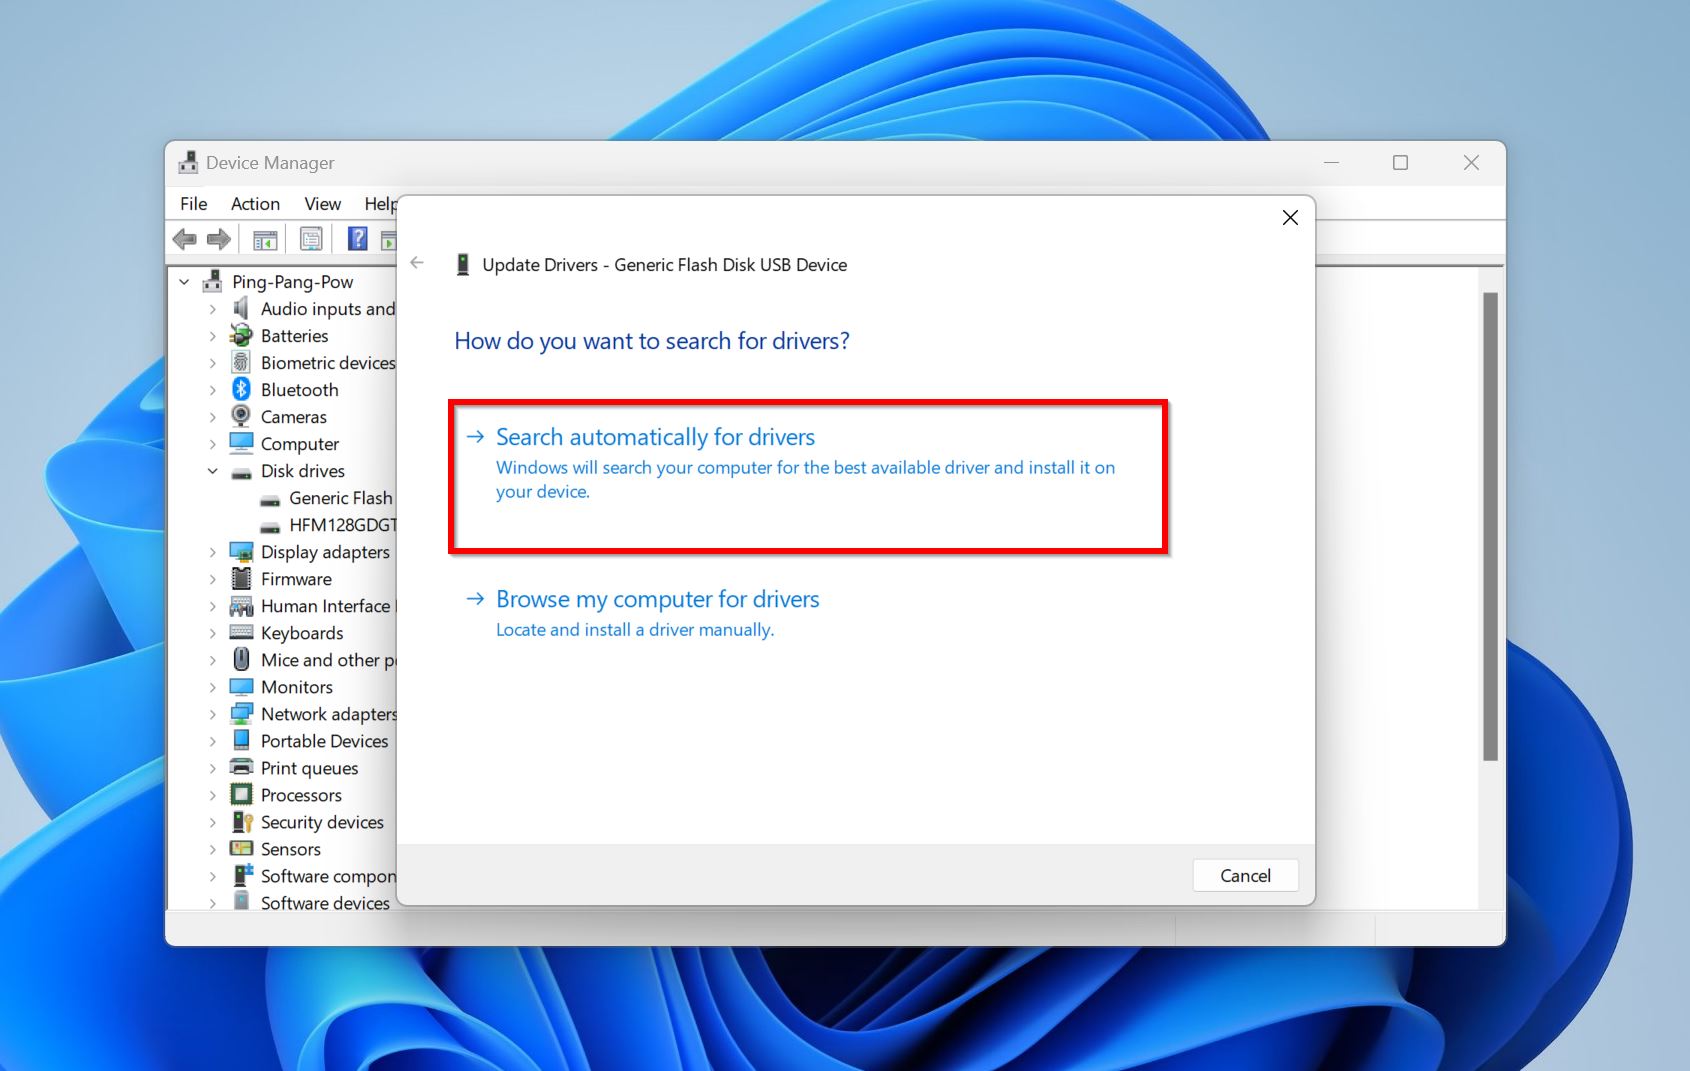
- Windows will search for the latest drivers for your drive and install them.
Method 6: Format the Secondary Hard Drive
Formatting your drive can fix its logical errors and make it detectable by your PC. However, this removes all your data permanently and it’s recommended to do this if the drive is new, doesn’t have any important data, or you have already recovered your data beforehand.
To format your secondary hard drive, follow these steps:
- Type “disk management” in Windows Search and click Create and format hard disk partitions.
- Right-click on the secondary hard drive and click Format.
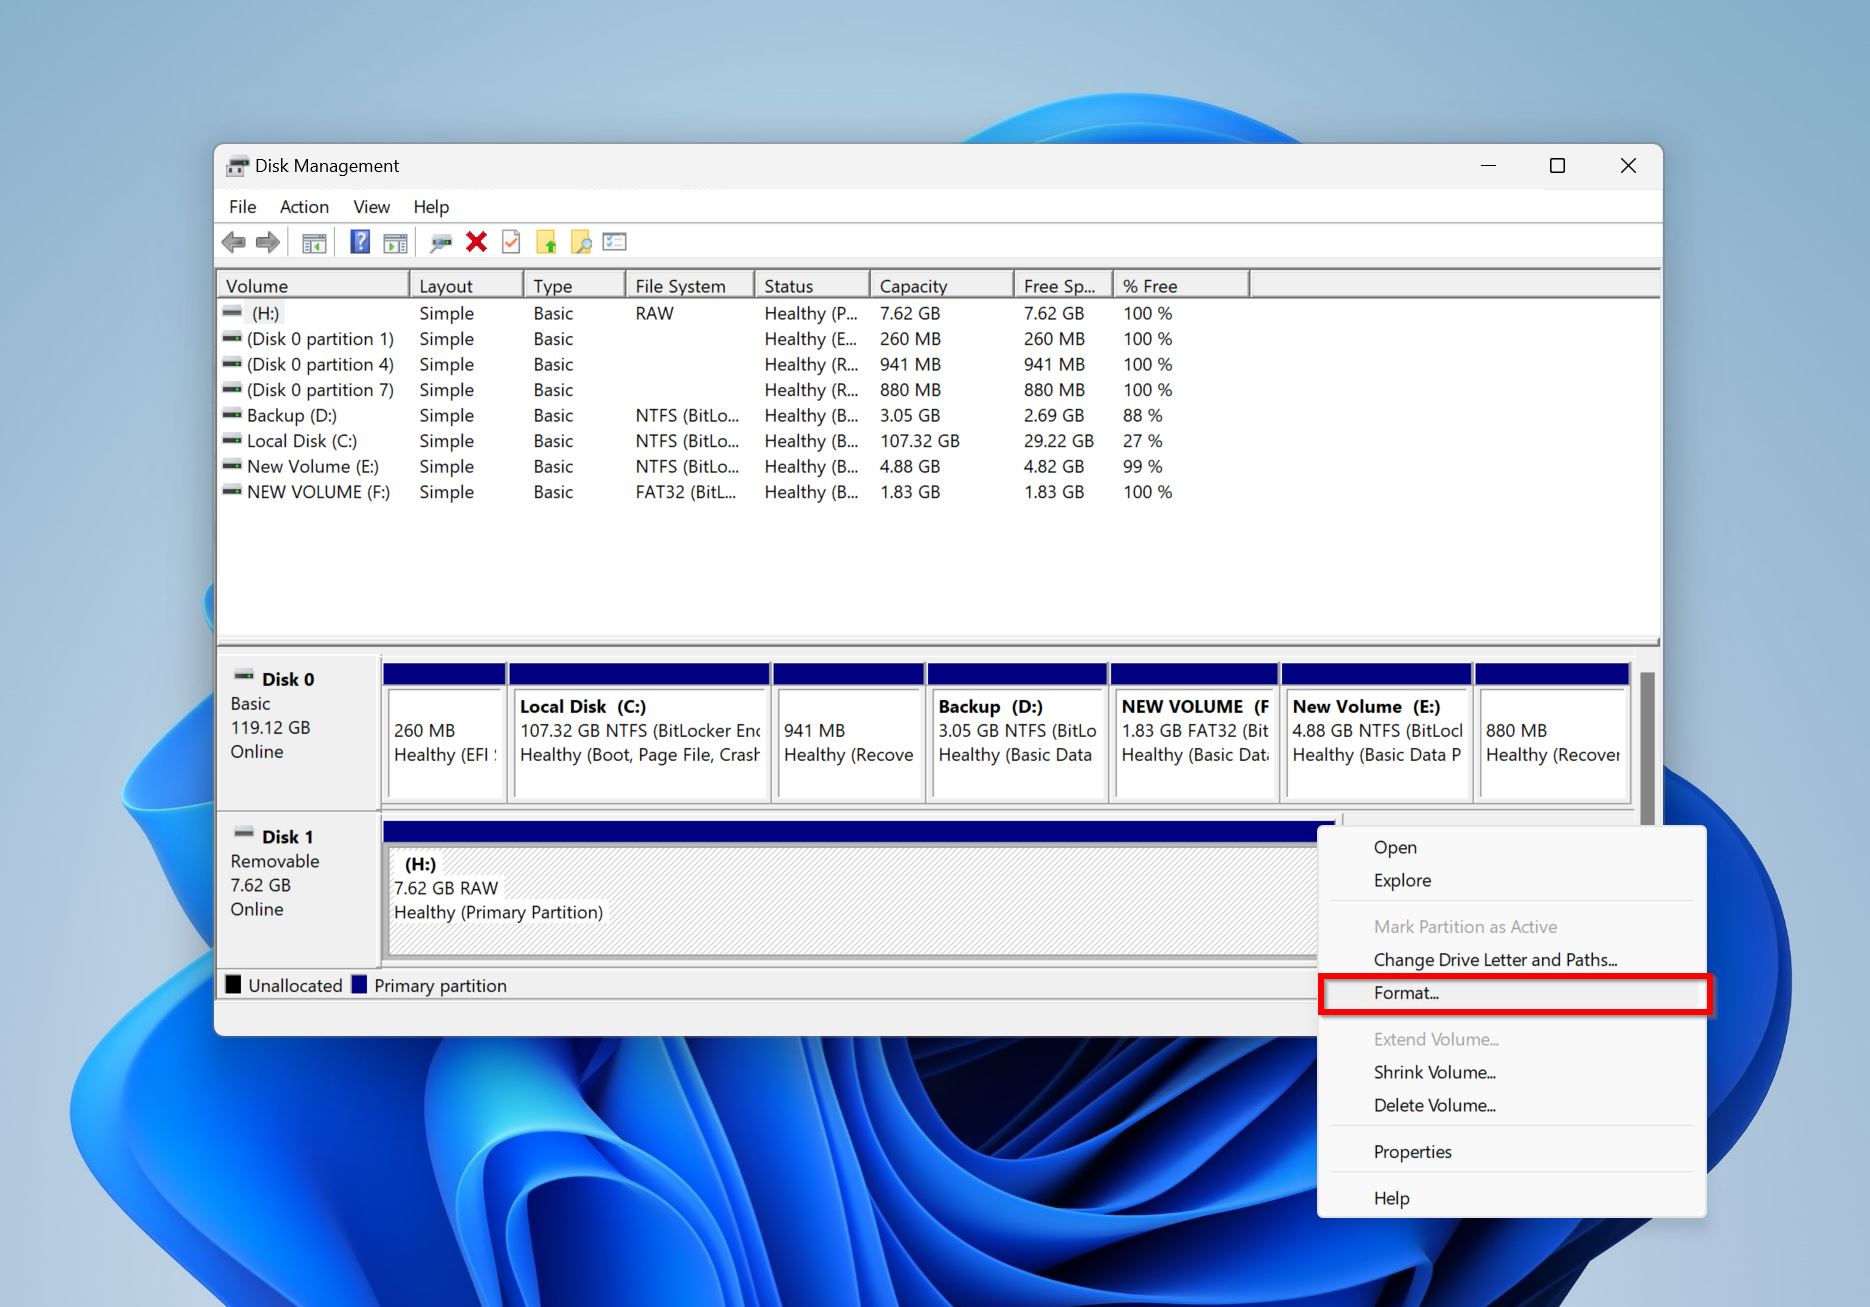
- Choose the desired file system and format options and click OK.
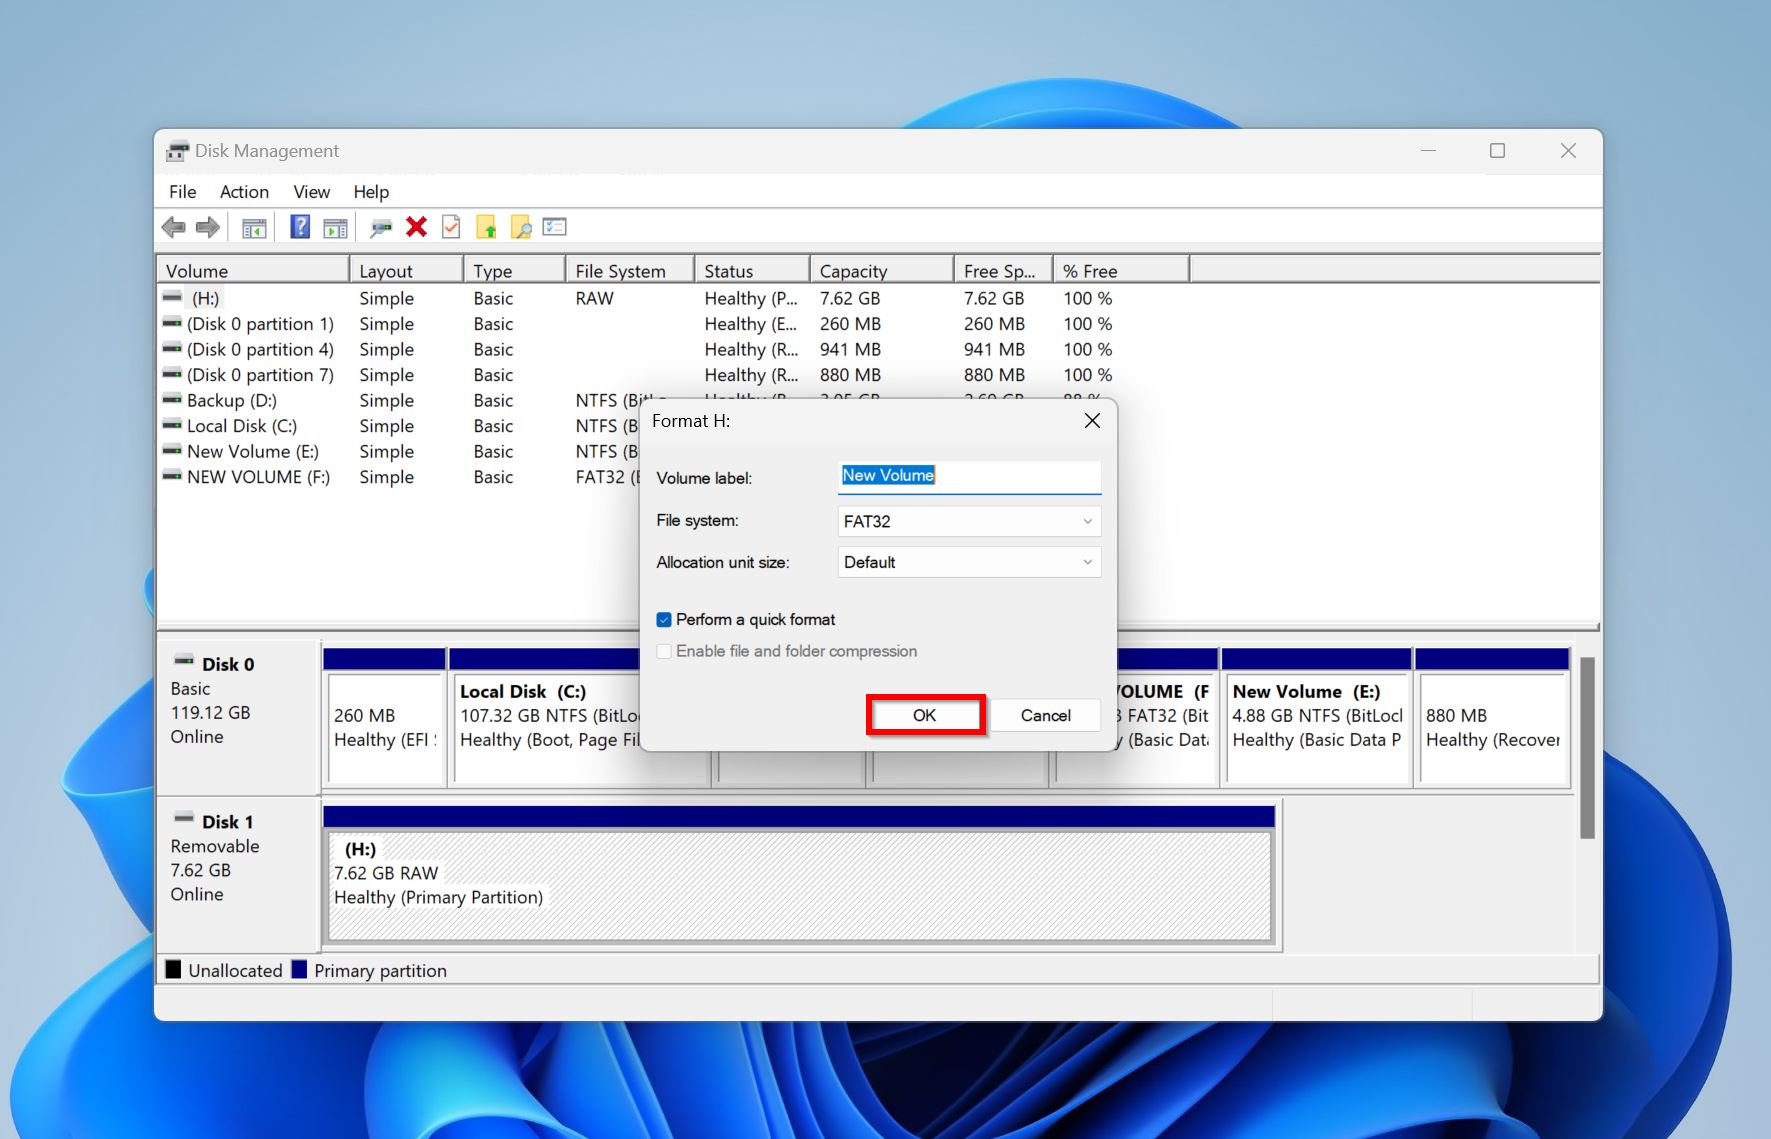
- Windows will format the drive.
Method 7: Delete the Controller
The hard drive controller allows you to transfer data to and from the drive. It’s a physical component and to communicate with your PC, it needs software drivers. By “delete the controller.” we essentially mean uninstall the controller’s driver software from your PC. When you restart your PC, Windows will automatically reinstall the controller’s driver software.
This method is useful if your second hard drive is not showing up in Disk Management. But, your PC may not be able to boot if the deleted hard drive controller is used by the primary drive.
Here’s how you can delete the hard drive controller in Windows:
- Press Windows Key + R to open the Run application, type devmgmt.msc in the text box, and press Enter.
- Expand the Storage controllers section in the Device Manager.
- Right-click on the relevant controller and choose Uninstall device.
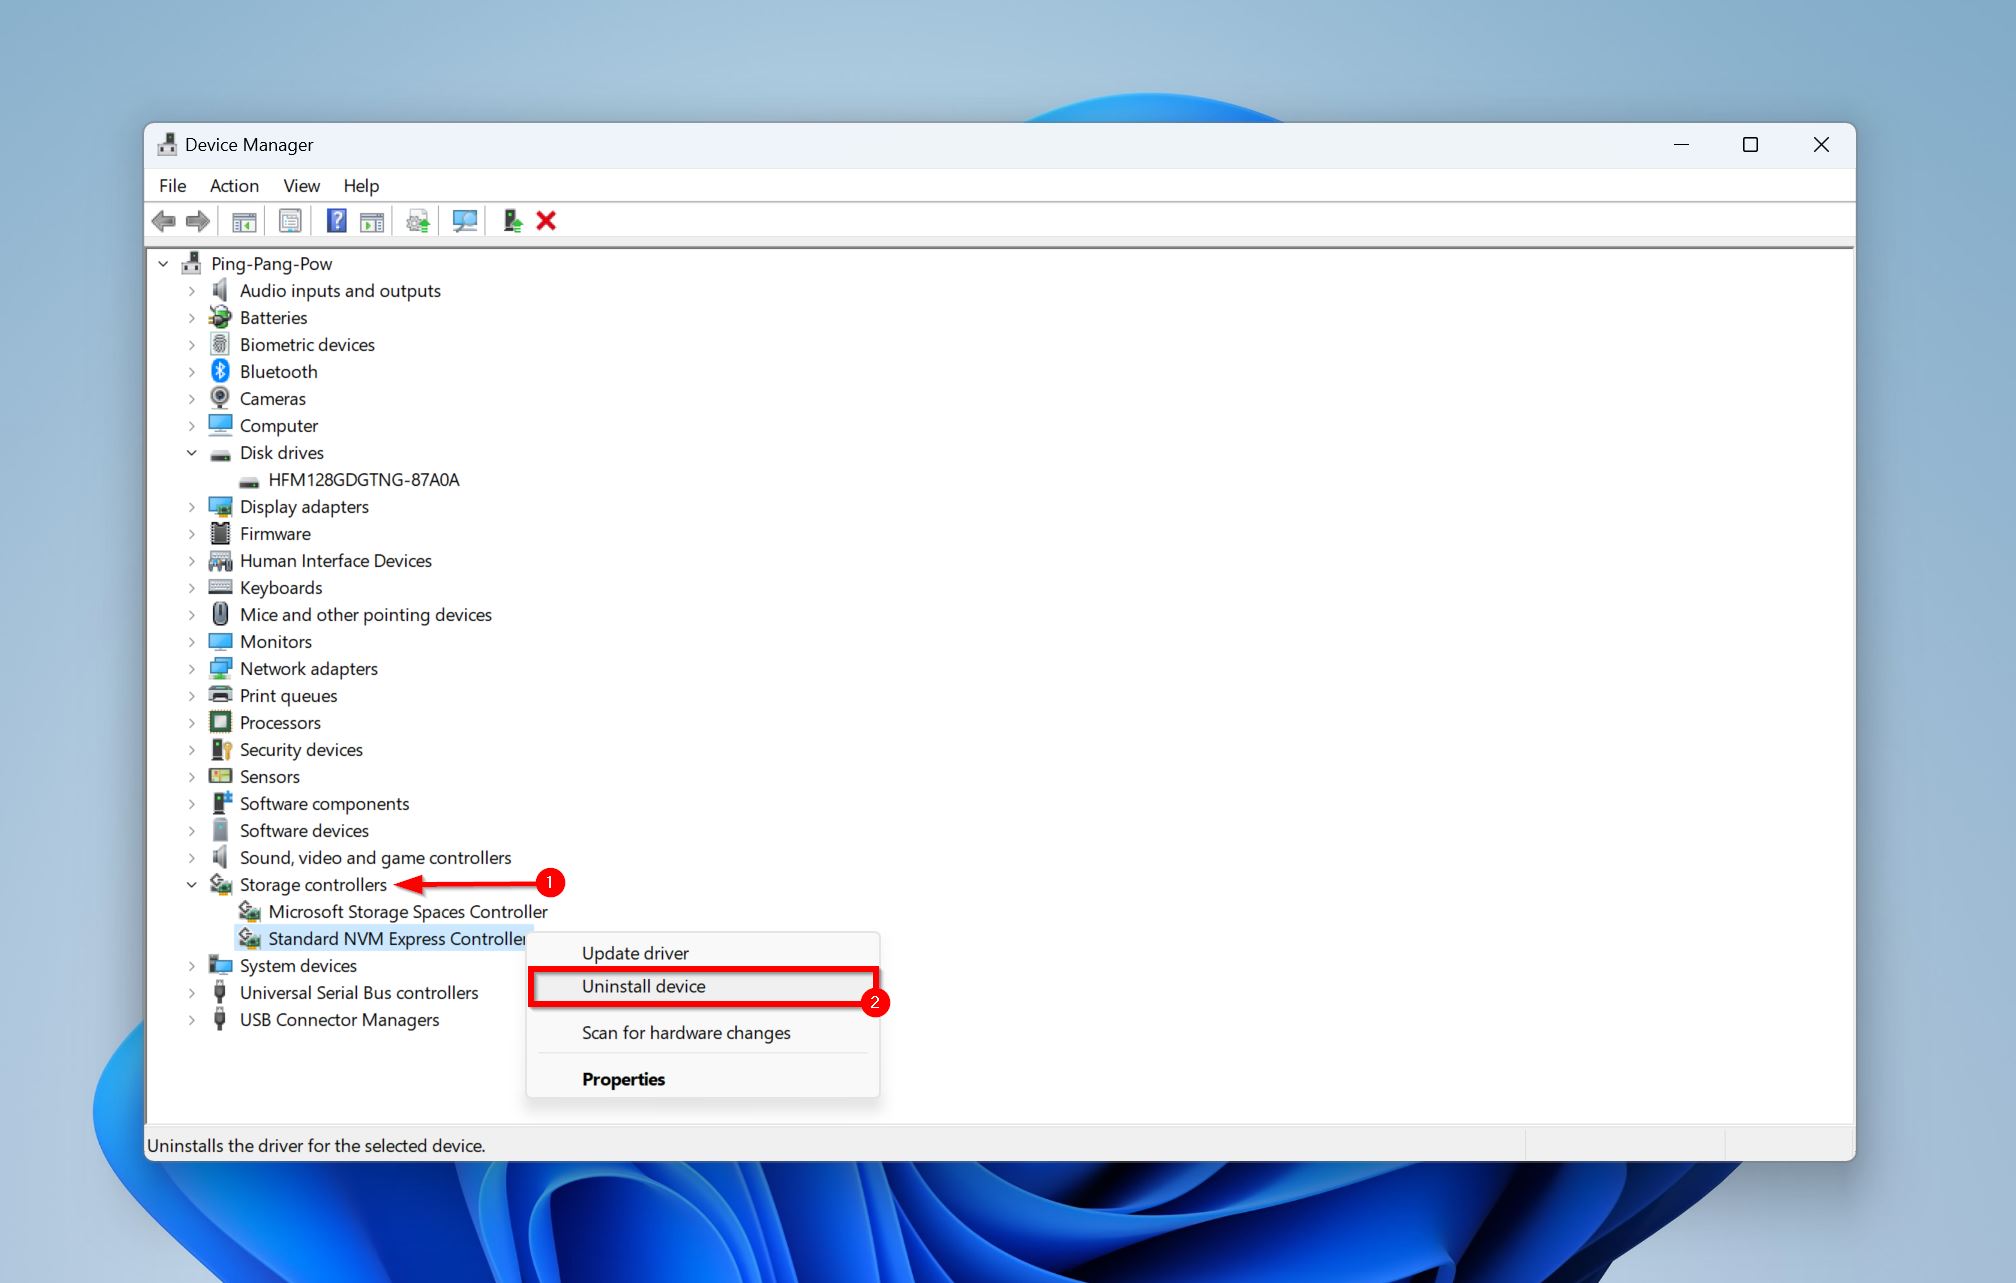
- Reboot your PC.
Conclusion
Fixing a secondary hard drive that’s not detected by Windows is mostly a simple affair. One of the methods listed above should be able to resolve the issue. But, if your hard drive remains undetected, you could be dealing with a dead or physically damaged hard drive, a professional data recovery service can repair it for you.
FAQ
- Logical corruption.
- Physical damage to the drive or connector cables.
- The hard drive is disabled.
- Outdated drivers.
- No drive letter.


