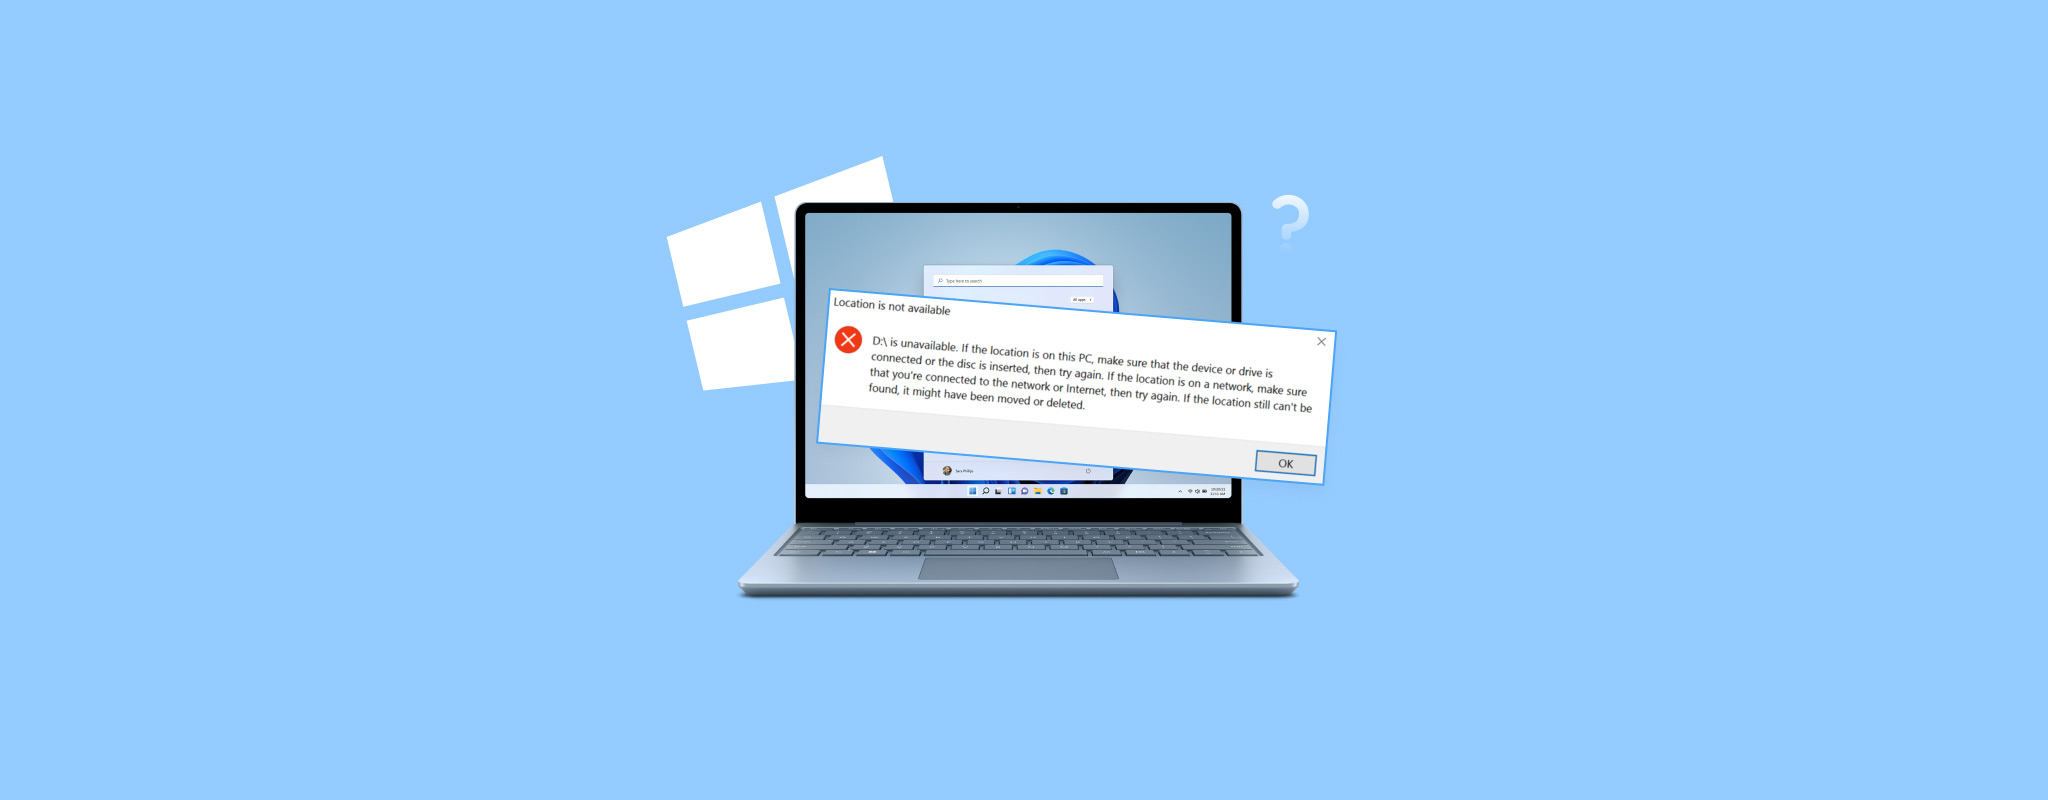
 While the D: drive may not contain your OS and installed applications, many users use it to store their personal files and media. It’s natural to panic when you boot the PC and discover that the D drive is missing. However, it’s easy to resolve this issue. Just follow our guide and you should be good to go.
Table of Contents
Reasons Why the D Drive Not Showing Up or Has Suddenly Disappeared
Before you proceed to restore the D drive/partition, it’s essential to know what caused it to disappear. Applying the wrong fix can sometimes do more harm than good. For example, if it’s physical damage that caused your D drive to disappear, attempting DIY fixes can further worsen the problem.
The following table lists the common reasons why your D drive may not be showing up and what you can do about it:
|
Reason |
Description |
| 🔧 Outdated or missing drivers | Software drivers enable your disk drive to communicate with your OS and vice-versa. If the drivers are missing or outdated, the PC may stop detecting your disk drive altogether. You can manually update the disk drivers using the Device Manager. |
| 🔏 Hidden drive | The D drive could be hidden by your system, or a third-party program that misconfigured the system settings. |
| 🔄 Updating or installing Windows | Windows updates can sometimes mess up your drive’s settings, resulting in the D drive not showing up. This could also happen when you attempt to install/reinstall Windows. If the issue popped up after installing a major Windows update, roll back the update. |
| 💿 Disk corruption | Malware, improper usage, and bad sectors can all cause disk corruption which, in turn, causes the D drive to not show up in Windows Explorer. In this case, it’s best to recover your data at the earliest, and then attempt to fix the corruption. |
| 🔠 Missing drive letter or the drive letter is occupied by a CD/DVD drive | The drive letters in Windows are unique to each partition and external disk connected to your PC. If the drive letter was unassigned, or it is conflicting with a CD/DVD drive or any other external storage drive attached to your PC, the computer’s original D drive will not show up. |
| 🔚 The D drive was the only volume on a disk that was removed | A bad connector, damaged SATA cable, and physical impact can result in the D: drive not showing up. |
| 🔨 Physical damage | Physical shock, power surges, heat, and water can result in physical damage to the drive. A consistent clicking, beeping, or whirring sound is usually a good indicator of it. A physically damaged drive could be the reason behind a missing D drive. Here, it’s best to contact a professional data recovery service. |
| 🗃️ File system damage | If the file system of the D drive is corrupt, or missing entirely, it won’t show up in Windows Explorer. Modern data recovery apps can recover data from a drive with a missing (RAW) file system, so you must first do this and then format the drive to a Windows-recognized file system. |
How to Recover Data From a D Drive that is Not Showing Up
It’s always a good idea to recover your files from the D drive, before proceeding to fix it. Although the partition may not be visible in Windows File Explorer, if it shows up in Disk Management along with its correct storage size, you can recover data from it using a data recovery program. But, you need to select a data recovery tool that is up to the job.
We recommend Disk Drill, as it offers an excellent blend of features and performance while being easy to use. It’ll work with all major file systems, including RAW, and supports over 400 file formats. You can use its Byte-to-byte backup feature to recover data from drives that are showing signs of corruption.
Here’s how you can recover data from the D drive using Disk Drill:
- Download Disk Drill and install it.
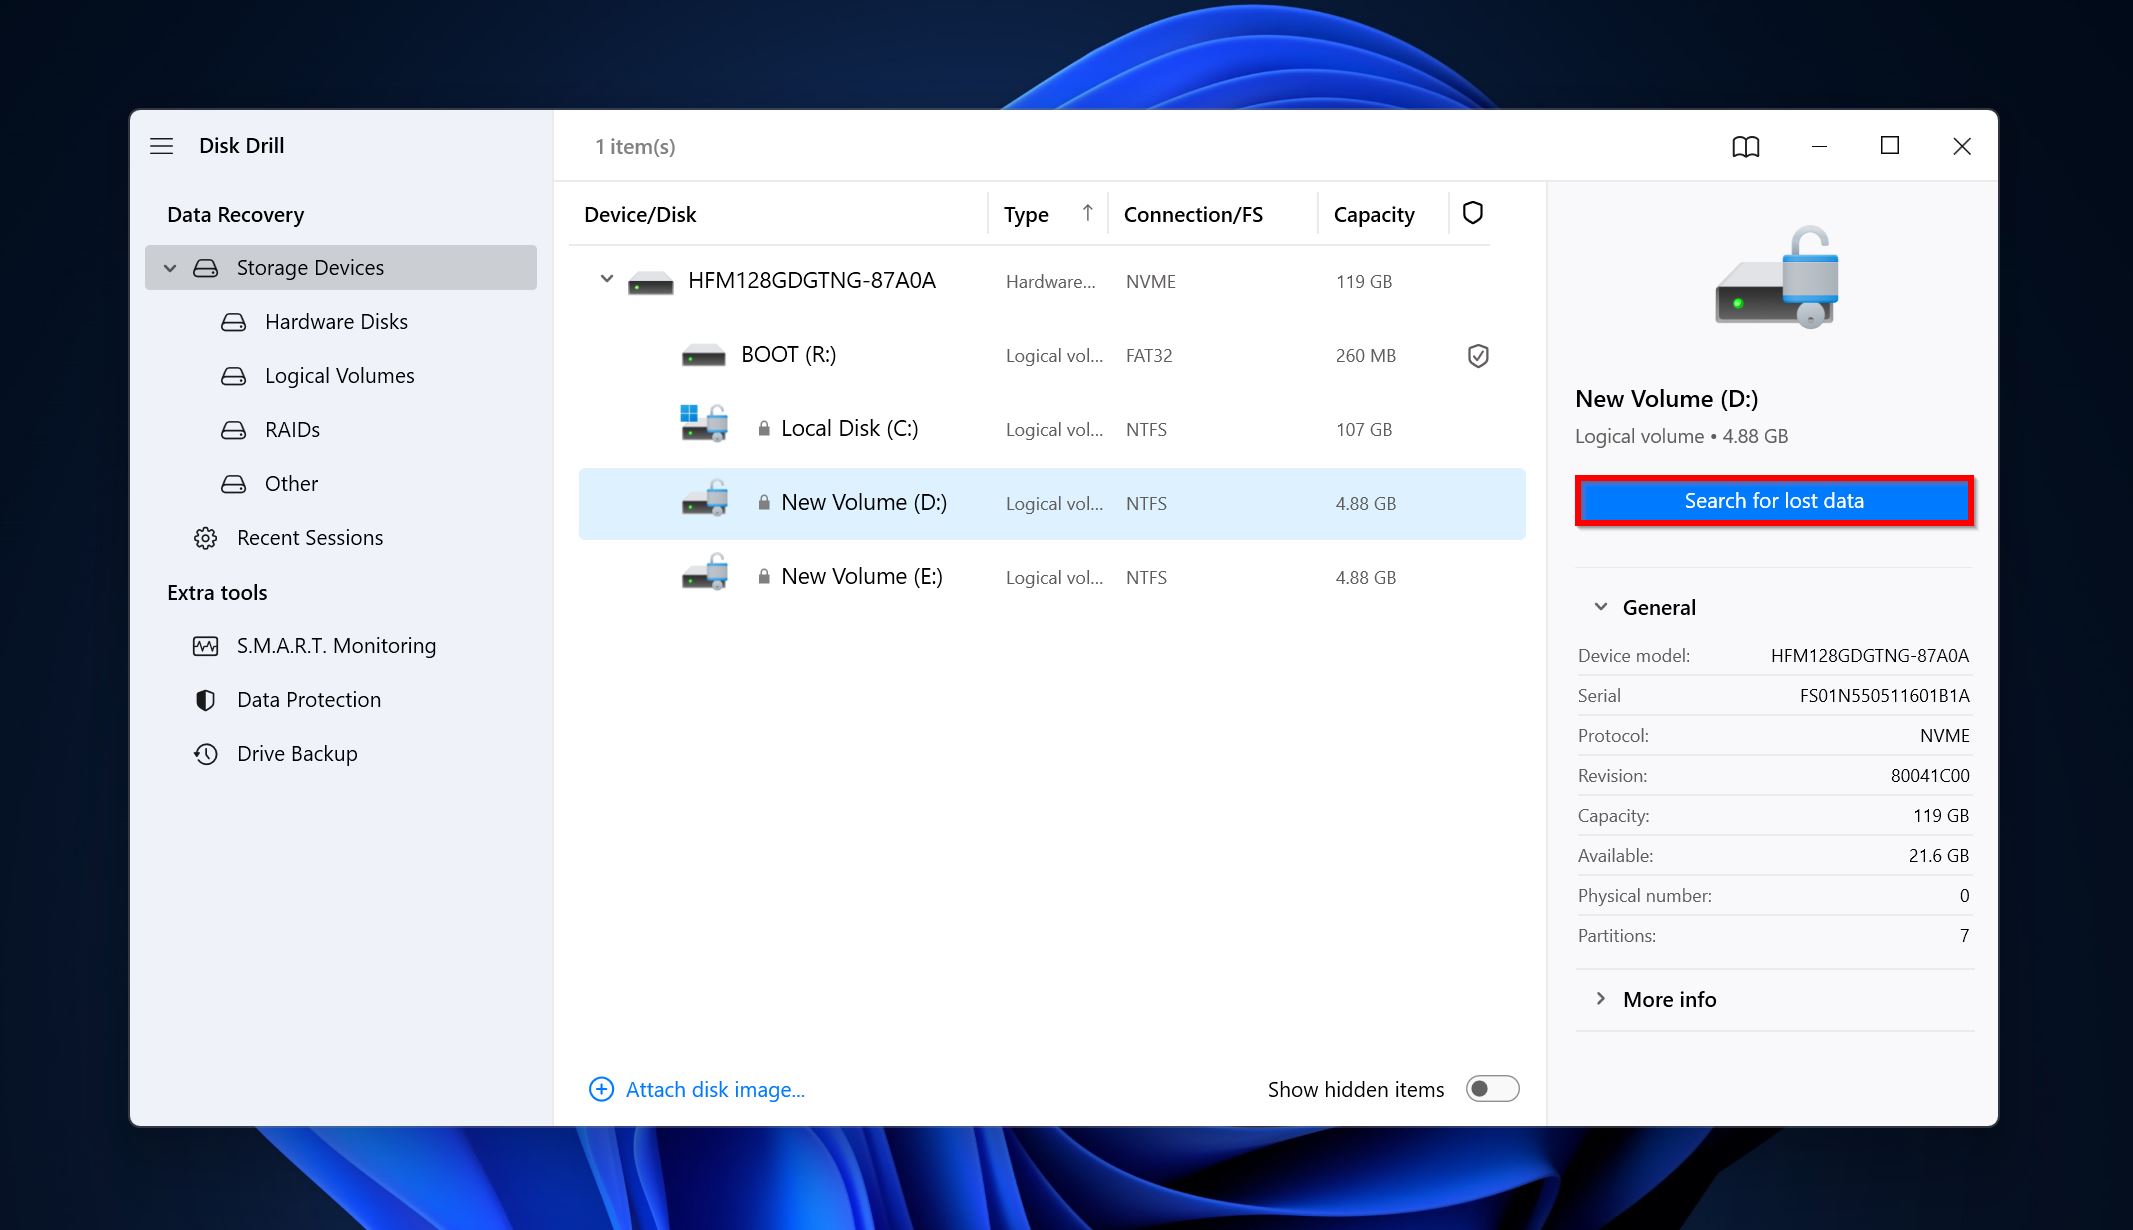
- Open Disk Drill, expand the disk drive, select the D drive, and click Search for lost data.
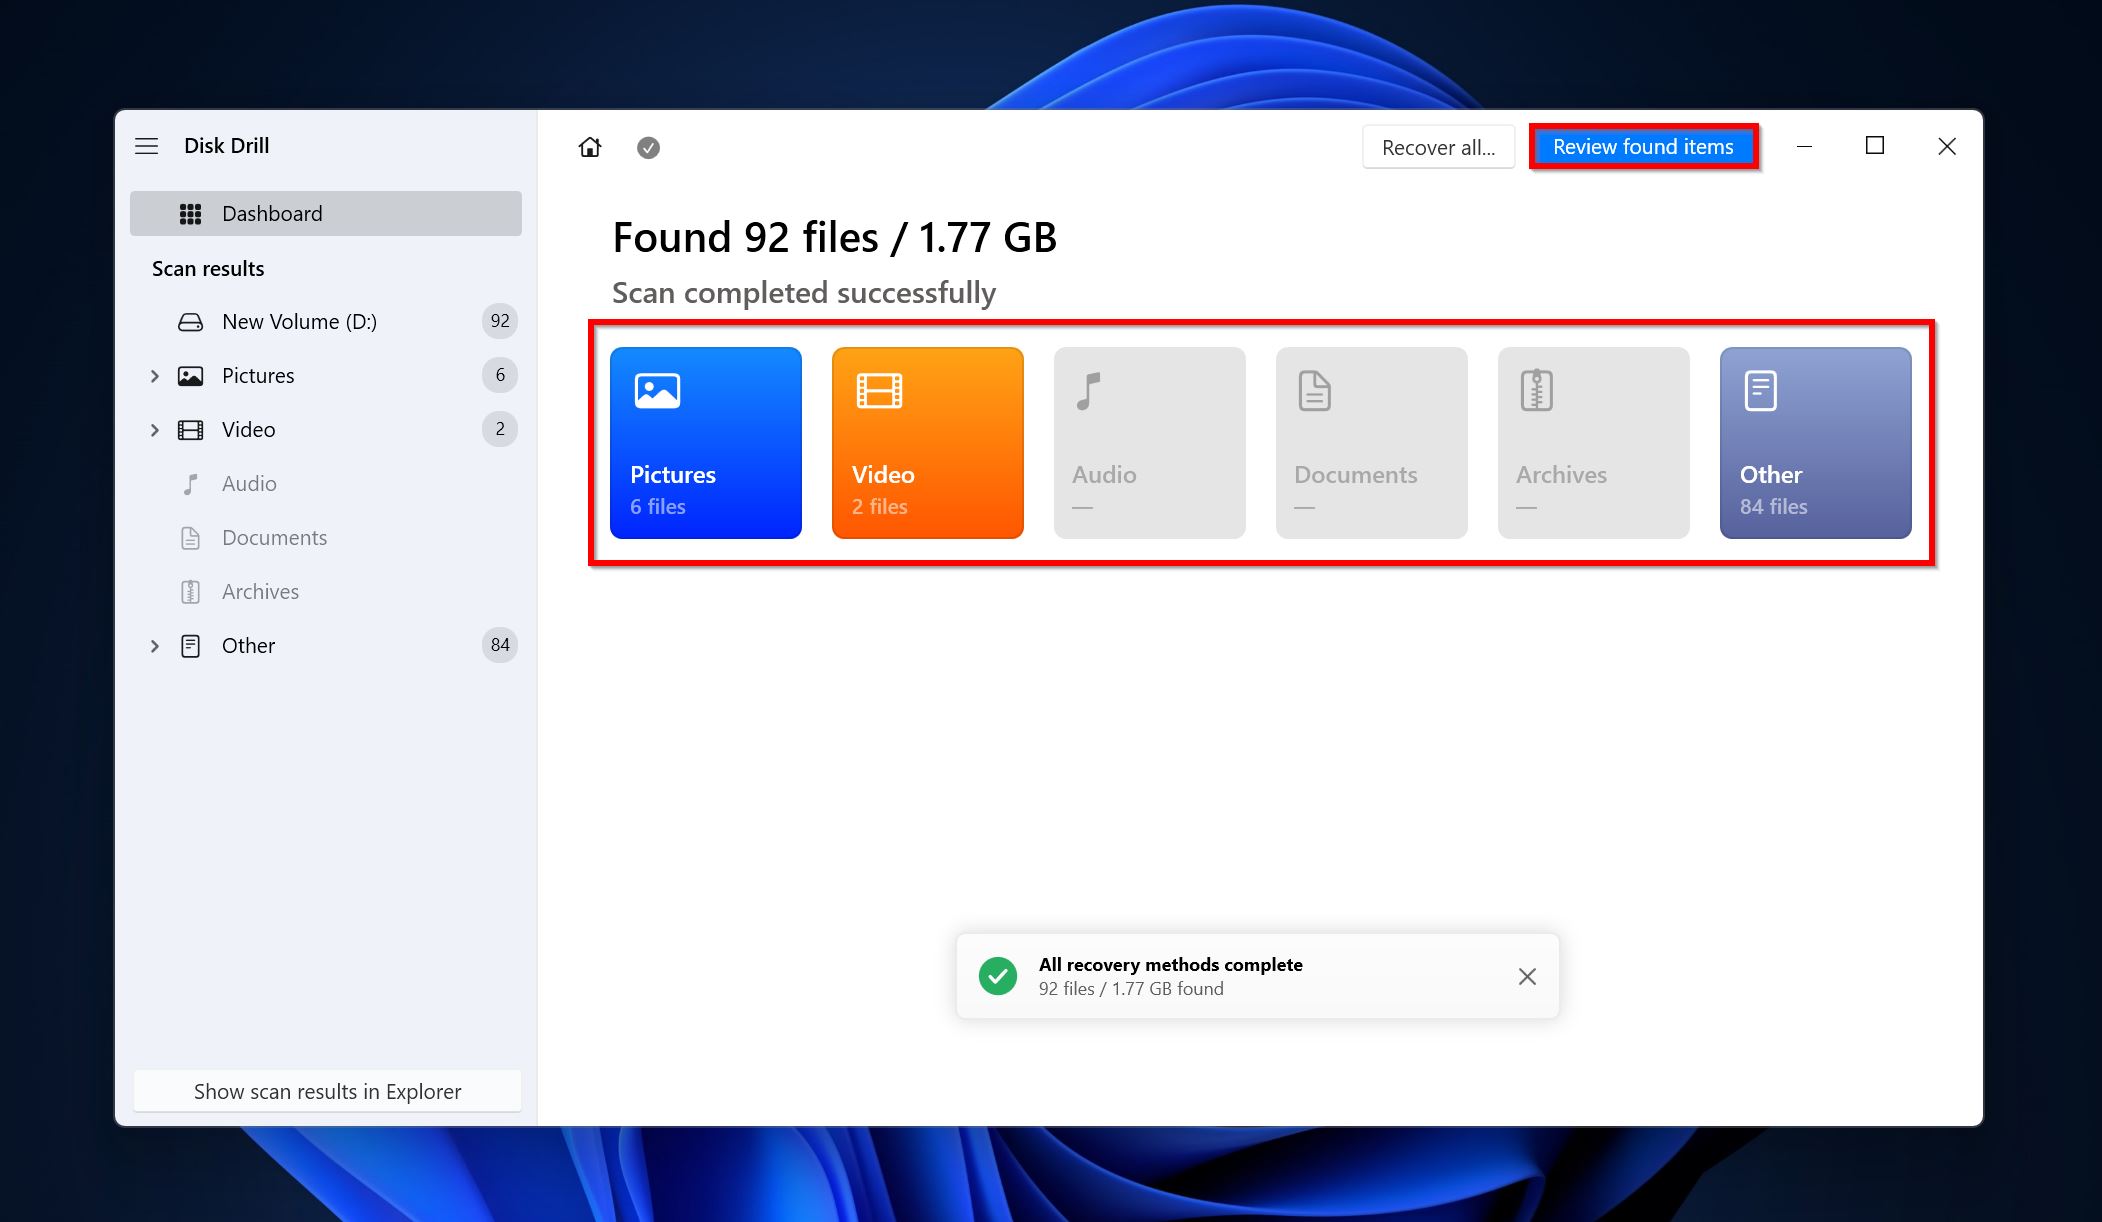
- Click on Review found items to see recoverable files. You can also directly click on the file type you wish to recover and view filtered results (Pictures, Videos, Audio, Documents, Archives, and Other).
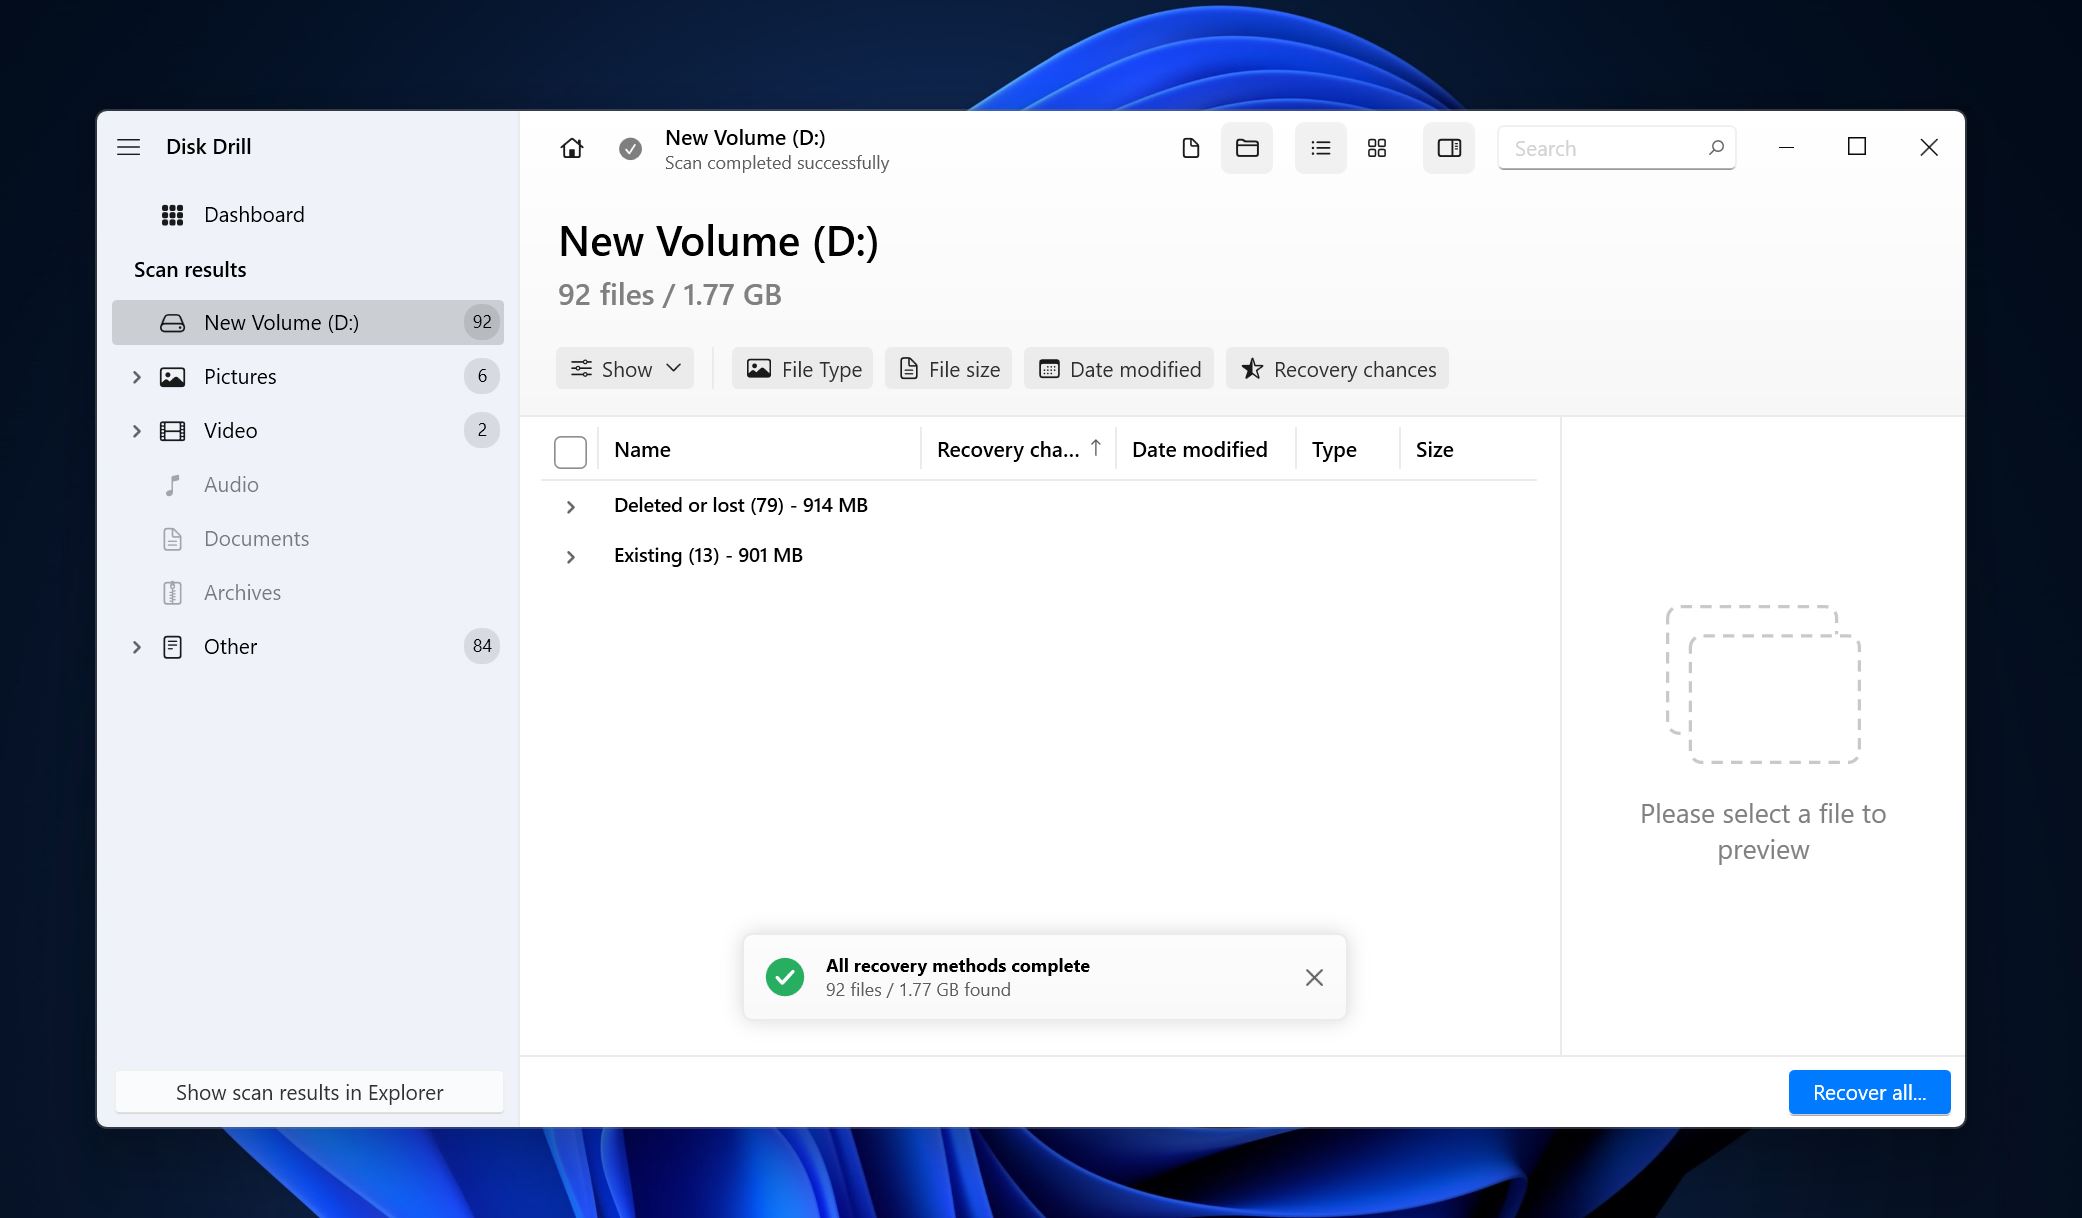
- Expand the Existing section to view the files that are already there on local disk D. To view recoverable files that were deleted or lost due to corruption, expand the Deleted or lost and Reconstructed sections.
- Use the checkboxes to select the files and click Recover. Disk Drill displays a preview of the currently selected file. You can manually preview a file by clicking the eye icon next to its name.
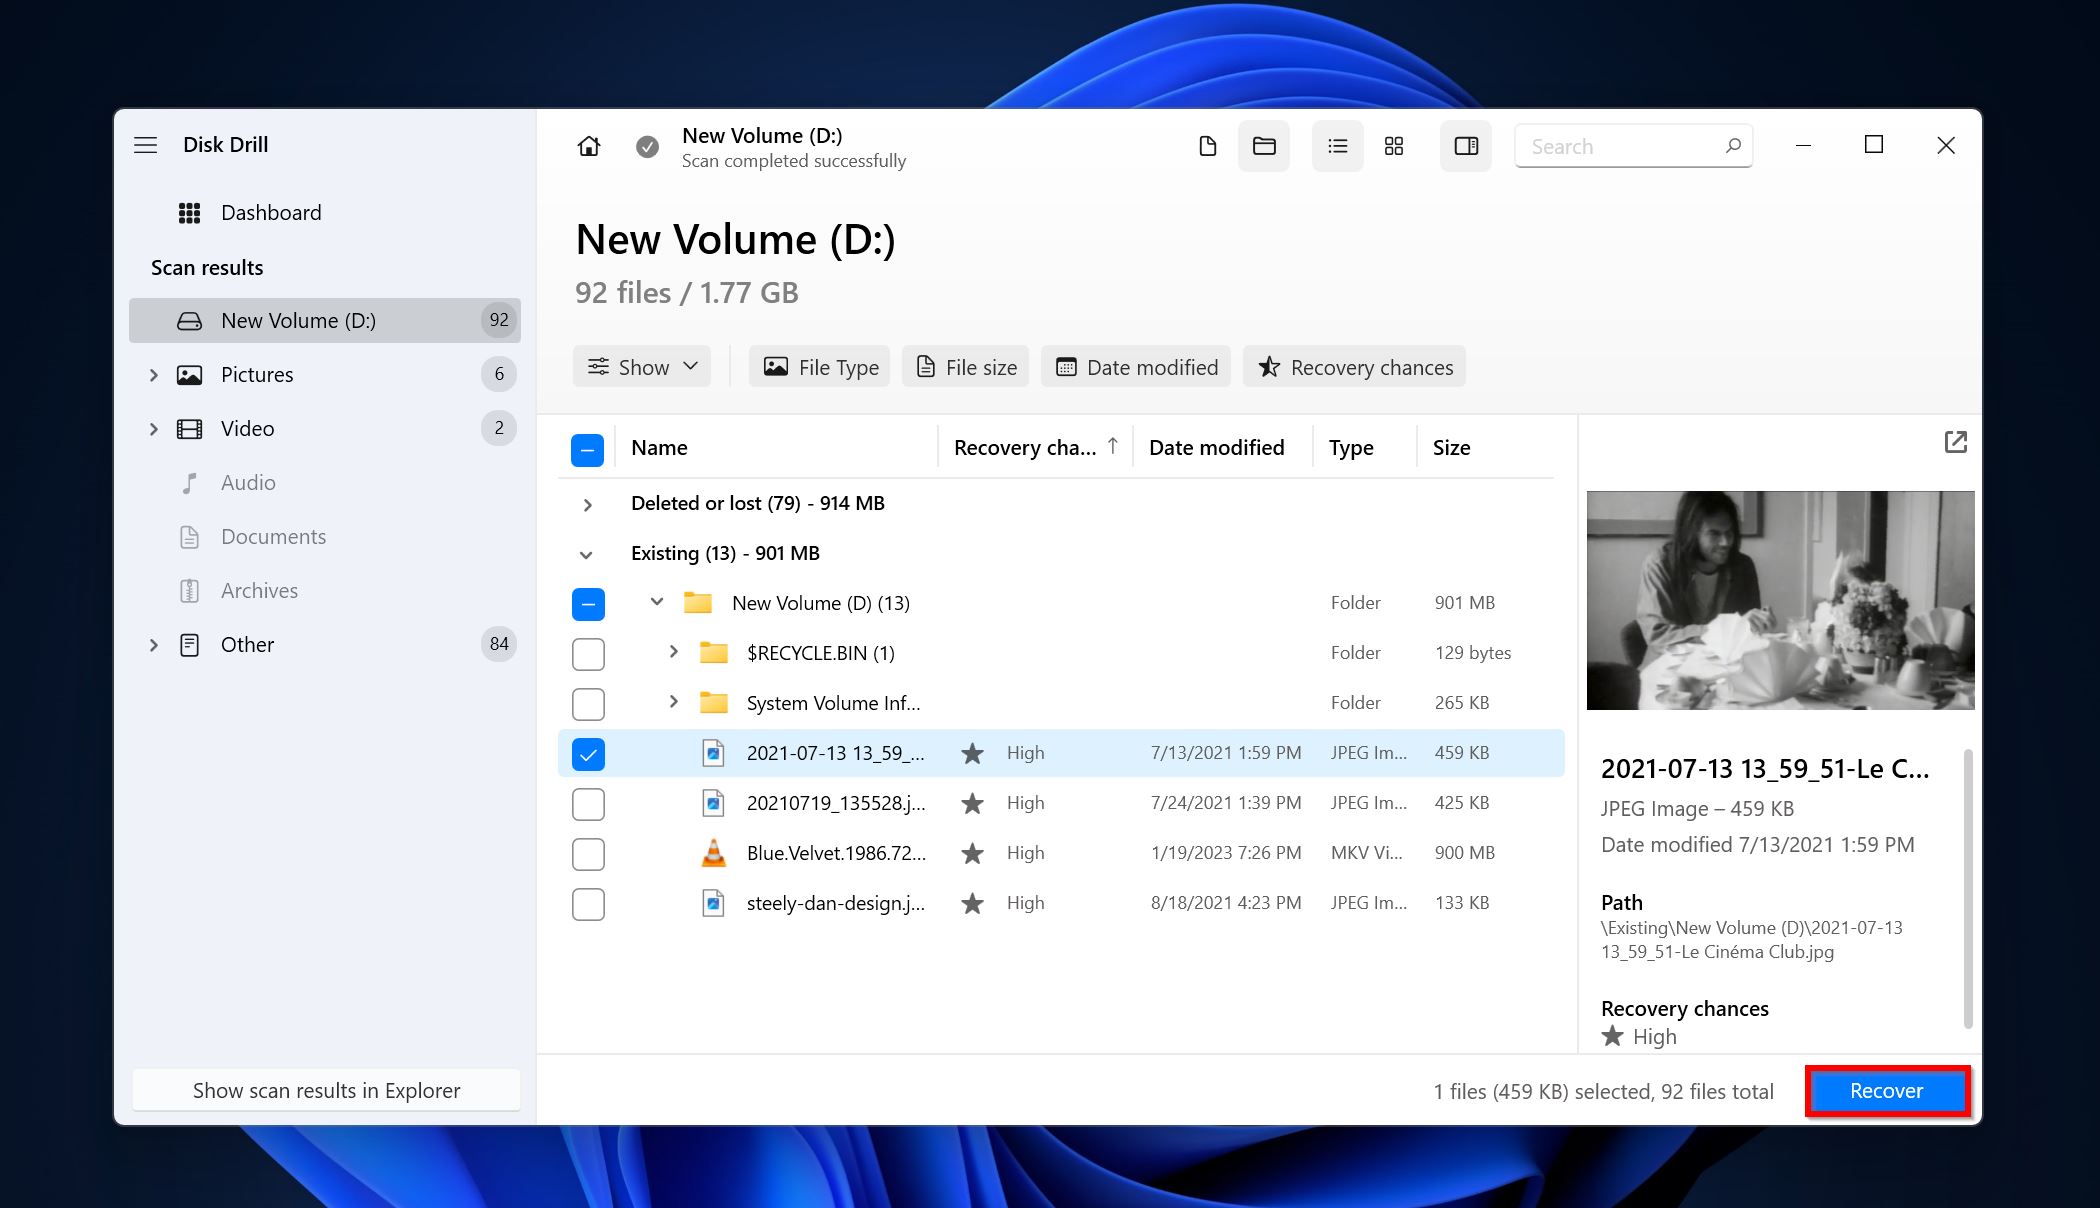
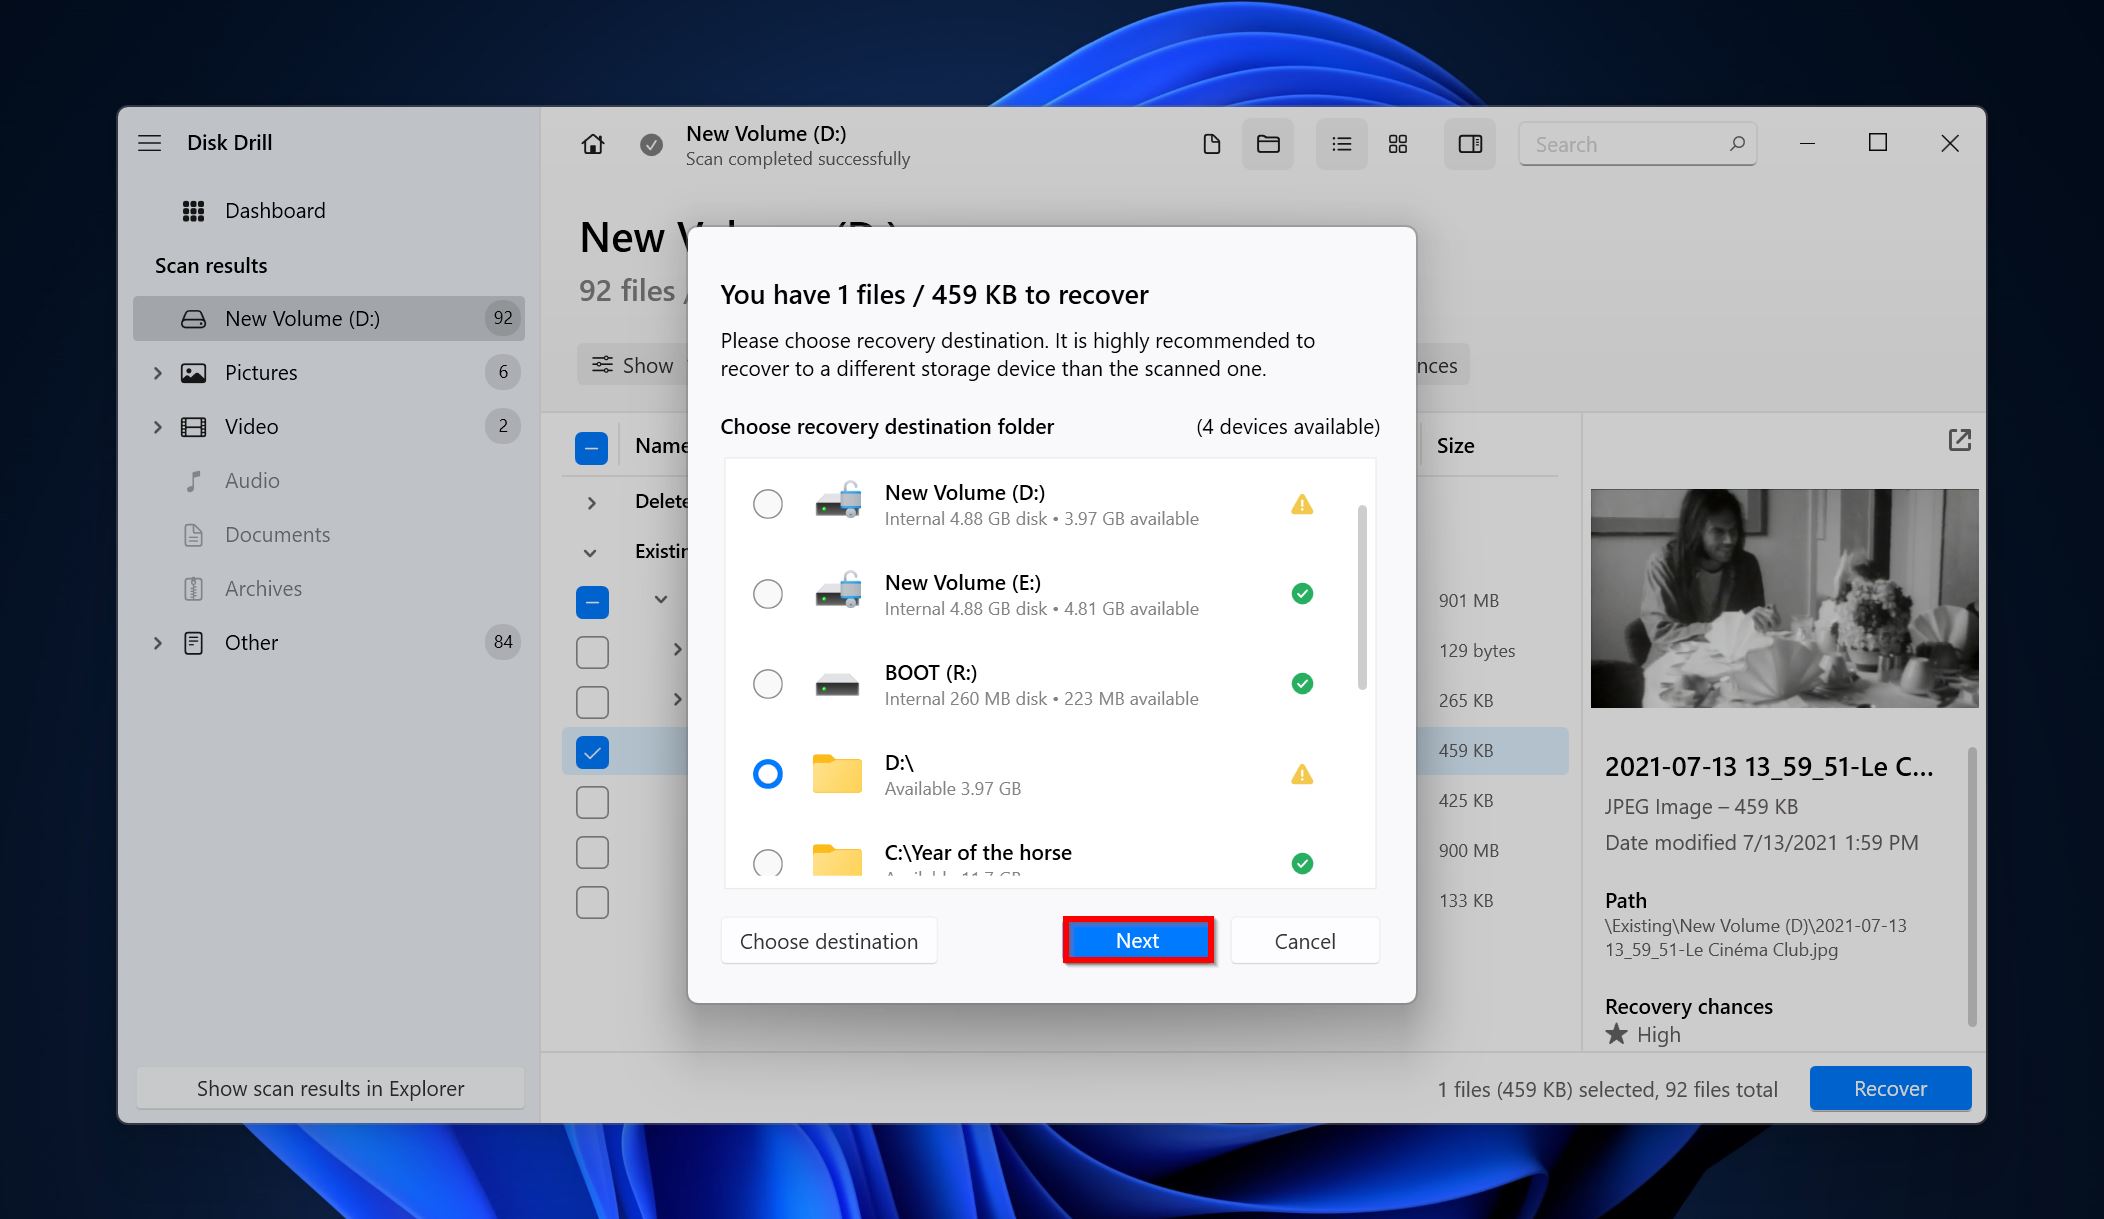
- Choose a recovery destination for the selected files. We recommend you save them on another disk. Click Next.
- Disk Drill will recover the selected files.
Creating a Byte-to-byte Backup of Corrupted Disks
Drives with clear signs of corruption, like slow performance and randomly disappearing/reappearing files, are best scanned using Disk Drill’s byte-to-byte backup feature.
A byte-to-byte backup or disk image is essentially a soft copy of your disk that can be scanned, even if the physical disk is not present.
Here’s how to create a disk image of the drive using Disk Drill:
- Connect an external storage drive that has enough free space to store the disk image of the D: drive.
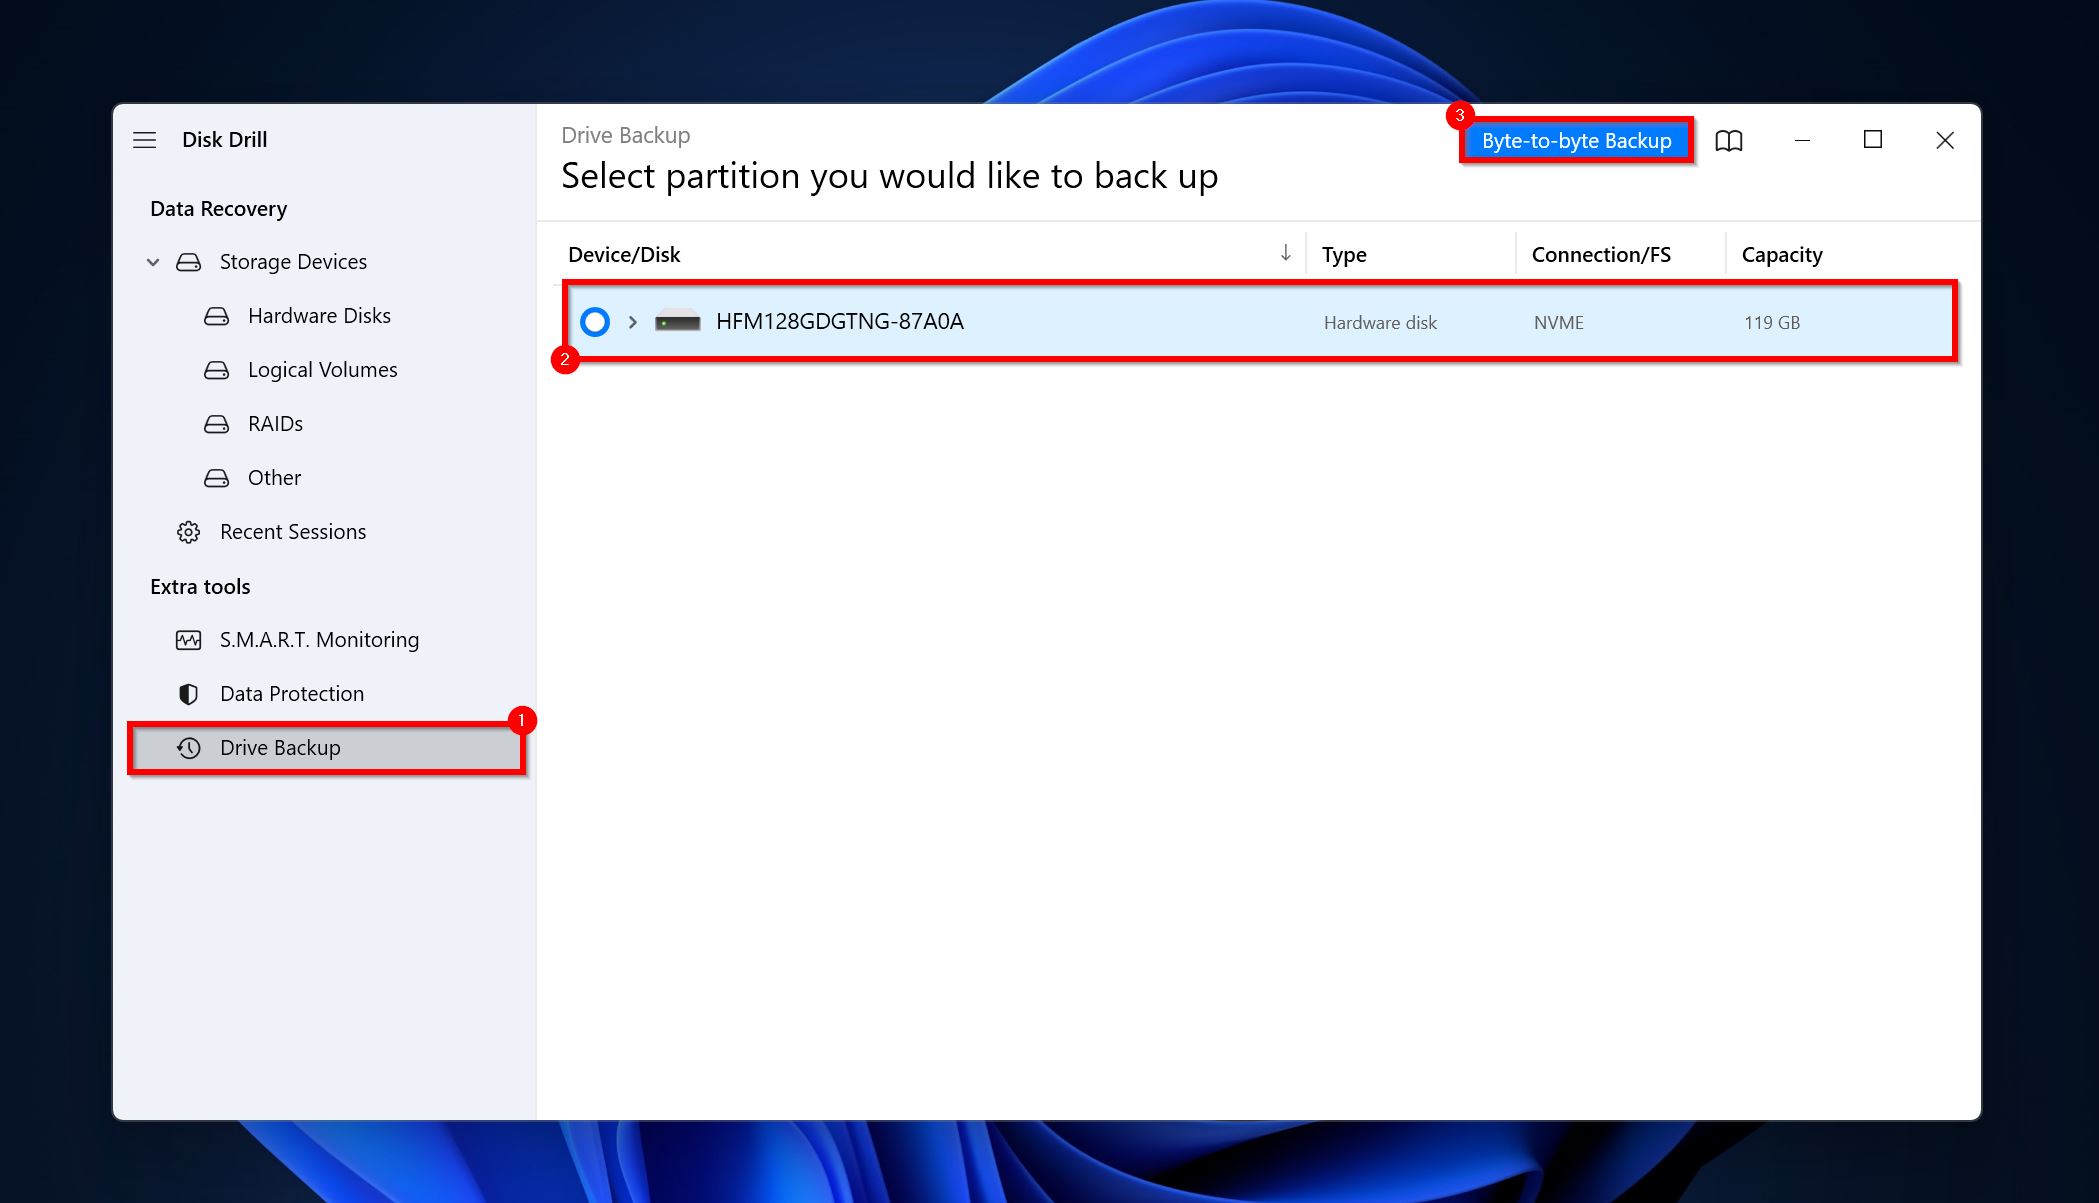
- Open Disk Drill and click on Drive Backup under Extra tools.
- Expand the drive and select the D partition and click on the Byte-to-byte Backup button.
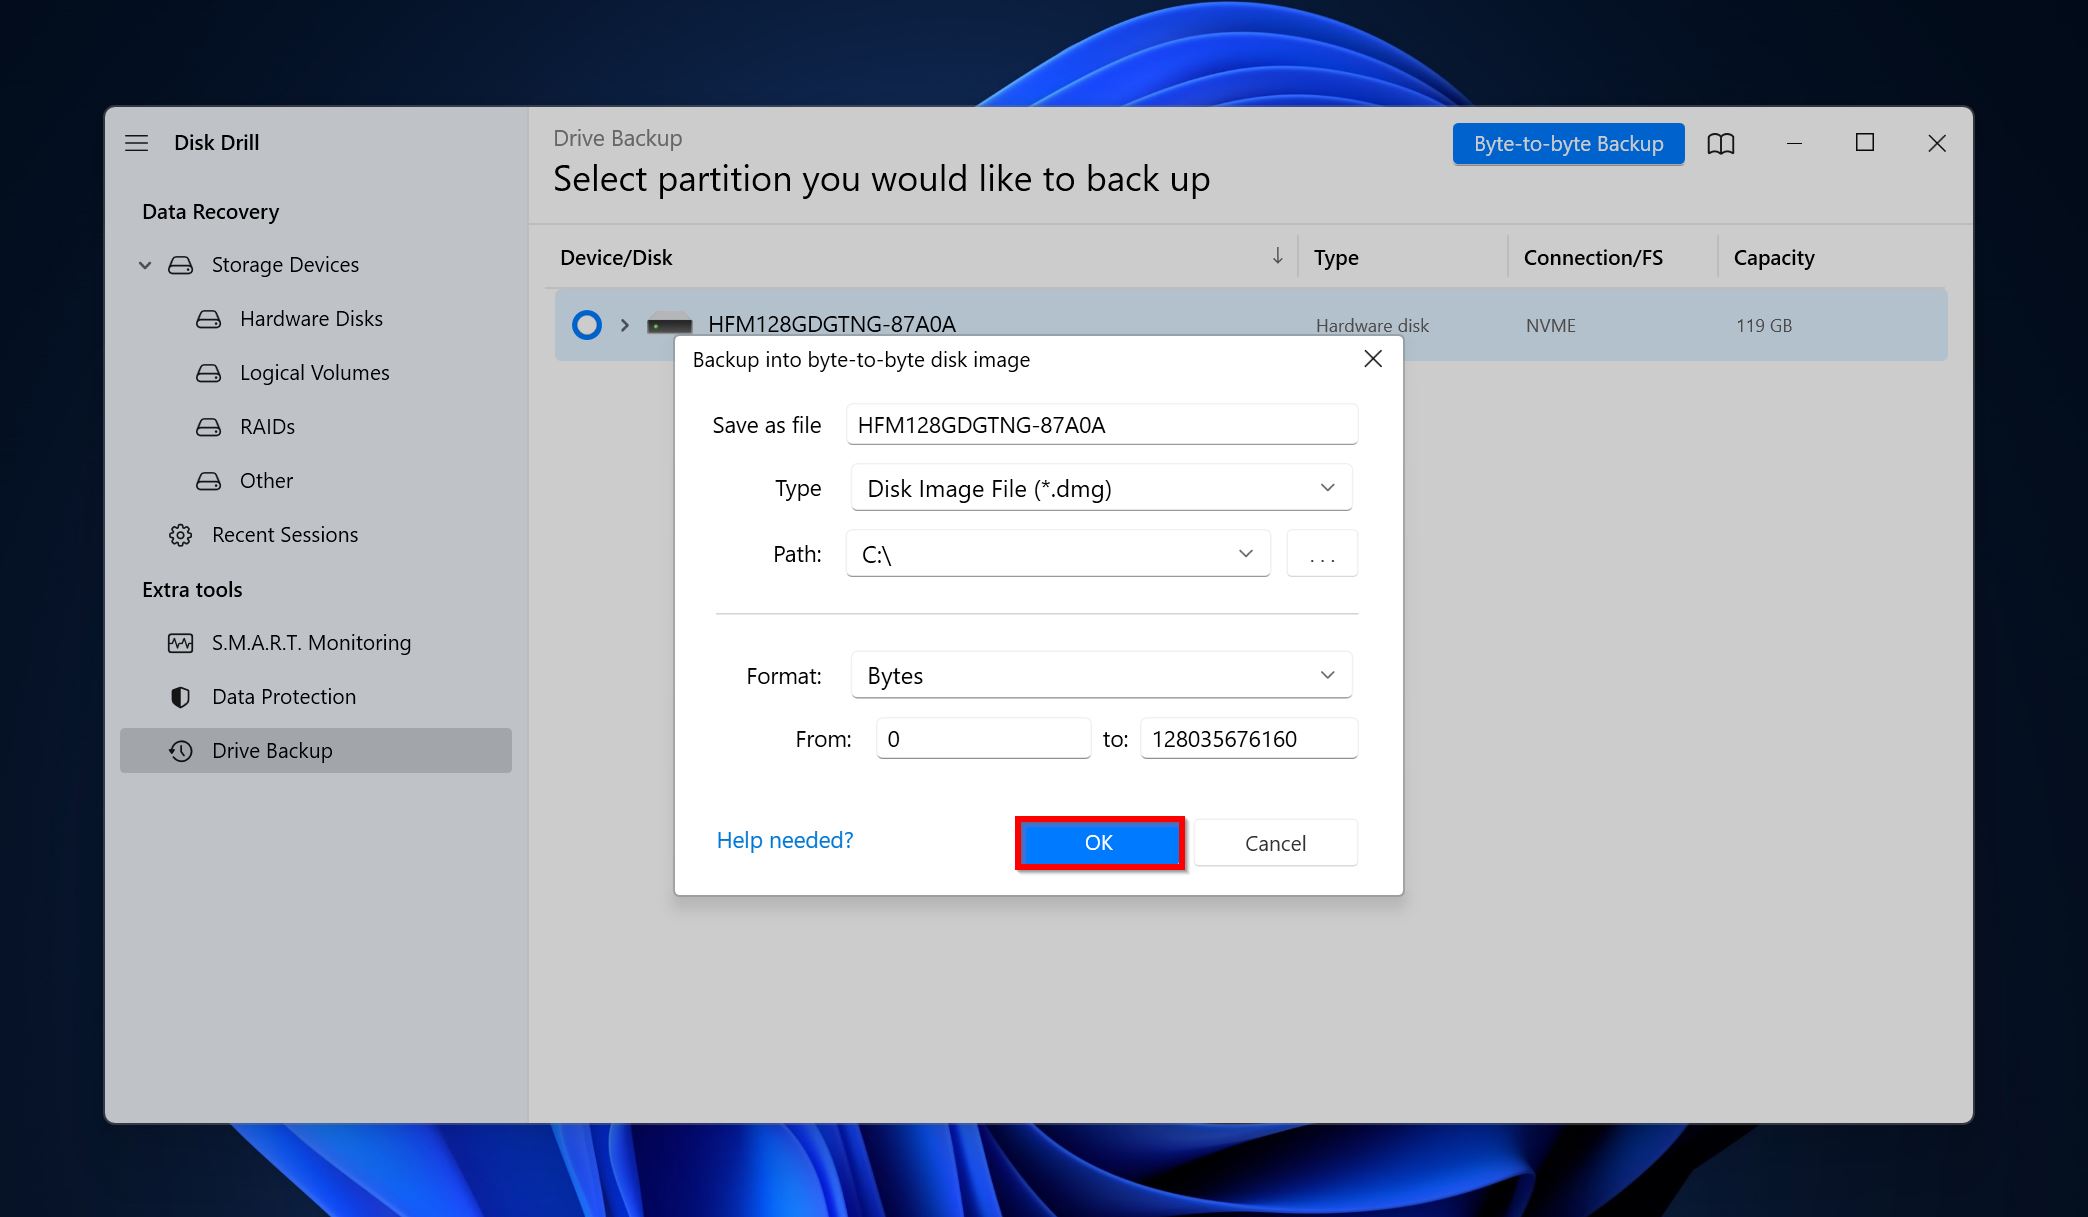
- Pick a save location for the disk image and click OK.
- Disk Drill will create the disk image.
To add the disk image to Disk Drill and scan it for recoverable data, use the Attach disk image option in the Storage Devices tab of the program. The disk image will show up as a regular drive, and you can scan it for recoverable data.
How to Fix a D Drive that is Not Showing Up in File Explorer
If you’re unable to find the D drive in Windows 10/11’s File Explorer, here are some ways to resolve the issue. Keep in mind, that the disk should be visible in Disk Management in order to execute these fixes.
Method 1: Rescan the Disk Drive
A simple rescan of the disks attached to your computer can make the D drive show up again on your computer. To do this, you need to use Windows in-built disk utility, Disk Management. Here’s how:
- Search for “disk management” in Windows Search (Windows Key + S). Click on Create and format hard disk partitions from the search results.
- Click on Action > Rescan disks.
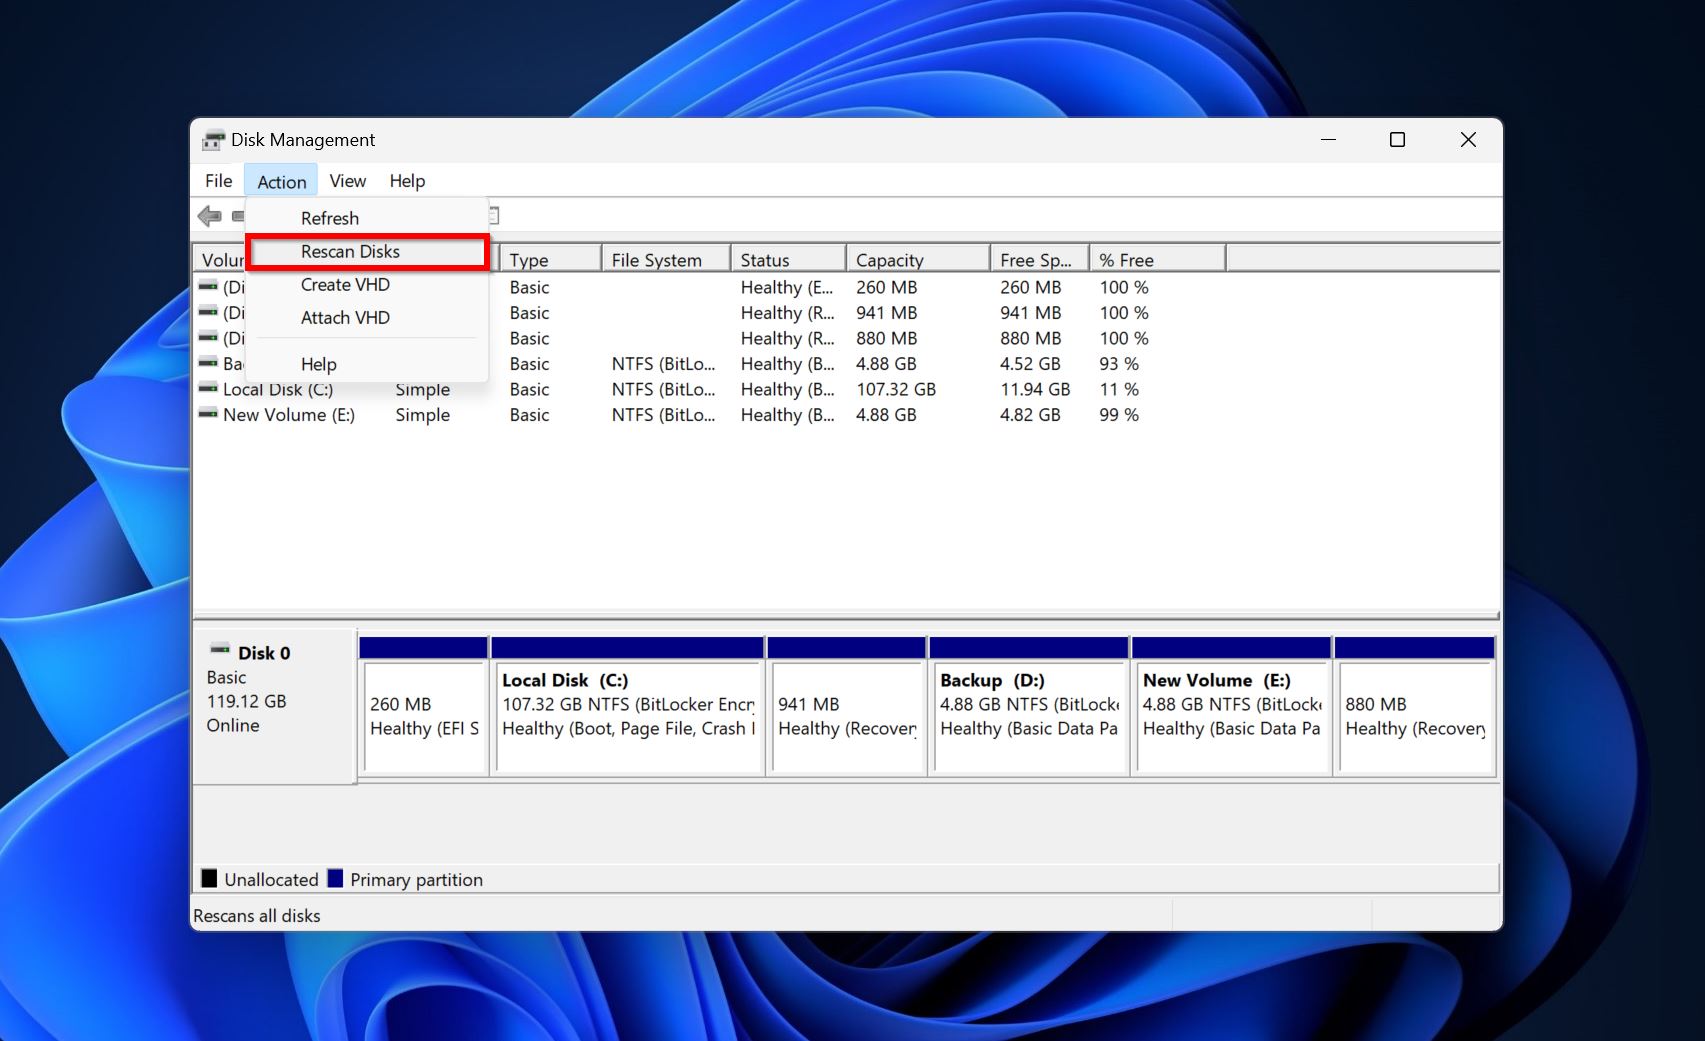
- Check whether the D: drive has reappeared in the File Explorer.
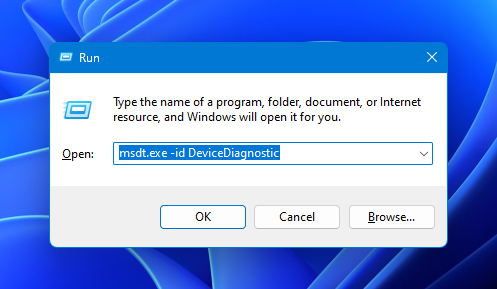
Method 2: Run the Hardware Troubleshooter
The Hardware Troubleshooter can detect and automatically fix numerous hardware detection and usage errors on your computer. Before moving to more complex fixes, it’s recommended you run this and see if it fixes the D drive disappearance issue.
To run the Windows Hardware Troubleshooter, follow these steps:
- Open Run command menu by pressing Win+R on your keyboard
- Type msdt.exe -id DeviceDiagnostic in the window and press Enter.
- Click Next on the Troubleshooting welcome screen.
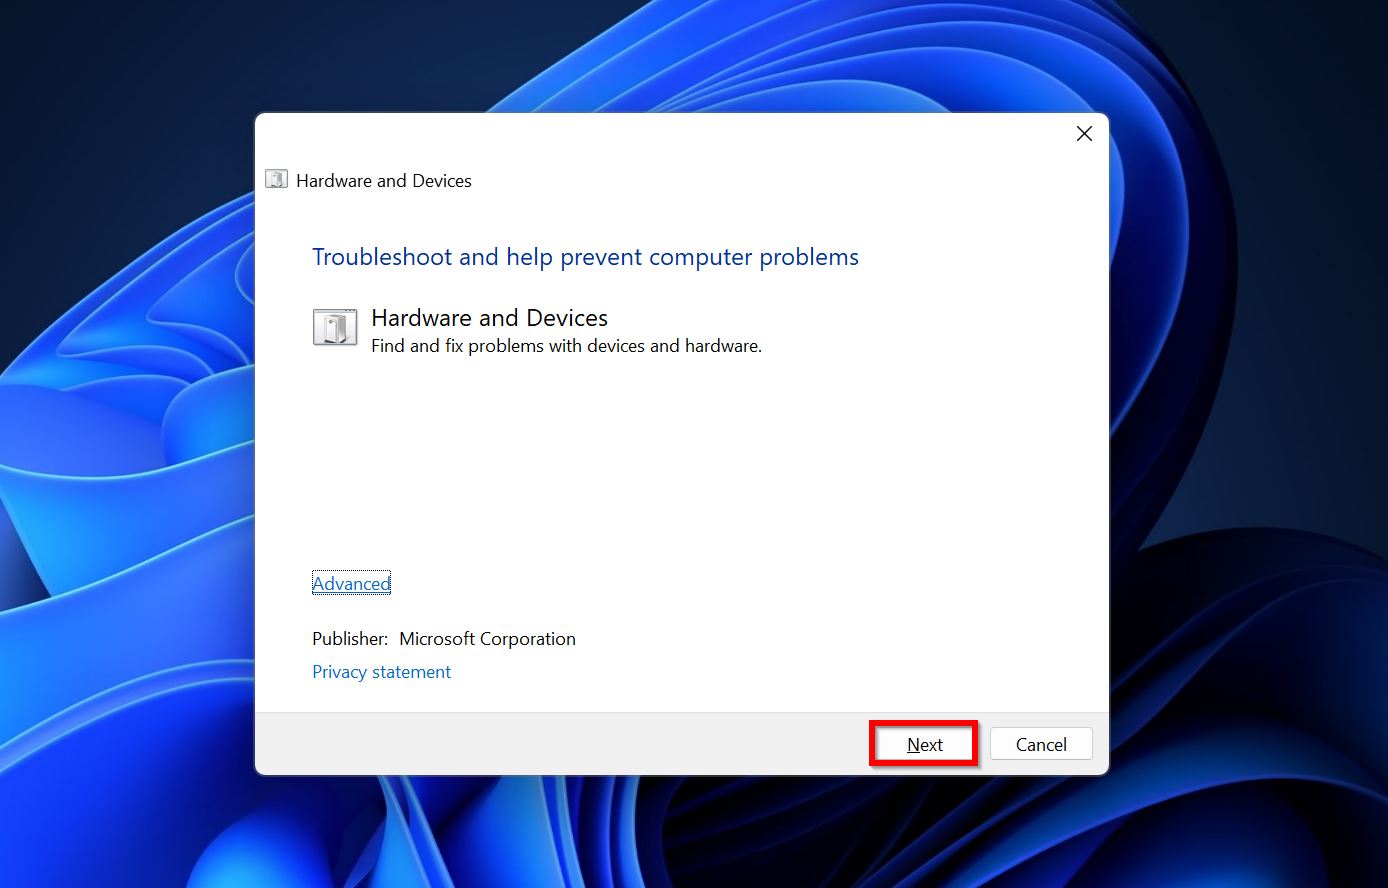
- After the troubleshooter finishes the scan, click on Apply this fix.

Method 3: Change the D Drive’s Letter
If the D: drive letter is conflicting with other storage devices attached to your PC, simply changing the driver letter from D to something else will prompt the partition to show up in Windows Explorer again.
Here’s how you can do this:
- Open Disk Management. You can search for it in Windows Search (Windows Key + S), or type diskmgmt.msc in the Run prompt (Windows Key + R) and press Enter.
- Right-click on the D: partition and choose Change Drive Letter and Paths.
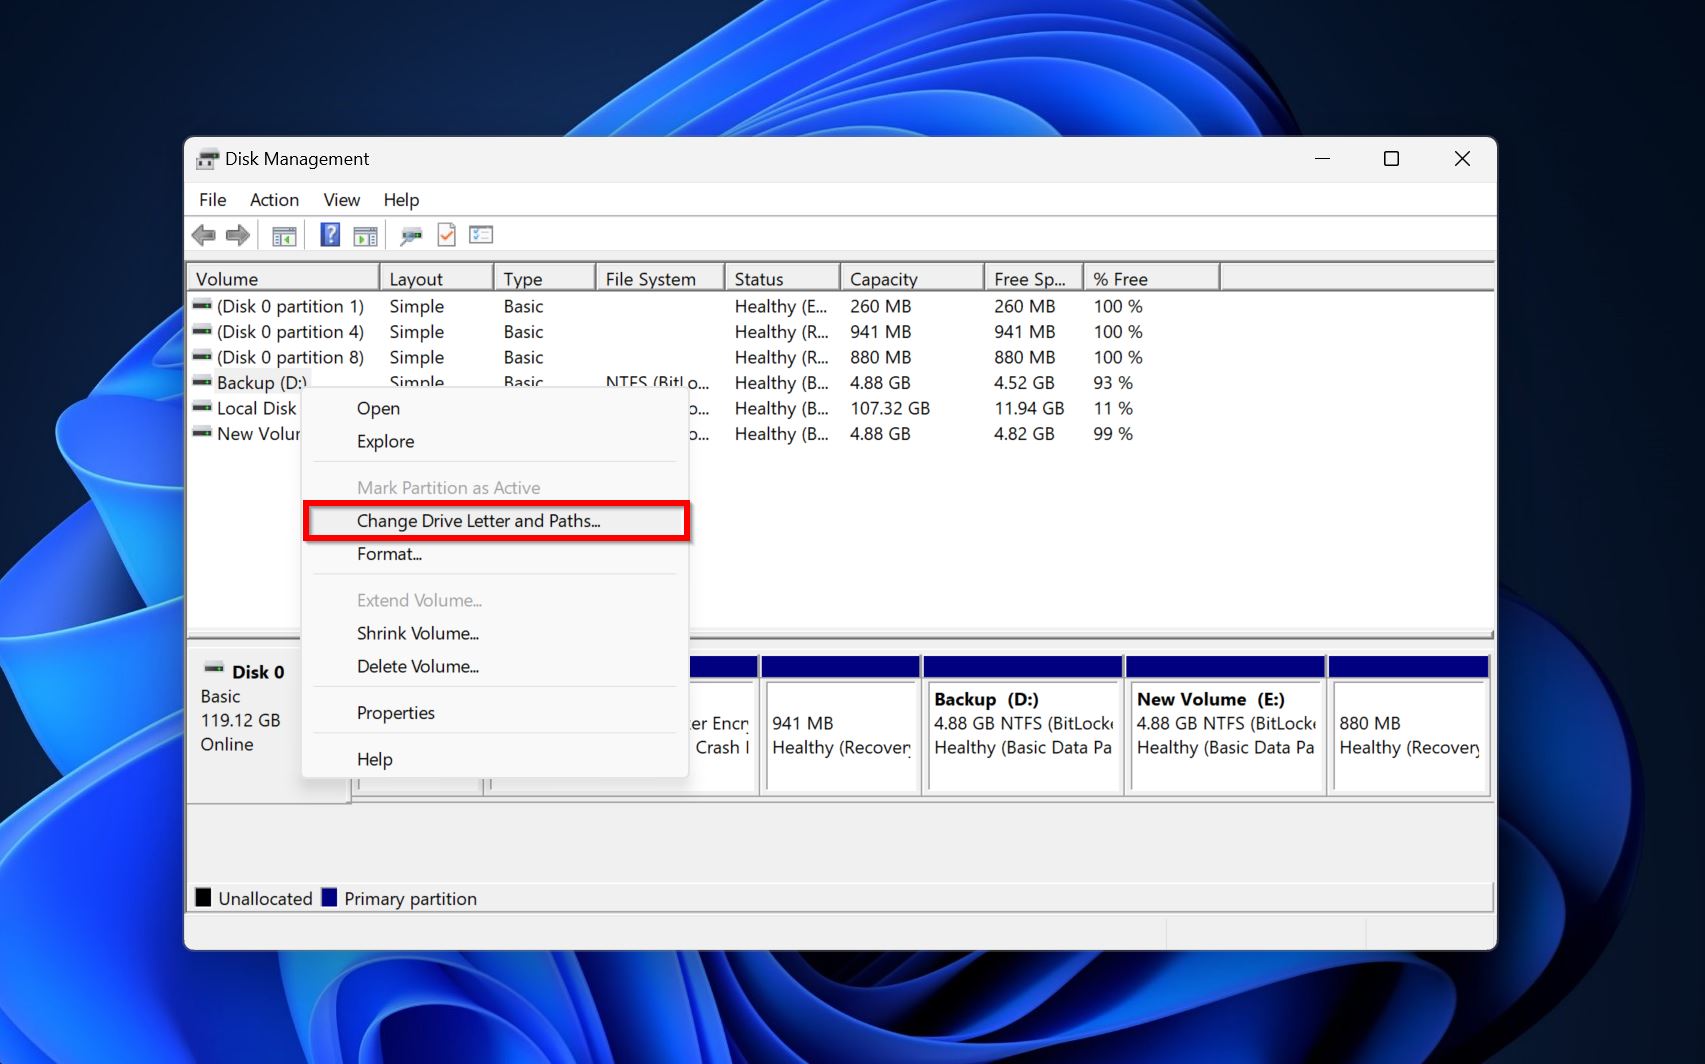
- Click on Change.
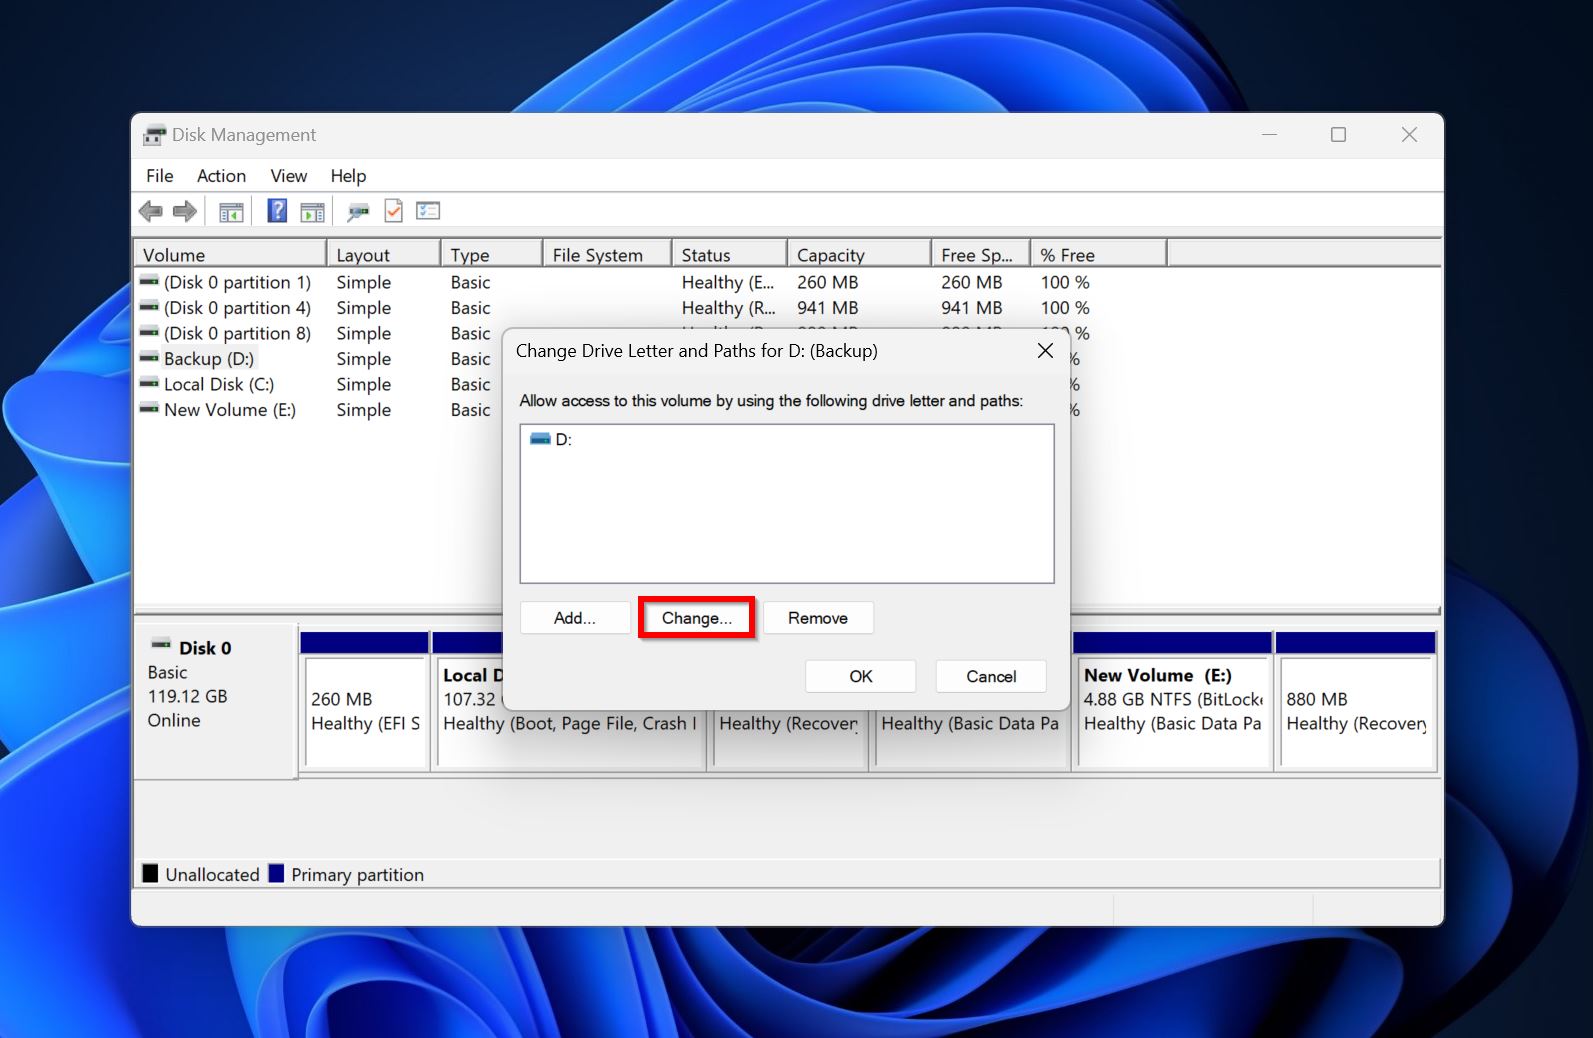
- Choose another drive letter from the drop-down menu and click OK.
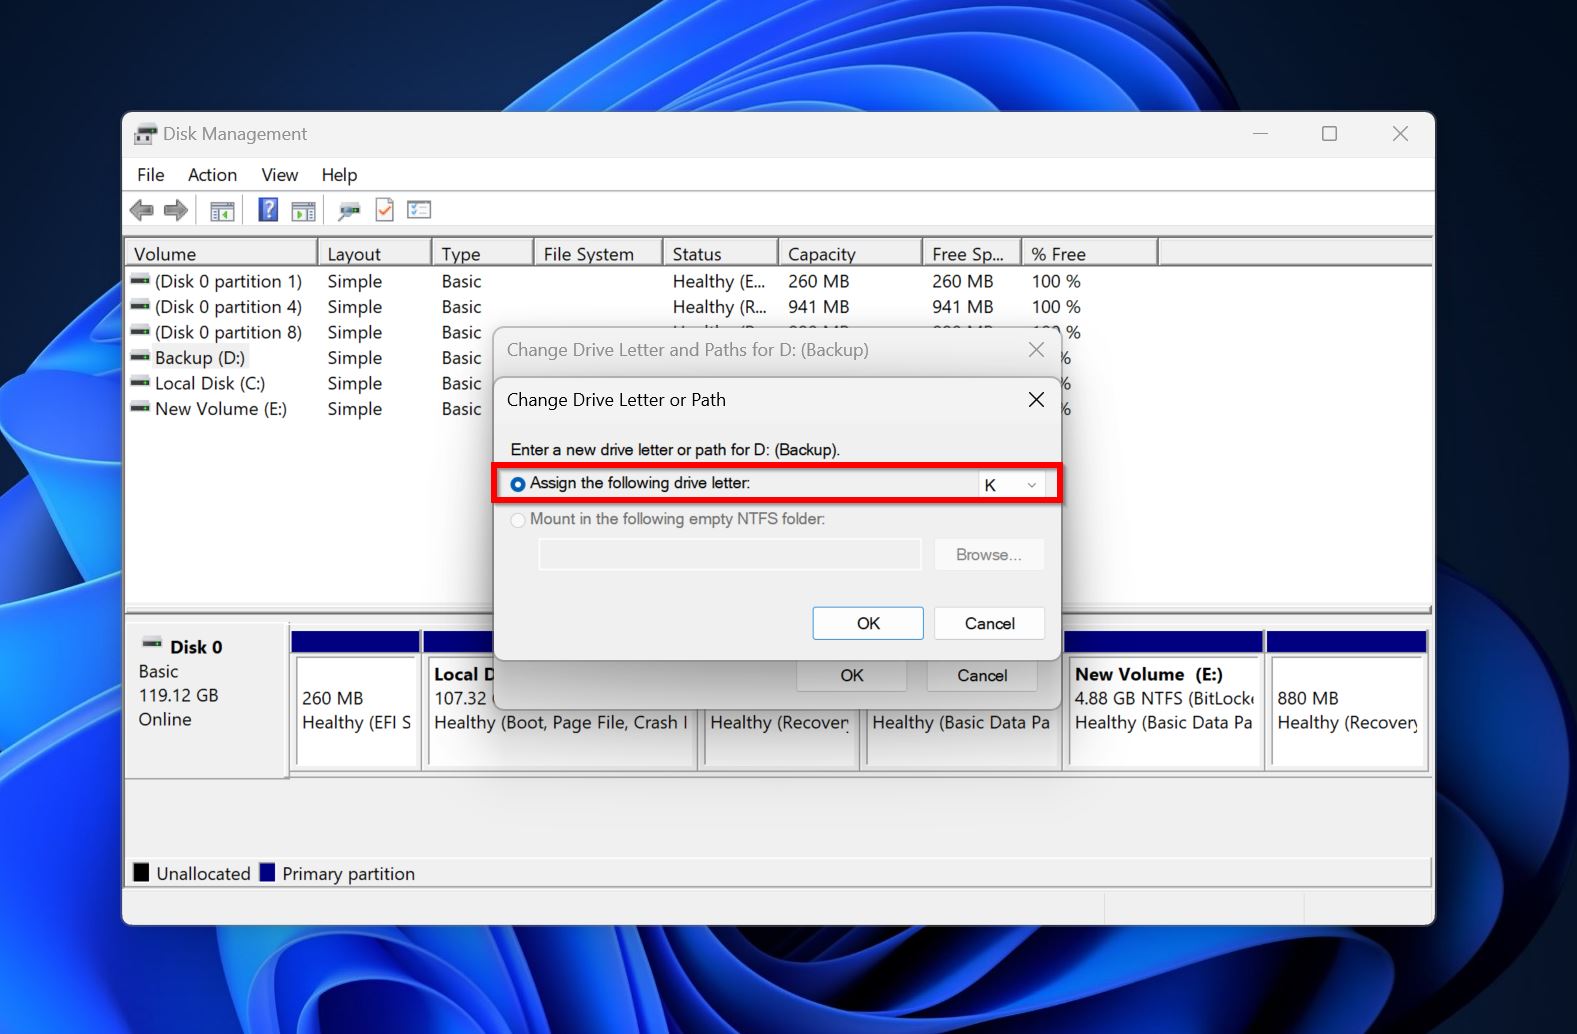
- Click Yes on the next prompt.
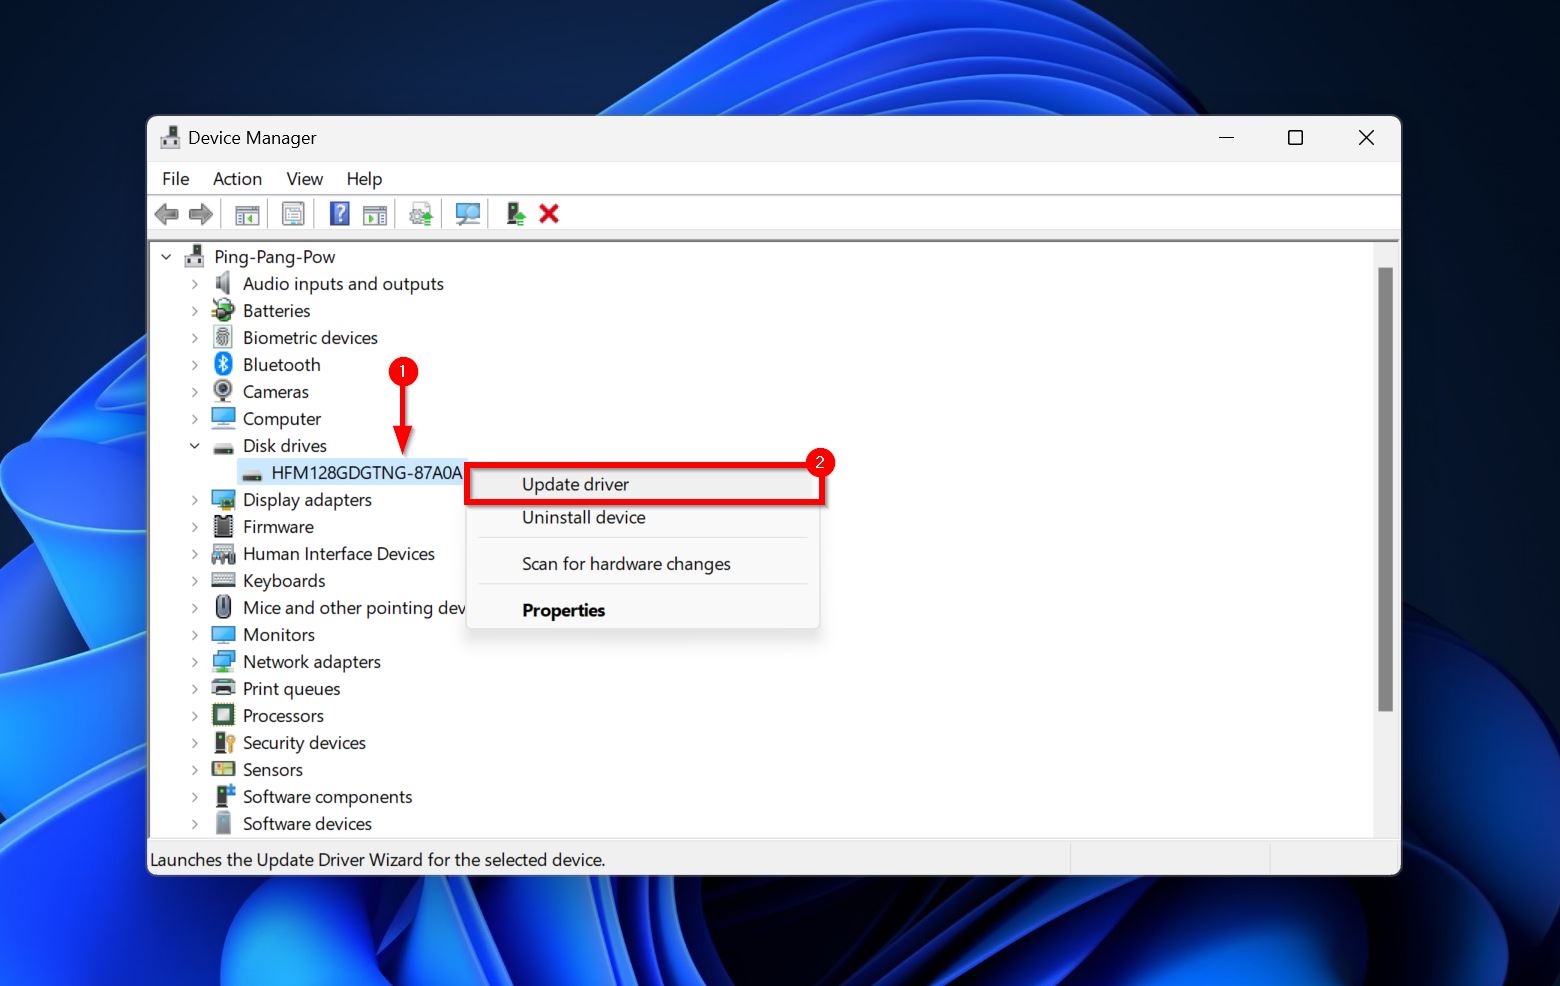
Method 4: Update Disk Drivers
You can use the Device Manager to manually update the disk drivers on your PC to potentially resolve the D drive not showing up issue. Here’s how:
- Search for “device manager” in Windows Search (Windows Key + S) and launch the app.
- Expand the Disk Drives section, right-click on the disk, and choose Update driver.
- Click on Search automatically for drivers in the next window.
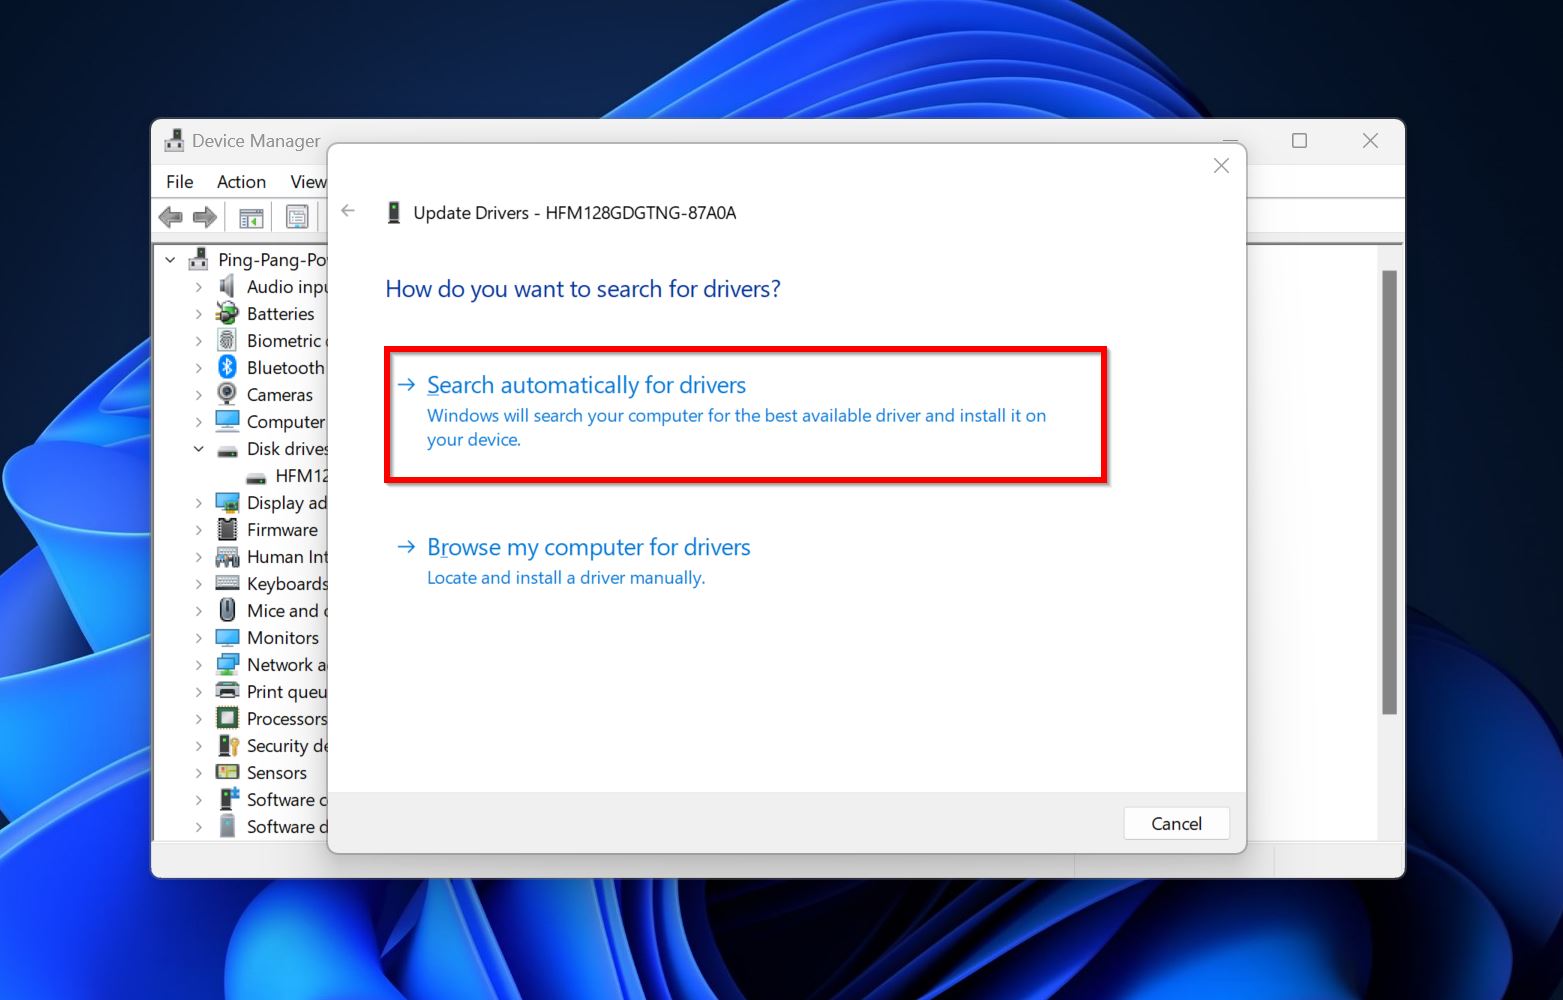
- Restart your PC after Windows downloads and installs the driver.
Method 5: Use the CHKDSK Command
The CHKDSK utility in Windows detects and fixes bad sectors on your hard drive. It’s a good idea to run this command if the D drive is not showing up in Windows 10/11. It’s a command line utility, so you’ll need to use the Command Prompt to use it.
Here’s how:
- Search for “cmd” in Windows Search (Windows Key + S). Right-click on Command Prompt > Run as administrator.
- In the console, type CHKDSK /f /r and press Enter.
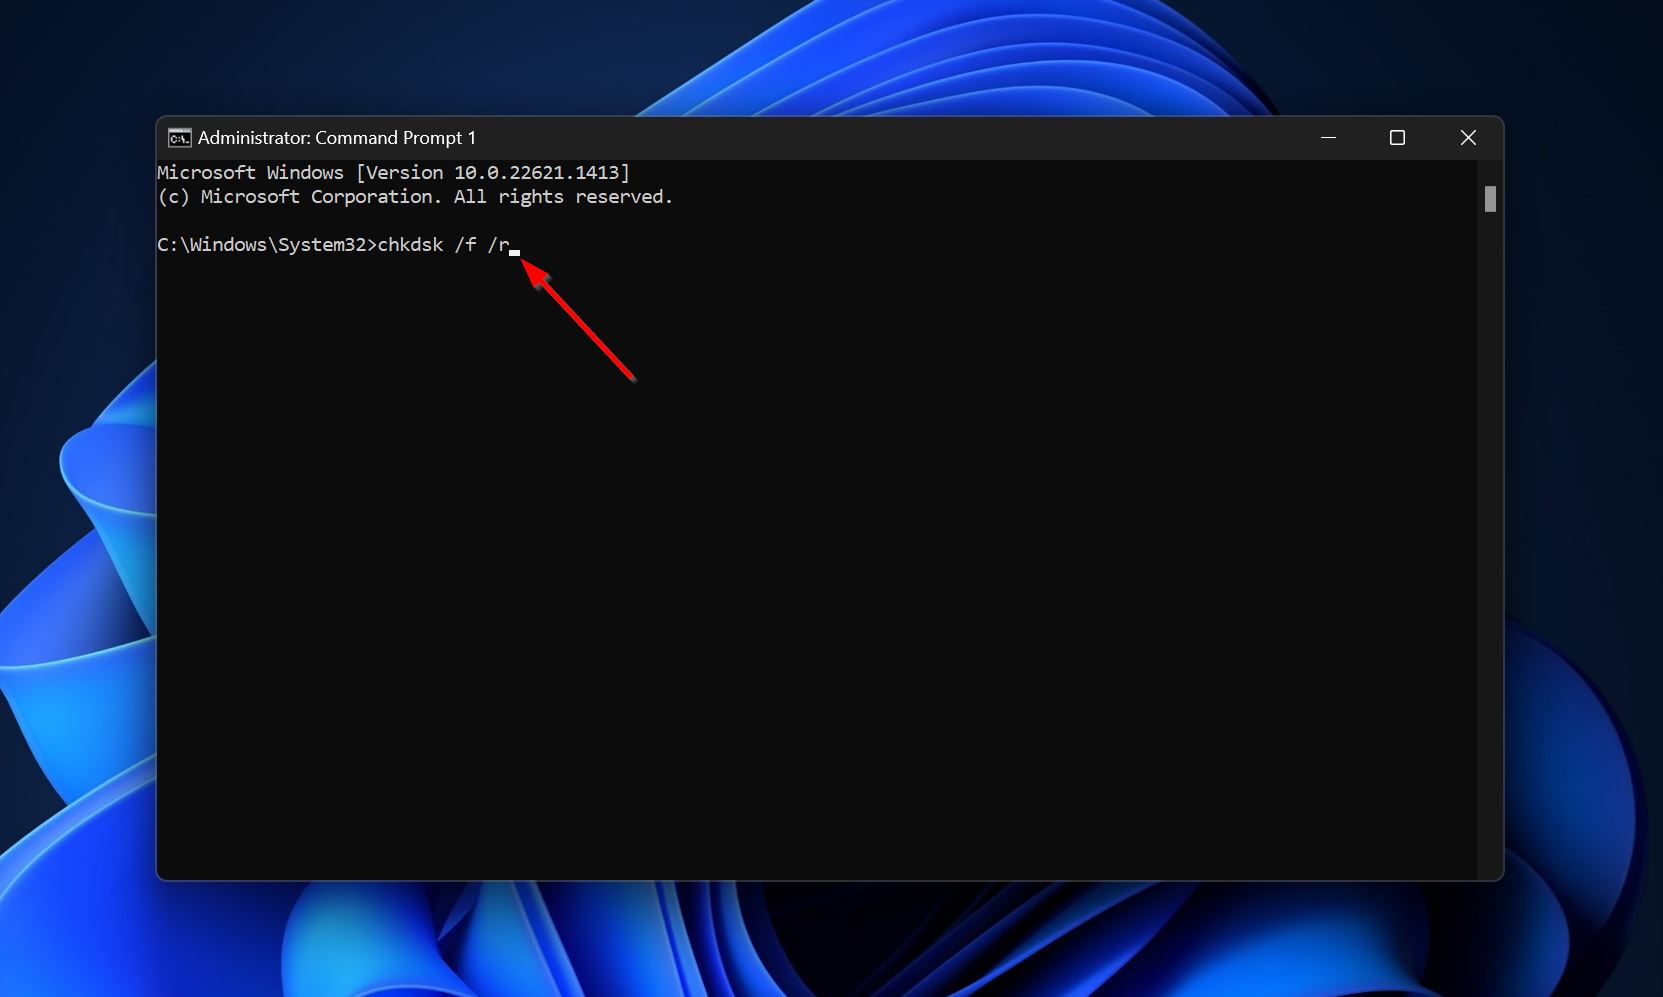
- Wait for the disk check to complete.
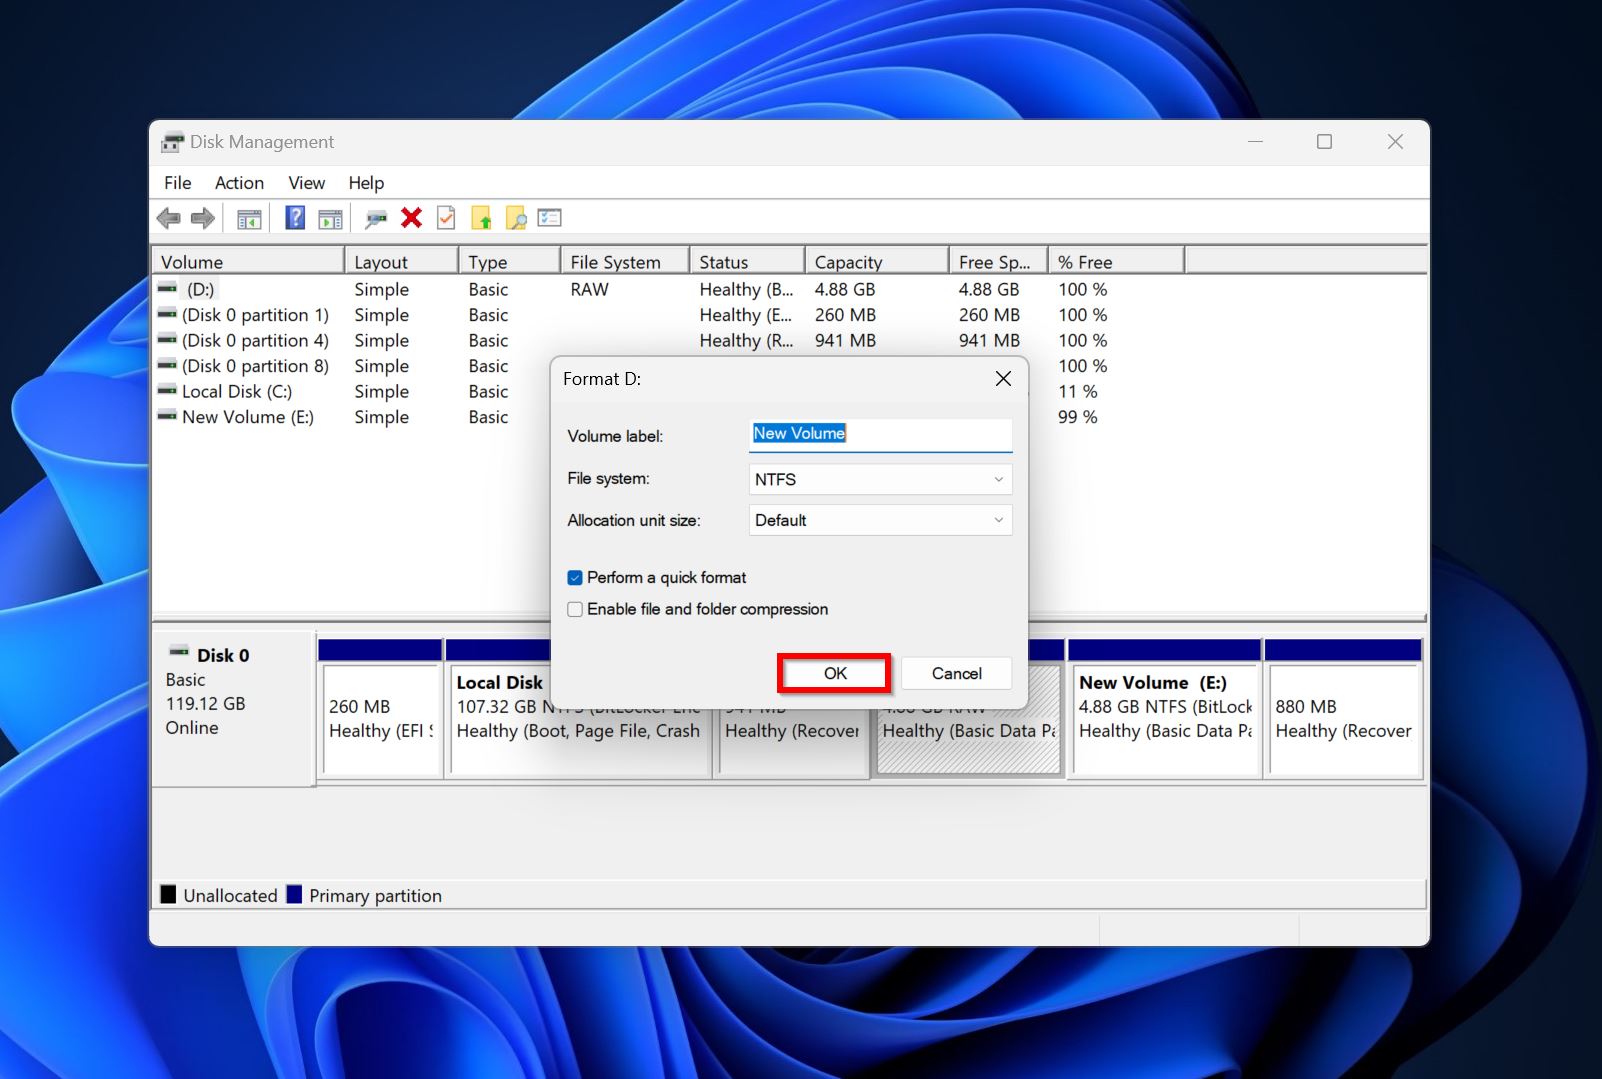
Method 6: Format the Disk
When dealing with a D: partition that is RAW or has a corrupt file system, the only way to fix it, is to reformat it. You will lose all your data in the process, so be sure to first recover it using a data recovery program.
Here’s how you can format the disk:
- Search for “disk management” in Windows Search (Windows Key + S) and choose the Create and format hard disk partitions option from the search results.
- Right-click on the D: partition and choose Format.
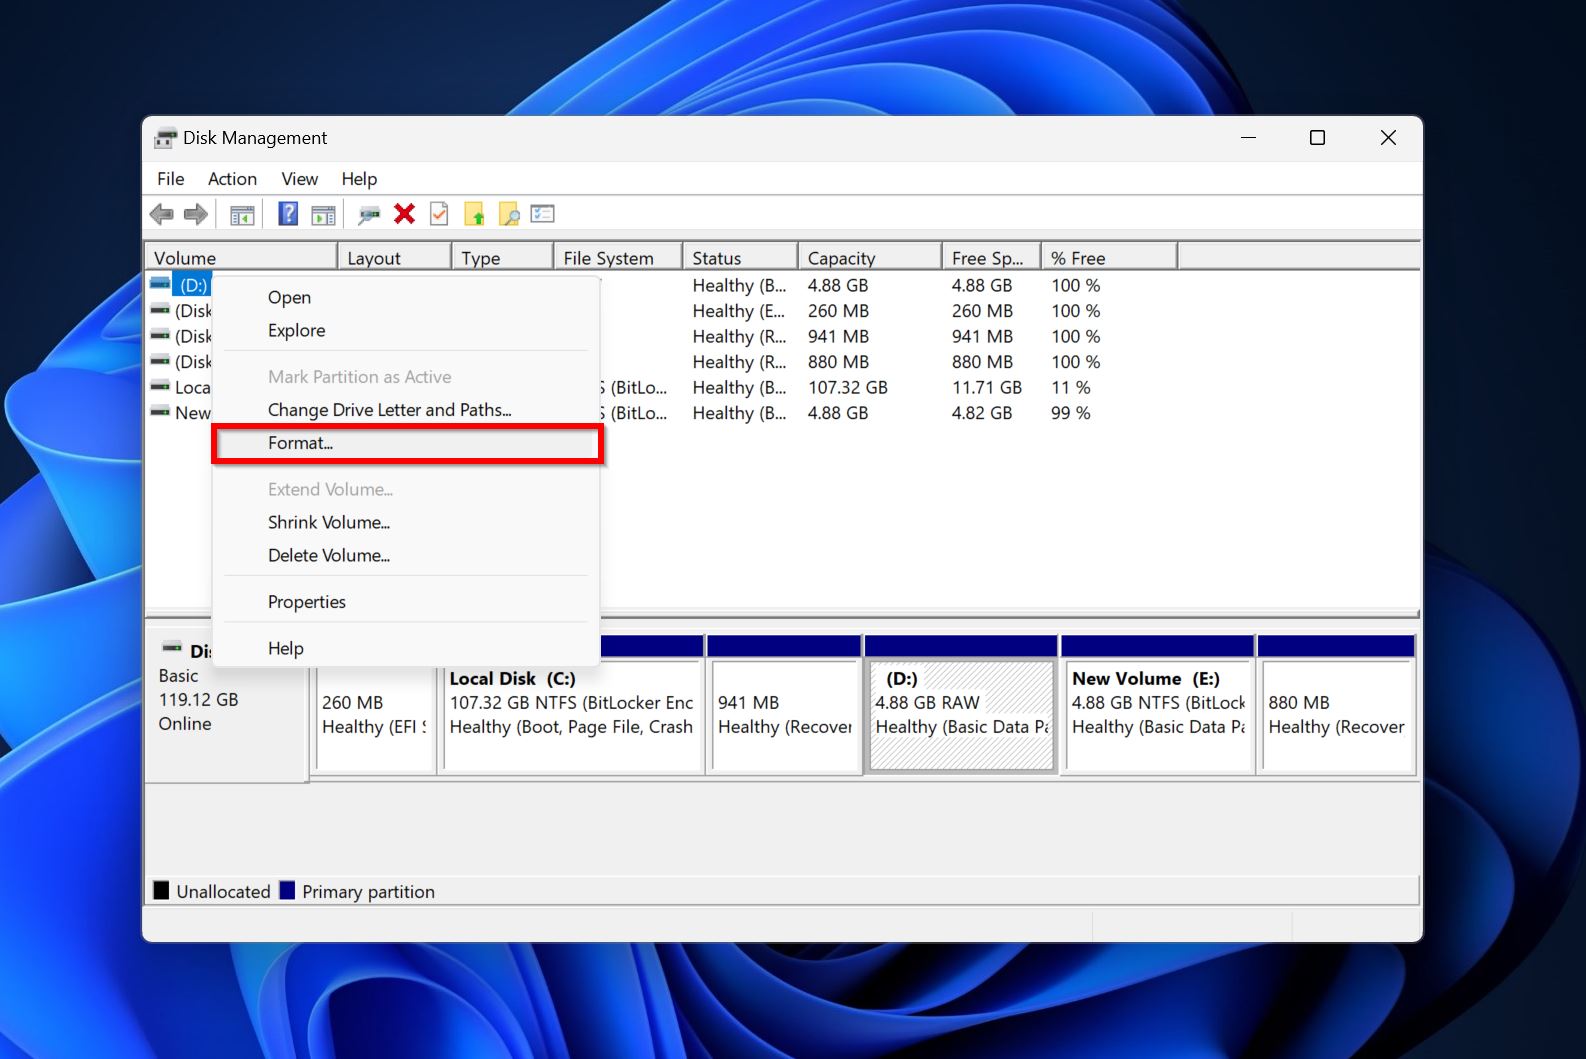
- Choose the format parameters and click OK.
What to Do If the D Drive is Not Showing Up in Disk Management
If the D: drive doesn’t show in Windows Disk Management, you cannot attempt to fix it, since it’s not detected by Windows at all. This doesn’t mean you should give up, and resign yourself to an expert to fix the drive. There are a few ways to prompt the drive to show up in Disk Management. These include:
Method 1: Check the Drive Connection
Physically inspect the connectors and the SATA cables of your disk drive for physical damage. Specifically, look for signs of stretching and peeling on the cables. Assess the ports for physical damage. Ensure that they are not bent or otherwise broken in any way.
A good way to determine whether the issue lies with the drive and its connectors, or your PC, is to connect the drive to another computer. See if it powers up and works like it should. If not, replace the SATA cables.
Method 2: Delete ATA Channel Drivers
Reinstalling the ATA channel drivers can resolve the issue of your drive not showing up in Disk Management. To achieve this, you need to uninstall them using Device Manager and then reboot your computer. Windows will install the required drivers when it boots.
Here’s what the process looks like:
- Open Device Manager. You can simply search for it in Windows Search (Windows Key + S).
- Expand the IDE ATA/ATAPI Controllers section.
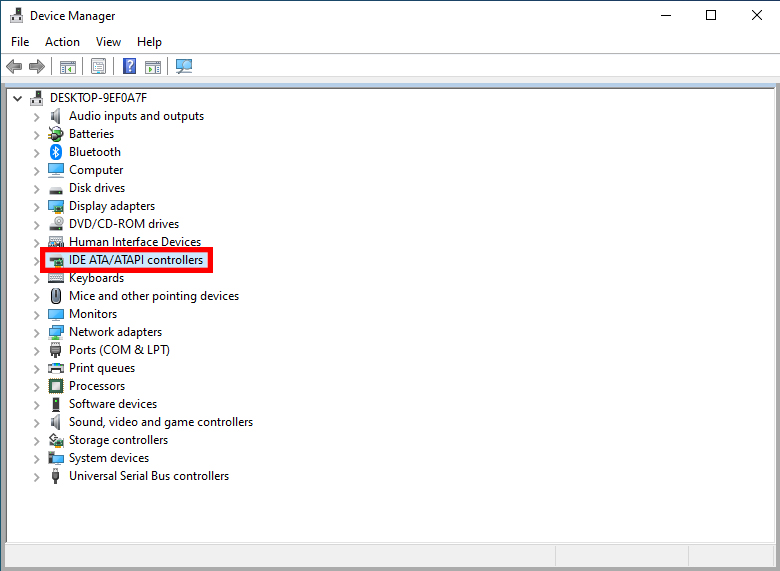
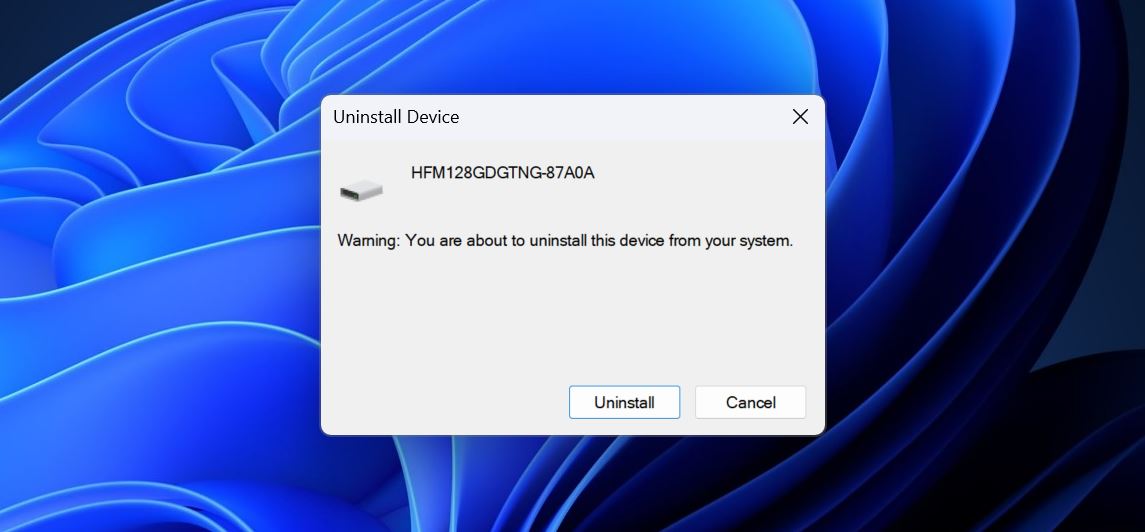
- Right-click on the ATA channel driver, and click Uninstall device.
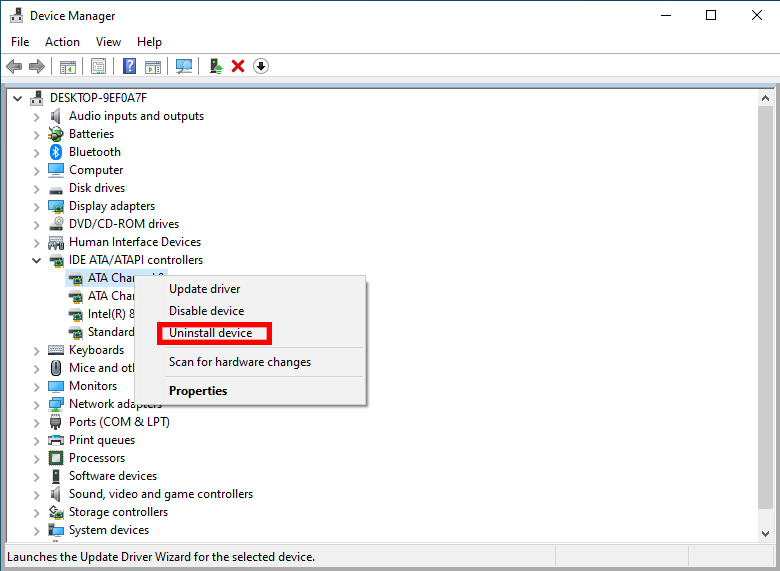
- Check the Attempt to remove the driver for this device option and click Uninstall.
Method 3: Reinstall the SATA Drivers
Windows may be unable to automatically download the latest SATA drivers for your PC. Here, you’ll need to take matters into your hands by manually installing them from the motherboard manufacturer’s website.
Here’s an overview of what this looks like:
- Go to the motherboard manufacturer’s website and head to the Downloads section.
- Search for the SATA drivers.
- Double-check to see if the drivers are right for the OS and architecture.
- Download and run the installation file.
Method 4: Enable SATA Hard Drive in BIOS
Some motherboards disable unused SATA ports automatically. It’s worth checking the BIOS setting to ensure that the SATA ports are enabled. Now, the exact process for this will differ across motherboard manufacturers, but it should look something like this:
- Start your PC and press the relevant key (usually one of the Function keys) to enter the BIOS settings.
- Navigate to the Configuration menu and set the SATA ports to enabled.
- You may have to press the F10 key to save your settings.
Conclusion
Never take a missing D: drive lightly. It could be a sign of other issues on the disk. Additionally, data recovery programs can recover your data, even if the disk shows signs of corruption, but always opt for a professional data recovery service if there is physical damage involved. It’s also advisable to have a regular backup schedule to shield yourself from data loss due to any reason.
FAQ:
- The drive could be corrupt and there’s an accumulation of bad sectors on it.
- If the entire hard drive keeps disappearing, it could signal some damage to the connectors and SATA cables.
- The disk drivers may be outdated or faulty.
- Use System Restore to restore the PC to an earlier state.
- Rescan the disk using Disk Management.
- Use the disk checking feature in Windows 7.


