 Deleting files you didn’t intend to. We’ve all been there. Fortunately, Windows and macOS let you undo a delete and get back the files you deleted. In most cases, you won’t even require a third-party tool. How? In the sections below, we explain how to undo delete operations on both OSes, and how to recover your files in case you’re unable to undo the delete command.
Table of Contents
Is It Possible To Undo a Delete Operation
Yes. Not only is it possible, but it’s also more straightforward than you think. Before we explain how, let’s first take a look at what actually happens when you delete a file and where it goes.
When you give the delete command to your OS, it doesn’t actually “wipe” the file out of the drive. Instead, the exact location it occupied is marked as available for use. In essence, the file is still there, just the path towards it has been forgotten. The file will remain at the location, until a new file overwrites it. This is applicable even if you empty the Recycle Bin, or Trash.
The delete operation can be undone using data recovery tools, as long as the file hasn’t been overwritten by new data. That’s why it’s universally recommended that you stop using the storage drive as soon as you notice data loss. Of course, if the file is in the Recycle Bin, or Trash, you can simply restore it.
In the case of SSDs, undoing a delete operation can be tricky. This is because of the TRIM feature–which periodically and clears up data locations that are available for use. While TRIM does improve the efficiency and lifespan of SSDs, it makes data recovery difficult. When dealing with SSDs, it’s best to perform data recovery ASAP, before the TRIM command has a chance to execute (usually during startup).
How to Recover Permanently Deleted Files
A good data recovery tool is your best bet when it comes to recovering permanently deleted files. However, it’s advisable to do your research when selecting a data recovery software. You should pick one that has a good track record, works with the file system your drive uses, and is easy to use.
Keeping these factors in mind, we opted for Disk Drill in our tutorial. The program has a proven history of recovering data from a variety of devices and file systems, a modern UI with built-in instructions, and a cutting-edge data recovery algorithm. Disk Drill is available for both Windows and macOS. However, Windows users get a free trial that lets them recover up to 500 MB of data for free. Regardless, both versions of Disk Drill will let you preview your recoverable files for free. You only pay if you wish to proceed with the recovery.
The data recovery steps on Disk Drill remain the same for Windows and macOS:
- Download Disk Drill and install it. Do so on a separate storage drive and not the one which suffered data loss.
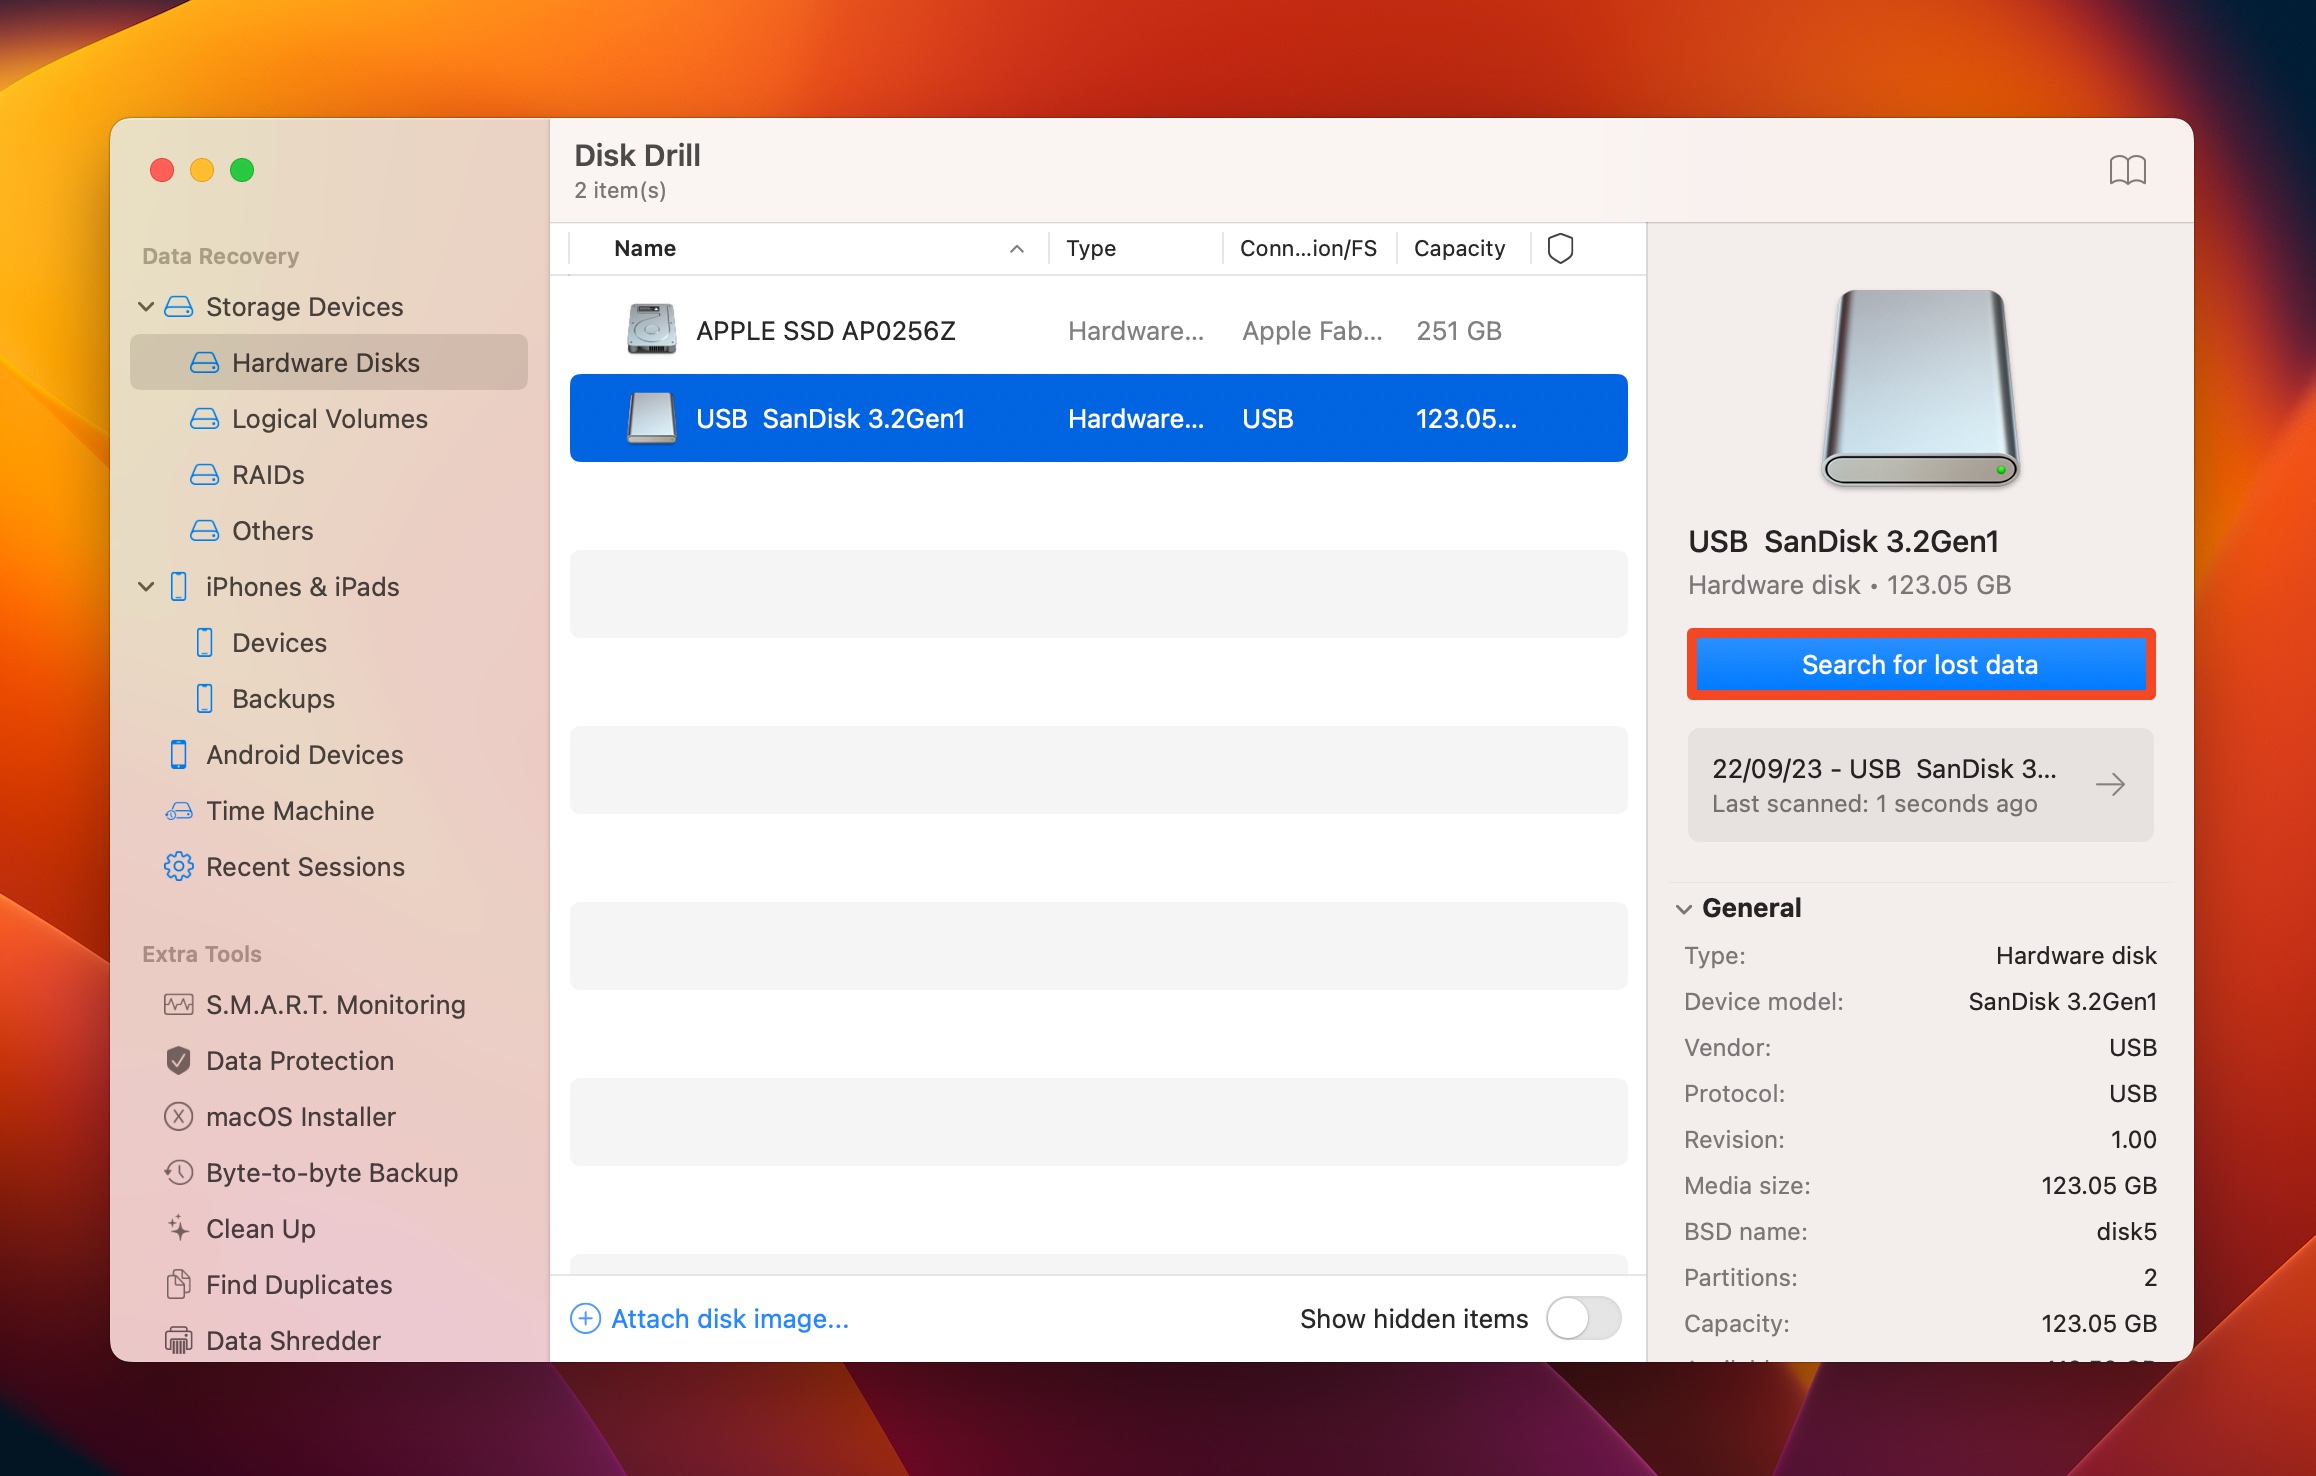
- Open Disk Drill, select the storage drive which contained the accidentally deleted files, and click on Search for lost data.
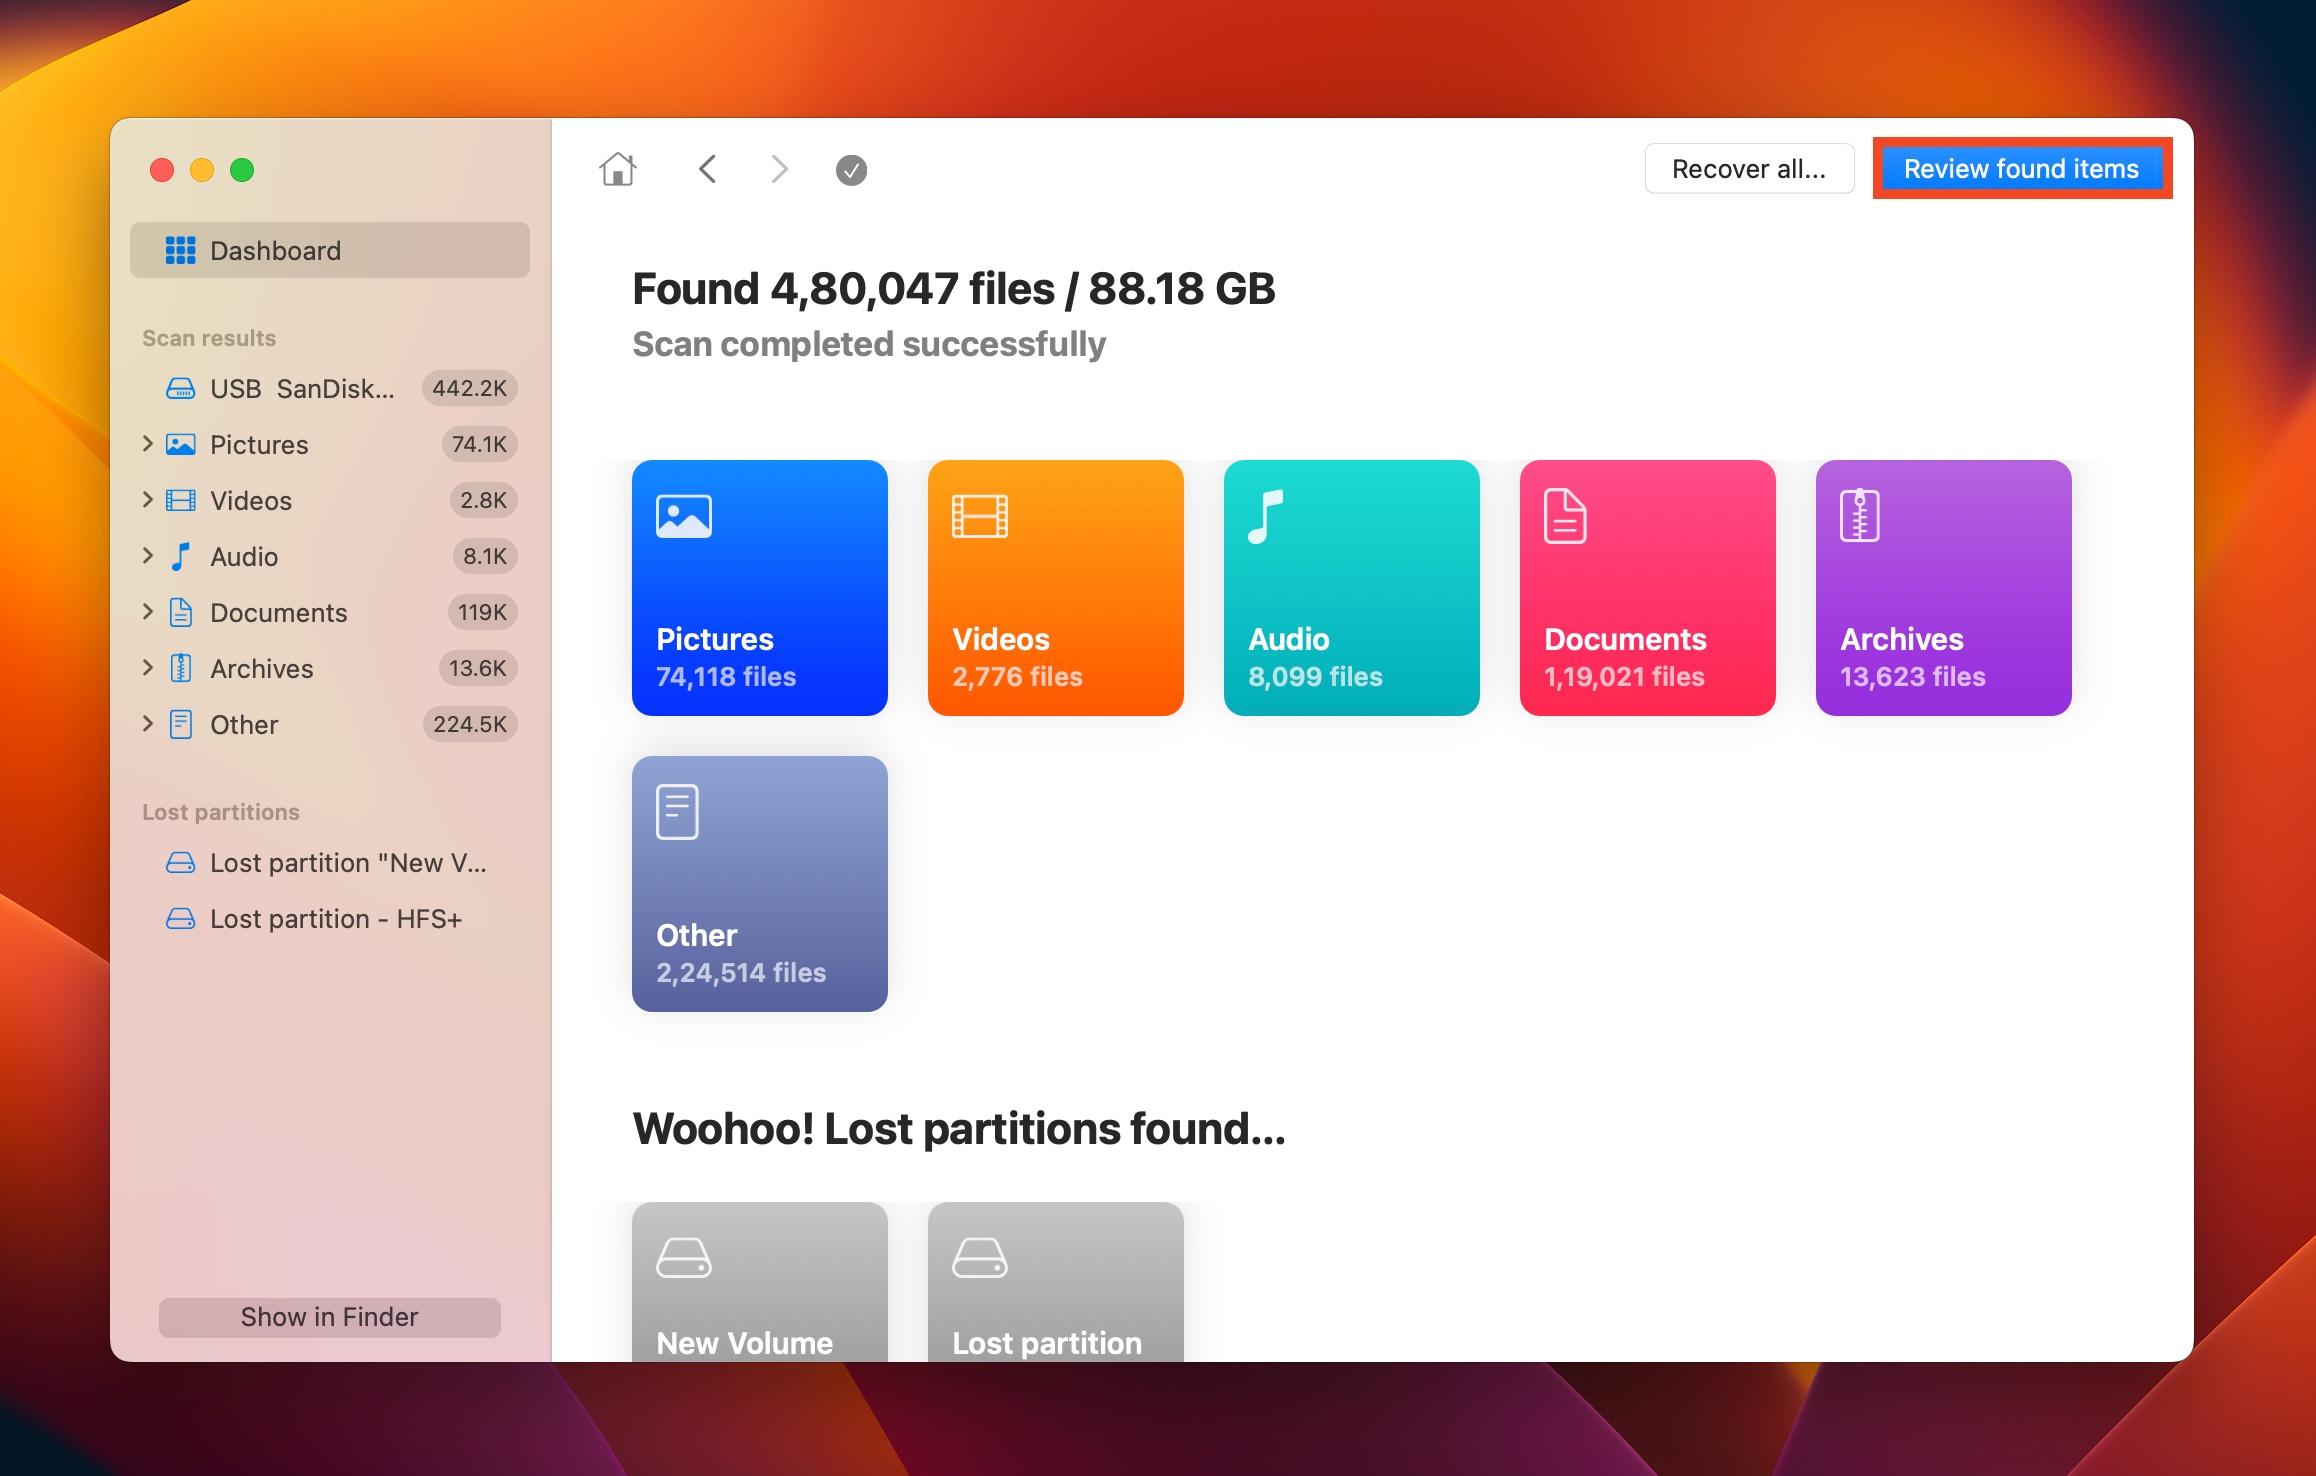
- Click on Review found items to view all the recoverable files Disk Drill discovered. If you only wish to view certain file types, click on the relevant tile instead (Pictures, Video, Audio, Documents, Archives, and Other).
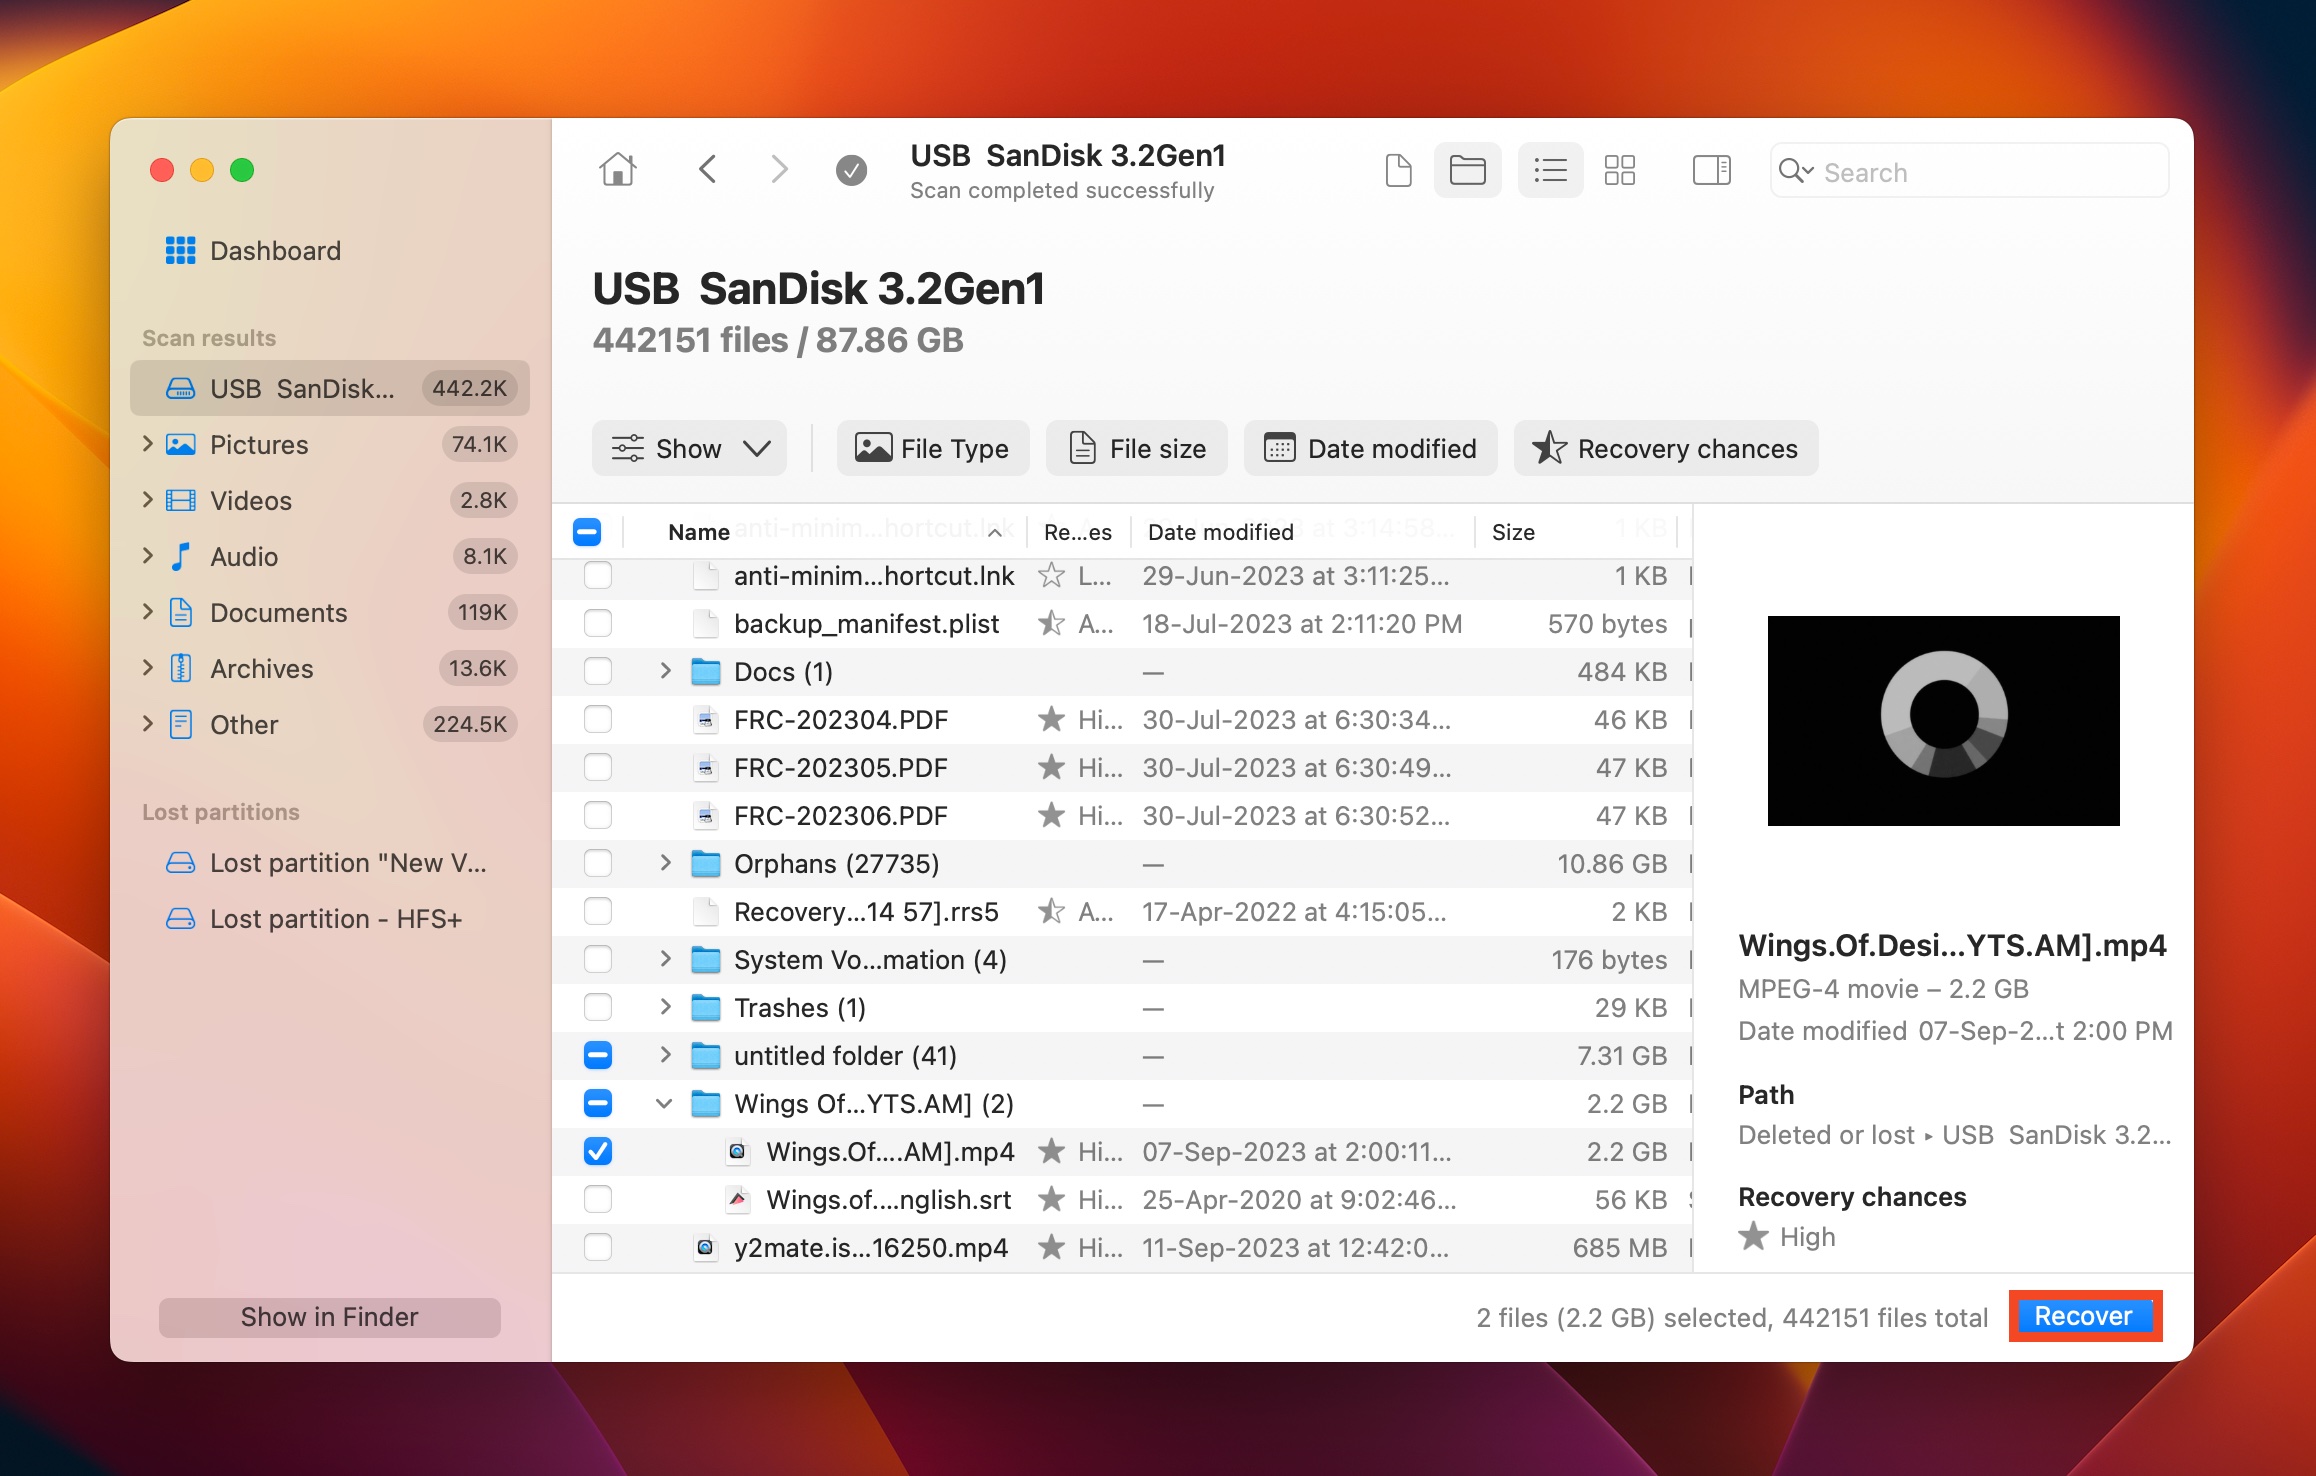
- Expand the Deleted or lost and Reconstructed sections.

- Select the files you wish to recover and click Recover. Disk Drill displays a preview of the currently selected file, but you can manually preview any file by clicking the eye icon next to its filename.
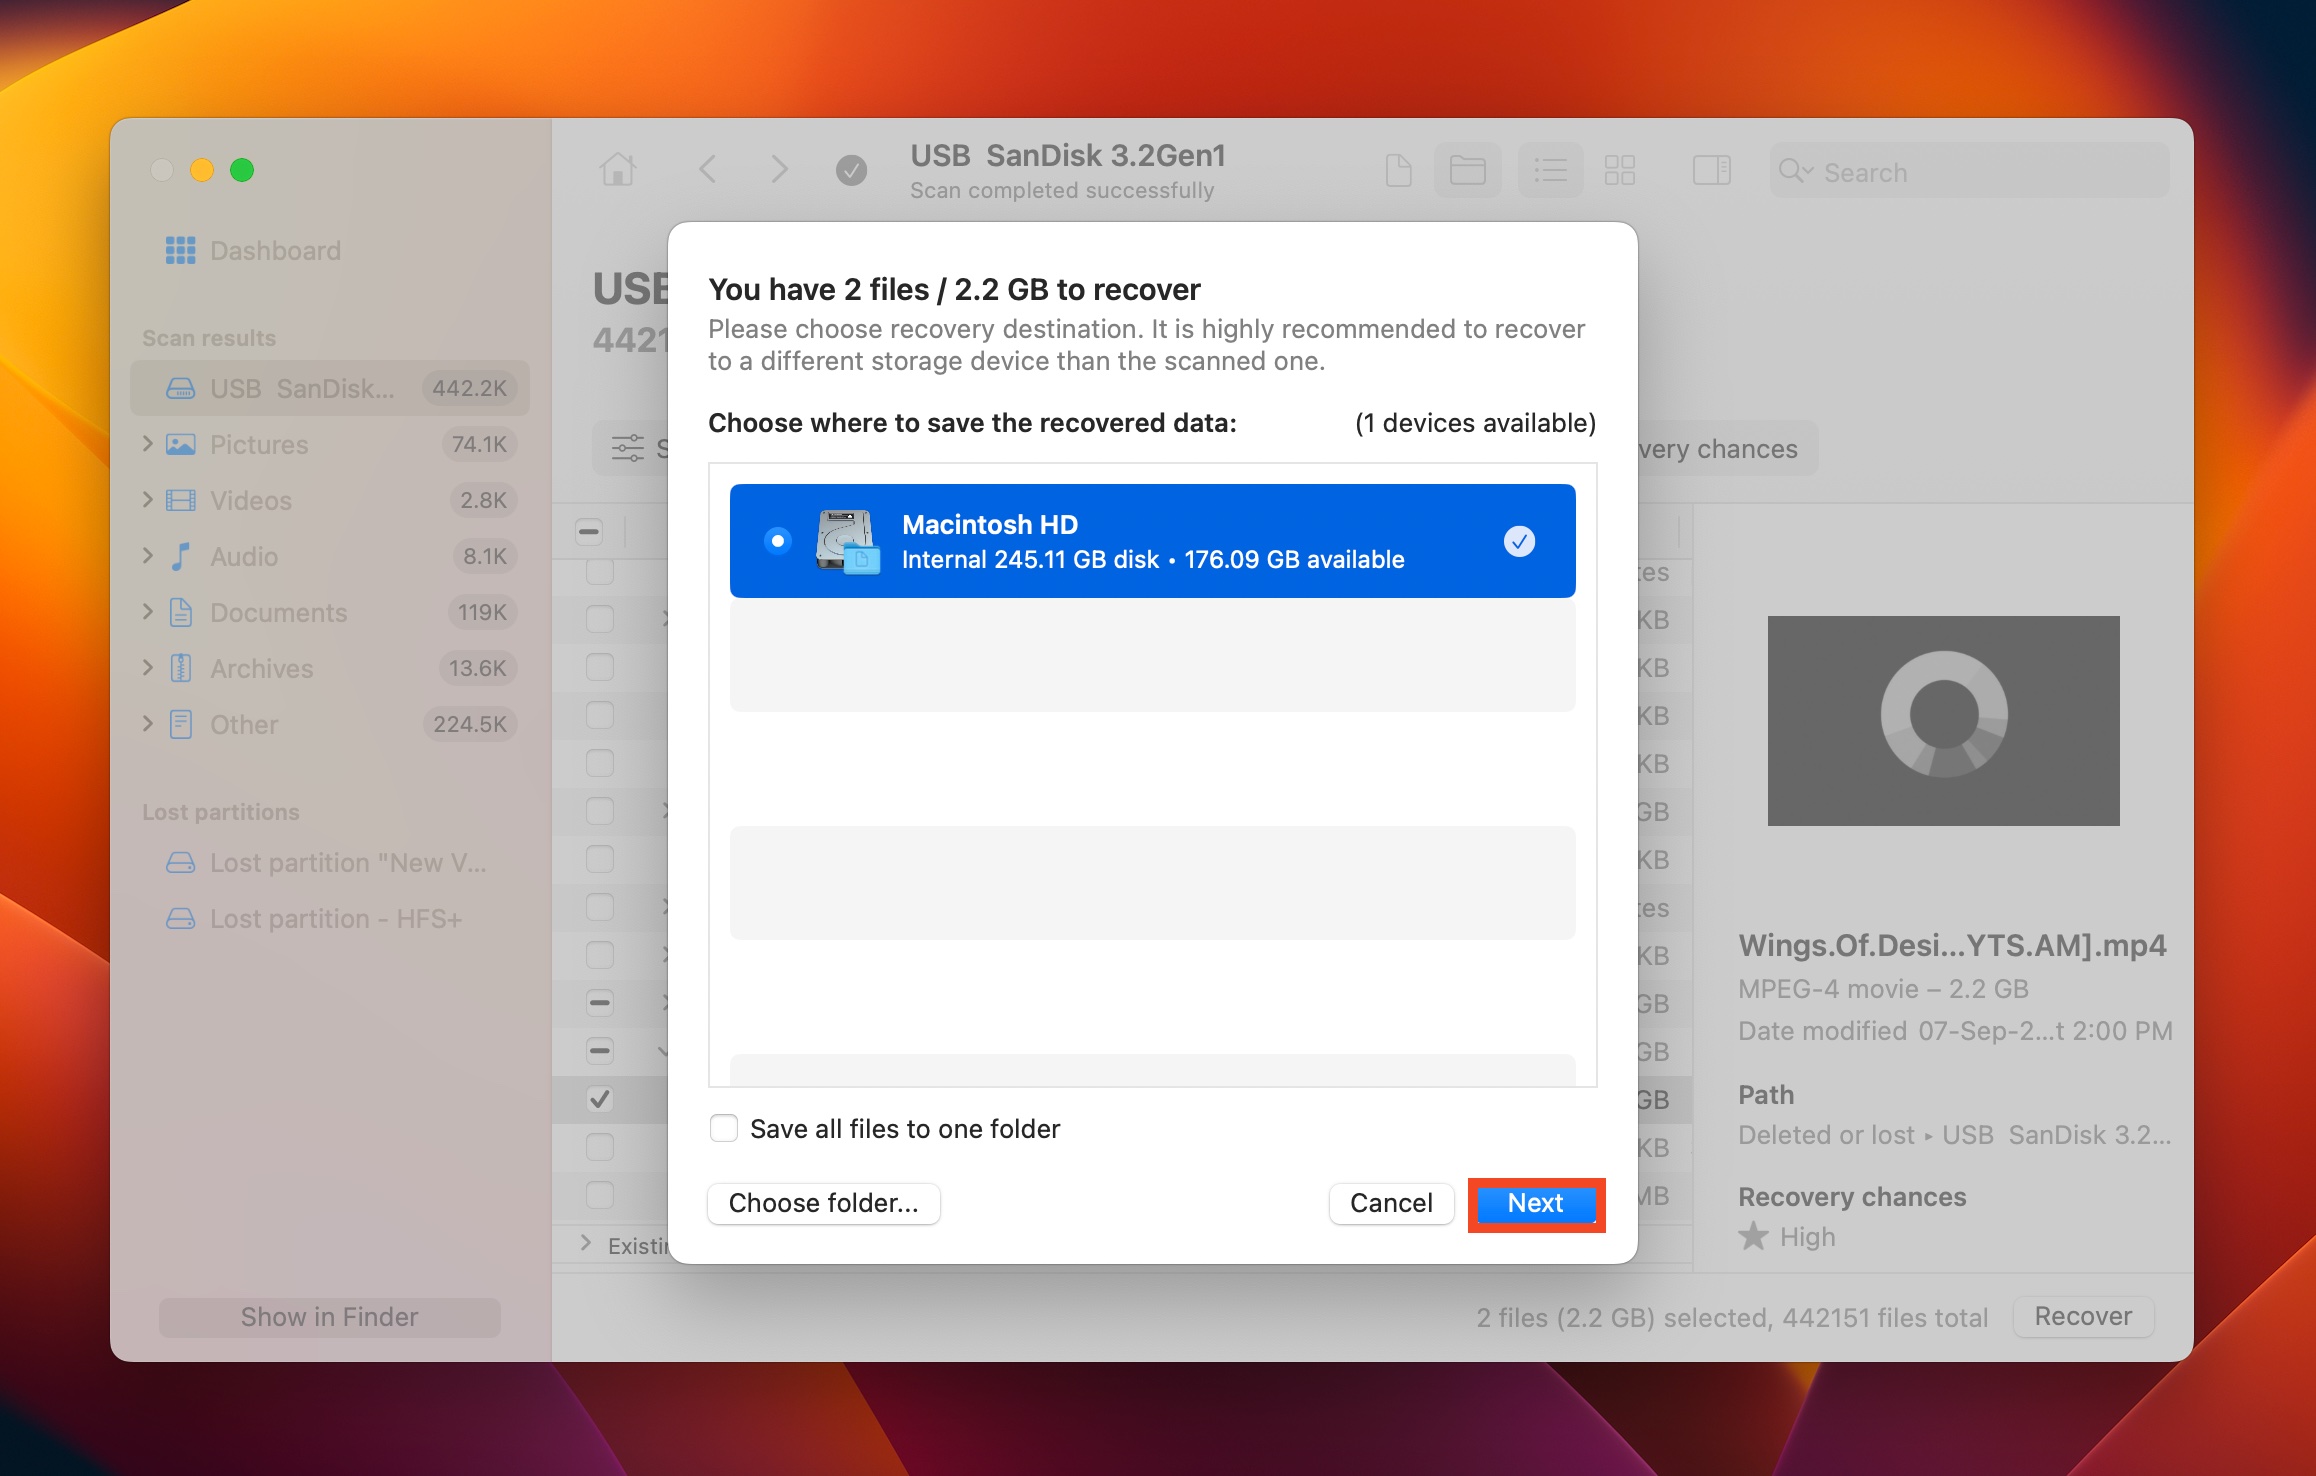
- Choose a recovery destination for the files and click Next. Again, it’s best to save them on a different storage drive and not the one that originally contained them.
- Disk Drill will recover the selected files.
4 Methods to Undo Deletion
Unwilling to use a third-party data recovery tool? Well, there are some other ways that can potentially help you undo a delete operation. These methods are universally applicable to Windows and macOS, but they do differ in their execution.
Method 1: Use the Undo Feature
As long as you haven’t performed other clipboard-related operations on your computer (such as copying and pasting), or rebooted it, you can undo the delete operation in both Windows and Mac.
Here is how to undo a delete operation on a Windows computer:
- Open Windows Explorer (Windows Key + E) and open the folder that contained the deleted file.
- Right-click on the white space and choose Undo Delete. In older versions of Windows, it will be labeled as Undo move.
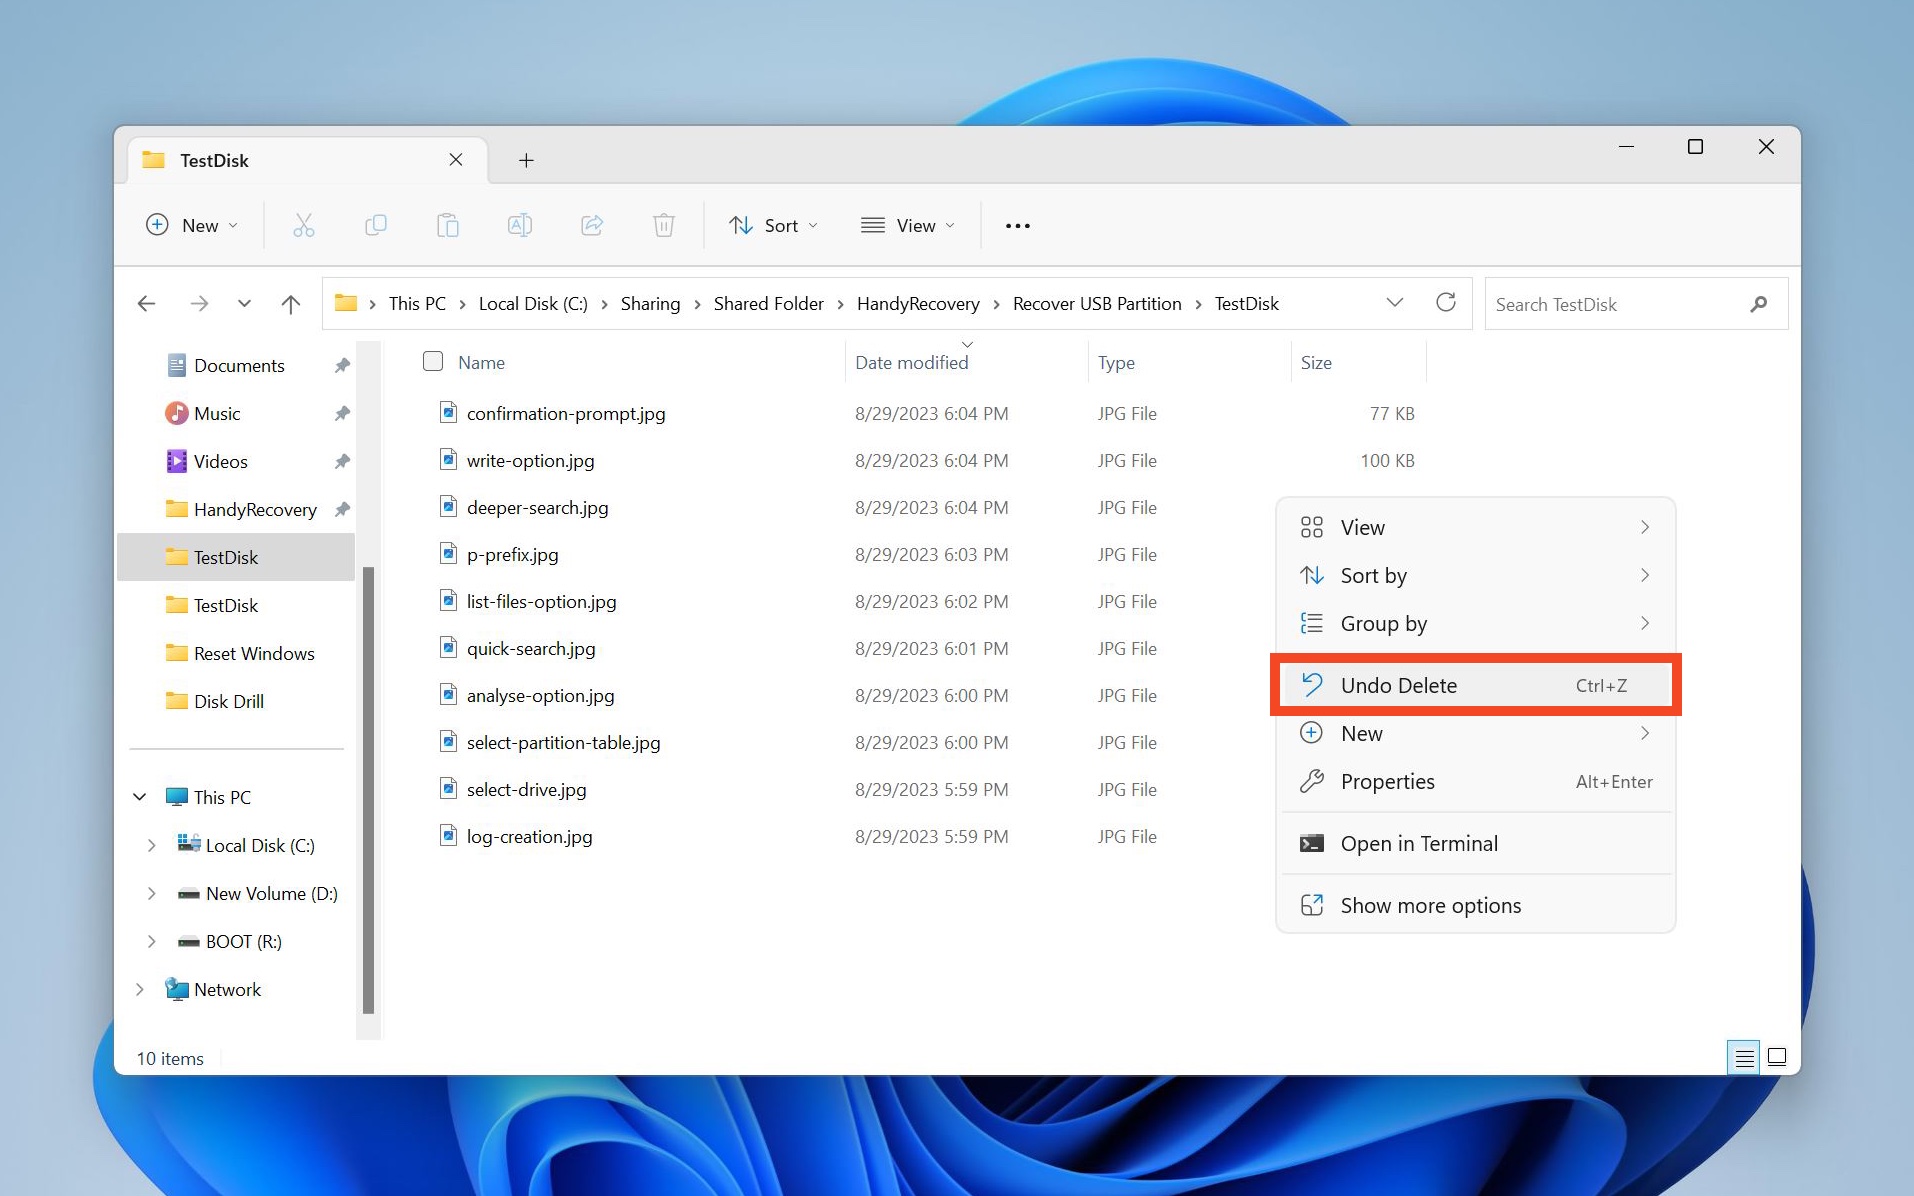
- The deleted file should reappear.
On macOS, the process is similar:
- Open Finder and navigate to the folder from which the file was deleted.
- Go to the Edit option and click on the Undo move of option.
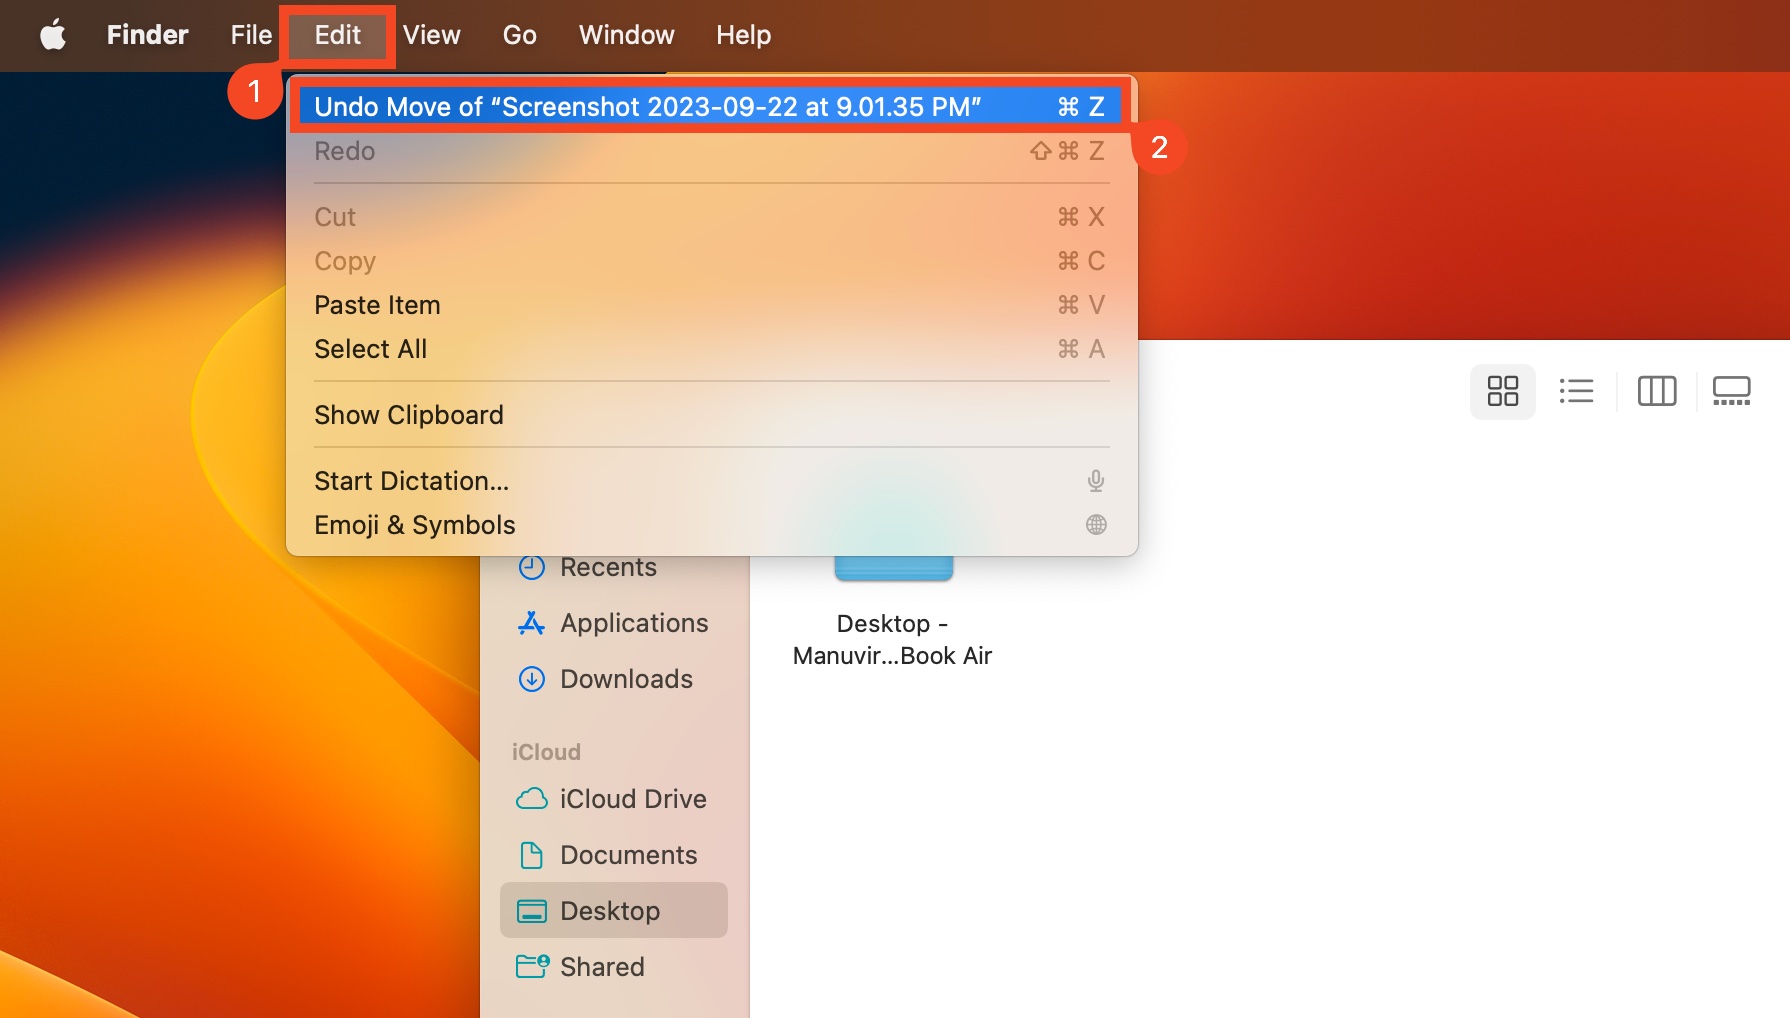
- The deleted file will be restored.
Method 2: Check the Recycle Bin, and Trash
Both Windows and macOS have dedicated folders – Recycle Bin, and Trash, respectively – that store deleted files until they’re restored, or further deleted permanently. Depending on how you’ve configured the OS, the folders may be periodically emptied as well.
It’s a good idea to check these folders for the deleted folders, before performing full-fledged data recovery:
Here’s how to restore deleted files from the Recycle Bin on Windows:
- Double-click the Recycle Bin icon on the desktop, or search for it in Windows Search (Windows Key + S)
- Look for your deleted files. If you can find them, right-click on them and choose Restore.
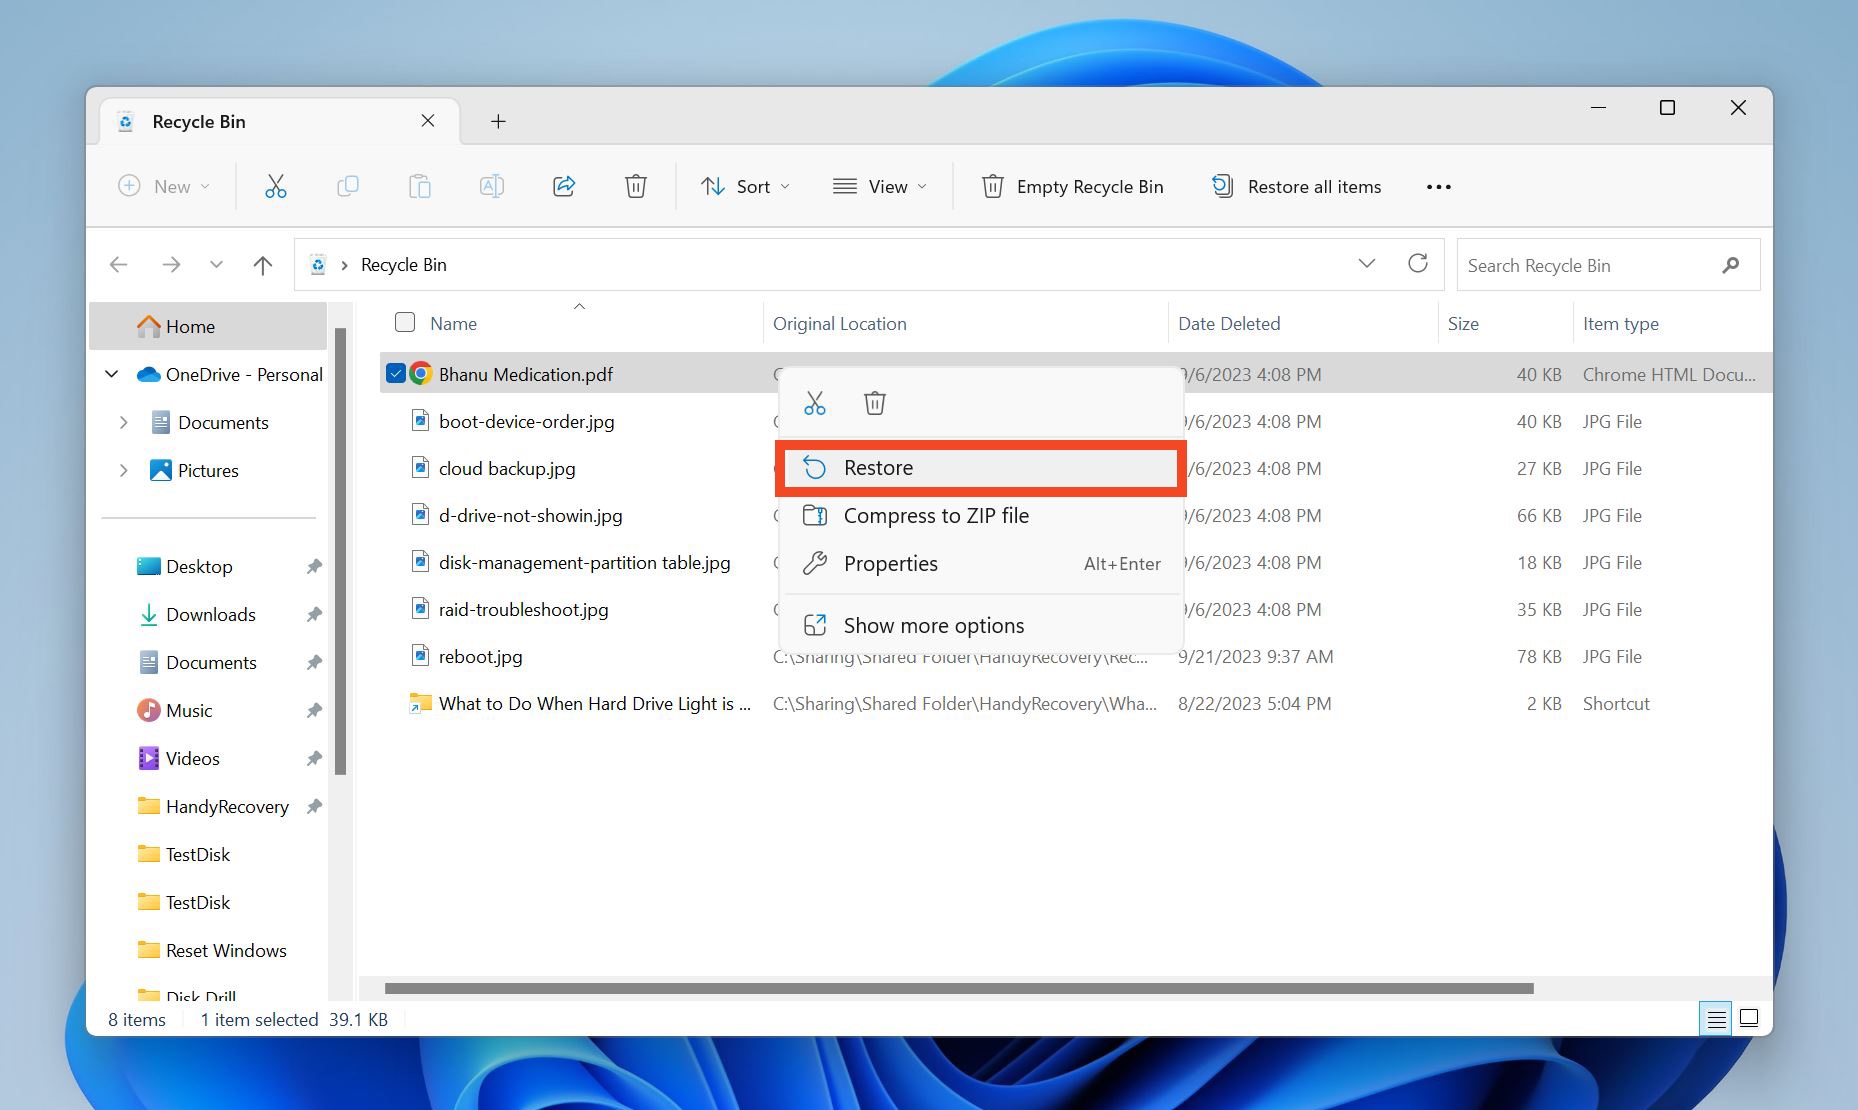
- The deleted files will be restored to their original locations.
On macOS, check the Trash/Bin folder:
- Click on the Trash/Bin icon on the dock.
- Right-click on the deleted files and choose Put back.
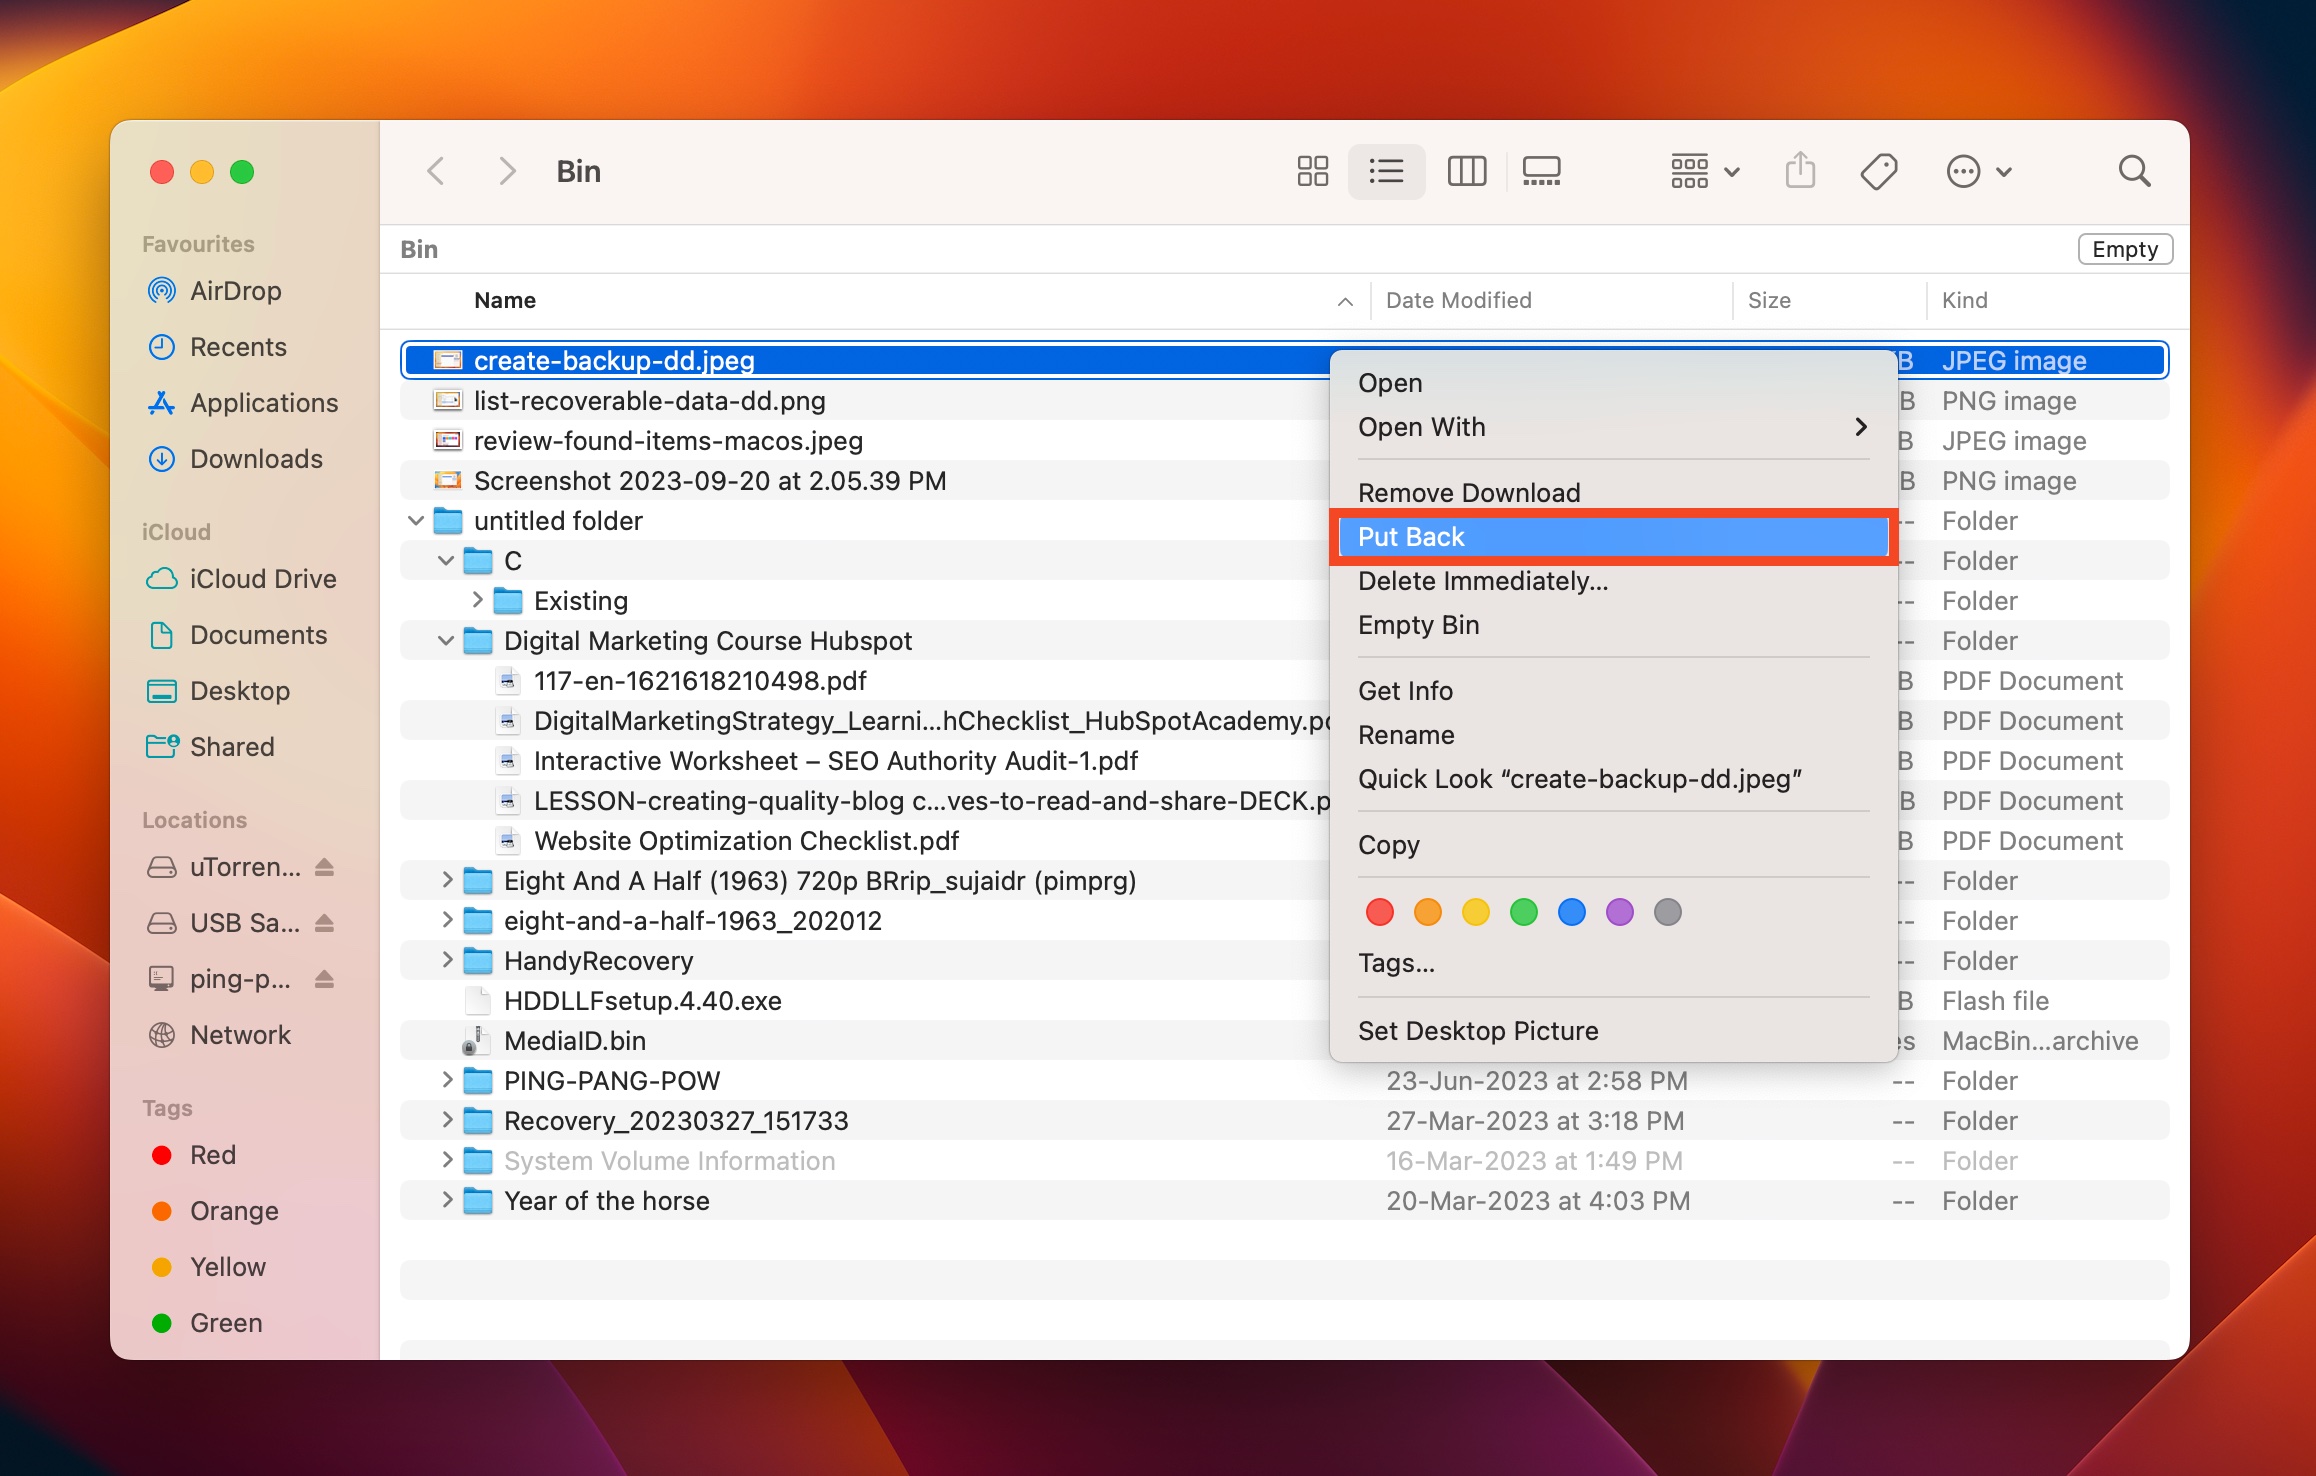
- The files will be restored.
Method 3: Restore the Files From a Backup
Unable to locate your files in the Recycle Bin, or the macOS Trash? Your next best option is to check whether you have a Windows File History, or Mac Time Machine backup. If you do, you can easily restore your files using the drive on which the backup is stored. We’ll describe this process in detail below.
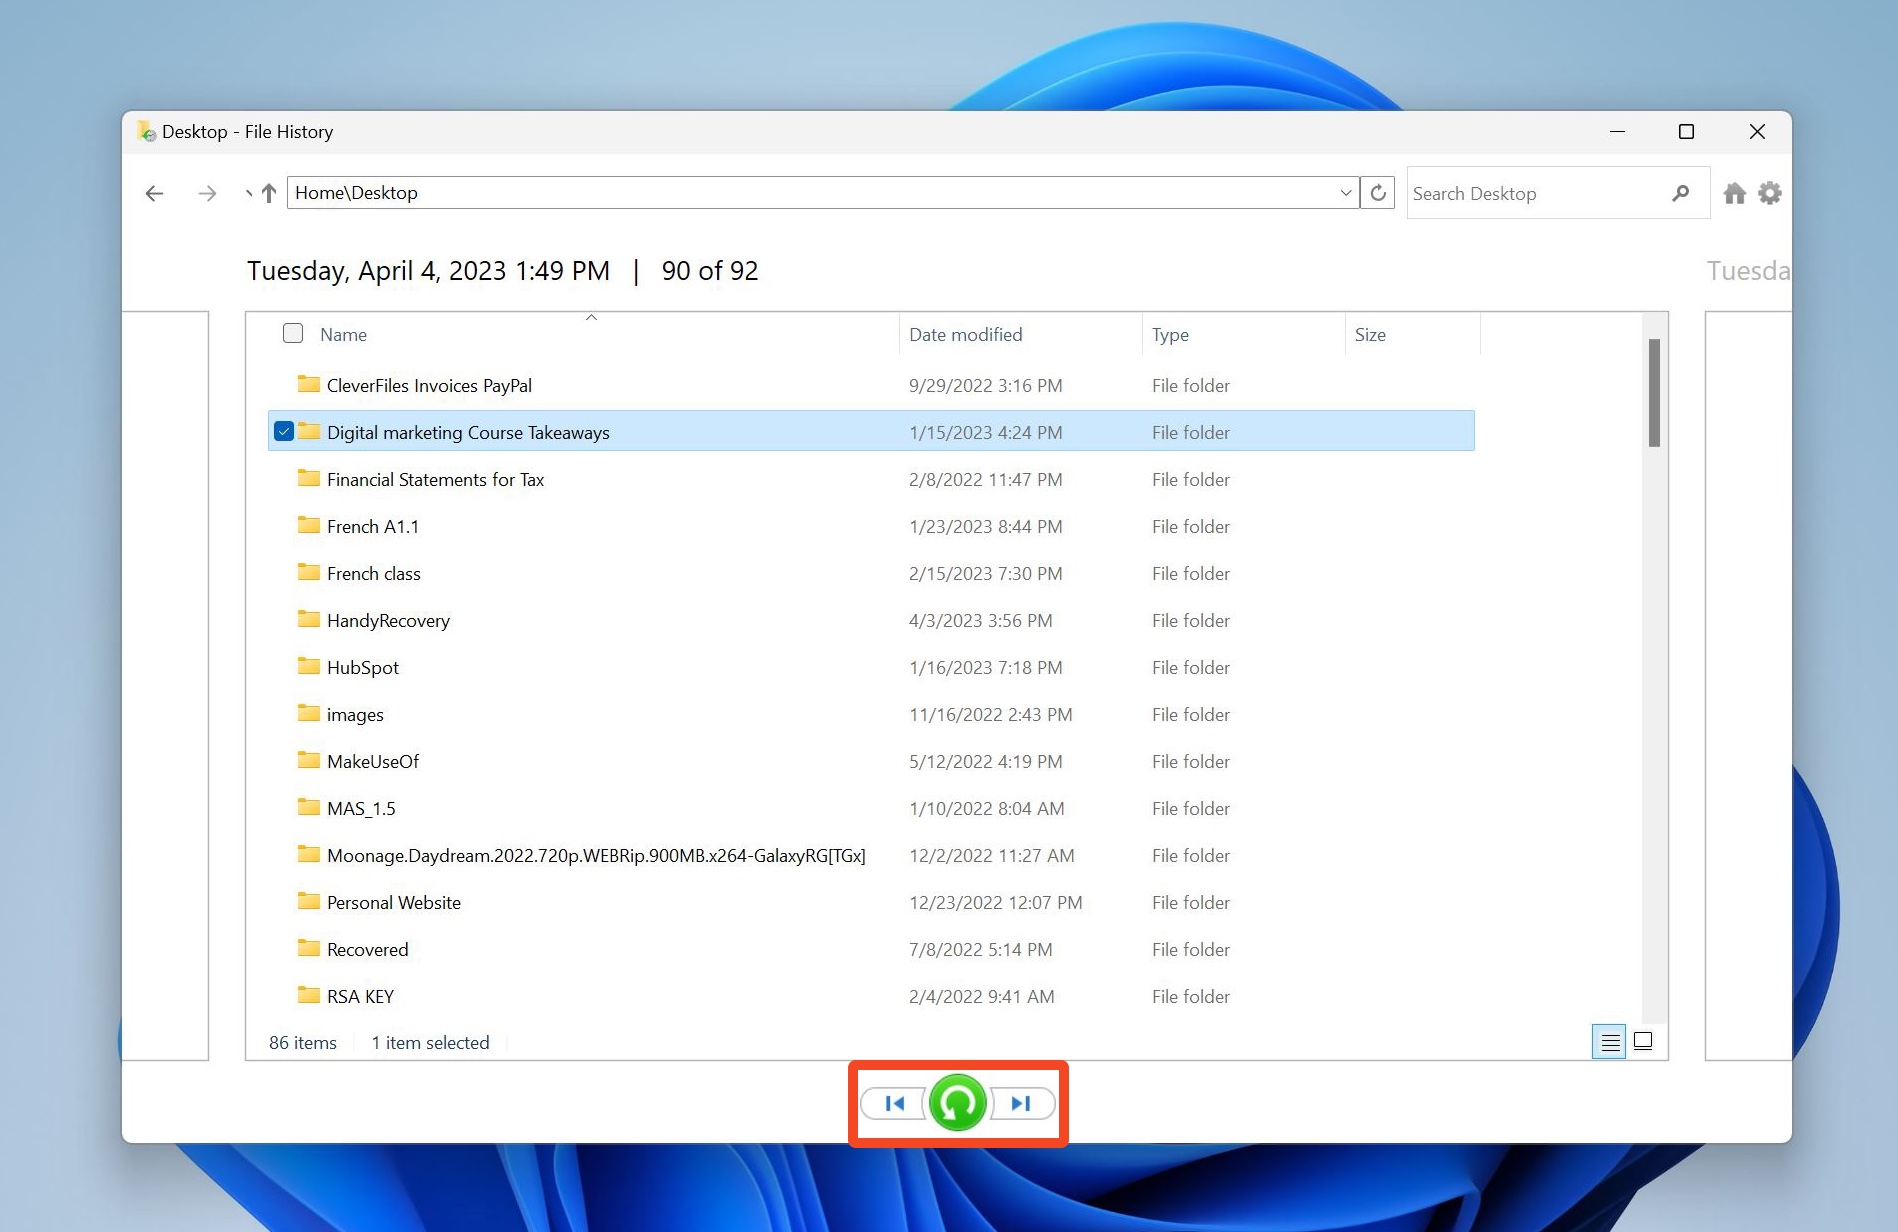
Here’s how to use Windows File History to undo what you deleted:
- Ensure the drive used to set up File History is connected to your PC.
- Search for “file history” in Windows Search (Windows Key + S). Click on the Restore your files with File History option.
- Locate the folder that contained the deleted files and cycle through the backups until you find one which has the required files.
- Select the files and click on the green restore button to get back the files.
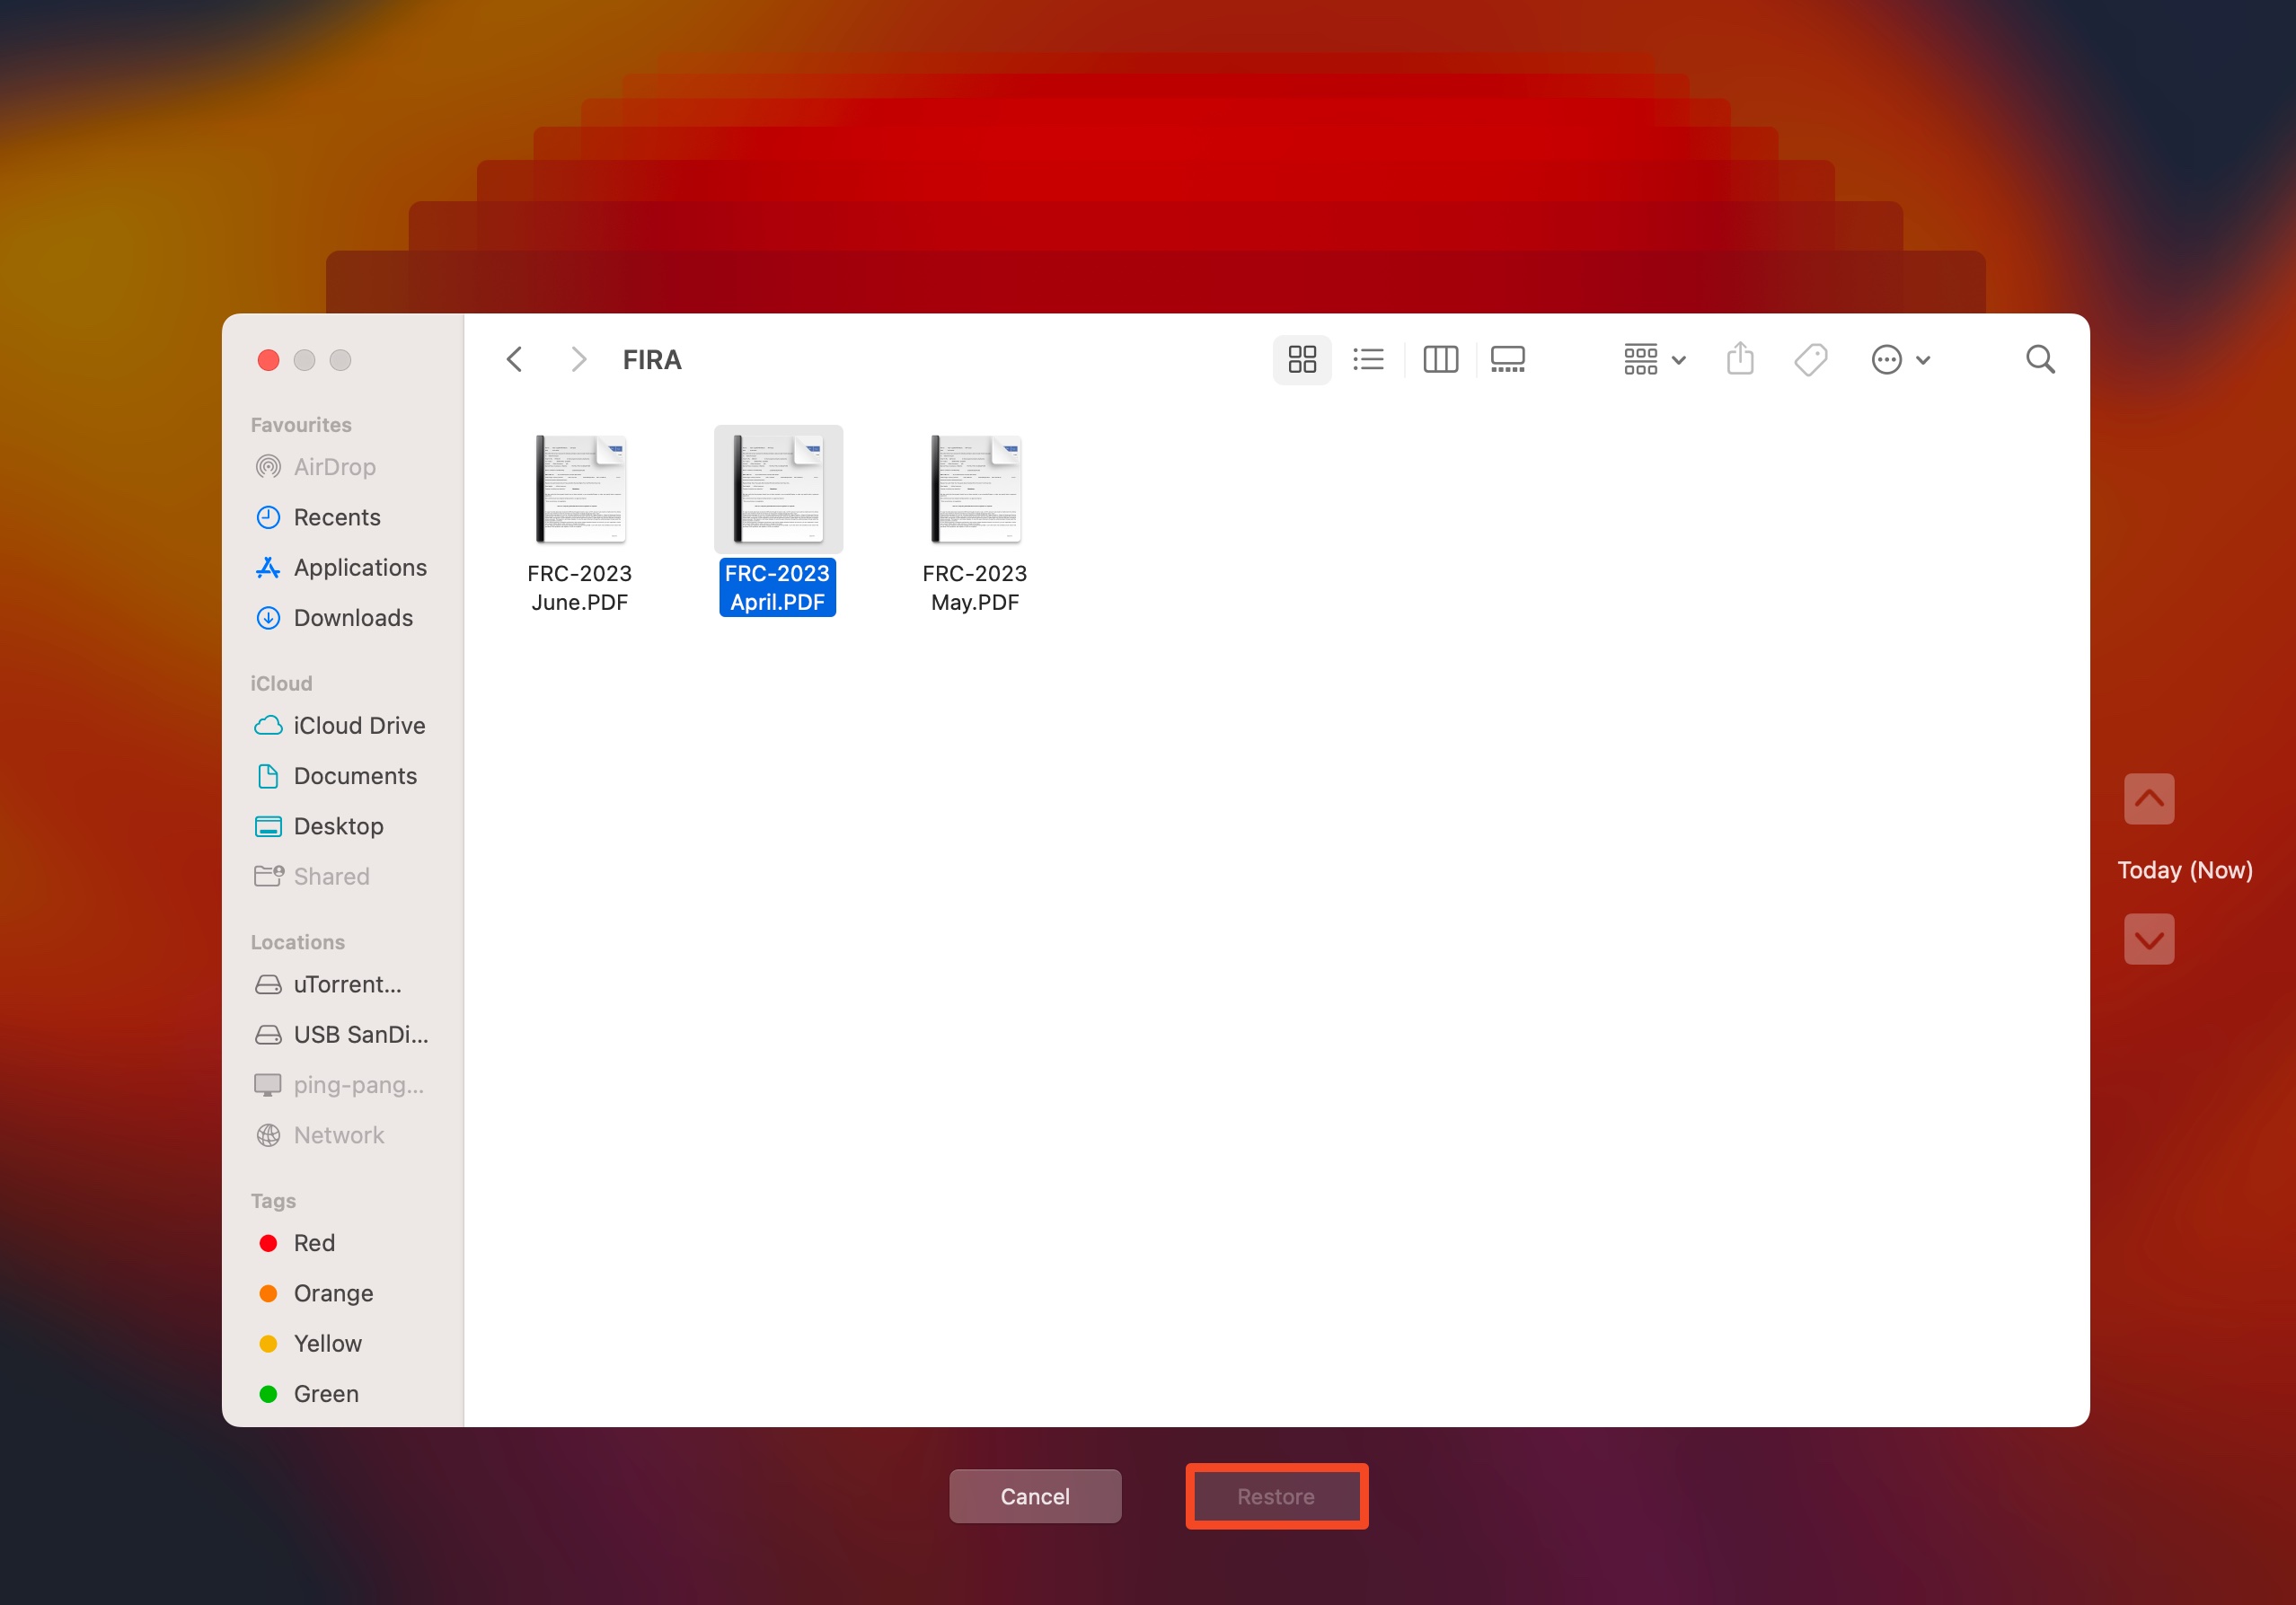
On macOS, you can use the Time Machine app to restore your files:
- Ensure the drive containing the Time Machine backup is connected to your Mac.
- Look for “time machine” in Spotlight Search (Command + Space) and open the app.
- Find the folder which contained the deleted files. Use the navigation buttons on the right side of the screen to cycle through the backups.
- Once you find the backup containing the required files, select the files and click Restore.
Method 4: Use the Command Prompt or Terminal to Undo Deletion
There are certain commands you can use in Windows, and macOS to undo deletion and remove certain attributes that may have made your files invisible. To execute these commands, you’ll need to use the Command Prompt (Windows).
Here’s how to undo deletion using the Command Prompt (CMD) on Windows:
- Search for “cmd” in Windows Search (Windows Key + S). Right-click on Command Prompt from the search results, and choose Run as Administrator.
- In the CMD console, type
attrib -h -r -s /s /d X:*.*and press Enter. Replace X with the drive letter or partition letter where the files were originally located.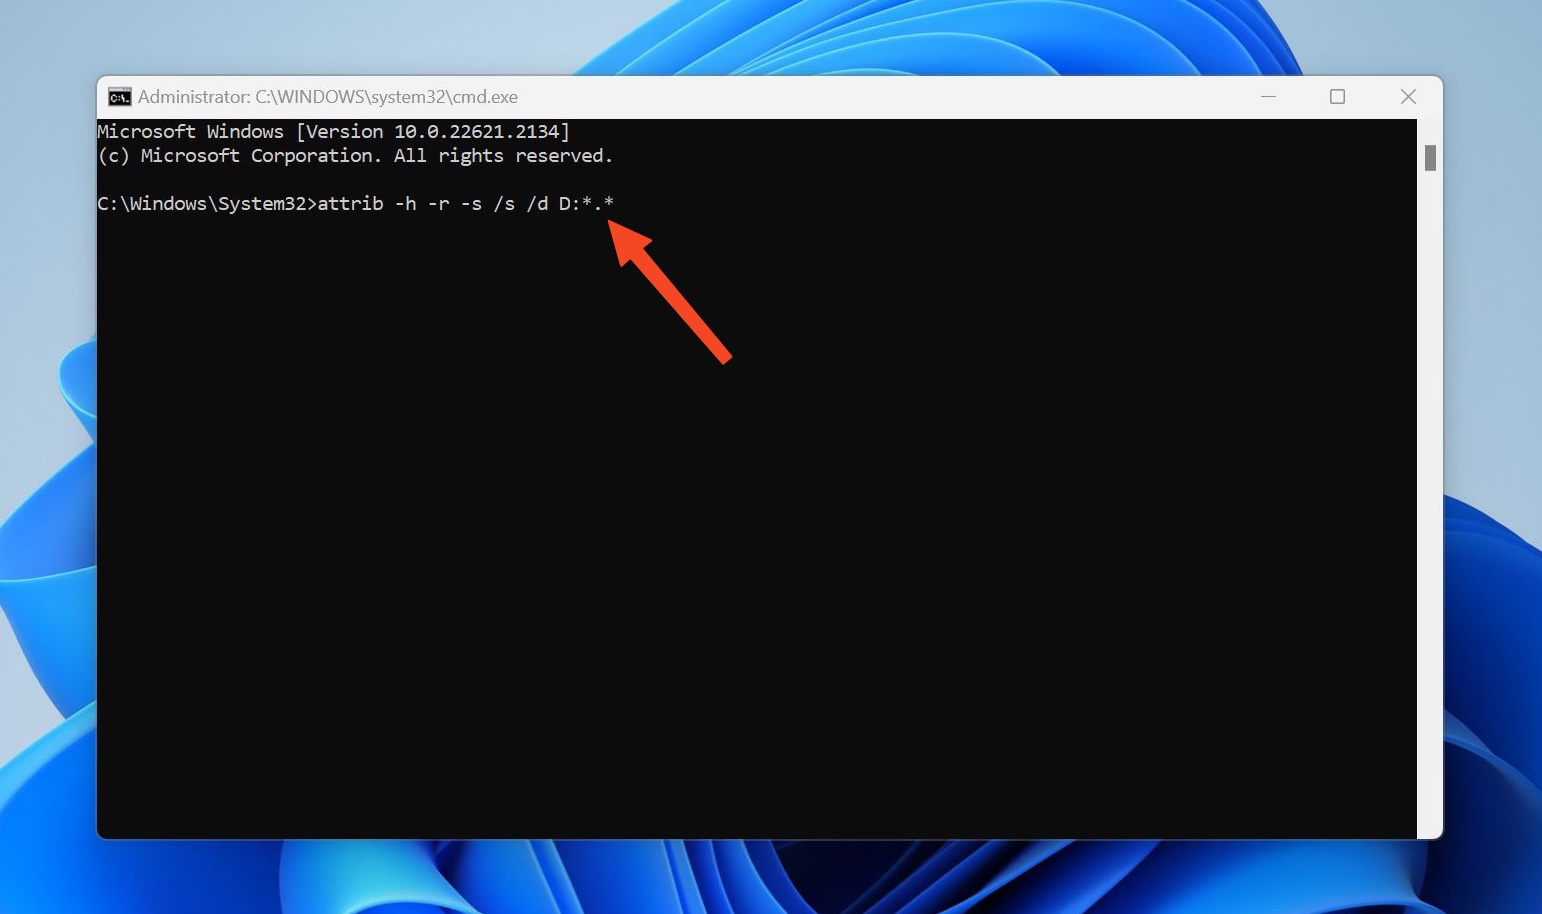
- Open Windows Explorer (Windows Key + E) and check if the files have reappeared.
On macOS, use the Terminal to undo deletion:
- Type “terminal” in Spotlight Search (Command + Space) and open the Terminal app.
- Type
cd .Trashand press Enter.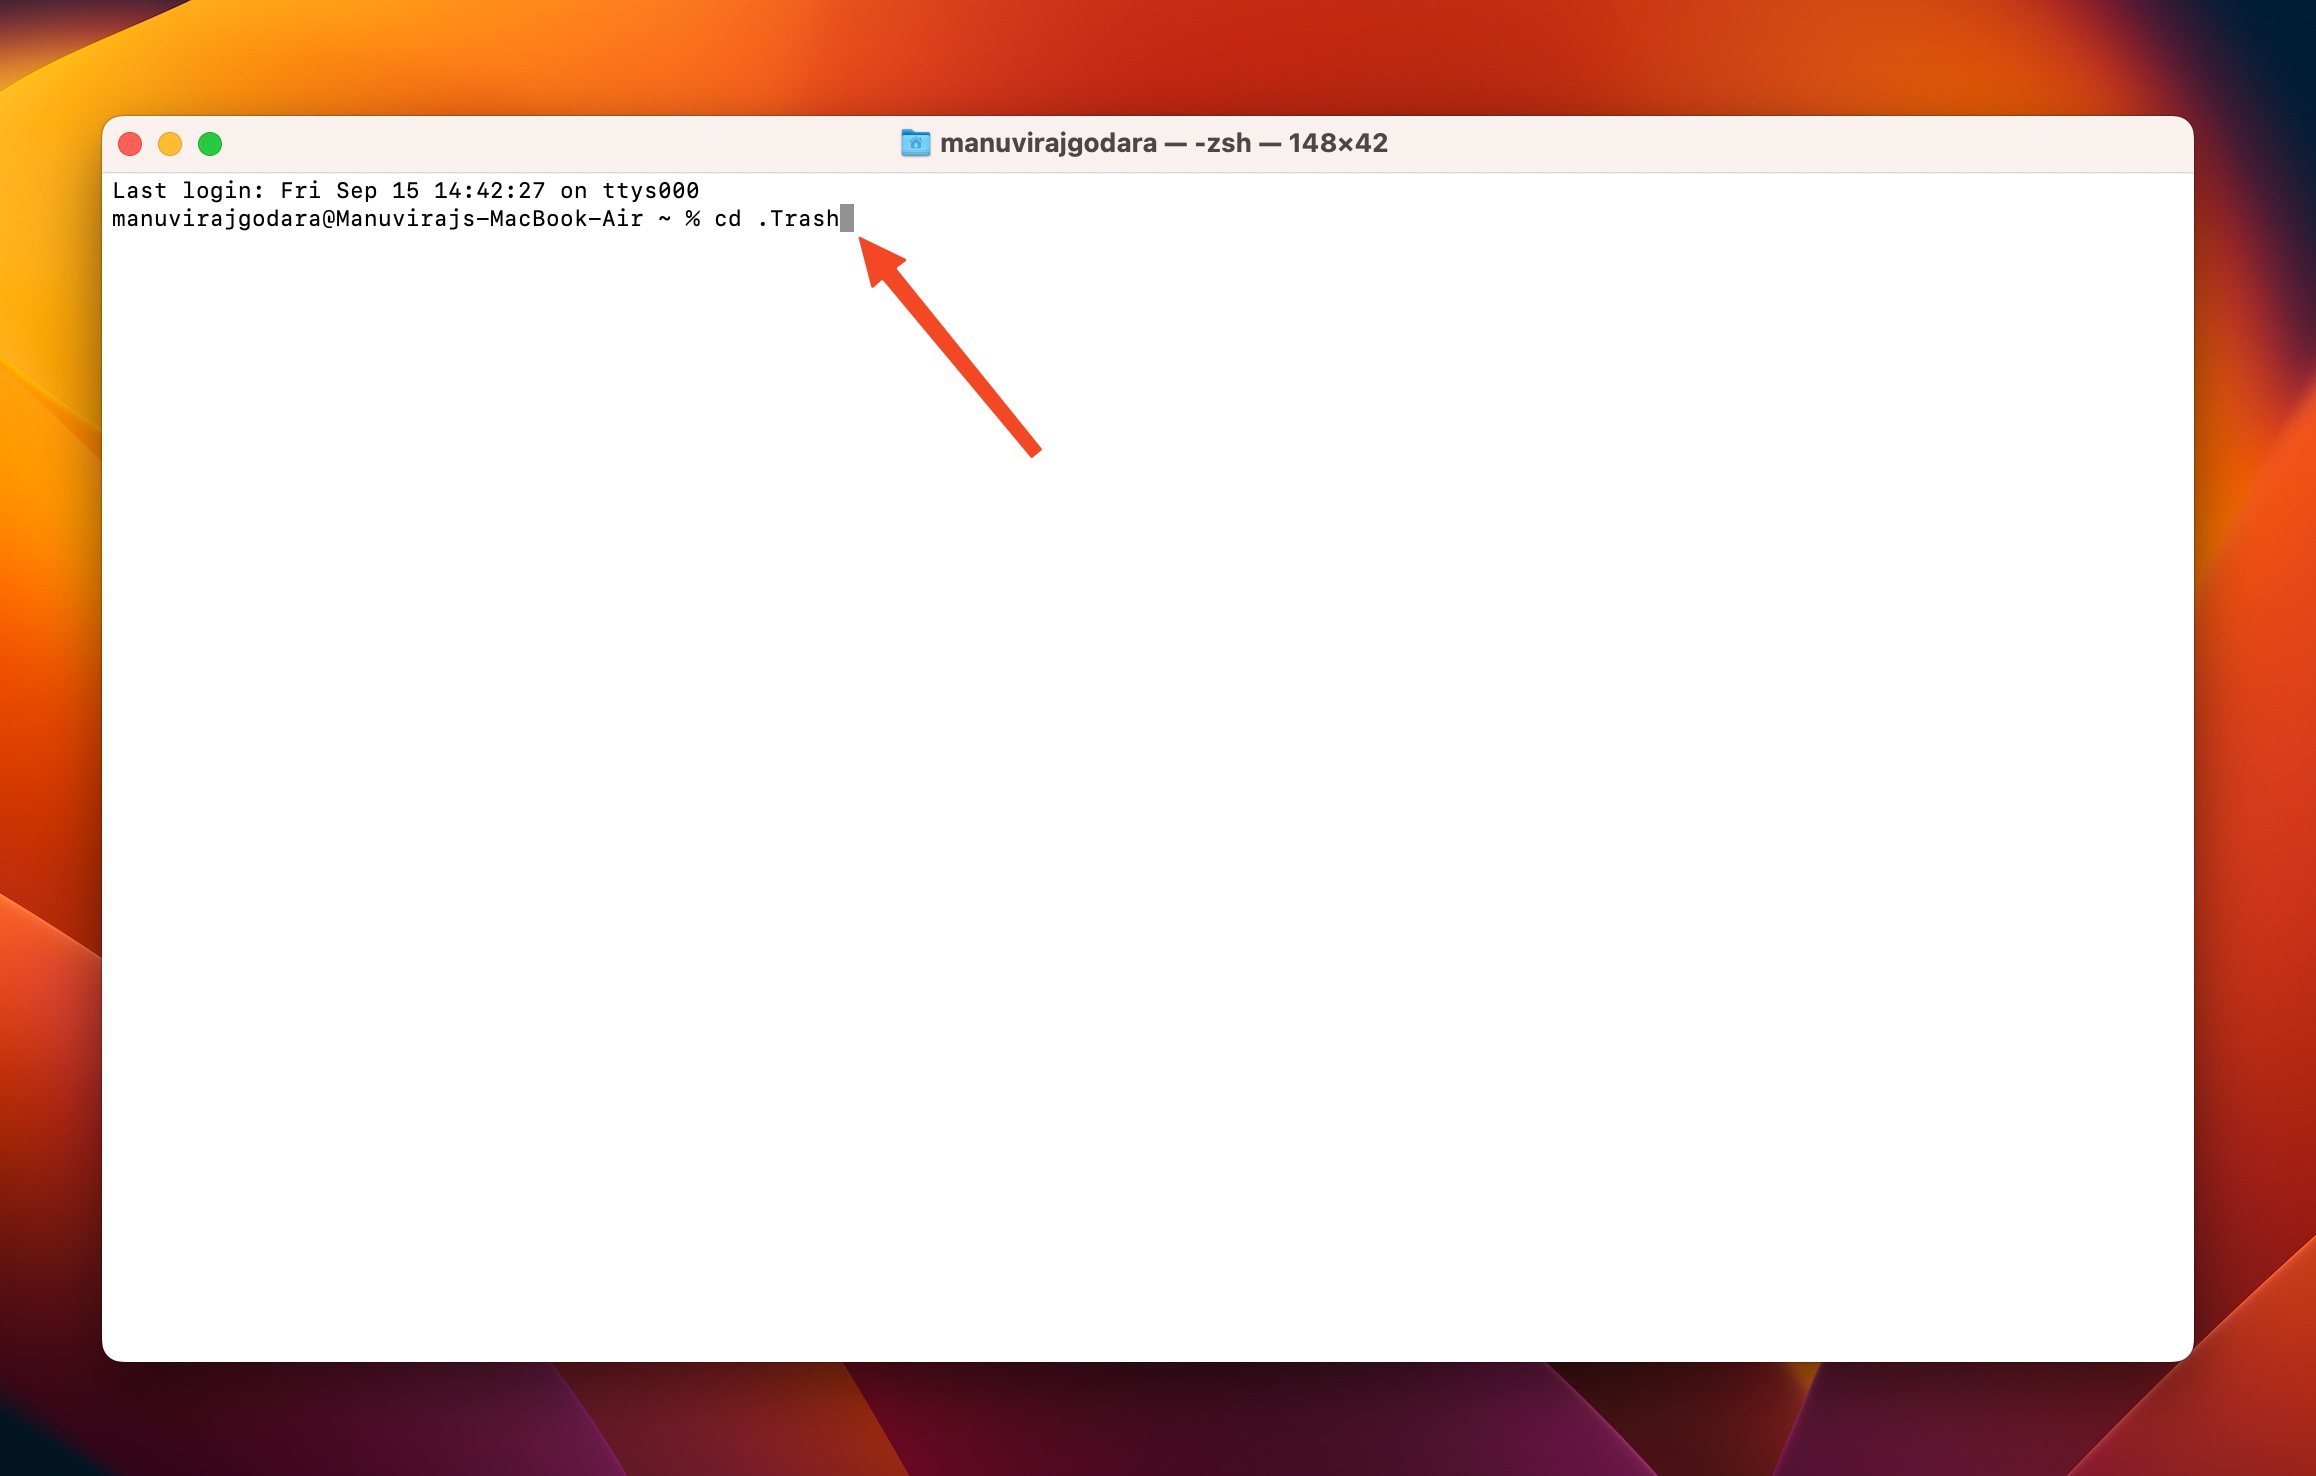
- Type
ls -al ~/.Trashand press Enter. Look for the file you wish to undo deletion for.
- Type
mv filename ../and press Enter. Replace filename with the file you wish to get back. The file will be restored to the home directory.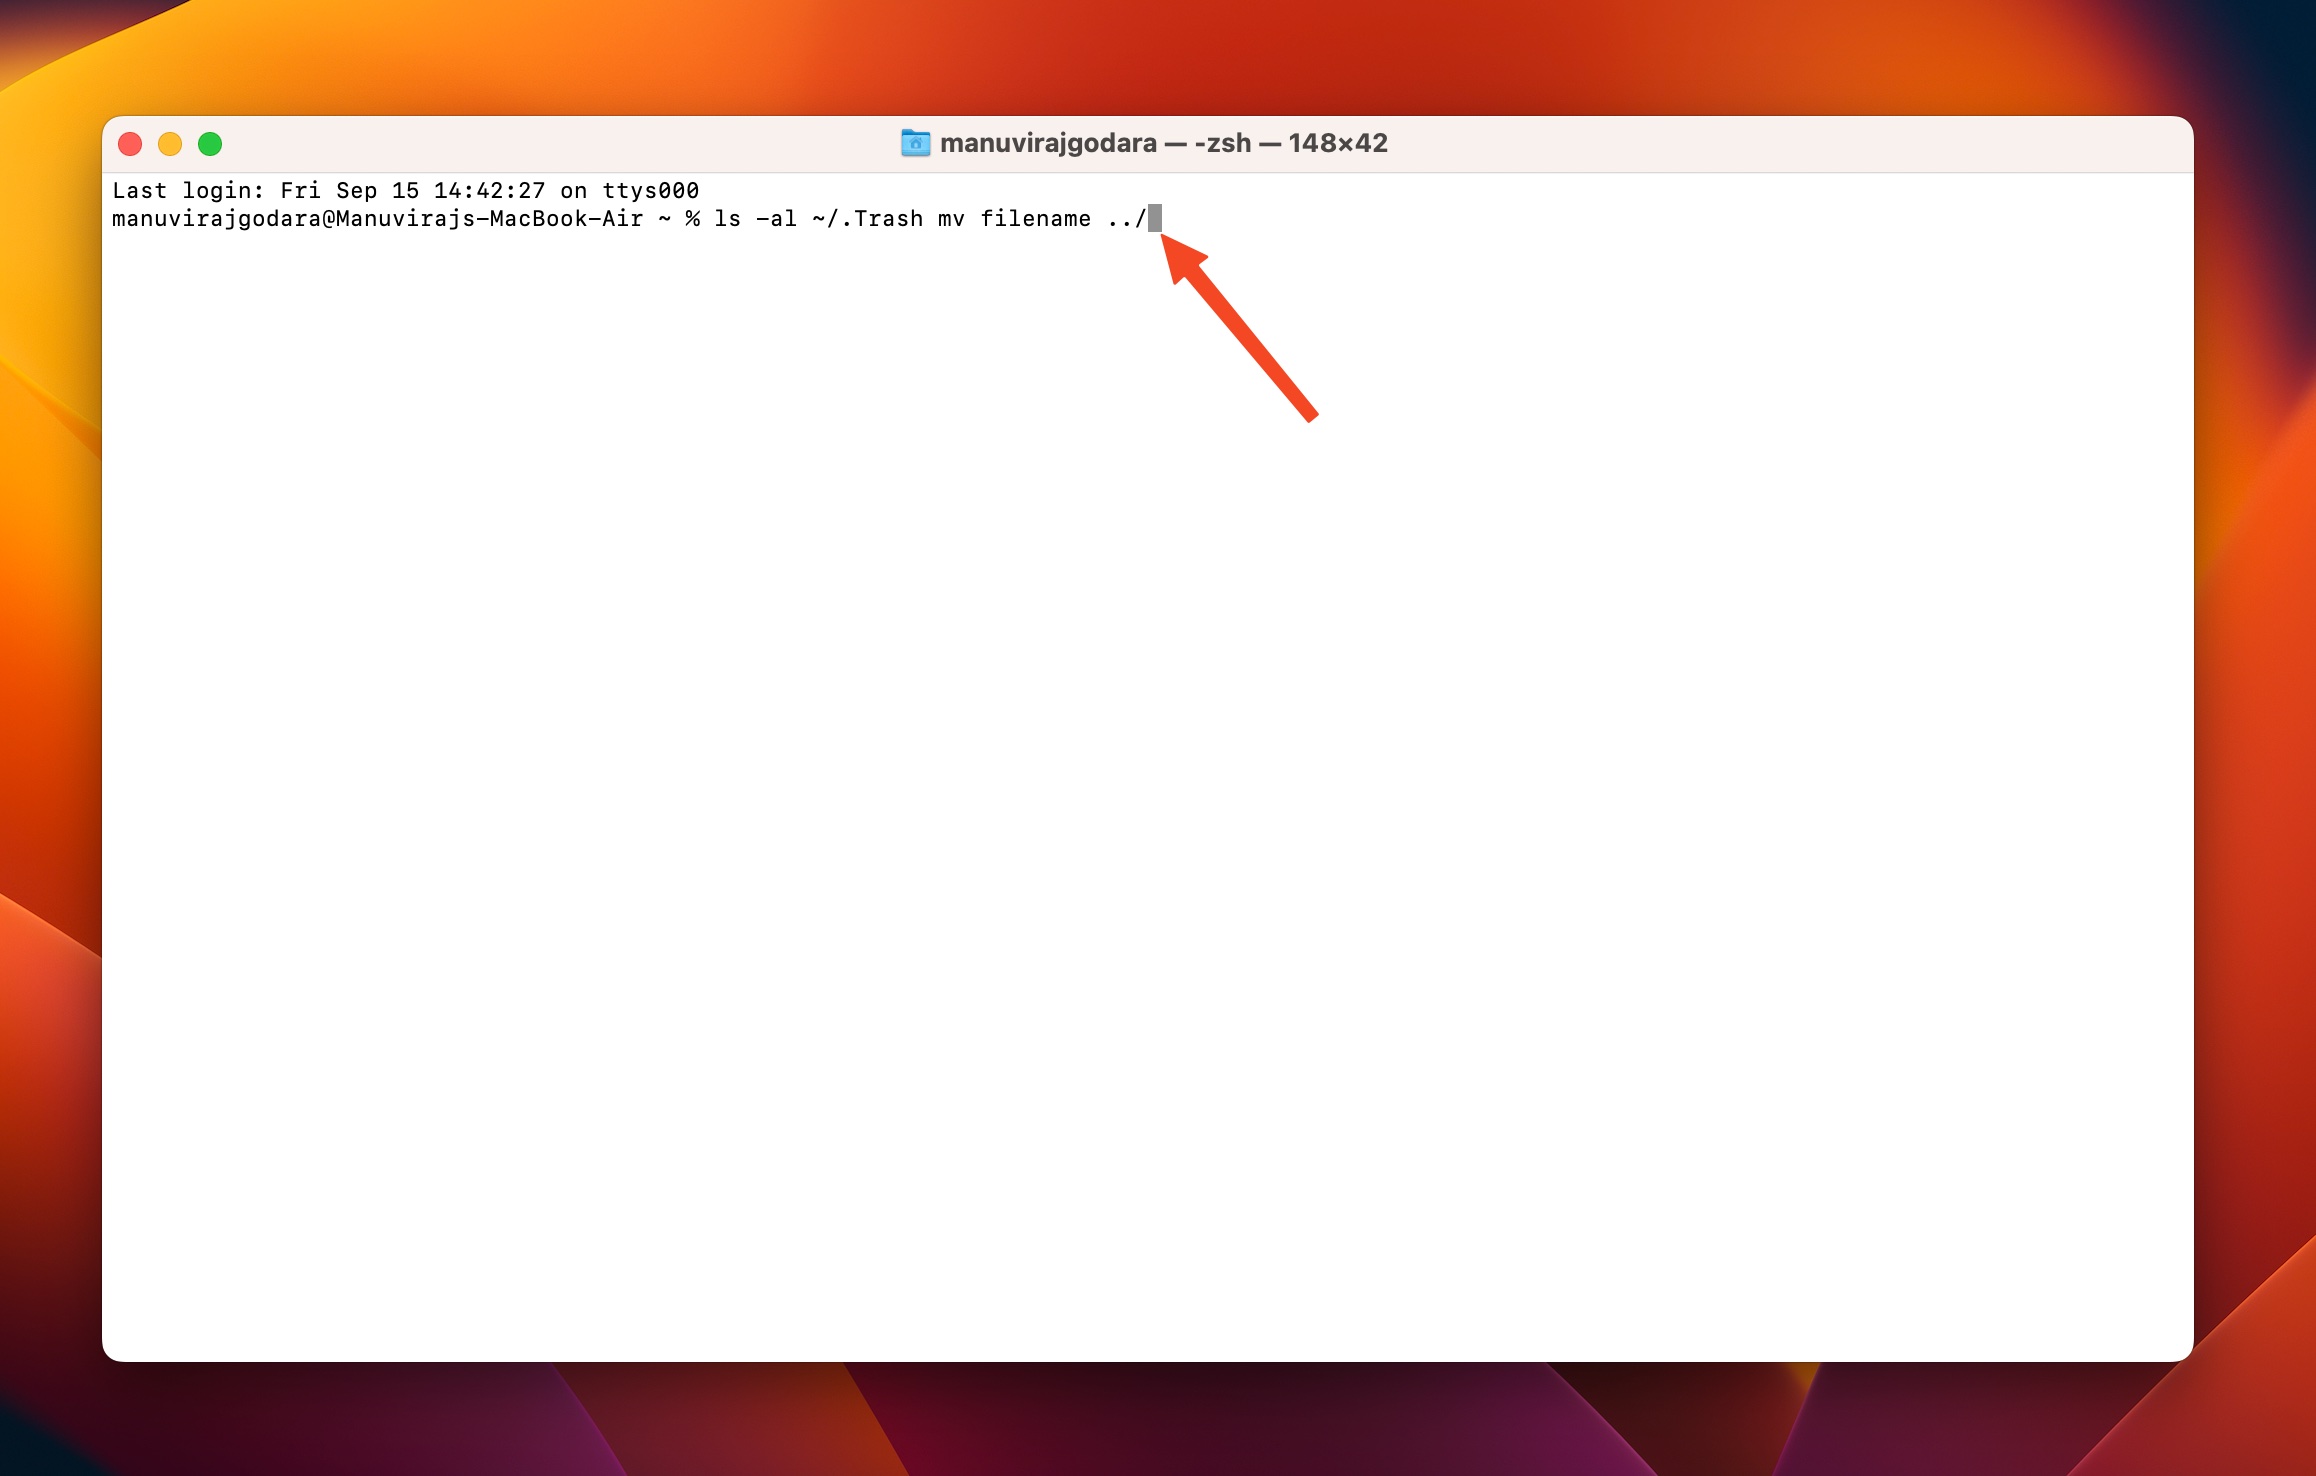
Conclusion
Accidents happen, and it’s easy to accidentally delete files you didn’t intend to. Luckily, both Windows and Mac have measures in place that let you undo what you deleted and recover your files. The methods to do this range from simply using the undo feature on the operating systems, or resorting to command line tools to help you out.
If you’re unable to undo deletion, you can always use a good data recovery program like Disk Drill to recover your files.


