 If photos from the SD card are not showing up when you insert it into your camera or computer, there’s a logical explanation for it. In most cases, you’ll be able to recover data from this SD card.
You can narrow down the fixes that are most likely to work for you by verifying if your SD card isn’t working on your computer, camera, or both. In this article, we explain how you can recover pictures from SD cards in various cases.
Table of Contents
Photos Aren’t Visible on Both PC and Camera
If you can’t view photos on an SD card when it’s plugged into your PC or camera, try the following fixes:
Method 1:Using the CHKDSK Command
CHKDSK is a command-line utility in Windows that scans a disk’s file system and file system metadata to detect logical and physical errors. If you don’t see your photos when the SD card is connected, logical errors like file system corruption or physical damage could be the cause.
Using CHKDSK might help view the photos on the SD card again. Here’s how you can use CHKDSK:
- Launch an elevated Command Prompt by pressing Ctrl + R, typing cmd, and pressing Ctrl + Shift + Enter.
- Execute the following command:
chkdsk F: /r
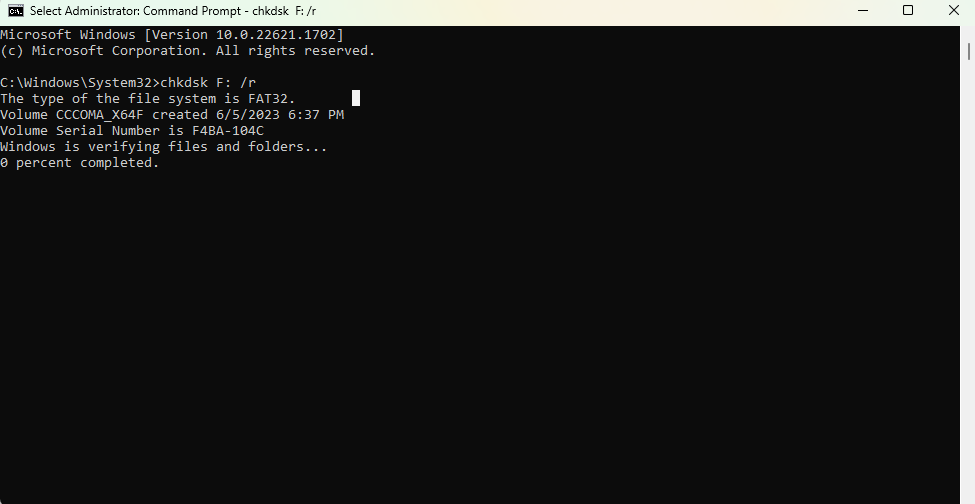
Replace F with the drive letter for your SD card. Once the scan completes, see if you’re able to access the photos on the SD card.
Method 2:Check Physical Write Protection
Most SD cards have a write protection lock along their left edge. A locked SD card is write-protected. This means you can only read the data, but won’t be able to modify, add, or erase any data.
However, in some cases, you might not even be able to read data. For example, some media formats like NEF might not appear on the SD card when it’s locked.
Try sliding the lock switch to disable physical write protection. See if the images that weren’t showing up appear on the SD card now.
Method 3:Scan for Viruses
Viruses can cause a range of issues from corrupting the file system to the file itself. The first step to recovery in case of a virus attack is to scan the SD card for viruses. You can use a third-party antivirus solution or Windows Defender.
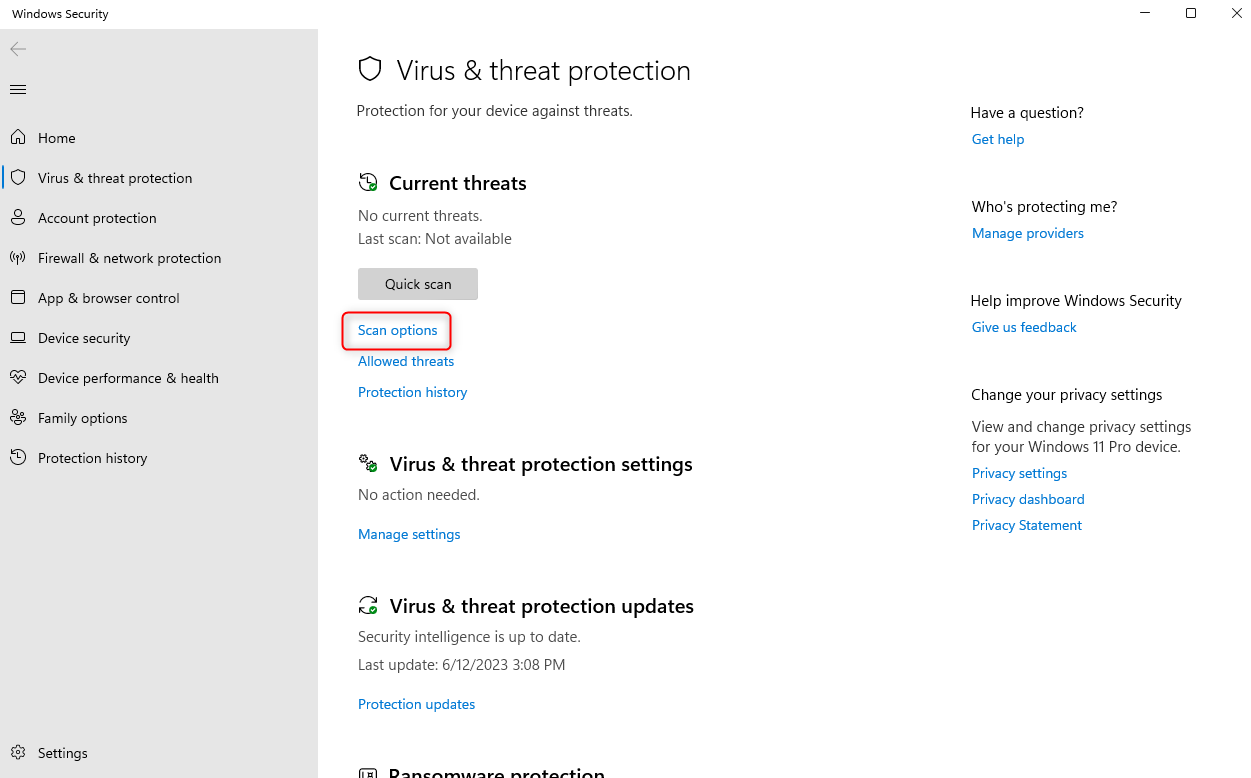
Here’s how to scan for viruses using Windows Defender:
- Search for virus & threat protection and click on the Virus & threat protection option.
- Click on Scan options.
- Select Quick scan to perform a surface-level scan. Or you can run a Full scan for a more thorough scan or a Custom scan to scan specific files.
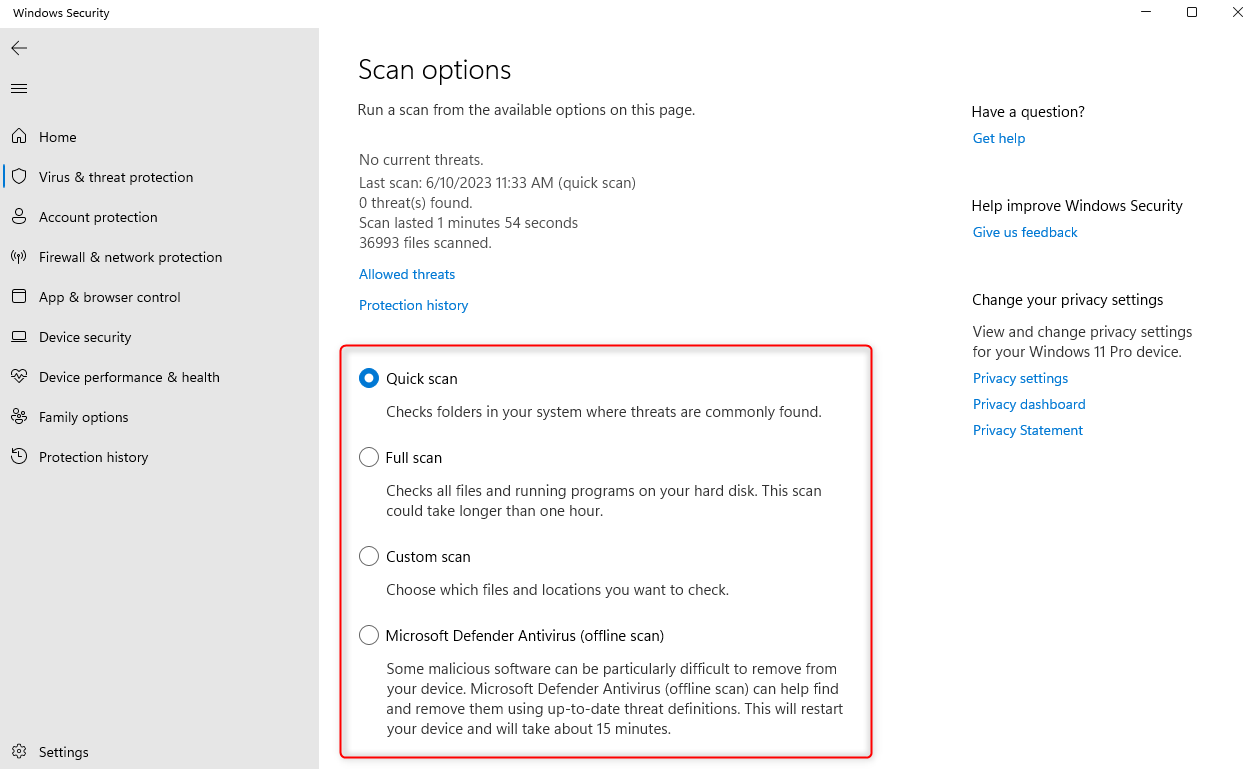
- Click Scan now.
Once the scan is complete, you’ll see a summary. If Windows Defender detects a virus, it will try to remove it or quarantine the responsible files. Delete these files and then reboot your computer. See if the problem is fixed now.
Method 4:Data Recovery Software
If you can’t access photos on your SD card, maybe they were accidentally deleted. If that’s the case, data recovery software can help in this case.
We recommend Disk Drill since it offers an extensive feature set and excellent data recovery capability. Disk Drill supports a wide range of photo formats including JPG, PNG, NEF, CR2, and more. The free version allows recovering up to 500MB of data.
To use Disk Drill:
- Download Disk Drill and install it on your computer.

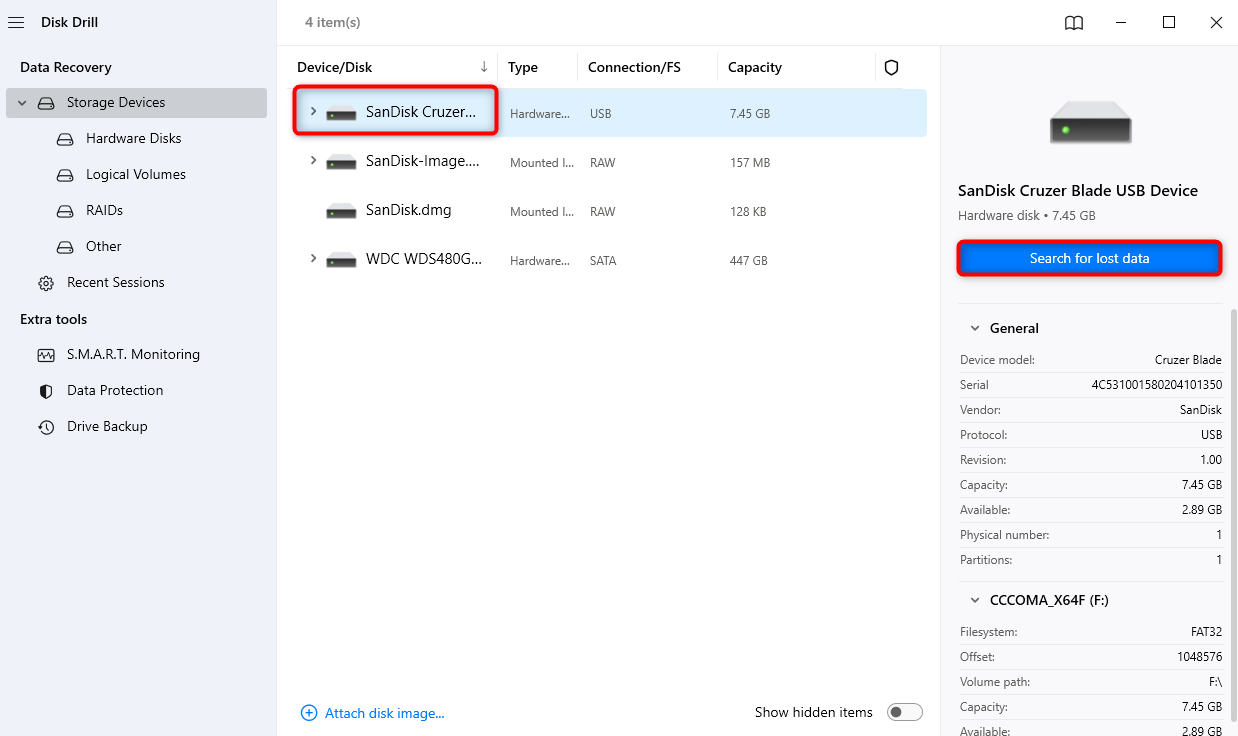
- Launch Disk Drill and select the SD card you’re trying to recover data from.
- Click on the Search for lost data button.
- Once the scan completes, select the Pictures category from the left. Select the pictures you want to recover (or check the box at the top to select all). You can also preview the pictures in Disk Drill before recovering them.
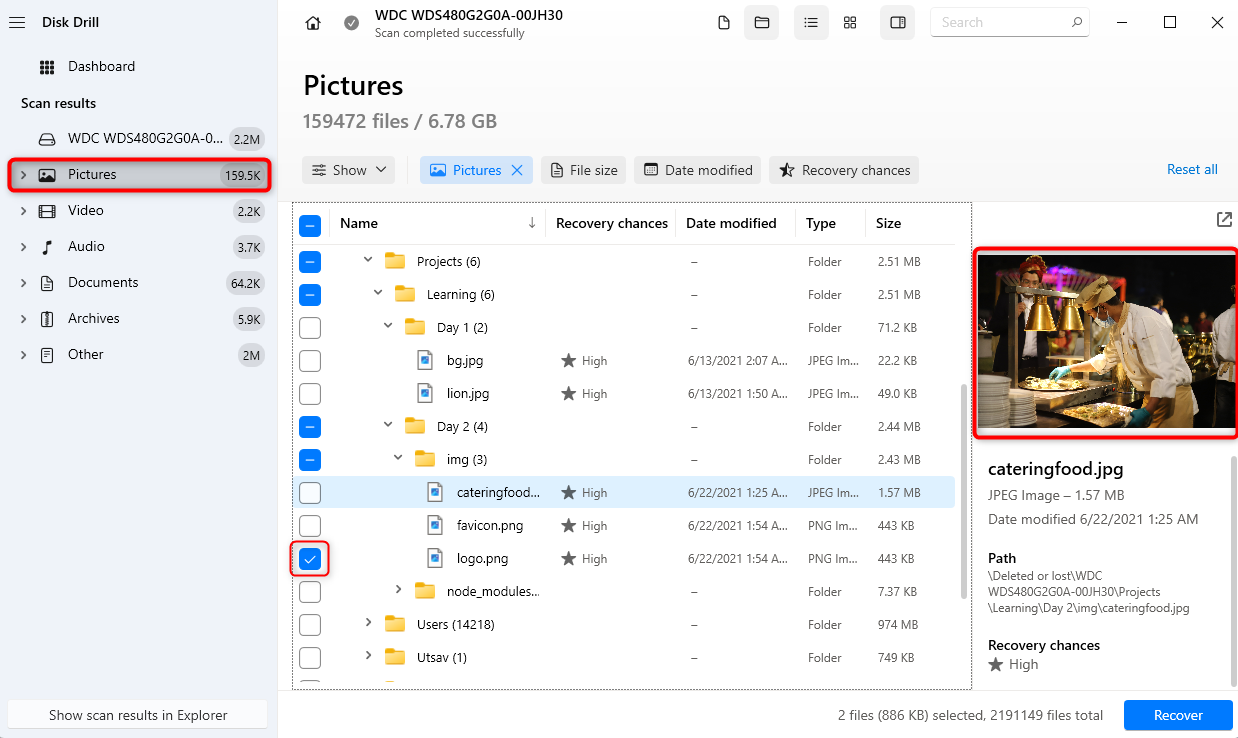
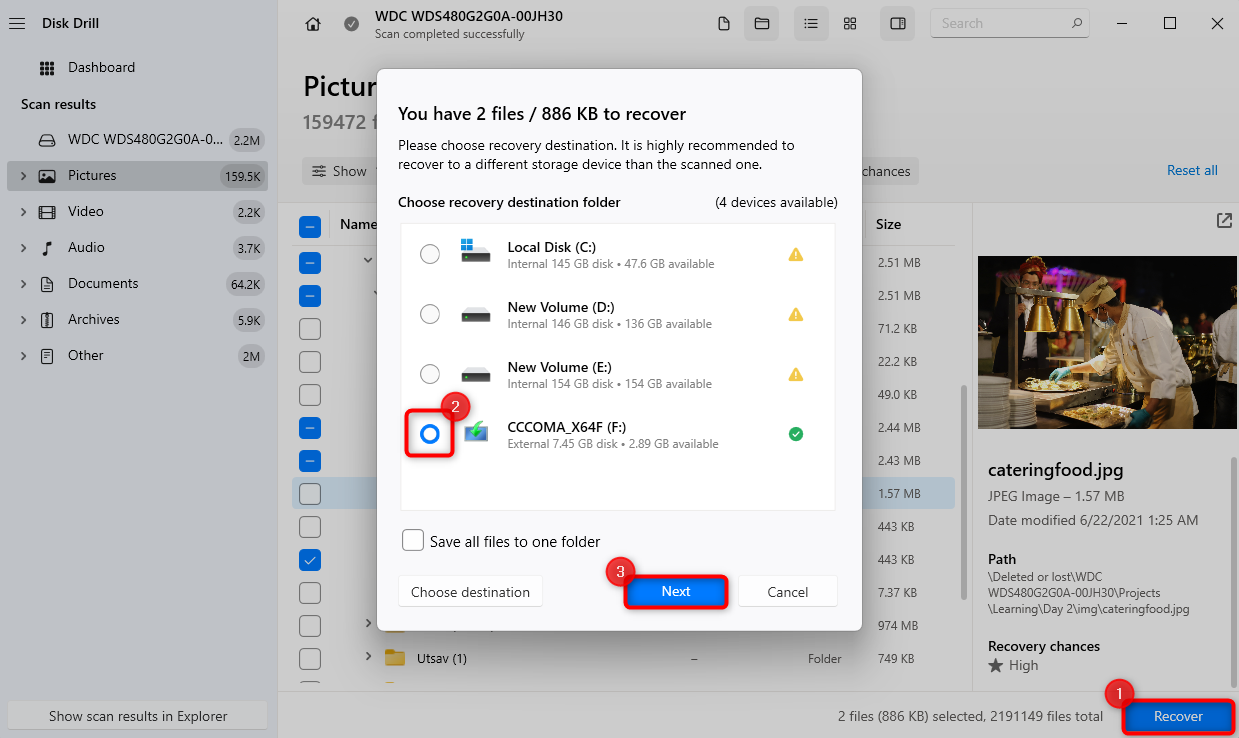
- Once you’ve selected the files, click on the Recover button. Select a recovery location that’s not on your SD card to avoid overwriting data. Click Next to recover data.
You’ll find the recovered photos in the selected recovery location once you’re done.
Photos are Not Showing on Computer But Visible on Camera
If pictures show up on the camera but not on the computer, the problem is likely with your computer. Here are fixes you can try to regain access to photos:
Method 1:Check Read/Write Policies
Your computer’s read-and-write policies for external storage can prevent you from viewing the data in the storage device. Here’s how you can check the read/write policies on Windows:
- Search for group policy editor in the Start Menu and select Edit group policy. This will launch the Local Group Policy Editor.
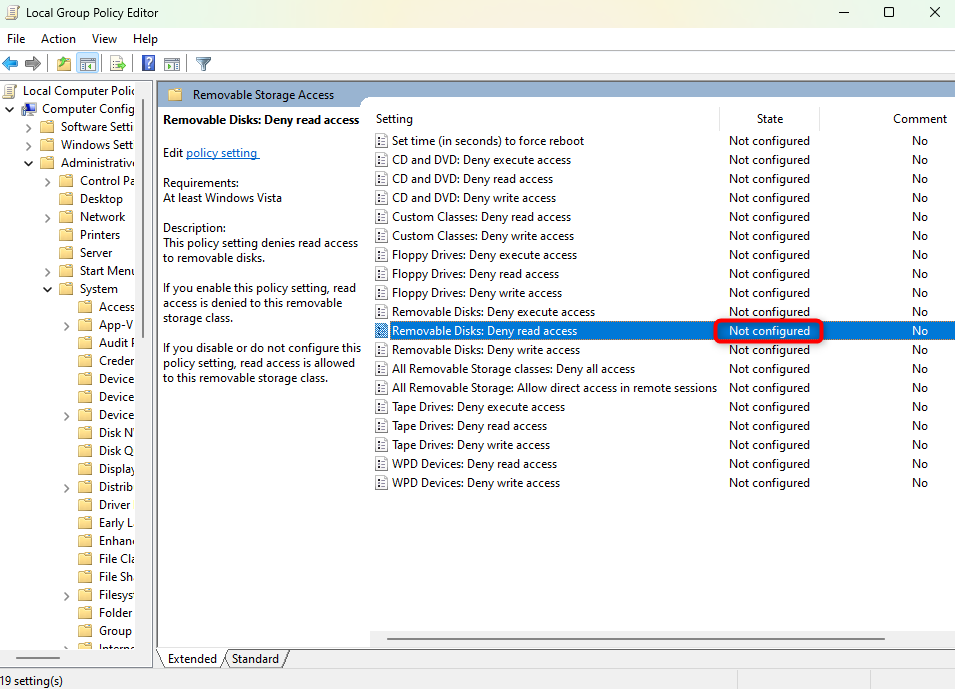
- Navigate to Computer Configuration > Administrative Templates > System > Removable Storage Access using the navigation bar at the left.
- Look for a setting called Removable Disks: Deny read access. If the state of this setting appears as Enabled and not Disabled or Not configured, you’ll need to change it.
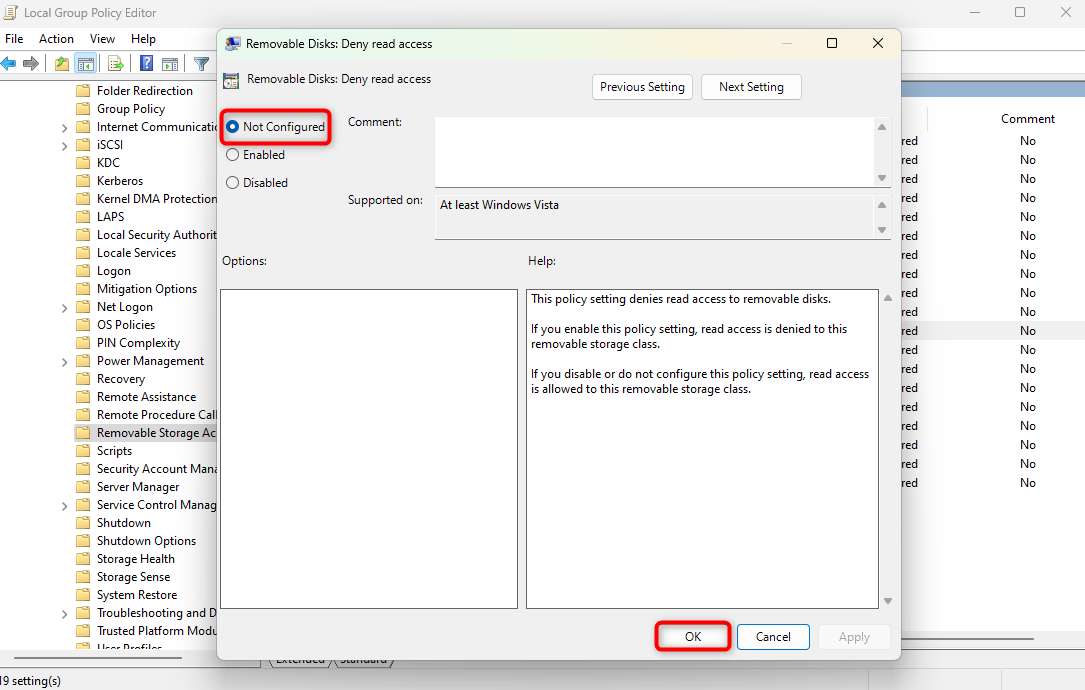
- To change its state, double-click on the setting. Select the radio button next to Not configured and click OK.
Method 2:Unhide Files
Sometimes, the simplest solutions can fix what seems like an impossible problem to solve. If you’ve unknowingly hidden files in the SD card, try unhiding them like so on a Windows 11 computer:
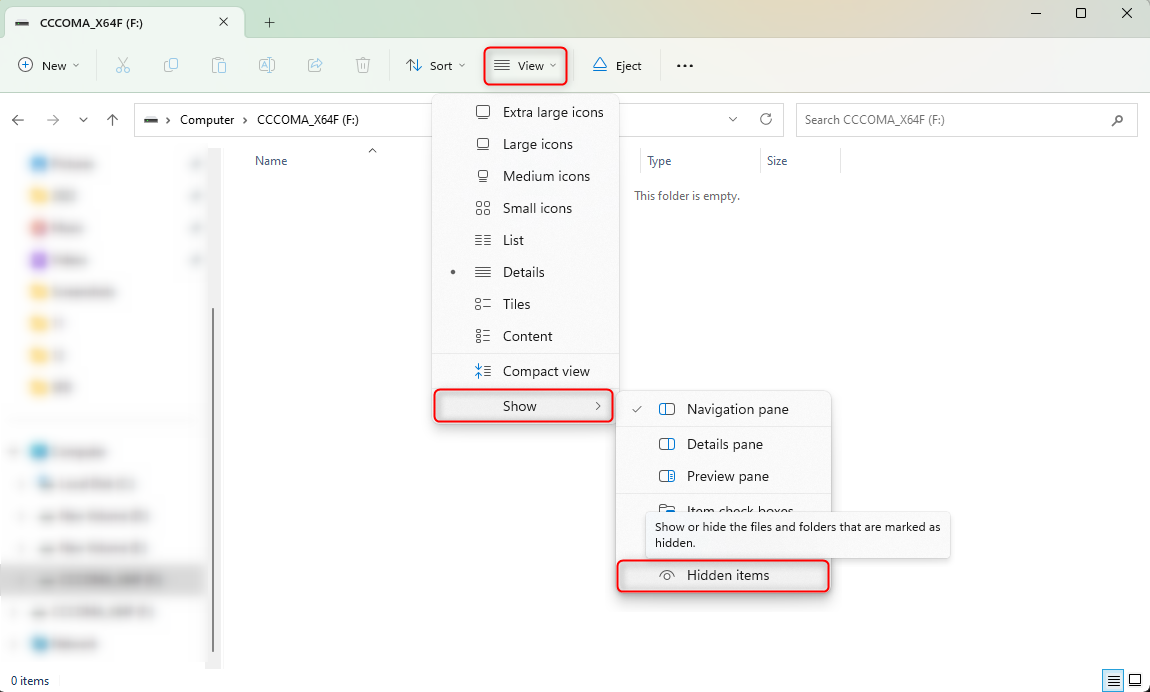
- Navigate to the SD card using the File Explorer.
- Click on View from the tools panel at the top and select Show.
- If you don’t see a checkmark next to Hidden items, click on it.
Check if you’re able to see all the photos on the SD card now.
If you are, unhide the files permanently like so:
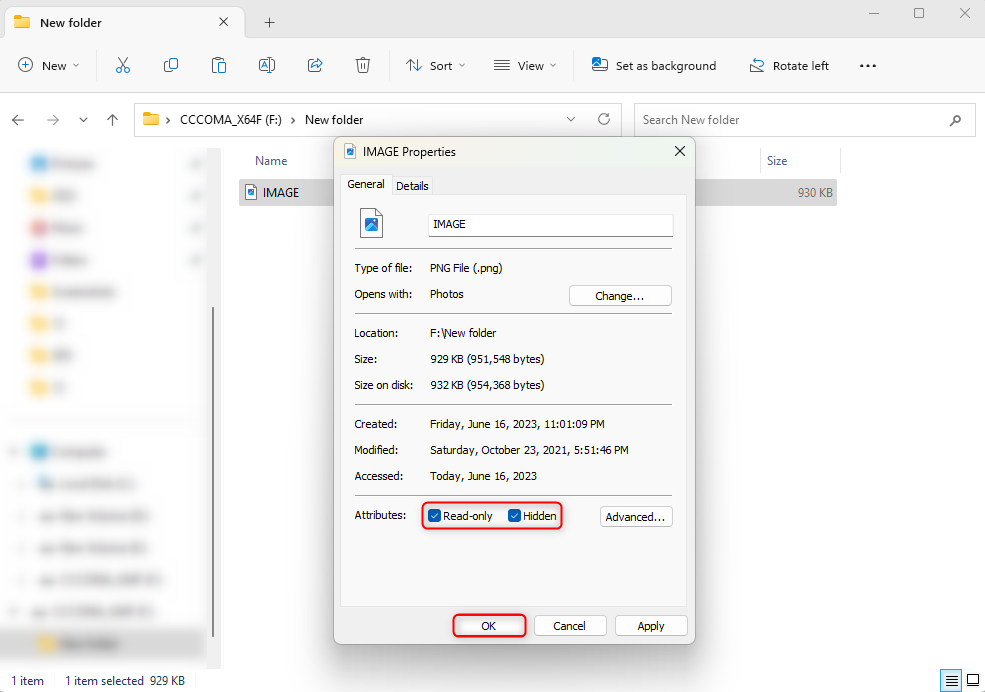
- Right-click on the file.
- In the General tab, look for Attributes.
- Uncheck the boxes next to Read-only and Hidden.
Click OK to exit.
Method 3:Remove BitLocker
BitLocker is an encryption feature on Windows that protects data against theft or unauthorized access. However, it can sometimes lead to an “access is denied” error when you try to access pictures on your SD card.
Here’s how you can remove BitLocker encryption:
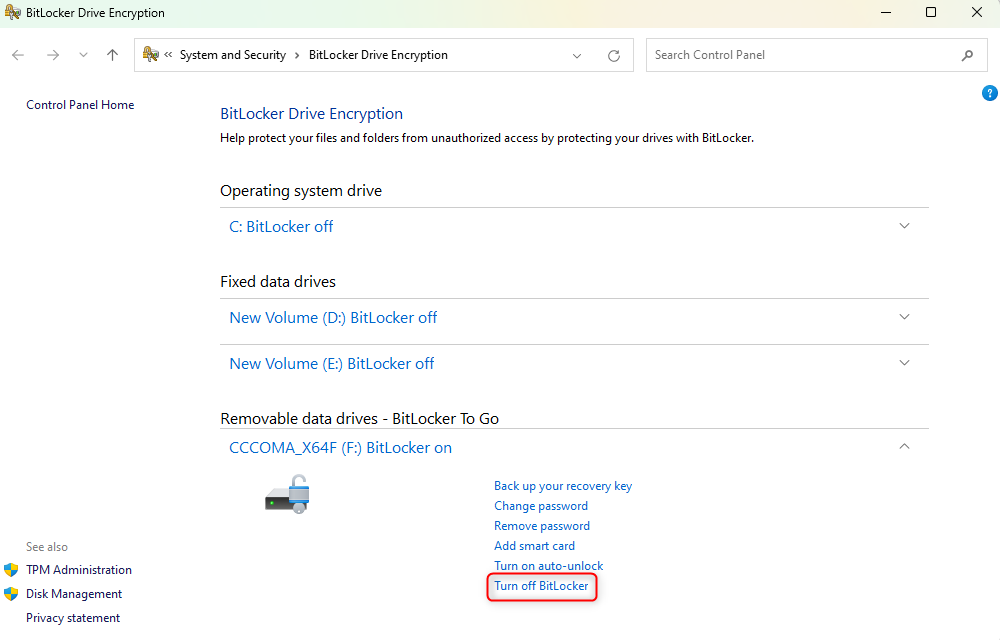
- Search for BitLocker in the Start Menu and launch the Manage BitLocker option.
- Locate your SD card and check if BitLocker is turned on.
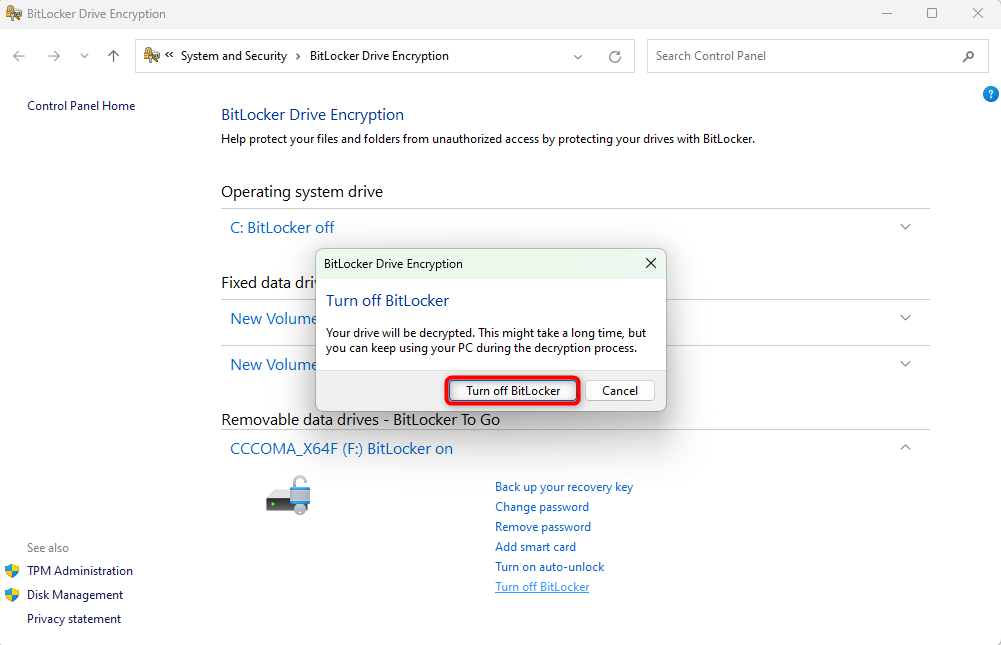
- If it is, click on Turn off BitLocker.
- Click on the Turn off BitLocker button again when prompted for confirmation.
Method 4:Use a Picture Viewer
If you can’t access the SD card’s images, try using a picture viewer like the Photos app on Windows. Press Ctrl + O and navigate to your SD card. See if you find those images in there. If you do, open them and see if it works.
Method 5:Update the Driver
When you insert an SD card into your computer, your SD card reader driver will help the computer access the SD card. However, if you have a faulty or outdated driver can, the computer can’t read your SD card. Try updating the driver like so:
- Search for device manager in the Start Menu and launch the Device Manager.
- Search for your SD card reader under Disk drives.
- Right-click on the SD card reader driver and select Uninstall device.
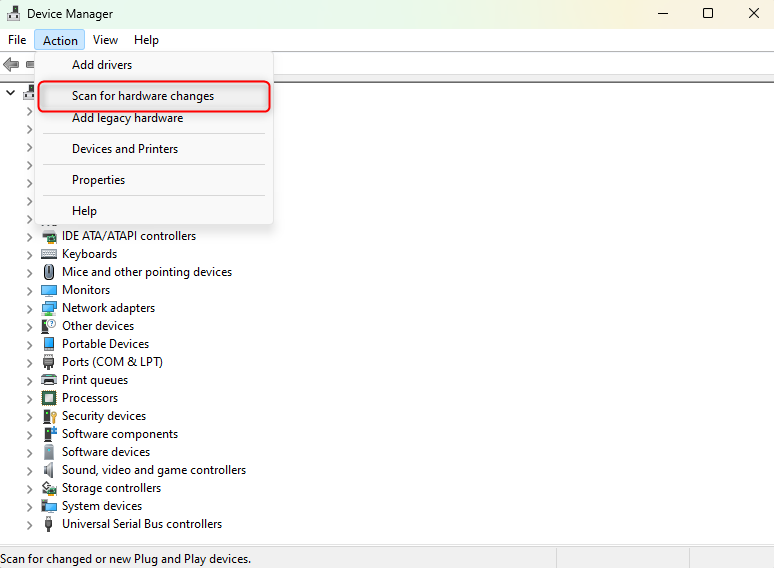
- From the panel at the top, click on Action > Scan for hardware changes.
This should reinstall the latest driver on your computer. See if you’re able to access the images on the SD card now.
Method 6:Make Sure Photos Were Saved on the SD Card
You might have been saving pictures on your camera’s internal memory all this while. If that’s true, none of the images you took would’ve been written to the SD card. Look for these images in your camera’s internal memory and see if they’re in there.
Method 7:Archive SD Card
Archive your SD card to another storage device. This could be your internal hard drive, flash drive, or any other storage device.
To create an archive, you’ll need an archival tool like WinRAR or 7Zip. Here’s how you can archive your SD card:
- Install an archival tool.
- Launch the tool and navigate to Computer using the navigation panel at the top.
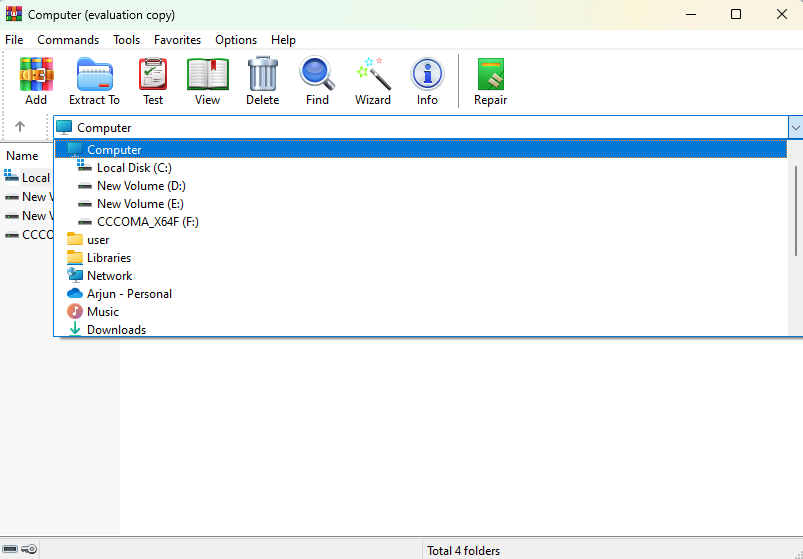
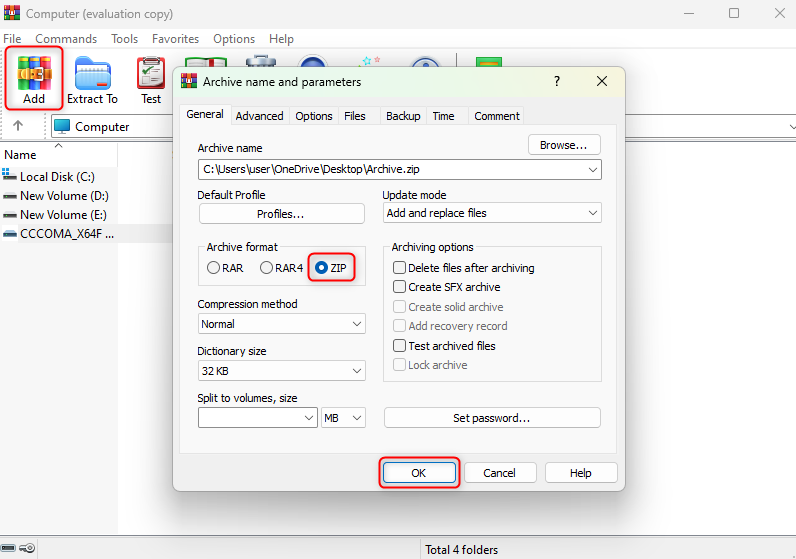
- Select the SD card and click Add from the top panel.
- Select zip as your archive format and click OK.
Note: The process may differ based on the tool you’re using but remains conceptually the same.
See if you’re able to see the photos in the archive.
Photos Not Showing on Camera
If the SD is not showing photos on the camera, the SD card might have a file system incompatible with your camera. This means the camera won’t read your SD card.
However, you’ll be able to view those photos using your computer, provided the file system is Windows-compatible.
To remedy this, copy over all the photos to your computer’s local storage. Format the SD card with a file system that’s compatible with your camera. The best way is to format the SD card using your camera. The formatting process differs based on the camera you use.
Note: If the SD card appears as RAW, you’ll need to recover data from the RAW SD card and then format the card using the camera.
Once you’re done, copy the photos back to the SD card. You should then be able to view photos on your camera as well as the computer.
Conclusion
If the SD card isn’t showing photos on the camera, computer, or both, there’s no need to panic just yet. You can recover your data using a data recovery software solution and use one of the methods explained in this guide to fix the problem. In most cases, you’ll be able to recover the photos and fix the SD card within minutes.


")
