 It’s smart to check your SD card’s health every once in a while. Identifying a failing SD card early on helps you safely recover data so you can store it on a different storage device. Fortunately, there are multiple ways to check SD card health on Windows.
If you’re curious about how well your SD card is doing, we’ll help you test its health using your Windows computer. We also explain how to recover data from a failing SD card, even when you’re unable to access it.
Table of Contents
How to Recover Data From a Failing SD Card
If you’re unable to access your SD card, prioritize data recovery over checking your SD card’s health. Running extensive health tests on the SD card can push a card on the verge of failing over the edge, lowering the chances of successful data recovery.
If you’re seeing signs of SD card corruption or imminent failure, such as multiple errors or files randomly appearing or disappearing, it’s best to move your data to another storage device.
If you’re still able to access the SD card, just copy and paste the data to a different location. However, if you’re unable to access the data, you’ll need to use data recovery software.
Disk Drill is the best recovery tool, especially for failing devices, because it offers a feature called byte-to-byte backup. The feature creates an image of the SD card, from which you can recover data. This way, you can avoid scanning the SD card, which is a resource-intensive activity that can cause a card on the verge of failure to fail.
Here’s a step-by-step explanation of how to recover data from an SD card using Disk Drill:
- Download Disk Drill and install it on your computer. Once you’ve installed Disk Drill, launch the app.
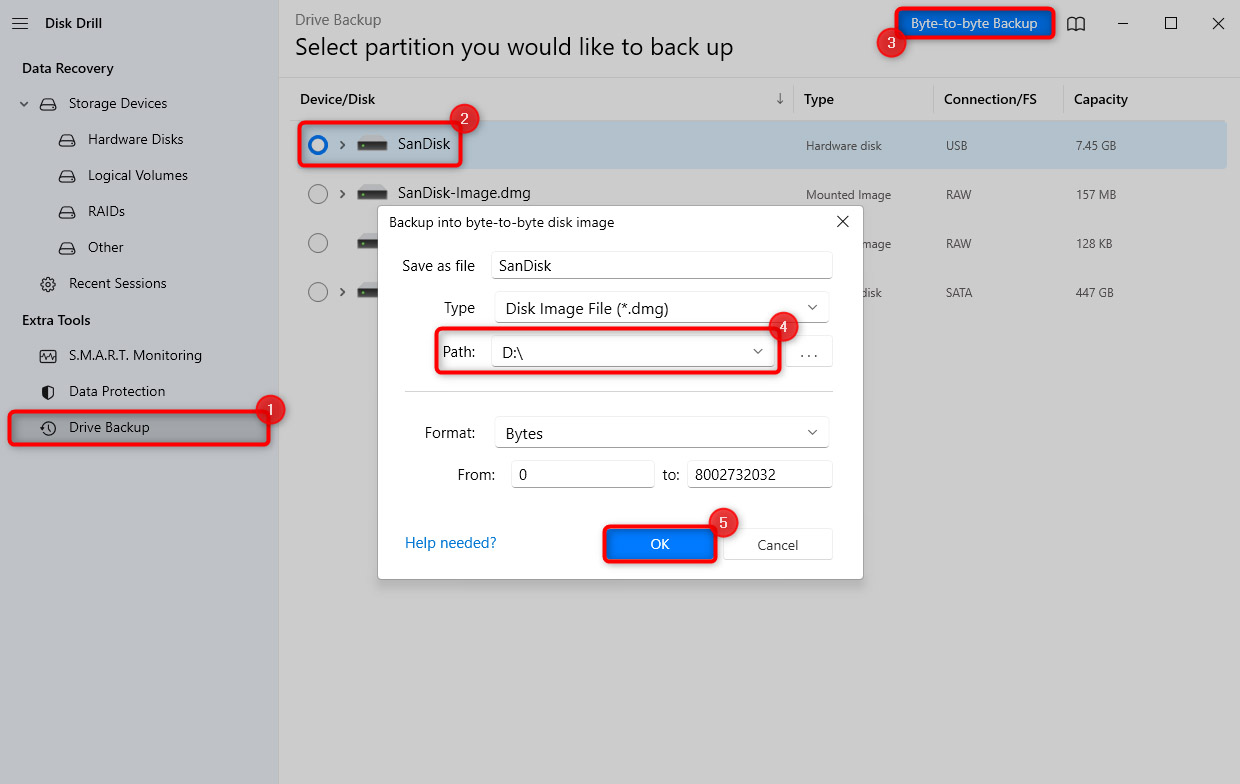
- Navigate to the Data Backup section using the left sidebar. In the right pane, select your SD card and click on the Byte-to-byte Backup button at the top-right. Select the location where you want to save the image and click OK.
- Navigate back to the Storage Devices section using the left sidebar. Click on the Attach disk image option at the bottom-left and select the image you just created. Once attached, the image will appear in the list of disks.
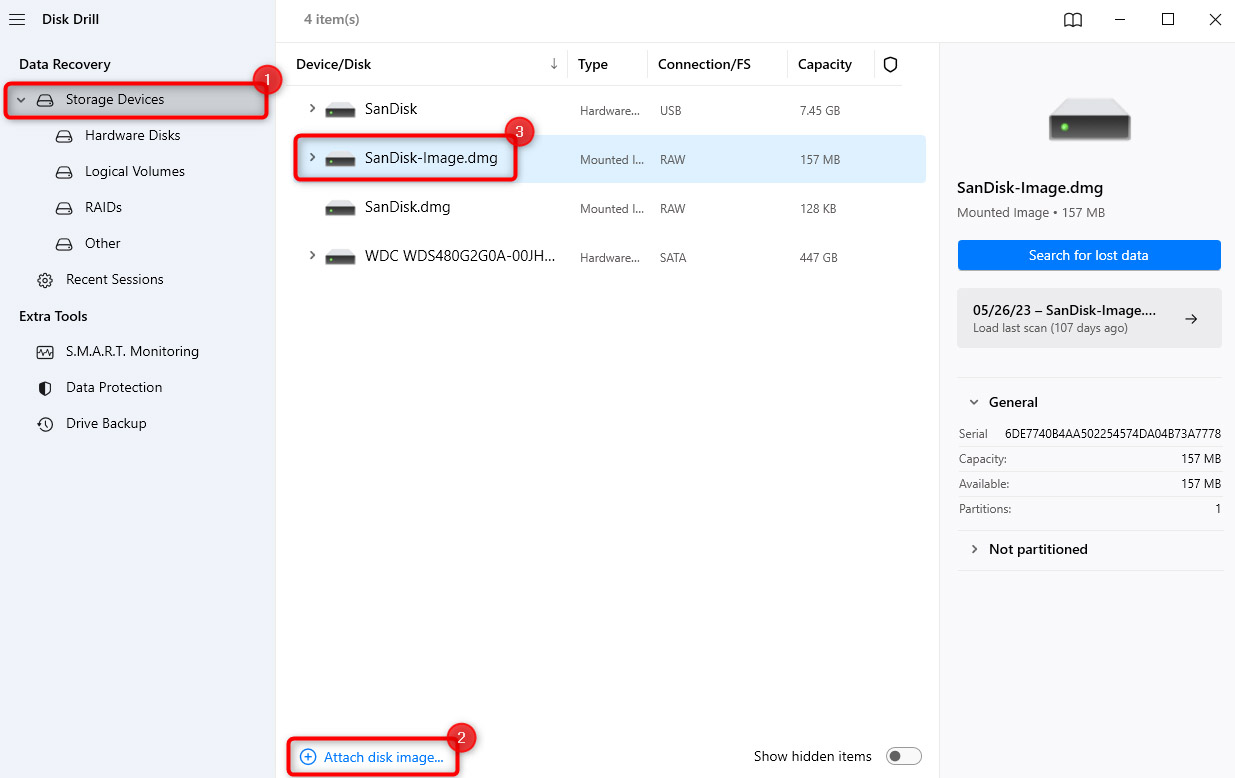
- Select the image from the list and click on the Search for lost data button. Let Disk Drill complete the scan.
- Go through the scan results and find the files you want to recover. Disk Drill makes looking for files easier by allowing you to filter the search results by file type (pictures, documents, etc.) and file extensions (you can enter a file extension in the search bar at the top). You can even preview image files before recovering them to ensure you’ve selected the correct files.
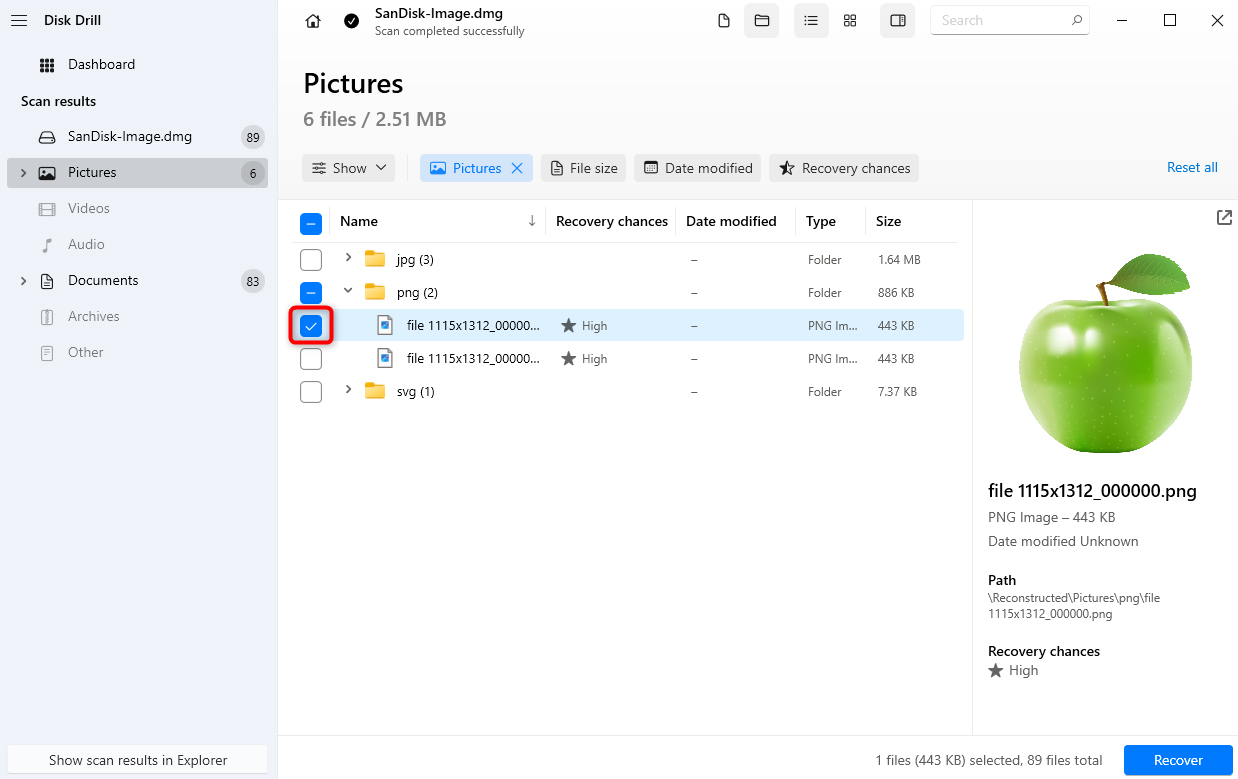
- Once you’ve selected the files you want to recover, click on the Recover button at the bottom right. Select a location other than the SD card to recover these files since the SD card has issues and to avoid overwriting data.
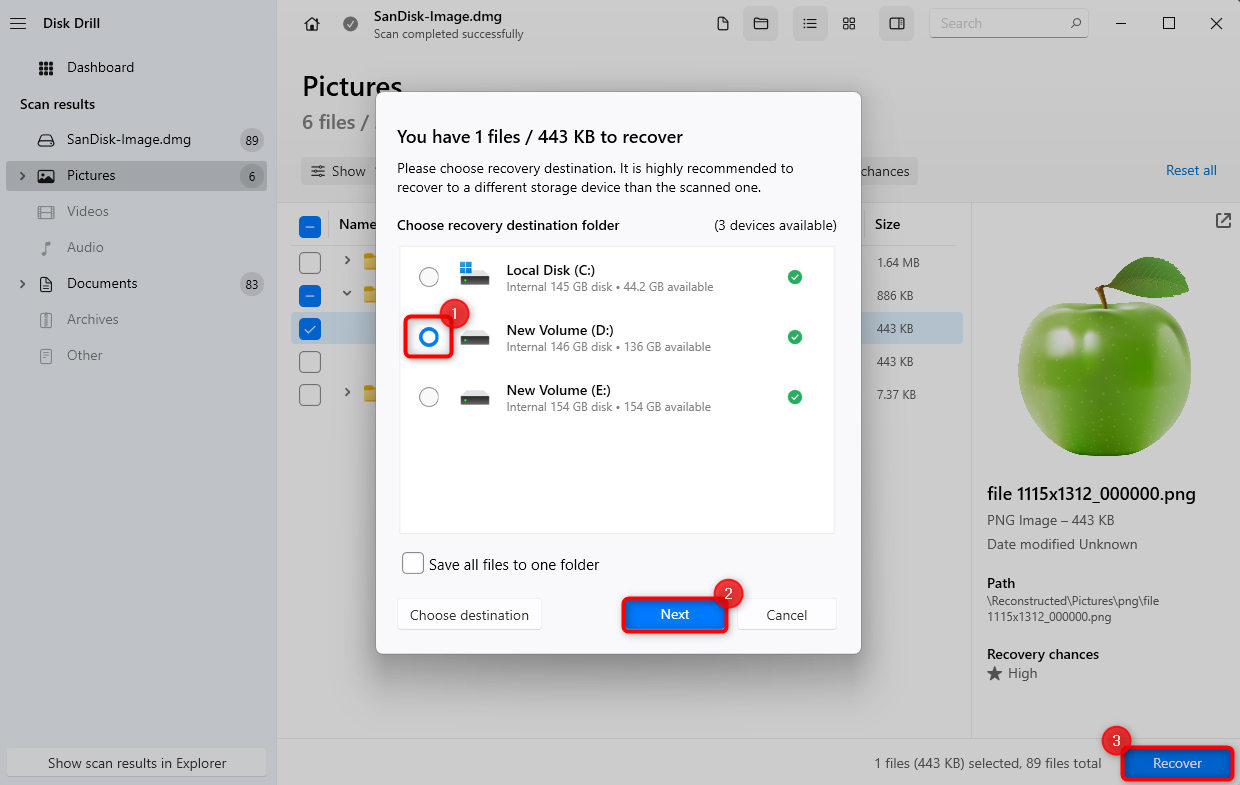
- Click Next to complete data recovery.
How to Check the Health of an SD Card
Most SD cards don’t collect S.M.A.R.T. (Self-Monitoring, Analysis, and Reporting Technology) data. This makes monitoring an SD card’s data using software impossible. Fortunately, there are ways to determine the approximate health status of an SD card using indirect indicators.
Before we talk about ways to check an SD card’s health, note that all SD cards have a limited lifespan (measured in read-write cycles).
Depending on your SD card model and manufacturer, its lifespan could range from 1,500 to 10,000 read-write cycles. In terms of time, the lifespan of an SD card could range from one to over 10 years. This could be your starting point for a health check—if your SD card’s lifespan has ended, it’s best to recover data and transfer it to a new SD card.
Below are ways to check its health. If your card has reached the end of its lifespan, you might encounter errors or negative results during the tests. This is also true for SD cards that are new but have been damaged in some way. If your card is new and in great condition, these tests should return positive results.
Method 1: Check for Bad Sectors
Bad sectors are tiny clusters that are defective. They’re either unreadable or slow to read. This can cause problems when using the SD card. Bad sectors can be soft or hard. Soft bad sectors are when data is written badly, while hard bad sectors are caused by physical damage.
SD card repair tools and built-in utilities can help mark these clusters as bad sectors. This marking is an instruction that tells the reading device not to read the bad sector.
There are multiple ways to check the SD card for bad sectors, as we explain below.
Error Checking Tool
The easiest way to do an SD card health check on Windows is to check for bad sectors using the built-in error-checking tool in Windows. Here’s the process:
- Launch Computer on Windows, right-click on the SD card and select Properties.
- Switch to the Tools tab.
- Click the Check button in the Error checking section.
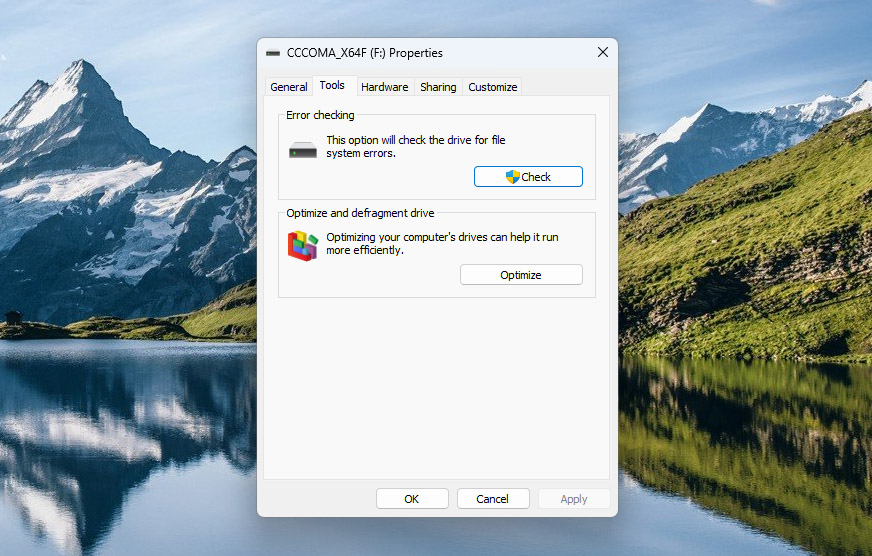
- Click on Scan and repair drive to start the scan.
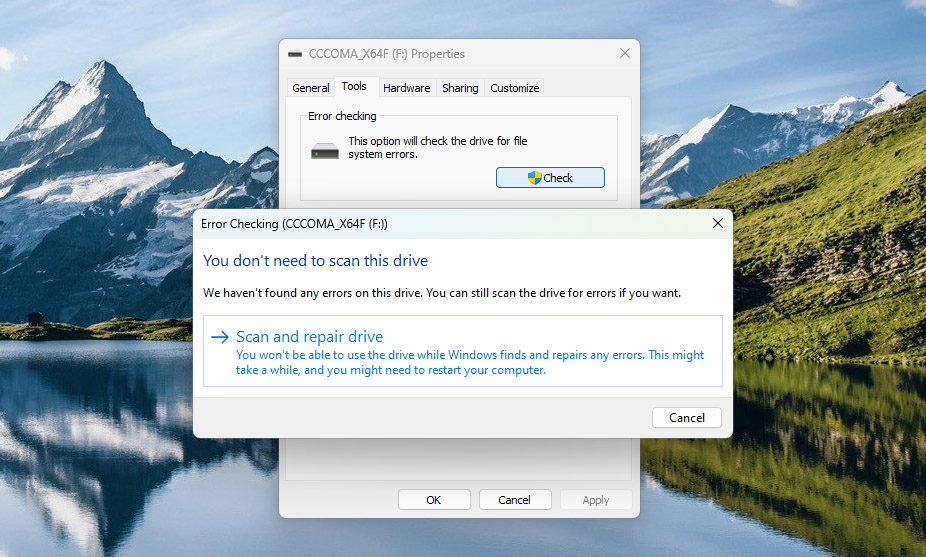
If the disk has errors or bad sectors, the scan will find and attempt to fix them.
Command Prompt
Windows has a built-in command-line utility called CHKDSK that checks a drive for filesystem errors and bad sectors. Here’s how you can use CHKDSK to check SD card health by scanning for bad sectors:
- Press Win + R, type cmd in the Run dialog box, and press Ctrl + Shift + Enter.
- Type the command
chkdsk /fand press Enter.

- Wait for the utility to complete scanning and fixing the errors, and then restart your computer.
FSCK
FSCK (File System Consistency Check) is a utility to identify file system errors in Unix and Unix-like operating systems such as Linux and macOS.
Here’s how you can use FSCK (we’ll use Ubuntu in this example):
- Launch the terminal.
- Type
mountand press Enter. - Note the identifier for the partition you want to repair and use it with the umount command:
sudo umount /dev/sdb1. - Type the command
sudo fsck /dev/sdb1. - Remount the repair filesystem using the mount command:
sudo mount /dev/sdb1.
Method 2:Test for Available Space
You can test an SD card to verify the available space. When you check the SD card storage, you might find a difference between the available space and the storage capacity mentioned on the card. This happens in the following cases:
- The card is counterfeit
- The memory cells have run out of rewriting cycles and your card is nearing the end of its lifespan
You can use a utility called H2testw to determine the actual space available on your SD card, which is also a way to check the remaining life of an SD card.
Here’s how to use H2testw:
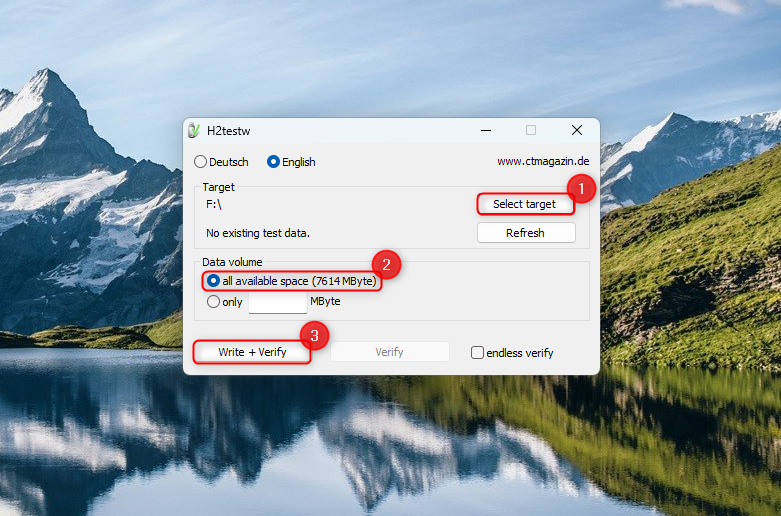
- Download H2testw and launch the app. It doesn’t require installation.
- Click on Select target and select the SC card you want to test for available space.
- Make sure the radio button next to all available space is selected in the Data volume section.
- Click Write + Verify and wait for the process to complete.
- When the test is complete, verify if the writing and verifying sections show the same size for your SD card. If the verified space is lower, you have a problem.

Method 3:Look for Common SD Card Problems
Even if the tests don’t reveal much, you can tell if an SD card is nearing the end of its lifespan based on common problems. Here are some problems that can be indicators of imminent failure:
- SD card not detected: Does your device detect the SD the first time you insert it? If not, that could indicate a problem with the SD card.
- Slow data transfer: As the SD card ages and nears failure, you’ll notice that transferring data to and from the SD card takes longer. If you’re experiencing significantly lower speeds, move your data to another storage device.
- Missing files: Memory cards nearing the end of life can make files disappear without you deleting them. If you’ve noticed files disappearing from the SD card, move data to another SD card.
- Frequent errors: Do you see errors when you insert or use the SD card? These errors are a sign of potential failure, and your best bet would be to protect your data by moving it to a different location.
Conclusion
Checking your SD card’s health status is critical to protecting your data. Tools like the error-checking tool and the CHKDSK command-line utility can help flag and fix problems. Third-party tools like H2testw are also a great way to test the SD card’s health indirectly.


