
Few things are quite as frustrating as racking up a respectable music collection on your computer or Android device only for it to be accidentally erased. It’s especially troublesome if some of the tracks are personal or unavailable on popular streaming platforms like Spotify or iTunes.
But don’t start panicking just yet. There are several methods you can try that could help you recover deleted music files on either Windows or Android devices. Just follow the guides below, and you’ll get your favorite tunes back in no time.
Table of Contents
How to Recover Lost Music Files on Windows
In many cases, data recovery software is the only way to recover deleted music files. But there are alternative methods that may be able to get back your lost tunes. You can try searching in the Windows Recycle Bin or attempt recovery from previously created backups. Here are the steps that you need to follow.
Method 1: Use Data Recovery Software
One of the most comprehensive ways to recover accidentally deleted music files on a Windows computer is by using a first-class data recovery program. Disk Drill is particularly effective at rescuing music files thanks to its compatibility with pretty much any kind of audio format.
It also supports a wide range of storage devices, ranging from hard drives and SSD to memory cards and USB sticks. Furthermore, the app boasts exceptional recovery rates, an accessible UI, speedy scans, and a free trial that lets you recover up to 500 MBs of music. Here’s how you can recover deleted music files on a Windows computer:
- First, download Disk Drill from the official Cleverfiles website.
- Then, run the downloaded setup file and follow the installation wizard until completed successfully.
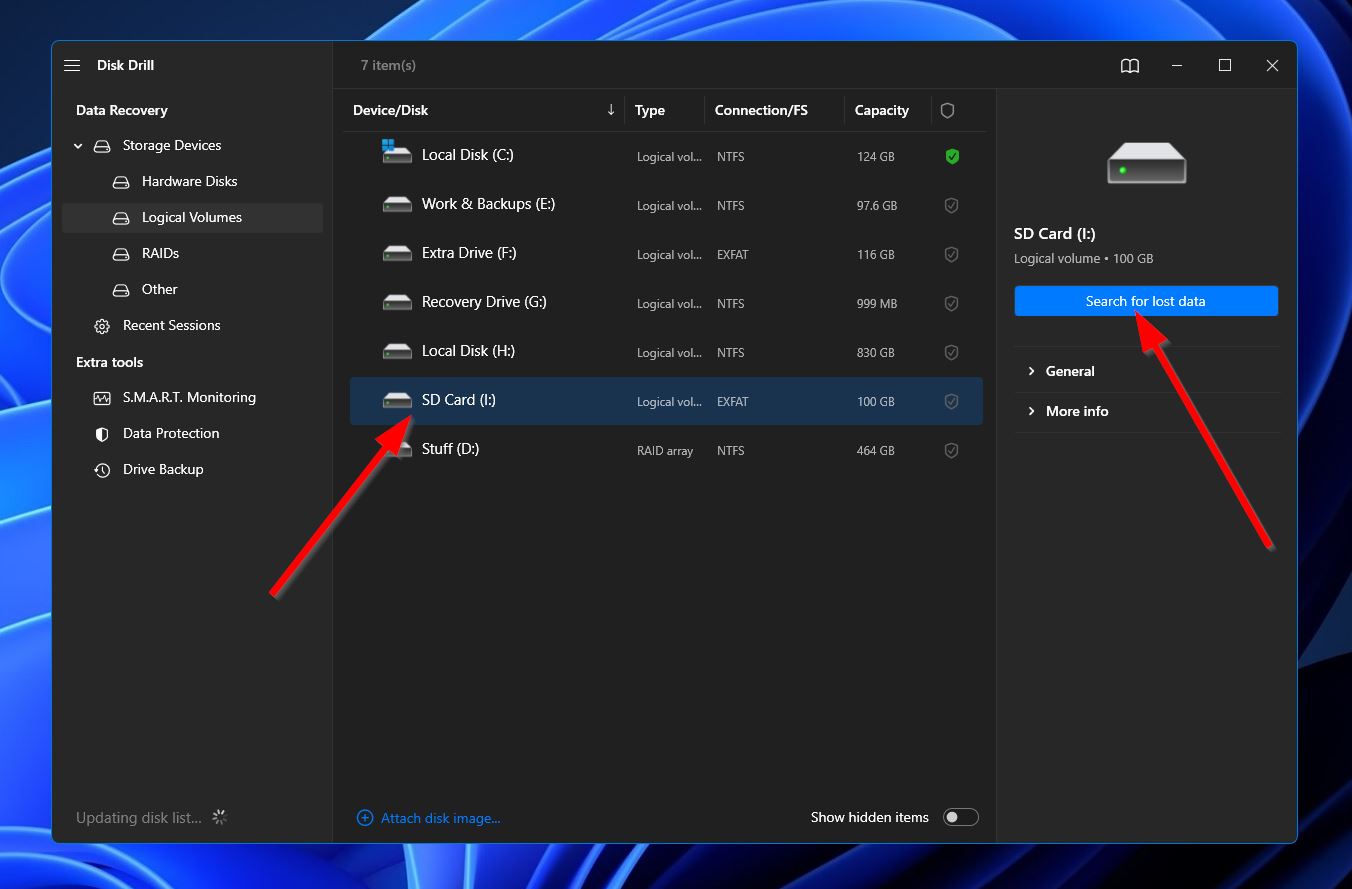
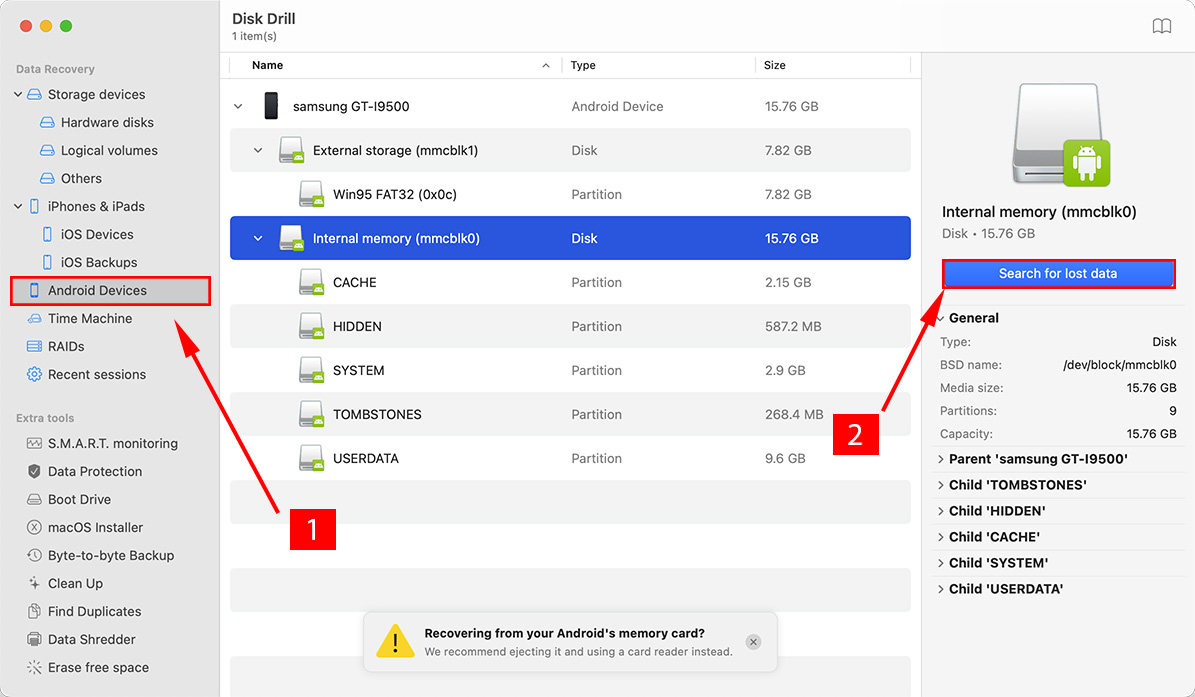
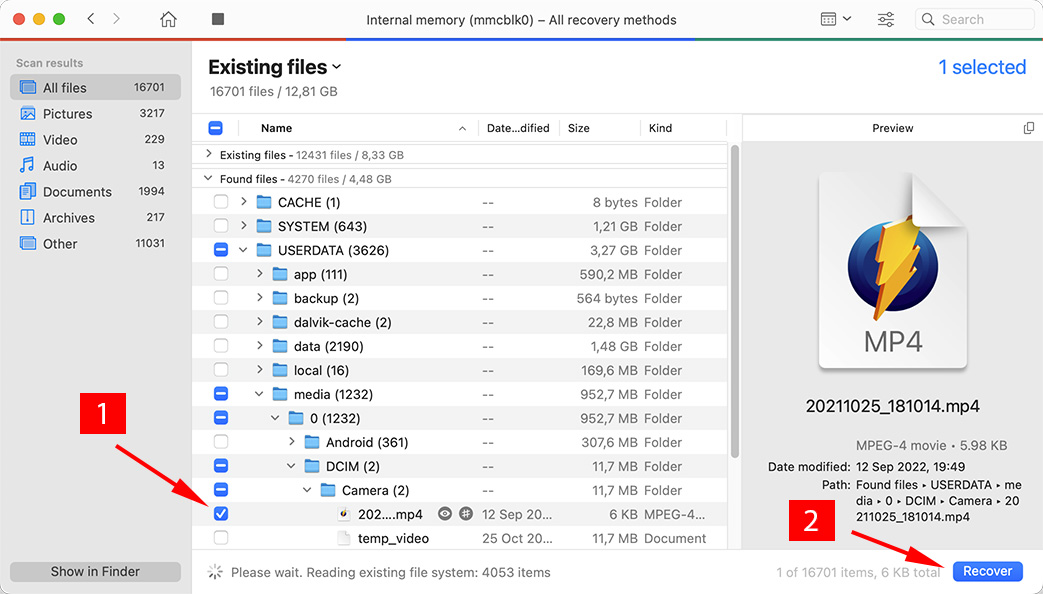
- Launch the Disk Drill app and select the storage device where your deleted music files were last located. If you’re looking to restore music from a smartphone SD card, you can connect the card to your computer using a memory card reader, and it should appear on the list of available storage media. Once you’ve decided, click the “Search for lost data” button to proceed.
- The program will start scanning your selected storage device for any files it can potentially recover. If you’d like to see the results populate in real-time, you can click the “Review found items” button on the top-right corner to navigate to the results screen while the scan continues. Alternatively, you can just wait for the scan to end and hit the same button to view the complete results.
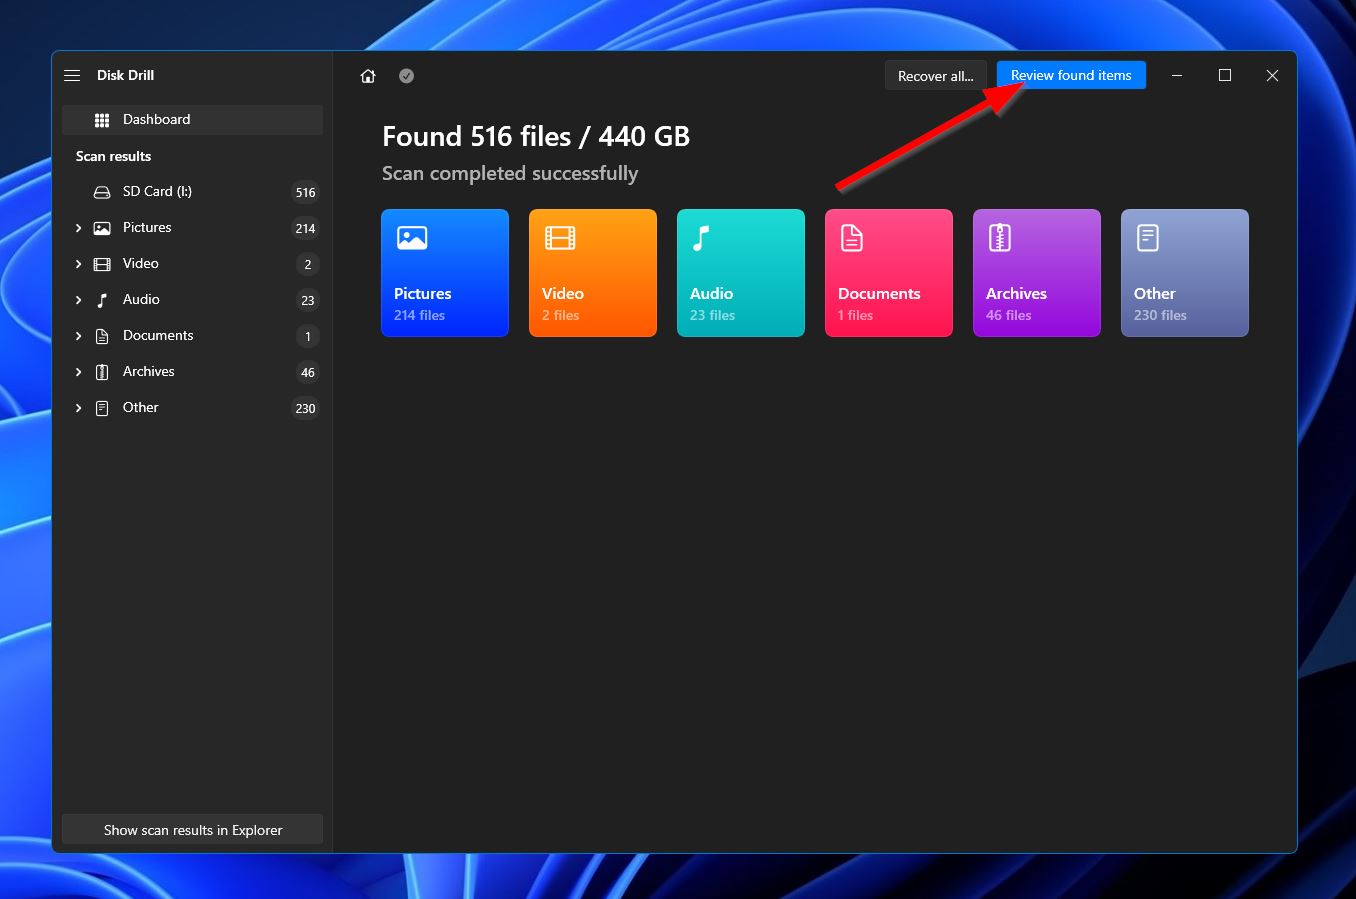
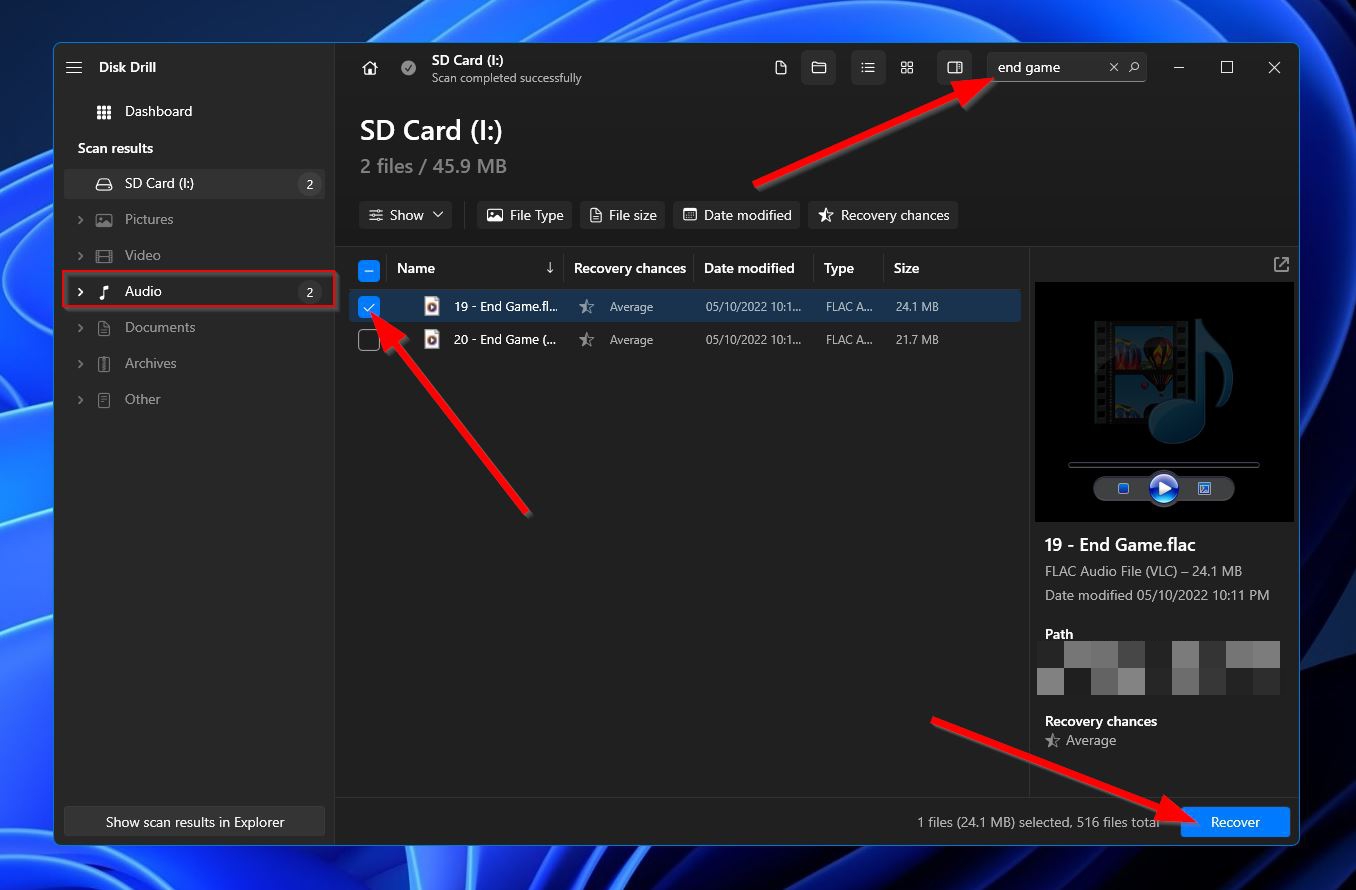
- On the results page, you can narrow down the found files using the “Music” filter on the left-side panel. You can also use the search feature on the top-right to look for specific file names or audio formats. When you’ve found the files you want to retrieve, select them by marking the checkboxes right beside the file names. From there, click the “Recover” button to move on to the next step.
- A small window should appear on-screen where you’ll need to pick the storage location of your recovered music files. Keep in mind that you need to choose a different storage device than the one you’re currently recovering from. Click the “Next” button when you’re ready.

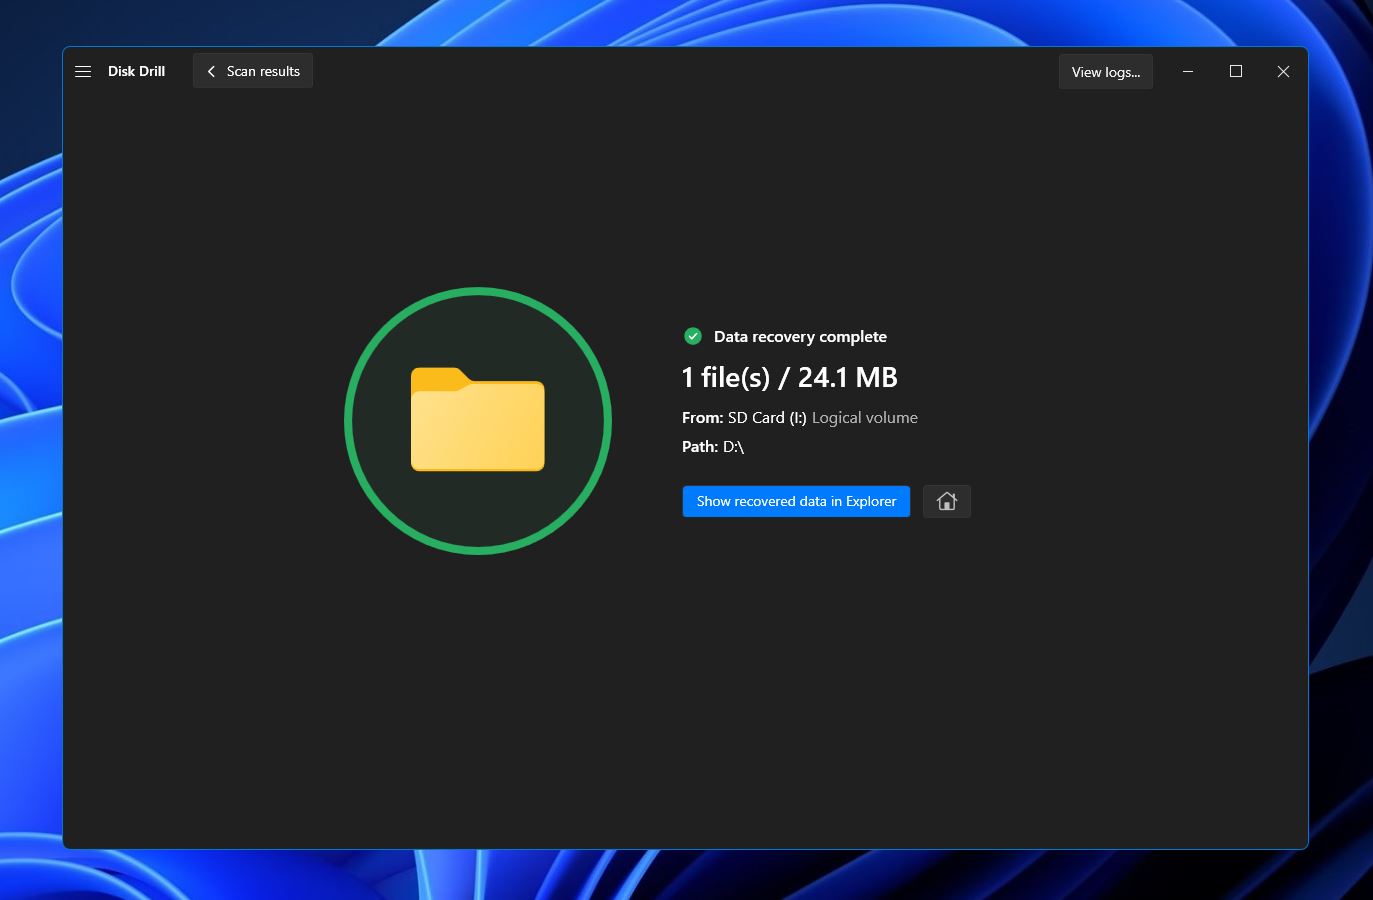
- Disk Drill will now attempt to recover your selected music files. Once the process is complete, you’ll see the “Show recovered data in Explorer” button. Clicking it will open the folder where your recovered music files are located.
Method 2: Recover Music Files from the Recycle Bin
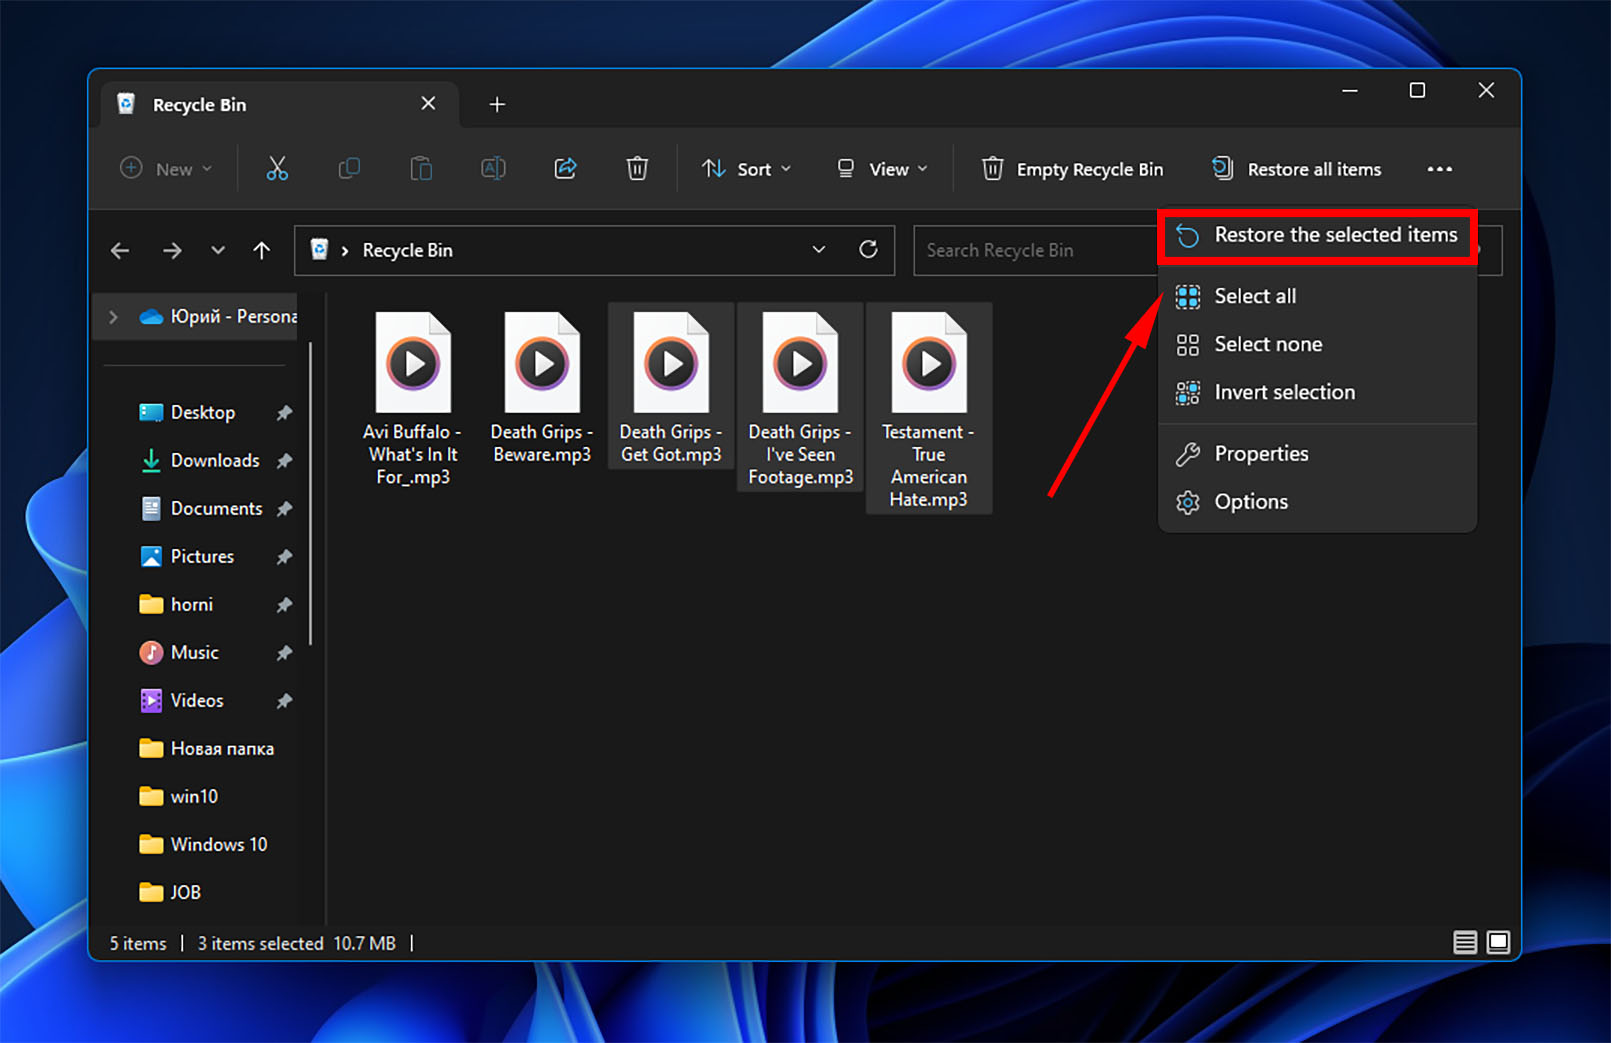
- Open the Recycle Bin by double-clicking on its icon.

- Locate the files you want to recover from the list of deleted items.
- Right-click on your selection and choose the Restore option. This recovers the deleted item to its original location on your computer.
Method 3: Recover Audio Files from Backup Media
Based on the particular backup and recovery solution you are using, there may be some slight differences in how you restore your files. This is the general procedure for recovering data from backups.
- Locate the storage media that contains the backup and connect it to your computer. You may also be using a cloud provider to back up your data, in which case you need to establish a connection to the designated cloud storage.
- Launch the backup and recovery program and use it to search the backups for the files you would like to restore.
- Use the recovery application to retrieve the found files to your computer or device.
If the files were recently created, such as at a concert or live performance, you may not have had time to back them up. Without a backup, that avenue is closed. For this reason, it is strongly recommended that you back up your data frequently.
Method 4: Restore Deleted Music Using Windows File History
Starting with Windows 8.1, Windows operating systems all come with a built-in feature called File History. Essentially, it creates regular backups of different versions of your files which you can later restore in case of data loss. File History does come with a few drawbacks, however.
The feature should be enabled prior to the data loss in order for it to be used for recovery. It also only creates backups for particular locations, and another storage device is required for the feature to function. These are the instructions on how you can recover deleted music files using File History:
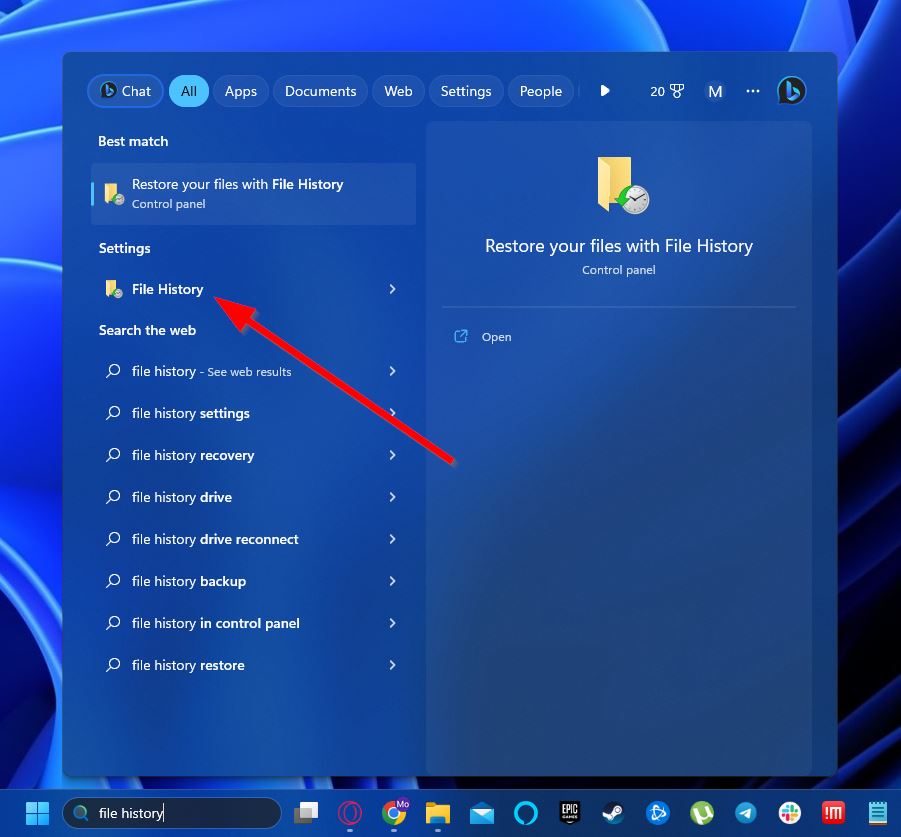
- Type “file history” into the search function of your taskbar and choose “file history” from the list of results.
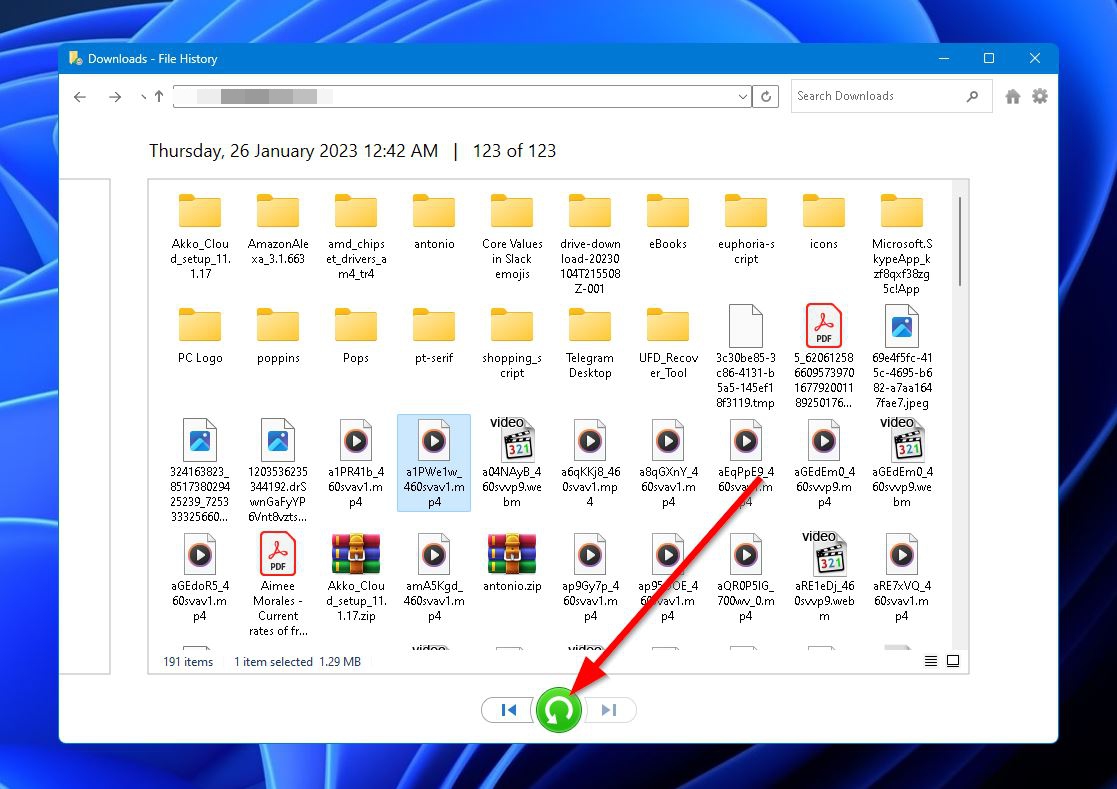
- Navigate to the folder where your deleted music files were last located before they were lost. You can also use the arrow buttons near the bottom of the window to cycle through the different versions available. Once you’ve found the tracks you want to recover, highlight them and click the rounded green arrow button at the bottom of the page. This will restore the music file to the same folder shown in File History.
How to Recover Deleted Audio Files from Android Phones
Android smartphones work great as portable music players because they support a broad range of audio file formats and often have a slot for a microSD card, allowing you to carry your entire collection of music with you anywhere.
There’s just one issue with using your Android smartphone as a portable music player: an increased chance of data loss. Why? Because you use your Android smartphone for all kinds of different things, from phone calls and text messages to emails and web browsing to playing games and watching Netflix.
All these activities create the potential for accidental deletion of important music files. The good news is that it’s still possible to recover deleted audio files on Android.
Method 1: Use Android Data Recovery Software
You can recover any lost files from Android phone by connecting it directly to a Mac computer via a USB cable and using Disk Drill for Mac as your Android audio recovery solution.
Here’s how to recover deleted audio files from an Android device using Disk Drill for Mac:
- Connect your Android device to a Mac. Make sure USB debugging is turned on.

- Download Disk Drill for Mac and install it.
- Launch Disk Drill and allow it to access your Android device.
- Scan your Android device.
- Select the files you want to recover and pick a safe recovery location.
Keep in mind that recovering lost audio files directly from your Android’s internal memory is possible only with root access. To read more about rooting and the risks associated with it, we recommend you read this comprehensive article on the subject.
Method 2: Recover Deleted Music from an Android Device without Root
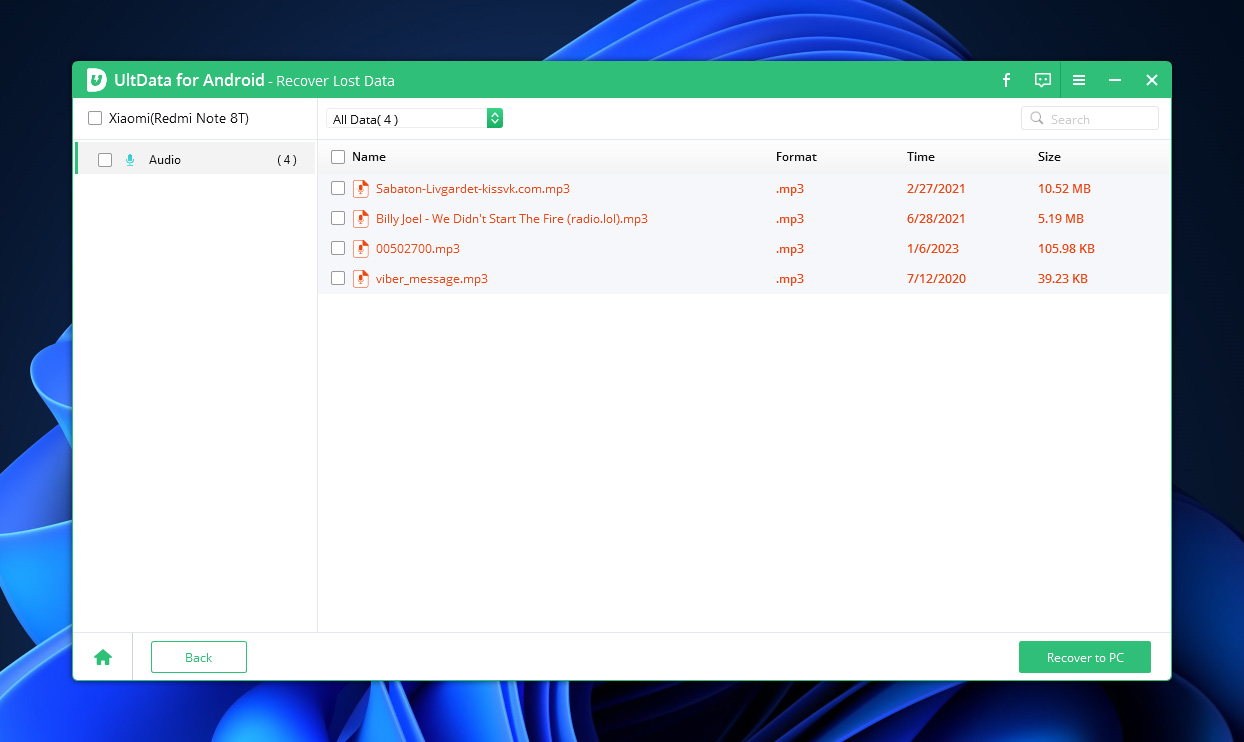
Similar to Windows machines, there are quite a few data recovery apps available that allow you to recover music files from your Android phone. We recommend the Tenorshare UltData app since it doesn’t require you to root your device to recover files, unlike some of its competitors.
The downside is that the trial version will only go as far as scanning your device for recoverable music files. If you want to retrieve them, you’ll need to purchase a subscription. Follow these steps to recover deleted music from an Android device using Tenorshare:
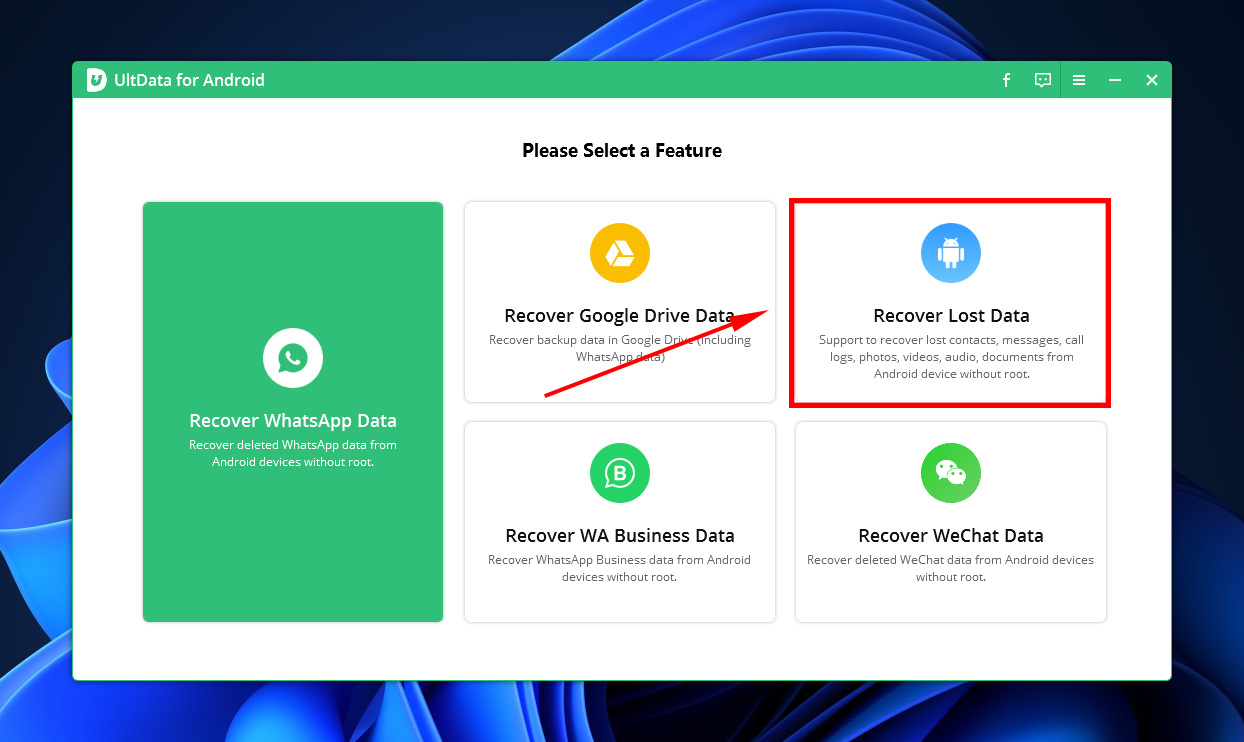
- Download the UltData app for Android from the Tenoshare website and install it on your computer.
- Launch UltData and select the “Recover Lost Data” option.
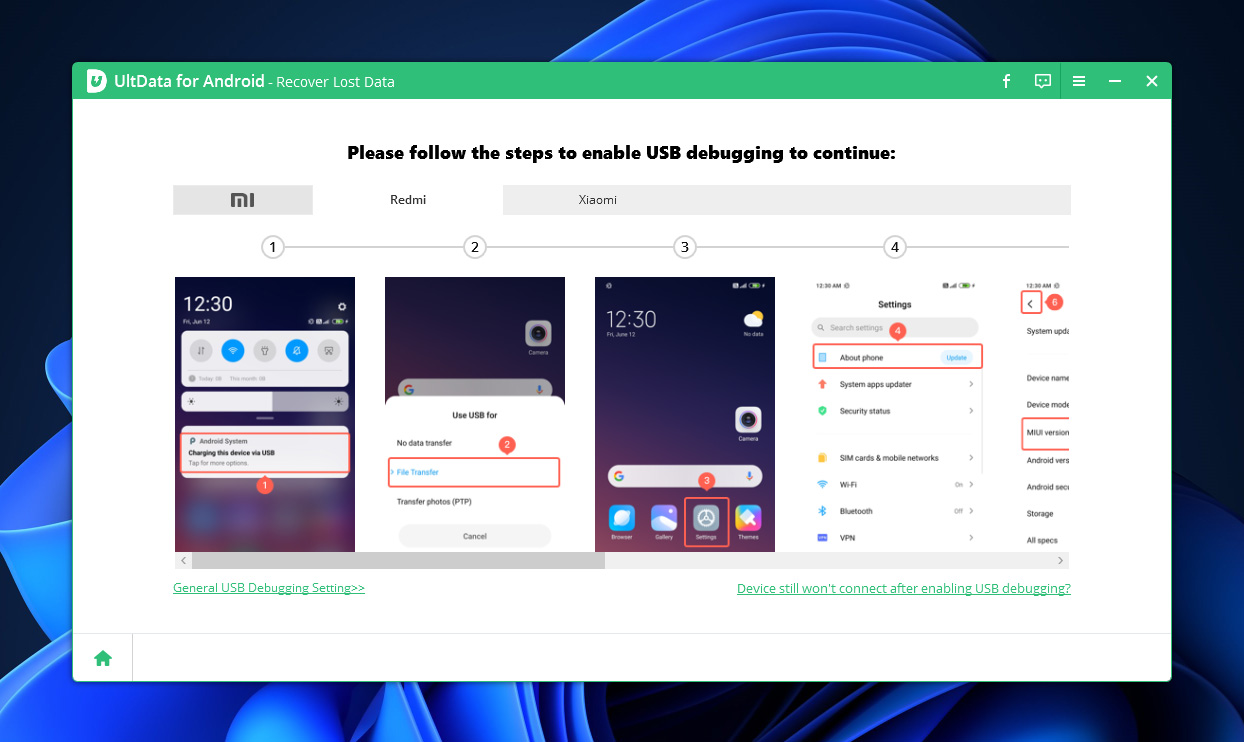
- Connect your Android device to your computer using a USB cable.
- Follow instructions on the screen to enable USB debug mode on your phone
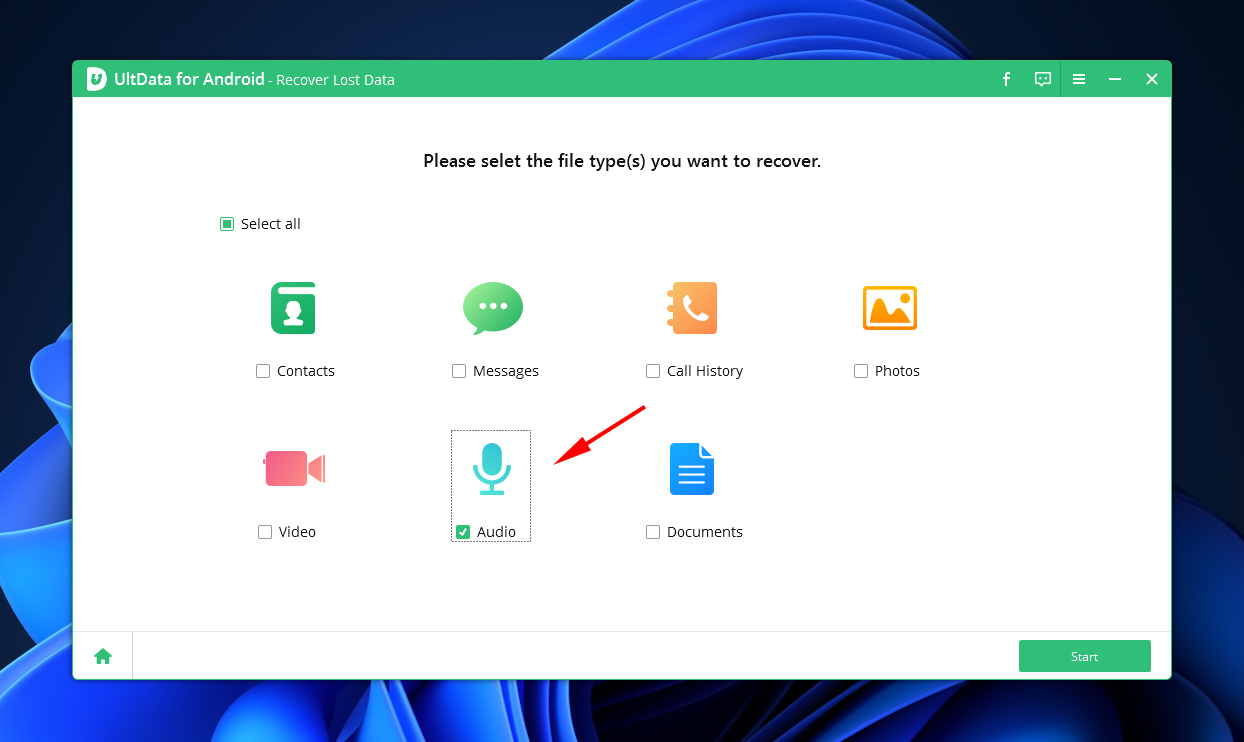
- Turn your attention back to the UltData program on your PC. Make sure the “Audio” category is ticked, and click “Start.”
- Another pop-up will appear on your Android device. Click “Install.” You’ll also be asked to allow the app to access various aspects of your Android device. Select “Allow” when requested.
- The UltData program will now start scanning your Android device for any music files it can recover. The duration of this process depends on the storage capacity of your device.
- On the results screen, you’ll see a list of all the music files that can potentially be recovered. Unfortunately, this is as far as the trial version of UltData will allow you to go. If you want to actually recover the tracks, you’ll need to purchase the program.
Method 3: Recover Deleted Music from a Cloud Backup
Storage space on mobile devices can quickly become scarce, especially if you enjoy taking a bunch of photos or downloading a lot of music. To remedy this issue, some people create backups of their files on a cloud service so they can restore them in case of data loss.
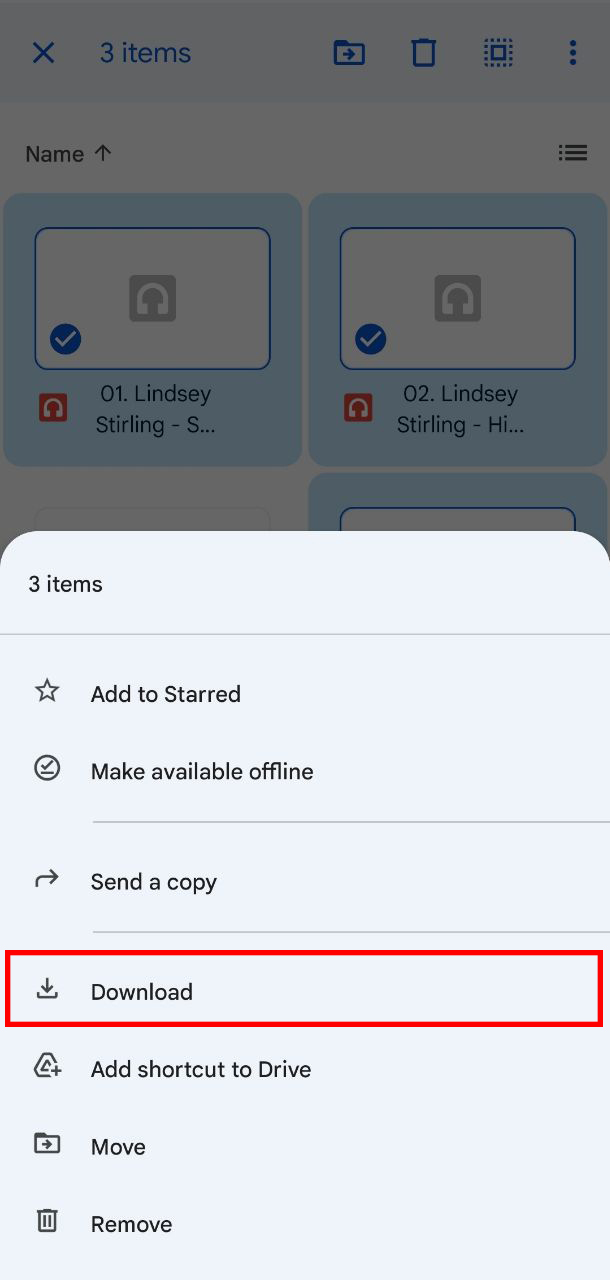
There are quite a few out there, but for the purposes of this guide, we’ll focus on Google Drive since we’re dealing with Android devices. Here are the steps on how you can recover music from a Google Drive backup:
- First, launch the Google Drive app from your Android device.
- Head to the folder where your music backups are located.
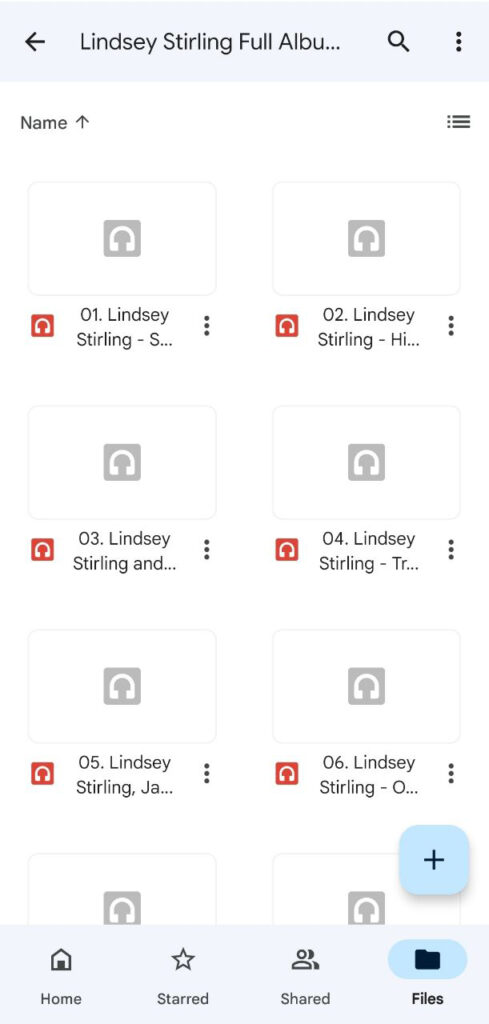
- Select the music files you want to recover, then tap the three buttons icon on the top-right corner of the screen and select “Download.” Your backup tracks should be saved on your Android device.
How to Prevent Accidental Deletion of Audio Files
Experiencing the loss of some of your valuable music can be devastating. It’s quite possible that you have one-of-a-kind performances that can never be recreated. You may be able to use Disk Drill to undelete lost music, but a better strategy involves taking measures to prevent further data loss scenarios. There are a number of steps you can take to minimize the chances of losing more music in the future.
| Tip | Description |
| 🖨️ Make backup copies | The first thing you can do is to make backup copies of any of your music files that cannot be easily recreated or downloaded. You might download the music from a mobile device to your computer and make backups from that platform. Another option is to engage a cloud provider which can enable you to create a backup at any time and from any location. This can be very useful if you are in the habit of recording live performances and want to protect your files as soon as they are created. |
| 🦠 Protect your disks from viruses | Many files are lost when disks or memory cards become corrupted due to exposure to viruses or malware. Using an effective anti-virus tool can go a long way toward protecting your disks from this type of damage. Stay away from unsecured websites, as they are notorious for spreading malware which could lead to file corruption and data loss. |
| 📇 Delete cautiously | If you have valuable music files on your computer or mobile devices, take extra care when deleting files or cleaning up your storage. Windows users might want to get in the habit of taking a look at what’s in the Recycle Bin before emptying it. |


