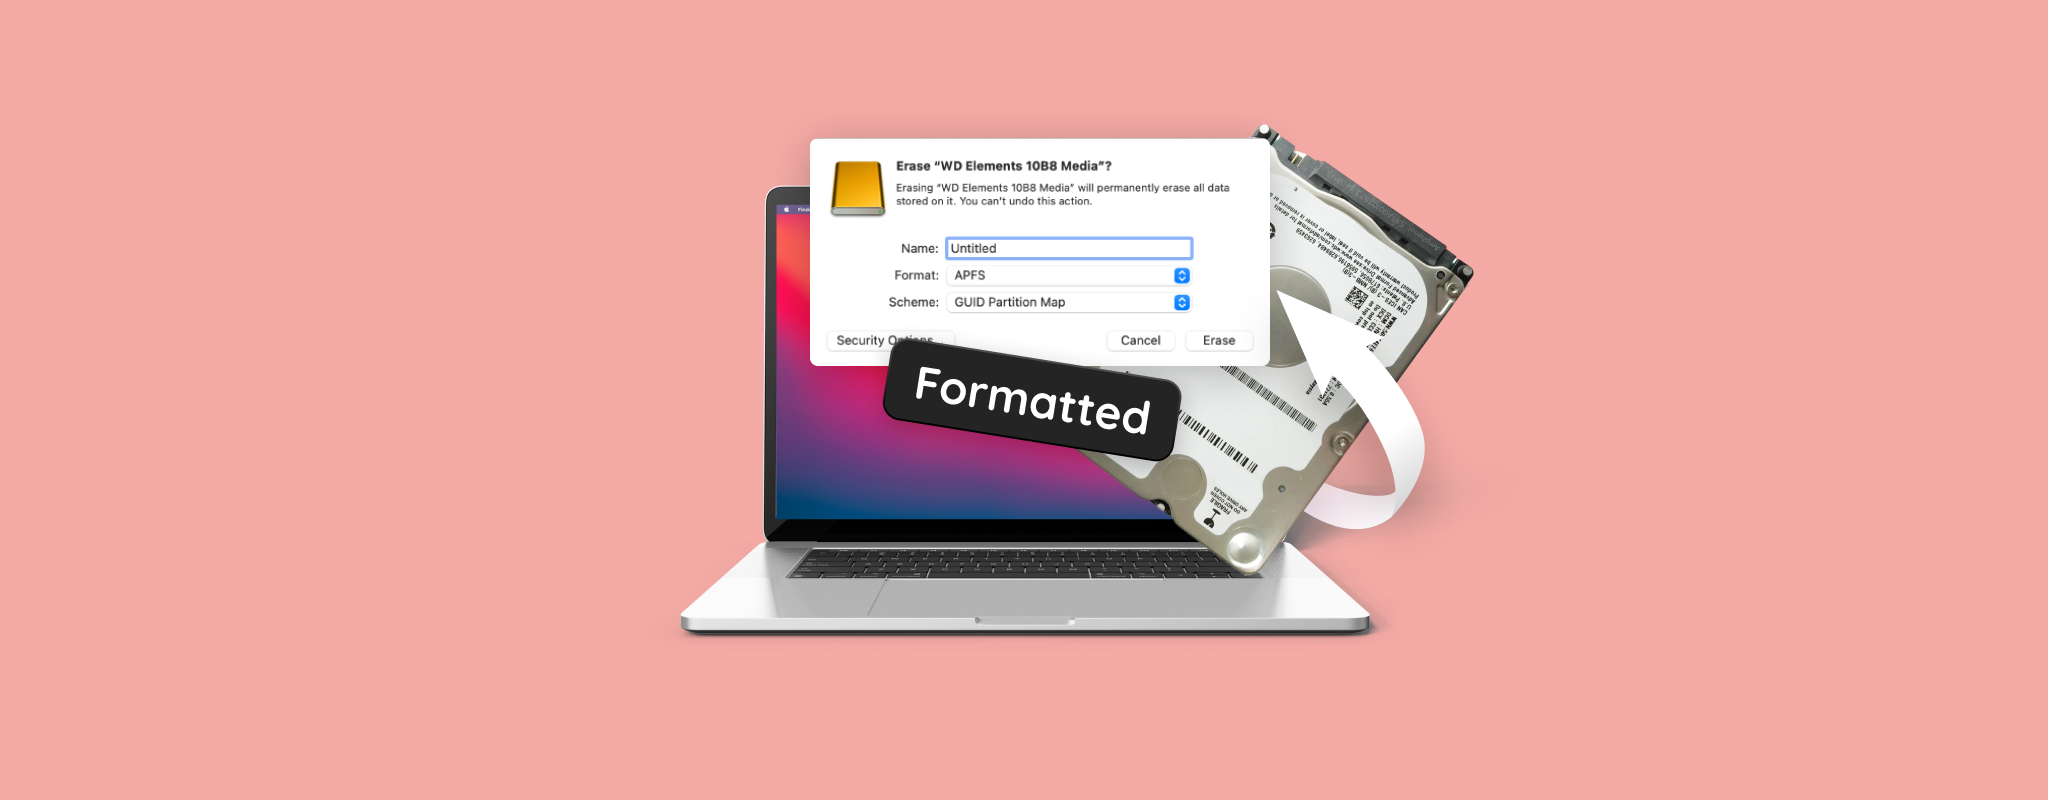
 You likely equate formatting with the permanent deletion of your files, but that’s not true—at least not always. In most cases, you can recover data from a formatted hard drive. How? Well, by using a capable data recovery tool, or contacting a professional data recovery service. The sections below will guide you through the process, and answer any questions you may have about data recovery from a formatted hard drive.
Table of Contents
When Is It Possible to Recover Data from a Formatted Hard Drive
Data recovery chances from a formatted internal, or external hard drive on your Mac depend on two main factors:
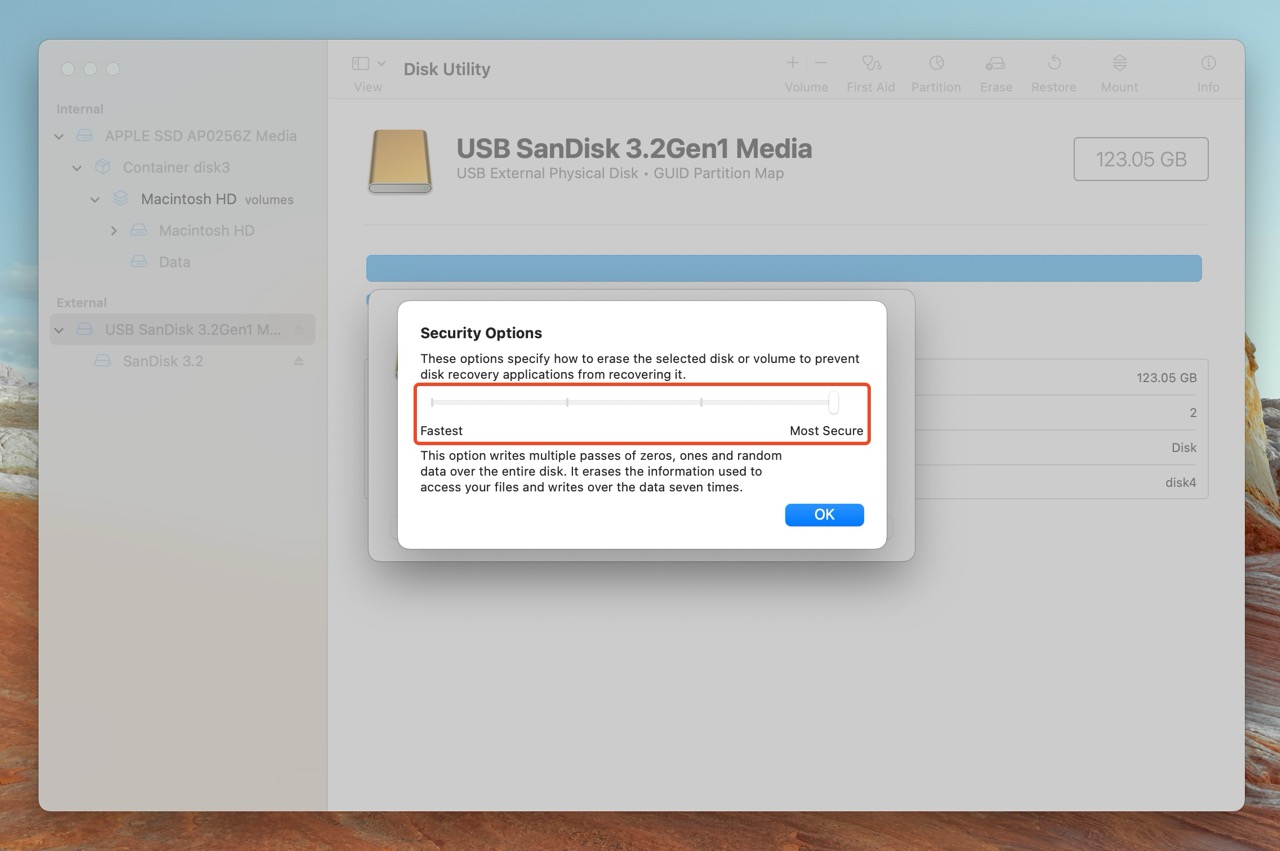
- Formatting Settings: By default, macOS performs a quick format on your drive. A quick format does not delete your files permanently. Instead, the data blocks occupied by these files are marked as available for use, allowing new files to be written to them. The previous files can be recovered as long as new data isn’t written to the drive. However, data recovery is impossible if you adjusted the Security Options slider for a more secure erase, or a full format.
- Overwriting: Continuously writing new files to a drive after formatting it, reduces the amount of data that can be recovered. Why? Because new files overwrite the deleted files. The more new files you write to the drive, the higher the likelihood of them overwriting the deleted files you want to recover.
Note: If you want to recover a formatted SSD, I have some bad news for you. SSD data recovery is significantly more complex than an HDD—thanks to the TRIM feature which clears up unused data blocks at regular intervals. It’s best to keep low expectations when attempting data recovery from SSDs.
How to Recover Data From a Formatted Hard Drive on Mac
You have two options to recover files from a formatted hard drive on your Mac—use third-party data recovery tools, or contact a professional data recovery service. Professional data recovery services can be expensive. I only recommend them if your data is irreplaceable and must be recovered at any cost.
Method 1: Use Data Recovery Tools
Data recovery tools are abundant on the web, and choosing one can be a tedious process. Different tools have different strengths, and most tools that show up on the top do so because of incessant marketing, not functionality.
To help you out, I’ll walk you through two data recovery tools I have personally used, and can vouch for—Disk Drill, and TestDisk. Both tools should be able to recover data from a formatted hard drive on macOS.
Option 1: Disk Drill
Disk Drill is my go-to tool for data recovery, mainly because of how easy it is to use. Scans are usually fast, and file selection is intuitive—thanks to its file filtering, and file preview features. It supports all major file systems and storage drive types. You can even scan drives with a missing, or corrupt file system.
Here’s how to recover data from an accidentally formatted hard drive using Disk Drill:
- Download Disk Drill, and install it.
- If applicable, ensure the formatted external hard drive is connected to your Mac. Open Disk Drill.
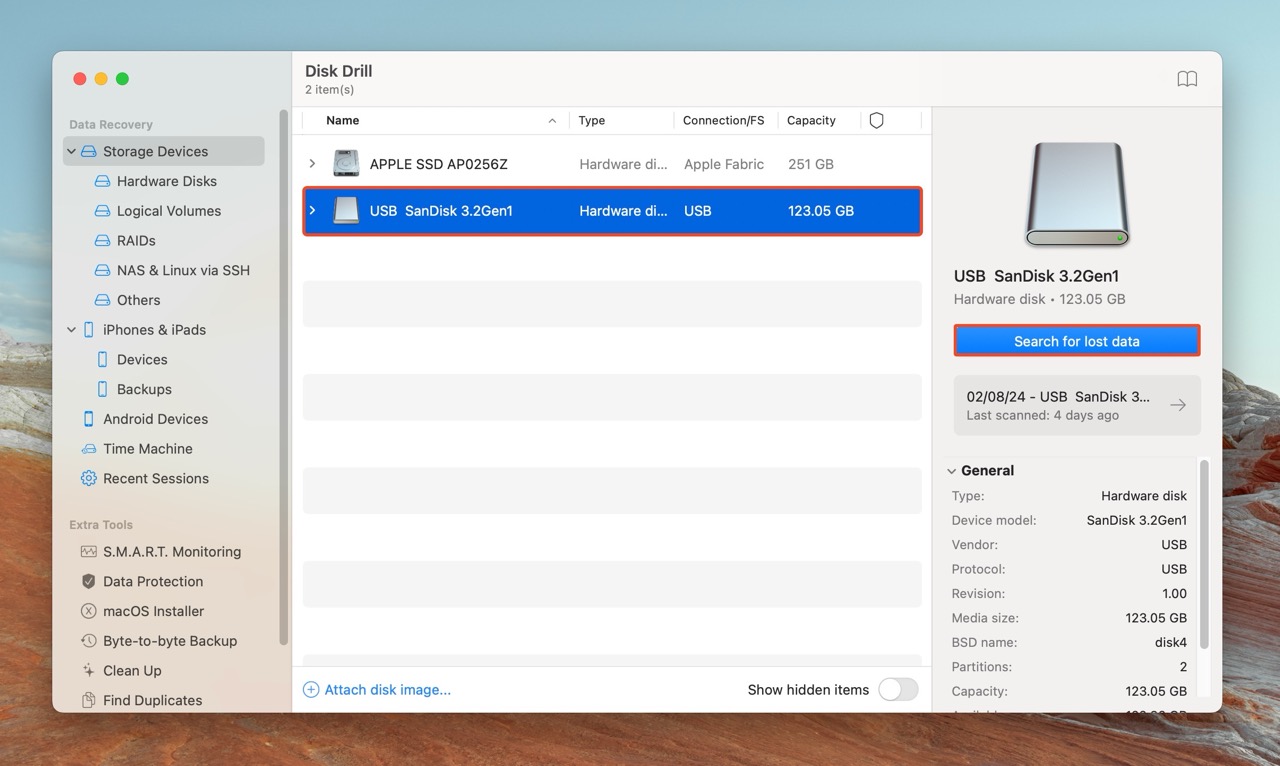
- Select the hard drive from the list, and click Search for lost data.
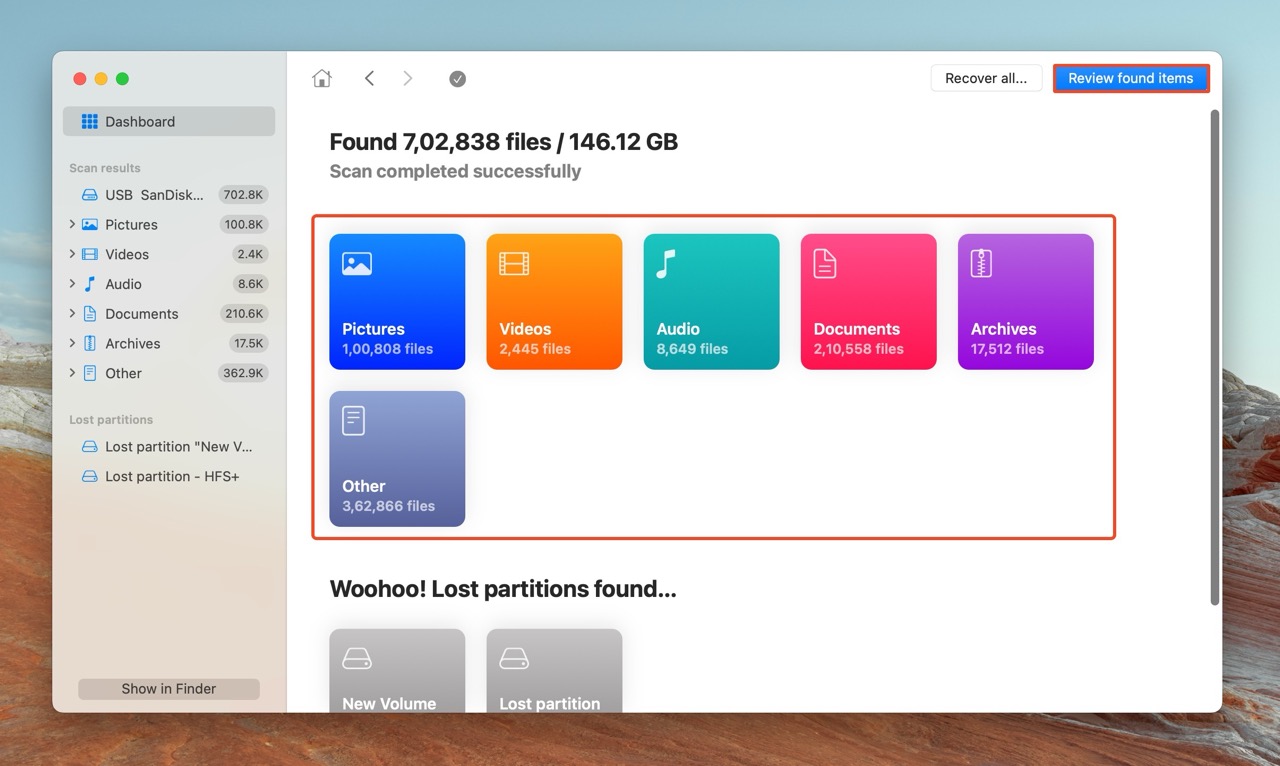
- Click Review found items to view all recoverable files. Only wish to see a certain file type? Click on the relevant file type tile instead (Pictures, Videos, Audio, Documents, Archives, and Other).
- Expand the Deleted or lost, and Reconstructed sections.
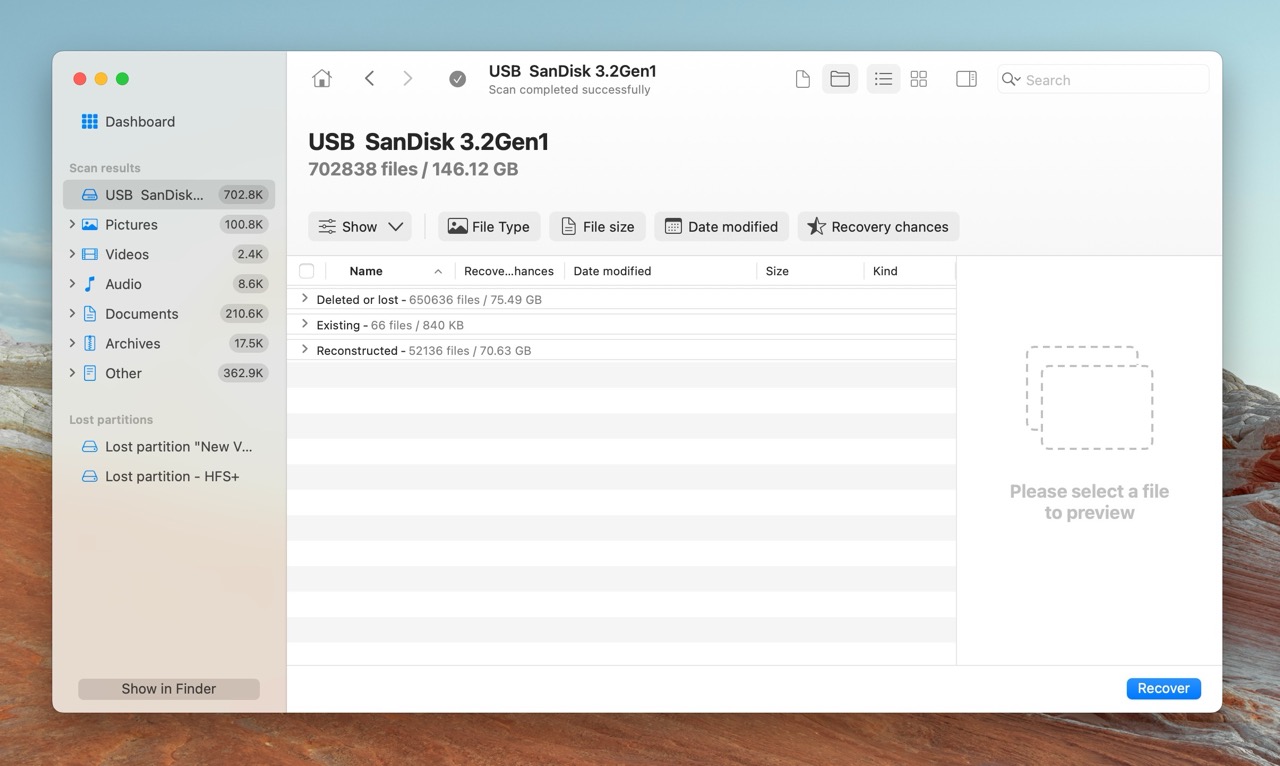
- Select the files you wish to recover. Disk Drill displays a preview of the currently selected file, but you can manually preview any file by clicking the eye icon next to its filename. Click Recover once you’ve confirmed your selection.
- Choose a recovery destination and click Next. I suggest saving these files to a drive other than the one you formatted. This will improve your data recovery chances in case you want to recover more data from the drive in the future.
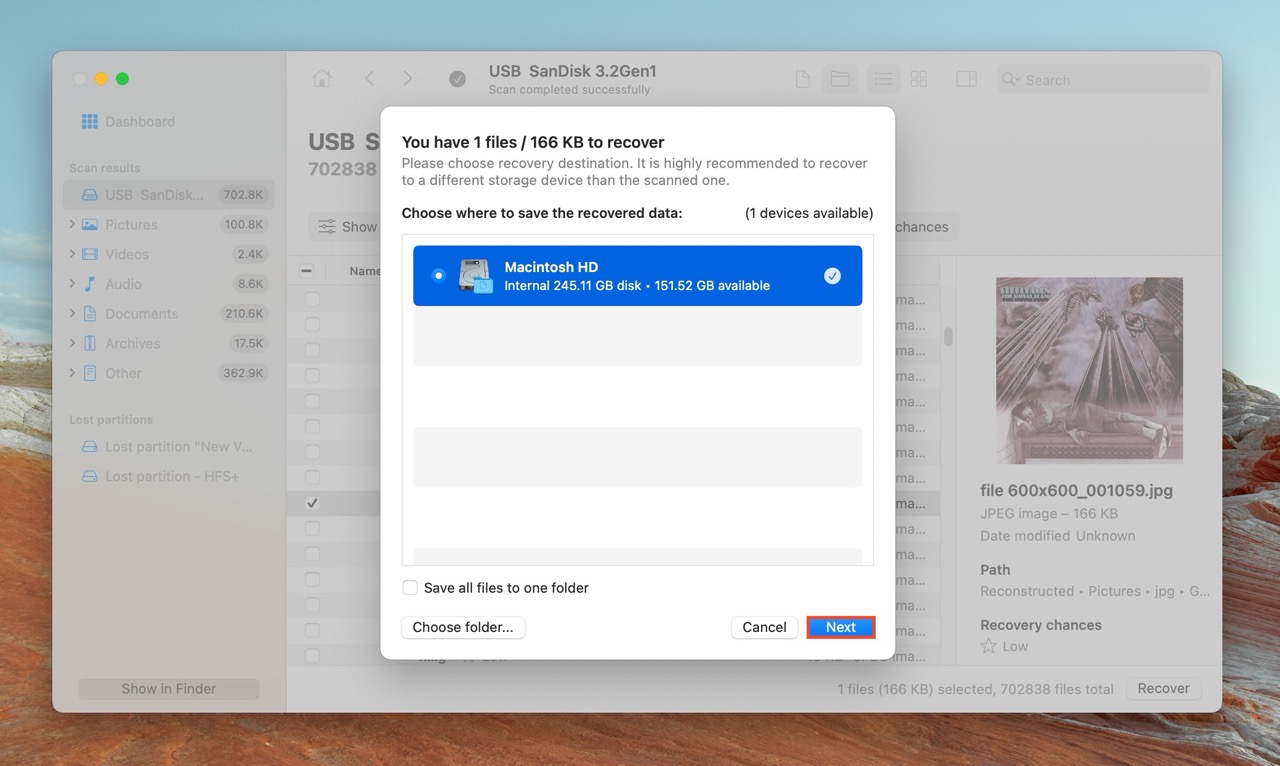
- Disk Drill will recover the selected files.
Option 2: TestDisk
TestDisk is a favorite amongst many data recovery pros, and for good reason—it’s free, and it’s effective. Like Disk Drill, it works with all types of file systems and storage drive types. However, it’s not an easy program to use. There’s no GUI, and you can only use the keyboard to navigate through the program. I only recommend TestDisk if you’re comfortable using a command-line interface.
Here’s how to install TestDisk and recover data from a formatted hard drive on macOS:
- Search for Terminal in Spotlight Search (Command + Space), and launch it.
- Type in the following command and press Enter:
/bin/bash -c "$(curl -fsSL https://raw.githubusercontent.com/Homebrew/install/master/install.sh)". Type in your password and press Enter. This will install Homebrew which will subsequently be used to install TestDisk.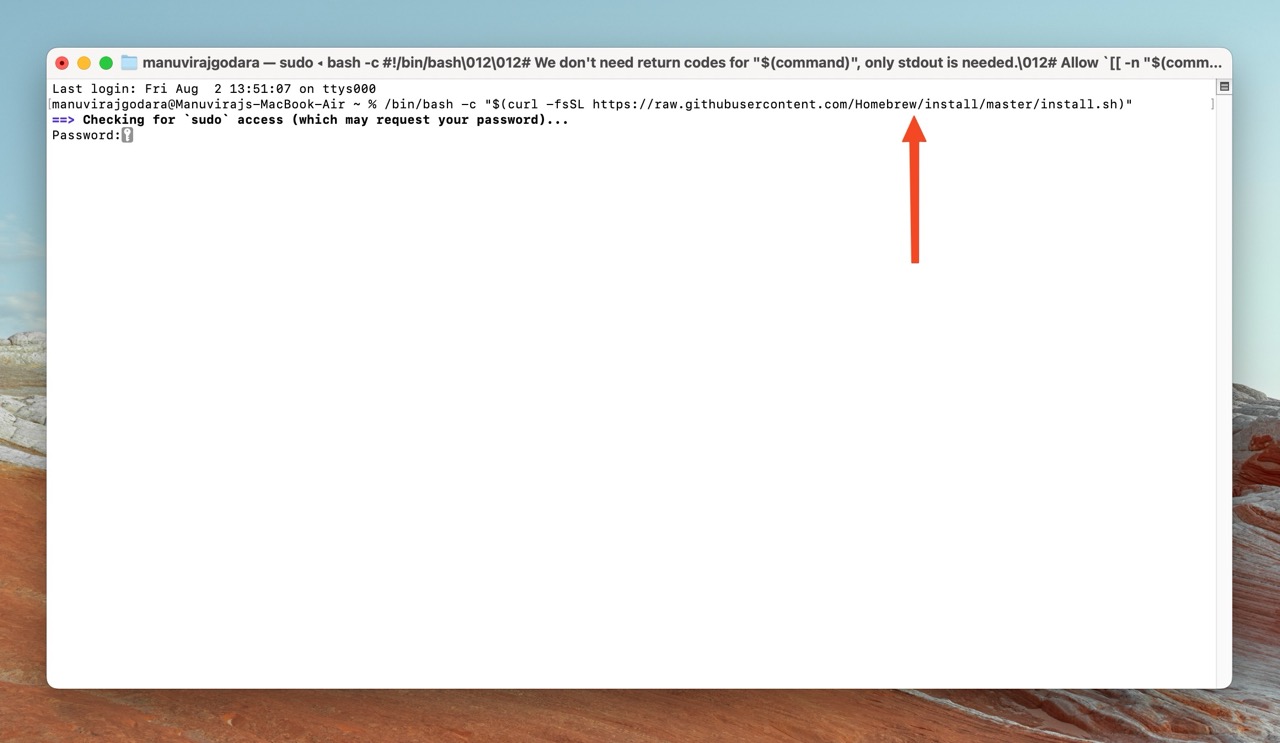
- Type
brew install testdiskand press Enter.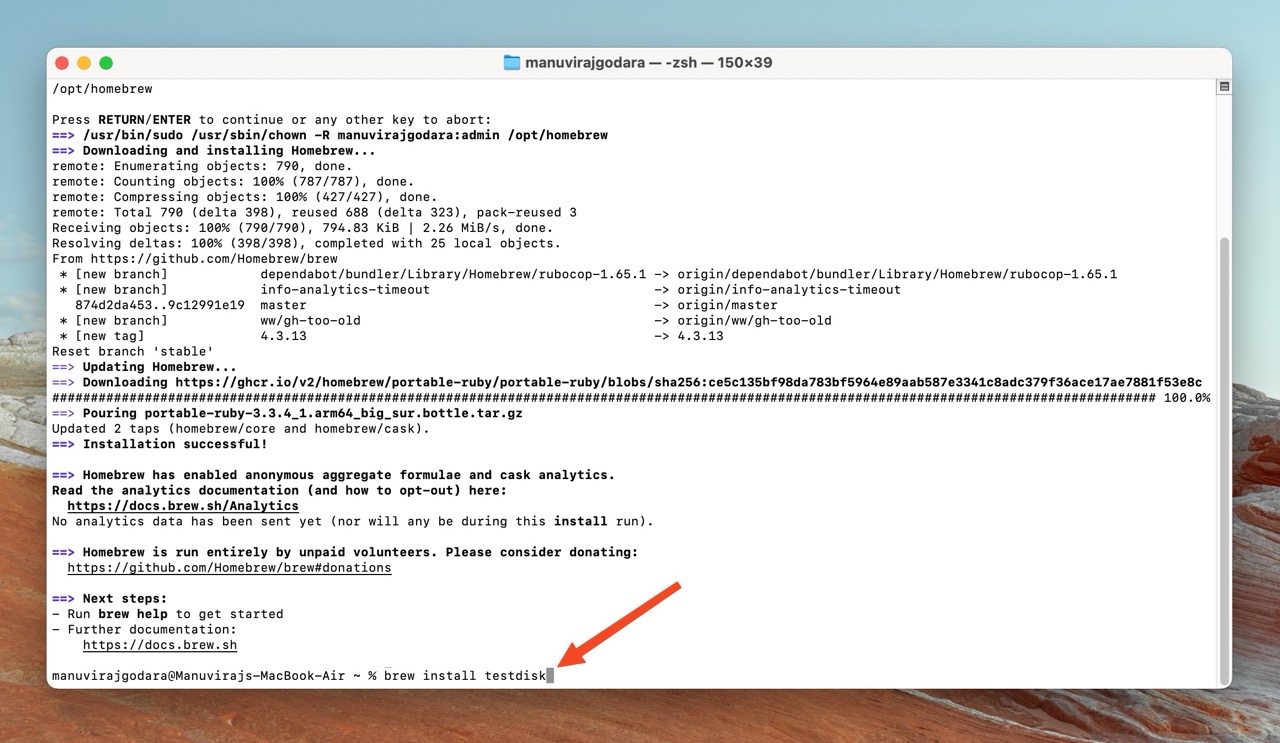
- Type
sudo testdiskand press Enter. Type in the administrator password and press Enter again. If you face any issues, follow the steps in this link and launch TestDisk again.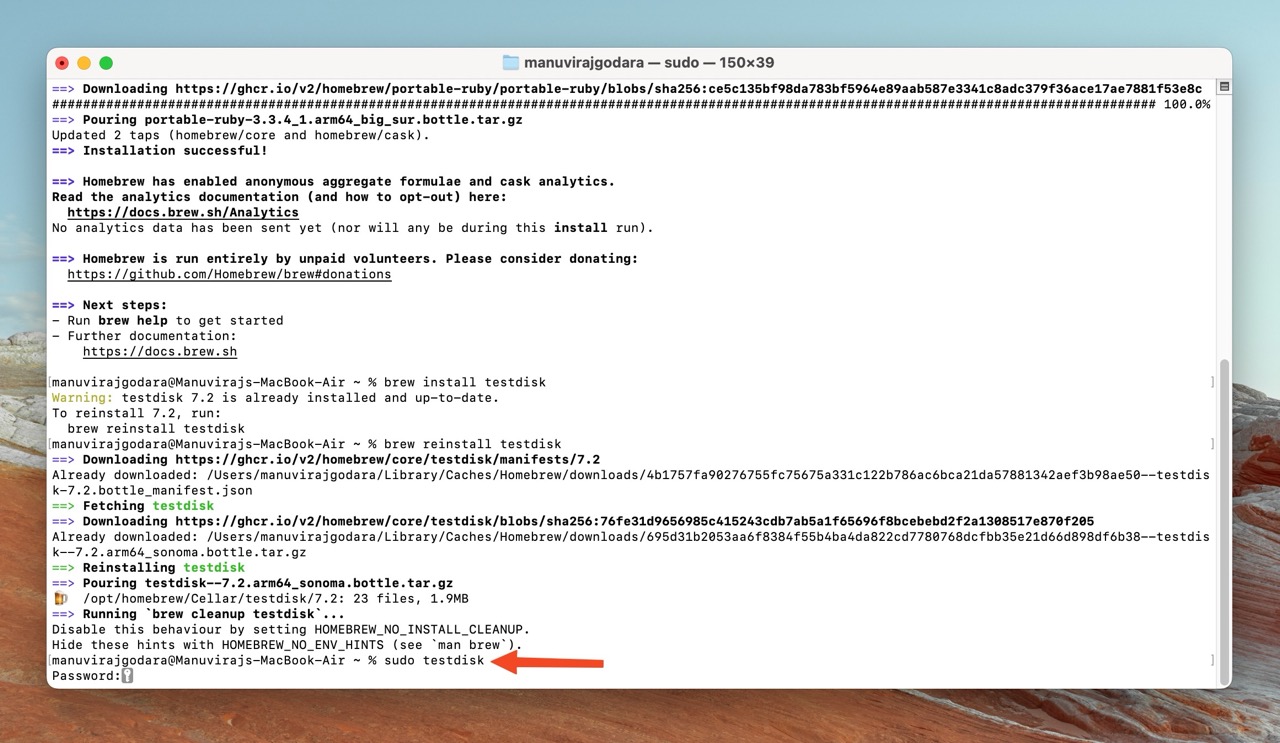
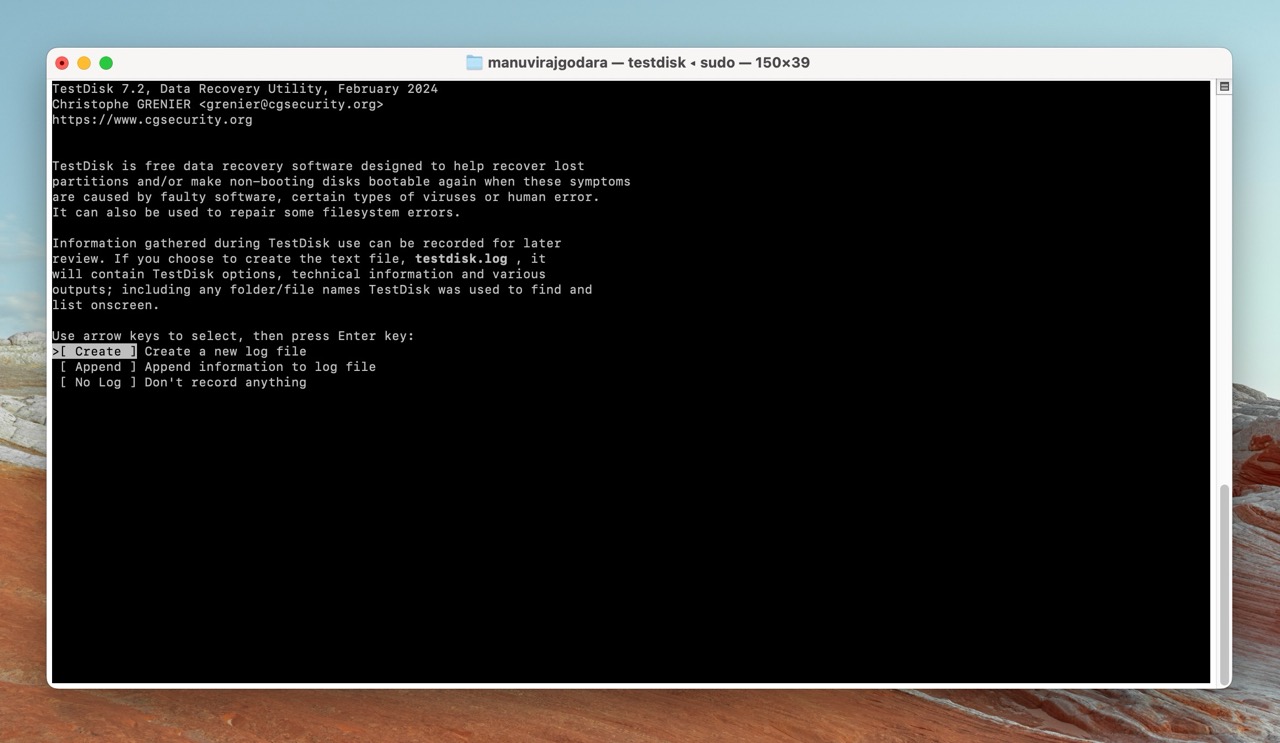
- In TestDisk, choose whether you want to create a log file or not. This doesn’t affect data recovery in any way. Navigate using the Arrow keys, and press Enter to confirm.
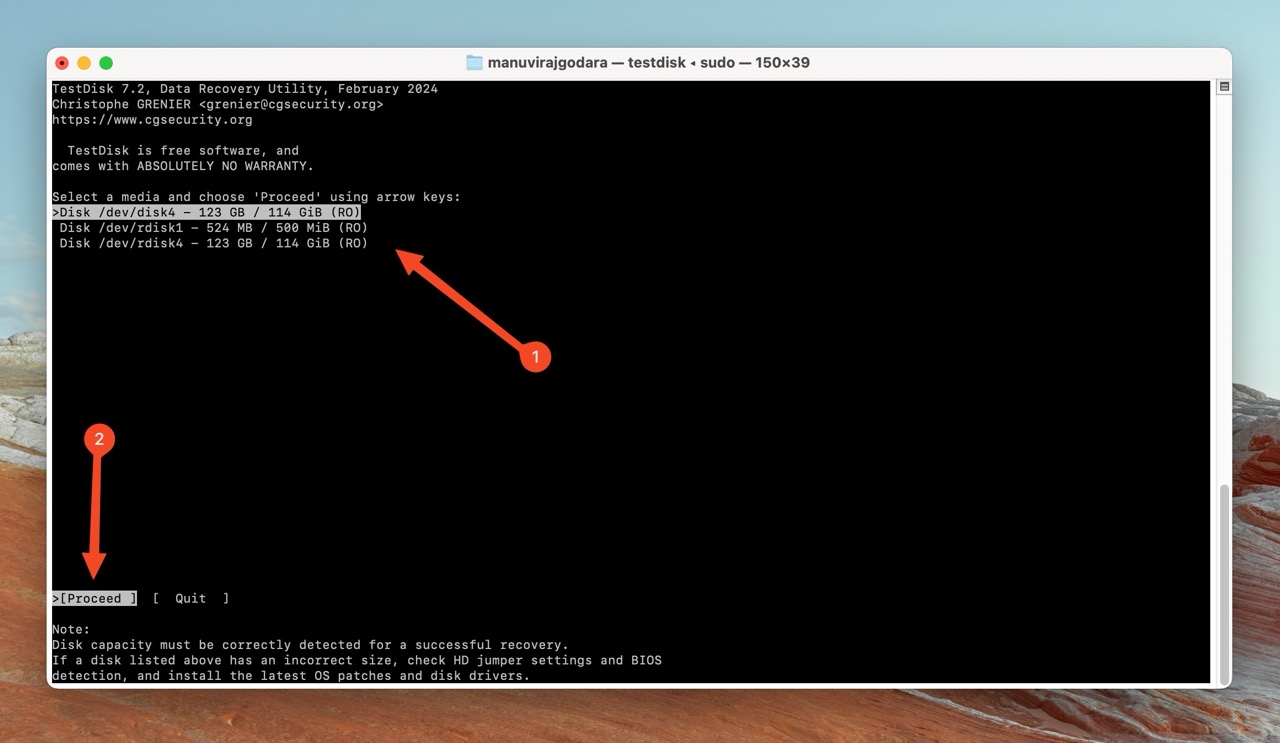
- Select the formatted HDD from the list of drives in TestDisk.
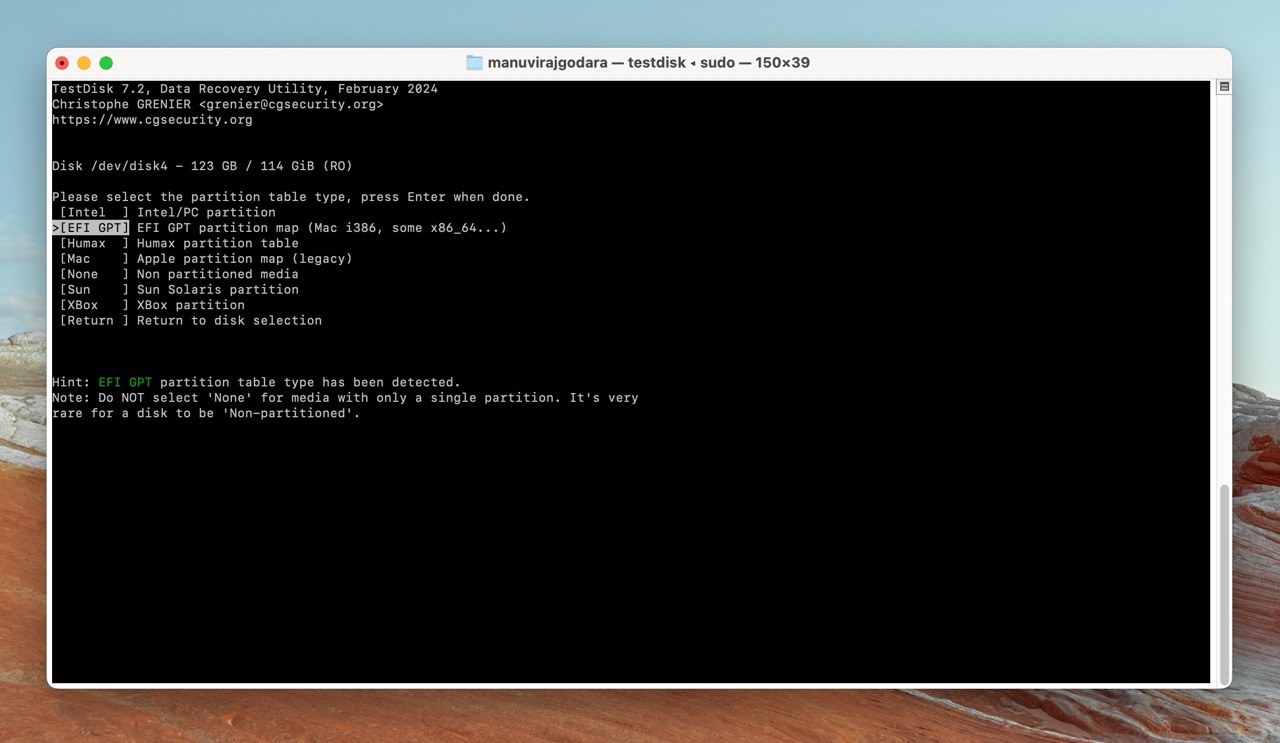
- Select the partition table type and press Enter. TestDisk auto-detects this, so it’s best to simply press Enter on this screen, unless you’re sure that the disk uses a different partition table.
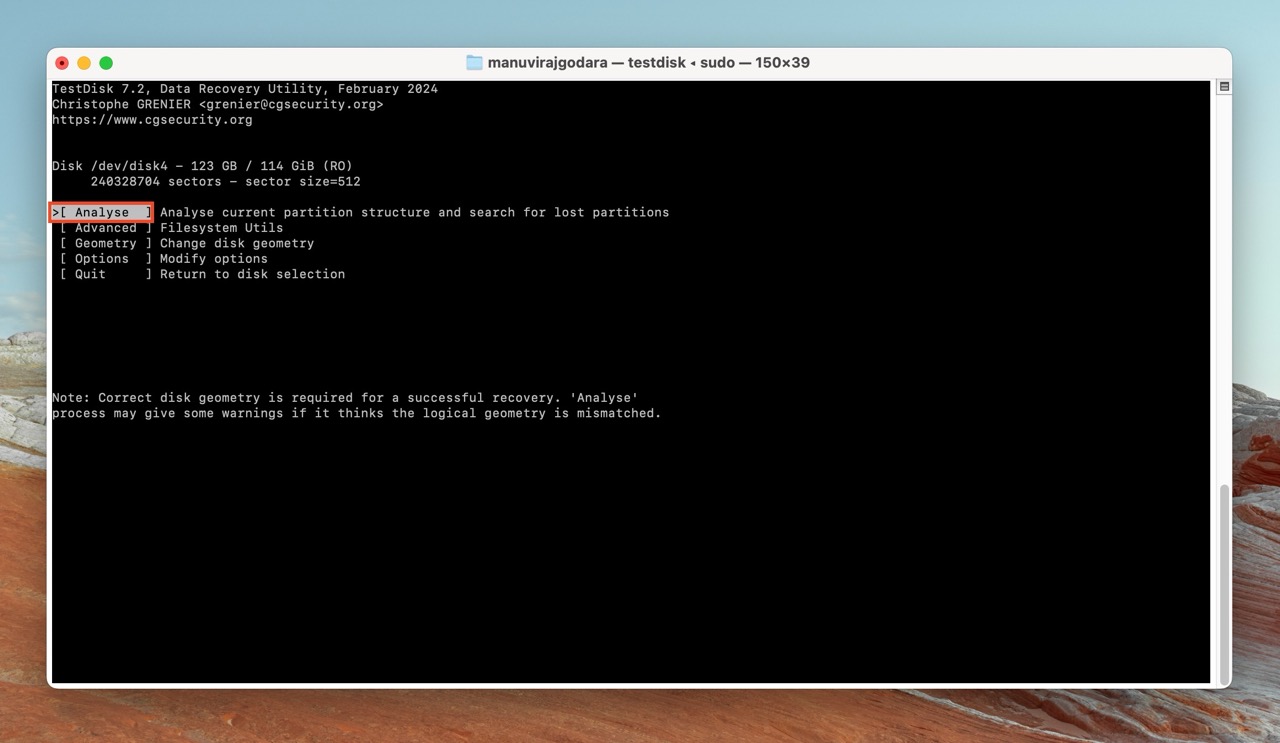
- Select Analyse and press Enter.
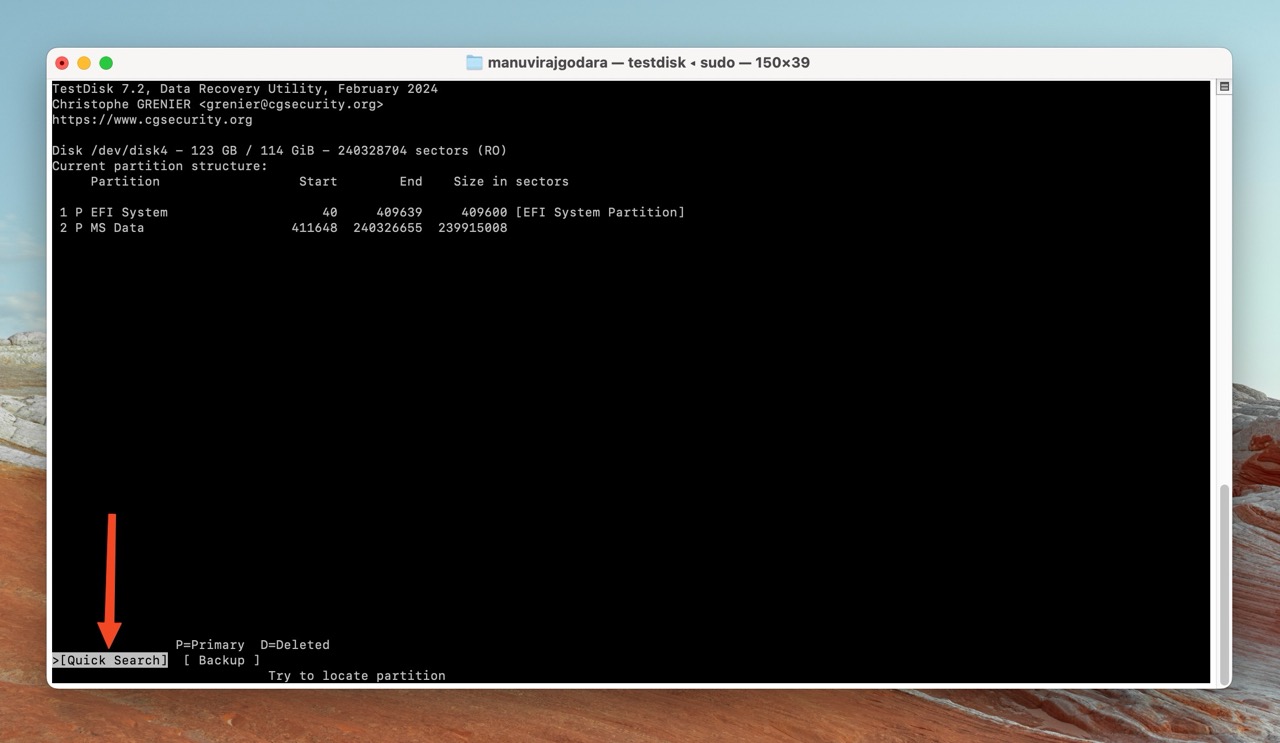
- Select Quick Search and press Enter.
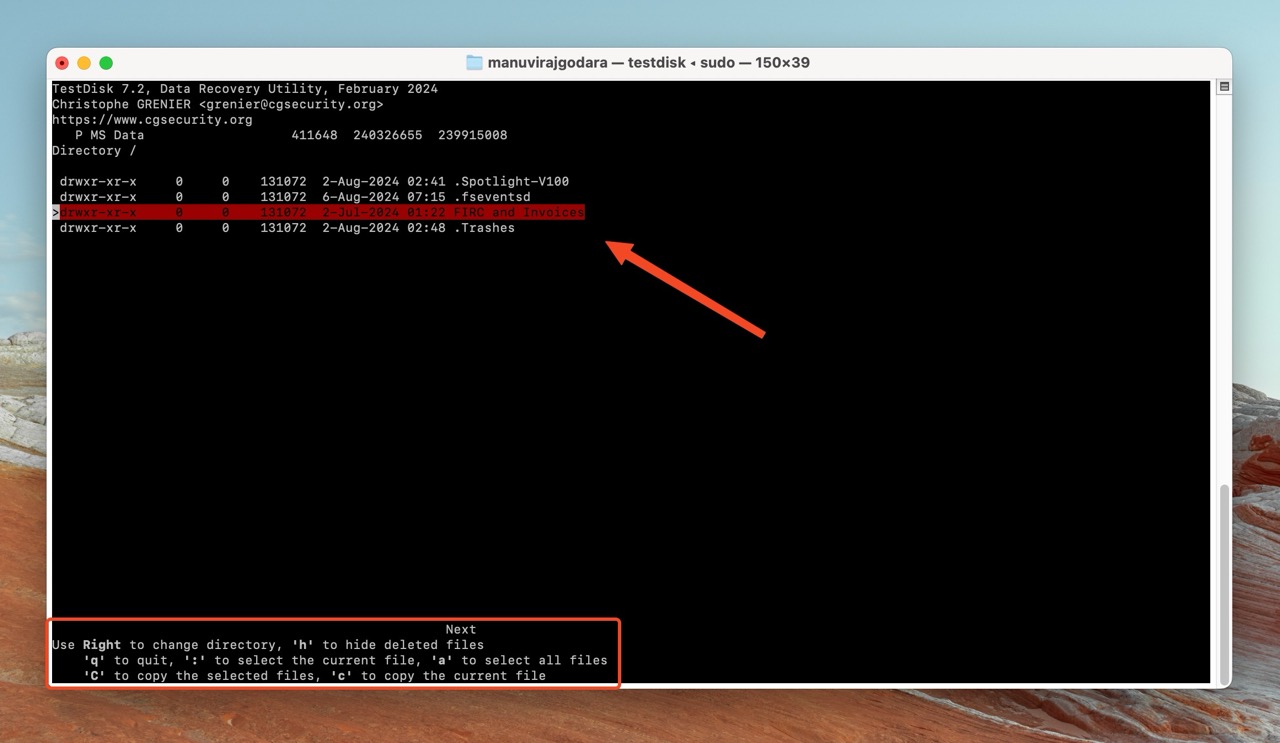
- TestDisk will list the partitions—current, and recoverable. Highlight the partition that contains your files, and press P to list its files. Navigate back and forth between directories using the left and right arrow keys. To select a file, navigate to it, and press the “:” key (Shift + ;). Once you’ve selected the files press C (uppercase) to choose a recovery destination. Again, navigate to the required directory and press C (uppercase) to copy them to that destination.
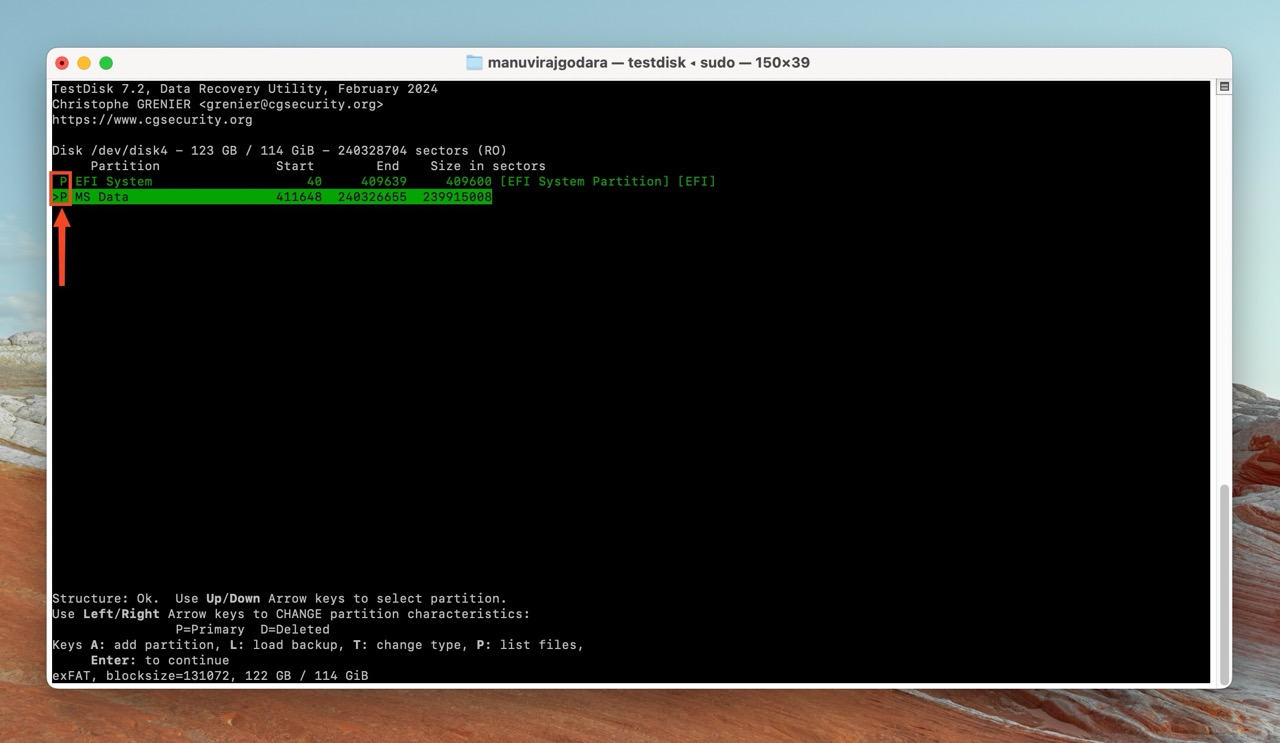
- Press Q repeatedly till you’re back on the partition list screen shown in Step 9.
- Each partition has a prefix before it— D(eleted), or P(rimary). You can cycle through the prefixes using the left and right arrow keys. If you want to recover the deleted partition, ensure it has a P prefix before it. Press Enter.
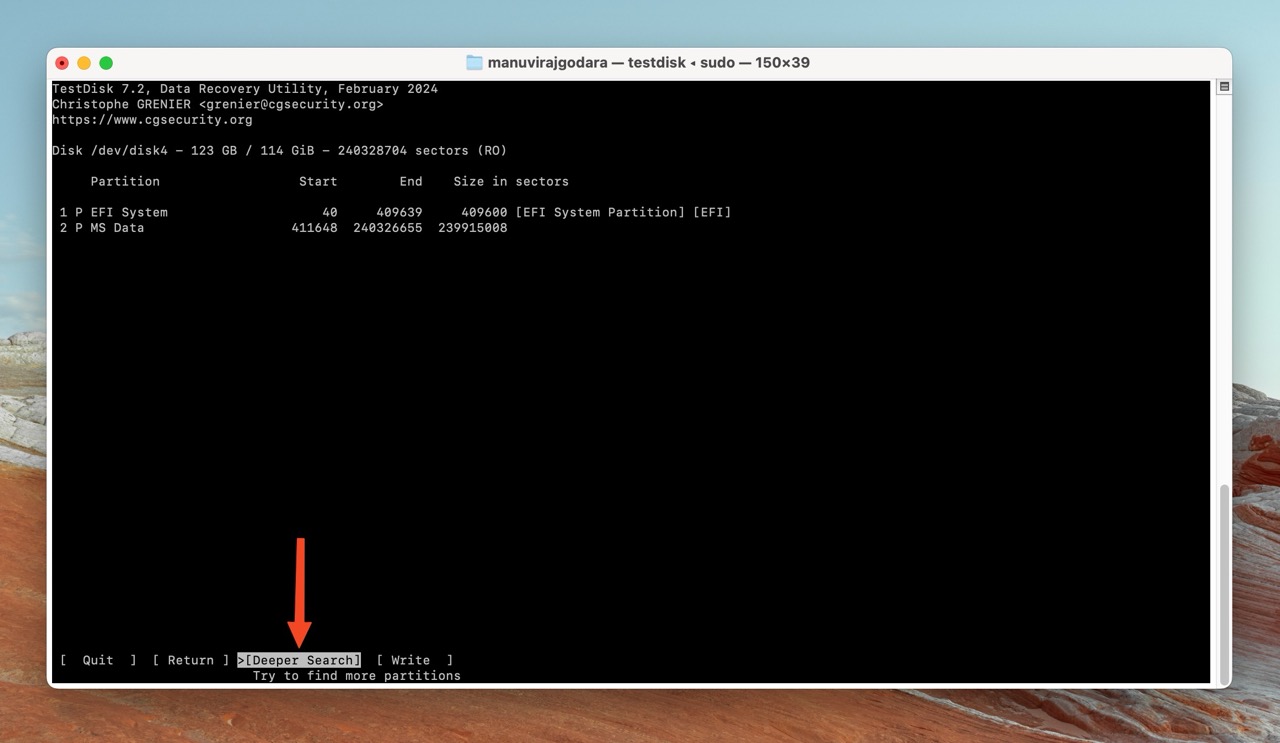
- If you couldn’t find your files in the previous steps, select Deeper Search, press Enter, then follow steps 9, 10, and 11 again.
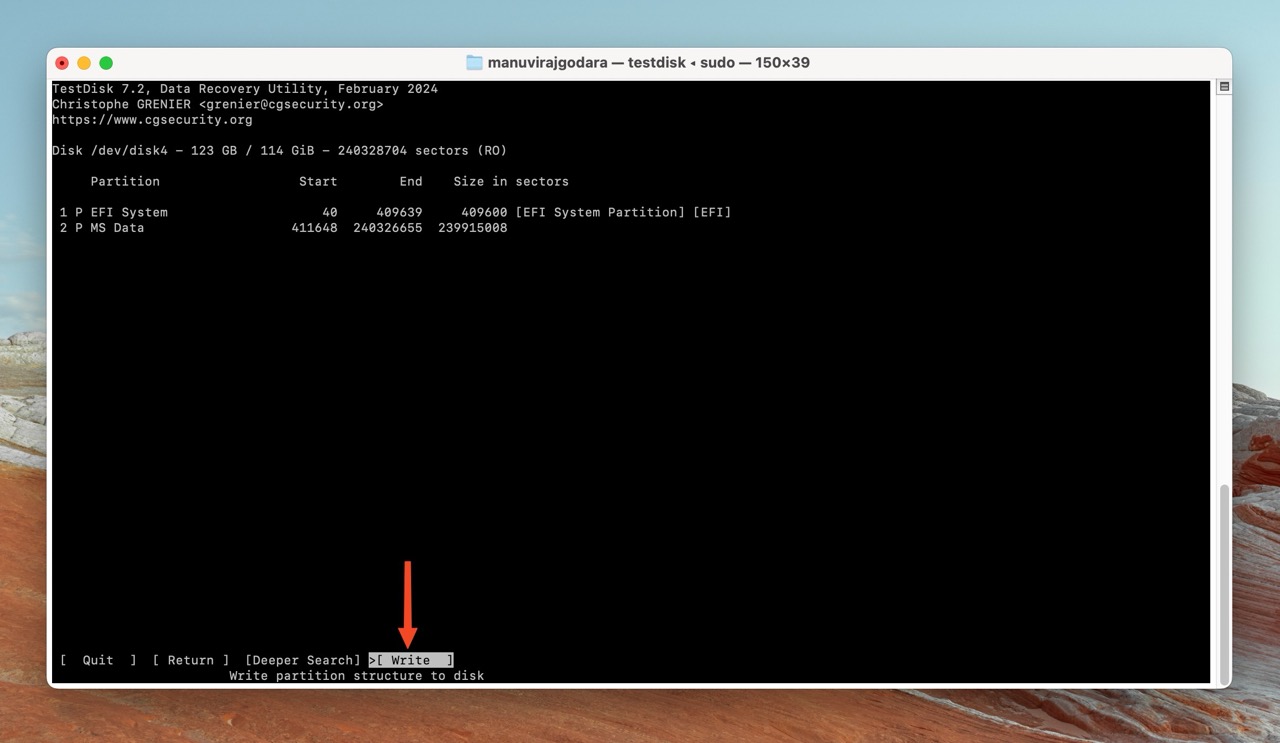
- Select Write and press Enter.
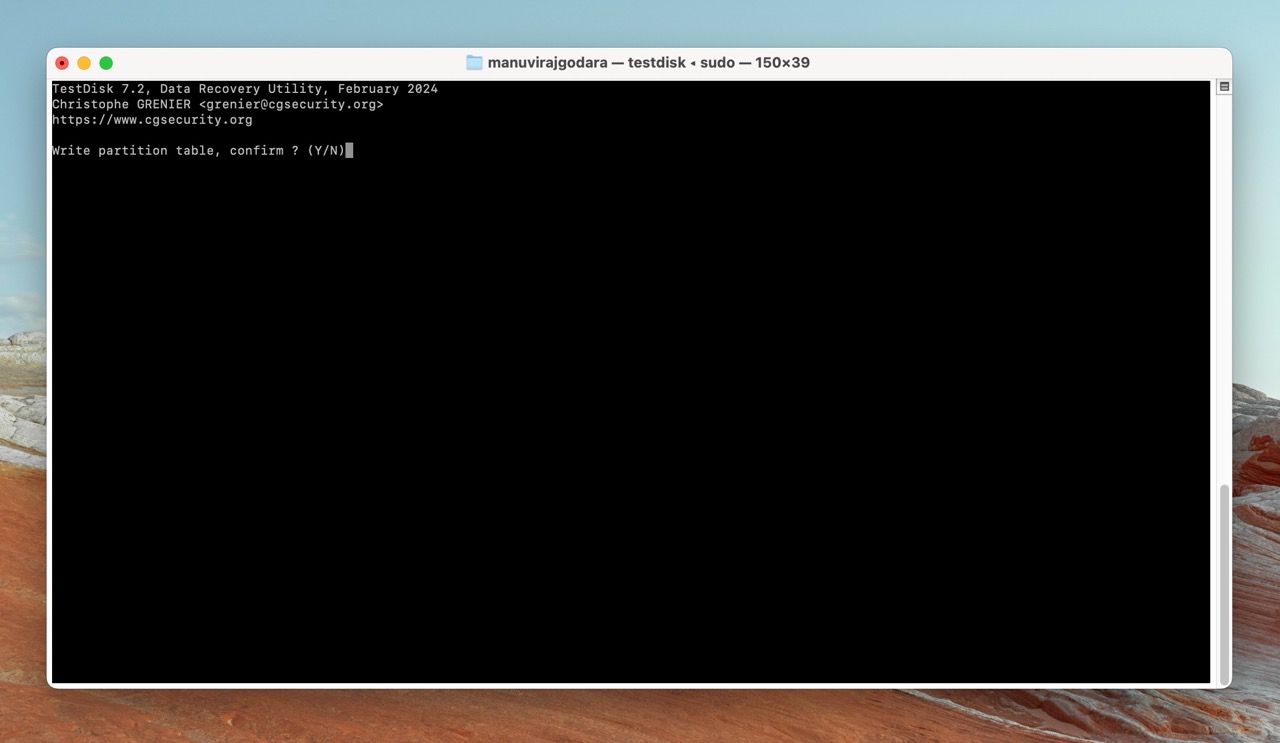
- Press Y on the confirmation screen.
- TestDisk will recover the deleted partition with your files intact.
Method 2: Contact a Professional Data Recovery Service
Data recovery companies are your best bet if you want to recover data from a drive that was full formatted. Though they’re significantly more expensive than using a data recovery program, data recovery services offer the highest chances of data recovery.
Here’s what to expect when contacting a professional data recovery company:
- Email, or call up a local data recovery company. Most companies have a 24*7 hotline.
- Explain your data loss scenario, when the drive was formatted, and how you formatted it.
- Then, you’ll need to ship the drive to the company, or drop it off at a drop-off point.
- The data recovery experts will analyze the drive and get back to you with a quote. This is usually free.
- You can then choose whether to proceed with data recovery or not.
Conclusion
Recovering data from a formatted hard drive mostly depends on how the drive was formatted. You can easily recover data after a quick format, but a full format is almost impossible to come back from. As for the recovery methods themselves—you can use data recovery programs for DIY data recovery. Otherwise, you can contact a professional data recovery service. In case of a full format, the latter is your only recourse.
FAQ
- Scan the affected drive using a data recovery program.
- Contact a professional data recovery service.
- Check the iCloud Drive for your files.


