
The Documents folder comes ready to use with every user profile. It’s a favorite storage location for many because it’s easily accessible. But, this convenience comes into question when the folder is deleted or seemingly disappears out of the blue. An empty documents folder is cause for concern.
If you’ve lost some data that was stored in the Documents folder, you have the option of recovering it. But, the option doesn’t last forever. Read on to find out how you can restore the Documents folder.
Table of Contents
Where Is My Documents Folder Located
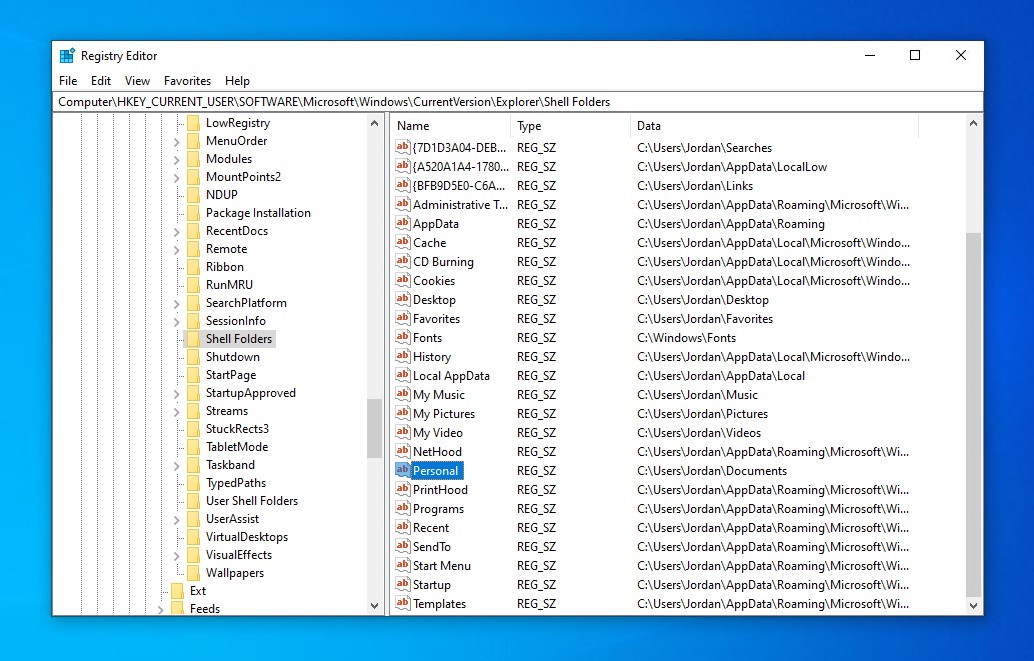
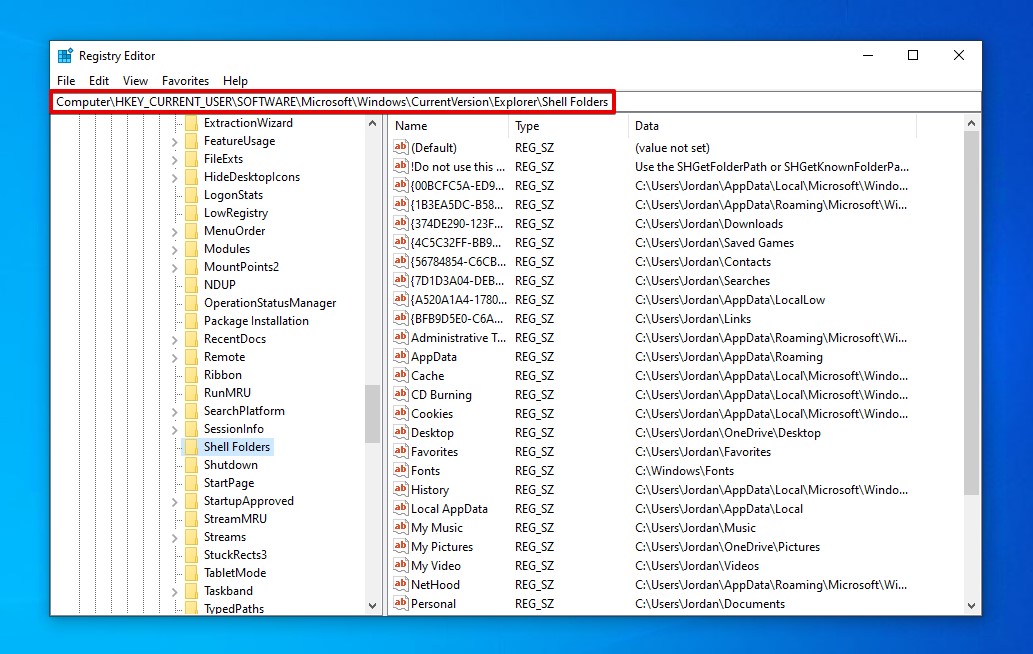
The My Documents folder is a default folder that’s attached to each user profile. By default, the location will be C:\Users\USERNAME\Documents. If the file path is ever updated, you can find the new location by looking at the registry key:
HKEY_CURRENT_USER\Software\Microsoft\Windows\CurrentVersion\Explorer\Shell Folders\Personal
Any subsequent changes to the location of the Documents folder will be updated here too.
The location of your Documents folder can be changed by accessing the Documents folder properties and specifying a new path in the Location tab.
How to Find My Documents Folder
Being one of the default folders included with each user, Windows makes it easy to access the Documents folder by providing many ways to access it.
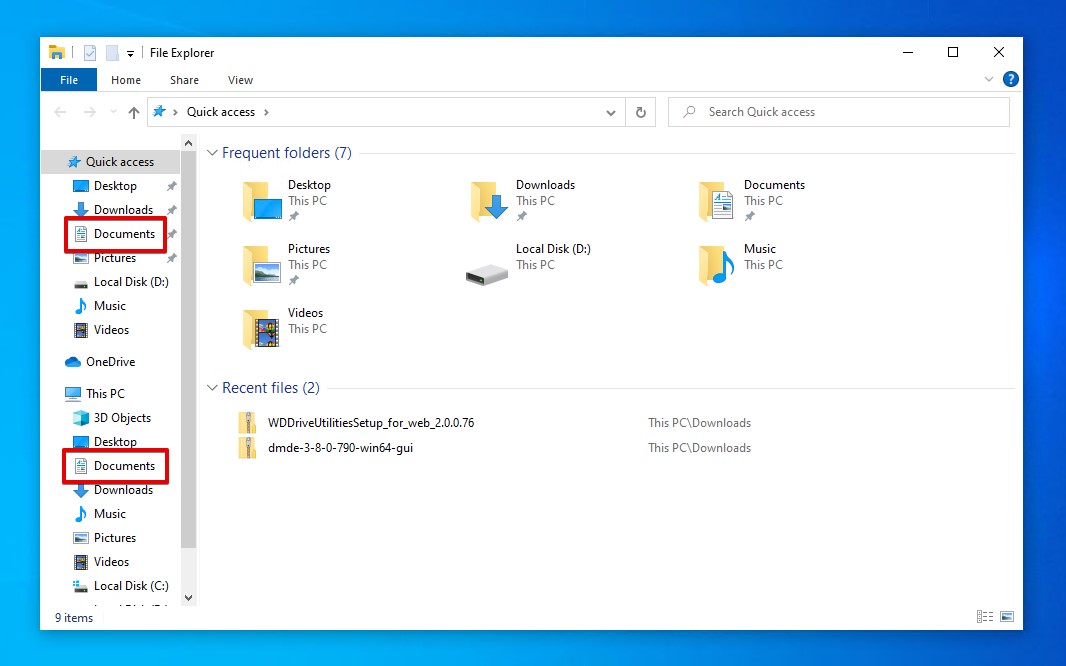
Method 1:Open Using File Explorer
Since the Documents folder is a default folder created with each user, it’s often very easy to access using the File Explorer window.
- Open File Explorer.
- Click the Documents folder in the left navigation pane, either under Quick access or This PC.
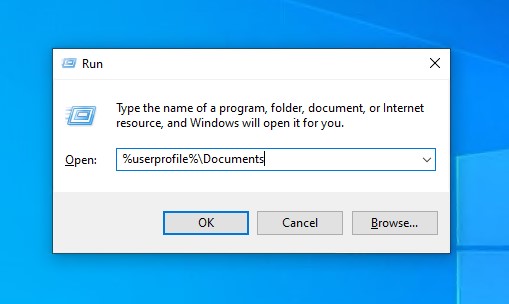
Method 2:Open Using Run
If for some reason, the Documents folder is not appearing in File Explorer, you can use the Run prompt instead to open the folder directly.
- Press CTRL + R on your keyboard.
- Type %userprofile%\Documents and press Enter.
Method 3:Show Hidden Folders
Windows comes with the ability to hide files and folders from view. In fact, there are lots of hidden system files in folders you commonly visit to ensure they’re not modified or deleted. Before recovering a Documents folder, check if it’s hidden.
- Open File Explorer.
- Click the View tab, then select Options.
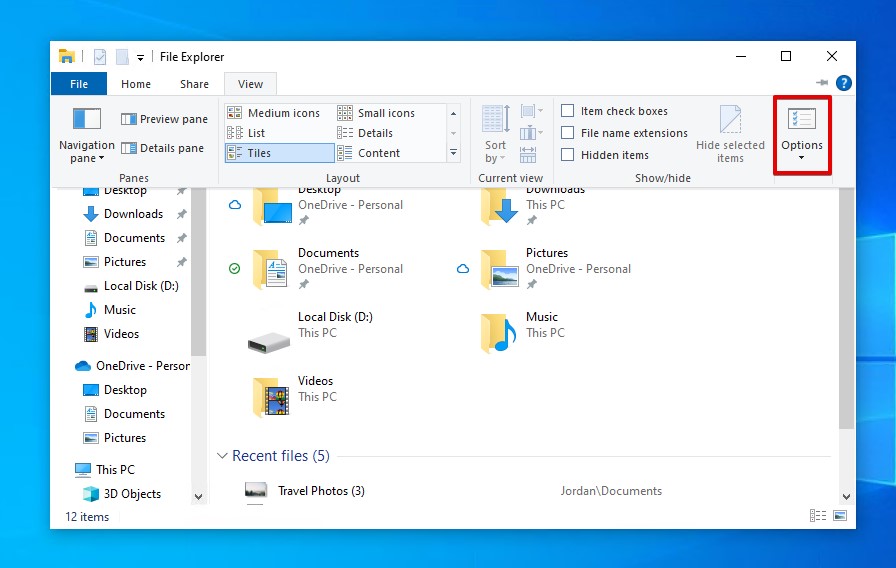
- Click the View tab. For the Hidden files and folders option, make sure Show hidden files, folders, and drives is selected. Click Apply then OK.

- See if the Documents folder reappeared.
How to Recover Deleted Files from Documents Folder
If you’ve found your Documents folder but your data isn’t there, let’s move on to methods for recovering the data that was lost.
Method 1:Restore from Recycle Bin
Deleted files are automatically sent to the Recycle Bin before they’re permanently deleted (unless they’re too large, in which case they’ll be permanently deleted instead). Before exploring more options, try restoring your files from the Recycle Bin using these steps.
- Open the Recycle Bin (found on your Desktop).
- Select the files you want to restore. Right-click, then click Restore. This will send them back to the Documents folder.
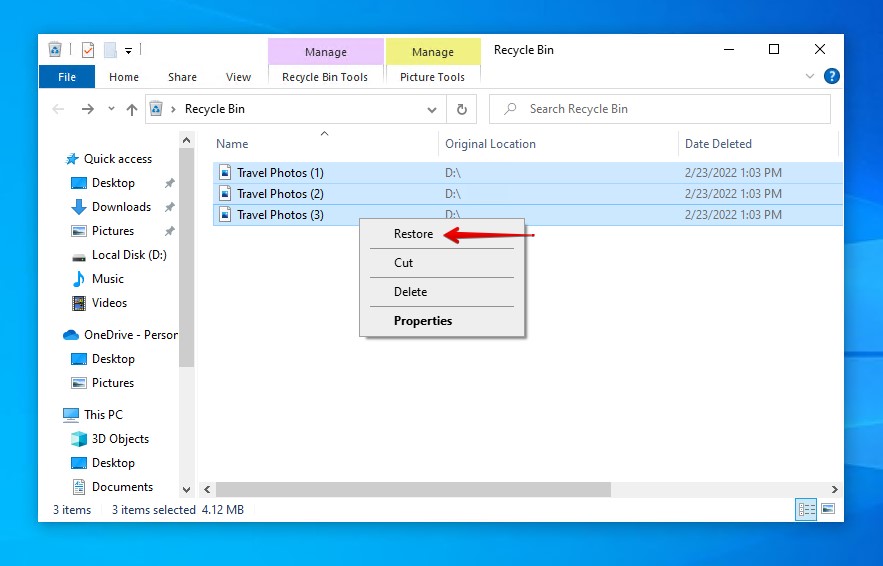
Once restored, the files and folders will be returned to the Documents folder.
Method 2:Restore from OneDrive
If OneDrive has been set up, Documents is often chosen as a default location to back up. This means a copy of your data is also stored in the cloud. When you delete something from your Documents folder on Windows, it will automatically move the cloud version to the OneDrive recycle bin.
Items held in the OneDrive recycle bin will be deleted after 30 days. Until then, you can recover the contents deleted from the Documents folder. The same goes for recovering Desktop files and other files that were synced to OneDrive.
Follow these steps to recover deleted Documents files from the OneDrive recycle bin.
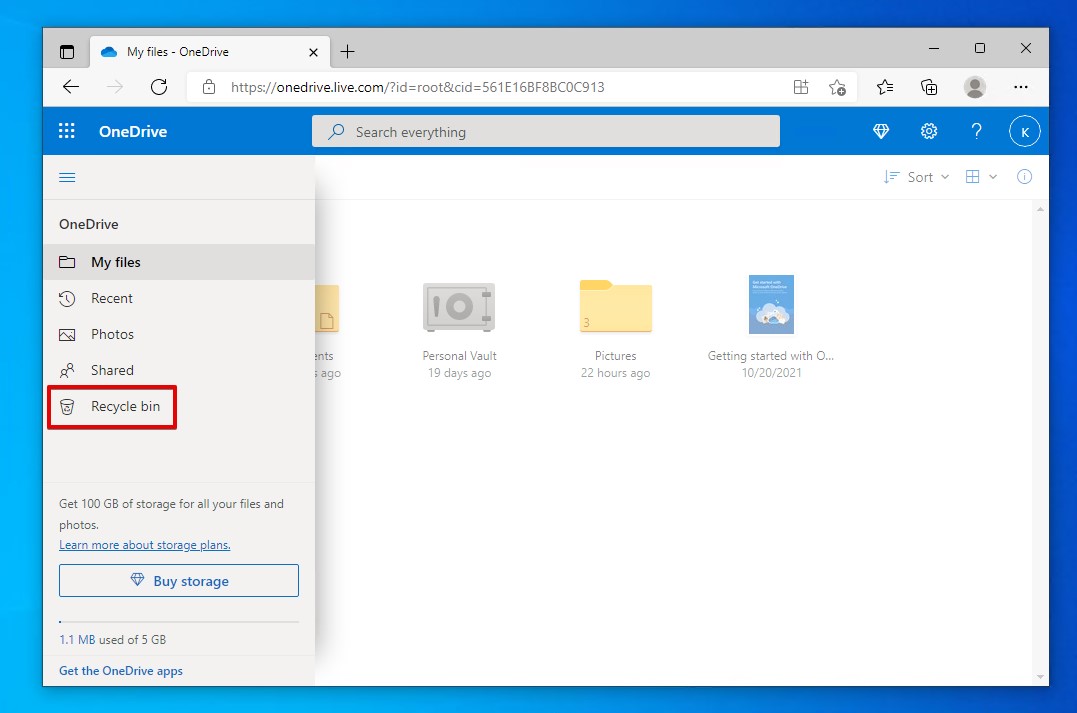
- Sign in to your OneDrive account in a browser.
- Click Recycle bin in the left navigation pane.
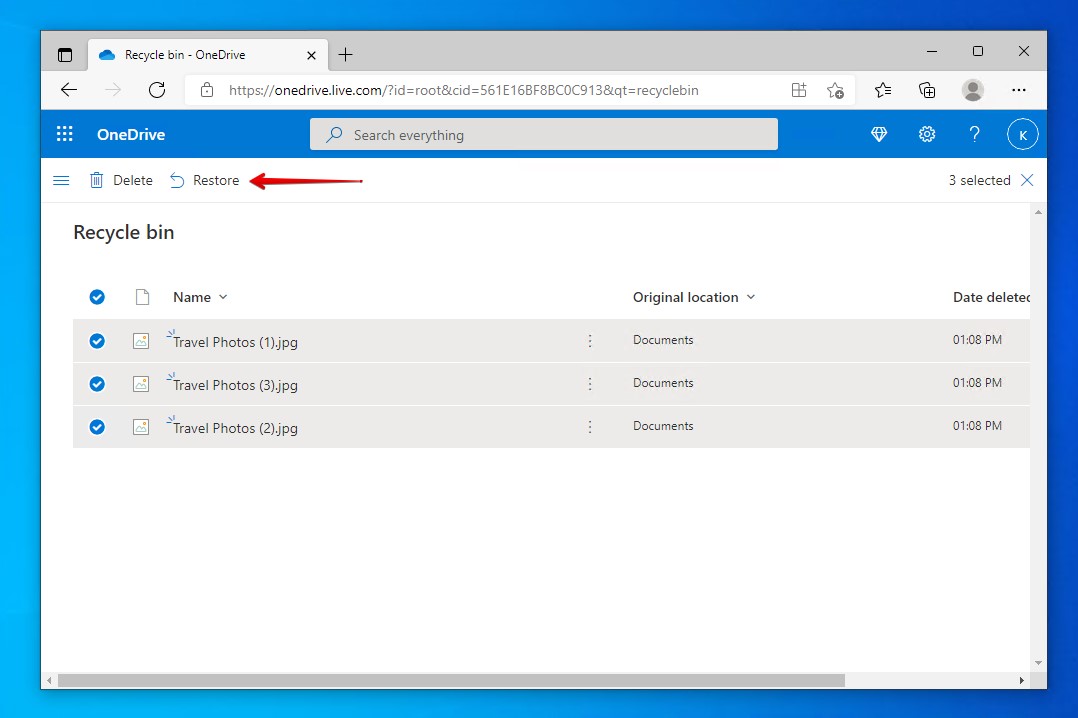
- Select the files you want to restore. When ready, click Restore.
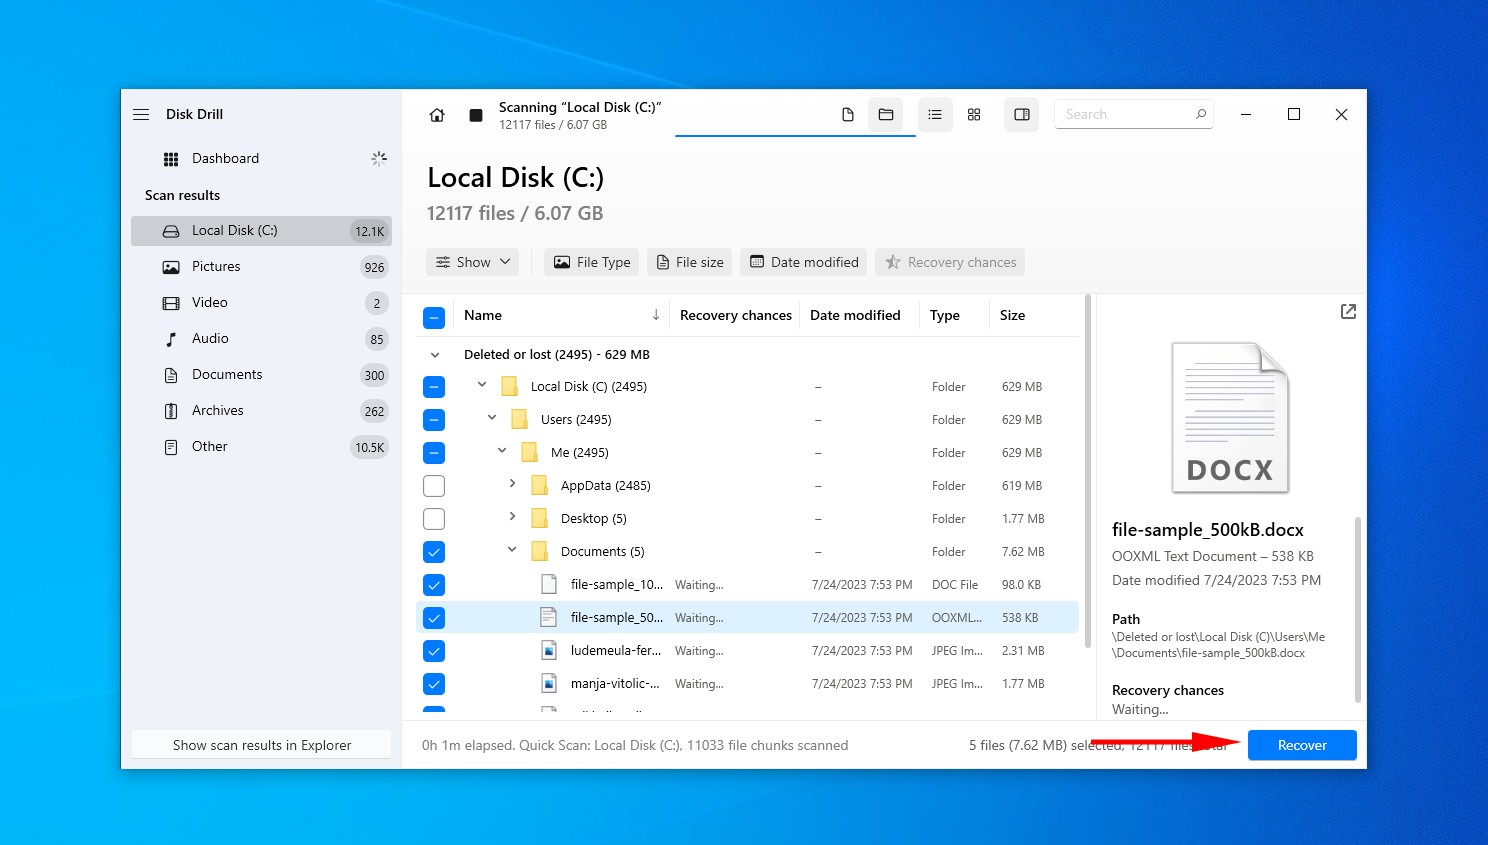
Method 3:Recover Using Data Recovery Software
If you accidentally deleted the Documents folder, you have a good chance of recovering it using specialized recovery software like Disk Drill. Using an advanced algorithm that scans your drive, Disk Drill can find data that has been deleted and recover it to a location of your choice.
Follow these steps to recover files that were deleted from the Documents folder.
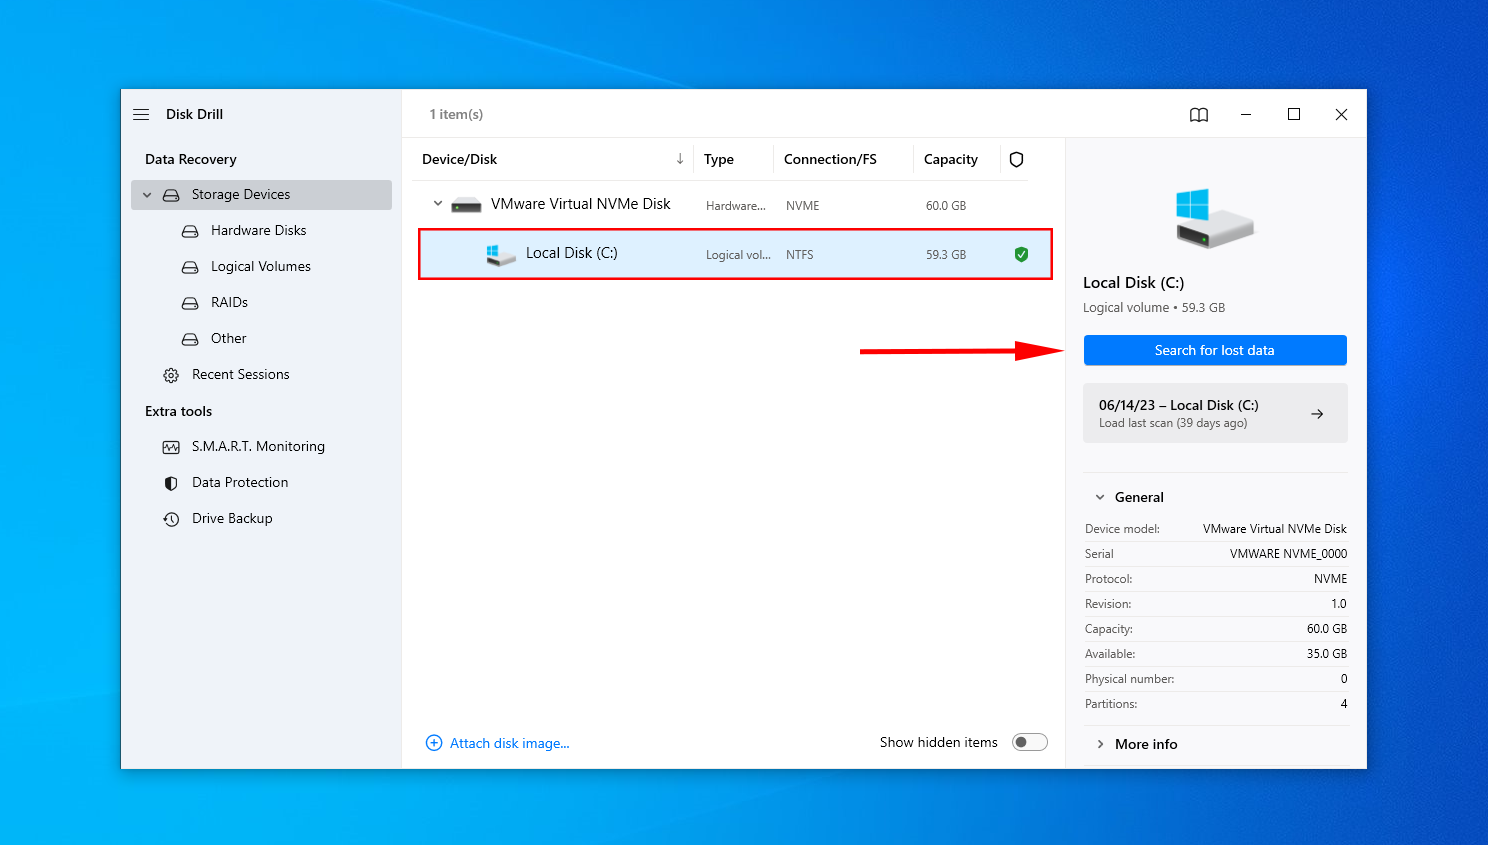
- Download Disk Drill and install it to a separate physical drive to avoid overwriting the lost data.
- Select the drive or partition that contains your Documents folder, then click Search for lost data.
- Click Review found items to review what Disk Drill discovered.

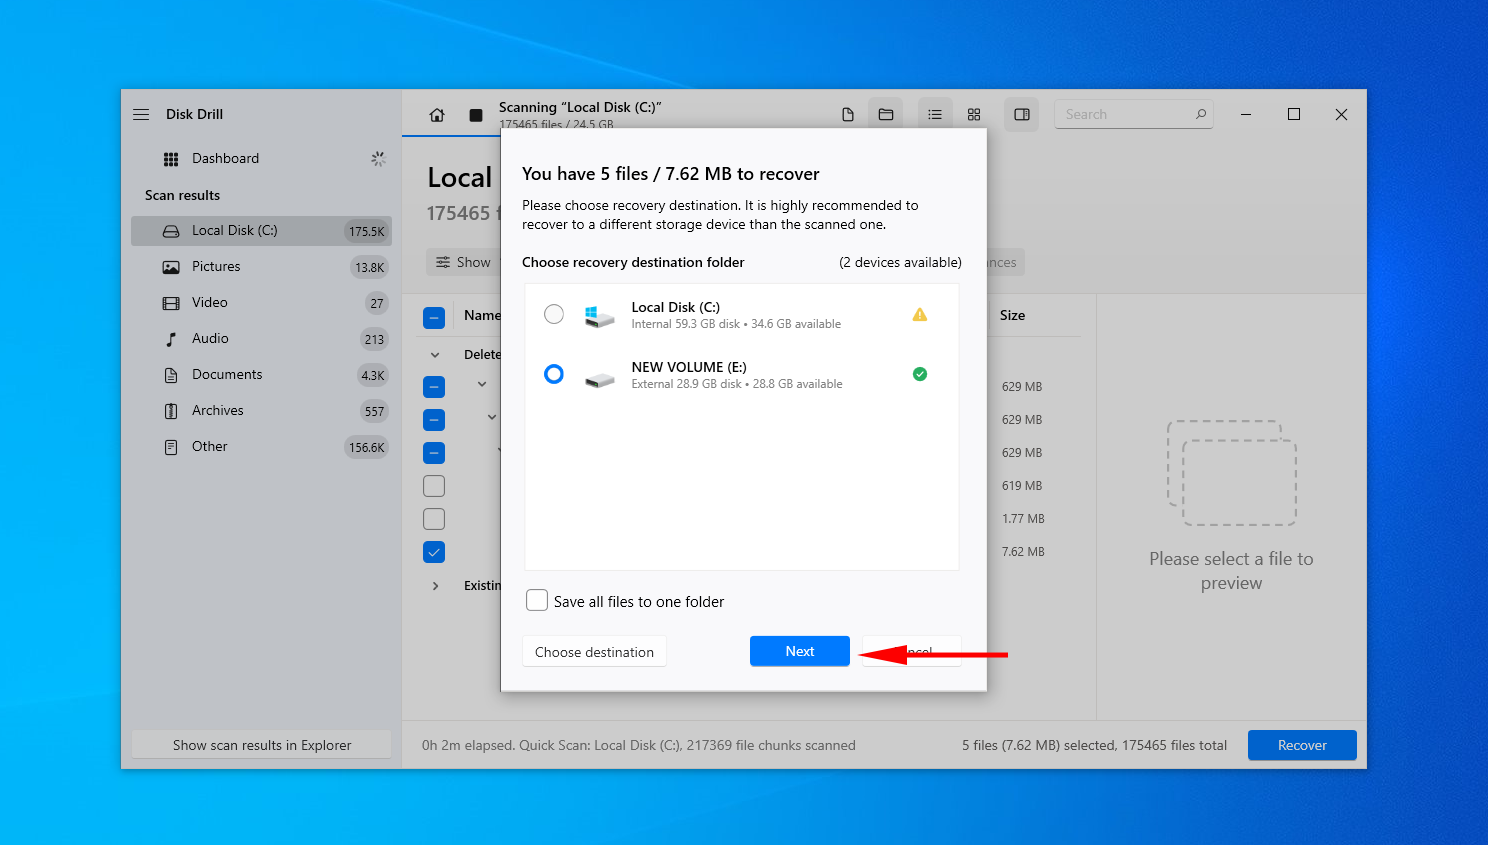
- Mark the files you want to recover. Find data easier by making use of the search box and preview functions. When ready, click Recover.
- Specify an output location on a separate physical partition to avoid corruption during recovery. Click Next to finalize recovery.
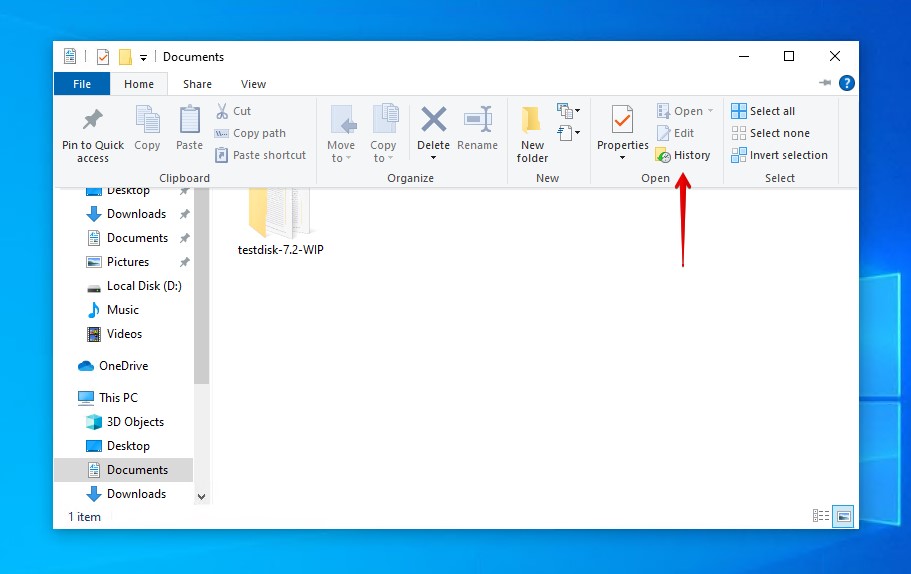
Method 4:Restore to a Previous Version
File History is a backup utility that comes built-in to Windows. When configured, it regularly takes snapshots of the specified folders, allowing you to not only keep a copy of the data but also restore it to a previous point in time if needed.
- Open the Documents folder.
- Click Home, then History.
- Select the data you want to restore, then click the green restore button.
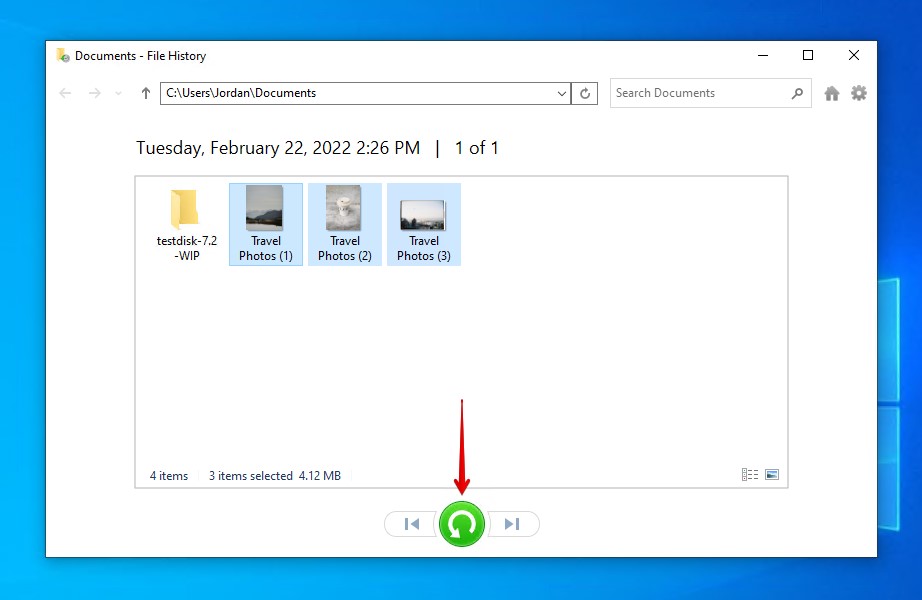
Once you restore, the files will be sent back to the Documents folder. This method can also be used to restore a deleted Documents folder if the parent folder was saved in File History. To do so, simply restore the Documents folder from a previous version of your user profile folder (C:\Users\USERNAME). File History remains one of the easiest ways to recover deleted files from Windows 11 and Windows 10 machines, as it takes mere seconds to set up and use.
How to Create a New Documents Folder
If your Documents folder is truly gone and you want to create a new one, this is also possible. You can do this by creating a new folder and updating the path address in the registry. Since these steps will involve updating your registry, make every action with care as registry mistakes can cause damage to your operating system.
These steps will guide you through how to restore the My Documents folder in Windows 10 by creating a new one and updating the registry path.
- Press CTRL + R, type %userprofile%, then press Enter. This is where the default Documents folder is stored.
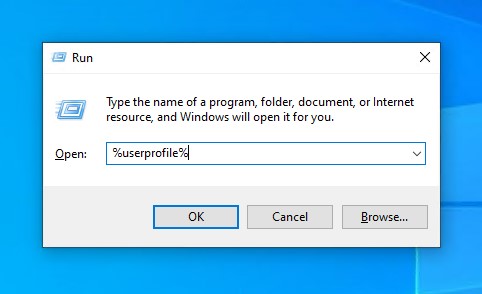
- Create a new Documents folder. In some cases, this is all you need to do. However, if it doesn’t link automatically, move on to the next steps which entail updating the registry item.

- Press CTRL + R, type regedit, then press Enter.
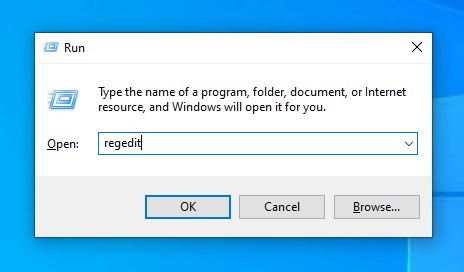
- Navigate to the following path:
HKEY_CURRENT_USER\Software\Microsoft\Windows\CurrentVersion\Explorer\Shell Folders\
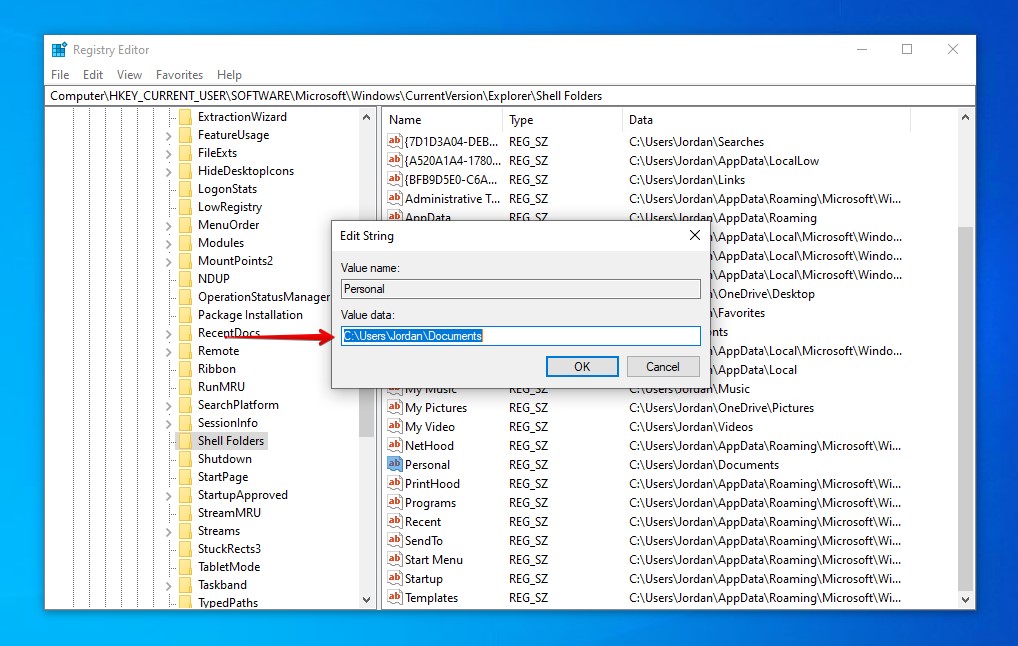
- Open the entry called Personal. In the Value data field, insert the path to the new Documents folder. Click OK when finished.
FAQ:
- Open the Documents folder.
- Click Home, then History.
- Select the data you want to restore. Click the green restore button.
- Press CTRL + R on your keyboard.
- Type %userprofile%\Documents. Press Enter.
- Open Finder on your Mac. Select Preferences.
- In the Sidebar tab, make sure the tickbox next to Documents is ticked. Doing so should restore the folder.


