 The most common parameters used in CHKDSK are /R and /F. They differ in function and time taken to complete. So, which one should you use, CHKDSK /R, or /F? To help you decide, we’ll describe both parameters, how they work, and how to run the CHKDSK command effectively.
Table of Contents
What is the Difference Between /R and /F in CHKDSK?
The CHKDSK command has numerous parameters that can be used to modify what the command does and how it works. Two of the most popular ones are /R and /F, which stand for “fix” and “repair,” respectively. Fix, and repair are synonymous, but not in CHKDSK. The primary difference between CHKDSK /F and CHKDSK /R, is the type of errors they fix.
| Parameter | /F | /R |
| 📋 Description | Detects errors and corruption in the drive’s file system, which is an index of all the files and folders on your drive. Borrowing an analogy from the Ask Leo blog, consider the file system to be the Table of Contents of a book. The /F parameter will check that all entries are correct, lead to the right pages and chapters (files and folders), and that all chapters have an entry. | The CHKDSK /R command does everything that /F does, but it also checks the health of each physical sector on your disk. It determines whether the data on each sector is readable. If not, it labels the damaged sectors as “bad sectors” and, if available, dedicated spare sectors are called upon to take the place of these bad sectors. Once a sector is marked as bad, it is no longer used by Windows to store data. |
| 🕒 Time Taken | Checking each of the drive’s sectors is an arduous process, and the CHKDSK /R command can take several hours to complete. Especially if it detects errors and attempts to fix them. | The /F parameter takes comparatively less time to complete. Usually, the time taken is under an hour, but it could be more, depending on the drive and the errors CHKDSK encounters. |
| ❓ When to Use | If you notice only minor data corruption on your drive and there’s no hit on the disk’s performance, CHKDSK /F is a better and faster choice. | If you observe the drive performing slower than usual and random disappearance and appearance of data, it could warrant the CHKDSK /R command. |
Regardless of the parameter you choose, it’s best to let the CHKDSK command run its course and don’t shut down your PC abruptly.
How to Avoid Data Loss Caused by Running the CHKDSK Command
Sometimes, running the CHKDSK command can cause data loss. This usually happens when CHKDSK finds bad sectors on the drive and attempts to repair them. Essentially, data loss is collateral damage when CHKDSK detects issues on your drive and fixes them.
While CHKDSK won’t always delete some files as it fixes your drive, it’s still better to be safe than sorry. So, here’s how you can avoid data loss caused by running the CHKDSK /R or CHKDSK /F commands.
The first thing you can do is, simply run the CHKDSK command without any parameters. In doing so, CHKDSK only displays the status of the drive, but doesn’t attempt to repair the drive. But, this way, you don’t actually take advantage of the CHKDSK utility because the errors remain as they were.
A better alternative is to back up all your data beforehand and then run the CHKDSK /F or CHKDSK /R commands, depending on your needs. But, simply copying and pasting the data from an already damaged hard drive can exacerbate its problems–and, in some cases, it could be straight up impossible. We recommend you create a disk image of the drive and recover your data from the disk image, using a program of your choice.
For this tutorial, we opted to use Disk Drill as it lets you create a disk image as well as recover data from it, within a single interface. It’s compatible with all storage device types, recognizes all major file systems and over 400 file formats. Using Disk Drill you can even recover data if your drive has no file system, i.e., it’s RAW (CHKDSK doesn’t work on RAW drives).
The process of creating a disk image and recovering data from it is pretty straightforward:
Step 1: Use the Byte-to-Byte Backup Feature in Disk Drill
- Download Disk Drill and install it.
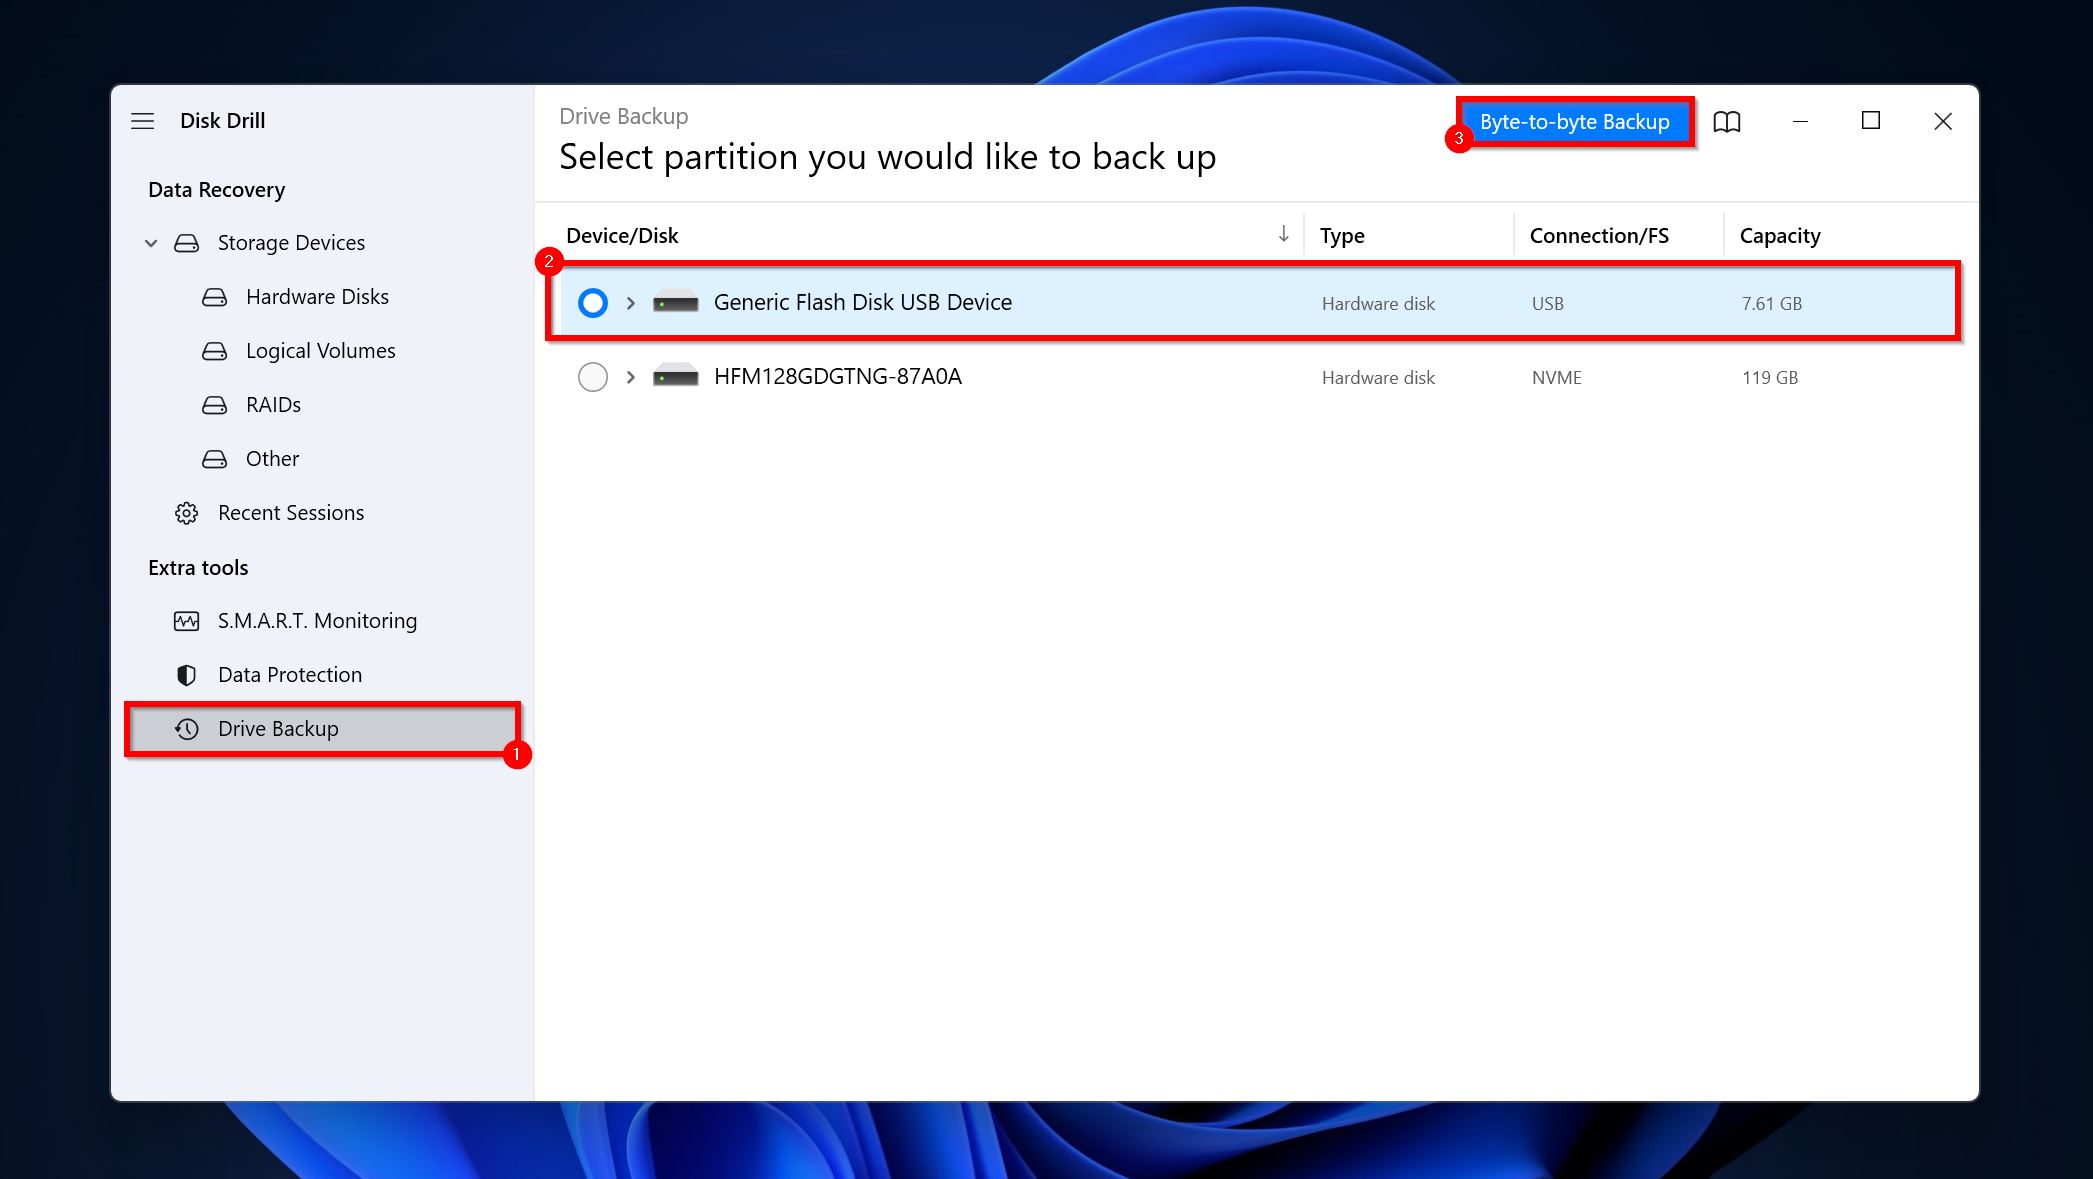
- Open Disk Drill, and click on Drive backup under Extra tools.
- Select the drive you want to create a disk image of, and click on Byte-to-byte Backup.
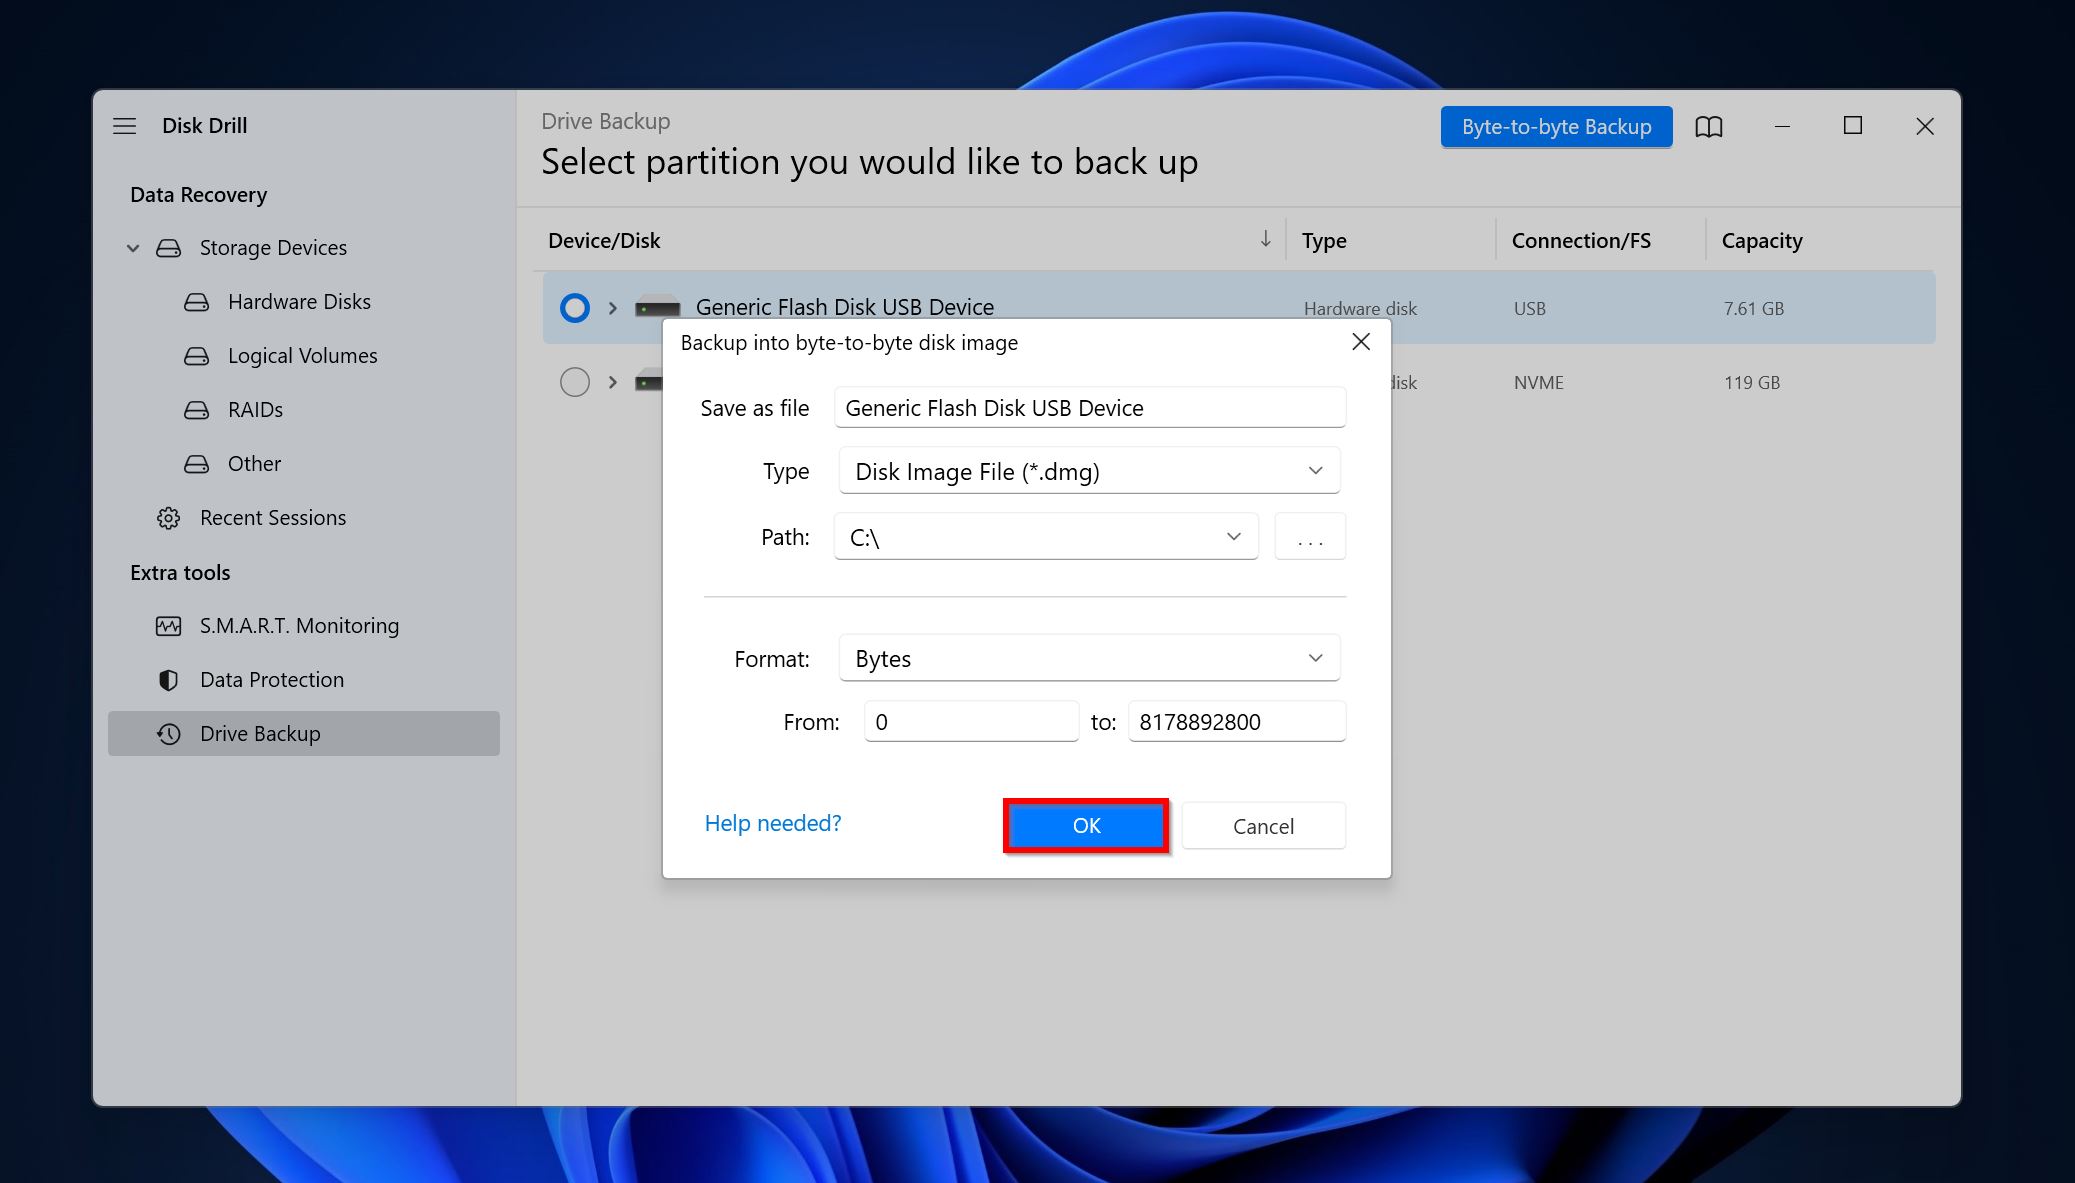
- Choose where you wish to save the disk image. Note, the disk image is essentially a soft copy of the entire drive, so make the save destination has enough free space. Click on OK.
- Disk Drill will create the disk image. The process could take some time, depending on the size of the drive.
Step 2: Recover Data from the Disk Image
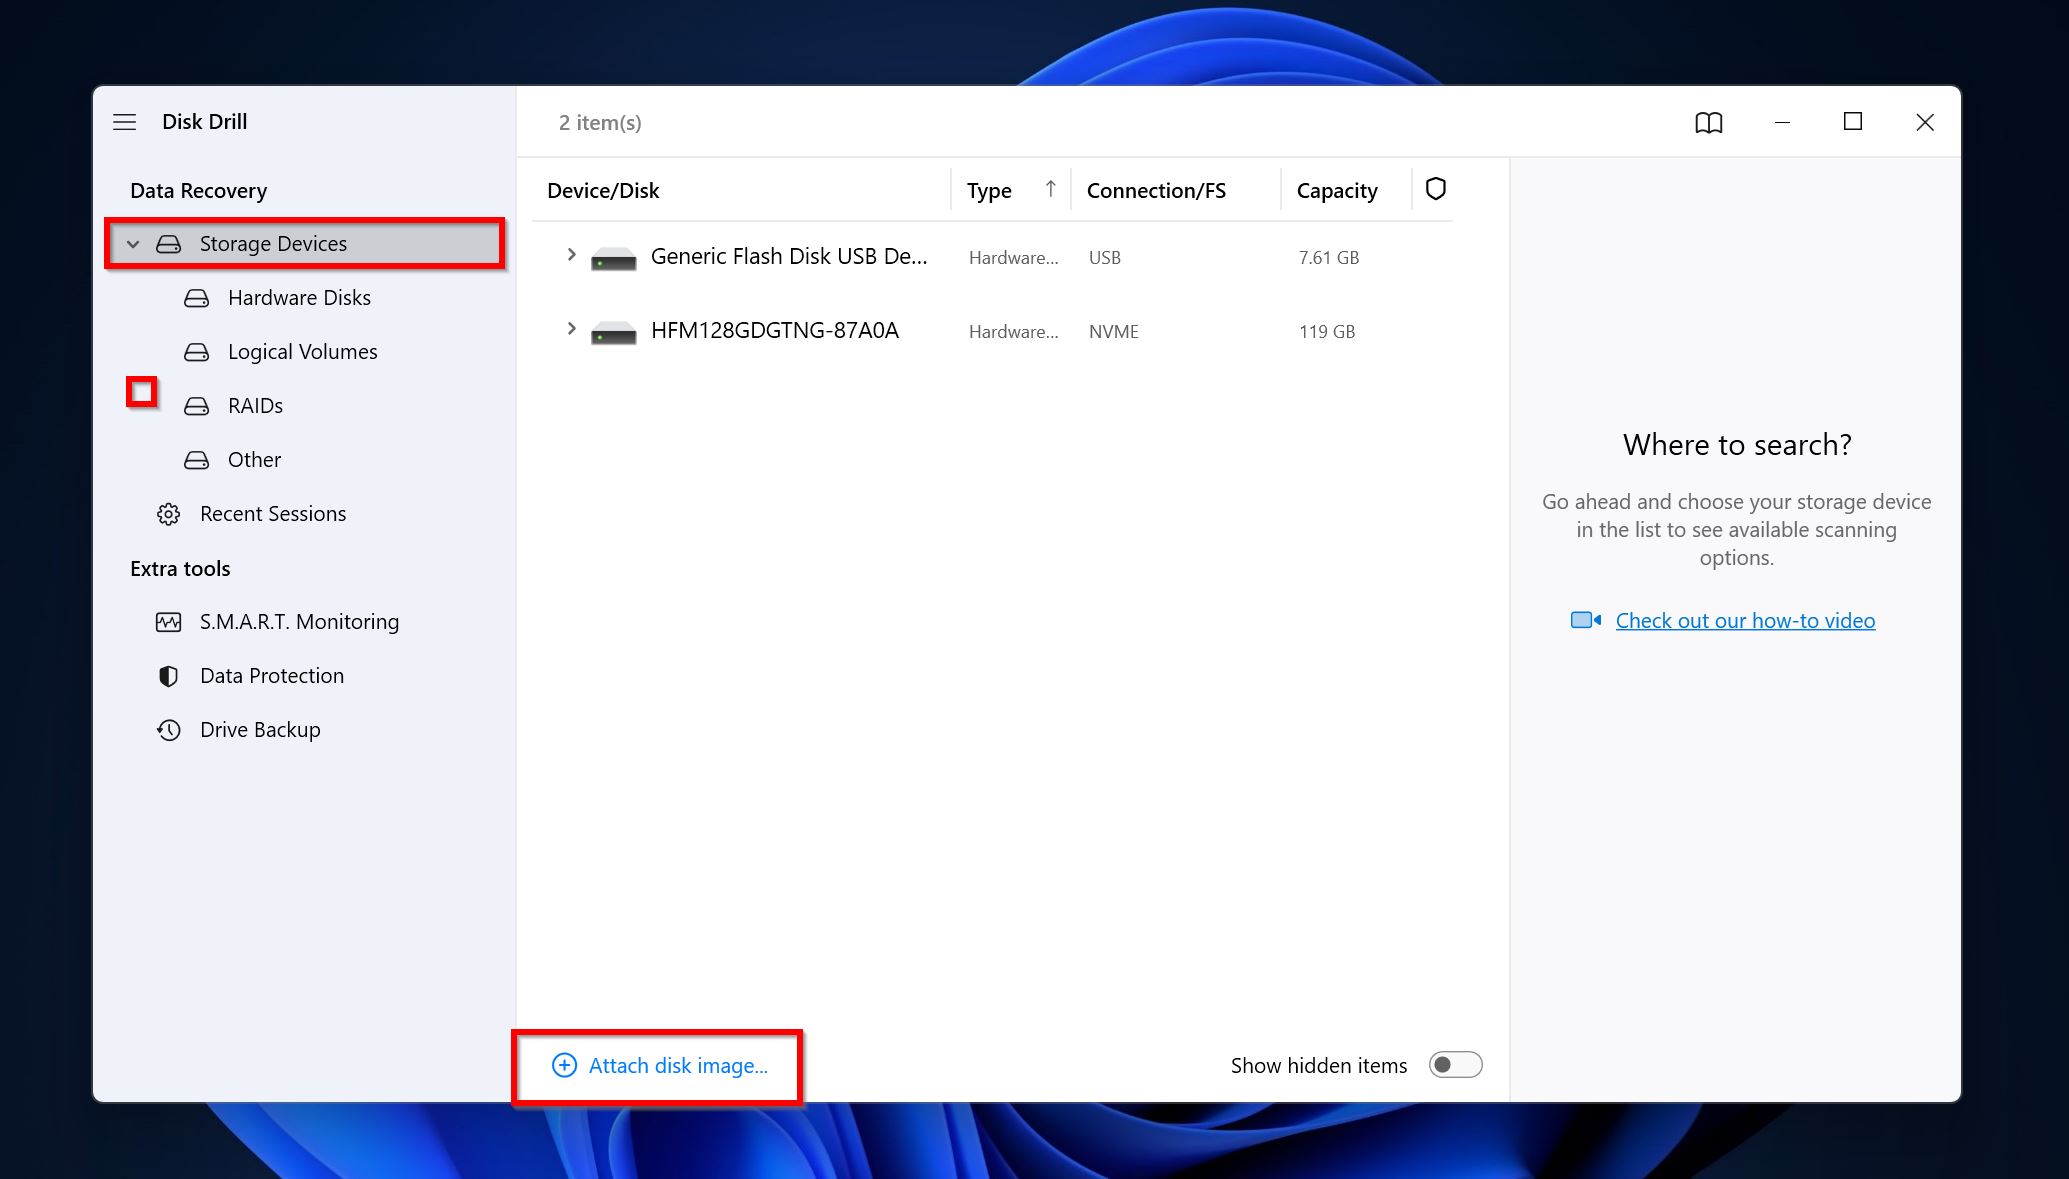
- Open Disk Drill and go to the Storage Devices tab, under Data Recovery.
- Click on Attach disk image, browse for the disk image you created in the previous section, and double-click on it. It’ll be added as a drive with a “Mounted image” label in the Disk Drill interface.
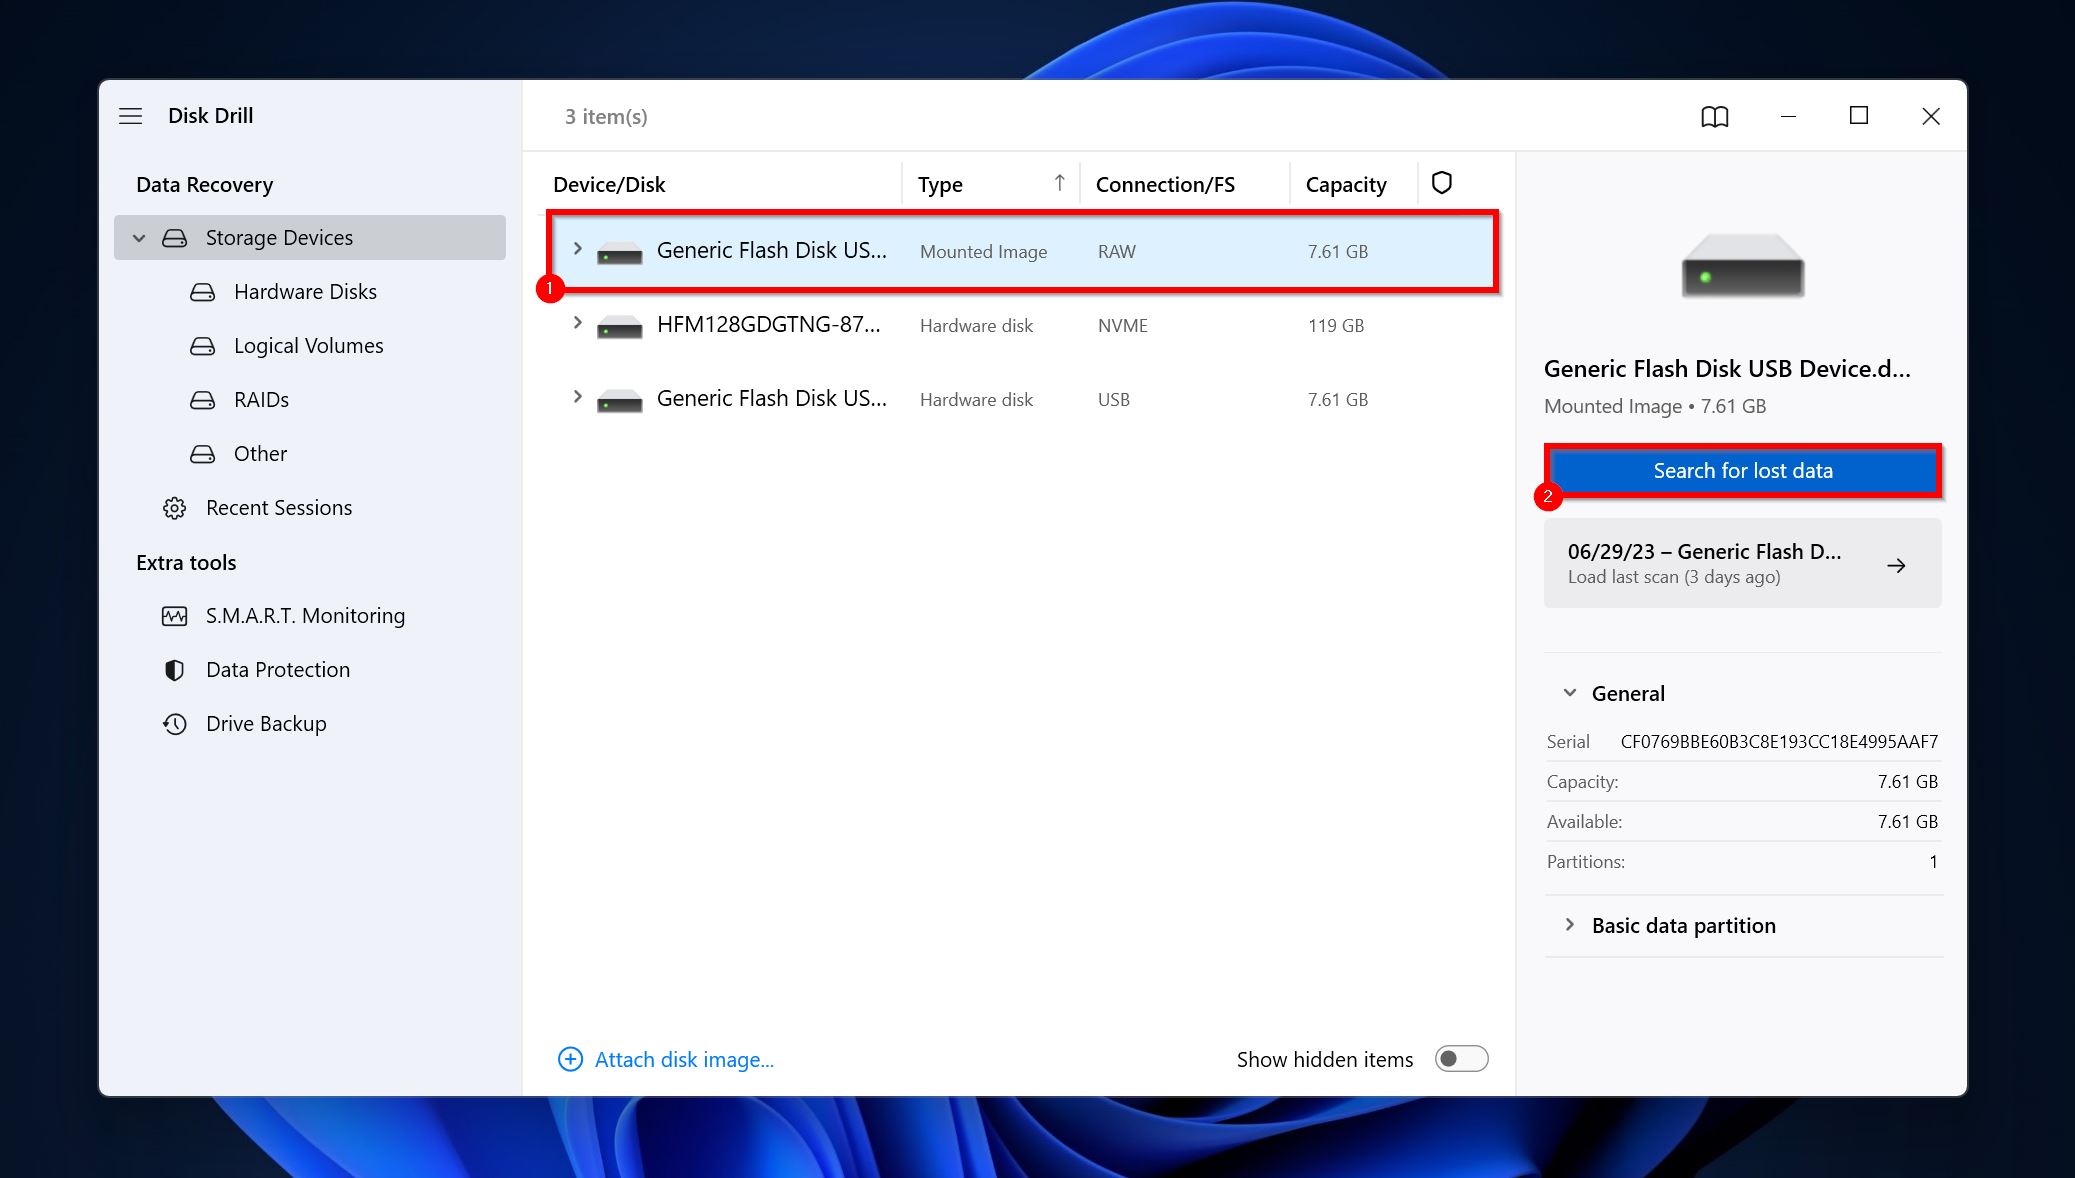
- Select the drive’s disk image and click on Search for lost data.
- Click on Review found items to view the files on the drive. You can filter through the files by clicking on the relevant file type as well (Pictures, Video, Audio, Documents, Archives, and Other).
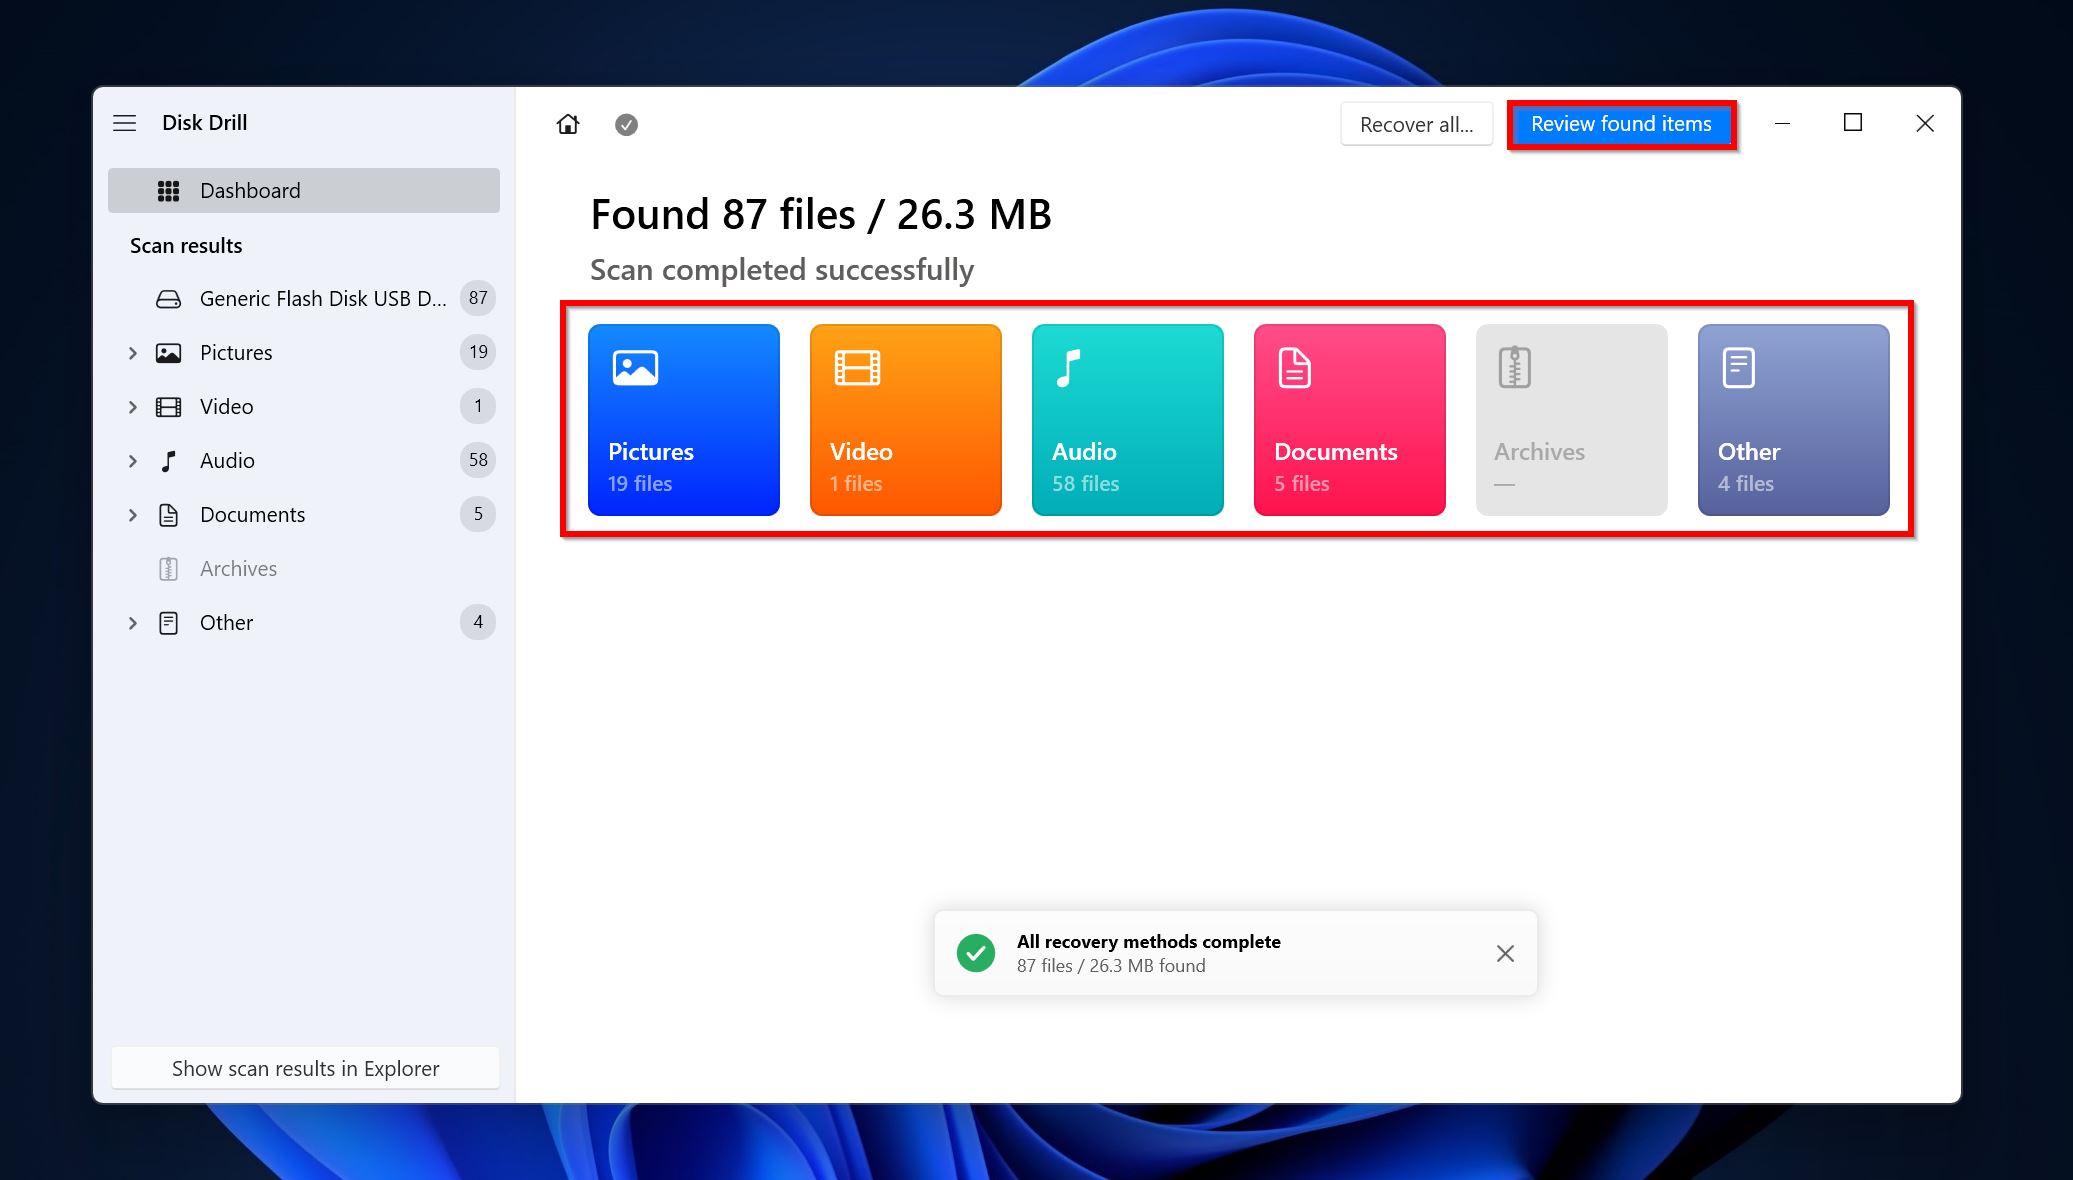
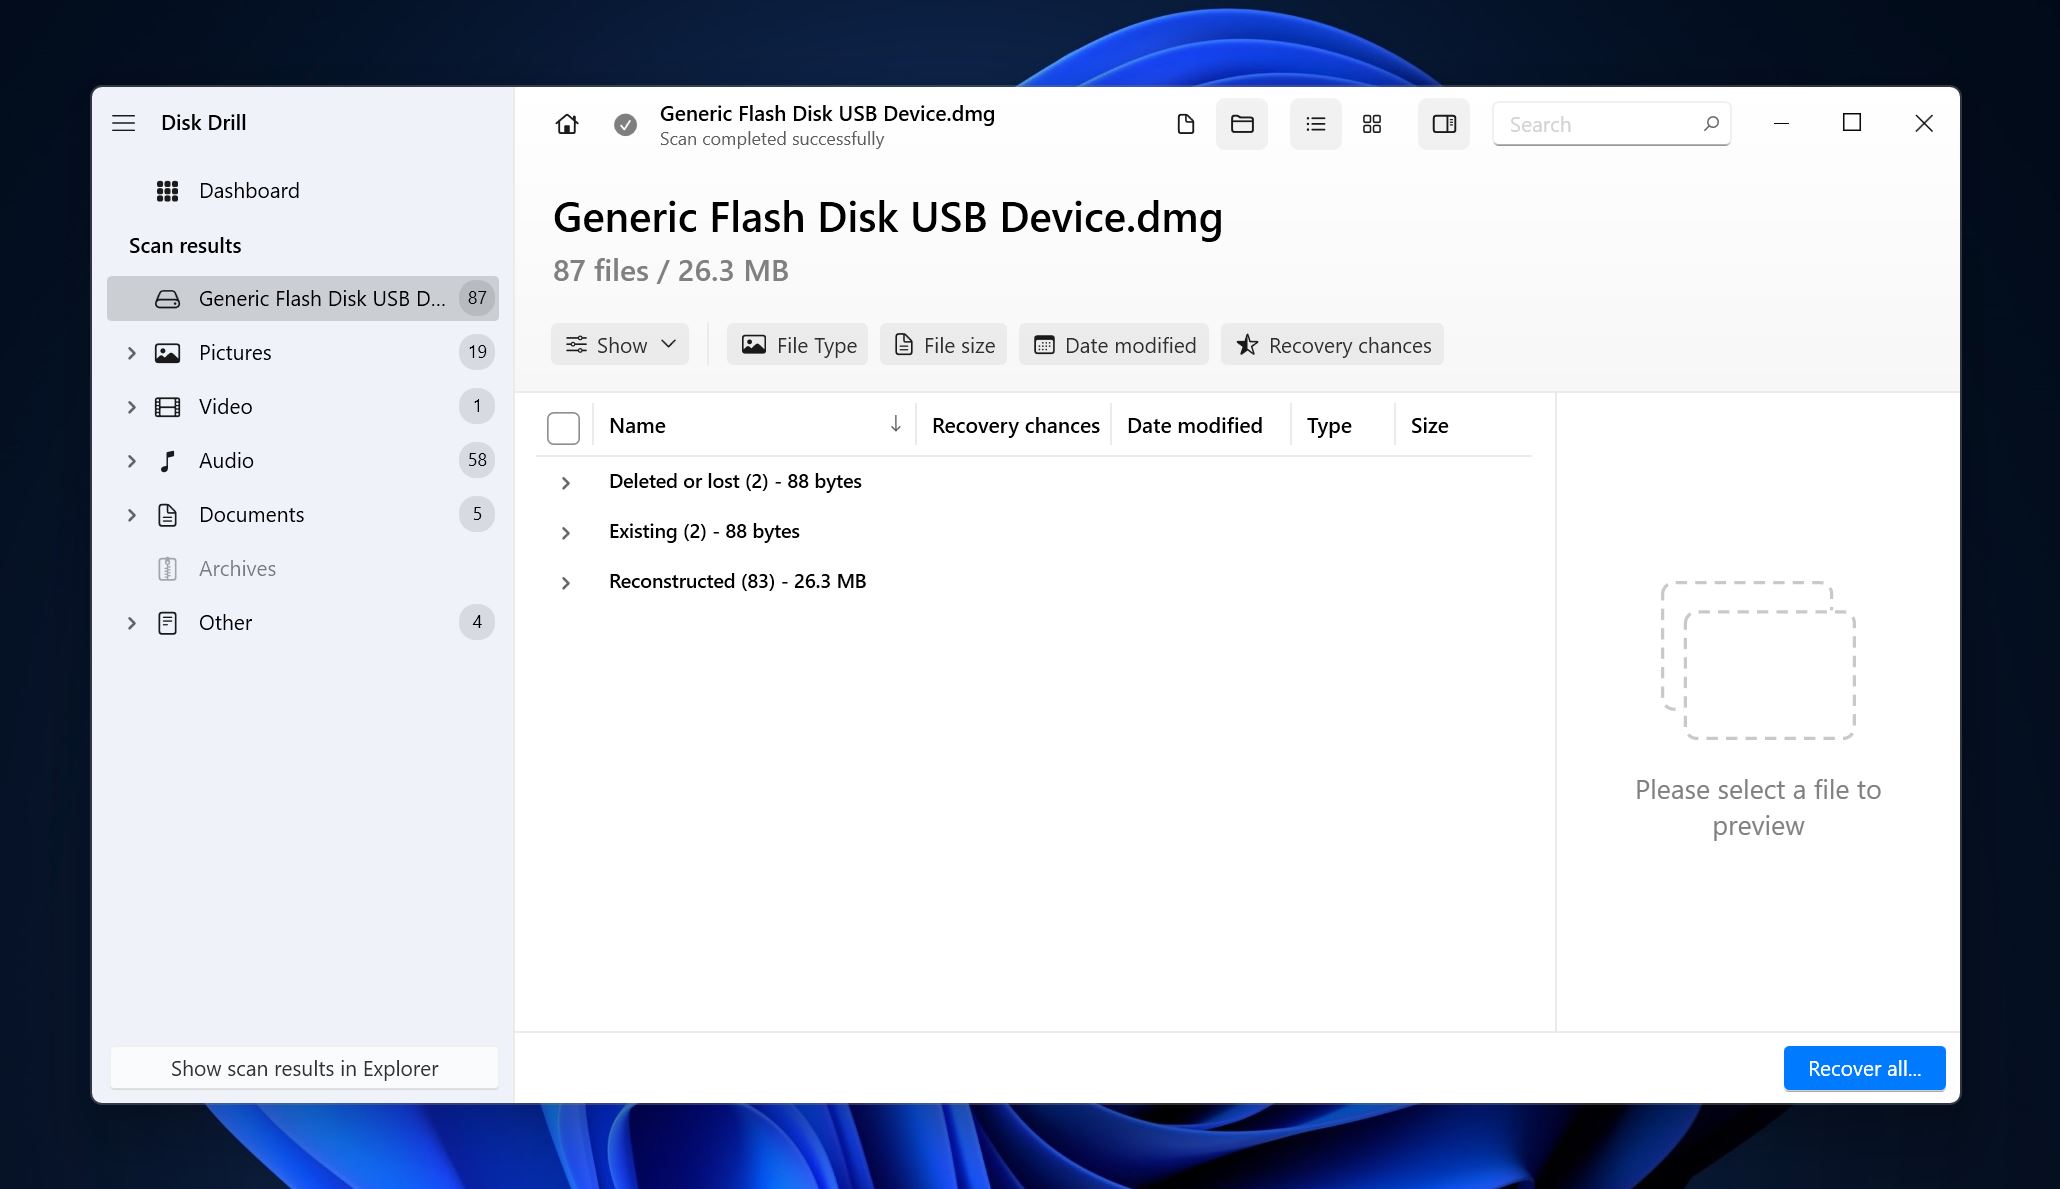
- Expand the Existing section to view files that are currently present on the drive. To view deleted files, expand the Deleted or lost and Reconstructed sections.
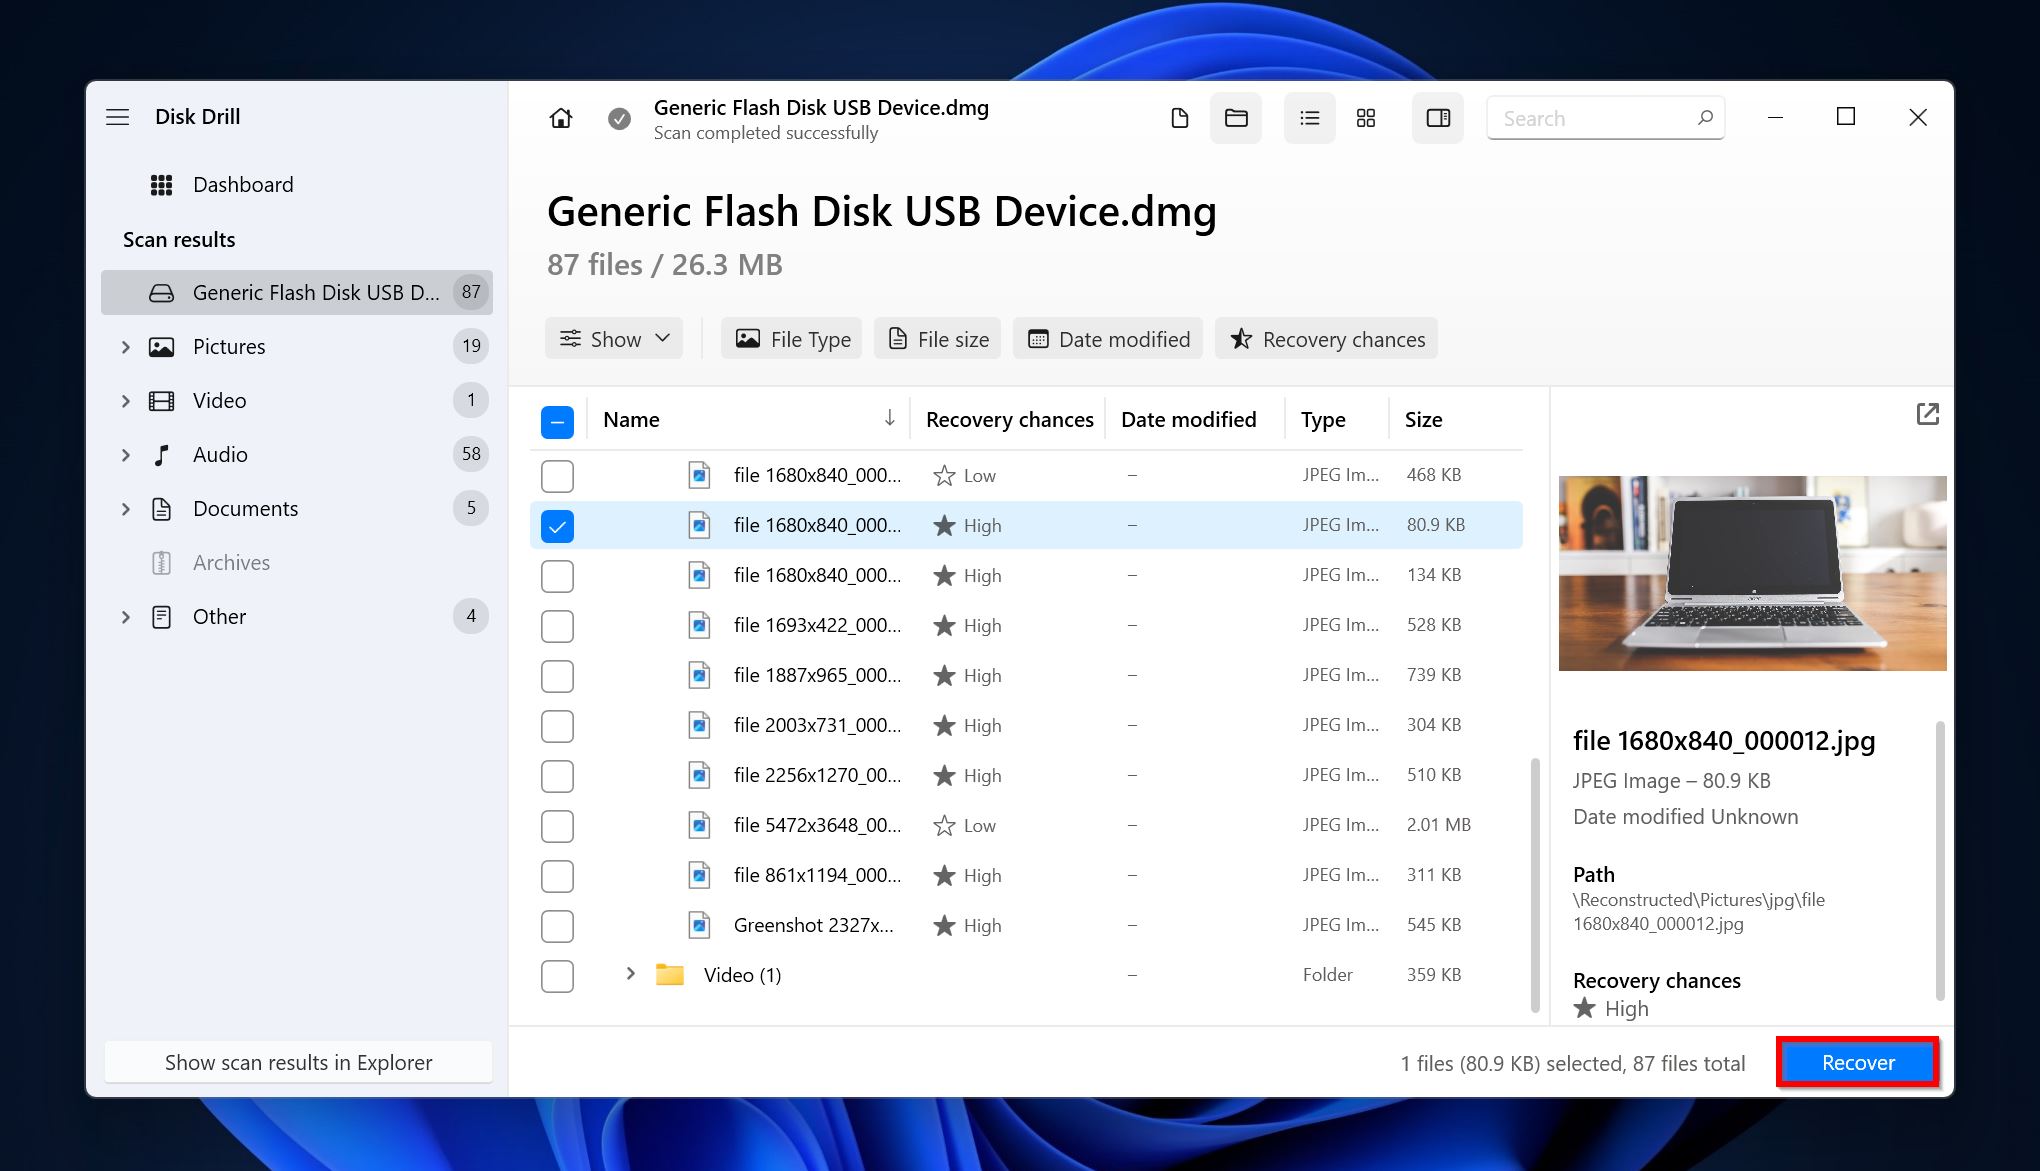
- Select the files you wish to recover. Disk Drill will display a preview of the currently selected file, but you can manually preview files by clicking on the eye icon next to the filename. Click on Recover once you’re done selecting the files.
 Choose a recovery destination for the files and click Next.
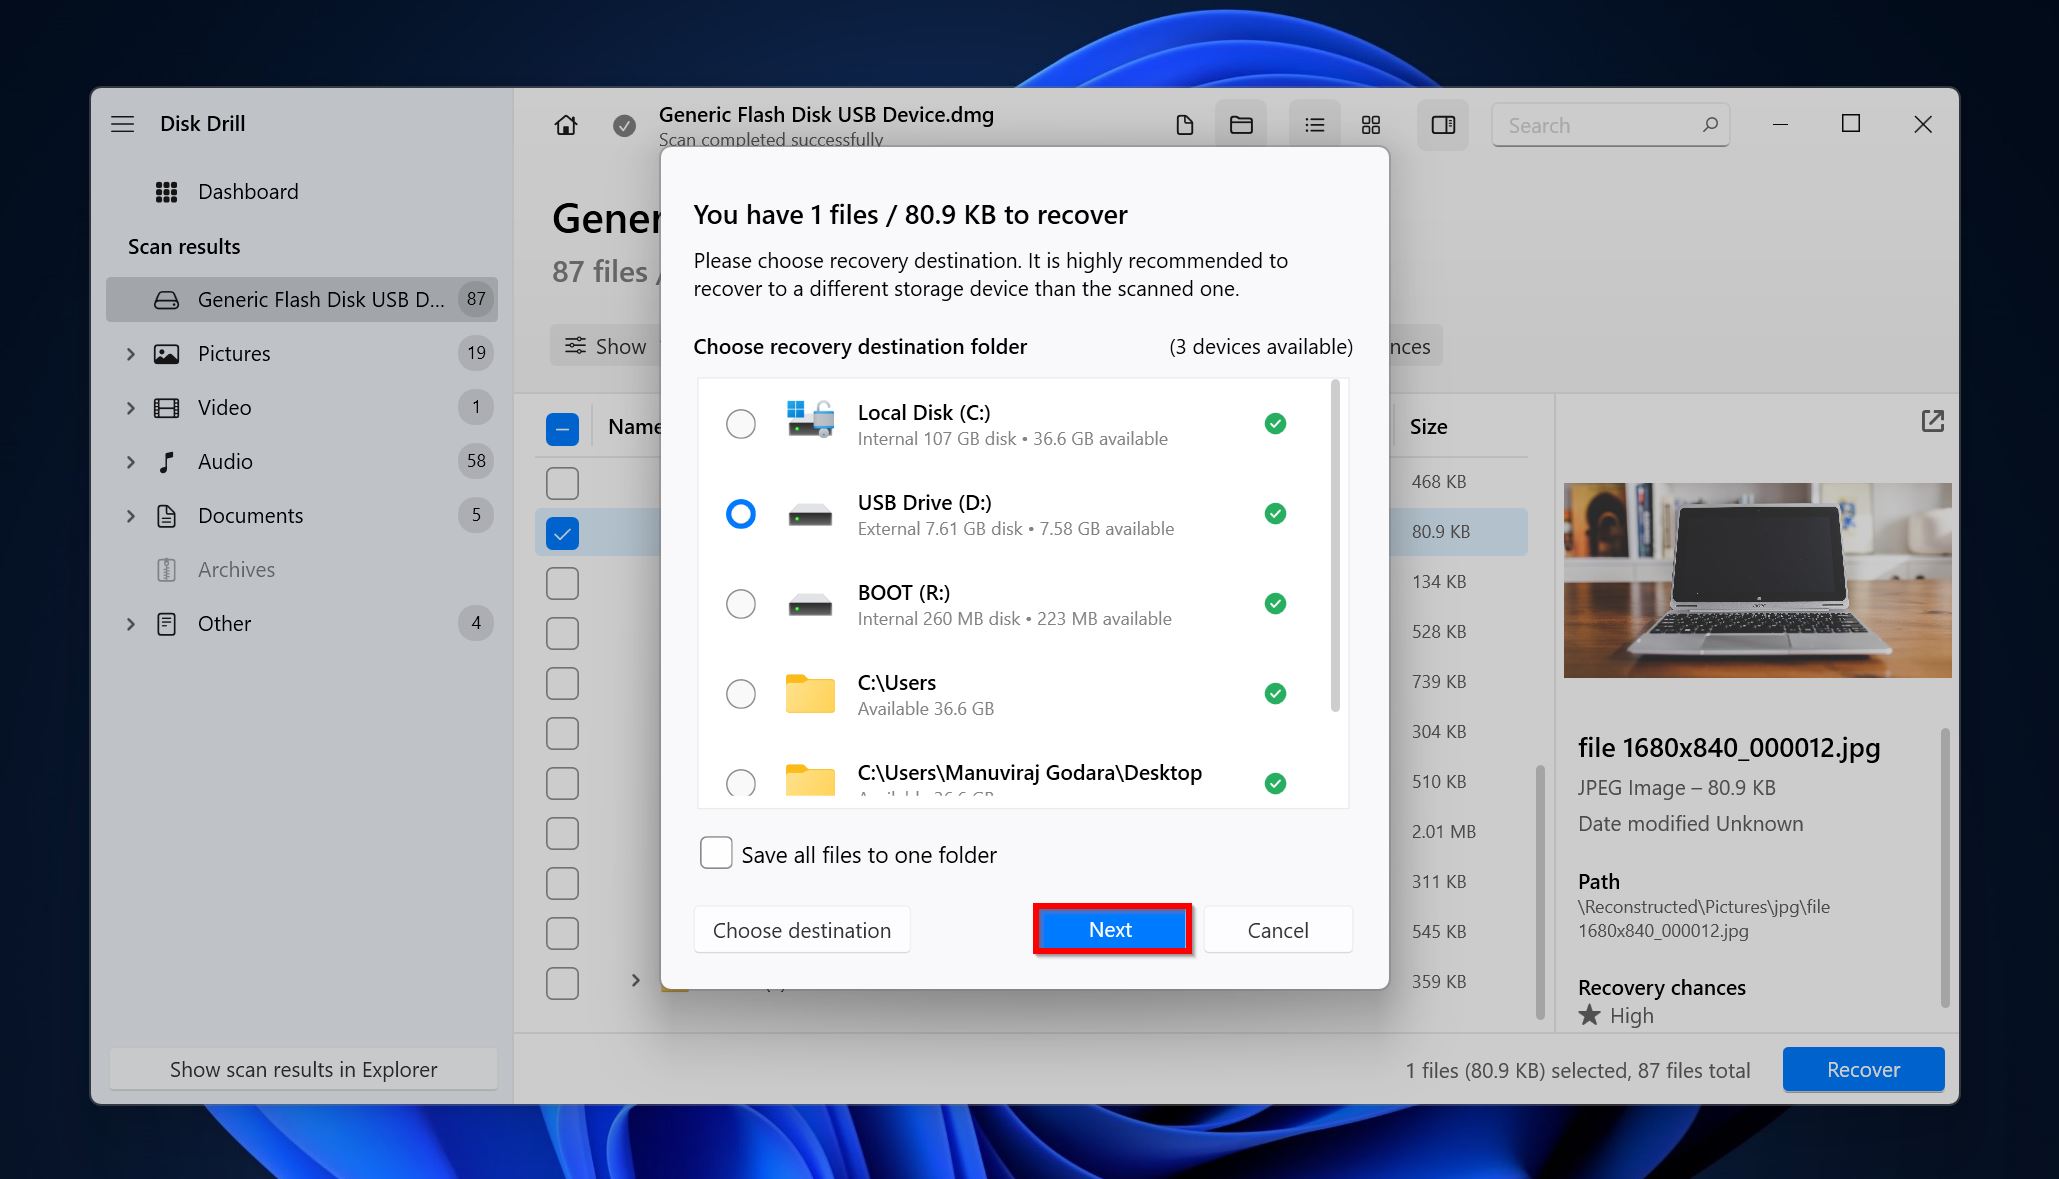
- Disk Drill will recover the selected files. You can recover up to 500 MB of data for free on Windows. For further recovery, you’ll require a license.
How to Run the CHKDSK Command Properly
Choosing the appropriate parameters and using correct syntax is important when running the CHKDSK command.
Here’s how to run the CHKDSK command correctly:
- Search for “cmd” in Windows Search (Windows + S). Right-click on Command Prompt > Run as administrator.
- Type
chkdsk /forchkdsk /rin the console and press Enter. You can also scan specific partitions, by using thechkdsk X: /fsyntax (replace X with the partition letter, such as C:, D:, etc.). - Wait for the CHKDSK process to complete. The time taken for CHKDSK to complete, will depend on the parameter you used, as well as the errors that the utility encounters on the disk.
On drives that are formatted with the NTFS file system (Windows’ default file system), you can use the /i parameter to perform a less thorough check of the index entries. This will reduce the time taken for CHKDSK to complete the scan. The /c parameter, too, can save your time at the cost of a less detailed scan.
Bonus: To know the various parameters you can use with CHKDSK and the correct syntax format for the utility, you can run the CHKDSK /? command in CMD.
Common Issues When Running the CHKDSK Command
Many users report facing certain hiccups while running the CHKDSK command.
We’ve listed some commons one below, and how you can deal with them effectively:
- Cannot open volume for direct access: If you get this message when running CHKDSK, it indicates that you entered the incorrect drive letter. The message can also show up if the syntax was correct, but you attempted to run CHKDSK on a specific folder in an NTFS drive. Here, run CHKDSK on the entire NTFS drive or partition, instead of a specific folder in it. Double-check the drive letter of the partition you wish to scan, using the Windows Explorer, and then rerun the CHKDSK command with the correct drive letter.
- CHKDSK cannot run because the volume is in use by another process: You’ll get this message when attempting to run CHKDSK on the PC’s internal HDD (which contains the OS). Windows will ask you whether it should run the scan when the system restarts next. Press Y on this screen and reboot your PC to run CHKDSK. You can also opt to run CHKDSK from the Windows Recovery Environment (WinRE).
- CHKDSK is stuck: CHKDSK takes several hours and sometimes even a day to complete (on very large drives). So, it’s likely CHKDSK is not stuck and is simply doing its job. But, if you notice that the hard drive LED is not blinking at all, CHKDSK could actually be stuck. In this case, press ESC to stop the process, and run CHKDSK again. If the issue repeats, run the sfc /sccanow command and then run the CHKDSK command.
Conclusion
Choosing the correct parameters for CHKDSK is important, as it can save you a lot of time. It also helps you avoid stressing the drive because of detailed scans that weren’t necessary in the first place. Regardless of the parameters you use, we still recommend you back up important data before running the CHKDSK utility.


