 The Downloads folder can abruptly stop responding, or become entirely inaccessible. There can be several reasons behind the issue, but in almost all cases, the problem can be fixed in a few simple steps. To help you out, we’ve created a list of 9 fixes that can help you out when you notice the Downloads folder is not responding.
Table of Contents
Why is the Downloads Folder Not Responding
Typically, an unresponsive Downloads folder indicates an underlying issue with the File Explorer. However, in some cases, it can also be a symptom of a logically damaged storage drive. It’s best to diagnose why the Downloads folder is not responding, so you can pick the appropriate solution.
To help you out, here are some common reasons behind a Downloads folder that’s not responding on Windows 10/11:
| Reason | Description |
| 🗂️ The Downloads folder has too many files | An accumulation of files can be difficult to process by Windows and File Explorer. Here, the File Explorer will work fine otherwise, but may freeze or slow down as soon as you access the Downloads folder. |
| 🕷️ Malware infection | Viruses and other types of malware can disrupt the functioning of the Downloads folder and even cause it to disappear entirely. Most viruses will enter your PC through the internet. |
| 📑 Optimization for certain file types | Windows can automatically optimize the Downloads folder for specific file types instead of “General items.” This can cause issues while accessing the folder, especially if you download several types of files. |
| 𓊒 Corrupt file system and bad sectors | A damaged file system can impede the regular functioning of your PC, especially when it comes to accessing your files. Bad sectors are unreadable areas on the disk and the Downloads folder may not be responding because your drive has too many bad sectors. |
| 💥 Damaged system files and other issues | If Windows’ system files are corrupt, it will hamper the functioning of your PC and can be a reason why you can’t open the Downloads folder. |
9 Ways to Fix a Downloads Folder That’s Not Responding
You have plenty of options at your disposal to fix a Downloads folder that won’t open, or isn’t responding. If you’ve figured out what caused the problem, you can directly choose the appropriate fix. If not, we recommend you attempt the fixes in the order they’re listed.
Method 1: Restart the Windows Explorer Process
It’s possible you’re facing a temporary glitch that caused the Downloads folder to not respond. A simple fix for this, is to restart the Windows Explorer. We don’t mean simply closing the File Explorer windows and opening it, but killing the File Explorer process and restarting it.
To do this, you’ll need to use the Task Manager:
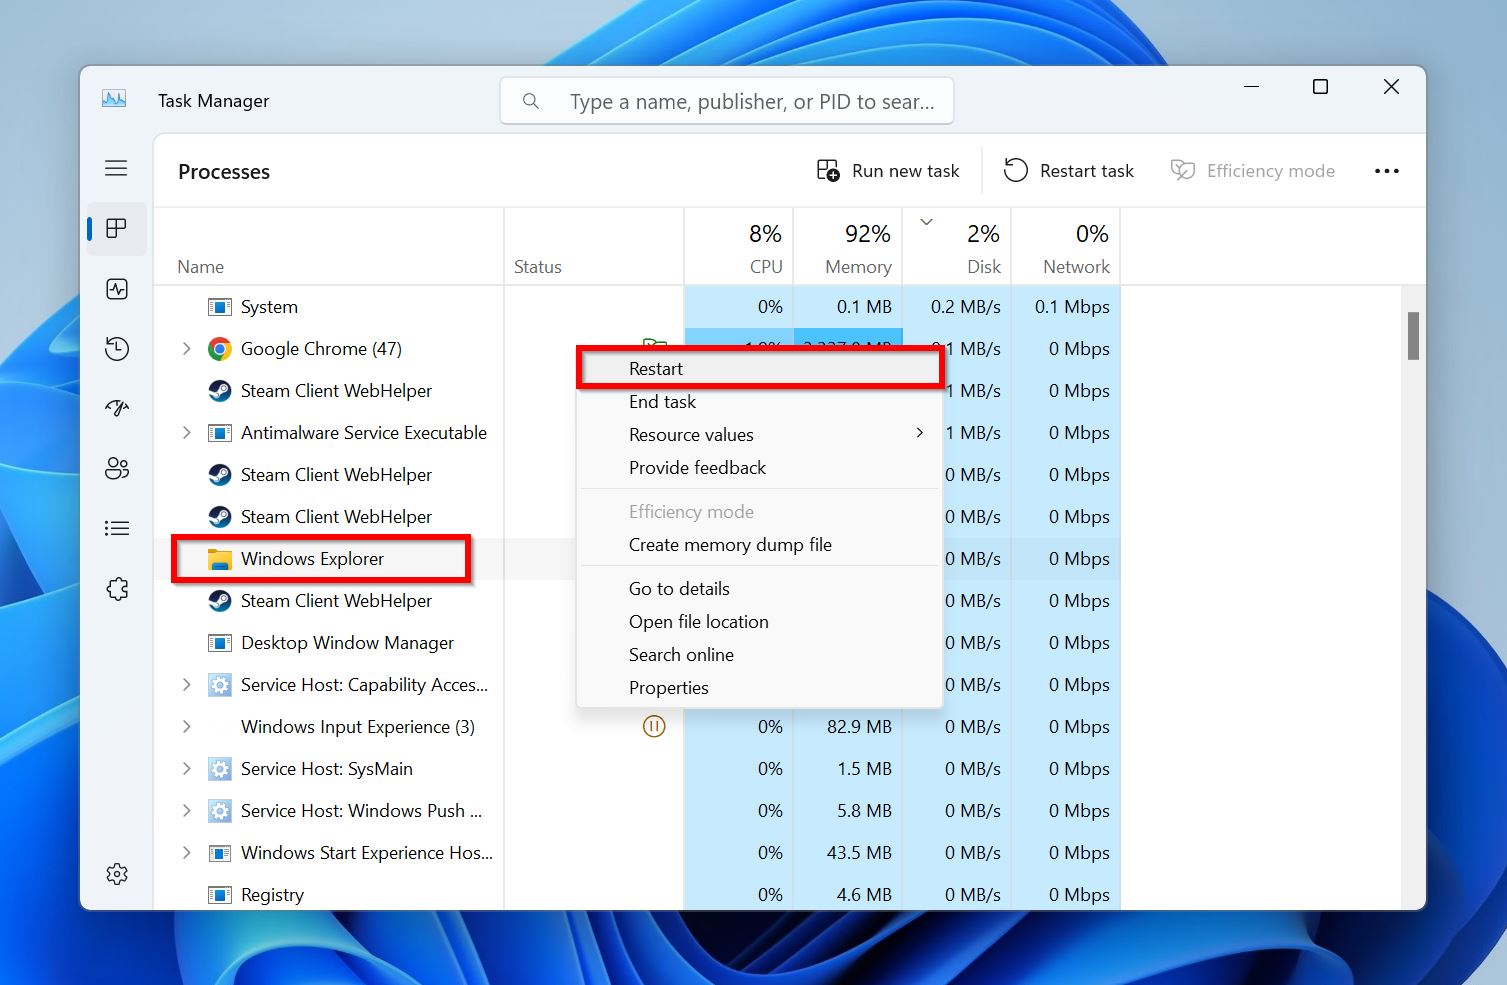
- Press CTRL + Shift + ESC to open the Task Manager. You can also open Task Manager by right-clicking the Taskbar and selecting Task Manager, or pressing CTRL + ALT + Delete and then clicking on Task Manager.
- Click on the Processes tab. In Windows 11, this will be the checkerboard-like option at the top of the left sidebar.
- Right-click on the Windows Explorer process and click Restart.
Method 2: Change View to Icons
Using Thumbnail view in File Explorer? It could be why the File Explorer is not responding on the Downloads folder. To resolve this, change the View type to Icons.
Here’s how:
- Search for “explorer options” in Windows Search (Windows Key + S) and click on File Explorer Options.
- Click on the View tab.
- Tick the Always show icons, never thumbnails option.
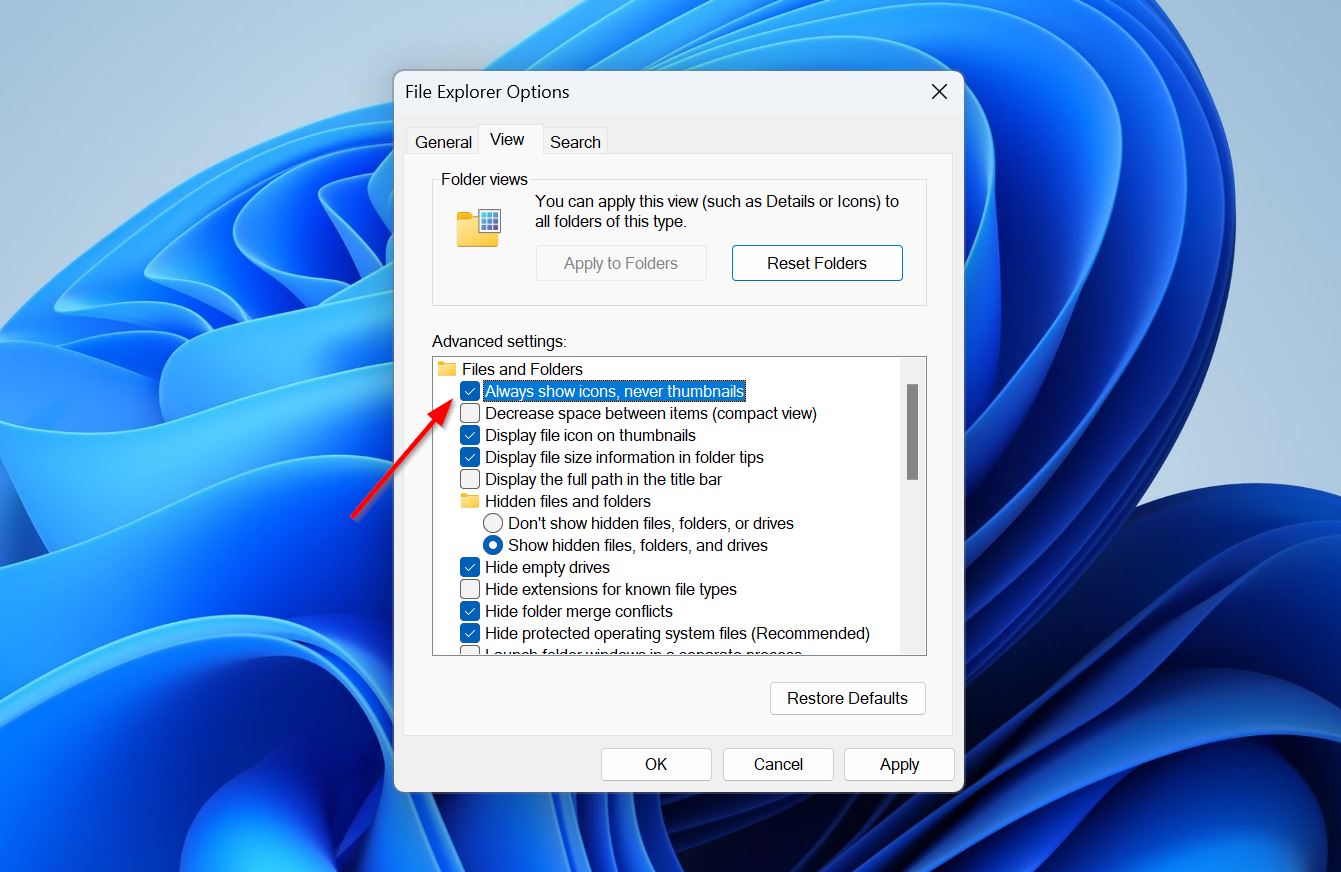
- Click on Apply and then OK.
Method 3: Disable Automatic Folder Type Discovery
The Automatic Folder Type Discovery Feature optimizes your folders for the file types they contain. But this can sometimes cause problems, resulting in an inaccessible or freezing Downloads folder. To resolve this issue for good–optimize the folder for general items, and then disable the Automatic Folder Type Discovery feature.
Follow these steps:
Step 1: Optimize the Downloads Folder For General Items
- Open File Explorer (Windows Key + E).
- Right-click on the Downloads folder and select Properties.
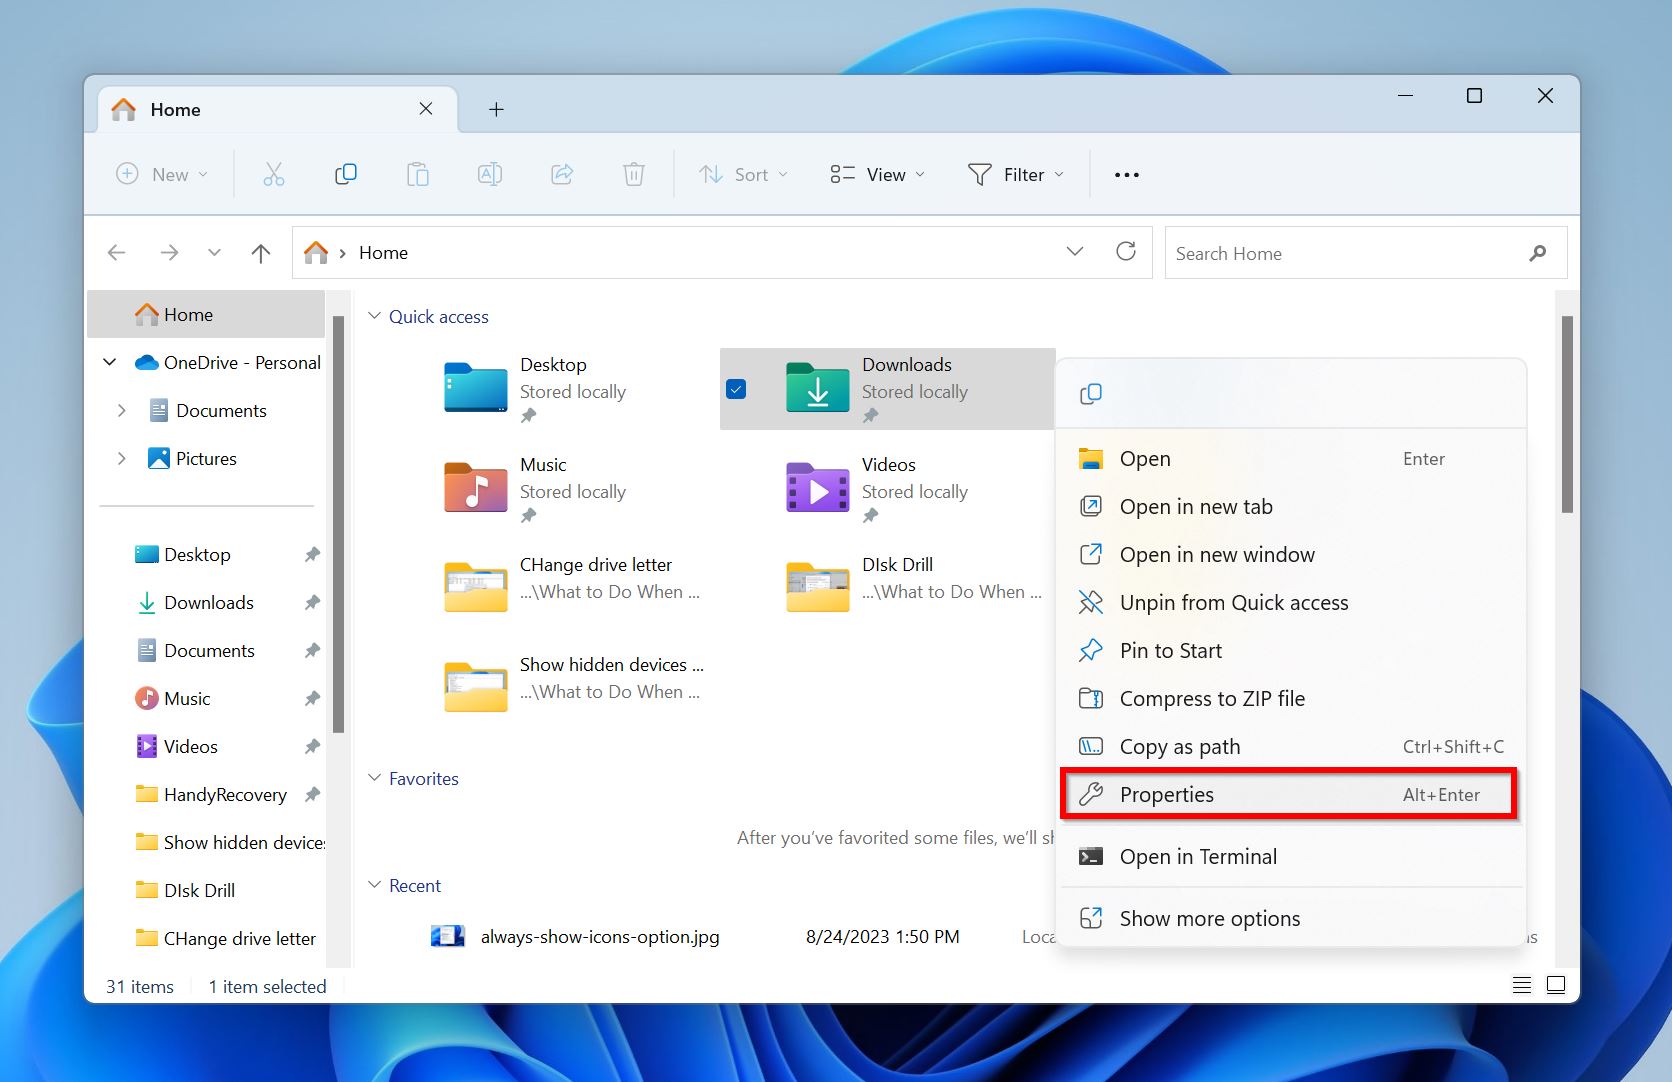
- Go to the Customize tab and choose General items from the Optimize this folder for drop-down menu.
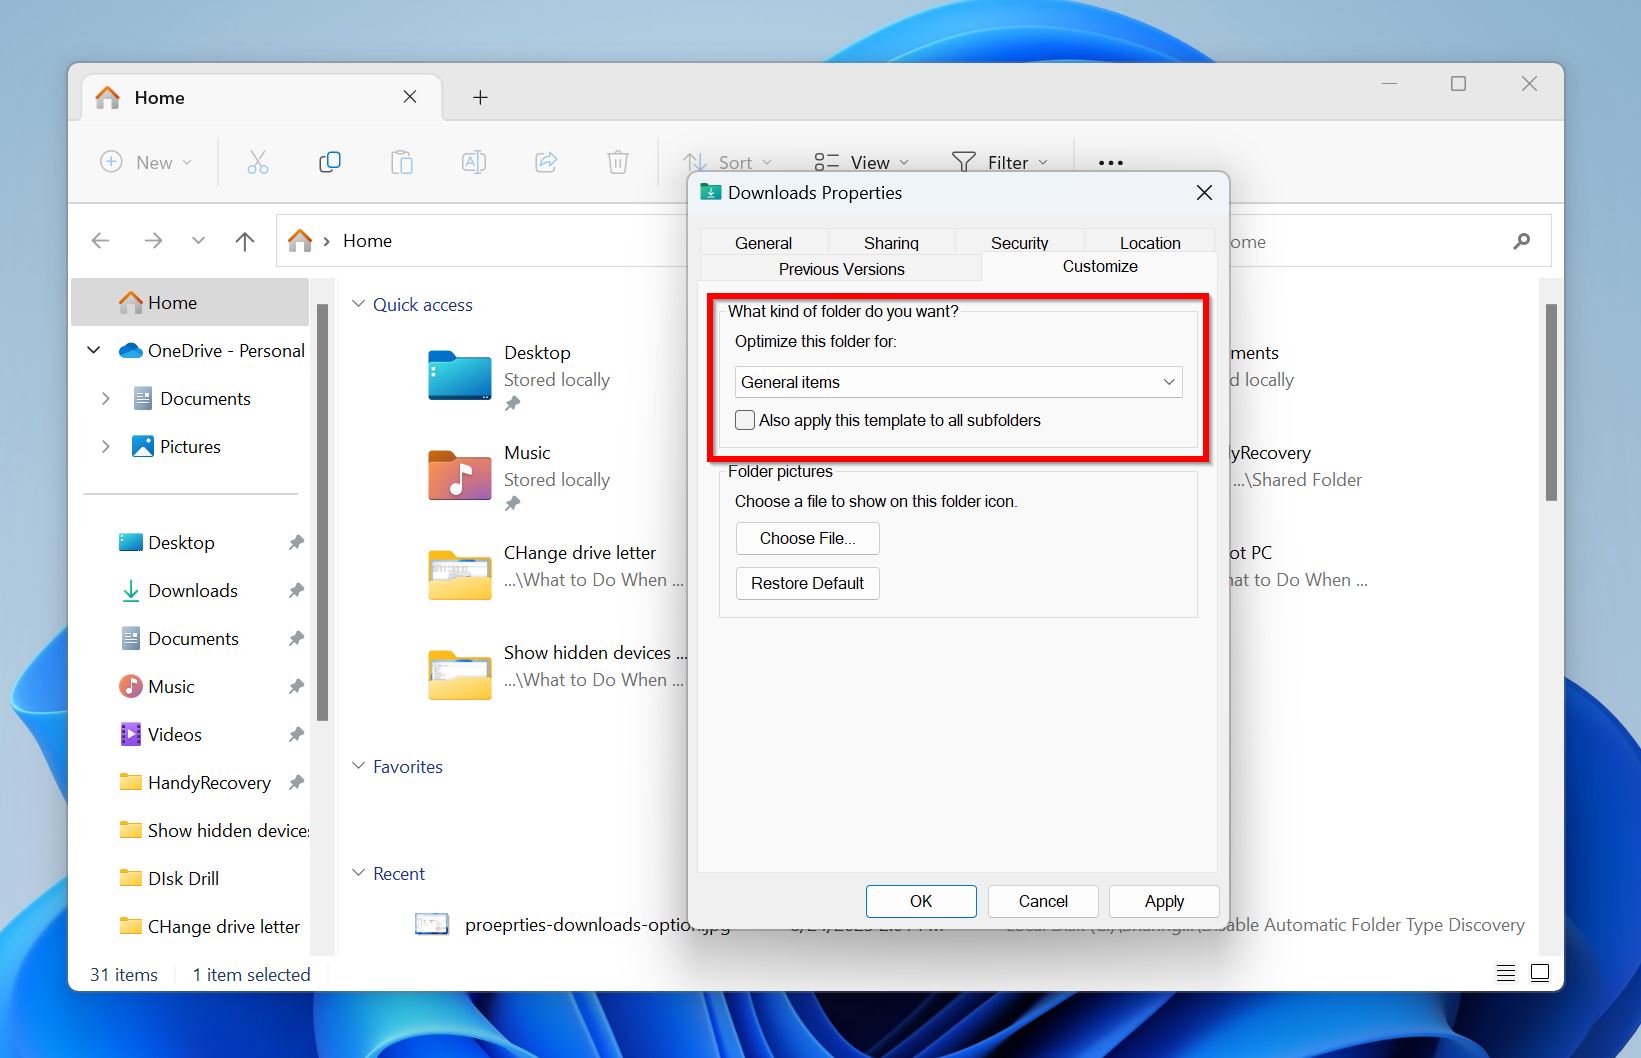
- Click on OK.
Step 2: Disable Automatic Folder Type Discovery
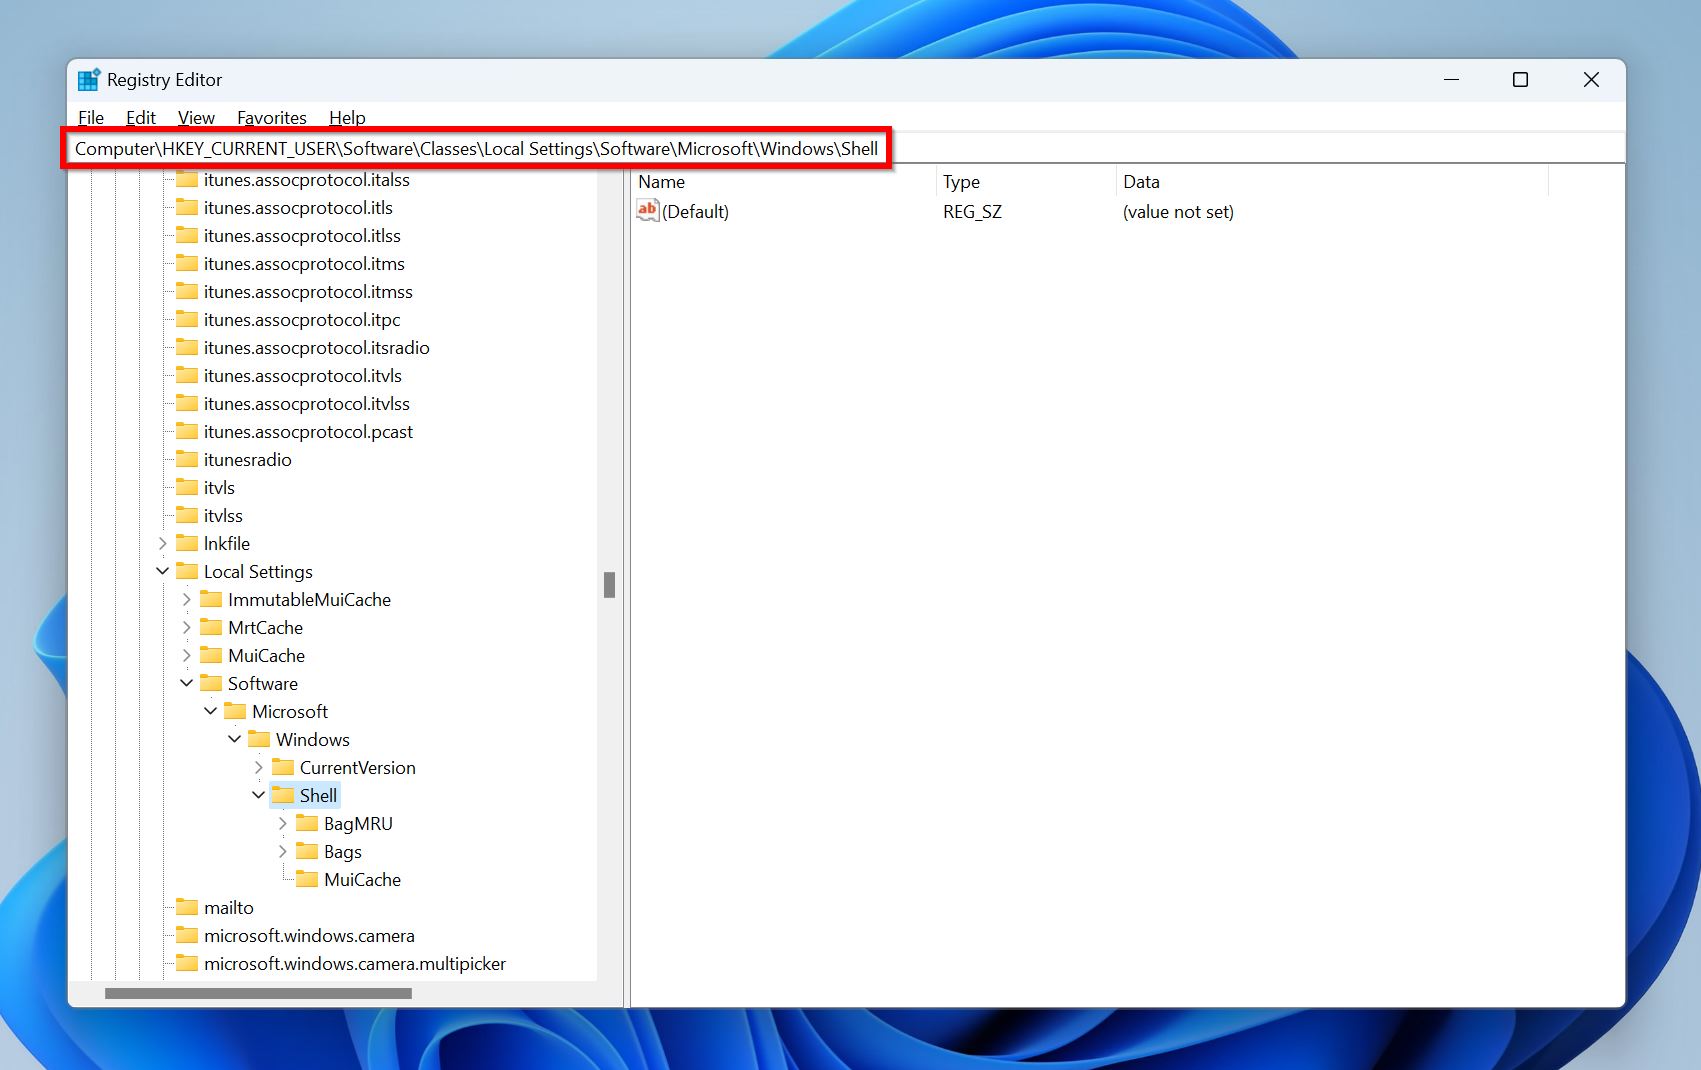
- Press Windows Key + R to launch the Run app. Type regedit in the text box and press Enter. This will open the Registry Editor.
- Navigate to the following location: HKEY_CURRENT_USER\Software\Classes\Local Settings\Software\Microsoft\Windows\Shell. To make the job easier, you can copy the aforementioned location and paste it in Registry Editor’s address bar, which is right-below the menu bar (the place that contains options such as File, Edit, etc.).
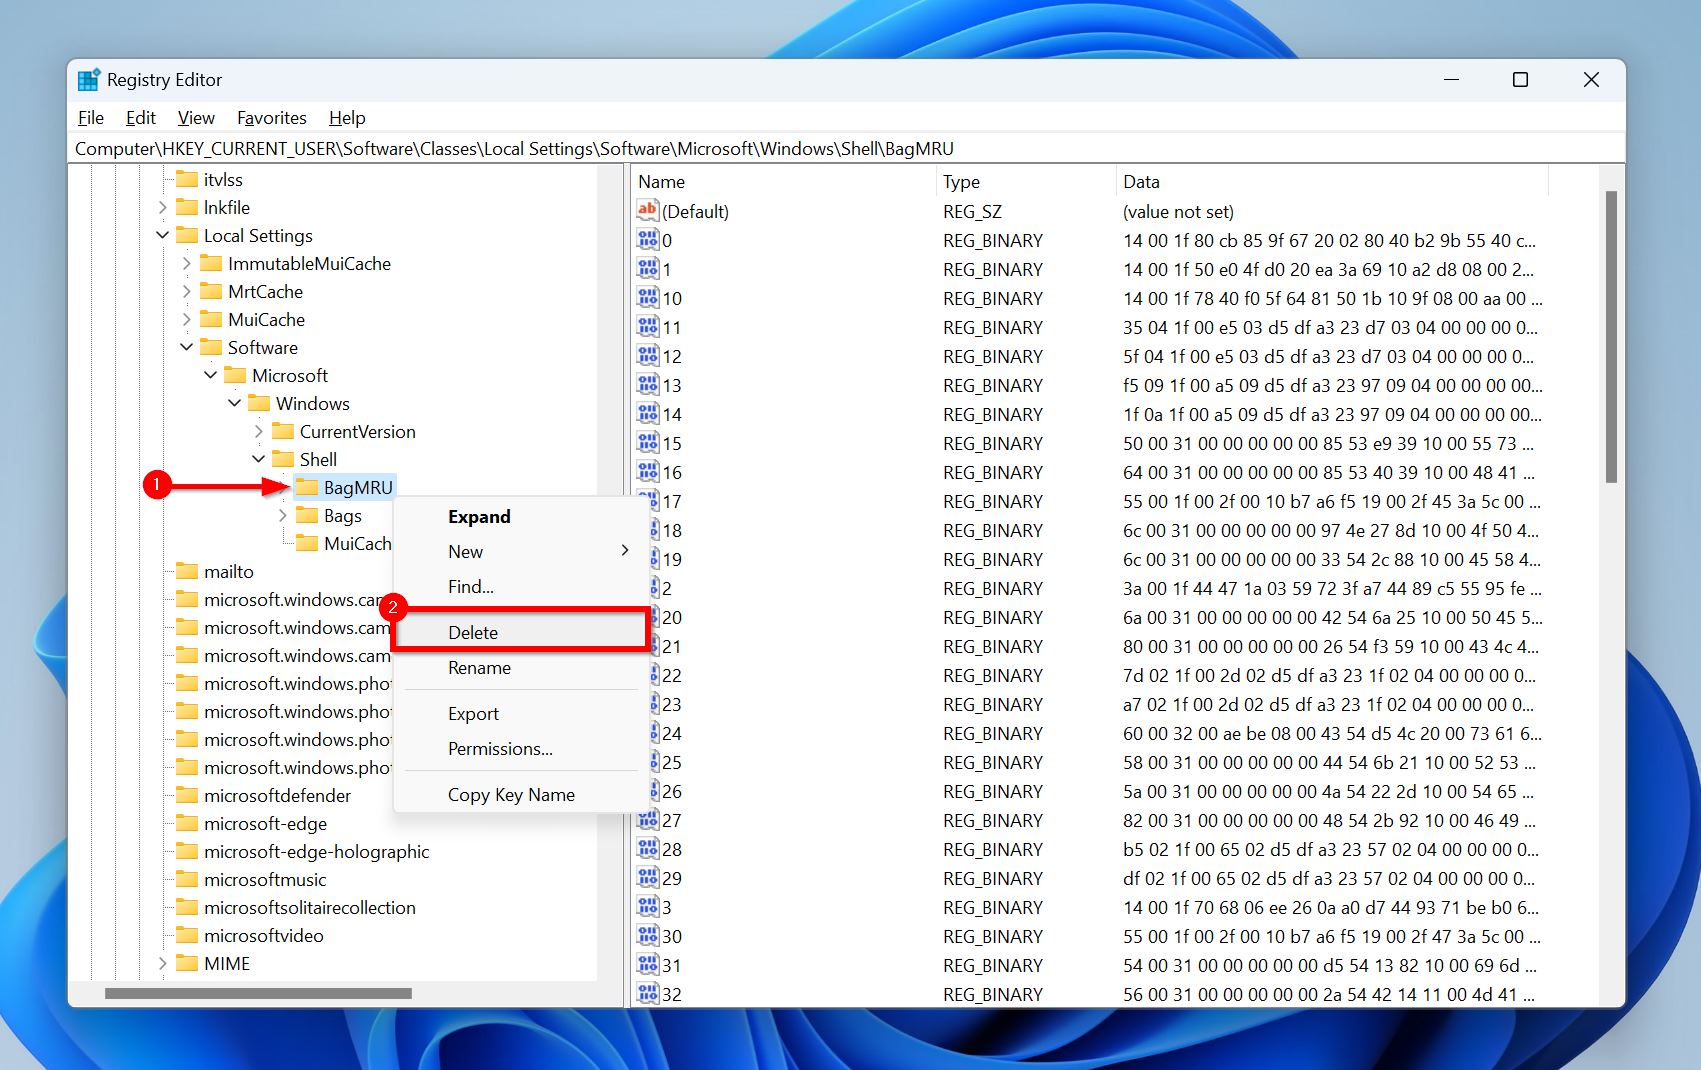
- Right-click on the BagMRU key/folder and click Delete. Click Yes in the confirmation prompt.
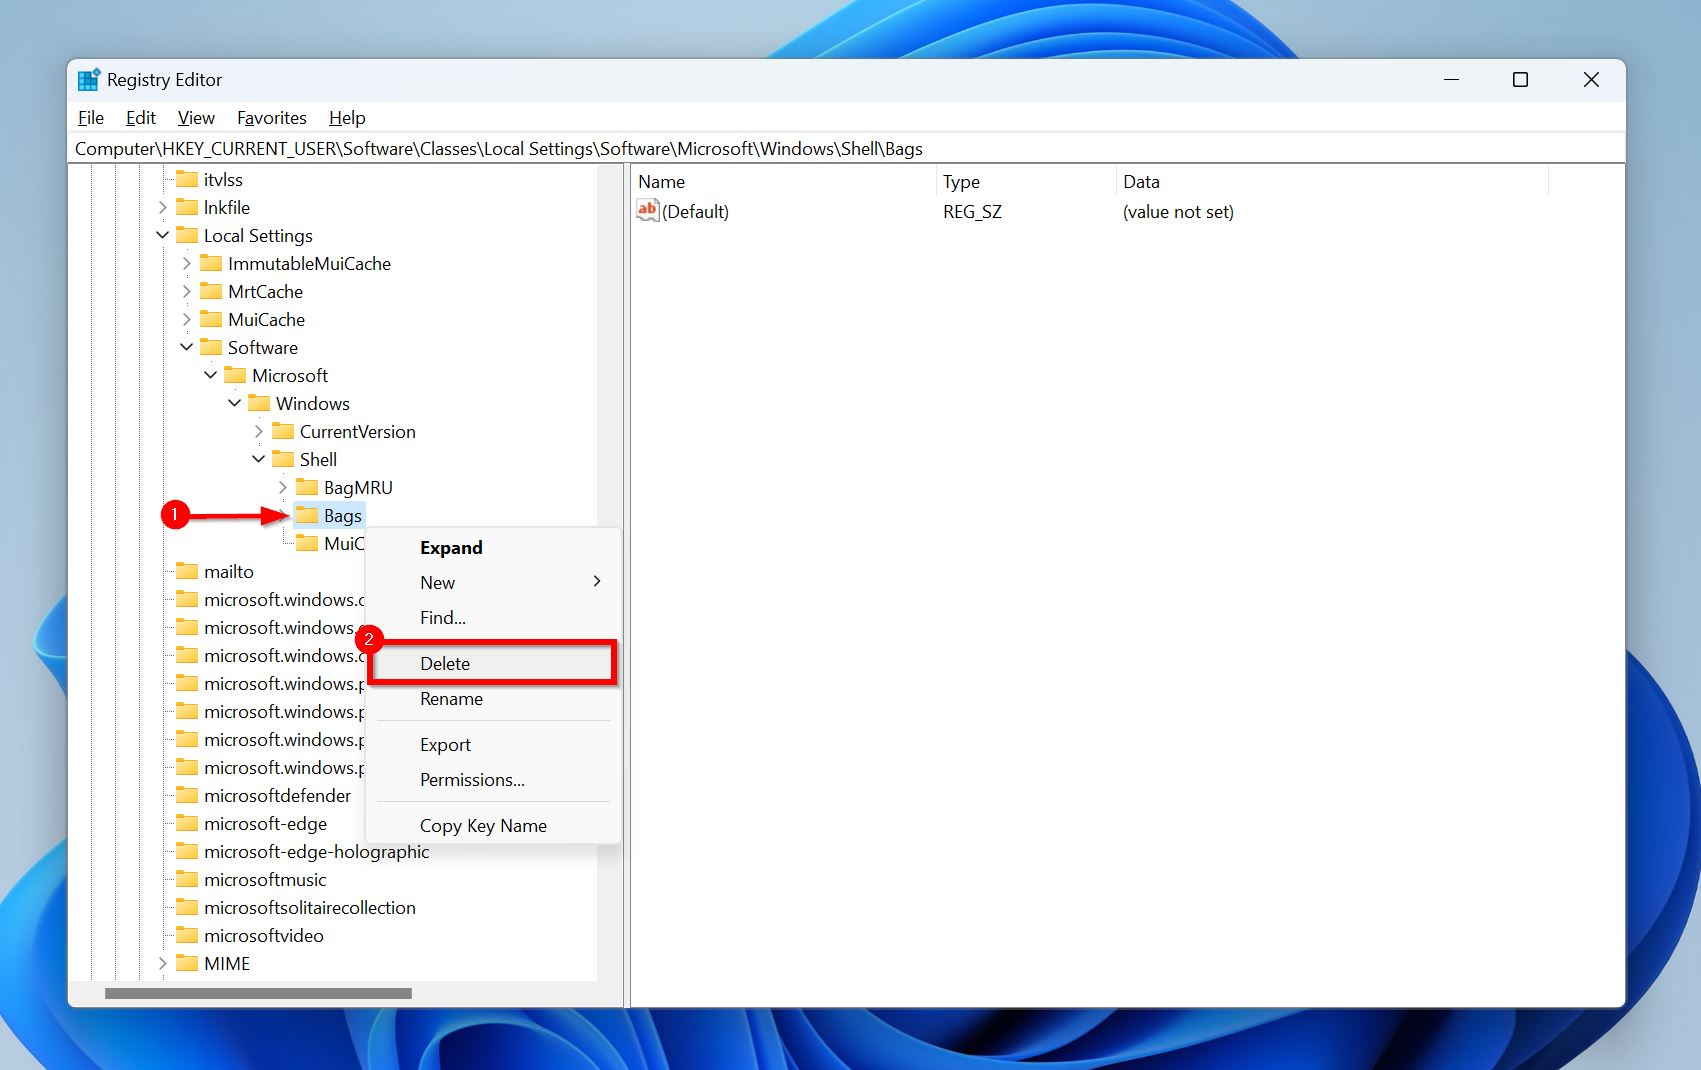
- Right-click on the Bags key/folder and click Delete. Again, click Yes when prompted.
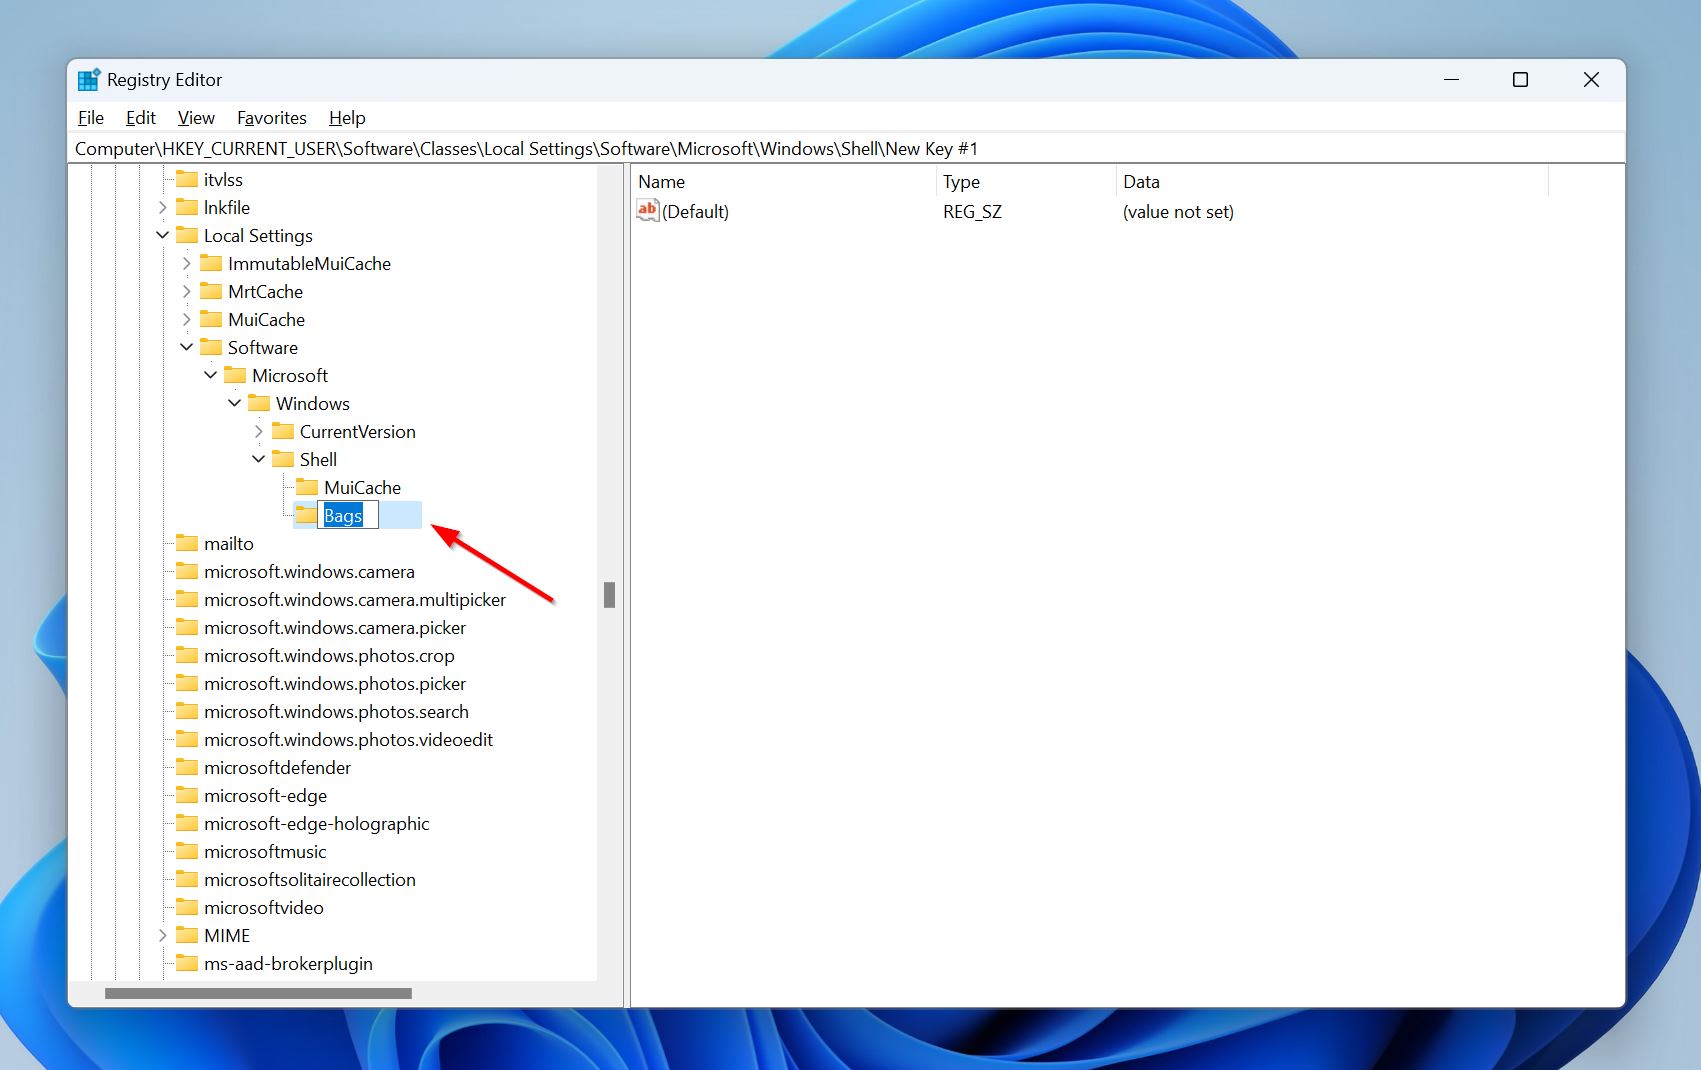
- Now, right-click on the Shell folder and choose New > Key.
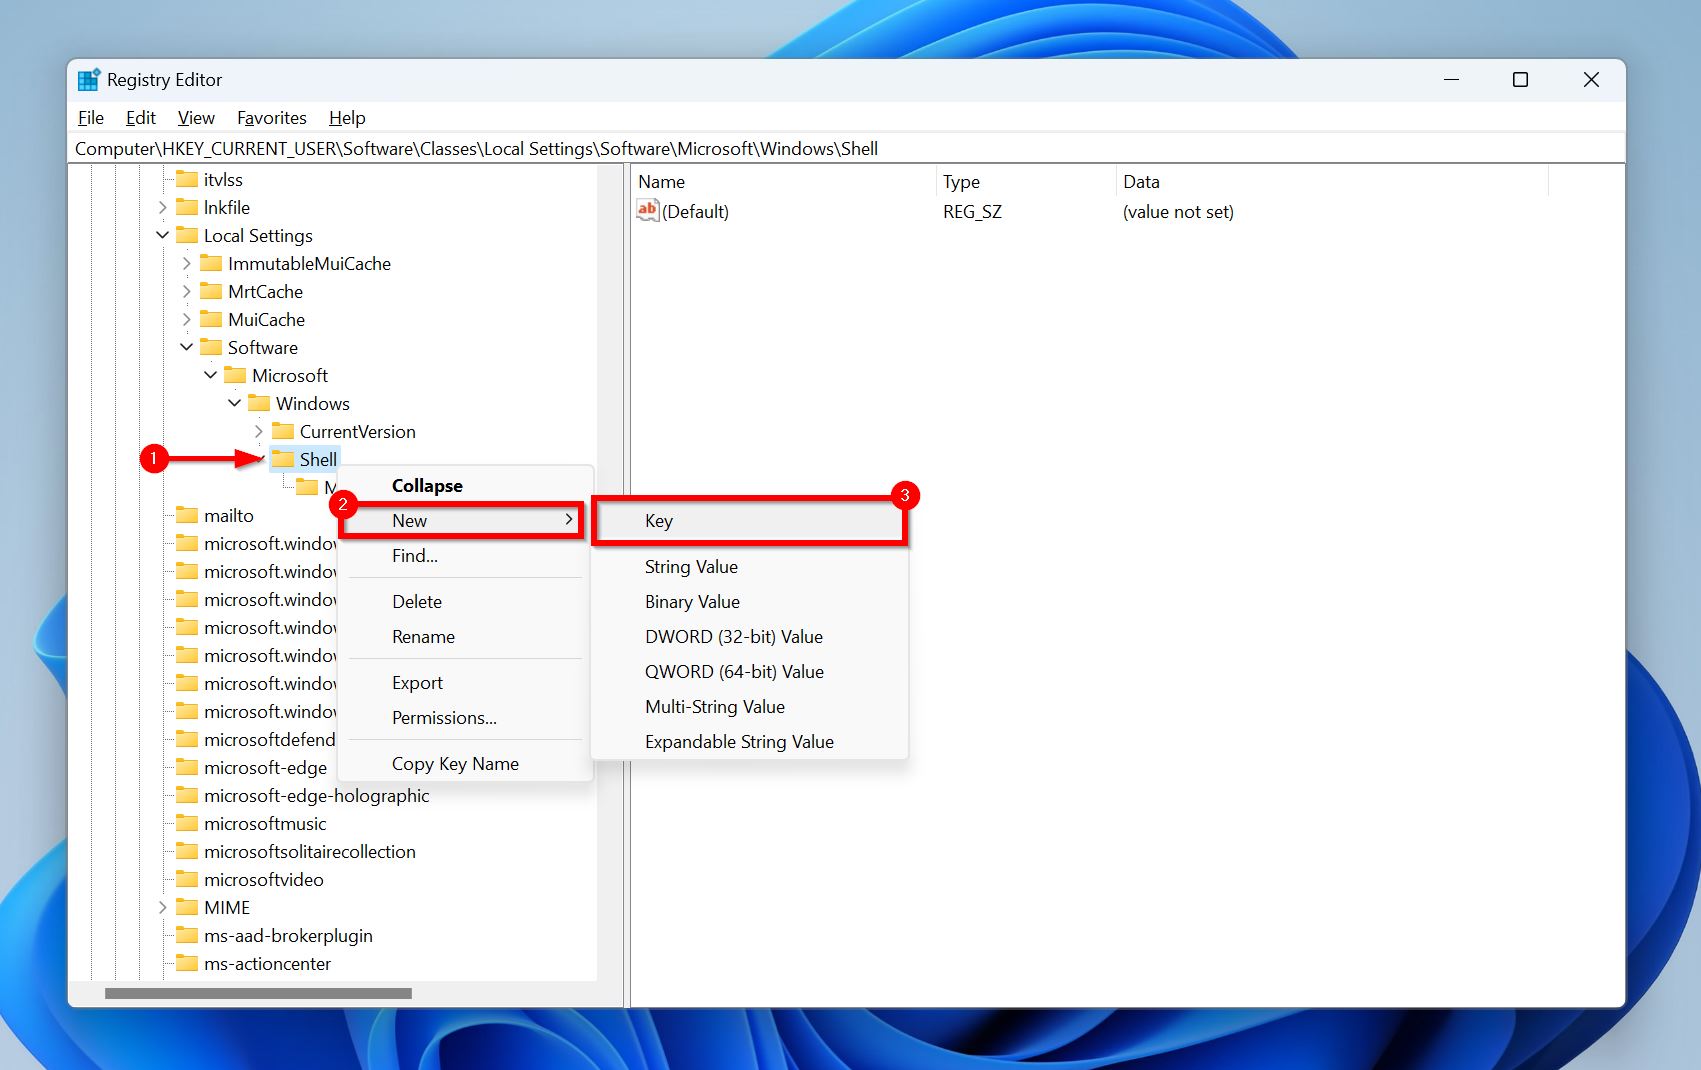
- Rename this newly created key to Bags.
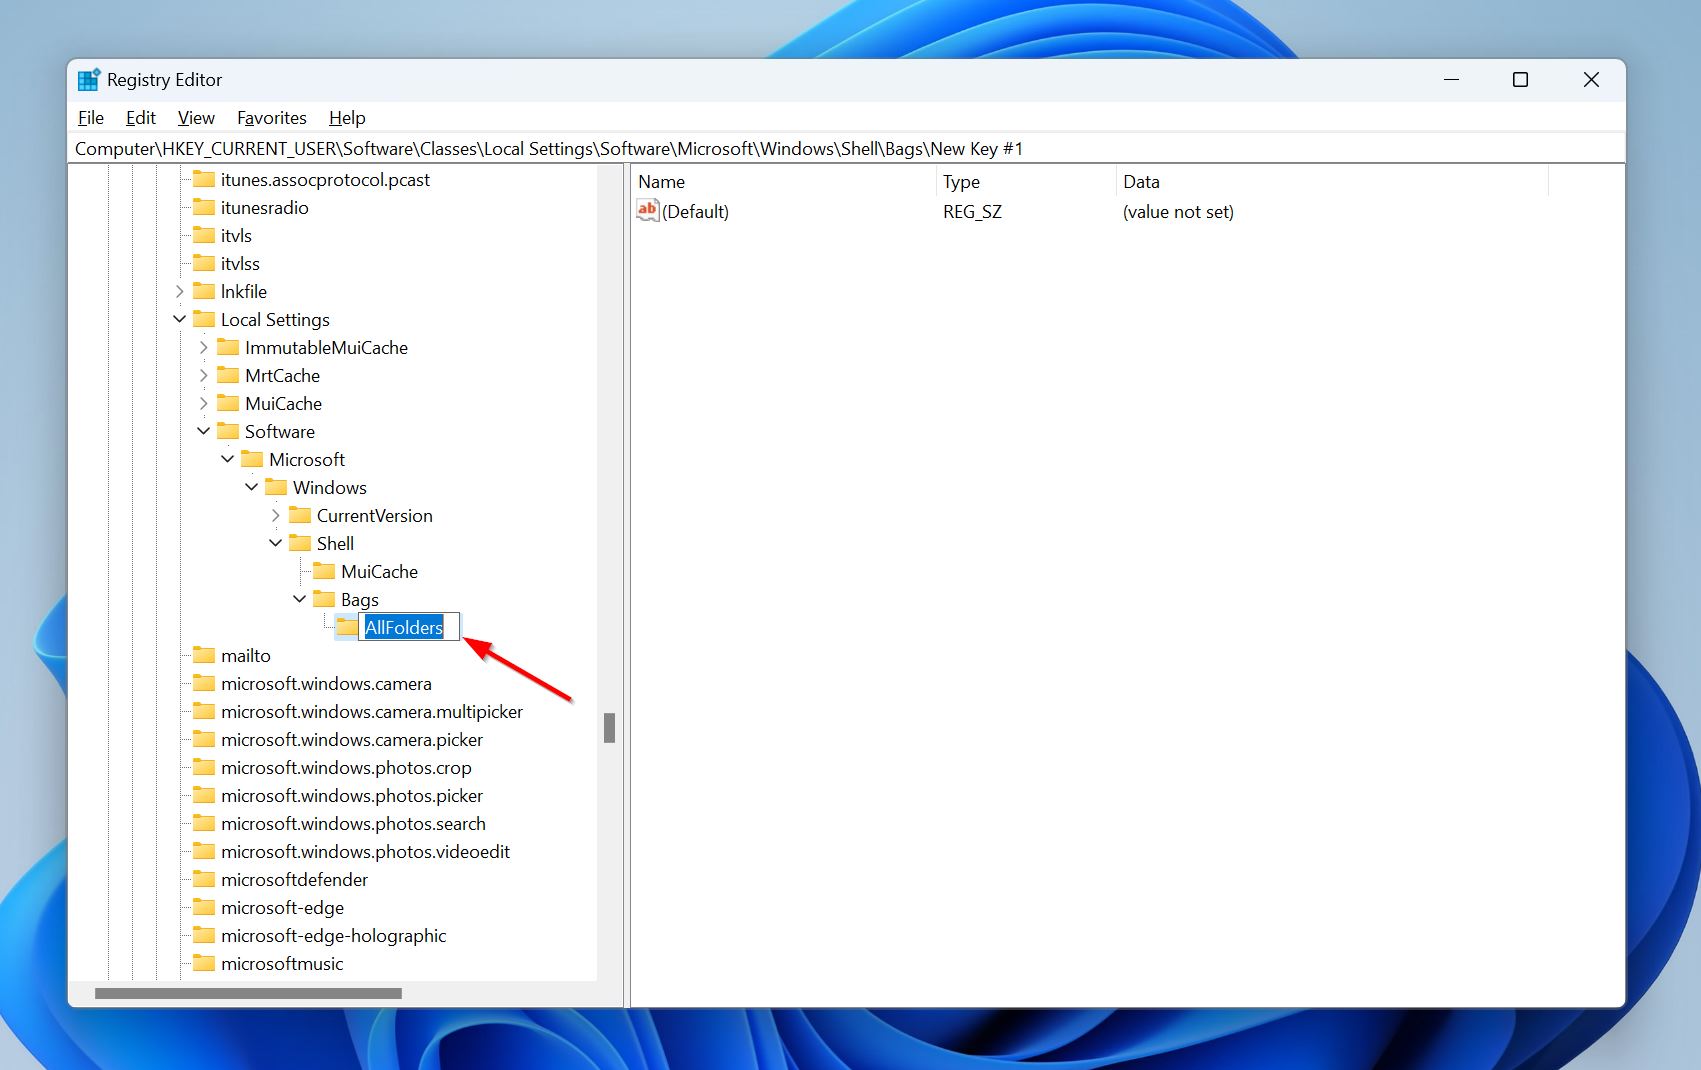
- Right-click on Bags and choose New > Key.

- Rename the newly created key within Bags to AllFolders.
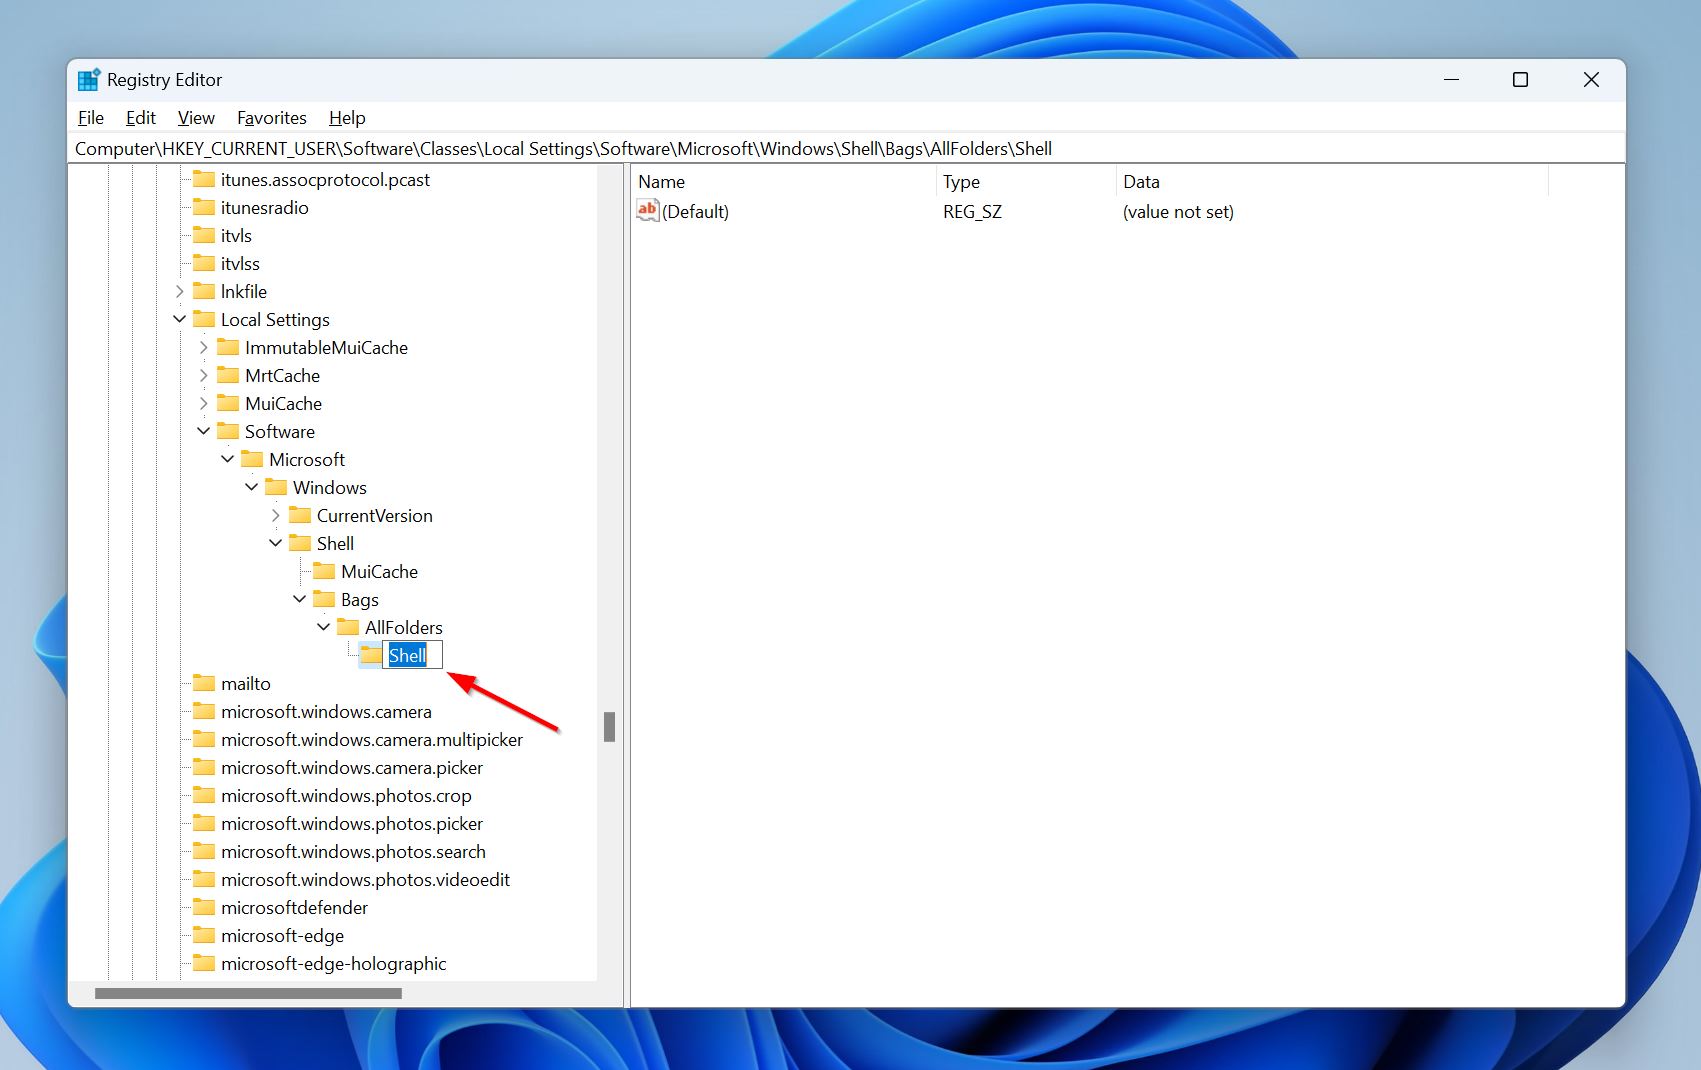
- Right-click on the AllFolders key and choose New > Key.

- Rename this newly created key to Shell.
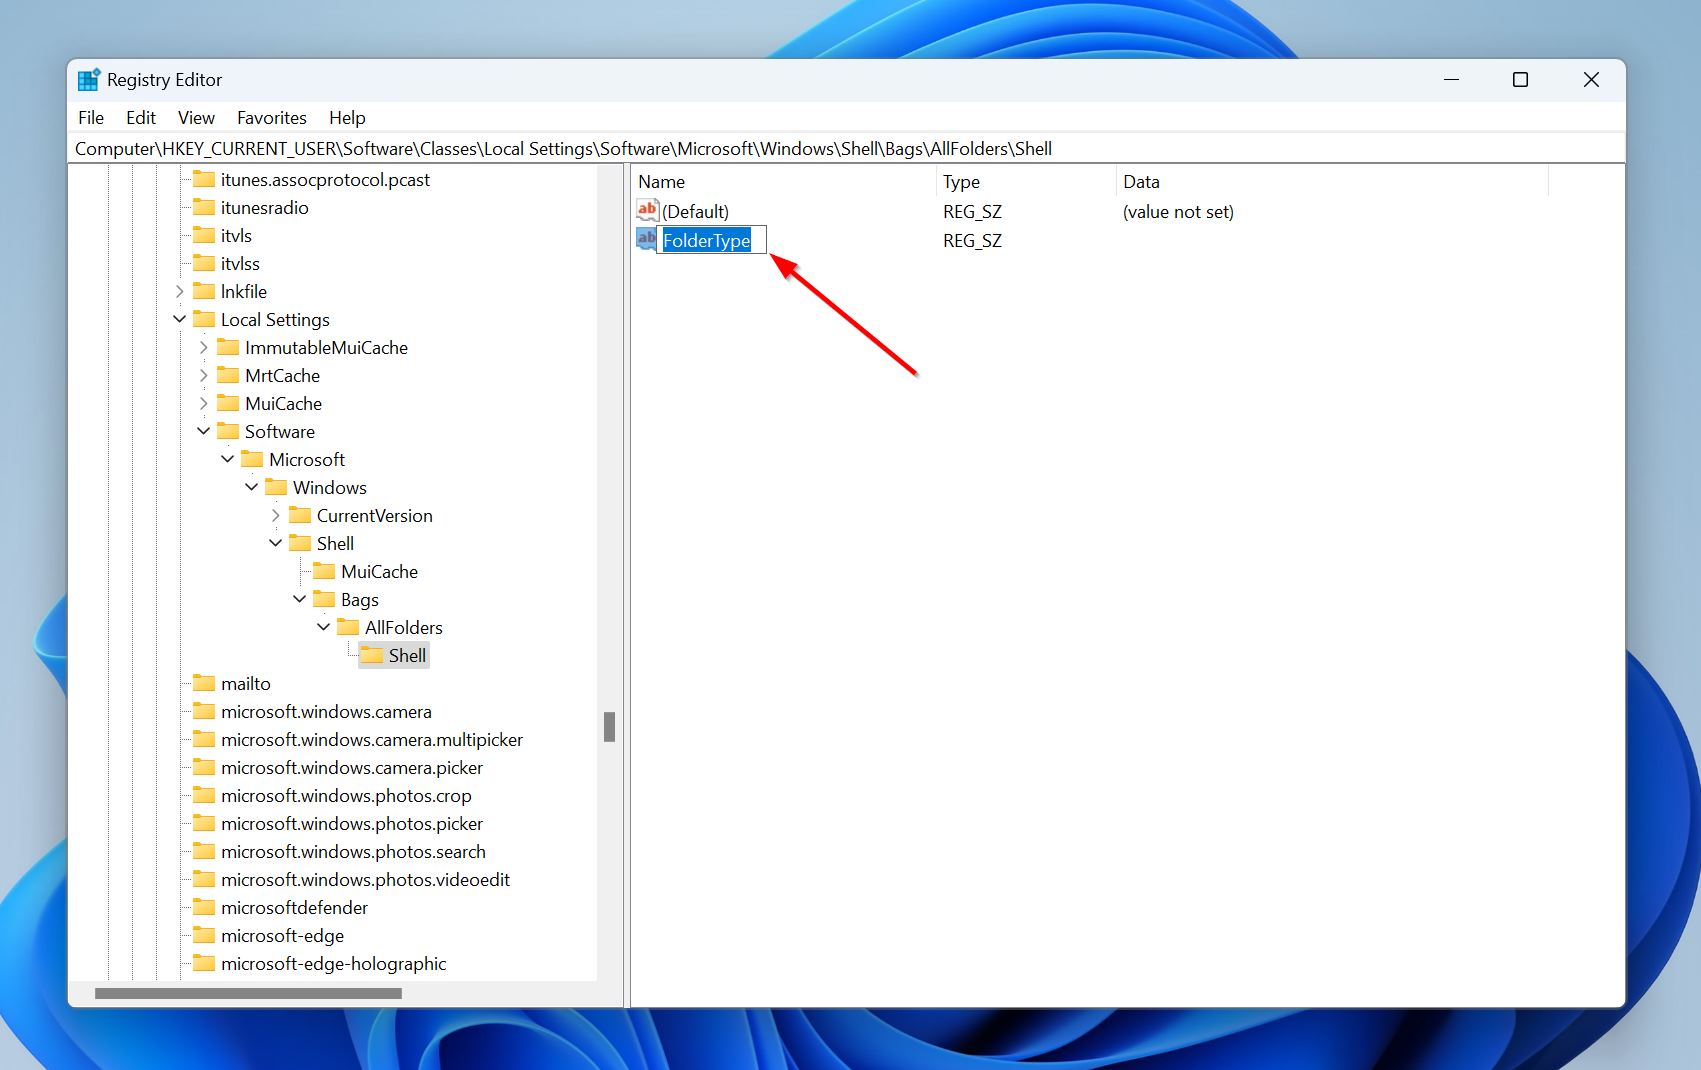
- Right-click on the Shell key and this time, choose New > String Value.
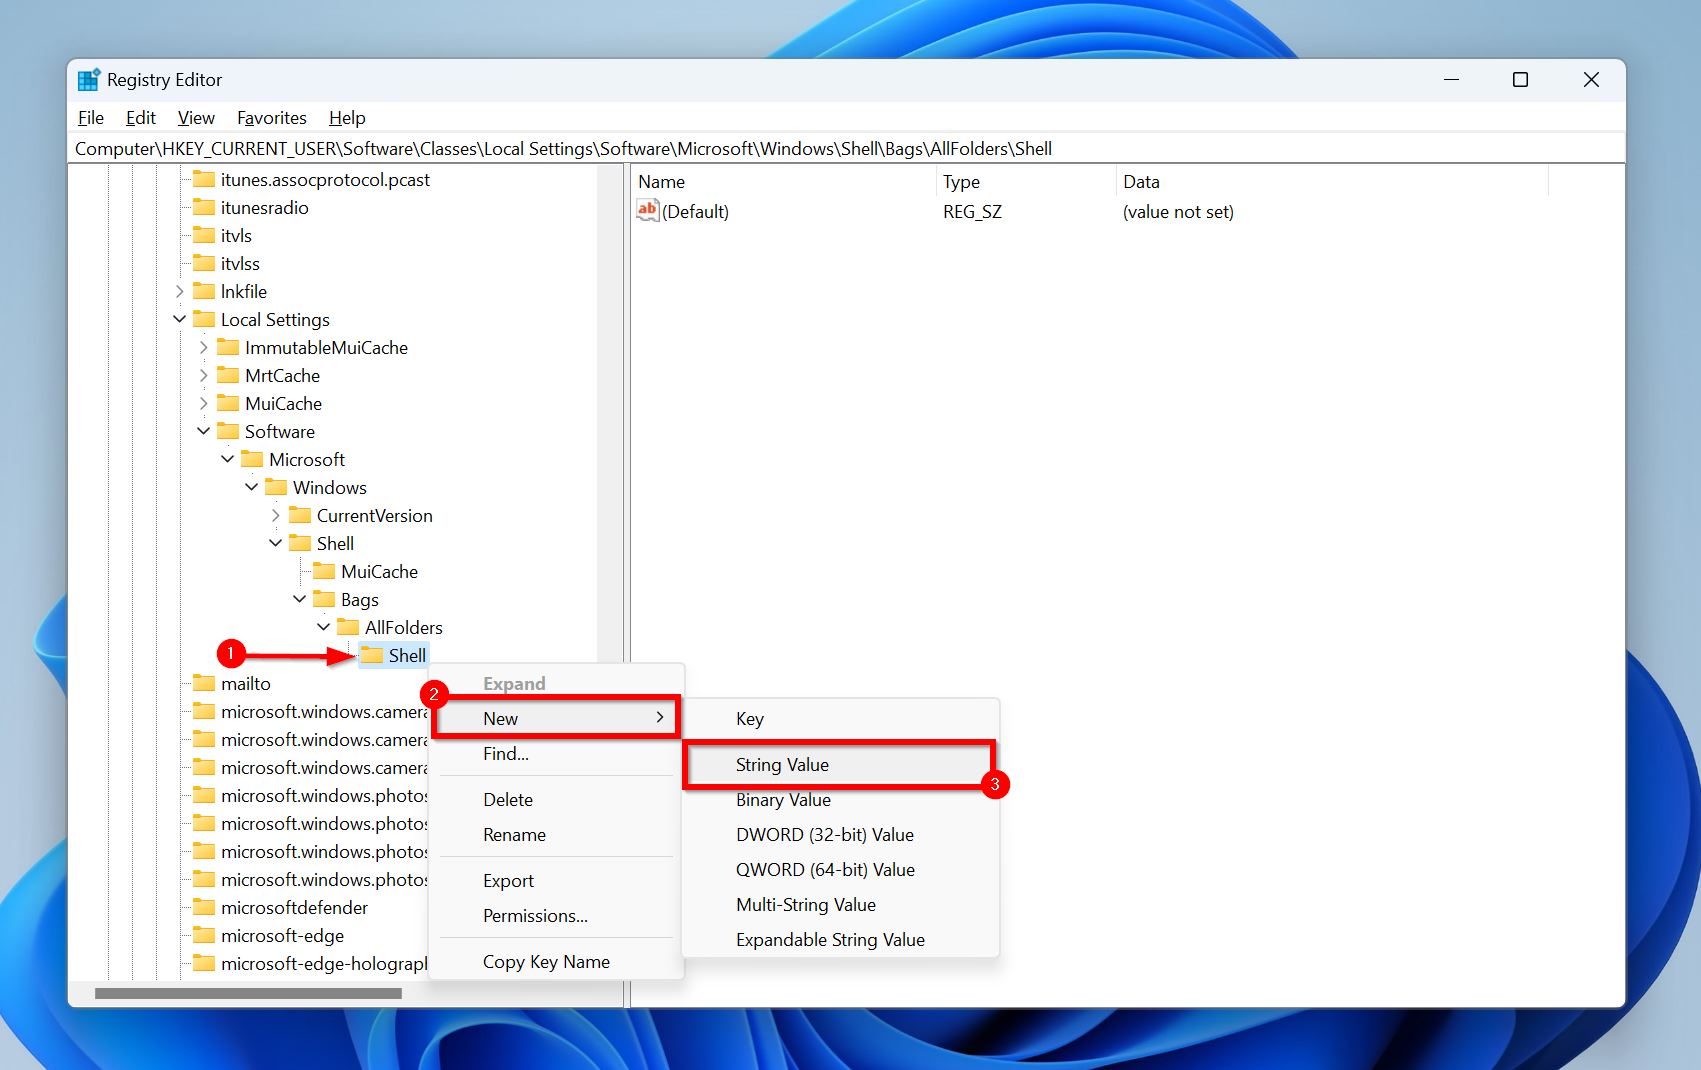
- In the right pane, name this newly created String Value to FolderType.
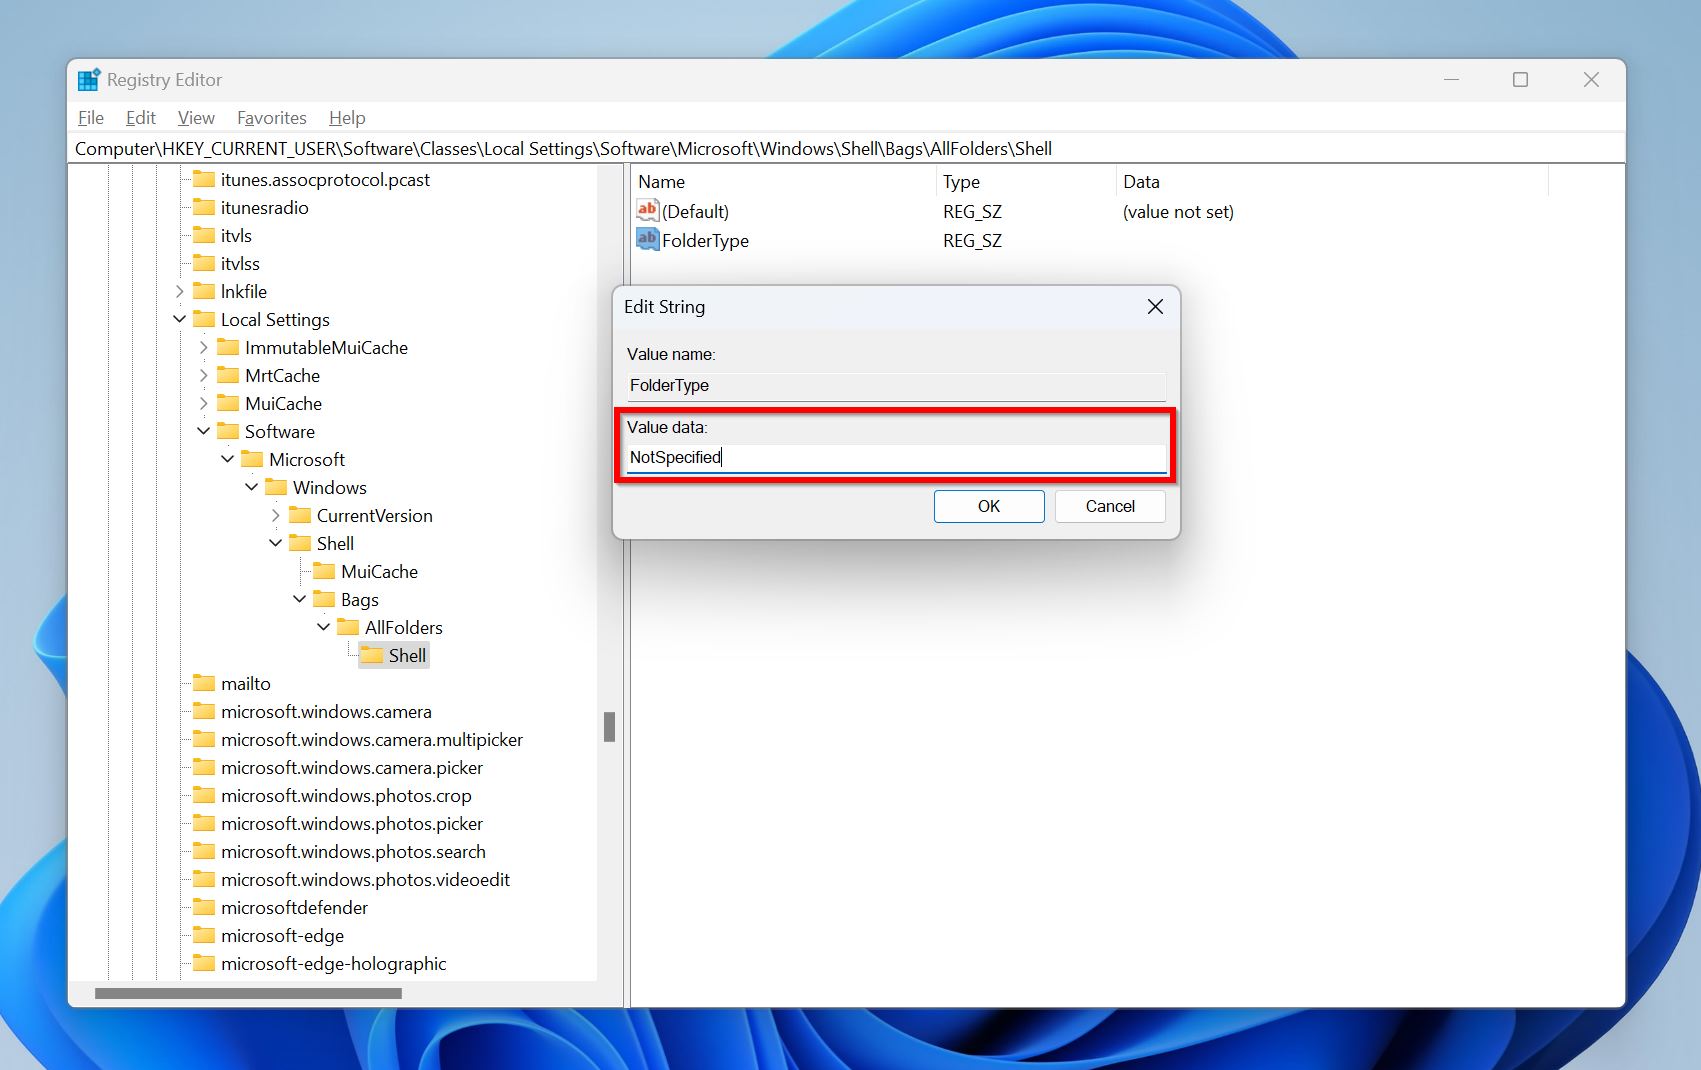
- Double-click the FolderType String Value.
- Under Value data, type NotSpecified and click OK.
- Reboot your PC.
Method 4: Clear the File Explorer History
By default, File Explorer stores all your search history. But, if the File Explorer is unable to access some, or all of this search history for whatever reason, it can lead to issues like an unresponsive Downloads folder.
To fix this, you can clear the Search History and give Windows Explorer a fresh start. Here’s how:
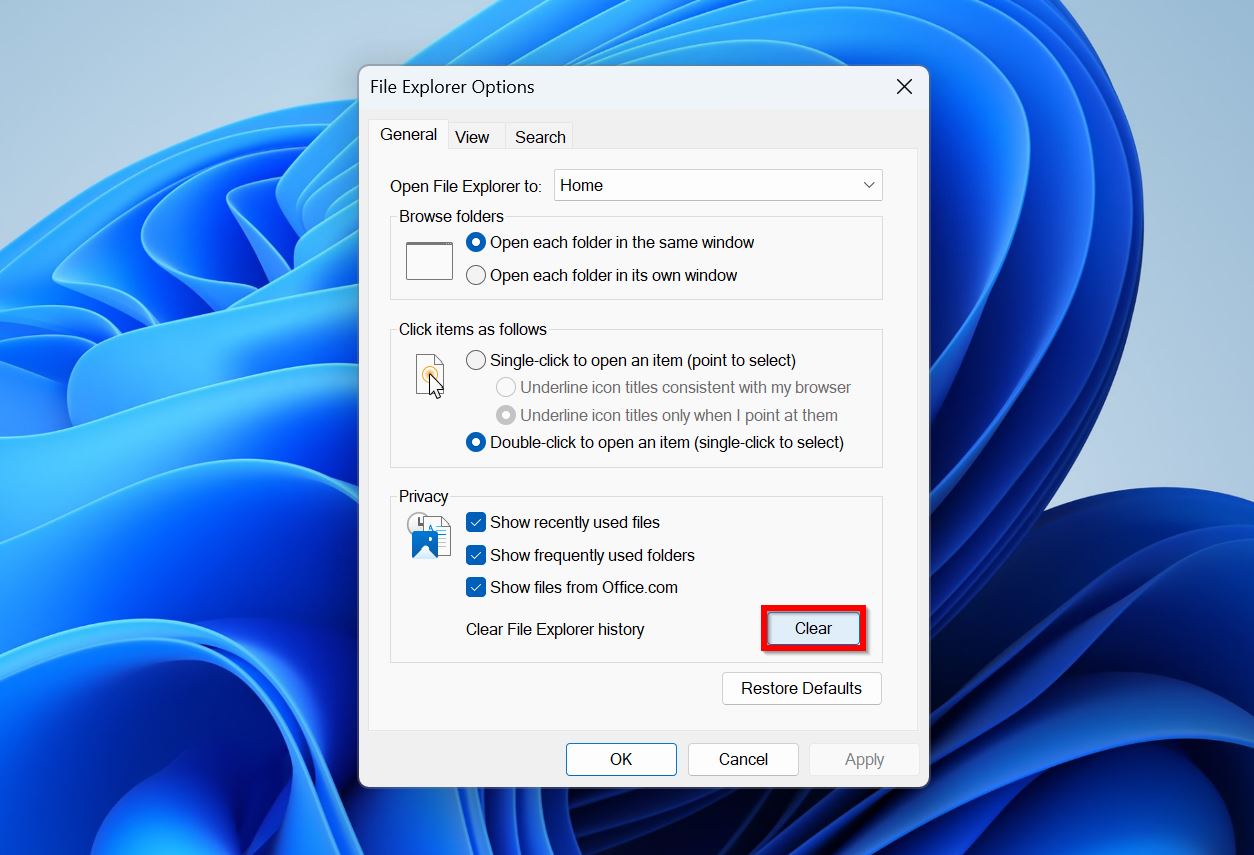
- Type “explorer options” in Windows Search (Windows Key + S). Click on File Explorer Options.
- Ensure you’re on the General tab.
- Click on Clear next to Clear File Explorer history. You can locate this in the Privacy section.
Method 5: Run a CHKDSK Scan
The CHKDSK utility in Windows scans your storage drive and fixes any logical errors and bad sectors that it encounters, restoring the normal functionality of your drive. By “fix,” we mean that CHKDSK will detect bad sectors and mark them unsuitable for use, depending on the parameters you use. As a result, sometimes you may notice some of your files are missing after a CHKDSK scan. You can still recover these files using a data recovery program.
Here’s how to run a CHKDSK scan and potentially fix a Downloads folder that’s not responding:
- Type “cmd” in Windows Search (Windows Key + S). Right-click on Command Prompt > Run as administrator from the search results.
- Type
chkdsk C: /rand press Enter. The CHKDSK scan will begin. It can be time-consuming, but it’s crucial that you let the CHKDSK scan complete.
- Reboot your PC, once the scan is over.
Method 6: Run DISM and SFC
Deployment Image Servicing and Management (DISM) and System File Checker (SFC) are both command-line utilities that can help restore the integrity of files that are integral to Windows normal functioning. This is a simplified explanation, but regardless–running both these tools is a good idea to ensure that corrupt/missing system files aren’t the reason you can’t access the Downloads folder.
Both DISM and SFC are command-line utilities that need to be run using an elevated instance of the Command Prompt. If that sounds like mumbo-jumbo, don’t worry, simply follow the instructions below:
Step 1: Run DISM
- Search for “cmd” in Windows Search (Windows Key + S). Right-click on the Command Prompt and choose Run as administrator.
- In the console, type
DISM /Online /Cleanup-Image /RestoreHealthand press Enter.
- Wait for DISM to repair any issues with the system image.
Step 2: Run SFC
- Look for “cmd” in Windows Search (Windows Key + S). Right-click on Command Prompt > Run as administrator.
- Type
sfc /scannowand press Enter.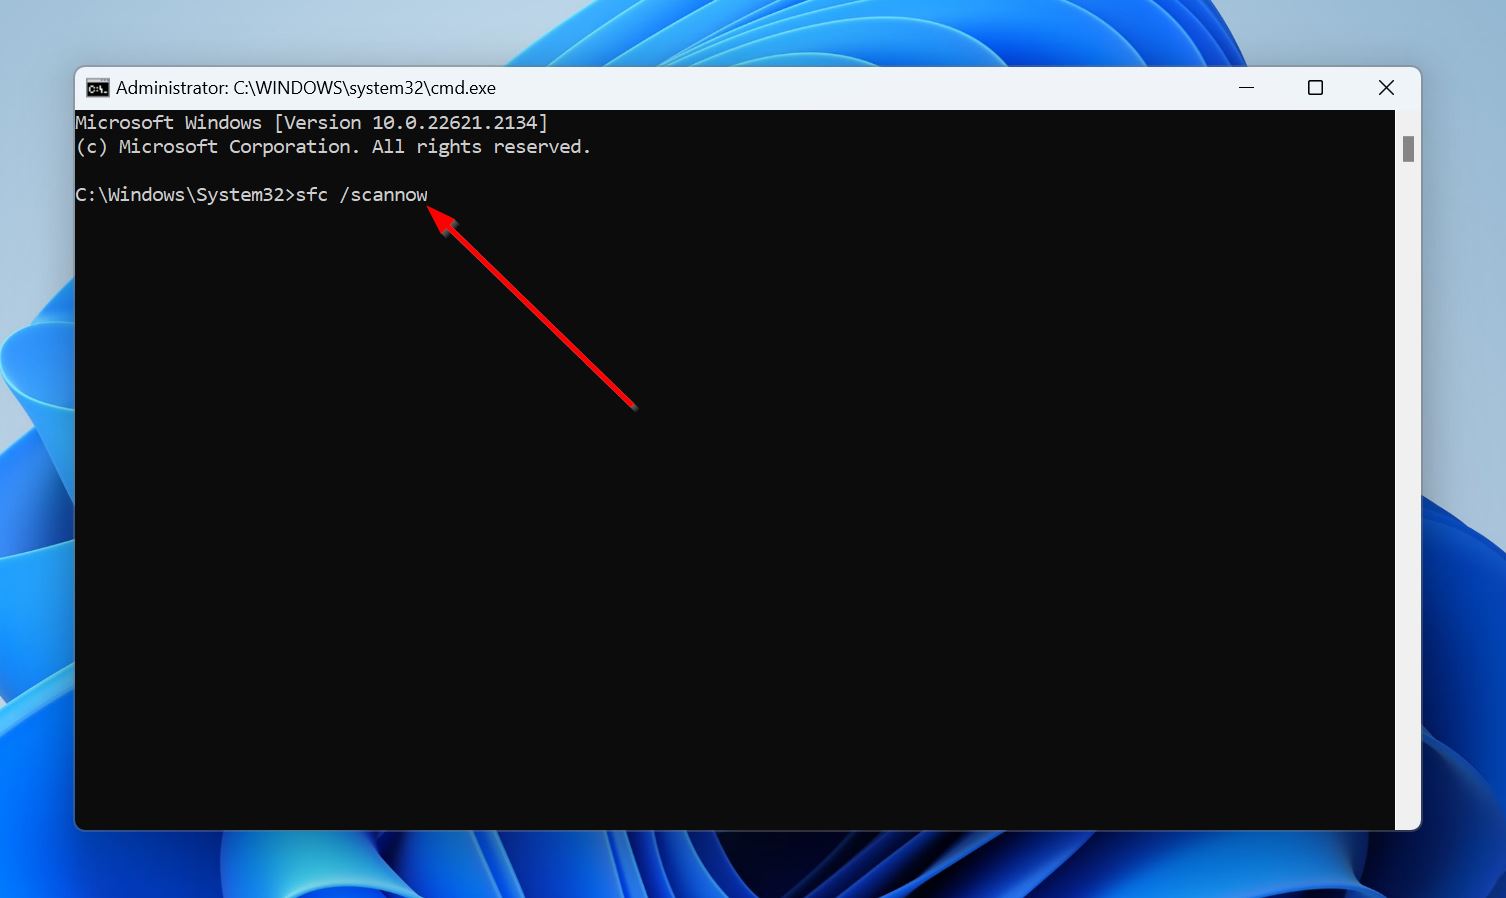
- Wait for the SFC utility to restore the integrity of Windows’ system files.
- Reboot your PC.
Method 7: Scan for Malware
Malware can wreak havoc on your PC and if it’s infected by a particularly malicious virus, an unresponsive Downloads folder could be the least of your problems. Thus, it’s essential to perform an antivirus scan when dealing with such issues.
You can use a third-party antivirus solution to perform a full system scan, or use Windows’ in-built antivirus program, Windows Defender.
To perform an antivirus scan using Windows Security/Defender, follow these steps:
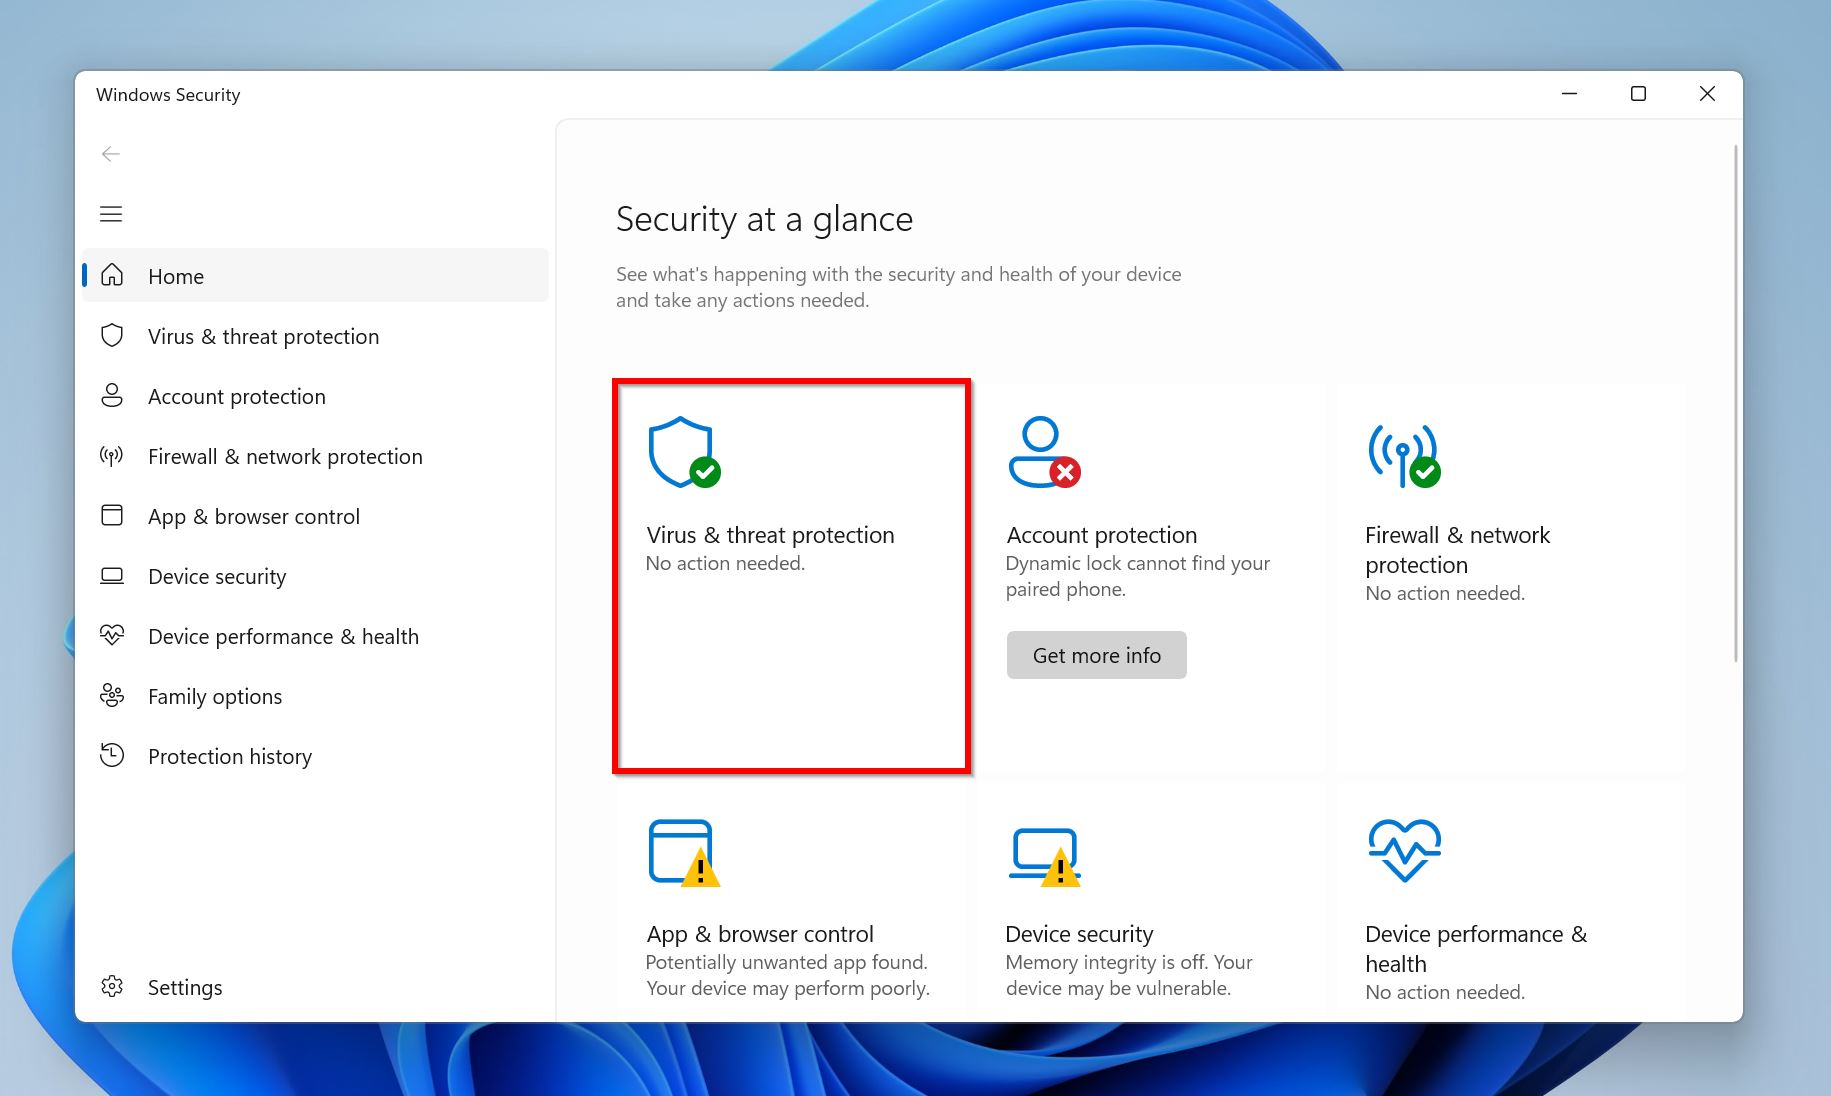
- Search for “security” in Windows Search (Windows Key + S) and open the Windows Security app.
- Click on Virus & threat protection in the Security dashboard.
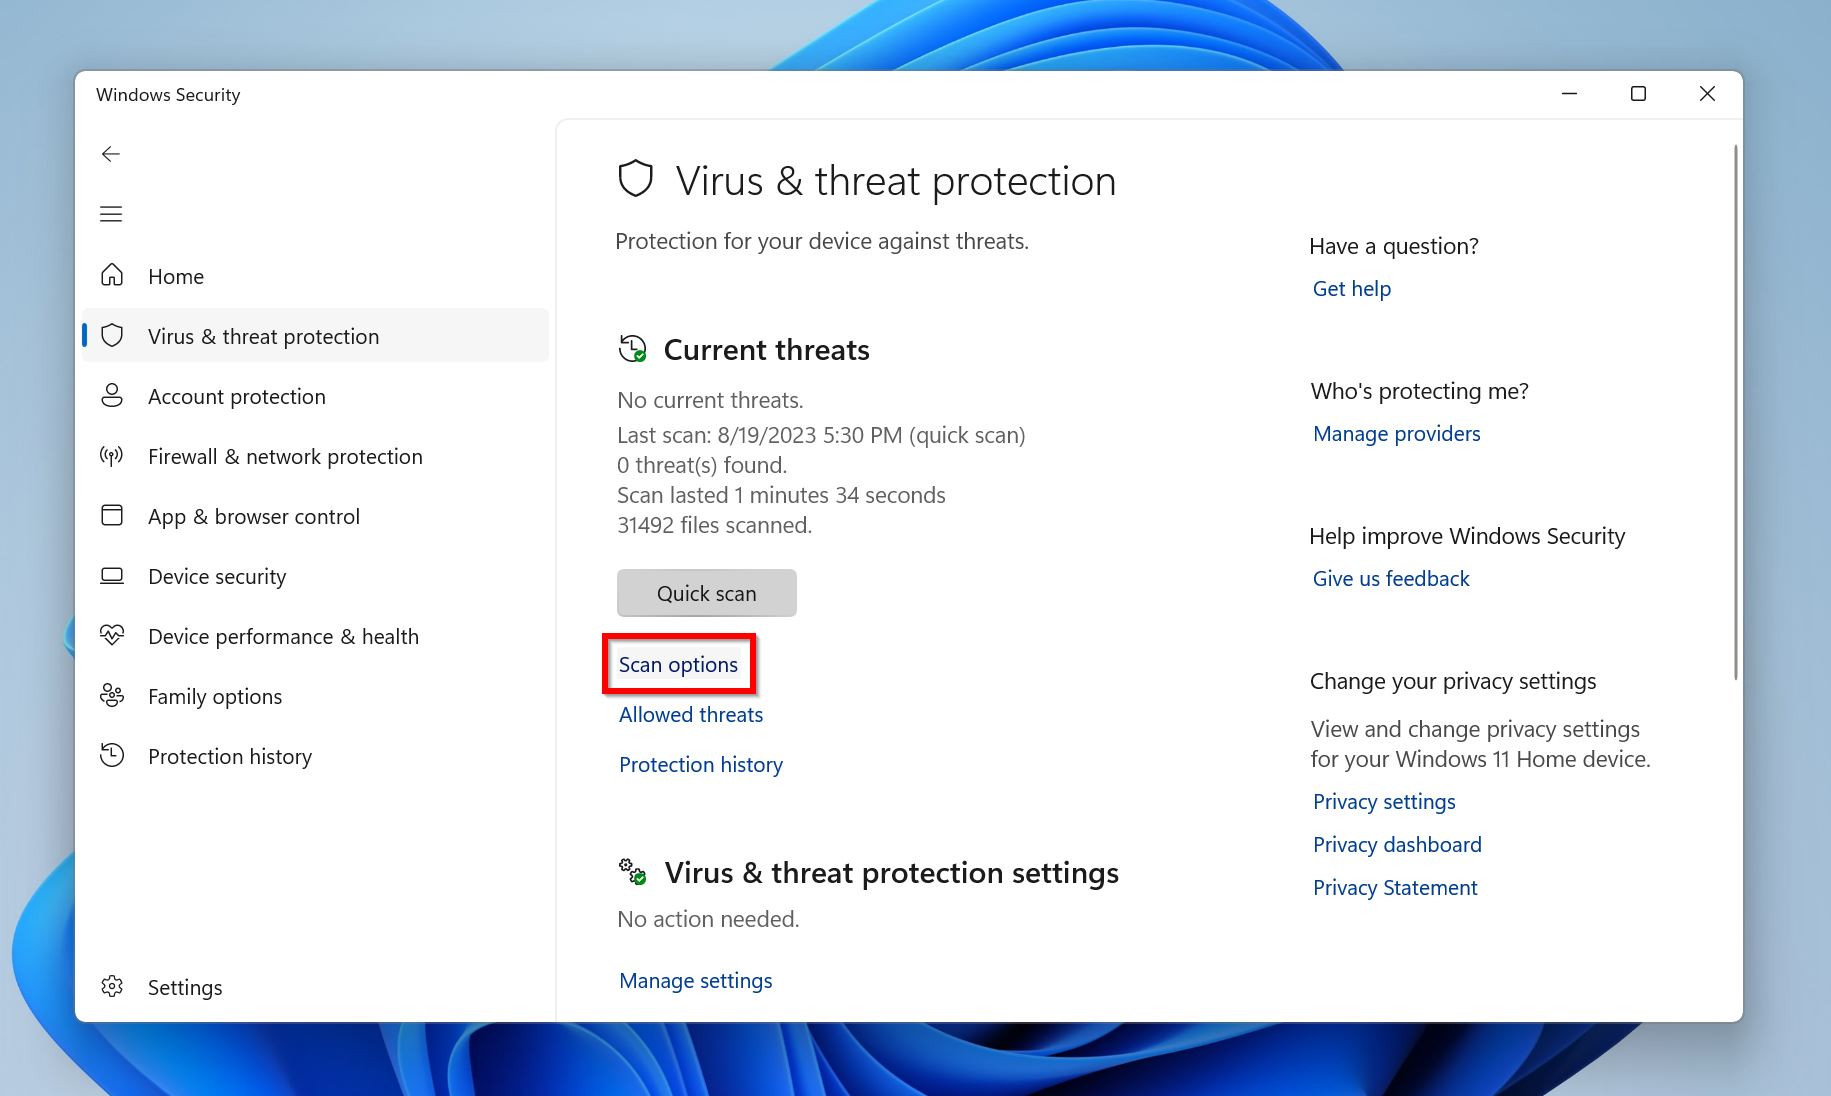
- Under Current Threats, click on Scan options.
- Select Full scan and click on Scan now.
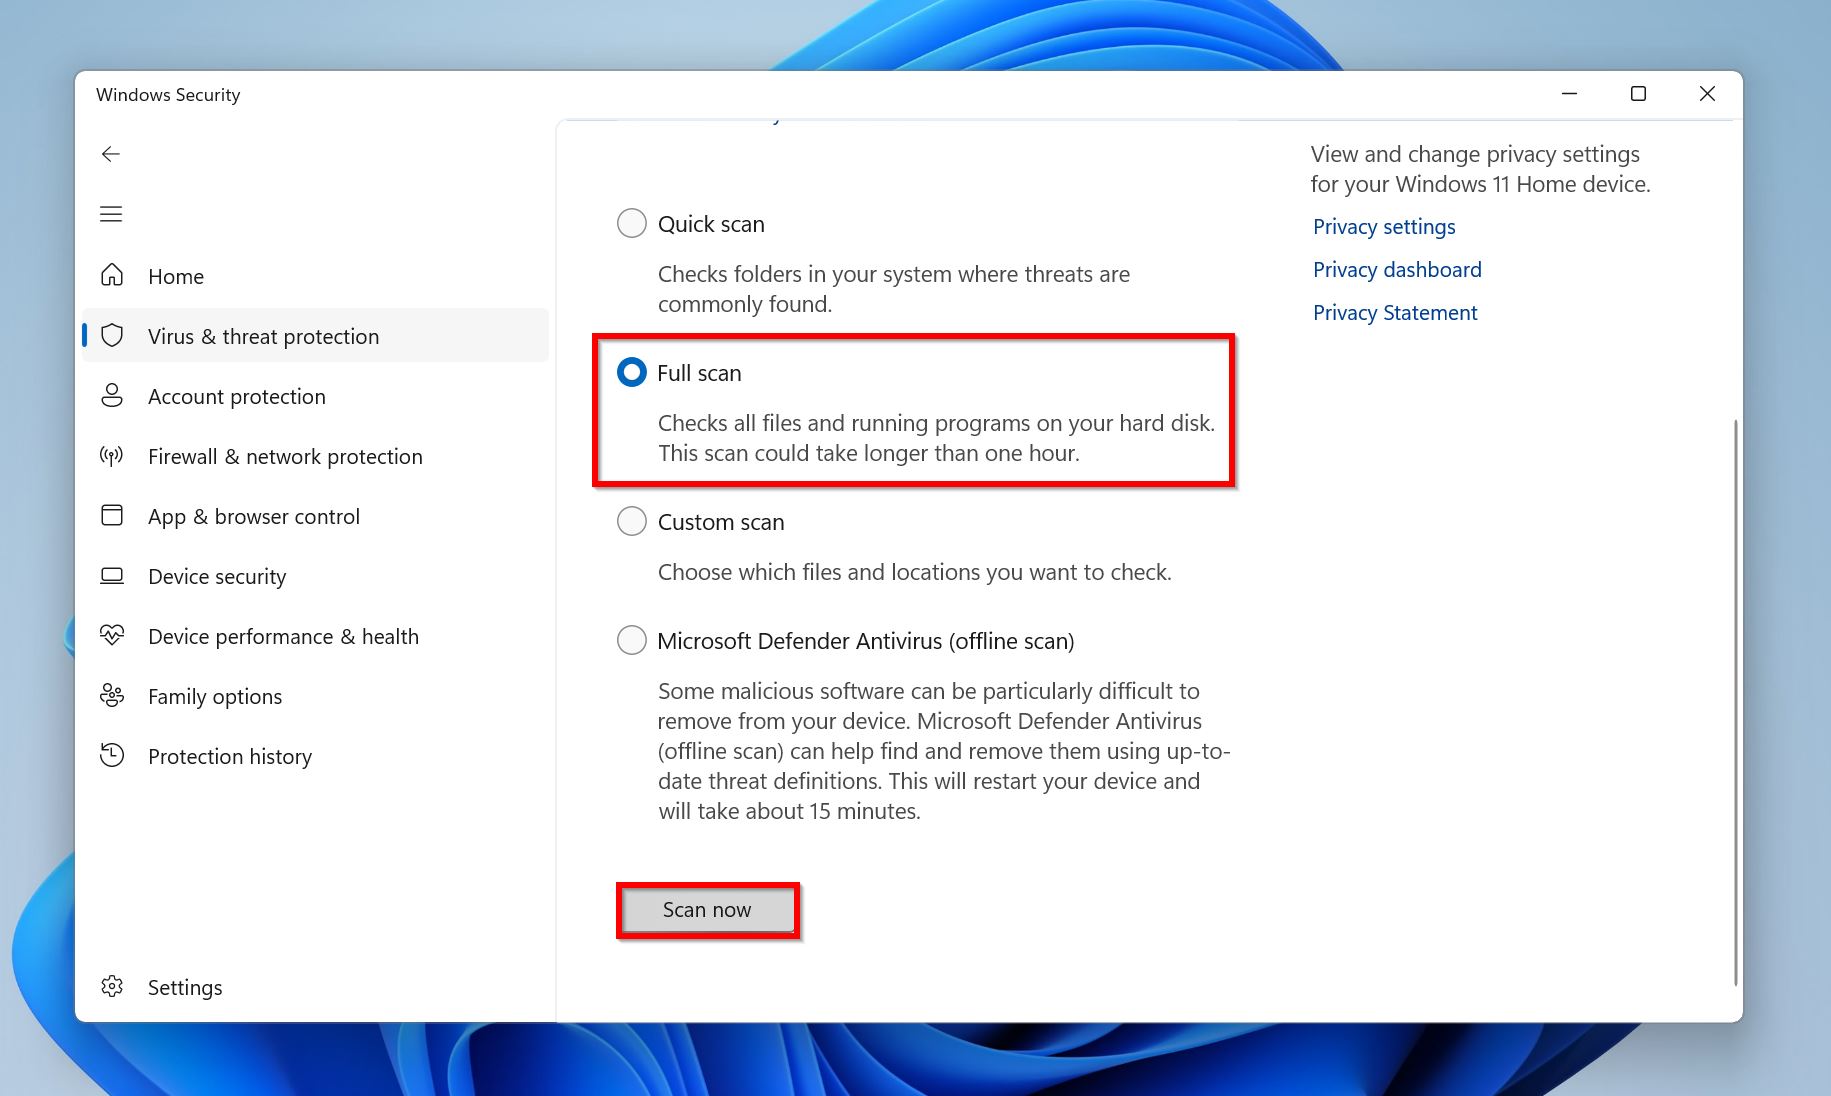
- Windows will scan your entire PC for malware.
Method 8: Update Windows
If you don’t remember the last time a Windows update was installed, it’s likely that your OS is outdated. Keeping Windows updated protects you against any bugs or glitches, including a non-responsive Downloads folder.
Here’s how you can check for and install Windows updates:
- Right-click on the Start button and choose Settings.
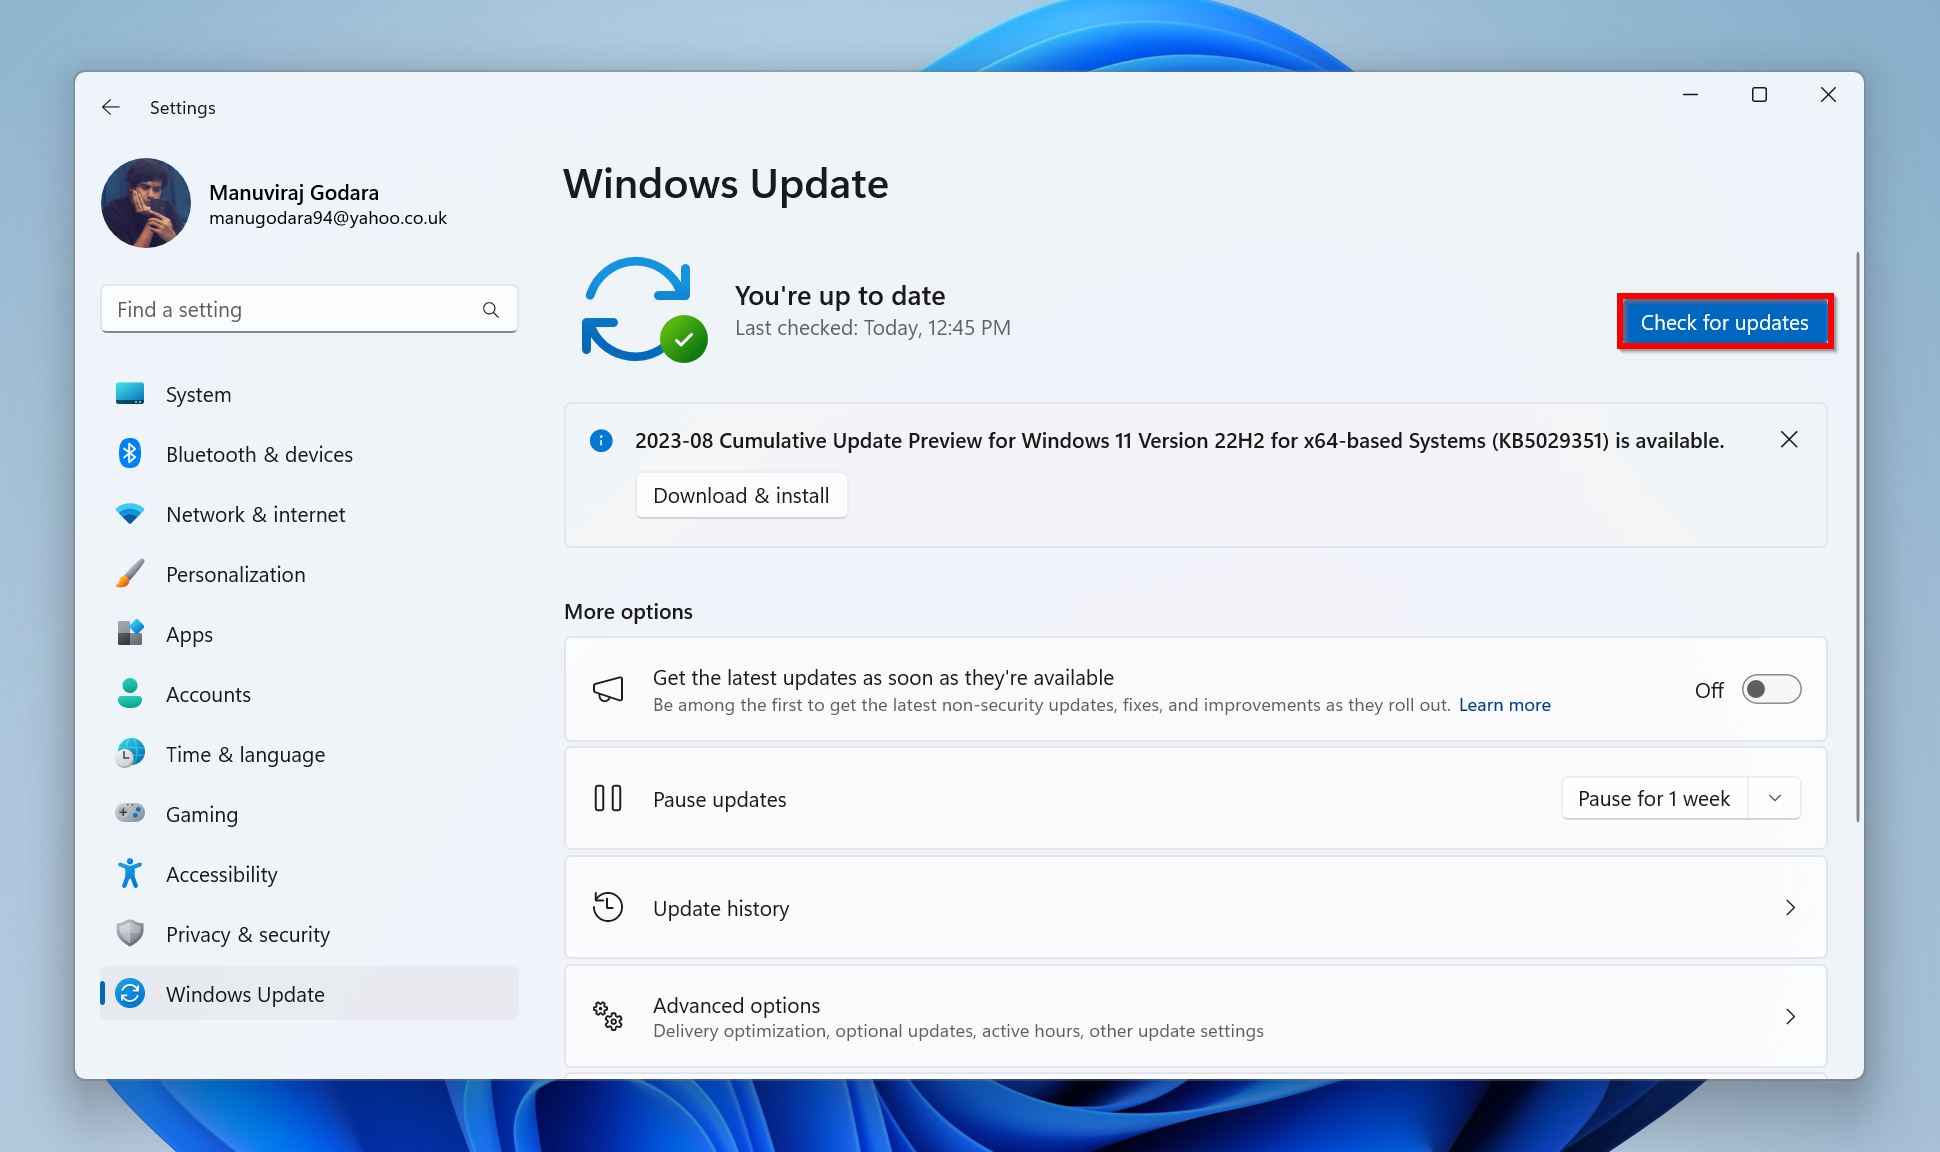
- Click on Windows Update in the right navigation bar.
- Click on Check for updates and wait while Windows looks for, and downloads the latest updates.
- Click on Restart now if Windows prompts you to.
Method 9: Perform a System Restore
A System Restore rolls back your Windows PC to a previous state. It restores all Windows settings and configurations as they were at the time when the Restore Point was created. System Restore won’t affect your personal files.
If none of the methods above bore any fruit, it’s best to use System Restore and restore your PC back to the time when the Downloads folder was working. Here’s how:
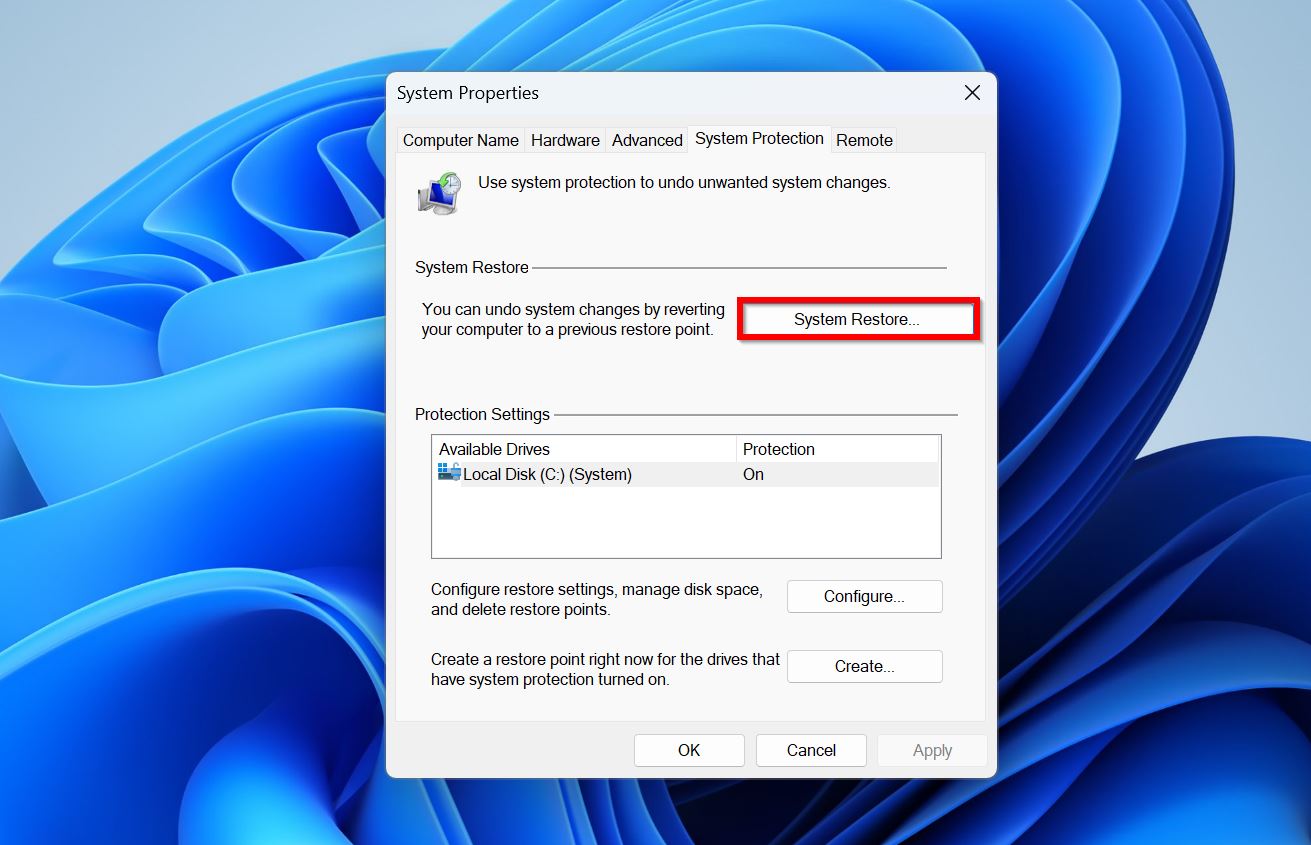
- Look for “system restore” in Windows Search (Windows Key + S). Click on Create a Restore Point.
- Click on the System Restore option.
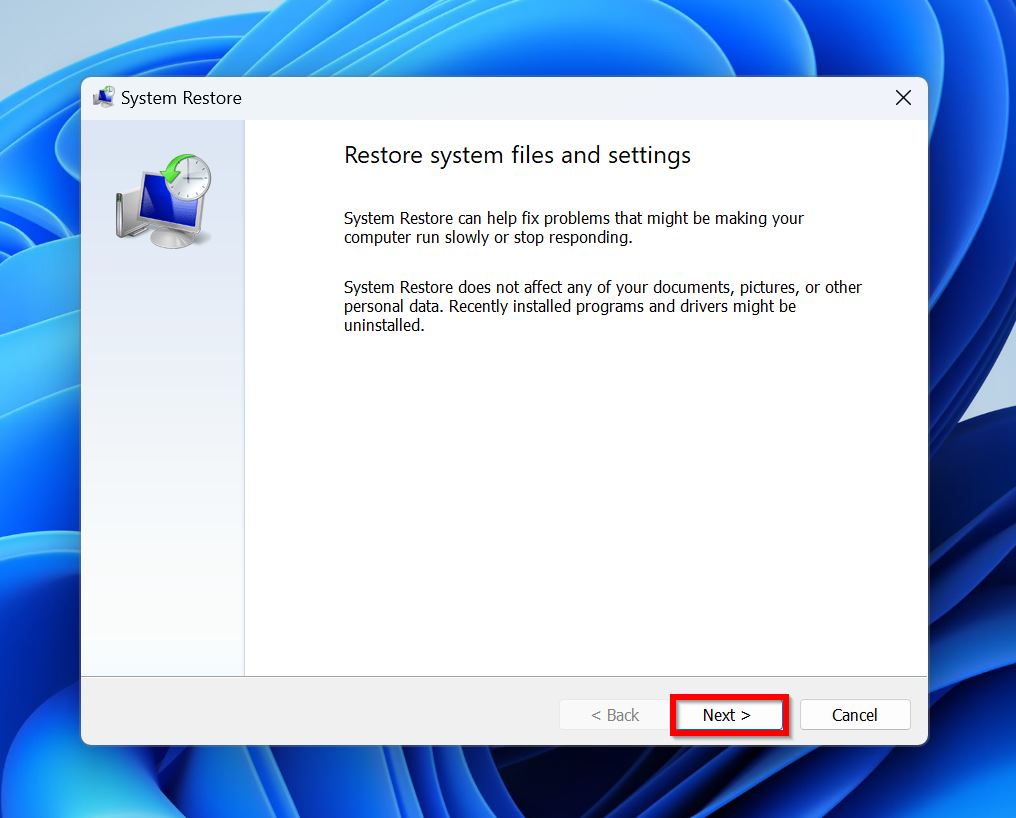
- Click Next on the System Restore welcome screen.
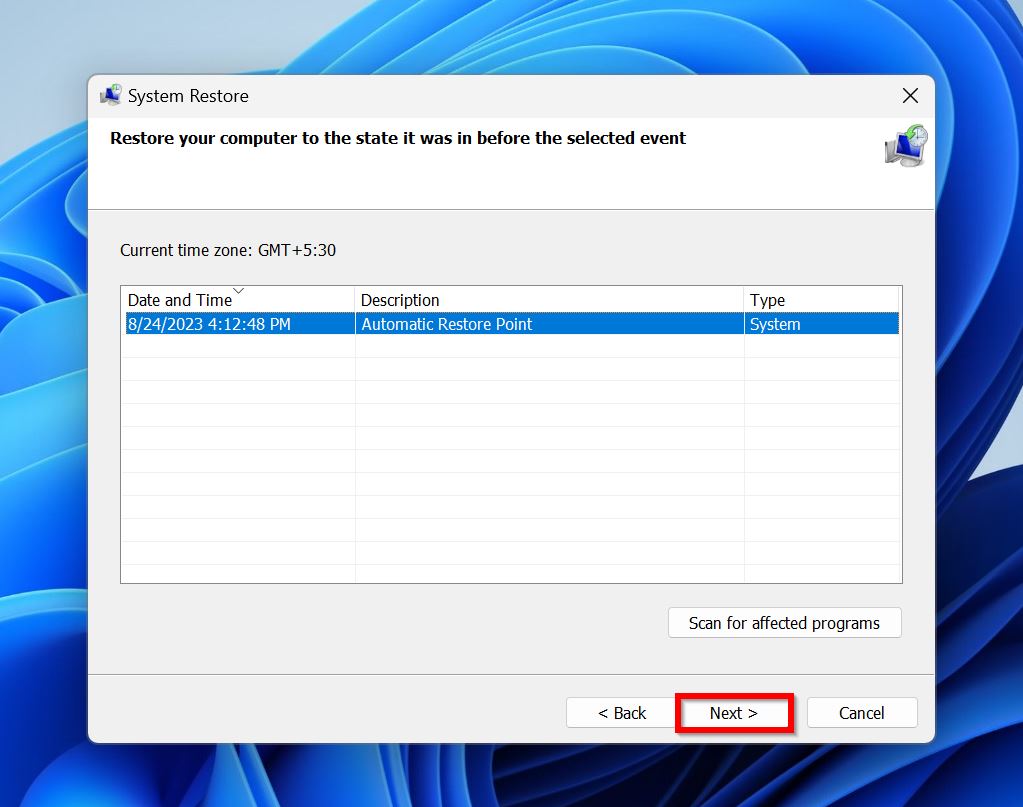
- Choose the appropriate Restore Point and click Next.
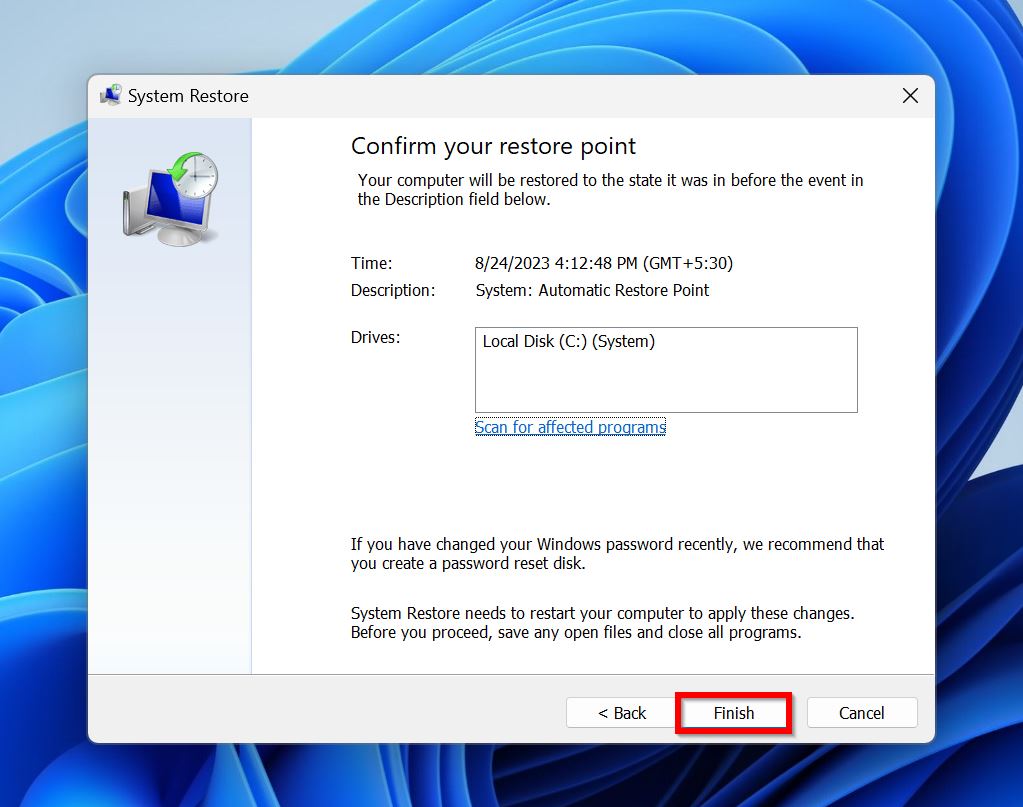
- Click on Finish to begin System Restore.
How to Recover Data from the Downloads Folder
After applying the fixes, you might see some of your files are absent from the Downloads folder. It’s also possible you weren’t able to restore access to the Downloads folder, despite applying all the fixes. In these cases, you can still recover your files from the Downloads folder.
You have plenty of options when it comes to data recovery programs. For this tutorial, we opted for Disk Drill, as it’s easy to operate, works with most major file systems, and has an excellent data recovery algorithm. The app’s preview feature, combined with its advanced filtering options, makes it easy to find the recoverable files you’re looking for.
Here’s how to use Disk Drill and get back your data from the Downloads folder:
- Download Disk Drill and install it. It’s best to do this on an external storage drive.
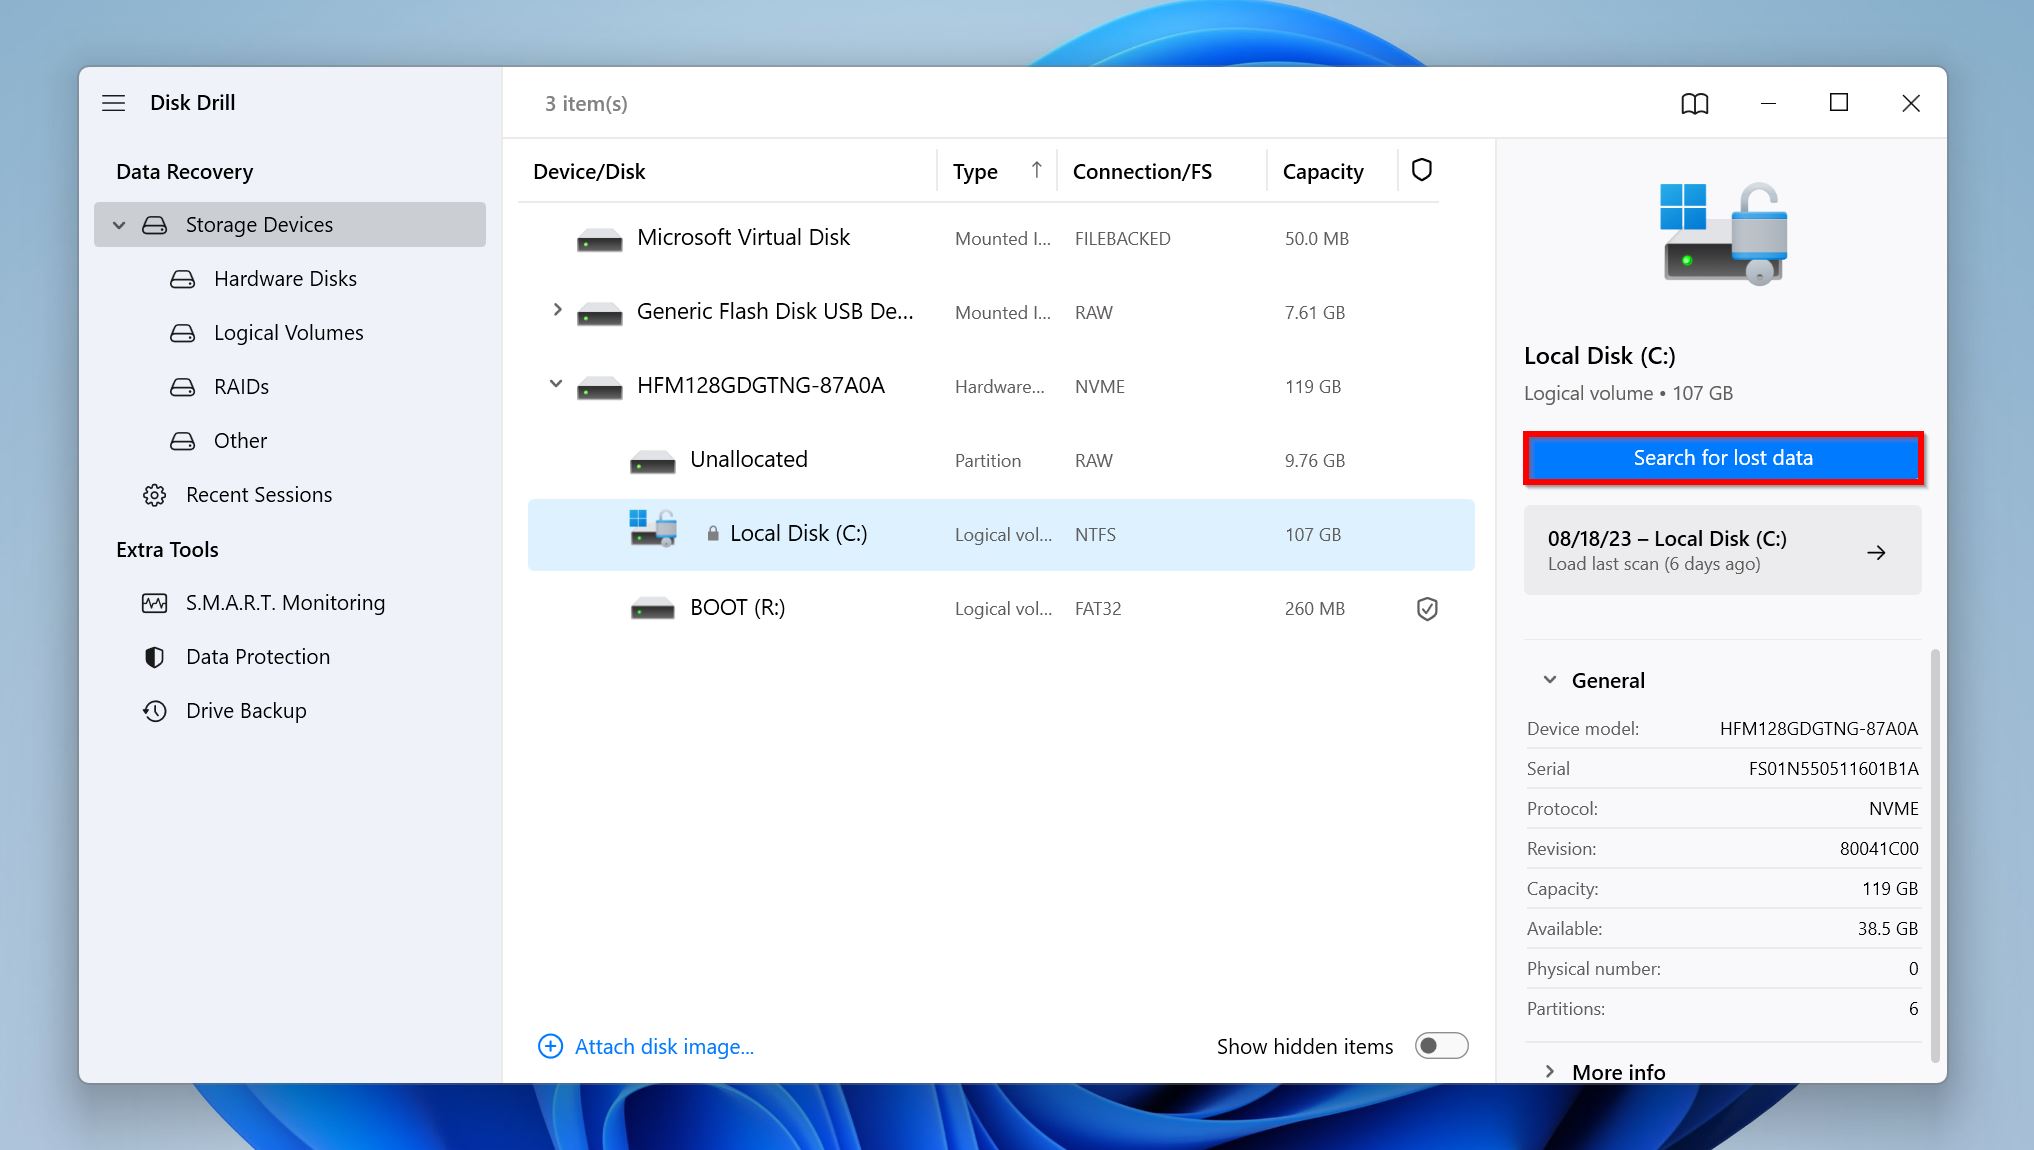
- Launch Disk Drill, select the PC’s internal storage drive, and click Search for lost data.
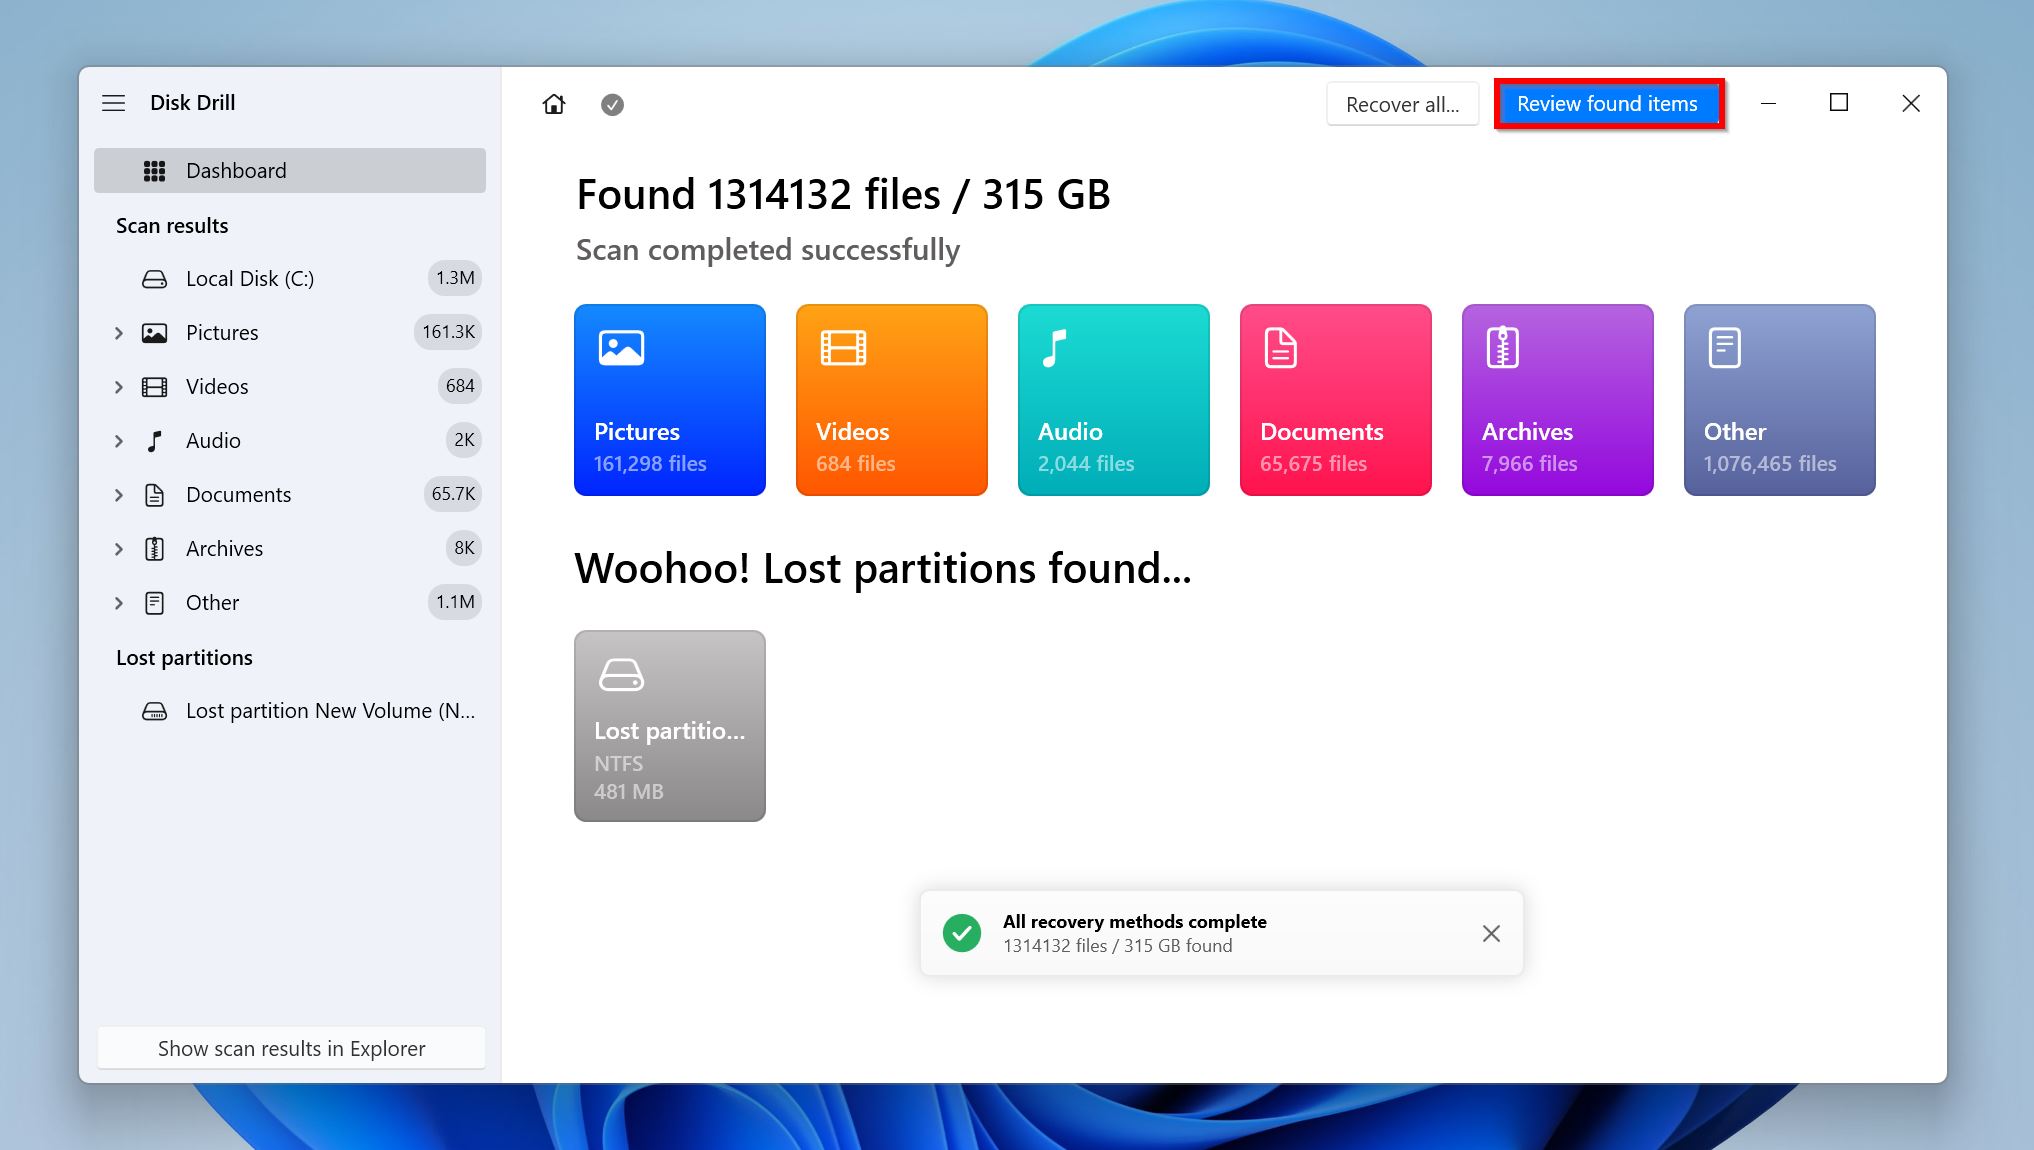
- Click on Review found items once the scan is complete. To only view a specific file type, you can directly click on the relevant option (Pictures, Video, Audio, Documents, Archives, and Other).
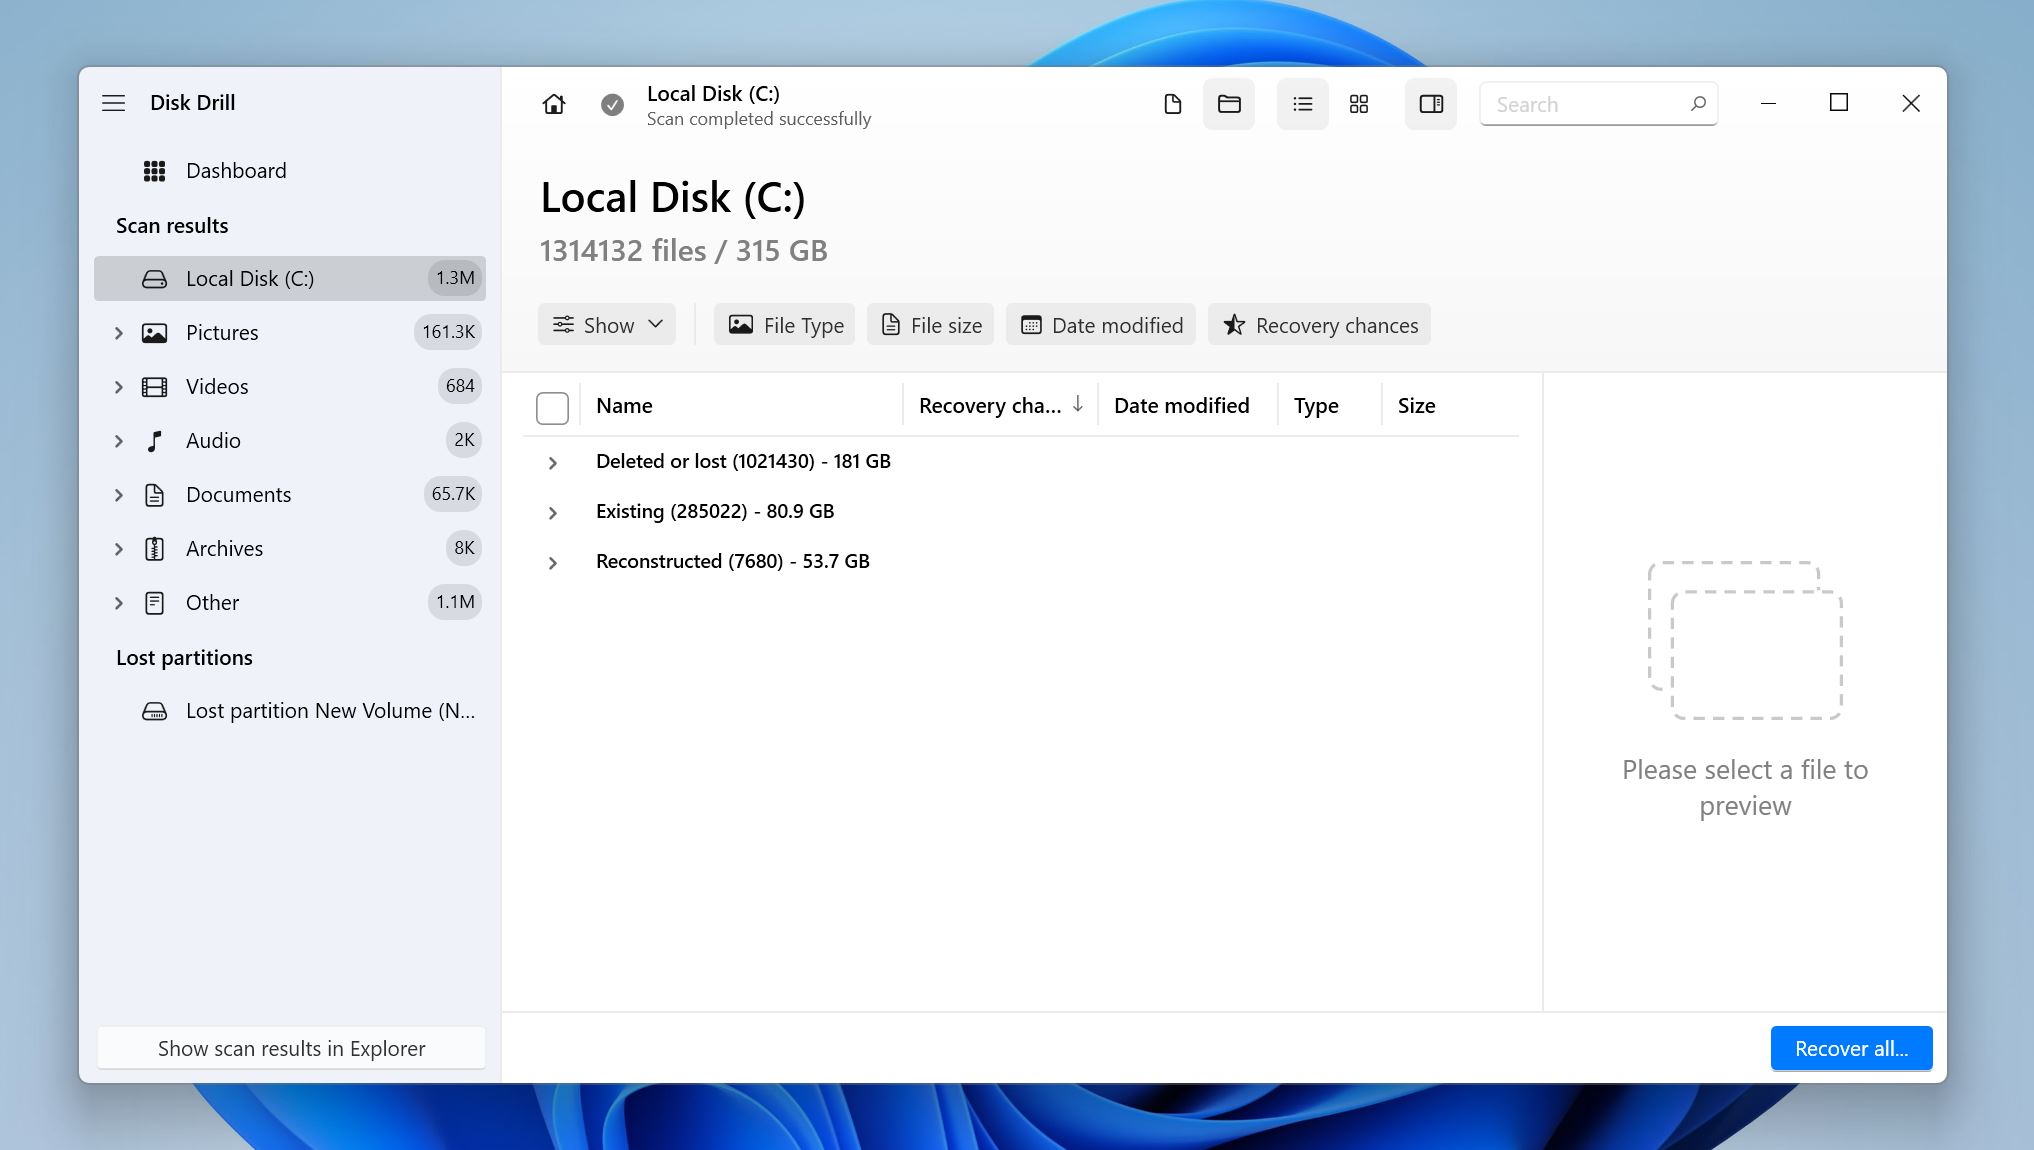
- Expand the Deleted or lost and Reconstructed sections to view deleted files that were discovered. To view existing files on the disk, expand the Existing section.
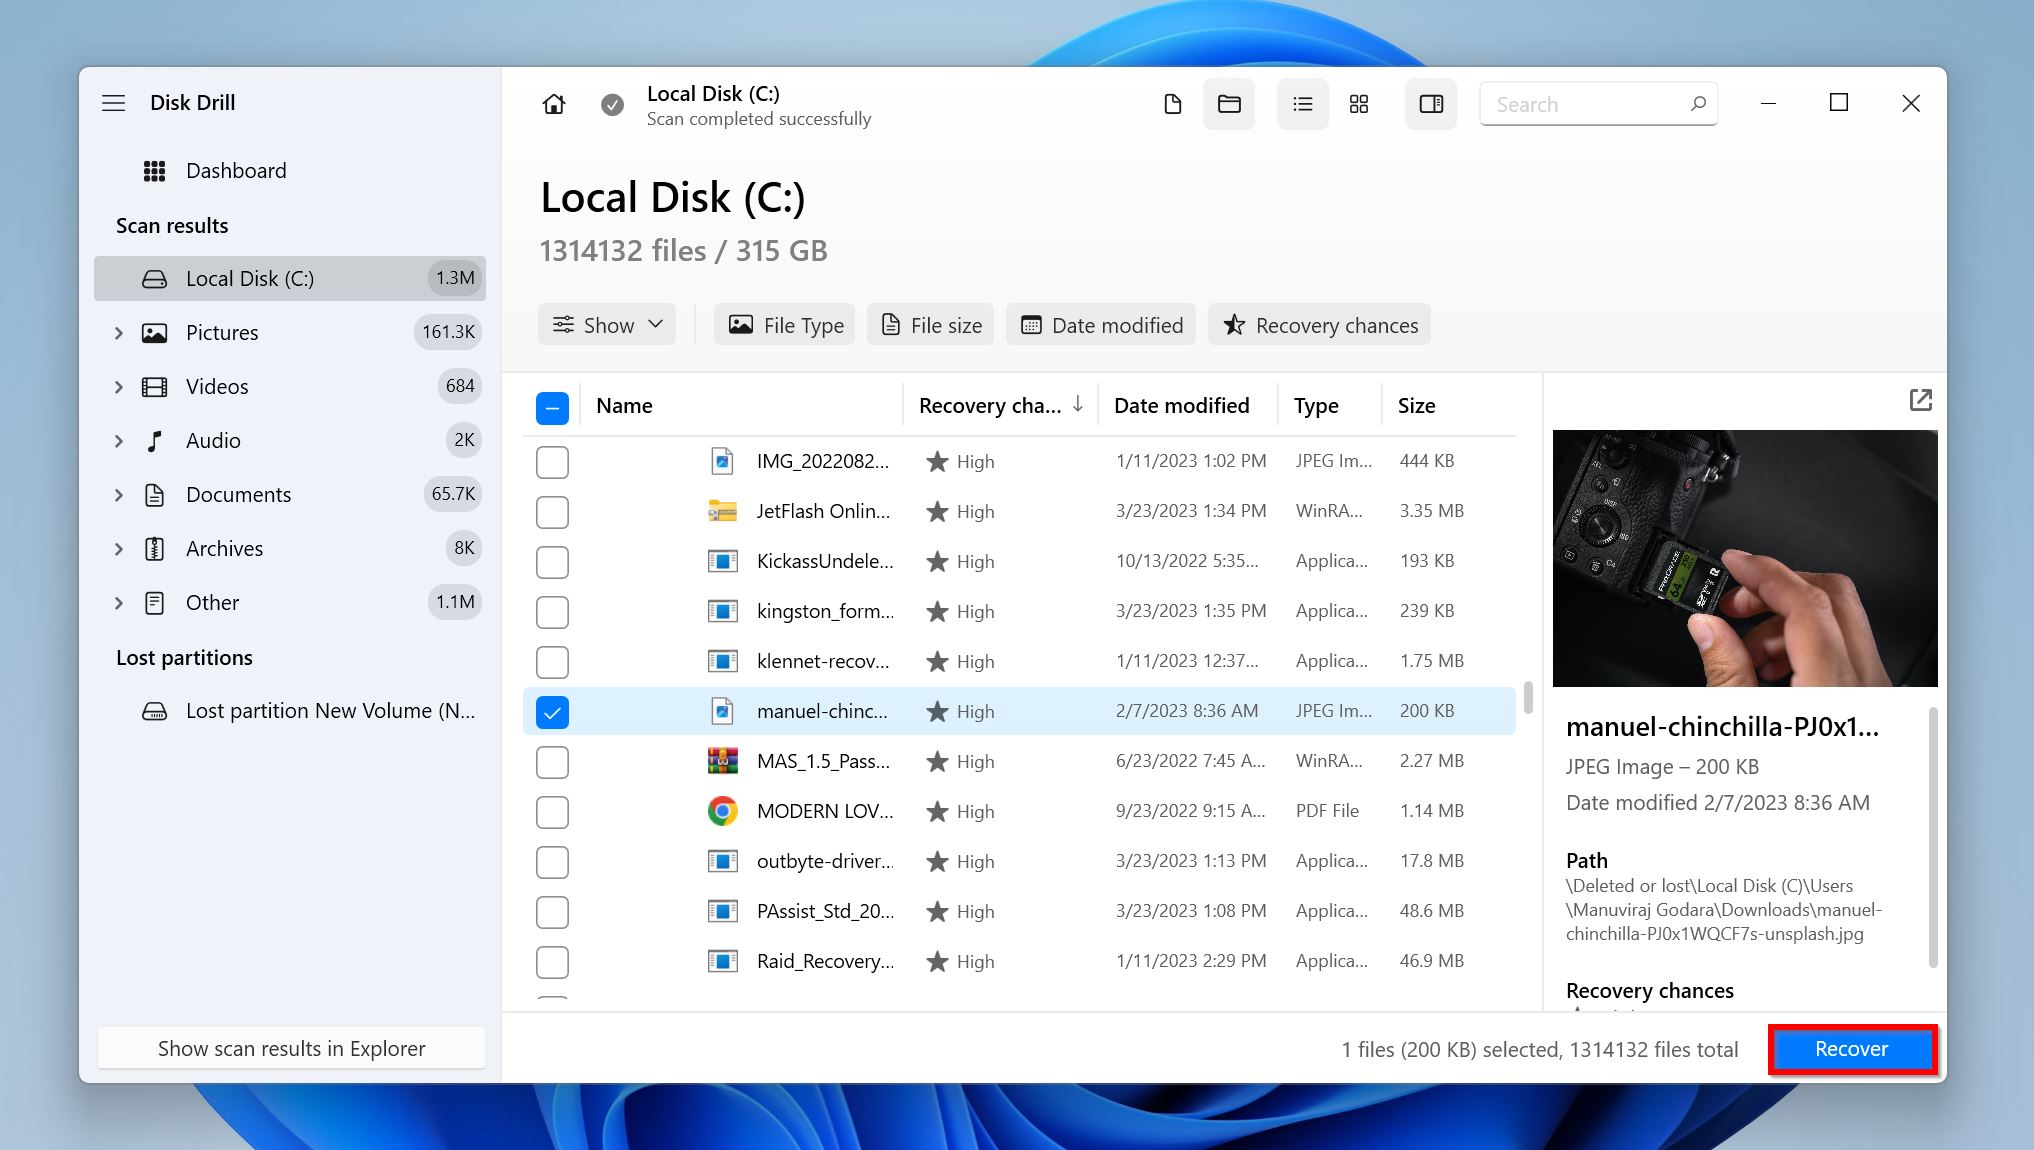
- Navigate to the Downloads folder in the folder tree. Select the files you wish to recover. Disk Drill displays a preview of the currently selected file, but you can manually preview any file by clicking the eye icon next to its filename. Click on Recover once you’re done with your selection.
- Choose a recovery destination and click Next.
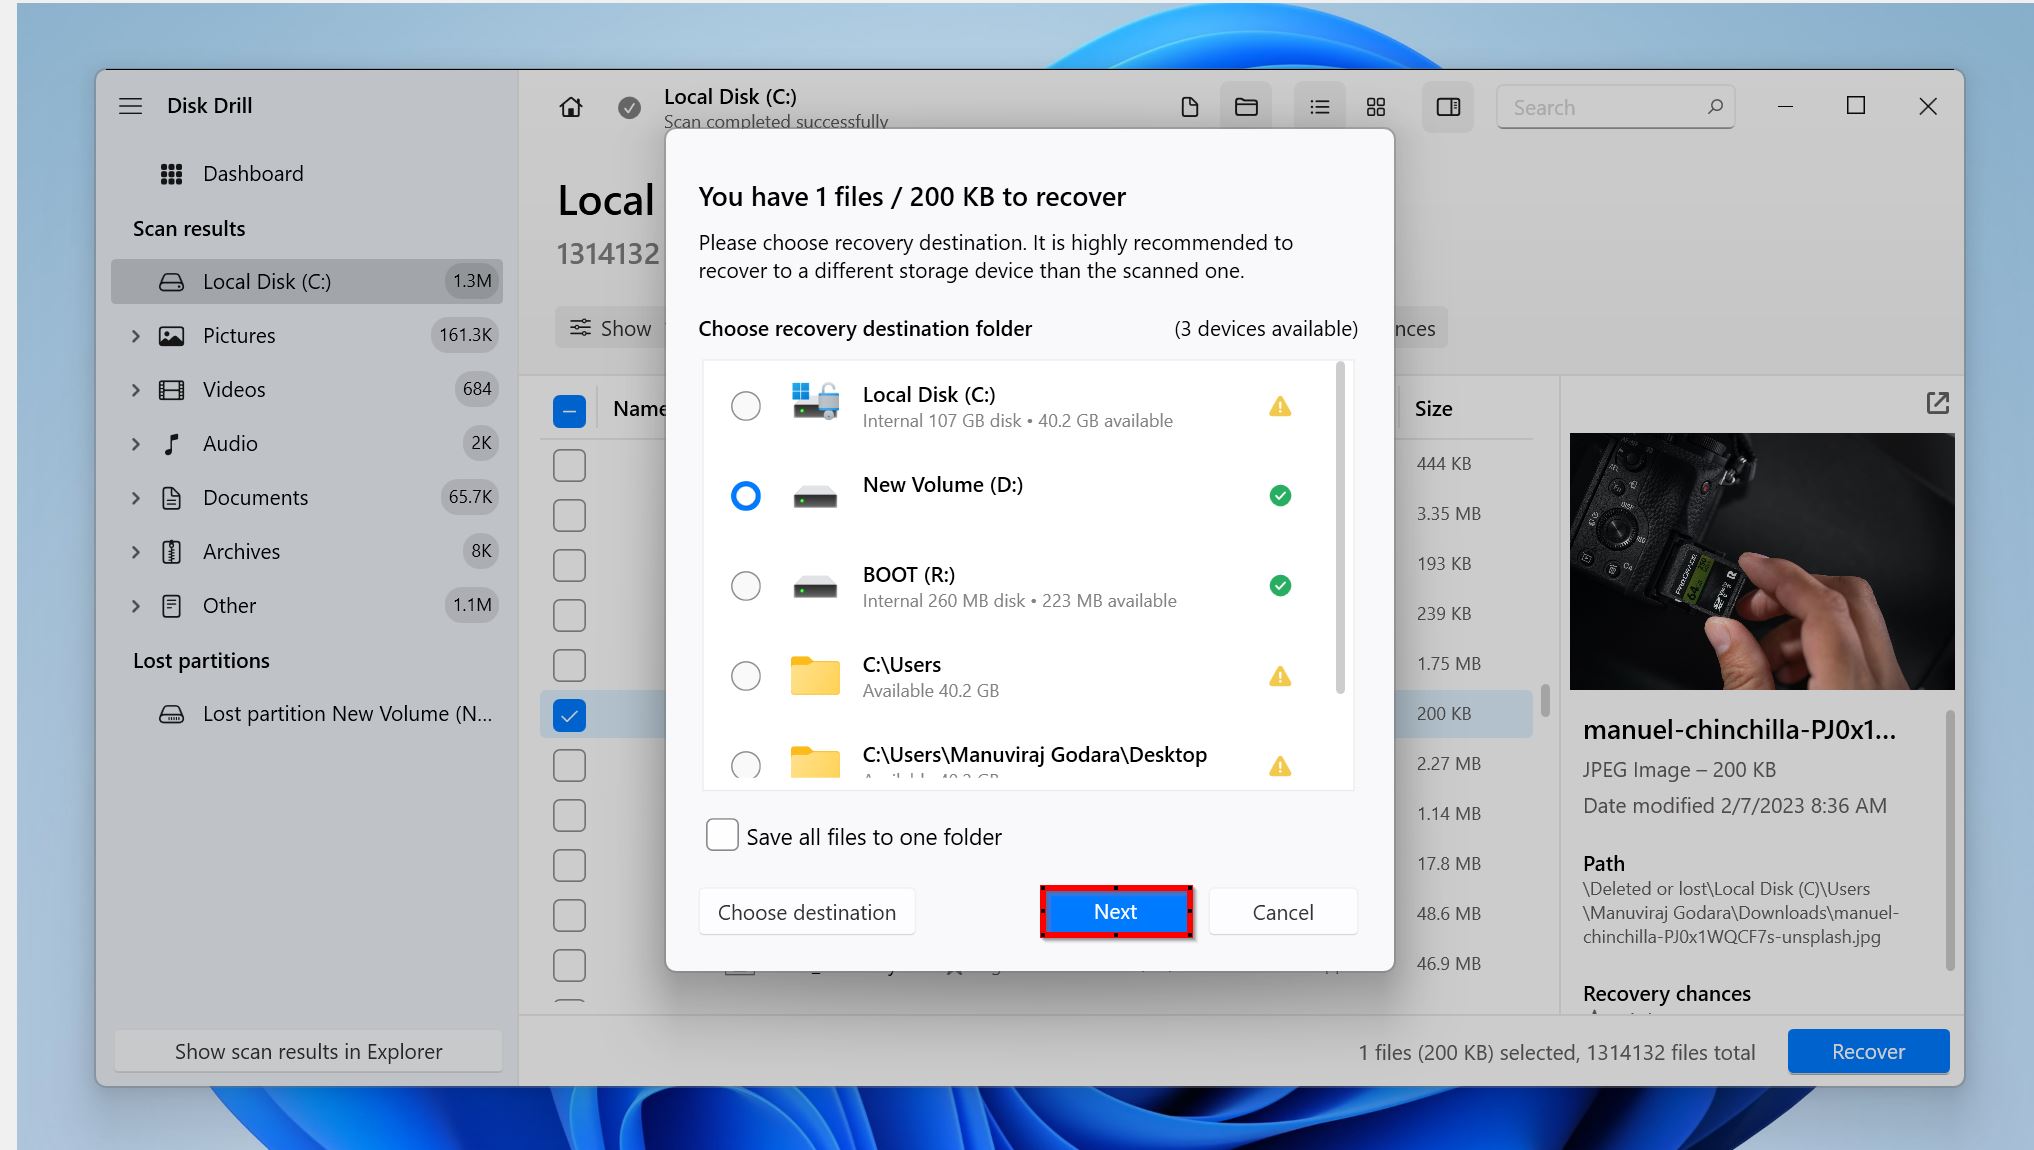
- Disk Drill will recover the selected files. You can recover up to 500 MB of files for free on Windows, as part of Disk Drill’s free trial.
Conclusion
Fixing a Downloads folder that’s not responding can be as simple as restarting the Windows Explorer process, or as complex as configuring the Windows Registry. Usually, it’s the former. You may end up losing some of your data when trying to fix the Downloads folder, or it may remain inaccessible. Here, a good data recovery program is your best friend.
FAQ
- Right-click the Downloads folder and choose Properties.
- Go to the Location tab.
- Click on Restore Default.
- Search for “control panel” in Windows Search (Windows Key + S) and open the Control Panel.
- Click on File Explorer Options.
- Go to the View tab and uncheck the Show status bar option under Advanced settings.
- Click on Apply and then click on OK.


