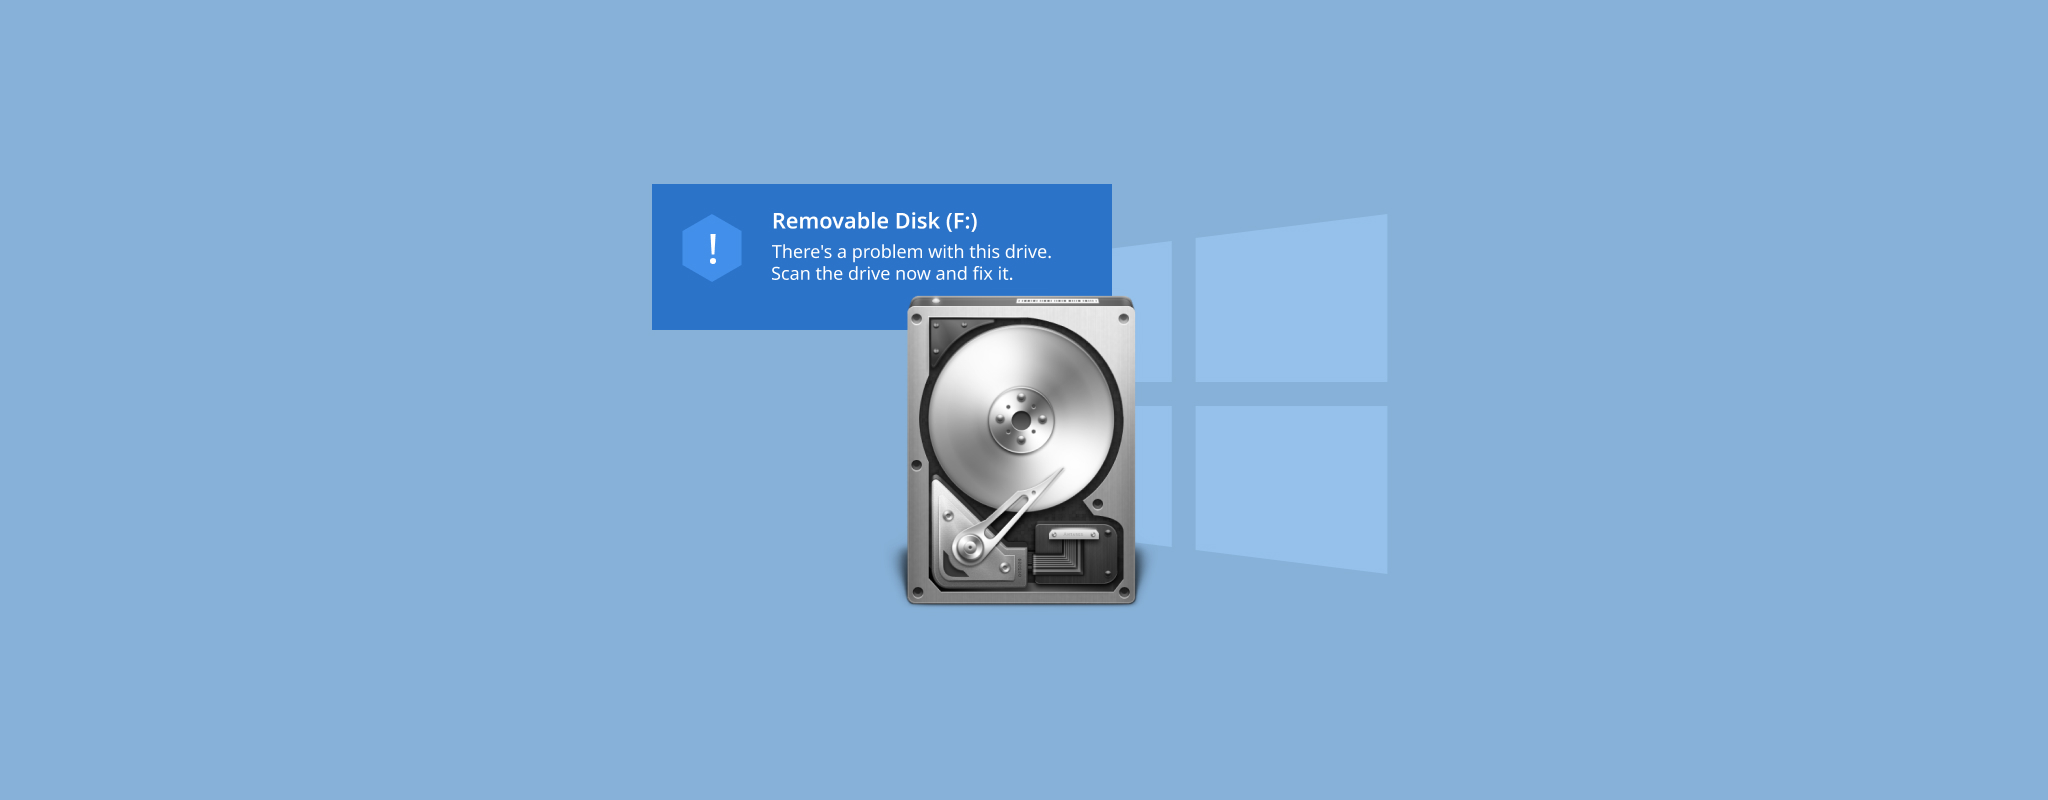
You plug your removable drive into your computer and Windows immediately prompts you with a message that says, “There’s a problem with this drive. Scan the drive now and fix it”. In most cases, you can still access your data, but this could get worse.
Rather than ignore the message, you should get to the bottom of it to confirm that it’s not a wider problem. In this article, we’ll discuss the reasons behind the error message and what you can do to fix the problem.
Table of Contents
What Causes the “There’s a Problem With This Drive” Issue?
This error message appears upon connecting your removable storage media. Wording can change depending on your operating system, but wording will simply state that there is a problem with this drive.
To fix this error on Windows 10, it’s good to have an understanding of what’s causing this issue first so you know what could be causing it. Here are common reasons that lead to the problem:
| Reason | Description |
| 🙅♂️ Improper device removal | Removing your storage device before ejecting it safely can corrupt the device as well as the data stored on it. Before removing a storage device from your computer, eject it safely to safely stop any write processes. |
| 🦠 Virus attack | Viruses can be created to target your data and the device it’s on. Protect yourself from viruses by installing an effective antivirus solution. |
| 💥 Damaged file system | If the file system of your storage device has been damaged or compromised by corruption, this message may appear when it’s inserted into a computer. |
Now that you’re aware of what’s causing it, let’s take a look at how to recover files from the drive-in case it’s inaccessible or showing additional signs of failure.
How to Recover Files From the Affected Drive
In some cases, this error message can appear and prevent you from accessing your files. Or, it could be an additional warning prompt alongside several others. Either way, it’s a good idea to recover what data you can from the removable drive before implementing any fixes, as they may result in the loss of your data.
We’ll be using Disk Drill to recover your files. Disk Drill is a data recovery tool used to recover deleted files from external hard drives, flash drives, and most other forms of storage media. It’s a trusted authority in the recovery industry thanks to its speed, effectiveness, and easy-to-use interface.
- Download and install Disk Drill. Open it.
- Select your removable drive, then click Search for lost data.
- When the scan is complete, click Review found items.
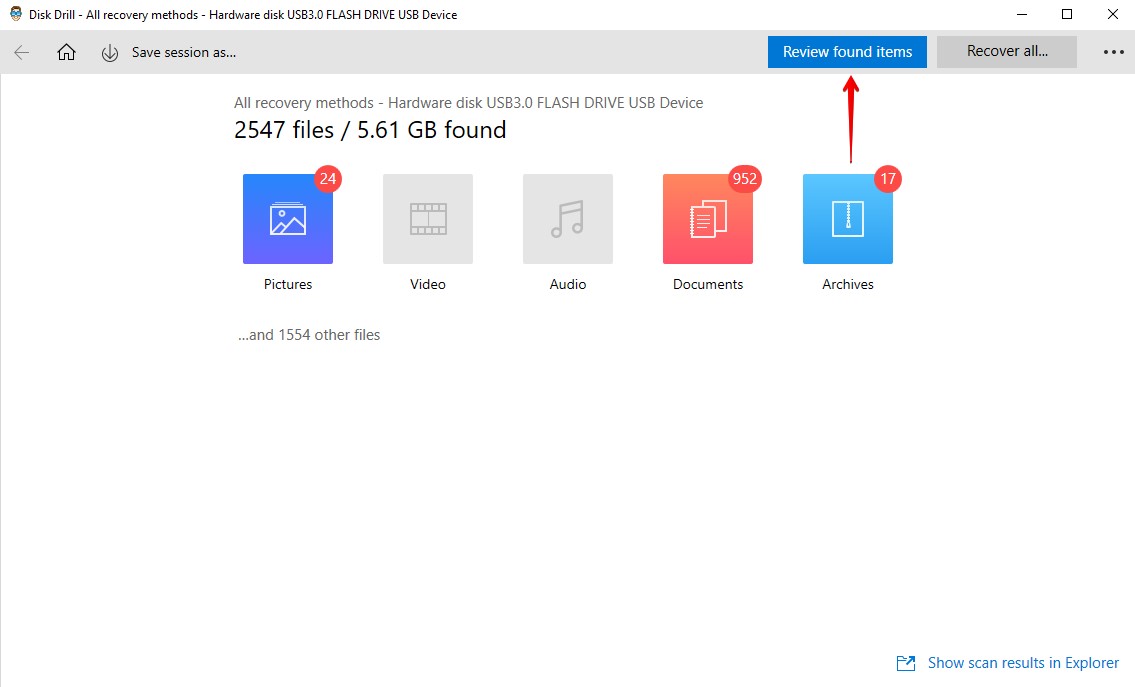
- Mark what files you want to recover. Take note of the Recovery chances column for an indication of how recoverable each particular file is. When ready, click Recover.

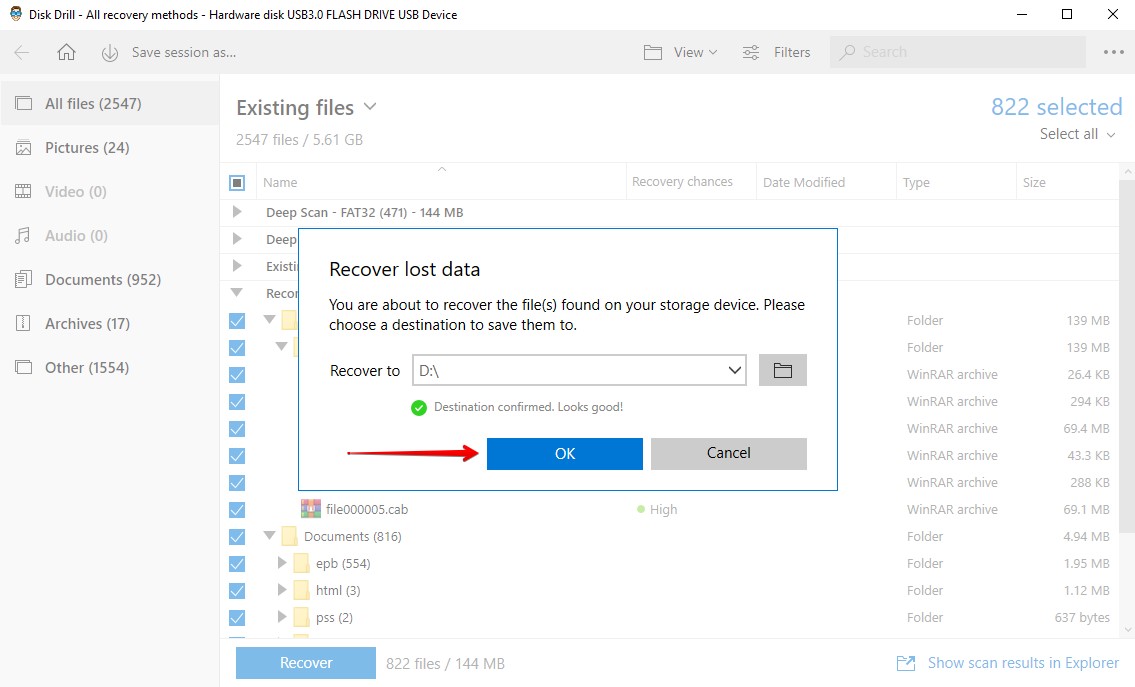
- Specify where you want the files recovered to. Click OK when ready.
How to Fix the “There’s a Problem With This Drive” Error
Now that we have an understanding of what’s causing this error and our data is safe and sound, let’s look at the various methods you can use to fix the “there’s a problem with this drive” error message to stop it from appearing once and for all.
Method 1:Continue Without Scanning
Depending on how severe the problem is, you may simply click Continue without scanning and proceed to access your data. If you don’t want to scan and fix the removable disk immediately, then ignoring the message and backing up your data is useful before proceeding to the next methods.
We don’t recommend continuing to ignore the message, especially if it continues to appear every time you connect your removable drive. This condition could worsen to the point where you encounter problems repairing the drive.
Method 2:Scan and Fix
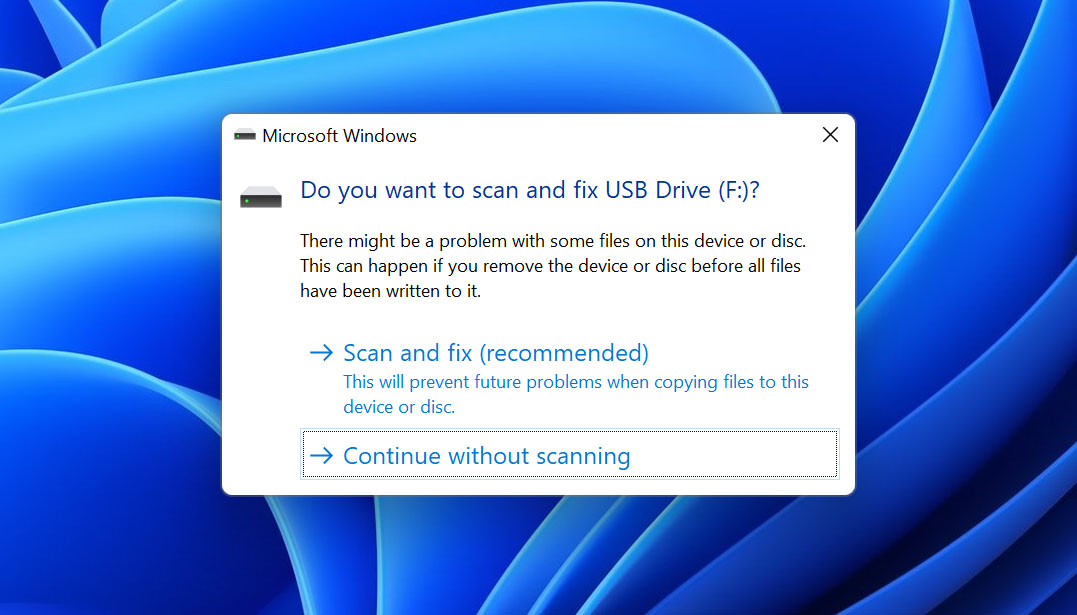
Upon connecting the drive, Windows will prompt you to scan and fix it. If you click the notification, you’ll be presented with two options: Scan and fix or Continue without scanning (as we mentioned above). The scan and fix option will actually use CheckDisk to scan and fix external hard drives and other storage media, another option that we’ll look at later in this list but using the Command Prompt instead.
Although this method is safe, there’s always a chance that you’ll lose your data. Make sure you back up the data before proceeding.
- Click the notification that says “There’s a problem with this drive.” when it appears.
- Click Scan and fix (recommended).

- Click Repair drive.

- Click Close.
If you received the error “there was a problem scanning this drive”, try some of the below methods instead.
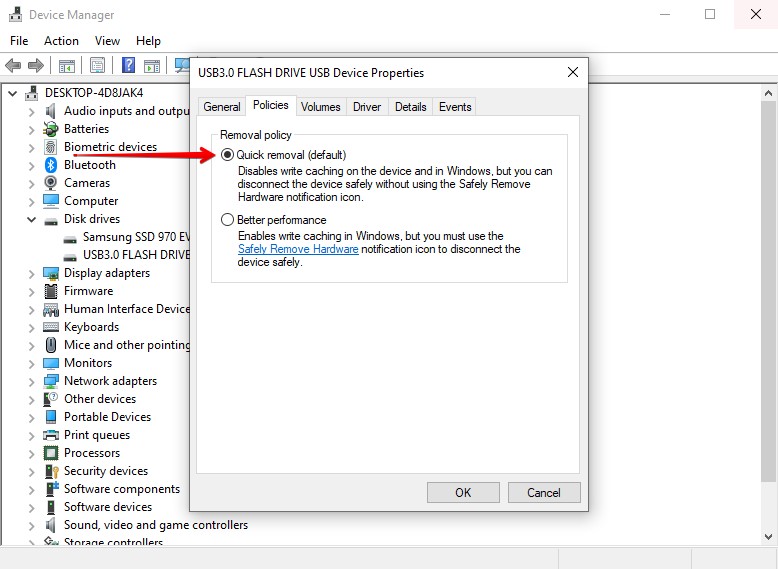
Method 3:Enable Quick Removal
If you’re someone who easily forgets to safely eject removable storage devices before disconnecting them, you can simply enable Quick removal so that your drive is always ready to be removed safely.
This may decrease system performance as Windows cannot cache disk write operations for that device, but it eliminates the need to eject the device safely. This can also stop the “do you want to scan and fix” message from appearing every time you connect it, as you’ll no longer need to scan to fix the drive.
This is device-specific. Enabling Quick removal will do so only for that device, not all removable devices you connect.
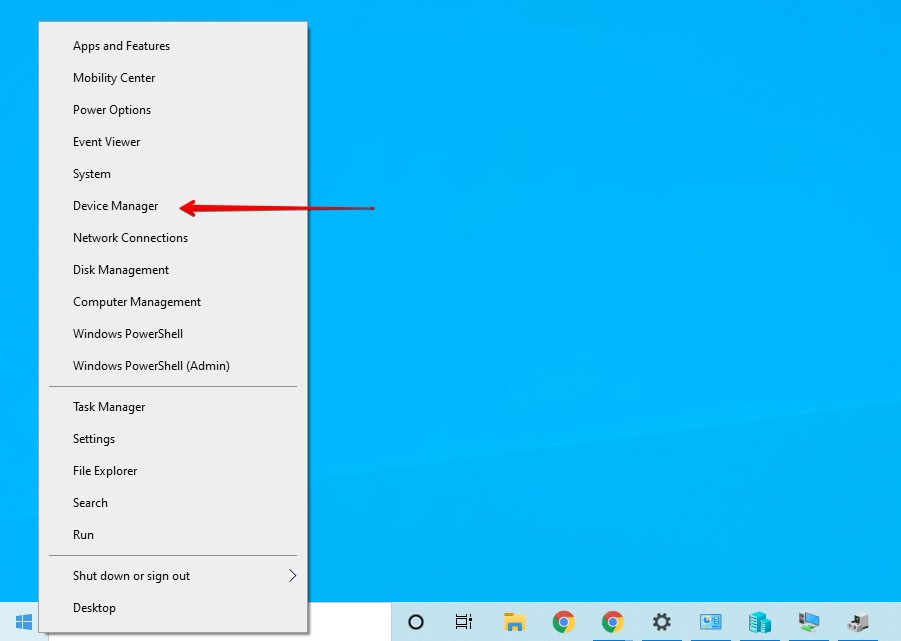
- Right-click Start and click Device Manager.
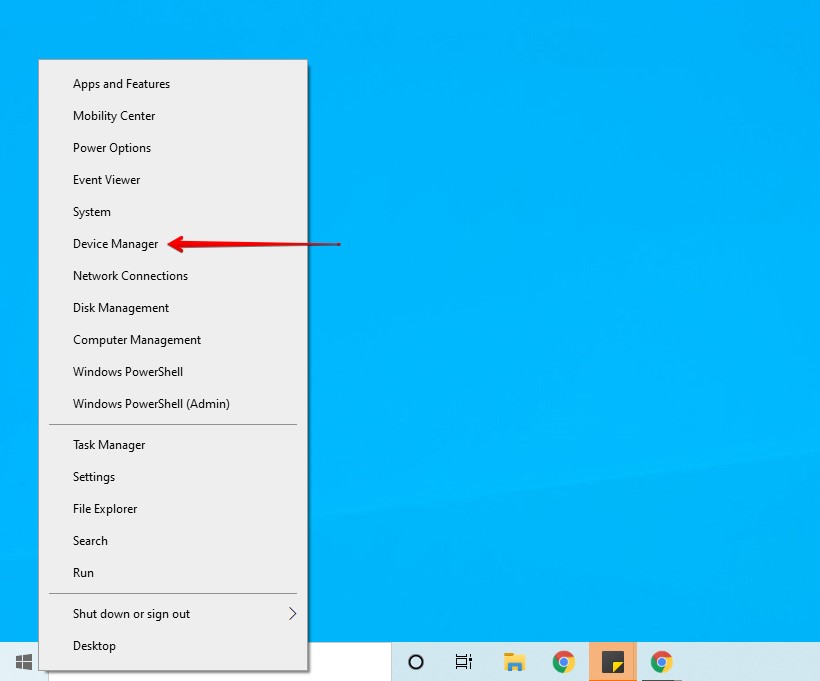
- Expand the Disk drives dropdown. Right-click your USB and click Properties.

- In the Policies tab, select Quick removal then click OK.
Method 4:Disk Error Checking
Windows has a built-in error checking function that you can use to scan and repair your removable drive. While this hard drive scan and repair is running, you won’t be able to use the removable drive. The below steps will guide you through how to scan and fix external hard drive.
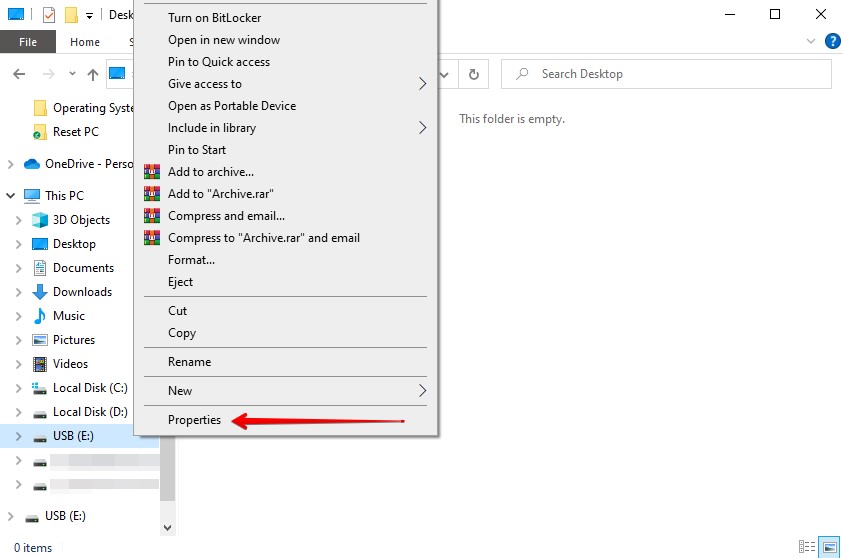
- Open File Explorer. Right-click your removable drive and click Properties.
- Click the Tools tab, then click Check.
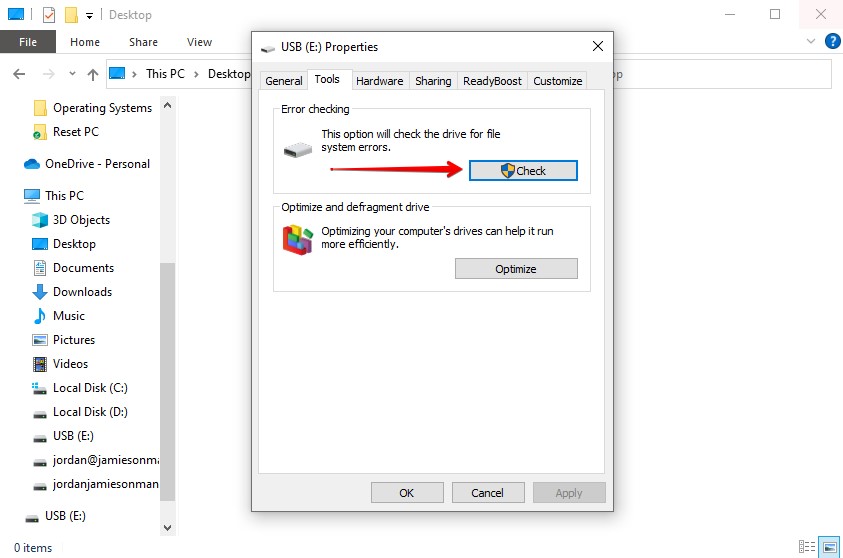
- Click Scan and repair drive. This may take some time to complete.
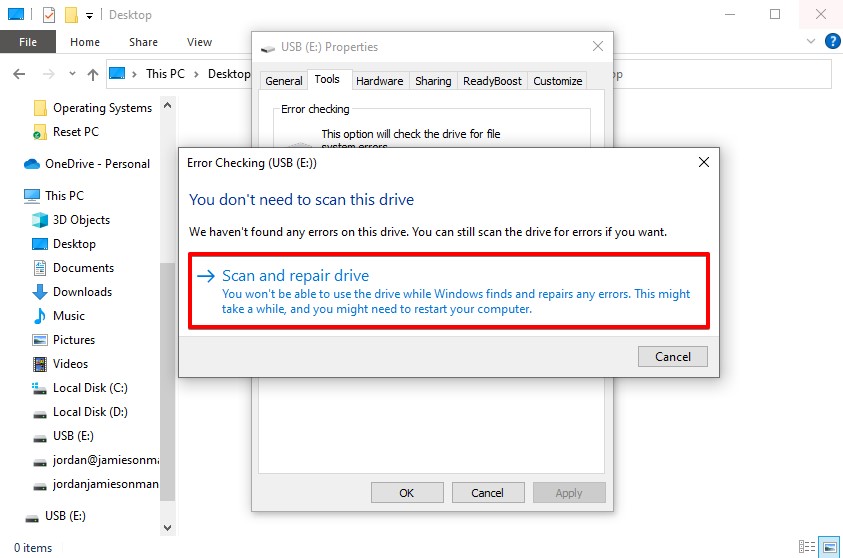
- When finished, a window will appear stating what was performed.
If Windows was unable to repair the drive, try the next method using CheckDisk.
Method 5:CheckDisk (CHKDSK) Command
You can scan and fix the hard drive using CheckDisk (CHKDSK), a disk-checking utility inside Windows that can scan and repair file system-related problems. Depending on the parameters used, you can simply scan your removable drive or scan and fix it.
The command we’ll be using will scan your removable drive for errors and attempt to automatically fix them upon discovery. When you’re prompted by Windows with the error message, close this dialog box and then repair the drive using the below steps.
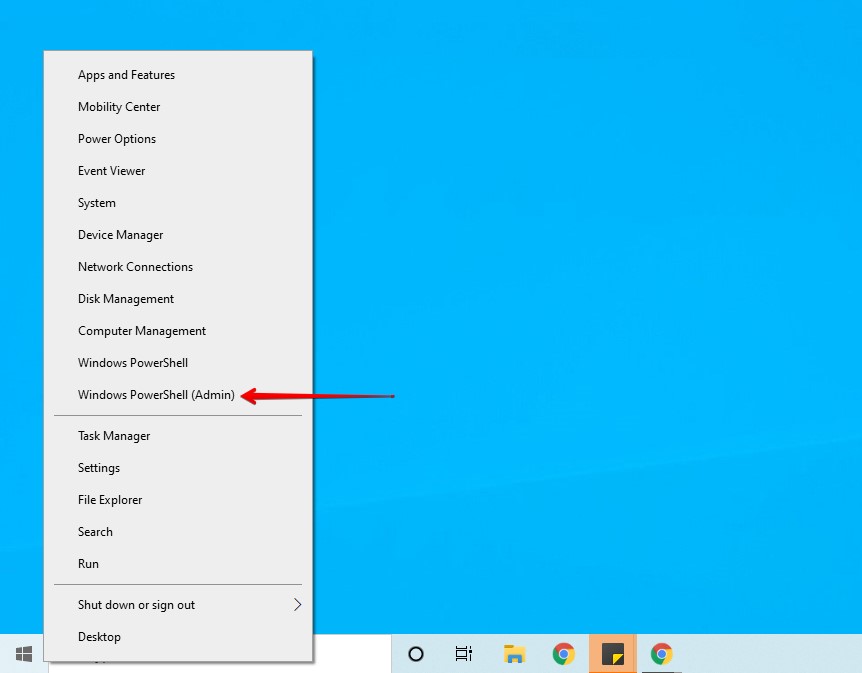
- Right-click Start and select Windows PowerShell (Admin).
- Type
chkdsk E: /r. Replace E: with the drive letter of your removable drive. Press Enter.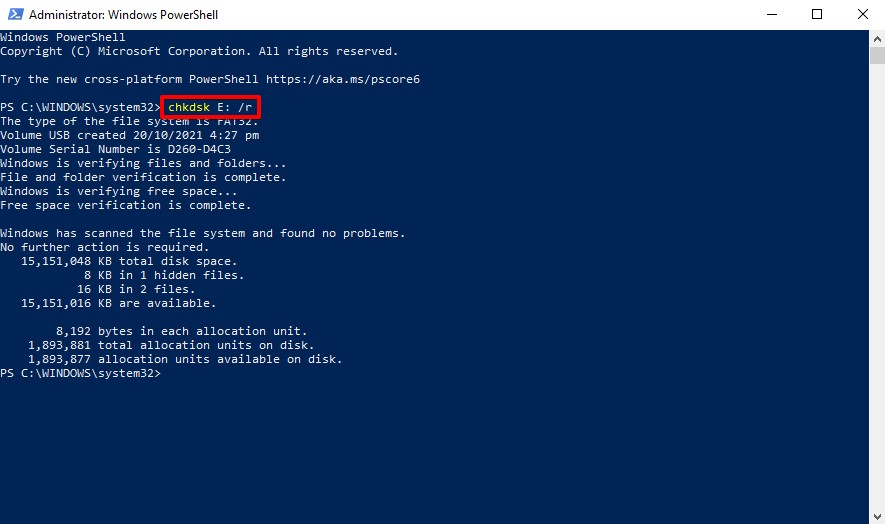
Method 6:Troubleshooter
Windows, by default, includes a list of troubleshooters that specialize in diagnosing and repairing issues in different areas. Windows’ scan and fix troubleshooters may automatically find and fix the problem.
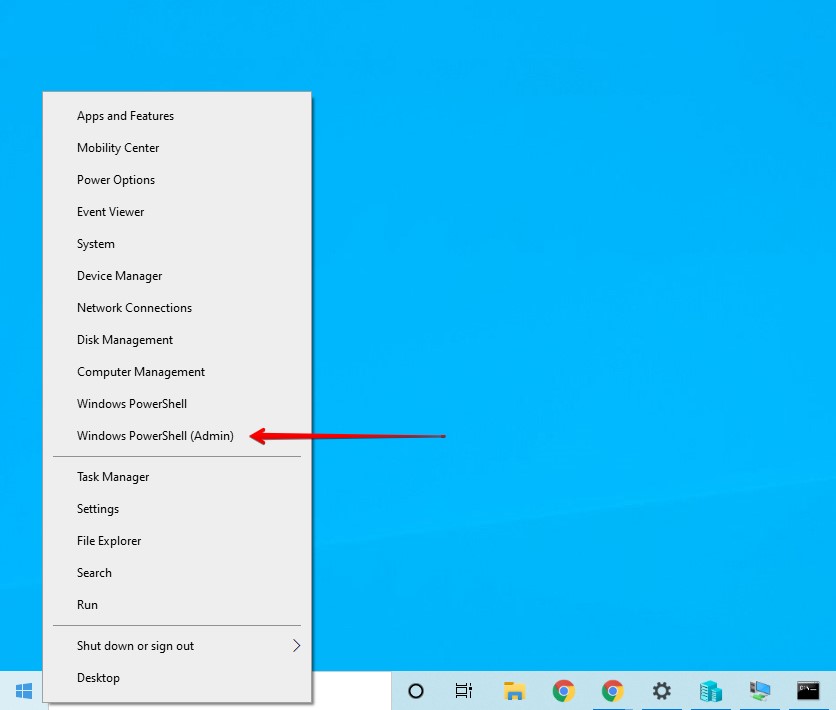
- Right-click Start and click Windows PowerShell (Admin).
- Type
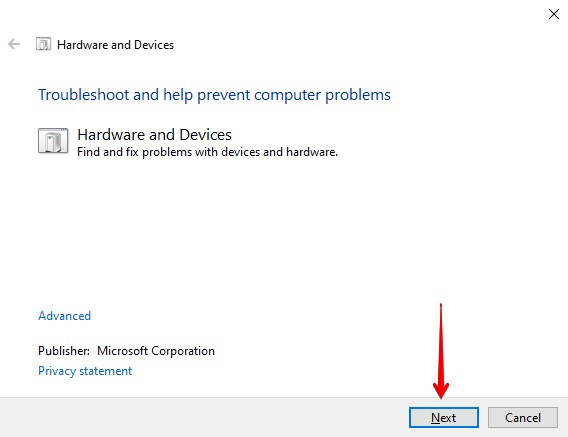
msdt.exe -id DeviceDiagnosticand press Enter.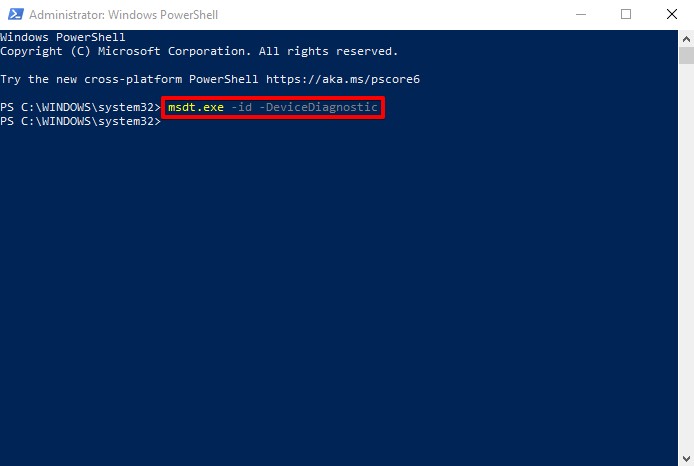
- Click Next. This will start the scan and automatically fix the issue.
Method 7:Update or Reinstall the Driver
Drivers enable your hardware to communicate with each other. Without them, your removable device wouldn’t be able to work at all. If your drivers are outdated, or if they’ve become corrupted, you can update them or reinstall them to see if this fixes the issue.
- Right-click Start and click Device Manager.
- Expand the Disk drives dropdown. Right-click on your storage device and click Properties.
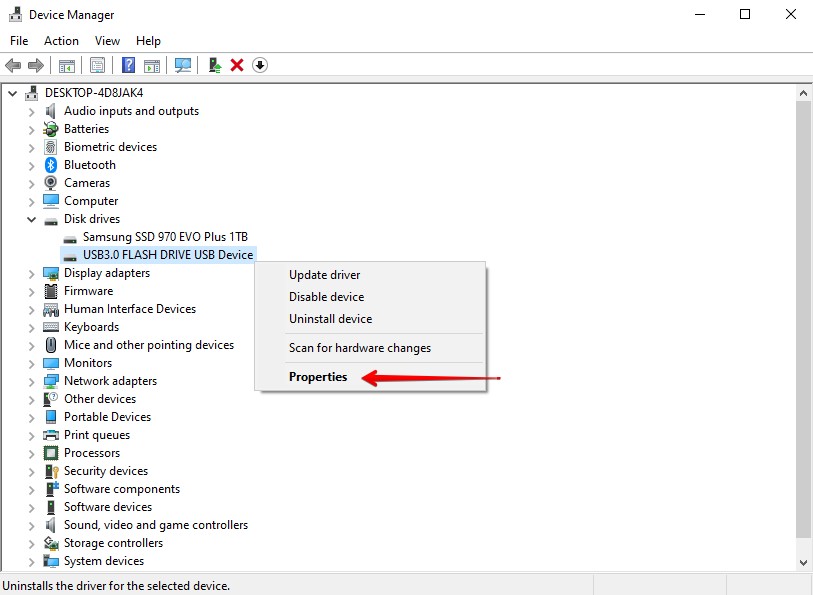
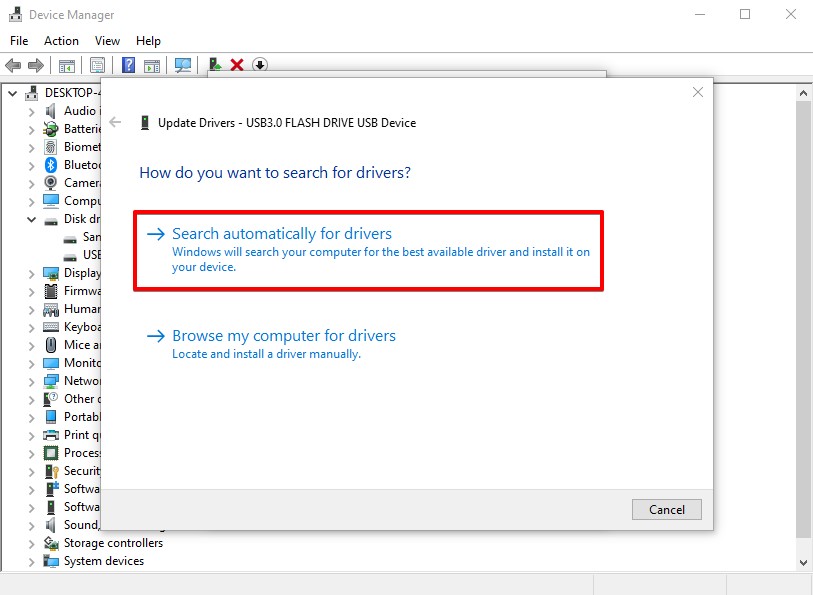
- Click to the Driver tab, then click Update Driver.

- Click Search automatically for drivers.
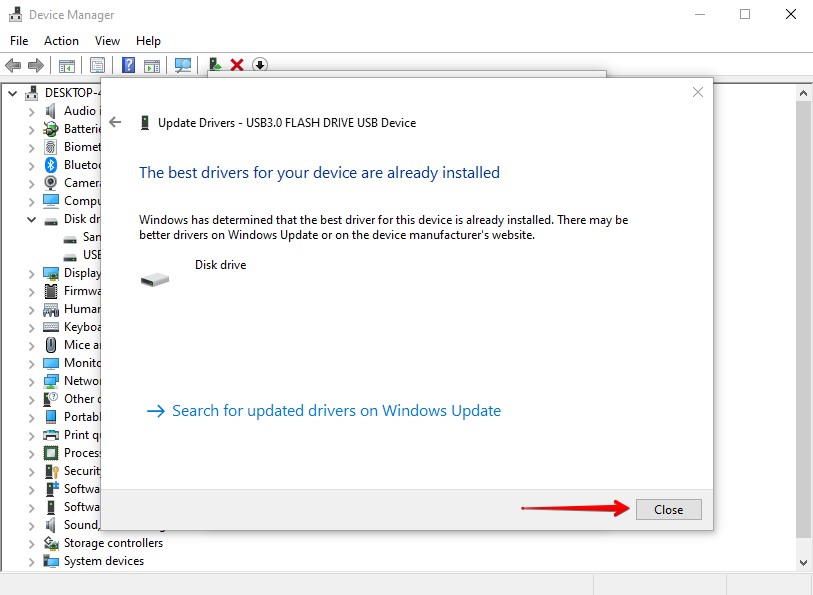
- If the most up-to-date drivers are already installed, let’s try reinstalling the drivers. Click Close.
- Click Uninstall Device.
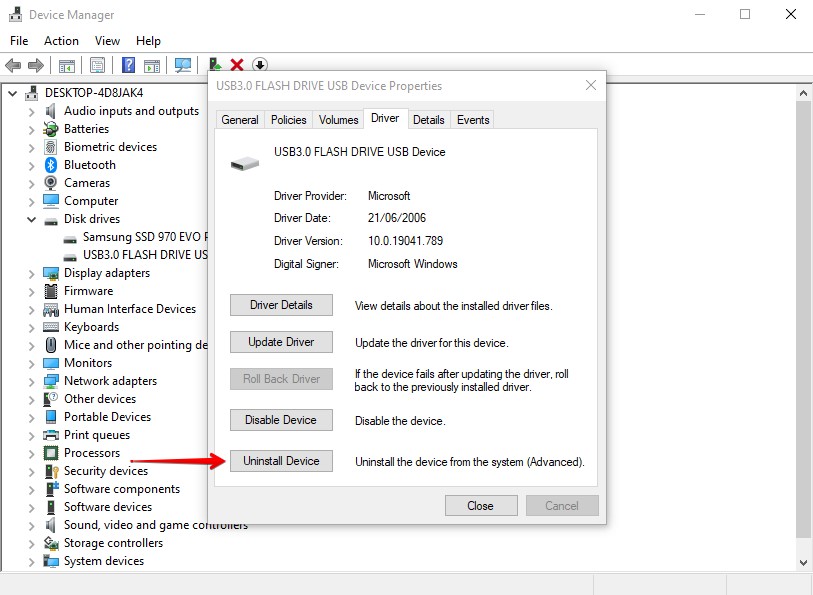
- Click Uninstall.

- When complete, simply disconnect and reconnect the device to install drivers again.
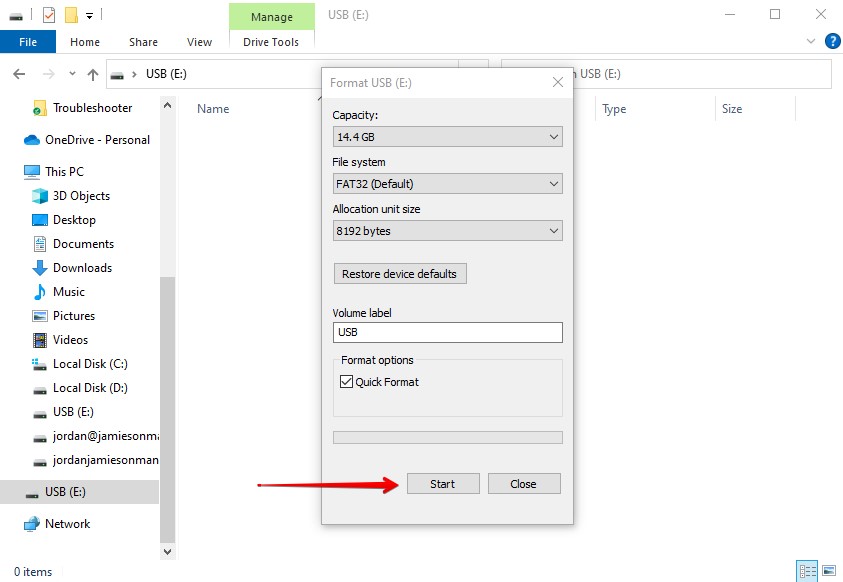
Method 8:Formatting
Finally, as a last resort, you can try formatting your storage device to fix the error message. Formatting your device will delete all of the files it contains and refresh its file system, fixing logical errors as it does. Therefore, you should back up or recover any files on the drive before performing a format.
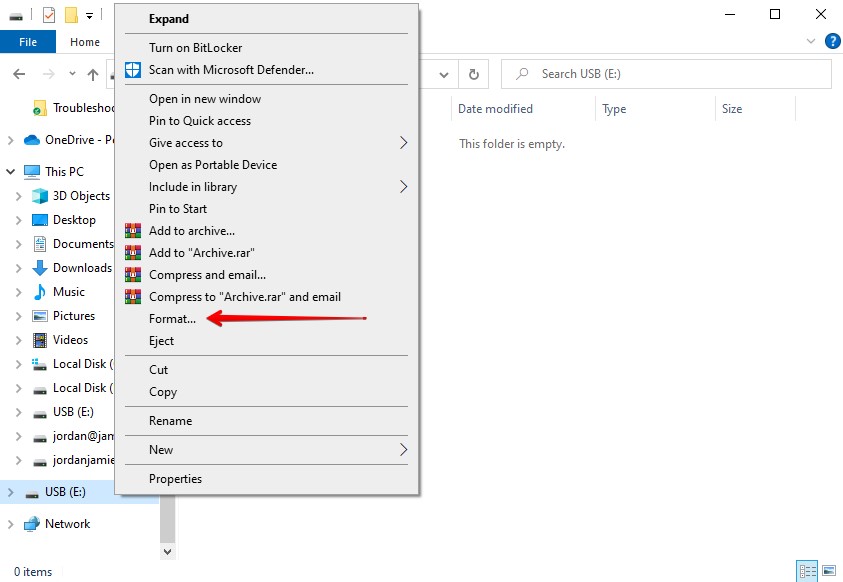
- Open File Explorer.
- In the left panel, right-click the storage device and click Format.
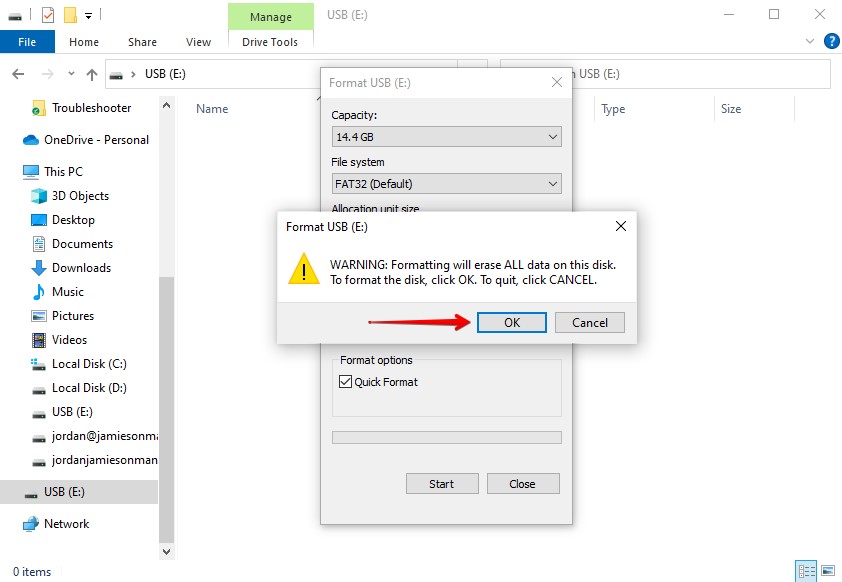
- Ensure Quick Format is ticked and click Start.
- Click OK to confirm the format.
FAQ
- When the notification appears upon connection, click it.
- Click Scan and repair (recommended).
- Click Repair drive.
- Click Close.


