 You connect your USB drive to your PC, just to find out that there’s nothing visible on the drive. Are the files hidden, or deleted? Is there an issue with the PC or the USB drive itself? The sections below will answer these questions and also offer possible solutions to the USB drive not showing any files issue, for both Windows and macOS.
Table of Contents
Reasons Why a USB Drive May Not Show Files or Folders
There can be several reasons why your USB drive isn’t showing any of your files. It could be a simple case of a loose connection, or an indication that the drive has suffered logical damage.
Broadly speaking, the culprits behind a flash drive not showing files, are:
| Reason | Description |
| 📂 Hidden Files and Folders | Unless you’ve enabled the view hidden items option on your Mac or Windows PC, none of the hidden files and folders will be visible to you. For example, if you only have a single folder on your USB drive, and it’s hidden, the drive will show up as empty in Windows Explorer/Mac Finder, if hidden items aren’t enabled. |
| 🖇️ Improperly Connected USB Drive | Your computer’s OS won’t read your flash drive if it’s not connected properly. This includes cases in which the connection is loose, or the drive is connected to a disabled, malfunctioning, or broken USB port. |
| 🔨 Logical or Physical Damage | USB drives are susceptible to logical and physical damage, both of which prevent the drive from working as it should. Signs of logical damage are slow performance, disappearance of files, and an inability to access the drive on your system’s file explorer. A broken or bent USB drive will typically not display any files. Additionally, if the drive was exposed to excess heat or moisture, it may have been physically damaged. |
| 🦠 Accidental Deletion and Malware | We all make mistakes, and it’s possible you accidentally deleted the wrong files or formatted the USB drive when you didn’t intend to. In addition to that, USB drives are an ideal vector for malware, which can wreak havoc on your PC, such as deleting all your data. If you suspect computer viruses are the culprit, it’s best to remove the viruses as soon as possible, then perform a data recovery scan. |
Important: Do not attempt to fix a physically damaged flash drive or attempt data recovery on it, using DIY methods. If your data is important enough, it’s better to contact a professional data recovery service.
How to Fix USB Drive not Showing Files and Folders on Windows
We highly recommend you create a disk image of your USB drive before attempting the fixes below.
Some ways to fix a USB drive that’s not showing your files and folders on a Windows PC, are as follows:
Method 1: Ensure Hidden Items Are Enabled
By default, the “Hidden items” option is disabled on Windows. This means that no hidden files and folders will show up in Windows Explorer. If the parent folder of the files is hidden, you won’t be able to see them even if the files themselves aren’t hidden.
To view hidden files and folders on Windows, follow these steps:
- Press Windows Key + E to open File Explorer. You can also search for it in Windows Search (Windows Key + S).
- Click View > Show in the menu bar at the top.
- Tick the Hidden items checkbox.
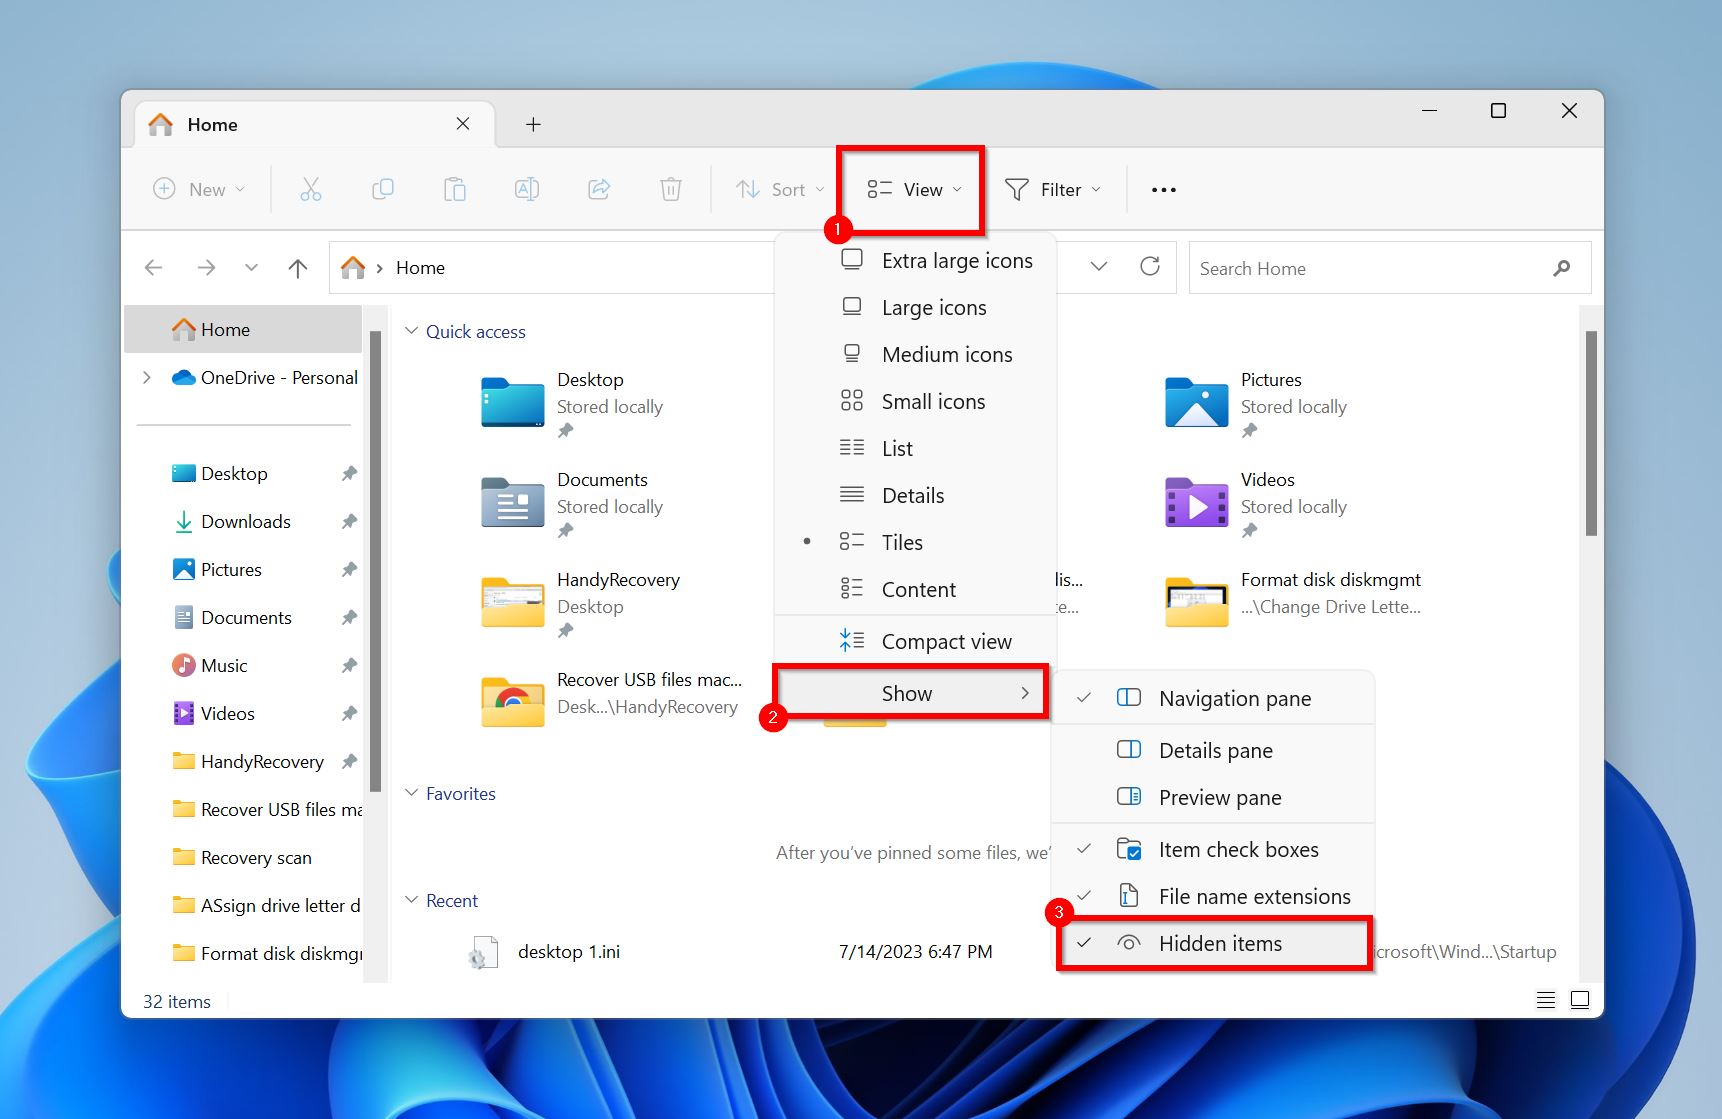
- Open your USB drive’s folder in File Explorer. If your files were hidden, they will be visible now.
For older versions of Windows, including Windows 7, 8, and 10, you can enable hidden items using the Change folder and search options window.
If you no longer want the folder to be hidden, you can disable the “Hidden” attribute. To do this, right-click on the required folder and go to Properties > General > Attributes and uncheck the “Hidden” checkbox. You can also unhide a folder using the Command Prompt.
Method 2: Connect the USB Drive to Another PC
To narrow down whether the problem lies with your PC or its USB port, or the USB drive, connect the flash drive to another PC. See if any files are visible on the other PC. We recommend you connect the drive to a USB port that’s directly attached to the motherboard and not to the PC case.
If you previously used the pen drive on a Mac, the USB drive might be formatted with an Apple-specific file system which Windows can’t recognize. In this case, you’ll need to first copy the files to another location (using the Mac) or create a disk image of the drive, then format the drive to a Windows-recognized format like FAT, or exFAT (which works with both Windows and macOS).
Method 3: Run the Hardware and Devices Troubleshooter
The Hardware and Devices Troubleshooter can automatically detect and fix a range of issues on your USB drive. It’s a good idea to use this Windows tool before you move on to fixes that require more manual input.
Here’s how to run the Hardware and Devices Troubleshooter to potentially fix a USB drive that’s not showing files on Windows 7/10/11:
- Search for “cmd” in Windows Search (Windows Key + S). From the search results, right-click on the Command Prompt > Run as Administrator.
- In the console, type
msdt.exe -id DeviceDiagnosticand press Enter.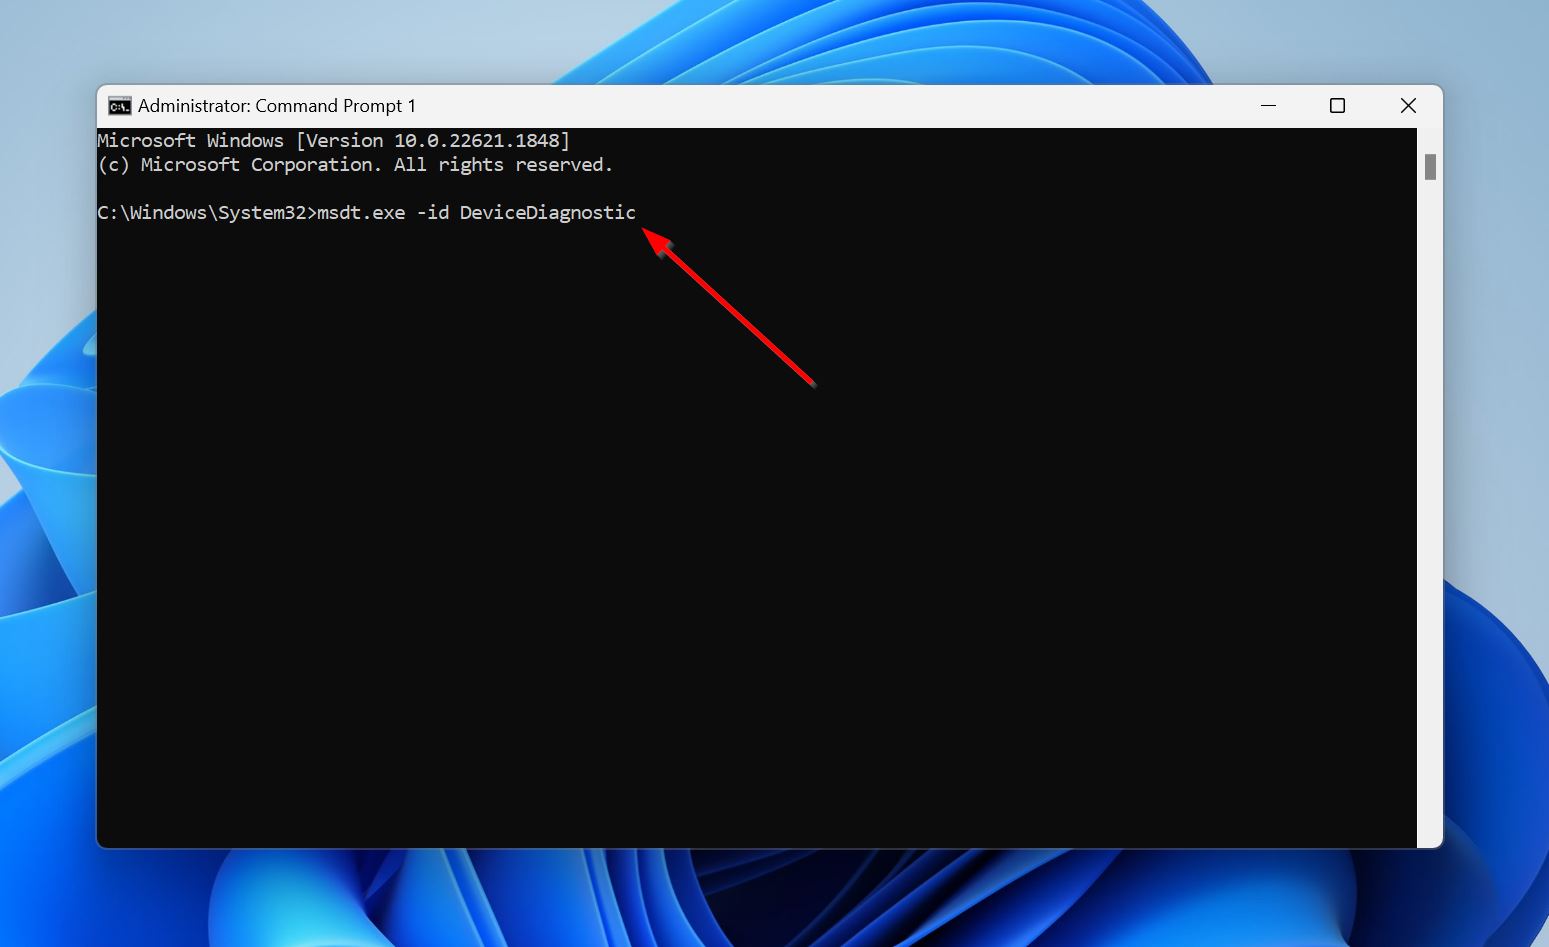
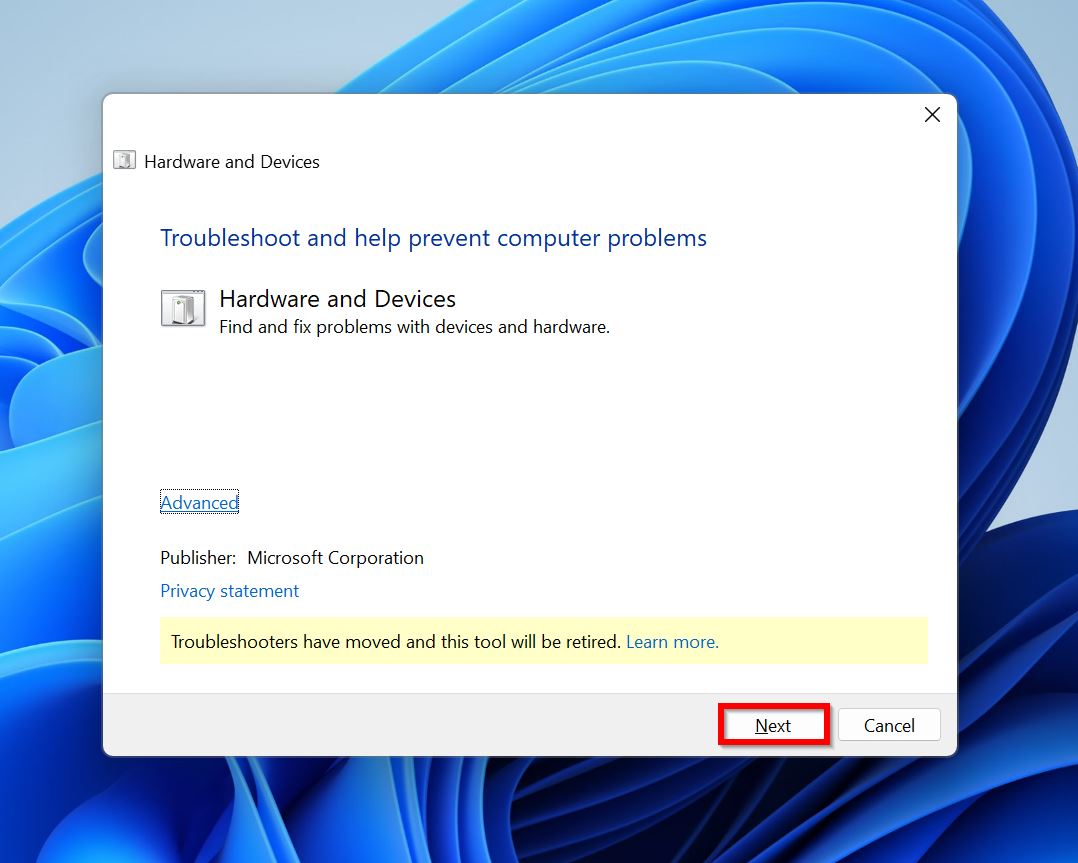
- Click on Next in the Hardware and Devices Troubleshooter welcome screen.
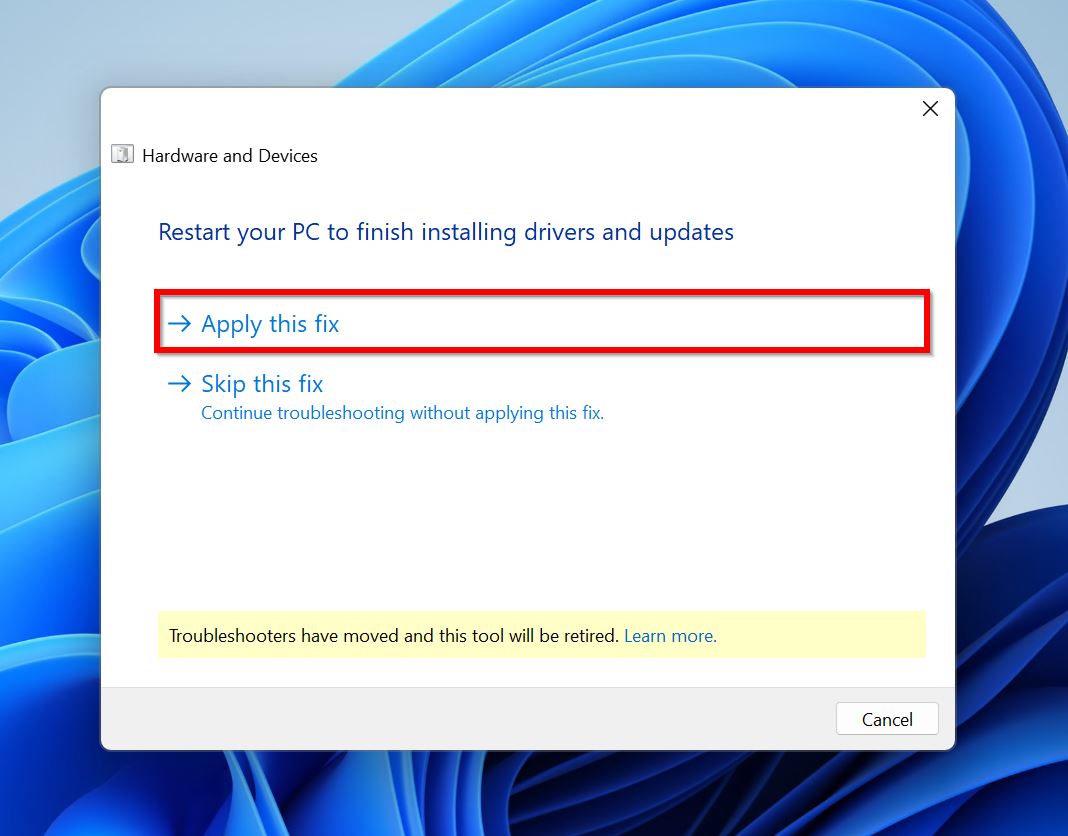
- Click on Apply this fix if there are any fixes found. Else, close the troubleshooter.
Method 4: Update the USB Drivers
Outdated USB drivers can hamper the communication between your PC and the flash drive. As a result of this, your pen drive may not display your files, or not be detected by the PC at all.
Usually, Windows updates the USB drivers along with Windows Update. But, it’s still recommended you update the USB drivers manually, especially if you haven’t updated Windows in a while.
To manually update your computer’s USB drivers, follow these steps:
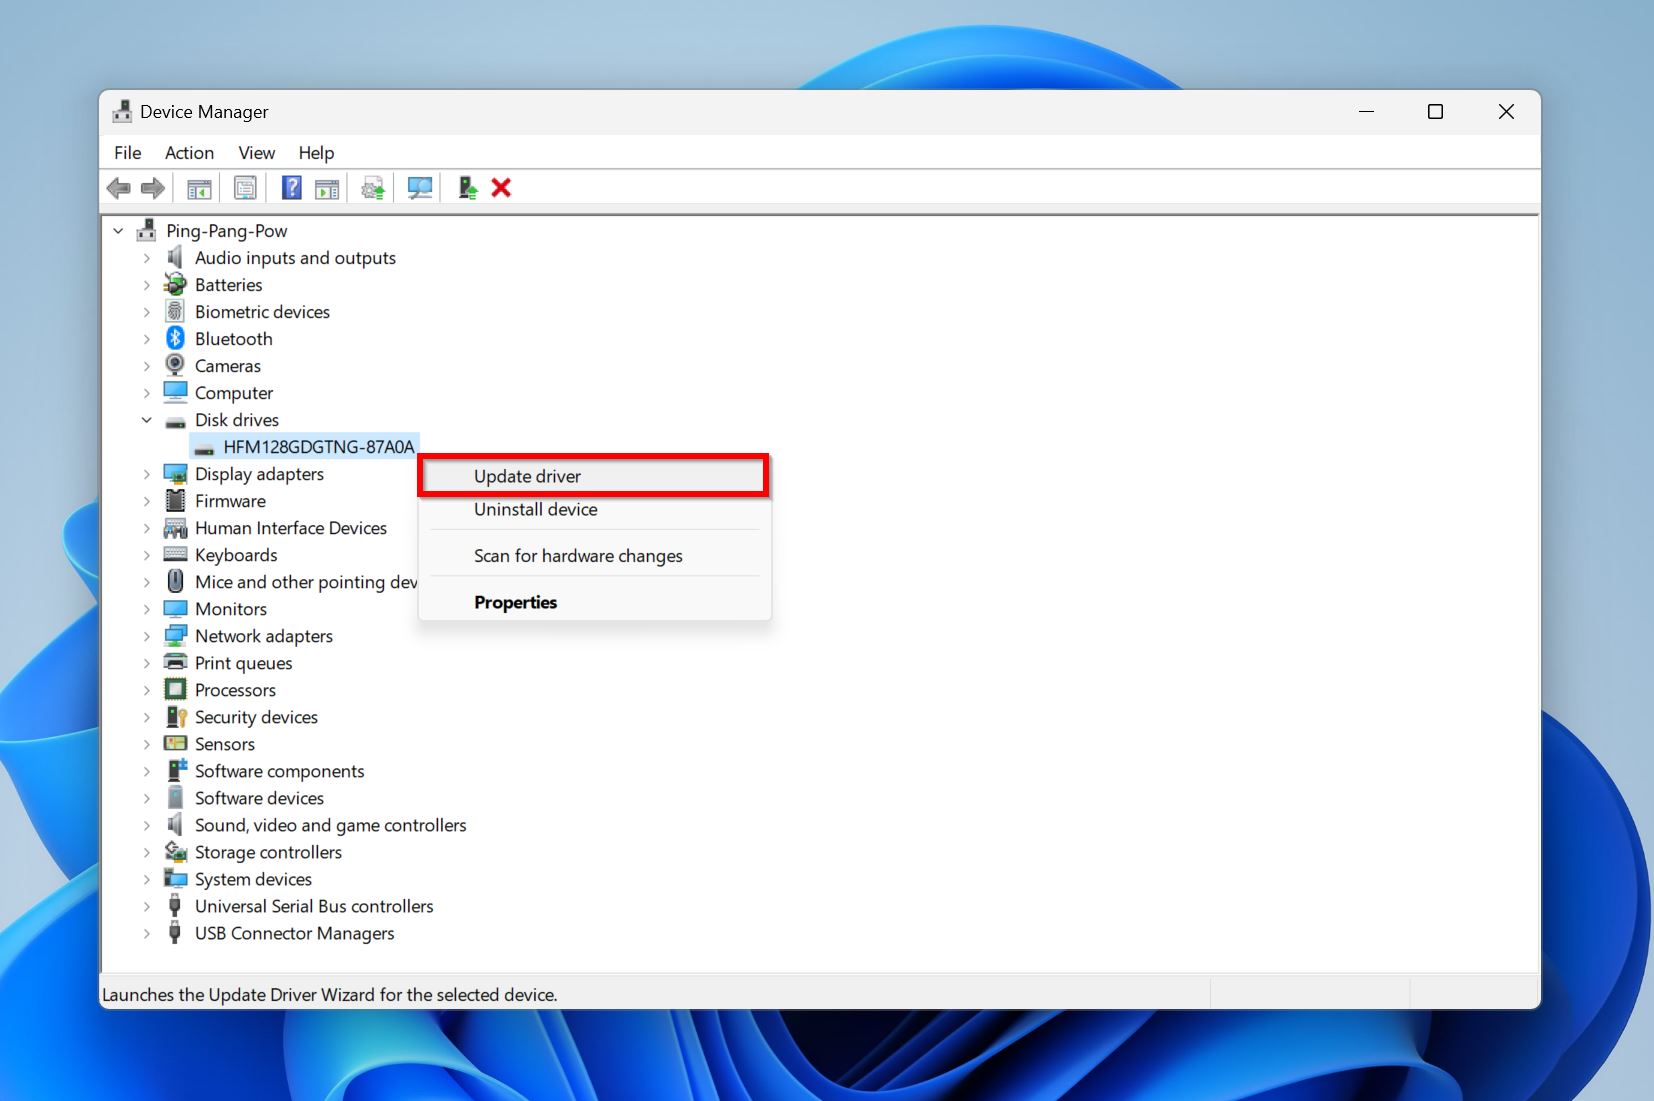
- Press Windows Key + R to open the Run app. Type devmgmt.msc in the text box and press Enter. If you prefer using Windows Search (Windows Key + S), look for the Device Manager in the search bar.
- Expand the Disk Drives section in the Device Manager. Right-click on your USB drive and click Update driver.
- Click on Search automatically for drivers.
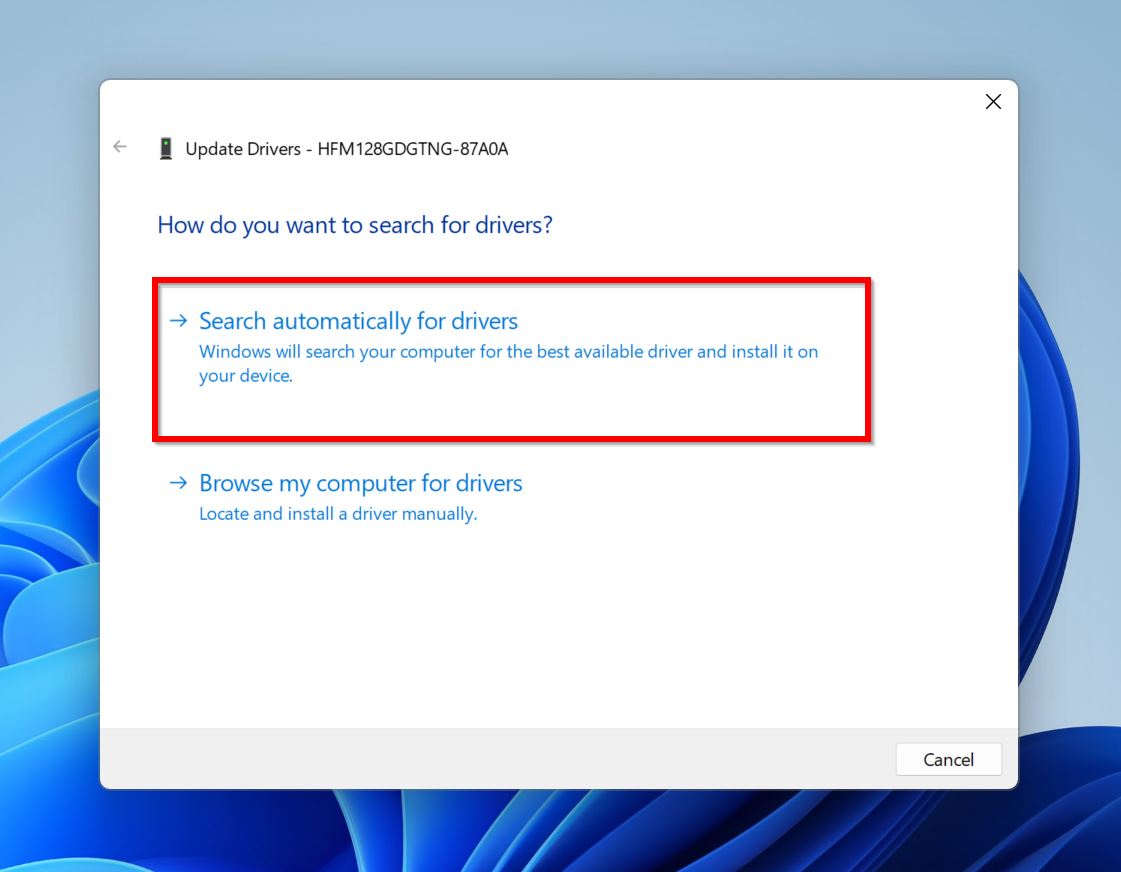
- Windows will download and install the latest drivers.
Note: Sometimes Windows may not find any updated drivers for your flash drive. In this case, it’s also best to double-check the USB drive manufacturer’s website for the latest drivers.
Method 5: Run the CHKDSK Utility
CHKDSK is a dedicated disk error-checking utility in Windows that can fix file system and bad sector related issues on your drive–that may be the reason your USB drive is not showing any files. But, as part of how it fixes these errors, you may lose some of your data, so ensure you create a disk image of your pen drive before using CHKDSK.
Here’s how to use CHKDSK to fix your USB drive:
- Search for “cmd” in Windows Search (Windows Key + S). Right-click on the Command Prompt and choose Run as Administrator.
- In the console, type
chkdsk X: /rand press Enter. Replace X with the drive letter of your USB drive (E:, F:, G:, etc.).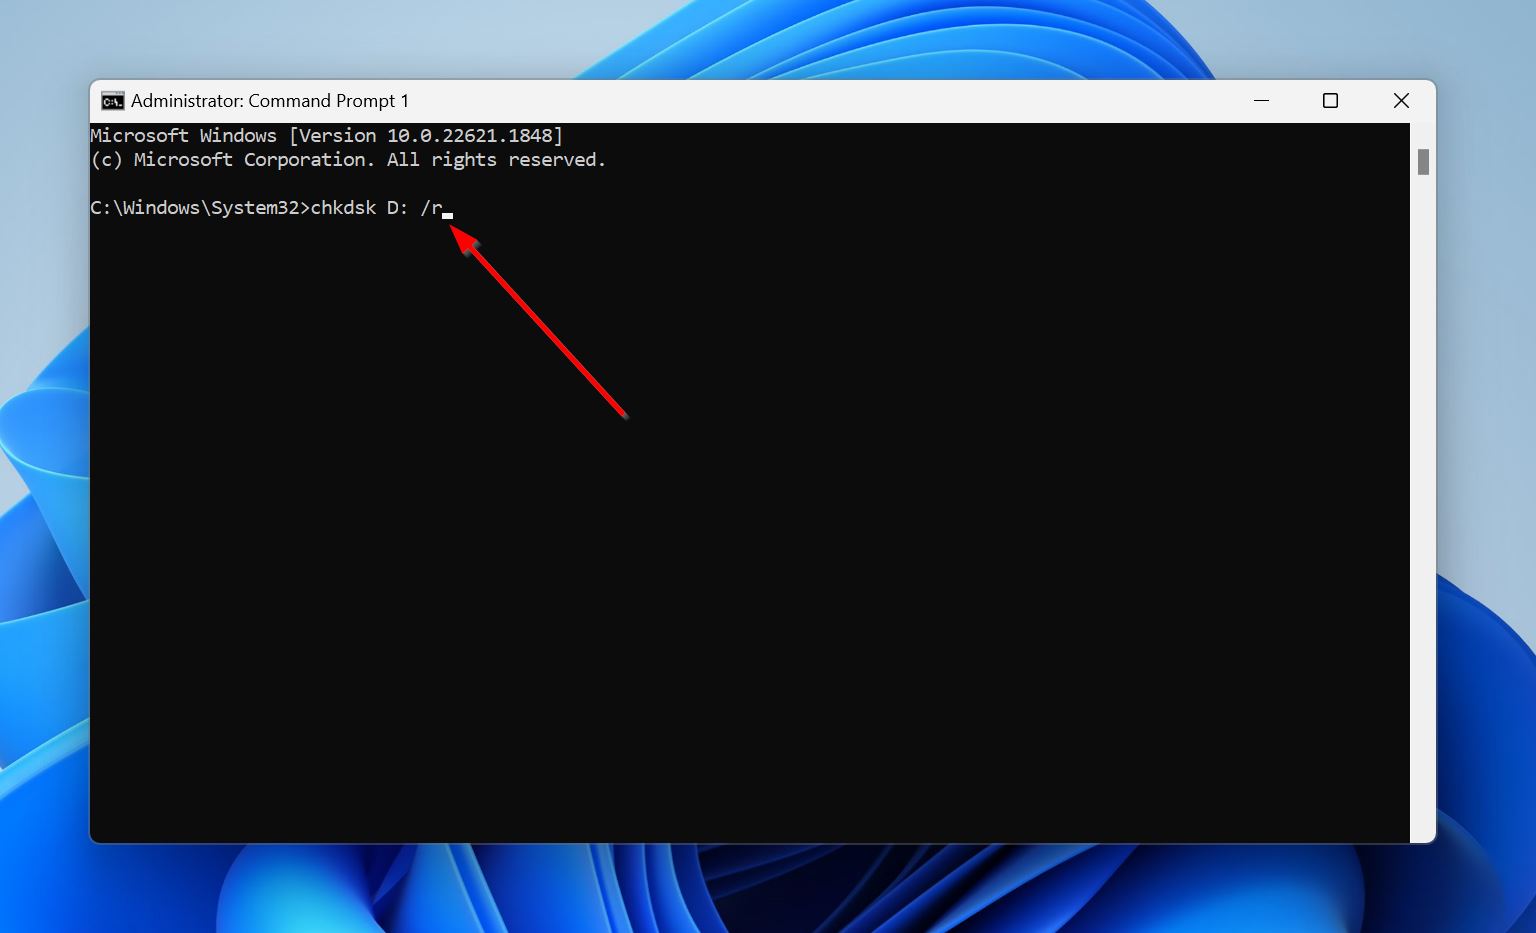
- Wait for CHKDSK to finish scanning and fixing your drive. Don’t interrupt CHKDSK or force shutdown your PC while the utility is scanning the pen drive.
How to Fix USB Drive not Showing Files and Folders on Mac
On macOS, there are three main ways to diagnose a flash drive that’s not showing your files. They follow a similar pattern to the Windows fixes–ensure the files aren’t hidden, try connecting the drive to another Mac, and use Mac’s in-built disk repair utility.
These are some ways to fix a flash drive that’s not showing any files on a Mac:
Method 1: Unhide the Files
The first thing you need to ensure is that your files aren’t hidden. On macOS, there are two main ways to unhide files–use a keyboard shortcut in Finder, or use the Terminal. We’ll describe both of these below:
First, let’s see how you can unhide files using a keyboard shortcut in Finder:
- Open Finder from the Dock, or simply press Command + O.
- Navigate to your USB drive using the sidebar.
- Press Command + Shift + . (dot). The hidden files will become visible. You can toggle between showing/hiding hidden files using the shortcut.
If you wish to unhide folders in Hollywood-hacker style (using the Terminal), here’s how:
- Search for Terminal in Spotlight Search (Command + [/sc]Space[/sc]) and open the app.
- Type
defaults write com.apple.Finder AppleShowAllFiles trueand press Enter. - Type
killall Finderand press Enter.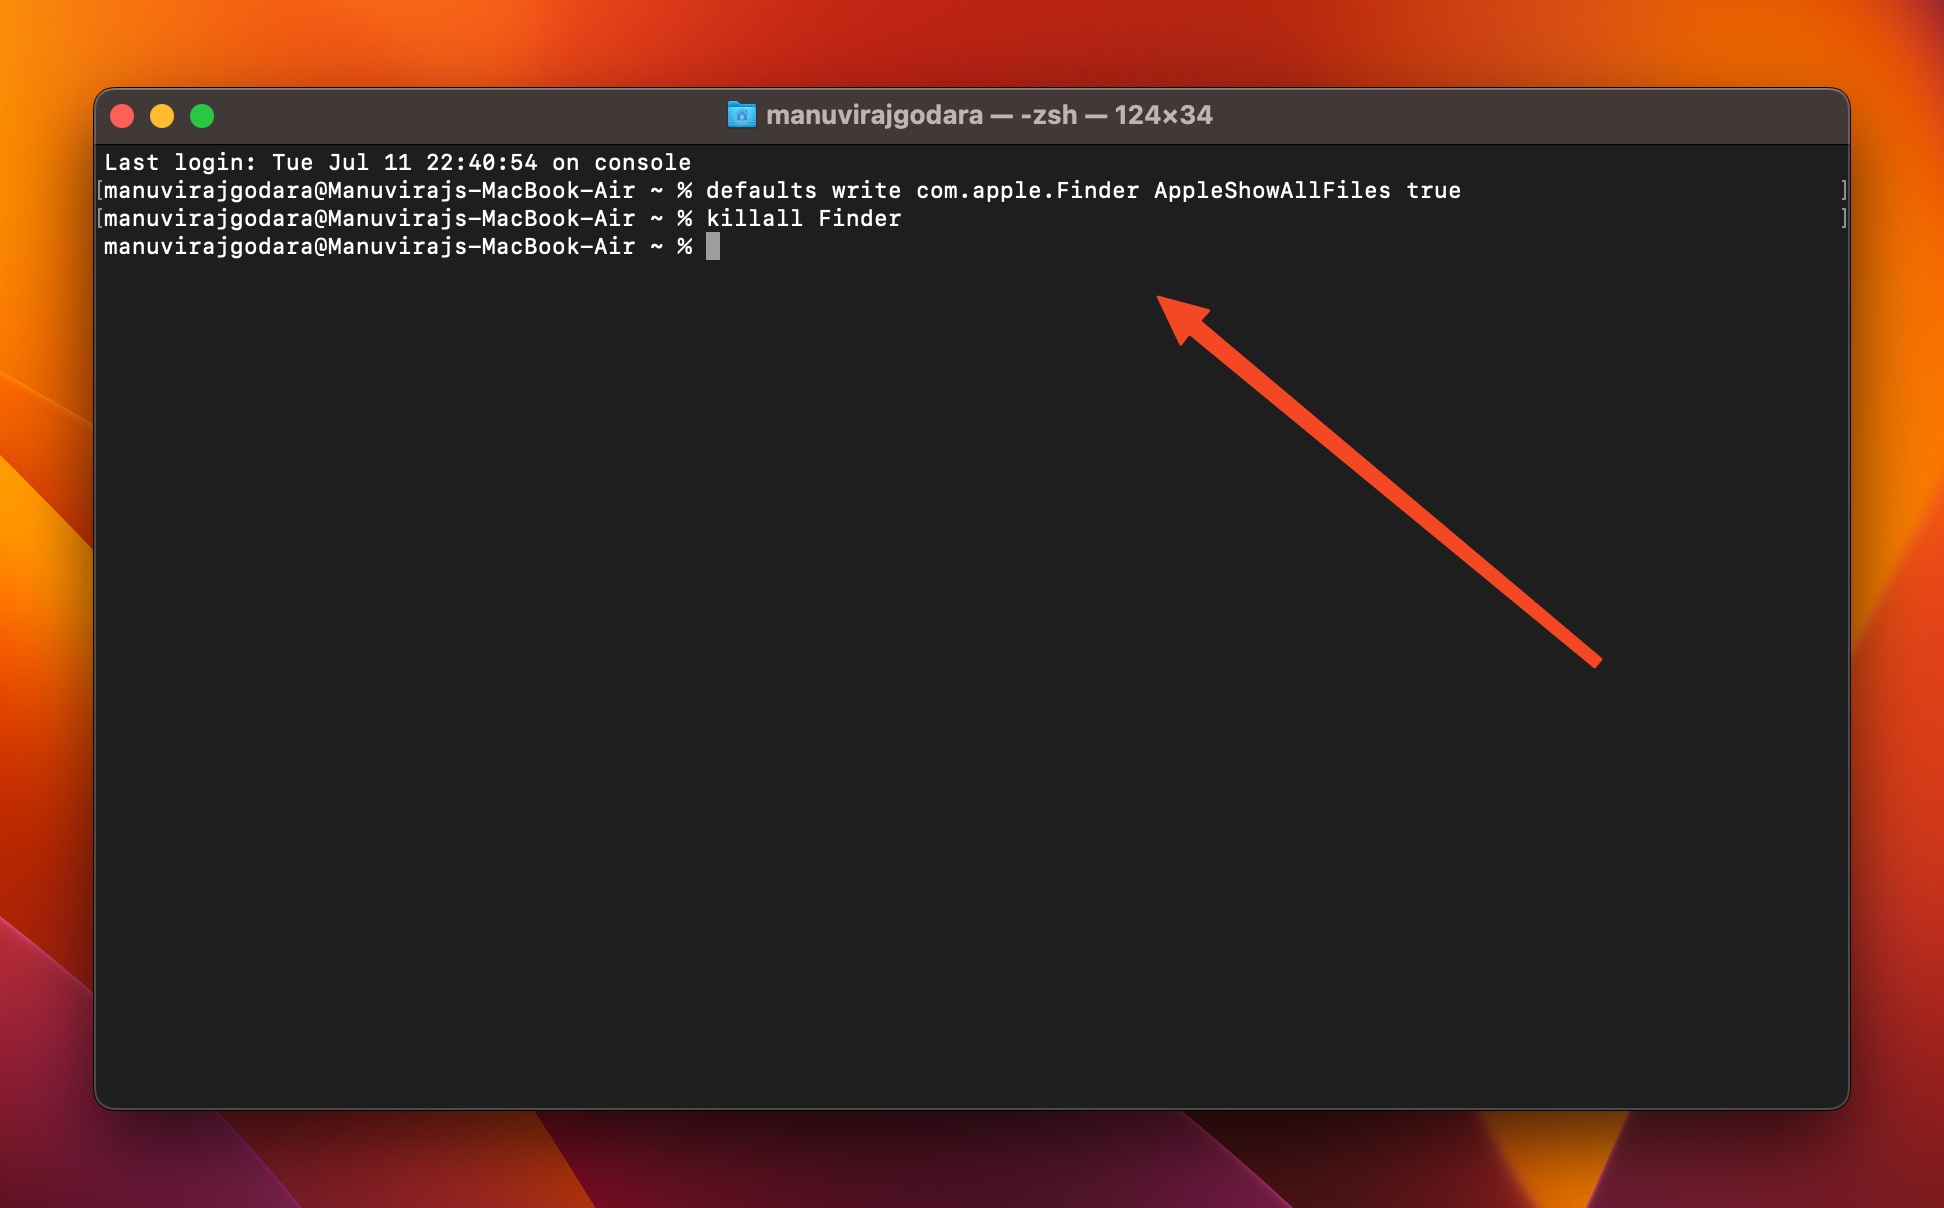
Method 2: Use the First Aid Feature in Disk Utility
The First Aid feature in macOS’ Disk Utility works similarly to CHKDSK in Windows–it detects and fixes file system and bad sector errors on your drive. Again, running the utility may cause some data loss because of how it fixes your drive, so back up your data beforehand.
Here’s how to use the First Aid feature in Mac, and fix a flash drive that’s not showing your files:
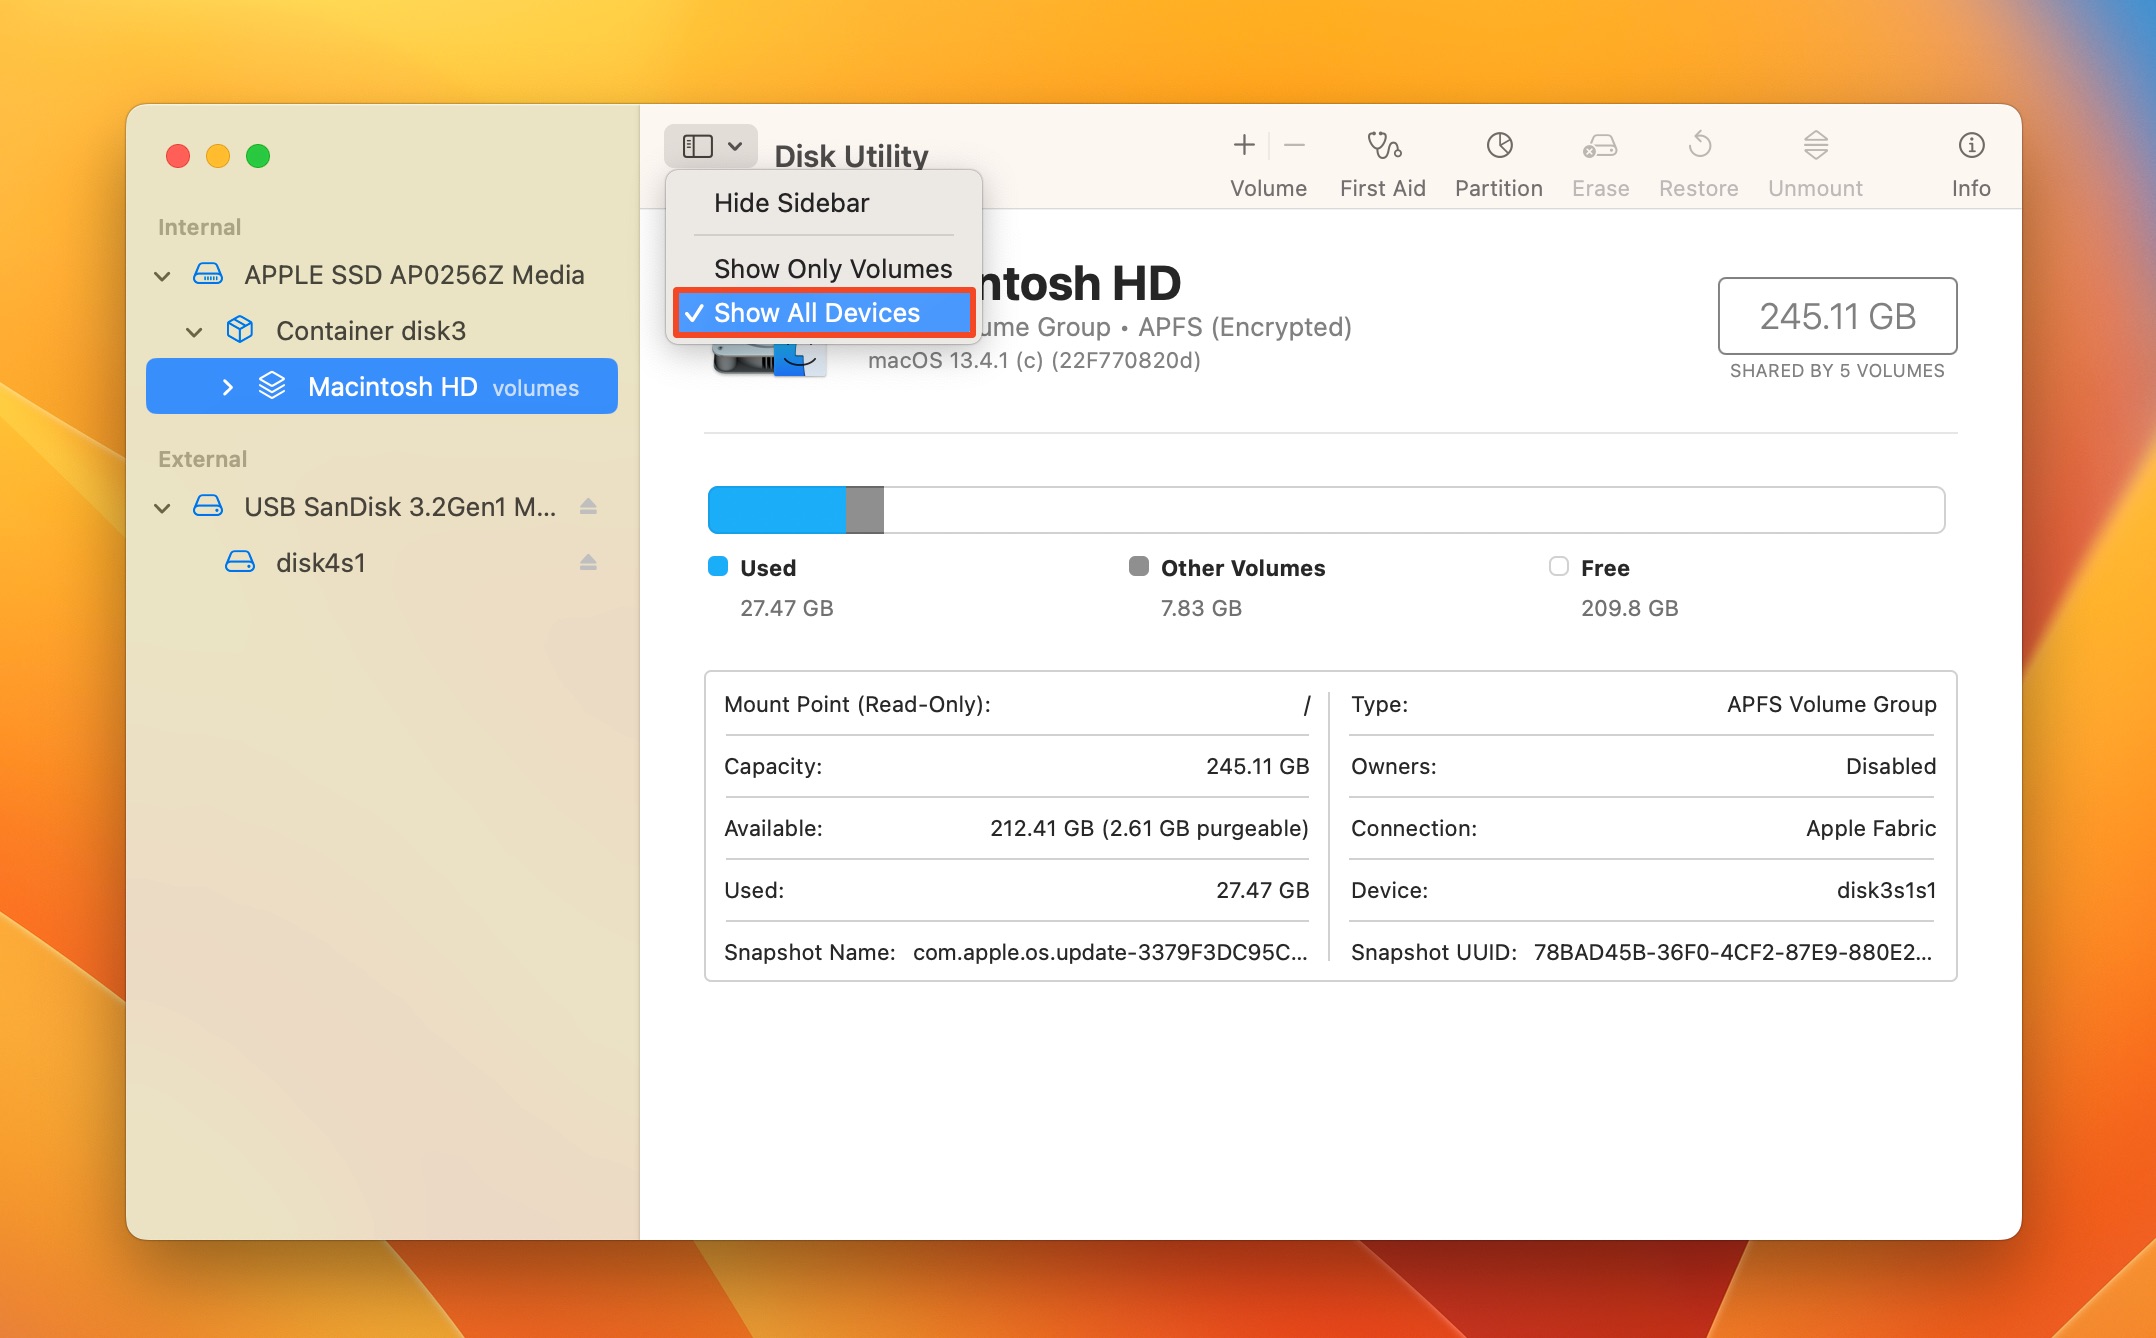
- Go to Finder > Go > Utilities > Disk Utility.
- Click on View > Show All Devices.
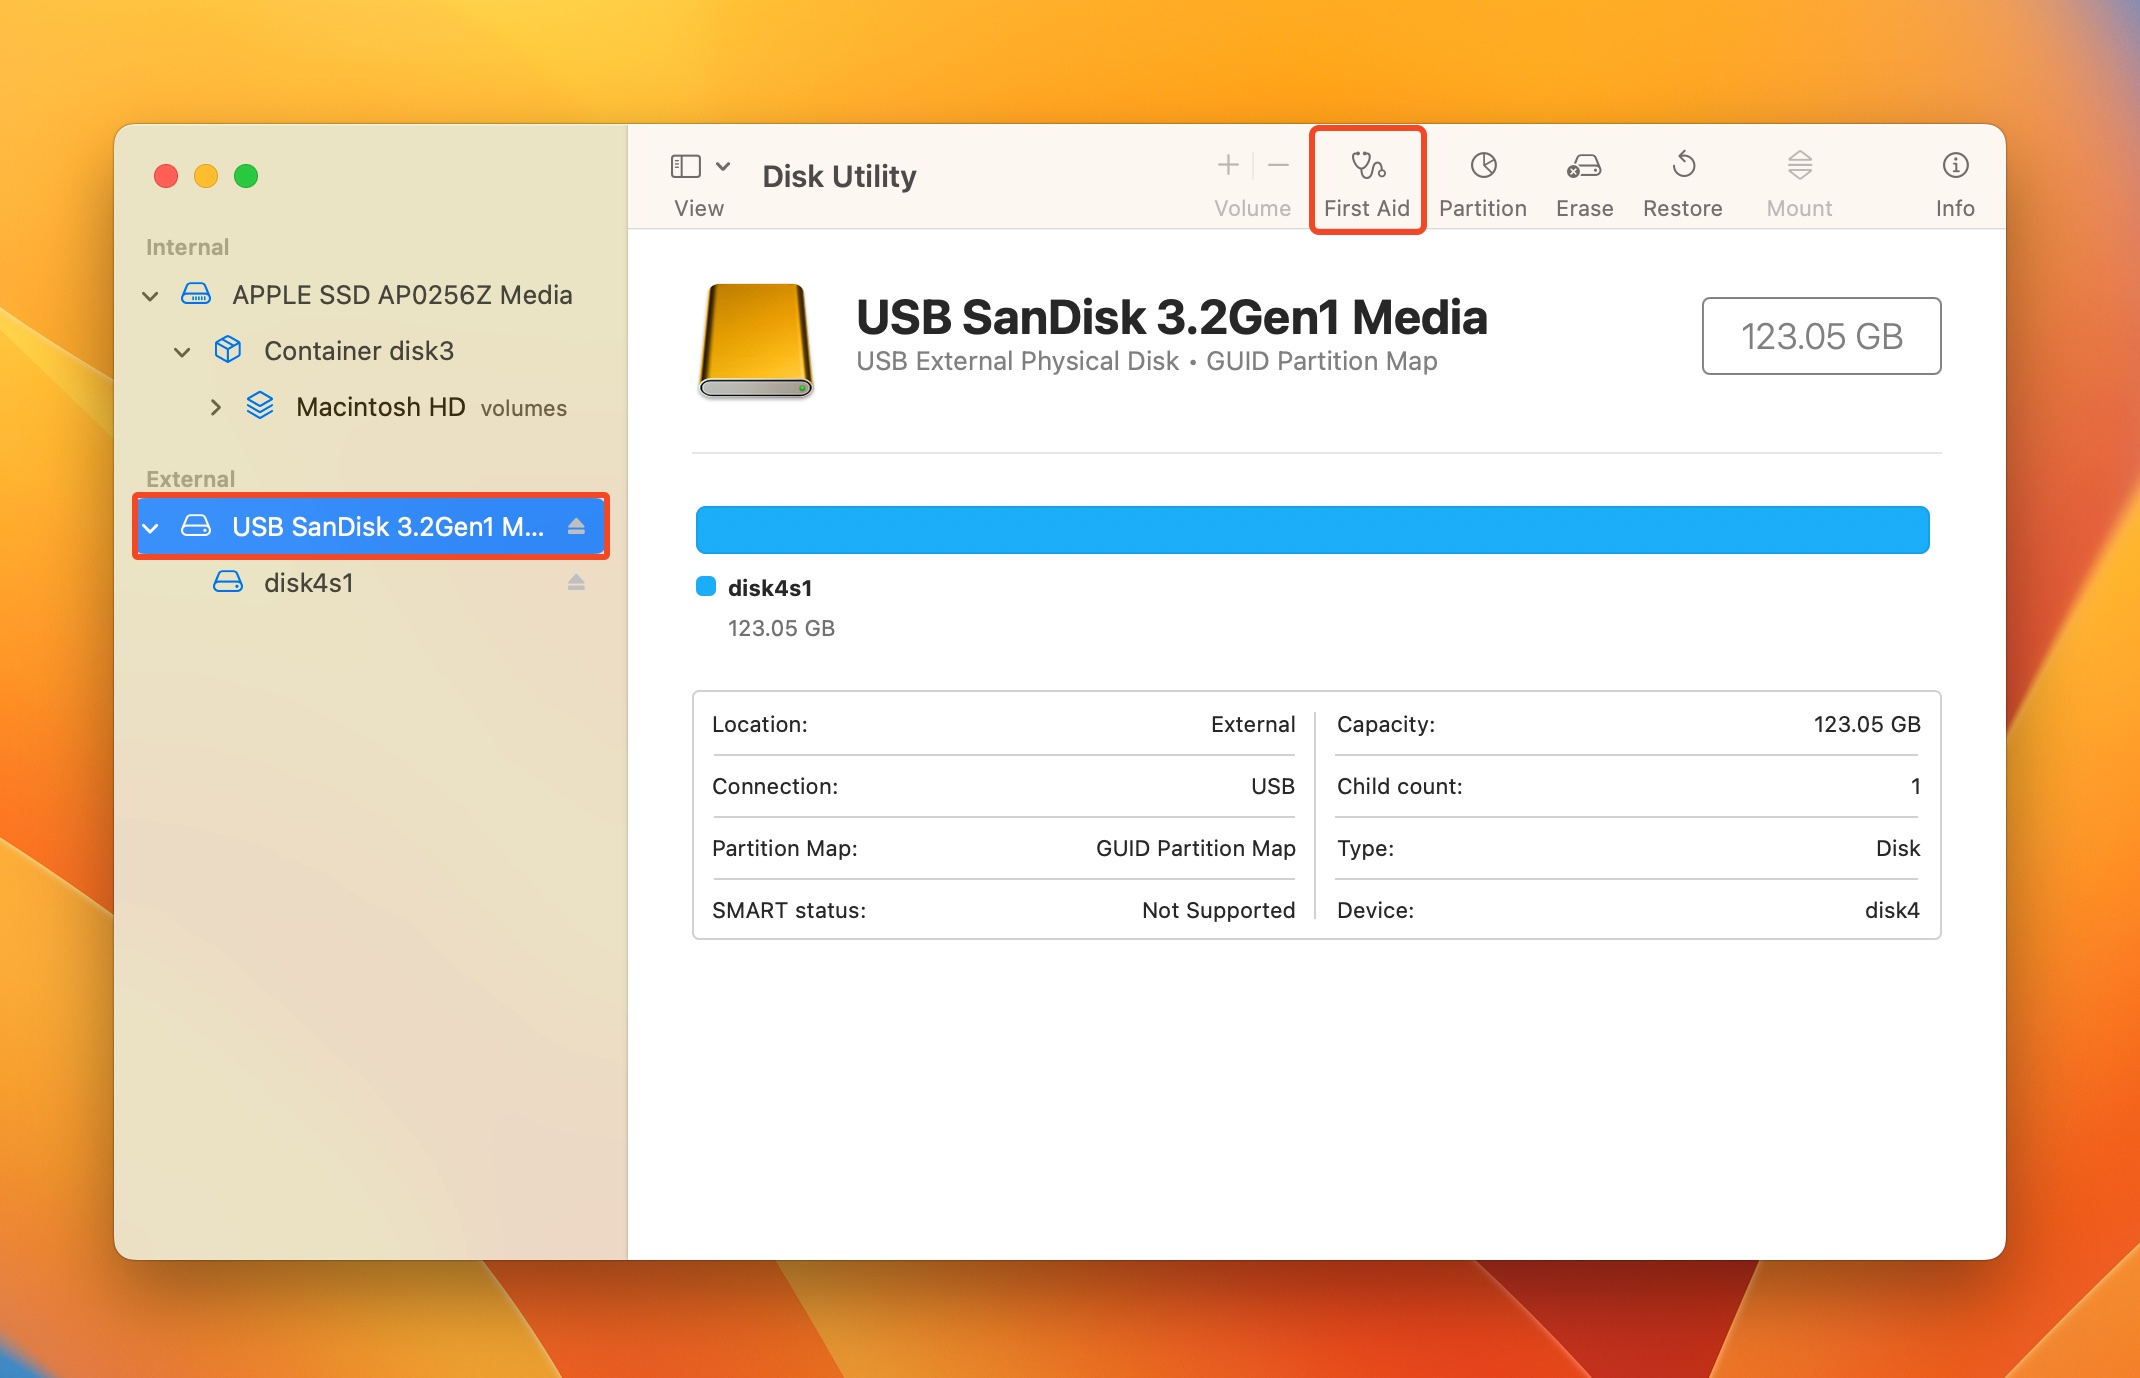
- Select your USB drive from the sidebar and click on First Aid.
- Click Run in the confirmation prompt.
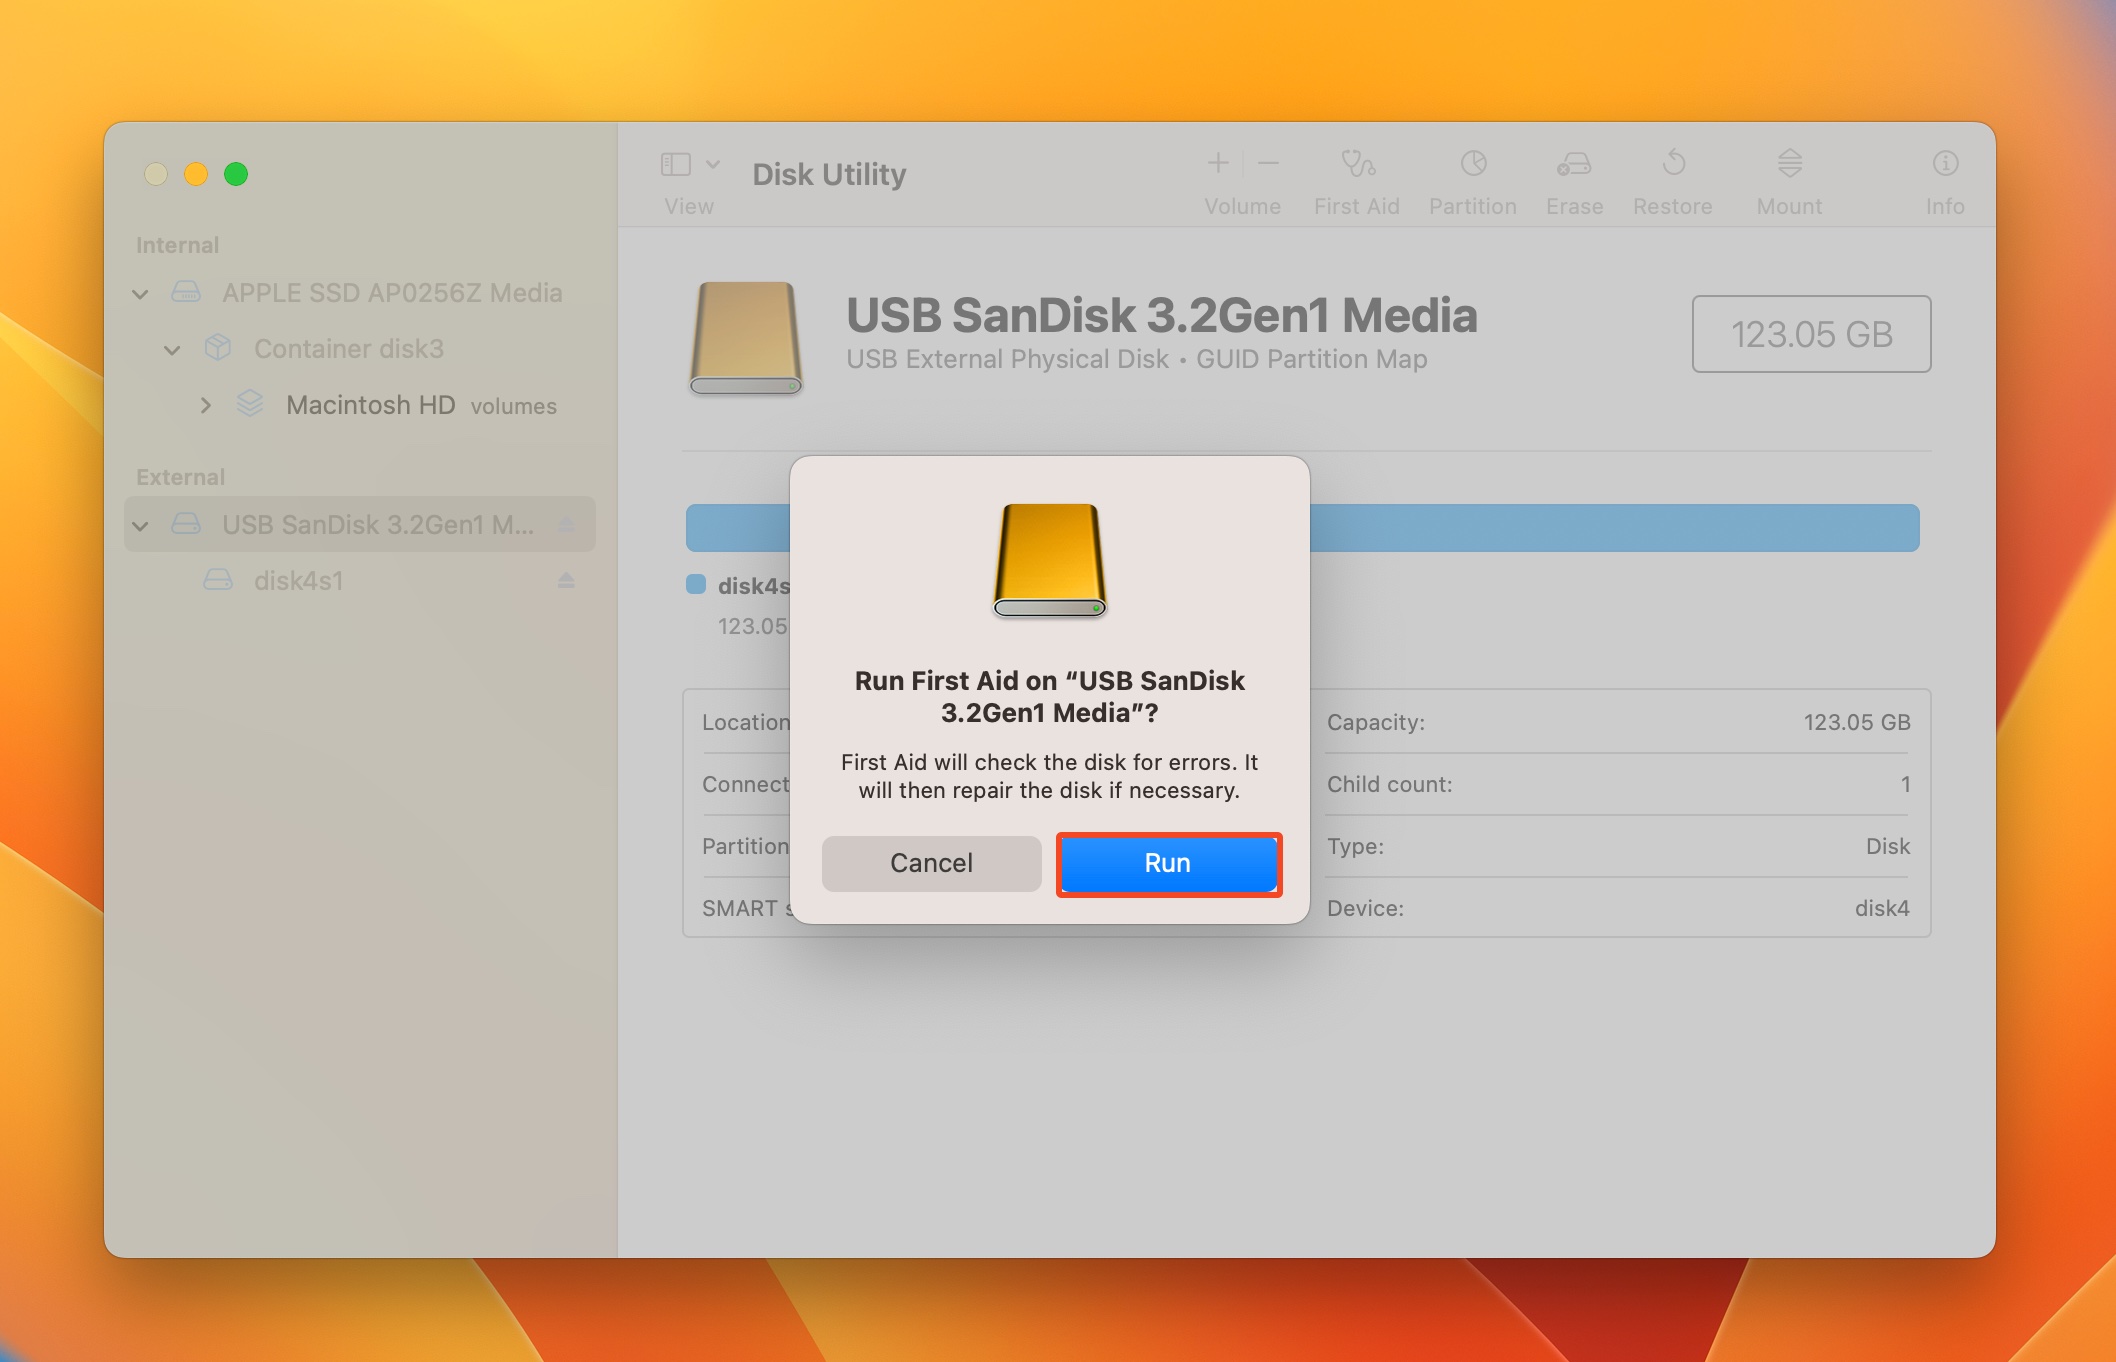
- First Aid will find and repair any problems on the USB drive.
Method 3: Connect the USB Drive to Another Mac
Try connecting your USB drive to another Mac machine and see if your files are visible. If they are, the problem likely lies with your Mac device. It could be a malfunctioning USB port, or an outdated system.
You can attempt to reinstall macOS and update your machine to the latest version of the OS. Try switching out the USB adapter if you’re using one. If nothing works, it’s best to contact Apple Customer Support.
How to Recover Lost Files from the USB Drive
Though you can recover data from a USB drive even if you didn’t create its disk image before proceeding to fix it, creating one lets you preserve the files that were already on the drive. You can even use it to recover any files that were deleted before you attempted to fix it. If the drive is logically damaged, scanning its disk image instead of scanning it directly, ensures that you don’t further stress the drive.
There are several programs that can help you create disk images, and recover data. But it’s advisable to choose one that has a proven track record.
We opted to use Disk Drill because it lets you create disk images as well as recover data within a single, easy-to-use interface. It’s extremely adept and versatile when it comes to data recovery, thanks to its cutting-edge data recovery algorithm and support for all major storage device and file system types. Disk Drill is available for both Mac and Windows.
Below, we’ve described the data recovery and disk image creation process using Disk Drill for Mac. However, the steps are the same for Windows computers. Additionally, you also get a free trial on Windows, that lets you recover up to 500 MB of data for free.
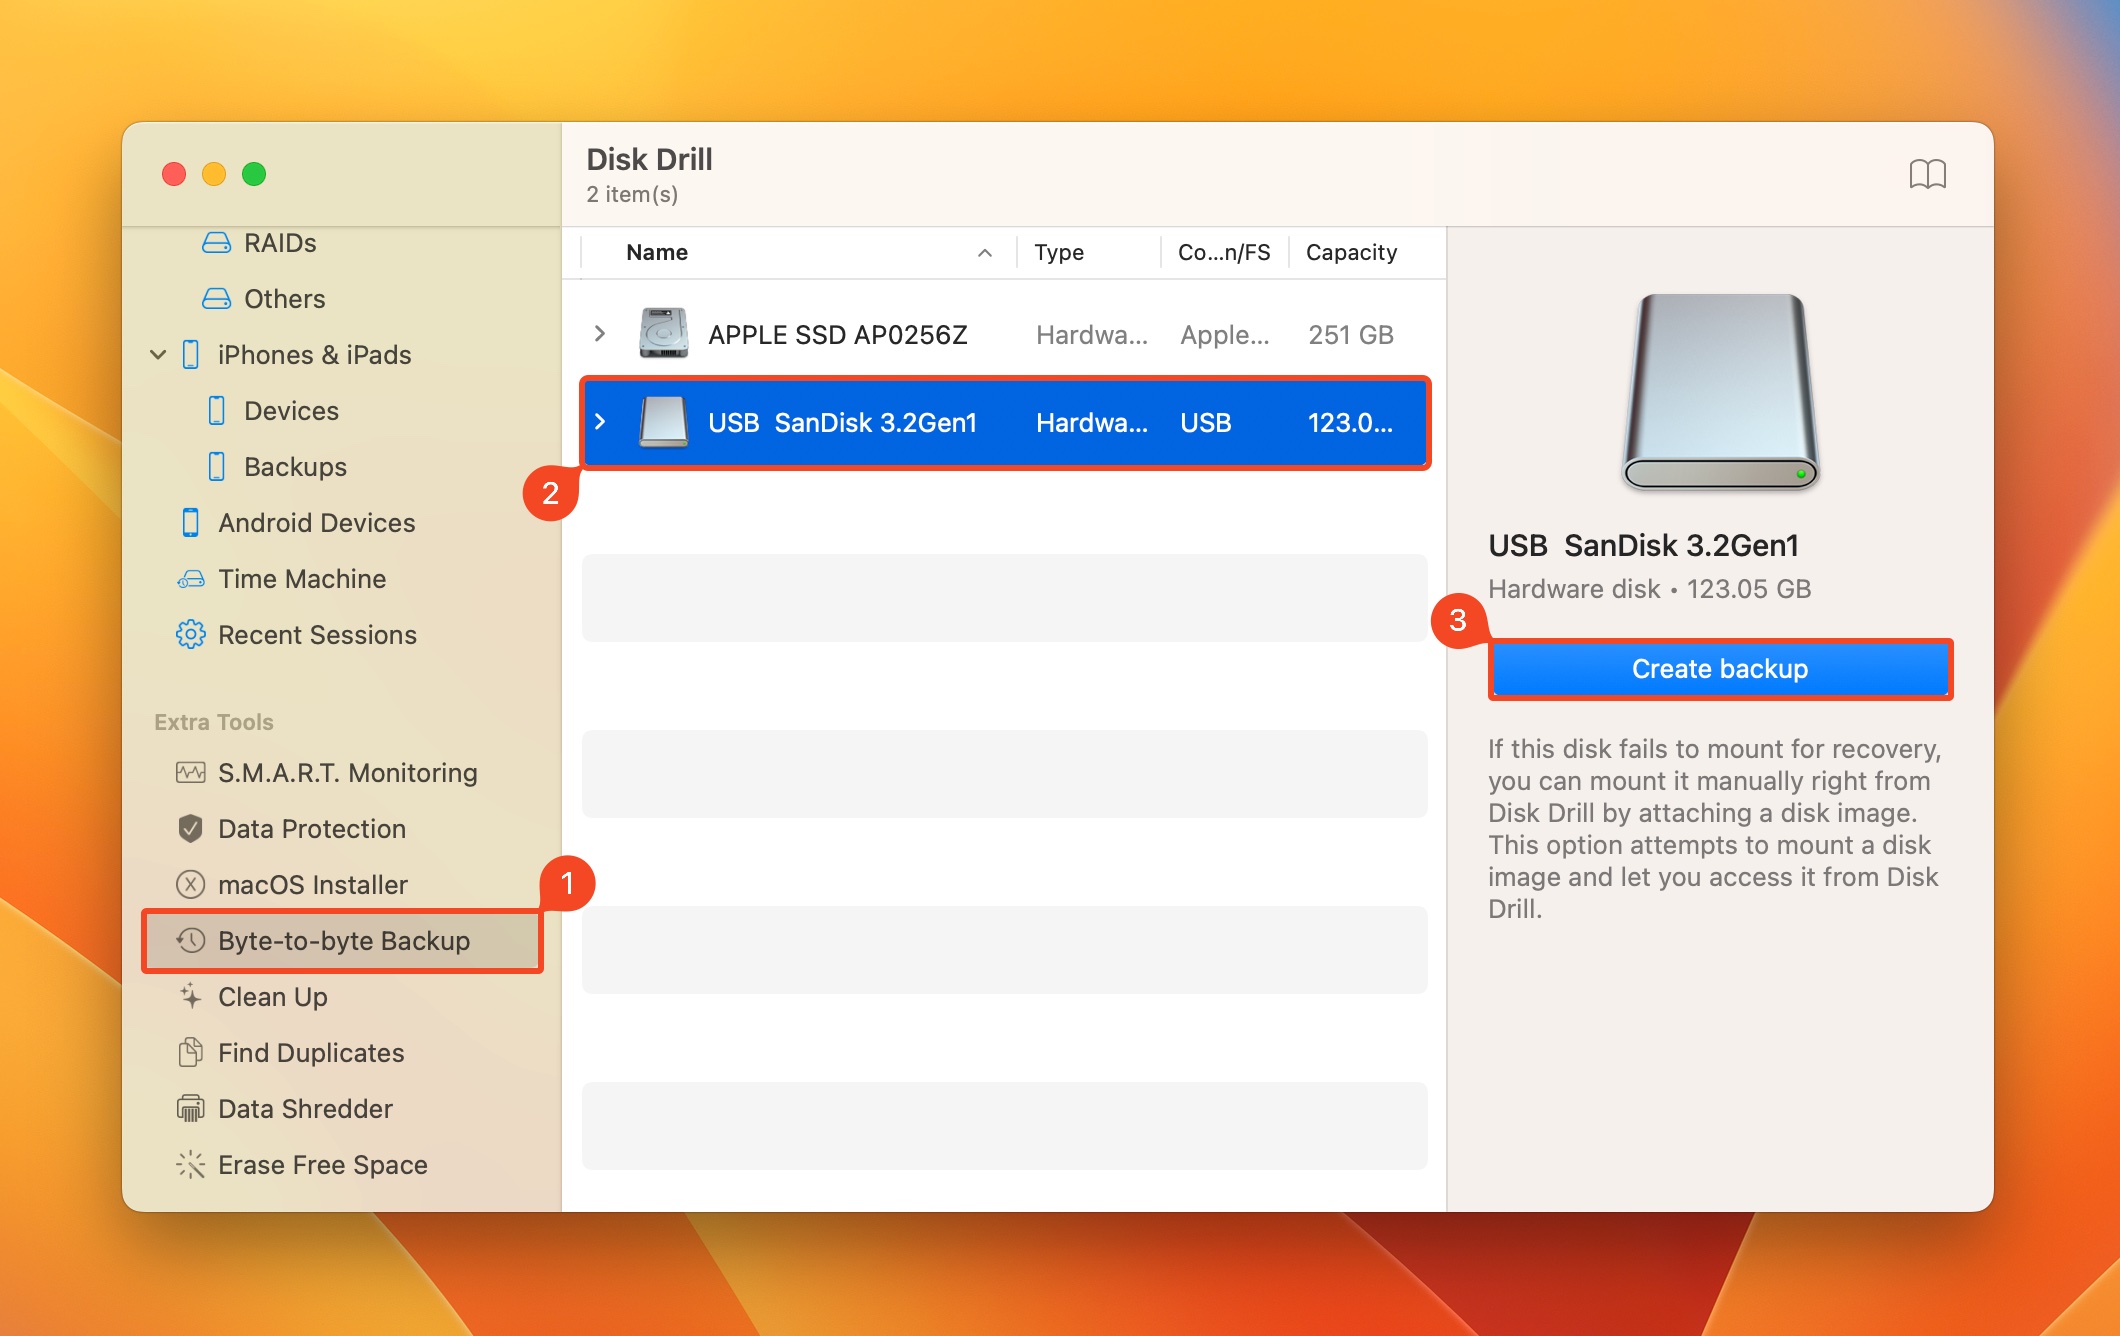
Step 1: Creating a Disk Image
- Download and install Disk Drill.
- Open Disk Drill and click on the Byte-to-Byte Backup option in the sidebar.
- Select the USB drive and click Create Backup (Mac), or the Byte-to-Byte Backup button (Windows).
- Choose where you want to save the disk image and click OK. The destination should have free space equal to or more than the storage capacity of the USB drive.
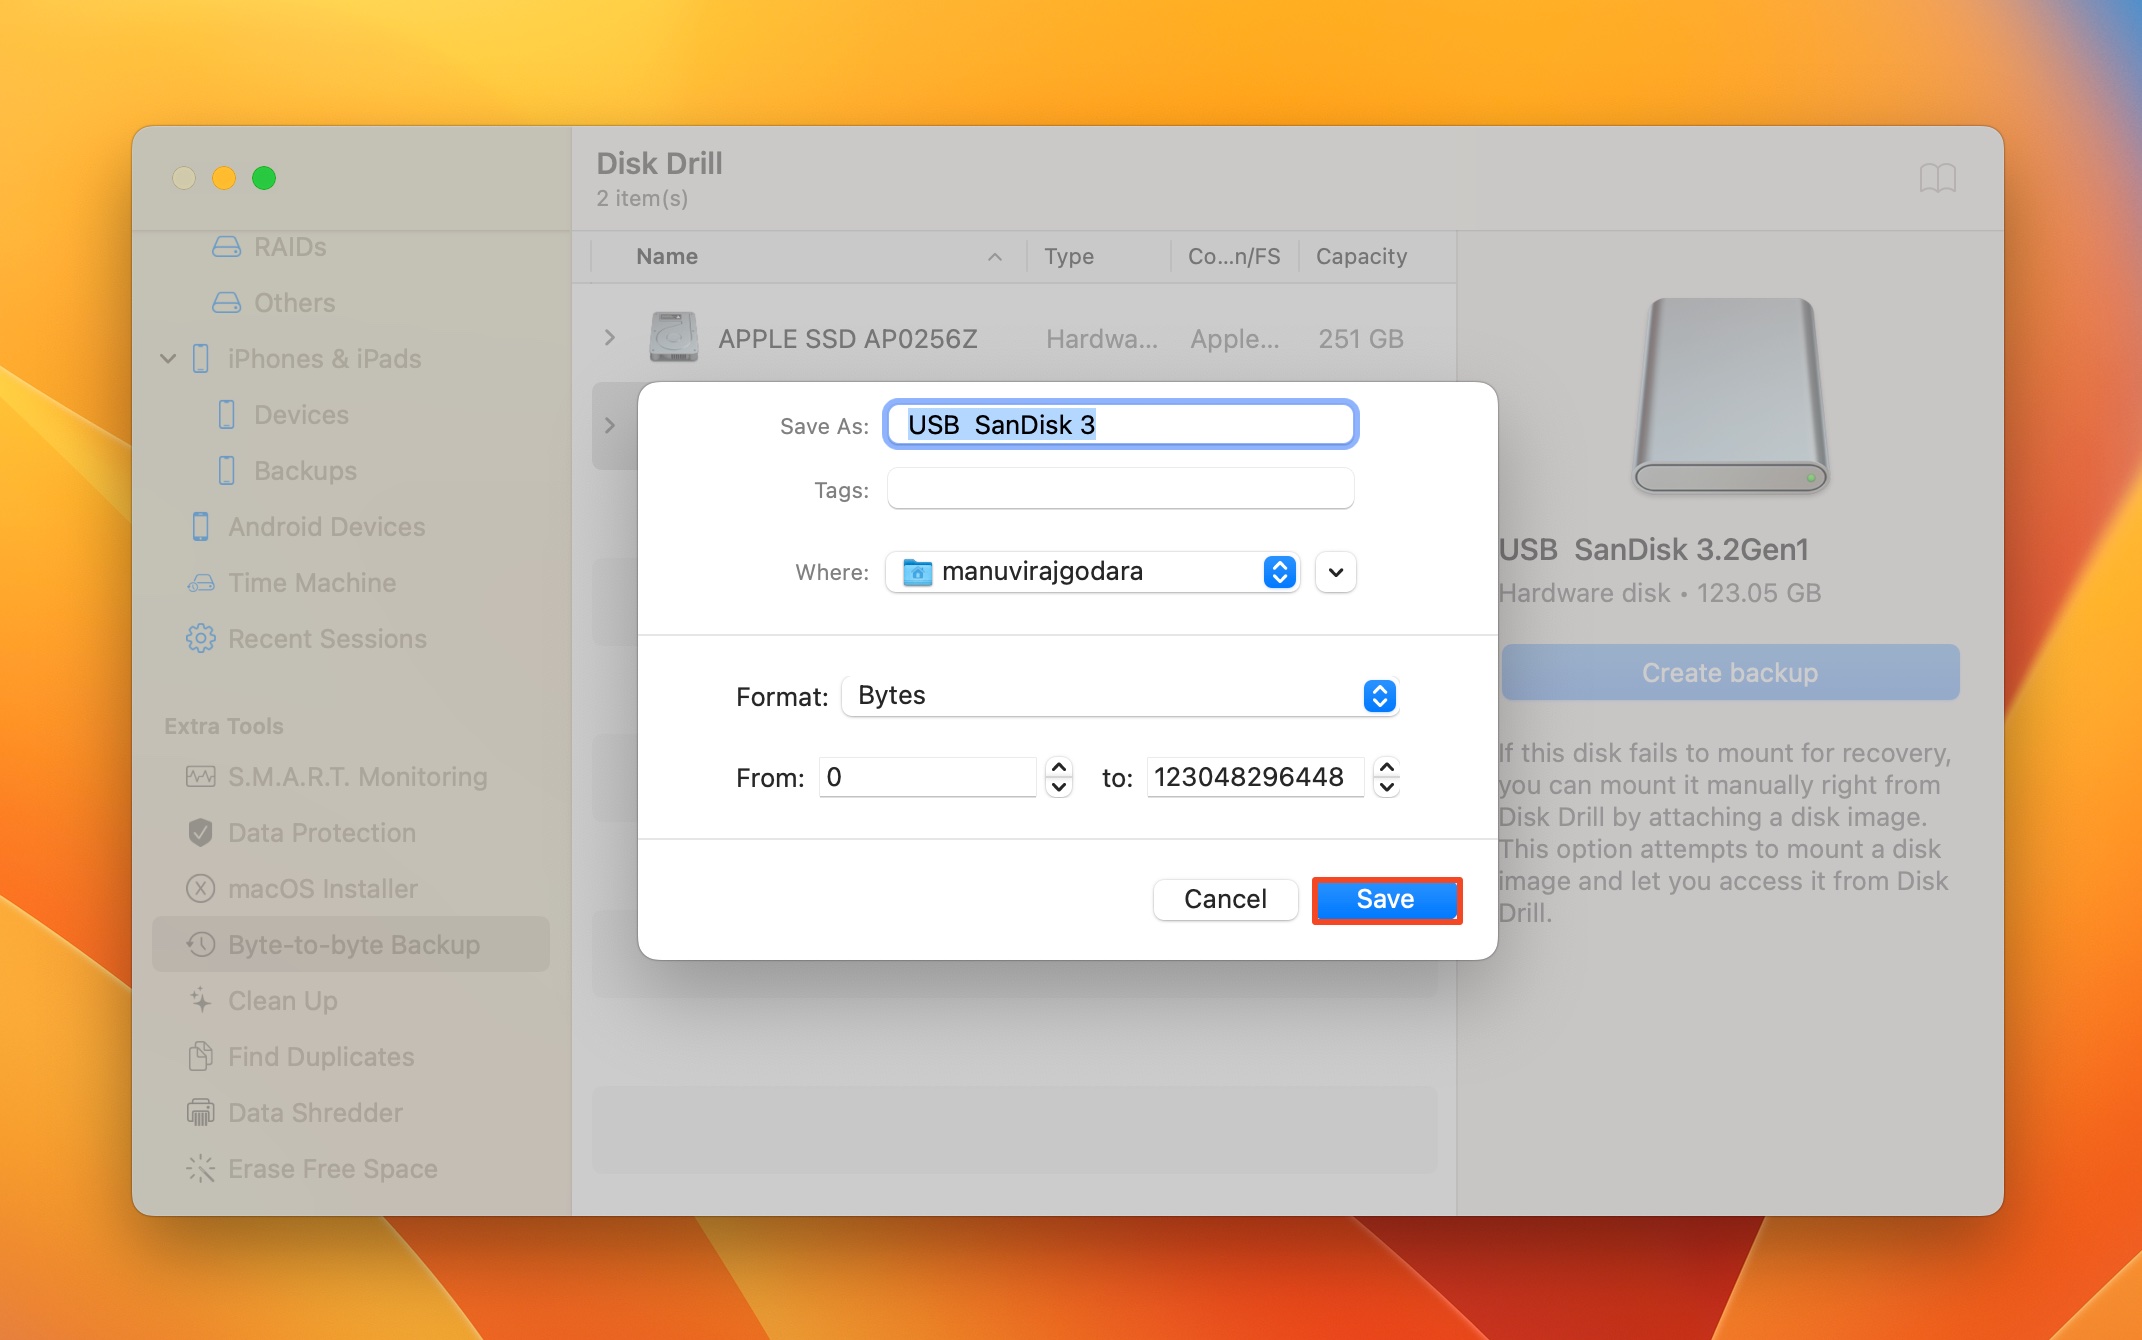
- Disk Drill will create the disk image.
Step 2: Recovering Data from the USB Drive
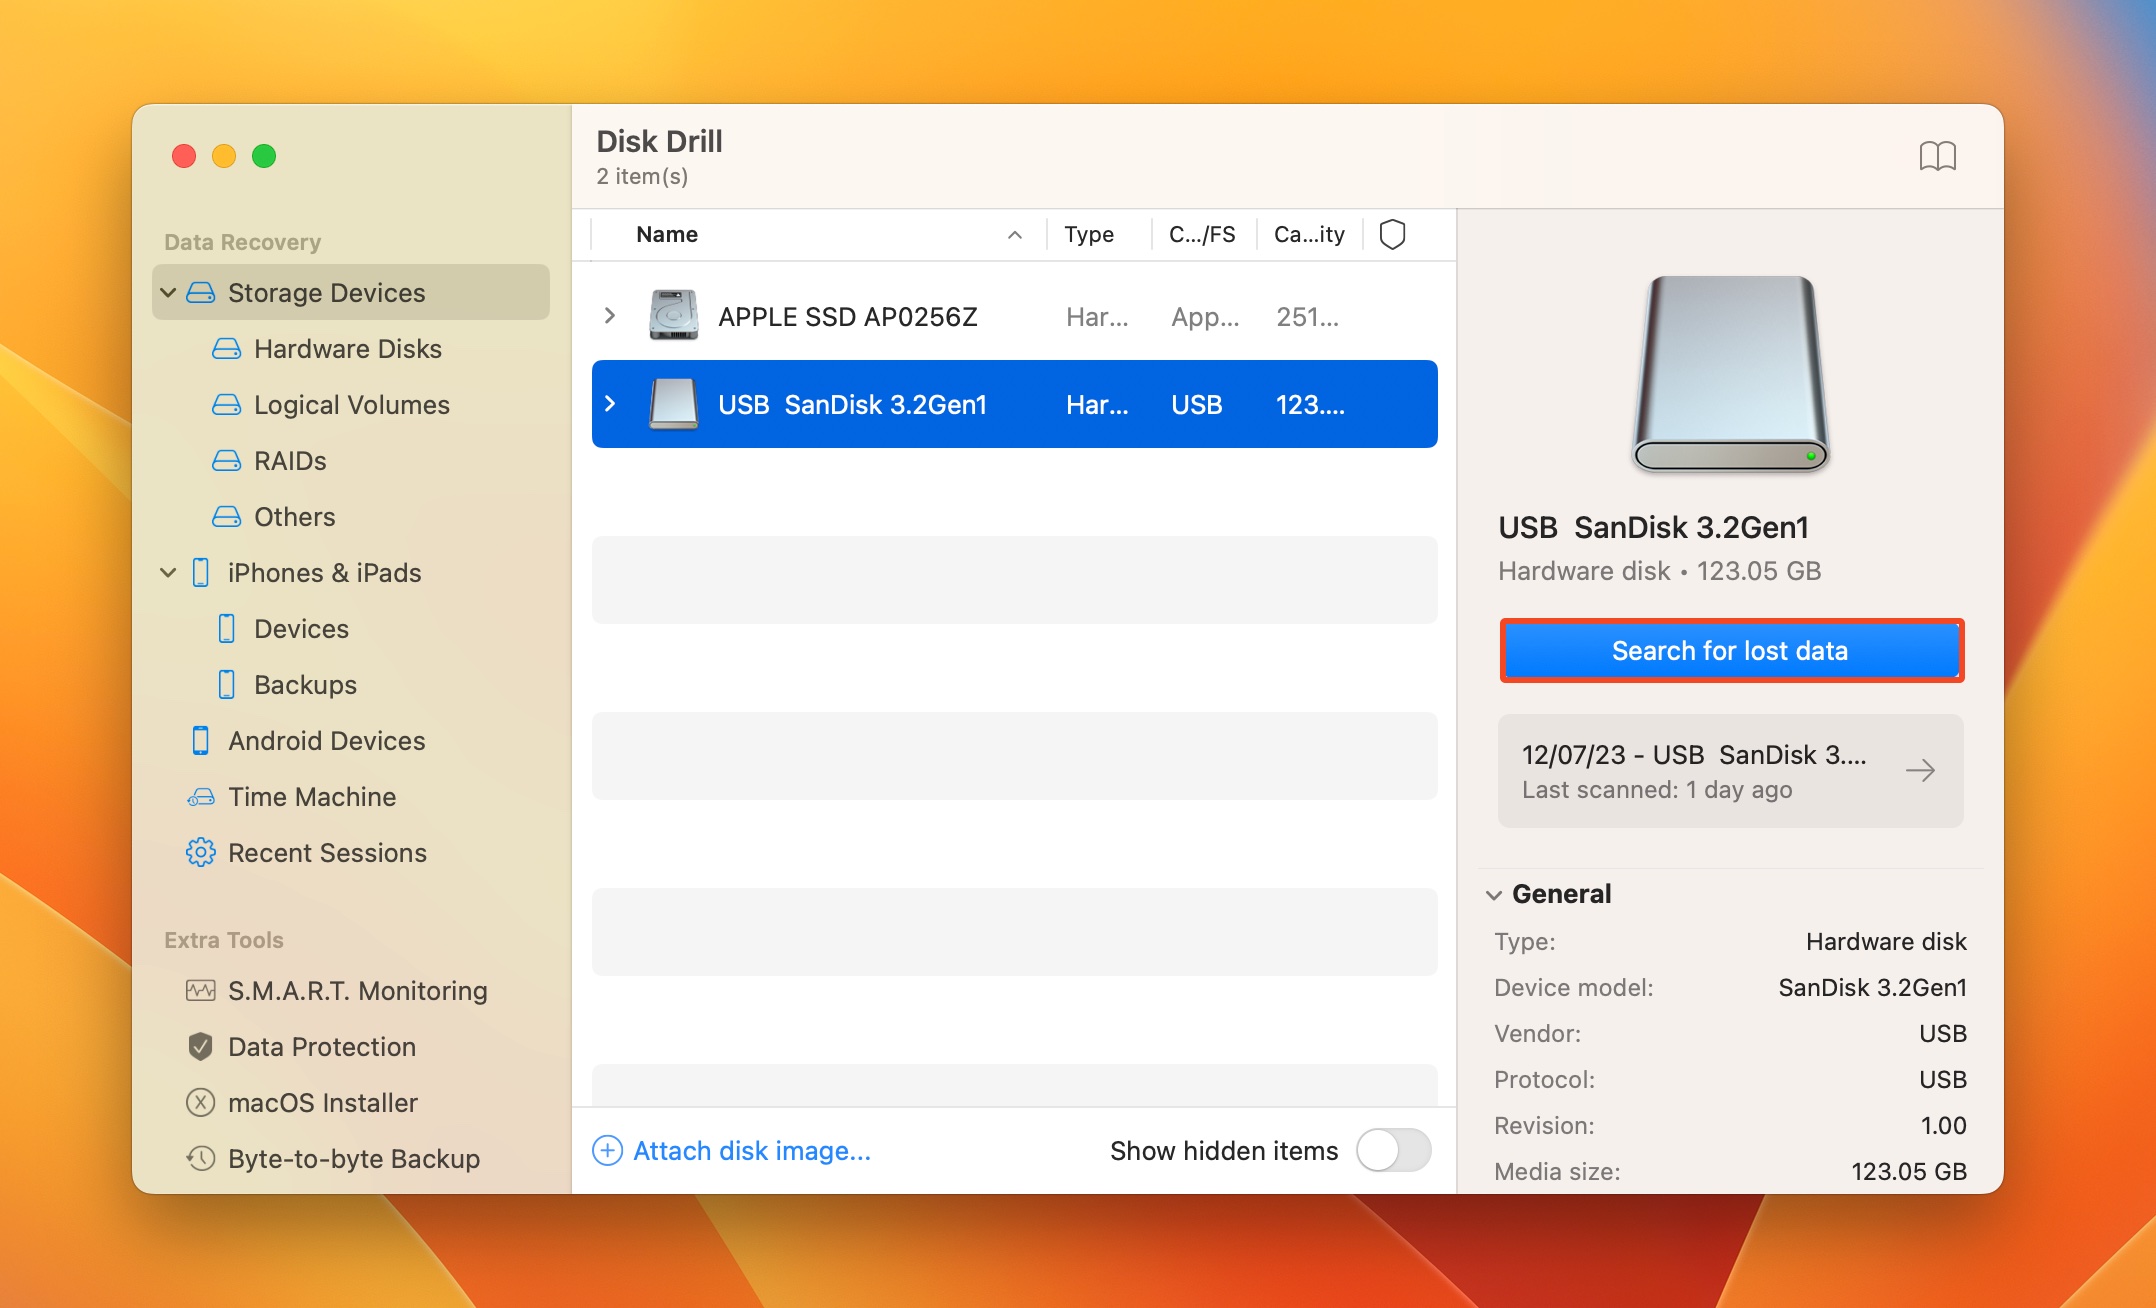
- Open Disk Drill and ensure you’re on the Storage Devices screen.
- If you created a disk image, click on Attach disk image, browse for the disk image and double-click on it. If not, skip this step.
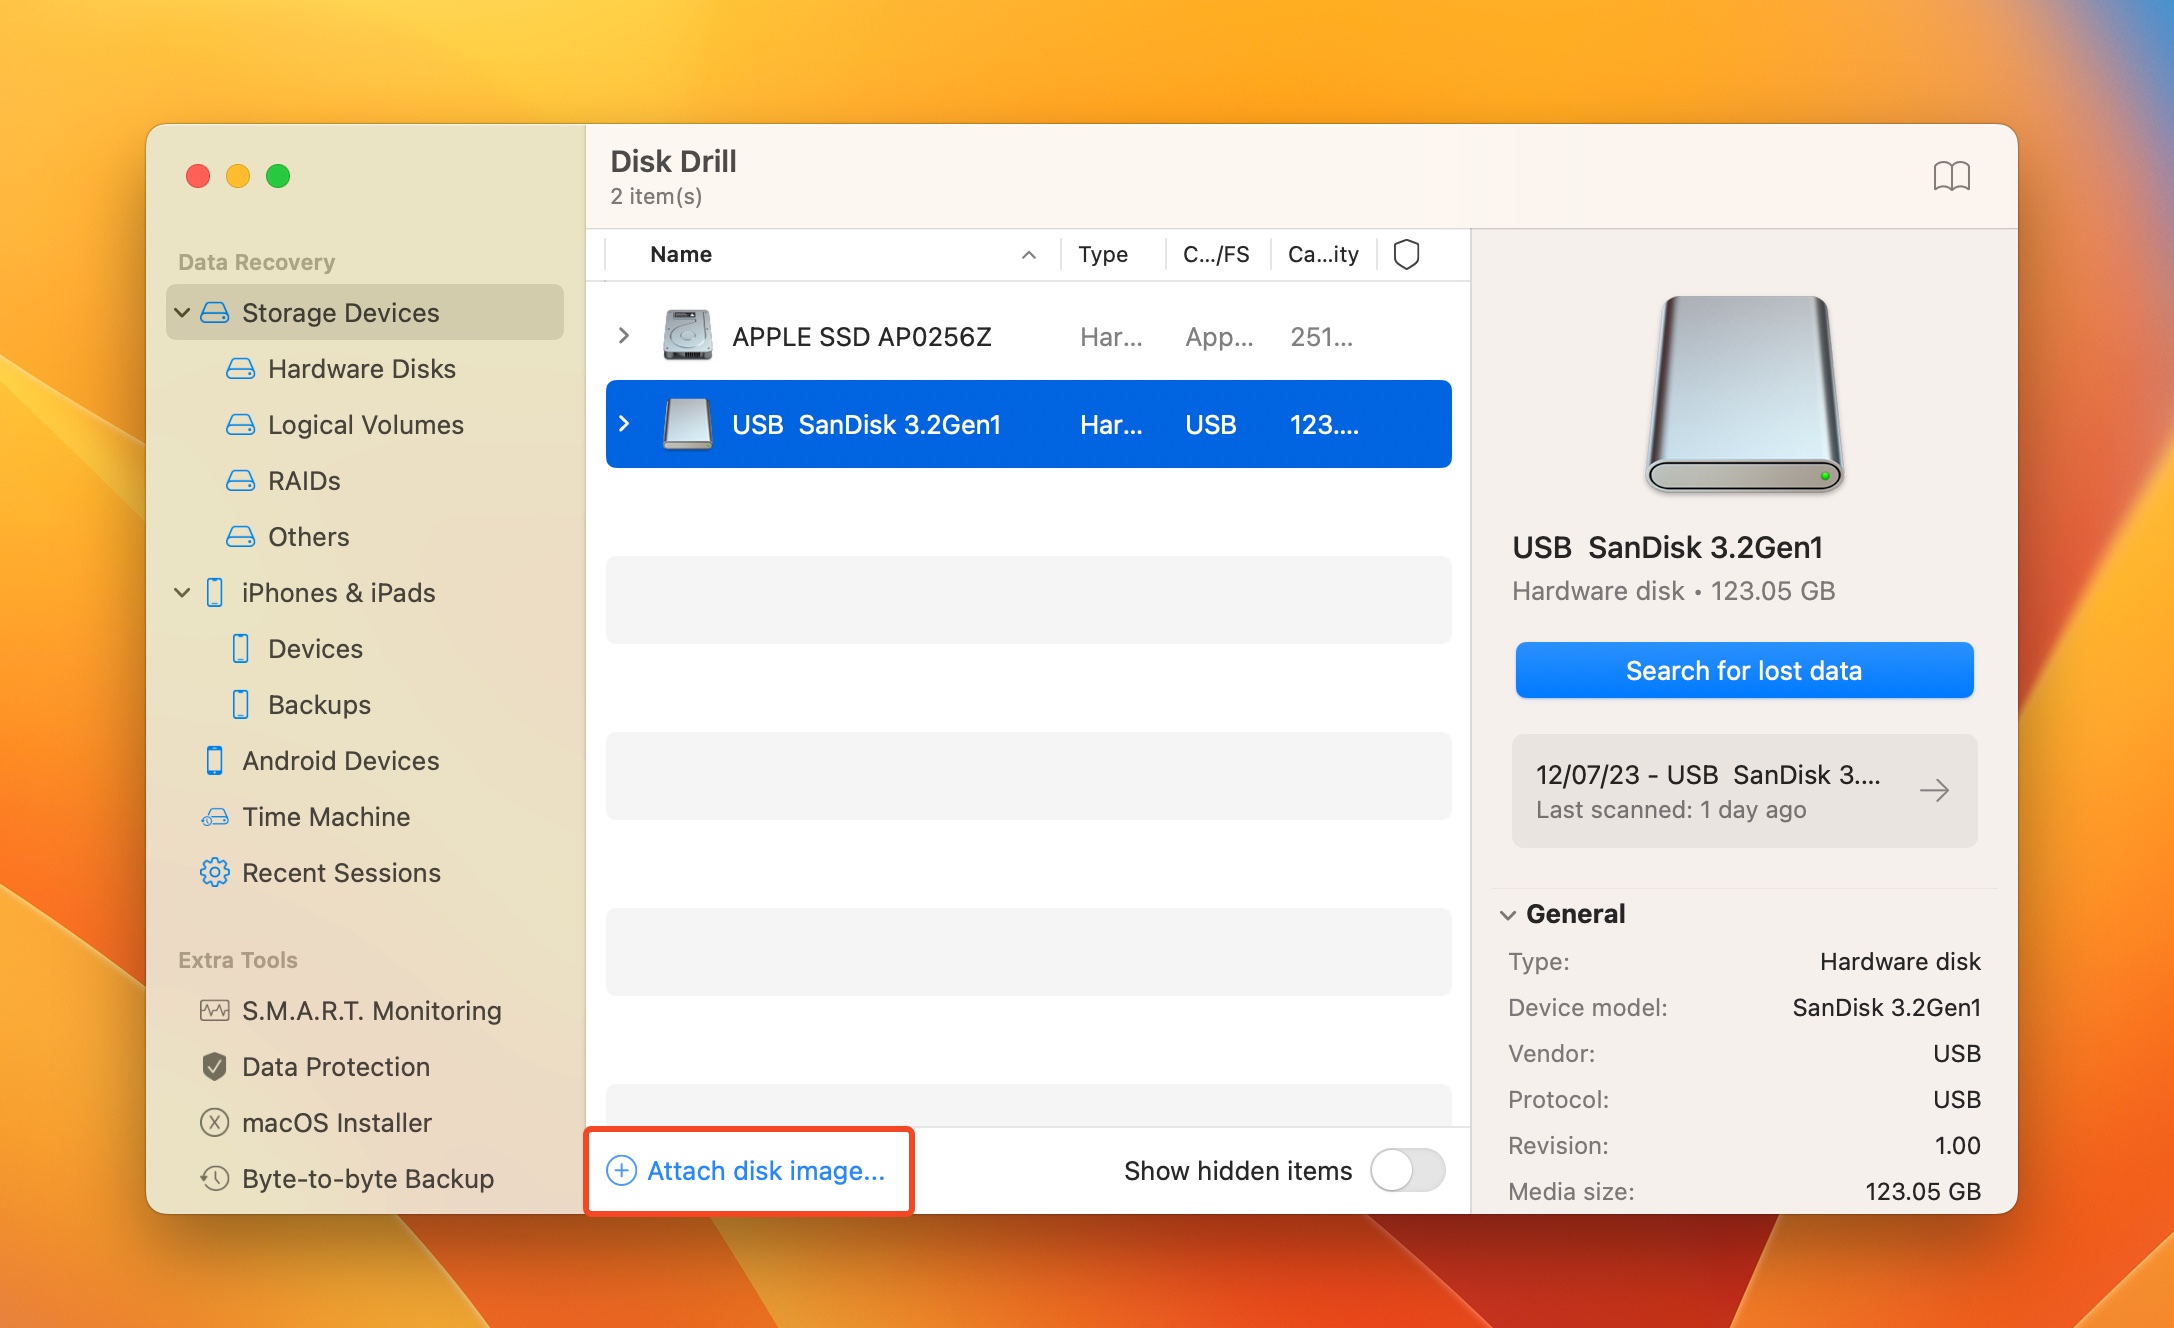
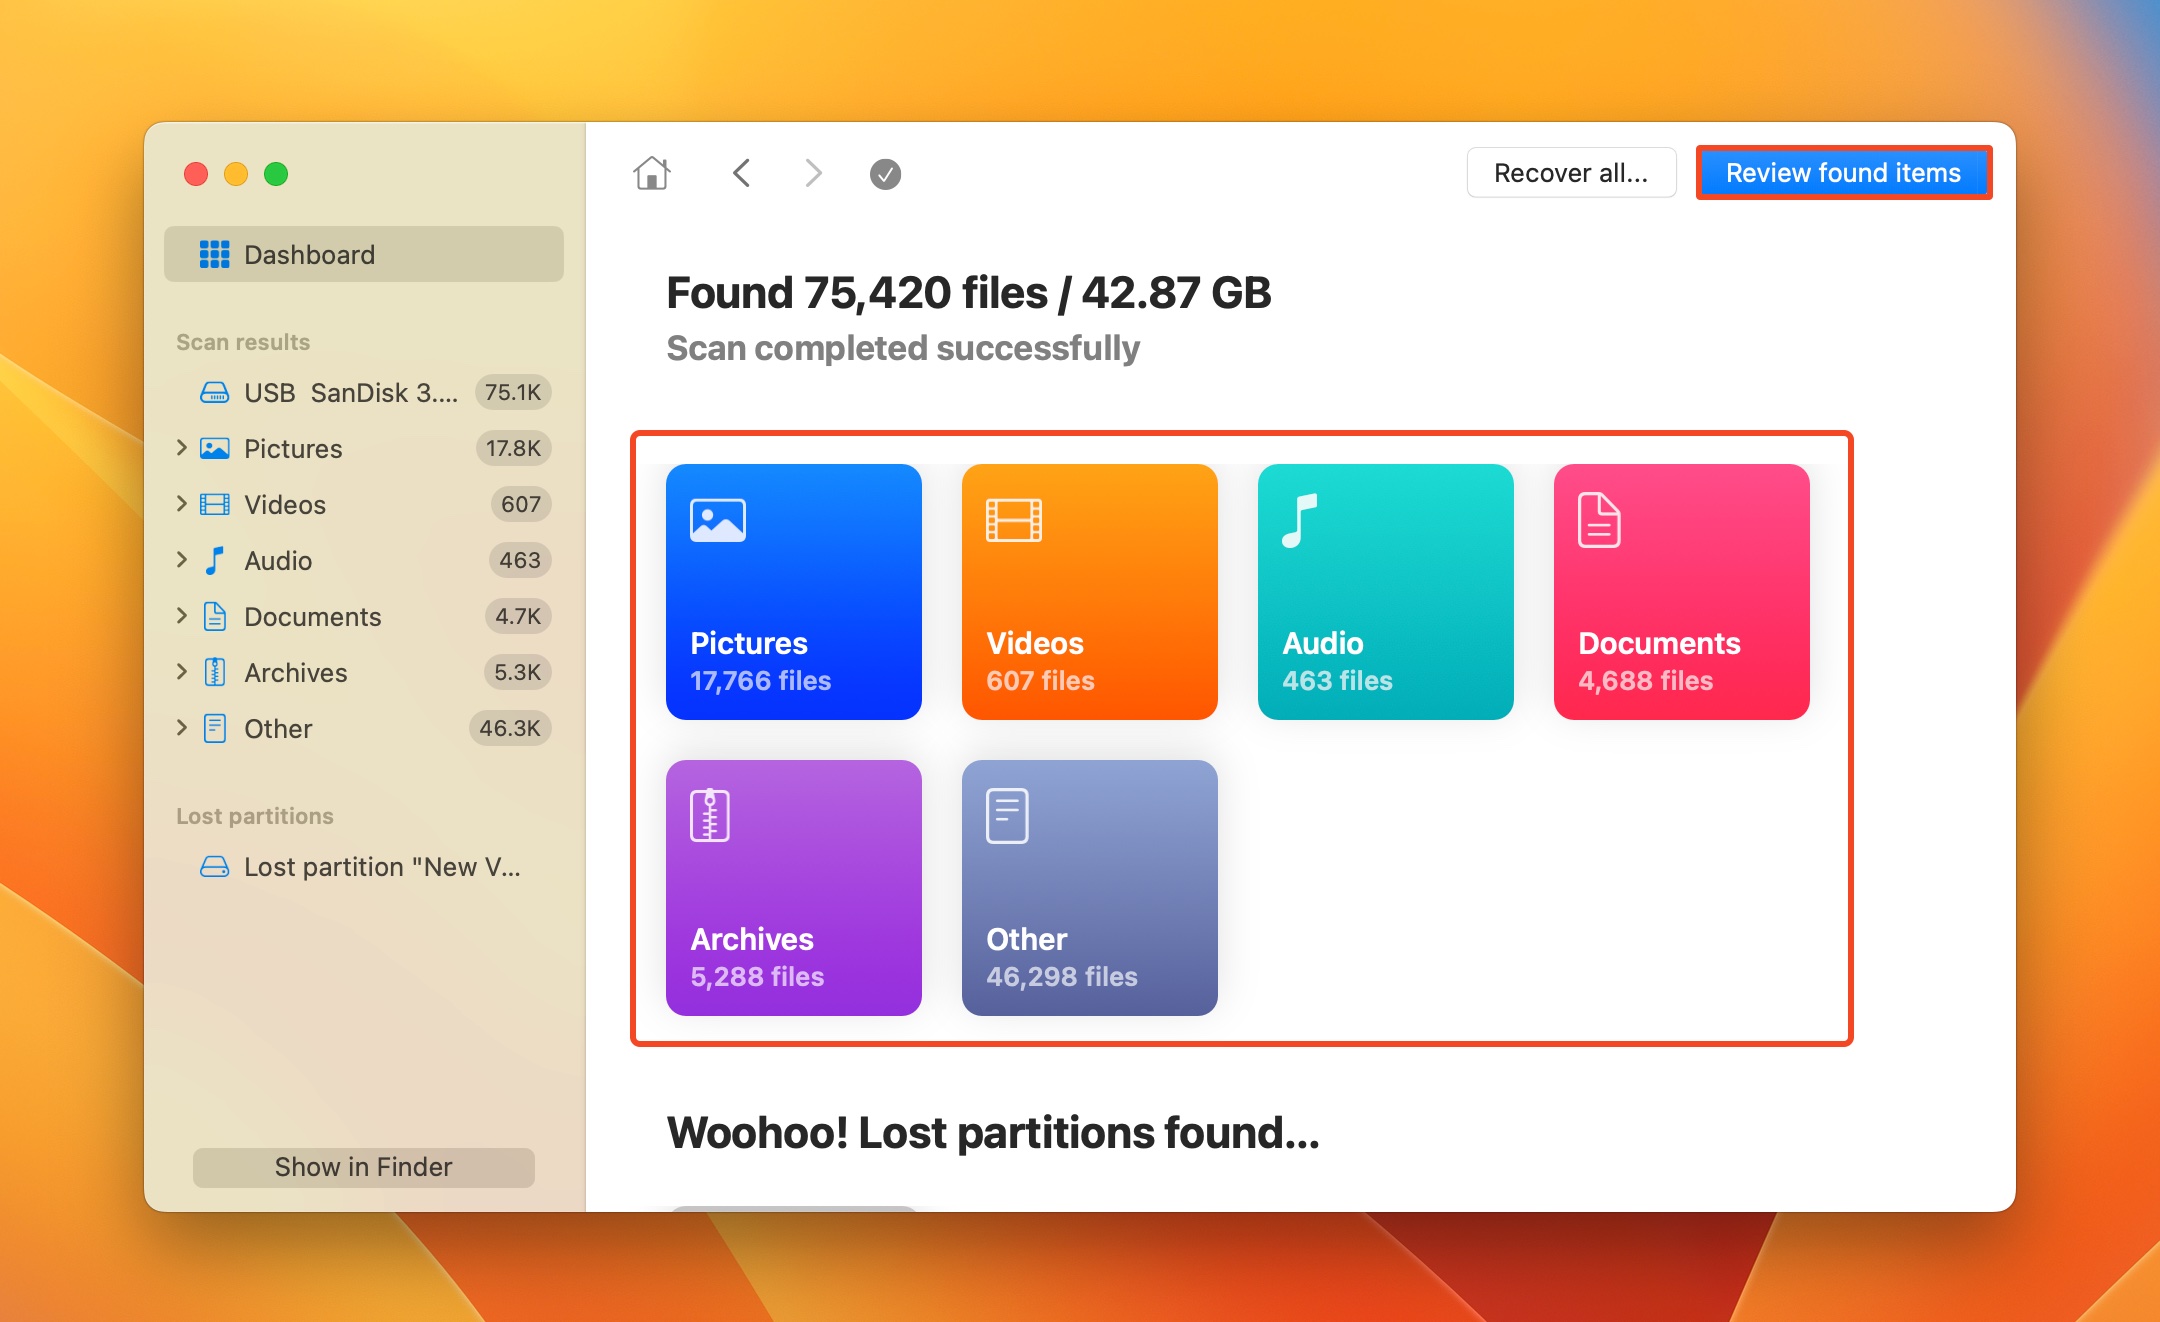
- Select the disk image/USB drive from the list of storage devices and click Search for lost data.
- Click on Review found items. If you wish to filter out the results, you can directly click on the relevant filetype (Pictures, Video, Audio, Documents, Archives, and Other).
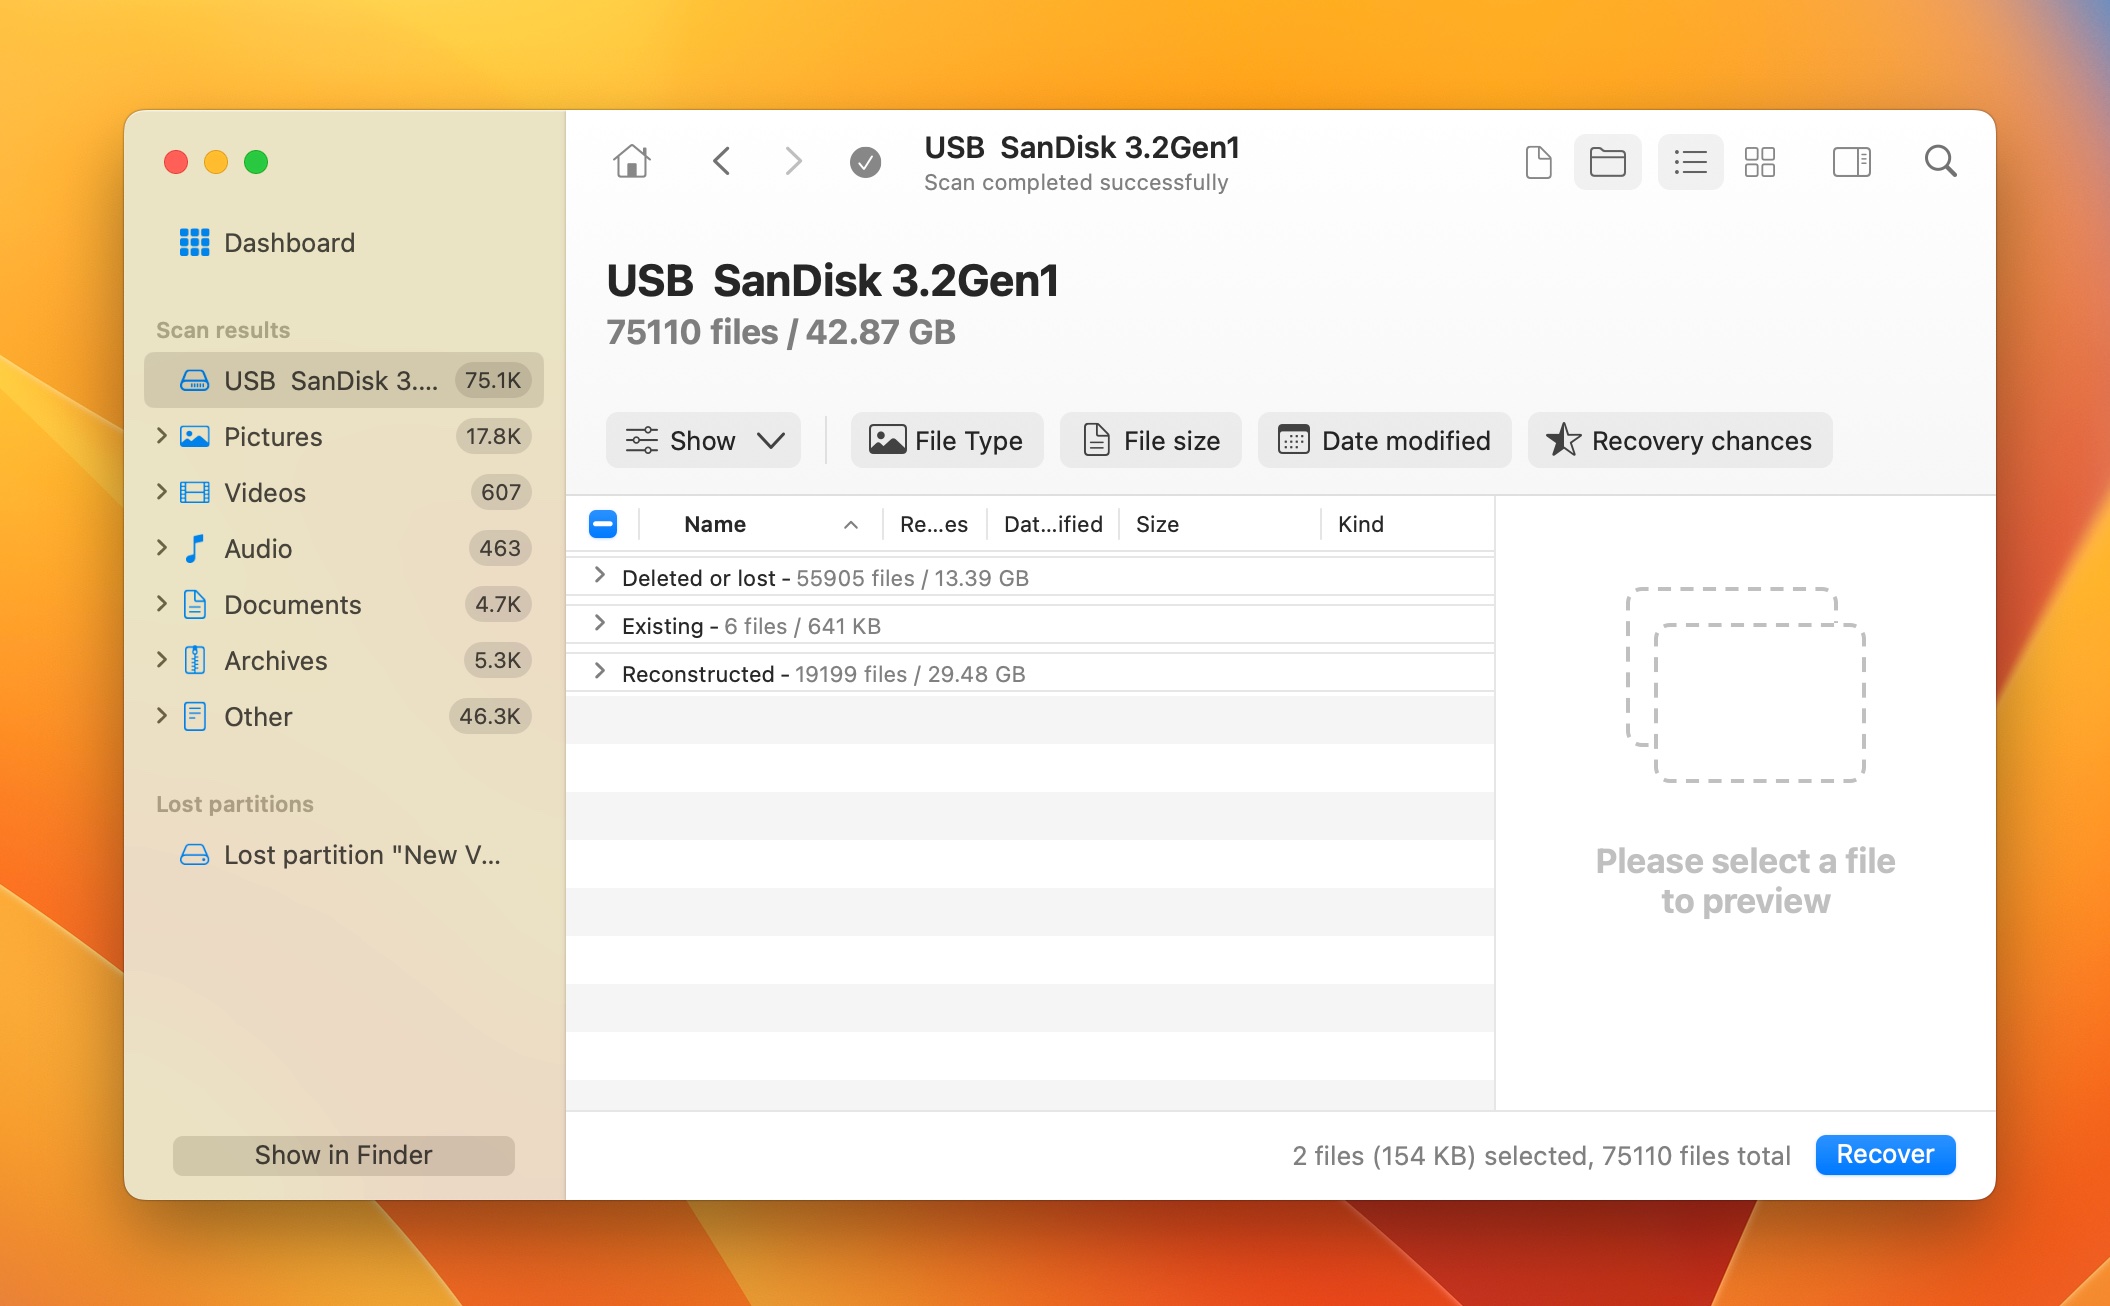
- Expand the Existing section to view the presently stored files on the USB or its disk image. To view deleted files that are recoverable, expand the Deleted or lost and Reconstructed sections.
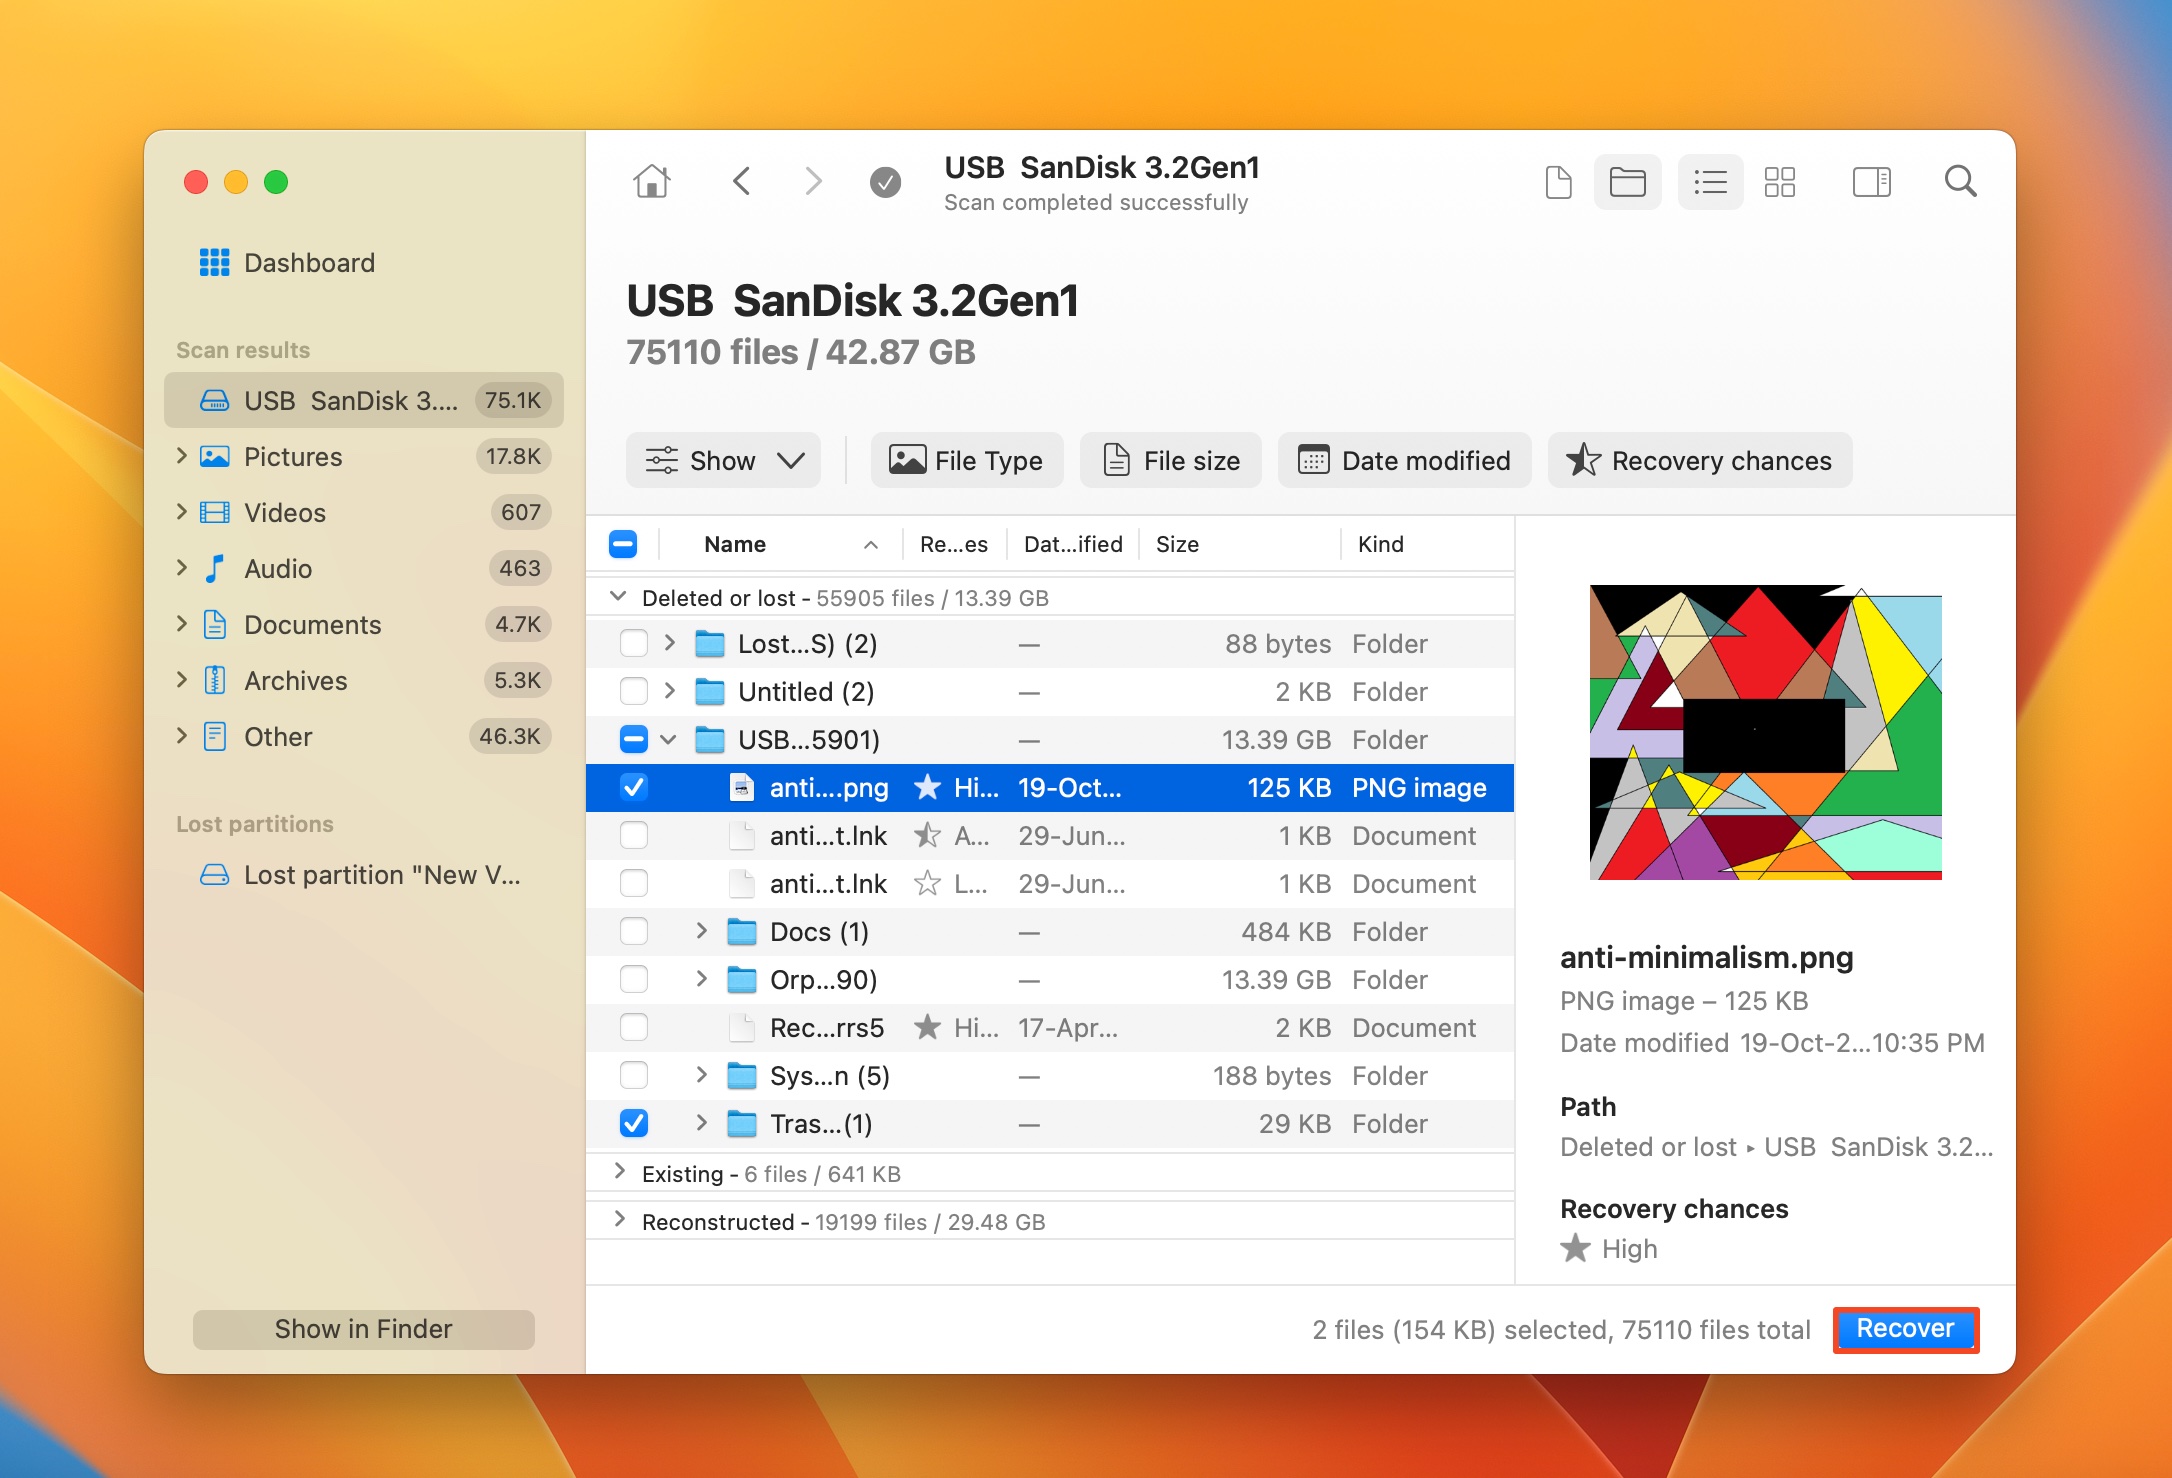
- Select the files you want to recover. Disk Drill will display a preview of the currently selected file, but you can manually preview other files as well. Click on Recover.
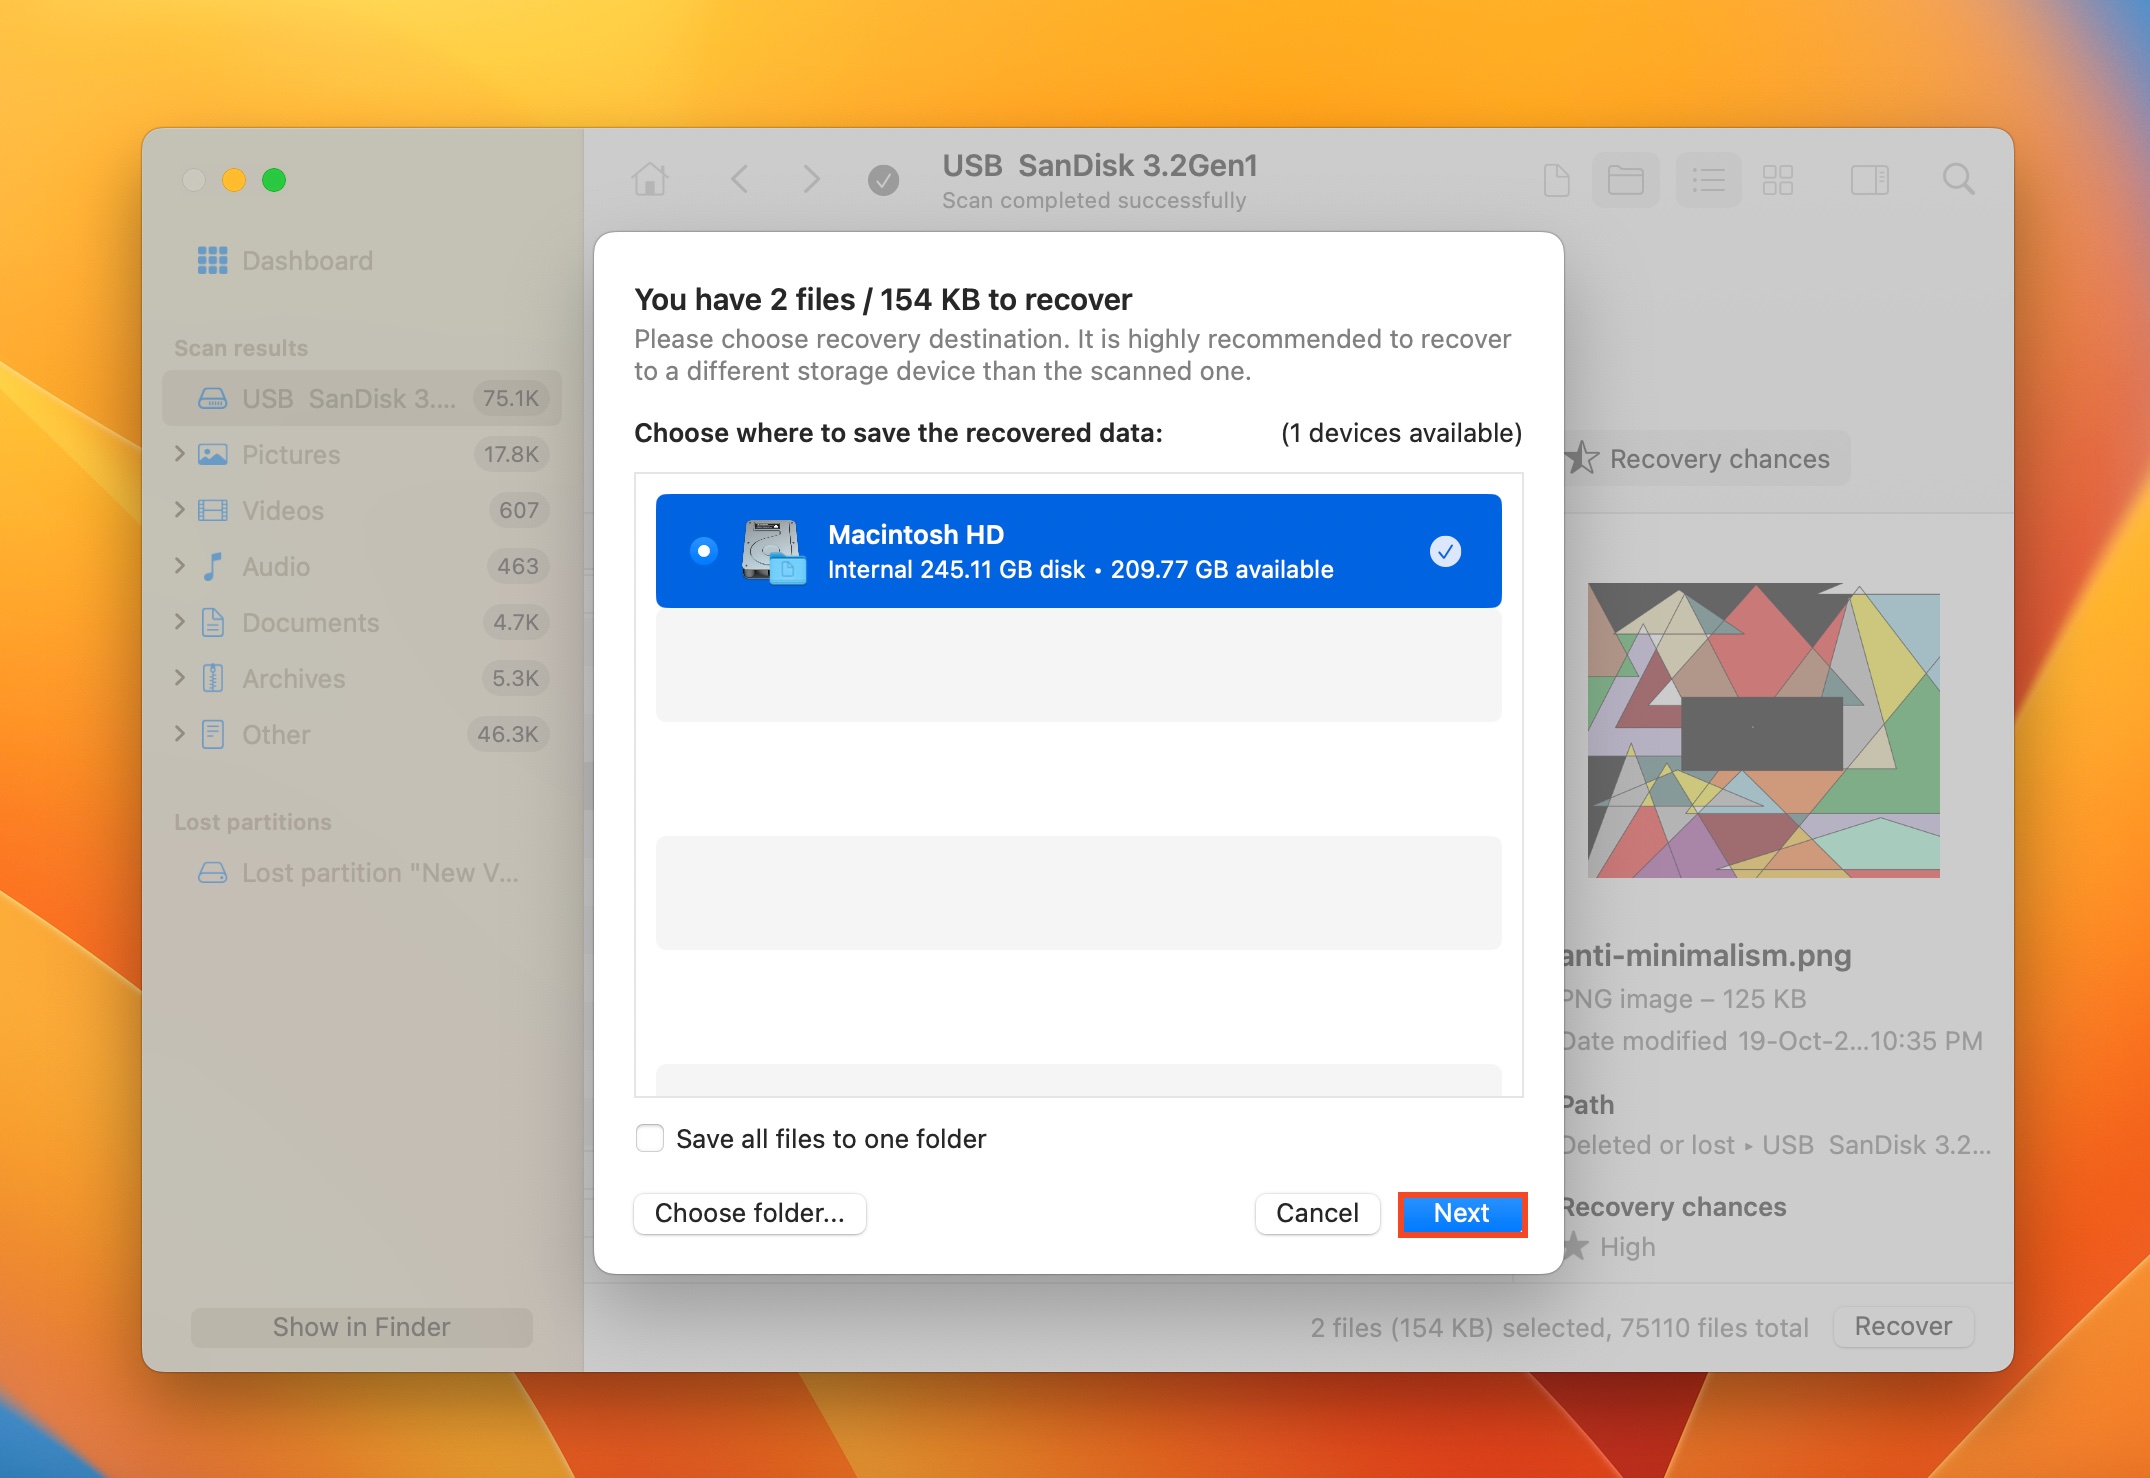
- Pick a recovery destination and click Next.
- Disk Drill will recover your files.
Conclusion
A USB drive that had files present on it but isn’t showing any of them, shouldn’t be taken lightly. It could be a sign of logical damage. That’s why it’s best to create a disk image of the flash drive and then proceed to fix it using the methods outlined in the sections above. The solution could be as simple as enabling hidden files on your Mac or Windows machine, or something complex like using command-line tools to repair the drive.


