 You attempt to access your USB drive, and seemingly out of nowhere–you encounter the “Please insert a disk into USB Drive” error. In addition to losing immediate access to your drive, you may wonder whether the existing data on your drive is safe. We’re here to help you out. In the sections that follow, we’ll take a look at what causes the issue, and how you can fix it, while keeping your data secure.
Table of Contents
Why Does Windows Show “Insert a Disk” After Connecting the USB Drive?
There can be several reasons why Windows asks you to “Please insert a disk into the USB Drive.” It can be a simple case of a loose connection or more serious issues like physical damage (which requires expert intervention).
Some common reasons include:
| Reason | Description |
| 🔌 The USB Drive is not correctly connected to the PC | Windows won’t detect a loosely connected USB drive properly. Also, if you own a USB drive with 2-in-1 connection types (Type C and USB 3.0) – try alternating between the connection type and see if the error persists. |
| 🔠 The USB disk’s drive letter is already assigned to another disk or partition | No two drives/partitions in Windows can have the same drive letter (C:, D:, E:, etc.). You can change this in Windows Disk Management. |
| 🩹 Your pen drive or partition is corrupt | In case of logical corruption, Windows may detect your USB drive but show you the, “Please insert a disk into Removable Drive” message. Additionally, if the USB drive’s space is allocated, but is not yet formatted to a recognized file system, you will get the same carry. However, the USB drive itself is not corrupt in this case. |
| 🔨 The USB drive or the USB port is physically damaged | Any damage to the USB drive or port will prevent Windows from detecting the drive properly. If you suspect a damaged USB port is the issue, try connecting the drive to one of the USB ports that are directly attached to the computer’s motherboard. |
How to Avoid Losing Your Data
Some fixes for the please insert disk error, may cause data loss on the affected drive. So, it’s advisable that you recover your data beforehand.
Since you won’t be able to access the drive’s files when dealing with this error, it’s best to create a disk image of the pen drive and recover your files from the disk image itself. It’s recommended that you use only reputable data recovery programs to do this.
For this tutorial, we picked Disk Drill as our tool of choice. The reasons for this are twofold. One, it lets you create a backup (disk image) of your drive as well as scan it for data within a single interface–making the entire process so much easier and faster. And two, in addition to regular drives with a file system, Disk Drill also supports recovery from drives that have no file system at all (RAW). This is particularly useful in the case of the please insert a disk error.
Here’s how to create a backup of your USB drive and recover data from it using Disk Drill:
Step 1: Create a Byte-to-Byte Backup
- Download Disk Drill and install it.
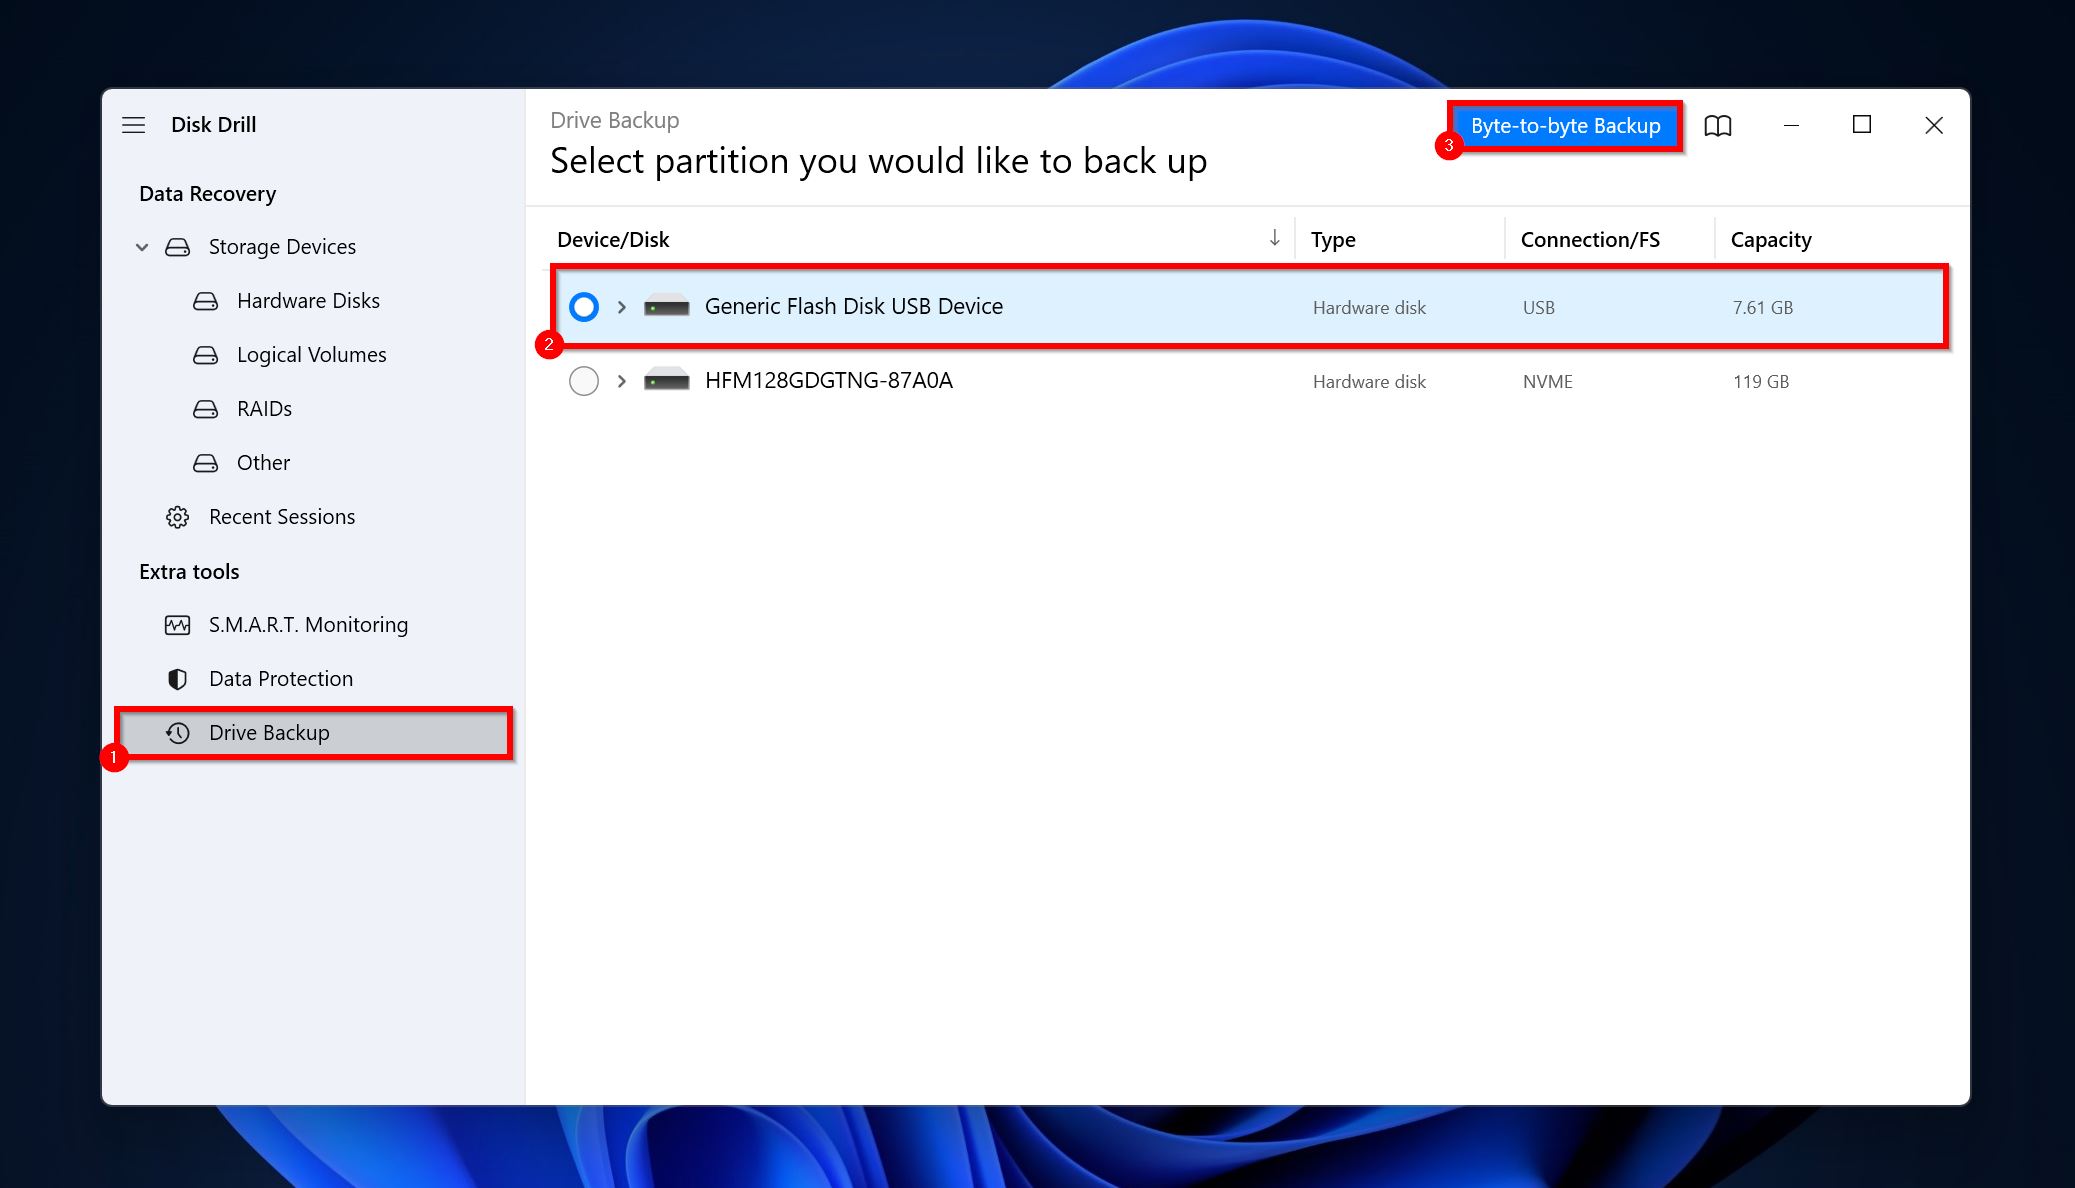
- Open Disk Drill, and go to Drive backup, under Extra Tools.
- Select the USB drive and click on Byte-to-byte Backup.
- Choose where you’d like to save the disk image and click OK.
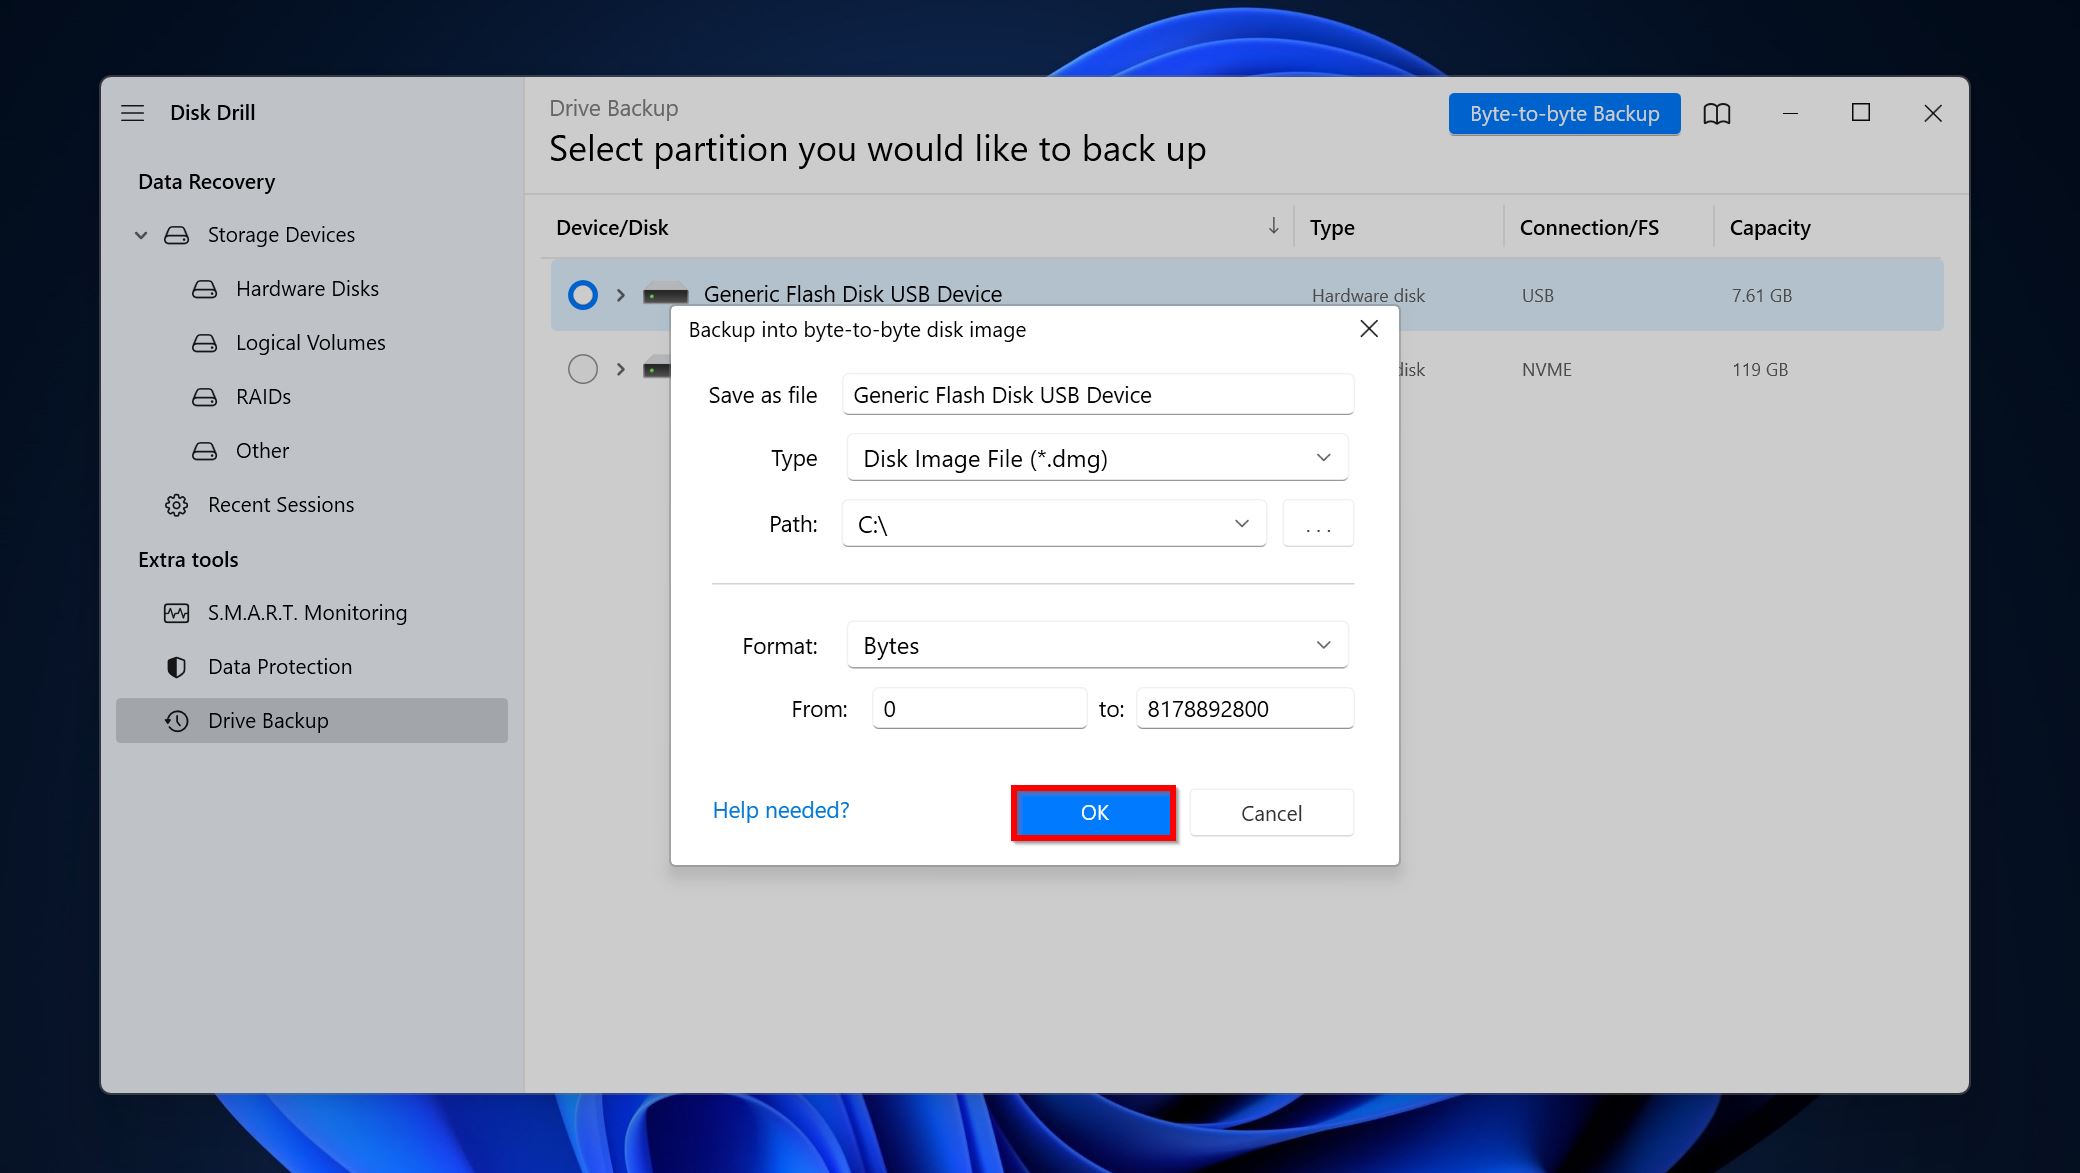
- Disk Drill will create a disk image of the USB drive. You can now disconnect the USB drive if you wish to.
Step 2: Recover Data from the Byte-to-byte Backup
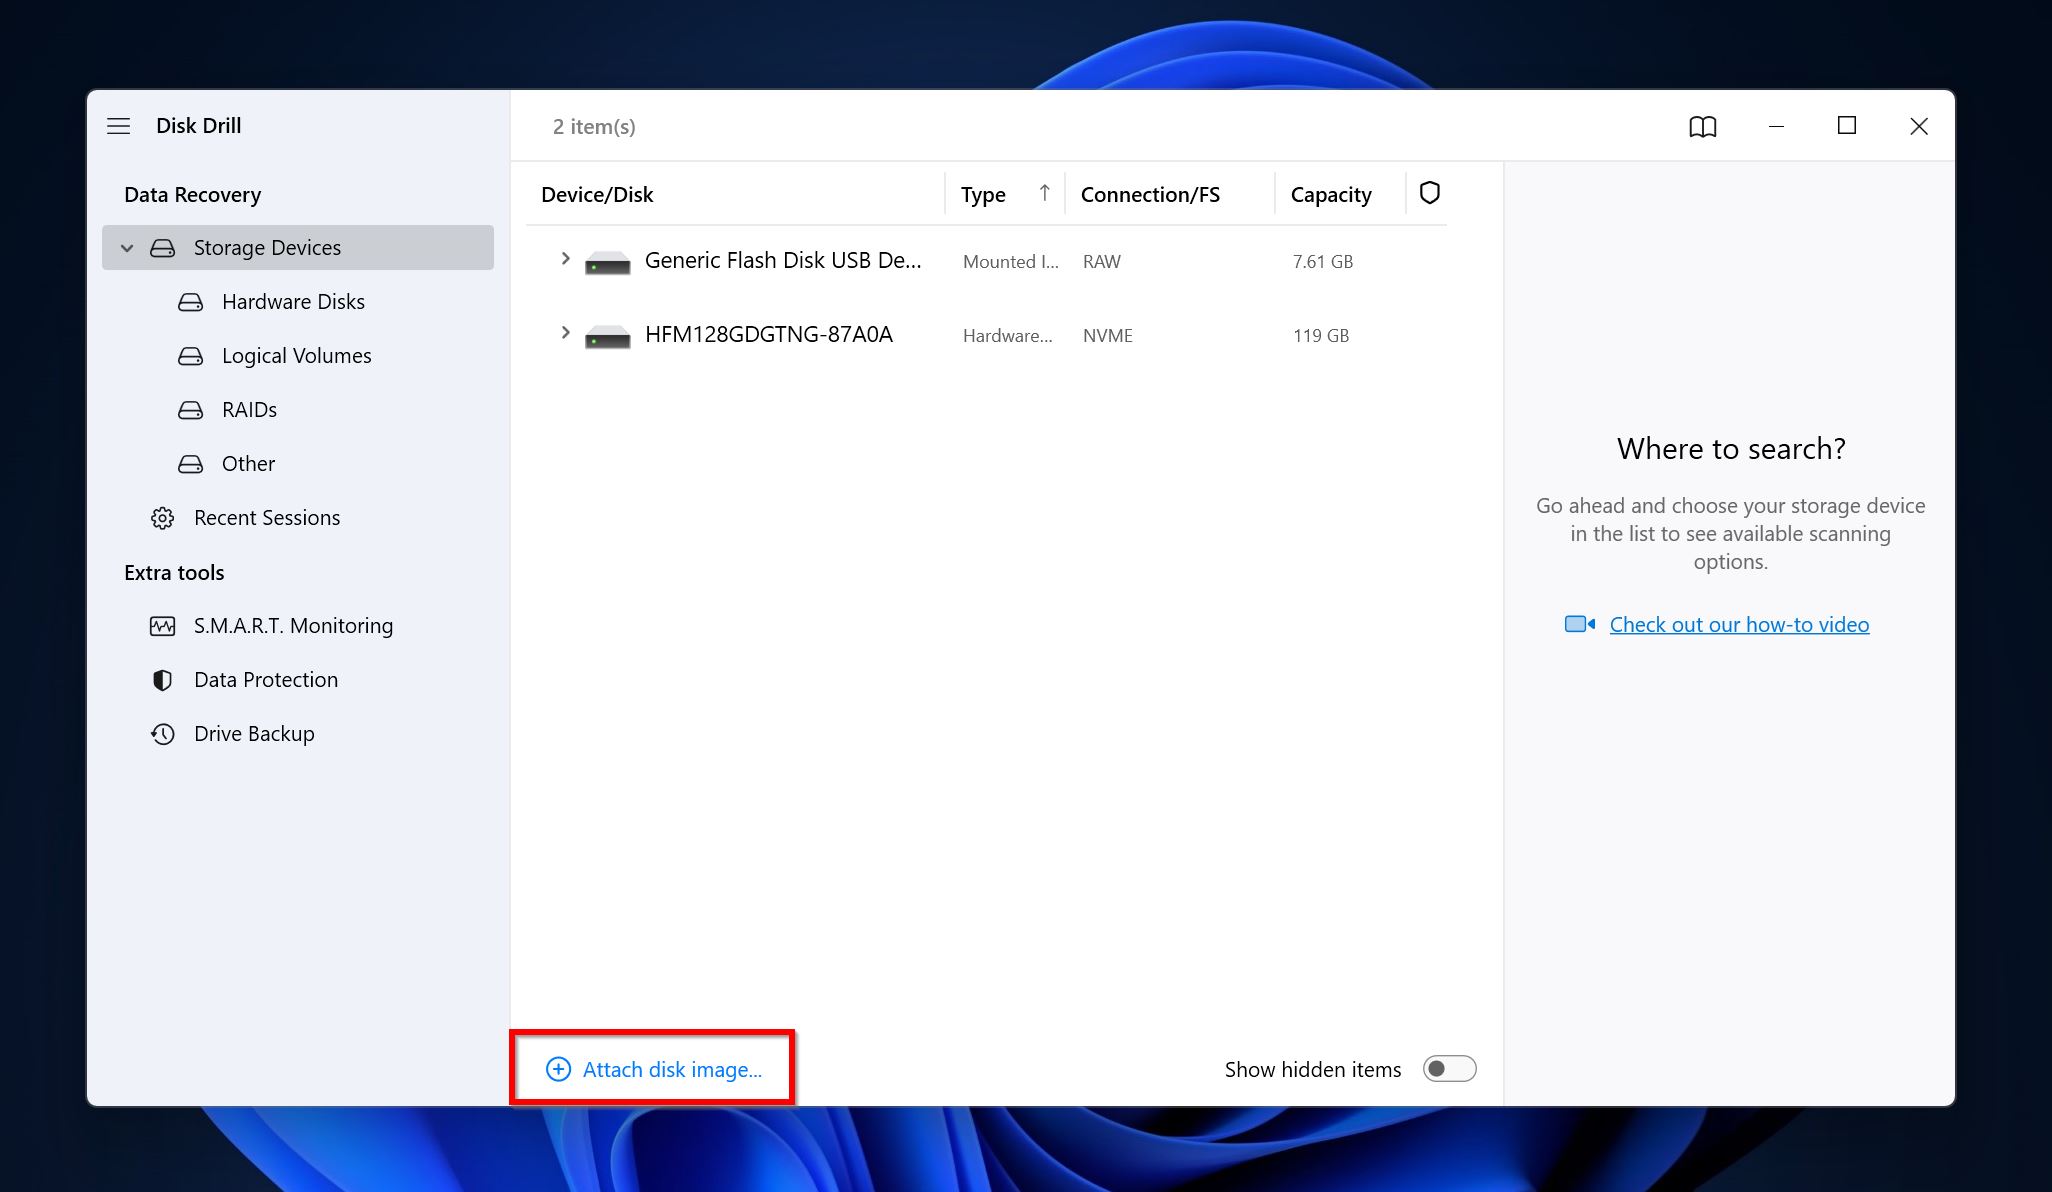
- Open Disk Drill and go to the Storage Devices screen.
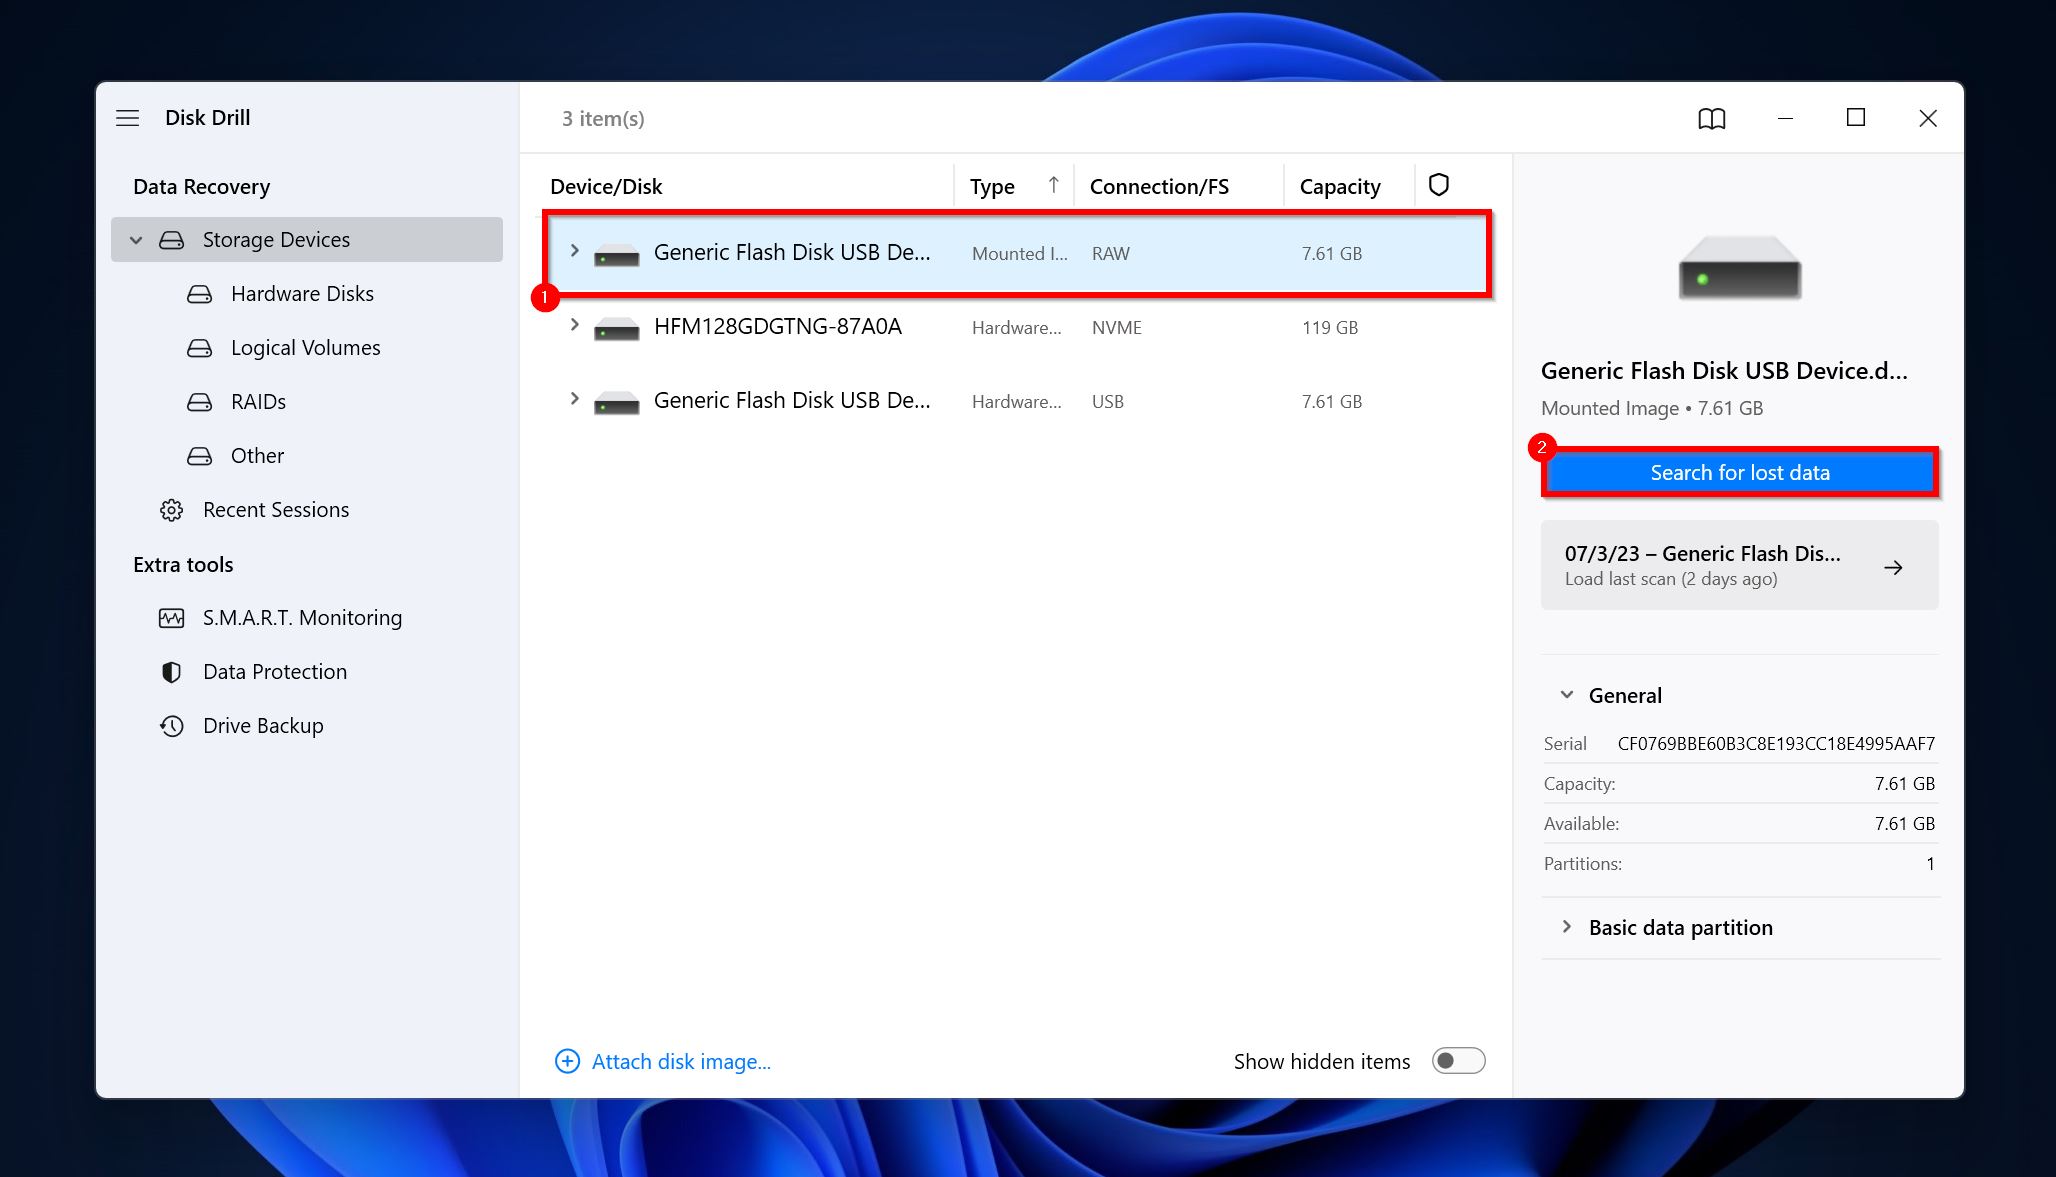
- Click on Attach disk image and browse for the disk image of the USB drive. Double-click on it. The USB drive will show up as a mounted image in the devices list.
- Click on the USB drive’s disk image and click on Search for lost data.
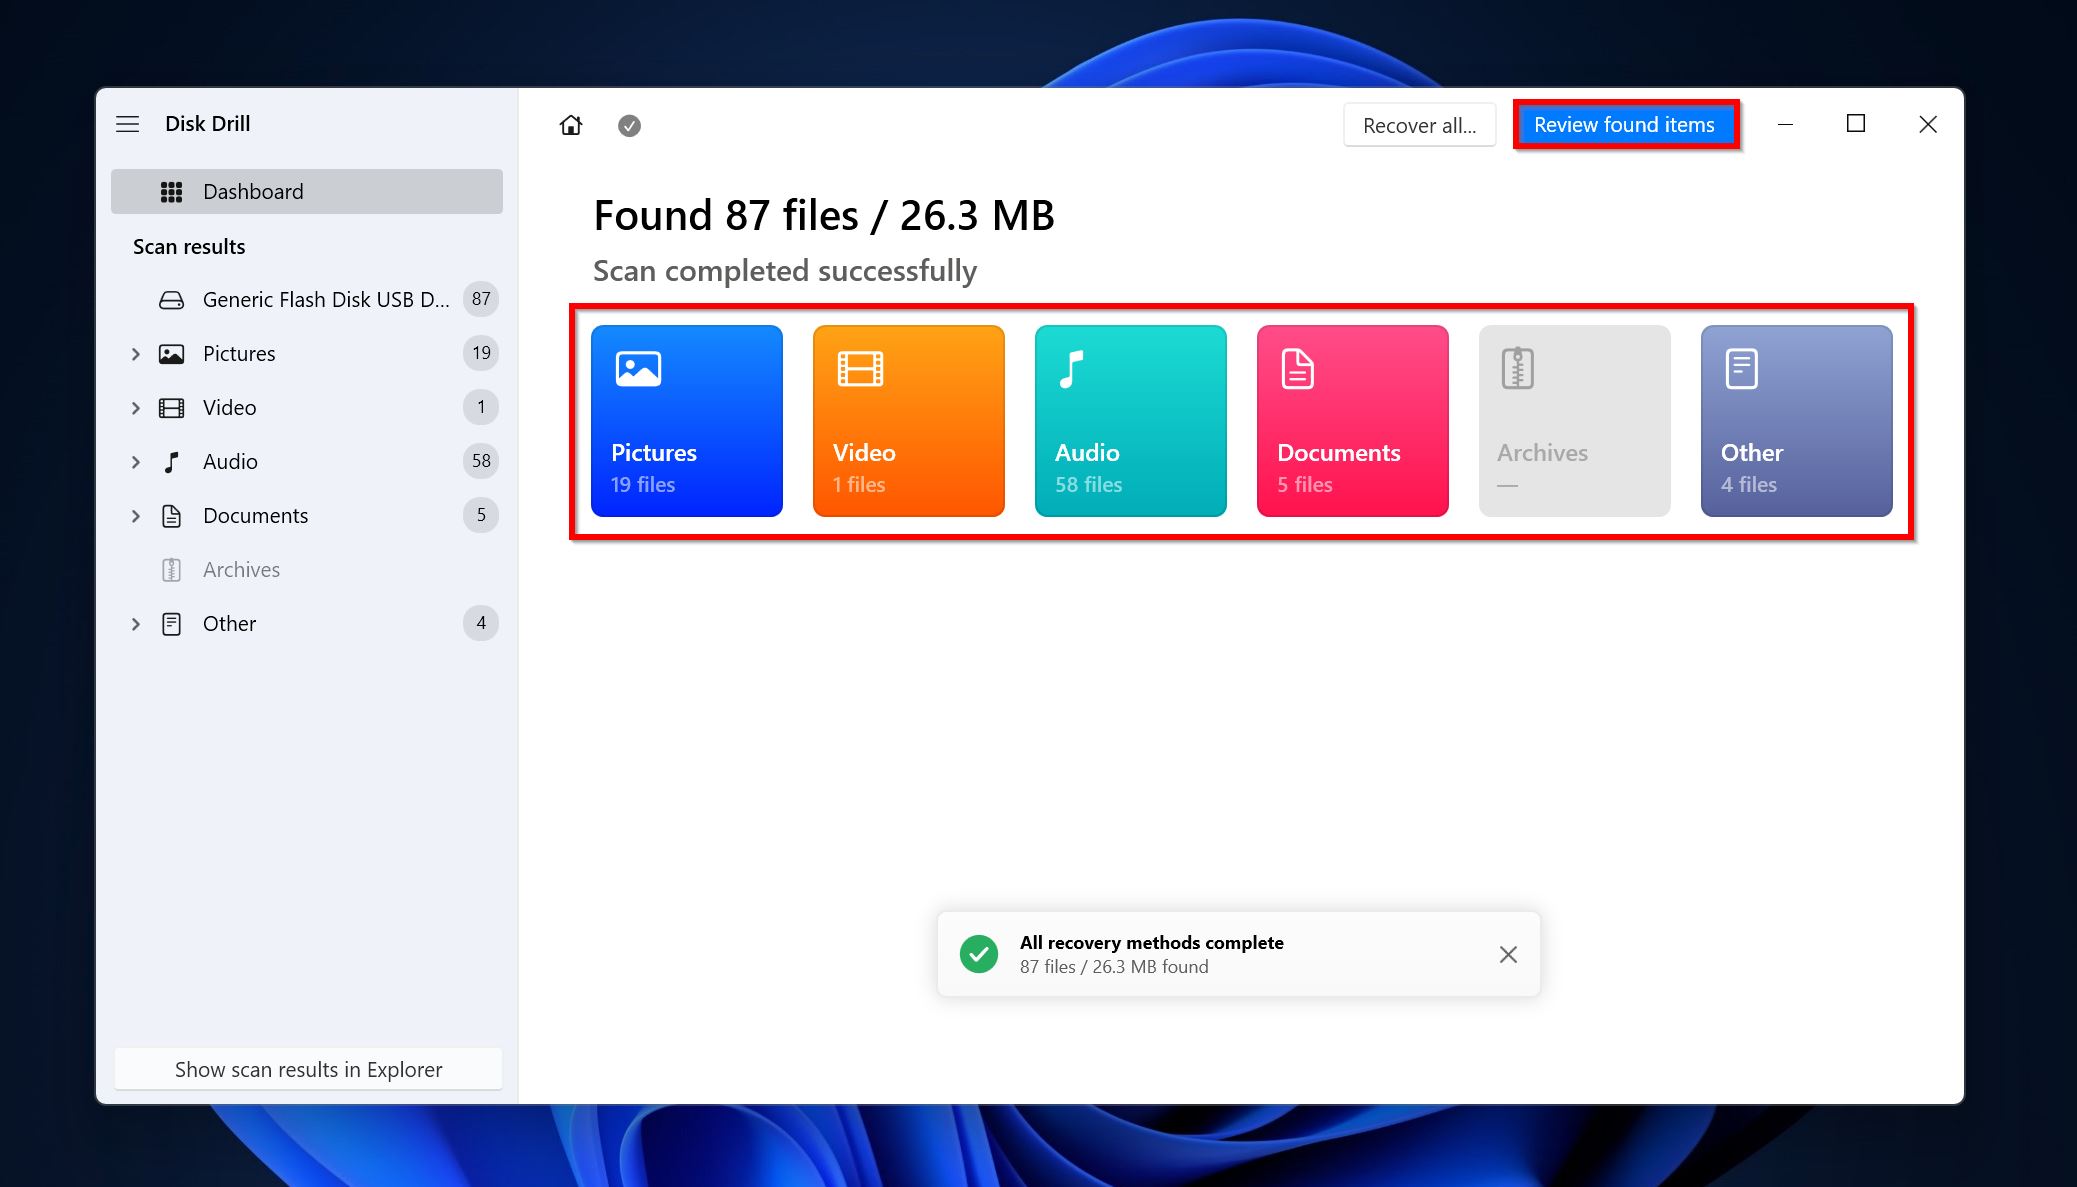
- Click Review found items to view the recoverable files on the drive. To filter out the results, you can directly click on the file type you wish to recover (Pictures, Video, Audio, Documents, Archives, and Other).
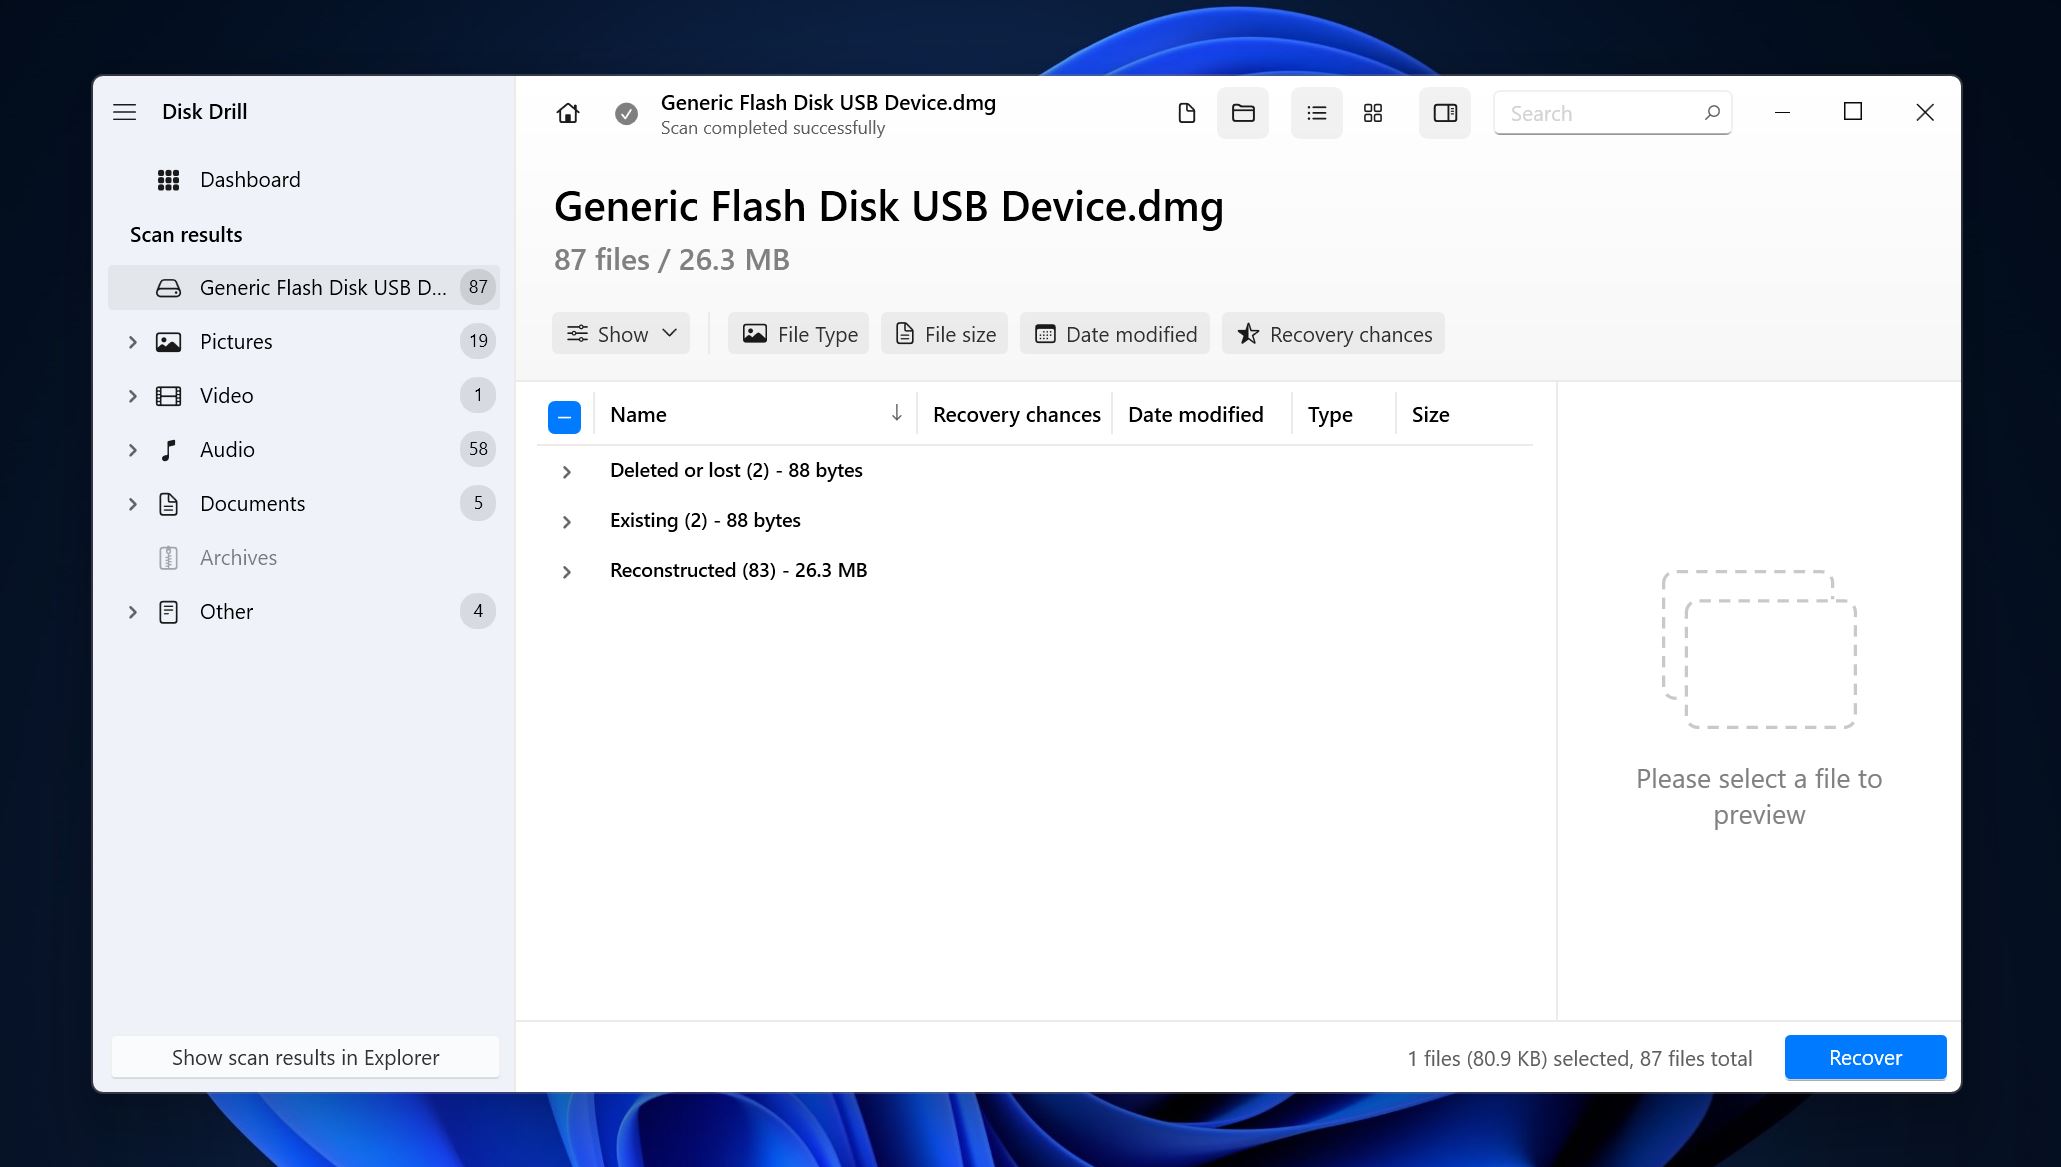
- Expand the Existing section to view files that are presently stored on the drive. To view files that are recoverable, expand the Deleted or lost and Reconstructed sections.
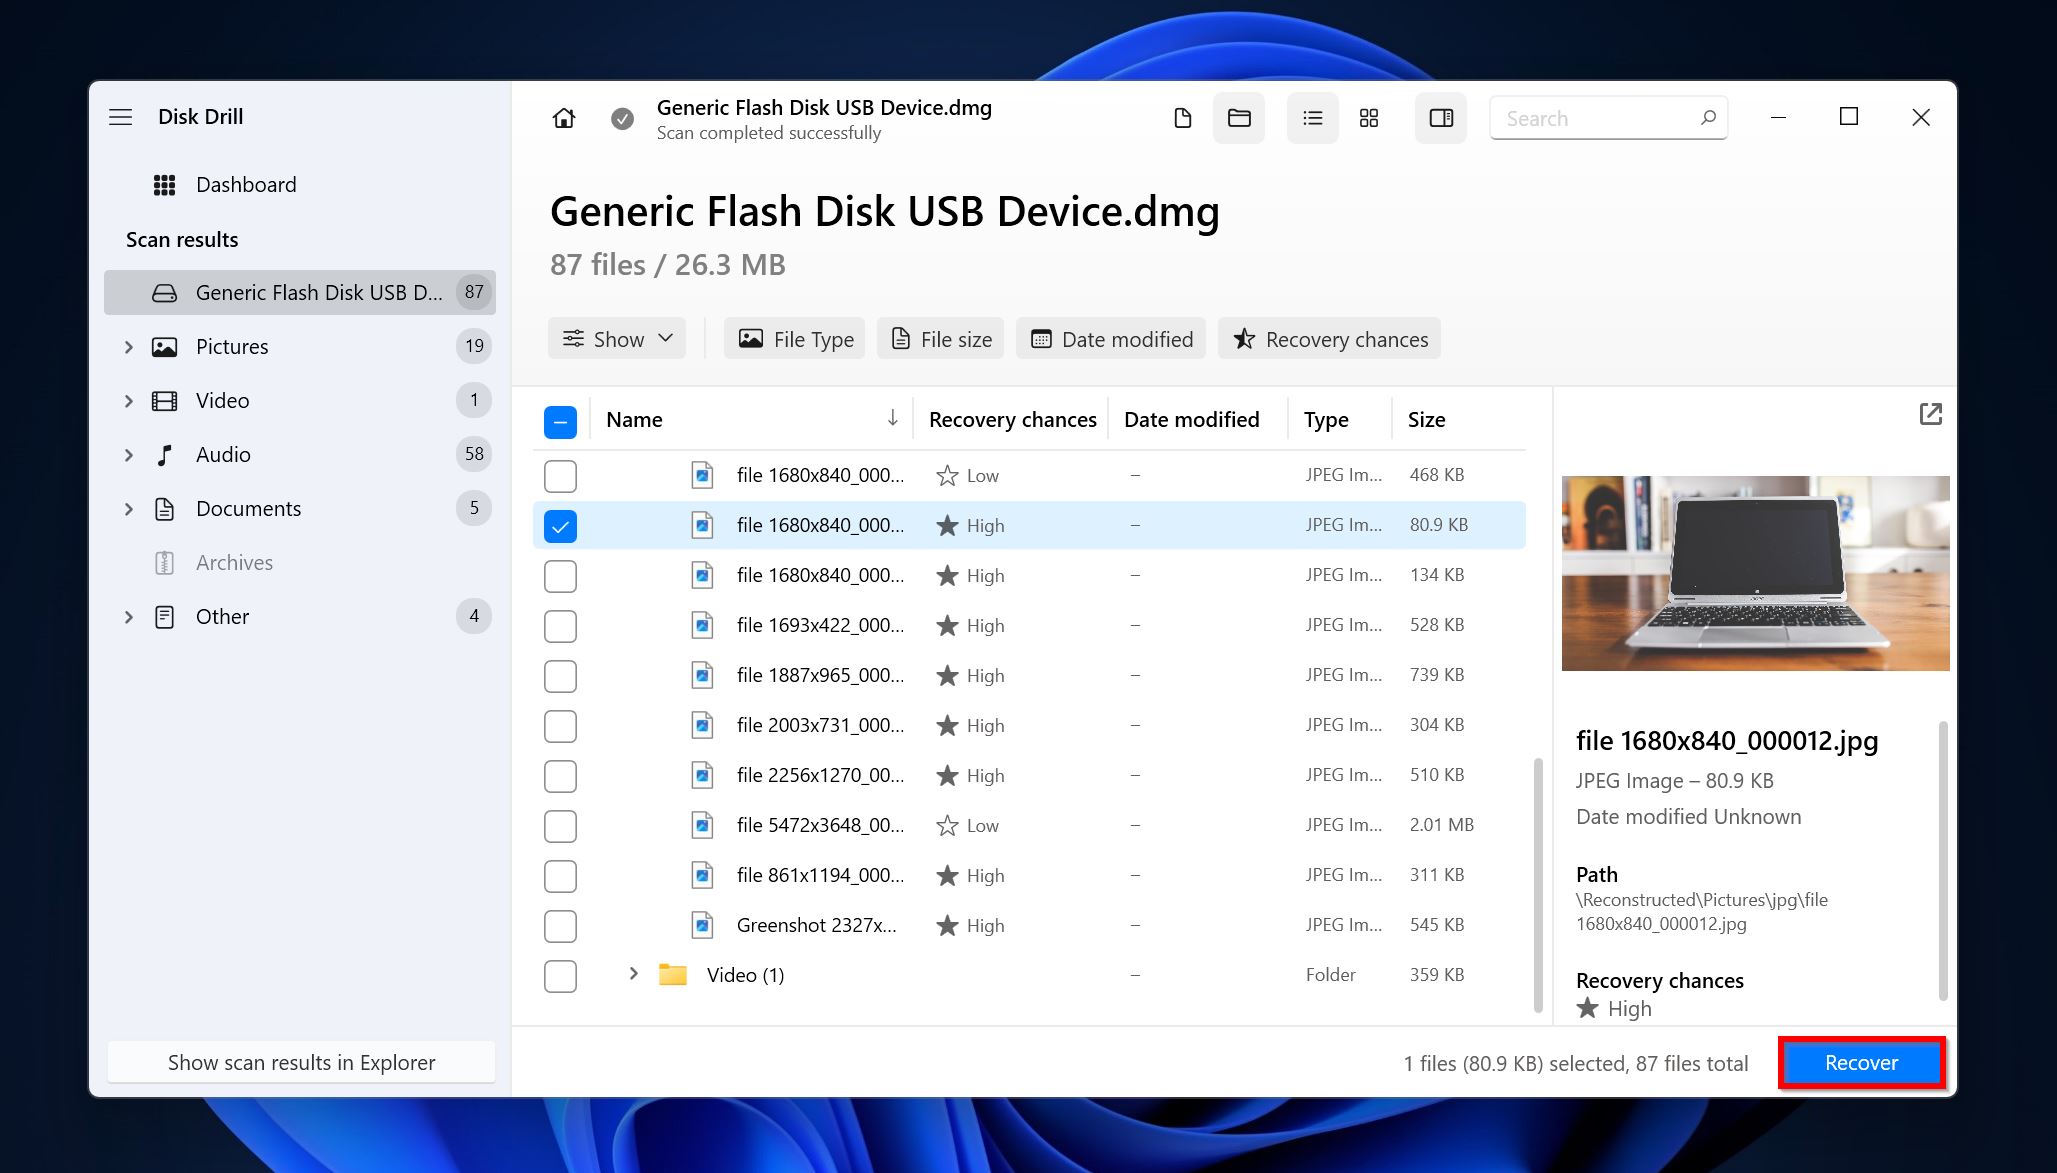
- Select the files you want to recover. Disk Drill will display a preview of the currently selected file, but you can manually preview any file by clicking the eye icon next to its filename. Click on Recover after you’ve confirmed your selection.
- Pick a recovery destination for the files and click Next.
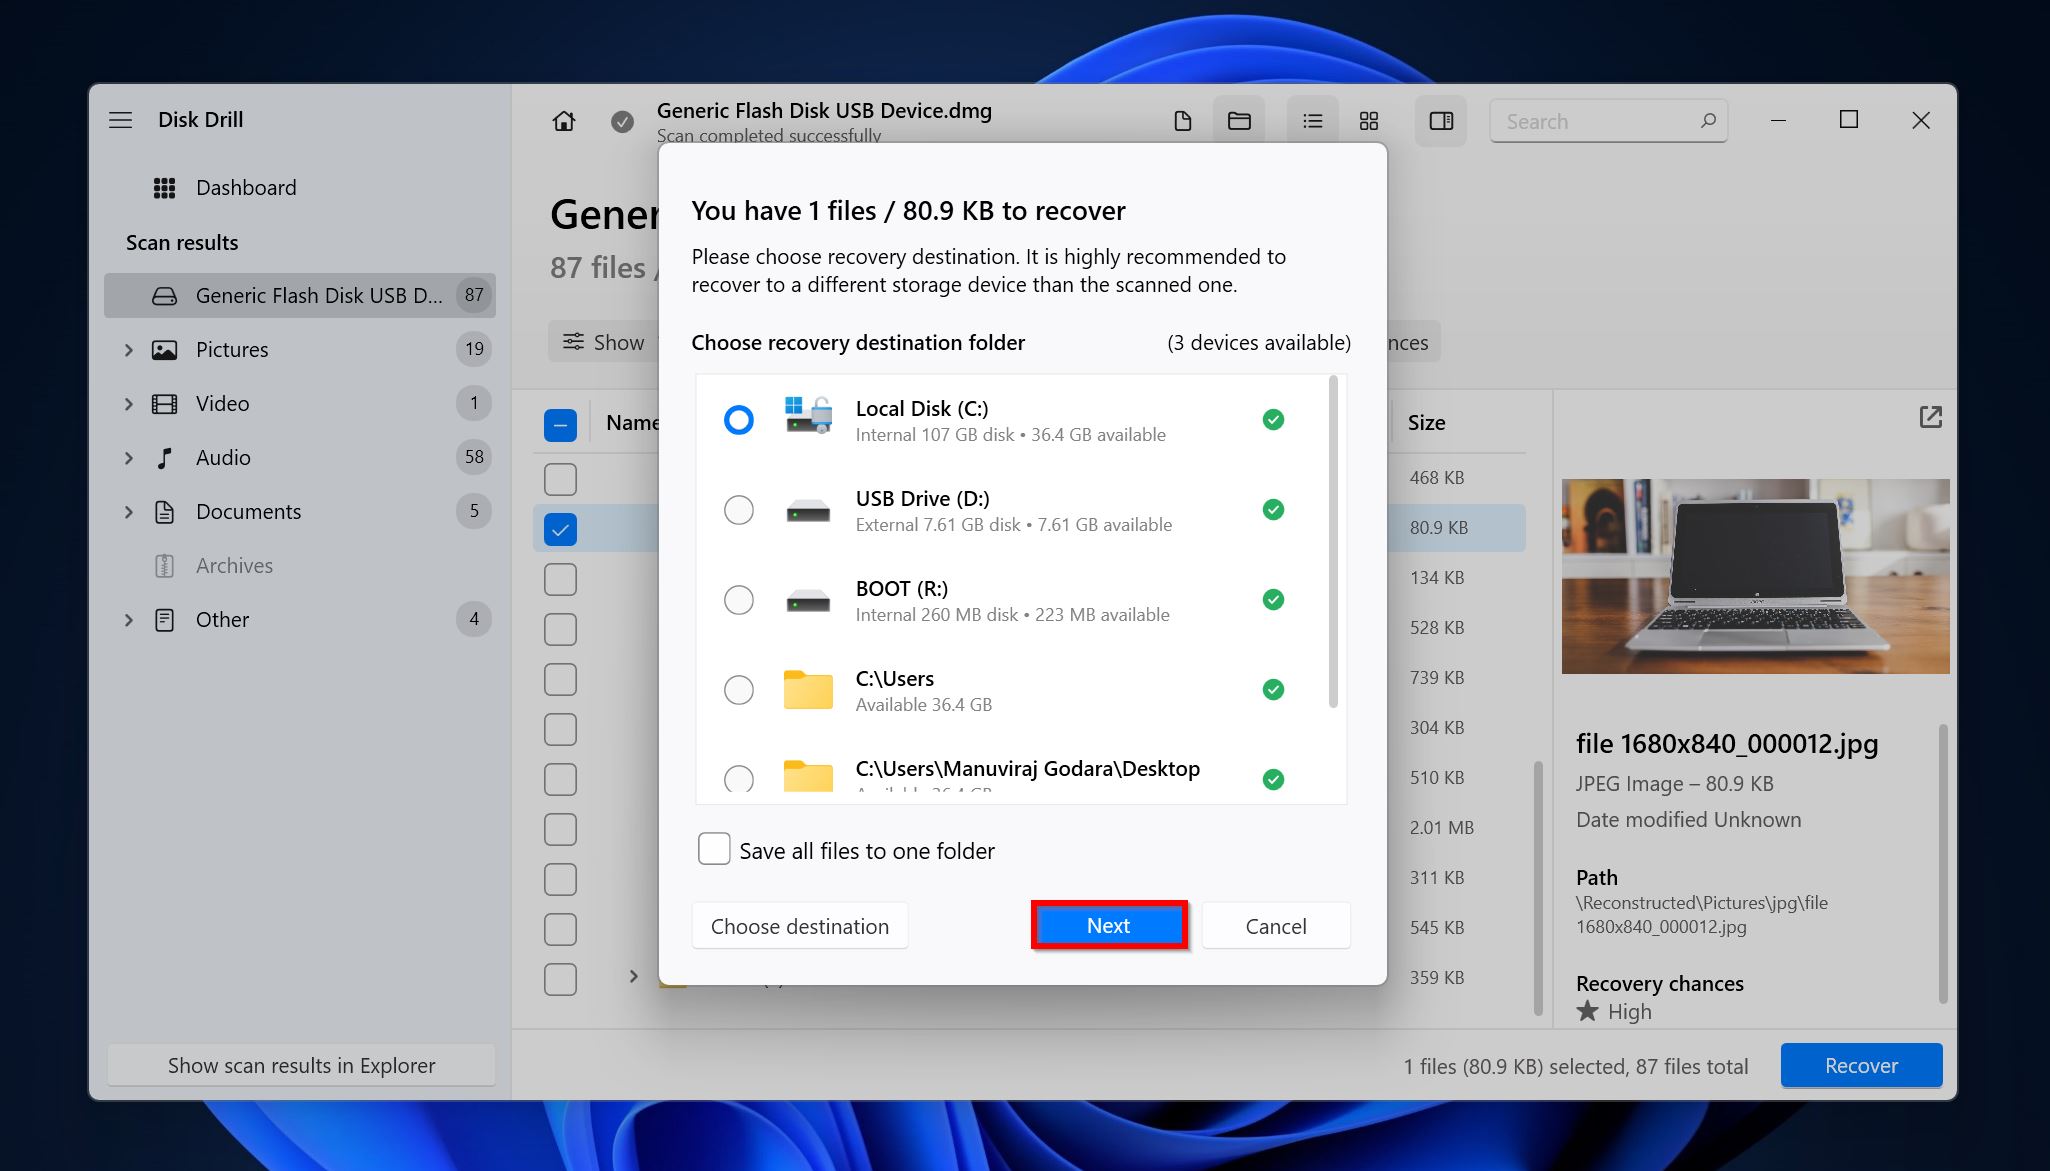
- Disk Drill will recover the selected files. As part of the program’s free trial, you can recover up to 500 MB of data for free (Windows only).
By following these steps, you’ll be able to ensure the safety of your data, before proceeding to fix the, “please insert a disk into USB drive” error.
How to Fix the “Please Insert a Disk Into USB Drive” Error
Depending on what caused it, there can be multiple ways to fix the please insert a disk into the removable disk issue. In case you were unable to figure out the exact reason for the error, we recommend you apply each fix in the order it is listed below.
Let’s get started.
Method 1: Eliminate Possible Physical Issues
The first thing you need to do is check the physical connection and the state of the pen drive/USB port. Ensure that the connection is not loose and the USB drive itself is not physically broken or bent. In the case of water or heat damage, the damage may not be that apparent.
Check the USB ports for signs of damage. If possible, connect the USB drive to a port that’s located on the motherboard, and not on the PC cabinet.
If you do observe that the pen drive is physically damaged, it’s best to take the help of an expert instead of attempting to fix the drive yourself.
Method 2: Run the Hardware and Devices Troubleshooter
The Hardware and Devices Troubleshooter in Windows can automatically detect and fix a range of hardware issues on your PC. It’s a good idea to run this tool before you proceed to more complicated fixes.
Here’s how to run the Hardware and Devices Troubleshooter and potentially fix the please insert a disk into the USB drive error:
- Search for “CMD” in Windows Search (Windows + S). Right-click on Command Prompt > Run as administrator.
- Type
msdt.exe -id DeviceDiagnosticin the console and press Enter.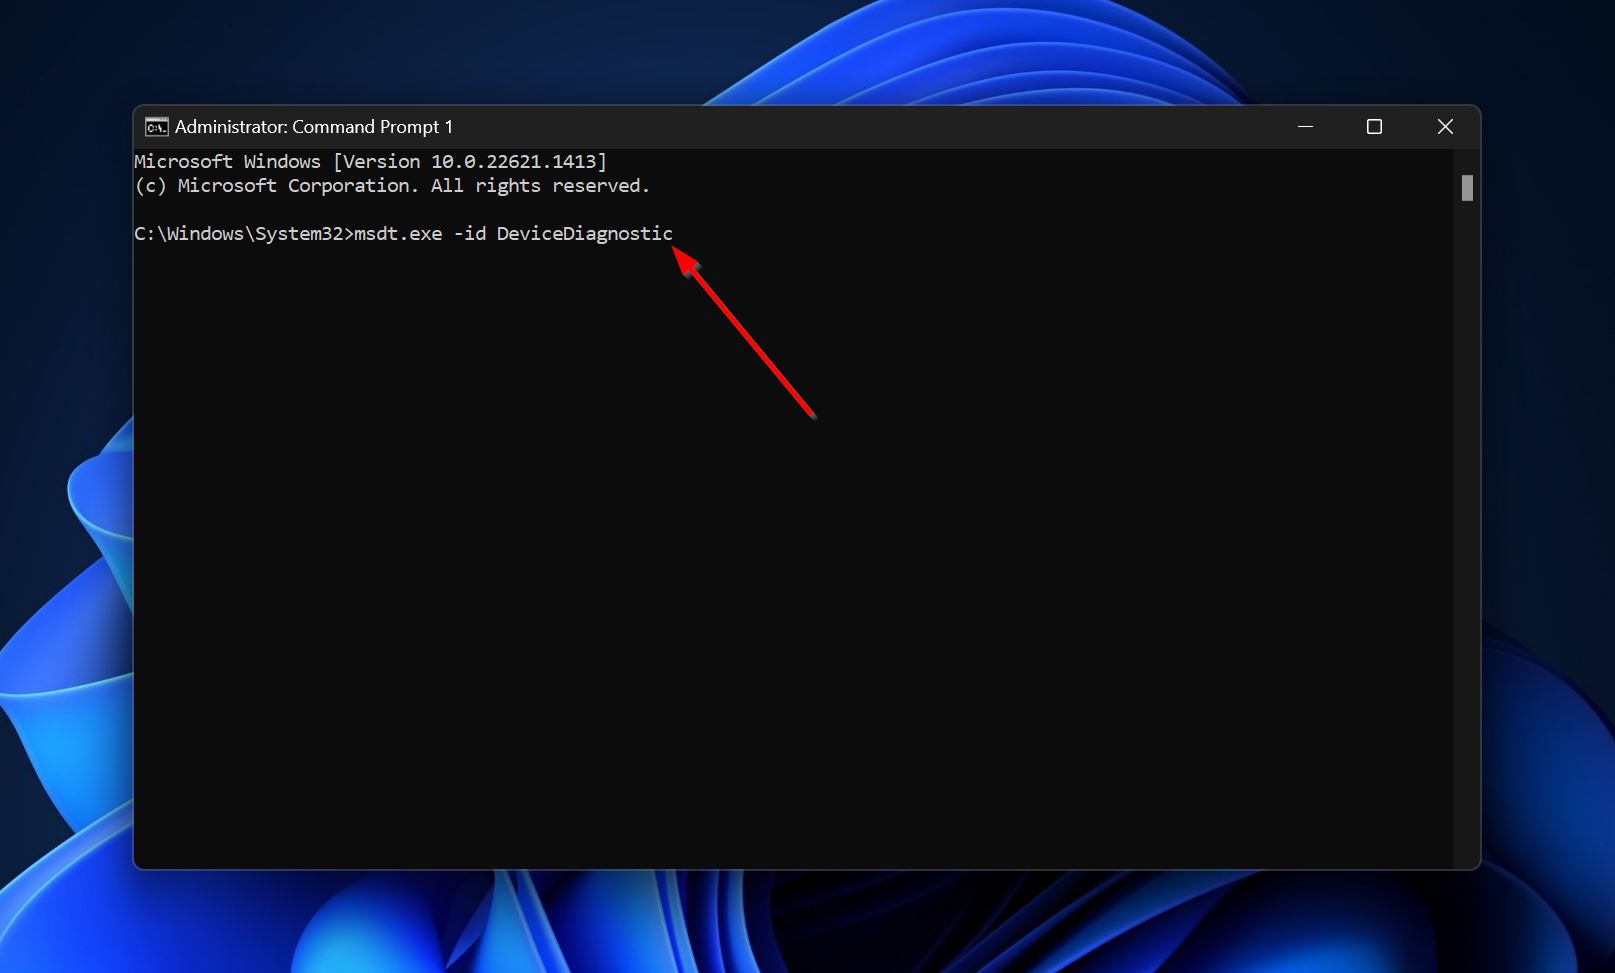
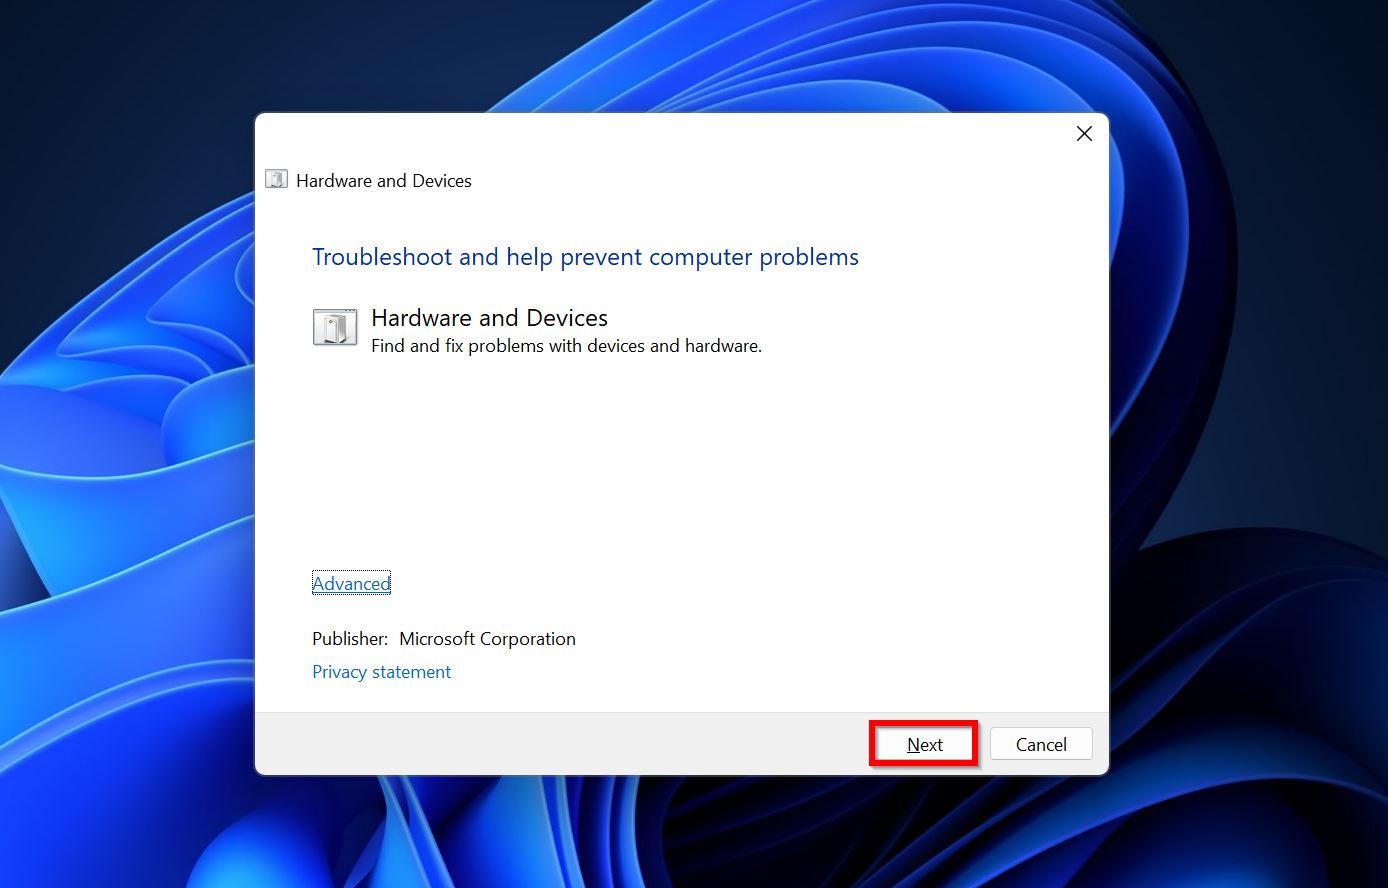
- Click Next on the Hardware and Devices Troubleshooter welcome screen.
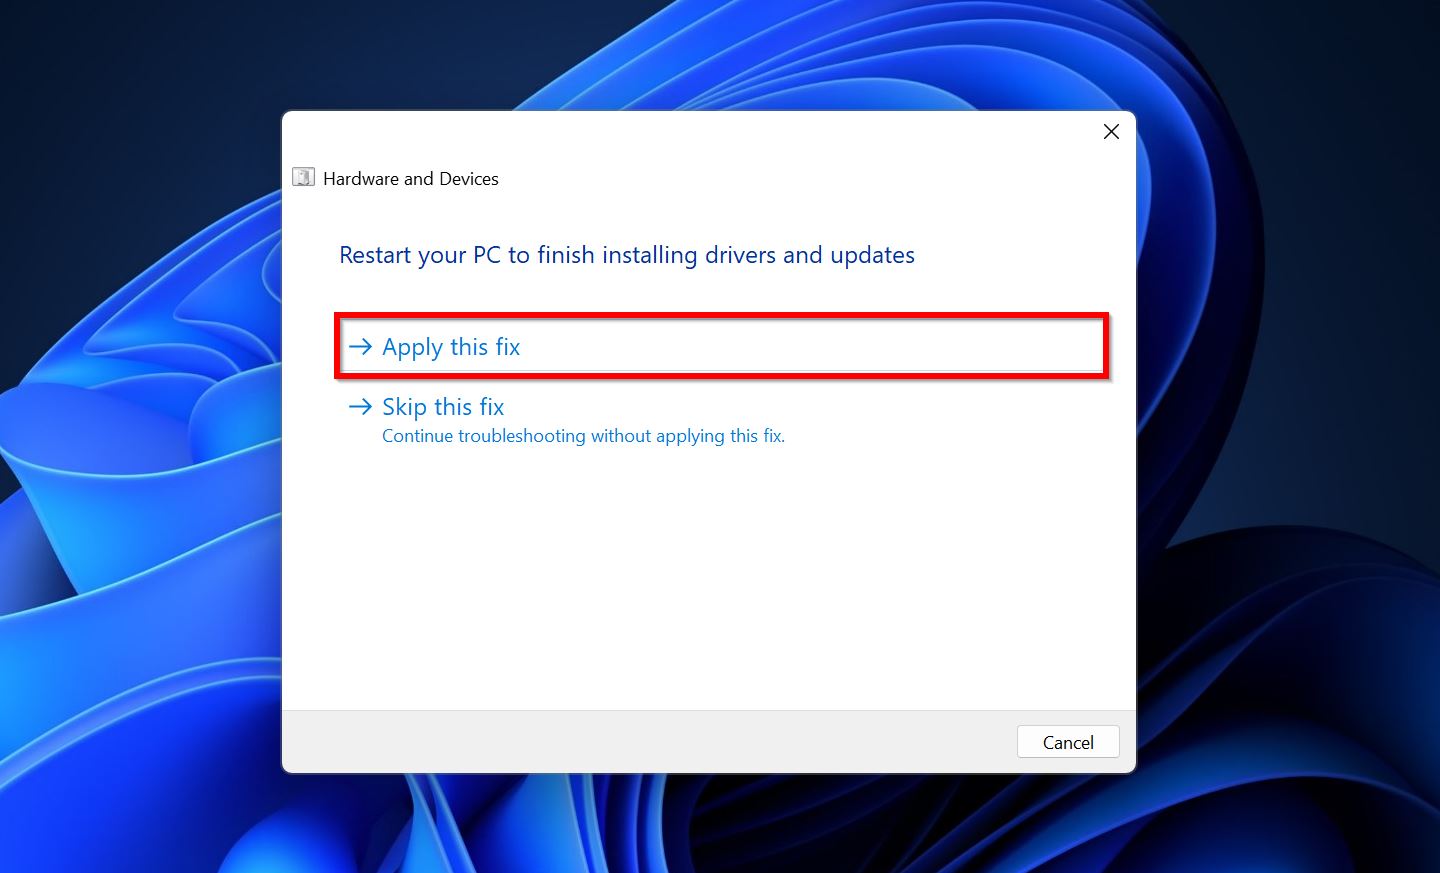
- Click on Apply this fix once the troubleshooter has finished running.
Method 3: Update the USB Drivers
Outdated drivers are a common reason behind USB drive-related errors. Typically, Windows updates the USB drivers when it updates the OS, but it’s still better to manually ensure that the drivers are updated.
To update the USB drivers and fix the insert a disk into the Removable Drive issue, you’ll need to use the Device Manager:
- Type “device manager” in Windows Search (Windows + S) and open the Device Manager.
- Expand the Disk Drives section, right-click on the USB drive and choose Update driver.
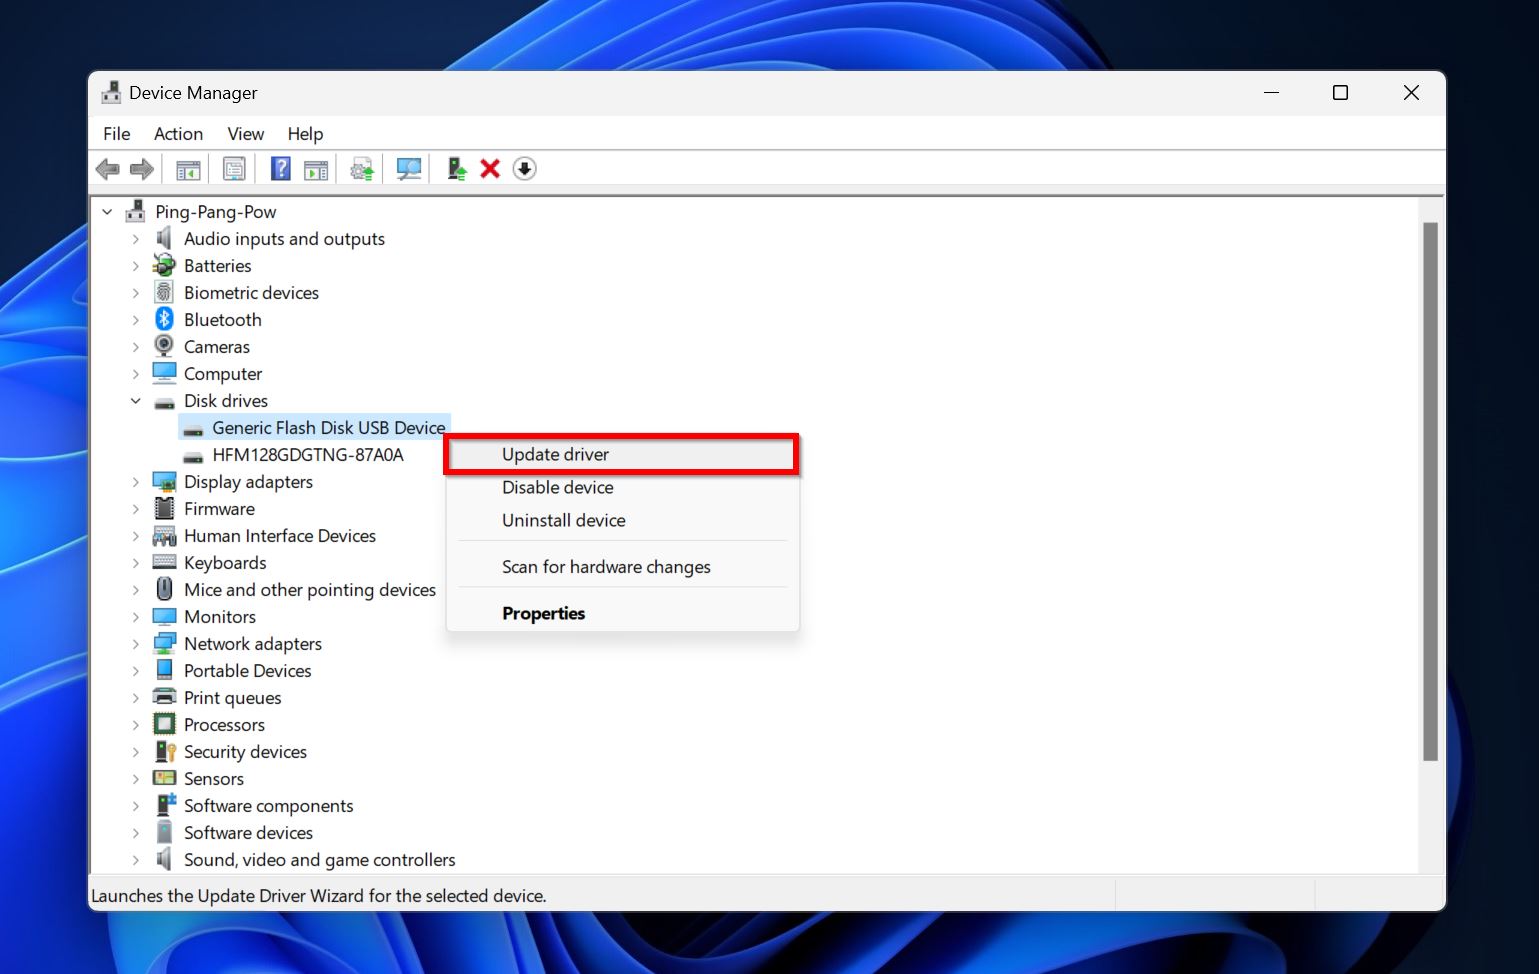
- Click on Search automatically for drivers.
- Expand the Universal Serial Bus controllers section, right-click on USB Mass Storage device and pick Update driver.
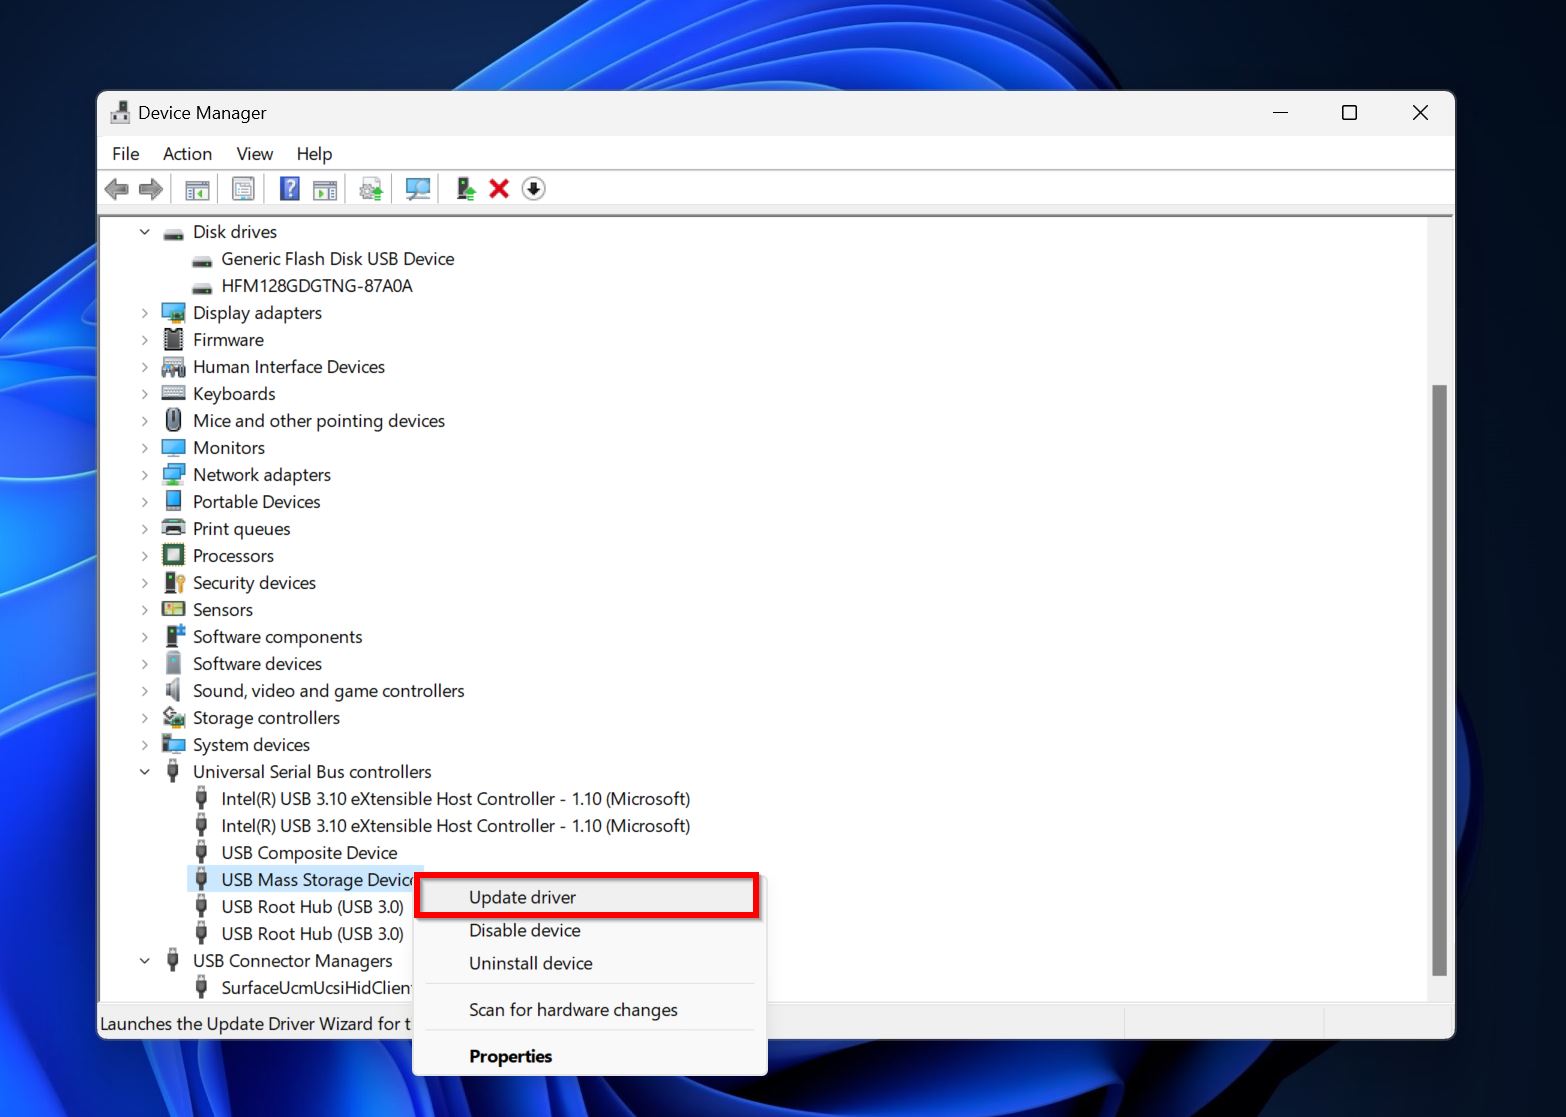
- Like before, click on Search automatically for drivers.
- Reboot your PC.
Method 4: Assign a Unique Drive Letter
For Windows to detect your USB drive, it needs to have a unique drive letter. If your USB drive says, “Please insert disk” when you try to access it, it may have a duplicate drive letter.
Fortunately, you can assign a drive letter to the USB drive in a few simple steps:
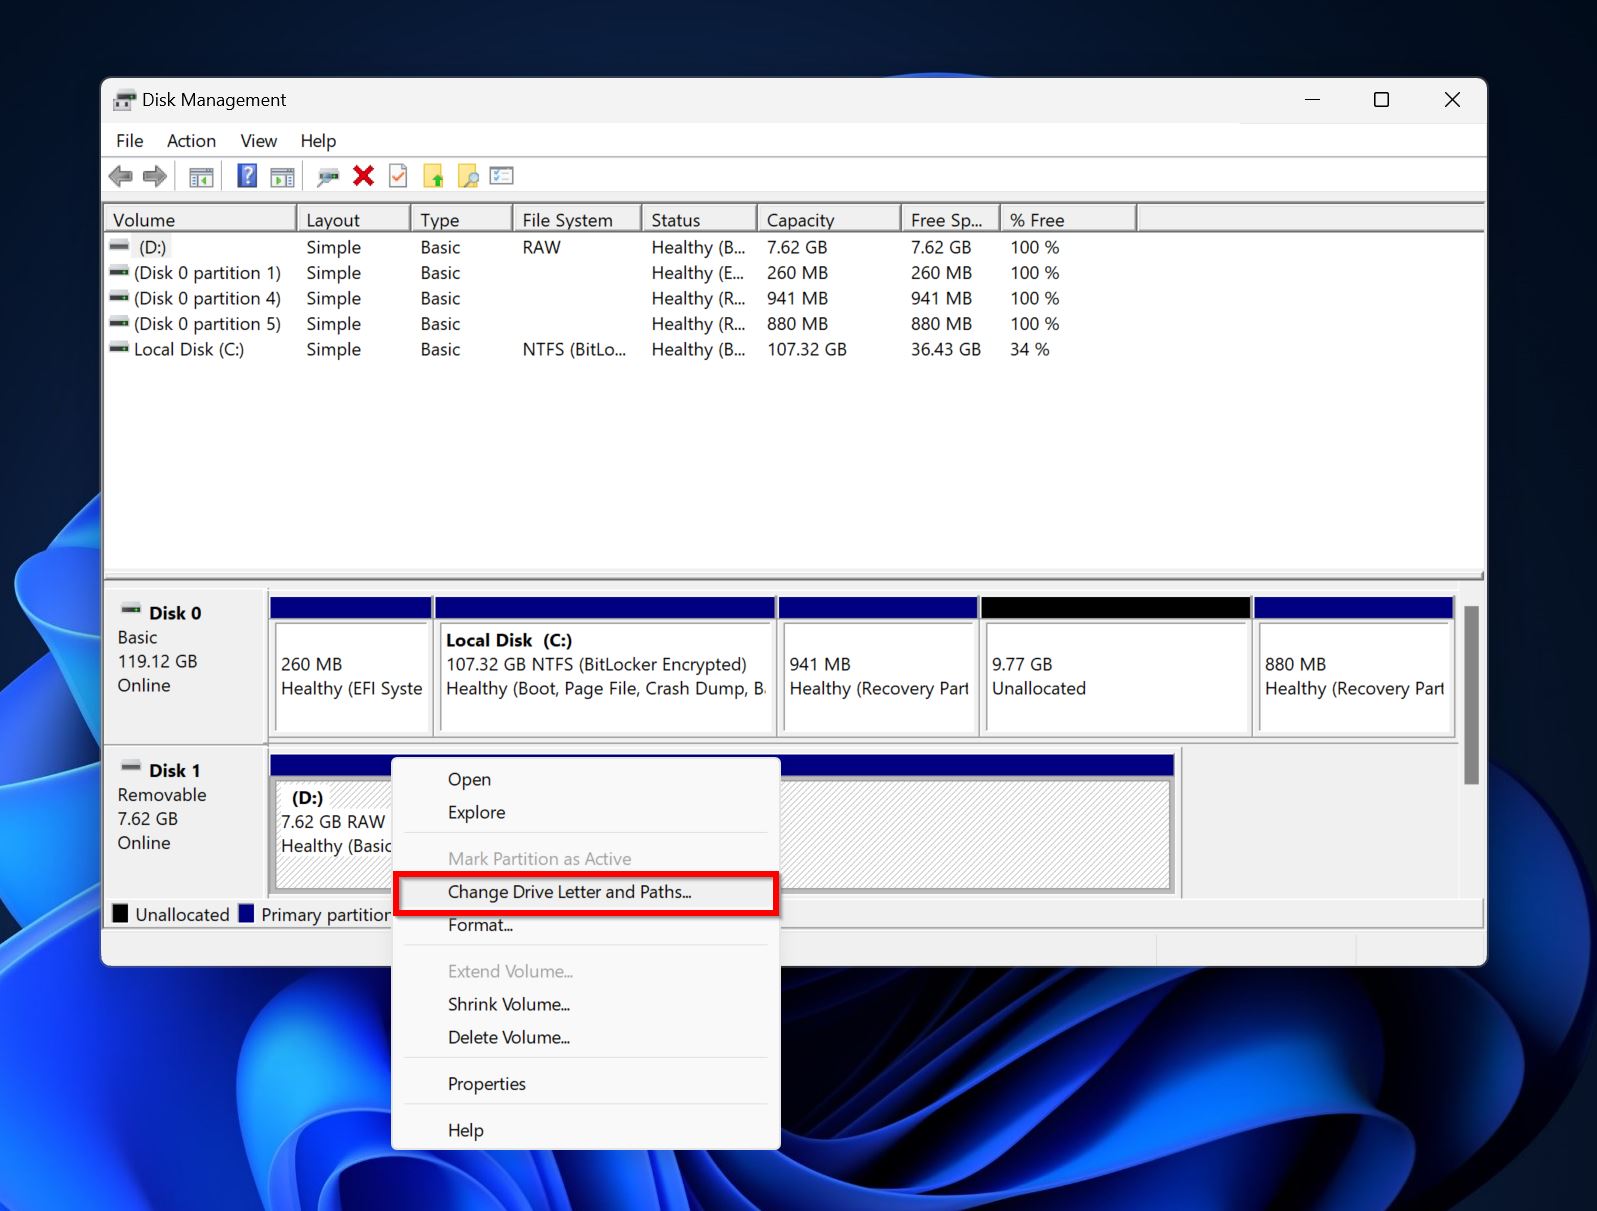
- Search for “disk management” in Windows Search (Windows + S). Click on Create and format hard disk partitions.
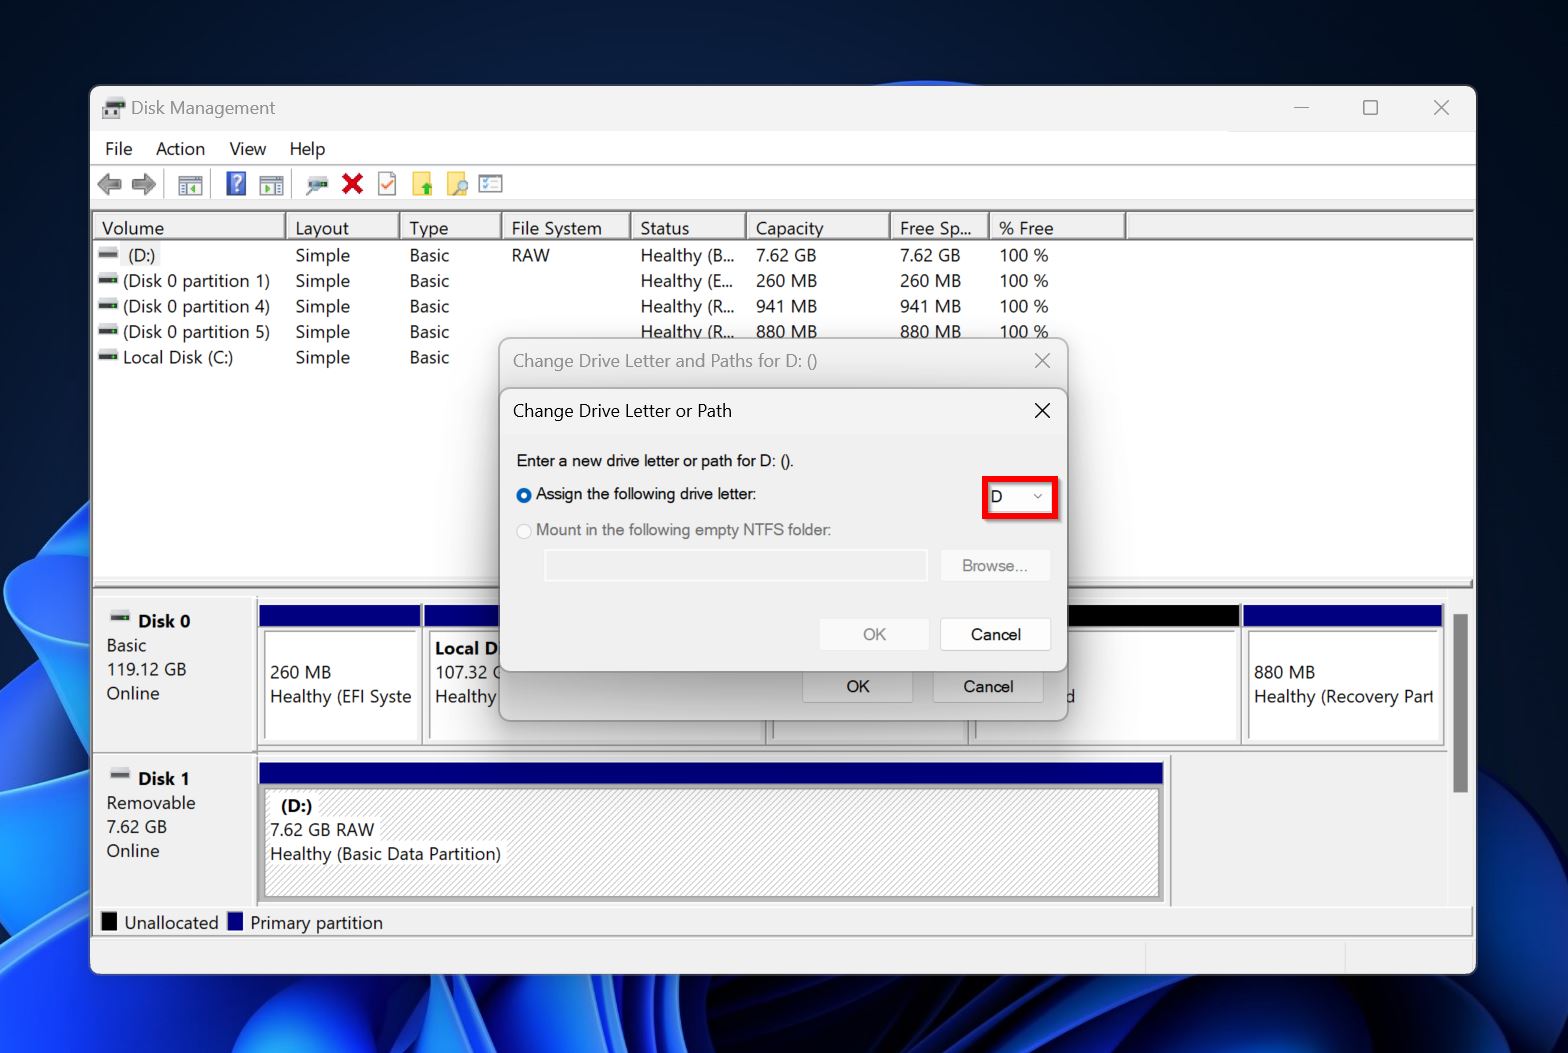
- Right-click on the USB drive and choose Change Drive Letter and Paths.
- Click on Change.
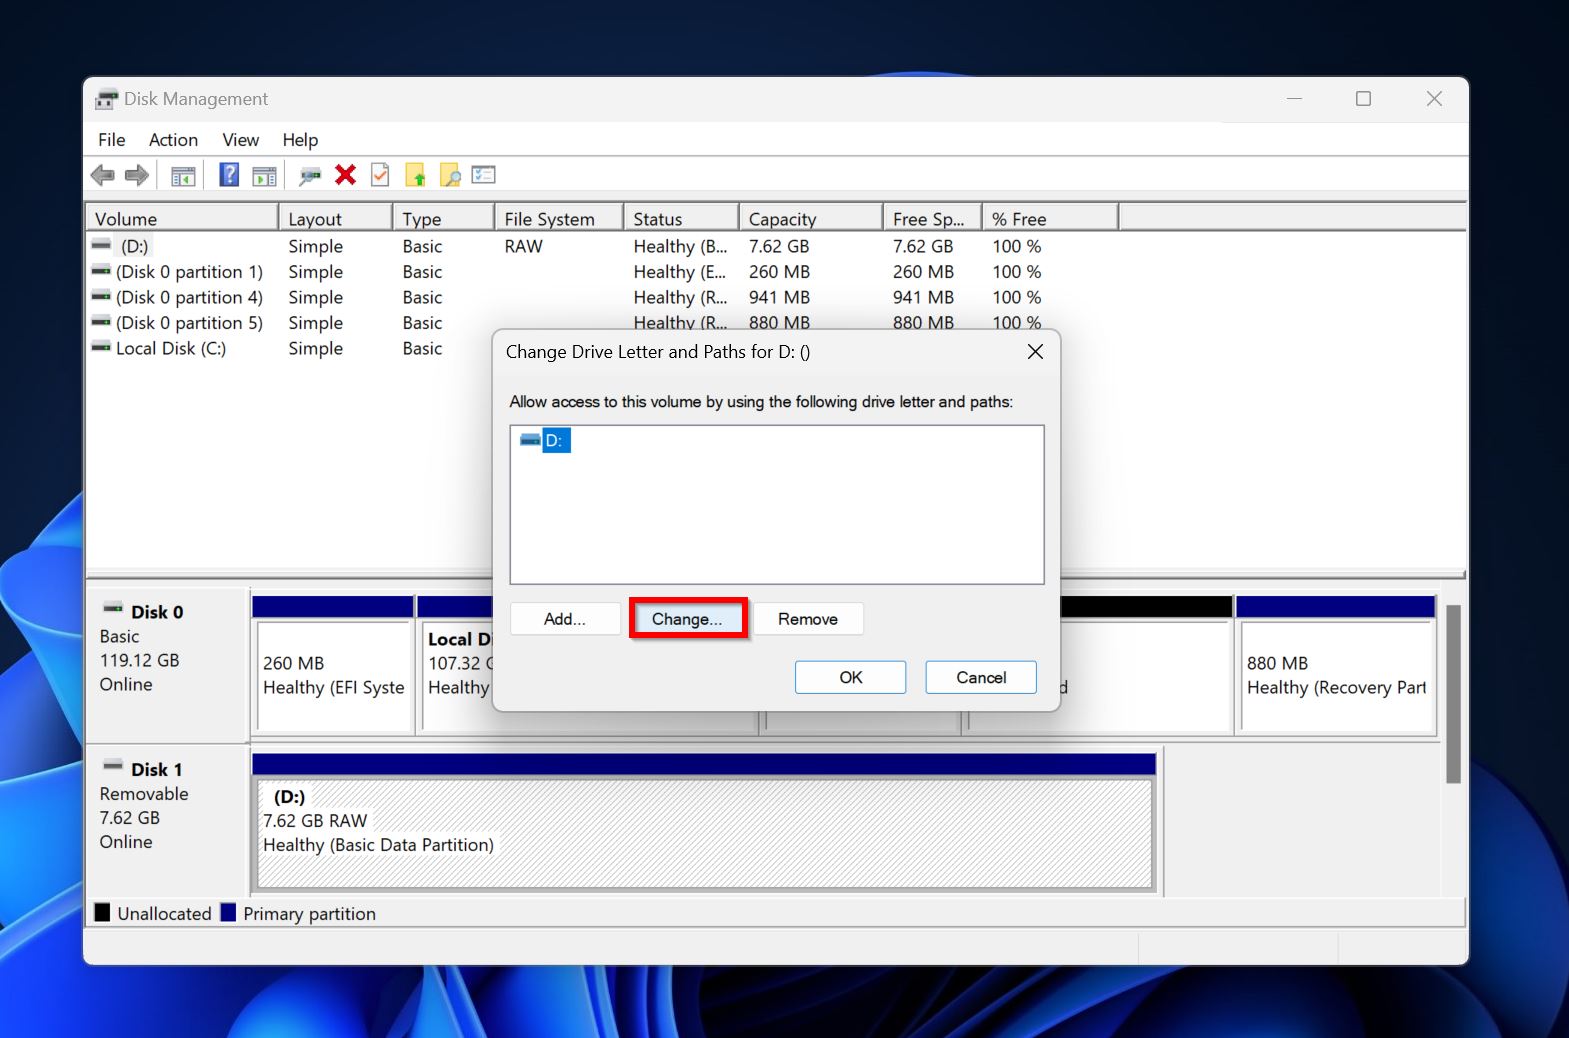
- Choose a new drive letter from the drop-down menu and click OK.
Method 5: Create a New Partition
USB drives that have unallocated space, will show the “please insert a disk into Removable Drive” message when you attempt to access them in Windows Explorer.
To fix this, you’ll need to partition the drive and make it fit for storing data. Here’s how:
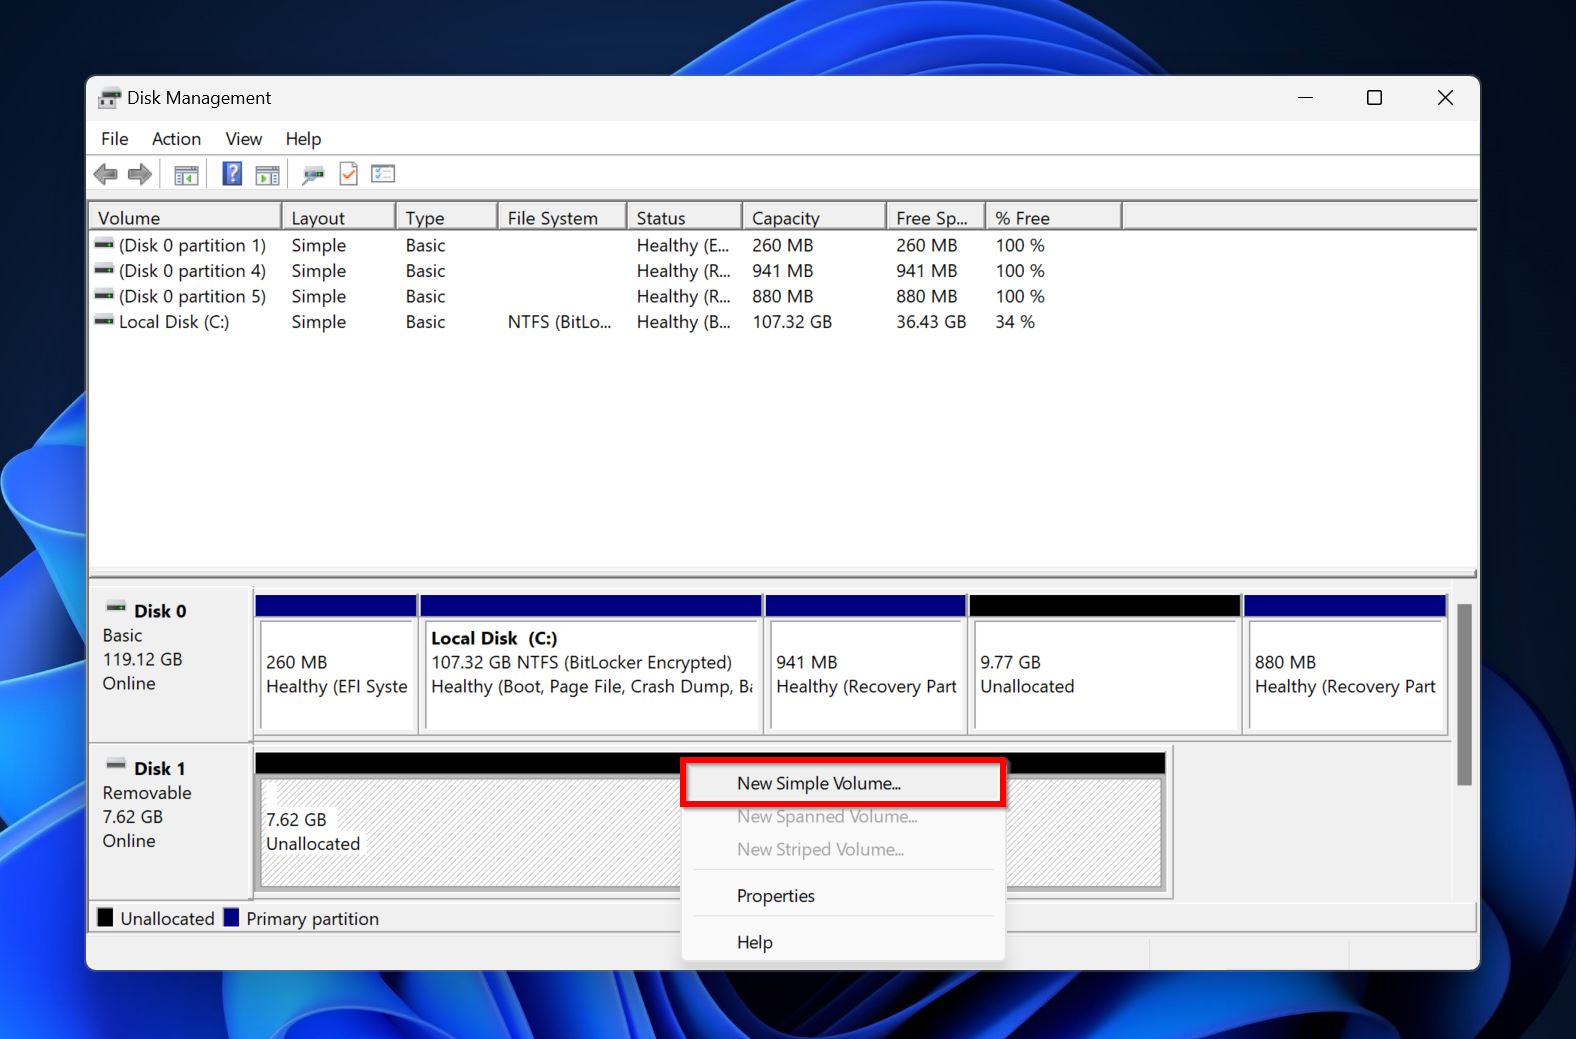
- Search for “disk management” in Windows Search (Windows + S) and click on Create and format hard disk partitions from the search results.
- Right-click on the USB drive with unallocated space and click New Simple Volume.
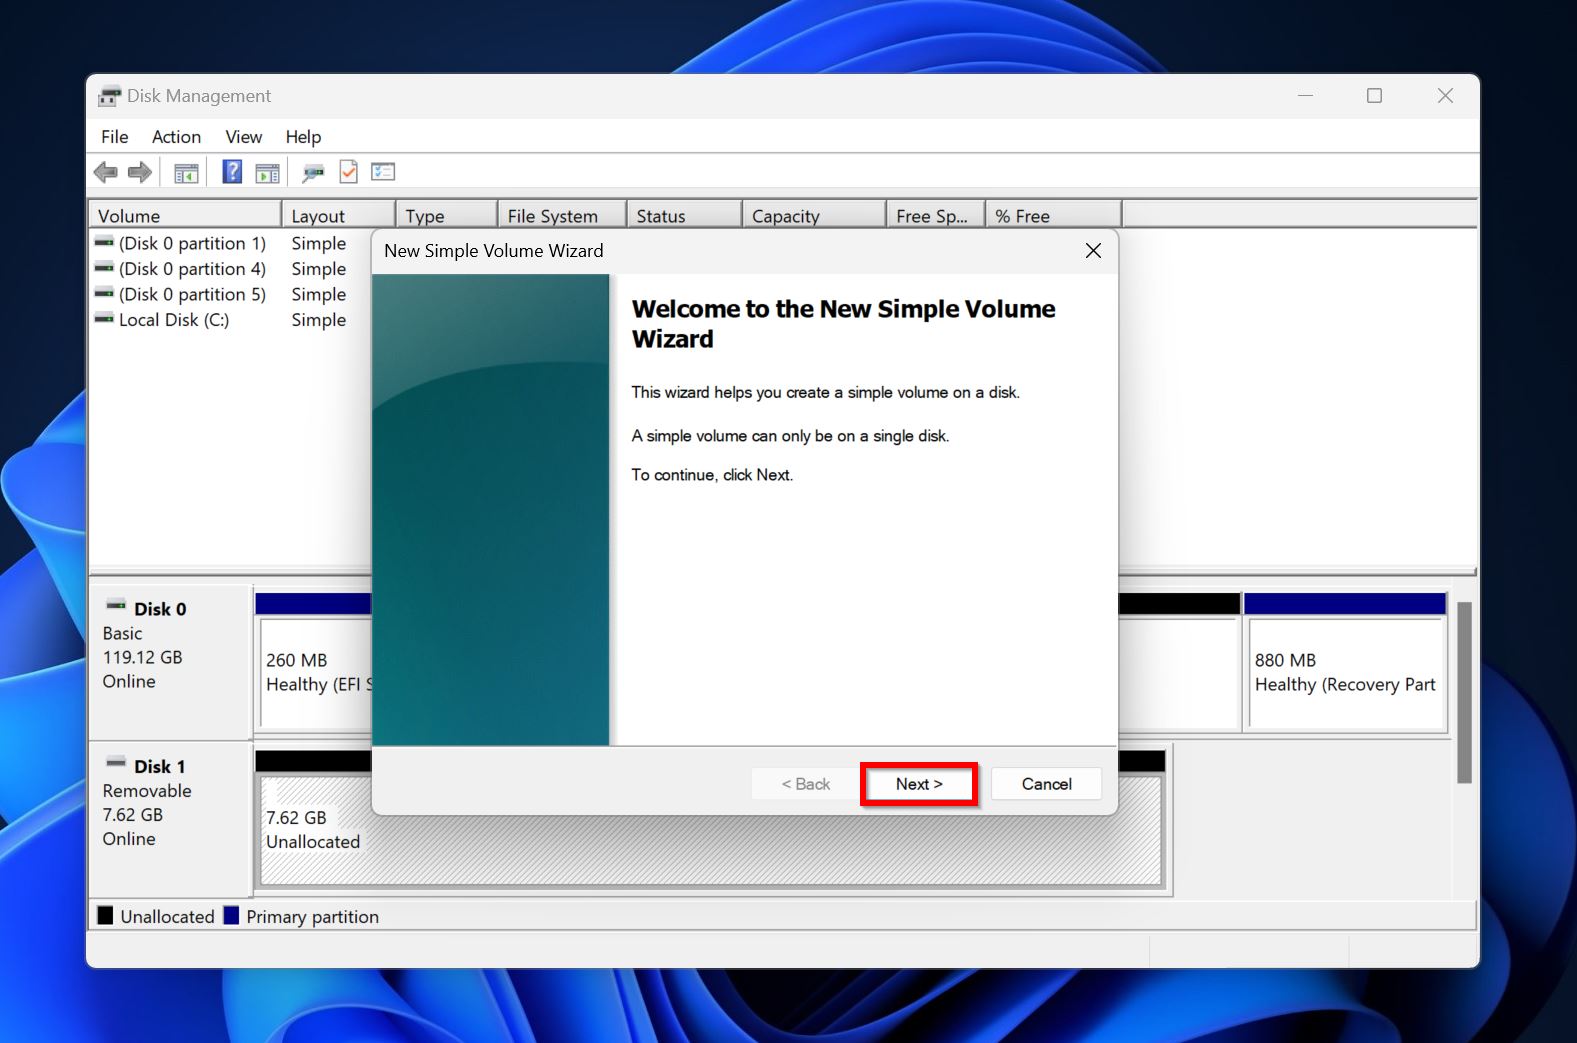
- Click Next on the New Simple Volume Wizard welcome screen.
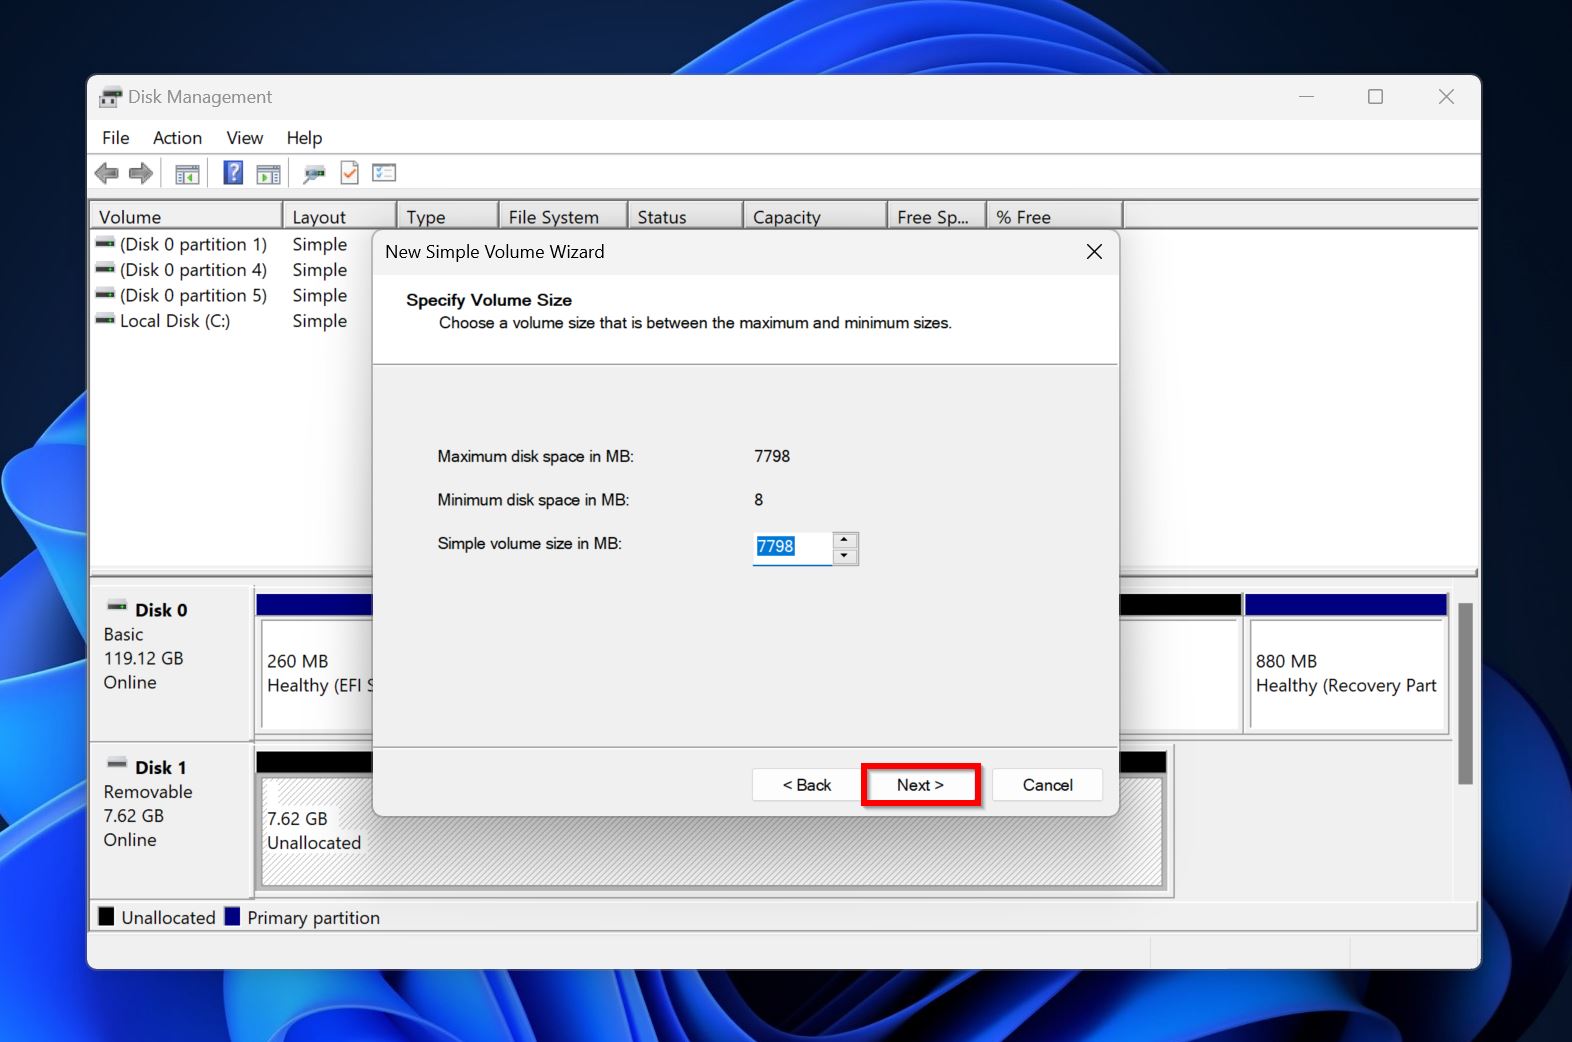
- Choose the Simple Volume Size on the next screen and click Next. It’s best to leave this option at its default value.
- Choose a drive letter from the drop-down menu and click Next.
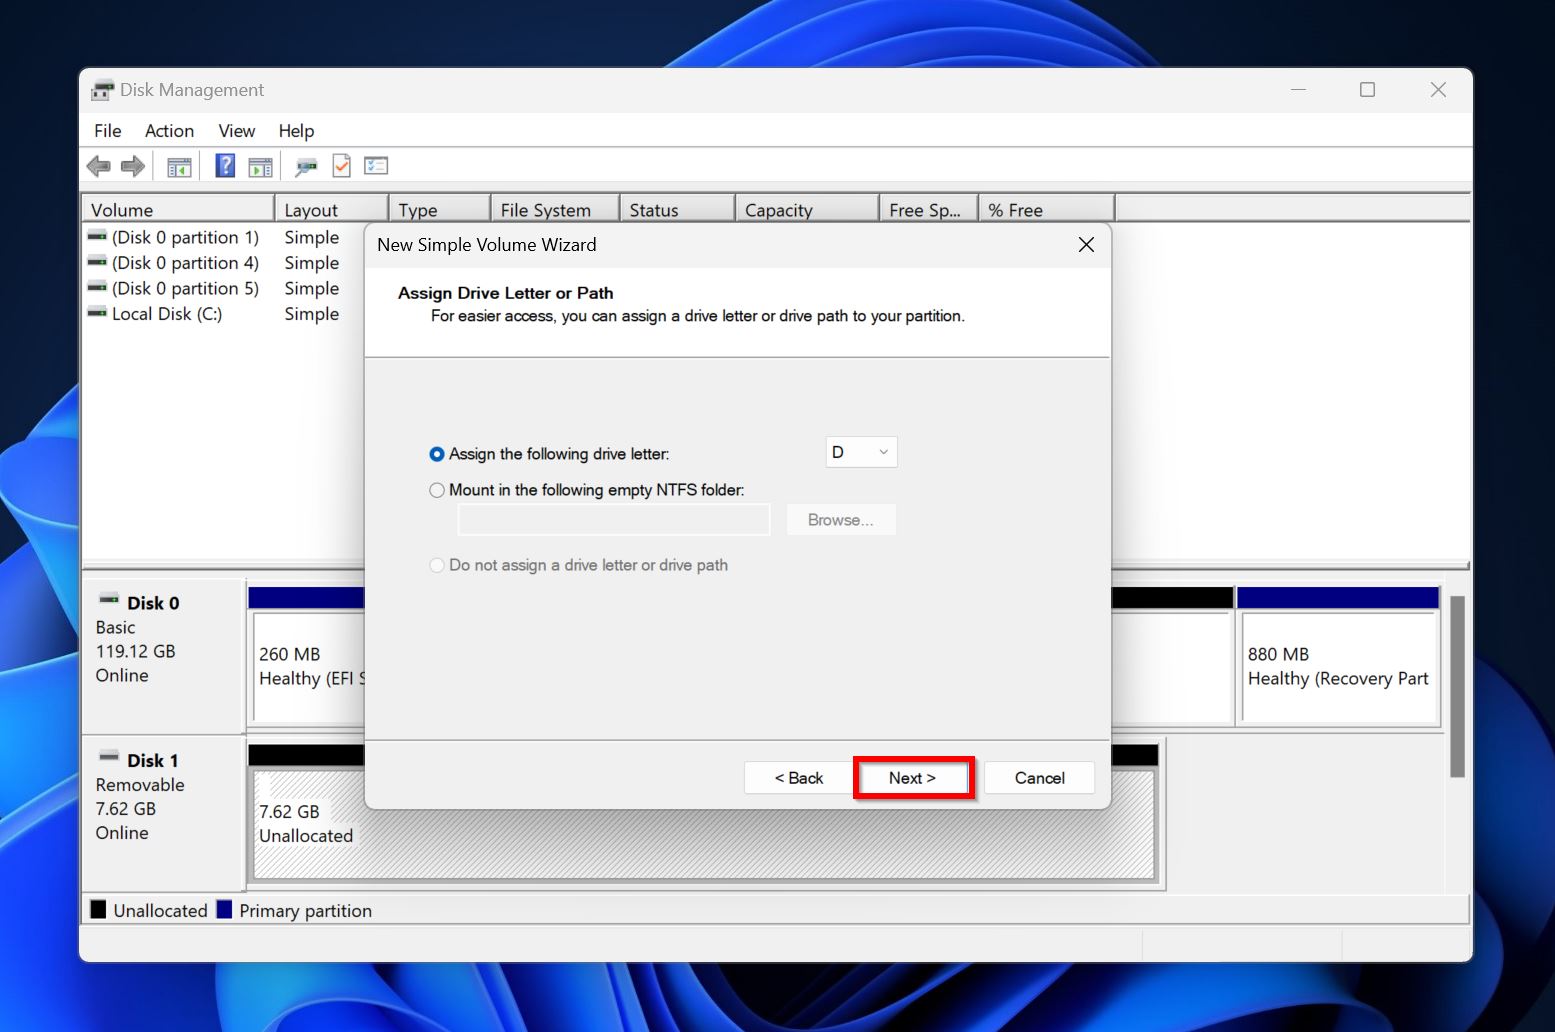
- Pick the format parameters according to your needs. You can leave the screen in its default state as well. Click Next.

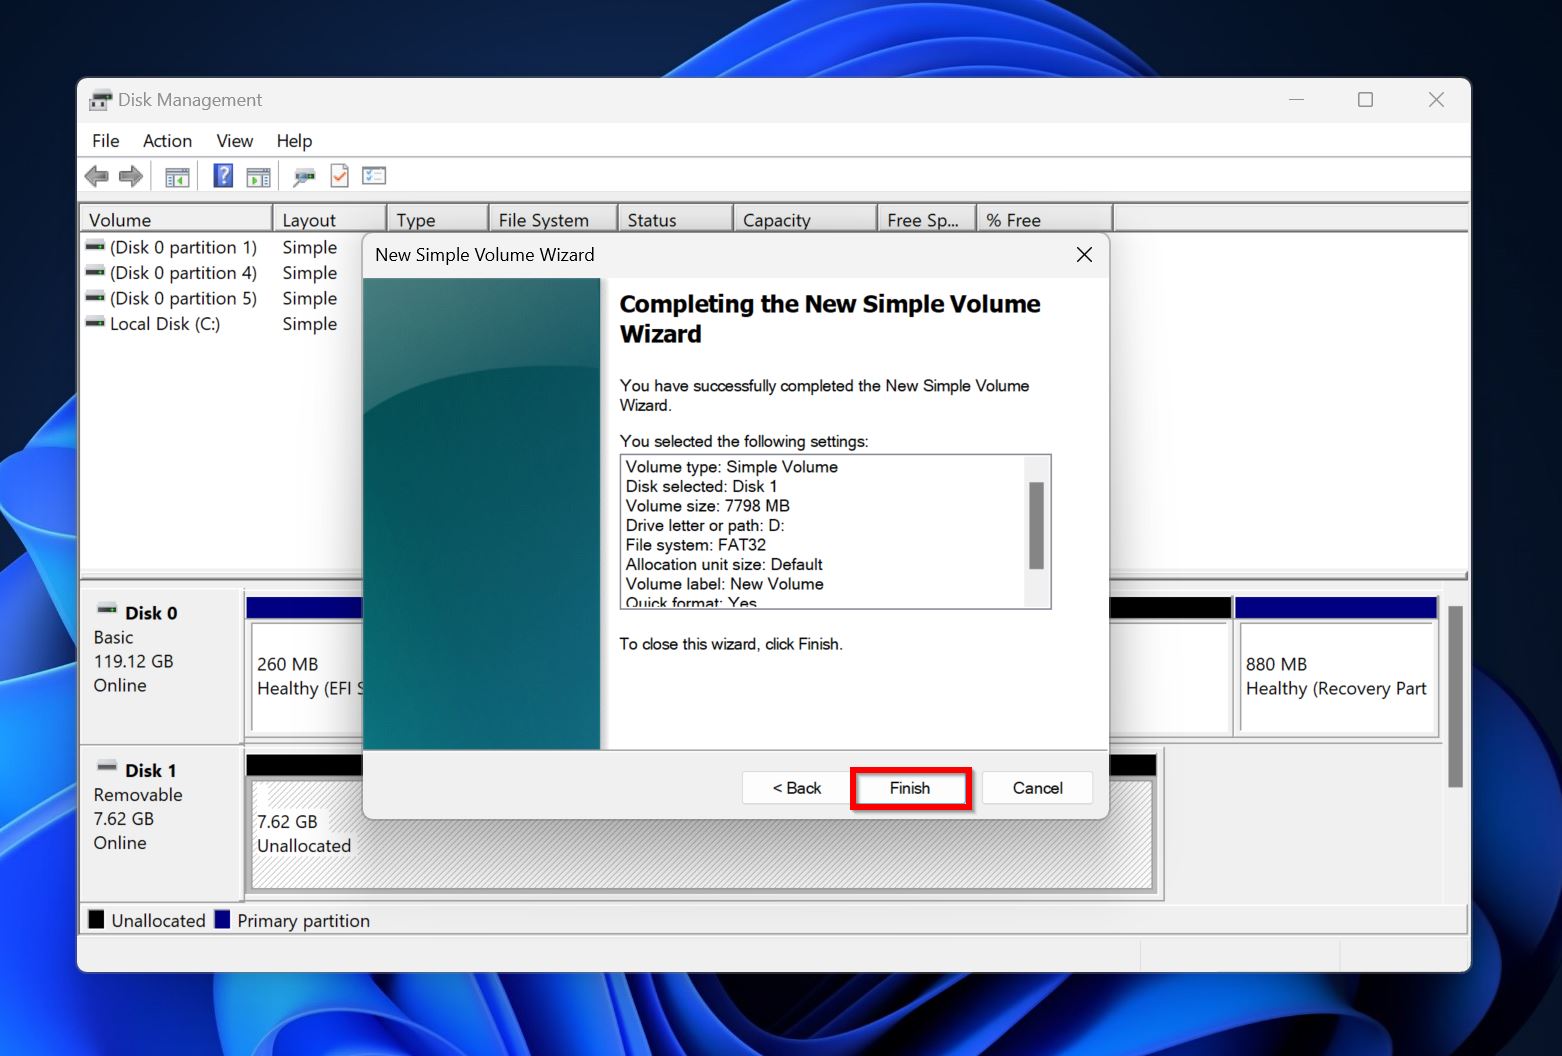
- Click on Finish.
Method 6: Format the USB Drive
When dealing with RAW partitions, you need to format the USB drive to resolve the please insert a disk into the USB drive error. There are two ways to do this–use Windows Disk Management, or the Diskpart utility.
We’ll take a look at both methods below:
Using Disk Management
- Search for “disk management” in Windows Search (Windows + S), and click on Create and format hard disk partitions.
- Right-click on the RAW USB drive and choose Format.
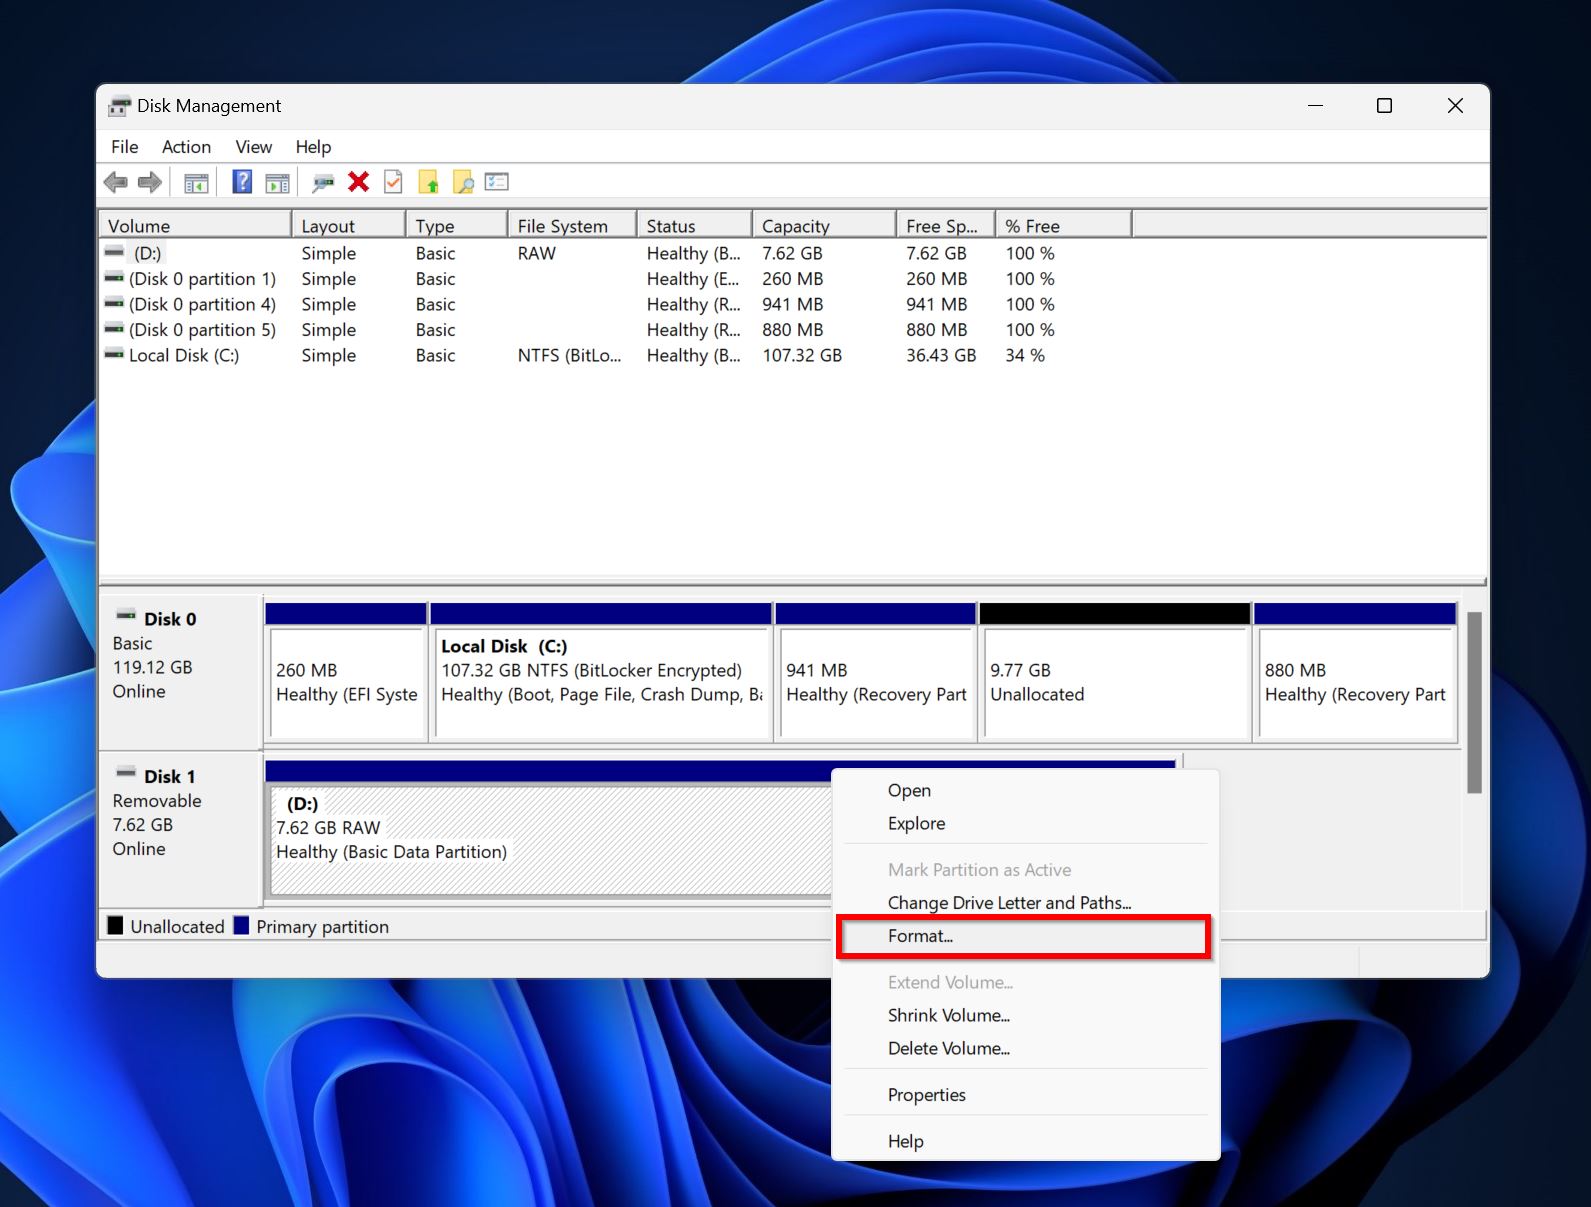
- Pick the format parameters such as File System and Volume Label. Click on OK.
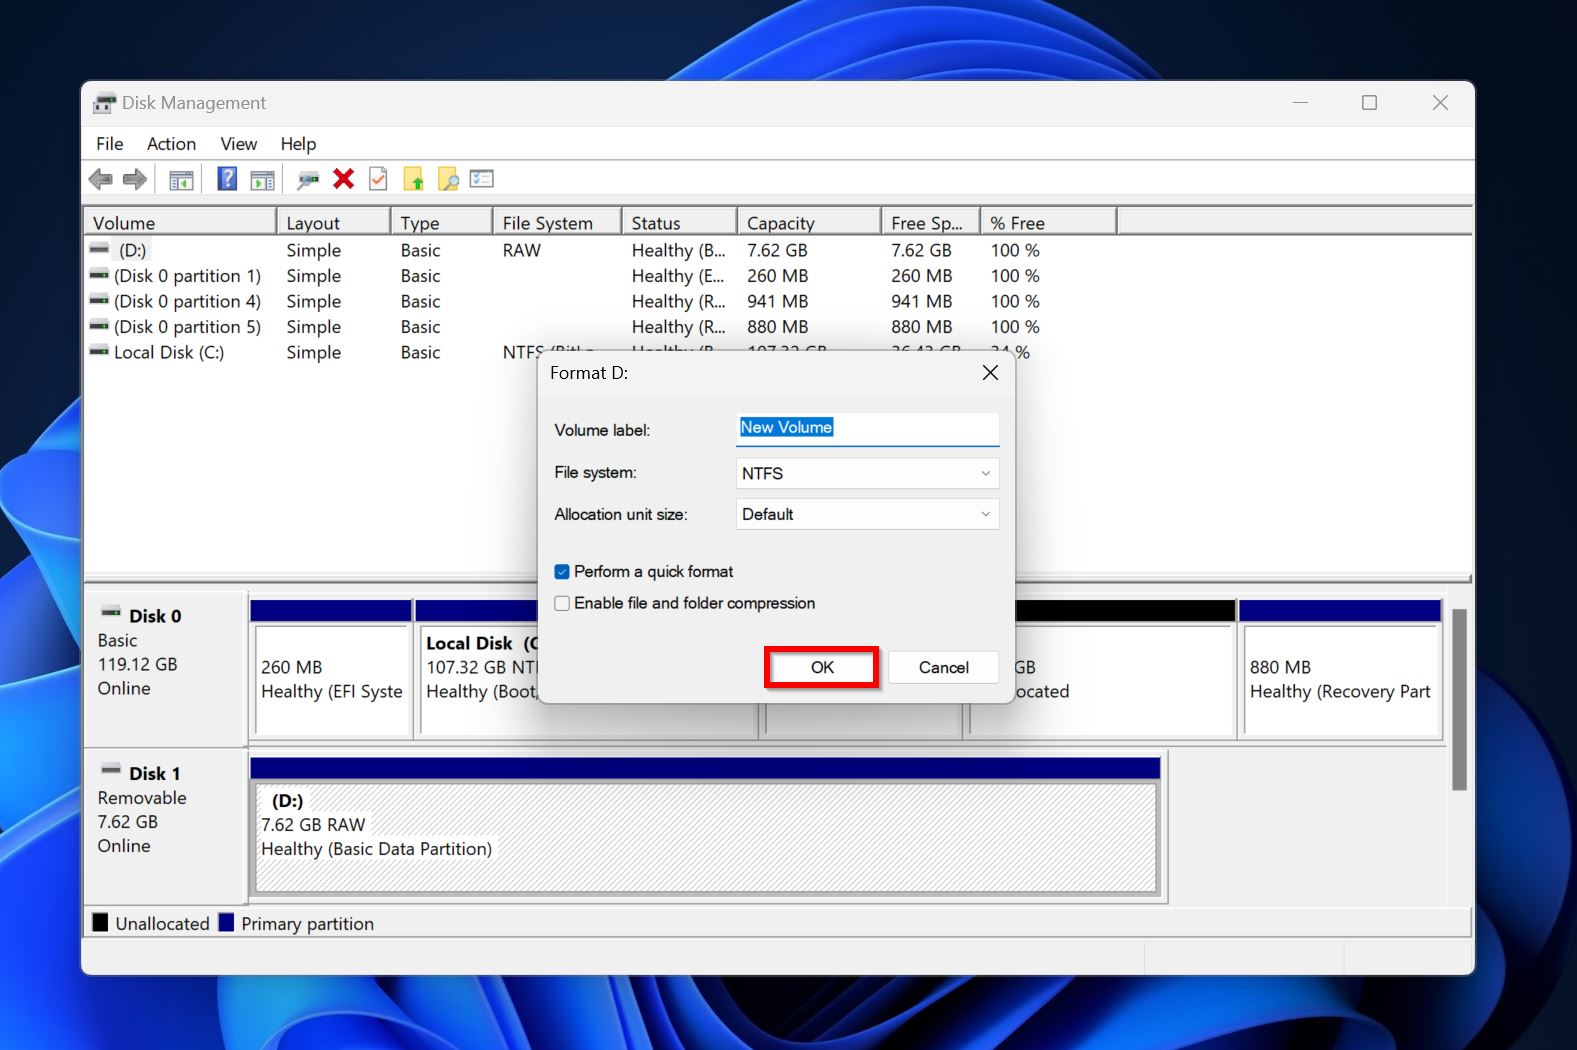
- Windows will format the drive.
Using the Diskpart Utility
- Search for “cmd” in Windows Search (Windows + S). Right-click on Command Prompt > Run as administrator.
- Type
diskpartin the console and press Enter.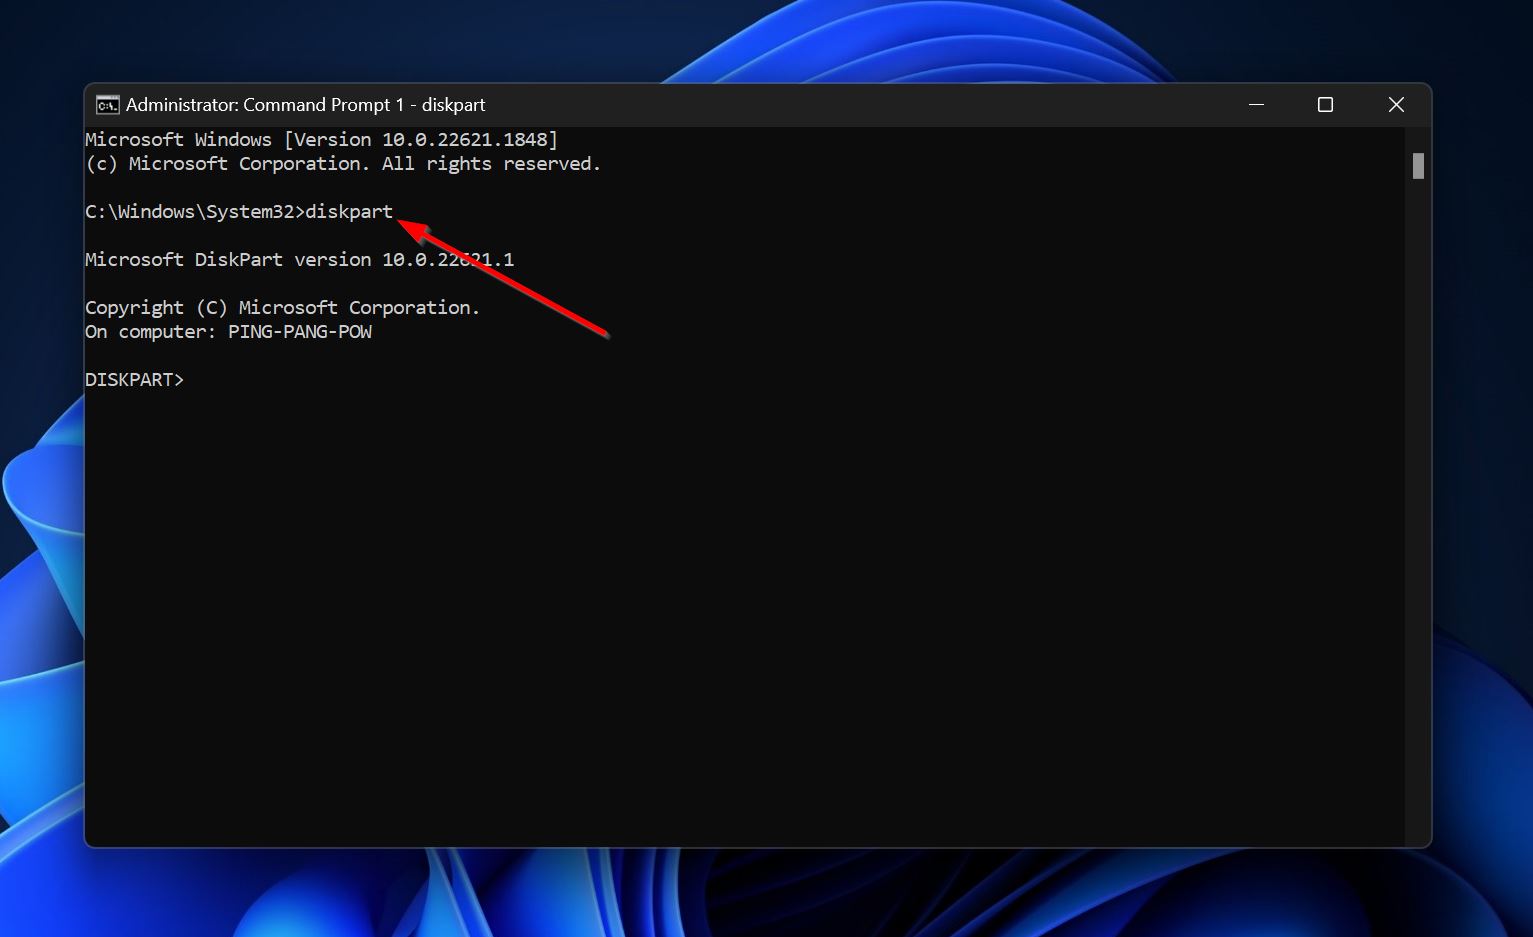
- Type
list diskand press Enter. - Type
select disk xand press Enter. Replace “x” with the number of the USB drive. In my case, it was Disk 1, so I typedselect disk 1.
- Type
list volumeand press Enter. - Determine which volume is the USB drive. It’ll have the RAW label under the “Fs” column. Type
select volume xand press Enter, replacing “x” with the volume number of the USB drive. In my case, it was Volume 4, hence–select volume 4.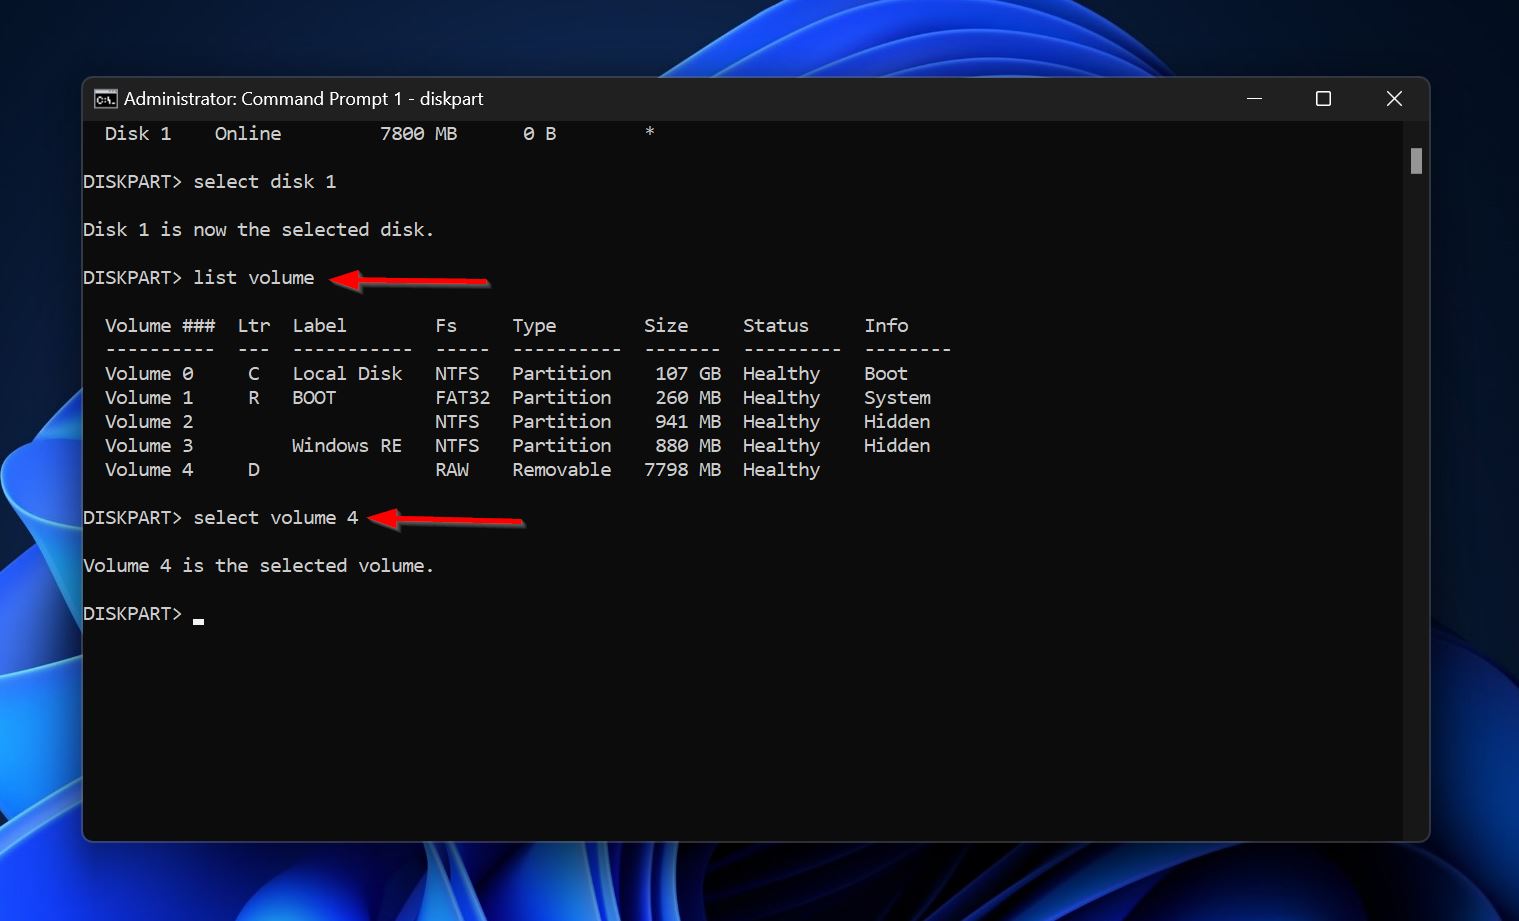
- Type
format fs=ntfs quickand press Enter. You can replace “ntfs” with a file system of your choice or let it be as it is.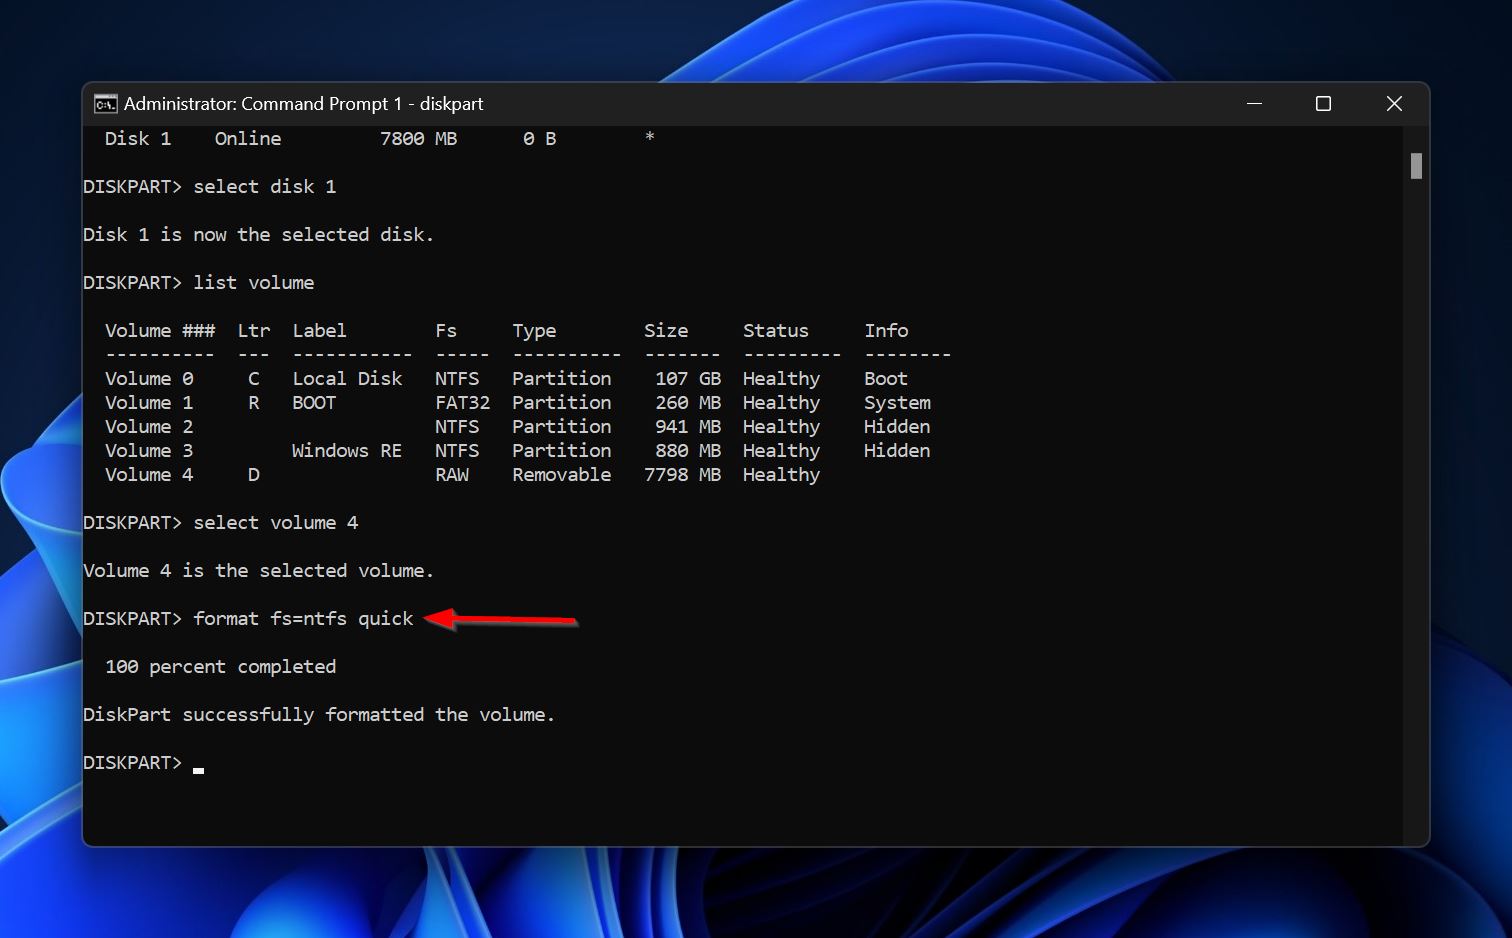
- Diskpart will format the drive.
Conclusion
The “Please insert a disk into Removable Drive” message usually doesn’t indicate any serious problems on the drive. But, it’s always best to back up important data to multiple drives and cloud services to ensure your data remains safe. It’s also best to handle your USB drive with care and eject it from the System Tray before physically disconnecting the drive.
FAQ
- Open Disk Management.
- Right-click on the USB drive and choose Format.
- Pick the format parameters and click OK.
- Open Disk Management.
- Right-click on the pen drive and click Format.
- Choose FAT32 from the File System drop-down menu and click OK.
- Download Disk Drill and install it.
- Open Disk Drill, select the USB drive, and click Search for lost data.
- Click Review found items.
- Select the files you wish to recover and click Recover.
- Pick a recovery destination for the files.


