For such commonly used portable storage devices, USB flash drives can be broken almost too easily, which is particularly disconcerting if you rely on them for storing important data.
In many cases, however, it’s possible to recover files from a broken flash drive using data recovery software, and the goal of this article is to guide you through the process and equip you with the information you need to achieve desired results.
Table of Contents
Why USB Flash Drives Stop Working?
There are several reasons why a working USB drive can become a dead USB drive. Understanding the issue is half the battle, and with that knowledge, you might stand a fighting chance at recovering your cherished data. It all depends on why the USB drive stopped working.
| Issue | Description | Recommendation |
| 🔨 Physical Damage | Flash drives are not nearly as durable as they may seem. Breakage can arise from simple things like a bent USB connector or grander foes like water and power surges. | Software solutions might not be the hero you need. If your drive isn’t recognized, it’s probably time to reach out to a data recovery service. They can often move the flash memory chip to a working drive. Recovery difficulty: High |
| 🖋️ Excessive Read and Write Cycles | All flash storage devices have a shelf-life. Over time, the inner workings (think: floating gate transistors) degrade, which can lead to data corruption, read/write errors, and even other similar problems. | The good news is that flash memory cell failure doesn’t immediately lead to data loss and drive failure because modern flash drives are smart enough to detect bad memory cells and avoid them, giving you enough time to back up and/or recover your data. Recovery difficulty: Medium |
| 🦠 Viruses and Malware | Malware creators are well aware that a single USB flash drive is often shared between many computers and users, which is why there are so many viruses and other types of malware that target flash drives. | Because malware can behave highly unpredictably, it’s difficult to recommend a single universally applicable way how to recover files from a flash drive that has been infected with malware, but creating a complete byte-to-byte backup is usually a good start. Recovery difficulty: Medium |
Is it Possible to Recover Data from Damaged Flash Drive?
Let’s address the burning question: Can you really recover data from a damaged flash drive? The answer depends largely on whether your USB drive is recognized or not. Let’s explore both of these scenarios in greater detail:
Scenario 1: The USB drive is recognized
Your computer plays a pleasant sound (or sometimes not-so-pleasant, depending on how you’ve customized your settings) when you plug in your flash drive, indicating that it has successfully recognized your USB drive.
If this is the scenario you’re currently dealing with, then you’re in luck because when your PC recognizes your drive, even if it’s begging you with that “format your drive” pop-up window to take action, you can almost always use data recovery software to retrieve your data. Just make sure to cancel the format prompt first.
Scenario 2: The USB drive is NOT recognized
Now, if your PC doesn’t recognize the drive at all, the situation gets much more complicated and much less optimistic. That’s because it may be more than just superficial damage. The underlying issues could range from a damaged USB connector, a malfunctioning circuit board, or worse, damage to the flash memory chip itself.
Common software solutions usually won’t help here since they require the drive to be recognized by the computer in the first place. Well, at least they won’t help until the underlying issue is fixed, and that’s usually something only specialized data recovery services can do.
How to Recover Data from a Broken Flash Drive?
With the right data recovery software, broken flash drive data recovery is not only possible but also relatively straightforward. Here’s how to perform it on Windows and Mac.
Use Data Recovery Software to Get Back Your Files
The job of data recovery software is to analyze flash memory sector-by-sector to locate and recover all deleted and lost files. Such software is available for both Windows and Mac, but not all data recovery applications perform equally well.
When recovering files from a USB flash drive, you need to select data recovery software with excellent support for all file systems in the FAT family (exFAT, FAT32, FAT16, FAT12). The software should also support all commonly used file formats and be intuitive and affordable.
Disk Drill meets all these criteria, which is why we recommend it to all Windows and Mac users, regardless of how much previous experience with broken USB stick data recovery they have.
Good to know: Disk Drill for Windows and Disk Drill for Mac are virtually identical, so you can follow the steps below regardless of which version you download.
Step 1. Download and Install Disk Drill
 First, download Disk Drill for Windows or Disk Drill for Mac and install it on your computer. You can download the basic version for free and use it to recover up to 500 MB of data (Windows only).
Step 2. Connect Your USB Flash Drive and Launch Disk Drill
Next, connect the USB flash drive to your computer and wait until it’s recognized. Then, launch Disk Drill and give it a few seconds to detect all available storage devices.
Step 3. Create a Byte-to-Byte Backup of your USB Flash Drive
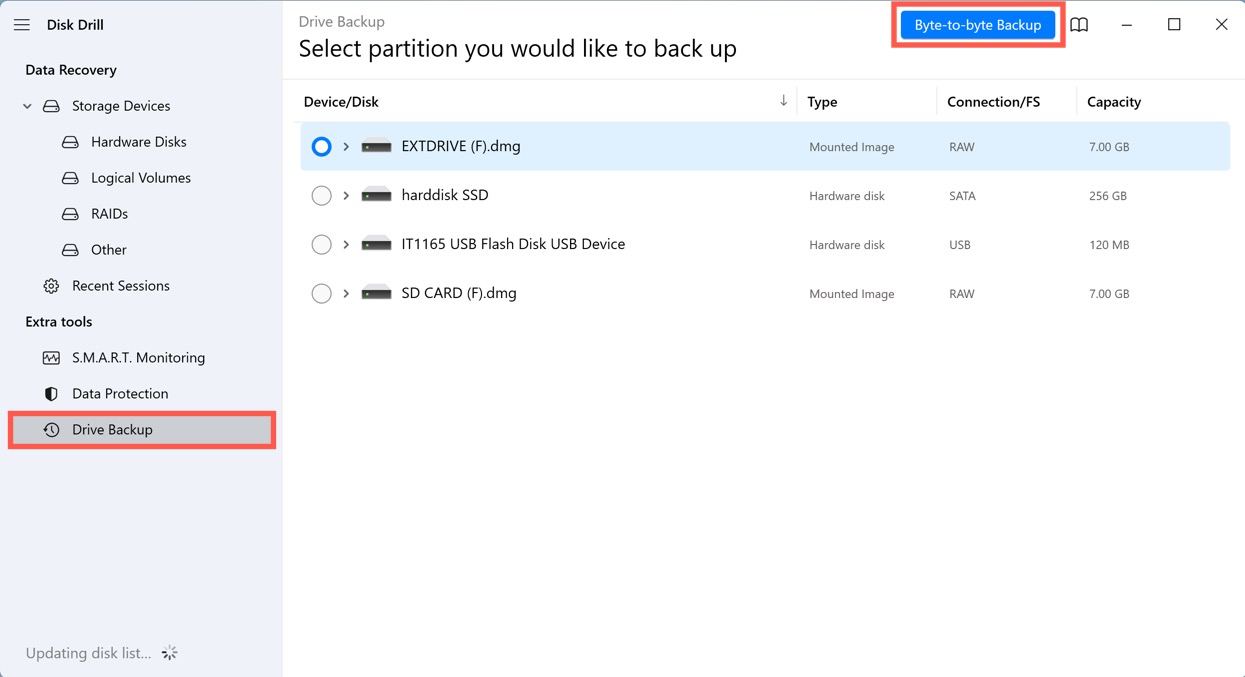
Before you dive into the actual recovery process, it’s essential to create a byte-to-byte backup of your flash drive to ensure you have a fallback option in case your broken USB flash drives decides to die suddenly. To do that, choose the Drive Backup extra tool, select your drive, and click the Byte-to-byte Backup button. Then, pick where you want to store the backup file.
Step 4. Scan the USB Flash Drive and Select Your Data
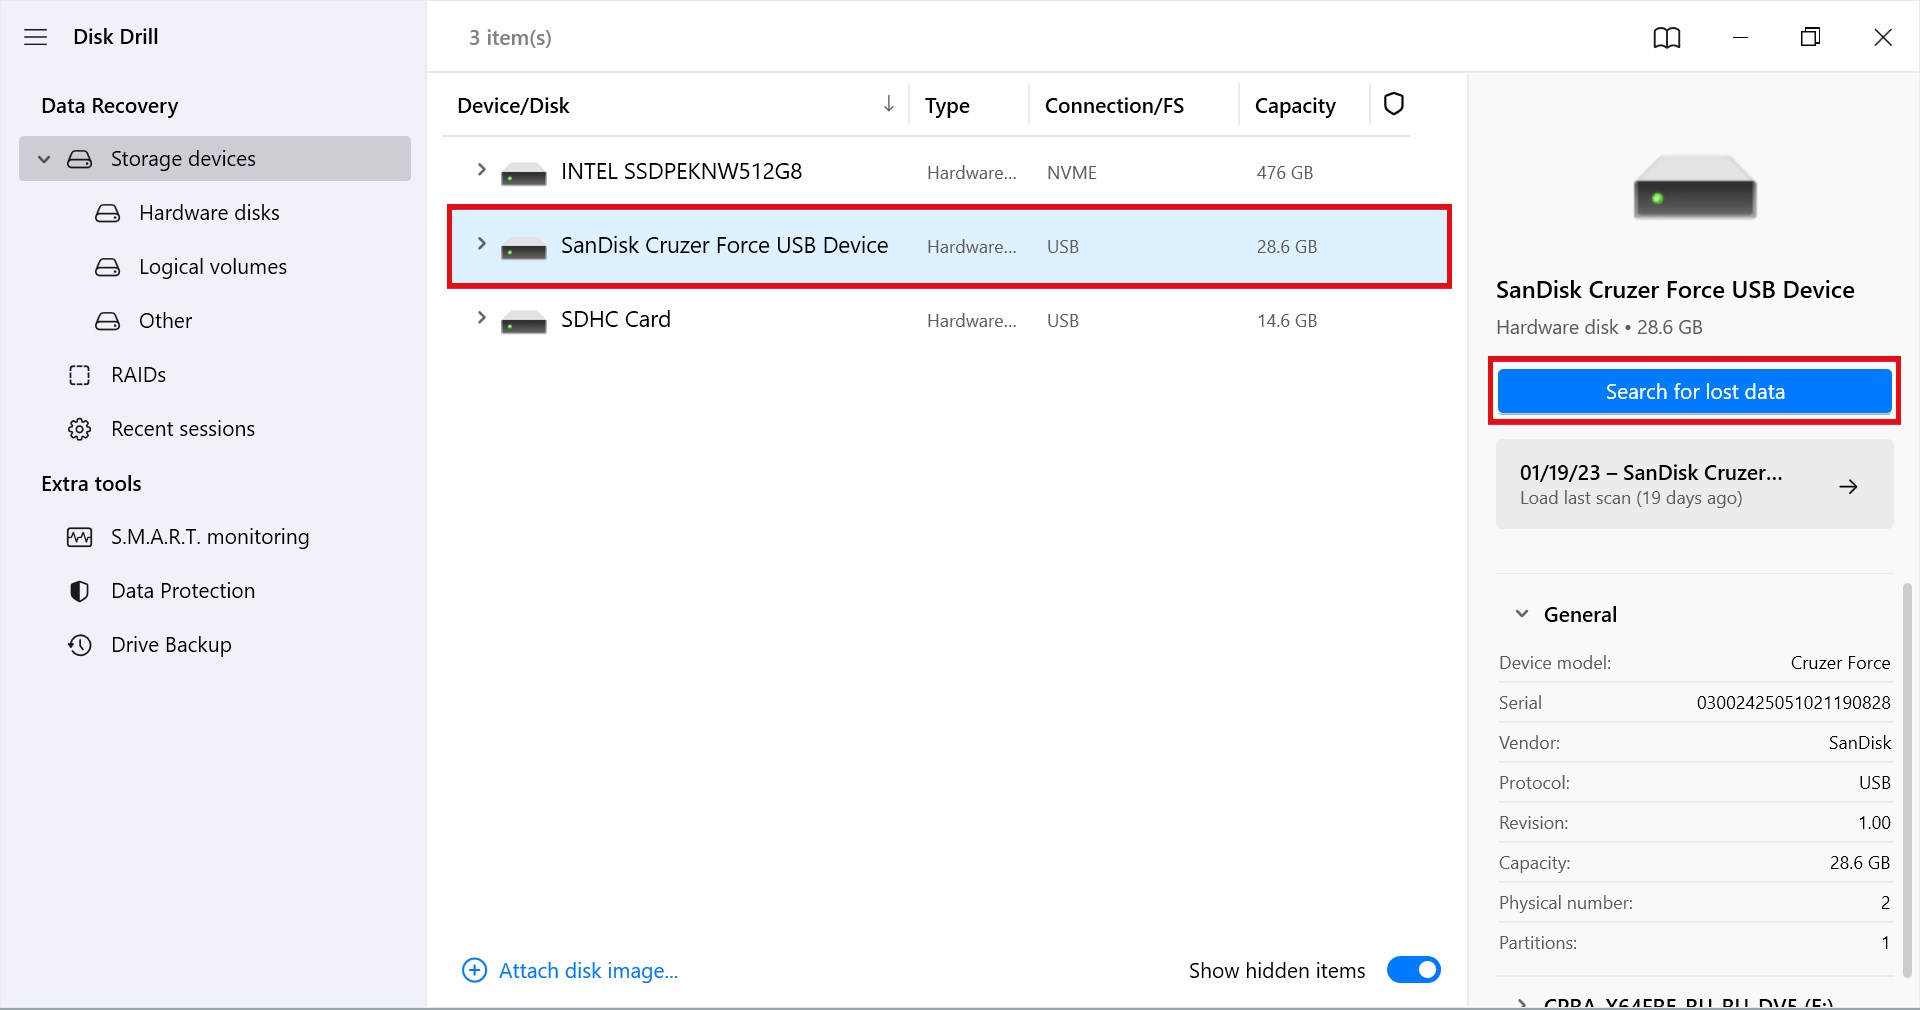
Return to the Storage devices tab, select the USB flash drive, and click the Search for lost data button. Wait until Disk Drill finishes scanning. You can then browse found files and select each file that you want to recover.
Step 5. Recover Your Data to a Different Drive

Finally, click the Recover button and choose a recovery location on a different storage device than your USB flash drive. Click Next and confirm that your files have been safely recovered to the specified location.
Use Data Recovery Services
If you’ve tried all the DIY methods and software solutions with no luck, or if your flash drive has sustained physical damage that prevents it from being recognized by your computer, don’t despair! Data recovery services specialize in these tricky situations and have the tools and expertise to salvage your data.
Here’s how professional data recovery works:
- Initial contact: Reach out to the service via phone, email, or their online portal. Explain the nature of your issue, including any physical damage or specific events leading up to the problem.
- Diagnosis: Most reputable services will first provide an initial assessment or diagnosis. They’ll evaluate the extent of the damage and estimate the probability of successful recovery. Some services might offer this diagnosis for free or for a nominal fee.
- Send in your drive: If you decide to proceed, you’ll need to send in or drop off your damaged USB flash drive. Many services provide guidelines on safely packaging your drive for shipping.
- Recovery process: Once received, the experts will use specialized tools and methods to attempt data recovery. This process can vary in duration, from a few hours to several days, depending on the complexity of the issue.
- Data return: Upon successful recovery, the service will typically transfer your data to a new USB drive or another storage medium of your choice. Some may offer cloud-based transfers or physical storage device returns.
Some data recovery services require clients to pay upfront, but the best ones operate on a “no data, no charge” principle, meaning you’ll only be charged if they successfully recover your data.
What are the Signs of a Failing USB Flash Drive?
Here are three common signs of a failing USB drive that you need to watch out for:
| Sign | Description |
| 🐌 Slow data transfer speeds | If your USB flash drive suddenly stops being able to achieve data transfer speeds it’s supposed to achieve, then there might be something wrong with it. To verify this, connect it to a different USB port and see if anything changes. |
| ⛔ Error messages | The “USB device not recognized” error message is just one of many possible error messages that you might see when attempting to connect a failing USB flash drive to a computer. While there’s no need to panic the first time you see an error message, ignoring reoccurring error messages is definitely not a good idea. |
| 📦 Wrong storage capacity | Failing USB flash drives sometimes show the wrong storage capacity, such as 27 GB instead of 32 GB. If the storage capacity is still wrong even after reformatting, then it’s very likely that the flash drive isn’t working correctly. |
If you encounter any of the above-described signs of a failing USB drive, we strongly recommend you backup your data as soon as you can because you never know when the drive decides to stop working completely.
Conclusion
USB flash drives, while compact and convenient, are not immune to issues. Whether due to physical damage, wear and tear from read and write cycles, or malware infections, these devices can sometimes fail. Fortunately, with the right know-how data recovery is often possible.
FAQ
- Try connecting it to a different USB port or another computer.
- Clean the USB connector and the USB port gently.
- Make sure the USB flash has a drive letter assigned to it.
- Use the chkdsk command in the Command Prompt.
- Use data recovery software to attempt data retrieval.


