USB errors come in all shapes and sizes. A rather peculiar issue is an empty USB drive saying it’s full. This error typically indicates logical damage to the pen drive, and prevents you from copying new files to it. It’s possible that all previously stored data on the USB drive has been wiped out because of the error. Fortunately, you can get back your data, and easily fix a USB drive that says it’s full. How? Read through the sections below to explore these fixes in detail.
Table of Contents
Why Flash Drive Says It’s Full But It’s Actually Empty?
The reason your USB flash drive is empty but still isn’t allowing you to copy files to it may be either of the following:
| Reason | Description |
| Logical issues | If you’ve been using the USB flash drive for some time, it’s possible that the drive has developed bad sectors. Bad sectors are portions of data on the drive that your computer isn’t able to read. For fixing this, you’ll need to repair the file structure. Fortunately, you can fix most logical issues far more easily than physical issues. |
| Copying large files to FAT32 drives | Another reason that your flash drive is empty but has no space is that you may be trying to copy a large file on a flash drive that’s formatted as FAT32. |
We’ll talk about how to fix your flash drive shortly. However, before you attempt to fix the USB flash drive, it’s important to at least recover your files so you don’t lose them if something doesn’t go as planned.
How to Recover Files from a Flash Drive that Says It’s Full?
Fixing a flash drive that says it’s full but is empty involves tinkering with the device, or in some cases, formatting it. If you’ve got some files on your flash drive, it’s best to recover them before you start working on fixing the device.
You’ll need a recovery tool like Disk Drill that efficiently scans your flash drive for recoverable files. If you haven’t used a file recovery tool before, here’s a simple four-step guide to walk you through the process:
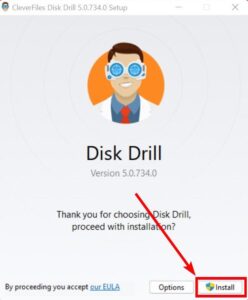
Step 1. Download and Install Disk Drill
Start by downloading Disk Drill on your Windows PC. Run the installation wizard and once the installation completes, launch Disk Drill. If you’re on the free version, you’ll be able to recover 500MB of data using Disk Drill.
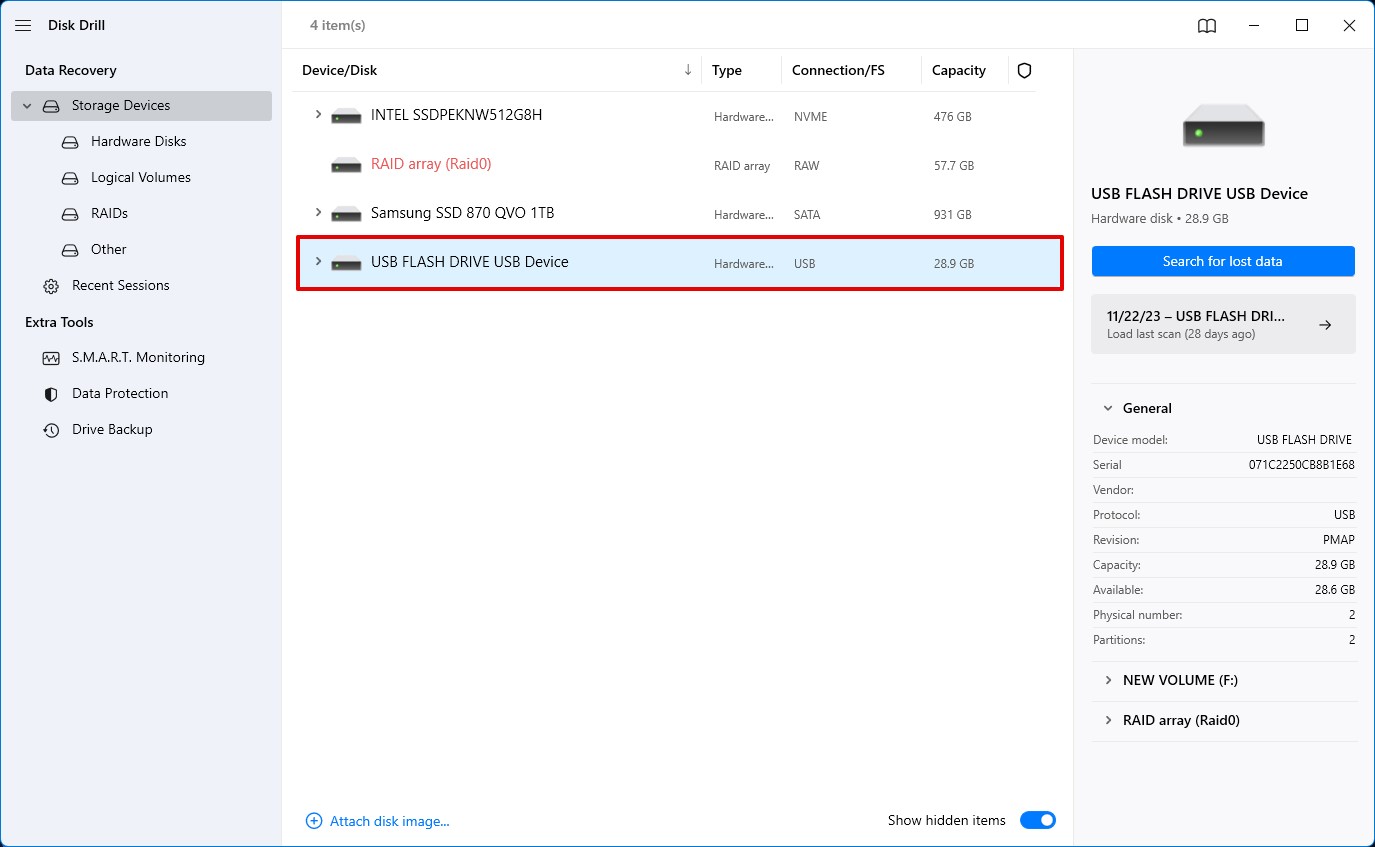
Step 2. Insert Your USB Flash Drive and Select It on Disk Drill
Insert the flash drive that’s empty but still has no space. Once your computer detects it, select the flash drive from Disk Drill’s home screen.
Step 3. Scan the Flash Drive
Start the scan by clicking the Search for lost data button. You’ll be able to see the files as the scan progresses by clicking on the Review found items at the top, so you won’t have to wait until the entire scan completes if you only want to recover certain specific files.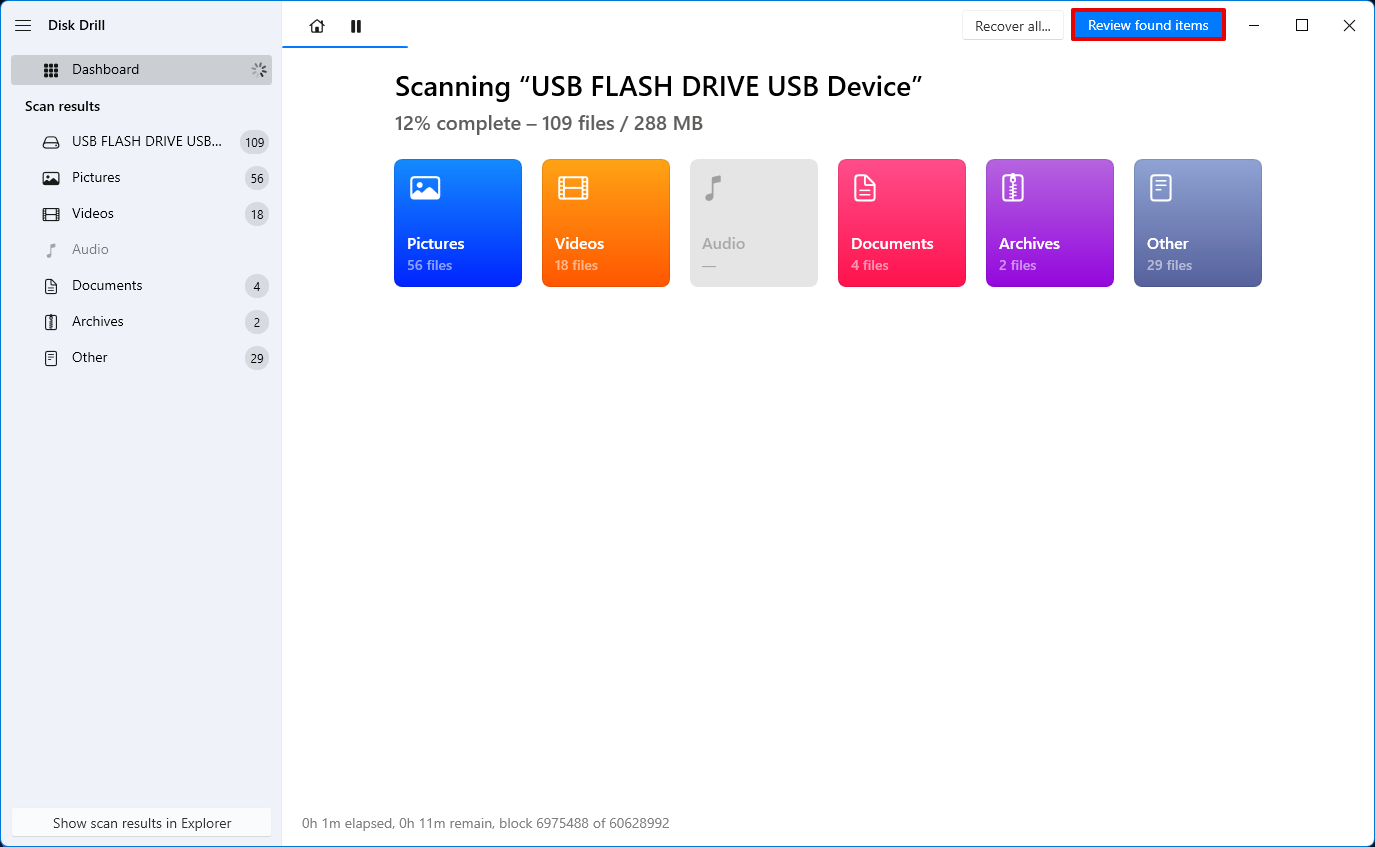
Step 4. Start Recovering Files
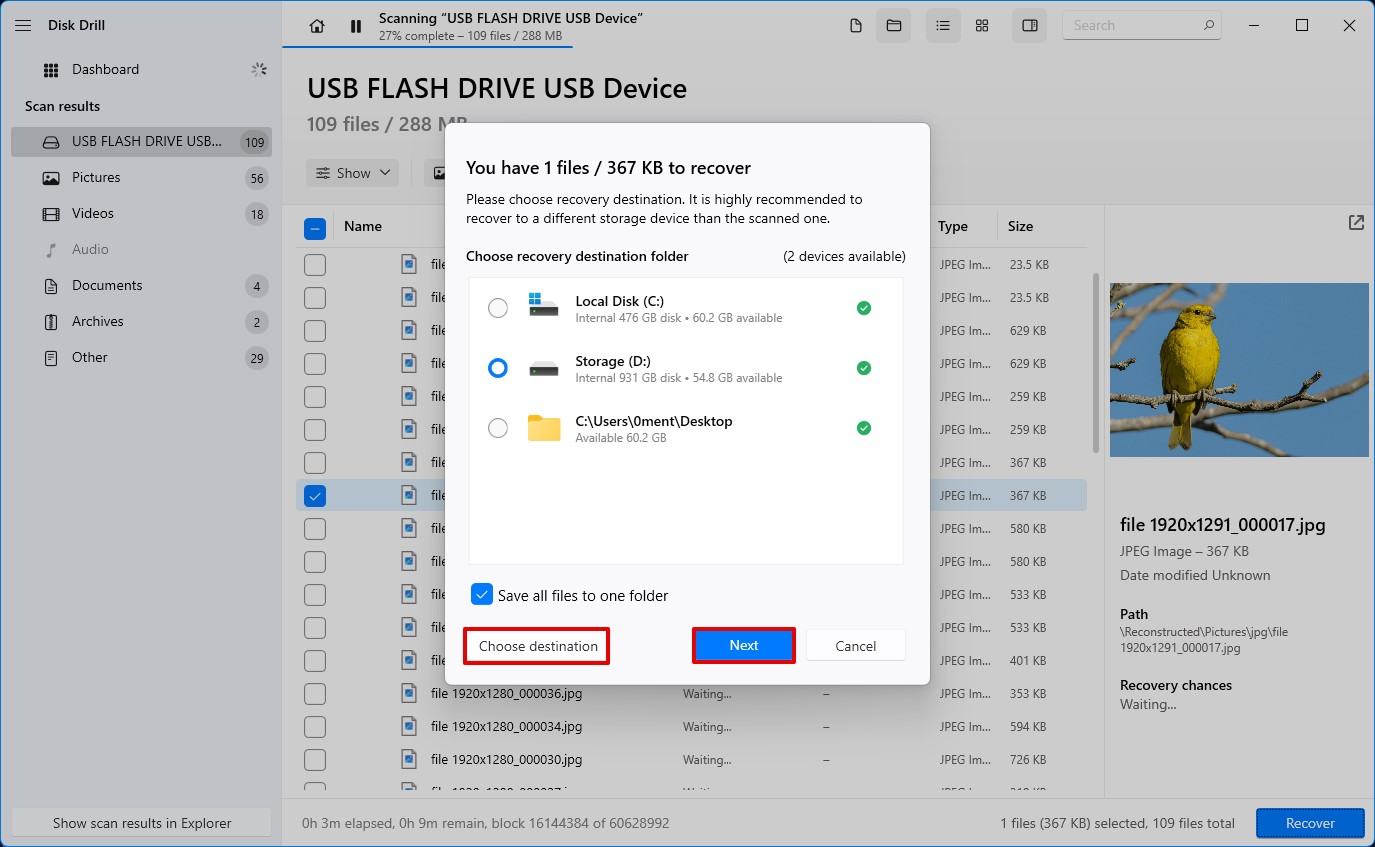
Once the scan has found the files you want to recover, you can start recovering them. You can recover a file by checking the box next to its name and clicking on the Recover button at the bottom. When you click on Recover, you’ll be asked to select a location where you want to recover the files.
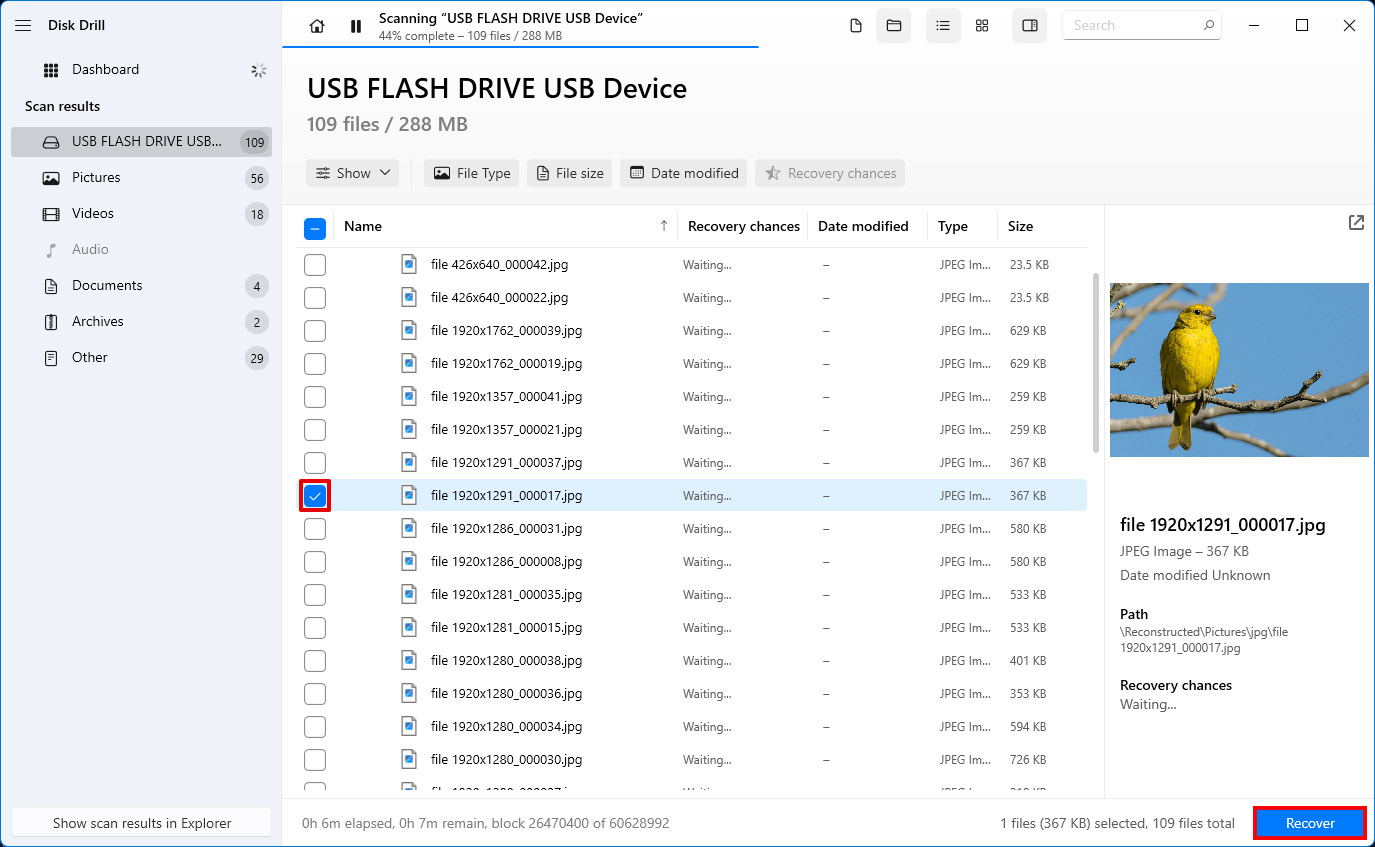
Be sure to select a location that’s not on the flash drive. Recovering files on the device you’re recovering from can result in overwriting and worsen the chances of recovering more files. Once you’ve selected a location, click Next. You should now be able to access your files from the recovery location.
Now that you’ve recovered your files, you can start fixing your flash drive.
How to Fix Flash Drive That’s Empty But Has No Space?
If your USB says it’s full, but no files are showing on your flash drive, it’s most likely a logical issue like filesystem errors or bad sectors. Filesystem errors and bad sectors aren’t exclusive to flash drives though. If you’re unable to access your SD card, that could also be potentially because of a logical issue. However, they’re usually not very difficult to fix.
It’s also possible that you’re trying to transfer a file that’s greater than 4GB to a flash drive that’s formatted as FAT32. Following are the methods you can use to fix your USB flash drive based on what’s causing your problem.
Method 1: Use CheckDisk Command
CheckDisk is a built-in command-line utility on Windows that can help you fix filesystem errors and bad sectors. If your USB flash drive is empty but says it’s full, it can potentially be a logical issue that you can fix using the CheckDisk utility.
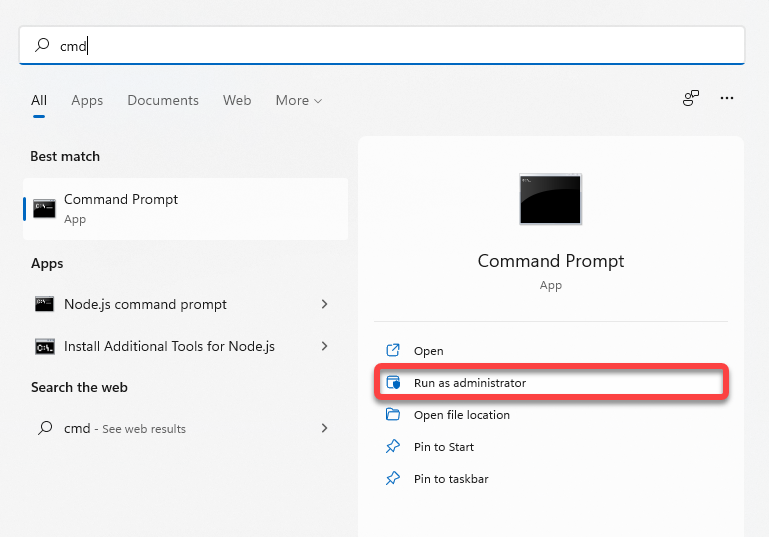
- Start by launching the Command Prompt as an administrator. To do this, search for cmd in the Start Menu and click on Run as administrator from the right pane.
- Run the following command in the Command Prompt:
chkdsk F: /r
(replace F with the drive letter assigned to your flash drive)
- The utility will automatically the logical issues it finds during the process. Once the process completes, exit the Command Prompt window.
It’s that simple. However, if you’d rather use a graphical interface than Command Prompt, use the next method.
Method 2: Utilse Error Checking Tool in Windows
Windows also has a more graphical way of checking your devices for disk errors. Here’s how you can use it:
- Press Ctrl + E to launch file explorer. Navigate to Computer (or This PC on Windows 10).
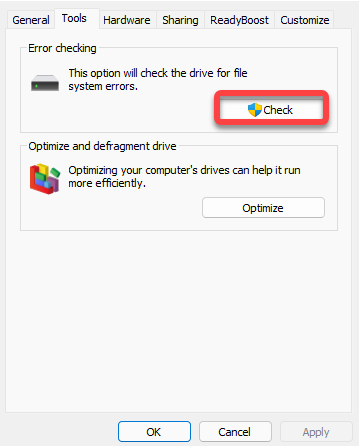
- Right-click on the flash drive that’s empty but has no space. Select Properties and switch to the Tools tab.
- Click the Check button. If prompted for confirmation, allow the scan.
The scan will essentially do the same job as the previous method, but you won’t need to run any commands. Once the process is complete, see if your flash drives works like it used to.
Method 3: Try Formatting the Flash Drive
Formatting can fix both logical issues and remove the 4GB file transfer cap that’s associated with FAT32 formatted devices. However, you’ll end up losing all the data you have on your flash drive, so you’d want to use it as a last resort. To format:
- Press Ctrl + E to launch file explorer. Navigate to Computer (or This PC on Windows 10).
- Right-click on the flash drive and select Format.
- You can choose to format it either as NTFS or exFAT. If you want to use the flash drive on Mac devices, select exFAT, because NTFS is only supported on Windows.
- Check the box next to Quick Format and click Start.
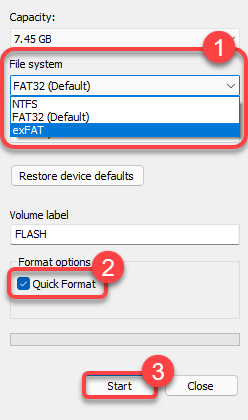
Once the format is complete, the flash drive should be good as new, unless it has understand some physical damage.
Method 4: Repair a Corrupted Partition Using TestDisk
TestDisk is an excellent third-party tool that can recover deleted or corrupt partitions with the stored files intact. However, TestDisk’s lack of a GUI means it’ll take beginners some time to get used to the program. The program is open-source and free to use.
Here’s how to repair a corrupted partition and fix a USB drive that says it’s full, using TestDisk:
- Download TestDisk and extract the downloaded archive.
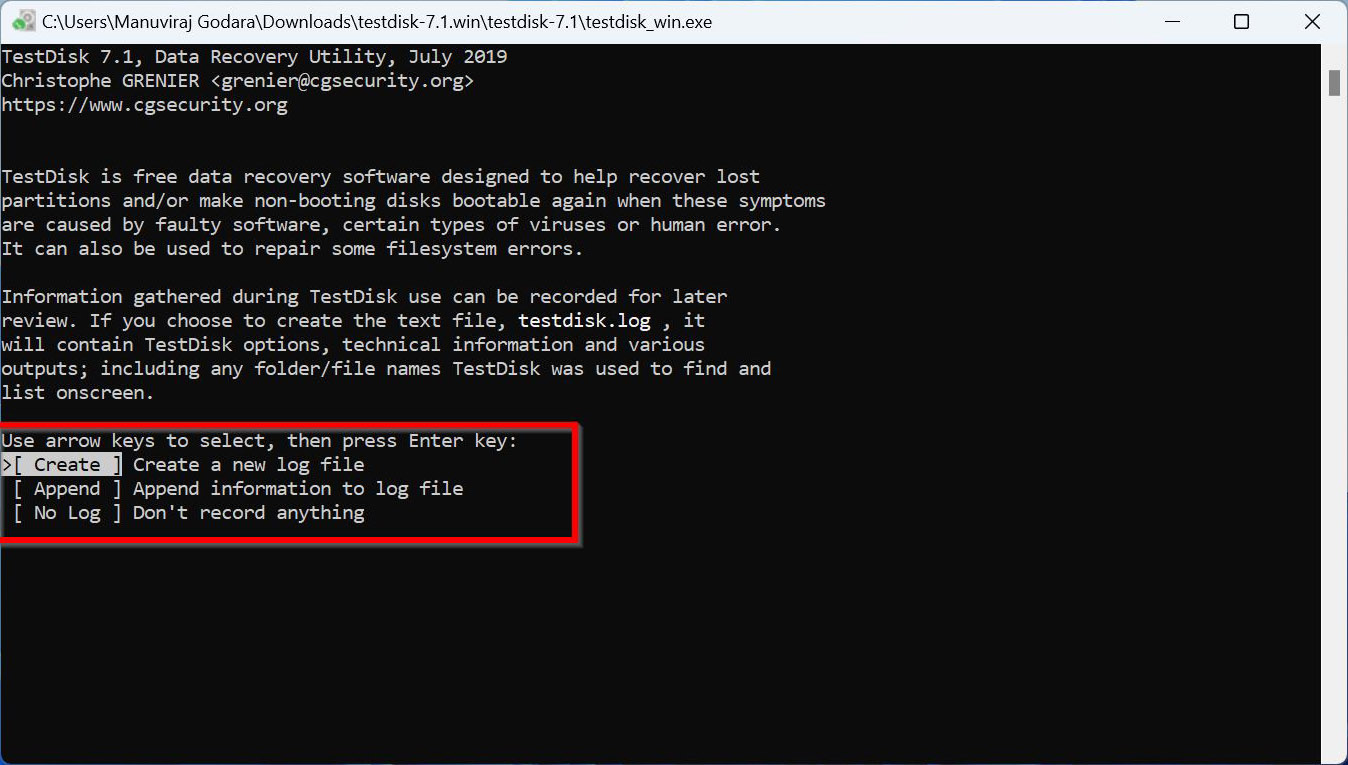
- Run TestDisk by double-clicking the testdisk_win.exe file. To navigate the TestDisk UI, use the Arrow keys. To select an option, press Enter.
- Choose whether you wish to create a log file or not, and press Enter to confirm your choice. This doesn’t affect the actual partition recovery/repair process in any way.
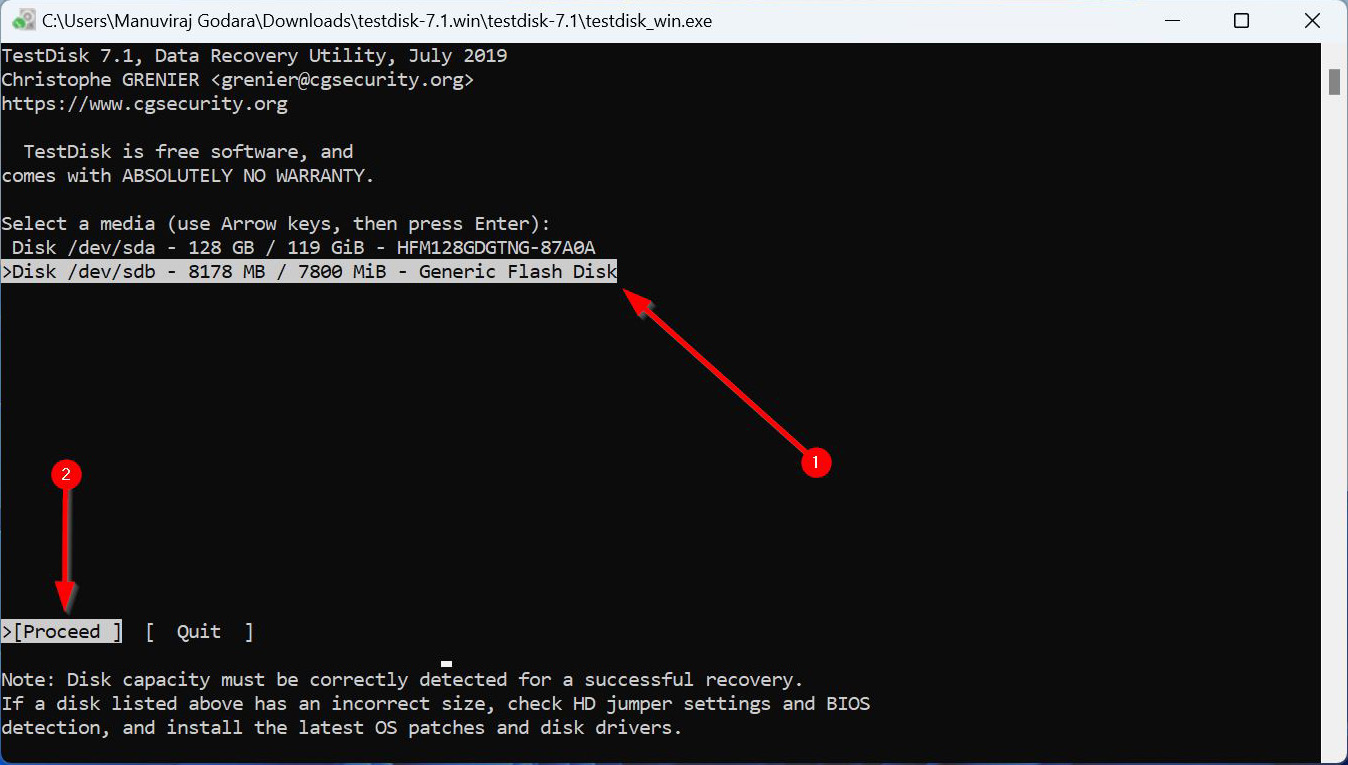
- Select the USB drive from the storage devices list. Select Proceed and press Enter.
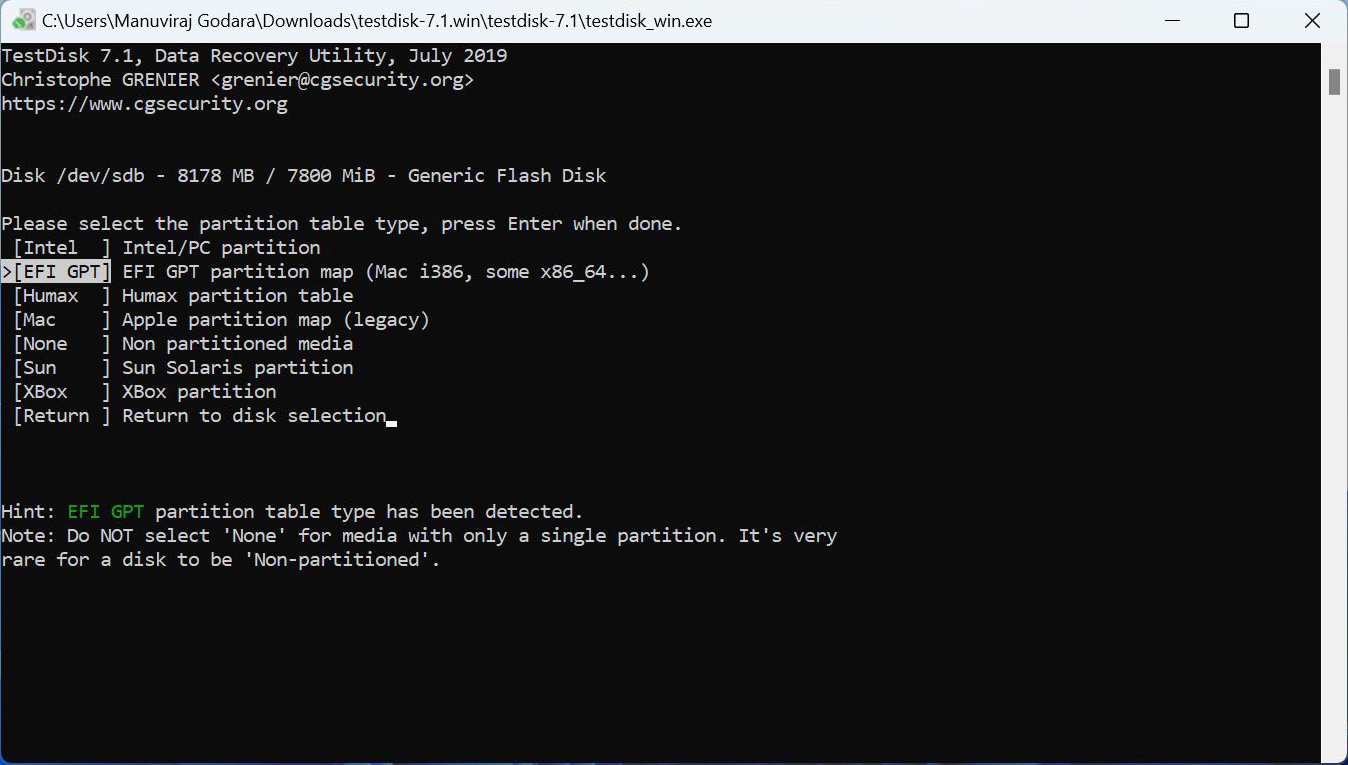
- Select the partition table type. TestDisk auto-detects this, so it’s better to simply press Enter on this screen.
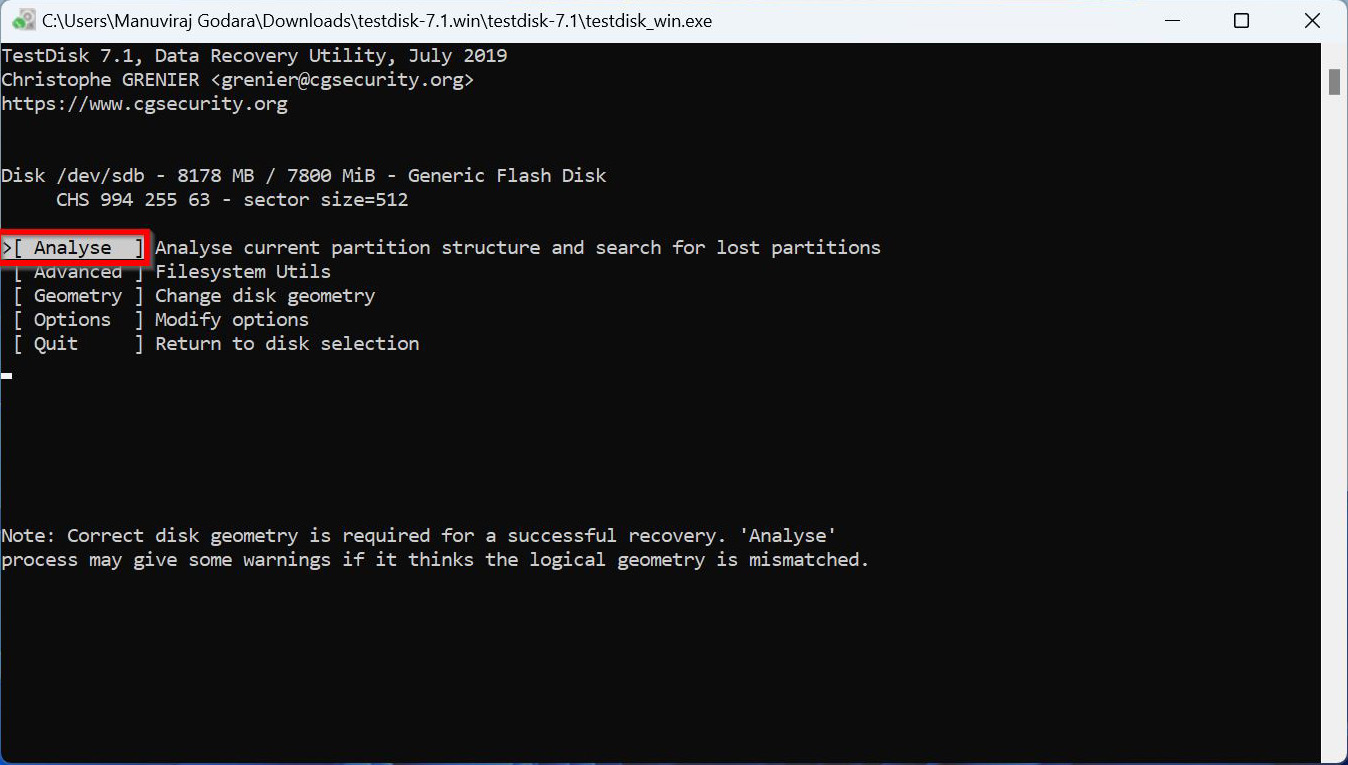
- Select Analyse and press Enter.
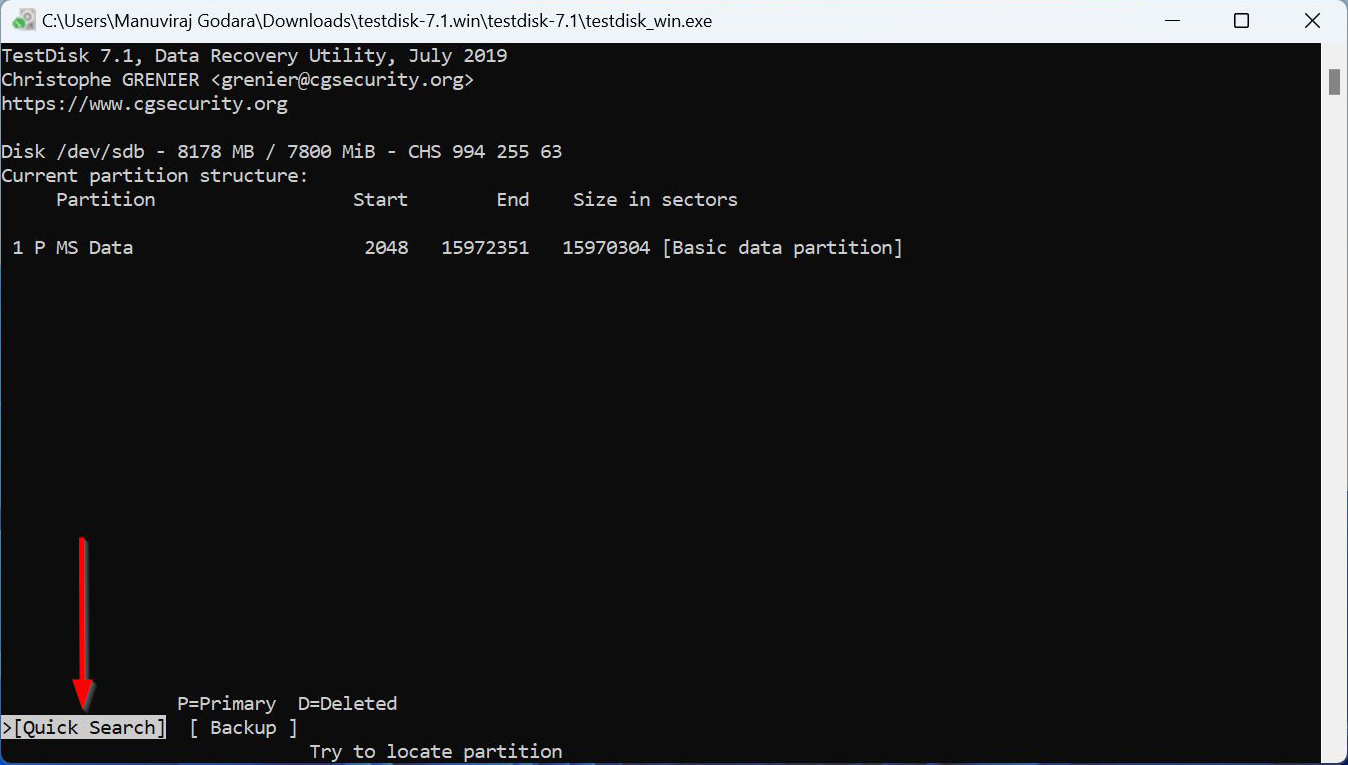
- Choose Quick Search and press Enter. TestDisk will list the partitions it finds.
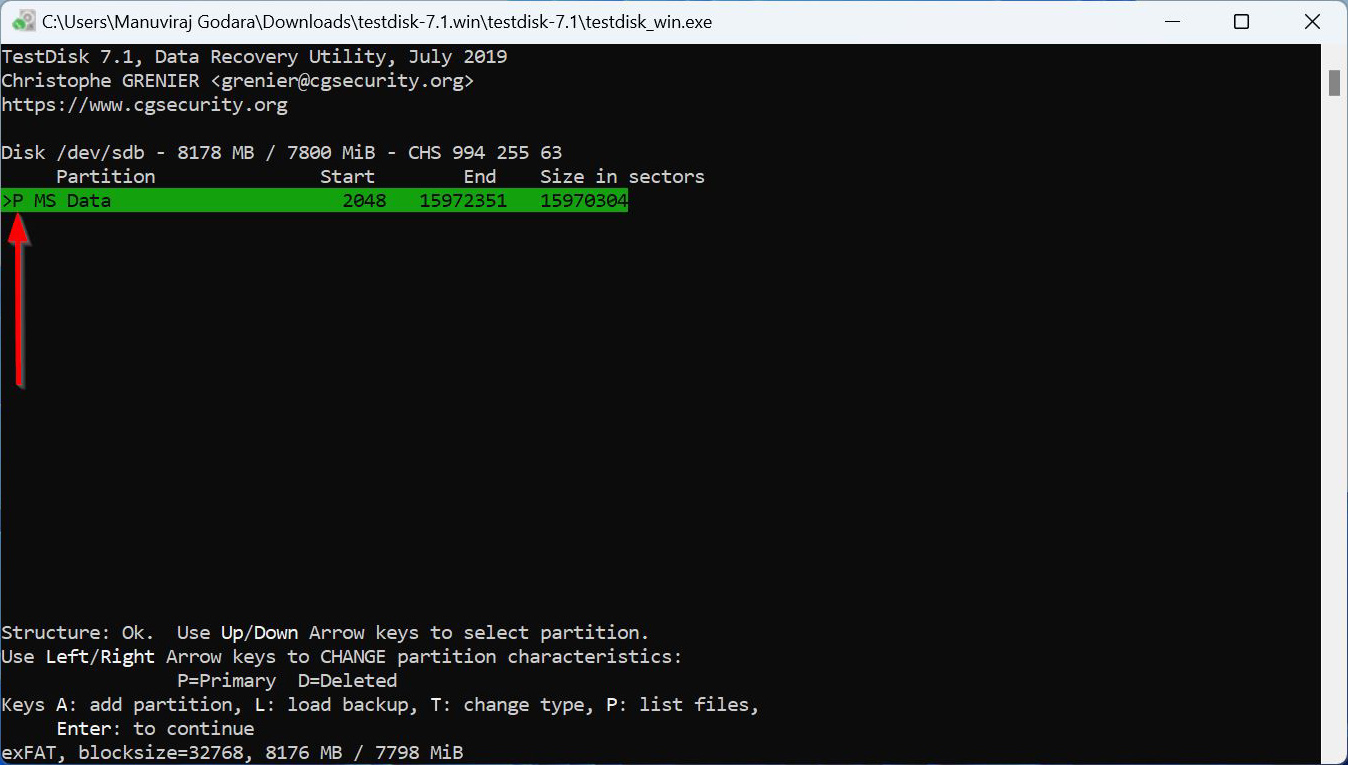
- Highlight the required partition and use the Left and Right arrow keys to cycle through the prefixes. Ensure there’s a P before the partition you wish to recover.
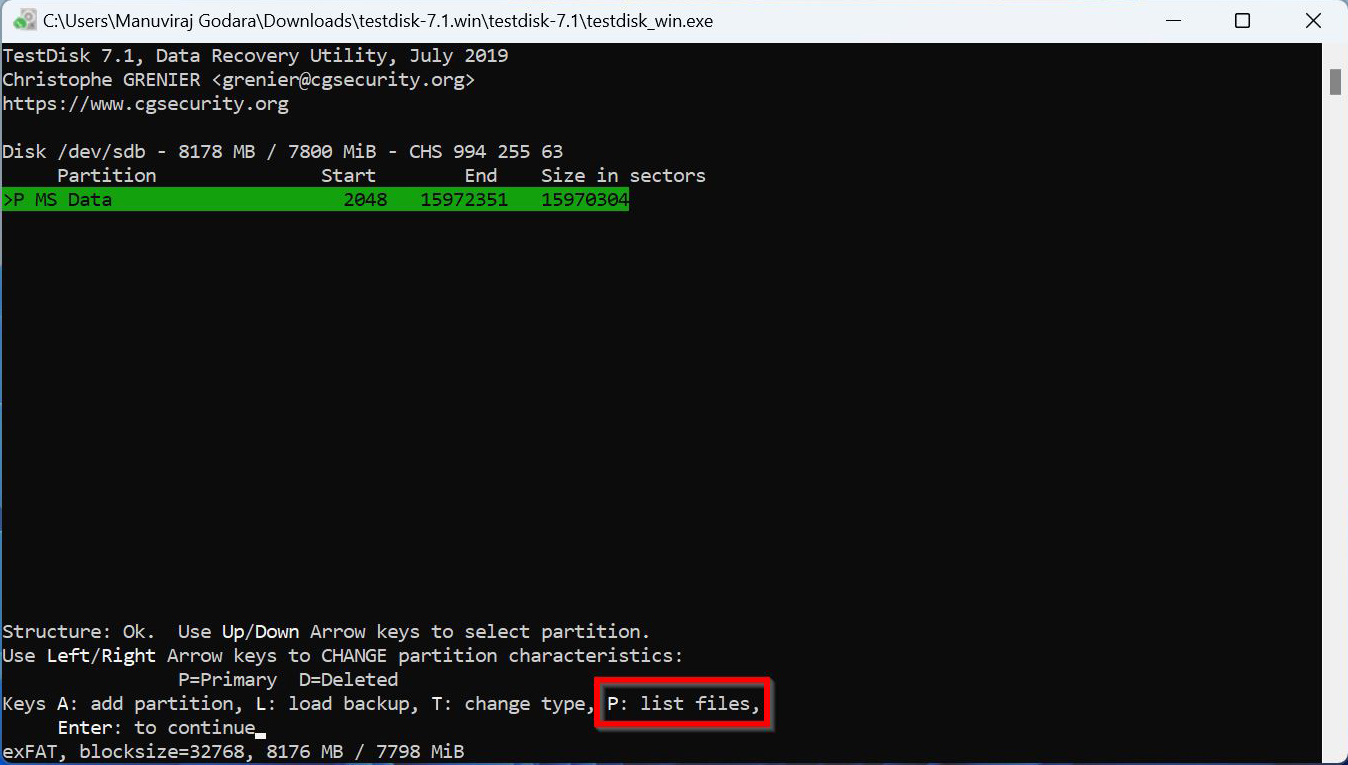
- Press P to list the partition’s files. Press Q to go back, and press Enter.
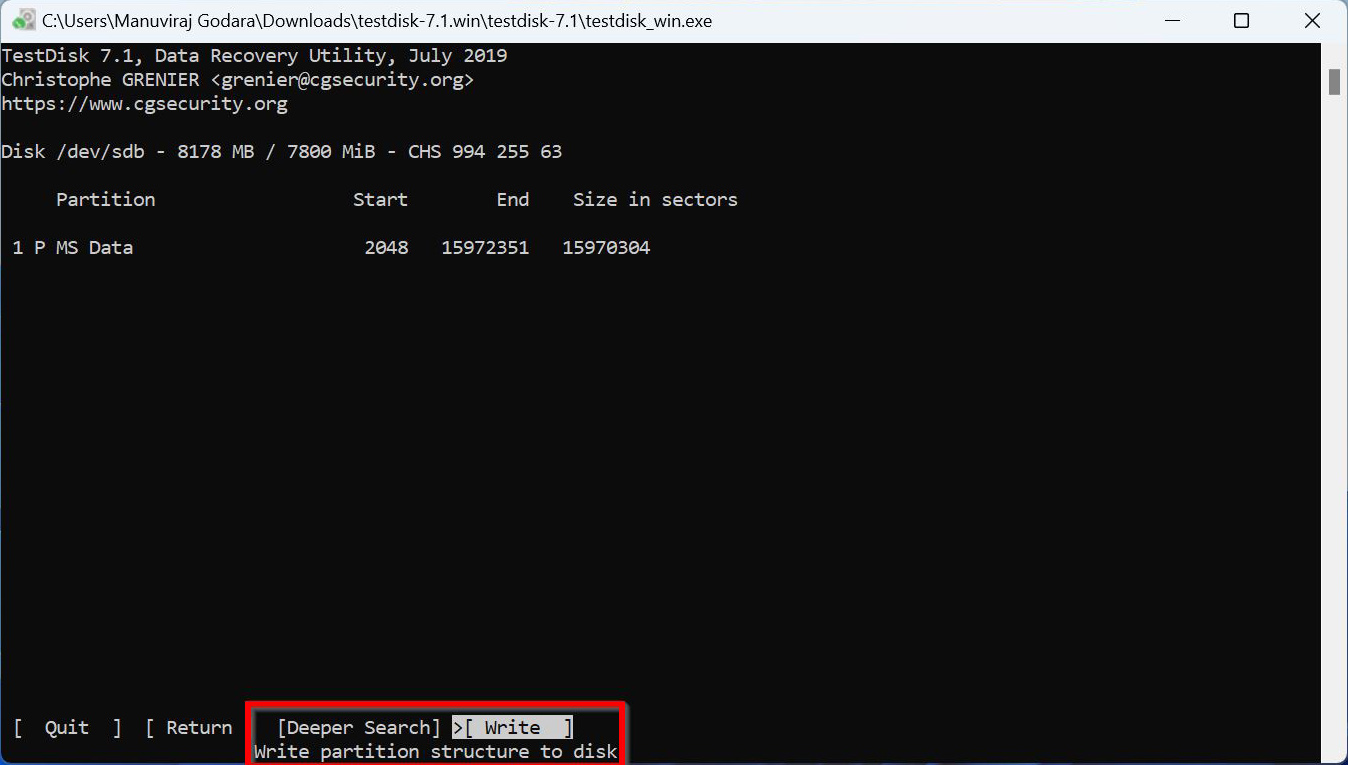
- If you saw the required files in the previous step, select Write and press Enter. If you didn’t see the required files, pick the Deeper Search option and follow Step 8, Step 9, and the first part of Step 10.
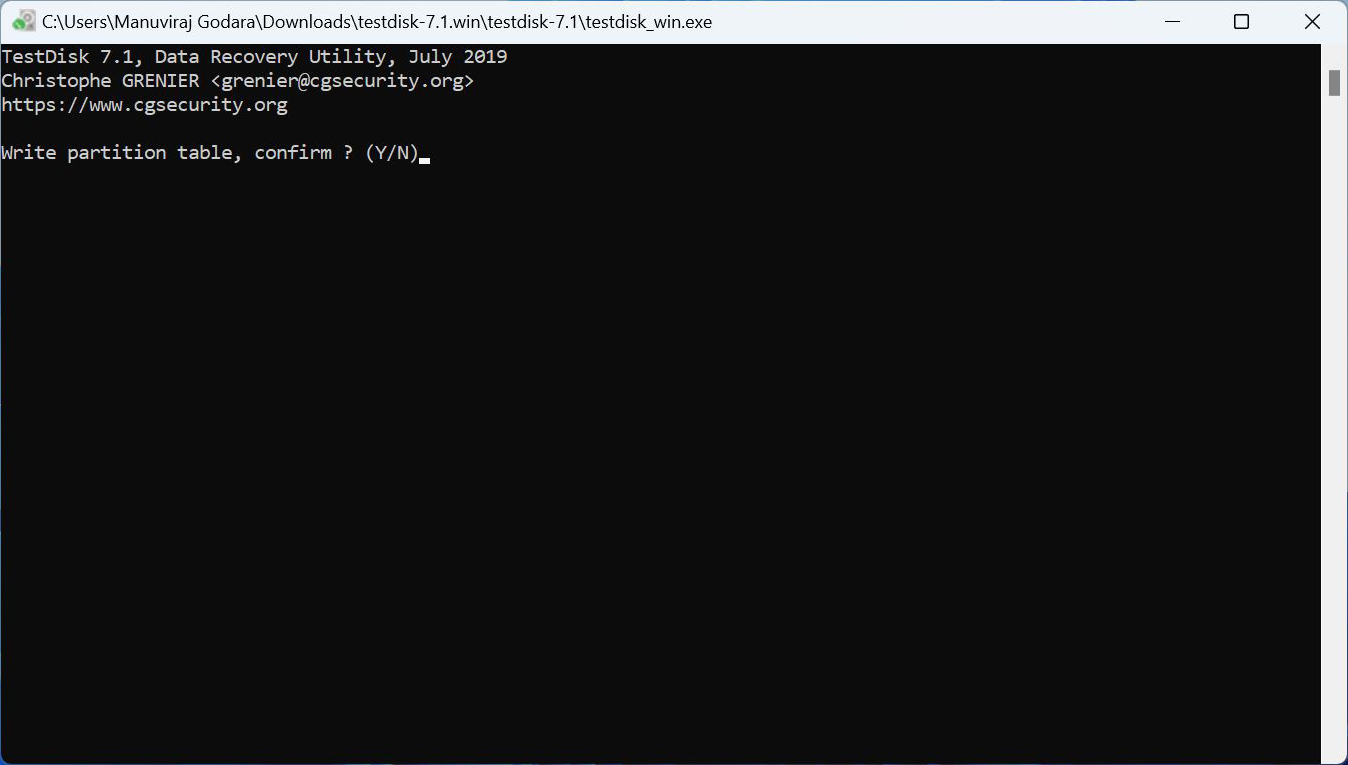
- Confirm by pressing Y on your keyboard.
- TestDisk will repair the corrupted USB partition, effectively resolving the USB drive says its full error.
Conclusion
When dealing with the flash drive says it’s full issue, prioritize data recovery, and then attempt to fix the problem. There are several third-party tools that can help you recover your data. We recommend you use Disk Drill. To fix the USB drive, run CHKDSK (CheckDisk) using CMD or the Error checking option. If CHKDSK fails to fix the flash drive, you can either use TestDisk to repair the corrupt partition, or simply format the pen drive.


