 From general security to capturing your child’s first word (if you use a security camera for a baby monitor), CCTV cameras give us eyes wherever we place them.
However, with losing CCTV video files comes information as crucial as solid evidence for a crime. So how can deleted CCTV footage be recovered?
How you recover CCTV footage differs based on where you store your videos: on a storage device, a NAS, cloud storage, or other storage options.
In this article, we’ll focus on the ins and outs of recovering deleted or lost CCTV footage from the devices we specified, providing you with simple step-by-step guides you can easily follow.
Table of Contents
Why Does CCTV Footage Get Lost?
Physical damage, logical errors, or other system corruptions can contribute to CCTV footage data loss. These errors will also determine the recoverability of your files.
Here are the most common reasons why CCTV footage gets lost:
| Reason | Description |
| 📝 Read/Write error of DVR or storage device | Some software glitches or hardware malfunctions can cause errors when reading or writing data. Read errors can be due to a variety of factors, including virus/malware infections, file system errors, and others. Write errors, on the other hand, can be caused by data transfer interruptions, which can lead to data loss. |
| 🔨 Physical damage to the recorder or storage device | Damaging magnetic components, deforming ports, exposure to extreme temperatures, or any significant physical impact your storage device suffered can contribute to CCTV footage loss. |
| ⚙️ Corrupted storage device | Storage devices used in CCTV systems can deteriorate over time, which might cause new errors and even data loss. Corrupted devices may become inaccessible or cause certain CCTV footage to be unreadable. Regardless, it’s best not to attempt to access your files and to perform data recovery as soon as you can to avoid further data loss. |
| 💾 Not enough memory on the storage device | Letting your storage device run out of memory puts it at risk of data corruption. In some CCTV systems, you can also set your device to automatically overwrite older footage to accommodate new recordings. This causes data loss that’s challenging to recover since the files are already overwritten. |
Can Deleted CCTV Footage Be Recovered?
As previously mentioned, the storage device that your CCTV camera uses will dictate how you can get your files back. It’s also one of the factors that determine the recoverability of your CCTV footage.
If your videos were stored on a physical storage device like a hard drive, it should be possible to retrieve CCTV footage with any of the best data recovery software available online. However, you have to act quickly to avoid overwriting lost footage.
There are other methods to recover deleted CCTV footage in the next section if you use other storage devices like NAS or cloud services.
How to Recover Deleted CCTV Footage
Recovering CCTV footage from storage devices can be performed easily using several methods. For example, if your videos are stored in a memory card, you can perform SD card recovery by connecting your device to your computer and using data retrieval apps.
Both internal or external drive data recovery follows a similar approach – using video recovery tools or repairing your drive if needed, so you can gain access to your files again. You can also remove the HDD from your DVR and perform CCTV DVR data recovery. In this guide, I used a hard drive as an example storage device.
Just note that using CCTV data recovery software may not be the best option if your drive itself is damaged (i.e. visually damaged, not working or showing up in BIOS after connecting it, HDD making screeching noises when connected, etc.). It’s better to seek a professional data recovery service for assistance in these scenarios.
Method 1:Recover Footage from a Drive Connected to a PC/Mac
Disk Drill is a pro tool that recognizes the most common file systems, such as NTFS, FAT32, APFS, and others, and can perform deep scans on them. On top of that, it can also preview the video files it scanned before attempting data recovery. For corrupted hard drives, Disk Drill features byte-to-byte backup to safely create a disk image of your drive and scan the image instead.
For Disk Drill on Windows, the free version offers up to 500 MB of files you can recover.
Here’s a simple step-by-step guide on how to recover CCTV footage using Disk Drill on Windows. Note that the steps will be virtually the same for Windows and macOS.
- First, download and install Disk Drill from the Cleverfiles official website.
- Once the installation is complete, connect your hard drive to your computer and launch the Disk Drill app.
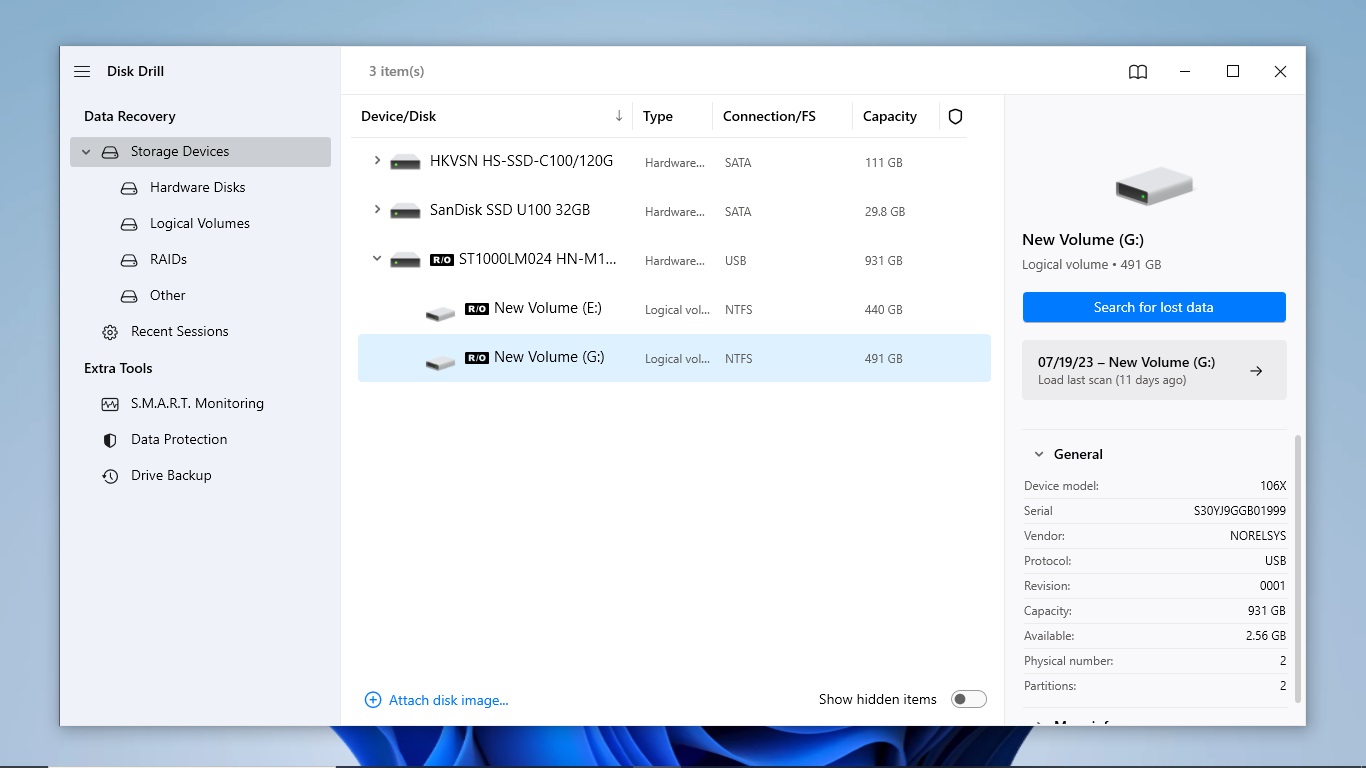
- On the list of available devices, select your hard drive. Then, click the Search for lost data button on the top right to start scanning.
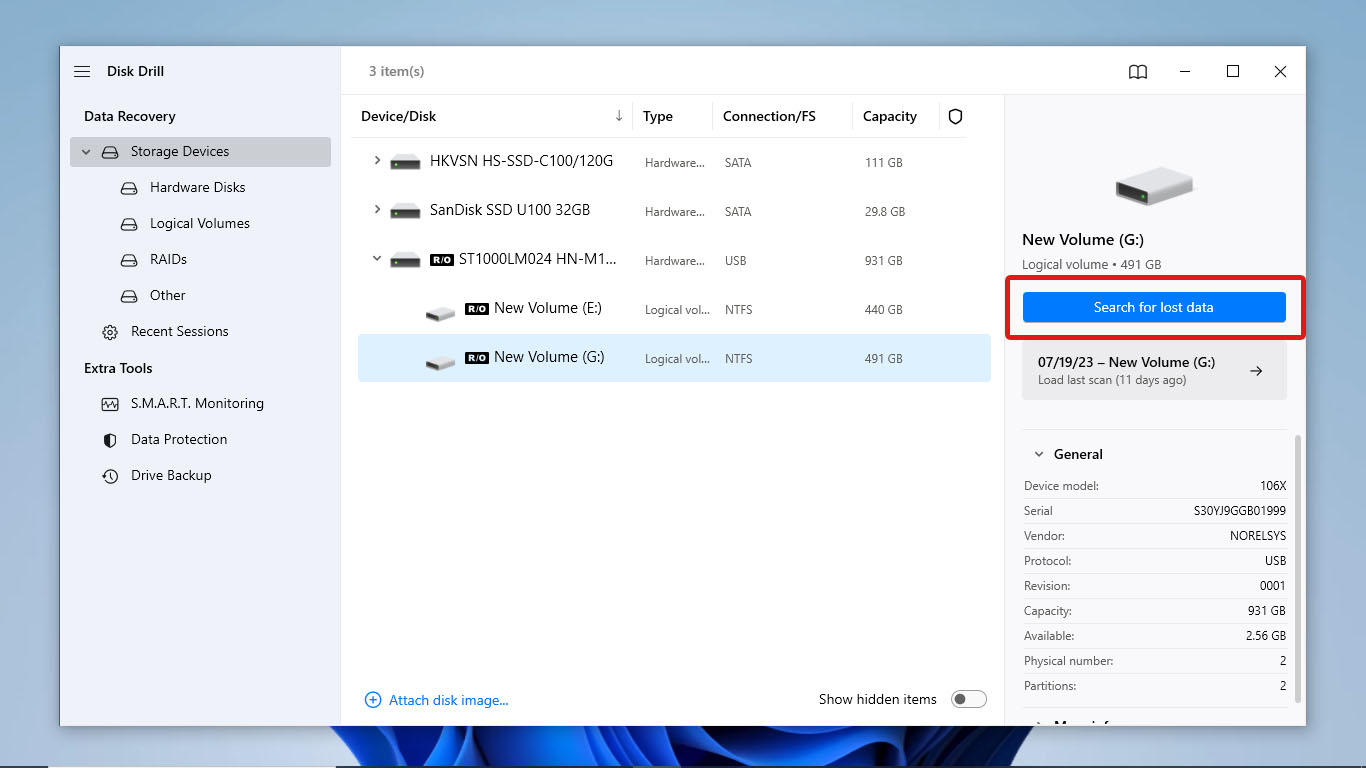
- During the scan, you can preview the CCTV footage Disk Drill has detected so far by clicking the Review found items button located on the top-right corner of the screen. To let the scan finish first, head to the next step.

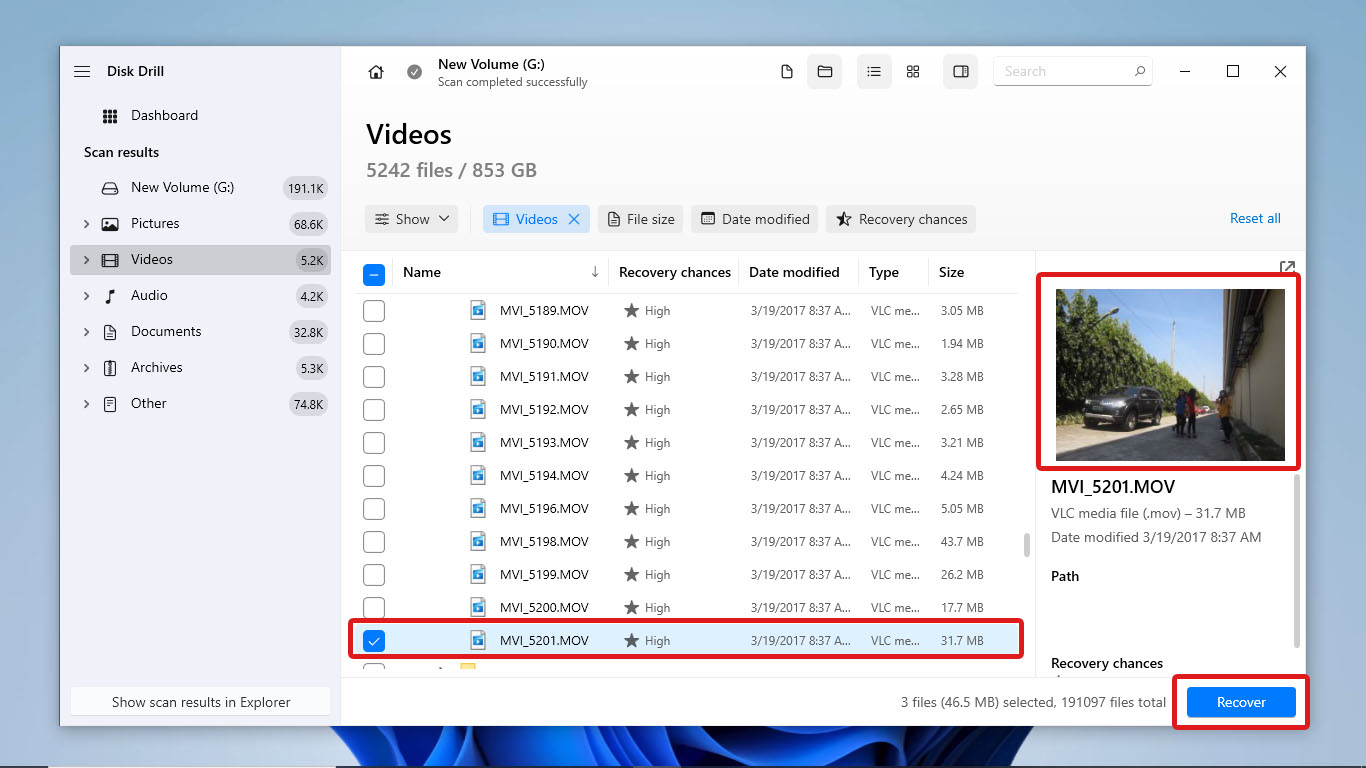
- Once the scan has finished, click Review found items to review all the videos scanned.
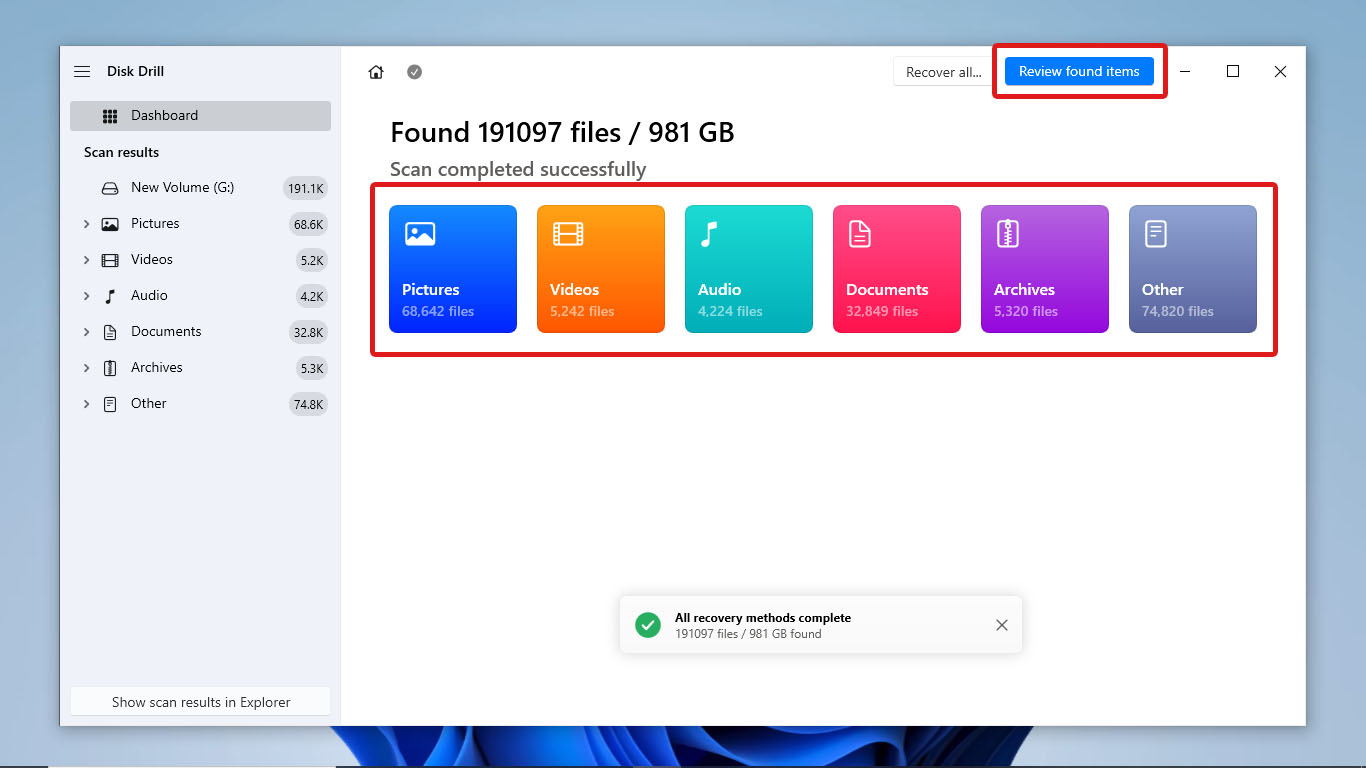
- After that, you can now select the videos you want to recover or use the search bar to search for them by file names. You can also preview the videos by clicking on their file names. Once you have selected all the videos you want to recover, click the Recover button on the bottom-right part of the screen.
- Select the file destination where Disk Drill will store the recovered videos. Then, click Next.

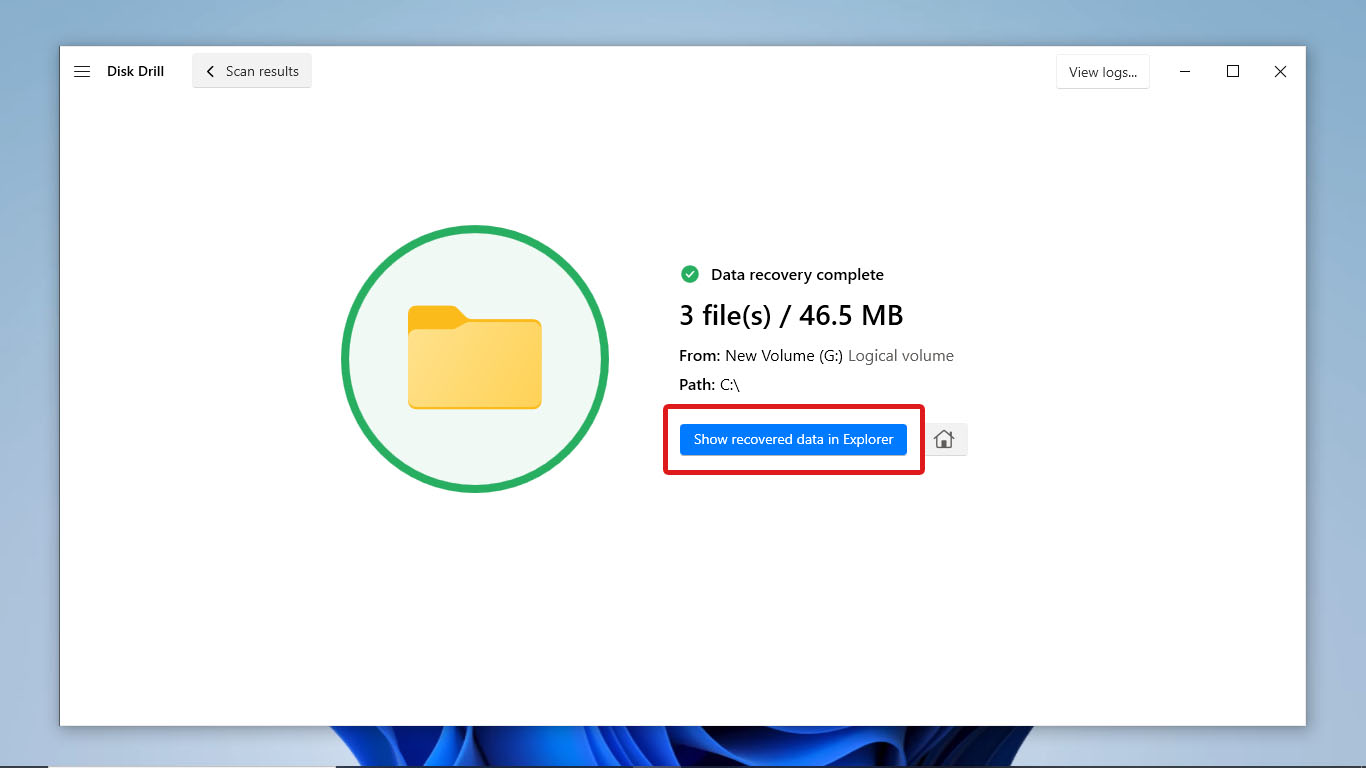
- After the data recovery process finishes, Disk Drill should display a summary of the files recovered. Click Show recovered data in Explorer to check your files in File Explorer.
Method 2:Recover Footage from a NAS
Network-Attached Storage (NAS) is a storage architecture that enables CCTV cameras to transmit video footage over a network, eliminating the need for local storage or a DVR.
Disk Drill offers a convenient solution for scanning your NAS via the network, avoiding the necessity to remove disks, rebuild RAID configurations, or experience storage downtime. Whether you need to recover deleted NAS data, retrieve data from formatted disks, repair broken devices, or perform failed RAID recovery, Disk Drill can assist you. It supports a range of file systems, including FAT16/FAT32, exFAT, NTFS, HFS, APFS, EXT2/EXT3/EXT4, and RAW.
To initiate the process of recovering CCTV footage from a NAS using Disk Drill, follow these steps:
- Connect the NAS drives to your PC directly using appropriate adapters or enclosures.
- Launch Disk Drill on your computer.
- Follow the previously outlined steps for NAS data recovery to retrieve your CCTV footage.
Method 3:Recover Footage From Cloud Storage
If your CCTV camera system uploads videos directly to the cloud, you will not be able to attempt data recovery by yourself. You have to contact the company that hosts your cloud storage service to help you retrieve lost CCTV footage.
However, remember that your cloud storage provider may have a retention policy for any backups of your videos. Review your terms and conditions before contacting support. If possible, reach out to them for a restoration request as soon as you can to increase your chances of successful data recovery.
Conclusion
CCTV footage data recovery is possible, but its success depends on the storage device your CCTV camera uses. It’s also recommended to perform data recovery as soon as you can to prevent further data loss.
If your videos are stored on a physical storage device like an HDD, you can use DVR recovery software like Disk Drill to recover them. You can also use Disk Drill to recover footage from NAS, but it requires configuring SSH to scan NAS over the network.
For cloud storage, you must contact your service provider to request data recovery. However, the chances of a successful recovery will depend on the retention period of your storage.
FAQ:


