 The Pictures folder is a convenient way to organize all your pictures and access them in a single place. But what if you boot up your PC and notice that the My Pictures folder has disappeared. Why does this happen and are your photos gone for good? We’ll answer these questions in the sections below and also explain how you can get the Pictures folder back.
Table of Contents
Why did the My Pictures Folder Disappear
To recover a missing Pictures folder, you first need to know why it disappeared in the first place. This will help you choose the appropriate solution and save your time and money.
Broadly speaking, the My Pictures folder on your PC probably disappeared because of one of the following reasons:
| Reason | Description |
| 🚨 The folder was deleted accidentally. | The Pictures folder may have been deleted by mistake. It’s easy to accidentally hit the delete key while the folder is selected. |
| 🔄 The location of the folder was changed. | The default location for the Pictures folder can be changed. If you did so, you won’t be able to locate it in its usual place in the C: drive. |
| 🔍 The folder is hidden. | A hidden Pictures folder won’t be visible in Windows Explorer, unless the Hidden items option is ticked. |
| 👤 Incorrect user account. | Each user account on Windows will have its own Pictures folder. You can’t use one user account to access the Pictures folder of another user account. |
How to Recover My Pictures Folder
To recover your Pictures folder, you either need to make it accessible/visible again, or if it was deleted, recover it. We’ll take a look at both scenarios in this section. We recommend you attempt these fixes in the order they’re listed in.
Method 1: Try to Find the My Pictures Folder
Before proceeding to more elaborate fixes, here are a few places you should check, when you notice the “My Pictures” folder has disappeared from your laptop or desktop PC:
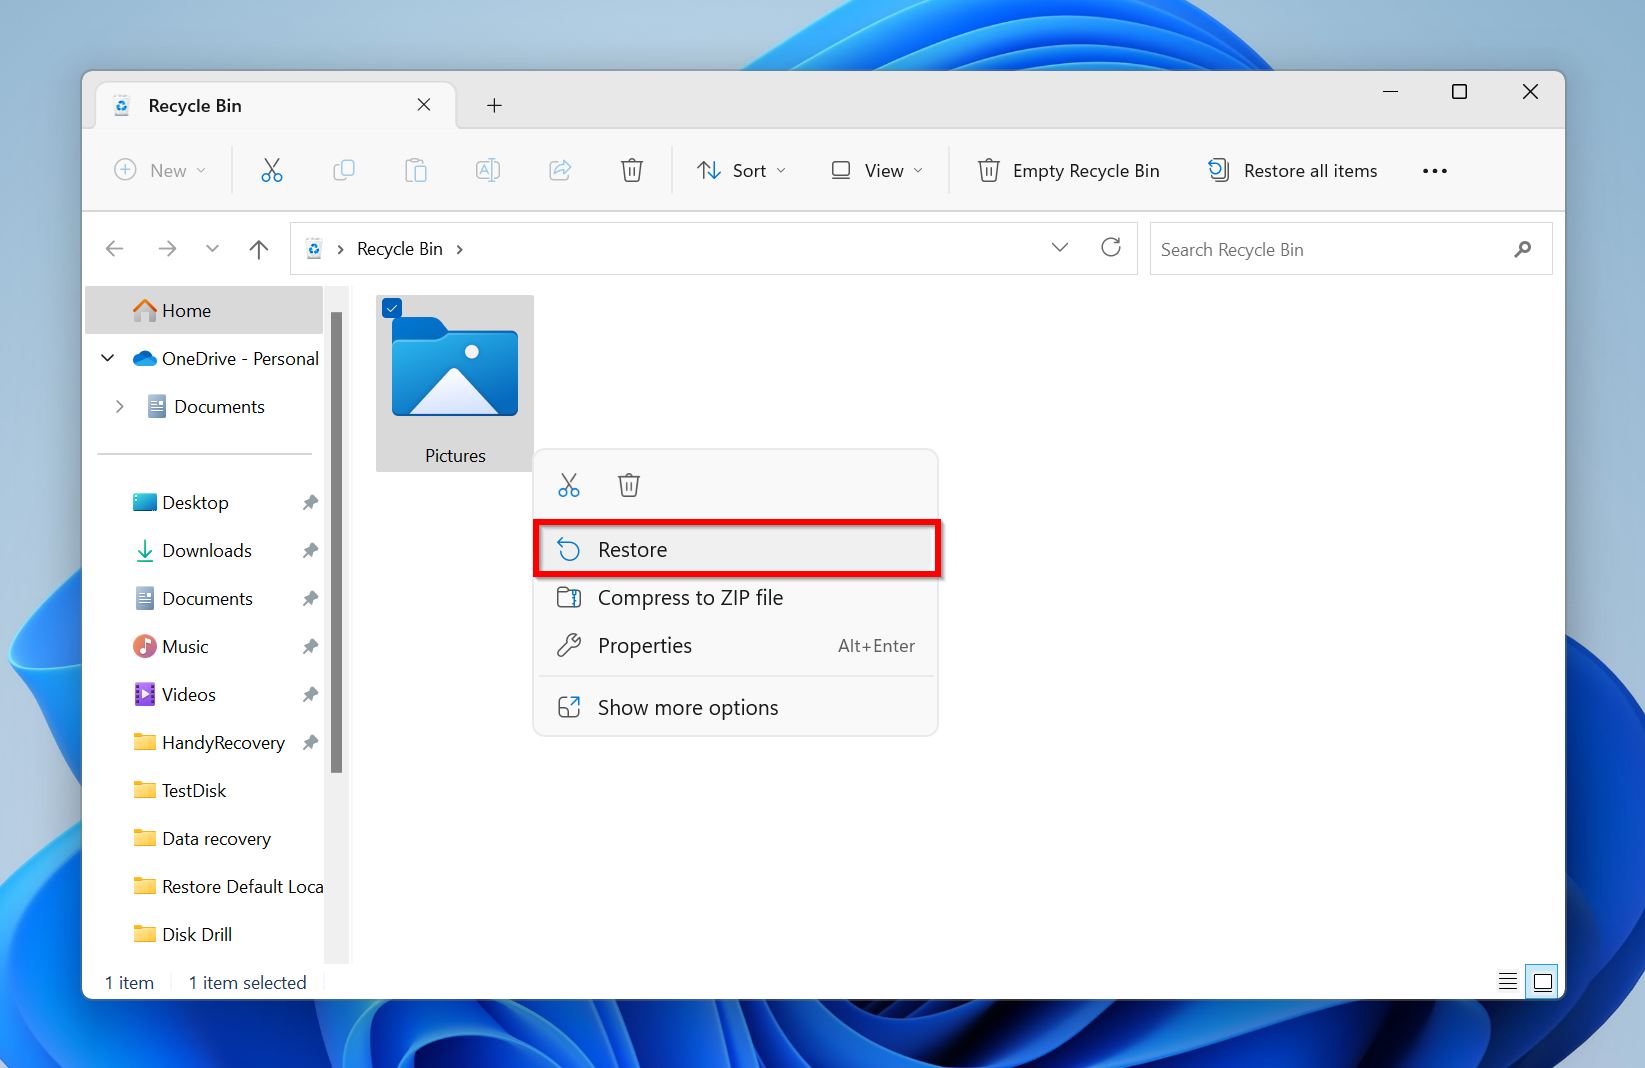
- The Recycle Bin: It’s quite possible you accidentally deleted the Pictures folder from your PC. Luckily, Windows doesn’t permanently delete files or folders, unless you use the Shift + Delete shortcut to delete them. Double-click on the Recycle Bin icon on your desktop, or simply search for it in Windows Search (Windows Key + S). If you find your Pictures folder there, right-click on it and choose Restore.
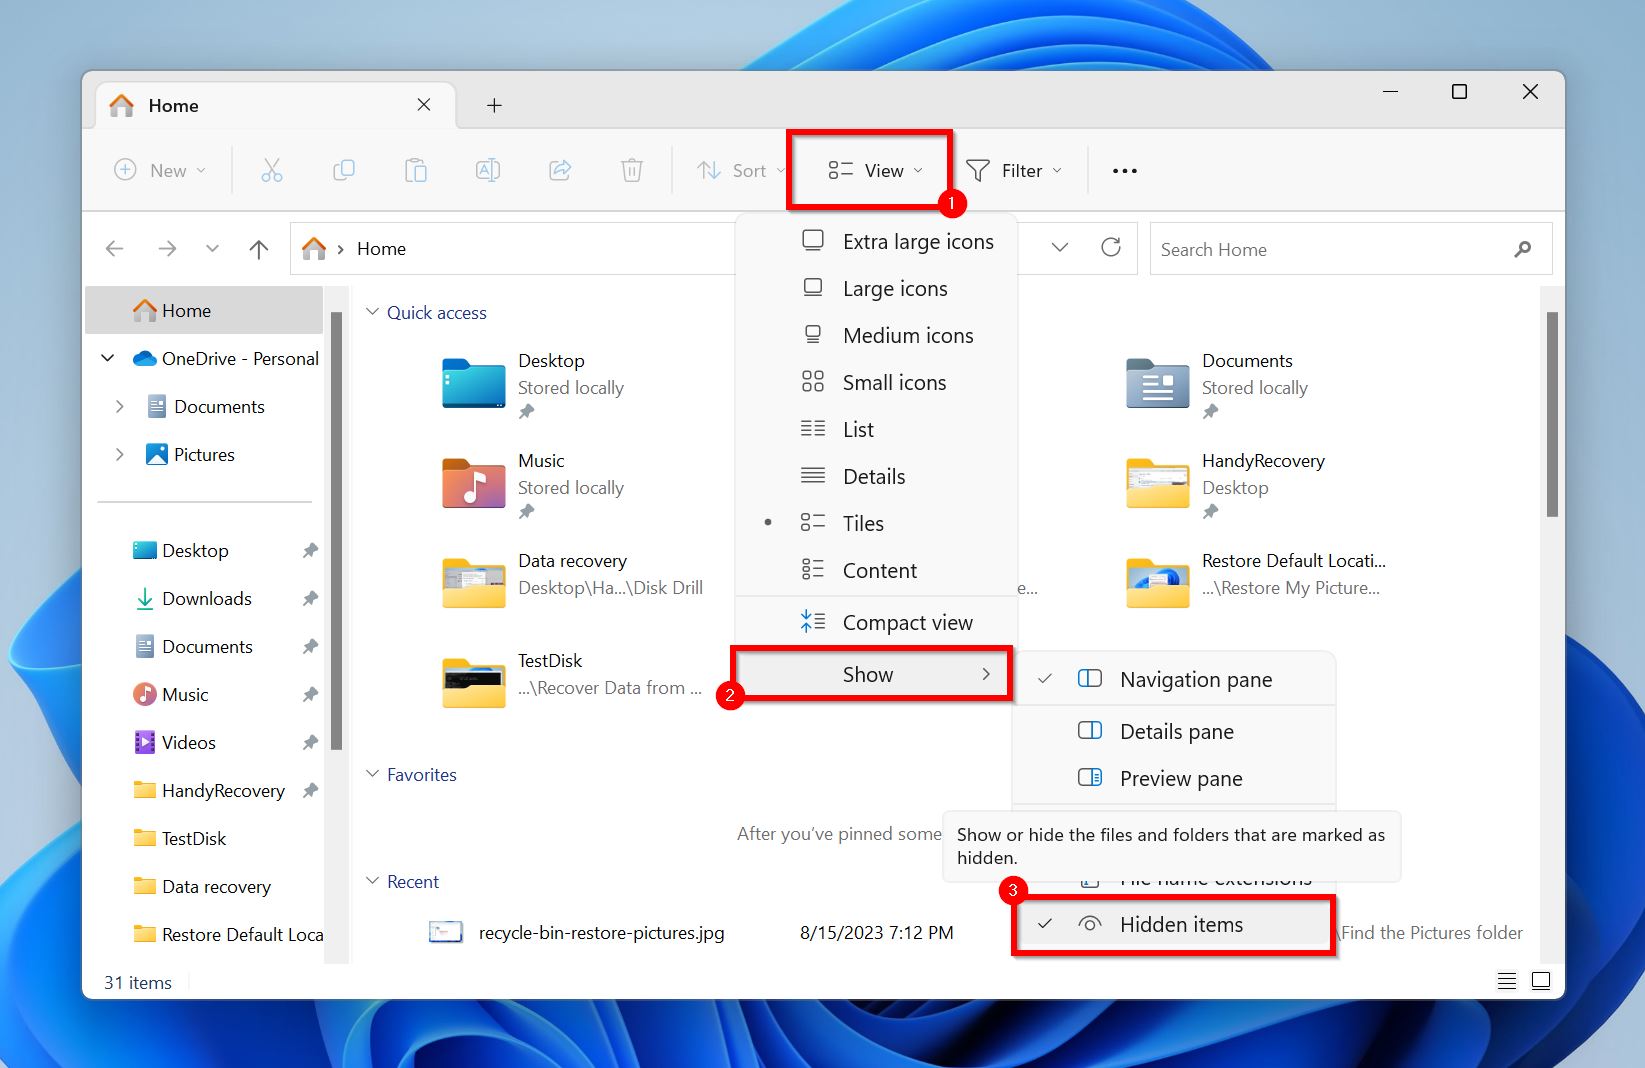
- View Hidden Folders: If the Pictures folder was hidden, it won’t be visible in Windows Explorer, until you enable the Hidden items option. To do this, open Windows Explorer (Windows Key + E) and go to View > Show > Hidden items. Now, try to locate the Pictures folder.
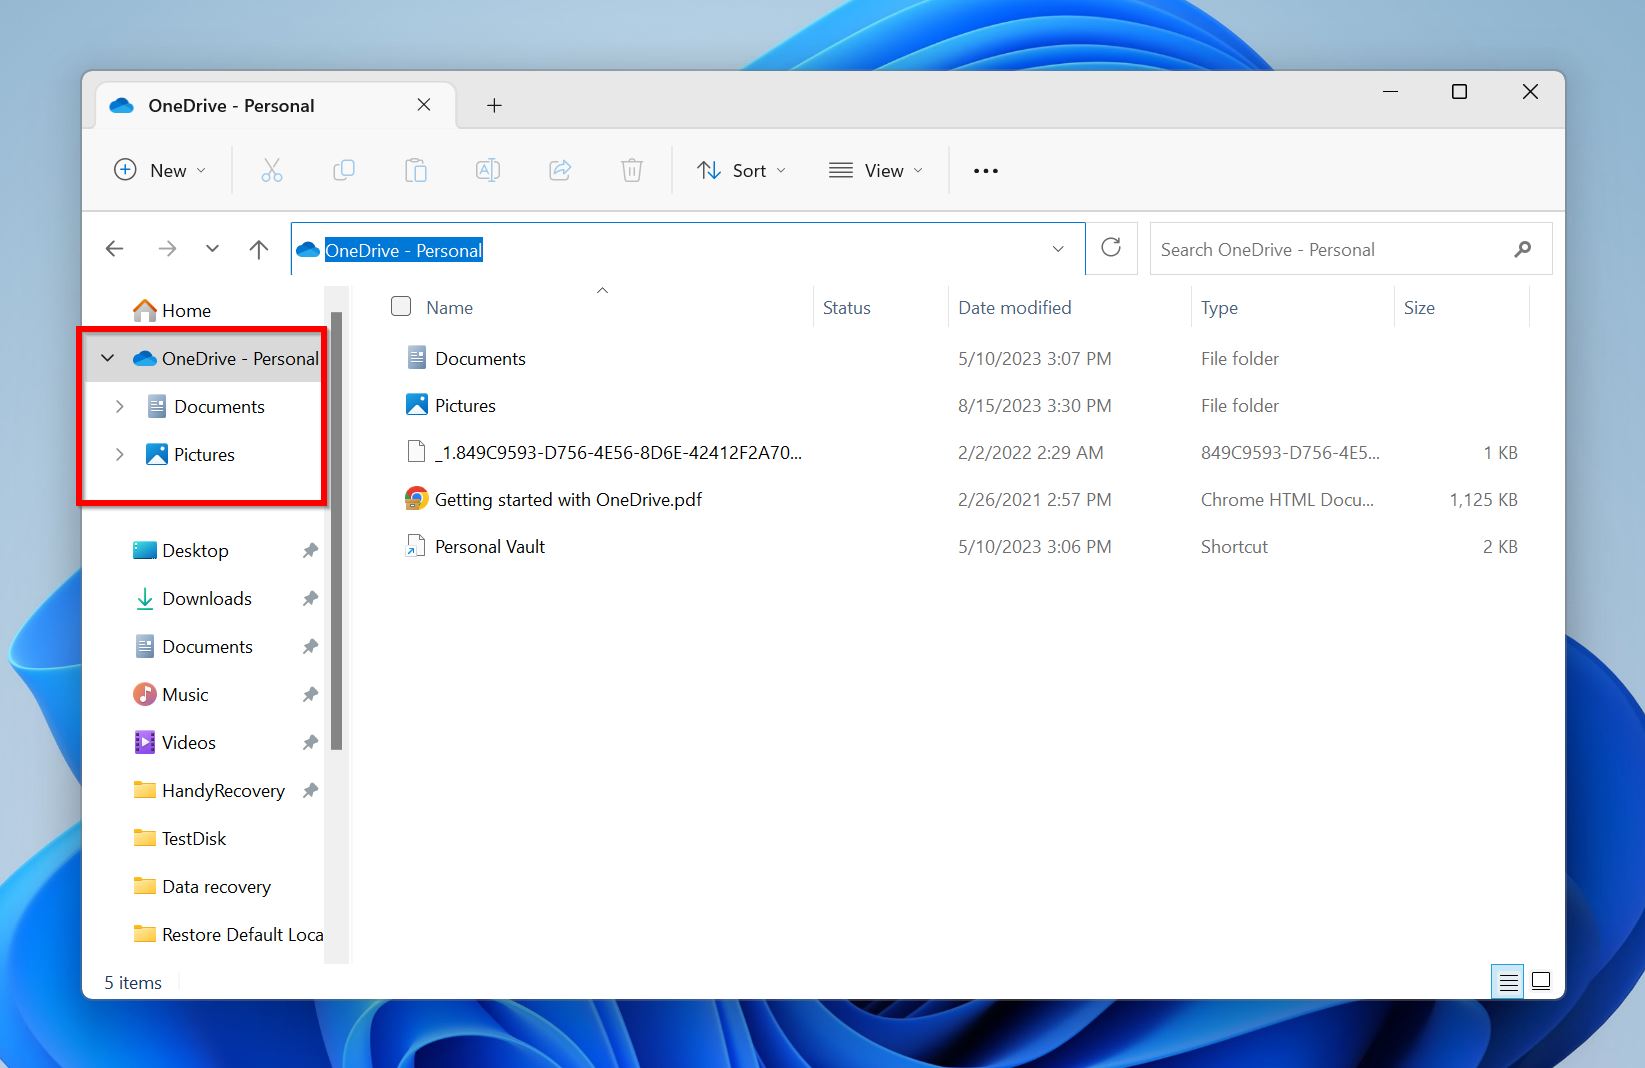
- Check the OneDrive Folder: If you’ve enabled OneDrive and set it up properly, your Pictures and Documents folders are synced to your personal OneDrive folder. It’ll be visible in the navigation bar of Windows Explorer. Click on the OneDrive – Personal folder and the Pictures folder should be there.
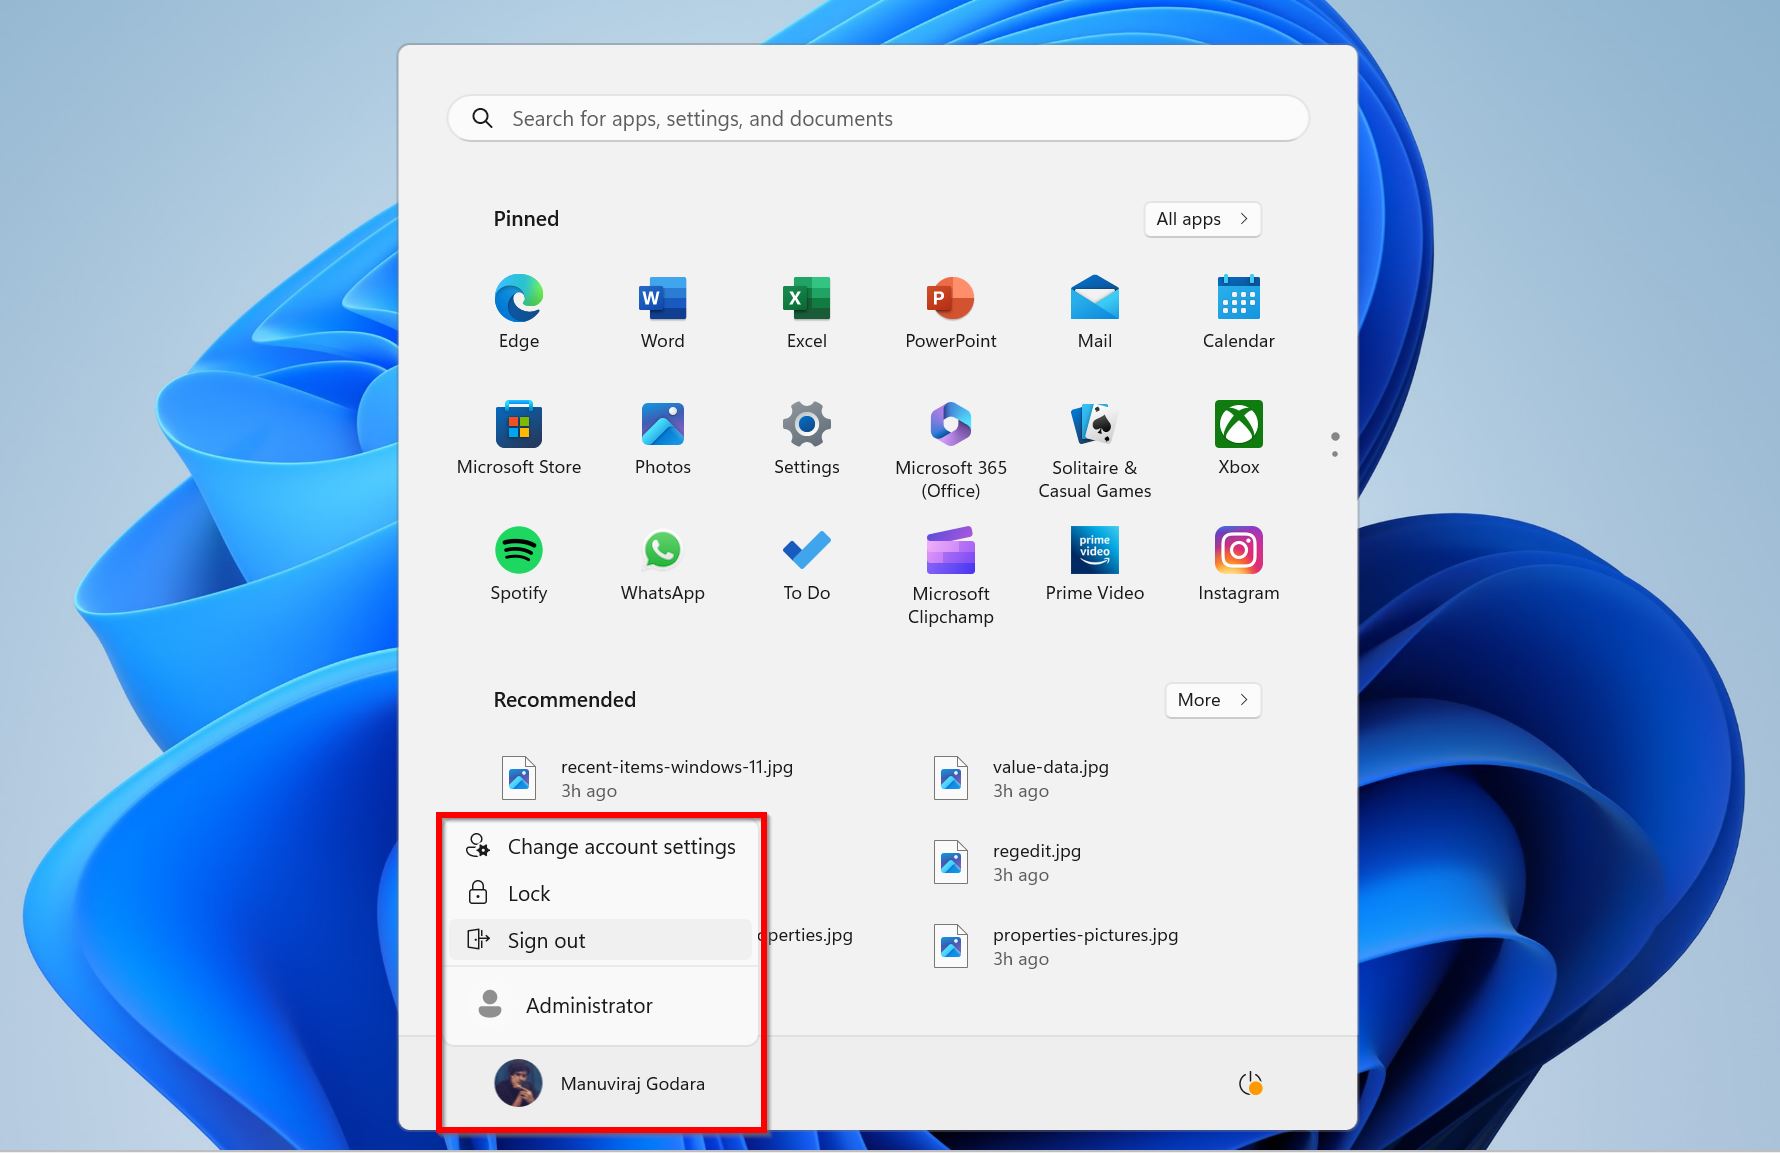
- Use the Correct User Profile: The Pictures folder is unique to each user profile on your computer. If you’re unable to locate your Pictures folder, it’s worth double-checking to see whether you’re logged in to the correct user profile. Simply click on the Start and look in the bottom left corner to see which user profile is currently logged in. If need be, click on the user profile, select Sign out, and log in using the correct user profile.
Method 2: Restore the Pictures Folder’s Default Location
The Pictures folder’s location can be changed, without affecting how it behaves. It’s possible the location was changed, and you’re still trying to find the folder in its default location, i.e., in the C:\Users/YourUsername/ folder.
Regardless of the Pictures folder’s new location, you can use the following steps and restore it to its default location:
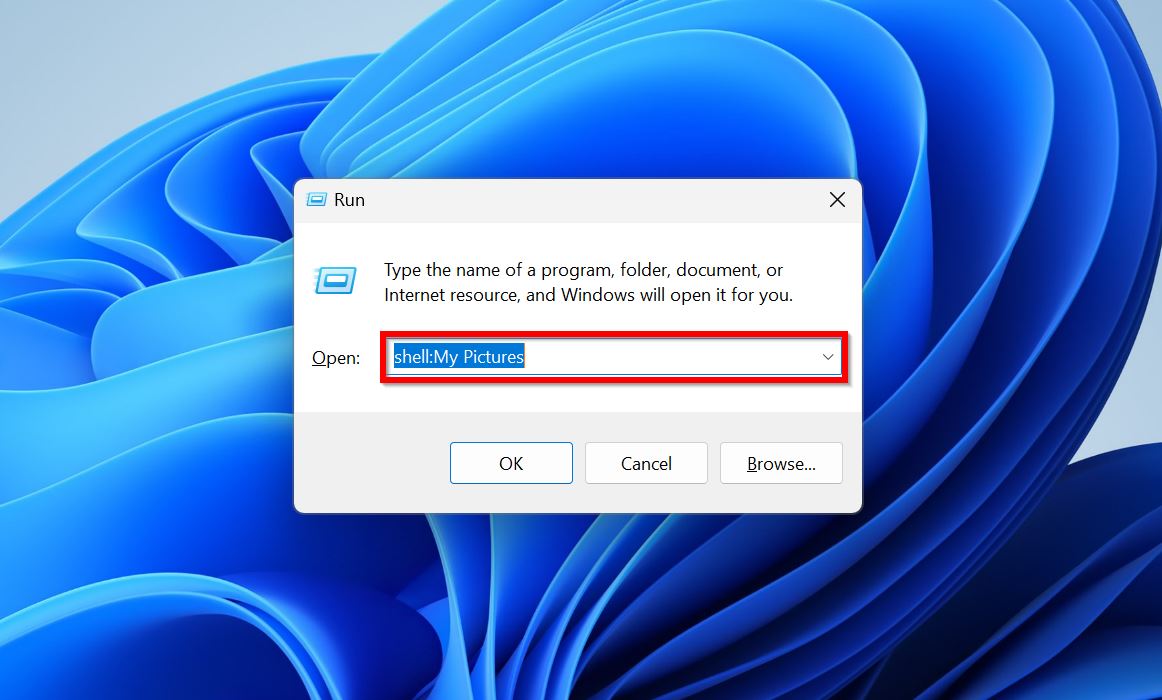
- Press Windows Key + R to launch the Run application. Type shell:My Pictures in the textbox and press Enter. This will open the Pictures folder in a Windows Explorer window. Alternatively, you can open Windows Explorer and type in the shell:My Pictures command in the address bar to open the Pictures folder.
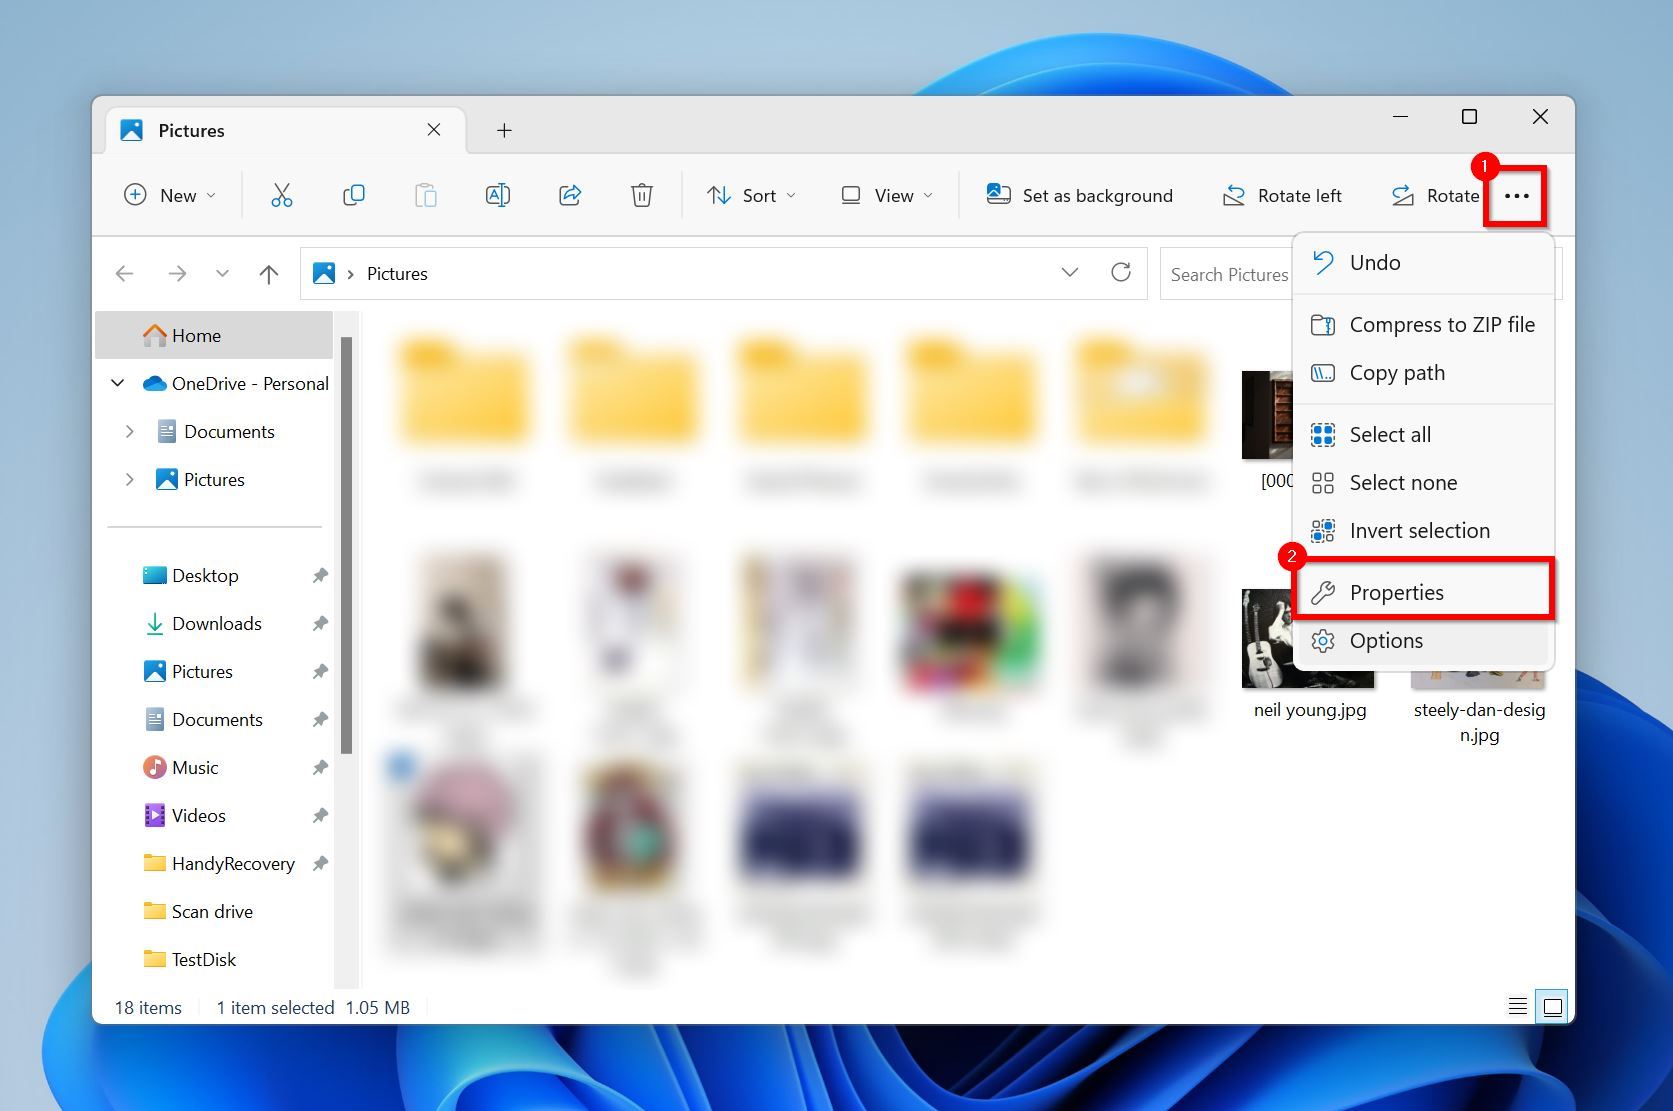
- Click on the three dots towards the top of the window and choose Properties. Ensure that no individual file is selected when you do this, otherwise the Properties window for that particular file will open up.
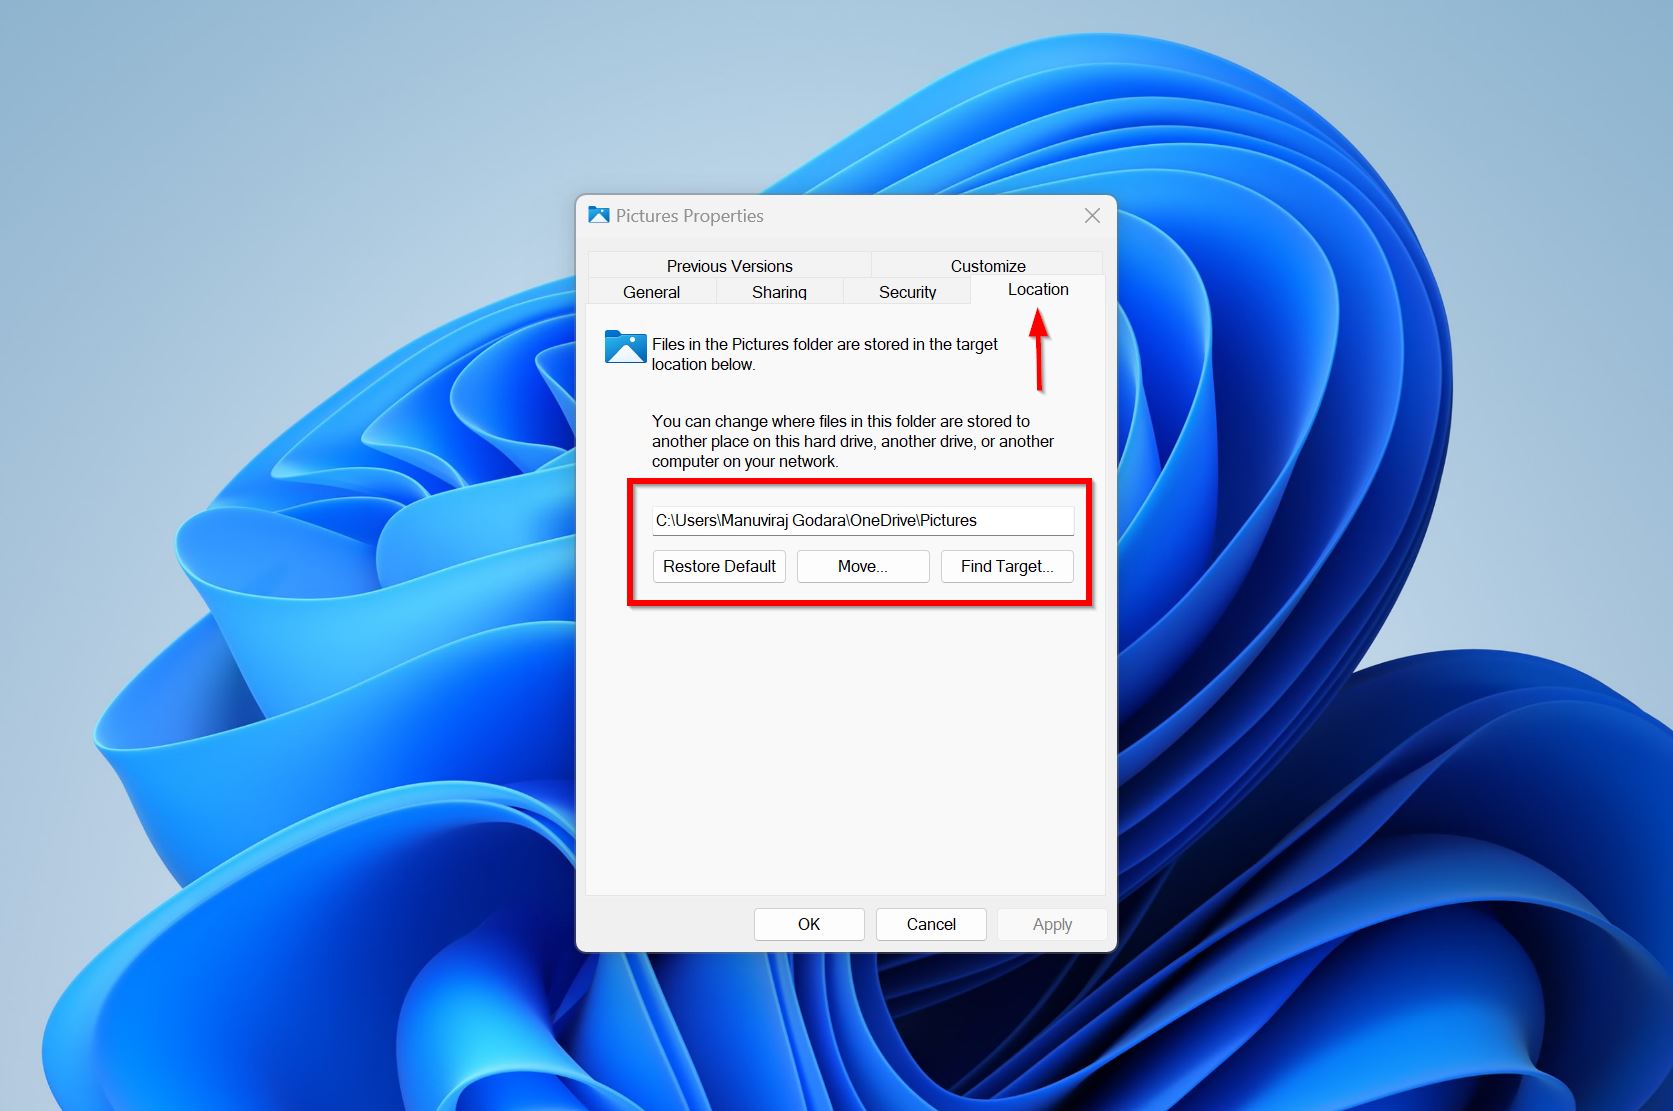
- Go to the Location tab in Properties.
- Click on Move to select a new location for the Pictures folder. You can also click on Restore Default to move the folder back to its default location–in your user folder on the C: drive.
Method 3: Restore the Folder Using the Registry Editor
If the previous method didn’t work, you can use the Registry Editor to restore the Pictures folder on Windows. Editing the Windows Registry is slightly complex and there’s no margin for error, so ensure you follow these steps carefully:
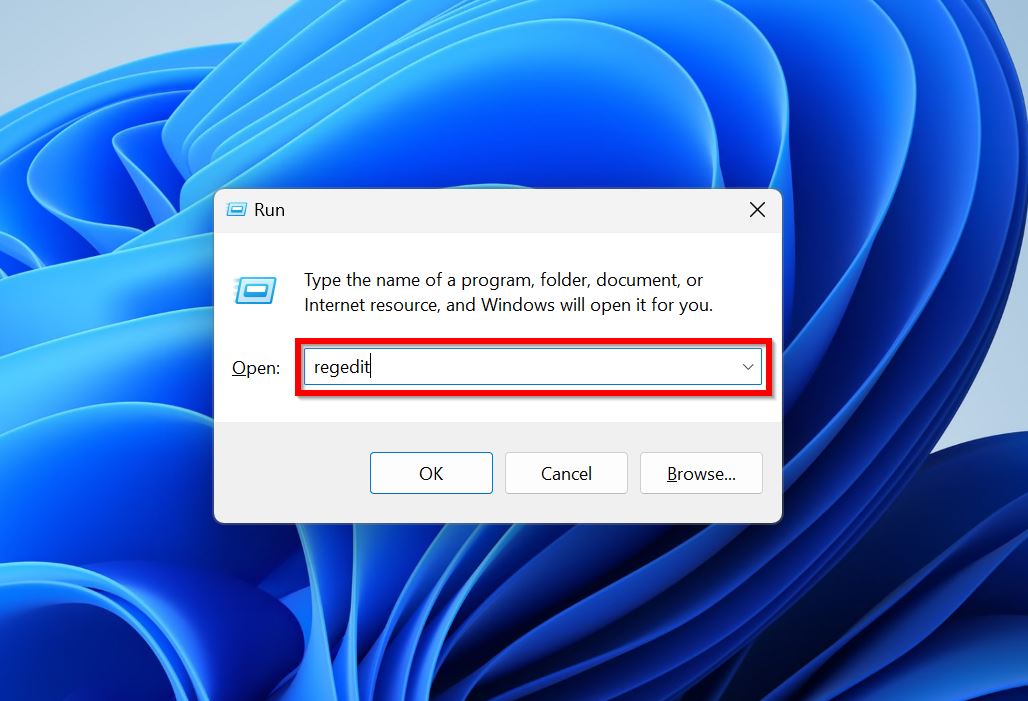
- Press Windows Key + R to launch the Run application.
- Type regedit in the textbox and press Enter to launch the Registry Editor.
- Navigate to the following location in the Registry Editor –
HKEY_CURRENT_USER\SOFTWARE\Microsoft\Windows\CurrentVersion\Explorer\Shell Folders
- Look for an entry labeled, “My Pictures,” and double-click on it.
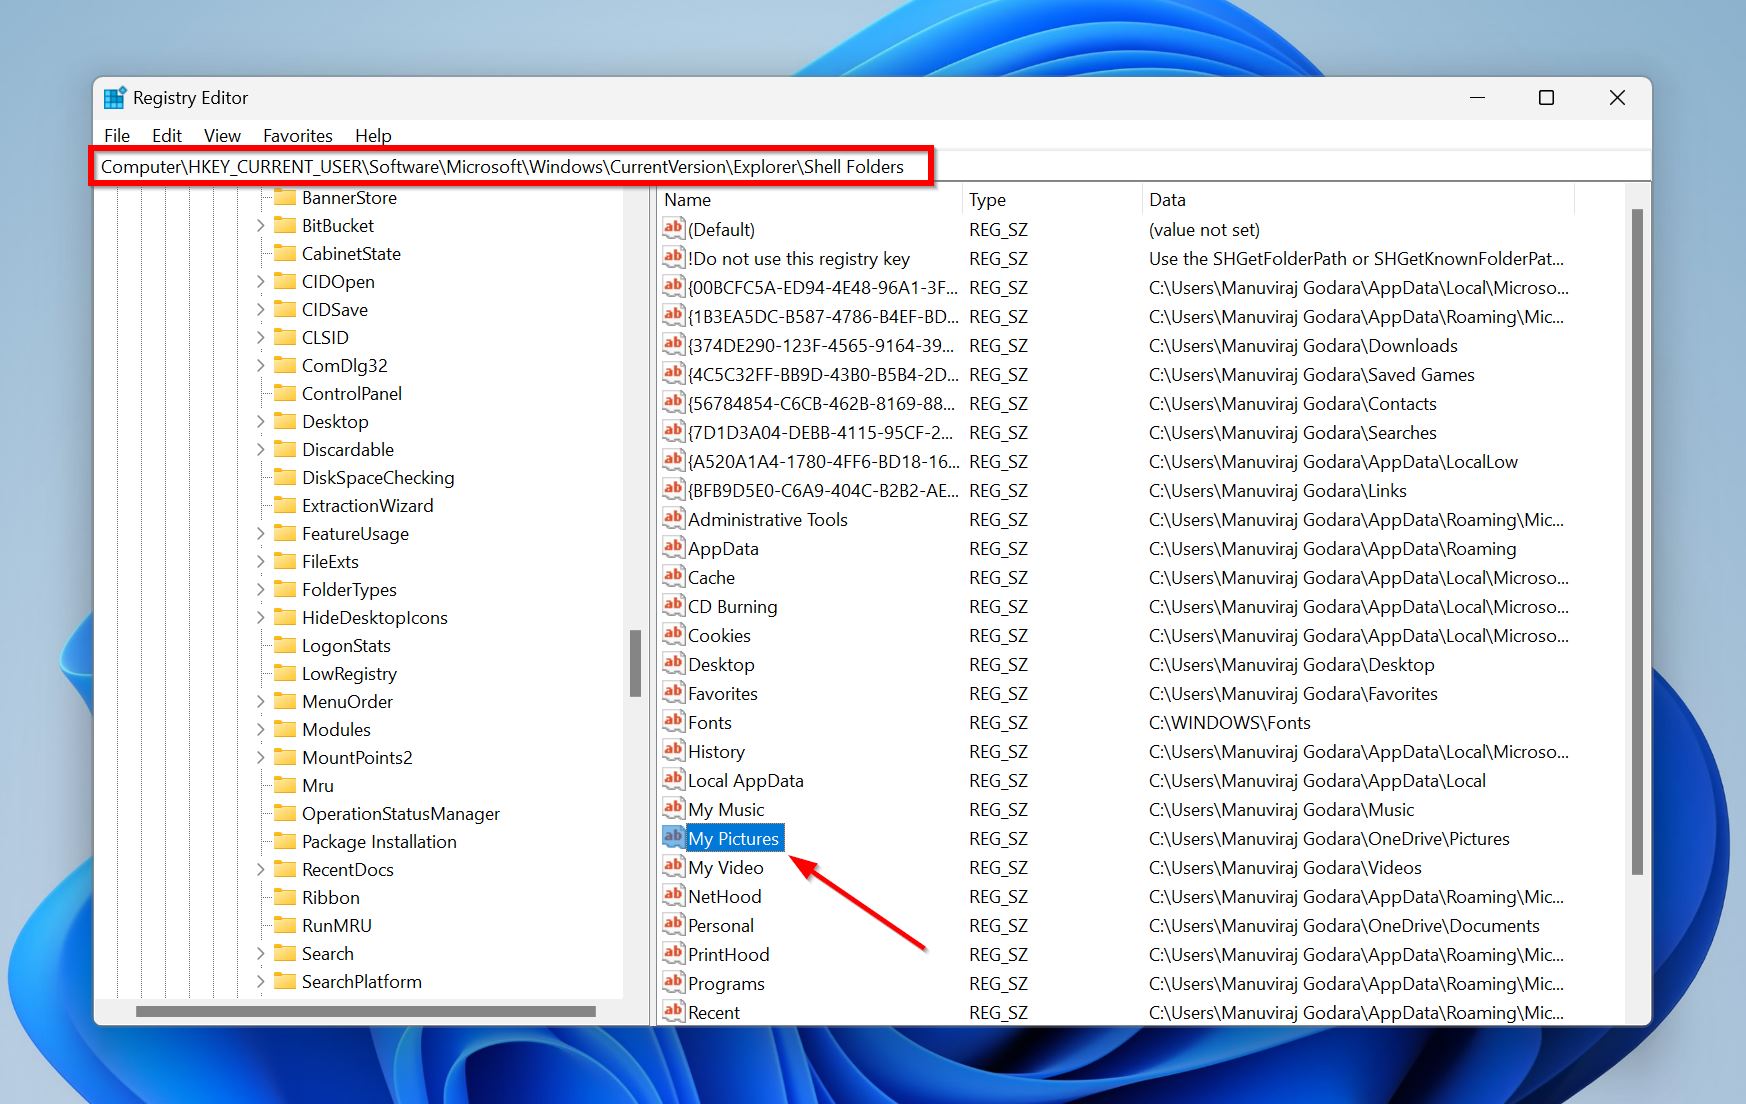
- The Value data filed should have the C:\Users\<username>\Pictures location in it. If it doesn’t, manually change it, replacing <username> with your user account name. You can find this in C:\Users/.
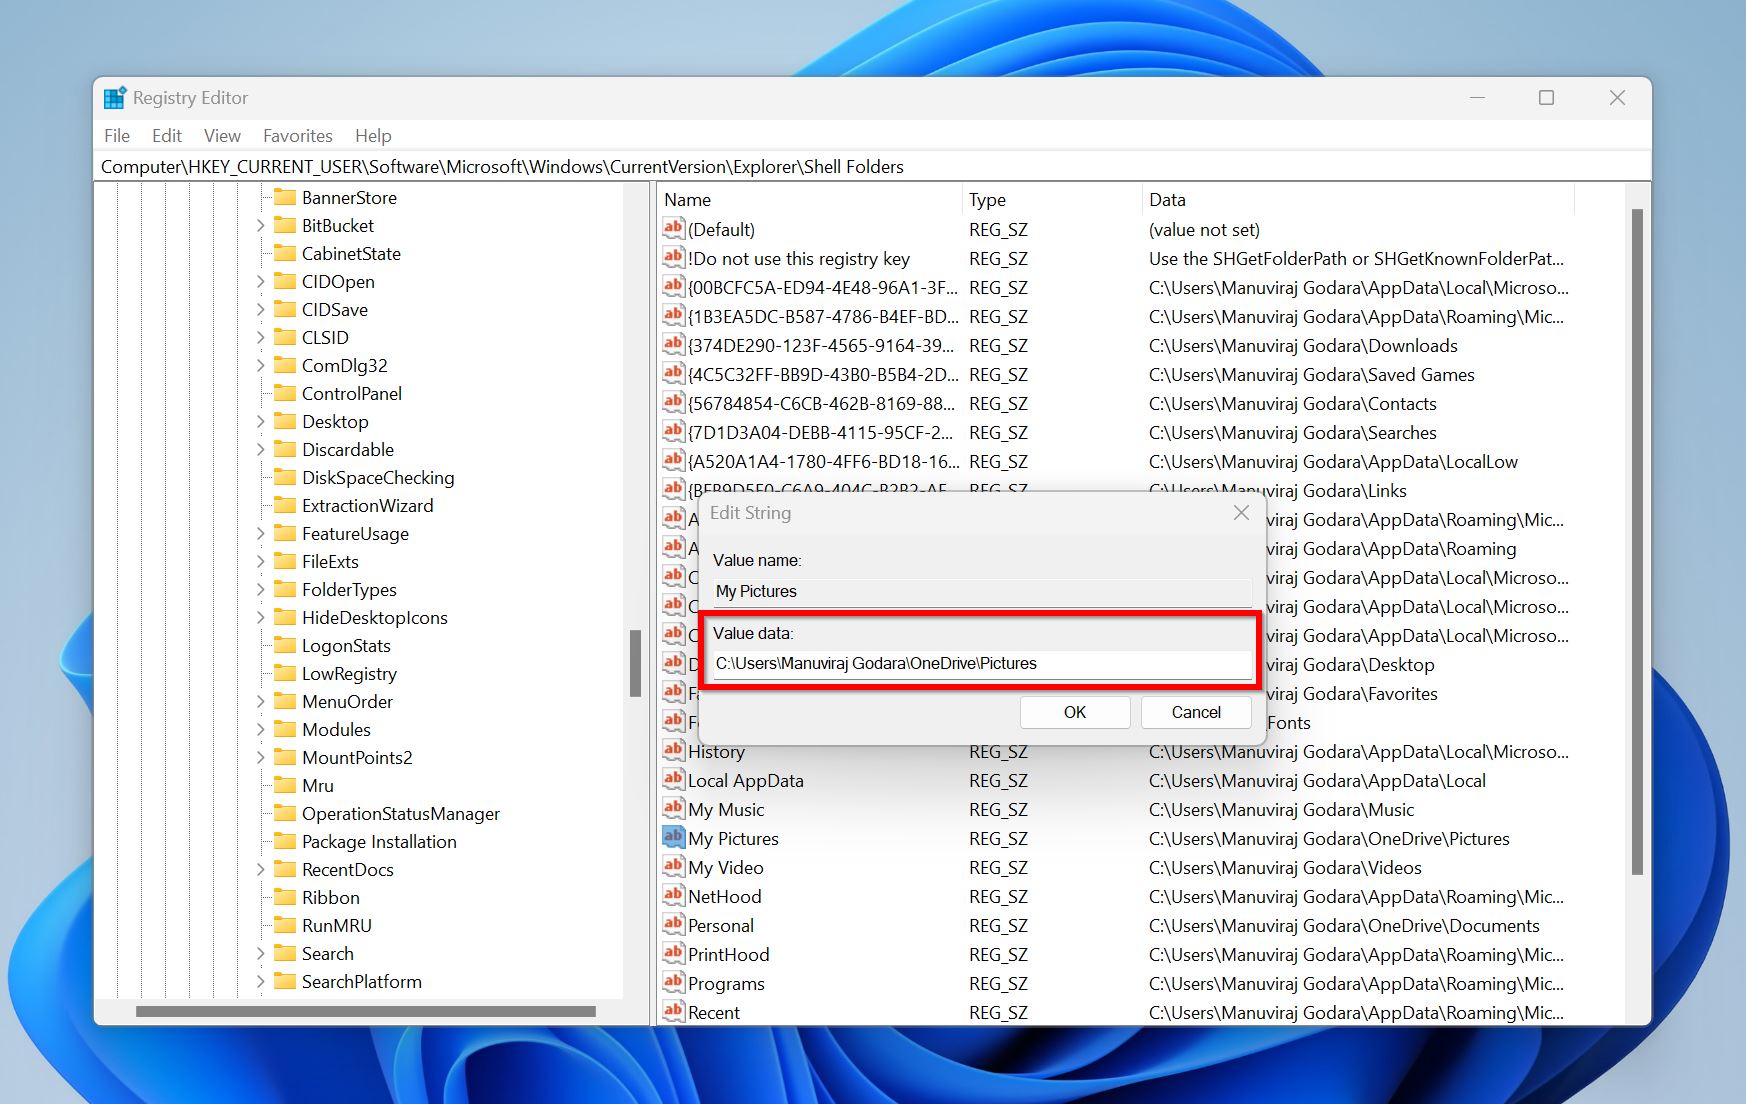
- Click on OK.
- Reboot your PC and you should be able to locate the Pictures folder now.
Method 4: Reset the Quick Access Menu
If you’re like me, you typically open the Pictures folder using the Quick Access menu in Windows Explorer. It’s possible that the Pictures folder is there on your PC, but is no longer visible in the Quick Access menu for some reason. An easy way to fix this is to simply reset the Quick Access menu.
Resetting the Quick Access menu is quite simple on Windows 10–open Windows Explorer, right-click on Quick Access, then choose Options > View tab > Reset folders.
On Windows 11, it’s a little more complex:
- Open Windows Explorer (Windows Key + E).
- Navigate to the following location: %AppData%\Microsoft\Windows\Recent Items. You can copy this, paste it into the Windows Explorer address bar and press Enter for easier access.
- Press CTRL + A to select all items in this location and press Shift + Delete to delete everything.
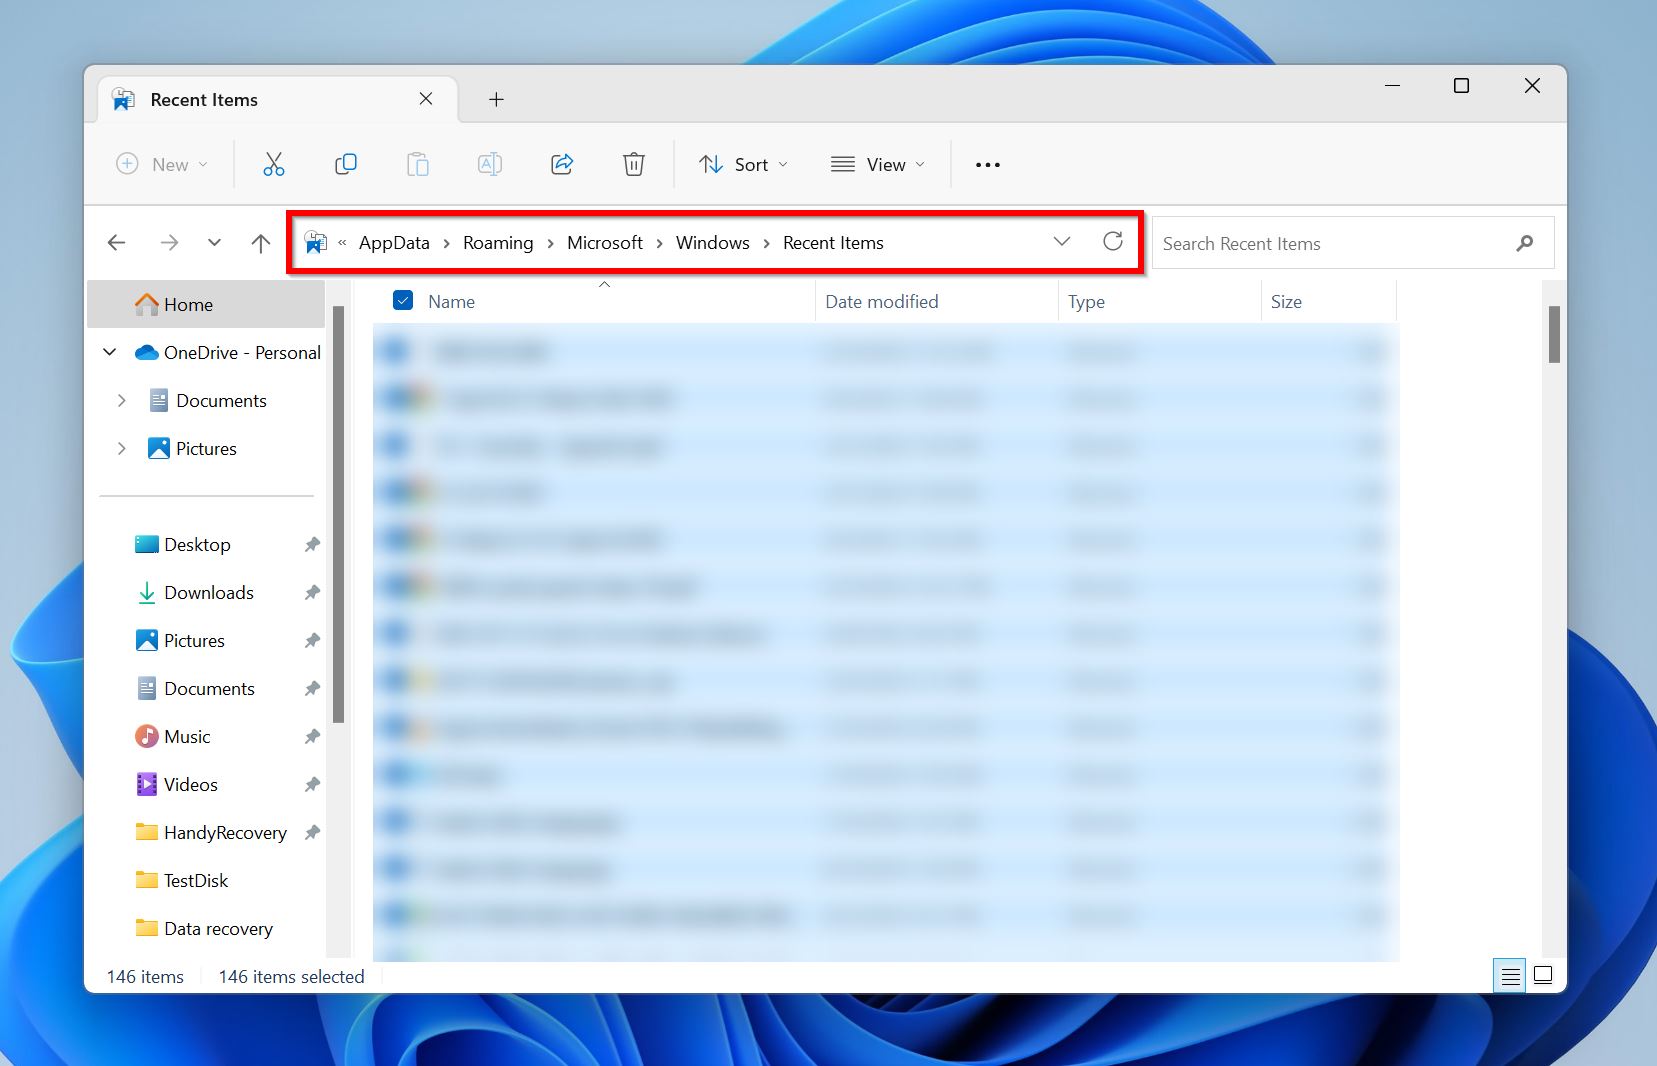
- This will reset the Quick Access menu in Windows 11.
Method 5: Restore the Pictures Folder Using Data Recovery Software
Still unsuccessful at restoring the Pictures folder? This likely indicates that the folder was deleted–accidentally, or because of reasons out of your control. Regardless, you can certainly get it back. How? Well, using data recovery software specifically designed for this purpose.
However, you do need to act quickly and avoid writing new files to your storage drive if you want to maximize the chances of recovering all your photos. Also, be sure to choose a good data recovery program, as the first data recovery scan is usually the most successful. To stay safe, you can stick to the tried and tested program we’ll use in our data recovery tutorial.
Our data recovery program of choice is Disk Drill. It has a proven track record, works with all types of storage drives regardless of the file system in use, and has a useful preview feature for easier identification of your files. The cherry on top is Disk Drill’s simple UI that seeks to simplify, not confuse. Windows users can take advantage of the program’s free trial that lets you recover up to 500 MB of data for free.
Here’s how you can use Disk Drill to restore the Pictures folder on Windows:
- Download Disk Drill and install it. Ideally, do this on an external storage drive to prevent overwriting of your deleted files.
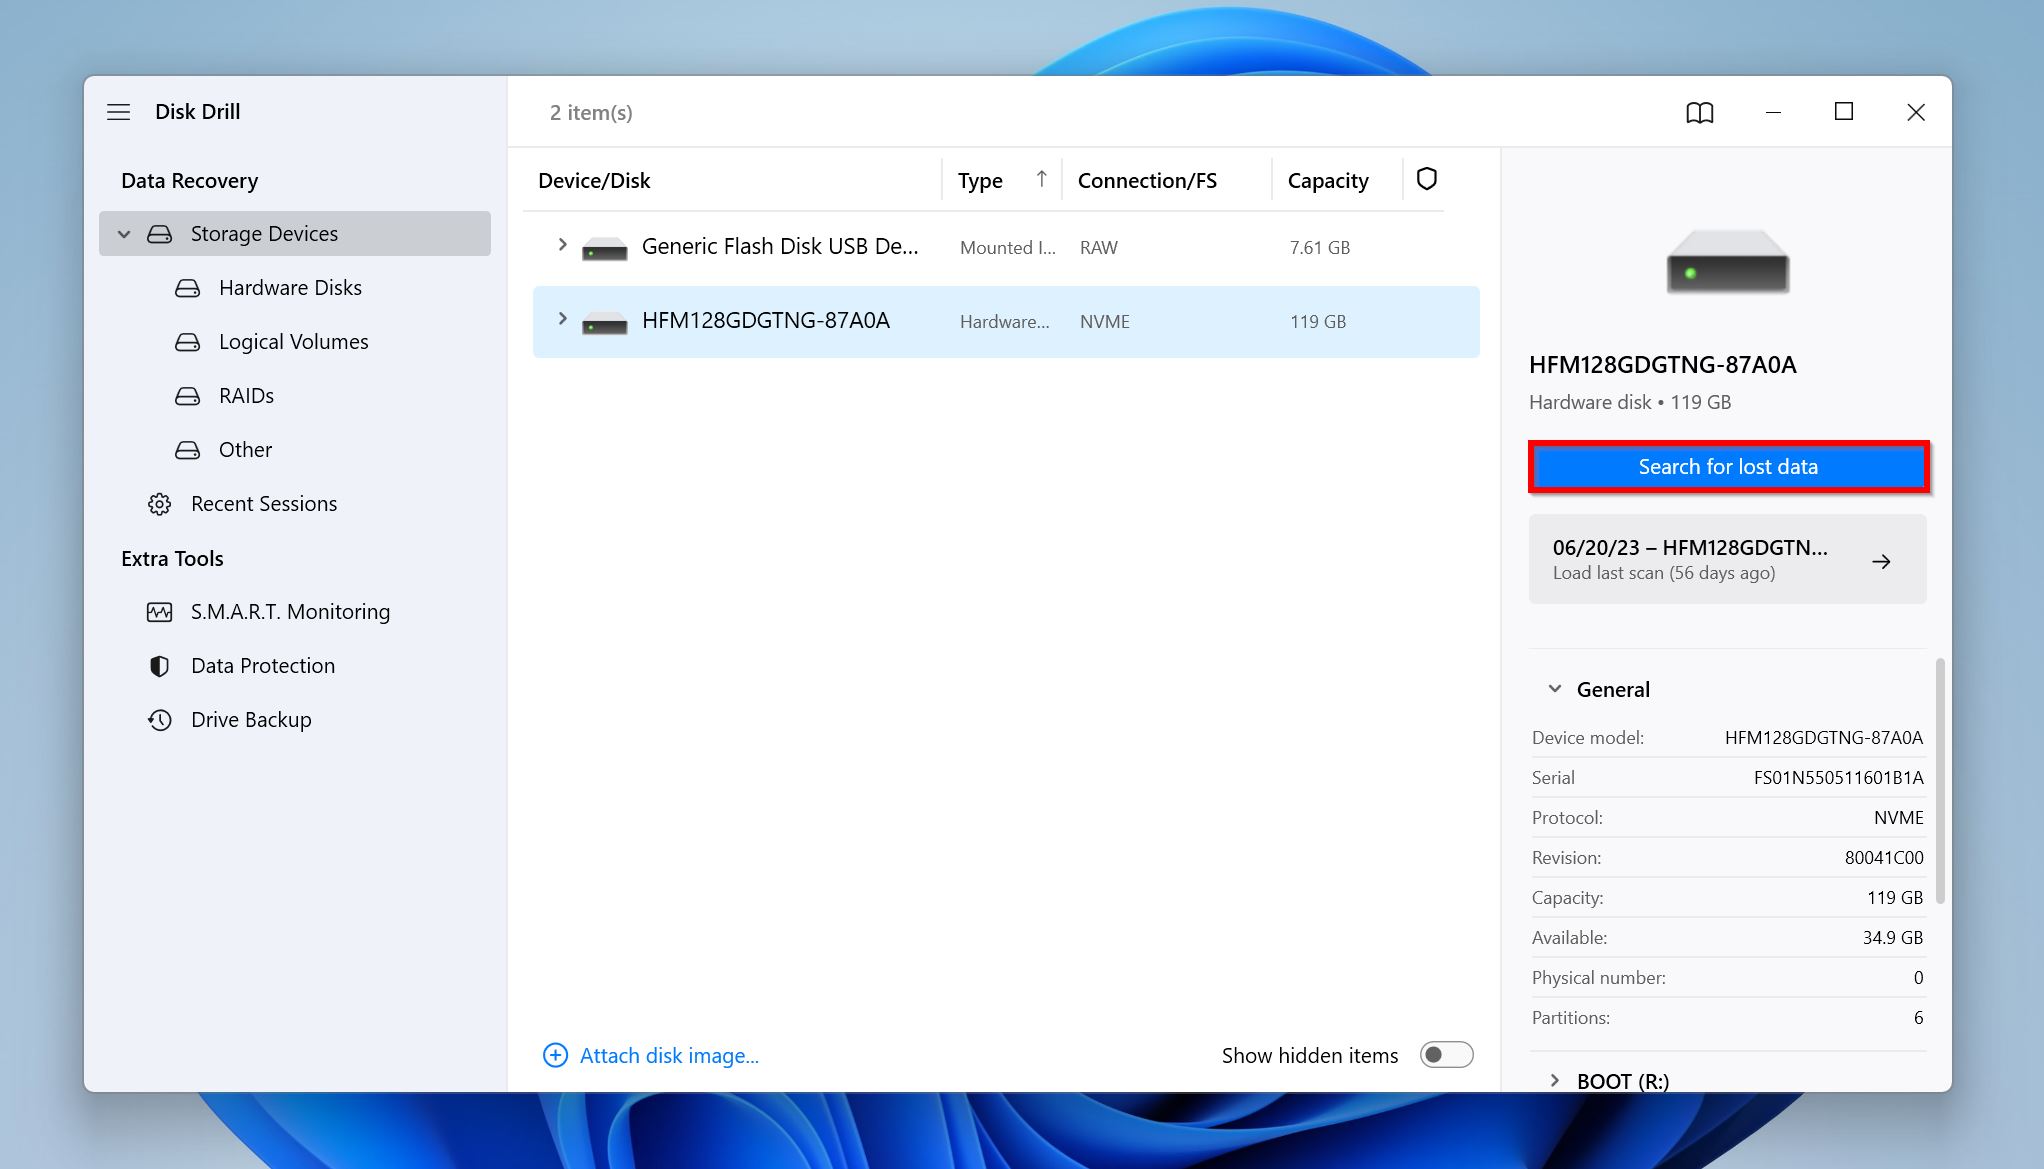
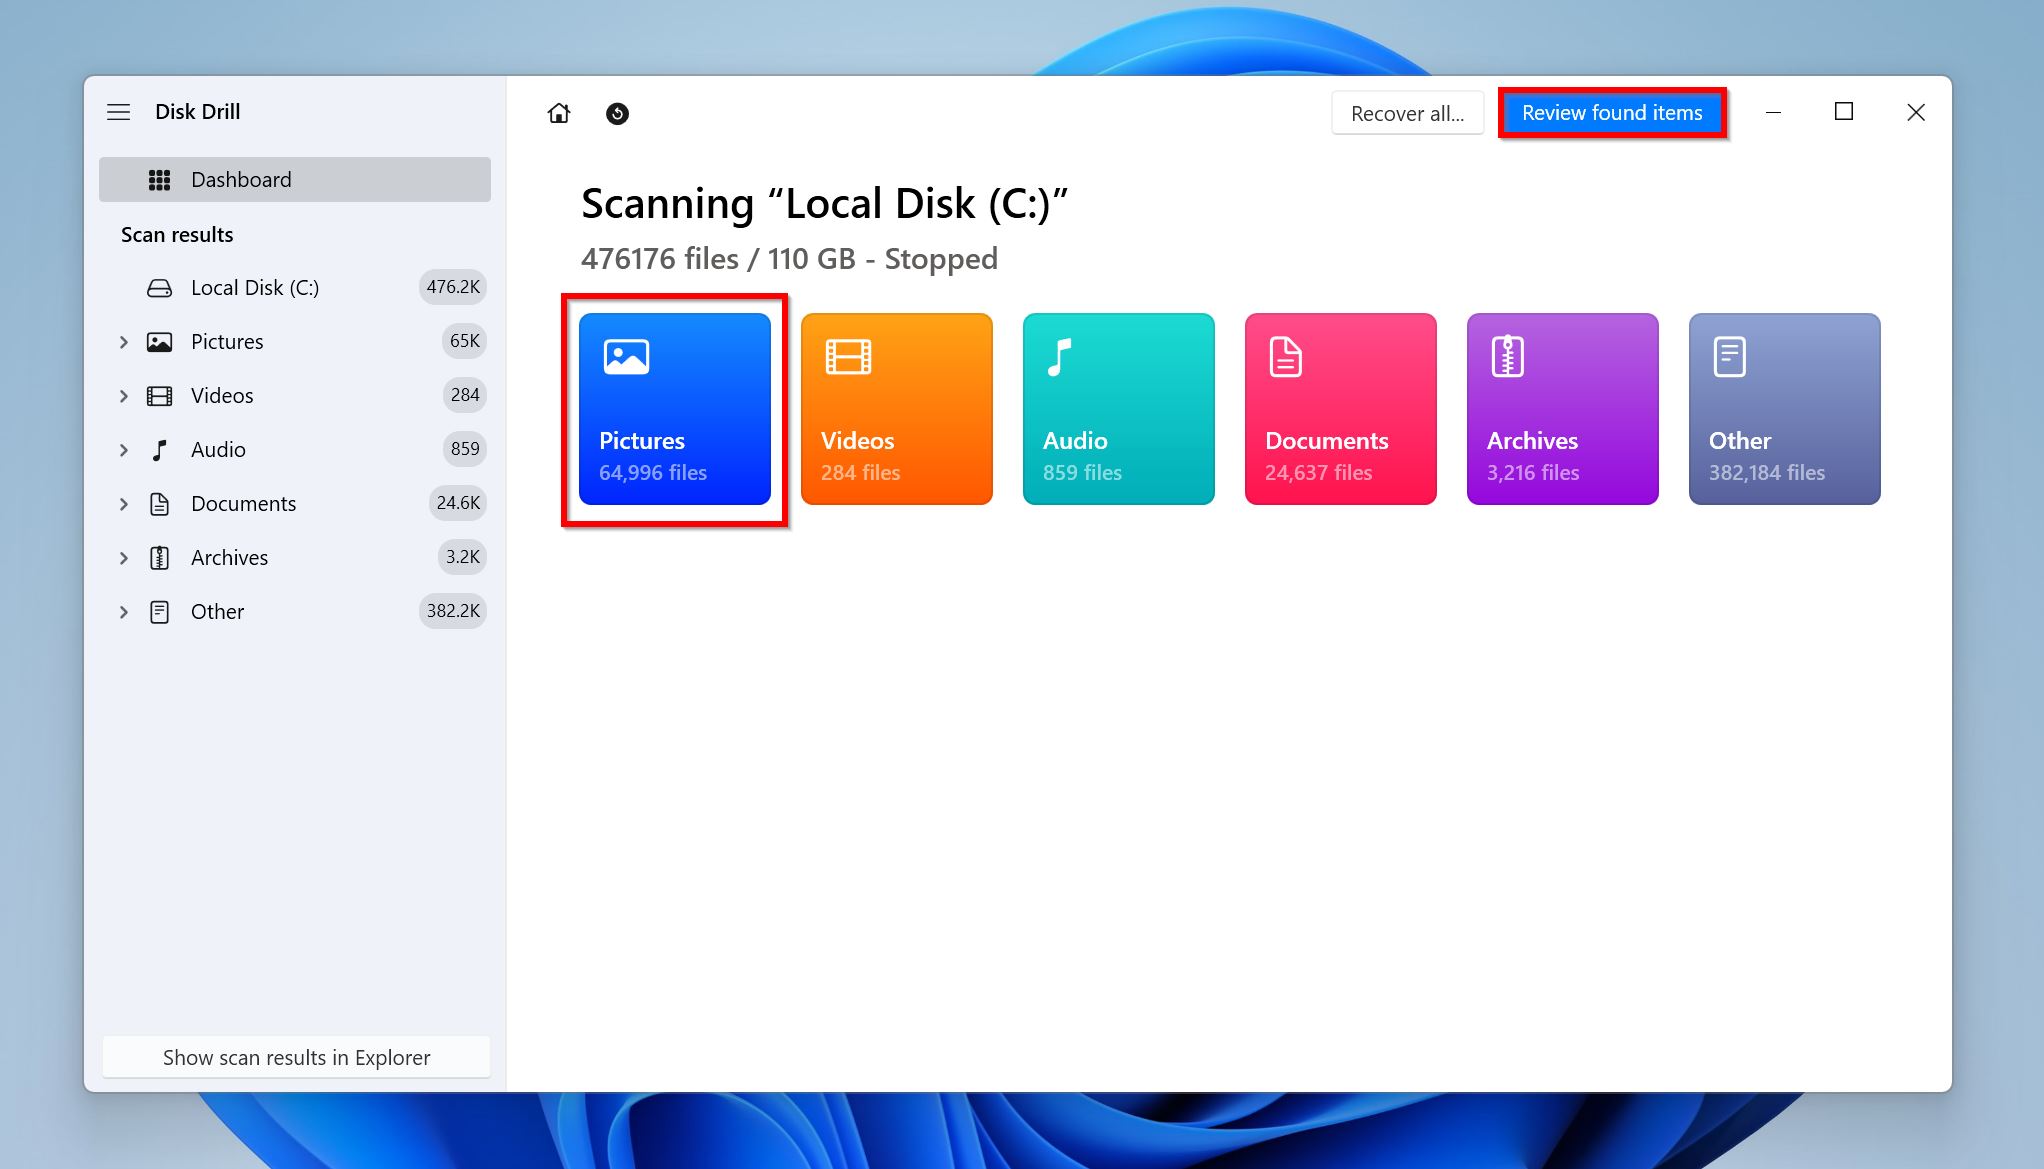
- Open Disk Drill, select the storage drive which contained the Pictures folder, and click on Search for lost data.
- Since we’re looking for pictures, click on Pictures to filter out the results. To view all types of recoverable files, click on Review found items.
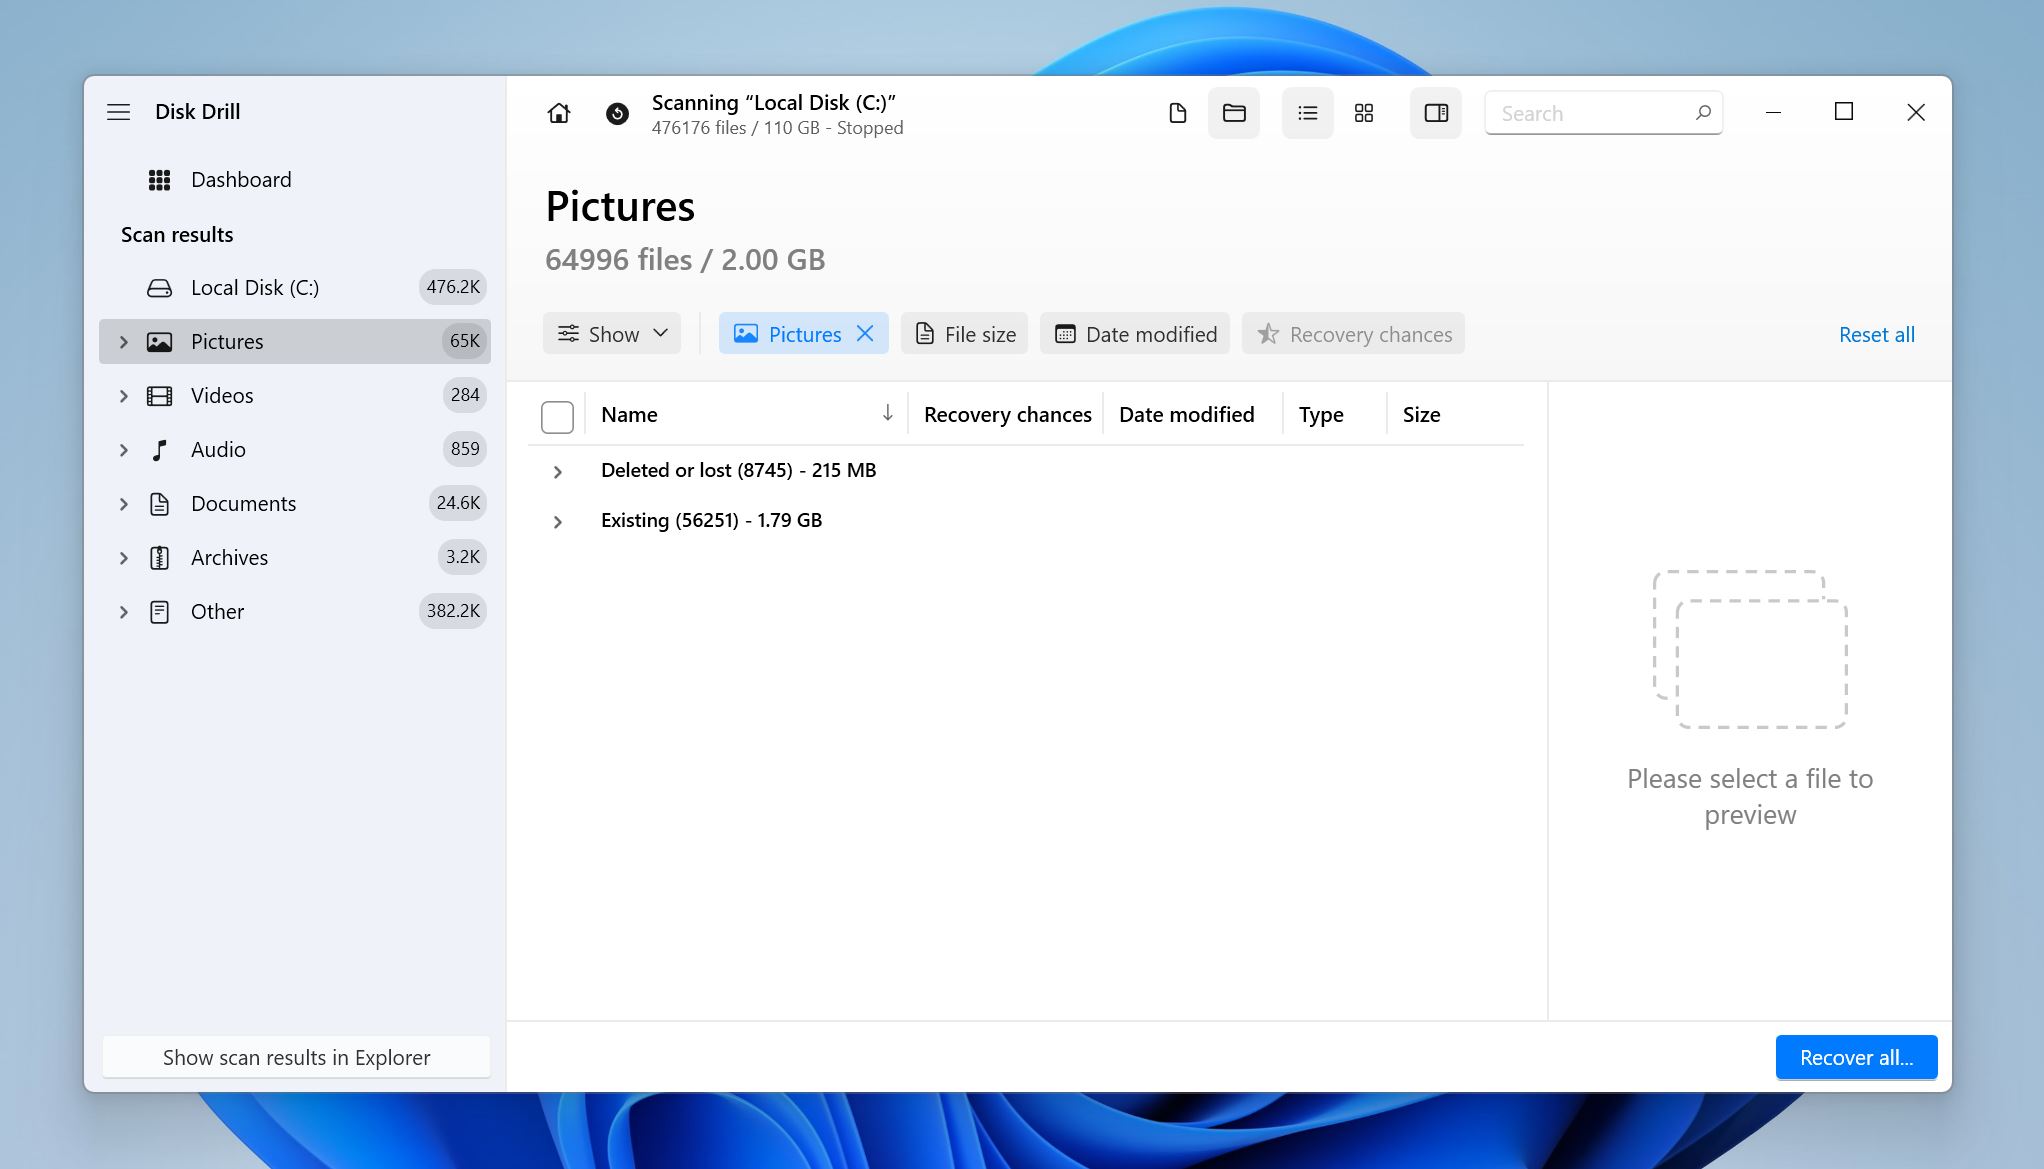
- Expand the Deleted or lost and Reconstructed sections to view deleted items that are recoverable. To view the currently stored items on your disk, expand the Existing section.
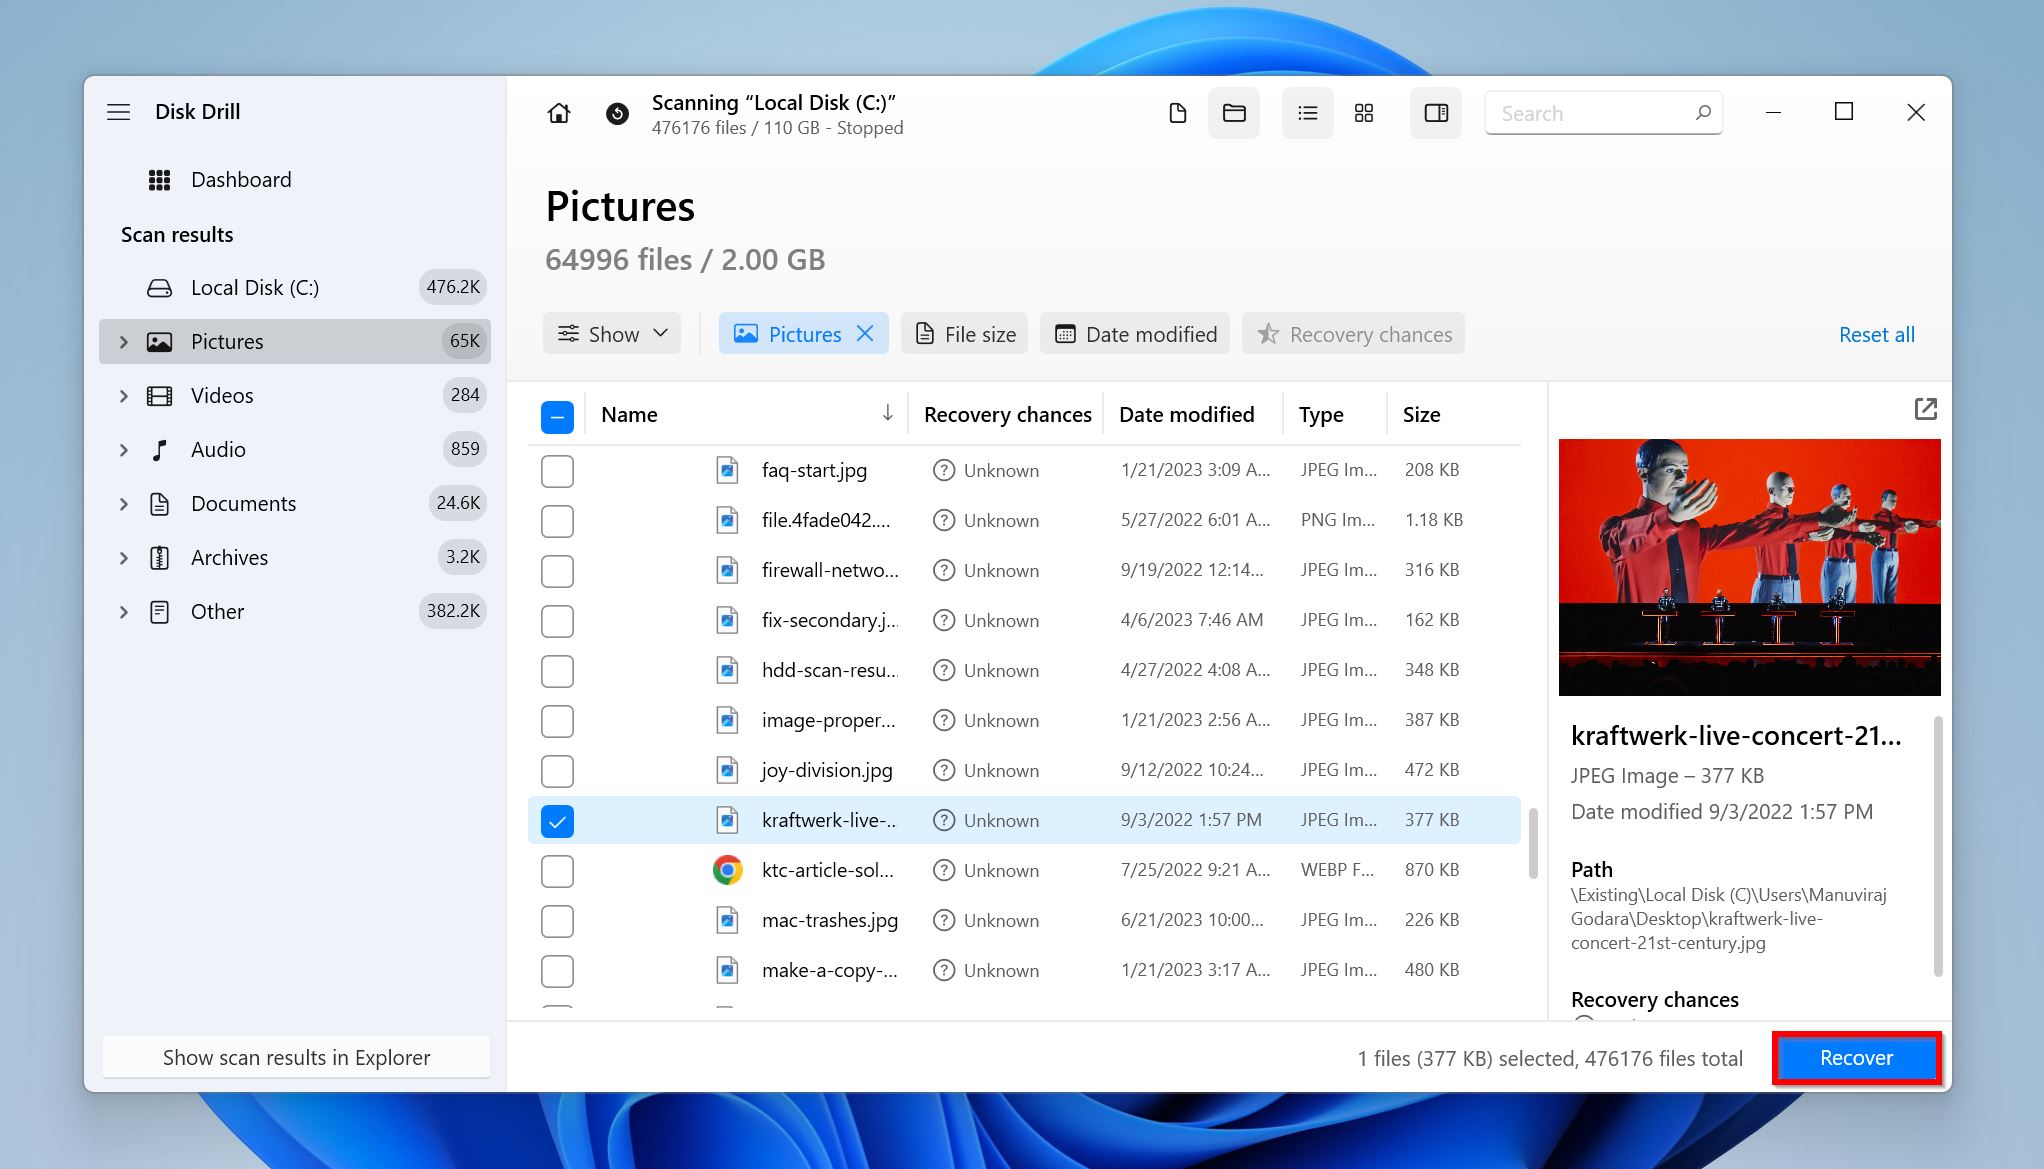
- Using the checkboxes, find the Pictures folder and select the files you wish to recover. Disk Drill will display a preview of the currently selected file, but you can manually preview any file by hovering the cursor over it and then clicking the eye icon that appears. Click on Recover once you’ve confirmed your selection.
- Pick a recovery destination for your files and click on Next.
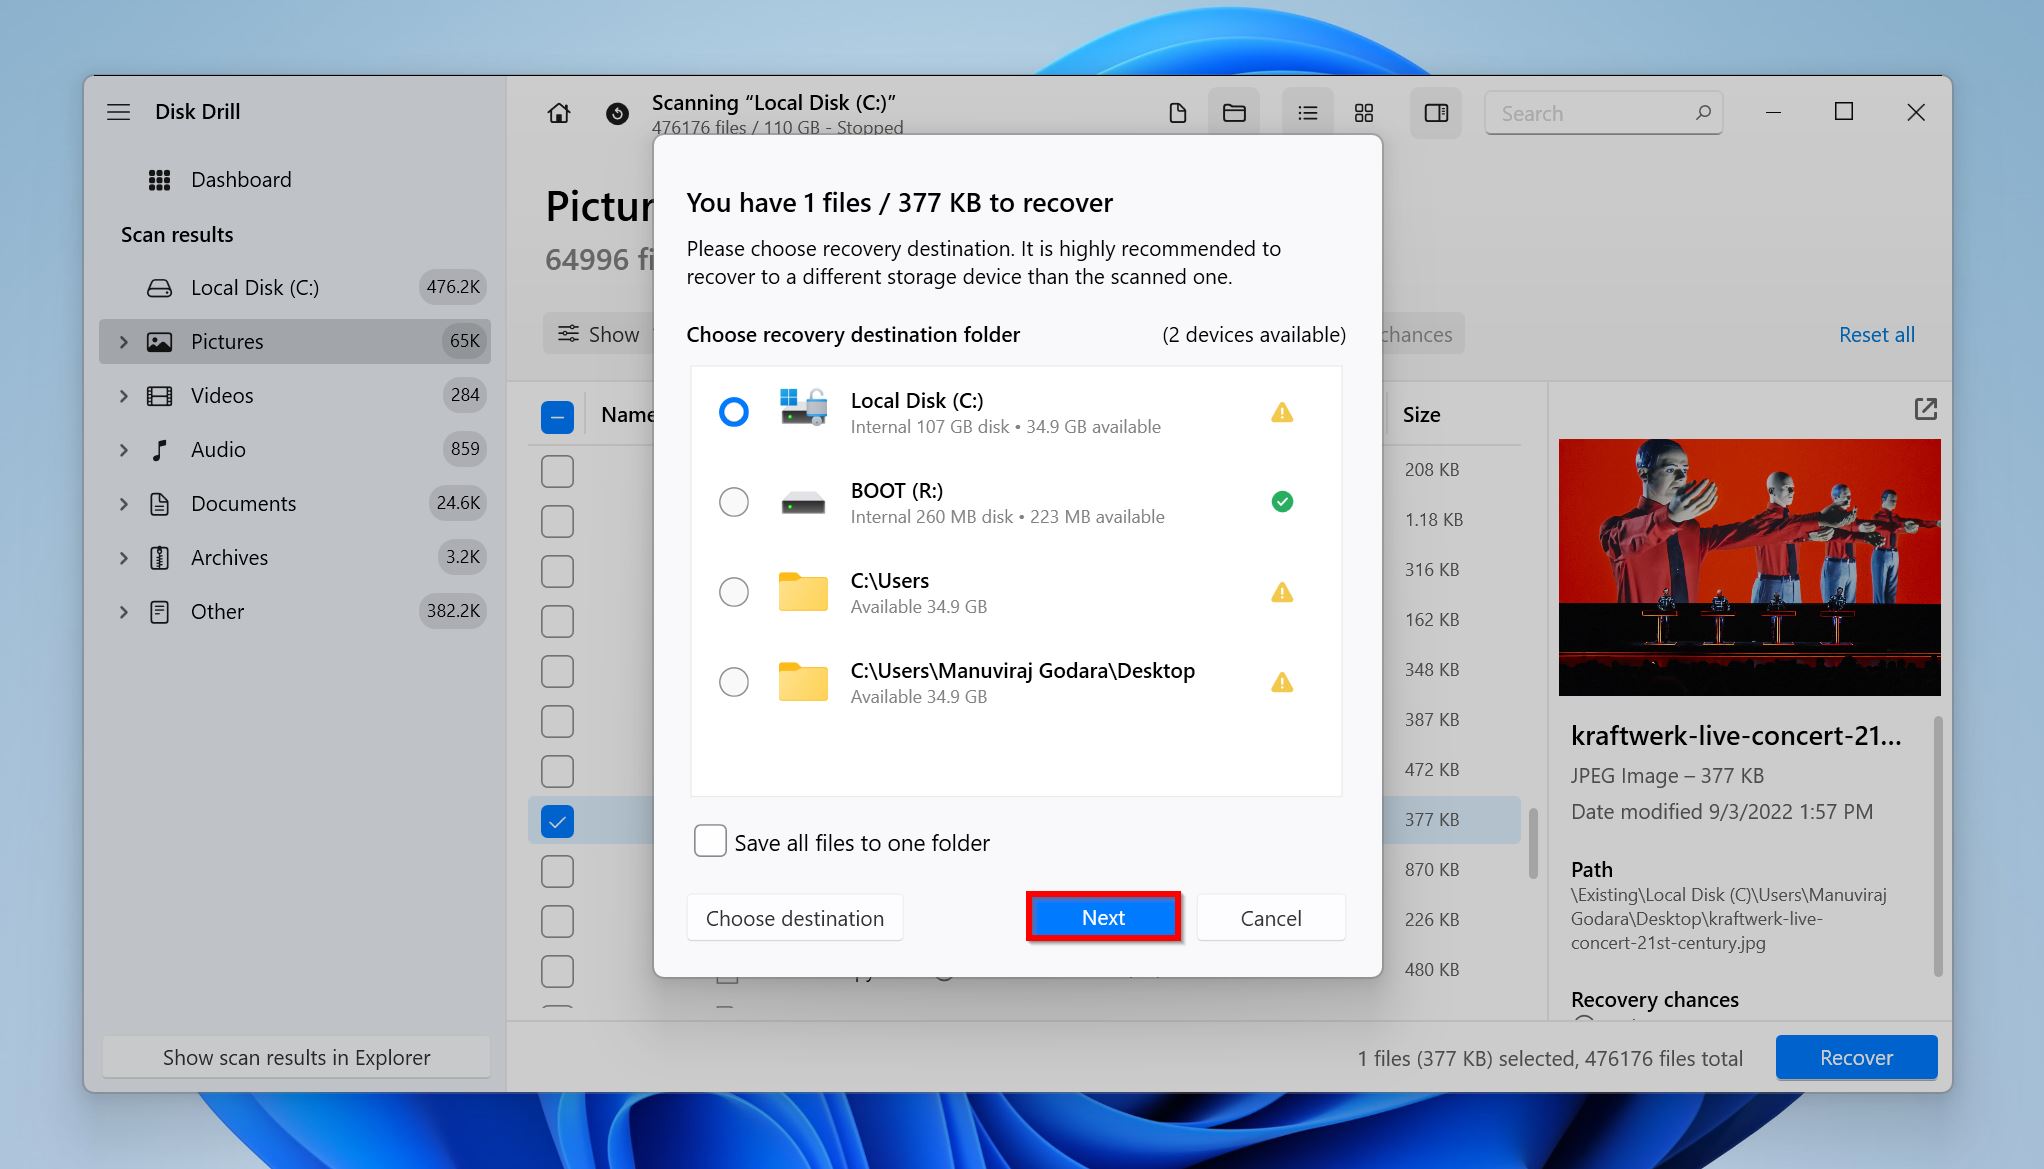
- Disk Drill will recover the selected files.
Note: Data recovery from SSDs can be a little tricky because of the TRIM feature, which automatically cleans up unused data blocks at regular intervals. The TRIM command is automatically executed, typically during startup. If the TRIM command was executed before you attempted data recovery, it’s next to impossible to recover deleted files using data recovery software.
Conclusion
It’s usually a simple affair to recover the Pictures folder that disappeared because in most cases the folder is simply hidden from view, and not deleted. Deal with the common offenders first–look in the Recycle Bin, ensure Hidden items are enabled, check the OneDrive folder, and make sure you’re logged in using the correct user profile. You can then attempt to restore the folder using the Registry Editor
If none of the previous methods bear any fruit, you can always use a good data recovery program to recover the files stored in the Pictures folder.
FAQ
- Search for the file in the Windows Explorer search box.
- Look in the Recycle Bin and restore the file if it’s there.
- Enable the Hidden items option and see if the file appears.
- Check your OneDrive folder.
- Use a data recovery program to recover the file if it cannot be located using any of the previous methods.


