 Partitions make data organization significantly easier, and most storage drives have multiple partitions. If you’re unable to access a specific partition on your drive, or it has suddenly disappeared from the Windows File Explorer, the partition could be corrupt. Fortunately, DIY partition repair is possible and it’s easier than you think. We guide you through the process in our guide below.
Table of Contents
Before We Begin: Recover Your Data
Fixing corrupt partitions can often entail data loss—you may have to run utilities like CHKDSK (which can sometimes cause data loss), or you may have to format your drive entirely. Therefore, it’s crucial to first ensure the safety of your data and recover it, before attempting to repair a partition on Windows.
The most user-friendly way to recover your data is third-party data recovery software. There are plenty of such programs available on the web, and most of them should be able to recover data from your drive, even if it has a damaged or corrupt partition.
For this tutorial, we opted to use Disk Drill – a capable, and user-friendly data recovery program. The program supports all major file systems across Windows and macOS. In fact, it’ll even work with RAW drives, i.e., drives that have a missing or corrupt file system. The best part of Disk Drill is that it lets you create and scan disk images–an effective way to prevent further data loss and protect your drive from repeated, stressful data recovery scans.
Let’s see how you can recover your data before attempting partition repair:
Step 1: Create a Disk Image (Optional)
- Download Disk Drill and install it. Do it on another drive and not the one with a corrupt partition.
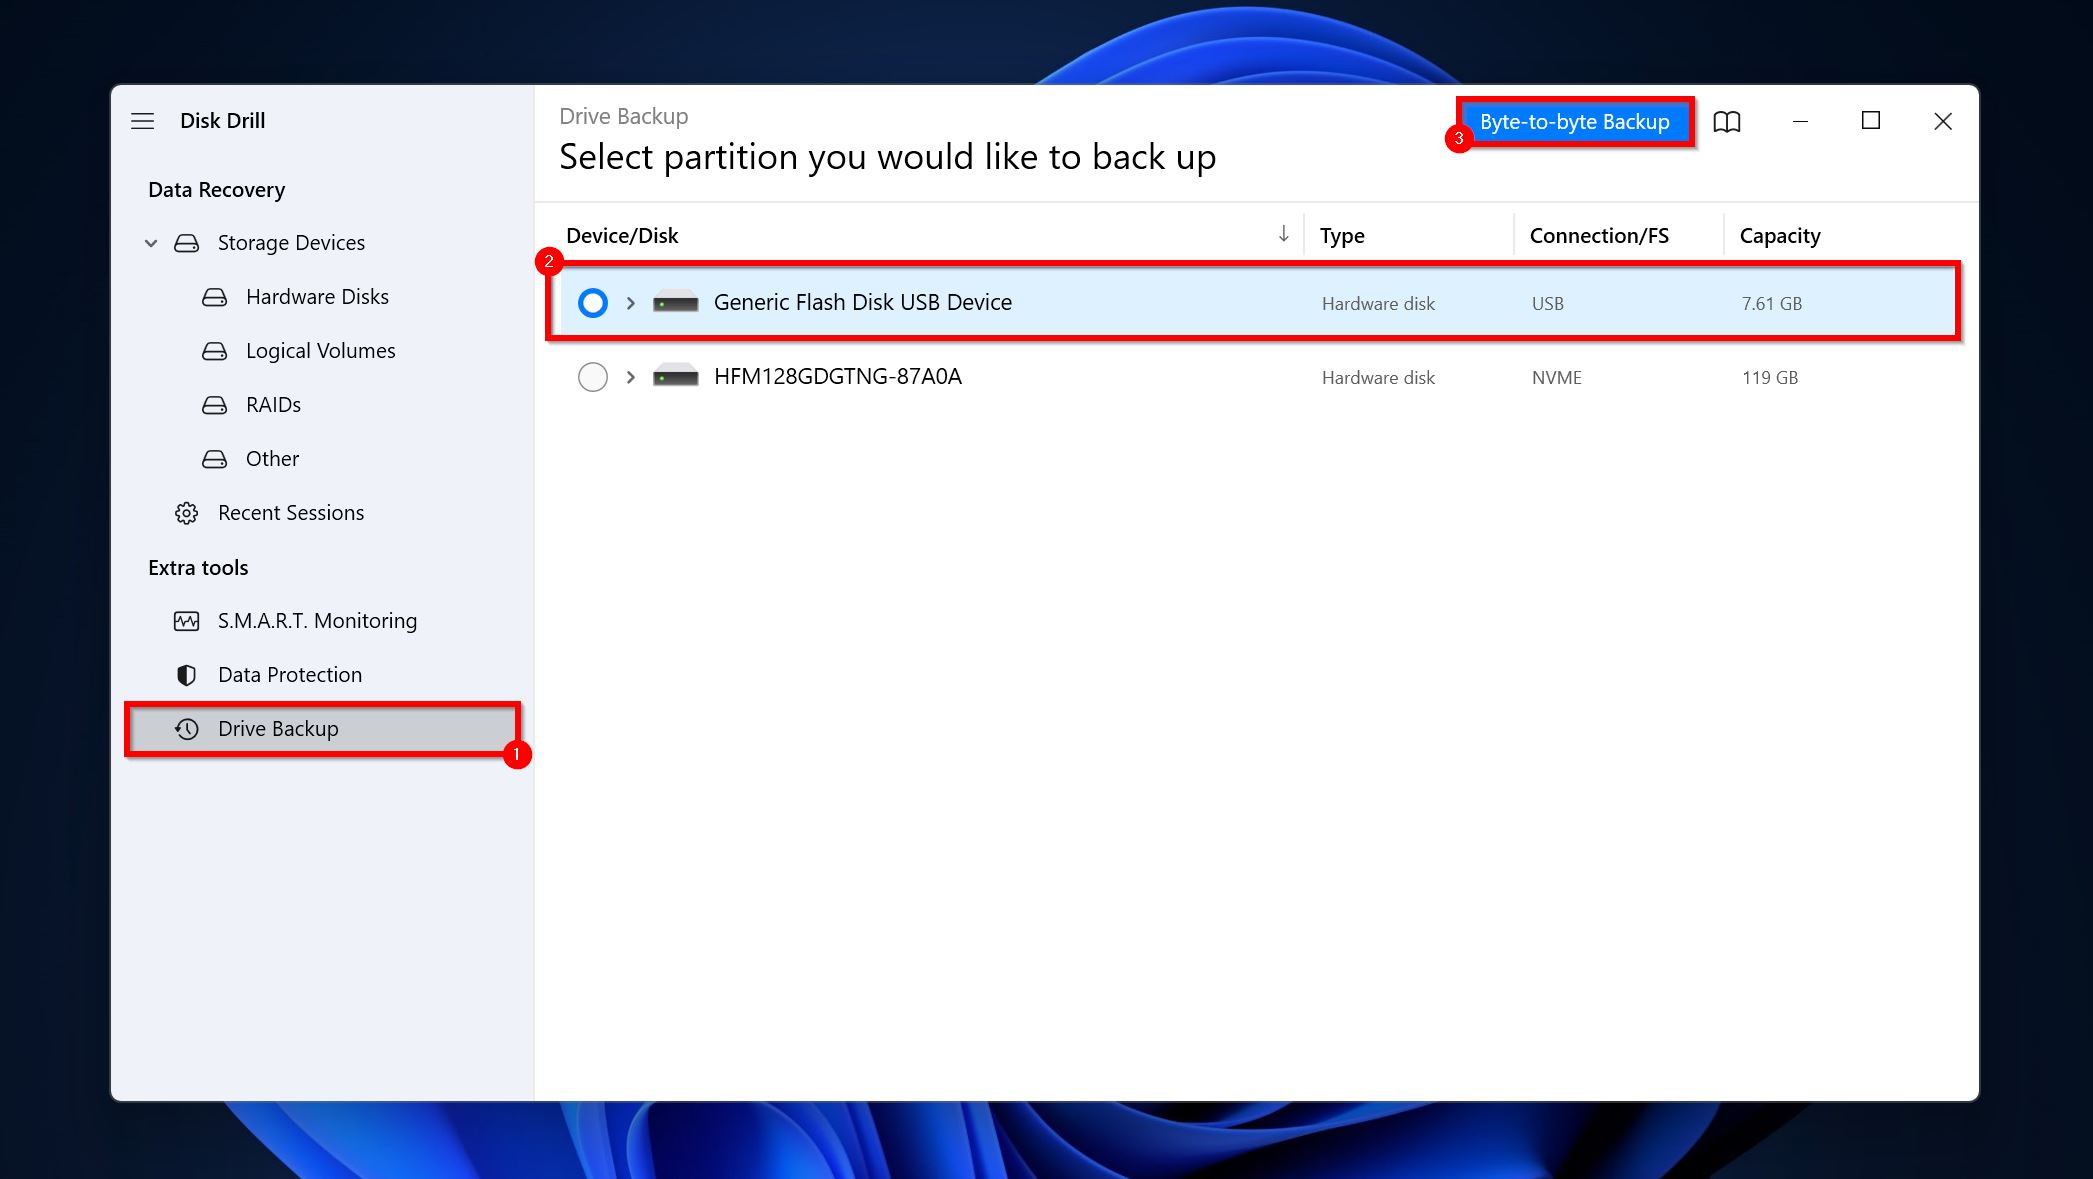
- Open Disk Drill and click on the Drive Backup option, under Extra Tools.
- Select the drive with a corrupt partition, and click on Byte-to-byte Backup.
- Choose where you wish to save the disk image and click OK. Ensure that the destination has enough free space (more than or equal to the total storage size of the affected drive).
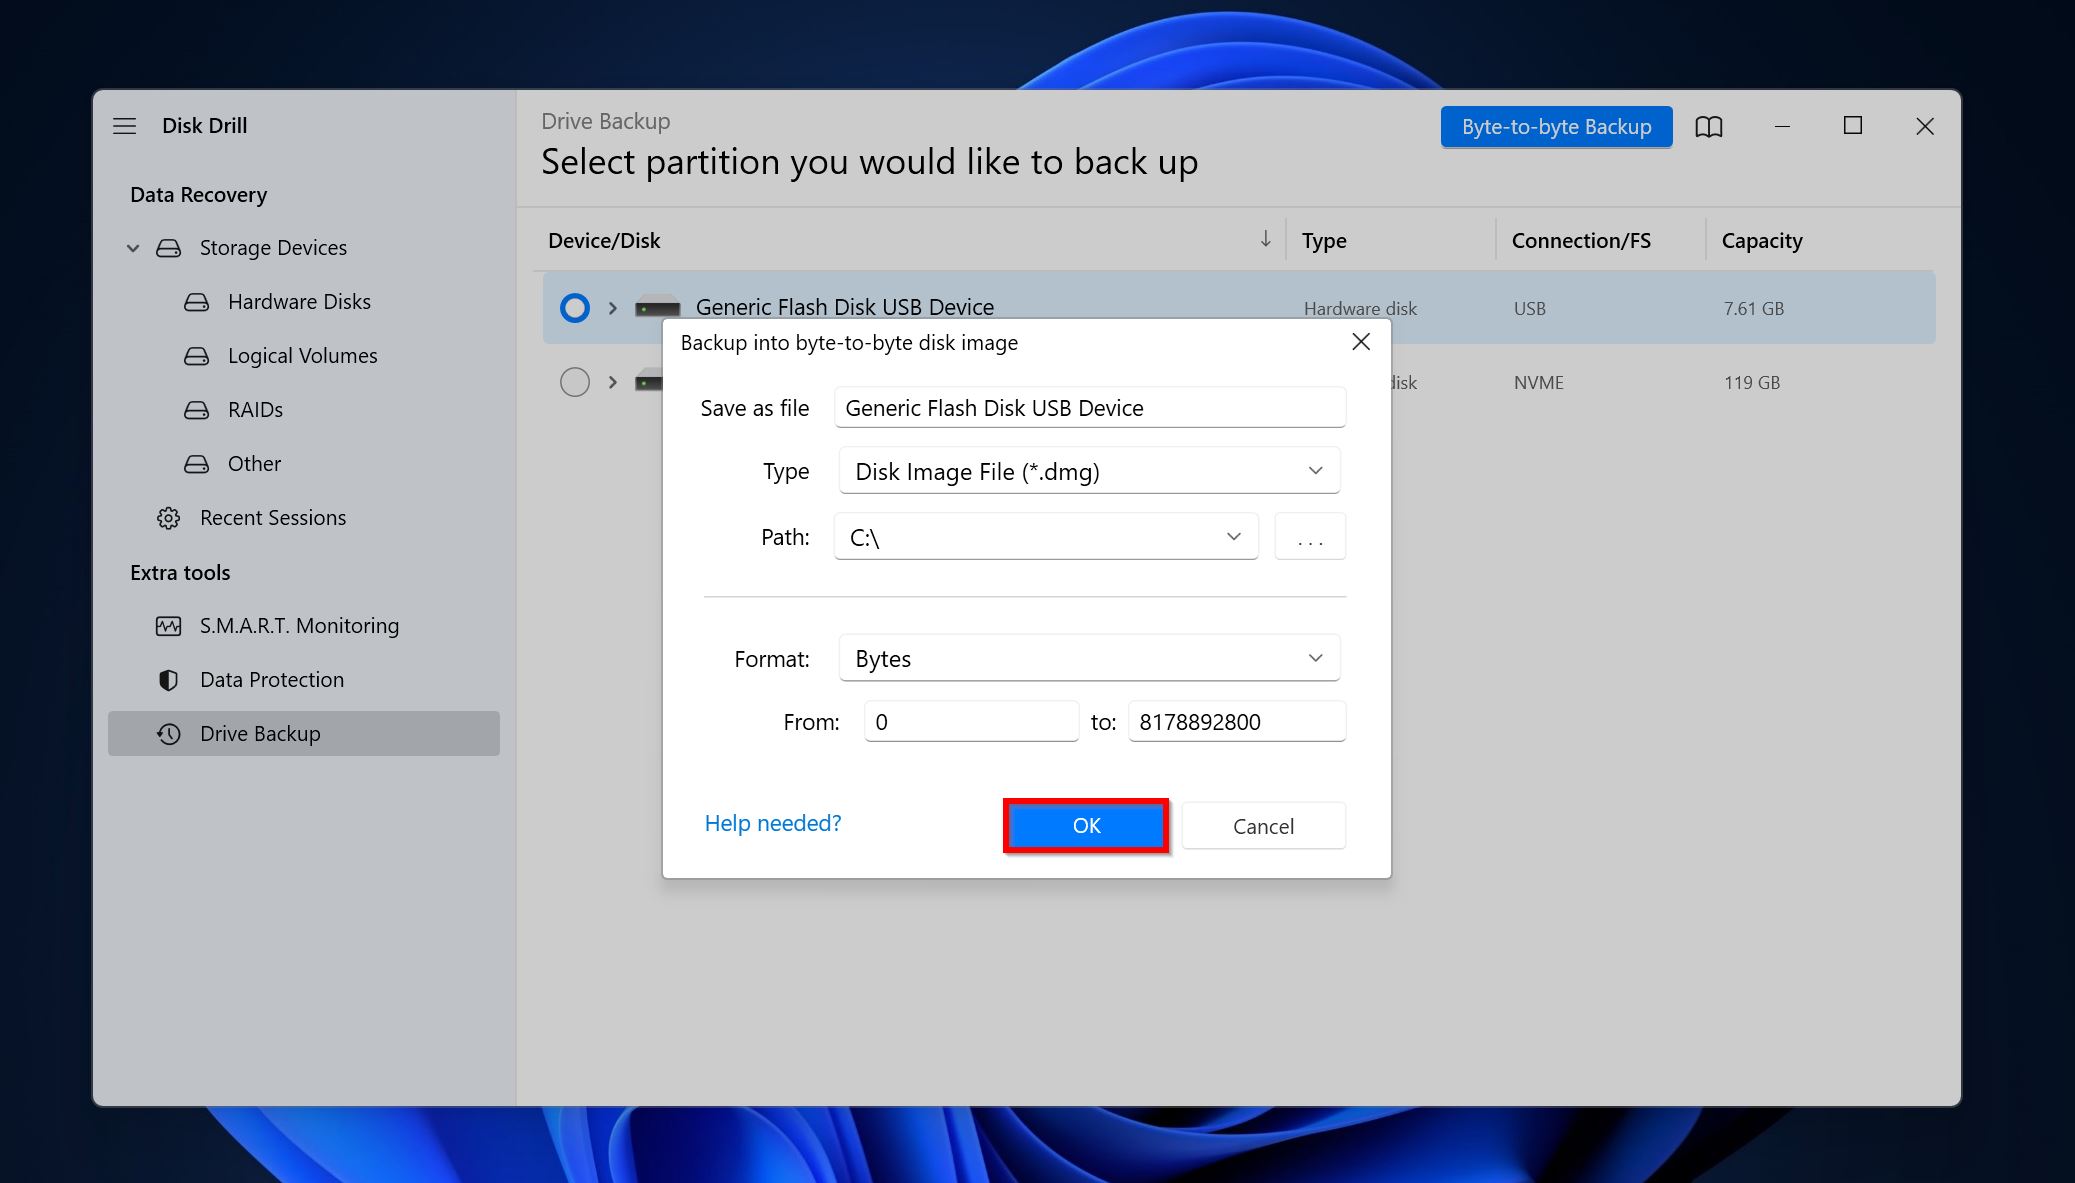
- Disk Drill will create a disk image. This may take a while.
Step 2: Scan the Drive or Disk Image for Recoverable Data (Required)
- Download and install Disk Drill if you haven’t already. Do it on another storage drive and not the one you wish to recover data from.
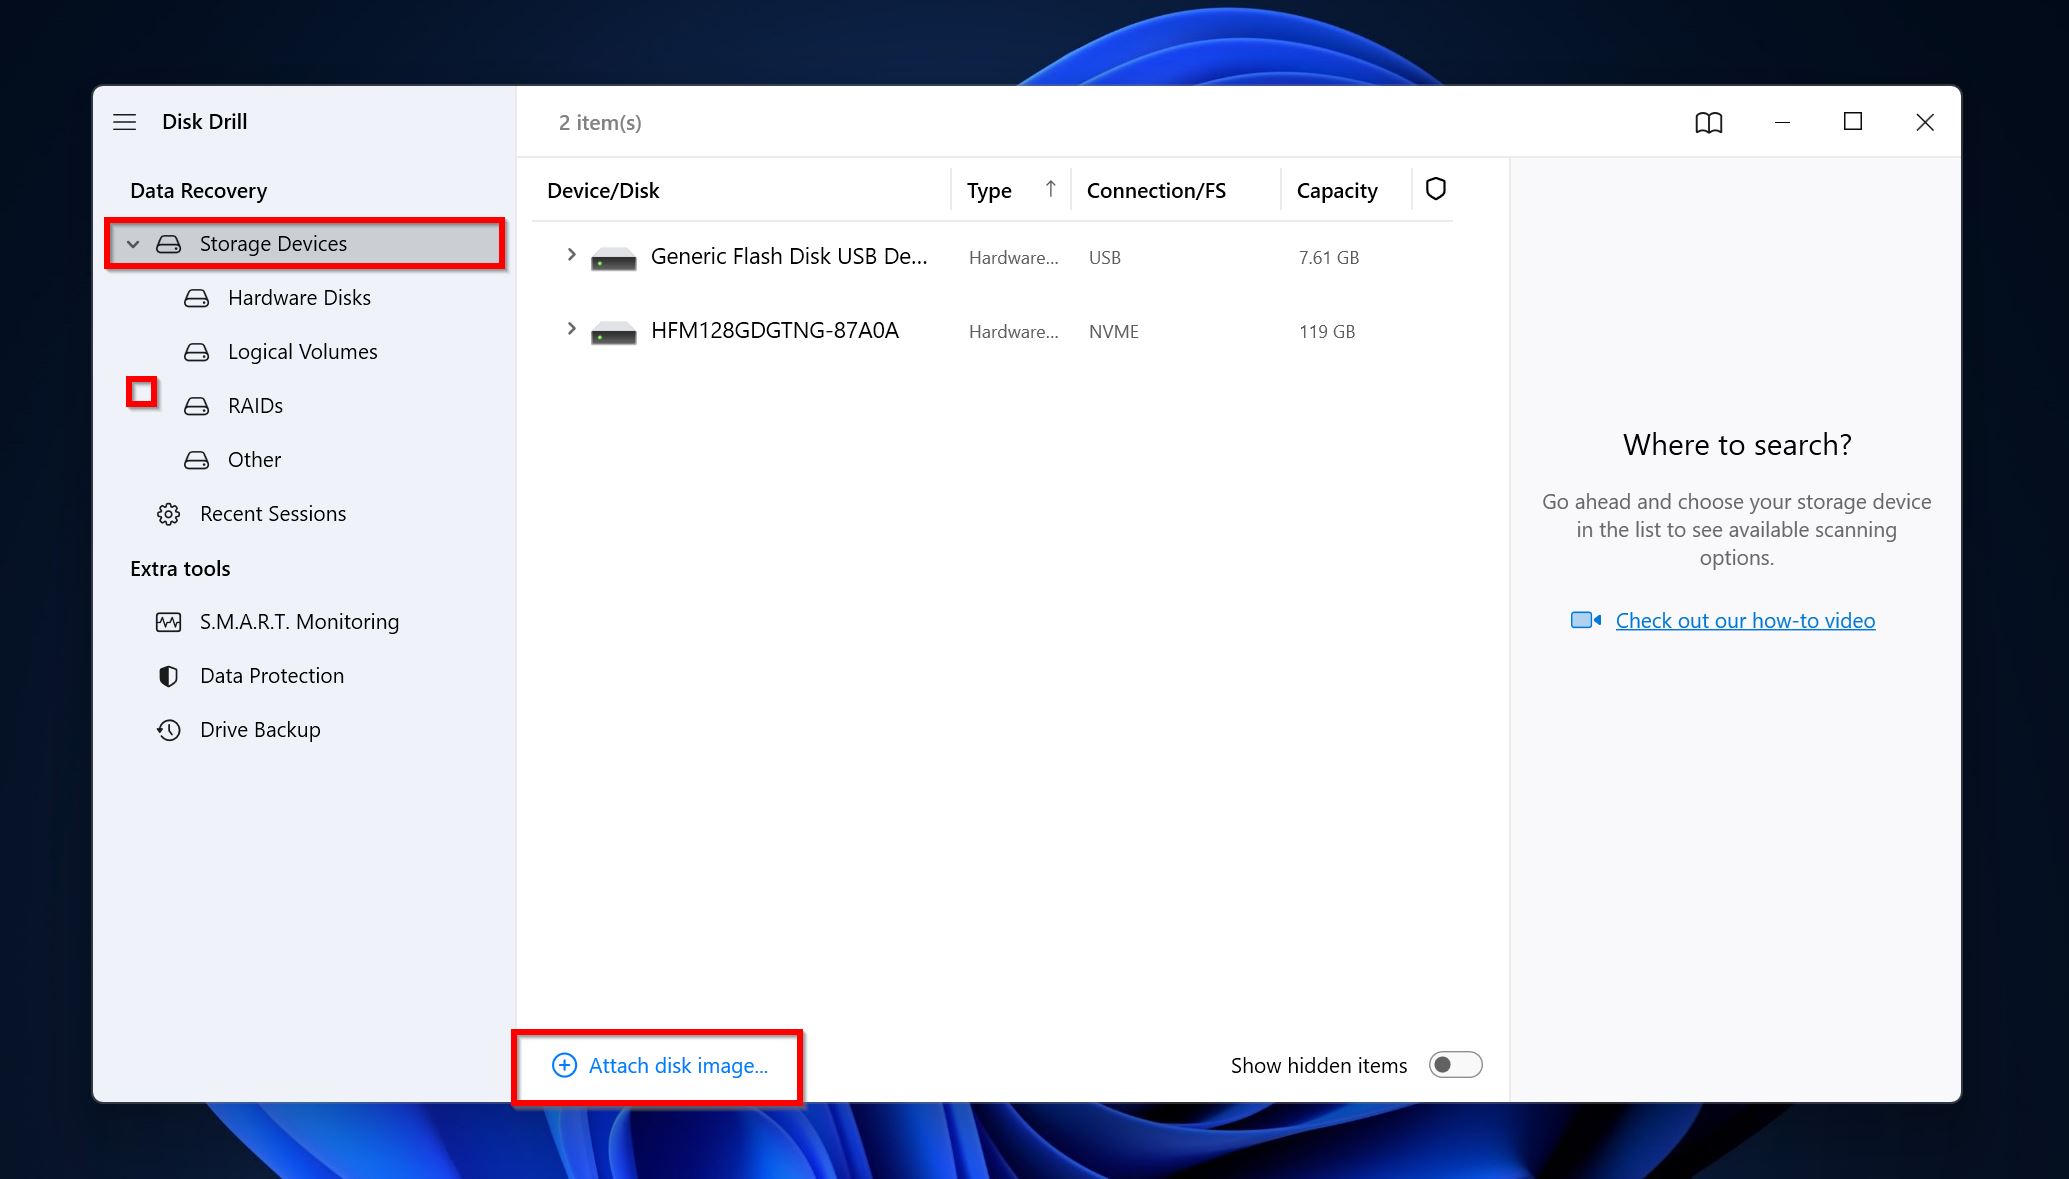
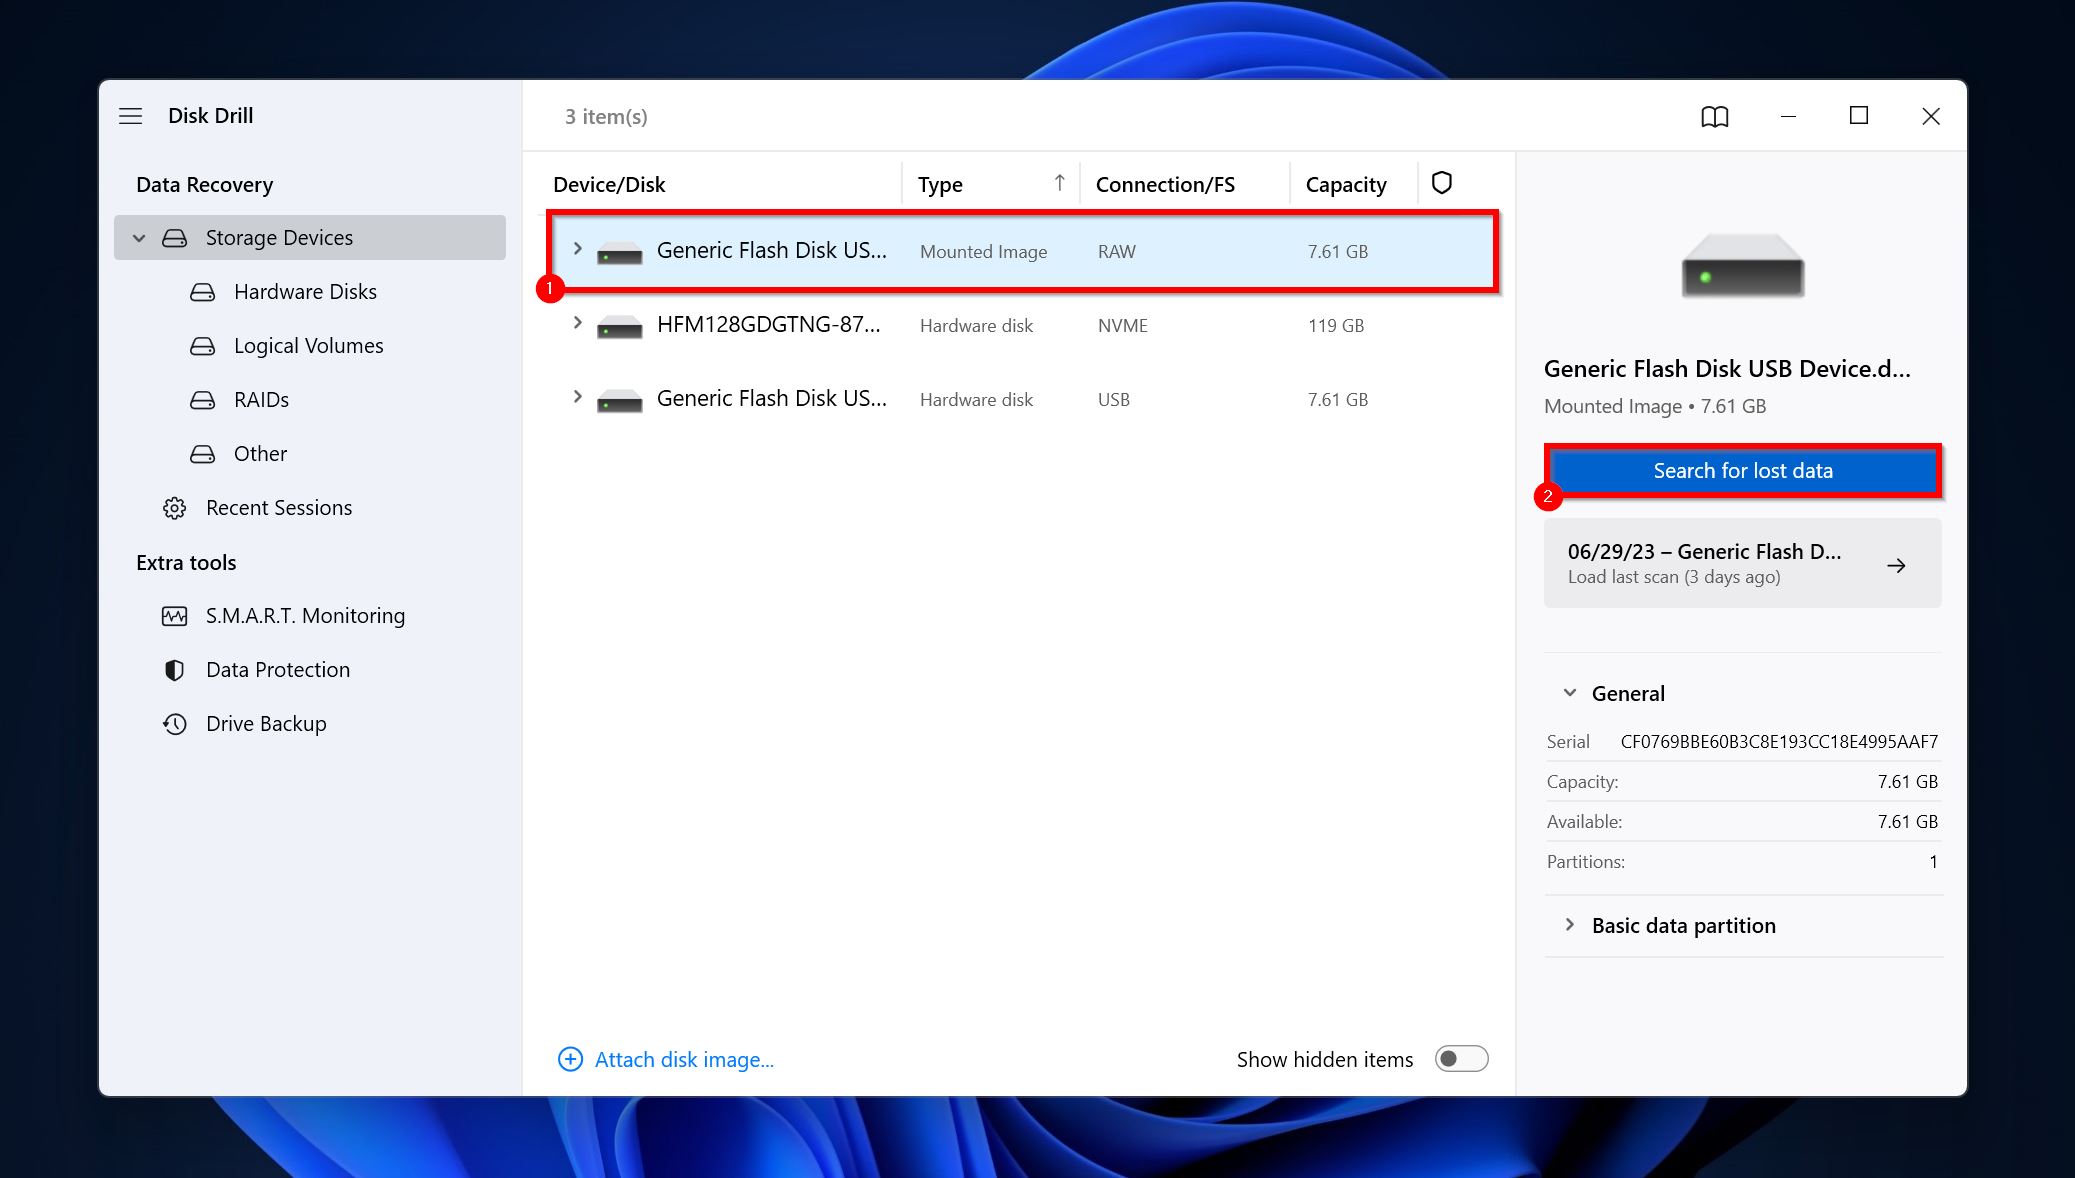
- Open Disk Drill and ensure you’re on the Storage Drives screen. Click on Attach disk image if you created a disk image earlier. Browse for the disk image and double-click on it. It’ll be added to Disk Drill as a mounted storage drive. Skip to the next step if you didn’t create a disk image.
- Select the storage drive or disk image and click on Search for lost data.
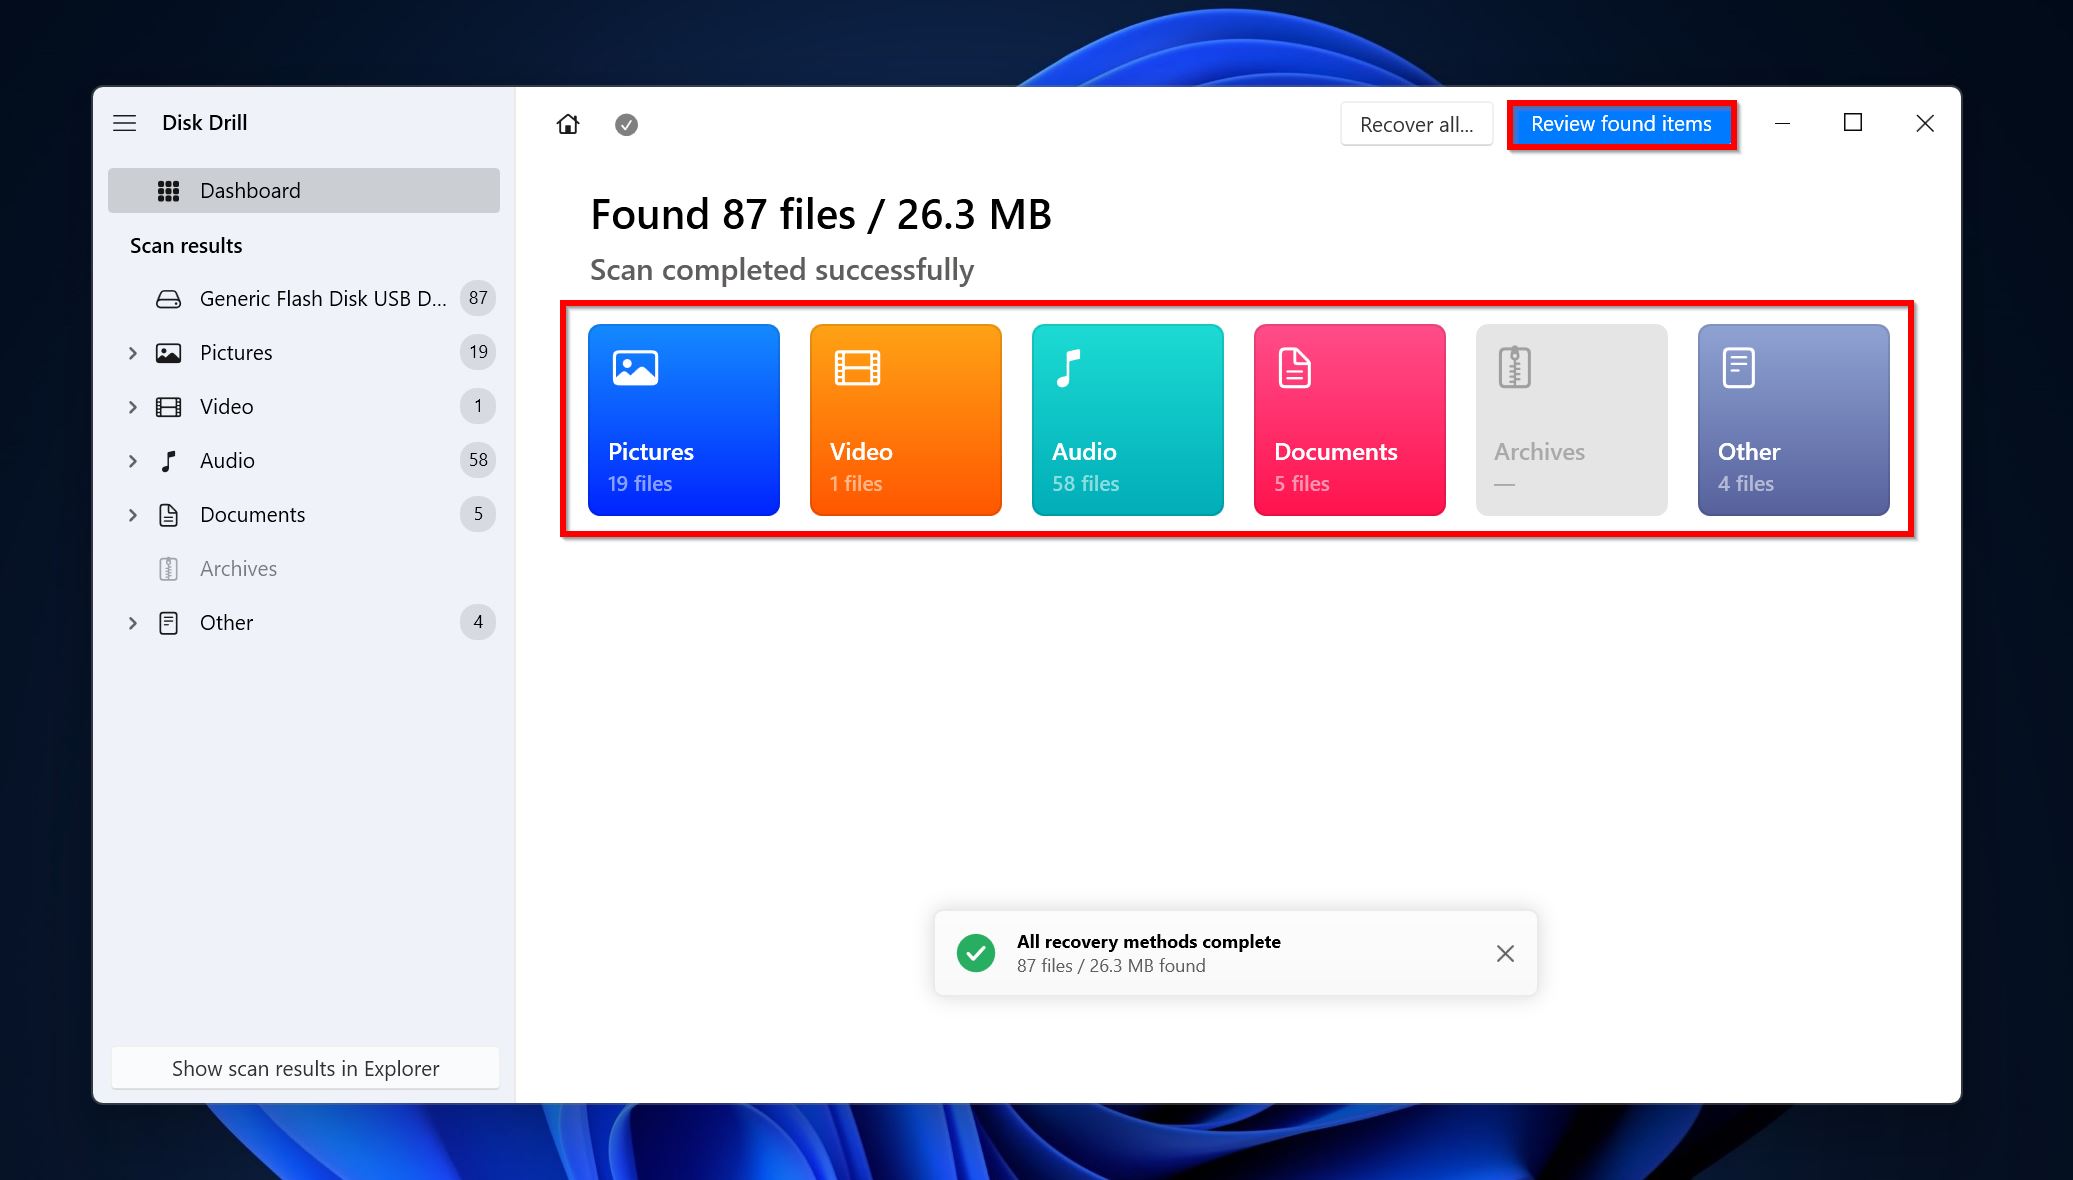
- Click on Review found items to view all recoverable files. If you wish to only recover a specific file type, click on the relevant file type tile instead (Pictures, Video, Audio, Documents, Archives, and Other).
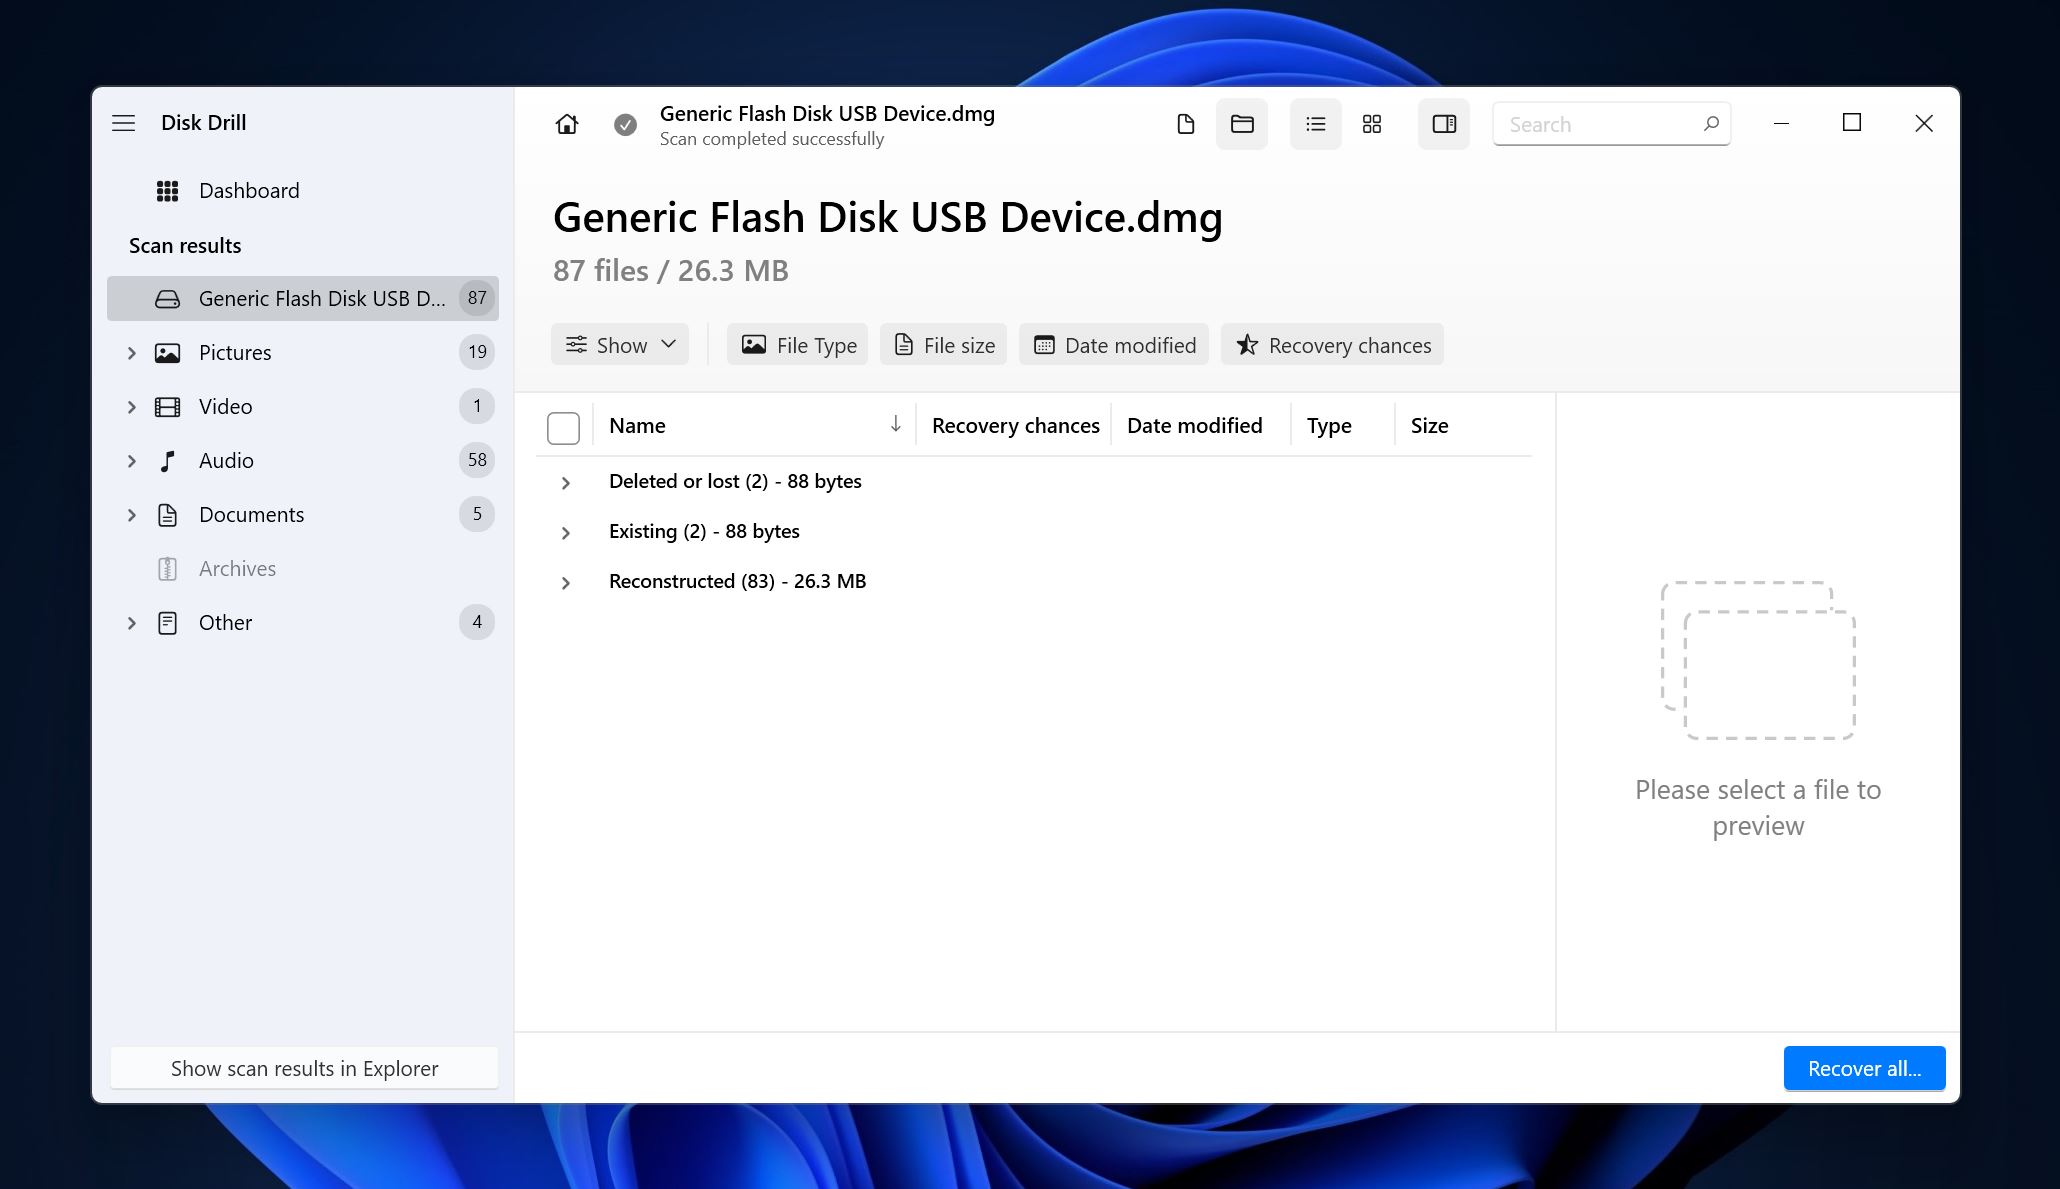
- Expand the Deleted or lost and Reconstructed sections to view deleted, recoverable files. If you wish to see the currently present files on the drive, expand the Existing section.
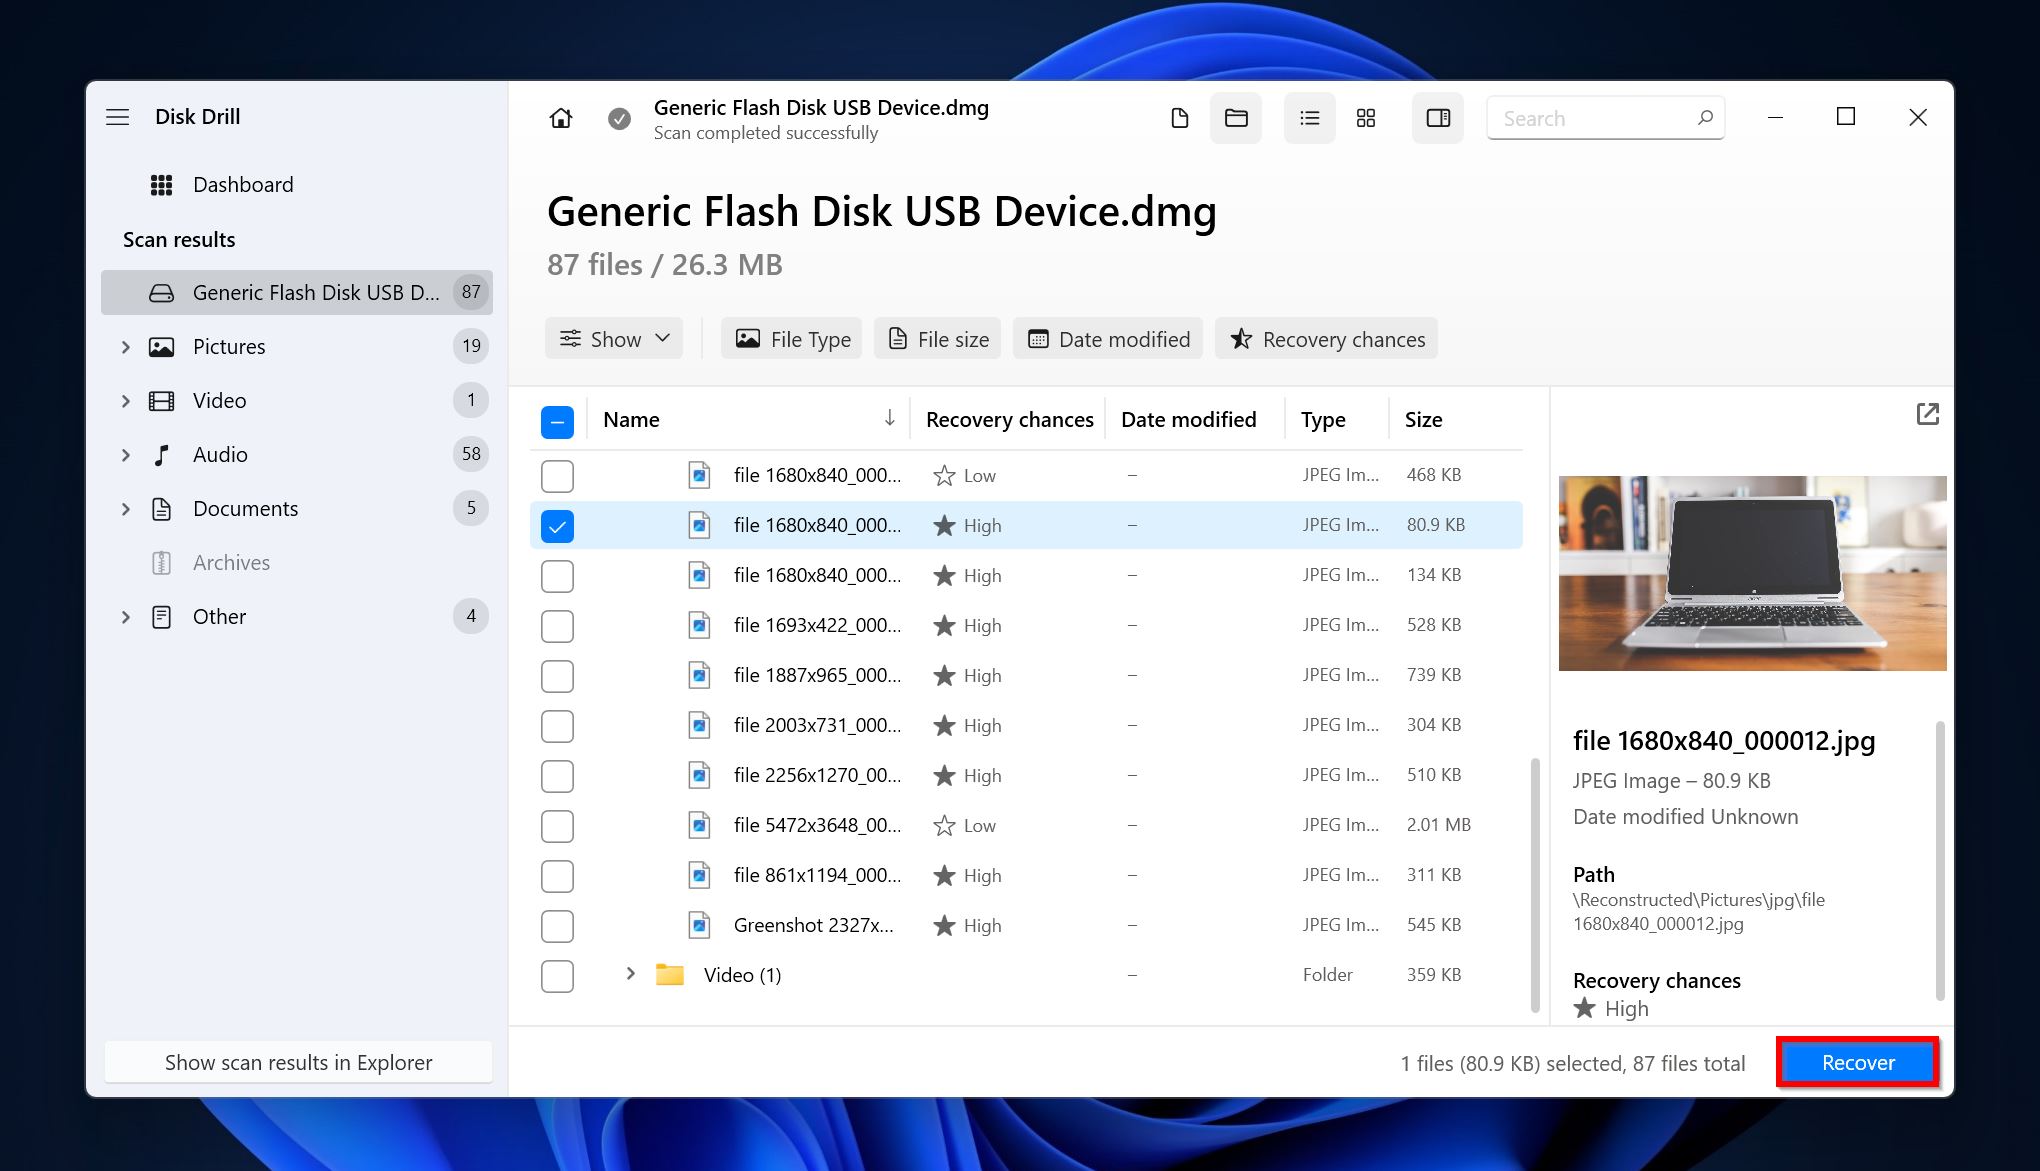
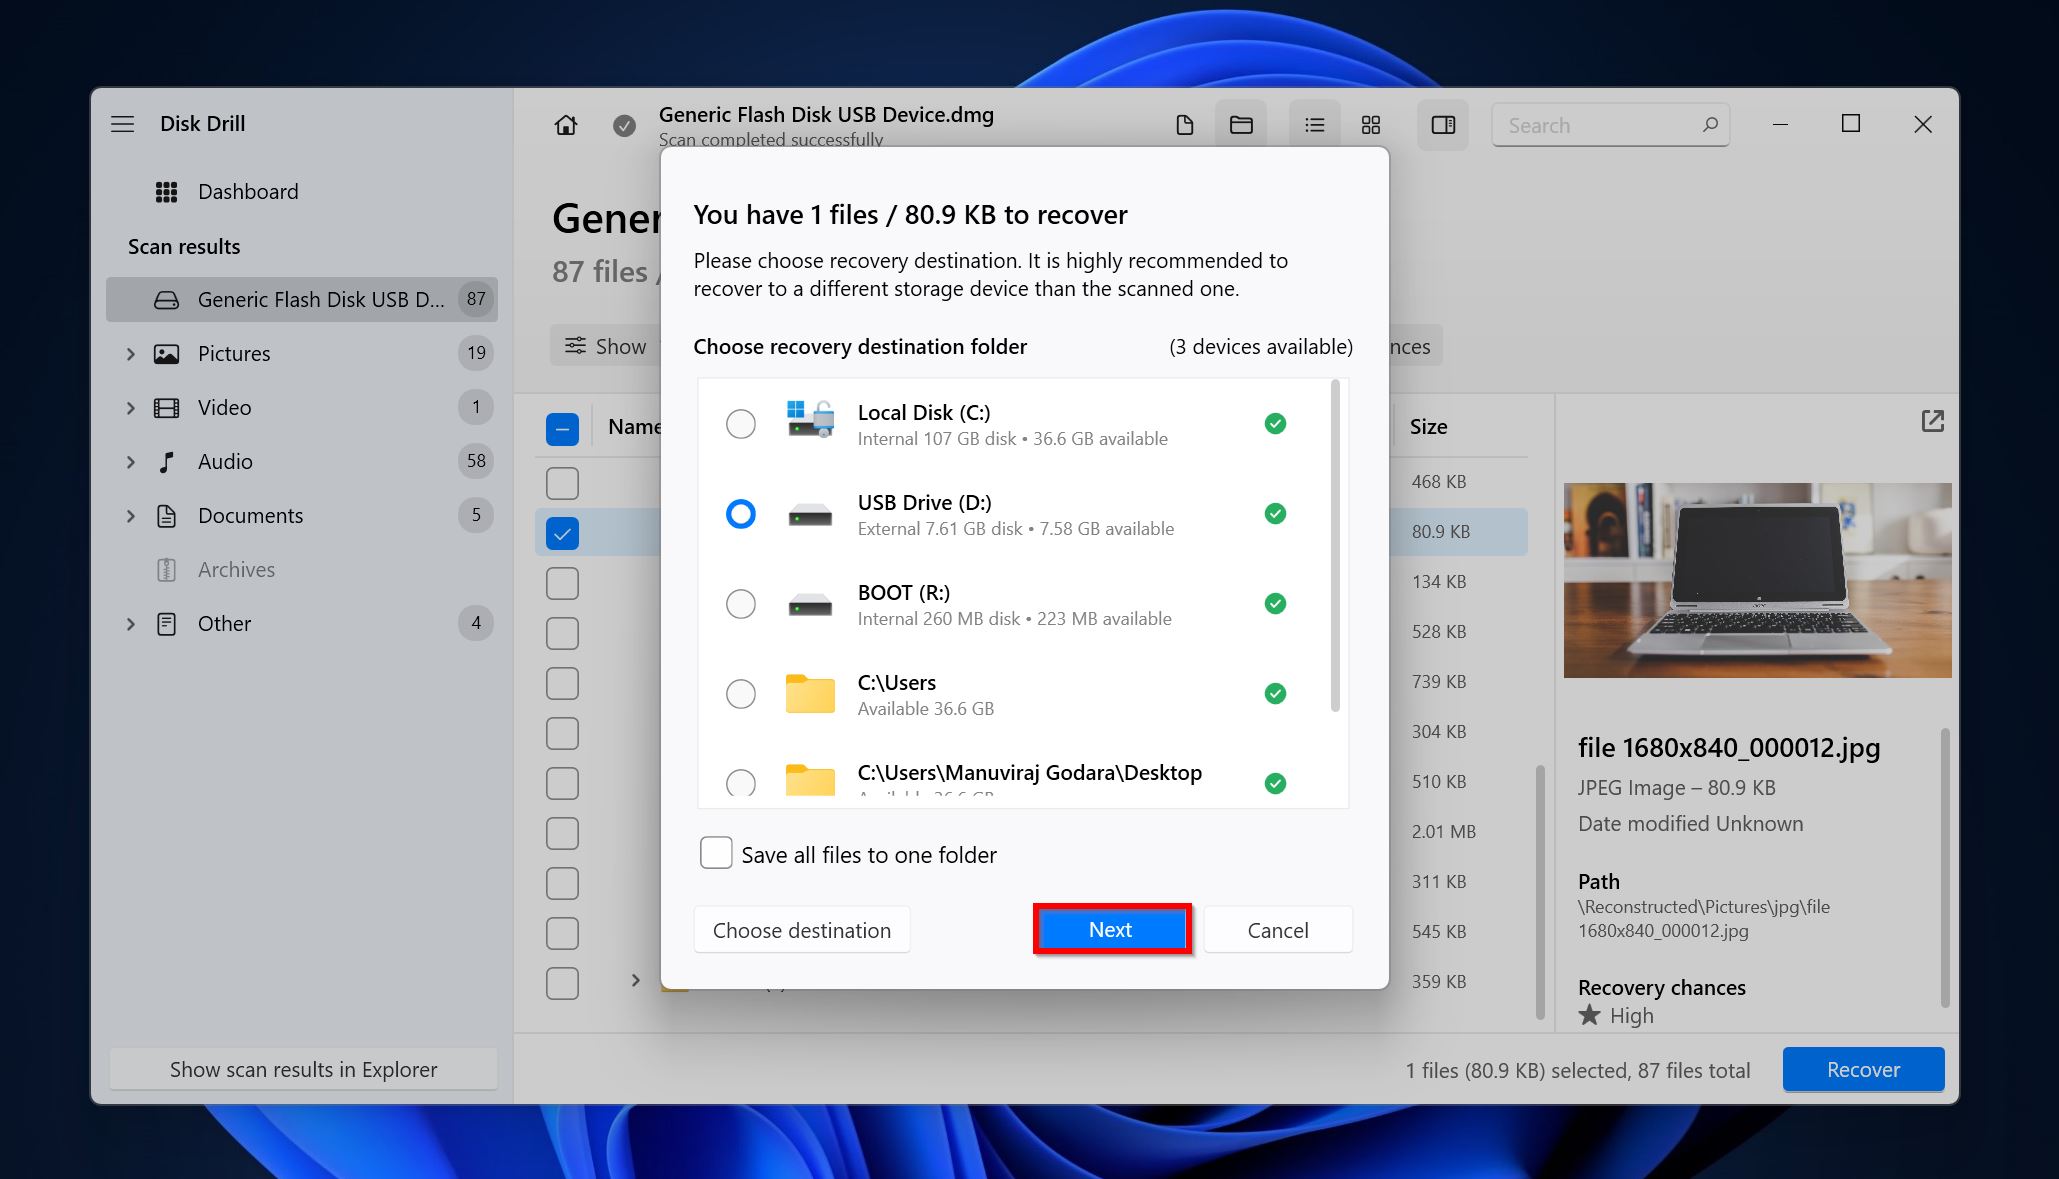
- Select the files you wish to recover and click on Recover. Disk Drill displays a preview of the currently selected file, but you can manually preview any file by clicking the eye icon next to the filename.
- Choose a recovery destination for the files and click Next. Disk Drill’s free trial for Windows lets you recover up to 500 MB of data for free.
- Disk Drill will recover the selected files.
5 Ways to Repair a Damaged or Corrupt Partition on Windows
There are several methods to diagnose and potentially repair a corrupt/damaged partition on Windows. We recommend you attempt the following fixes in the order in which they’re listed. Additionally, if you haven’t recovered your data yet, now is a good time to do so.
Method 1: Add a Drive Letter to the Partition
It’s possible that the partition in question simply doesn’t have a drive letter. Without a drive letter, the partition won’t be visible in Windows Explorer, leading you to assume that it’s corrupt or damaged. Sometimes, drive letter conflicts can also lead to drives becoming invisible in the Windows Explorer.
Fortunately, you can manually add or change a drive letter using Disk Management. Here’s how:
- Press Windows Key + R to open the Run app. Type diskmgmt.msc in the text box and press Enter to launch Disk Management.
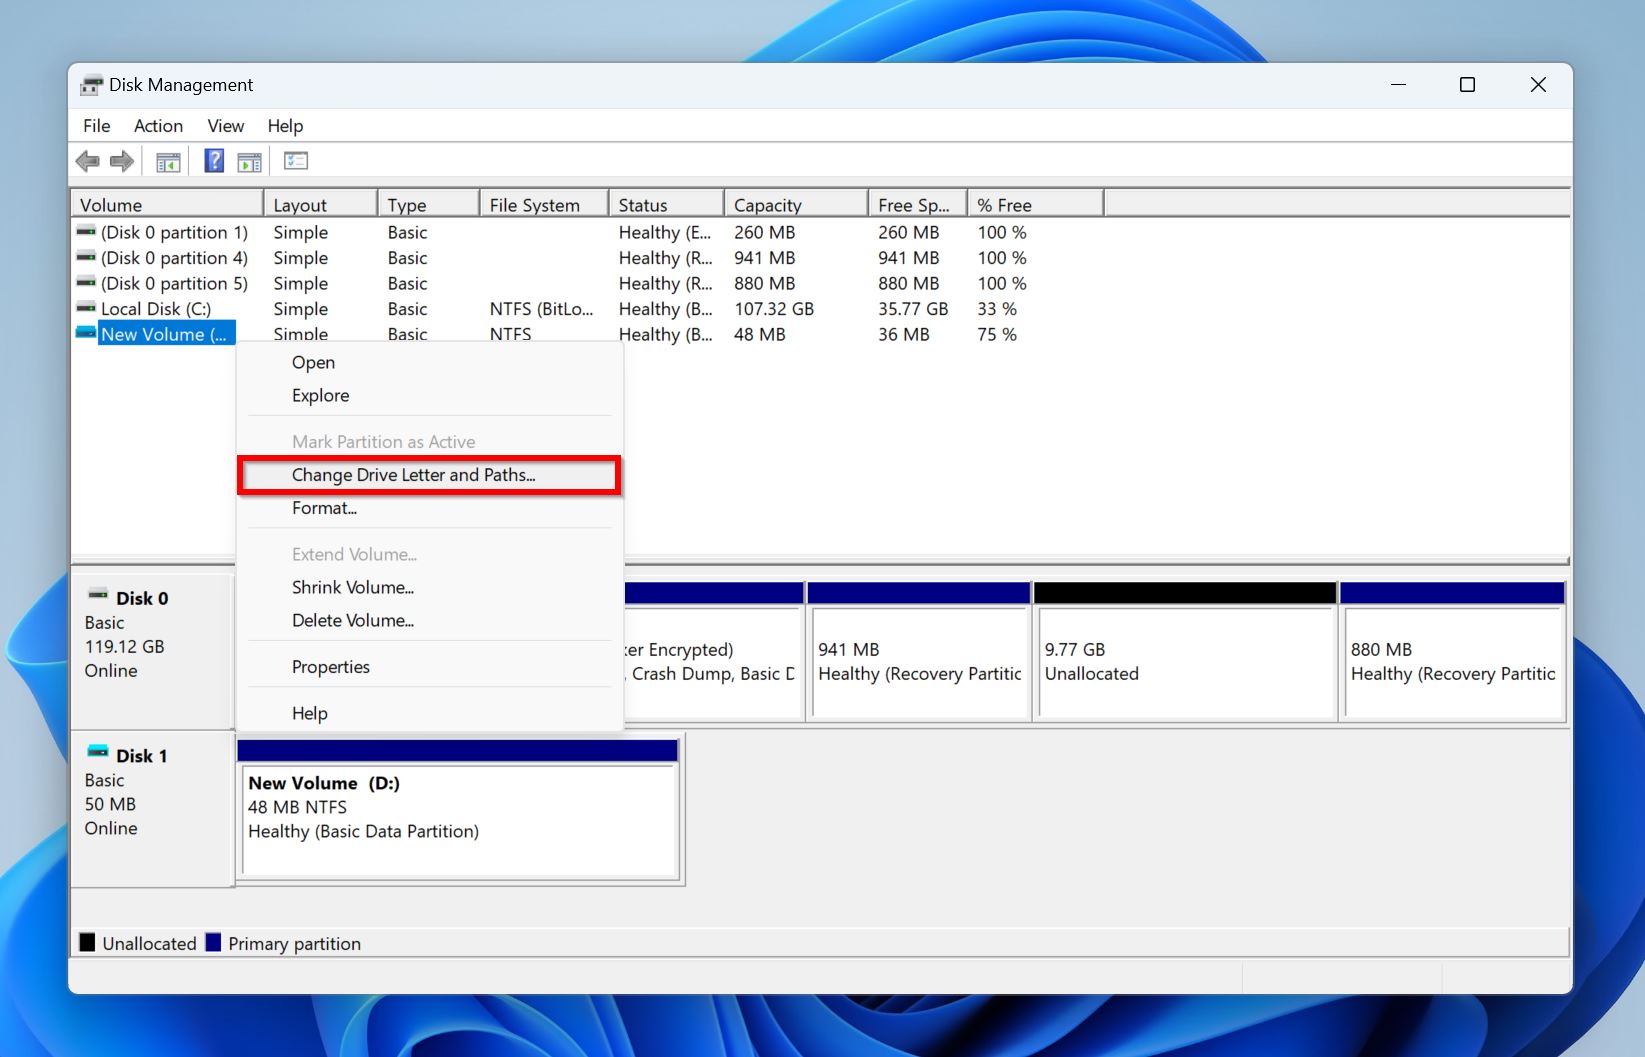
- Look for the partition you wish to fix and right-click on it. Choose Change Drive Letter and Paths.
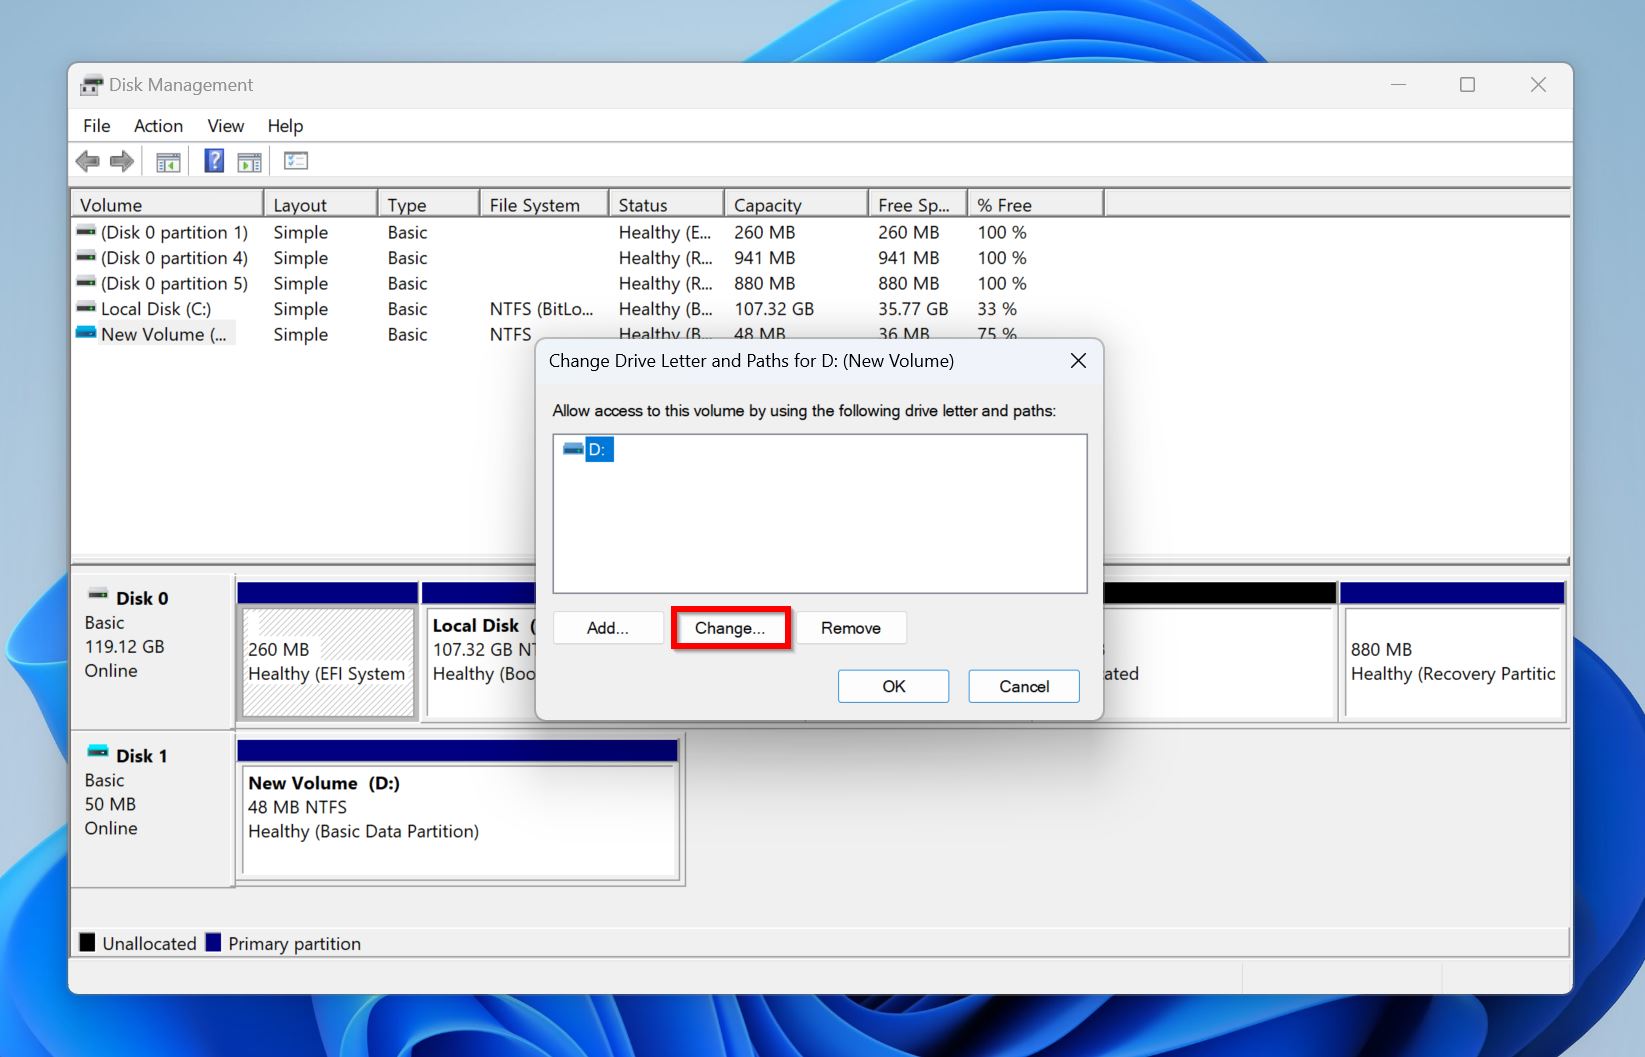
- If you wish to change the drive letter so it doesn’t conflict with other drives you periodically attach to your computer, click on Change. If the drive/partition doesn’t have a drive letter, click on Add.
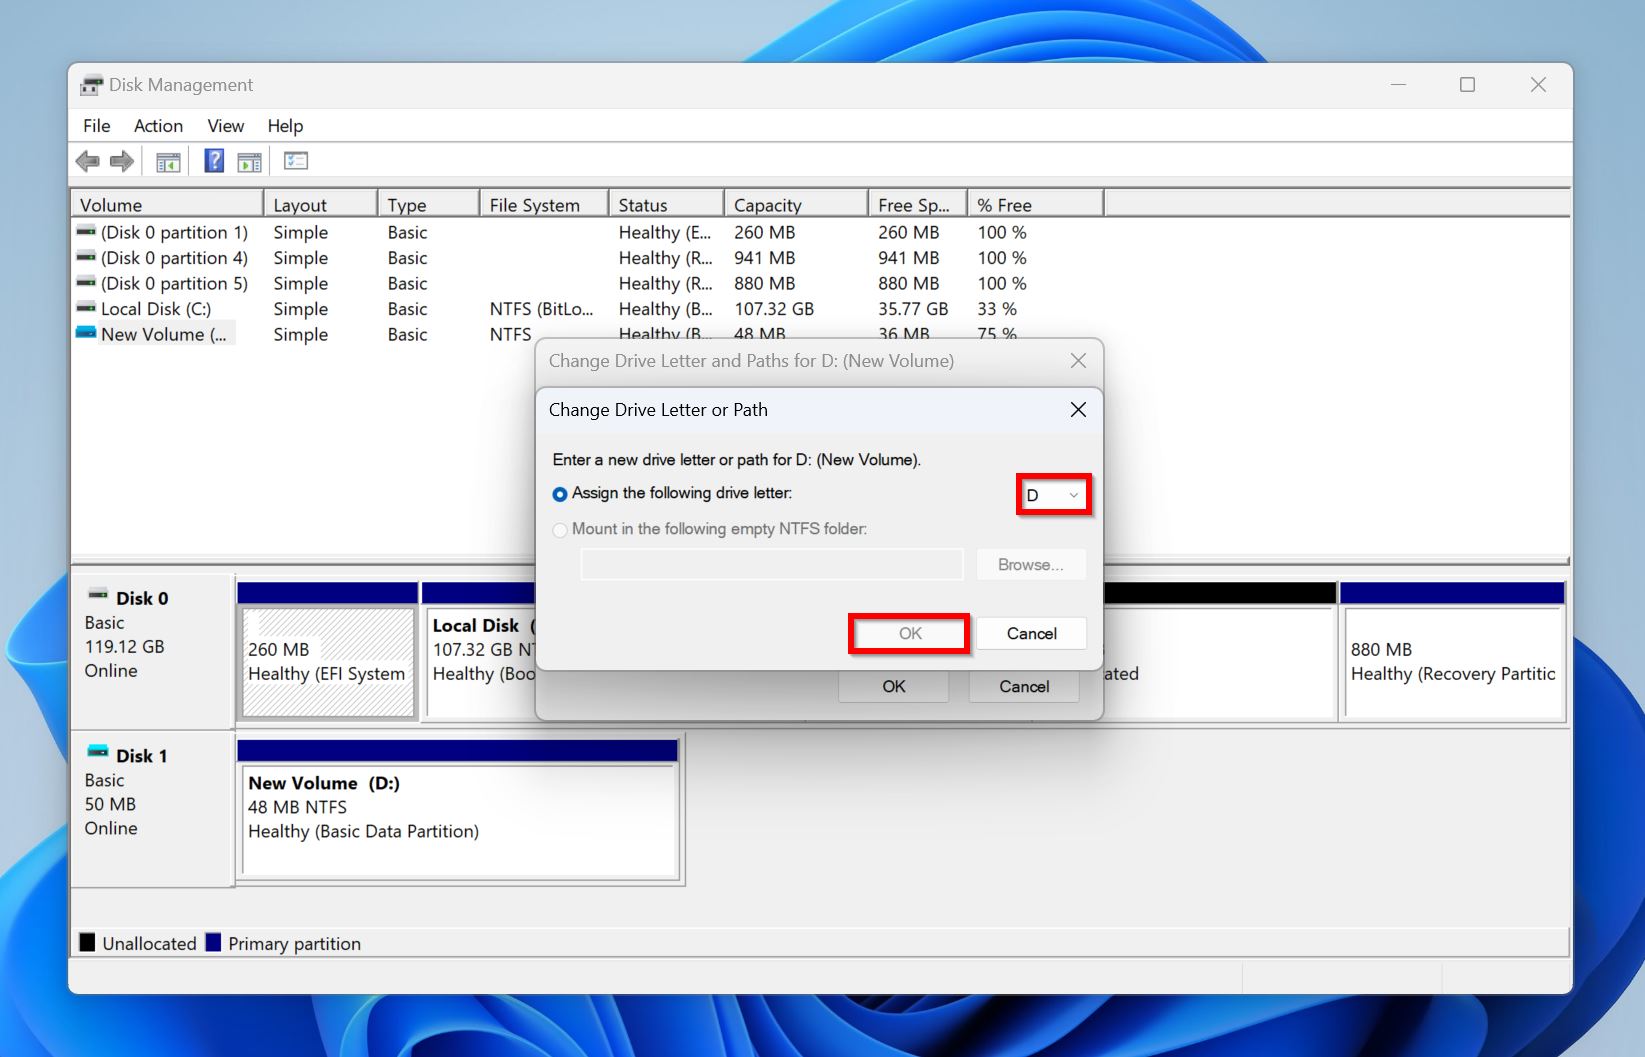
- Pick a drive letter from the Assign the following drive letter drop-down menu and click OK.
Method 2: Run the CHKDSK Utility
CHKDSK (Check Disk) is an in-built command line tool in Windows, that can detect and automatically resolve any logical issues on your drive. A simple CHKDSK scan can address any problems with the drive’s file system, as well as fix bad sectors on the drive. However, CHKDSK can often cause some minor data loss, so ensure you recover your data beforehand.
Here’s how to run CHKDSK and repair a Windows partition:
- Search for “cmd” in Windows Search (Windows Key + S). In the search results, right-click on Command Prompt and choose Run as administrator.
- Type
chkdsk X: /r /xand press Enter. Replace X with the drive letter of the partition you wish to scan. It’s best to run CHKDSK on each partition.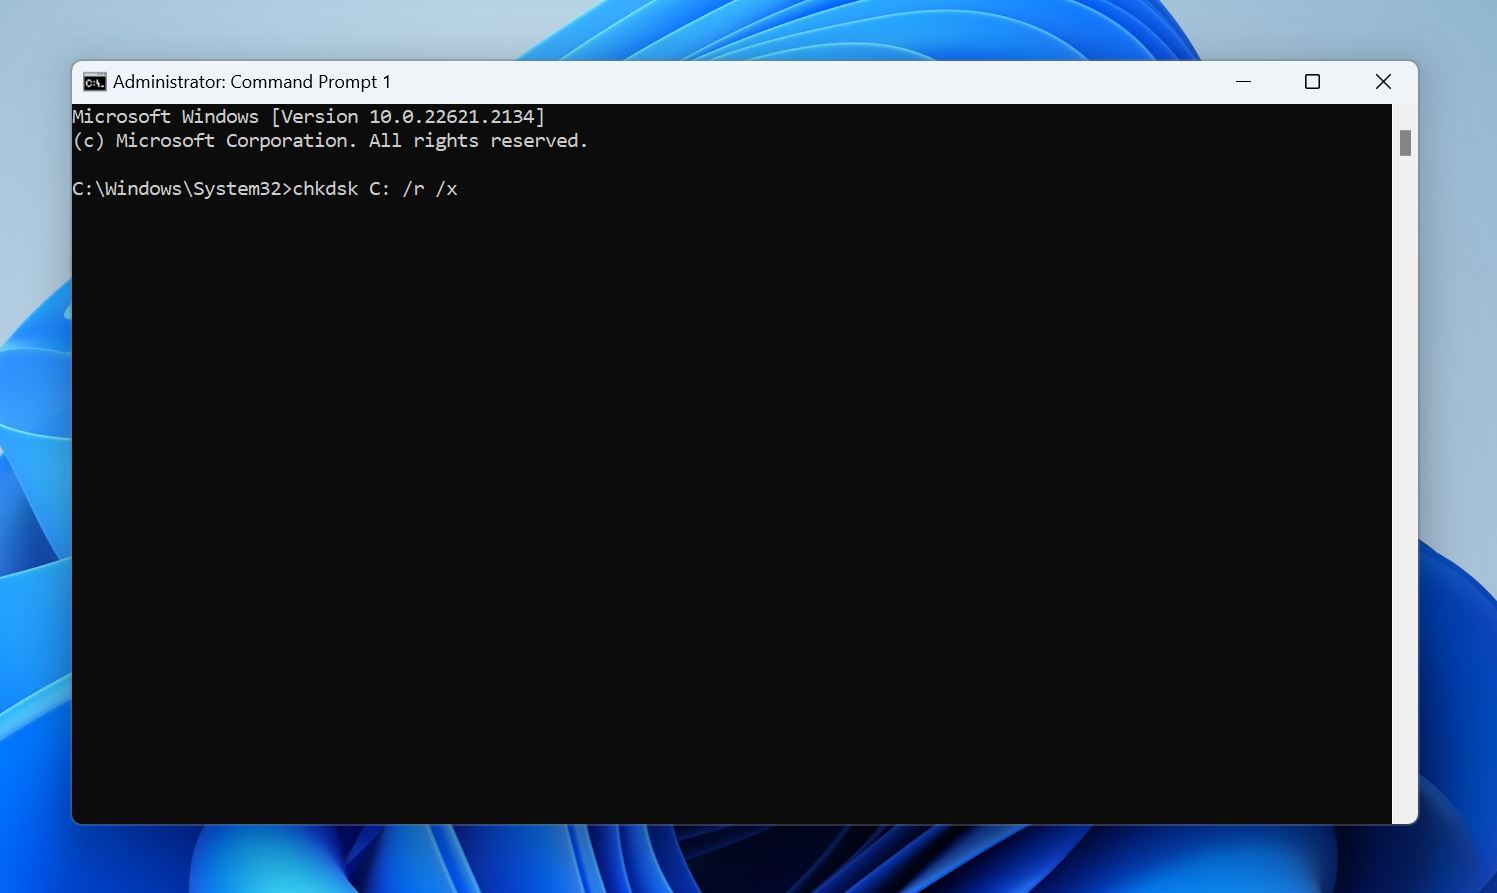
- Wait for the CHKDSK scan to complete.
- Reboot your PC.
You can also run the CHKDSK command with the /f parameter (chkdsk X: /f /x). This essentially performs a less intensive scan that takes less time than /r. Here’s a detailed guide on the difference between CHKDSK /f and /r and when to use each one.
Method 3: Use TestDisk to Recover the Partition and Rewrite the Partition Table
TestDisk is a third-party tool that can be used to fix a range of issues on your storage drive. It’s often used to fix corrupted partitions and recover deleted ones. Using the program, you can rewrite your drive’s partition table, potentially fixing the corrupt partition.
TestDisk’s only pitfall is its lack of a GUI, so ensure you follow the steps below carefully:
- Download TestDisk and extract the contents of the archive.
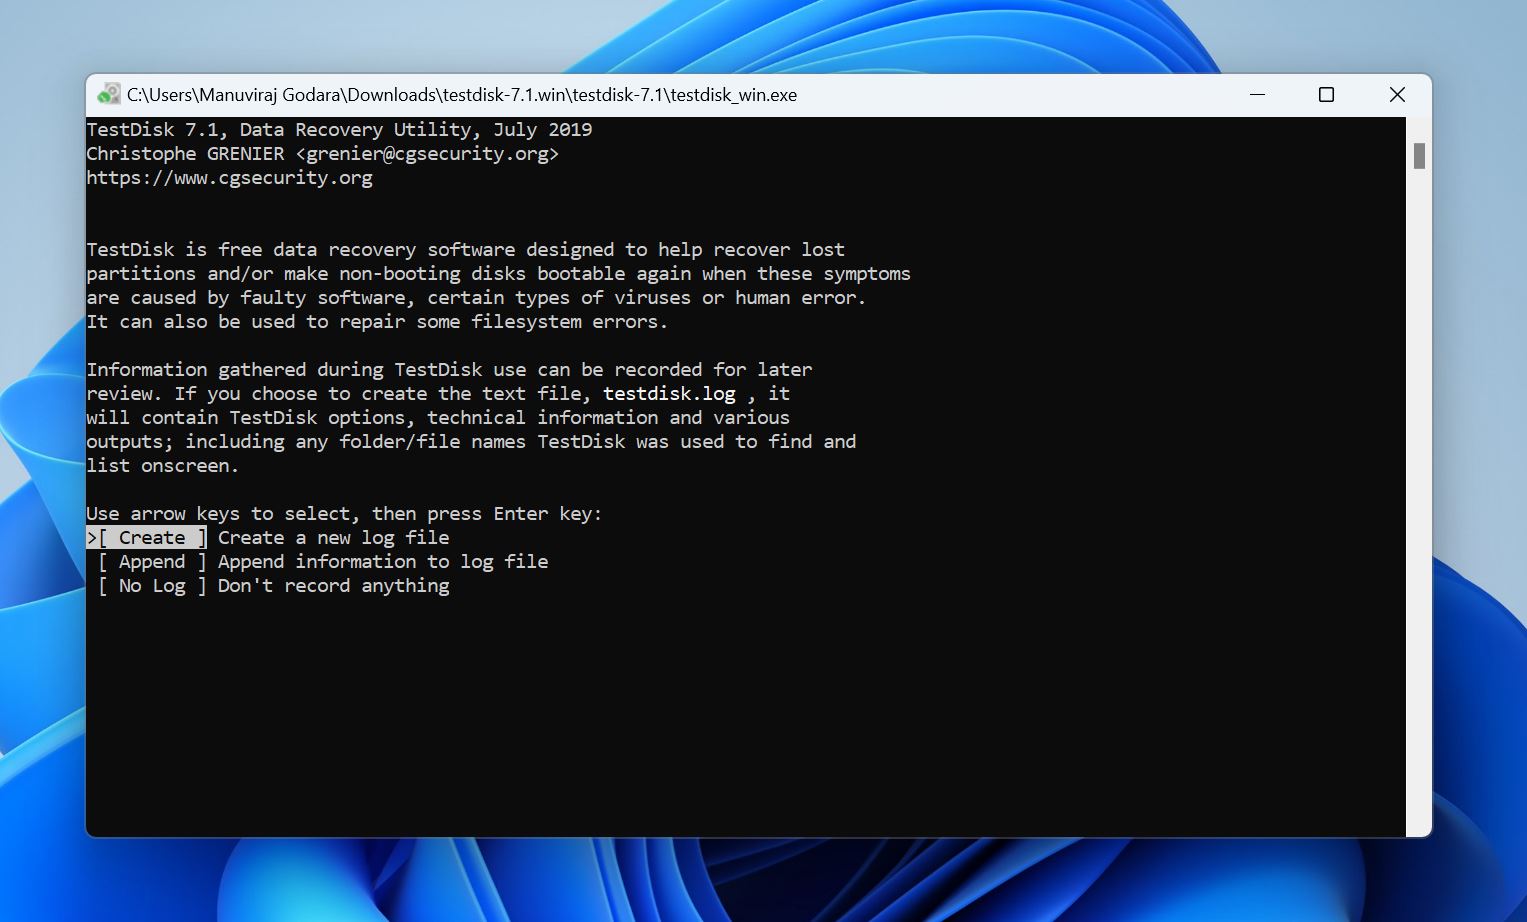
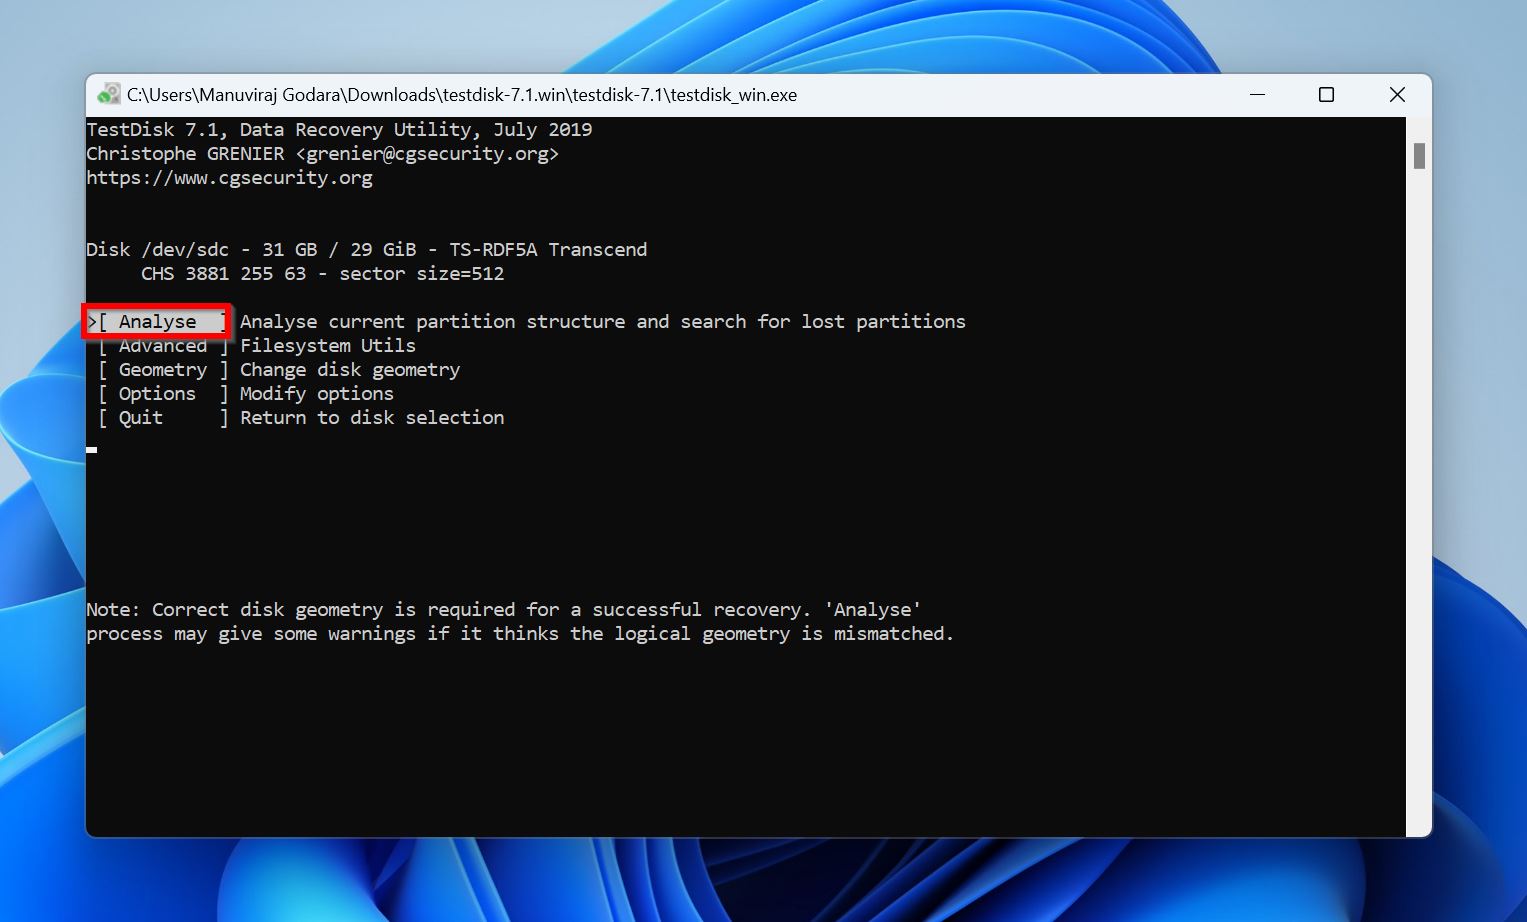
- Open testdisk_win.exe from the install location.
- Choose whether you wish to create a log file or not. Use the arrow keys to highlight an option and press Enter to confirm.
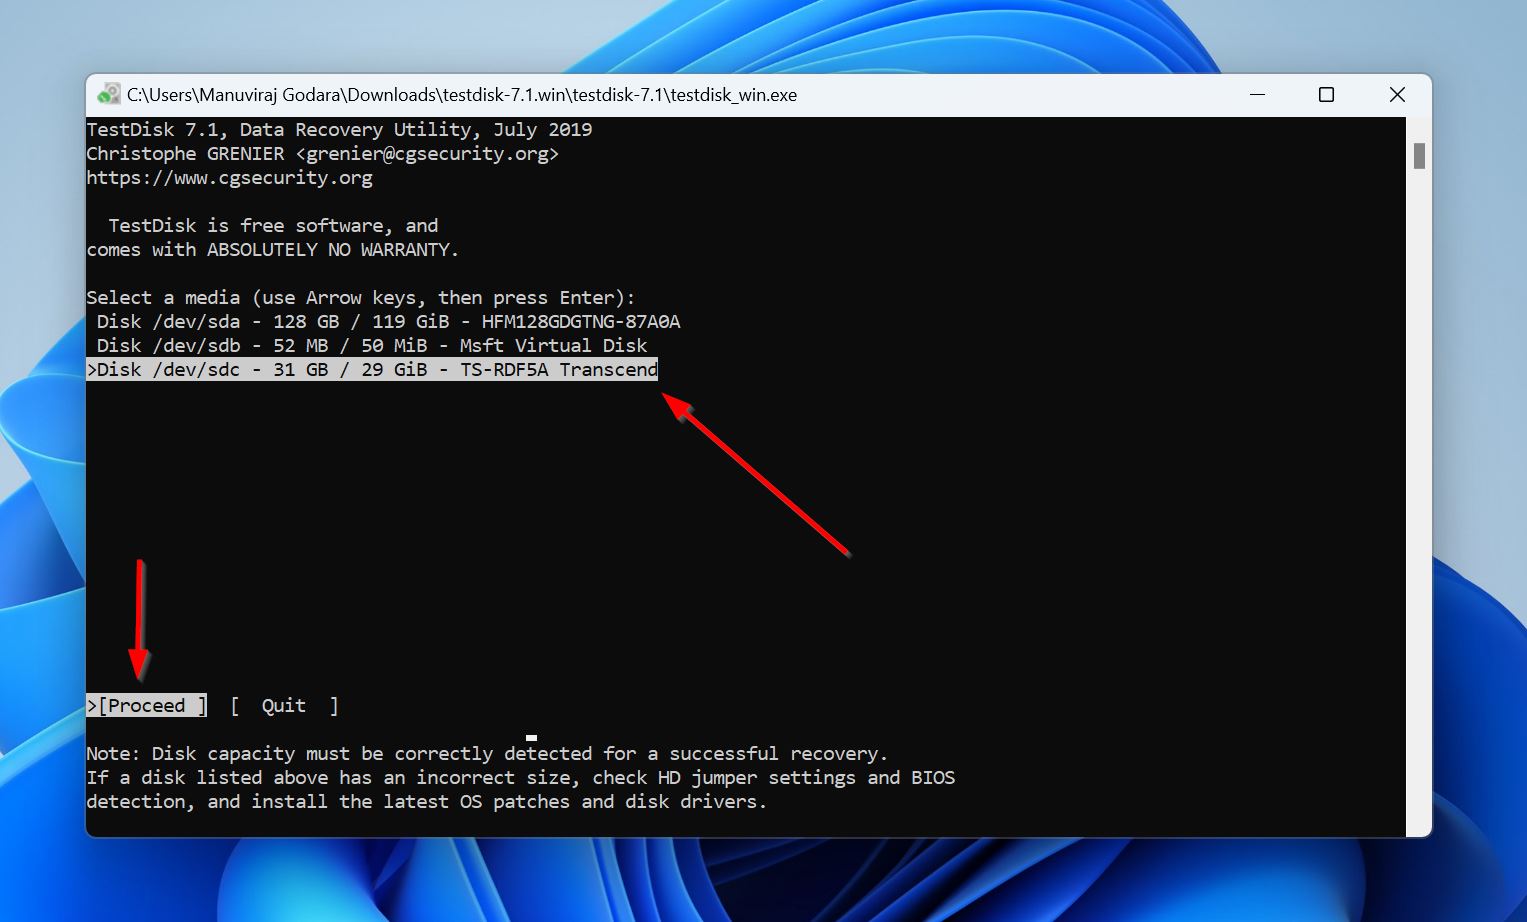
- Select the disk with the corrupt partition and press Enter.
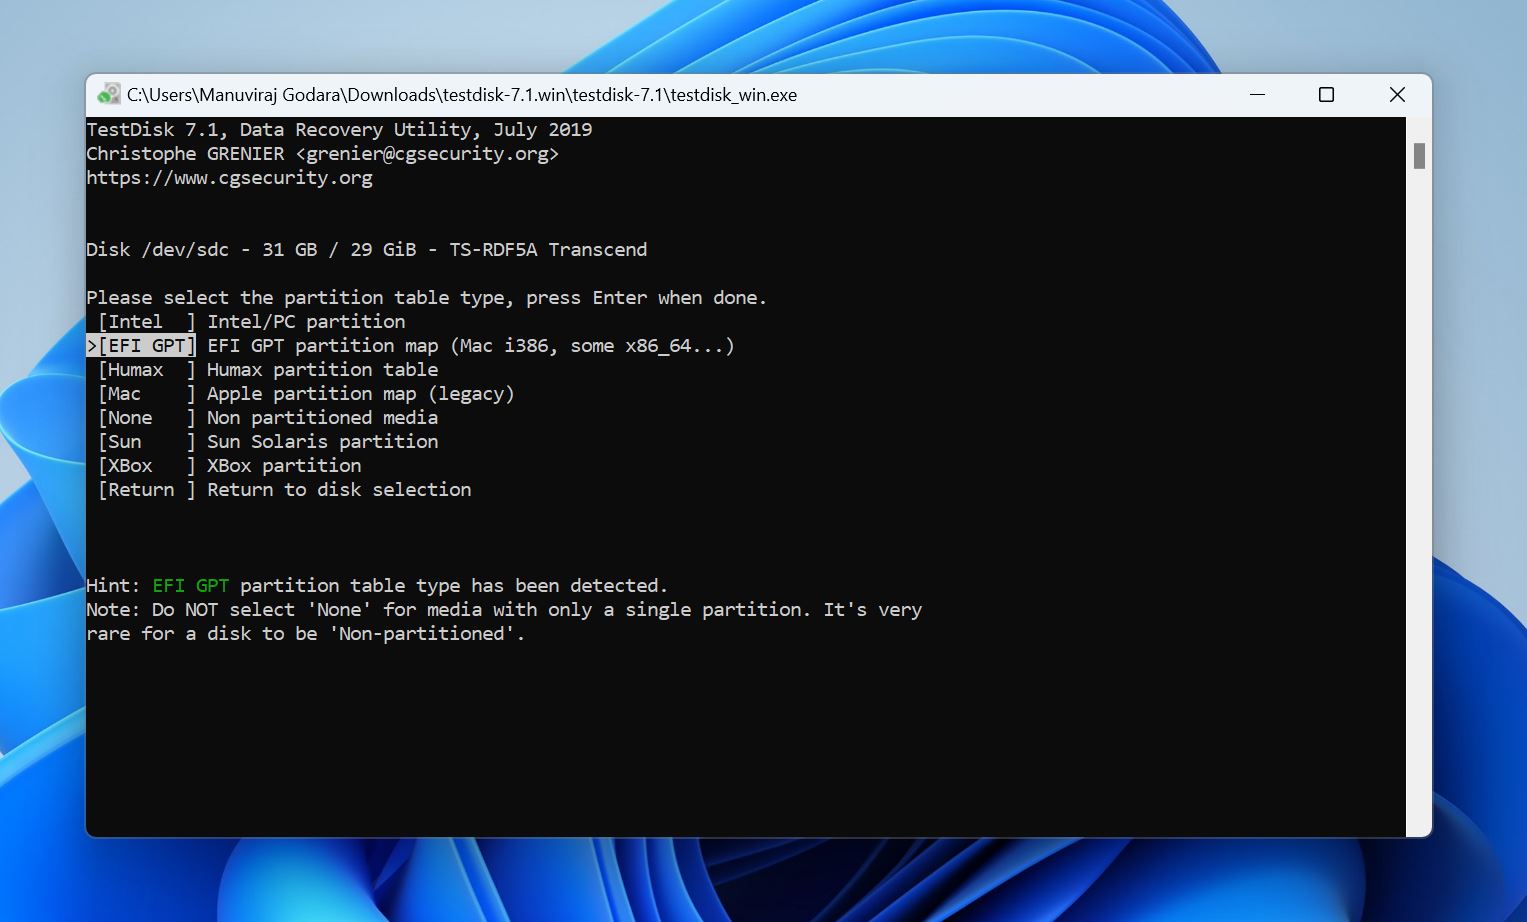
- Select the partition table type and press Enter. TestDisk auto-detects the partition table, so it’s best to simply press Enter on this screen.
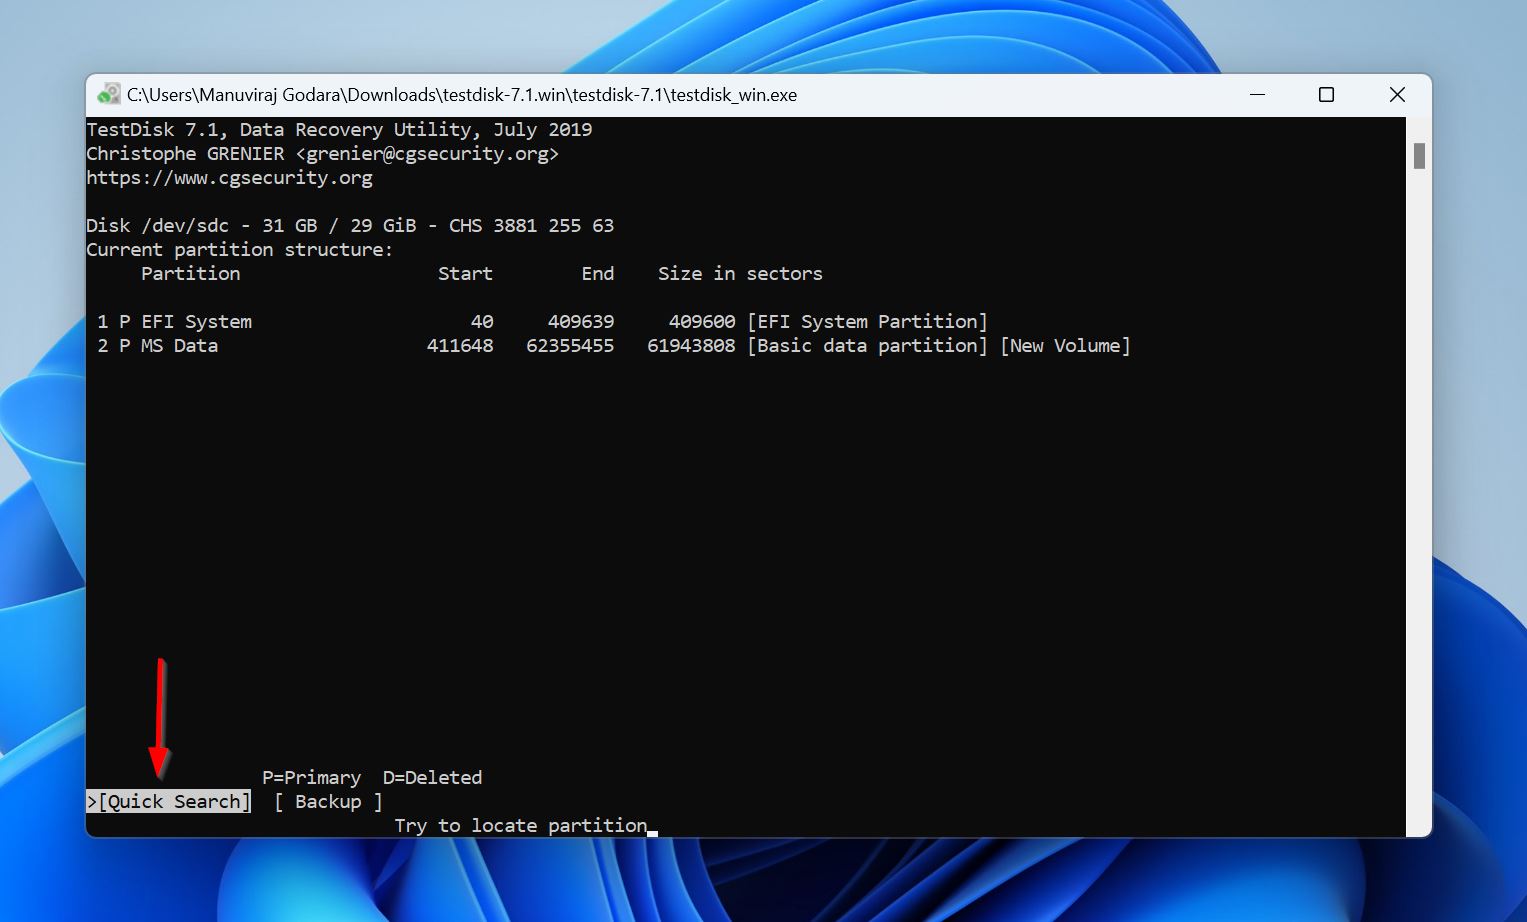
- Select Analyze and press Enter.
- Select Quick Search and press Enter. TestDisk will list the recoverable partitions in real-time.
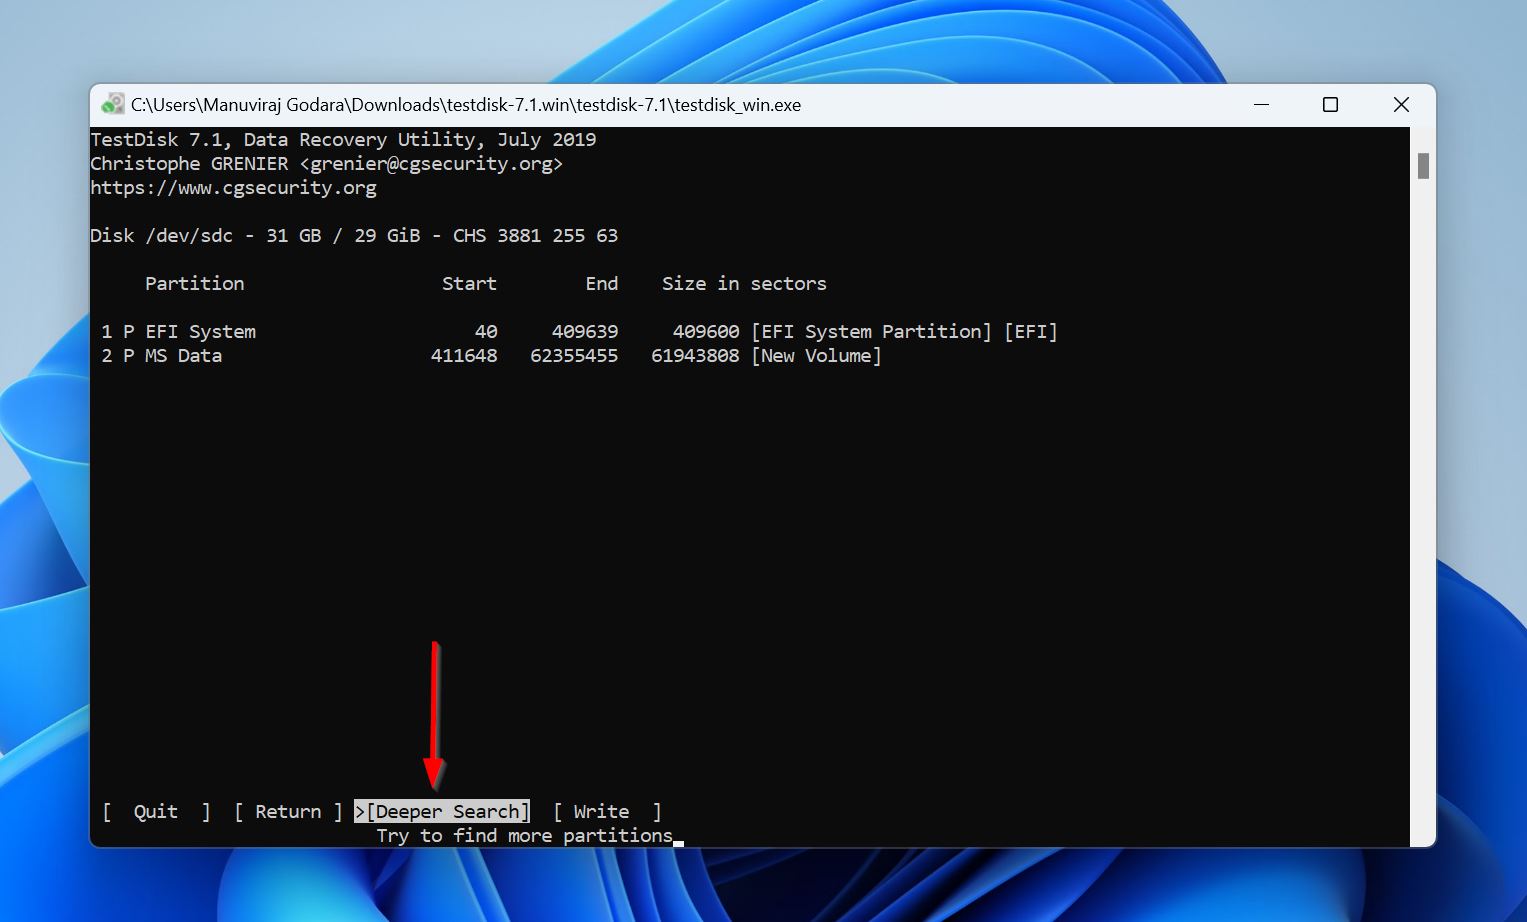
- To view the files in a partition, highlight it and press P. Press Q to return to the partition list. You can also highlight Deeper Search and press Enter, if the partition you wish to recover isn’t listed.
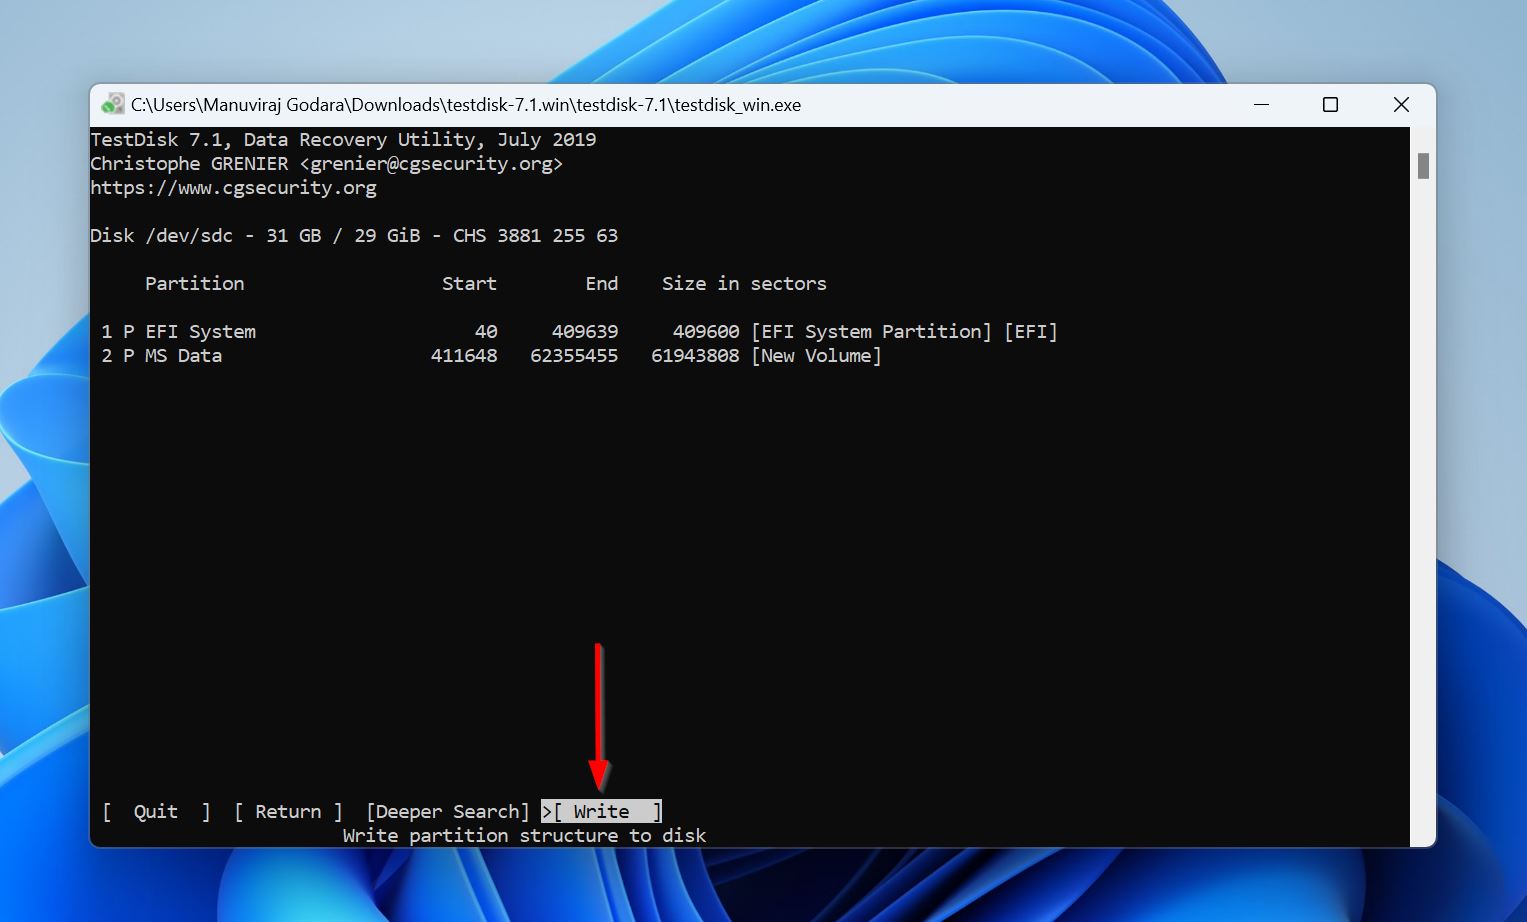
- Each partition will have a prefix before it—D(eleted), P(rimary), *(bootable), or L(ogical). Highlight the partition you wish to recover, use the left and right arrow keys to cycle through the prefixes, and ensure that the partition has the P prefix before it.
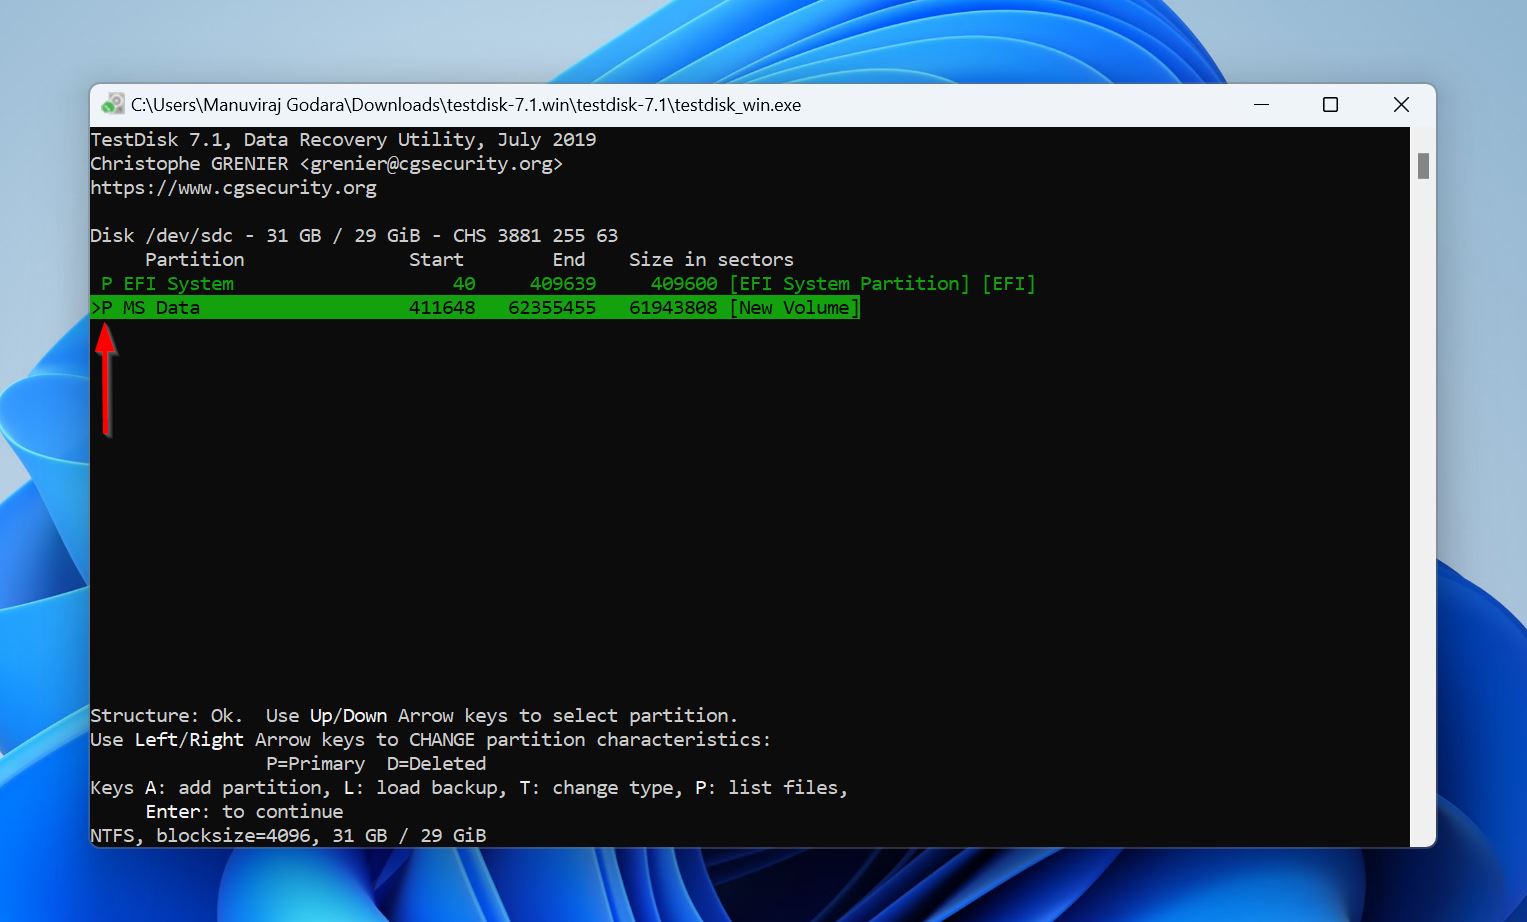
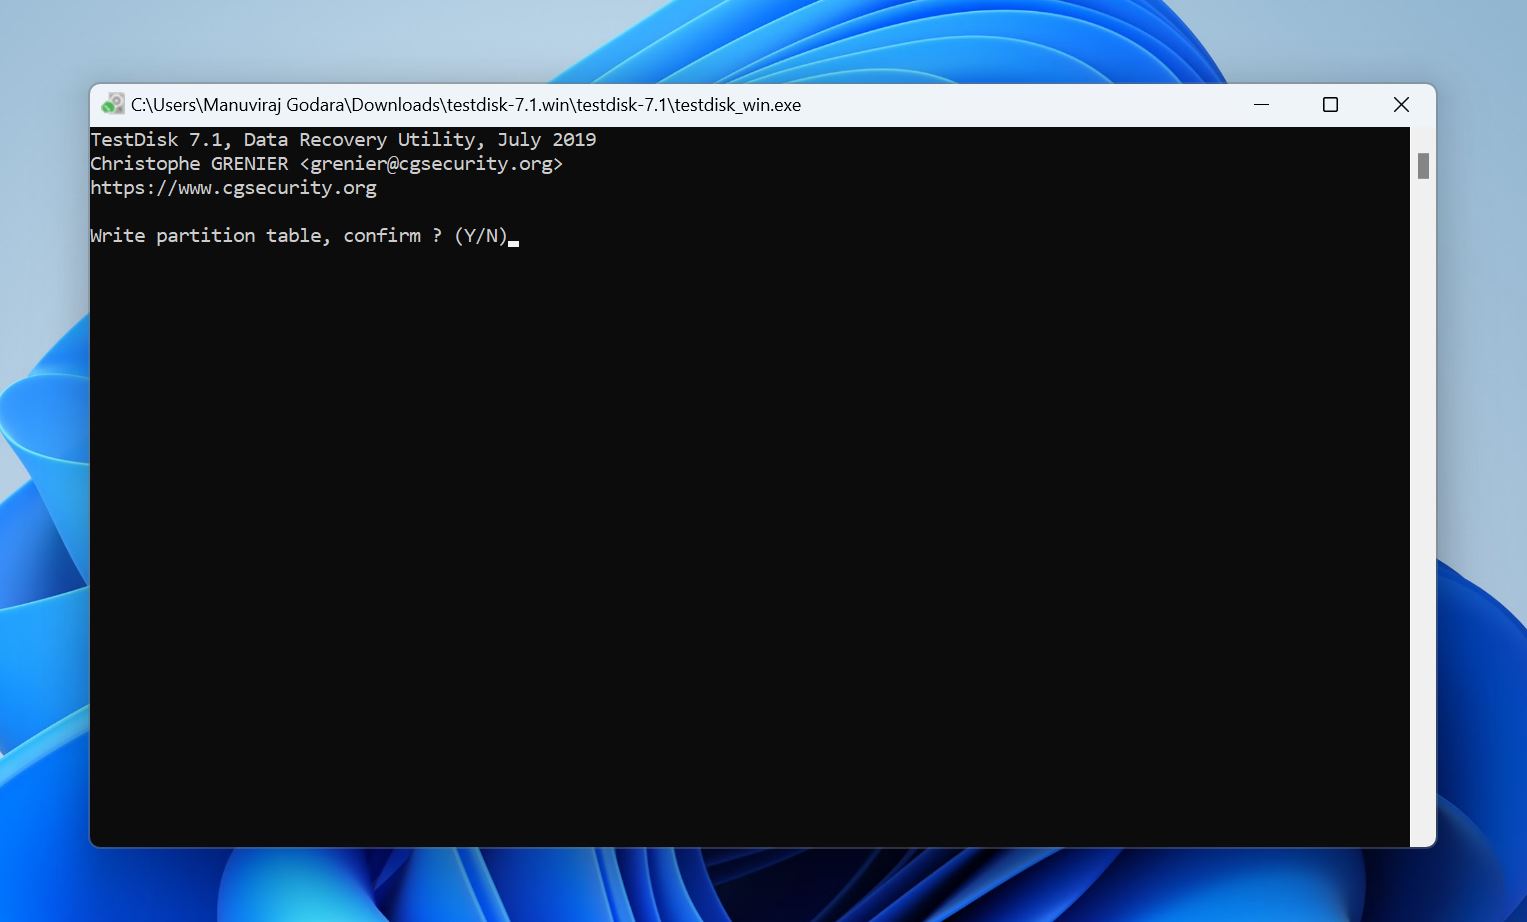
- Select Write and press Enter.
- Press Y on the confirmation screen.
- Reboot your PC.
Method 4: Repartition the Drive
It’s recommended you format and re-partition the drive if none of the aforementioned methods helped fix the problem. Repartitioning involves deleting the corrupt partition and creating a new one. You will need to format it during the process, so it’s best to recover your data beforehand.
Here’s how to repartition the drive:
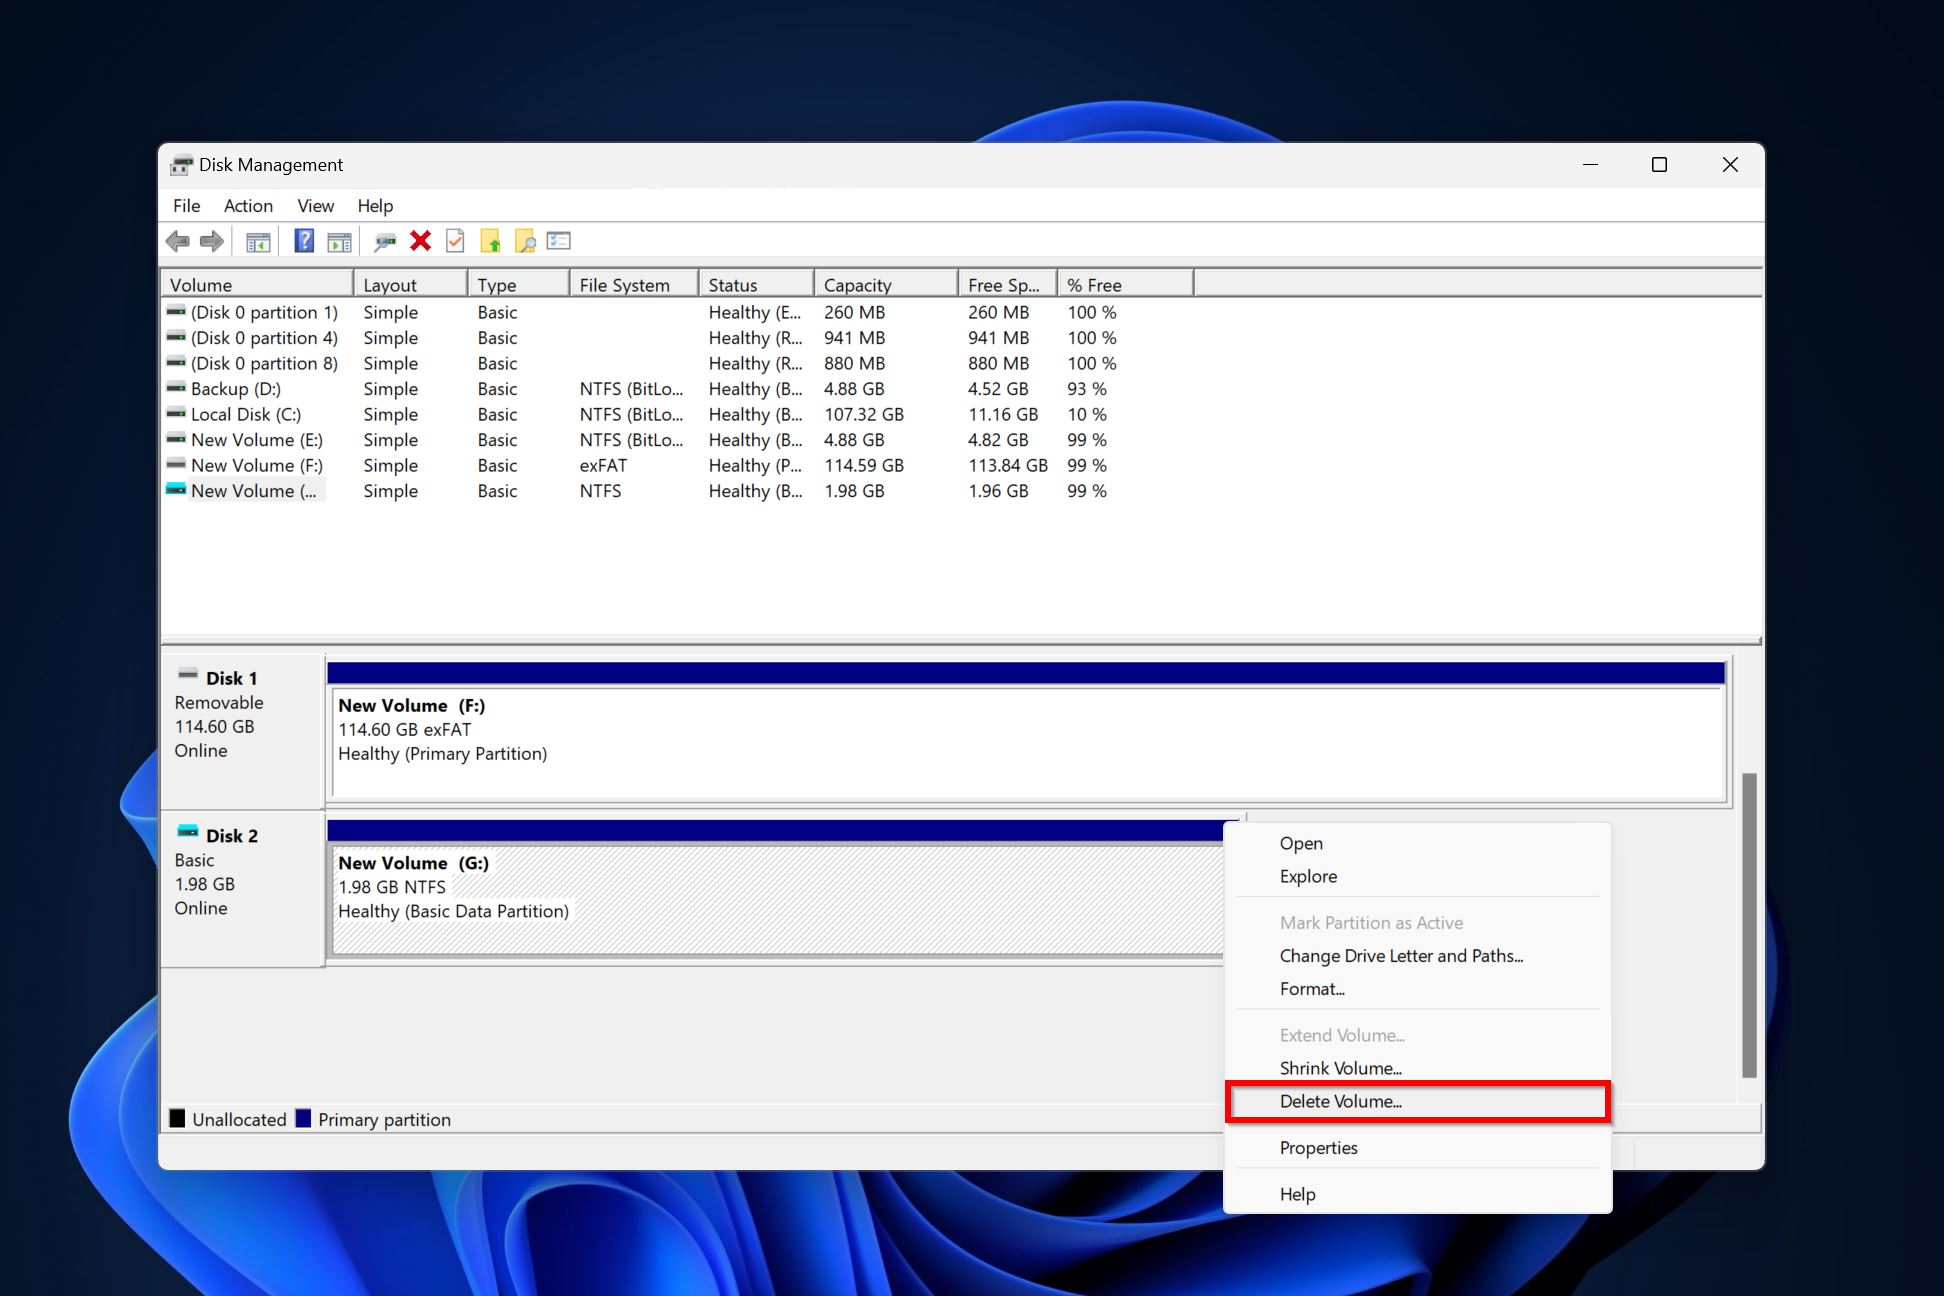
- Search for “disk management” in Windows Search (Windows Key + S). Click on Create and format hard disk partitions from the search results.
- Right-click the partition you wish to delete and choose Delete volume. Click Yes on the confirmation prompt.
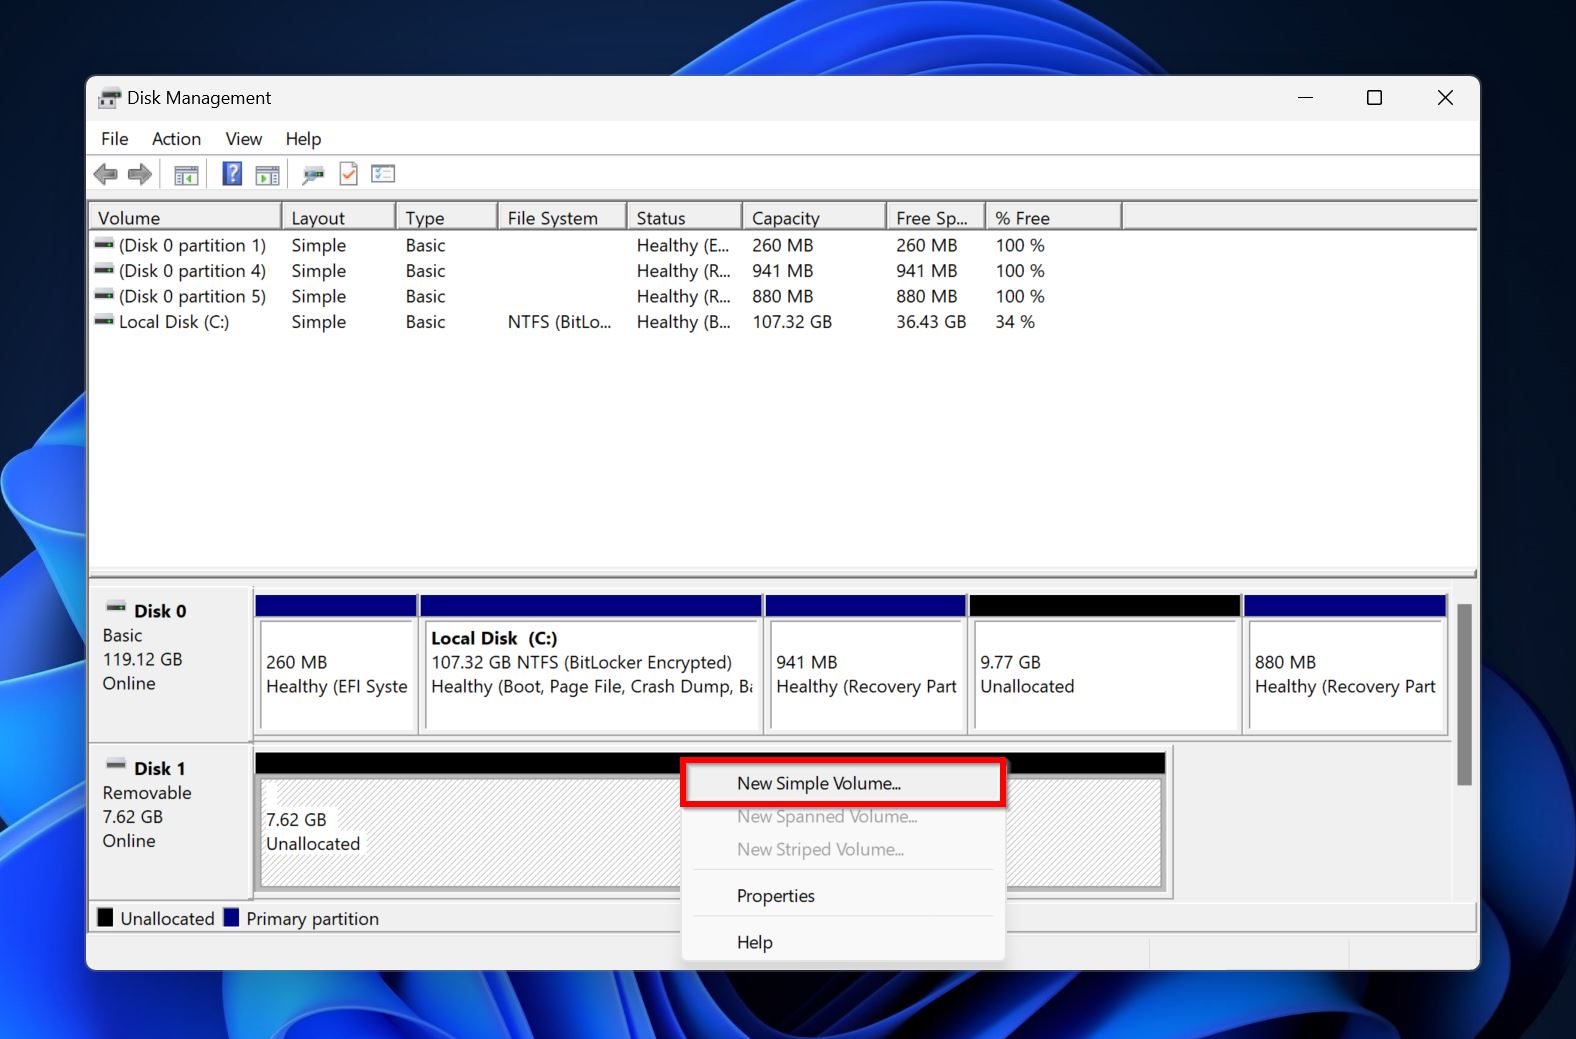
- The space that the deleted partition occupied will now become unallocated, denoted by a black color. Right-click on this unallocated space and choose New Simple Volume.
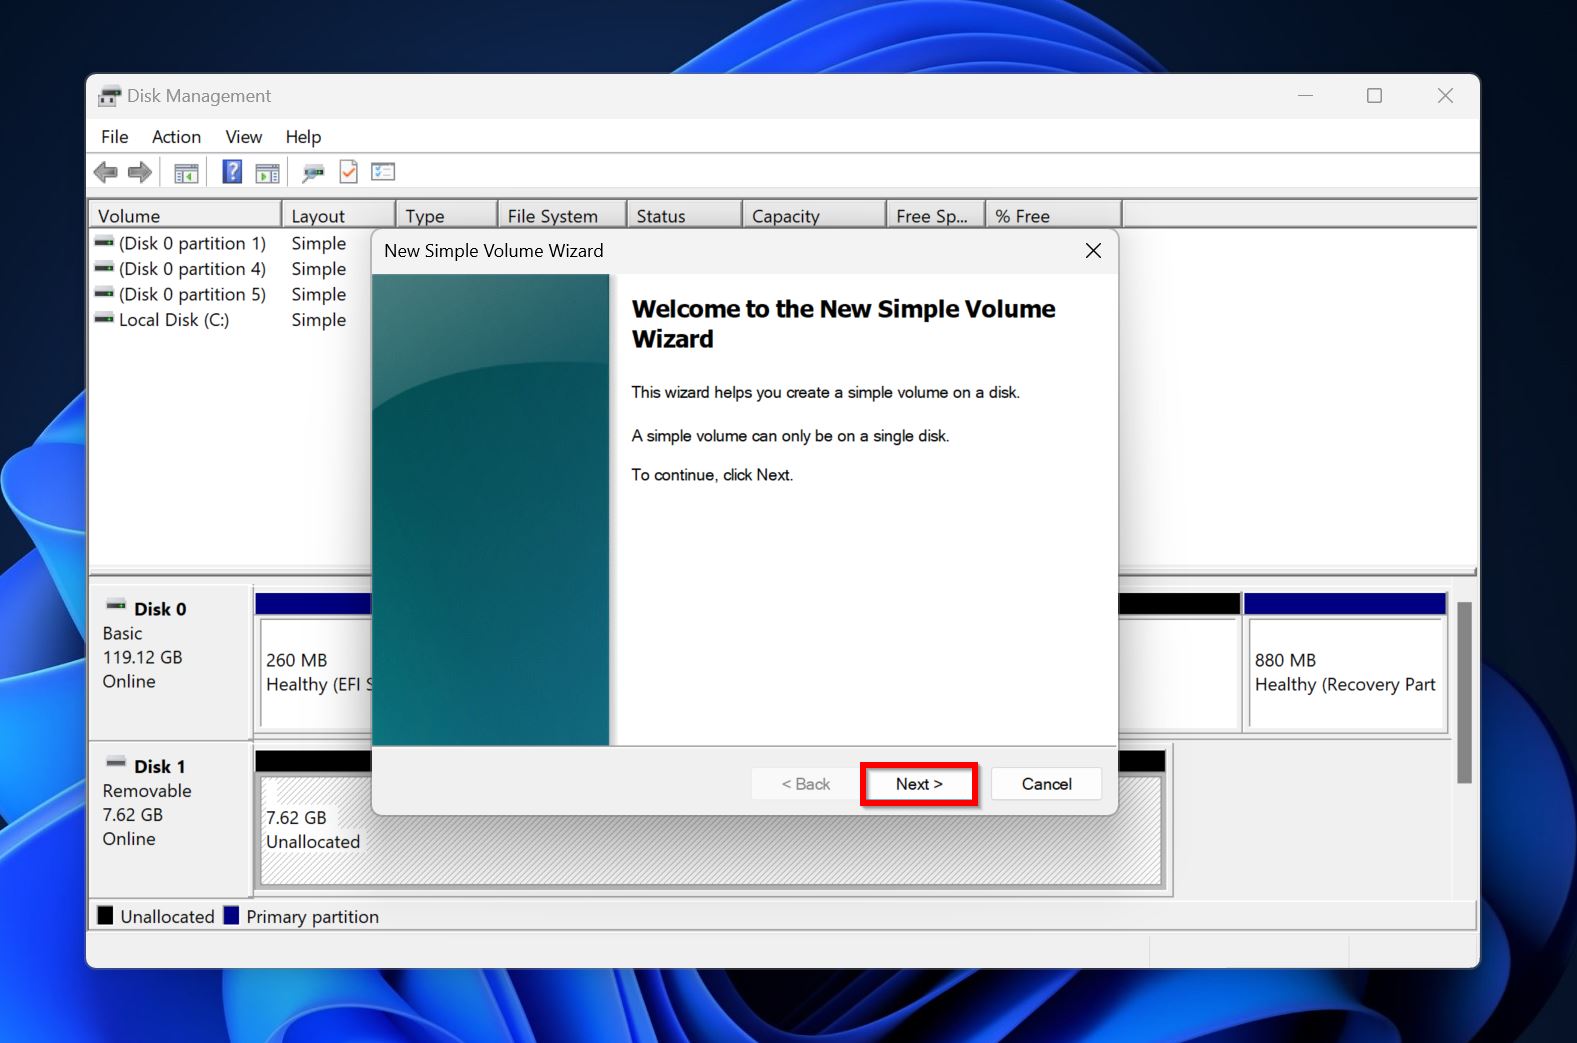
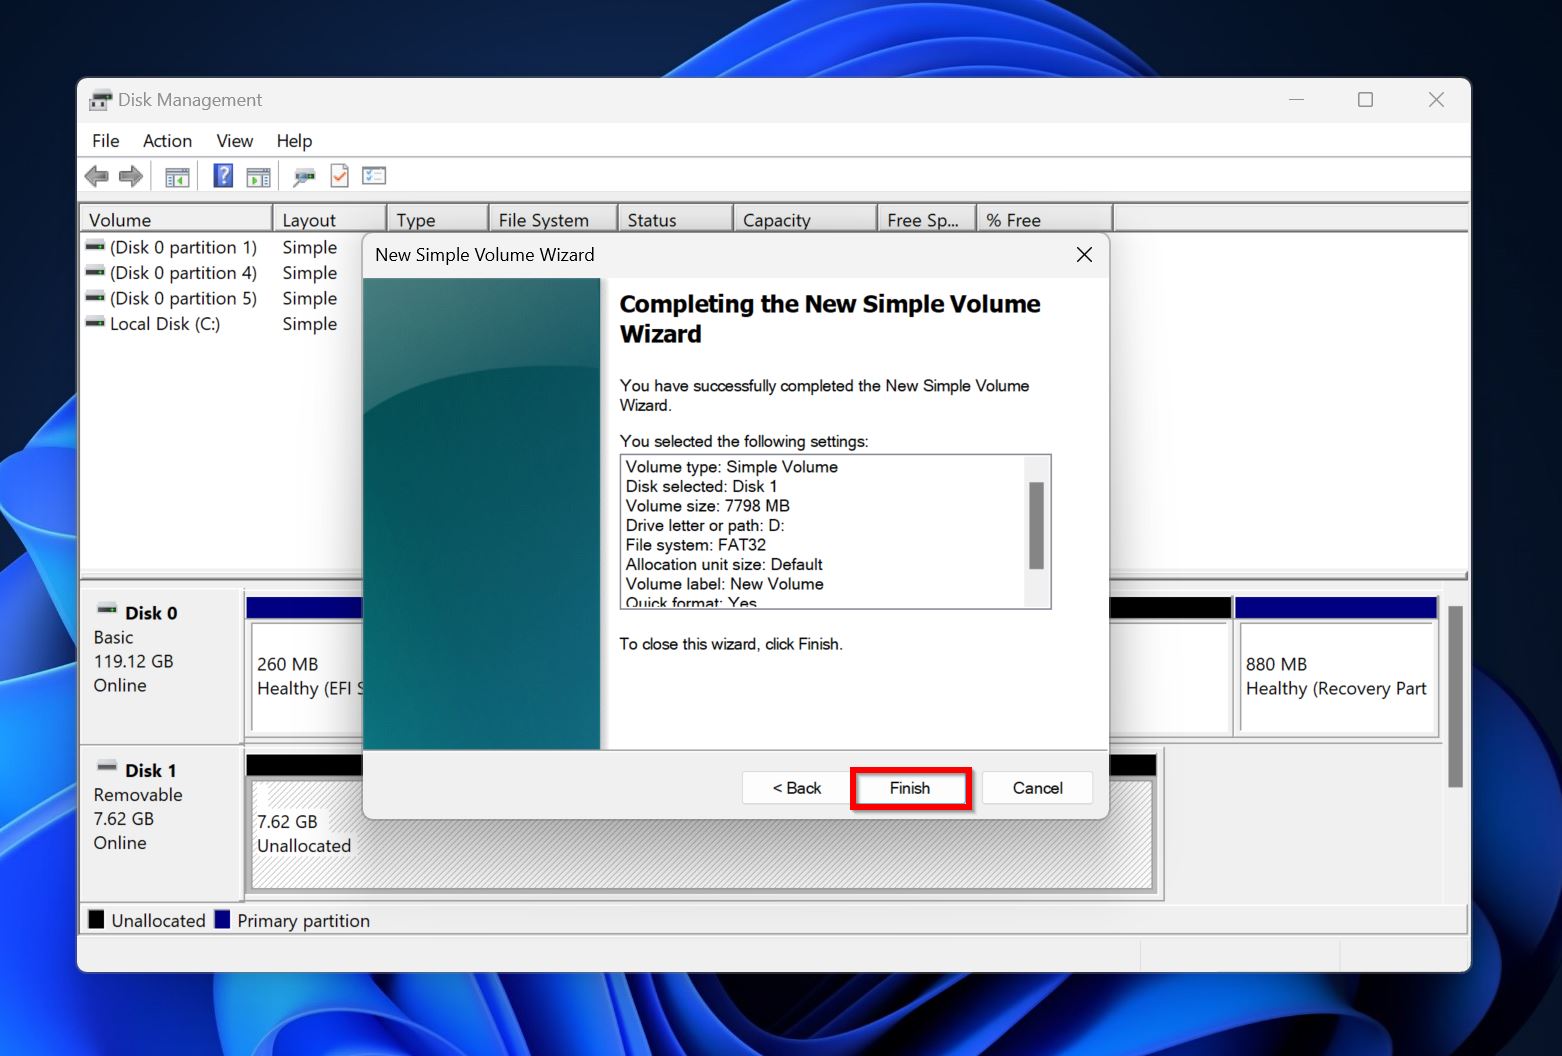
- Click Next on the New Simple Volume Wizard welcome screen.
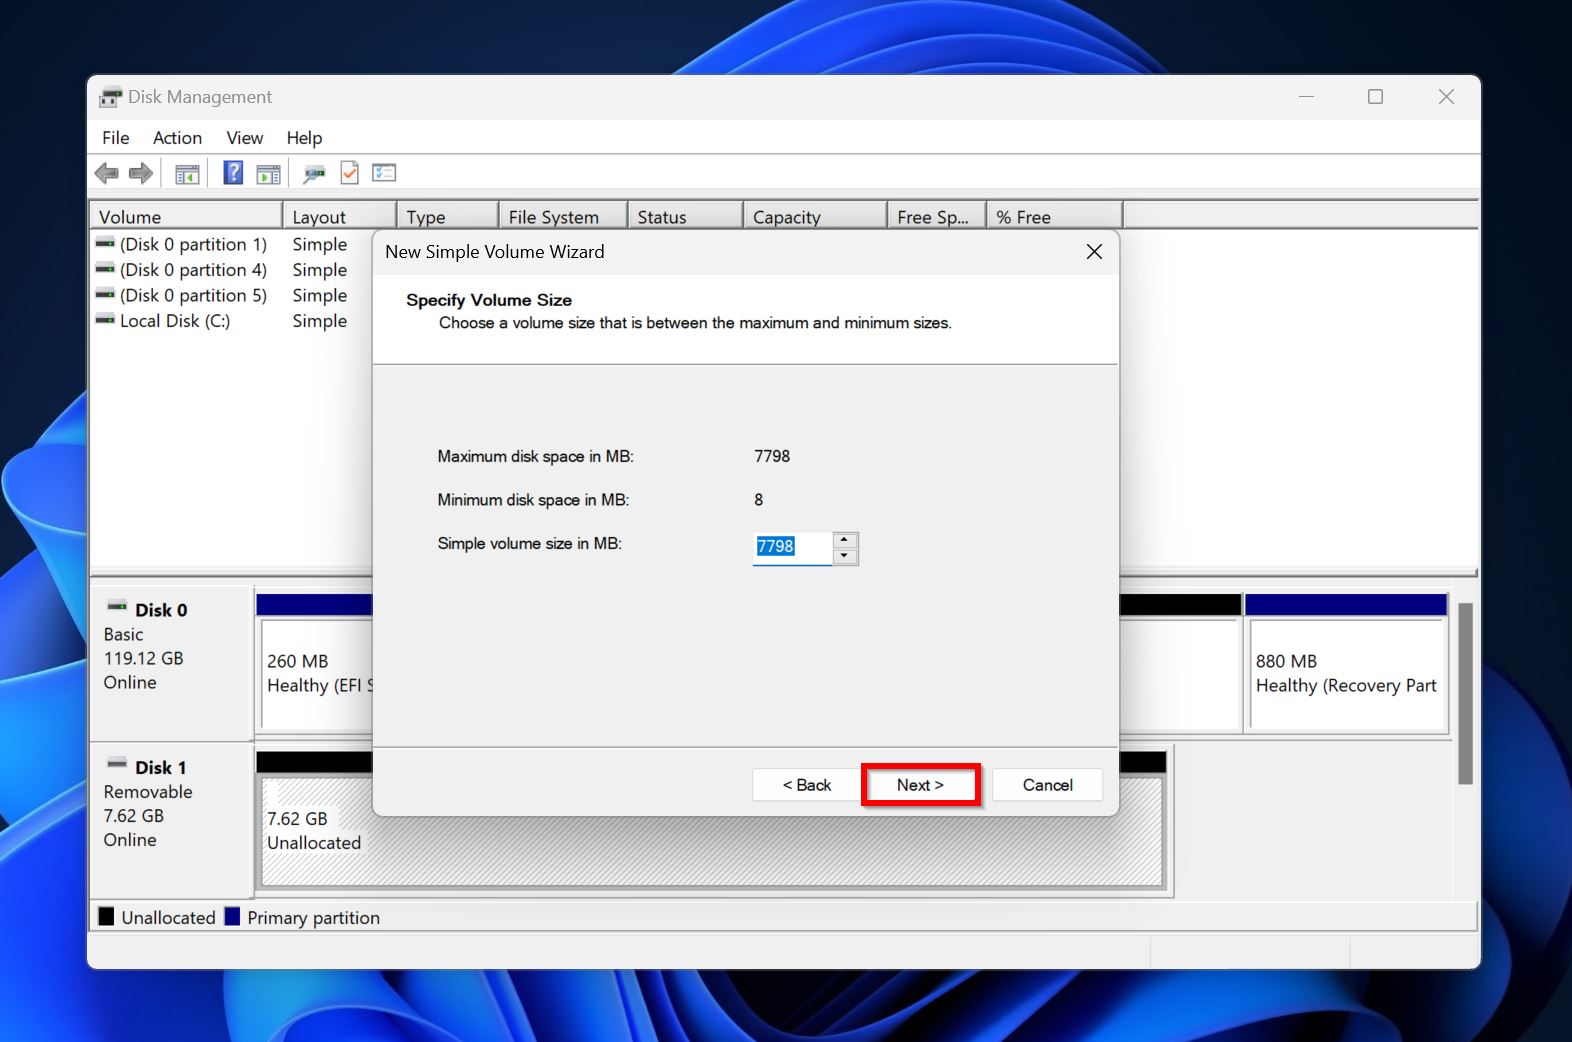
- Choose the size of the partition (in MB) and click Next.
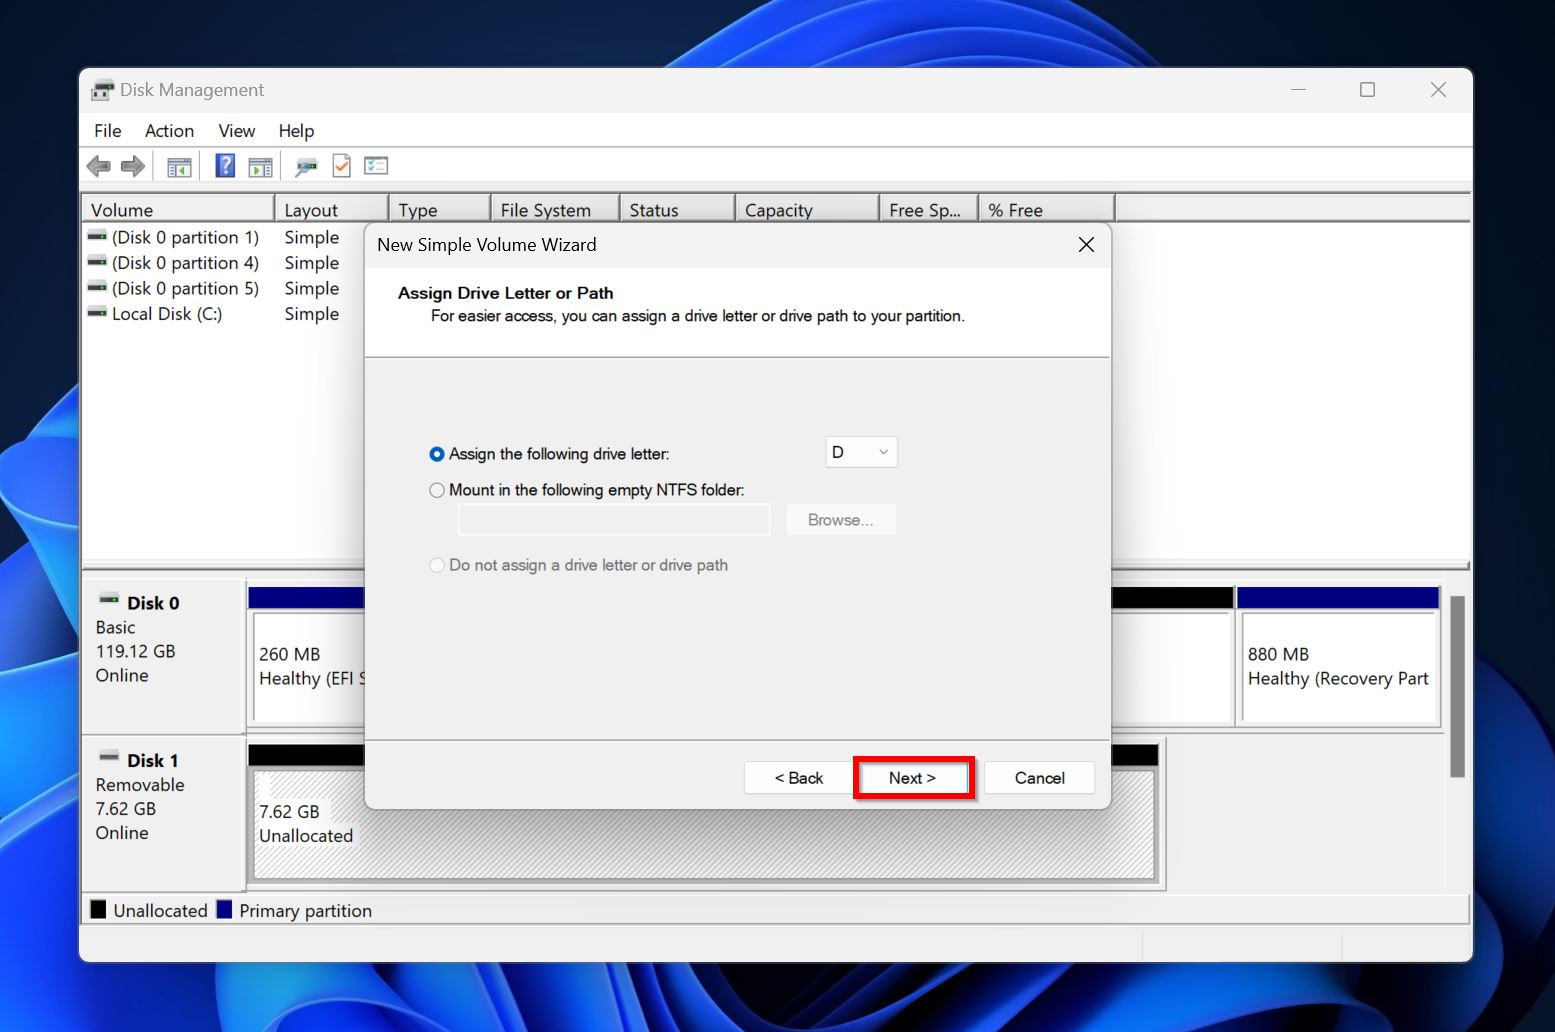
- Pick a drive letter from the drop-down menu and choose Next.
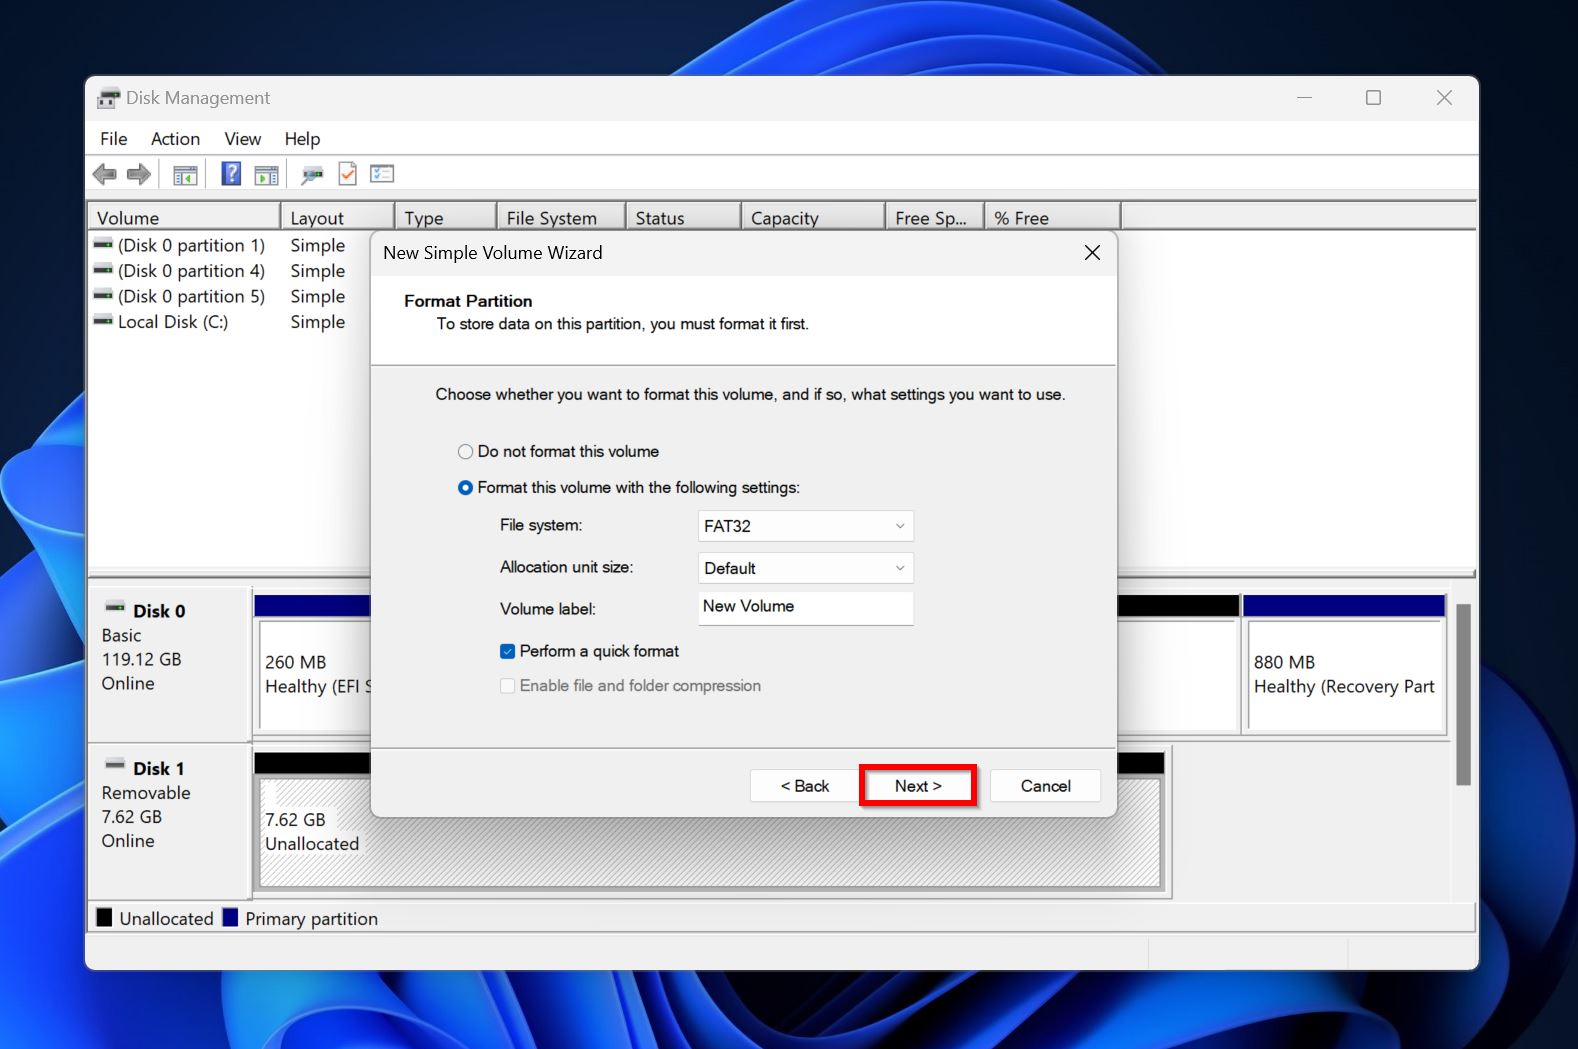
- Assign the required Format parameters or leave them as they are and simply click Next.
- Click on Finish.
Method 5: Request Professional Assistance
Sometimes, no amount of DIY methods can help you. If your drive is undetectable in Disk Management and in case of physical damage, it’s important that you avoid using DIY methods and contact a professional data recovery service or hard drive repair shop instead.
If you don’t wish to take any chances with your files, it’s better to contact a professional data recovery service. Here’s what to expect when contacting one:
- Use the data recovery service’s website or phone number to contact them. Most companies have a 24/7 hotline.
- Explain your data loss scenario in detail.
- You will then need to ship the drive or drop it off at a drop-off point.
- The company will evaluate the drive, determine the amount of data that can be recovered, and get back to you with a quote. The evaluation is usually free.
- You can then proceed with data recovery or not.
Conclusion
A corrupt or damaged partition may indicate serious issues with your drive. Therefore, it’s best to first secure your data and then proceed to fix the drive using methods like—adding a drive letter, running CHKDSK, and using TestDisk. If the DIY methods bear no fruit, or if you’re dealing with a physically damaged disk, it’s best to contact a professional data recovery service right away.
FAQ
- Malware attacks.
- Improper disk usage.
- Unexpected power outages.
- Physically damaged storage drives.
- Run CHKDSK on the affected partition.
- Use TestDisk to fix the partition.
- Format the partition and create it anew.
- Download a free data recovery tool like Recuva.
- Launch the tool, select your drive and click on the scan option.
- Select the files you wish to recover.
- Choose a recovery destination for the files and click finish.


