 Certain methods to fix a malfunctioning drive require you to change its drive letter. But, what do you do when the Change Drive Letter and Paths option is greyed out? We’re here to answer exactly that. The sections below contain all you need to know about the greyed out change drive letter option, and how to fix it.
Table of Contents
Reasons Why Change Drive Letter and Paths May Be Greyed Out
Knowing why the Change Drive Letter and Paths option is greyed out can help you determine which fix is appropriate, as well as help you pick the best option to secure your data.
Some things that can lead to a greyed out Change Drive Letter and Paths option are:
| Reason | Description |
| 🛍️ Uninitialized Disk | If you’re using a brand new disk, you first need to initialize and format it before you can assign drive letters to it. In most cases, the Change Drive Letter and Paths option will not be visible at all. Disks that were working perfectly earlier and suddenly show up as uninitialized have usually suffered logical or physical damage. |
| 🗃️ Incompatible Formatting | A drive needs to have a Windows compatible file system if you wish to modify its drive letter or path. This commonly happens when an external hard drive, that was previously used on a Mac, is connected to a Windows PC. The drive will likely be formatted in the HFS+ or AFPS formats, which Windows doesn’t recognize. |
| 🖥️ Recovery and EFI Partitions | Windows has certain reserved partitions–the Recovery partition and EFI System partition–that cannot be modified by you. Upon right-clicking on any of these volumes, you’ll observe that all options are greyed out, except “Help.” |
| 🚫 Permissions | If you’re logged in using a non-administrator account on your PC, certain settings, such as the Change Drive Letter and Paths option, could be out of bounds for you. To access the option, you’ll need to log in using an Administrator account. |
| 🔨 Physical or Logical Damage | Windows may be unable to read your drive properly if it’s physically and/or logically damaged. Usually, a drive will exhibit symptoms like slow performance and data loss when it’s logically damaged. Consistent clicking or beeping sounds are clear indicators of a physically damaged drive. |
How to Fix the Change Drive Letter and Paths Option Greyed Out Issue
There are several ways to diagnose a greyed out Change Drive Letter and Paths option. In the worst-case scenario, you will need to format the drive for the option to become accessible. That’s why, it’s best to back up all your important data from the drive, especially if the drive exhibits symptoms of logical damage.
If the drive works flawlessly, you can simply copy the required files to a safe location. But, in case you suspect the disk is logically damaged, or you’re unable to access it in Windows Explorer, you’ll need to create a disk image of the drive. A disk image is essentially a soft copy of the entire drive. You can use it to restore your existing data, and even recover deleted files.
We recommend you use Disk Drill to create the disk image, since it’s compatible with all types of storage drives and works with Windows, Linux, and macOS file systems. You can also mount the disk image in Disk Drill and use it to recover existing, as well as deleted files.
Here’s how to create a disk image (backup) of your drive using Disk Drill:
- Download and install Disk Drill.
- Open Disk Drill, and go to Drive Backup under Extra Tools.
- Select the required drive and click on Byte-to-byte Backup.

- Choose where you wish to save the disk image and click OK. The destination should have enough free space–equal to, or more than the entire storage capacity of the drive you’re creating an image of.
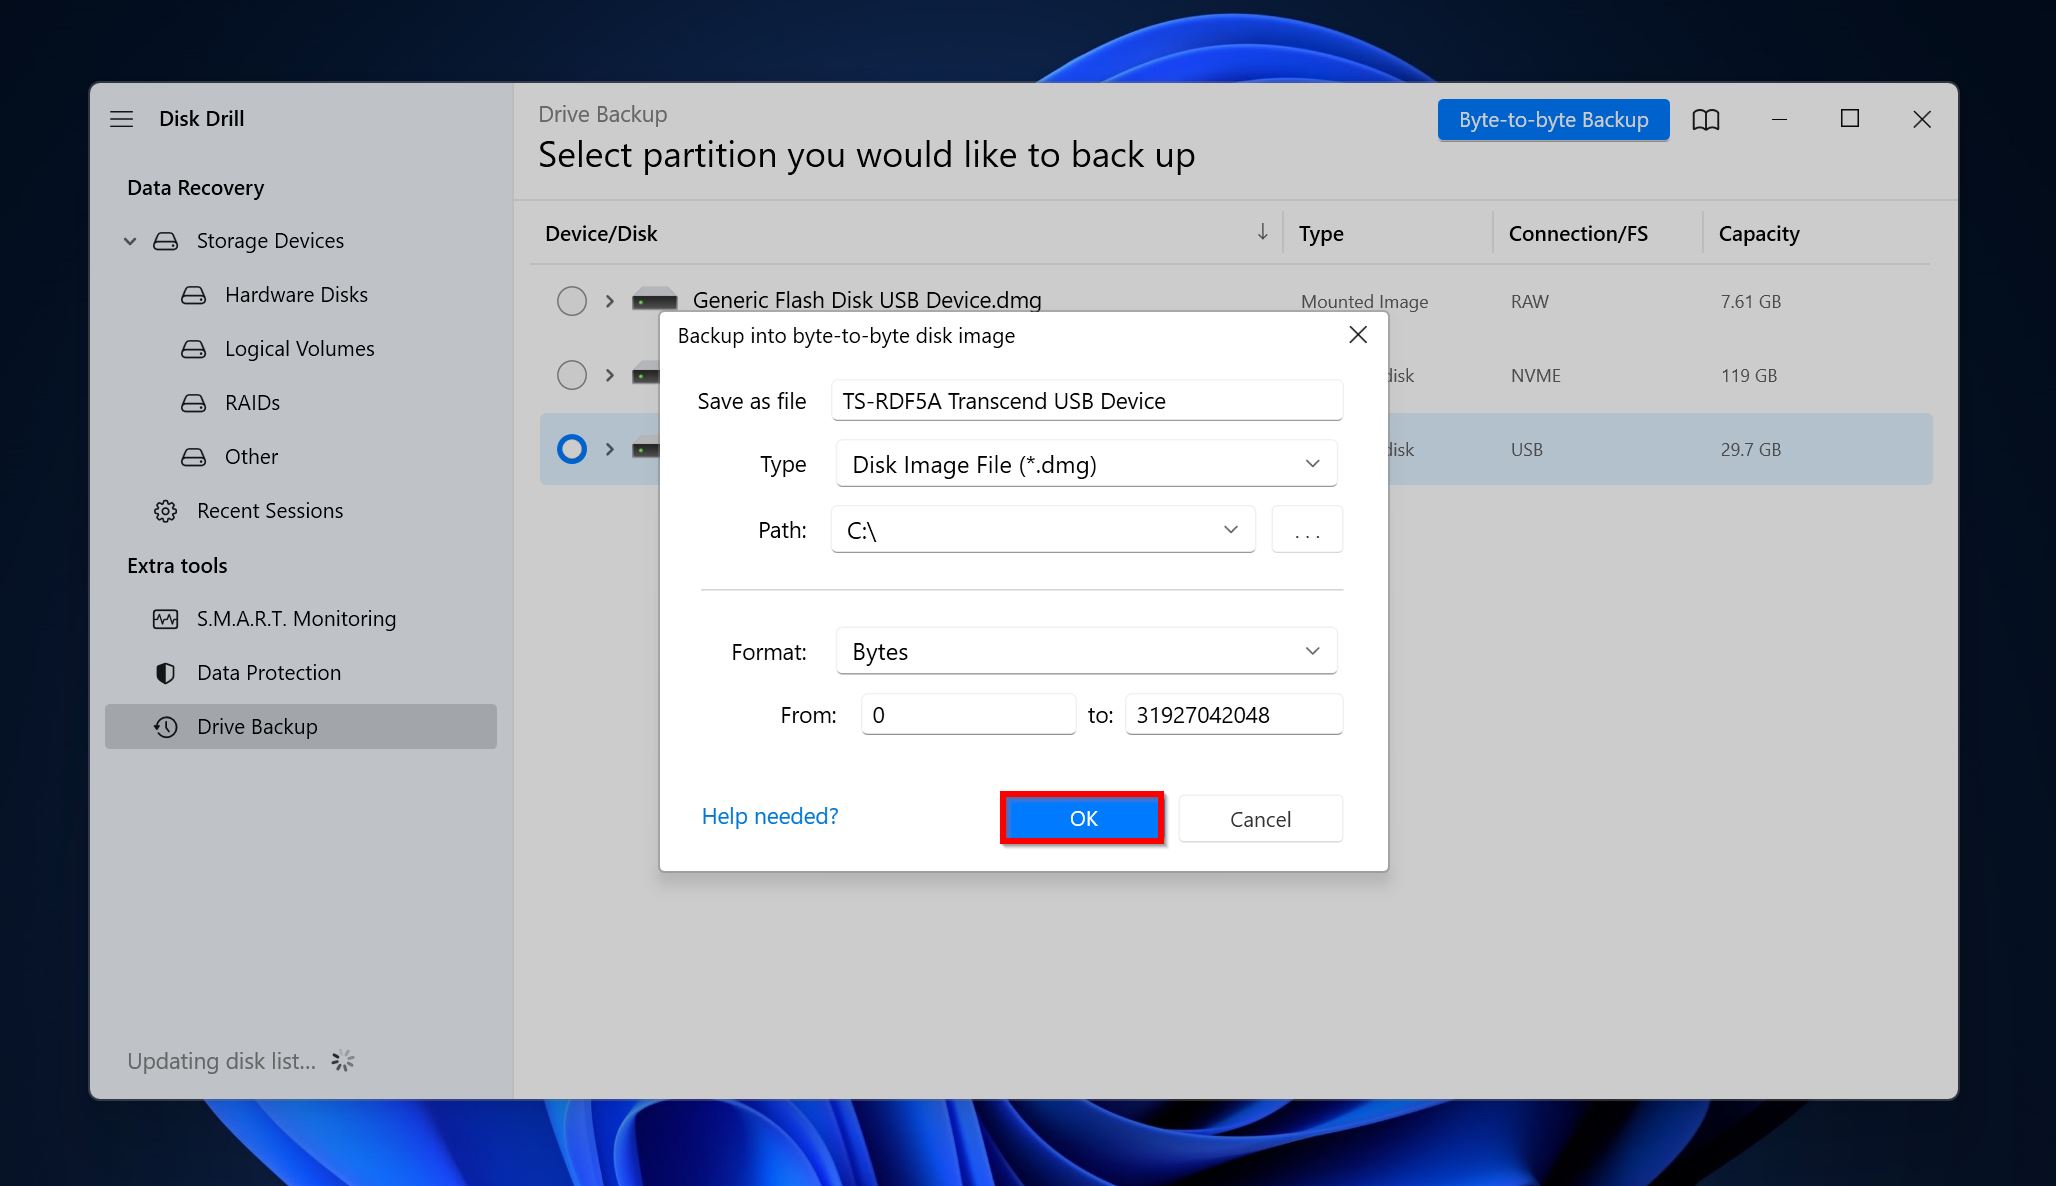
- Disk Drill will create the disk image.
Once your files are secured, you can proceed to fix the Change Drive Letter and Paths option not available issue.
Method 1: Run Disk Management as an Administrator
All user accounts on your PC do not have the same privileges. To ensure you have the highest level of access, run Disk Management using an Administrator account. Here’s how to do this:
- Click on the Start button or press the Windows key.
- Click on your user profile at the bottom left and select Sign Out.
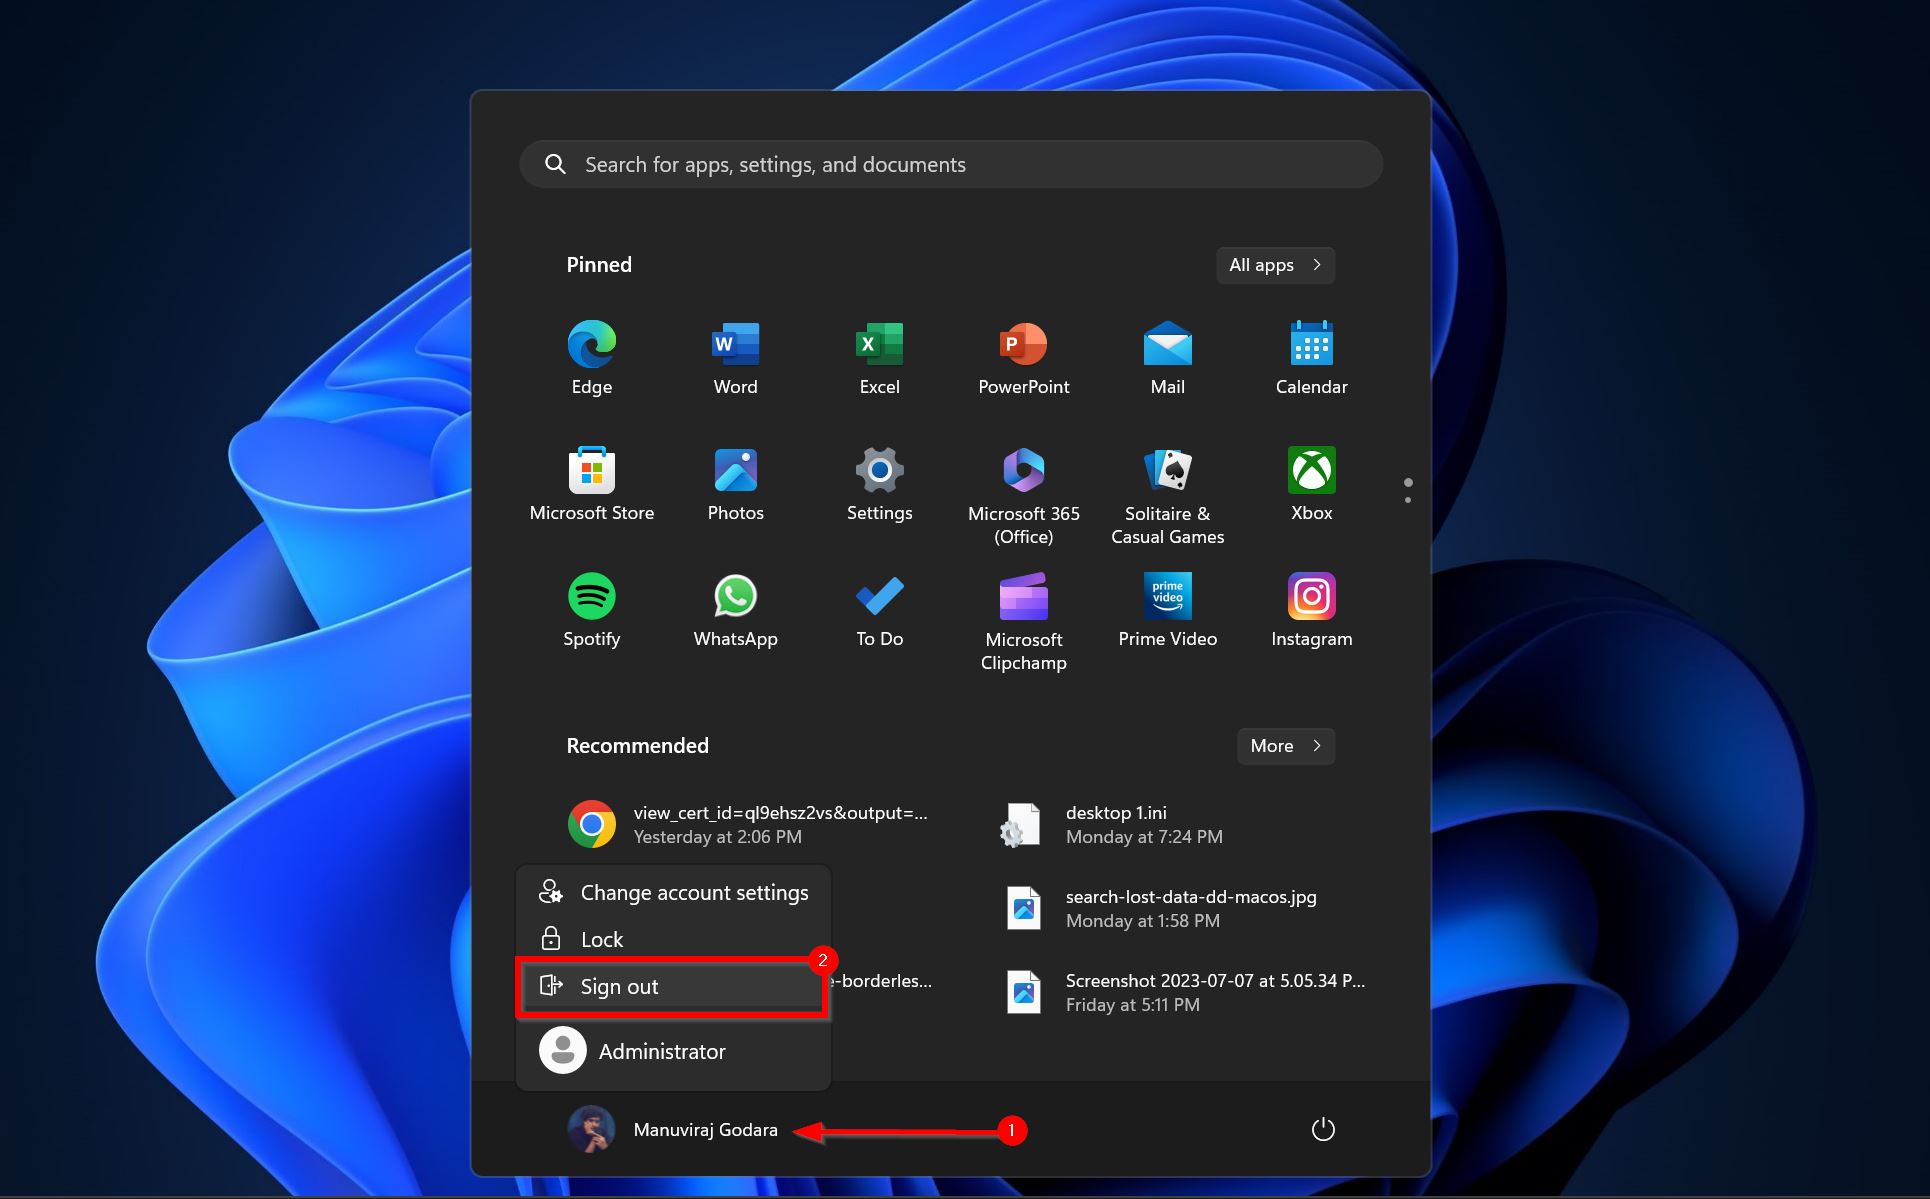
- On the log in screen, select the Administrator user account or any account that has Administrator level access and sign in using that.
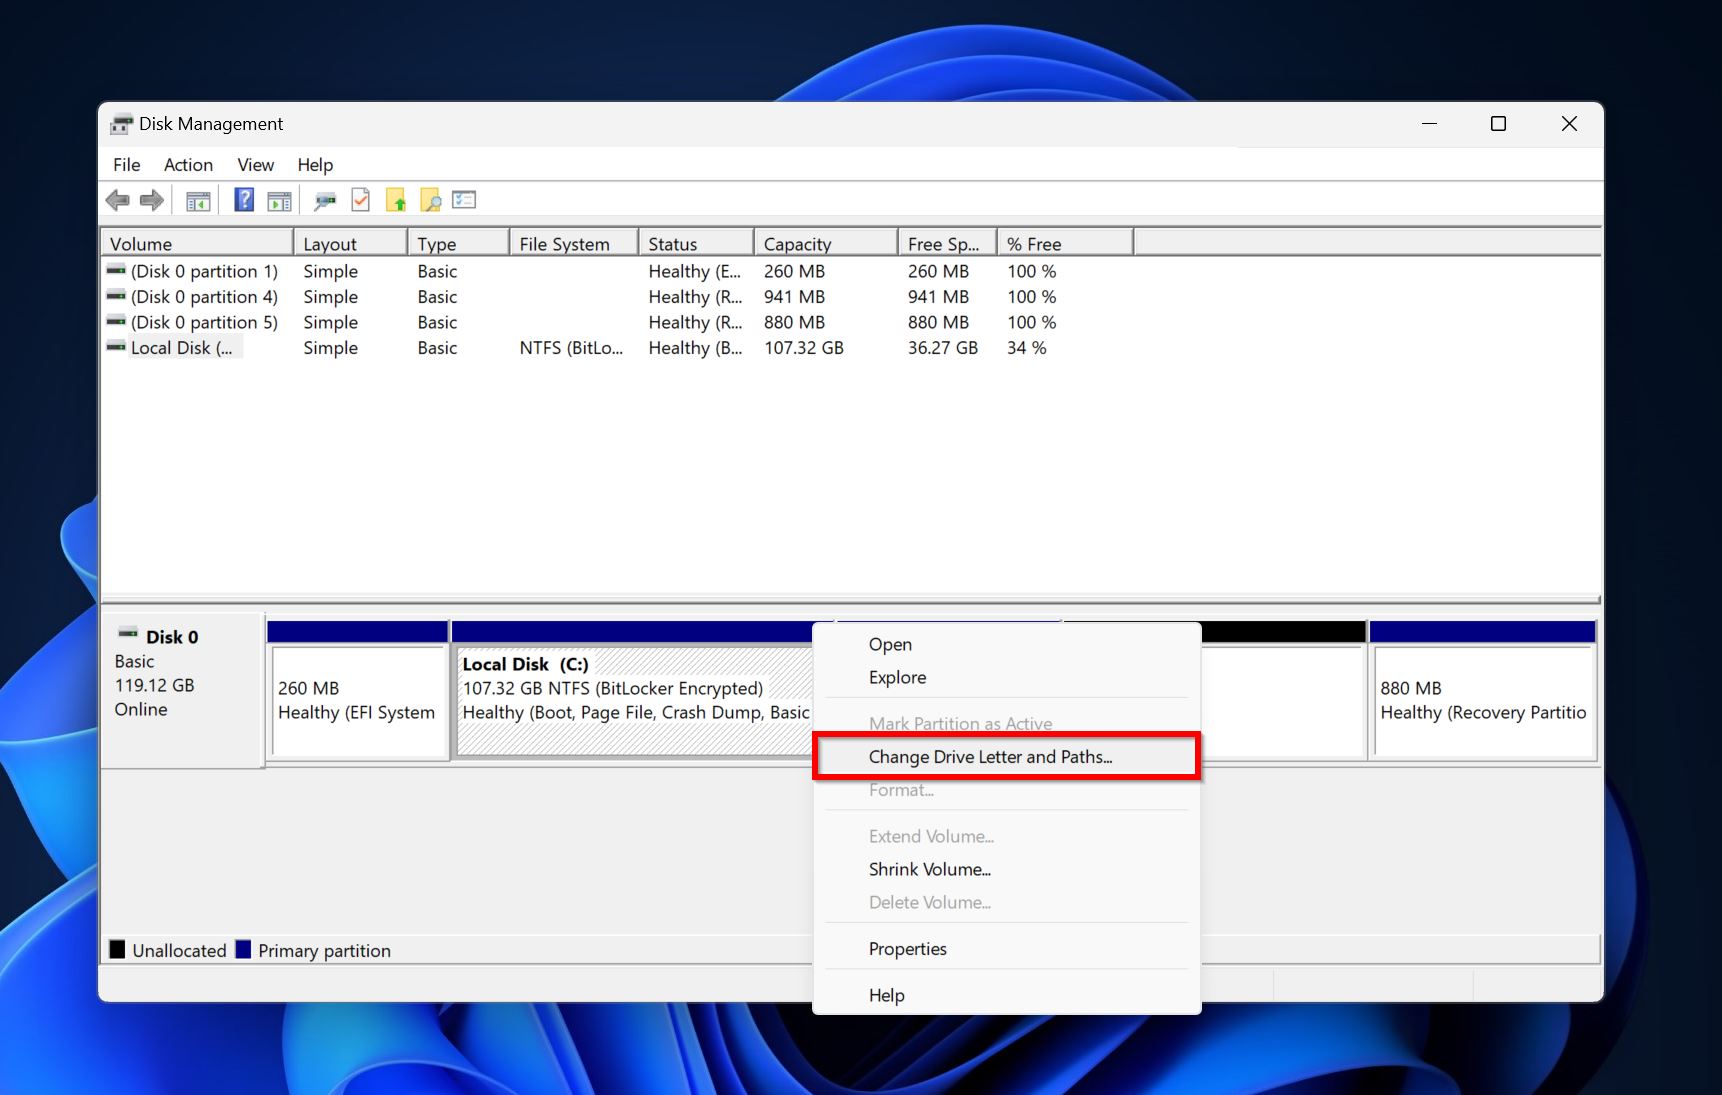
- Search for “disk management” in Windows Search (Windows Key + S). Click on Create and format hard disk partitions from the search results.
- Right-click on the partition or drive you wished to change the drive letter of and see if the Change Drive Letter and Paths option is still greyed out.
Method 2: Connect the Drive to a Mac
If your drive worked properly on macOS, it’s best to reconnect it to a Mac and format it to a Windows-recognized file system. You can also take this chance to copy any important files to another location.
Once you’ve connected your drive to a Mac, format it to FAT32, and it should work properly with Windows. Here’s how to format the drive in macOS:
- Go to Finder > Go > Utilities > Disk Utility. You can also search for “Disk Utility” in macOS’ Spotlight Search (Command + Spacebar).
- Select your drive from the left sidebar and click on Erase.
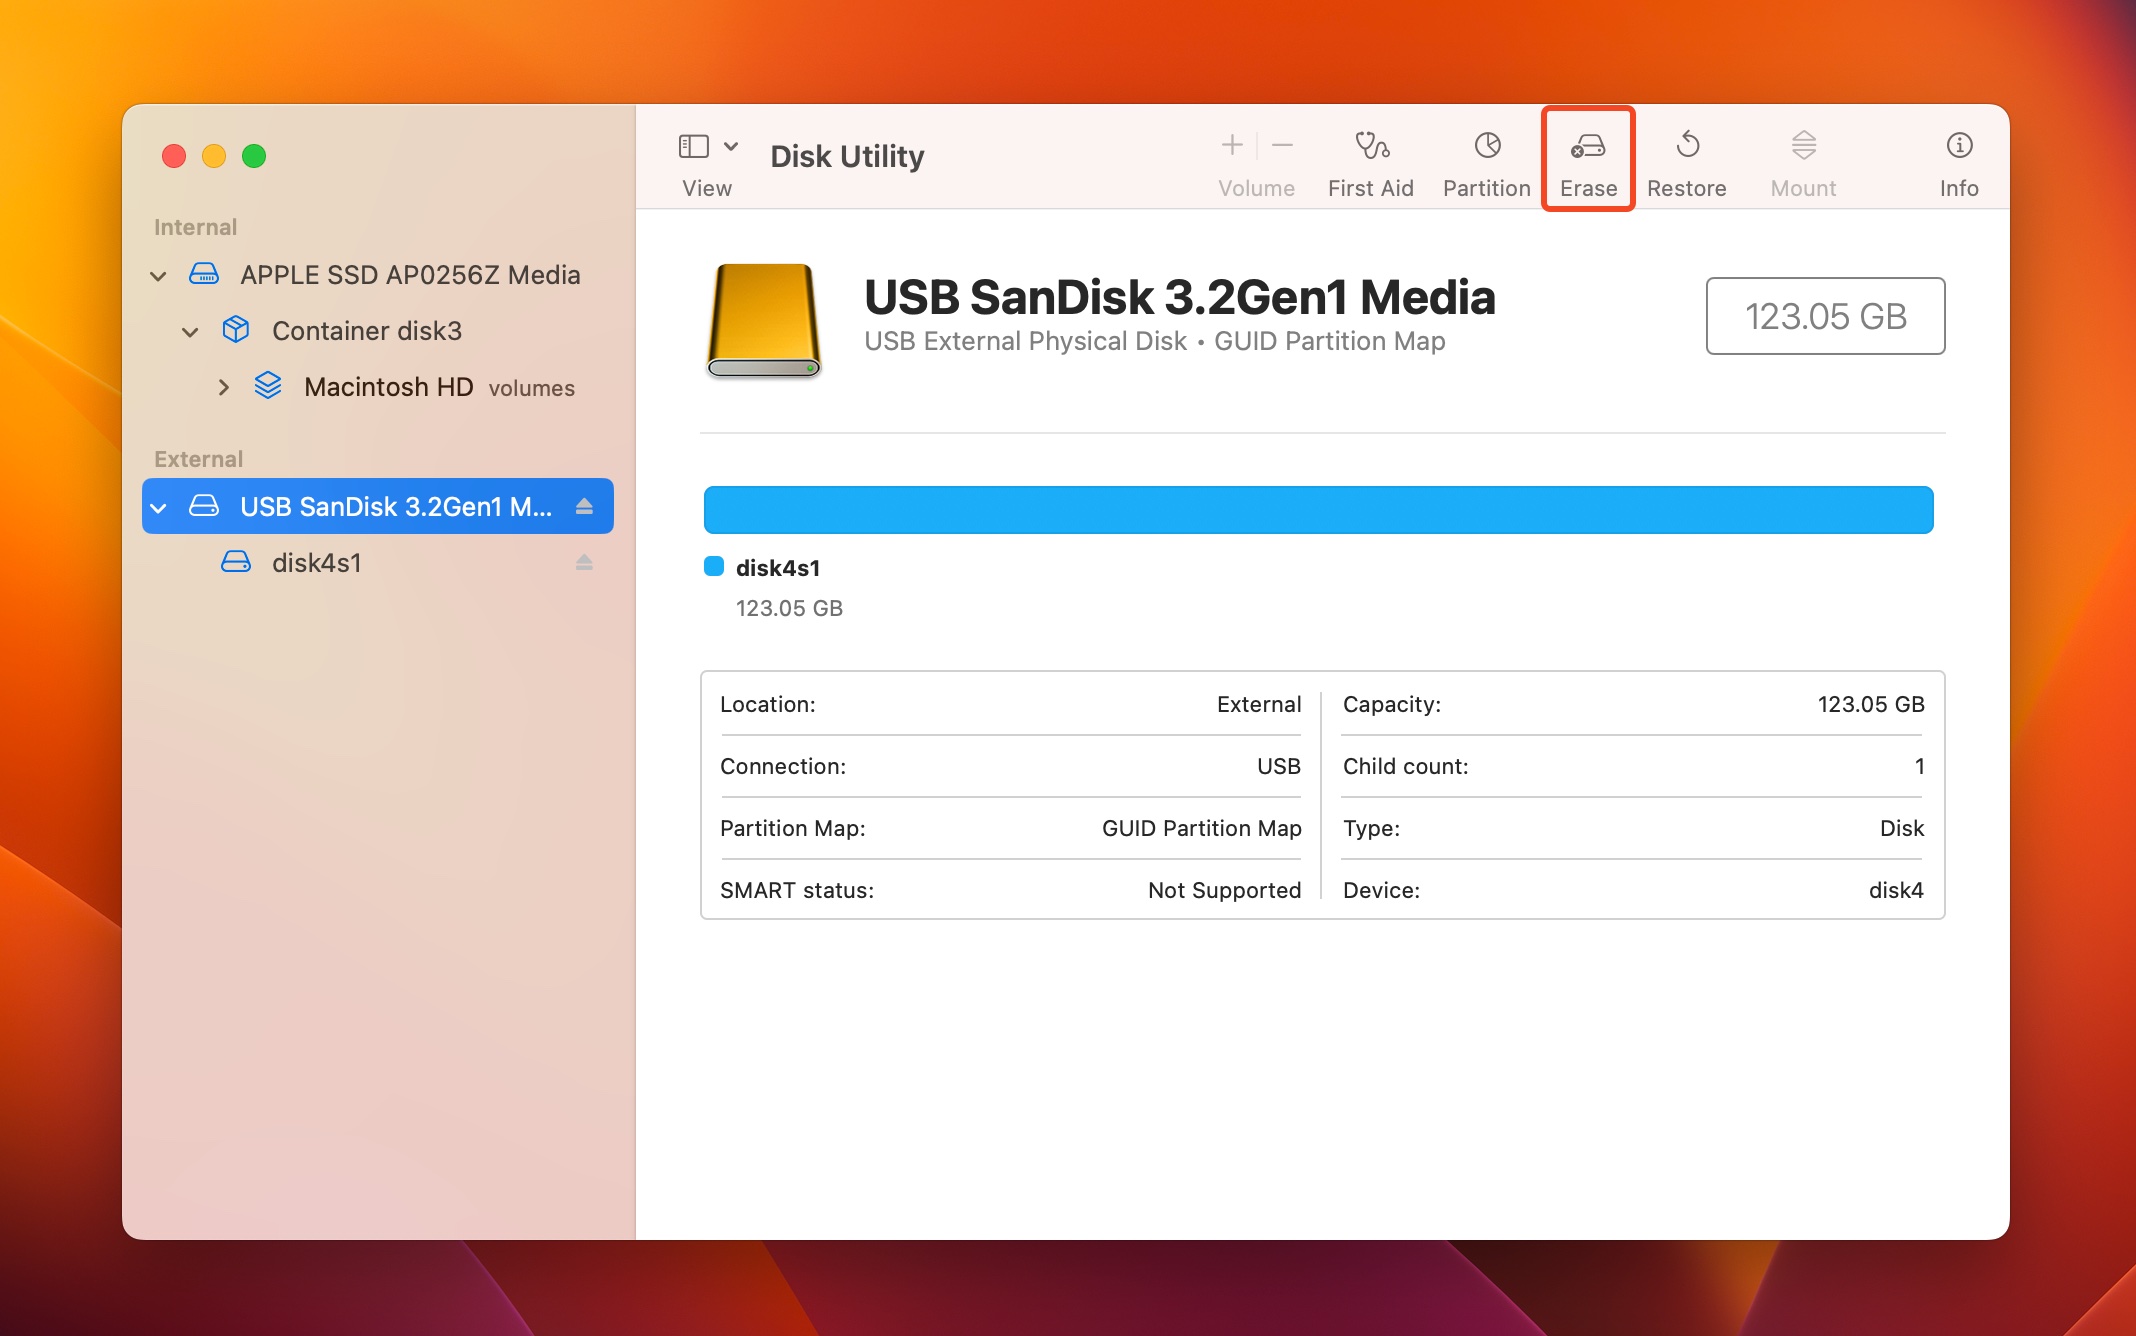
- Pick FAT32 from the Format drop-down menu and click on Erase.
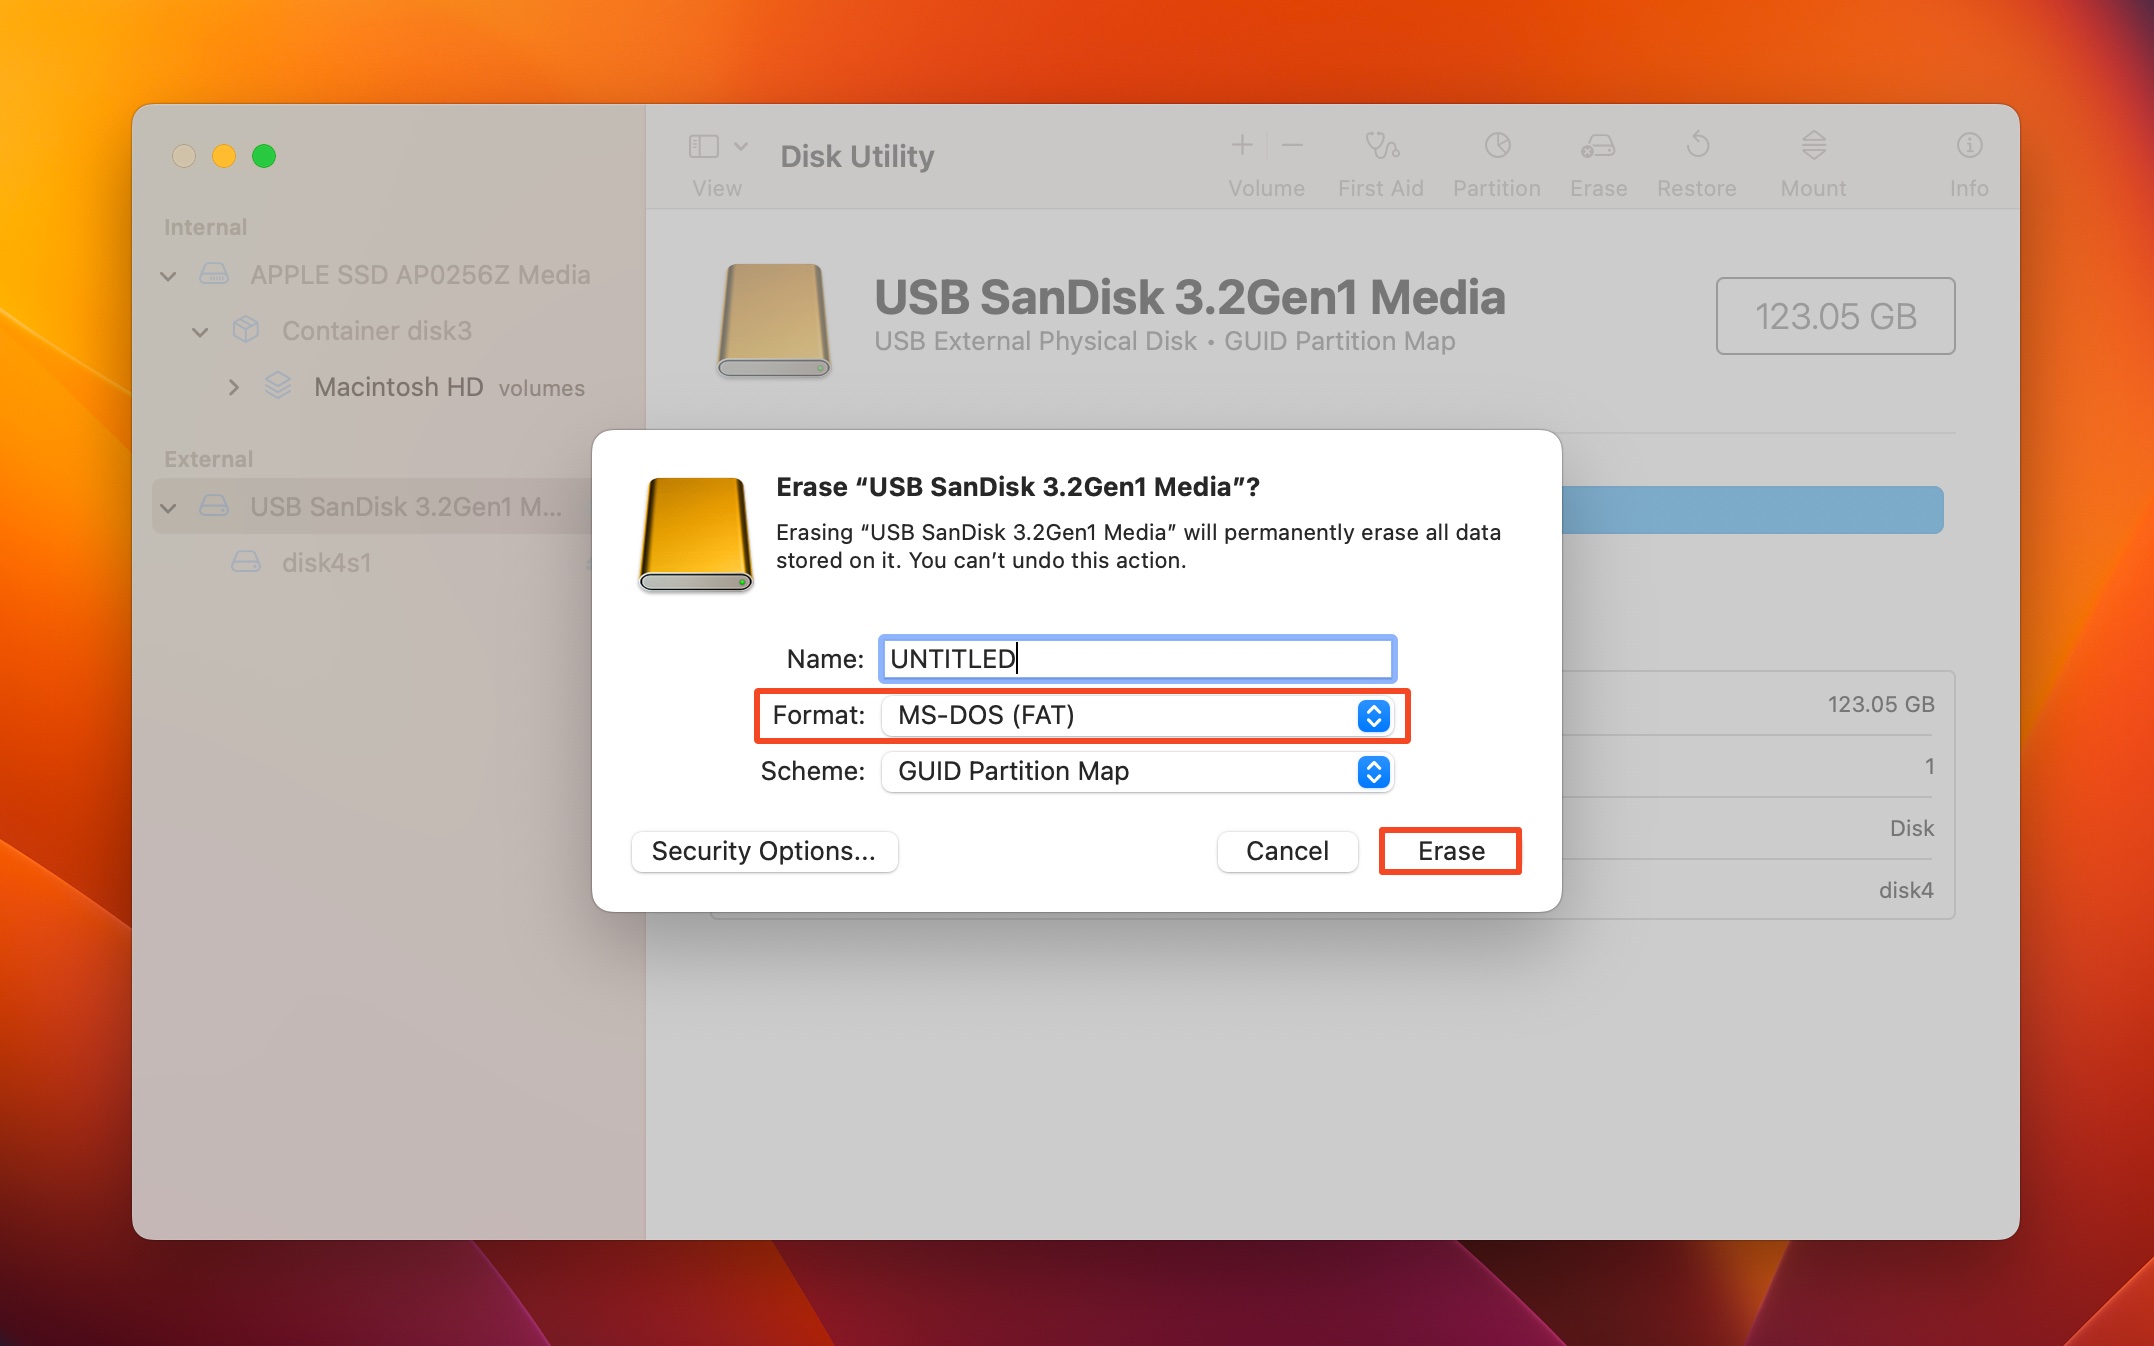
- Once the drive has been formatted, reconnect it to your Windows PC. The Change Drive Letter and Paths option should no longer be greyed out.
Method 3: Change the Drive Letter Using the Command Prompt
Whether you’re using an ancient version of Windows, or the relatively newer Windows 7/8/8/1/10/11, you can force Windows to perform drive letter assignment. How? Well, using Diskpart, a command-line tool that can be run using the Command Prompt.
Here’s what the process looks like:
- Search for “cmd” in Windows Search (Windows Key + S). Right-click on Command Prompt > Run as administrator.
- Type
diskpartin the console and press Enter.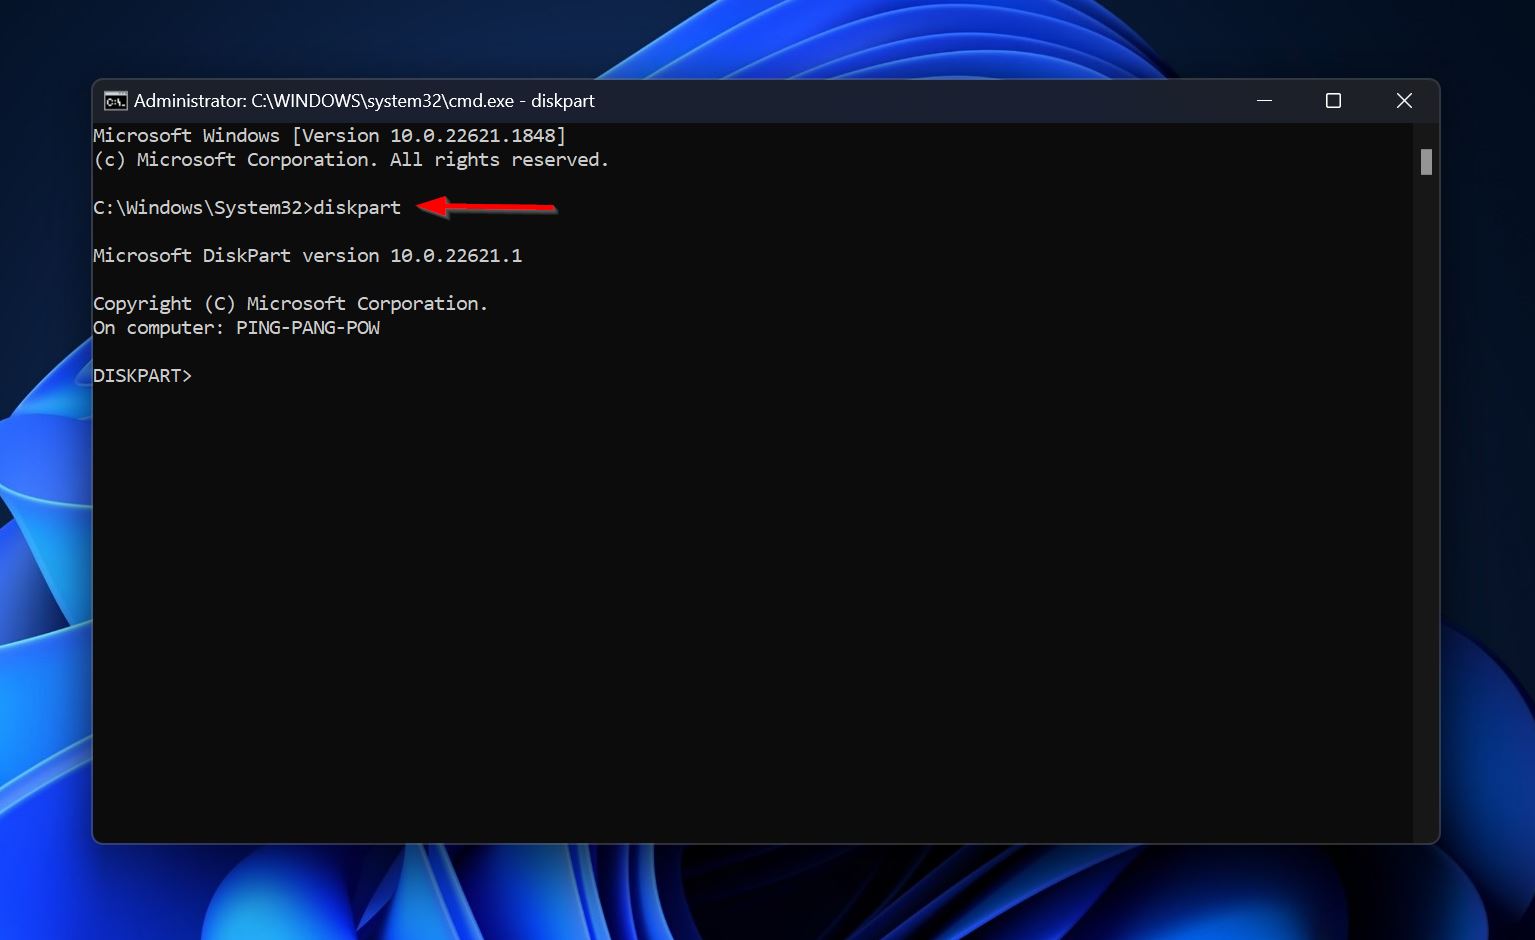
- Type
diskpartand press Enter.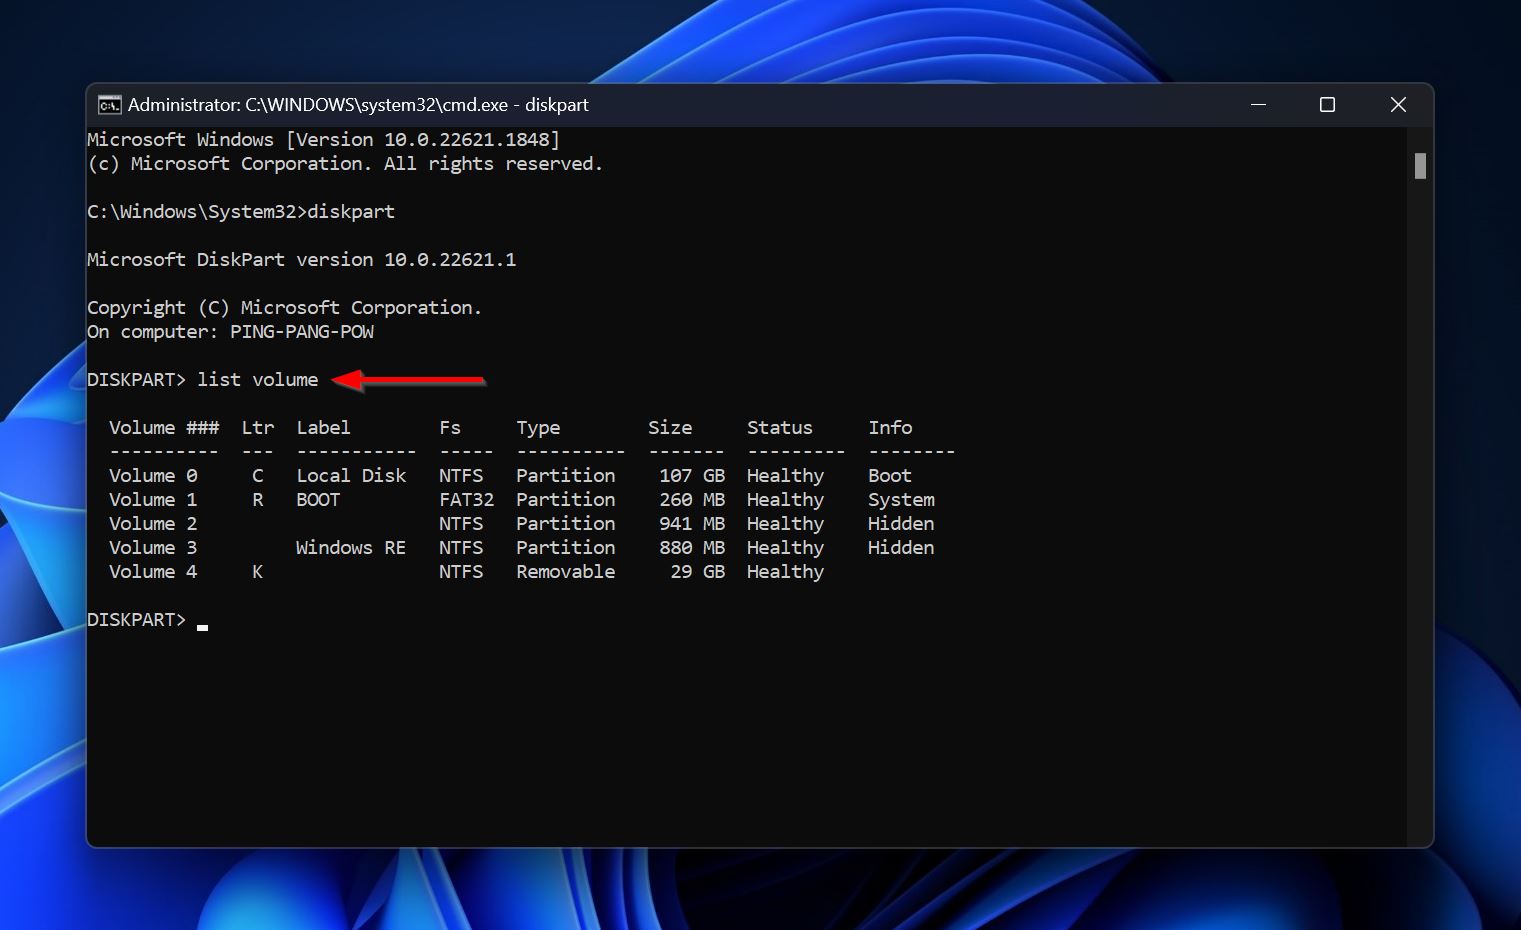
- Identify the partition whose drive letter you wish to change. You can do this by looking at the values in the Size and Fs (file system) fields.
- Type
select volume xand press Enter. Replace x with the volume number of your drive/partition.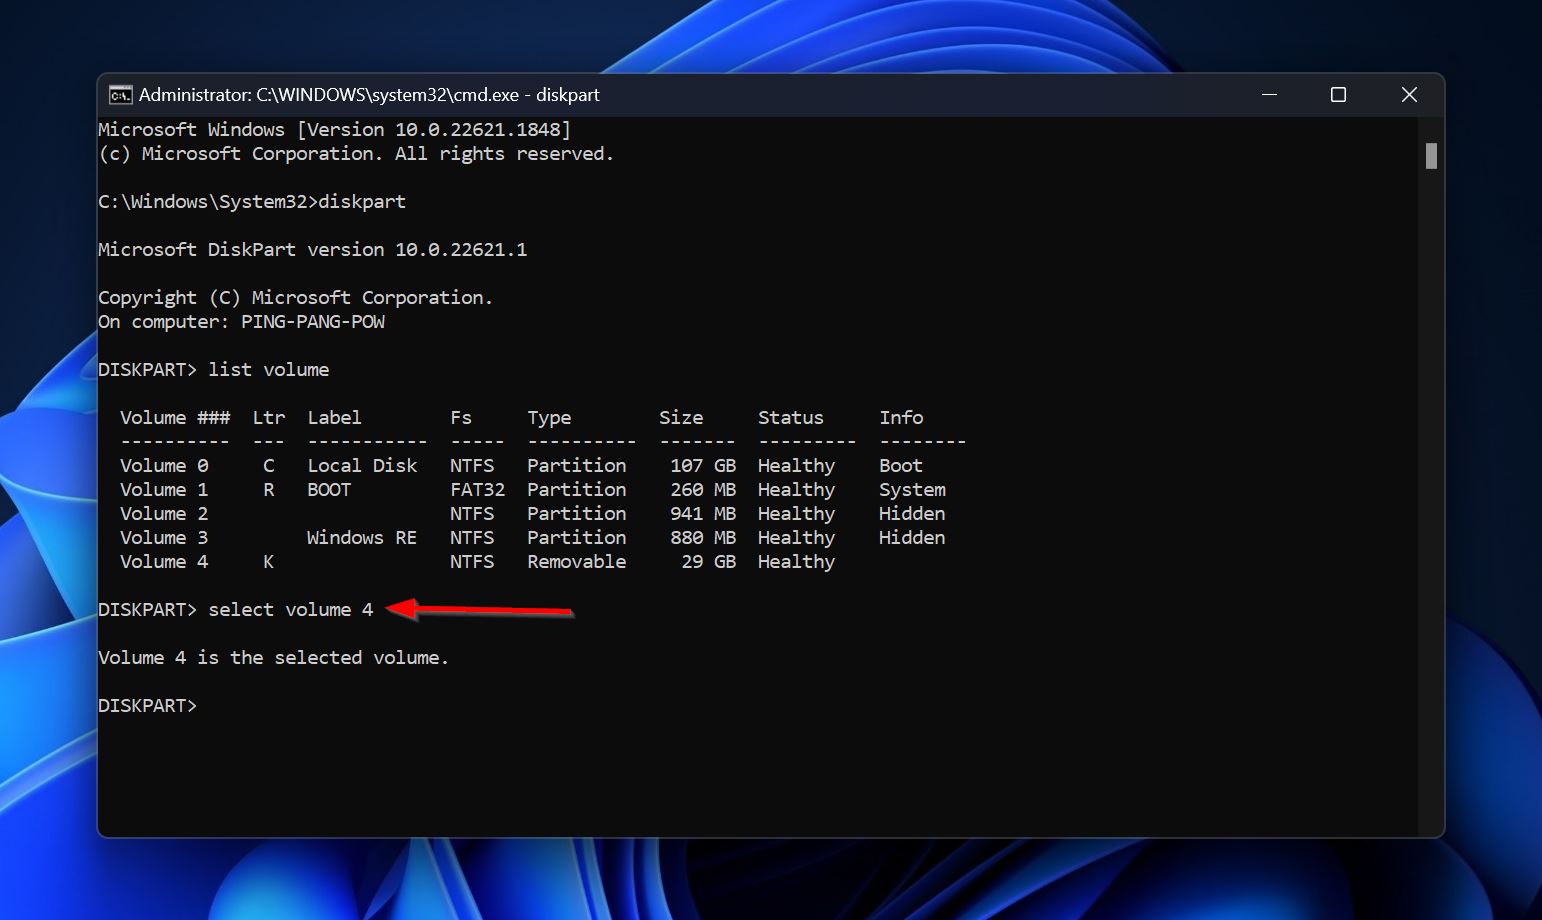
- Type
assign letter=xand press Enter. You can replace x with the drive letter you wish to assign.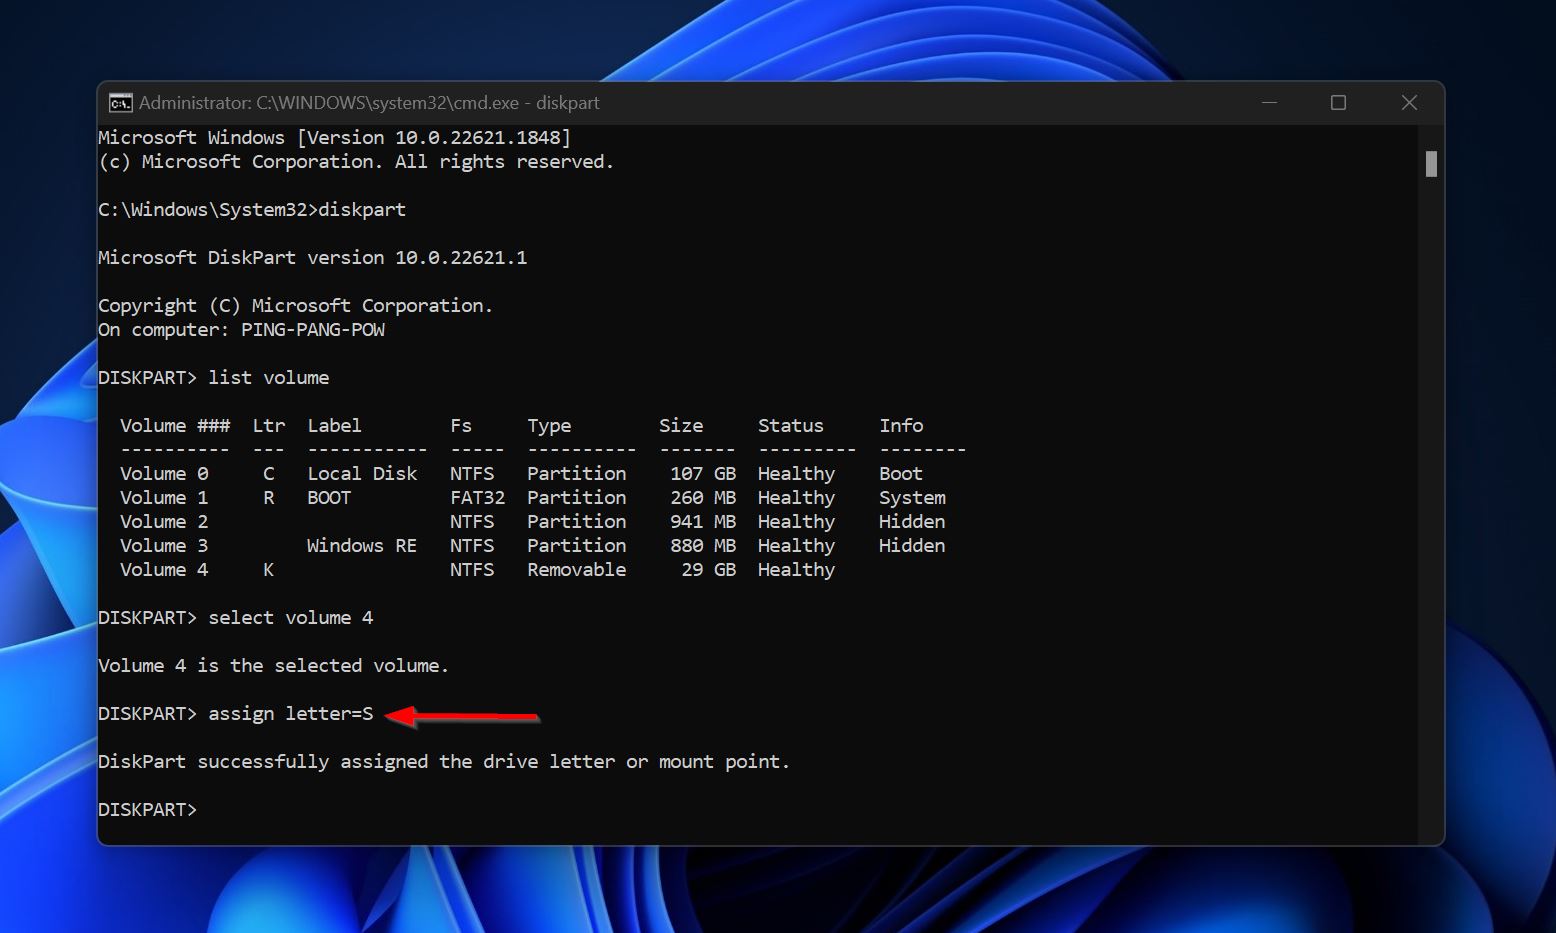
- Windows will assign the requested drive letter.
Method 4: Format the Drive
If all else fails, you’ll need to format the drive in order to fix a greyed out Change Drive Letter and Paths option. Formatting will clean the disk and rewrite the file system to your drive, giving you a fresh start. It can also fix minor logical issues on the drive.
Here’s how you can format a drive in Windows:
- Press Windows Key + R to open the Run app. Type diskmgmt.msc in the text box and press Enter.
- Right-click on your drive or partition in Disk Management and choose Format.
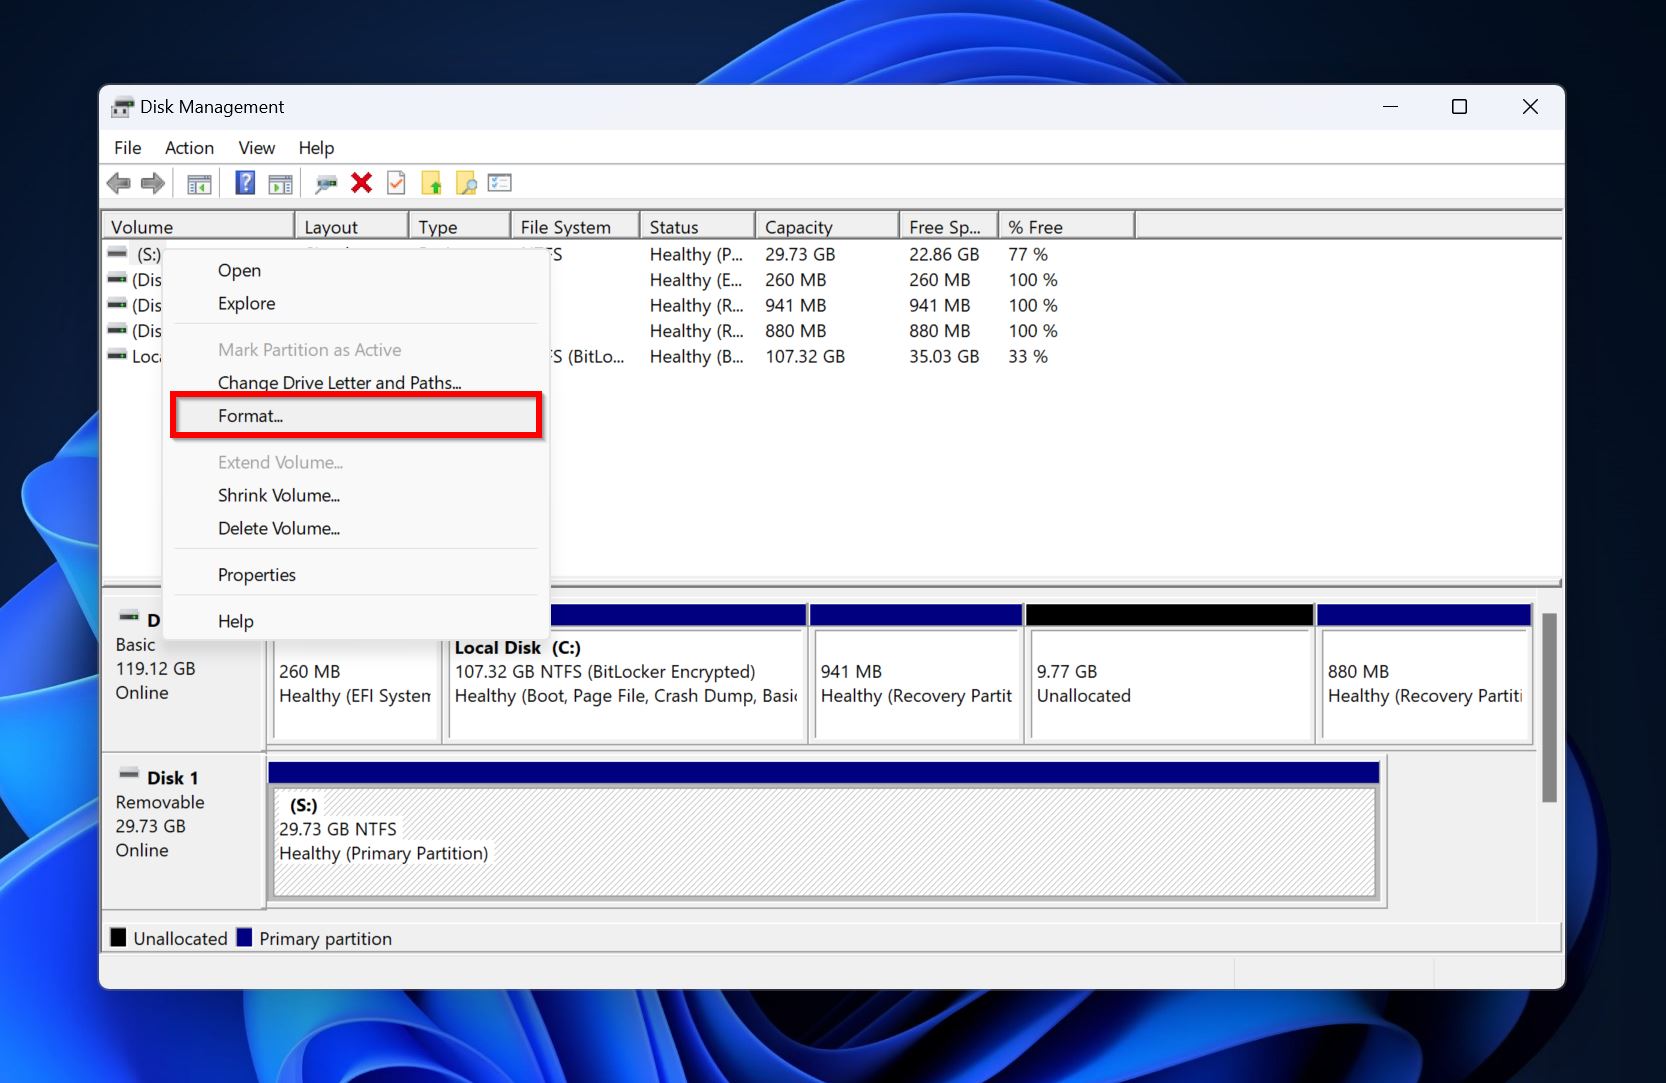
- Select the required format parameters and click OK.
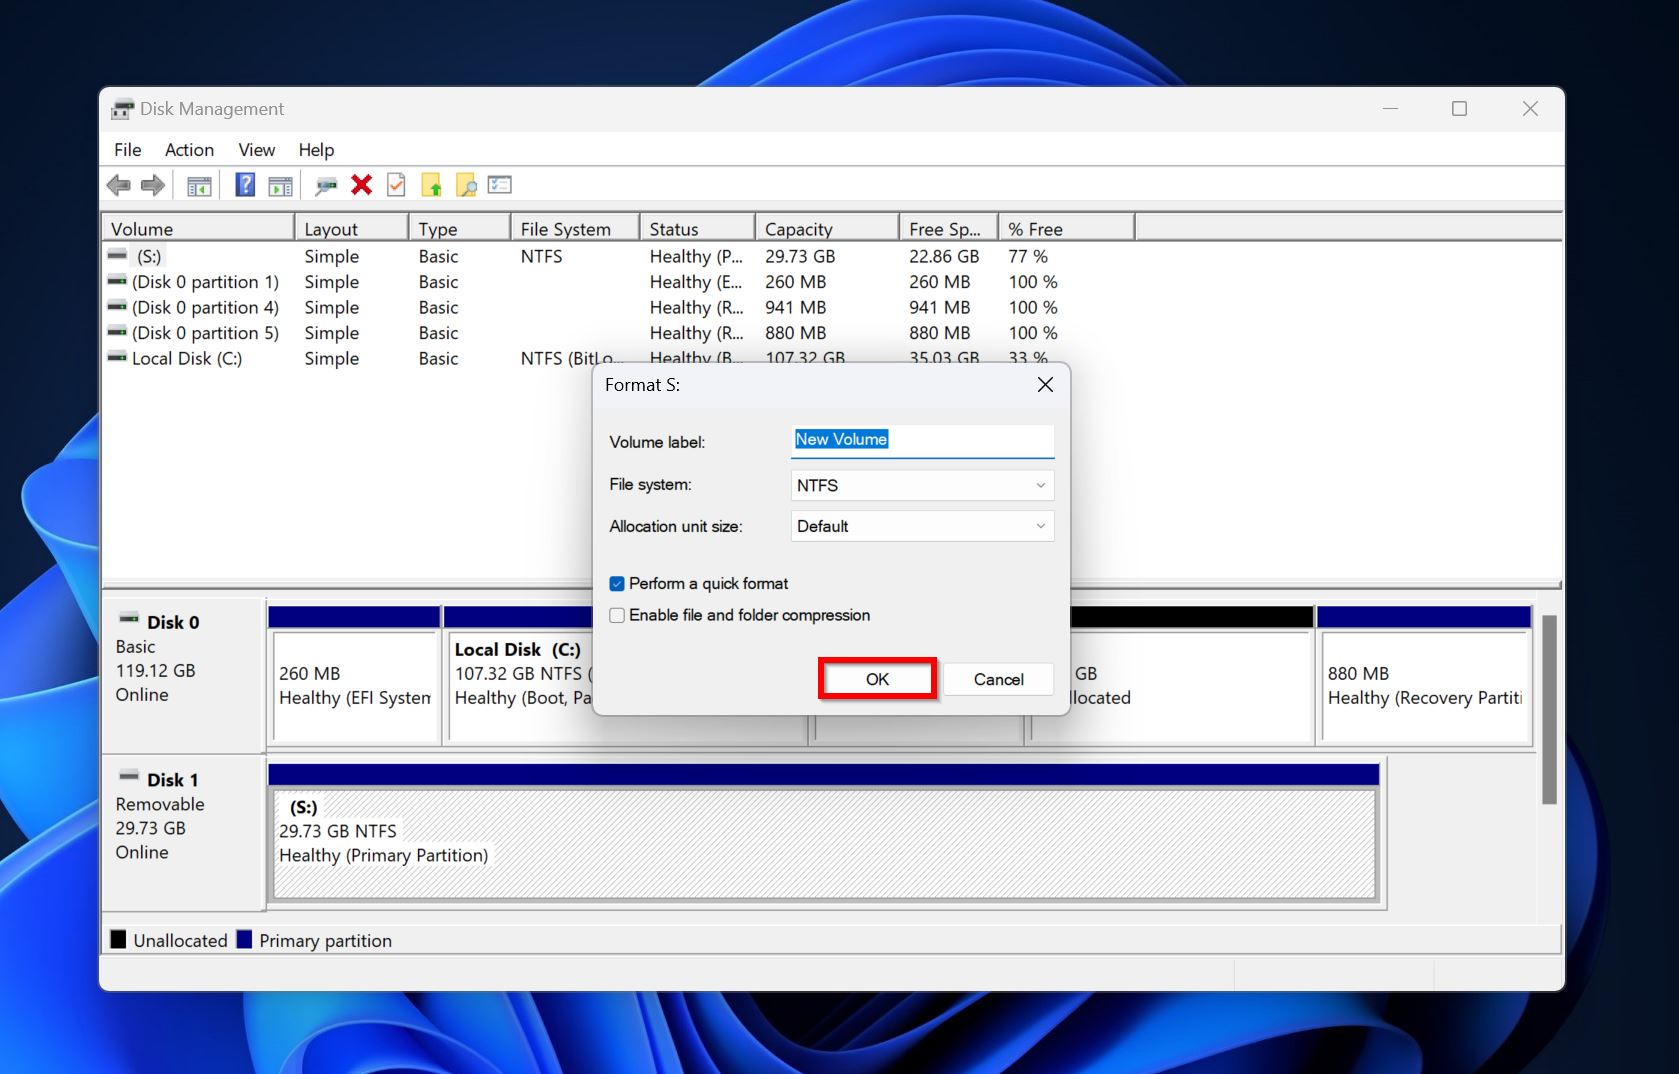
- Windows will format the drive.
Note: You can also format the drive using Diskpart. Here is an excellent guide on how to do this.
How to Recover Data From a Drive that You Had to Format
If you created a disk image of your drive, your’e good to go and we’ll describe how you can recover data from it. If you didn’t, and had to format your drive, you can still scan the drive directly and recover data, provided the Quick Format option was enabled while formatting. But, you may not be able to recover all your data, especially if you wrote new files to the drive after formatting it.
For our tutorial, we’ll use Disk Drill to perform data recovery as it’s easy to use, has a proven track record, and will work with your drive regardless of its file system and manufacturer. It can also recover data from drives that are RAW, i.e., have no file system at all. On Windows, you can take advantage of Disk Drill’s free trial that lets you recover up to 500 MB of files for free.
Let’s see what the data recovery process looks like in Disk Drill:
- Download Disk Drill if you didn’t earlier.
- Open Disk Drill and ensure you’re on the Storage Devices screen. Skip the next step if you didn’t create a disk image earlier.
- Click on Attach disk image, browse for the disk image you created earlier and double-click on it. The disk image will be mounted in Disk Drill.
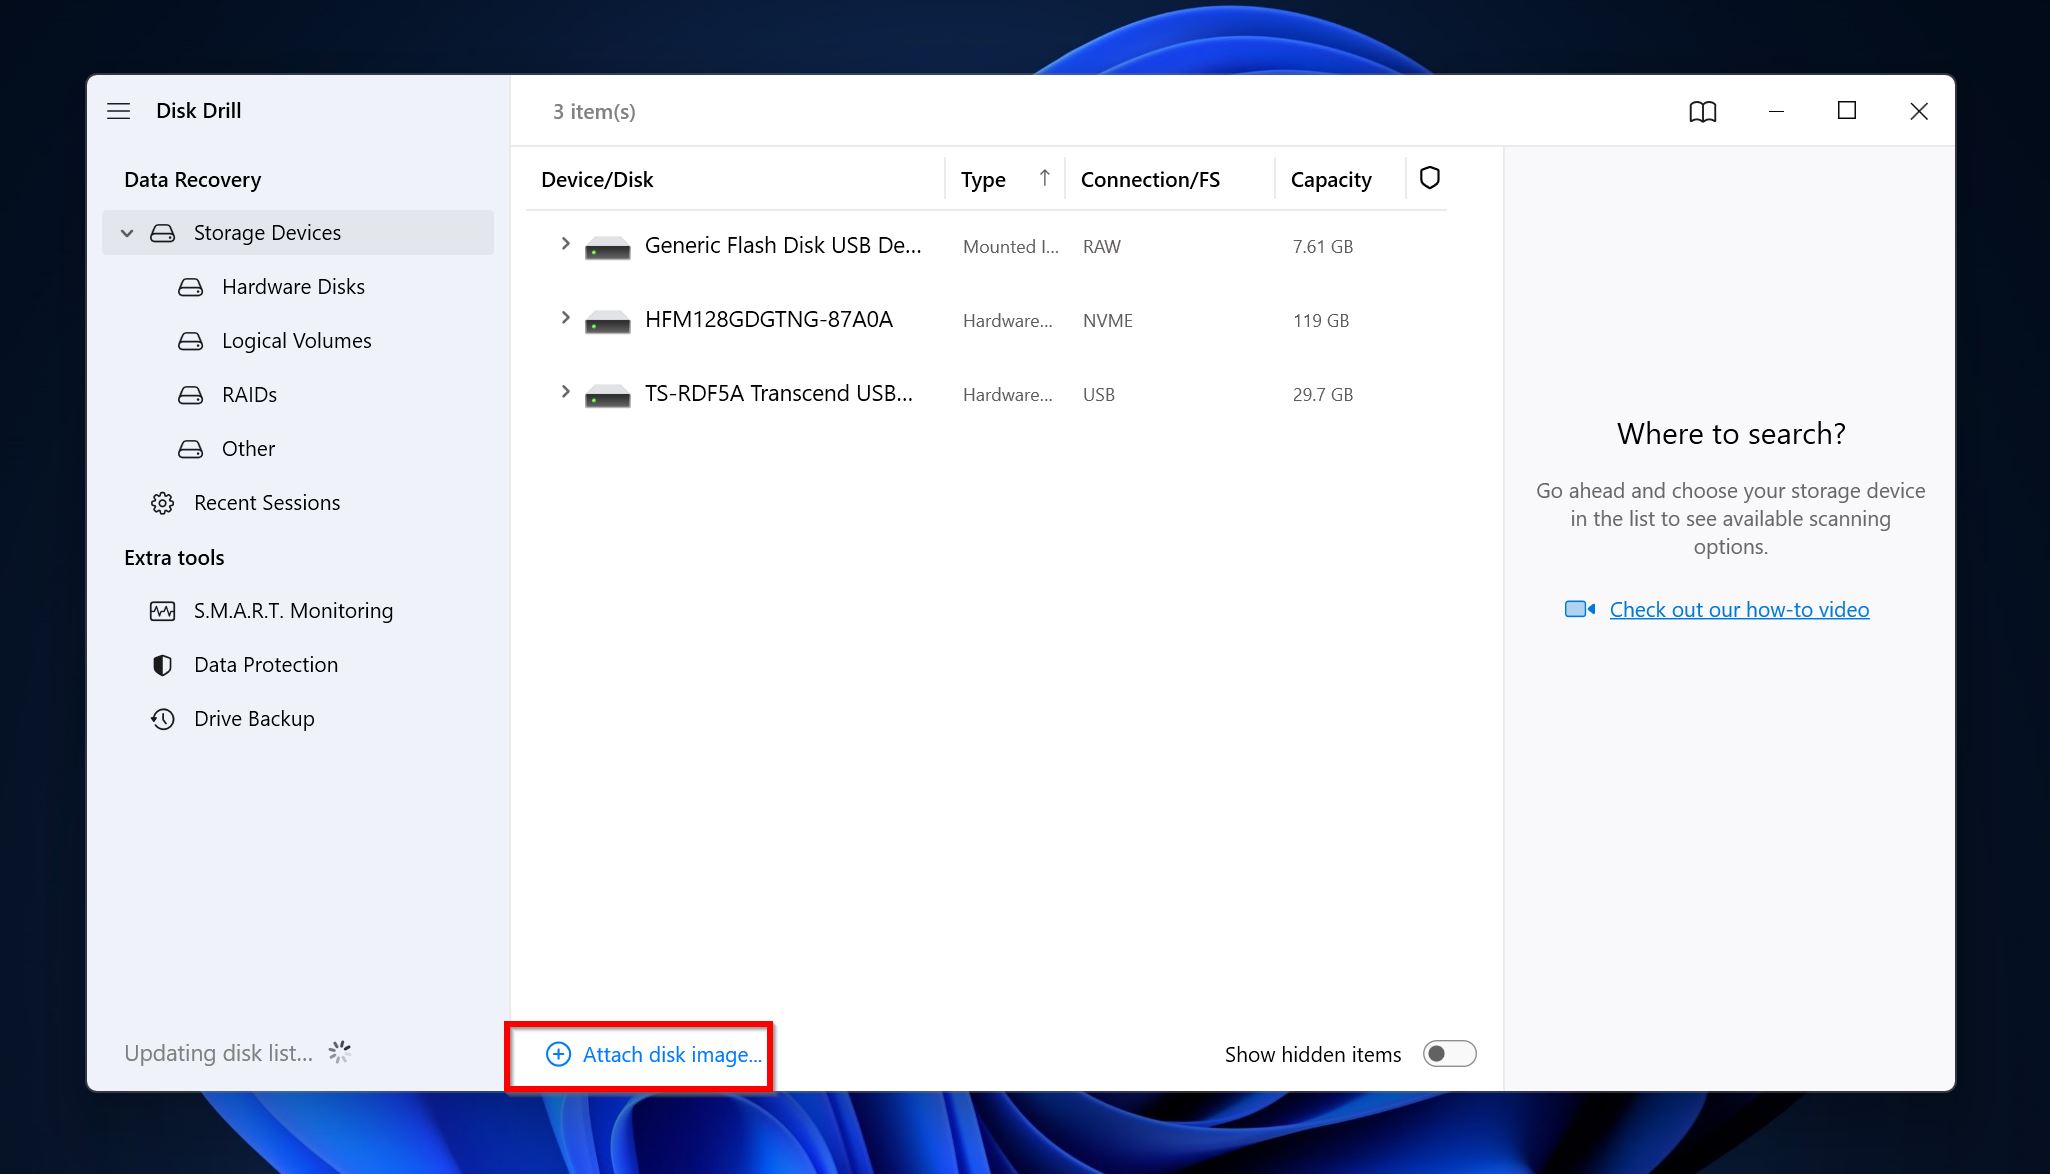
- Select the disk image, or the drive, depending on your situation. Click on Search for lost data.

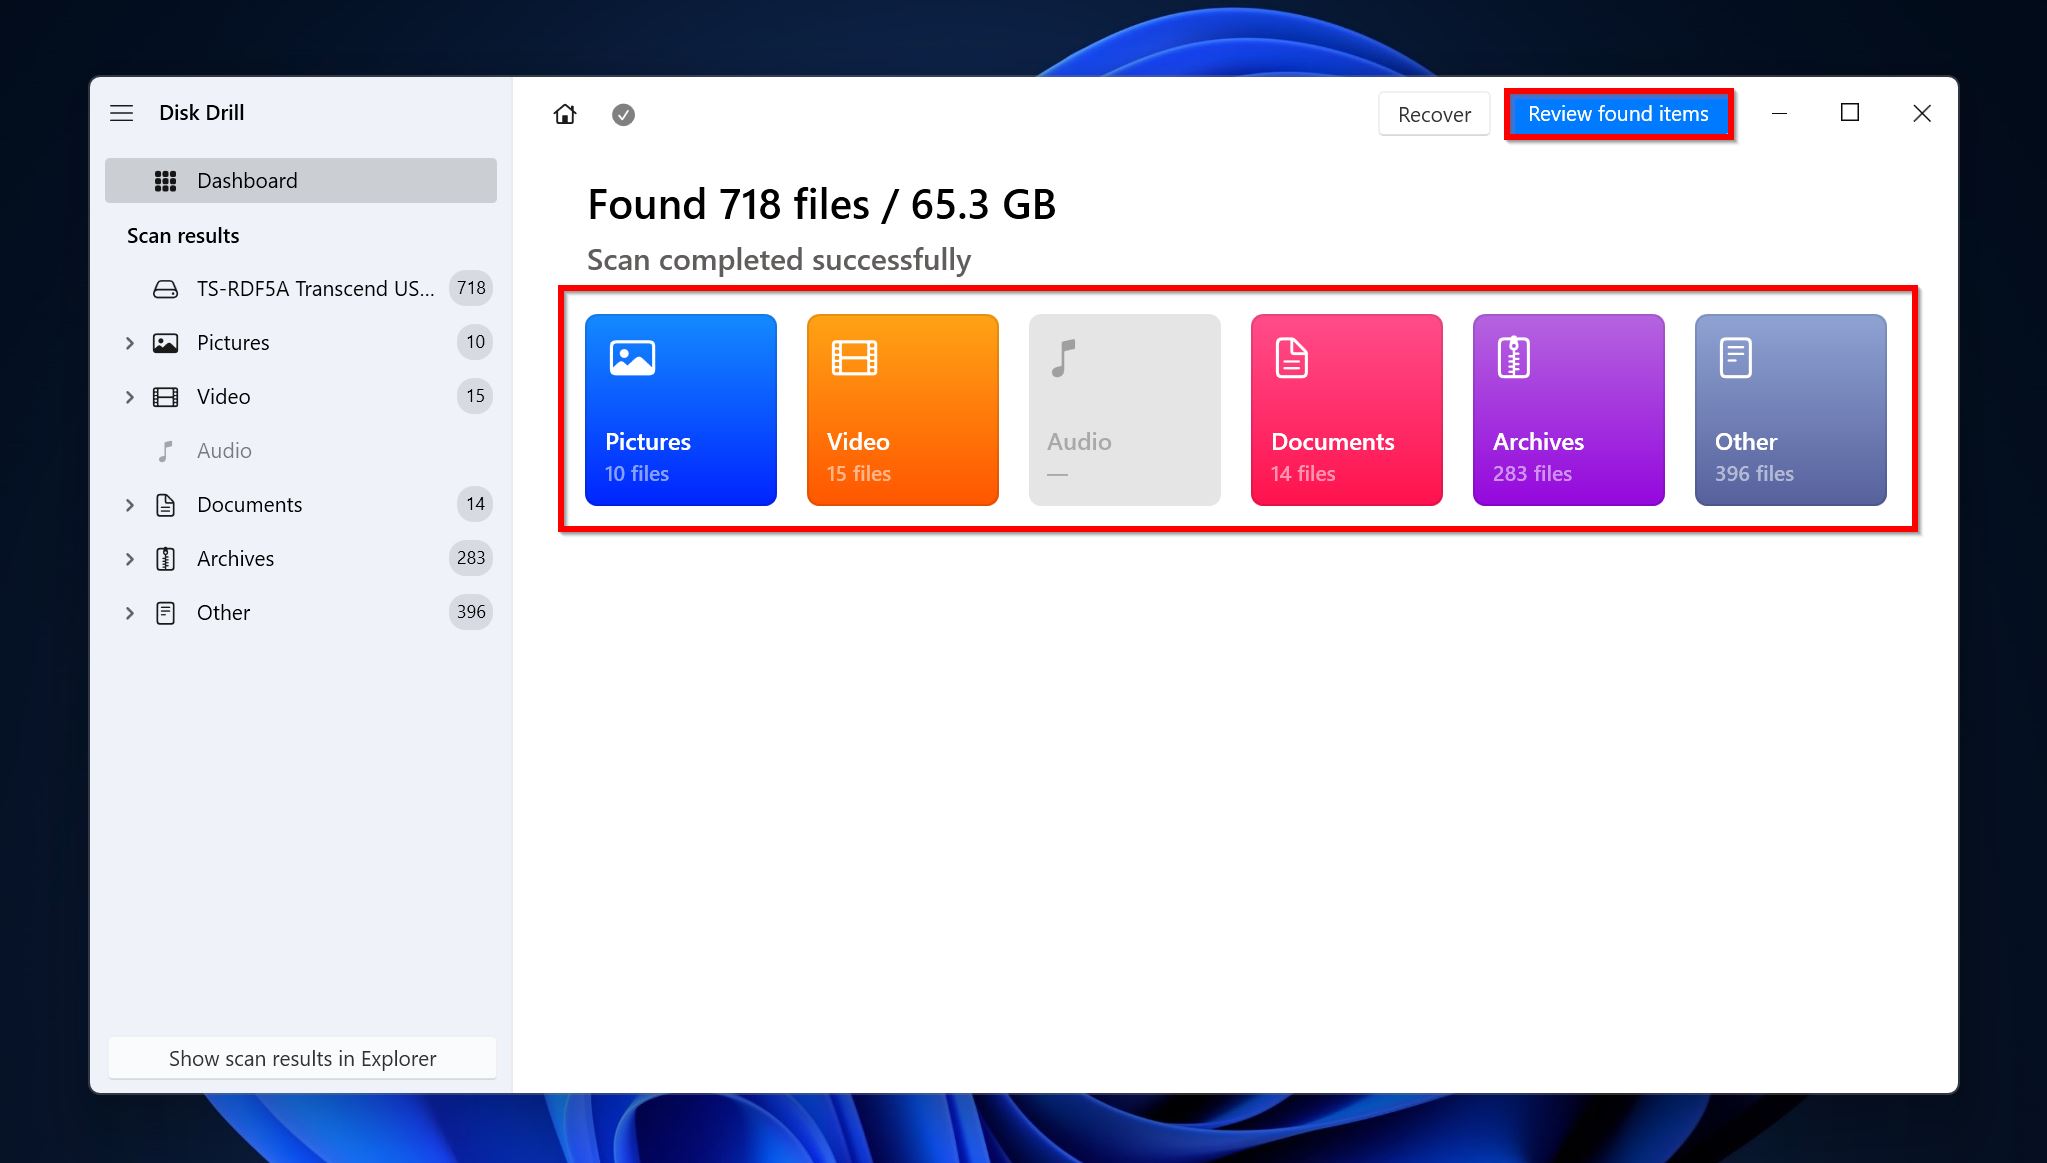
- Click on Review found items. If you wish to see only a certain file type, click on the relvant option directly (Pictures, Video, Audio, Documents, Archives, and Other).
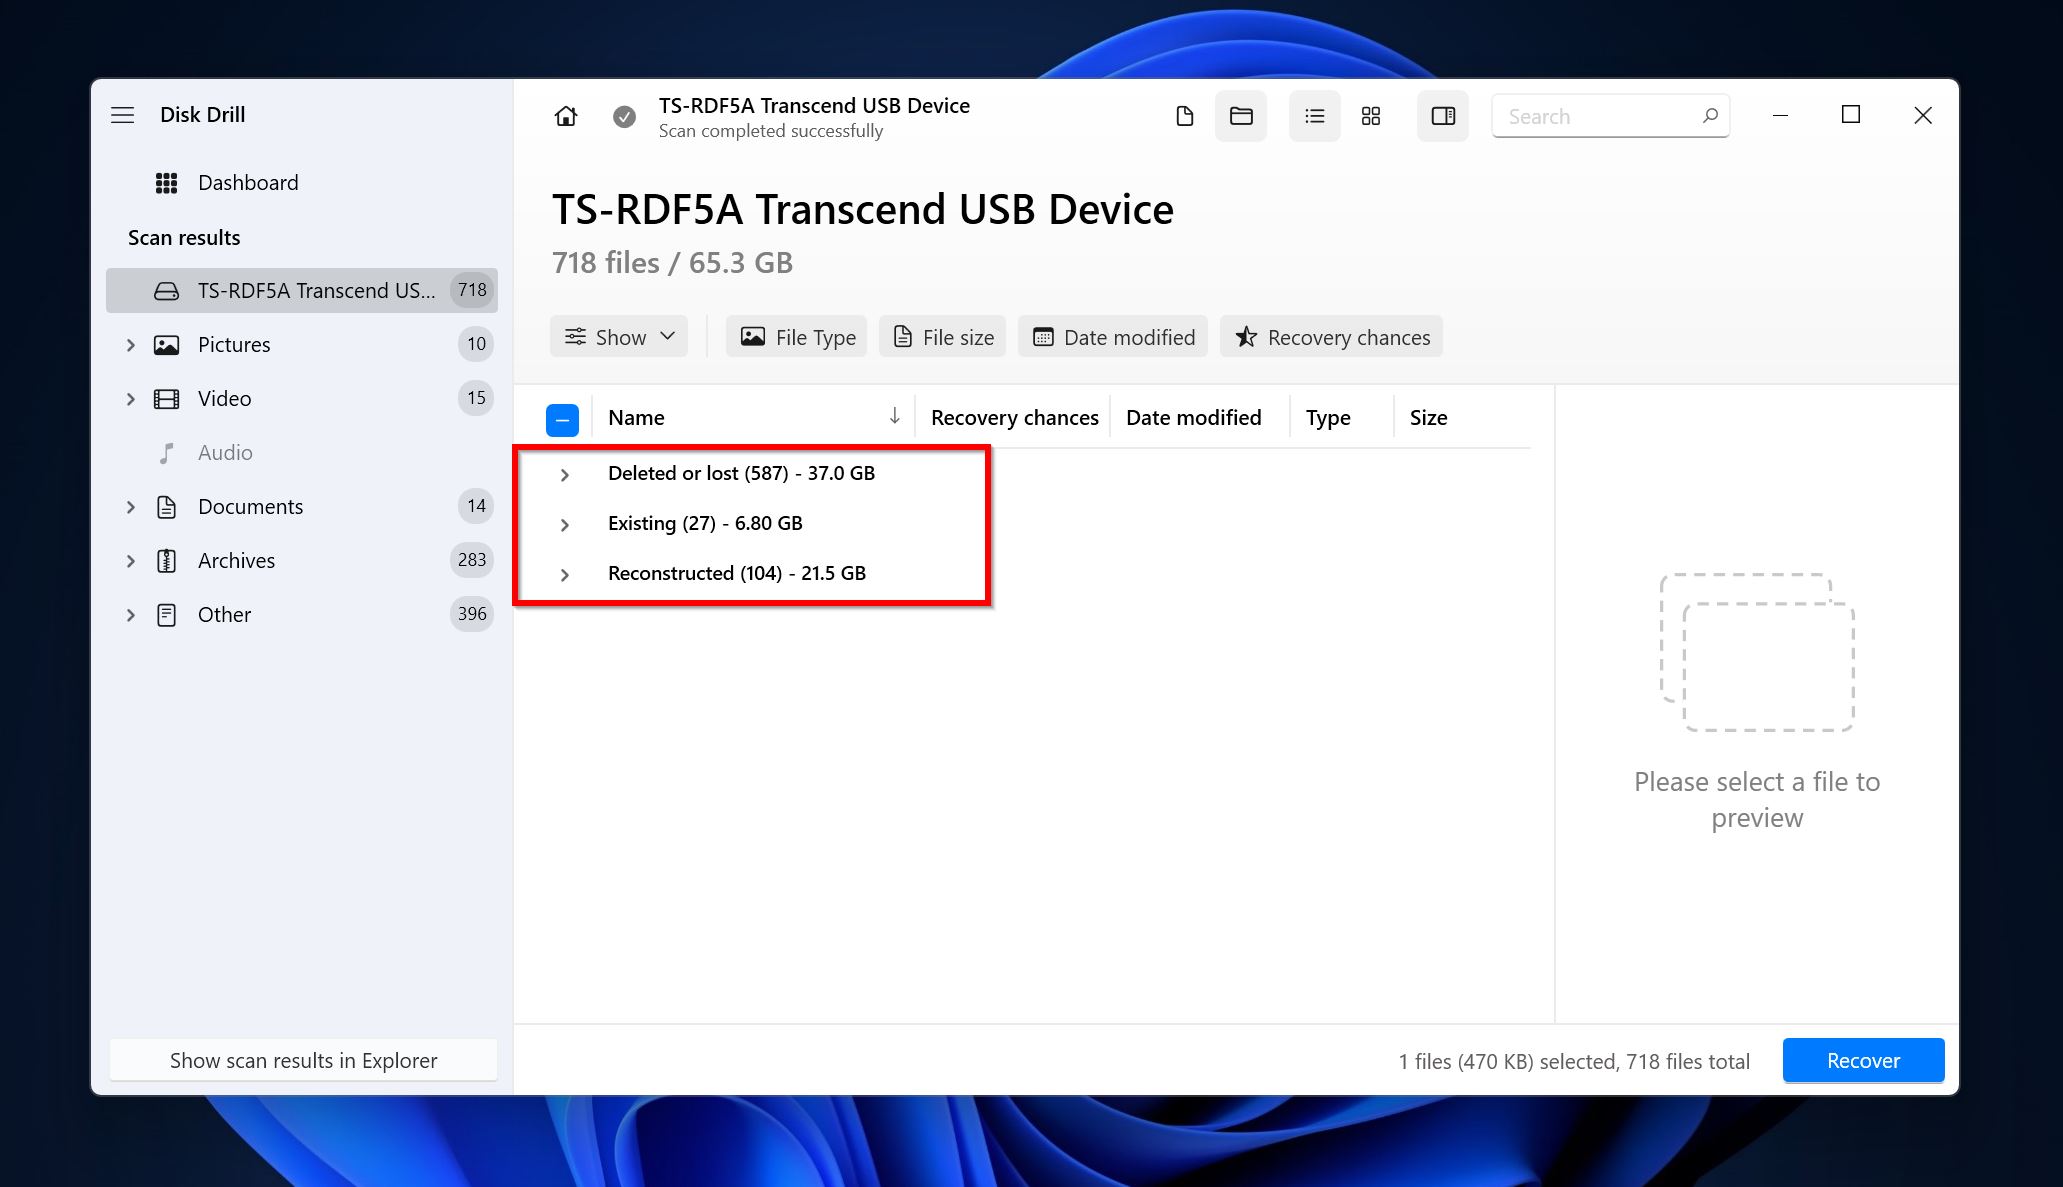
- Expand the Existing section to view the currently stored files on your disk, or the files that were present on the drive at the creation of the disk image. If you’re looking to recover deleted files, expand the Deleted or lost and Reconstructed sections.
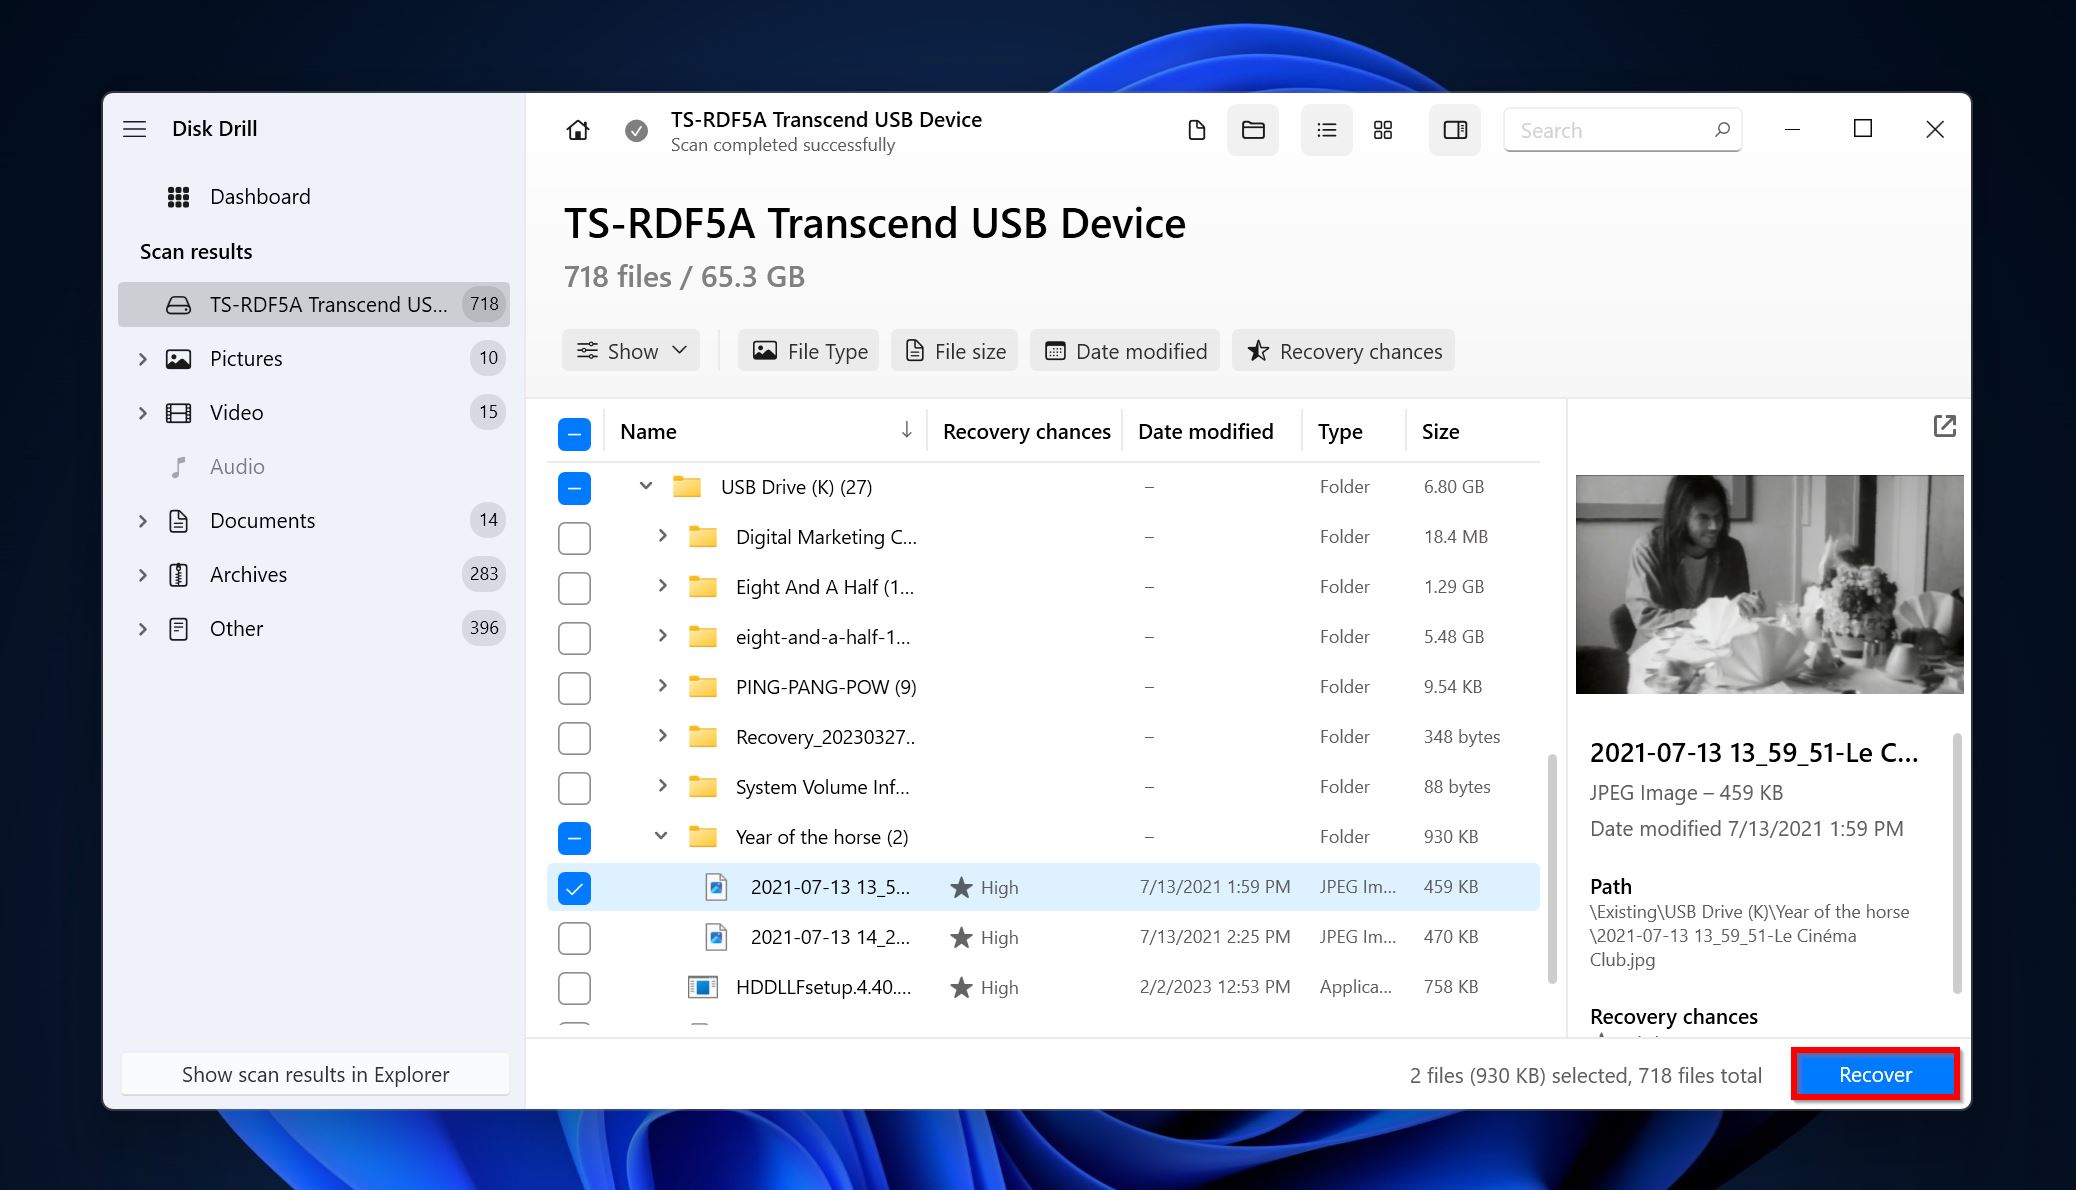
- Use the checkboxes to select the files you wish to recover. Disk Drill will display a preview of the currently selected file, but you can manually preview any file by clicking the eye icon next to its filename. Click on Recover once you’ve confirmed your selection.
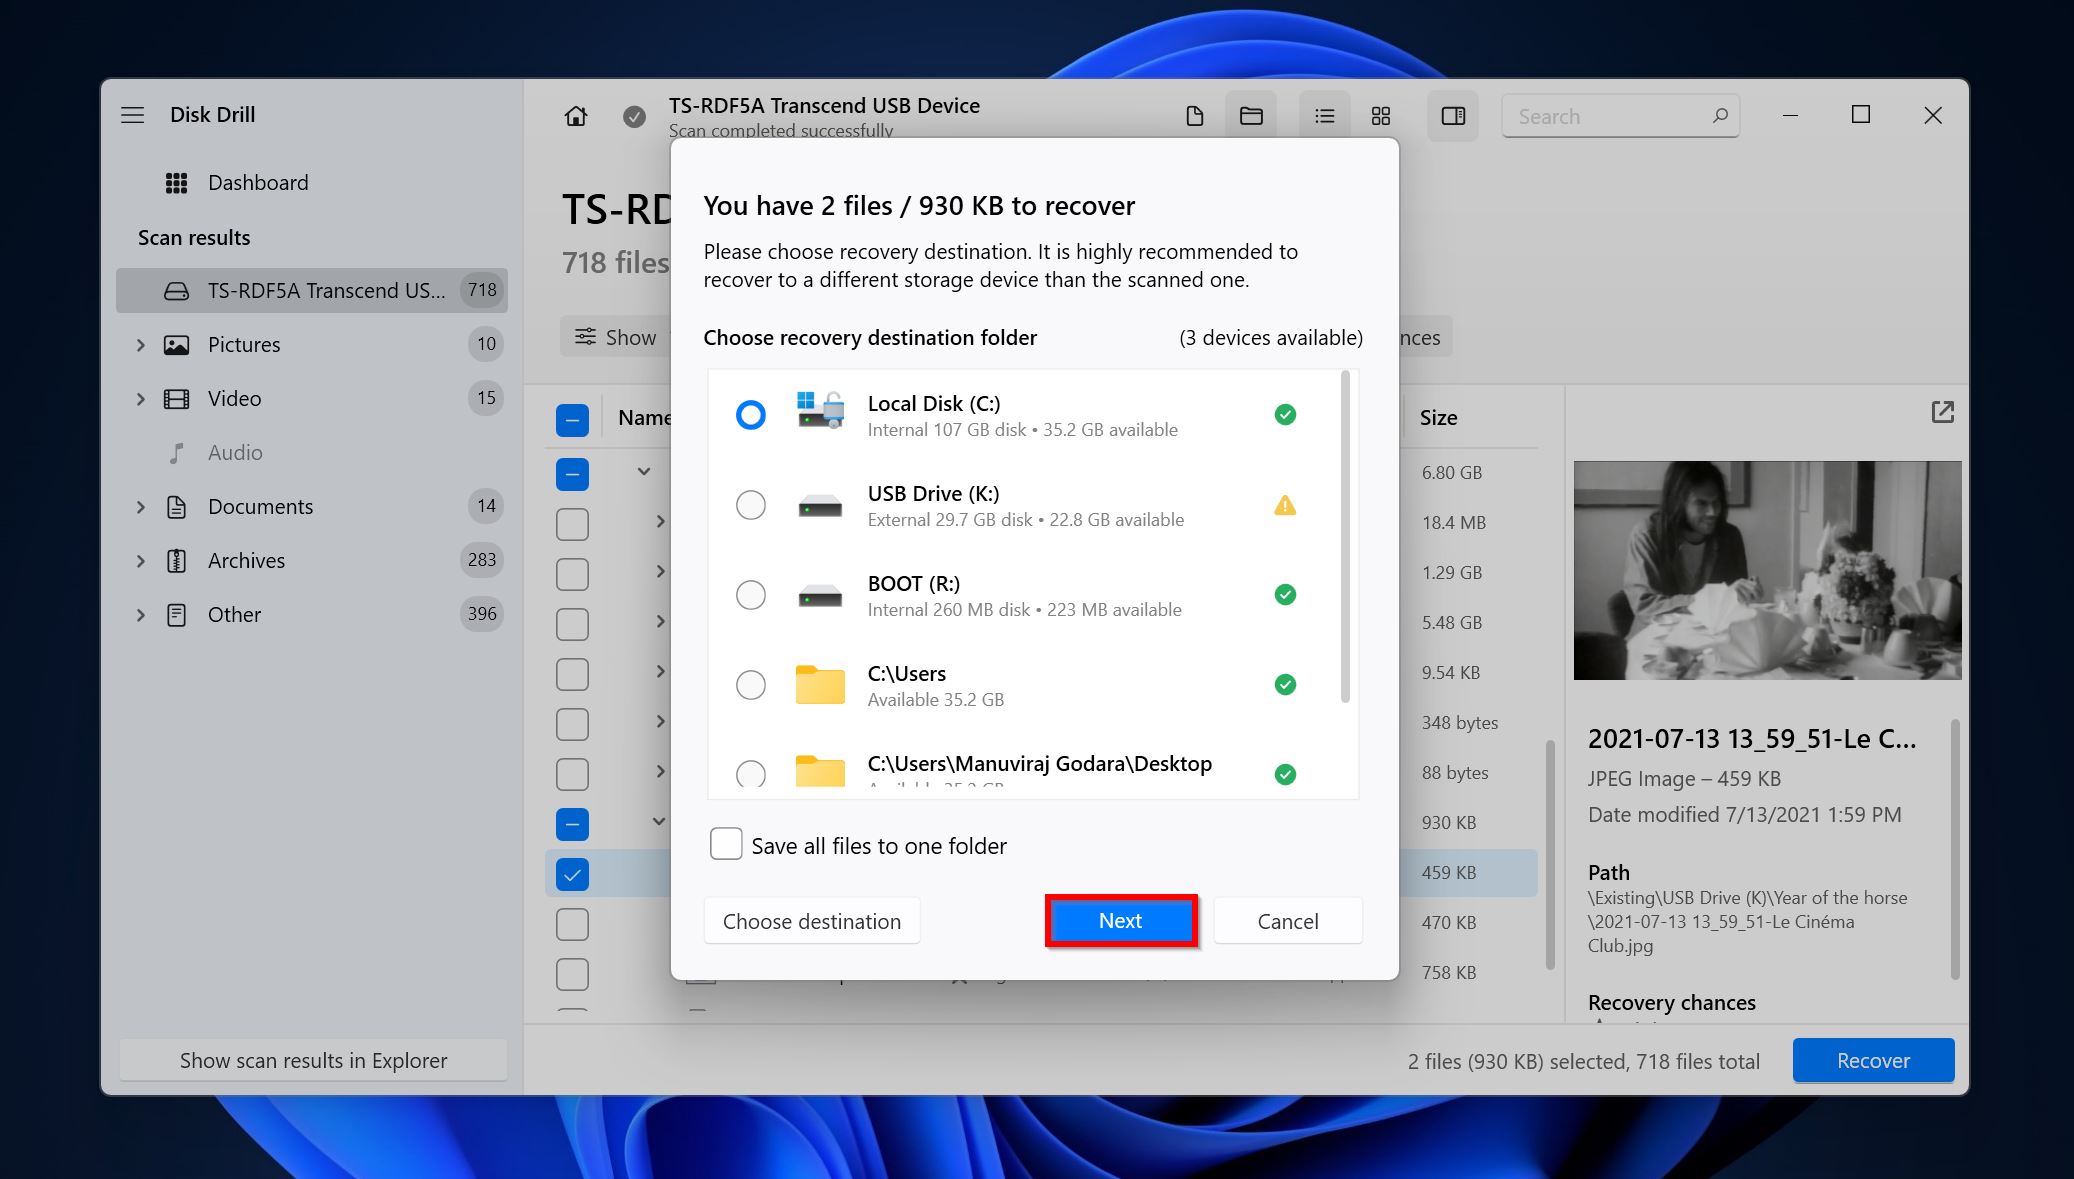
- Pick a recovery destination for the files and click Next.
- Disk Drill will recover the selected files.
What To Do If You Encountered “Can’t Change Drive Letter Parameter Is Incorrect”
A common error that you may face when attempting to change the drive letter of a disk or partition, is the “Parameter is incorrect” message.
Use one of these methods to combat this error:
- Use CHKDSK to resolve possible file system errors and bad sectors on the drive.
- Convert the partition to NTFS, if it is RAW.
- Update outdated drivers to ensure the best possible communication between your drive and Windows.
Conclusion
Often, a greyed out Change Drive Letter and Paths option is a result of an incompatible file system or insufficient user account permissions. But, since logical and physical damage can also lead to the issue, it’s best to back up all important files from the drive as soon as you can. Thereafter, you can proceed to resolve the problem using the methods described above.
Importantly, do not attempt DIY data recovery on a drive that’s physically damaged. It’s best to contact a professional data recovery service in such a case.


