 SD cards are a staple for modern cameras. However, if you’ve been using SD cards for long, you’ve probably experienced an instance where your camera won’t read the SD card. You might be worried about losing the data on your SD card when you can’t access it, but the good thing is, you can recover those files.
In this guide, we walk you through the process of fixing the SD card and recovering the files so you can ensure you don’t lose personal or client data. The process discussed here works on all camera devices, whether it’s a DSLR or dash cam that’s not recognizing the SD card.
Table of Contents
Why is Camera Not Reading SD Card?
An undetected SD card could be caused by a simple case of improper insertion, or something more serious—like physical damage. Knowing why your camera refuses to read your SD card, helps you choose the appropriate fix.
Hint: Let experts handle physically damaged SD cards. Forcefully attempting to insert and recover data from such SD cards often results in more damage and data loss.
- Unsupported card type and capacity: If you purchased a new large-sized SD card, your camera might not support the type of SD card. Cameras between 4 and 32GB follow the older SDHC standard, while cards larger than 32GB follow the SDXC standard. Devices that read SDHC cards can read SDXC cards, but the reverse isn’t true and that might be why your camera isn’t reading your new SD card.
- SD card not inserted properly: When the SD card isn’t inserted properly, the card’s terminal won’t align with the camera’s reader properly, which means the camera won’t read the SD card.
- Unsupported file system: The file system determines how files are organized and accessed in a storage drive. If you originally used the SD card in another camera, it’s possible the SD card is formatted with a file system that’s incompatible with your current camera. Upon detecting an SD card with an unsupported file system, the camera may display an error message, prompt you to format the SD card, or not detect the SD card at all.
- Dirty terminal or physical damage: A dirty terminal can make it difficult for the camera to read the memory card because of a loose connection. Your terminal may also have been physically damaged, causing the camera to not recognize the SD card.
- File system errors: SD cards commonly formatted with file systems like FAT32 (used by SDHC cards) and exFAT (used by SDXC cards). These file systems provide a structure for organizing data (among other things) on the disk and can become corrupt for various reasons such as virus infection or abrupt removal when writing data on it.
- Hardware problems: The SD card port on your camera may have undergone physical damage leading to the camera not reading the SD card.
Regardless of the cause, the first thing you should do upon encountering this problem is stop using the SD card. If you end up overwriting data or damaging the card further, the data might be lost permanently.
Basic Checks When Camera Won’t Read SD Card
Before proceeding to more elaborate fixes, perform some simple checks. You’d be surprised at their effectiveness. Additionally, these checks help rule out malware as a potential culprit.
Here are some of the basic checks:
Method 1: Reinsert the SD Card
Turn off the camera and remove the SD card. Make sure you reinsert the SD card in the right direction. When inserting, push the edge sticking out of the device at the center until you hear a click to ensure the card is inserted properly.
Method 2: Check the SD Card for Physical Damage
A physically damaged SD card will usually remain undetected in the camera. Some telltale signs of physical damage on an SD card are—a missing lock switch, missing protective casing, and visible cracks on the casing.
Damage to an SD card’s protective casing can often be superficial. However, corroded, discolored, or misaligned golden connectors will surely prevent the SD card from being detected by the camera.
Unusual discoloration on an SD card often indicates heat or electrical damage.
Regardless of the exact signs of physical damage, it’s best to let professionals handle a physically damaged SD card. It’s easy to exacerbate the damage if you don’t know exactly what you’re doing.
Method 3: Remove Virus from SD Card
A virus can corrupt the filesystem as well as the files. Your SD card may have been infected when you connected it to your PC for transferring photos and videos. You can generally remove a virus using a robust antivirus software solution. Of course, you’ll first need to connect the SD card to the computer using a card reader.
However, note that the antivirus tool might also end up deleting important files that it views as malicious. Before you perform any action using the antivirus, double-check those actions and the files it will take those actions on to ensure you don’t end up losing important files.
Method 4: Try Another SD Card
Insert another SD card and see if the camera detects it. If the new SD card remains undetected, it’s possible the problem lies with your camera, and not the SD card.
Additionally, see if the problematic SD card is detected by your computer. Use a high-quality SD card reader to connect it to your PC. If your PC detects it, displays the correct storage capacity, and lets you access your photographs, it may be another sign that the camera is problematic.
Method 5: Leave the SD Card to Dry
If the SD card got wet, you should simply leave it to dry for a few days. Do not use artificial heat to accelerate the drying process because it can cause more damage. Leave the SD card in a cool, dark, and dry environment until it dries off naturally.
If you frequently shoot in extremely wet conditions, it’s worth investing in SD cards specifically designed for such conditions.
How to Get Data from an SD That is Not Recognized by Camera
You must prioritize data recovery when dealing with an SD card that’s not recognized by your camera. We recommend this because some methods of fixing an unrecognized SD card—like formatting—entail data loss that’s difficult to undo. As long as your SD card is detected by your PC, and Disk Management displays the SD card’s correct storage size, DIY data recovery is possible.
If it’s possible to simply copy your files from the SD card, do so. If not, use a third-party data recovery tool to recover your data. There are plenty of data recovery programs available on the web, but pick an option only from the best ones.
For our SD card data recovery tutorial, we decided to use Disk Drill. We reviewed Disk Drill and found that not only is it equipped with a cutting-edge data recovery algorithm, it’s also extremely easy-to-use. Disk Drill’s compatibility with all major file systems and storage drive types (including SD cards) ensures that the data recovery process proceeds without any hiccups.
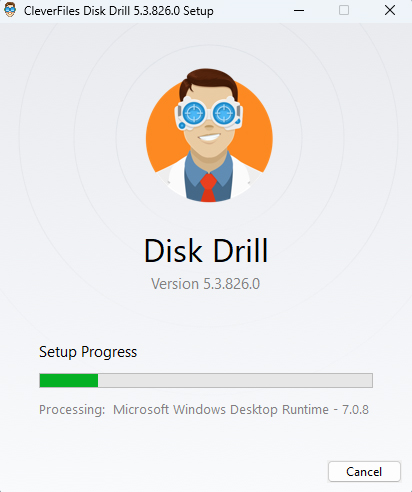
Step 1. Download and Install Disk Drill
Download Disk Drill and install it on your PC. The free version lets you recover up to 500MB of data.
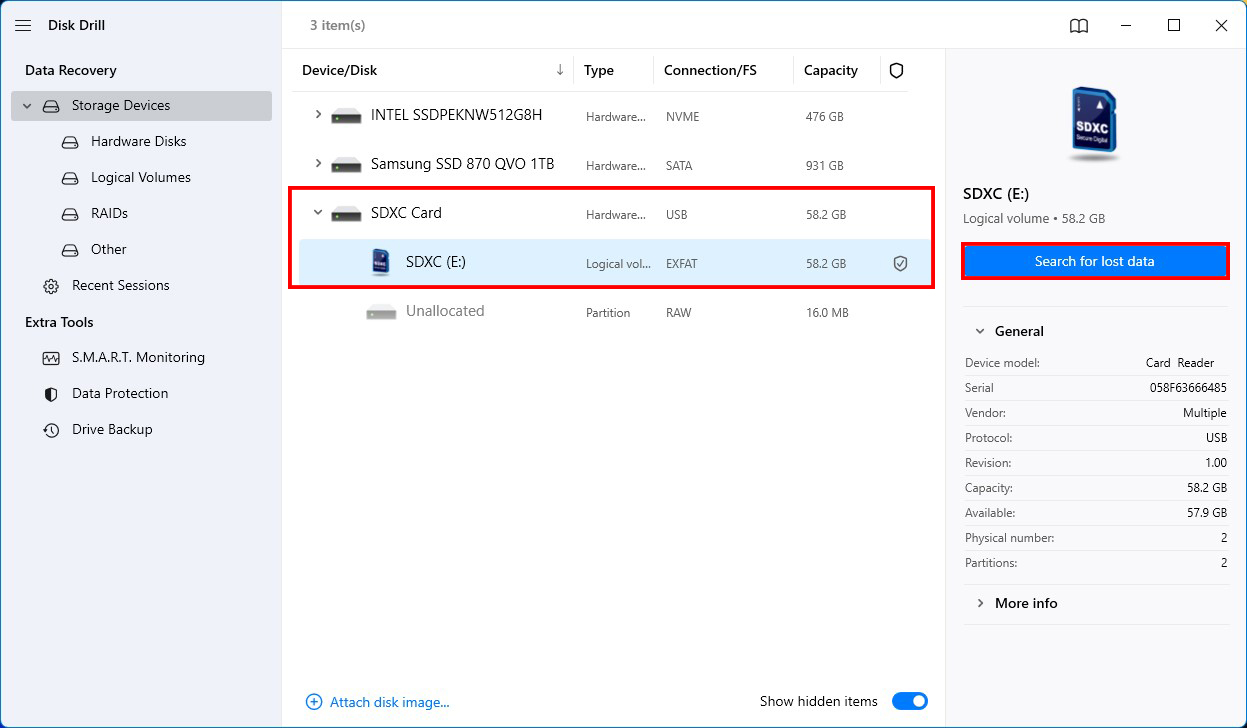
Step 2. Scan the SD Card
Connect the SD card to your computer using a built-in or external card reader. Then, launch Disk Drill, select the SD card from the home screen, and click on the Search for lost data button.
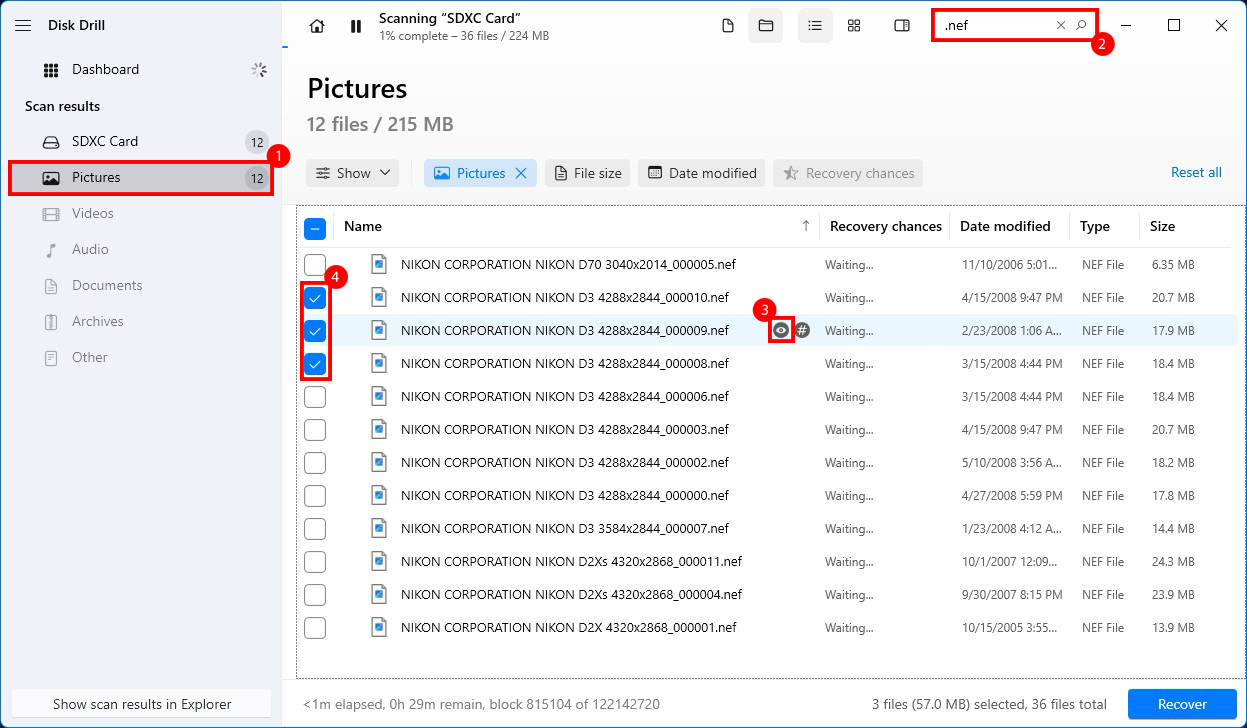
Step 3. Select Files to Recover
Once the scan completes, you’ll see the files available for recovery. If you previously used the SD card for also storing other types of files, Disk Drill can help you filter the search results by file type and extension.
You can also preview your files before recovering them so you can be sure you’re recovering the right files. To preview a file, hover your cursor over the file and click on the small eye icon.
Then, select all files that you want to recover by checking the box to their left.
Step 4. Recover Files
Once you’ve selected the files to recover, click on the Recover button at the bottom. Select a location where you want to recover the files and click Next.
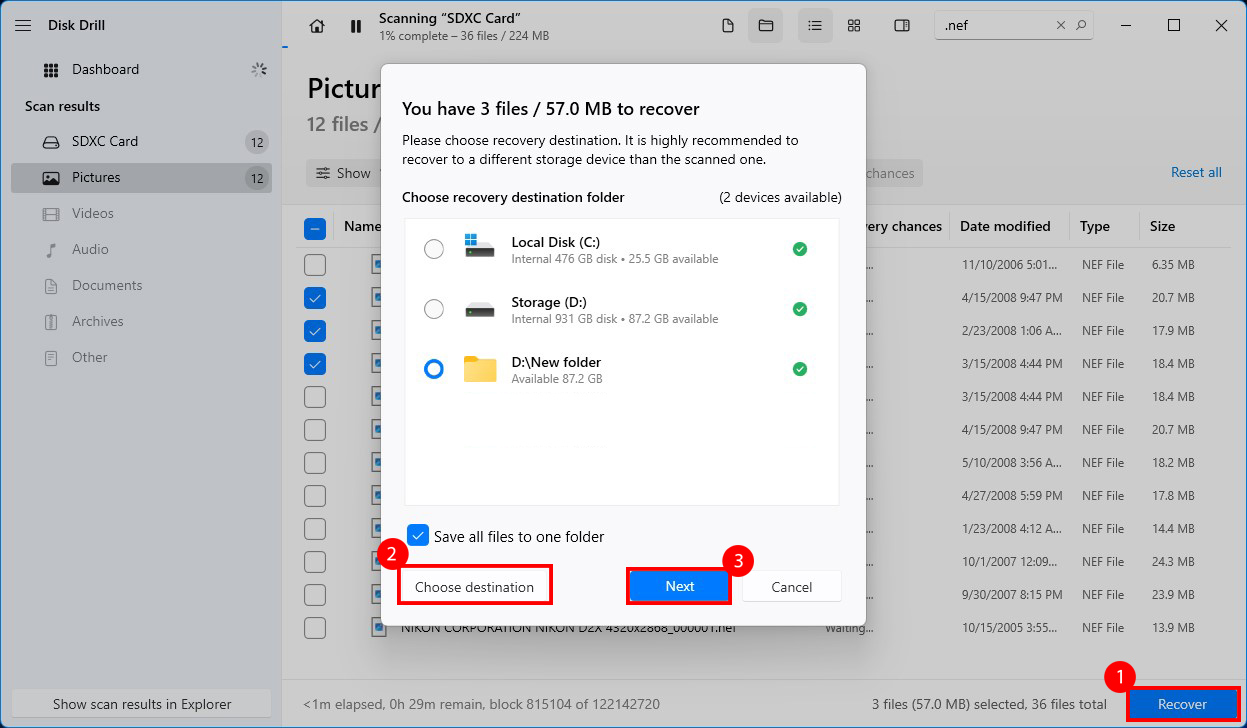
Note: You should always recover files to a location different from the source location (the SD card in this case) to avoid overwriting any data.
Once you’ve recovered the files, you can focus on fixing the SD card.
How to Fix Camera Won’t Read SD Card Issue
The exact method that will help you fix the SD card depends on what caused the problem. Here are the solutions for the most common causes that can cause the camera to not read the SD card.
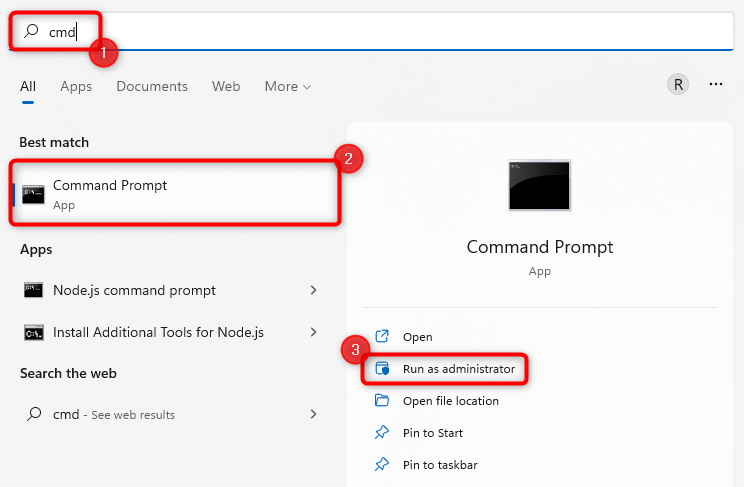
Method 1: Use the CHKDSK Utility
CHKDSK is a built-in utility in Windows that checks a storage device’s file system and file system metadata for logical and physical errors. If your camera is having trouble recognizing your SD because it has become corrupt or has bad sectors, the CHKDSK utility can help fix that, provided your PC recognizes the SD card.
To run CHKDSK:
- Connect the SD card with the PC using a card reader.
- Search for cmd in the Start Menu, hover your cursor over Command Prompt, and select Run as administrator.
- Type
chkdsk F: /xin the Command Prompt and press Enter (replace F with the drive letter assigned to the SD card)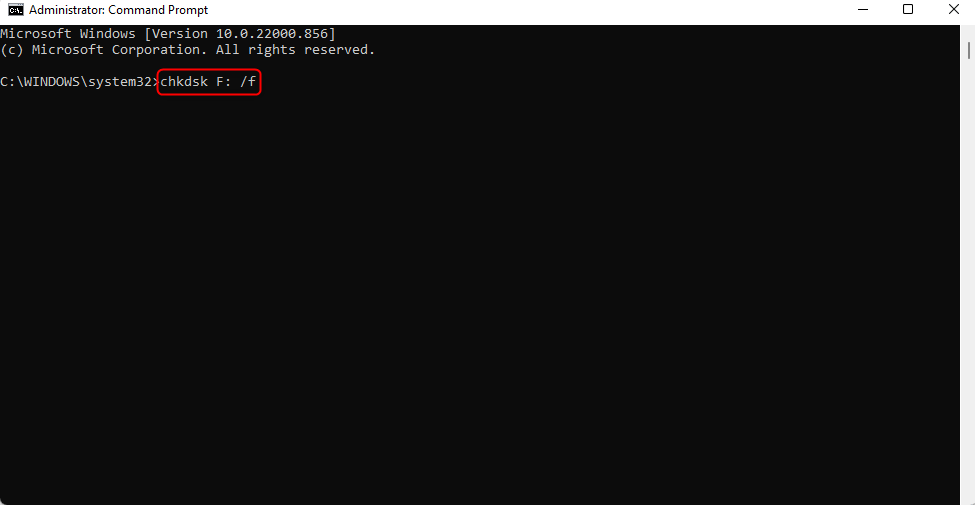
CHKDSK will start scanning the drive for errors and fix them if it finds any.
Method 2: Update Camera Software
Camera software updates might be able to help you resolve the issue if the reason for your SD card not being recognized is a firmware bug. The exact method for updating camera software differs depending on the camera brand and model you use. If you use Sony Cybershot, you’ll need to use a different method than someone with a Nikon Coolpix.
However, the process of updating as well as the firmware upgrade file is generally available on the manufacturer’s website. Here are a few general guidelines to get you started:
- Go to the camera manufacturer’s website to download the firmware. The process may look different for each website, but here are the most popular camera brands’ support page link to get you started:
- Look for your camera model. In most cases, you can search for the model by typing the model’s name in the search bar on the support page.
- Beyond this point, you’ll need to explore the website a little. Look for the latest camera software or firmware on the next page. Note that you must download the firmware for your specific model. Firmware typically isn’t compatible with multiple cameras.
The rest of the process should appear on the firmware download page. However, if you’re not fully confident about the process, it’s best to seek help from a technician. If you mess something up, you might need to get the camera repaired anyway.
Method 3: Format the SD Card
Formatting the SD card should be a last resort because you’ll end up erasing all of the data on the SD card. However, formatting can help you solve almost all logical errors on the SD card.
To format an SD card using a PC:
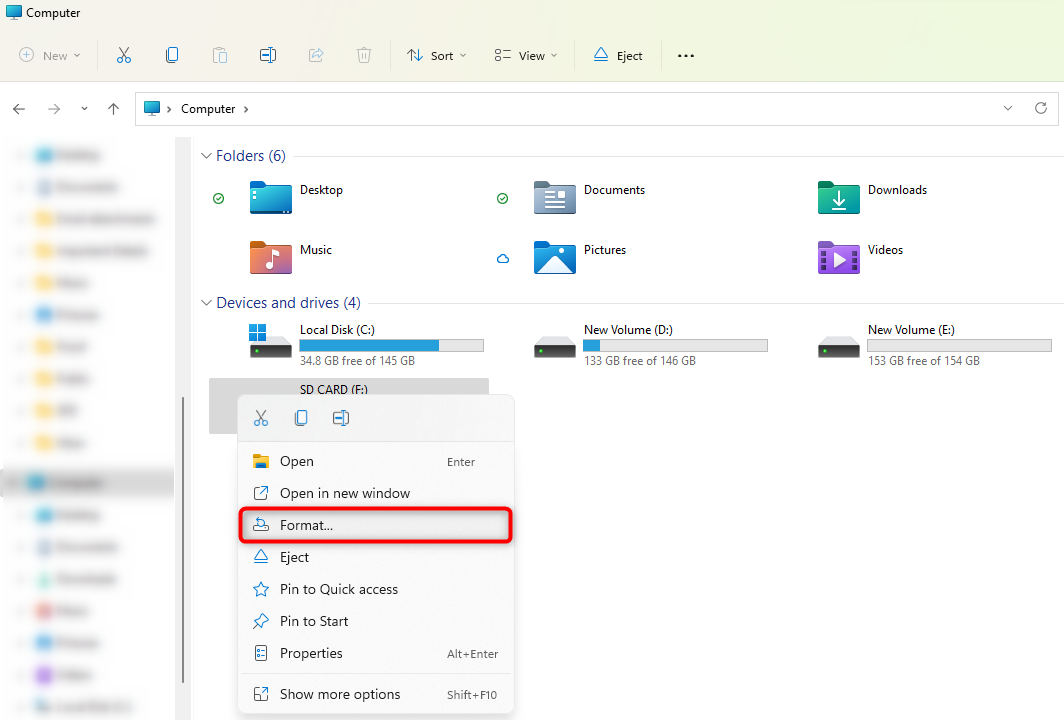
- Connect it with your PC using a card reader.
- Press Ctrl+E to launch the File Explorer and select Computer (This PC if you’re on Windows 10) from the left sidebar.
- Right-click on the SD card and select Format.
- Select a file system. Ideally, exFAT for cards with capacity of 32GB or more or for cards on which you want to store files greater than 4GB. FAT32 is another option if you don’t plan on storing files greater than 4GB.
- Select a Volume label.
- Check the box next to Quick Format.
- Click Start.
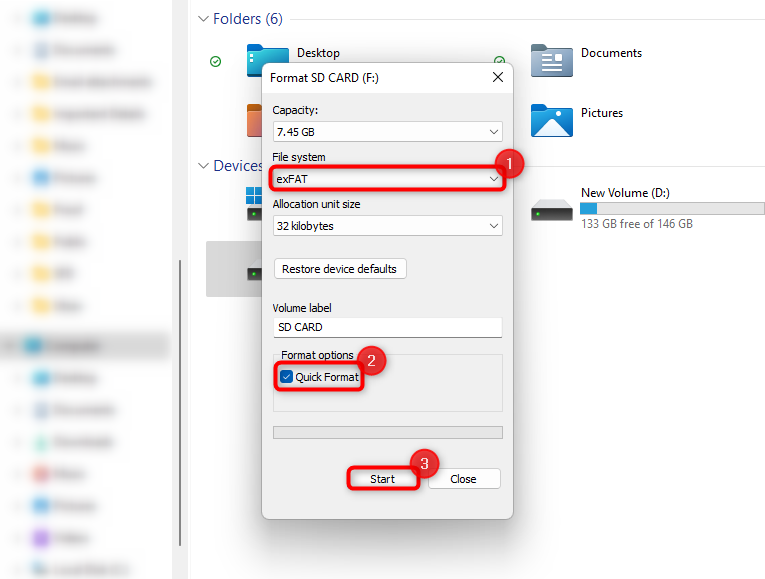
- Press OK for confirmation when prompted.
Wait for the process to complete and then reinsert the card into your camera.
Conclusion
There could be several reasons why your camera isn’t detecting your SD card. These reasons range from a simple case of an improperly SD card, to full-blown physical and logical corruption. If your undetected SD card is physically fine, it’s best to first recover data from it—either by copying your files, or using a tool like Disk Drill—before fixing it.
In case of physical damage, stop using the SD card, avoid DIY data recovery and contact a data recovery professional ASAP. Do the same, if your PC doesn’t detect the SD card or the storage size is listed incorrectly in Windows Disk Management, as it often indicates severe logical or physical damage to the SD card.
Once you’ve recovered your files, you can use methods like running a CHKDSK scan, updating the camera software, or formatting the SD card, to resolve the issue.
FAQ
- The SD card is inserted improperly.
- Logically or physically damaged SD card.
- The SD card’s file system is incompatible with your camera.
- Your camera doesn’t recognize the SD card type.
- The camera’s SD card slot is damaged.
- Your Canon camera doesn’t support the SD card type and its storage capacity. Not all Canon models support the same types of SD cards.
- You inserted the SD card improperly.
- The SD card’s lock switch is set to the ON position, preventing the Canon camera from writing or formatting it.
- A malfunctioning Canon camera, or a damaged insertion slot.
- Damaged SD card connectors.
- The SD card is defective.


")

