 You boot your PC and suddenly, you encounter the message, “invalid partition table,” or “missing partition table.” It’s natural to panic and assume you have permanently lost access to your data. Rest assured, that’s not the case. There are several ways you can repair the partition table on your PC’s HDD or SSD. We take an in-depth look at these methods in the sections below.
Table of Contents
What is a Partition Table
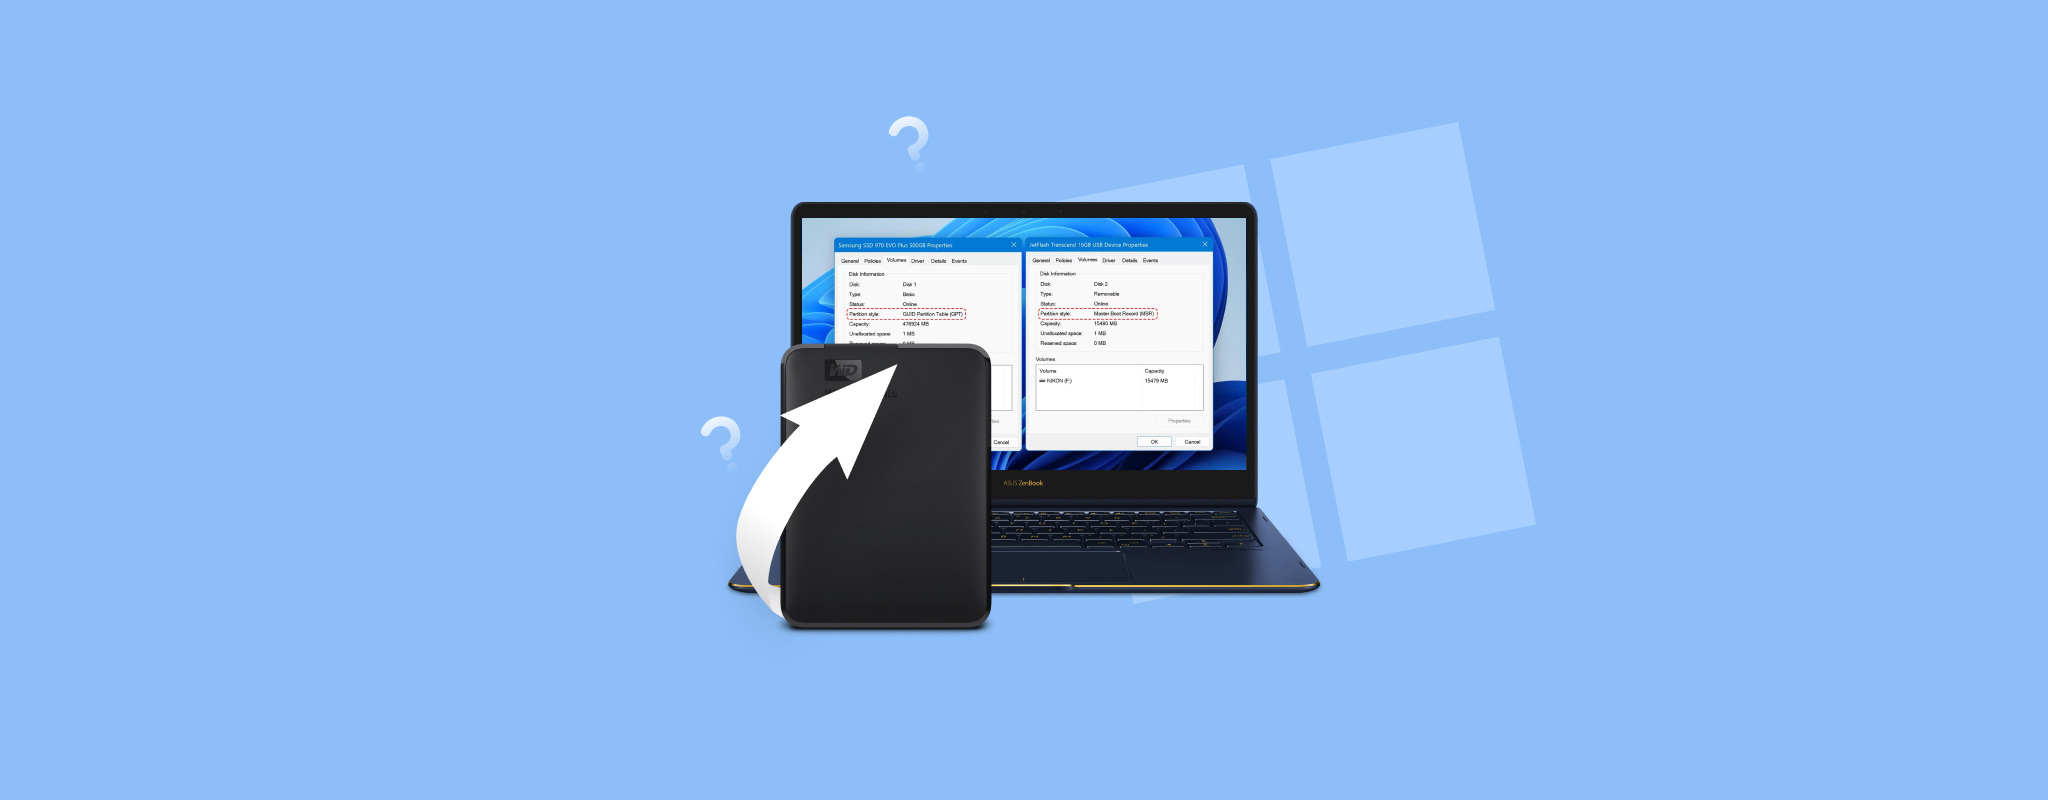
The partition table (or partition map) of an HDD, or SSD, defines how the disk is partitioned. It contains the necessary information which lets your OS know which is the boot partition. The two most commonly used partition tables on Windows are Master Boot Record (MBR) and GUID Partition Table (GPT).
MBR is an older partition scheme, primarily used in older computers (pre-2015). In it, the disk’s first sector stores the partition data. Each partition entry constitutes 16 bytes, with a maximum supported size of 64 bytes. Therefore, the MBR partition table supports a maximum of 4 partitions. The maximum partition size of each partition is 2 TB.
GUID Partition Table (GPT) was developed to overcome the limitations of MBR as well as form a part of Intel’s Unified Extensible Firmware Interface (UEFI) – the replacement for the old-school PC BIOS. Most modern computers use GPT. For the average user, GPT provides three main advantages over MBR:
- It supports up to 128 partitions.
- The maximum supported partition size is 18 Exabytes (EB).
- GPT contains a backup partition table for better data protection and integrity.
What Does Invalid Partition Table Mean?
If you encounter the invalid partition table error, it means that your system is unable to locate the partition which contains the boot data. There can be several reasons for this, with most of them easily addressable. Use the table below as a guide:
|
Reason |
Description |
| ⛓️ Incorrect boot sequence | The boot sequence determines which storage disk your system will check for your OS’s boot files. If set incorrectly, the PC will check the wrong storage drive for the OS, and consequently return the invalid partition table error when it cannot locate the boot partition in that disk. The boot sequence can be changed in the BIOS/UEFI settings. |
| 💿 Bad sectors | Bad sectors are unreadable/unwritable areas of a disk. They can develop due to various reasons, including normal wear and tear. If the boot sector develops a bad sector, the PC will return the invalid partition table error. |
| 🦠 Damaged partition table | There are a multitude of factors that can cause damage to the partition table. Computer viruses, data corruption, power cuts, and surges, can all damage the integrity of your data and the partition table, rendering it unreadable. |
| ⚙️ Misconfigured Windows OS | If you’ve tampered with Windows boot settings or the sequence, it can result in an invalid partition table error |
| ✅ Two or more partitions are marked as active | The Active partition on your computer is the one that contains the OS and Windows boot files. If multiple partitions are marked as active, Windows won’t boot, and you’ll get the invalid partition table error. |
| 💻 An outdated BIOS | A motherboard with outdated BIOS drivers may be unable to locate the boot sector of your disk. |
How to Recover Data From a Drive with an Invalid Partition Table
Fixing a partition table can occasionally cause data loss, depending on what caused the error and the method employed to fix it. That’s why it’s a good idea to first recover all your data before proceeding to repair the partition table. The only way to perform DIY data recovery is to use a data recovery tool.
To perform data recovery on a disk that displays the invalid partition table message on boot, you’ll need to connect it to another working PC. You can either connect the drive directly using its SATA cable, or use a disk enclosure to perform partition recovery on it as an external drive.
In our tutorial, we’ll use Disk Drill, mainly because of its ease of use and unparalleled functionality. It recognizes over 400 file formats, all common file systems across different operating systems, and works with drives even if they’re corrupt. You can take advantage of Disk Drill’s free trial, which lets you recover up to 500 MB of files for free.
Here’s how you can restore data from a drive with a corrupt master file, using Disk Drill:
- Download Disk Drill and install it on a separate disk.
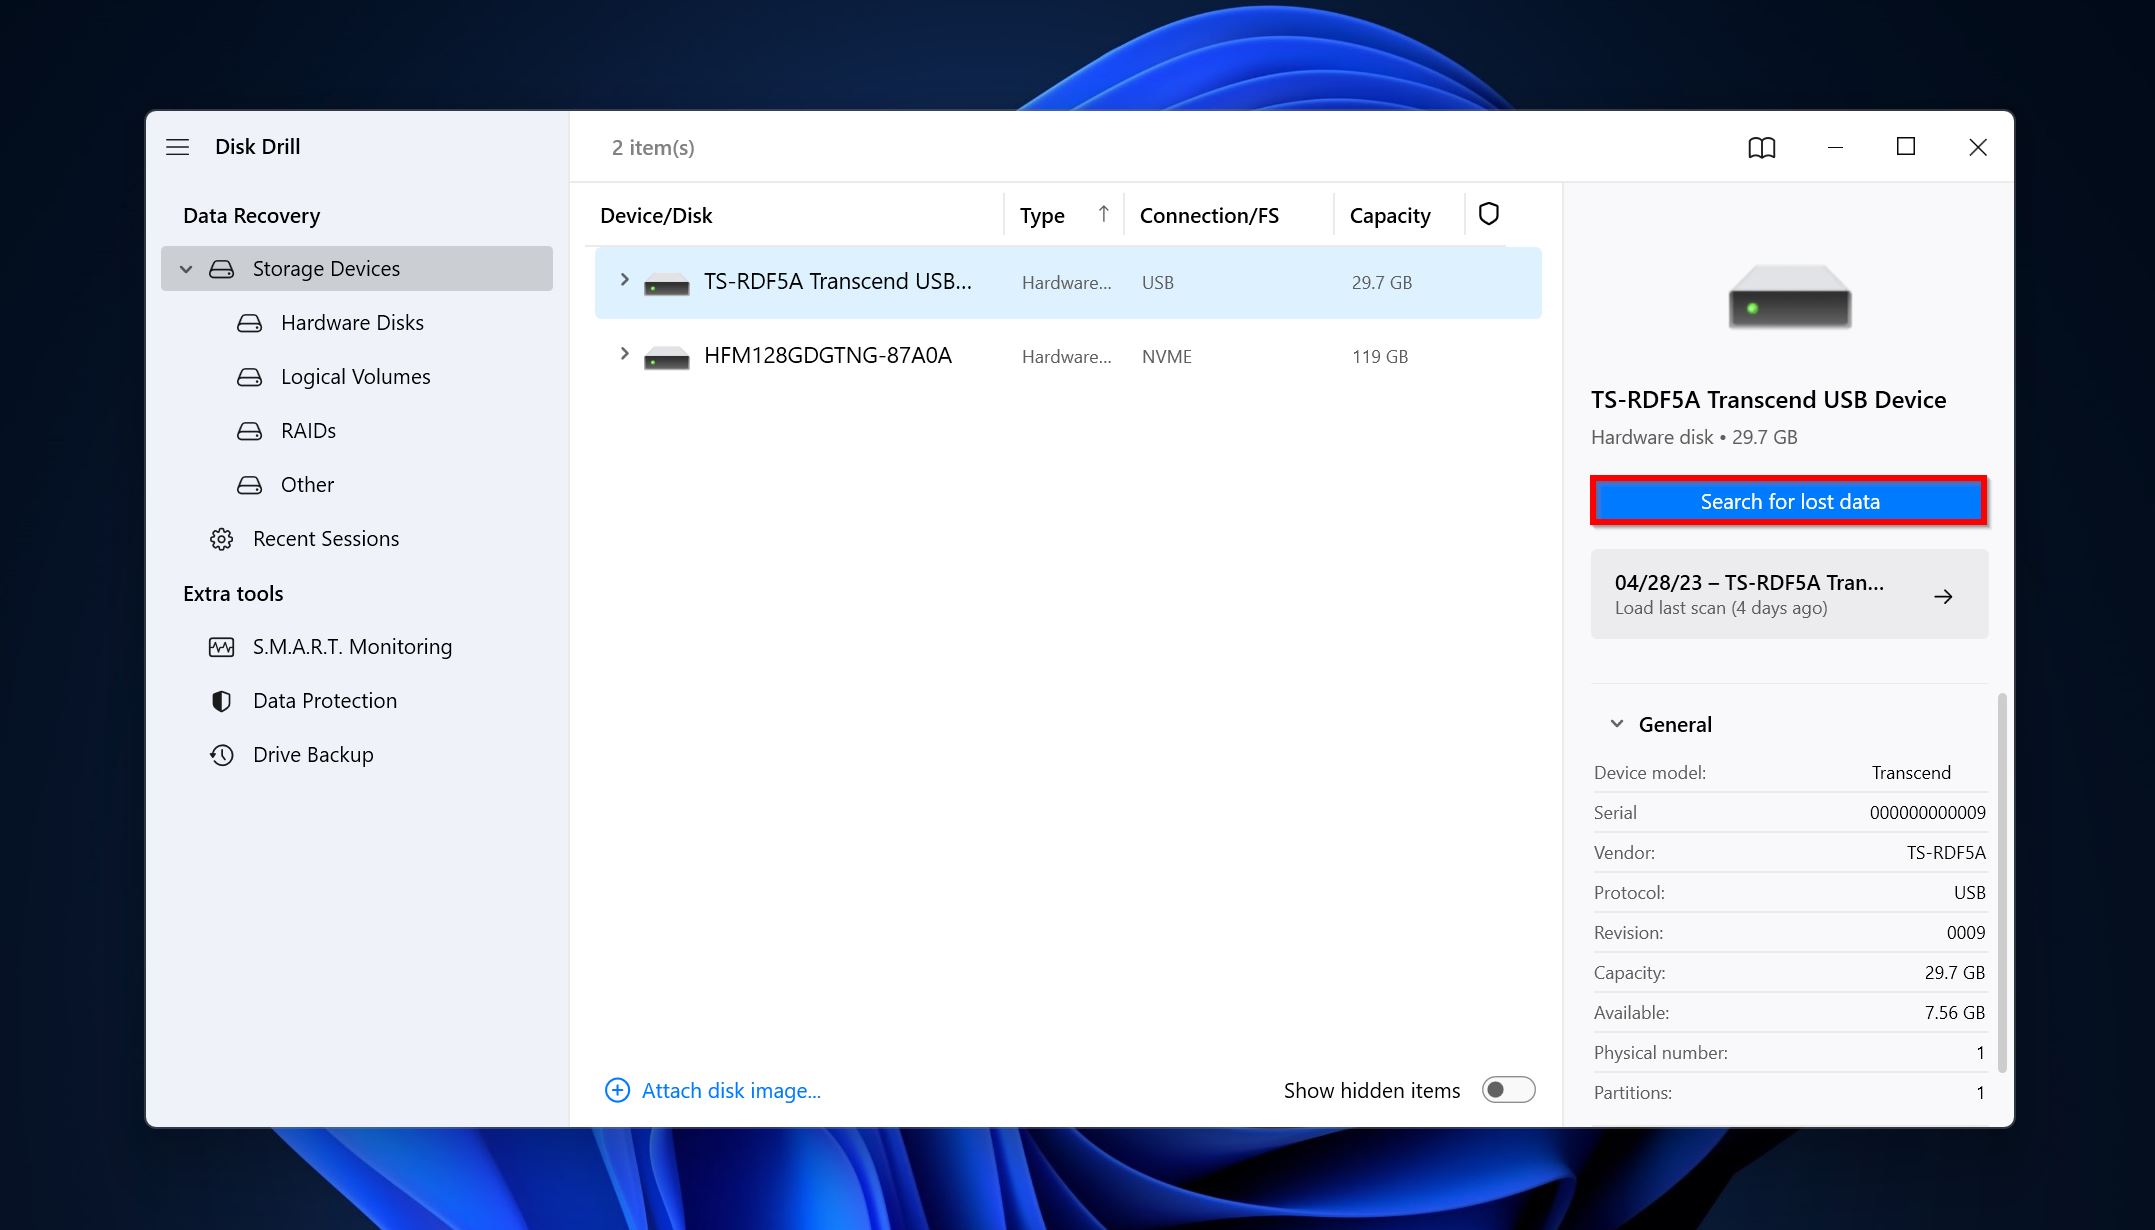
- Open Disk Drill, select the disk that had the invalid partition table, and click Search for lost data.
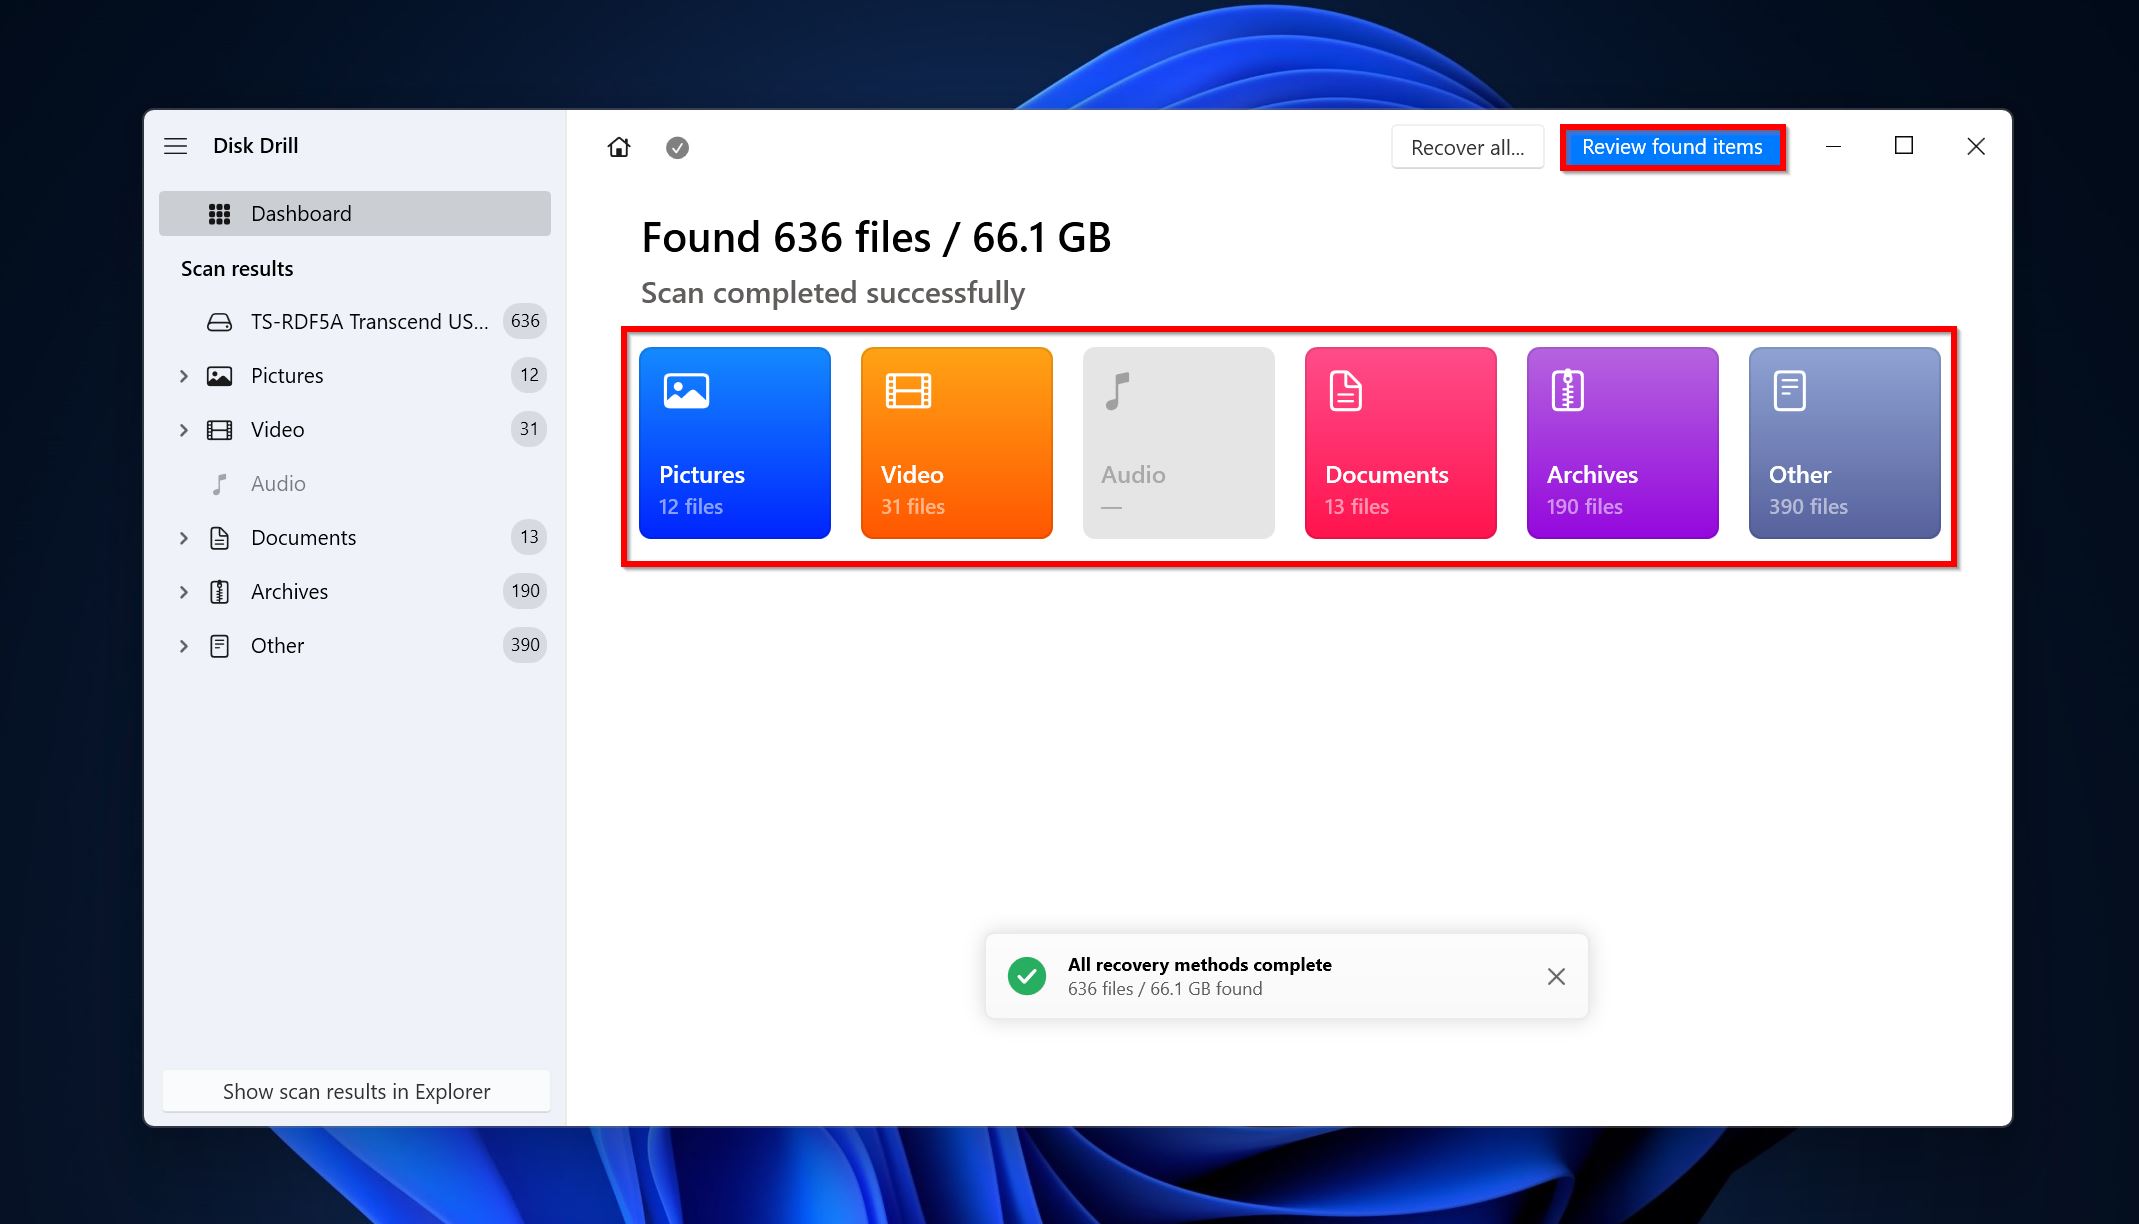
- Click Review found items to see the recoverable data that Disk Drill discovered. To filter out the results, you can directly click on the relevant file type–Pictures, Audio, Videos, Documents, Archives, and Other.
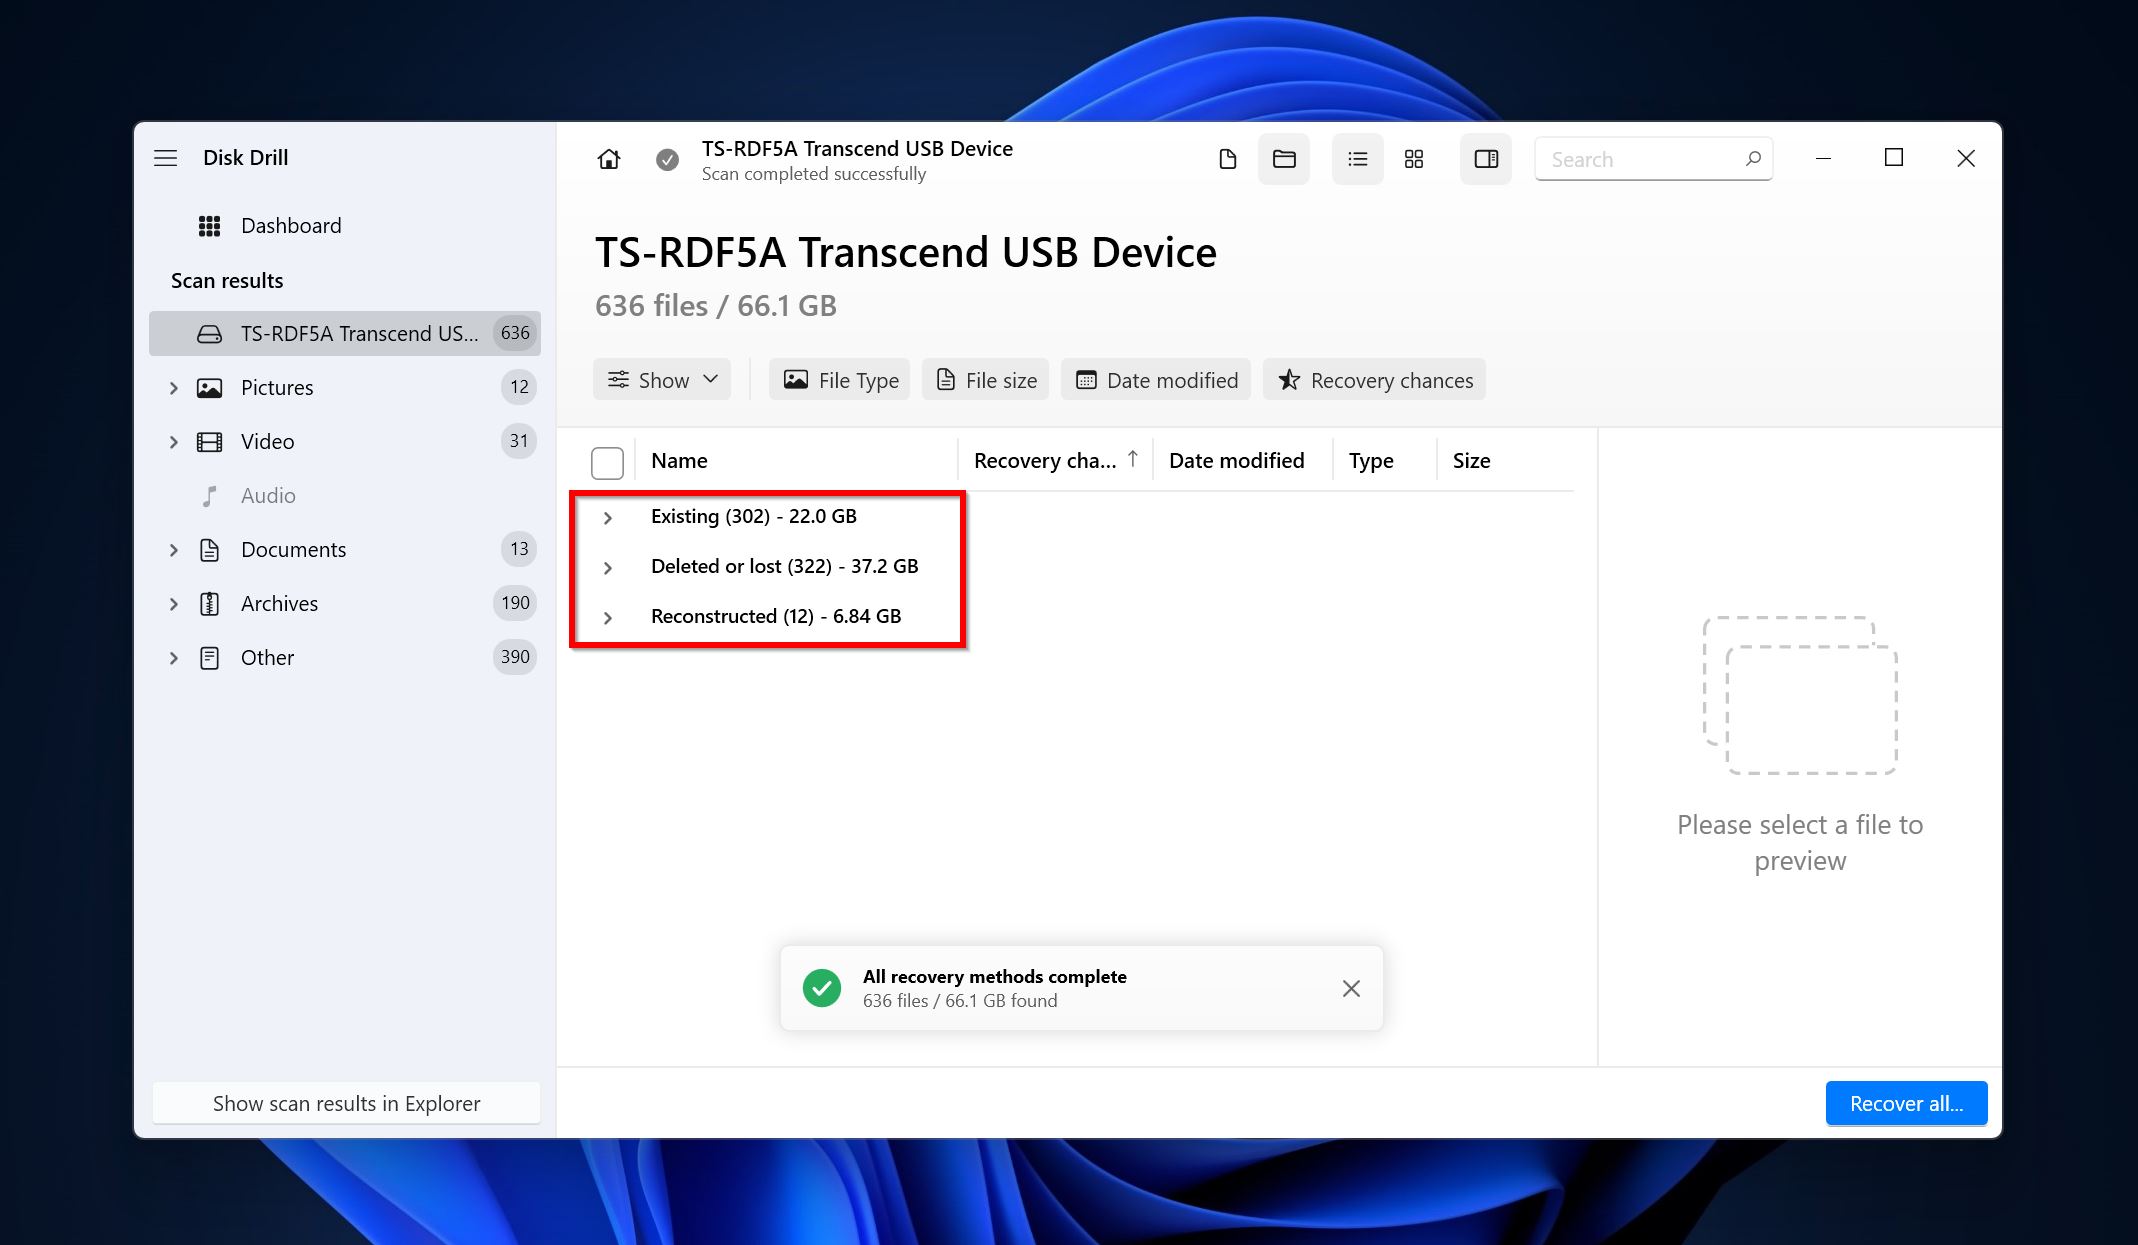
- Expand the Existing section to view the files that are already on your drive, or the Deleted or lost section to view files that were deleted earlier.
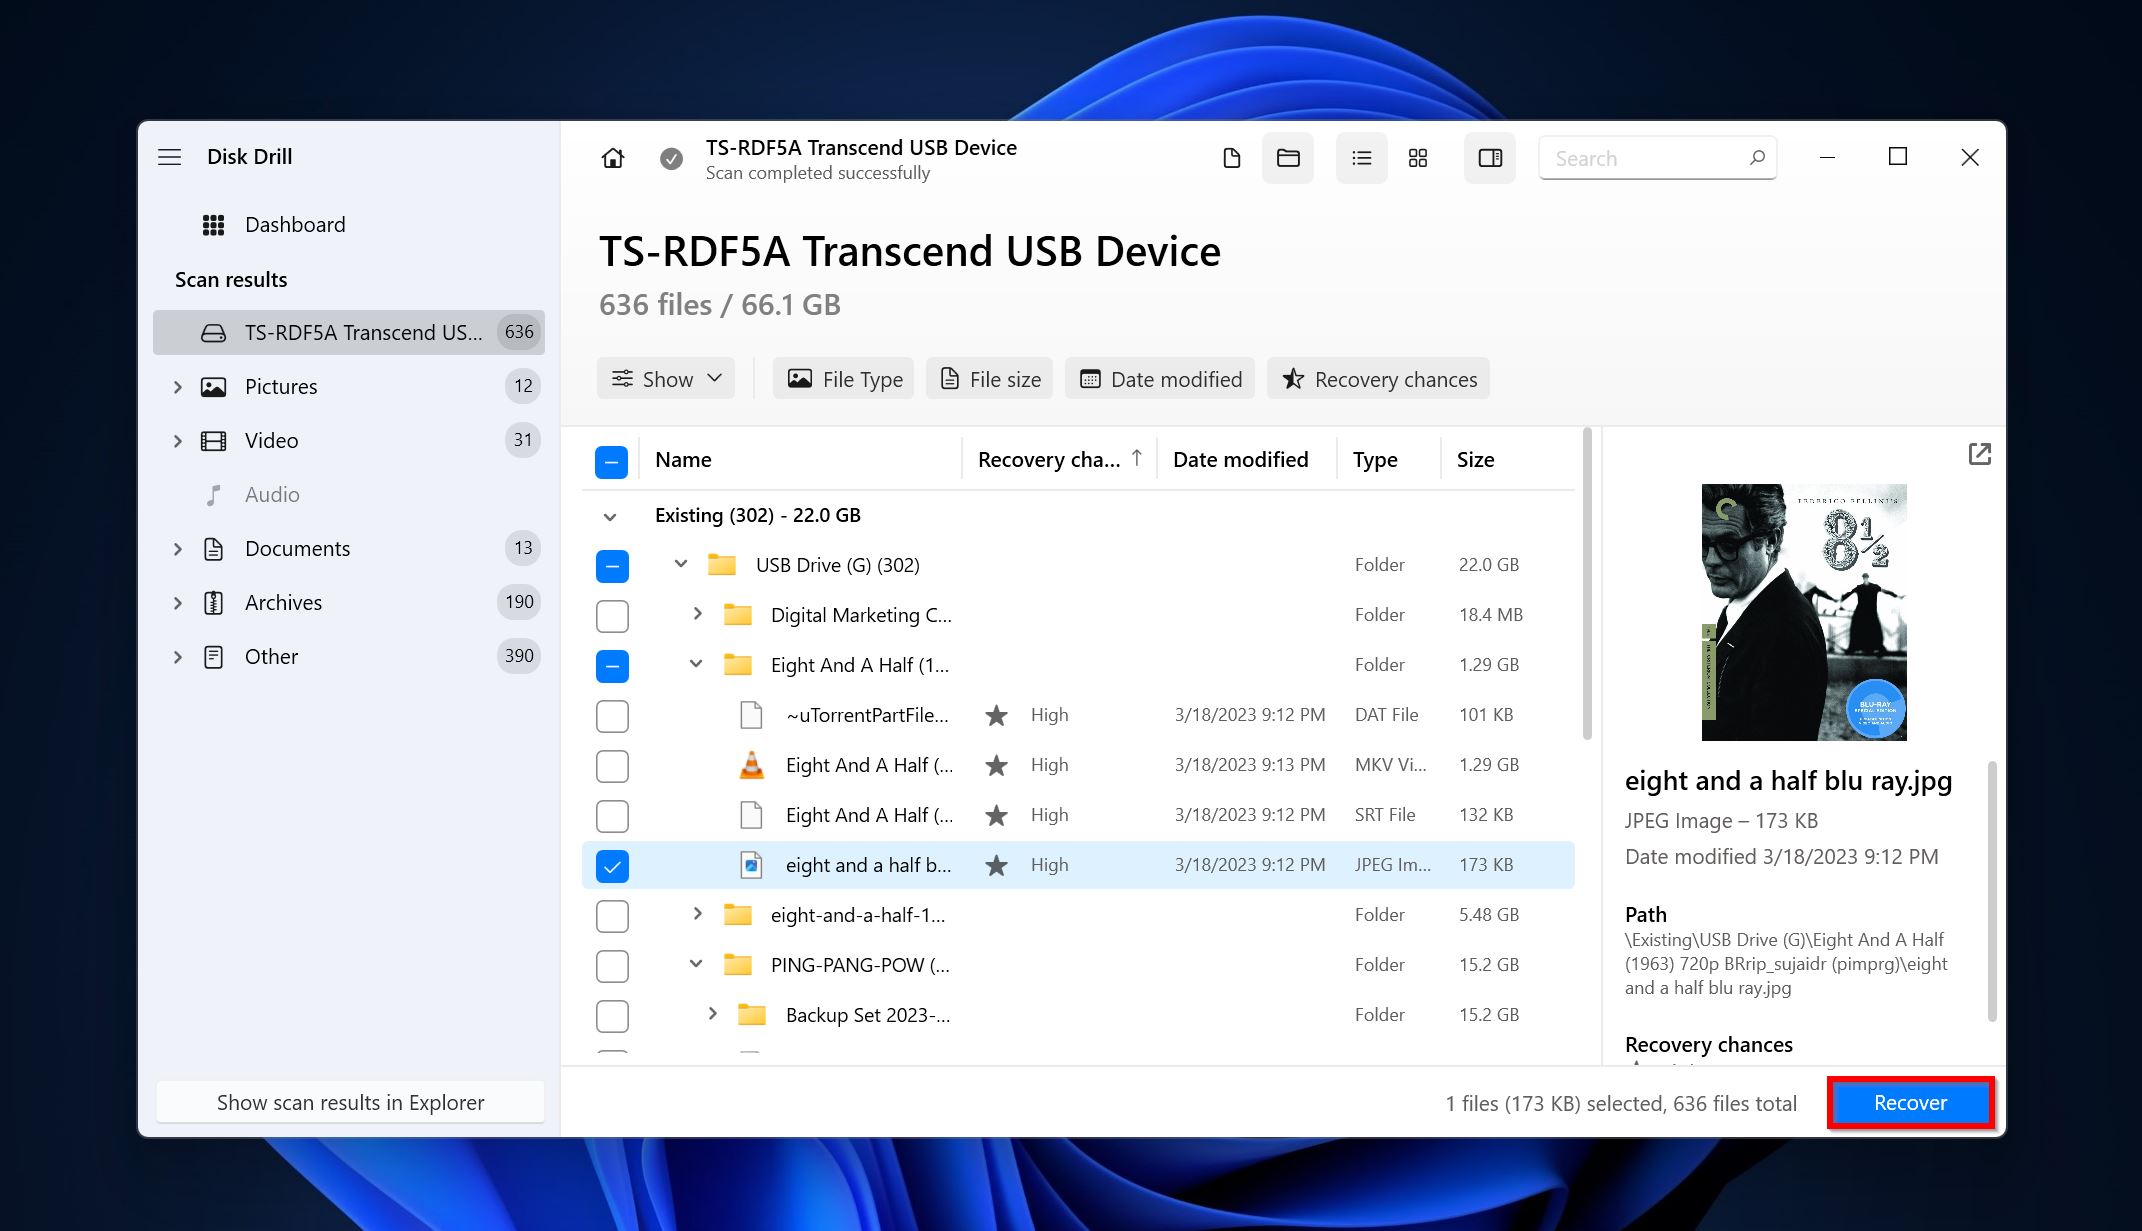
- Use the checkboxes to select the required files. Disk Drill displays a preview of the currently selected file. You can also click on the eye icon next to the filename to manually prompt Disk Drill to display a preview. Click Recover after confirming your selection.
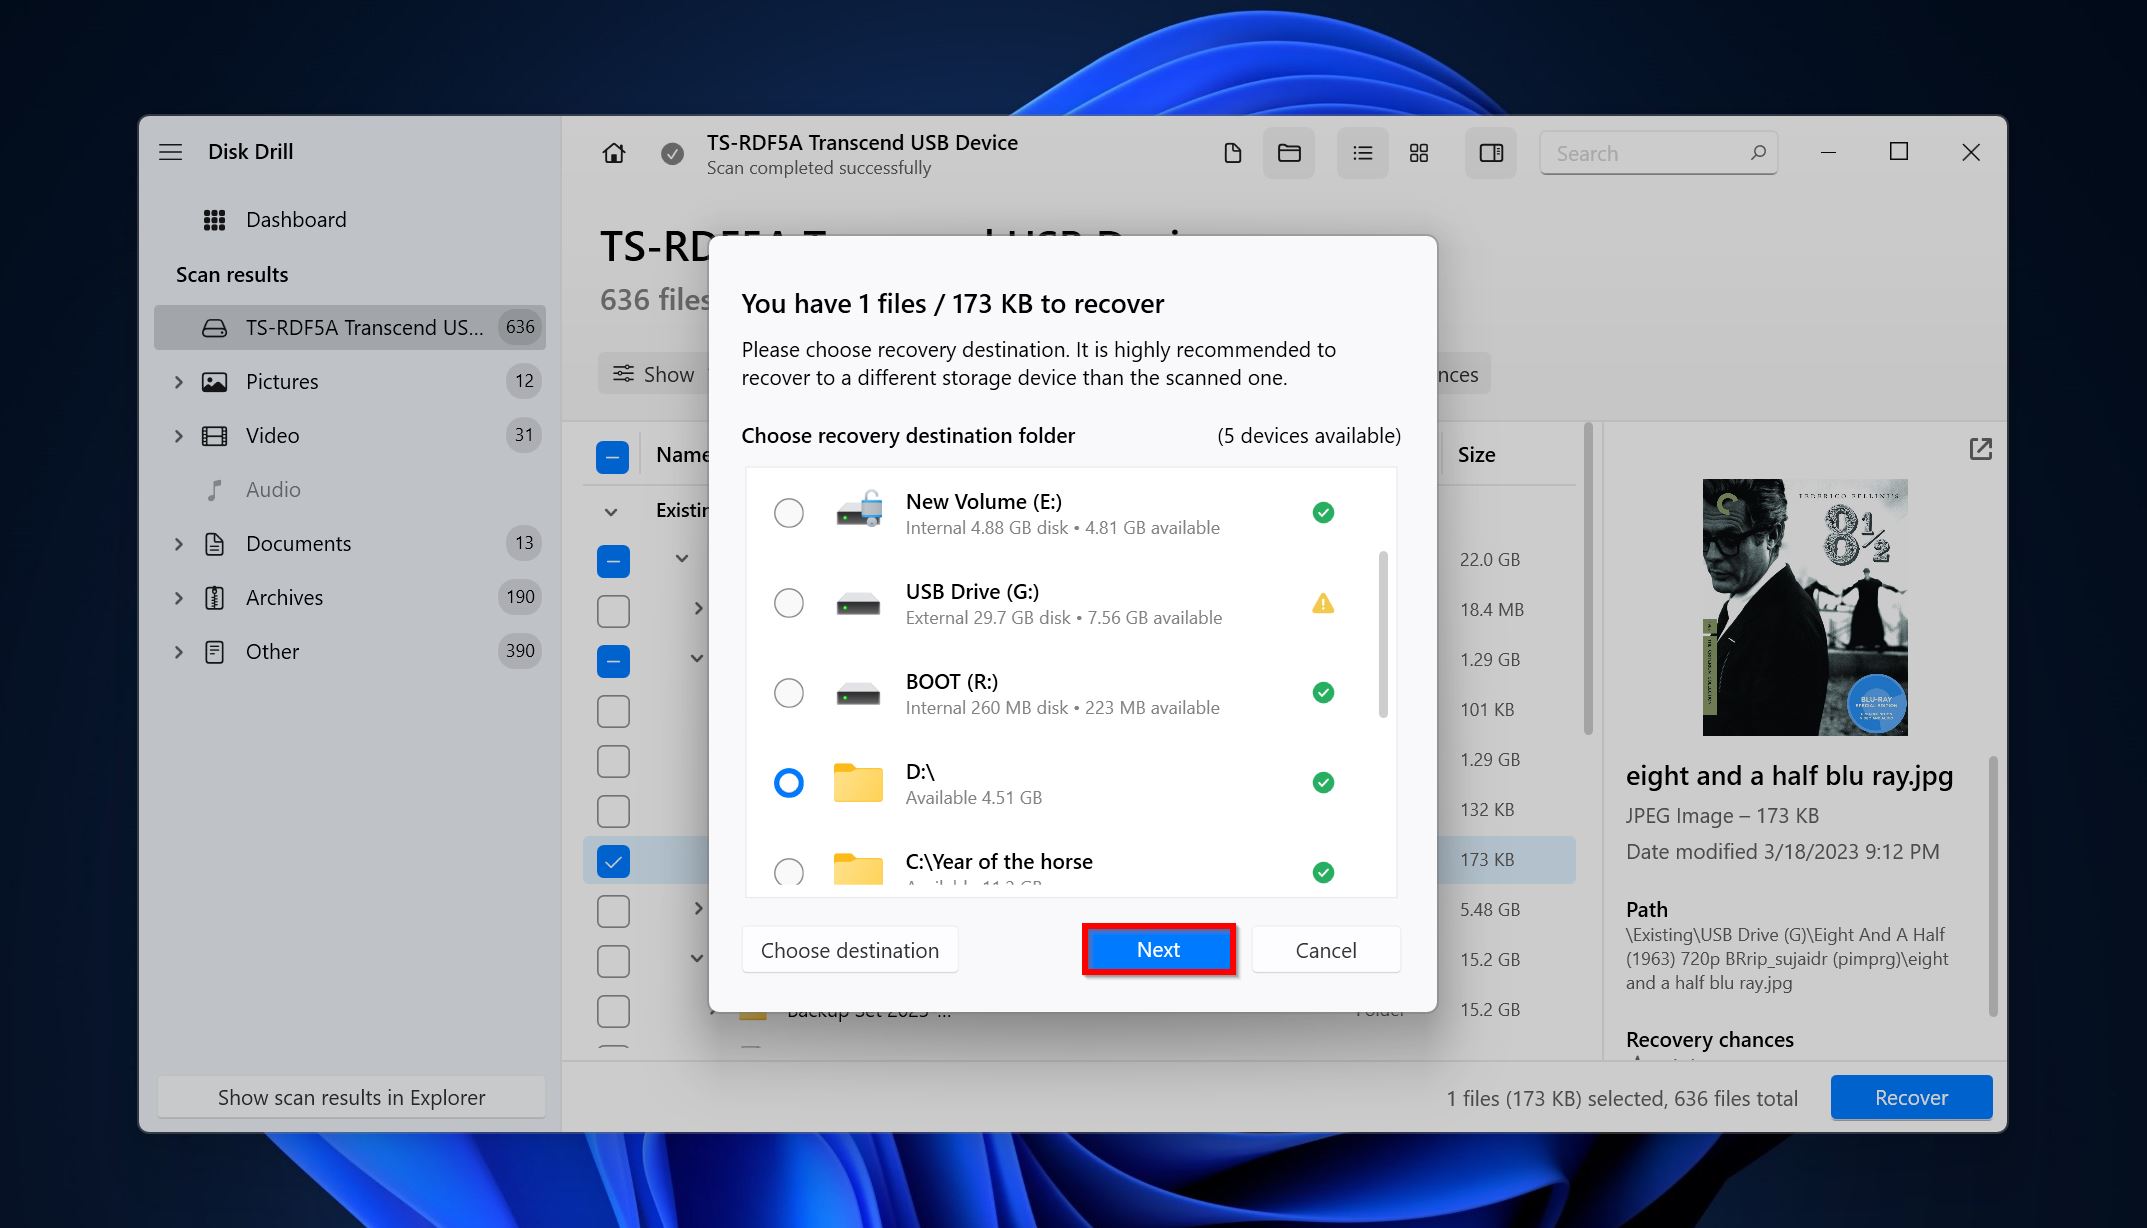
- Choose a recovery destination for your files. Click on Next.
- Disk Drill will recover your files.
How to Repair Partition Tables on Windows
Since your PC won’t boot with an invalid partition table, you’ll need to create a bootable USB drive using Windows installation media to apply these fixes. Once you’ve created the installation media, you can use it to enter the Windows Recovery Environment (WinRE) and fix the invalid partition table error.
For some fixes you’ll need to create a Windows to Go USB using a tool like RUFUS.
Once you’ve done that, here’s how you can fix the invalid partition table issue on your computer:
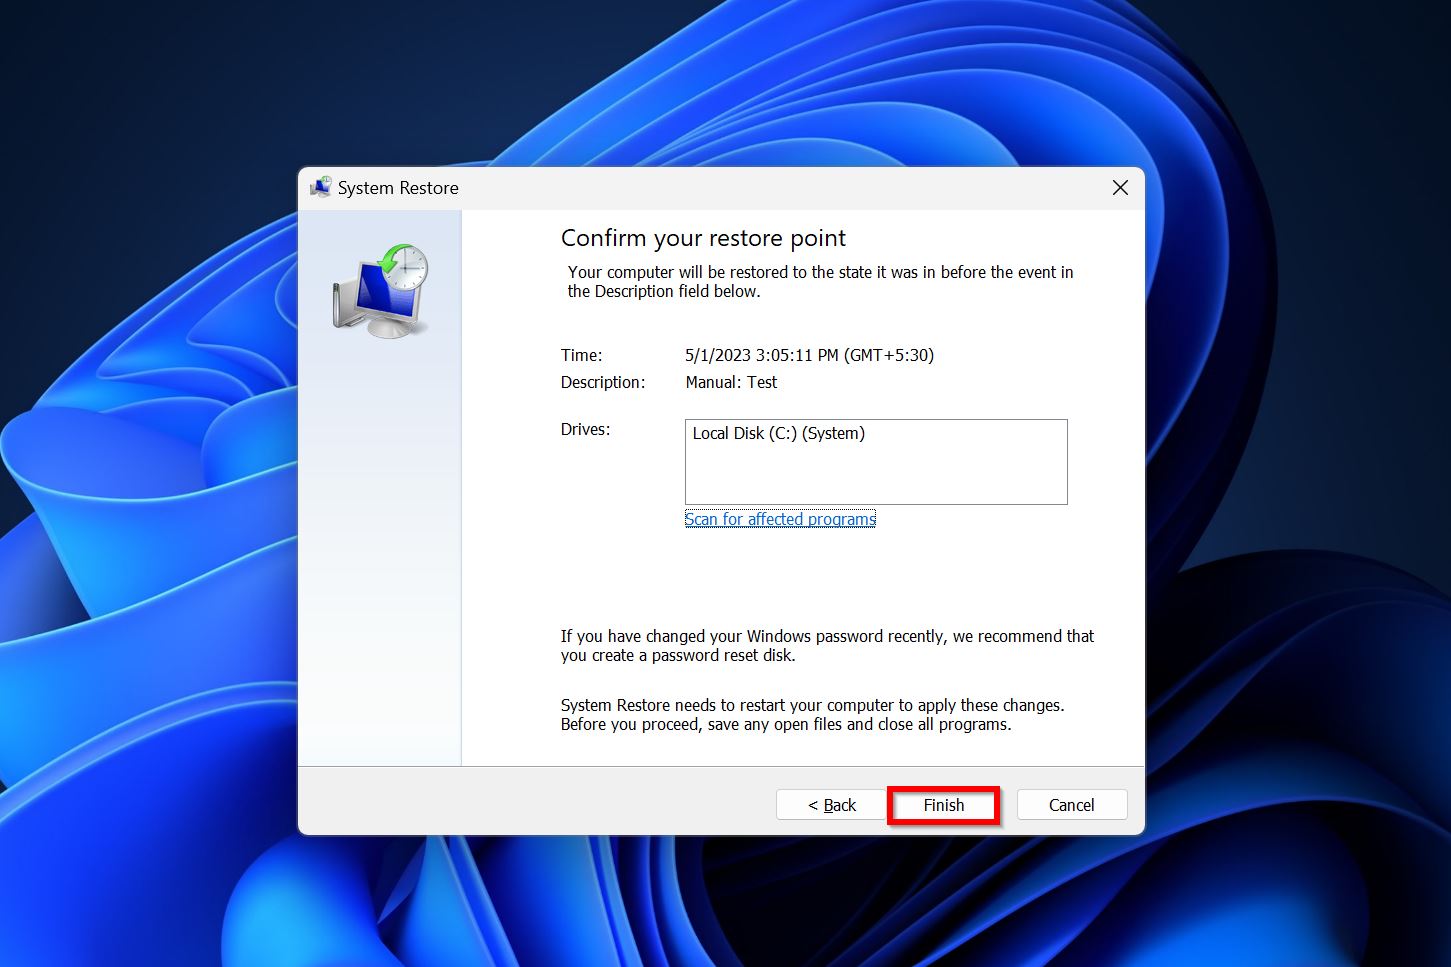
Method 1: Restore Windows to a Previous State Using System Restore
The System Restore feature in Windows is a godsend if you wish to restore the partition table. It’ll revert your PC to a previous state, one in which the system was configured properly. However, the feature should’ve been enabled with a restore point that was created before Windows got misconfigured.
Here’s how to use Windows System Restore to repair the partition table on your PC:
- Connect the Windows installation media USB to your PC.
- On the install Windows screen, select Repair this PC to enter Windows Recovery Environment (WinRE).
- Now, go to Troubleshoot > Advanced options > System Restore.
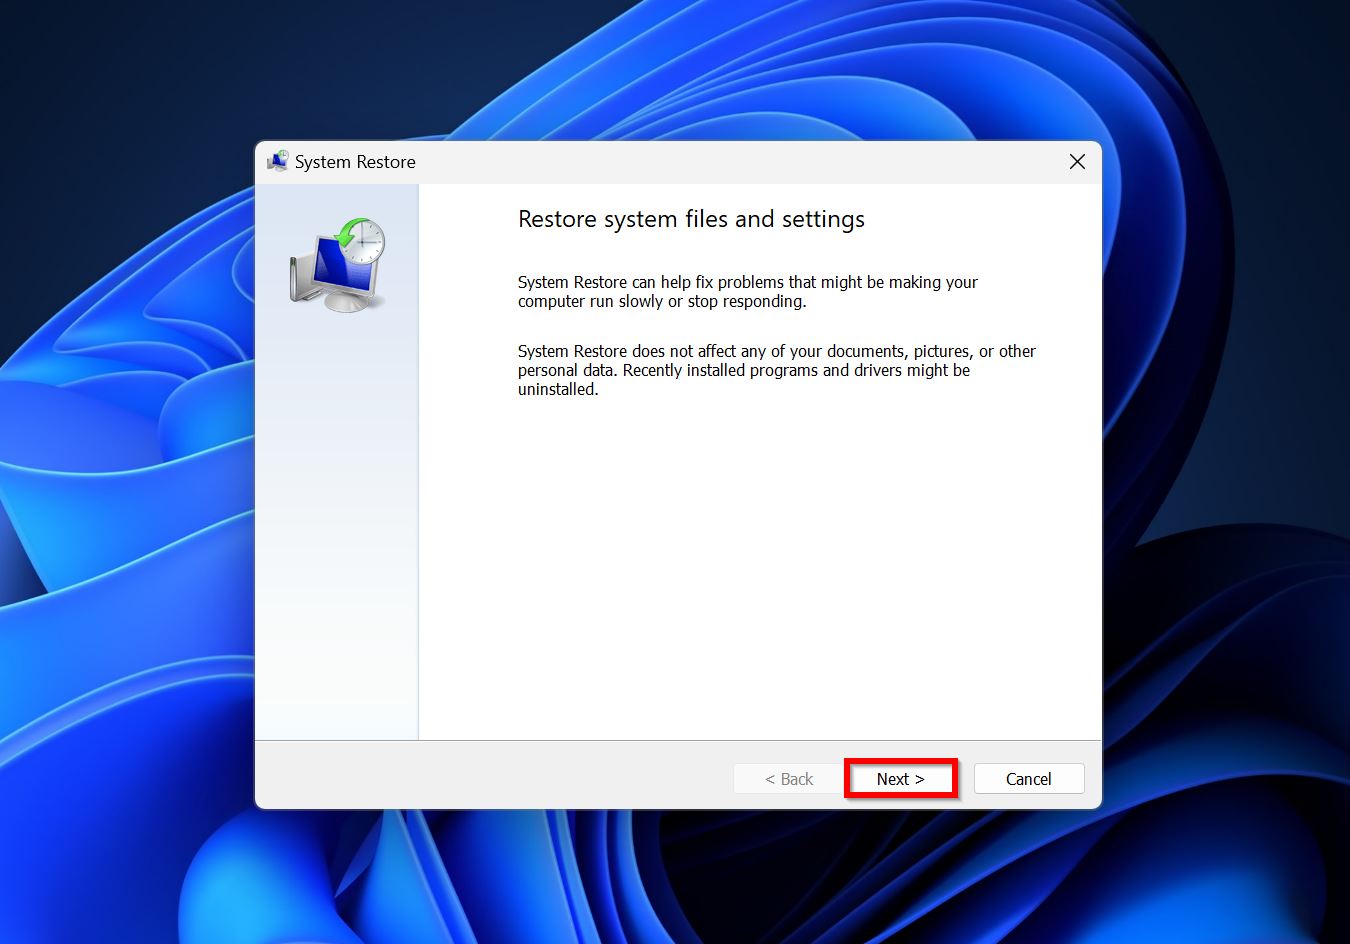
- Click Next on the System Restore welcome screen.
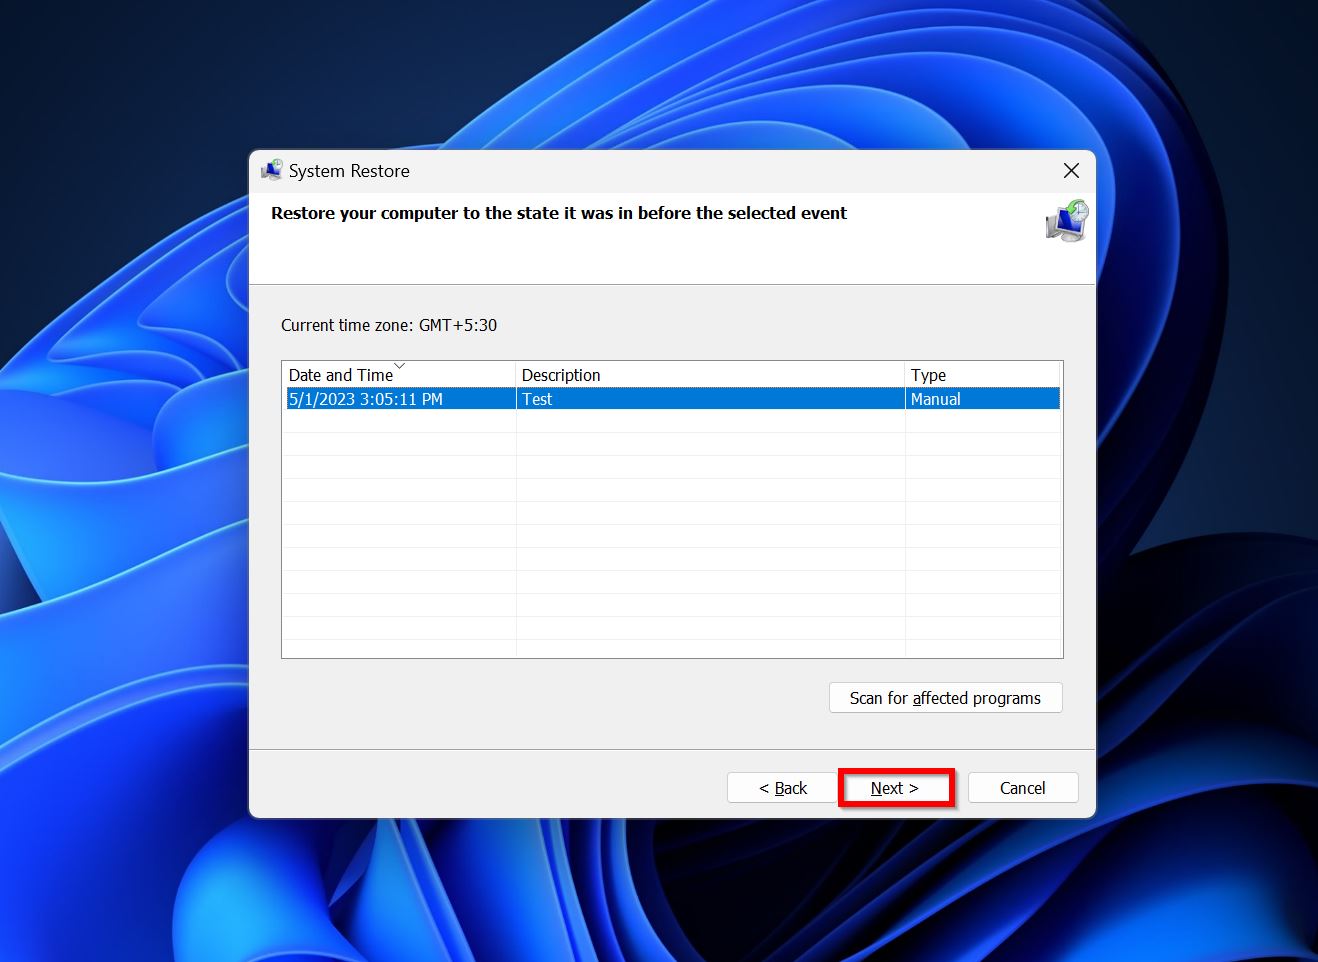
- Select a system restore point on this screen and click Next.
- Double-check all details and click on Finish.
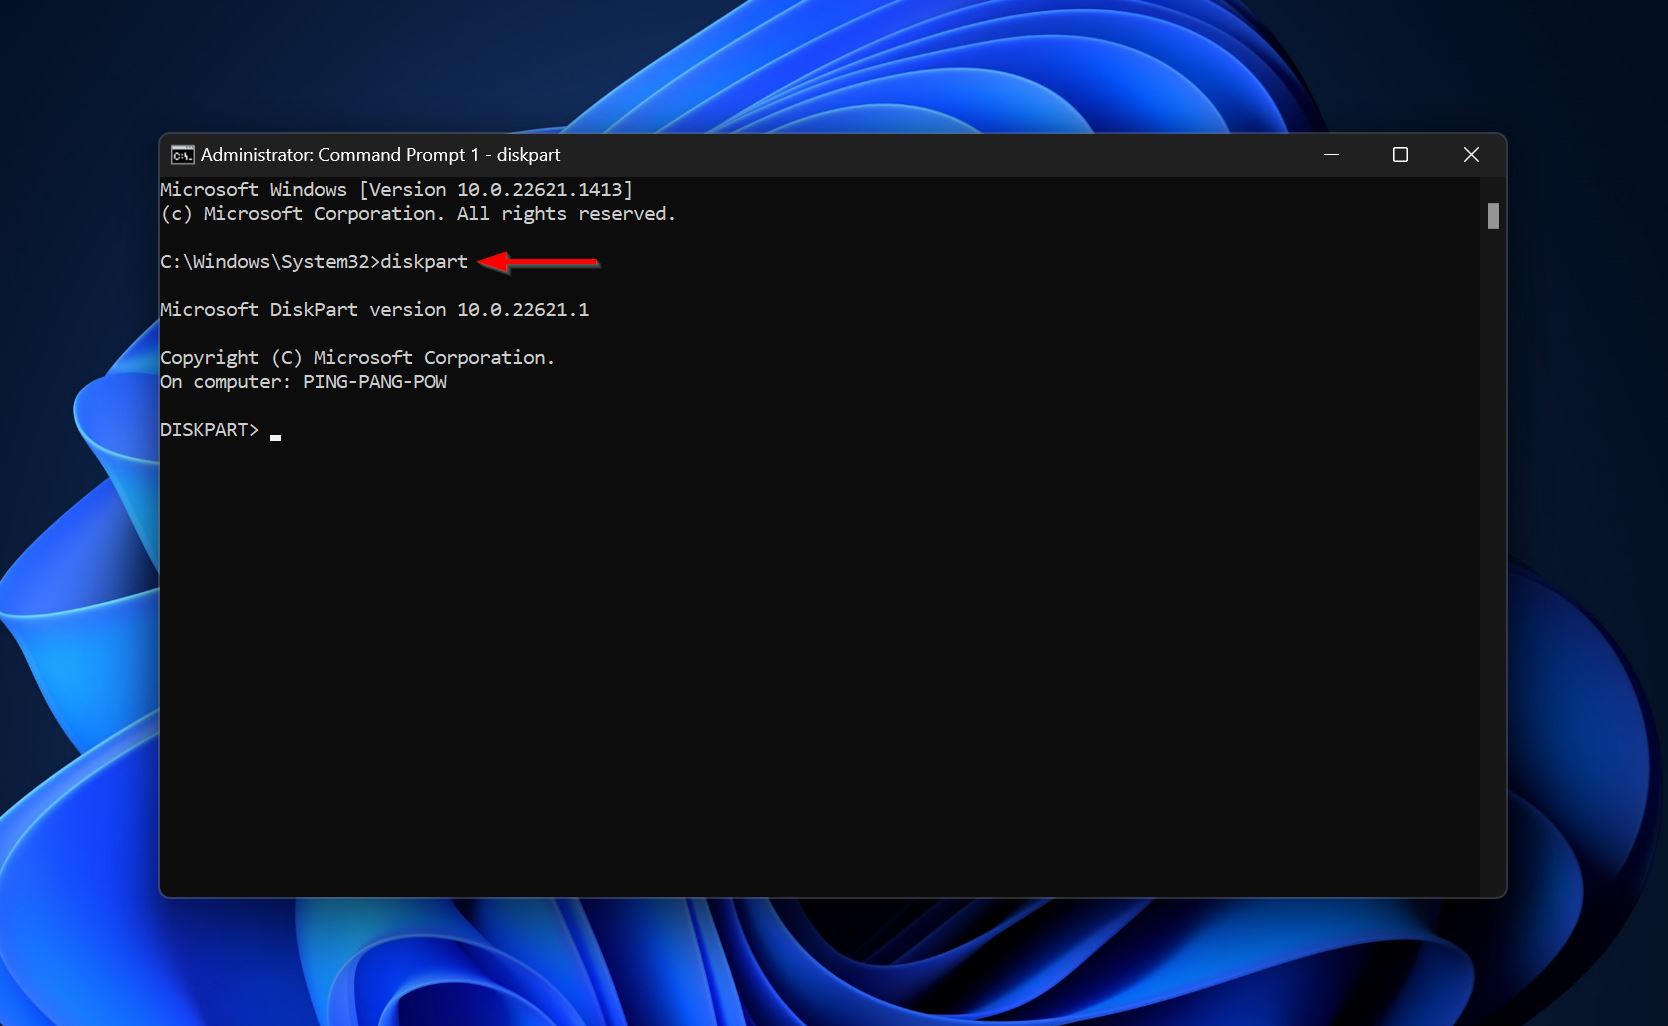
Method 2: Mark Other Primary Partitions as Inactive
The diskpart command-line utility on Windows can help you mark partitions, besides the one containing Windows, as inactive. This will fix the invalid partition table error if it was caused due to multiple active primary partitions.
Here’s how to do this:
- Enter Windows Recovery Environment (WinRE).
- Go to Troubleshoot > Advanced options > Command Prompt.
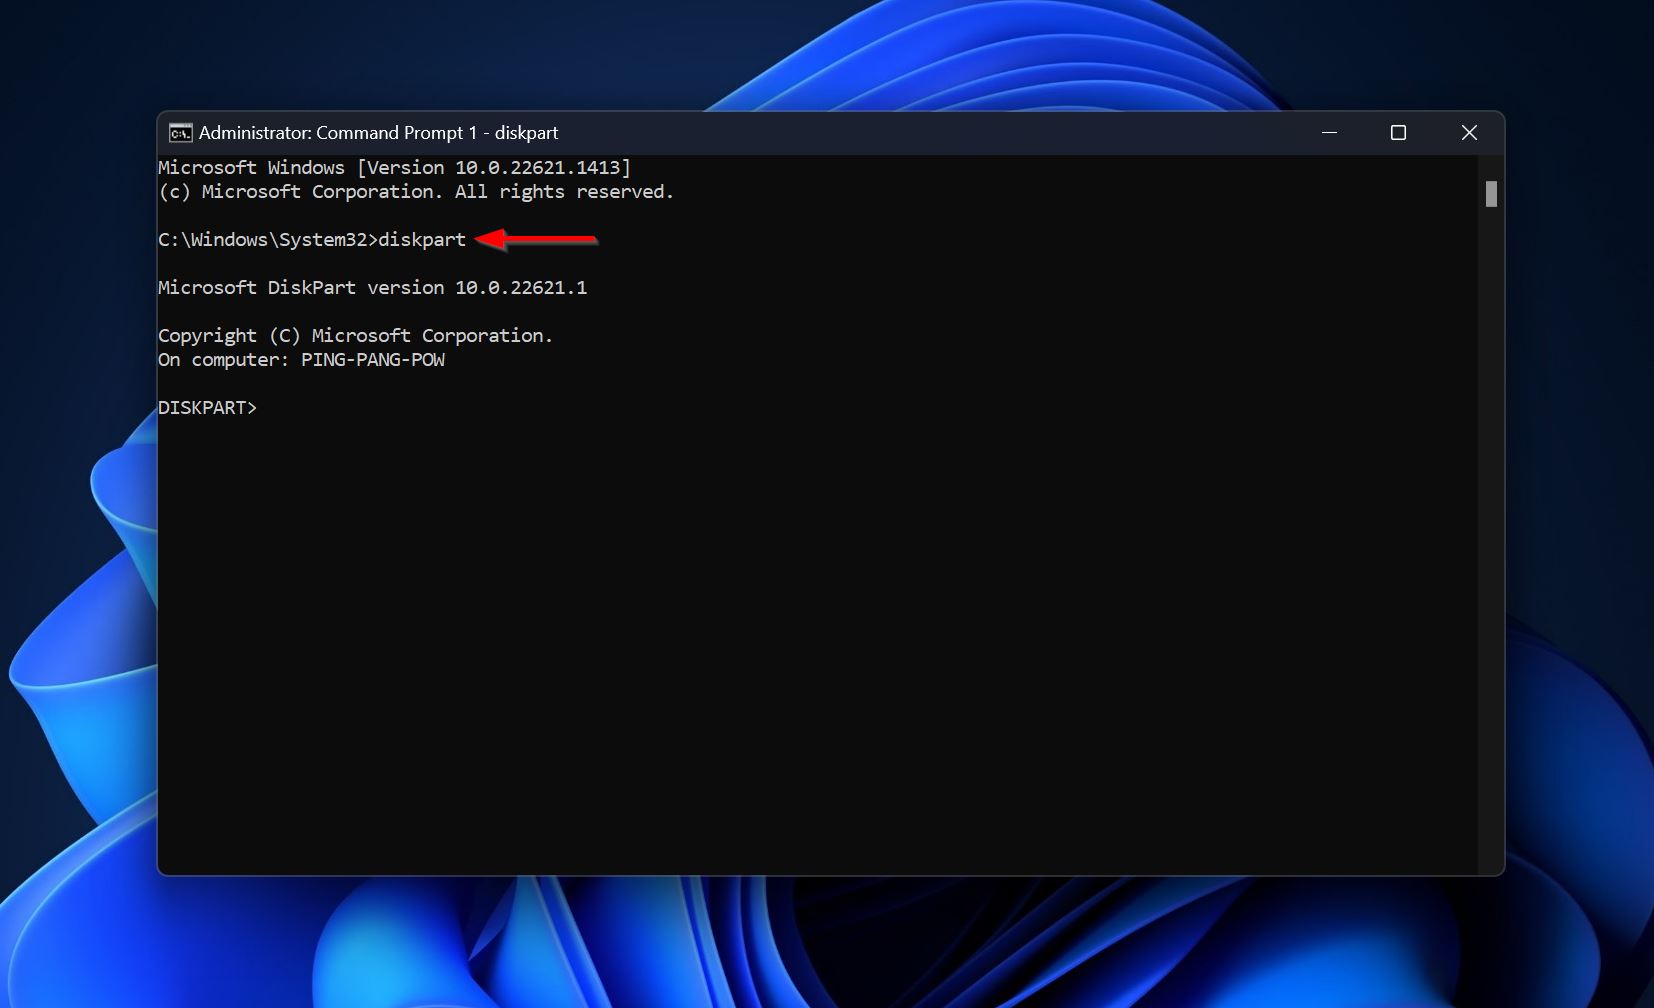
- Type diskpart in the console.
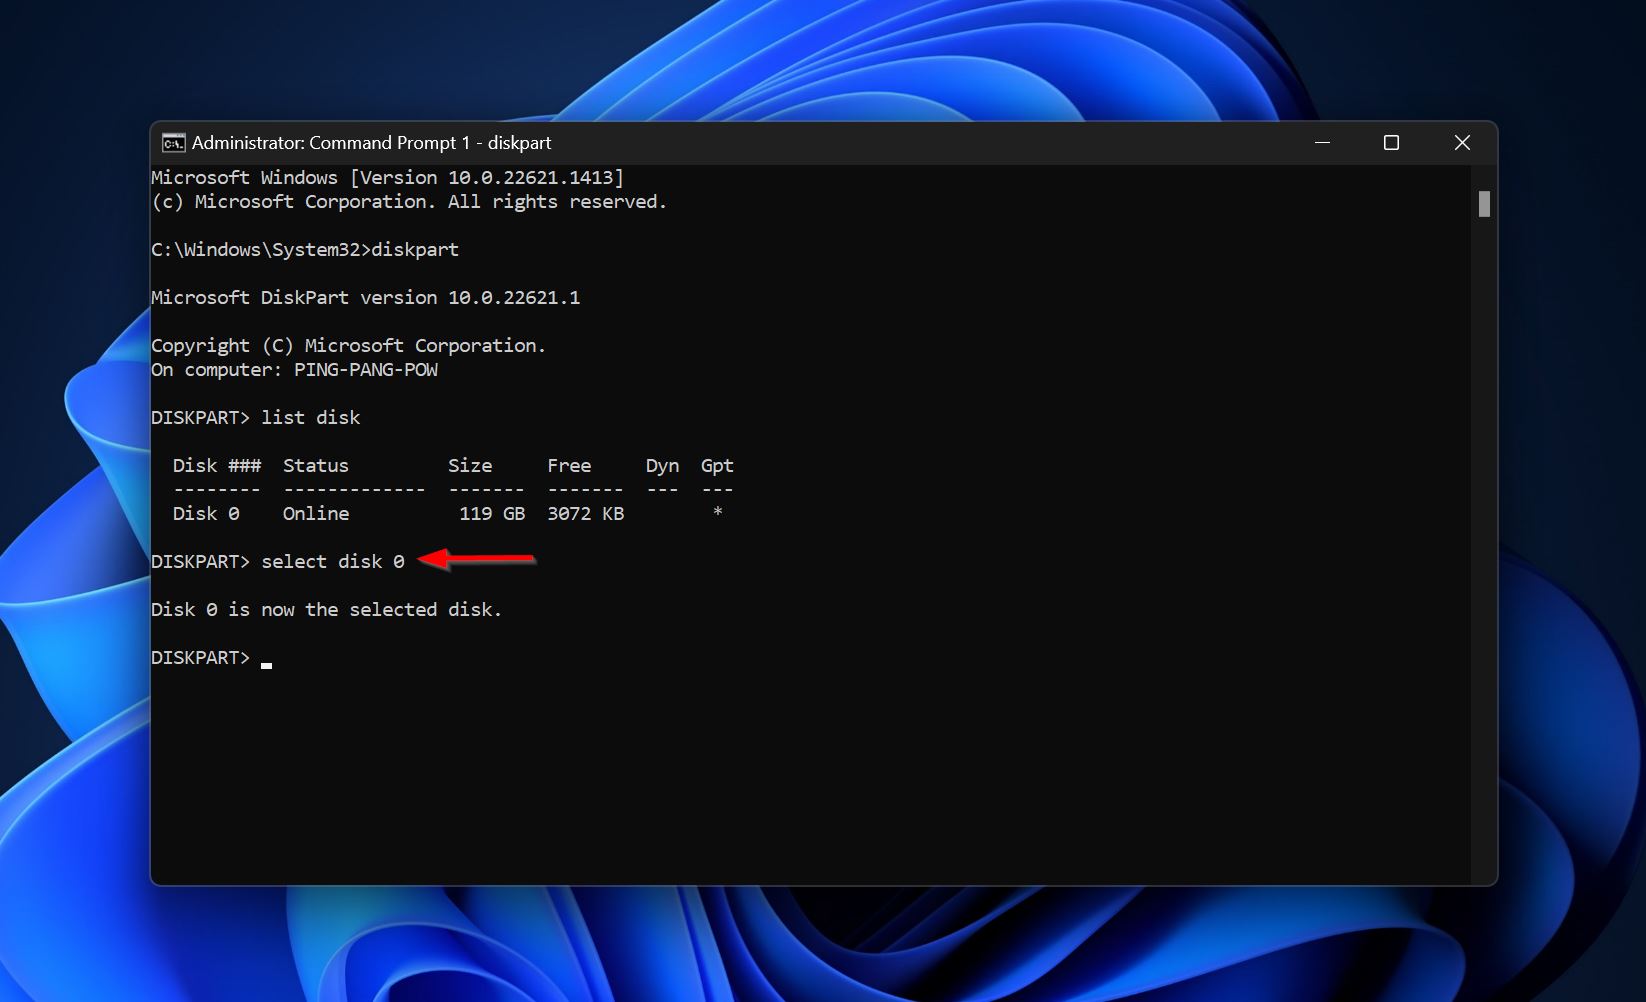
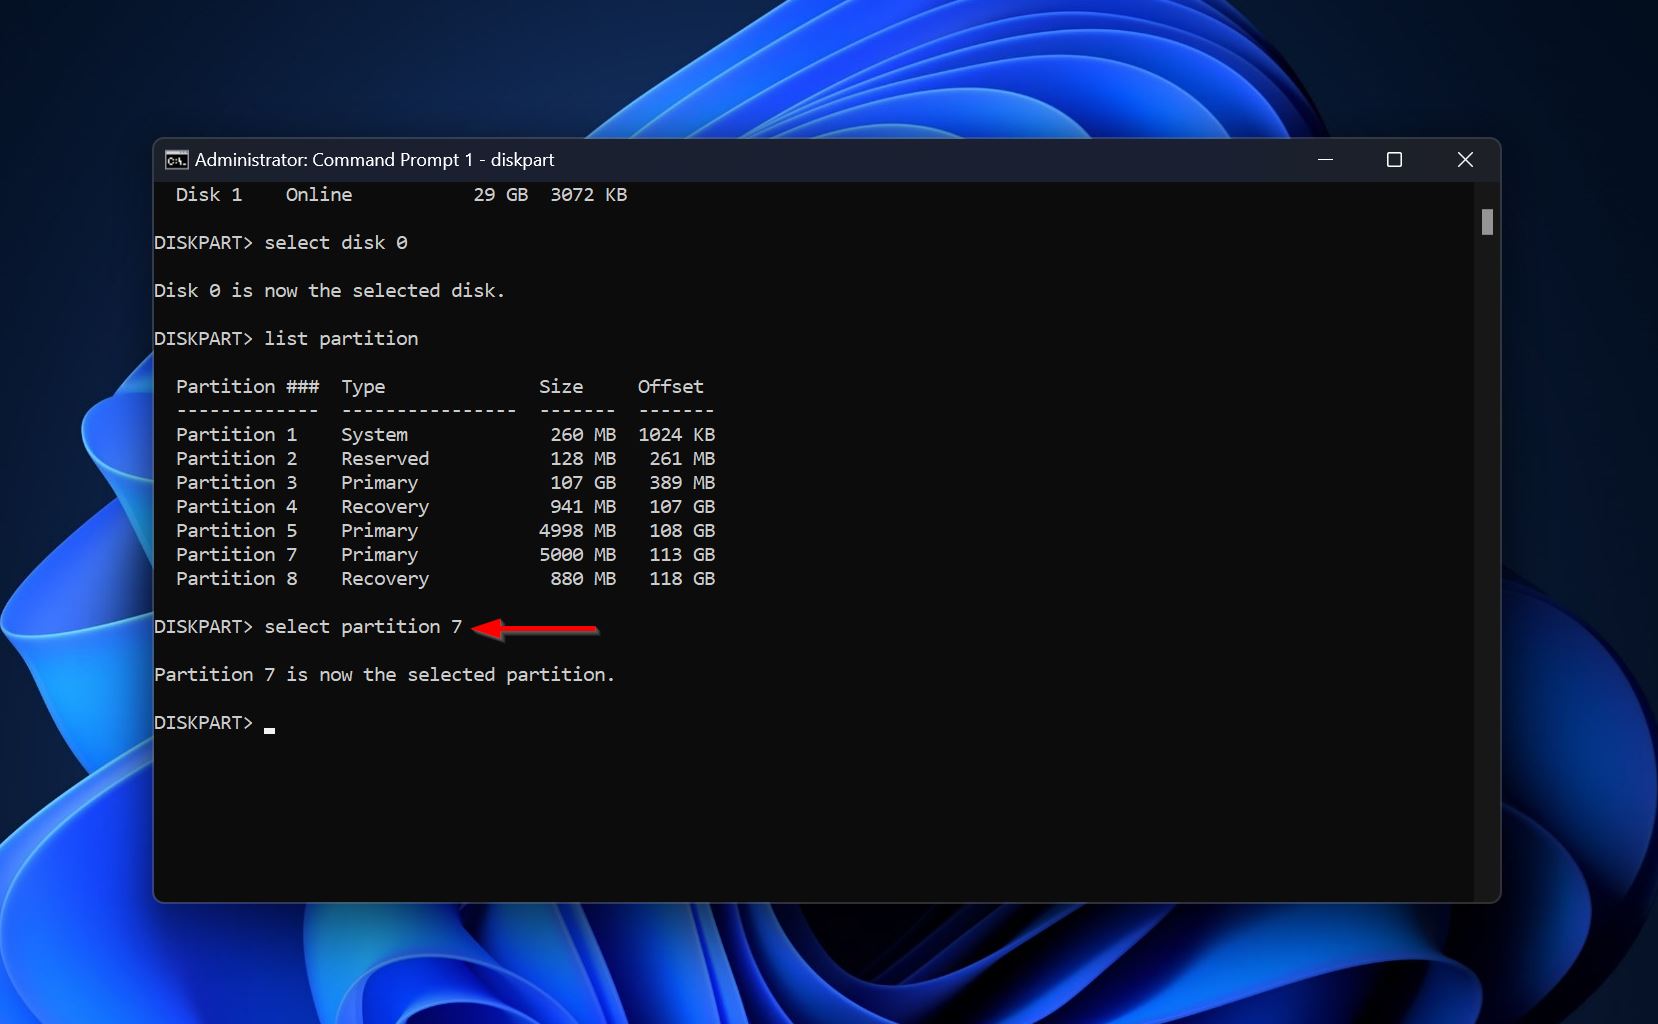
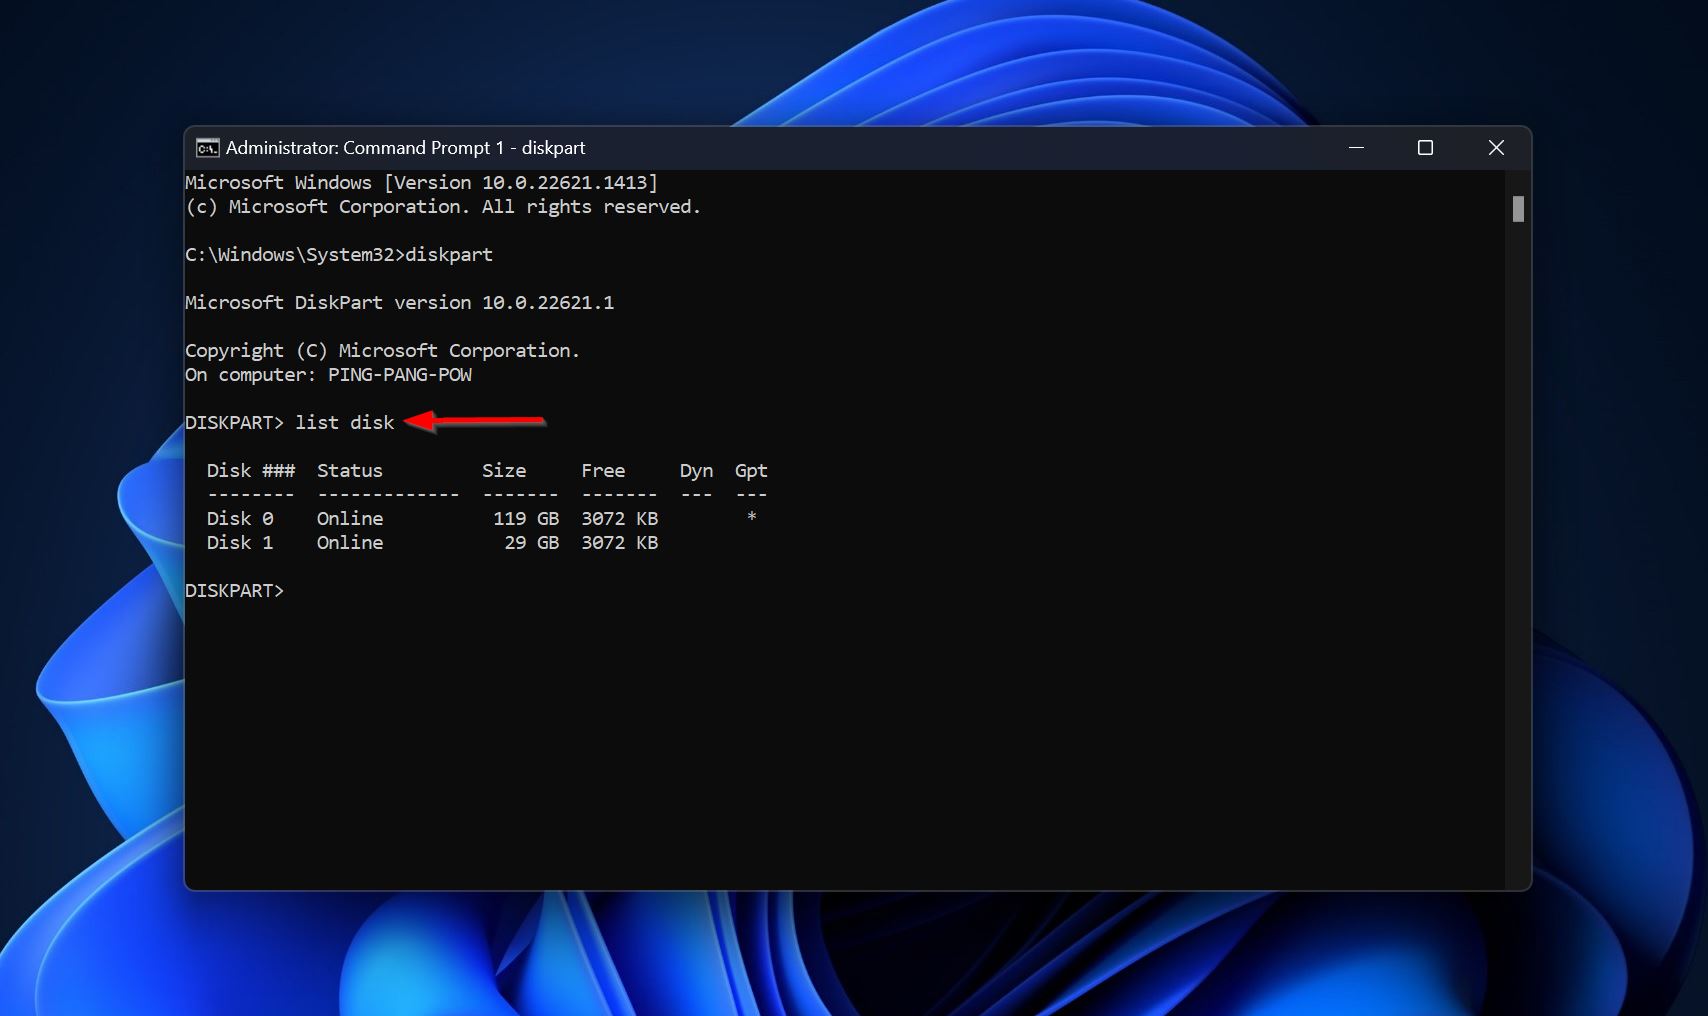
- Type list disk and press Enter.

- Select the disk which contains the Windows OS. You can do this using the select disk x command. Replace x with the disk number of the relevant drive. For example, select disk 0.
- Type list partition and press Enter.
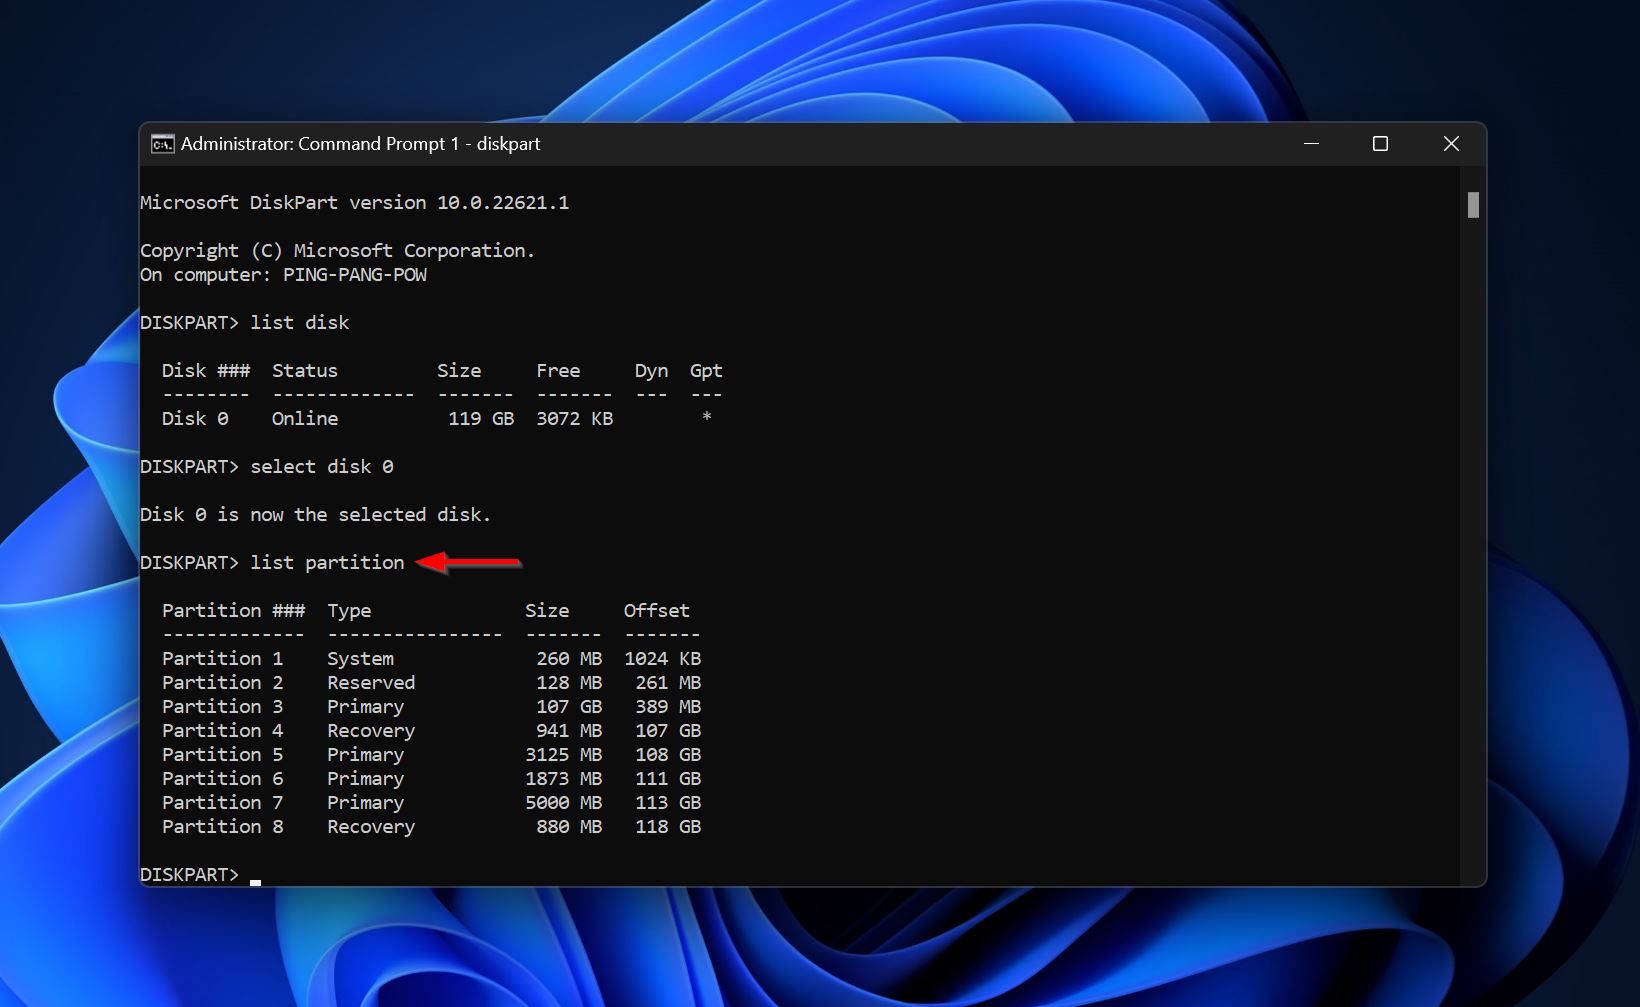
- Now, look for partitions with the “Primary” label. Select the one which doesn’t contain Windows. Type select partition x and press Enter. Again, replace x with the partition number.
- Finally, type inactive and press Enter.
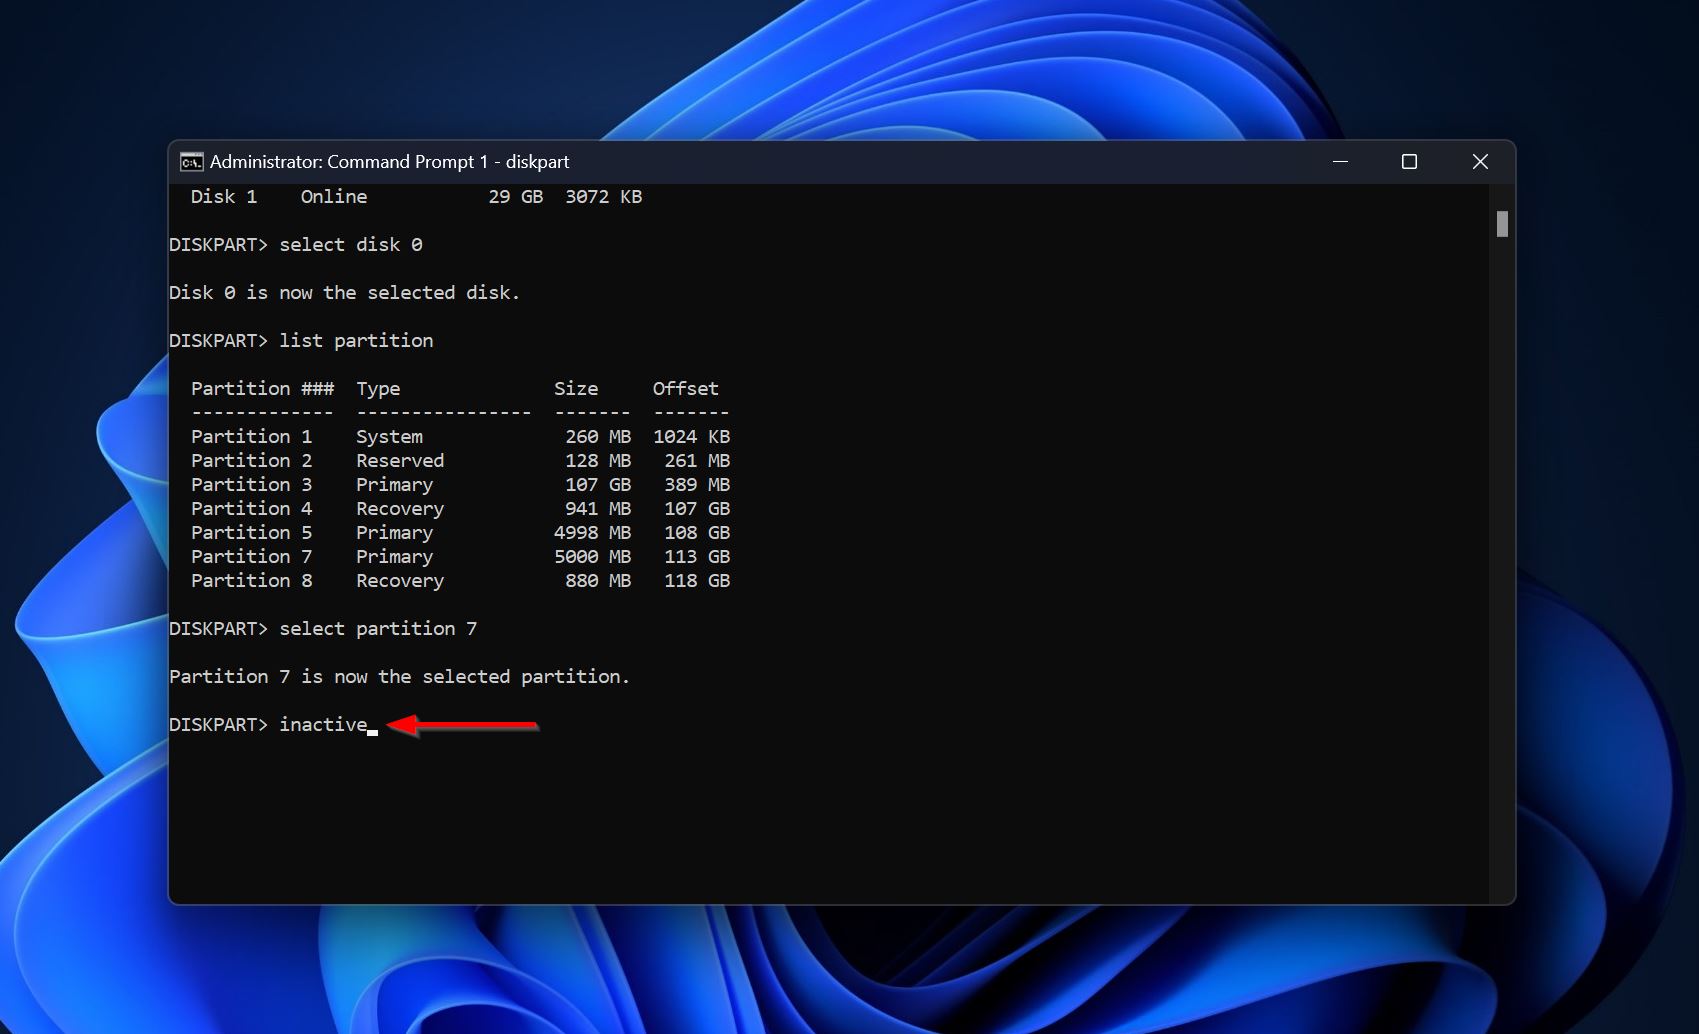
- Repeat the steps to mark all other partitions, except the one containing the OS, as inactive.
Method 3: Change the Boot Sequence
If there are multiple disks attached to your PC, the one containing Windows should be at the top of the boot sequence. You can change the boot sequence in your PC’s BIOS or UEFI settings.
The exact steps will differ across manufacturers, but it should look something like this:
- Start your PC and press the relevant function key or combination to enter the BIOS menu. Refer to the user manual of your motherboard or simply perform a Google search to find out the exact key you need to press.
- Go to the Boot menu in the BIOS and look for the boot order setting.
- Adjust the boot order so that the disk containing Windows is listed first.
- Save the settings and exit.
- Reboot your PC.
Method 4: Repair Partition Table Using CMD
Windows has a couple of commands that can detect corruption and perform partition table repair. You need to execute these commands within the Command Prompt. You can also run the CHKDSK command to detect and fix bad sectors on your drive.
Use CHKDSK to Scan and Fix Bad Sectors
- Open Command Prompt in the Windows Recovery Environment (WinRE).
- Type chkdsk C: /f /r and press Enter.
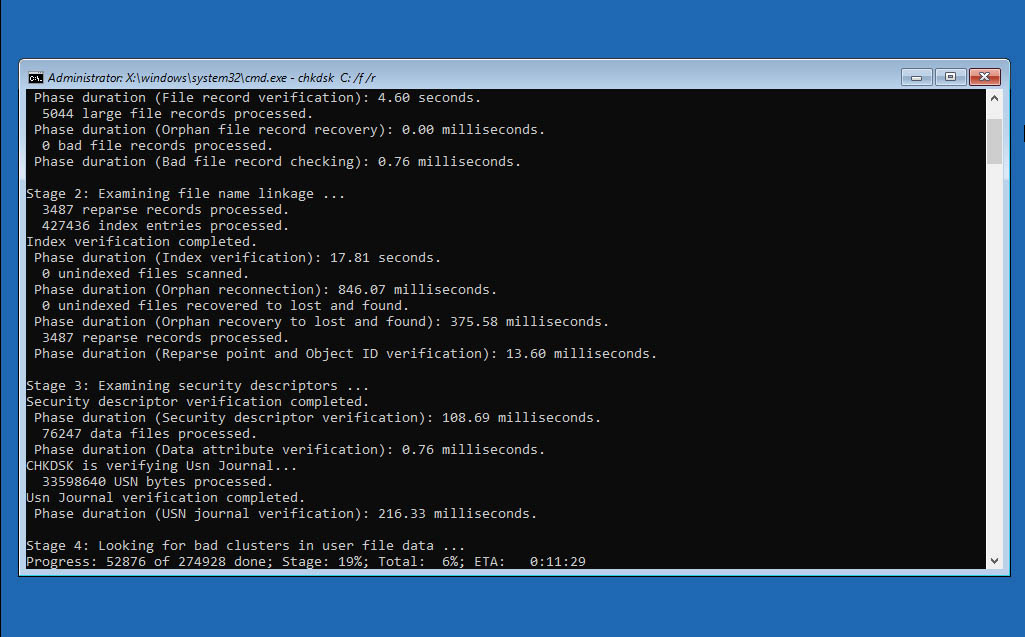
- The CHKDSK scan will begin.
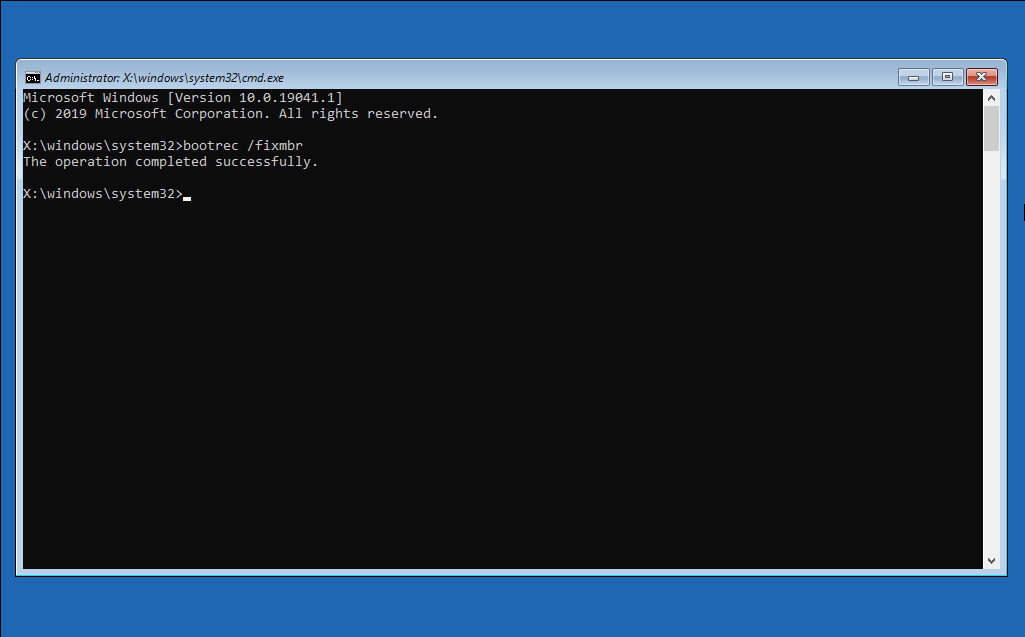
Use Bootrec to Fix the Partition Table
- Open Command Prompt within Windows Recovery Environment (WinRE). You can do this using Troubleshoot > Advanced options > Command Prompt.
- If you’re using the MBR partitioning scheme, type bootrec /fixmbr and press Enter. For GPT-based disks, type bootrec /fixboot and press Enter.
Method 5: Fix the Partition Table with Windows Disk Management
Use this method for drives that don’t contain your system’s primary OS, or if you’ve connected the drive to another computer. This method involves deleting the problematic volume and then creating a new one.
You will lose your data, so be sure to recover it beforehand.
Here’s how you can do this:
- In Windows Search (Windows Key + S), type “disk management.” Click on Create and format hard disk partitions from the search results.
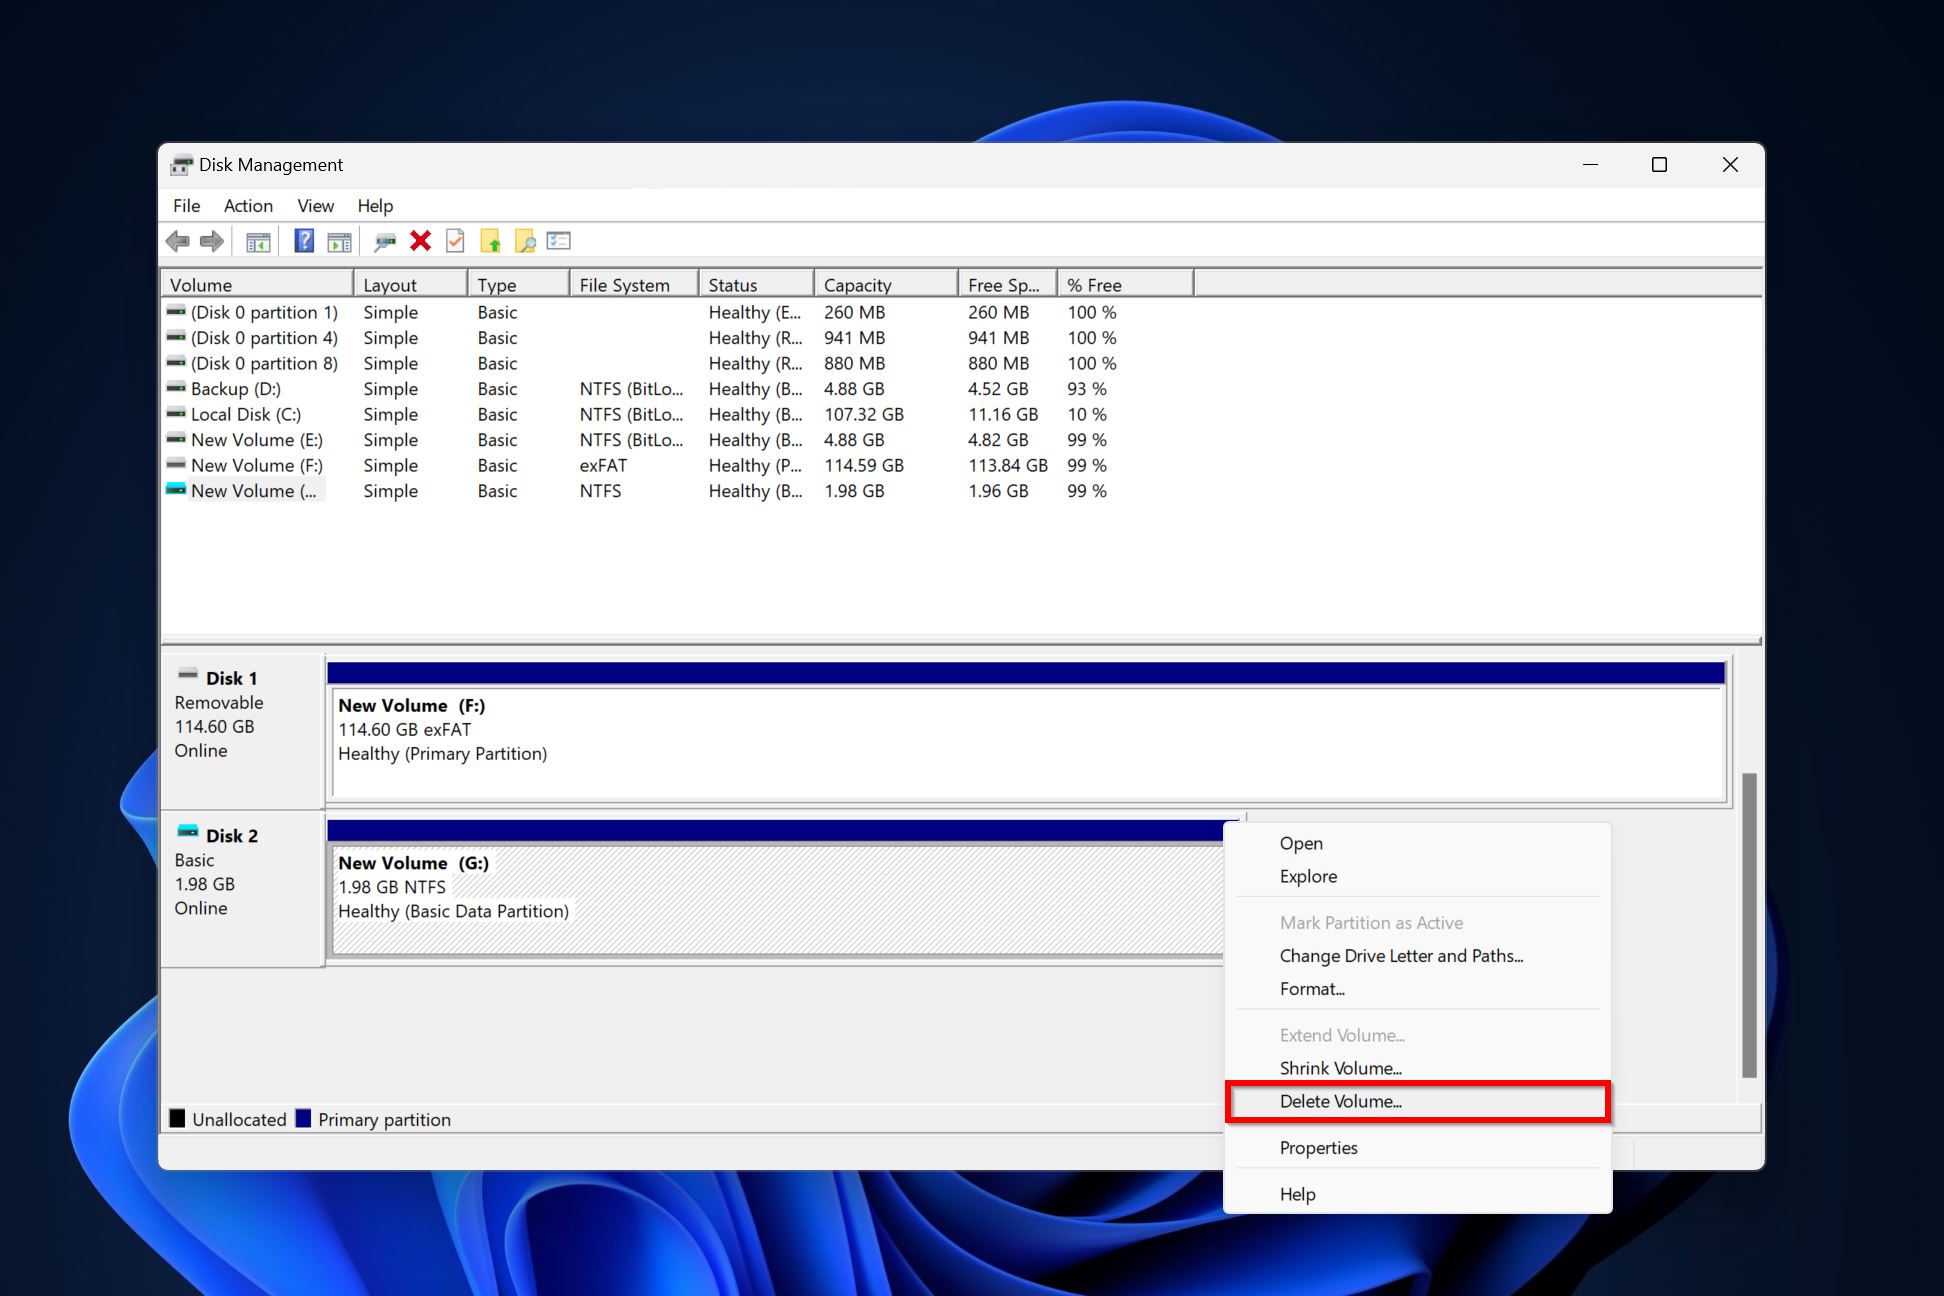
- Right-click on the drive that’s showing the invalid partition table message, and click Delete volume. Press Yes on any confirmation prompts.
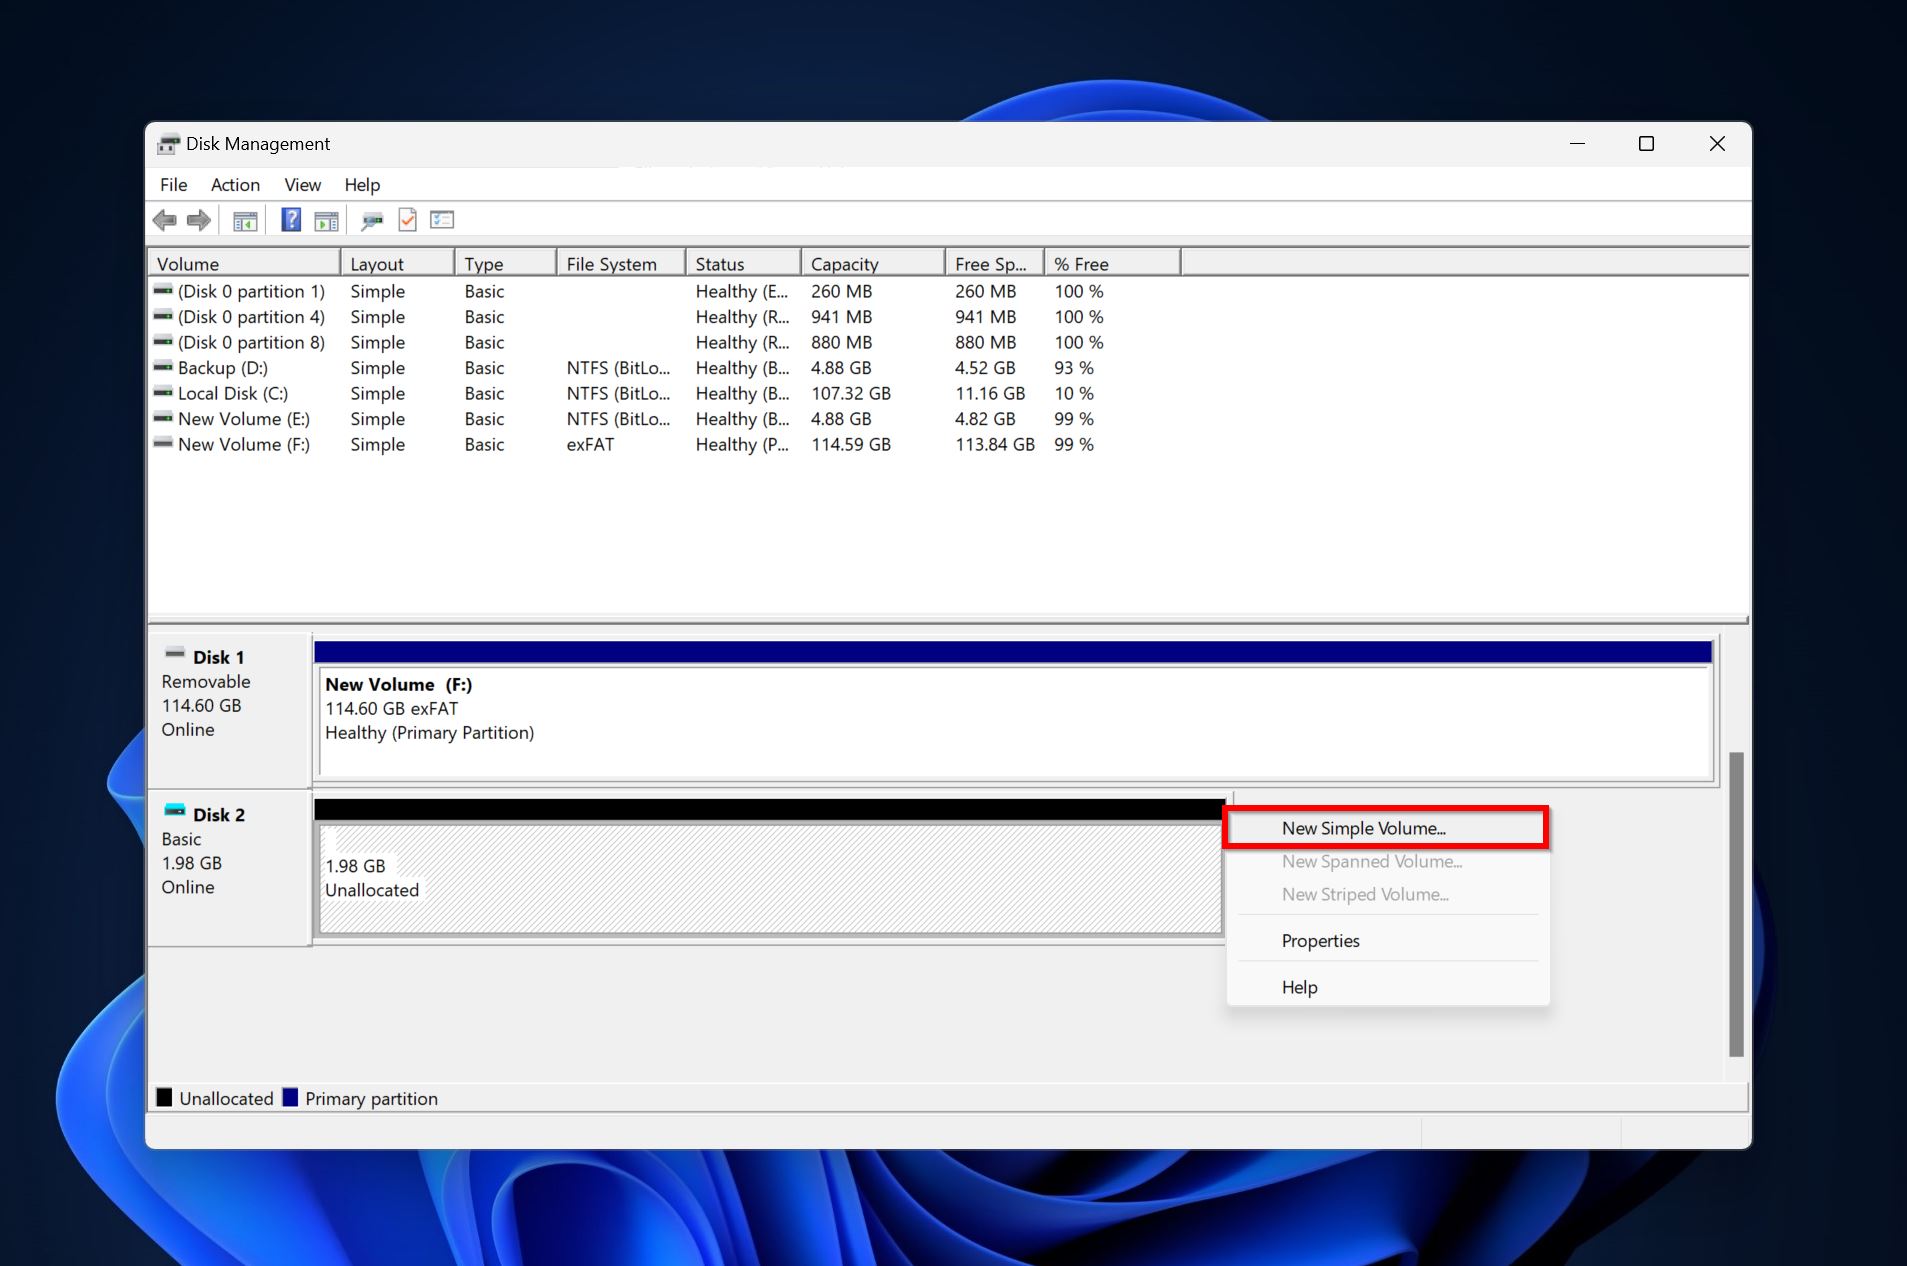
- The space that the volume occupied will show up as unallocated. Right-click on the unallocated space and choose New Simple Volume.
- Follow the steps in the New Simple Volume wizard to create a brand-new volume with a fresh partition table.
How to Fix the Invalid Partition Table Error When/After Installing Windows
While non-boot GPT disks can be recognized by a legacy BIOS, using boot GPT disks will require you to use UEFI. You’ll encounter the invalid partition table error if you attempt to use a boot GPT disk with the legacy BIOS or use an MBR disk with UEFI. Most motherboards let you switch between legacy BIOS and UEFI modes to facilitate wider compatibility with both MBR and GPT disks.
Outdated BIOS drivers can also result in the invalid partition table error. In the sections below, we’ll show you how to switch between legacy BIOS and UEFI modes, and how to update your BIOS drivers.
Switch Between Legacy BIOS and UEFI Modes
Depending on the motherboard’s manufacturer, the exact process to switch between legacy BIOS and UEFI modes will differ. But it should look something like this.
- Enter the motherboard’s BIOS/UEFI menu by pressing the relevant key as soon as the manufacturer’s logo appears. Usually, it’s one of the function keys.
- Enter the Boot menu.
- Use the mentioned keys on the screen to switch between BIOS and UEFI in the Boot Mode field. Switch to BIOS if you intend to use an MBR disk, and UEFI if you wish to use the GPT partition scheme.
- Save the settings and exit.
Download and Install BIOS from a Bootable USB Drive
To update the BIOS in a system that can’t locate the partition table or displays the invalid partition table error, you’ll need to flash the BIOS update using a bootable USB drive. Here’s what this looks like:
- Connect a USB drive to a working computer.
- Download the latest BIOS update for the motherboard of the PC that’s showing the invalid partition table error.
- Copy the BIOS update file to the USB drive. We recommend you don’t store any other files on the USB drive. Note down the exact filename and the extension of the BIOS update file.
- Connect the USB drive to the PC with the invalid partition table and enter the BIOS menu.
- Go to the Boot options and select the USB drive.
- Most motherboards will detect the update automatically. Others will display a Command Prompt window. In this case, type the exact filename of the BIOS update file along with the extension and press Enter.
- Follow the relevant steps on your motherboard to flash the BIOS update.
Rebuild Partition Table From MBR to GPT
The diskpart utility lets you convert an MBR disk to GPT, but it does wipe your data in the process. This is useful when you want to use UEFI and take advantage of the GPT partition table. Be sure to recover your data first.
Here’s how you can restore a partition table and convert it to GPT using diskpart:
- Enter Windows Recovery Environment (WinRE) and open Command Prompt (Troubleshoot > Advanced Options > Command Prompt).
- Type diskpart and press Enter.
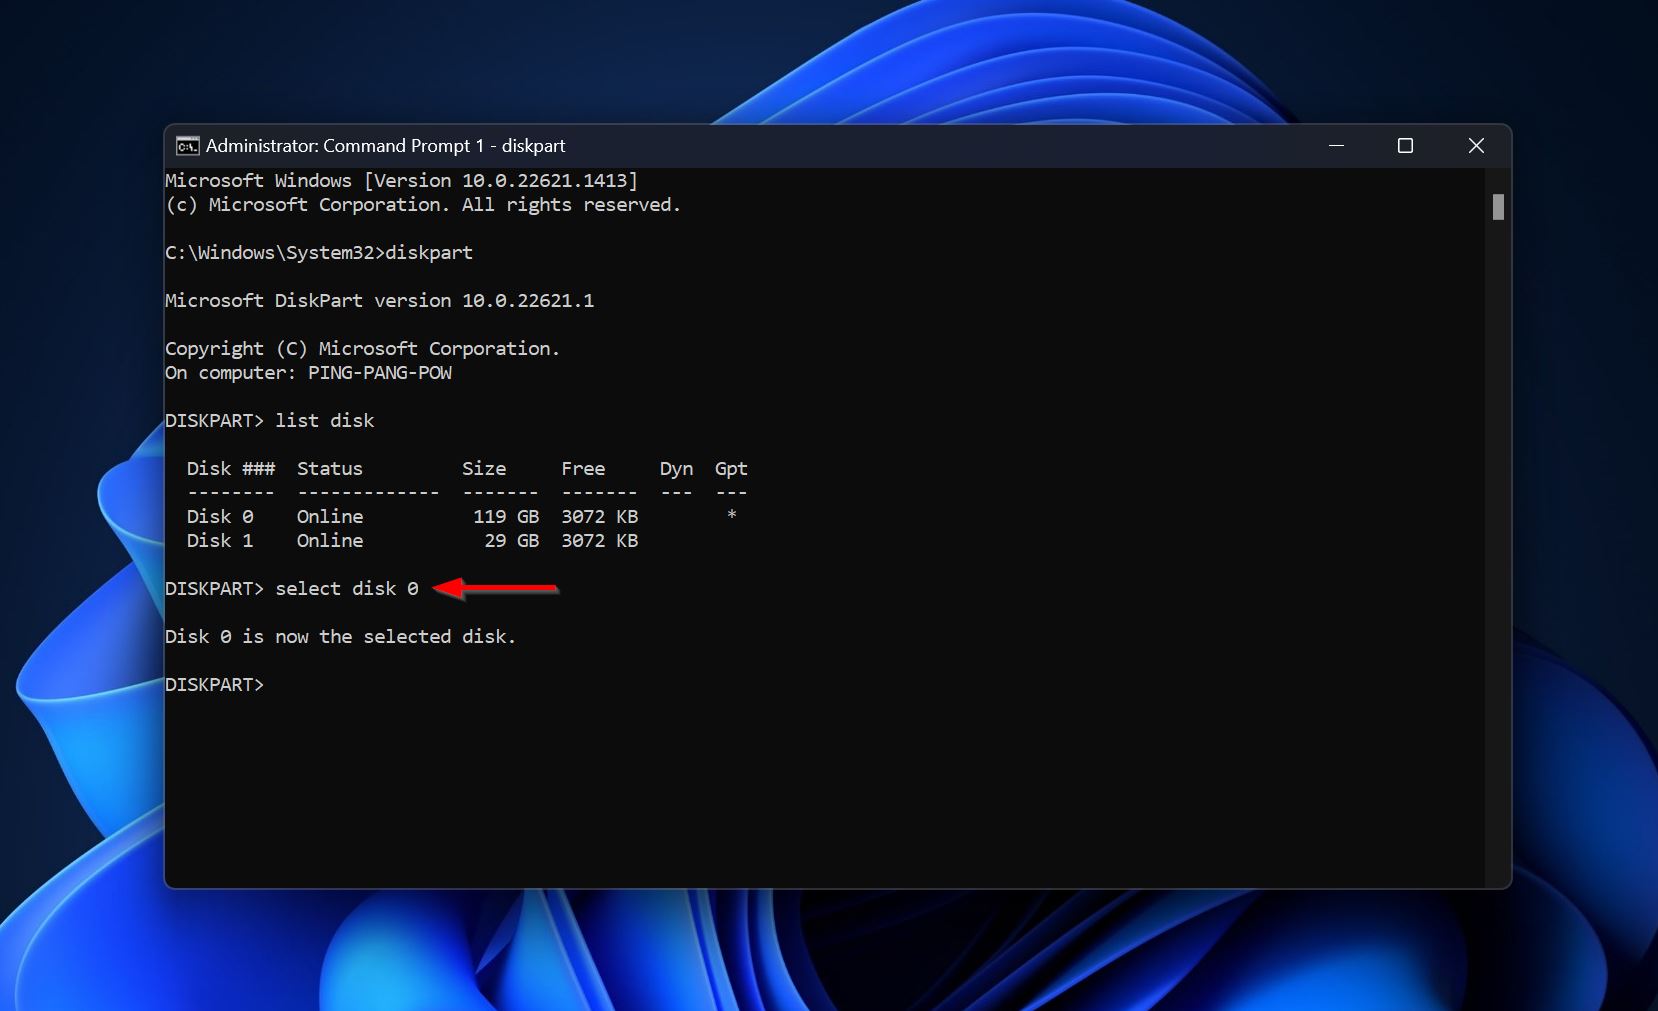
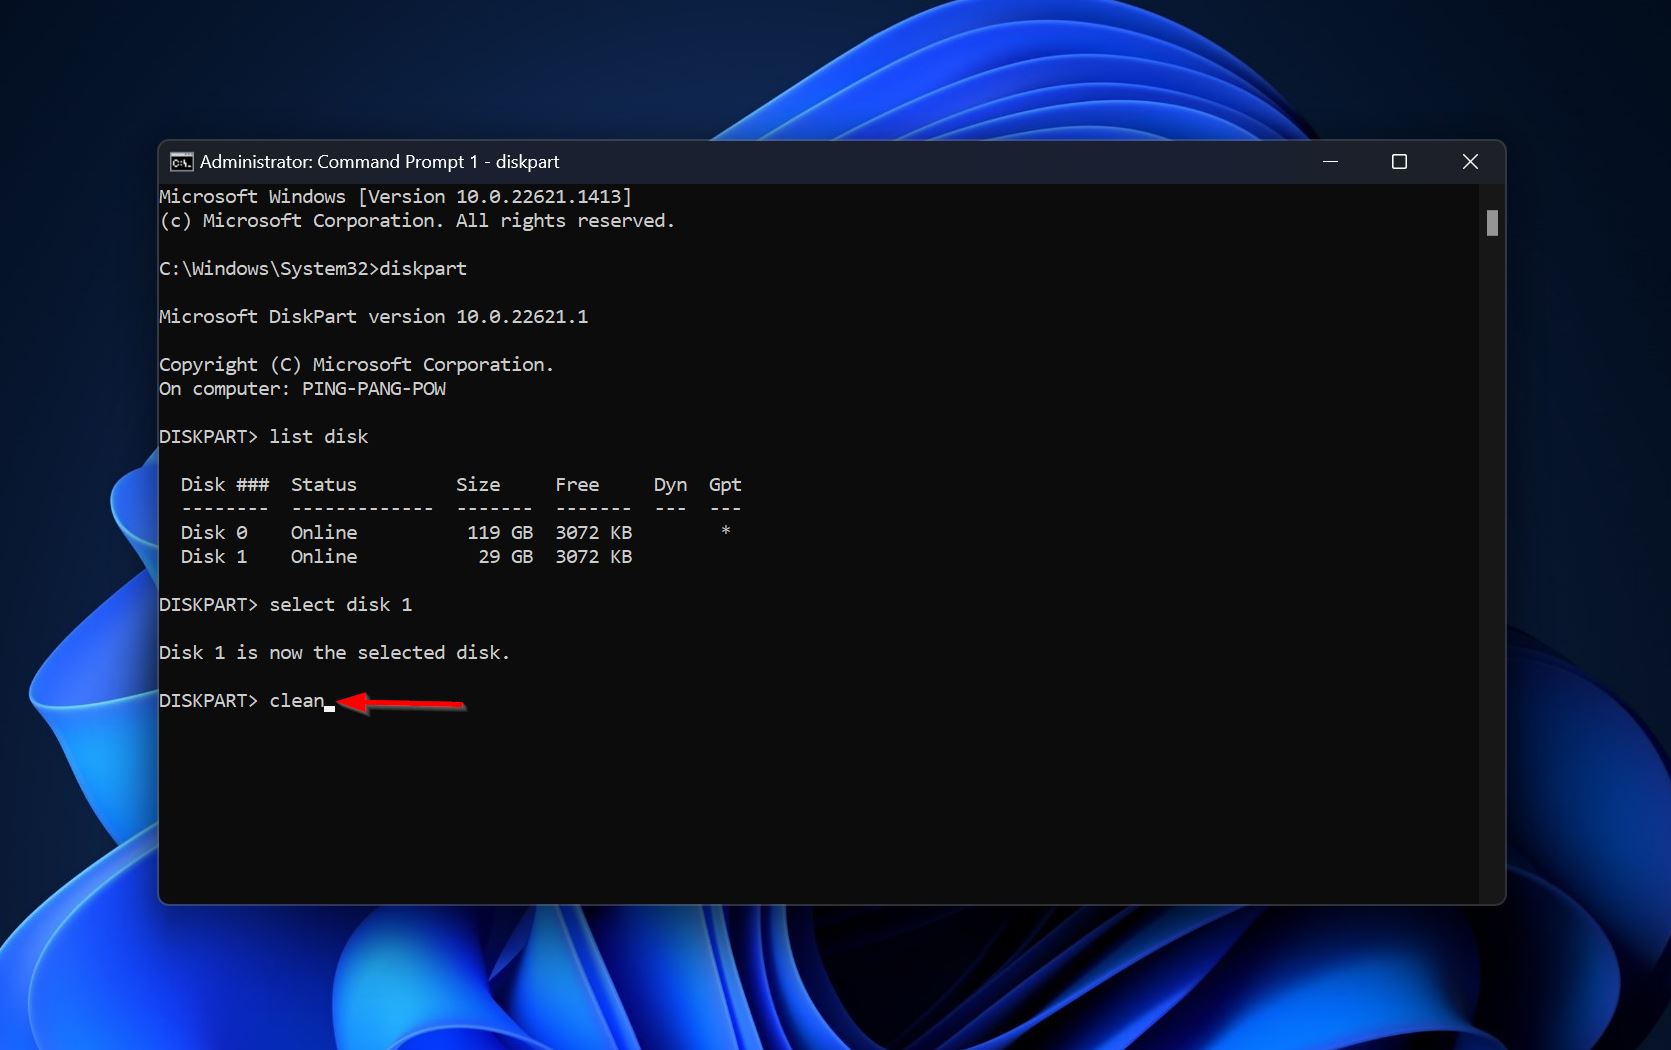
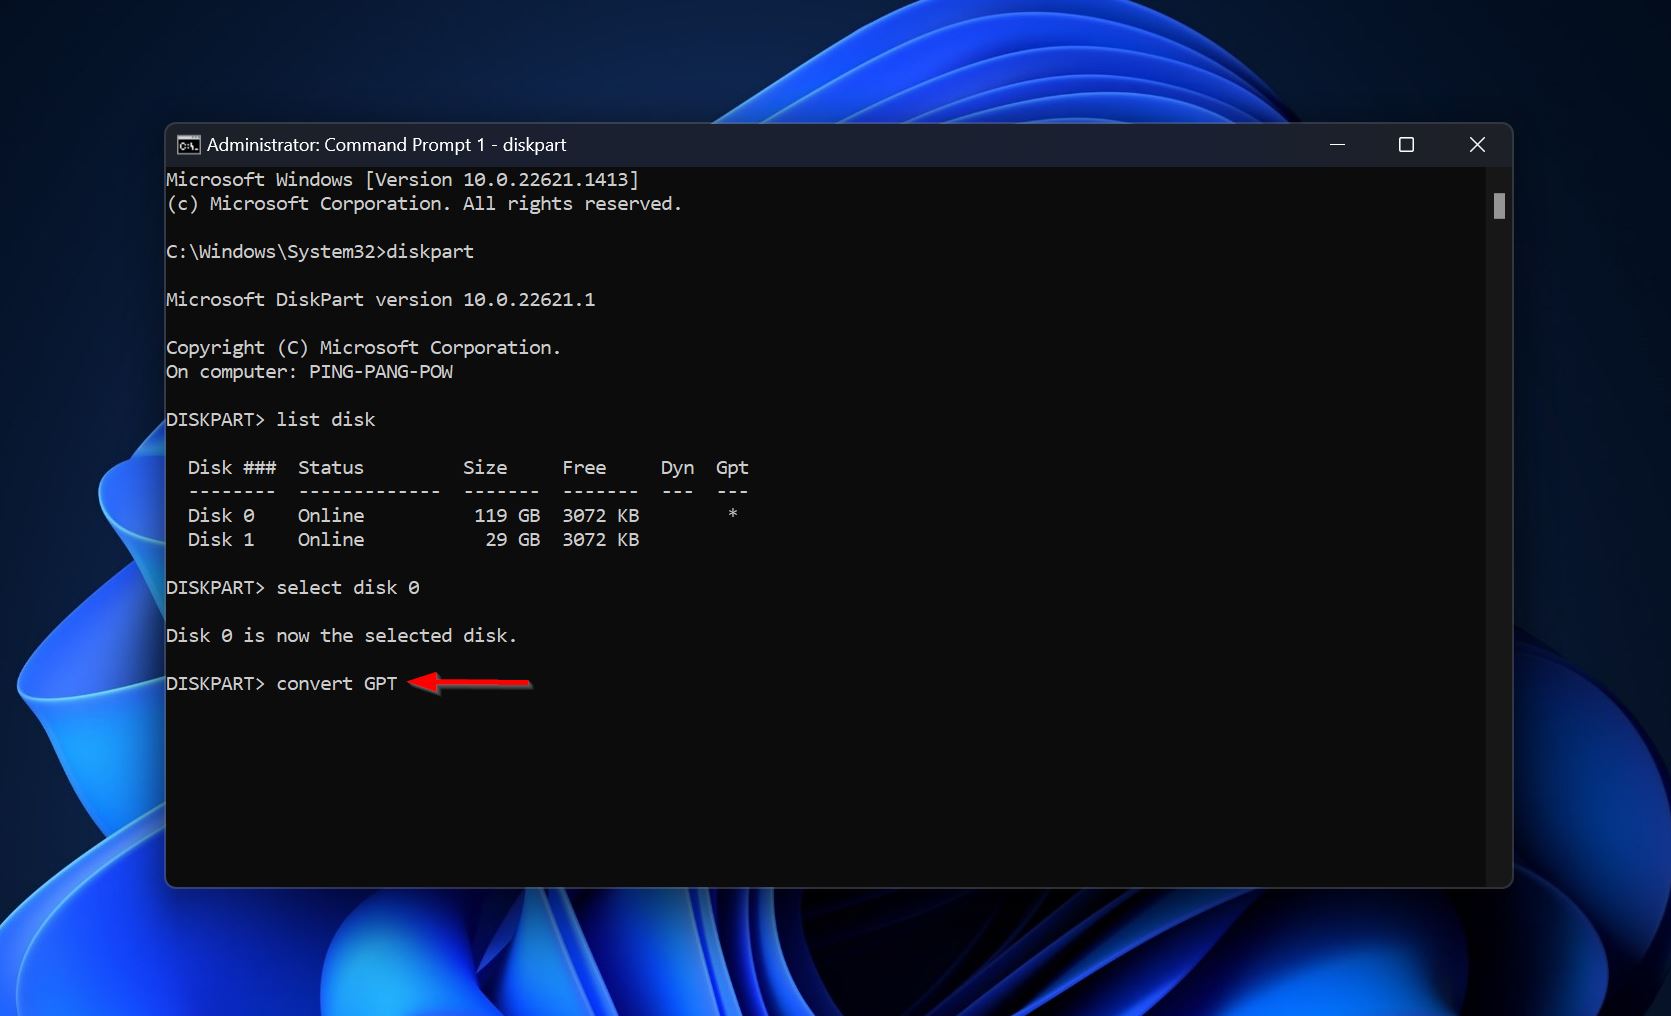
- Type list disk and press Enter.
- Type select disk x and press Enter. Replace x with the disk number of the drive that you wish to convert to GPT.
- Type clean and press Enter.
- Finally, type convert GPT and press Enter to convert the disk to GPT.
Rebuild Partition Table Without Losing Data
Windows 10 and 11 allow you to convert an MBR disk to GPT, without losing data. But, the disk should meet these prerequisites for this solution to work.
If your disk checks the criteria, here’s how you can convert it to GPT:
- Boot your computer into the Windows Recovery Environment (WinRE) and open Command Prompt (Troubleshoot > Advanced Options > Command Prompt).
- Type MBR2GPT /validate and press Enter.
- Now, to perform the conversion, type MBR2GPT /convert /disk x. Replace x with the disk number of the drive you wish to convert to GPT. If there’s only one disk attached to your PC, this will be 0.
Conclusion
The methods above explain how you can repair your hard drive’s partition table without losing data. Such errors usually come unannounced and the best way to protect yourself is to have a regular backup schedule. This ensures you don’t have to download third-party programs to recover your data, allowing you to address the issue without the added stress of data loss.
FAQ:
- Use Windows System Restore.
- Repair the partition table using the Bootrec utility.
- Use Disk Management to repair the partition table.
- Rebuild and convert the partition table to GPT using diskpart or the MBR2GPT utilities.
- Use the Bootrec utility to fix the partition table.
- Use the MBR2GPT utility to recover and convert the partition table to GPT in Windows 10 and 11.
- Malware.
- Sudden power cuts or surges.
- Misconfigured Windows OS.
- Bad sectors on the drive.


